Tag: portraits

How to take enchanting photos using cellophane

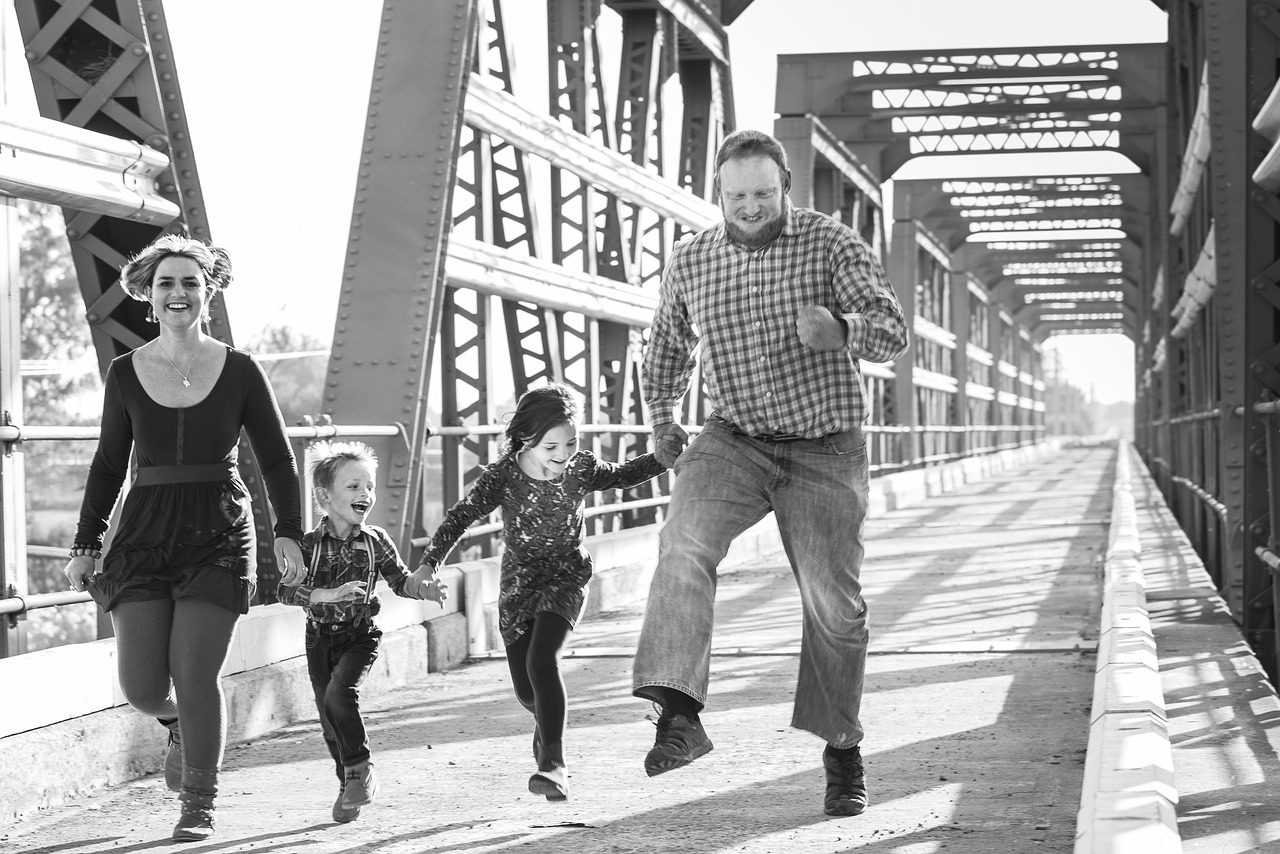
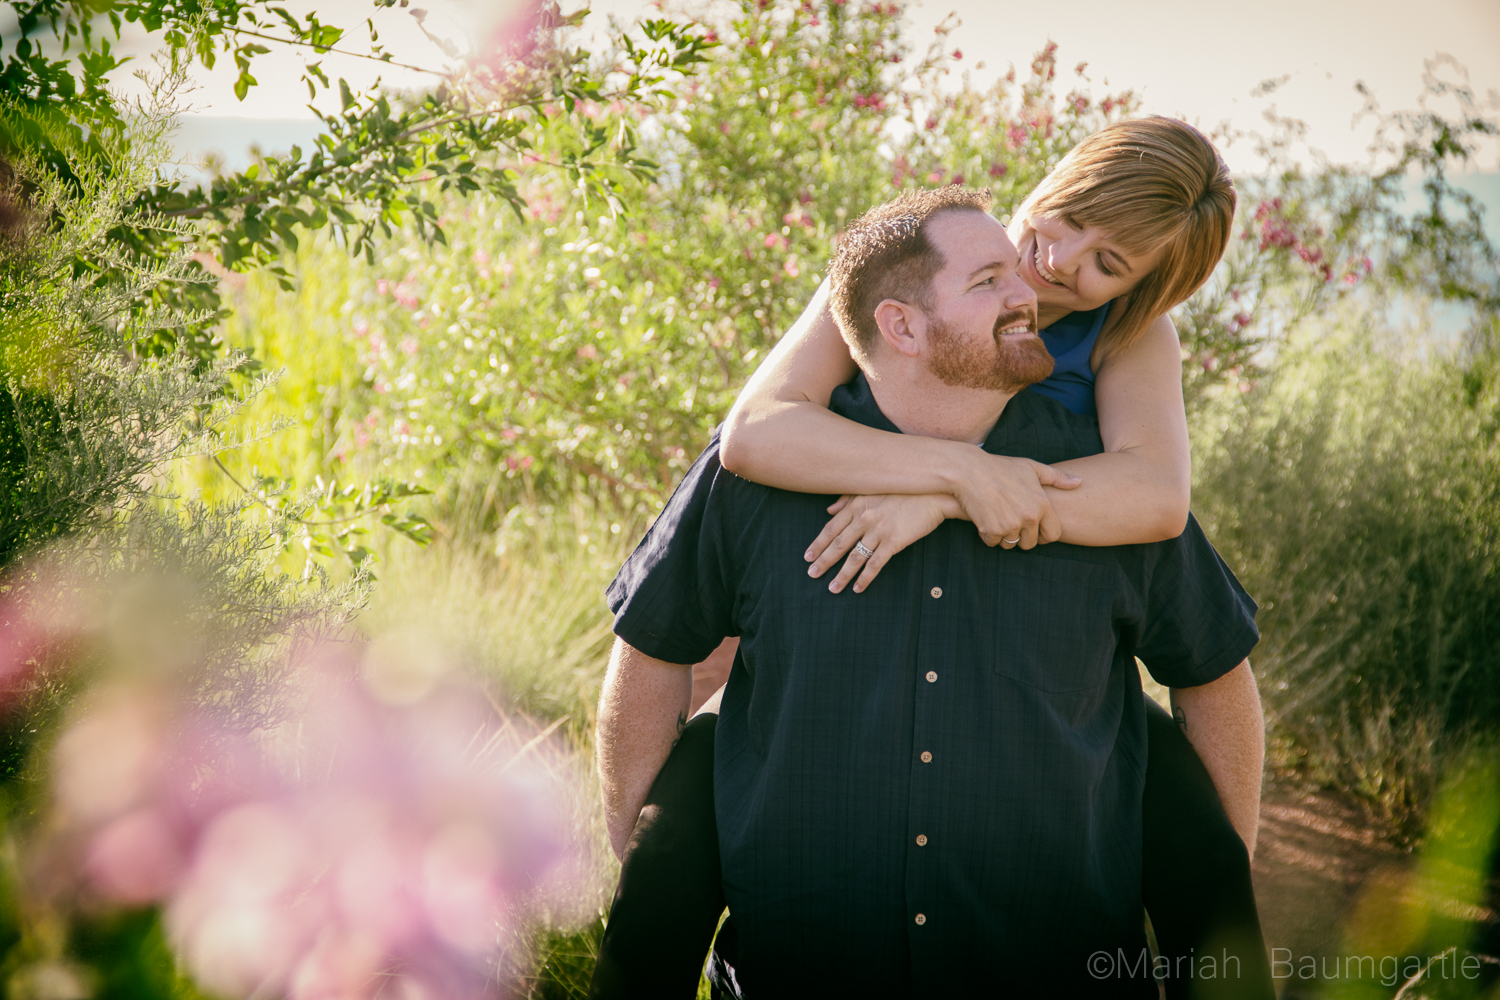
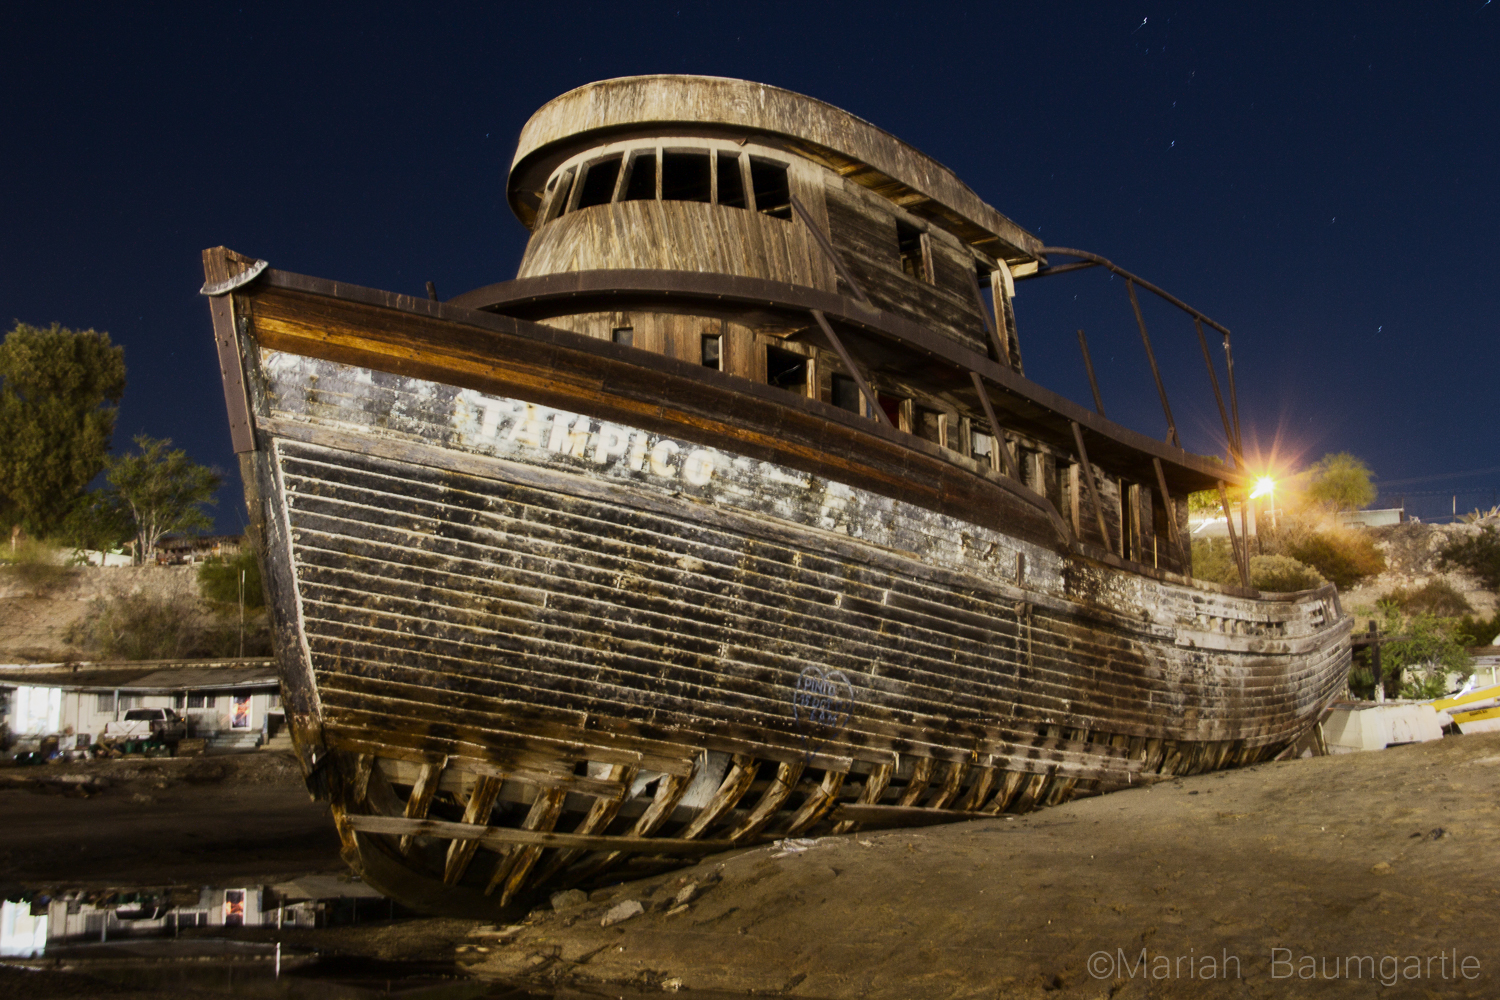
It’s a given that professional photography equipment enhances every artist’s workflow and is an absolute joy to work with. However, professional tools aren’t the only things that can help you become a better photo-taker. There are many unlikely things in our homes which have the potential to add an extra touch of creativity to our work. Some obvious things, like lamps and mirrors, are often used by creatives because of their interesting ways of either creating or reflecting light. Other things, though occasionally used by artists, aren’t as popular. One of these handy little photo instruments can be found in almost every person’s kitchen: cellophane.

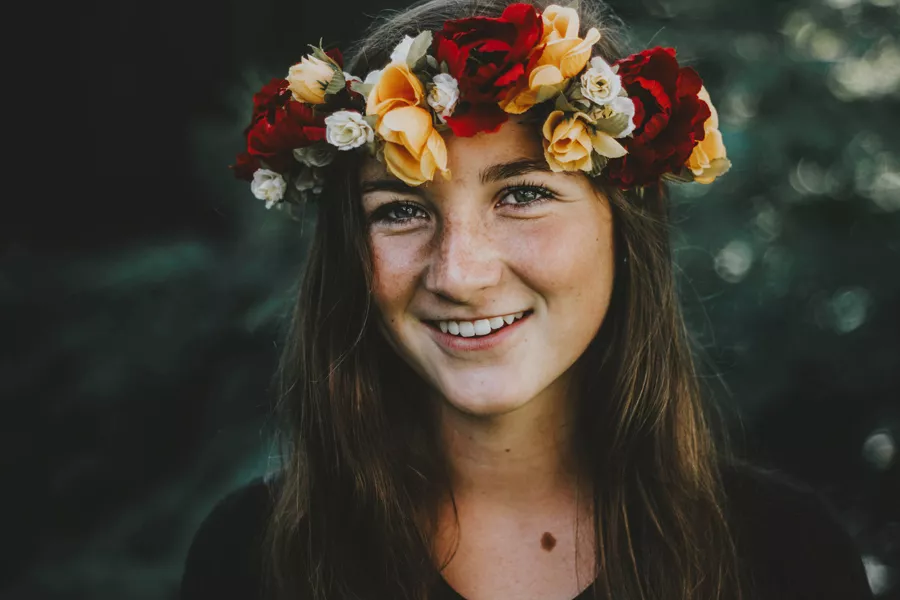
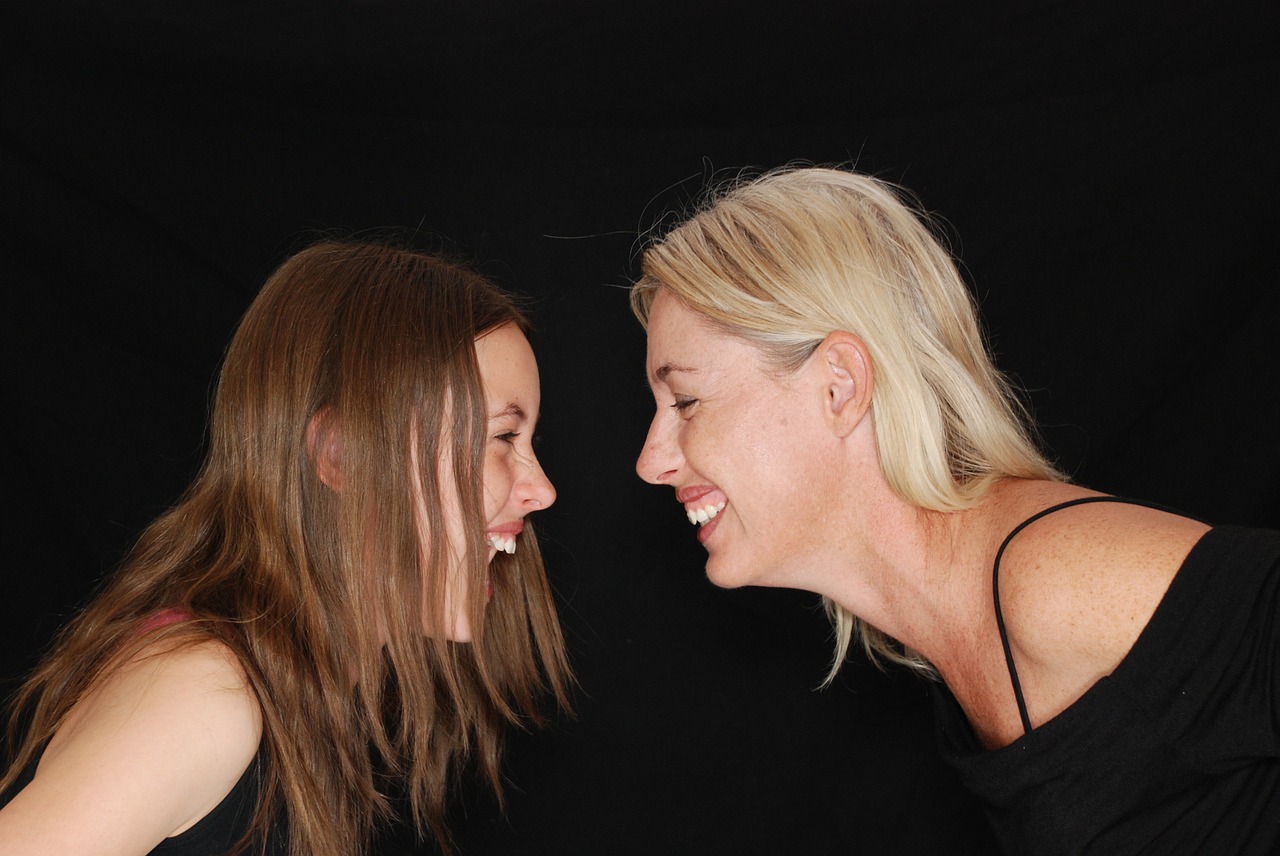
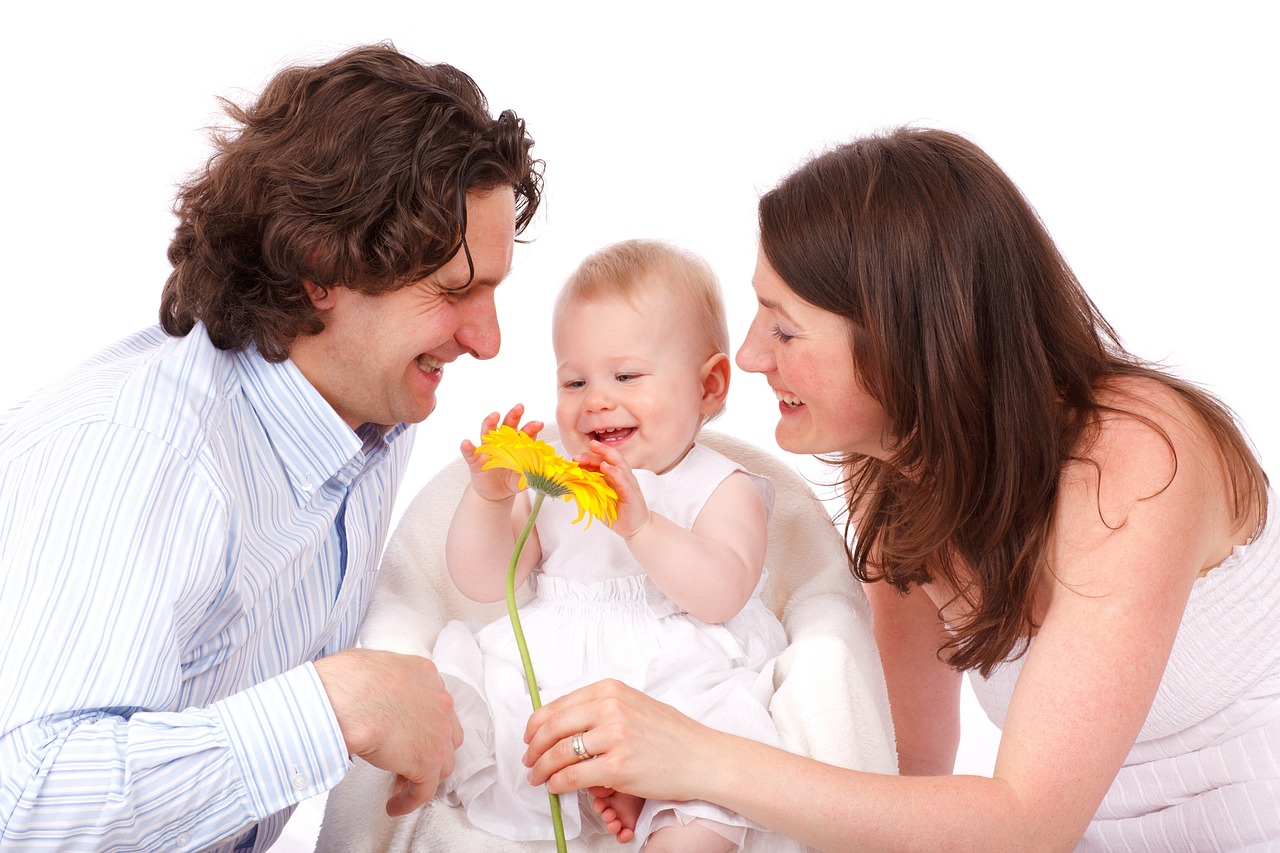
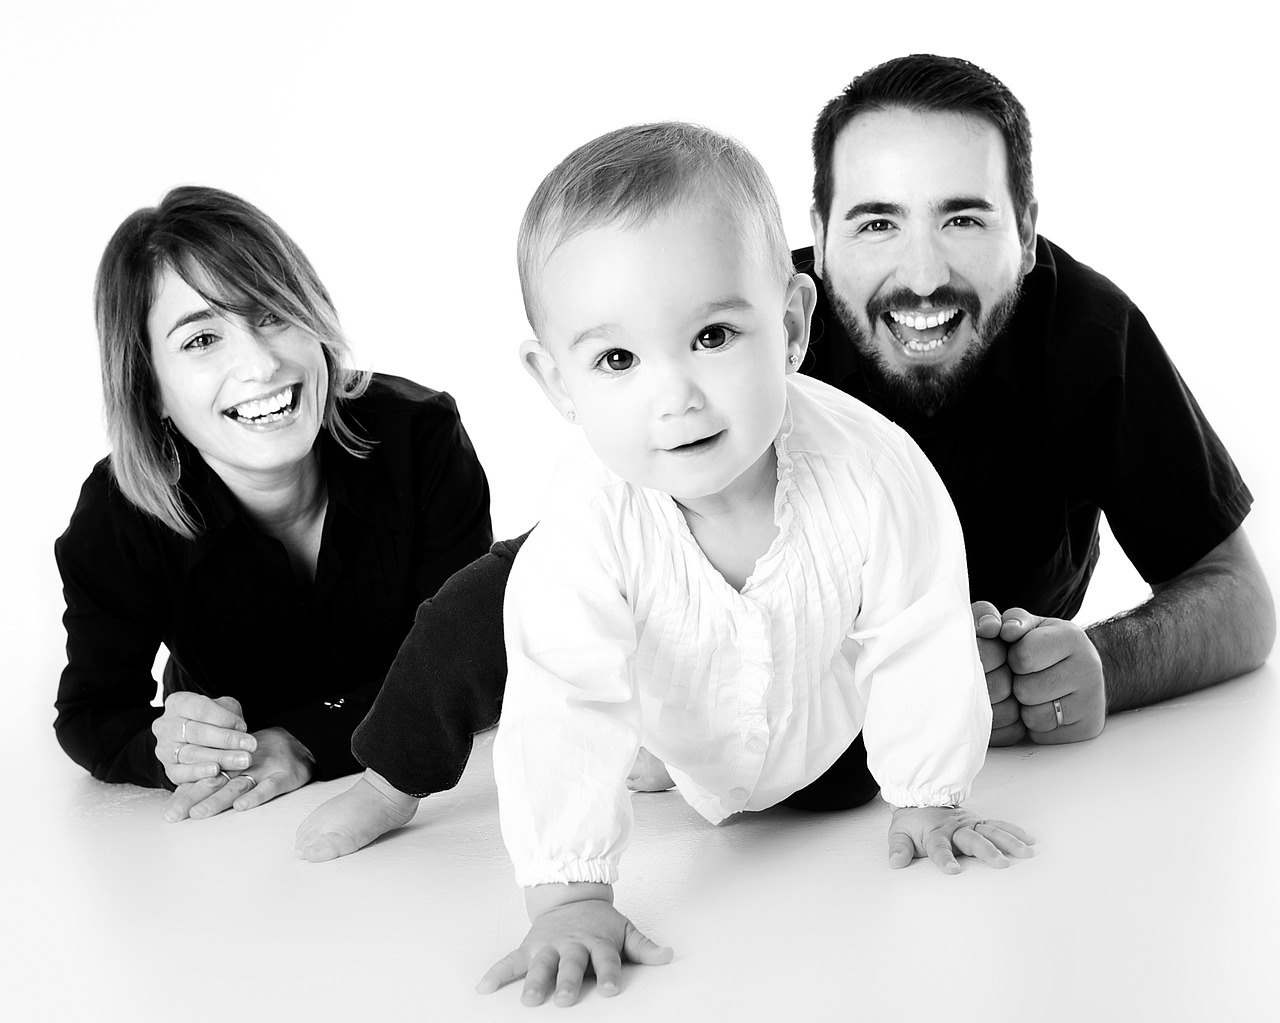
You might be wondering how cellophane, a transparent sheet mostly used for the preservation of food, can be used in the world of photography. You may have noticed that despite the sheet’s transparency, it can quickly become opaque when crumpled up. This haziness is ideal for the creation of enchanting photographs of all types. Whether you’re photographing animals, people, or something entirely different, cellophane can help you experiment with textures and clarity. This experimentation will compel your mind to absorb new ways of thinking creatively. In turn, these innovative ways of thinking will allow you to become a better, more observant, and more open-minded photographer with a bountiful supply of initiative.

Cellophane can be used in limitless ways, depending on your imagination. Though the following tips will help you look at photography from a creatively peculiar point of view, don’t stop there. Let these ideas be the foundation for even more fascinating and striking ideas.

/

//

Using cellophane to take photographs with blurred edges

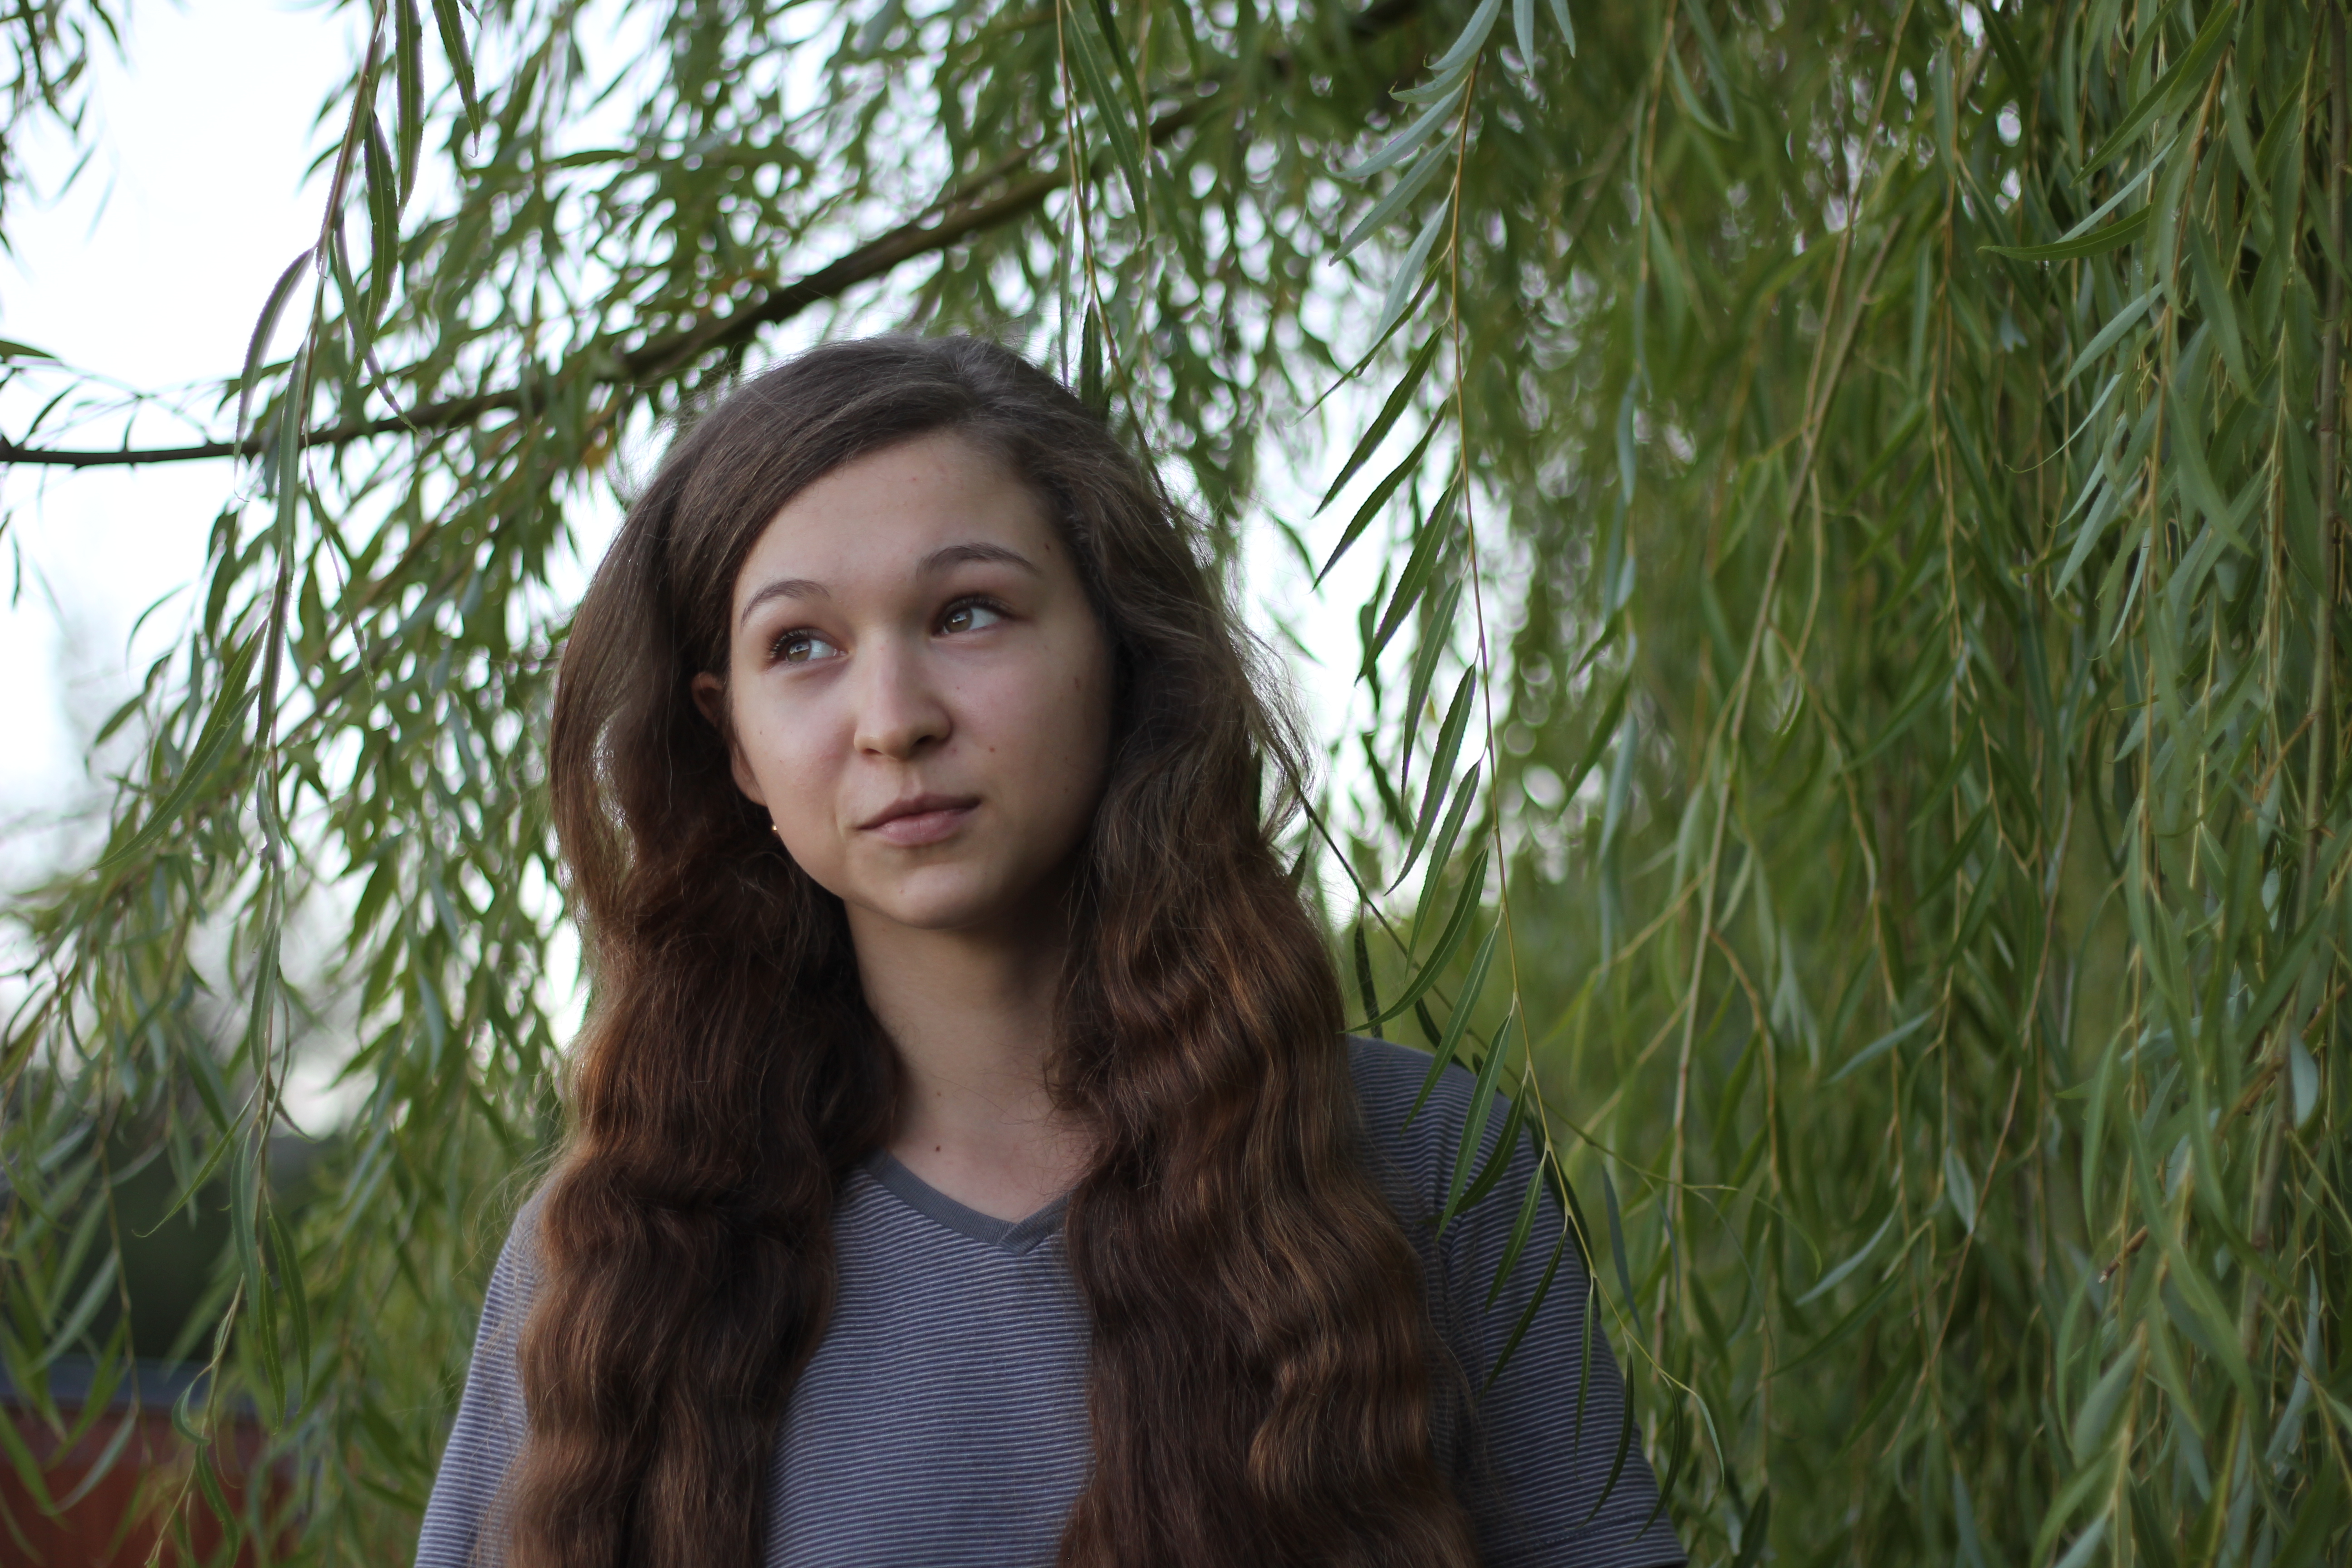
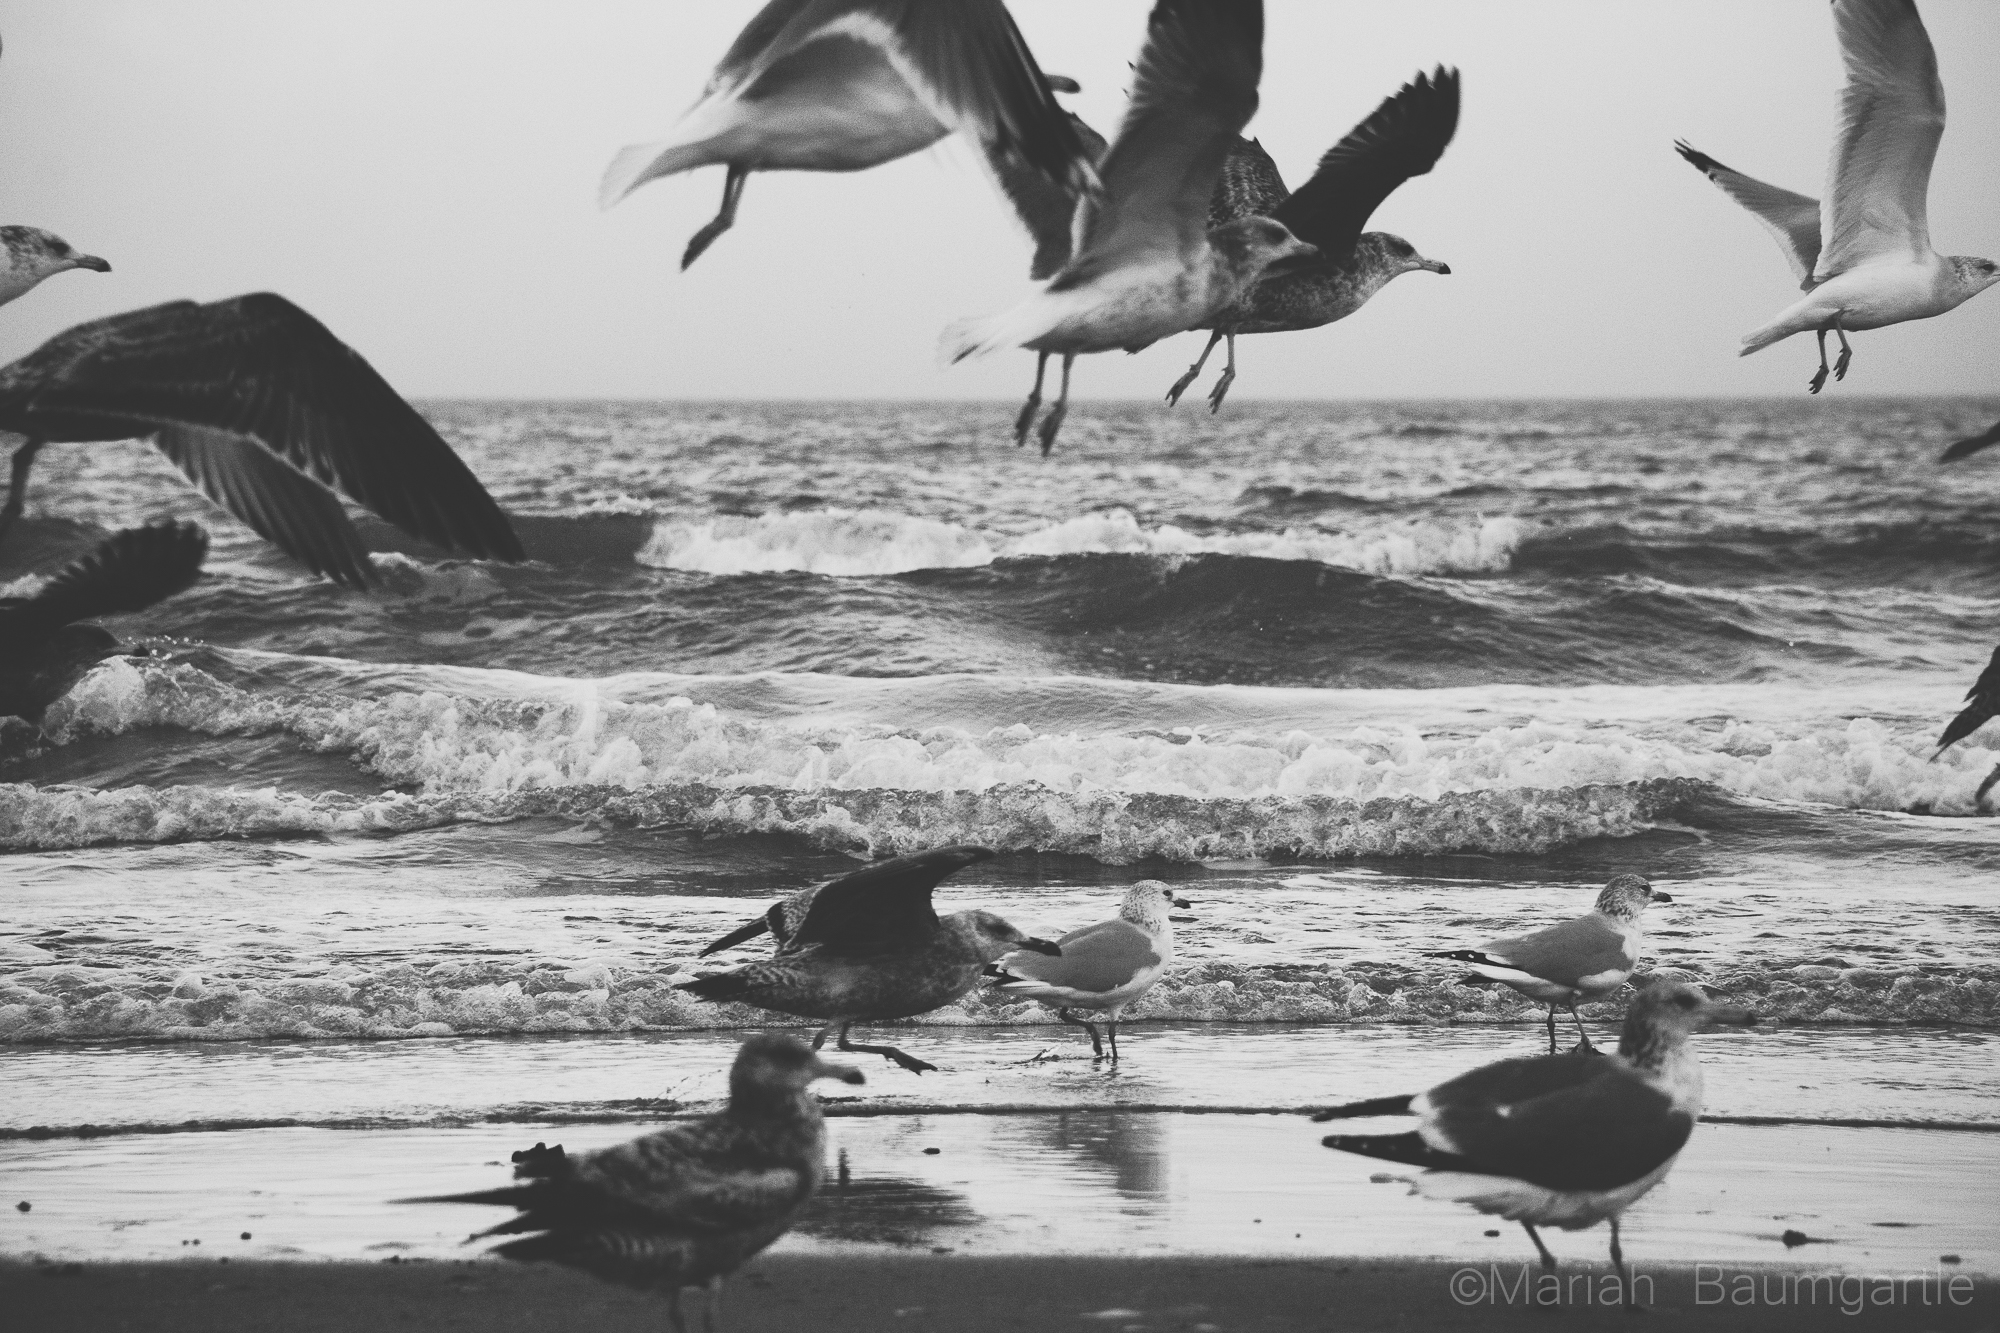
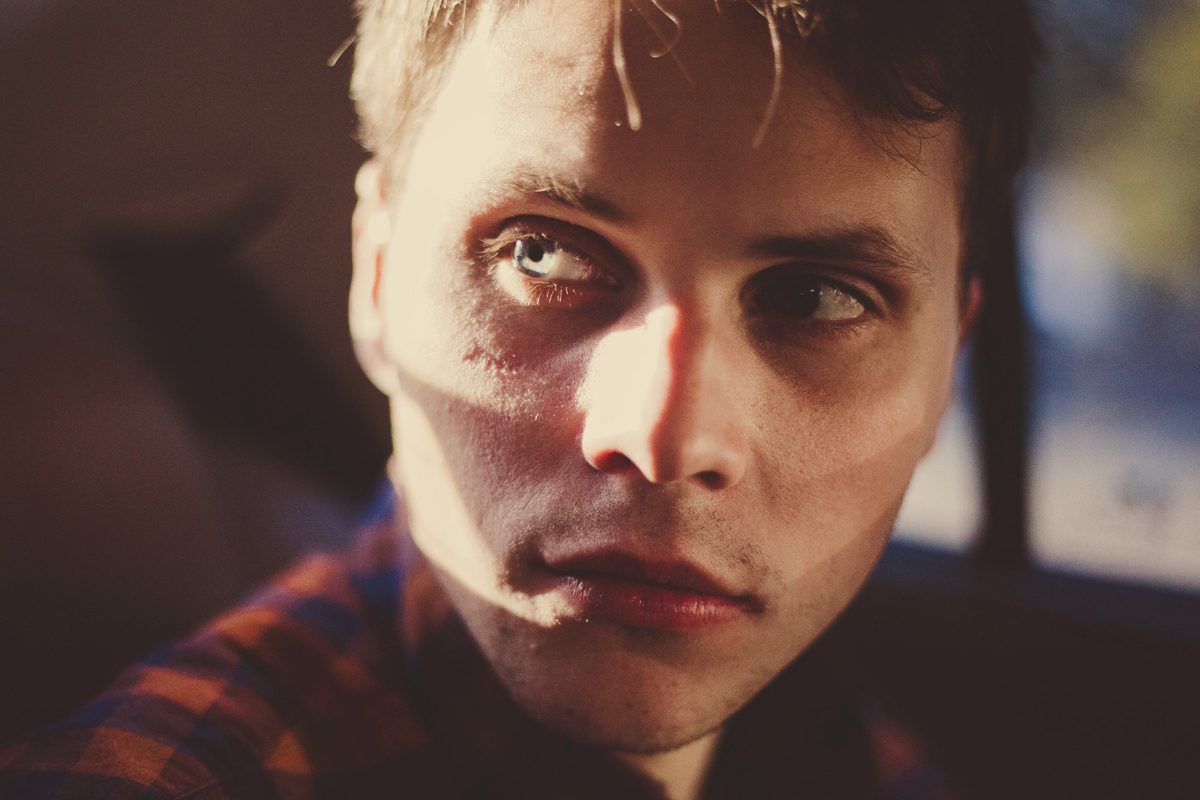
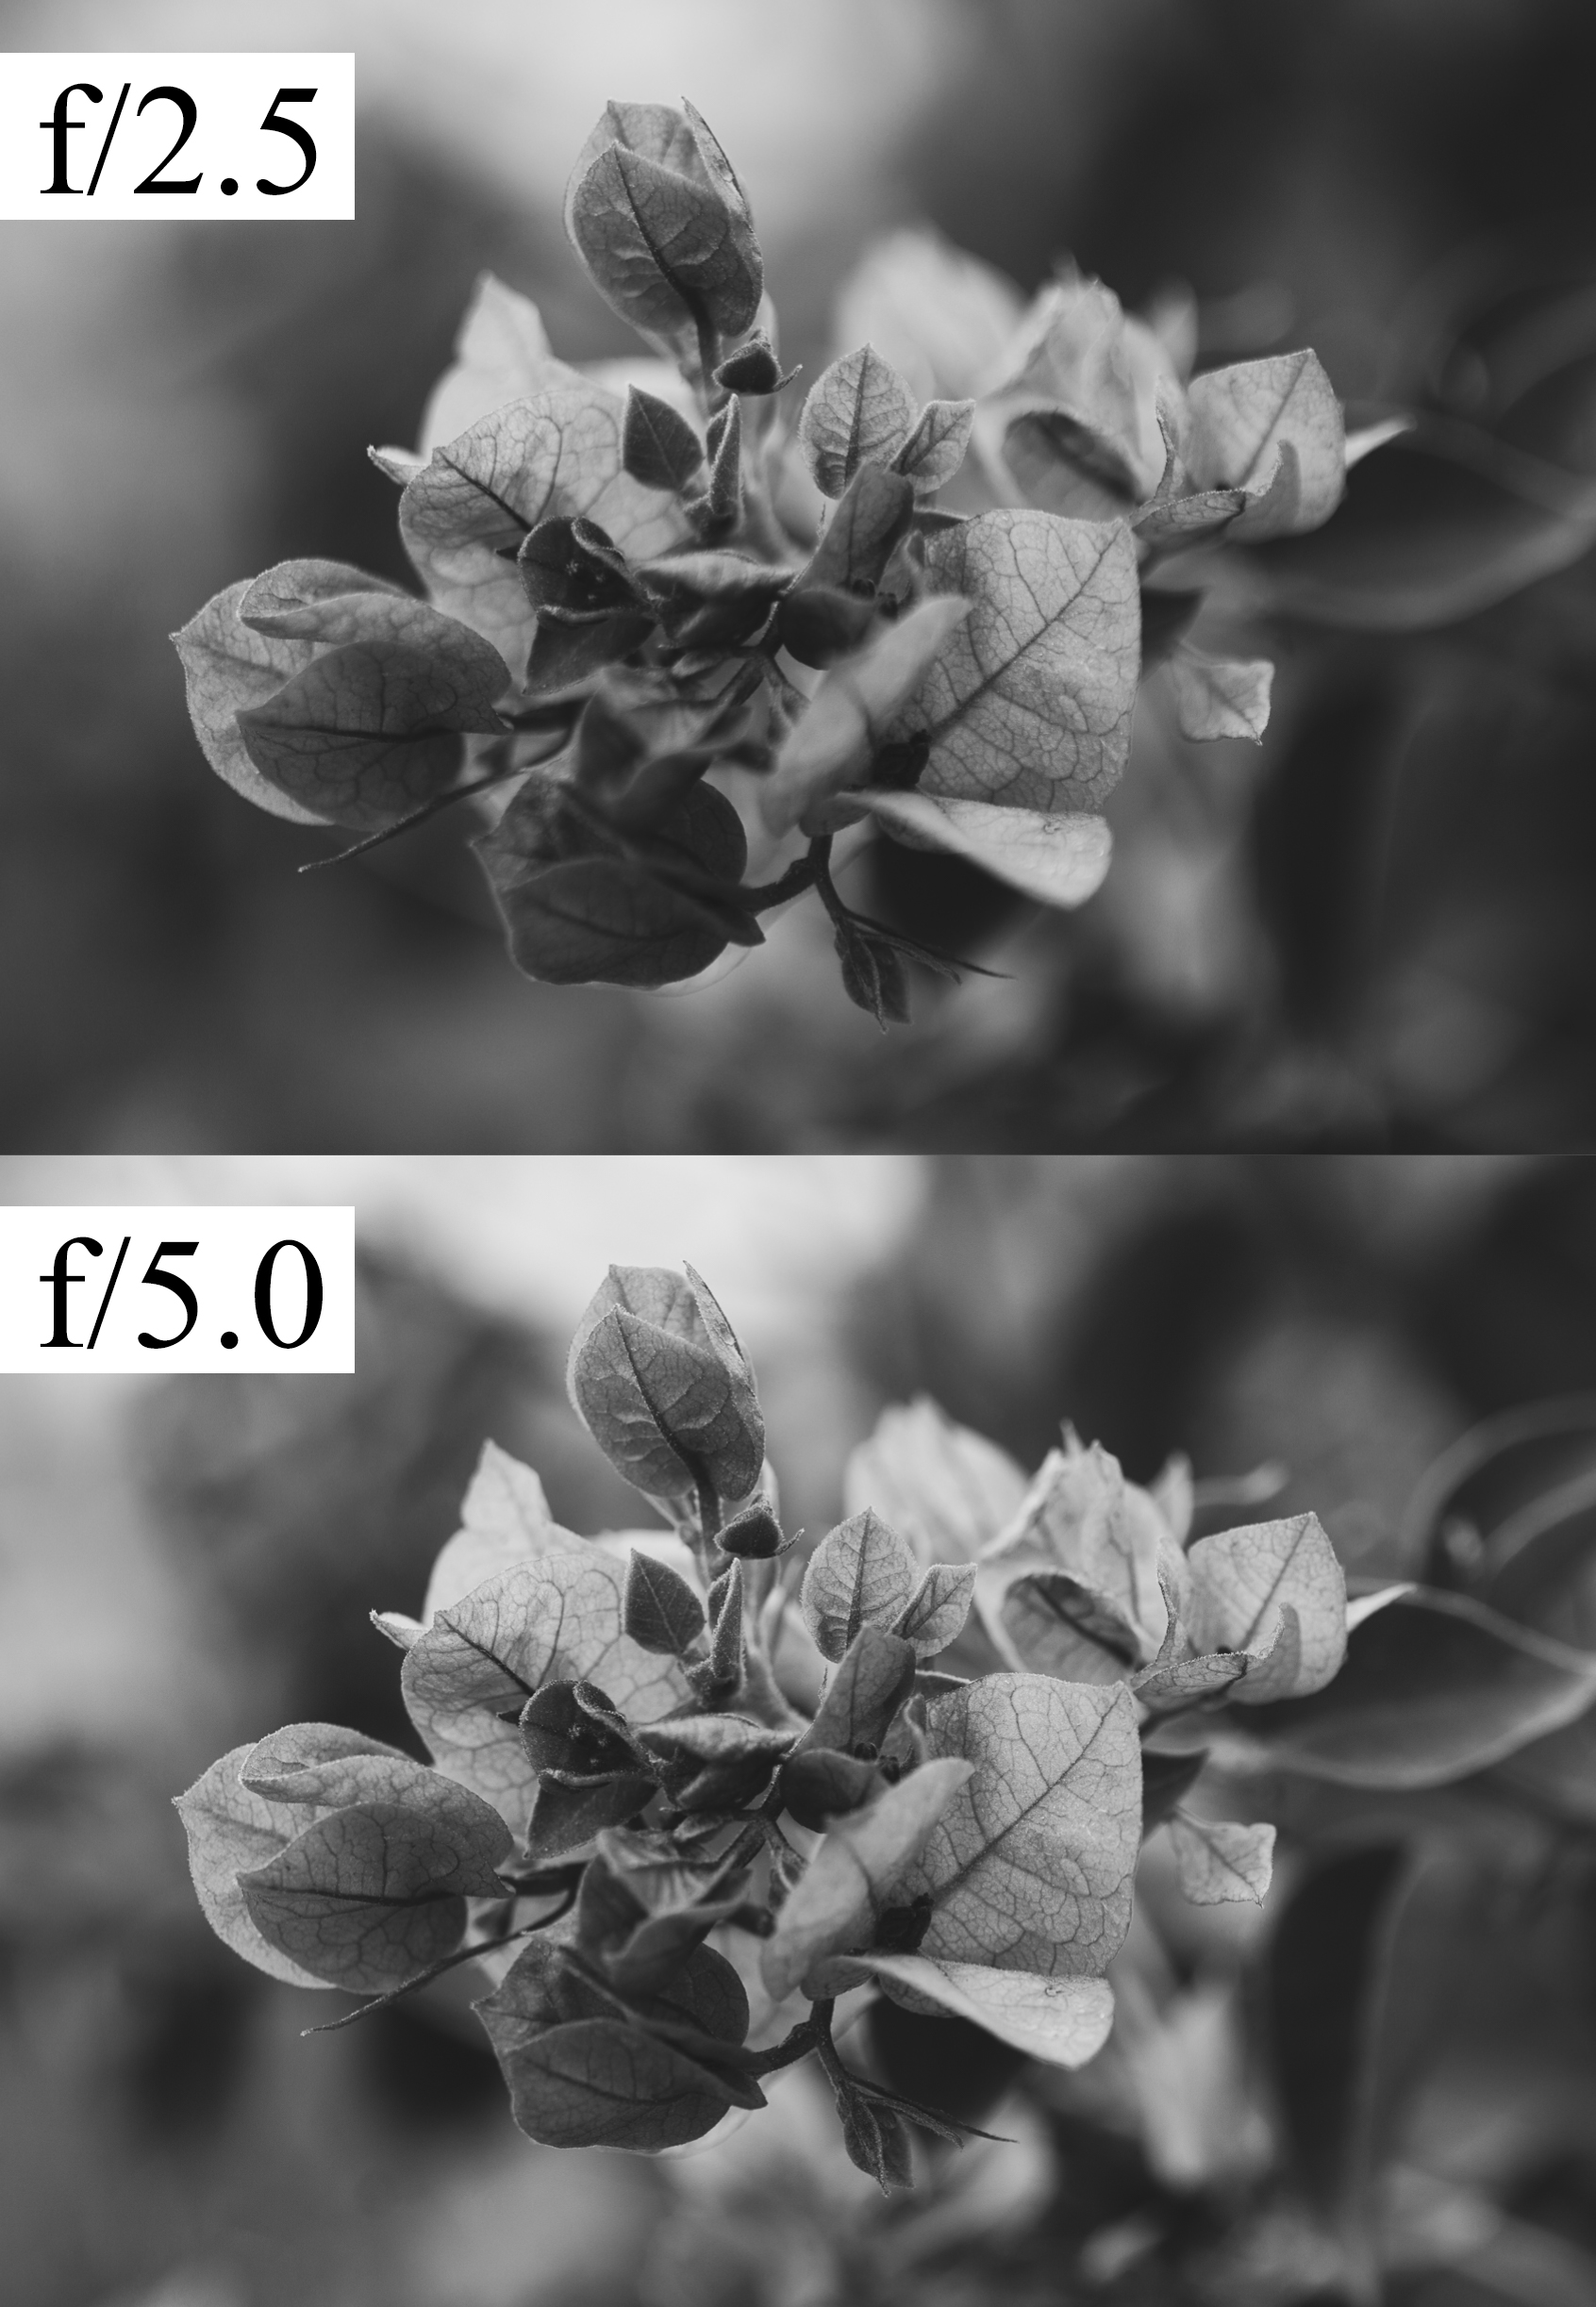
If you want your images to be sharp with a vignette of blurriness, cut your cellophane into a square that’s a little larger than your camera lens. Afterward, proceed to cut a hole in the center of the square – its size depends on how unclear you want the edges to be. The smaller the cut in the center, the blurrier your image will appear and the more challenging it will be to get sharp results. Once you’re happy with the results, wrap the cellophane square around your lens, making sure that the cut-out hole is placed roughly at the center of the lens.

/

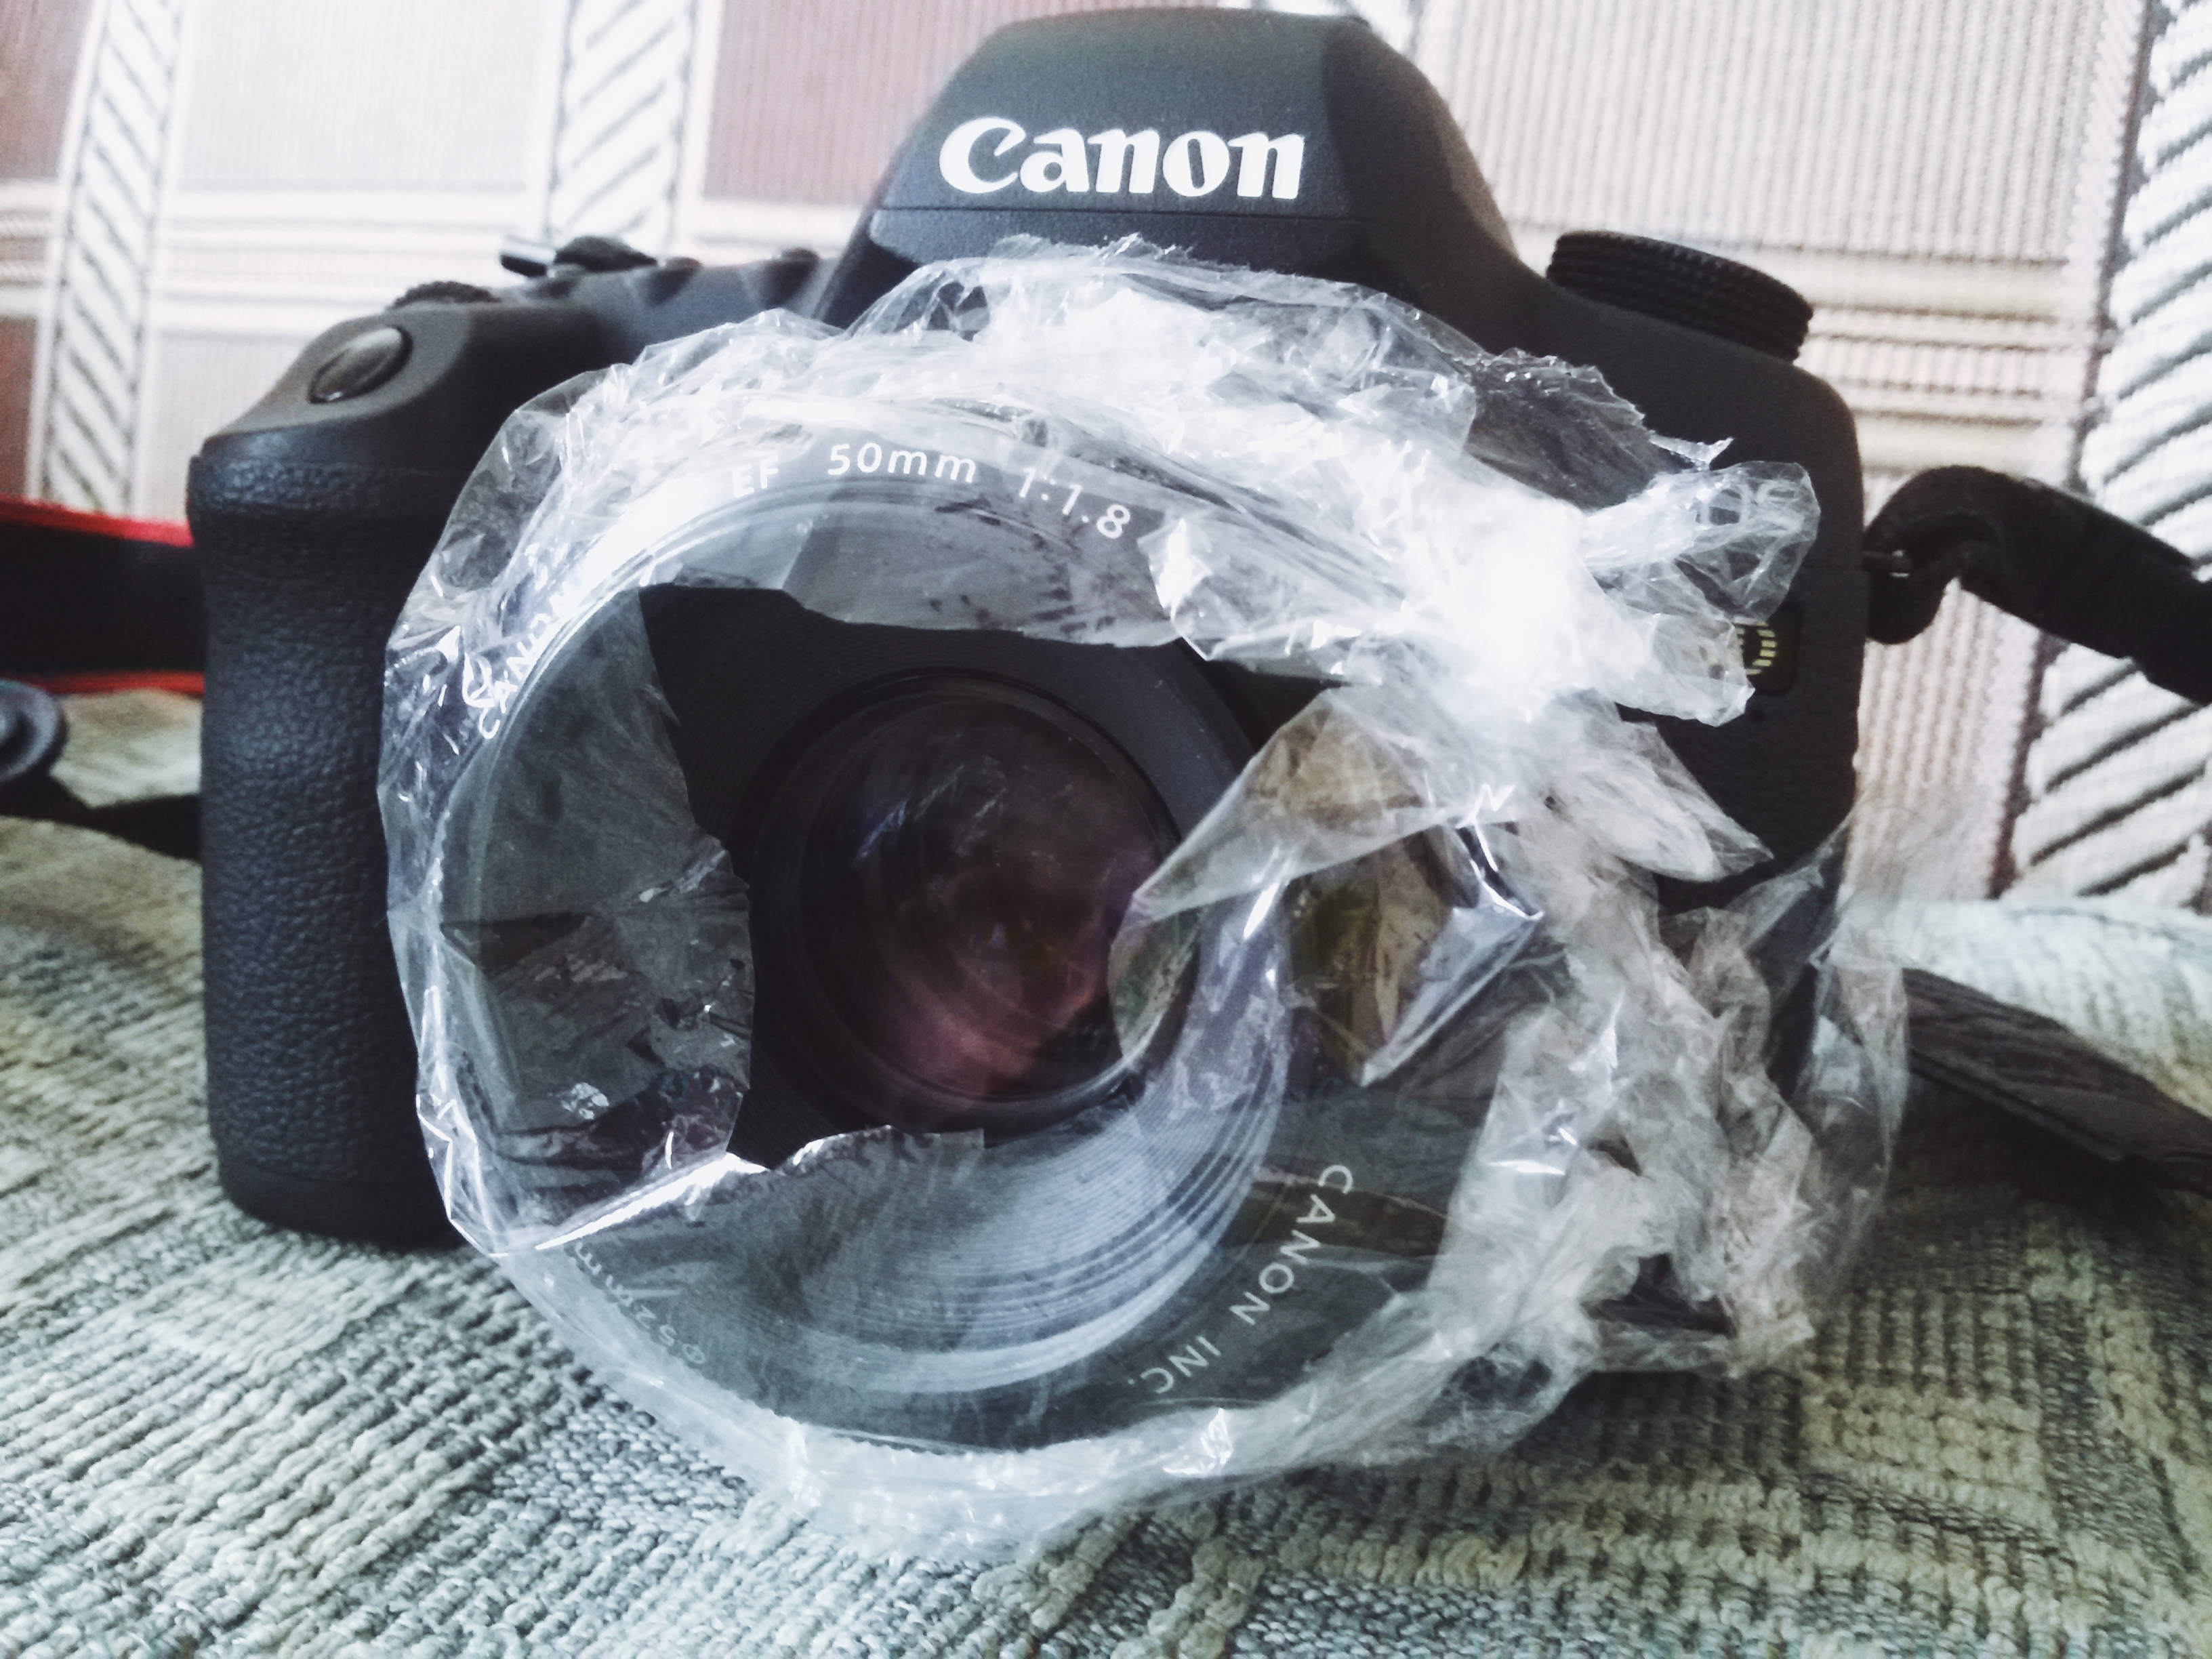
Something to keep in mind is that it might be difficult to focus your lens manually due to the tightly wrapped cellophane. To make focusing easier, don’t wrap the cellophane square around your entire lens and leave some space for your fingers to change the focus. Though using tape is optional, it could prevent the cellophane from constantly falling off. Remember that it doesn’t have to be perfect or visually appealing since the effect itself is the most important part.

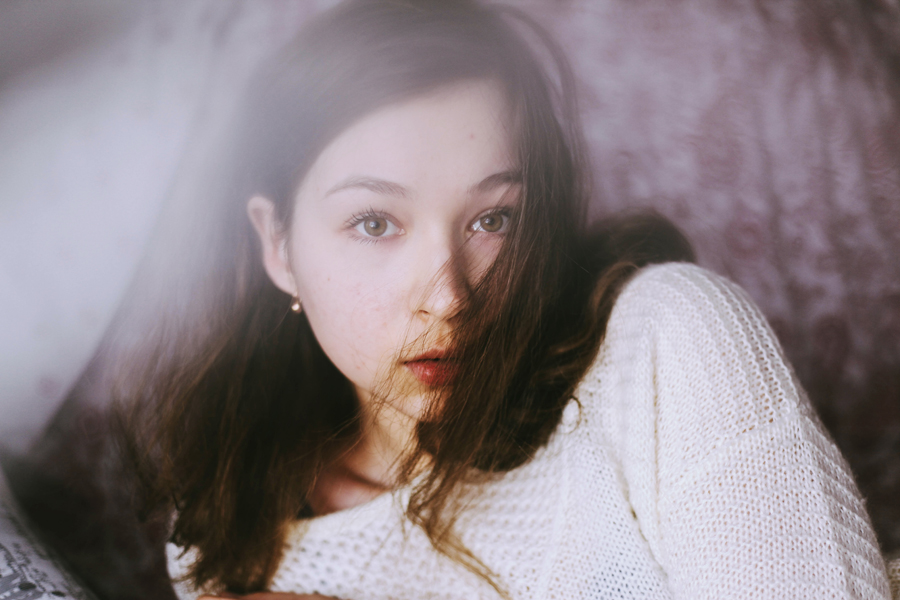
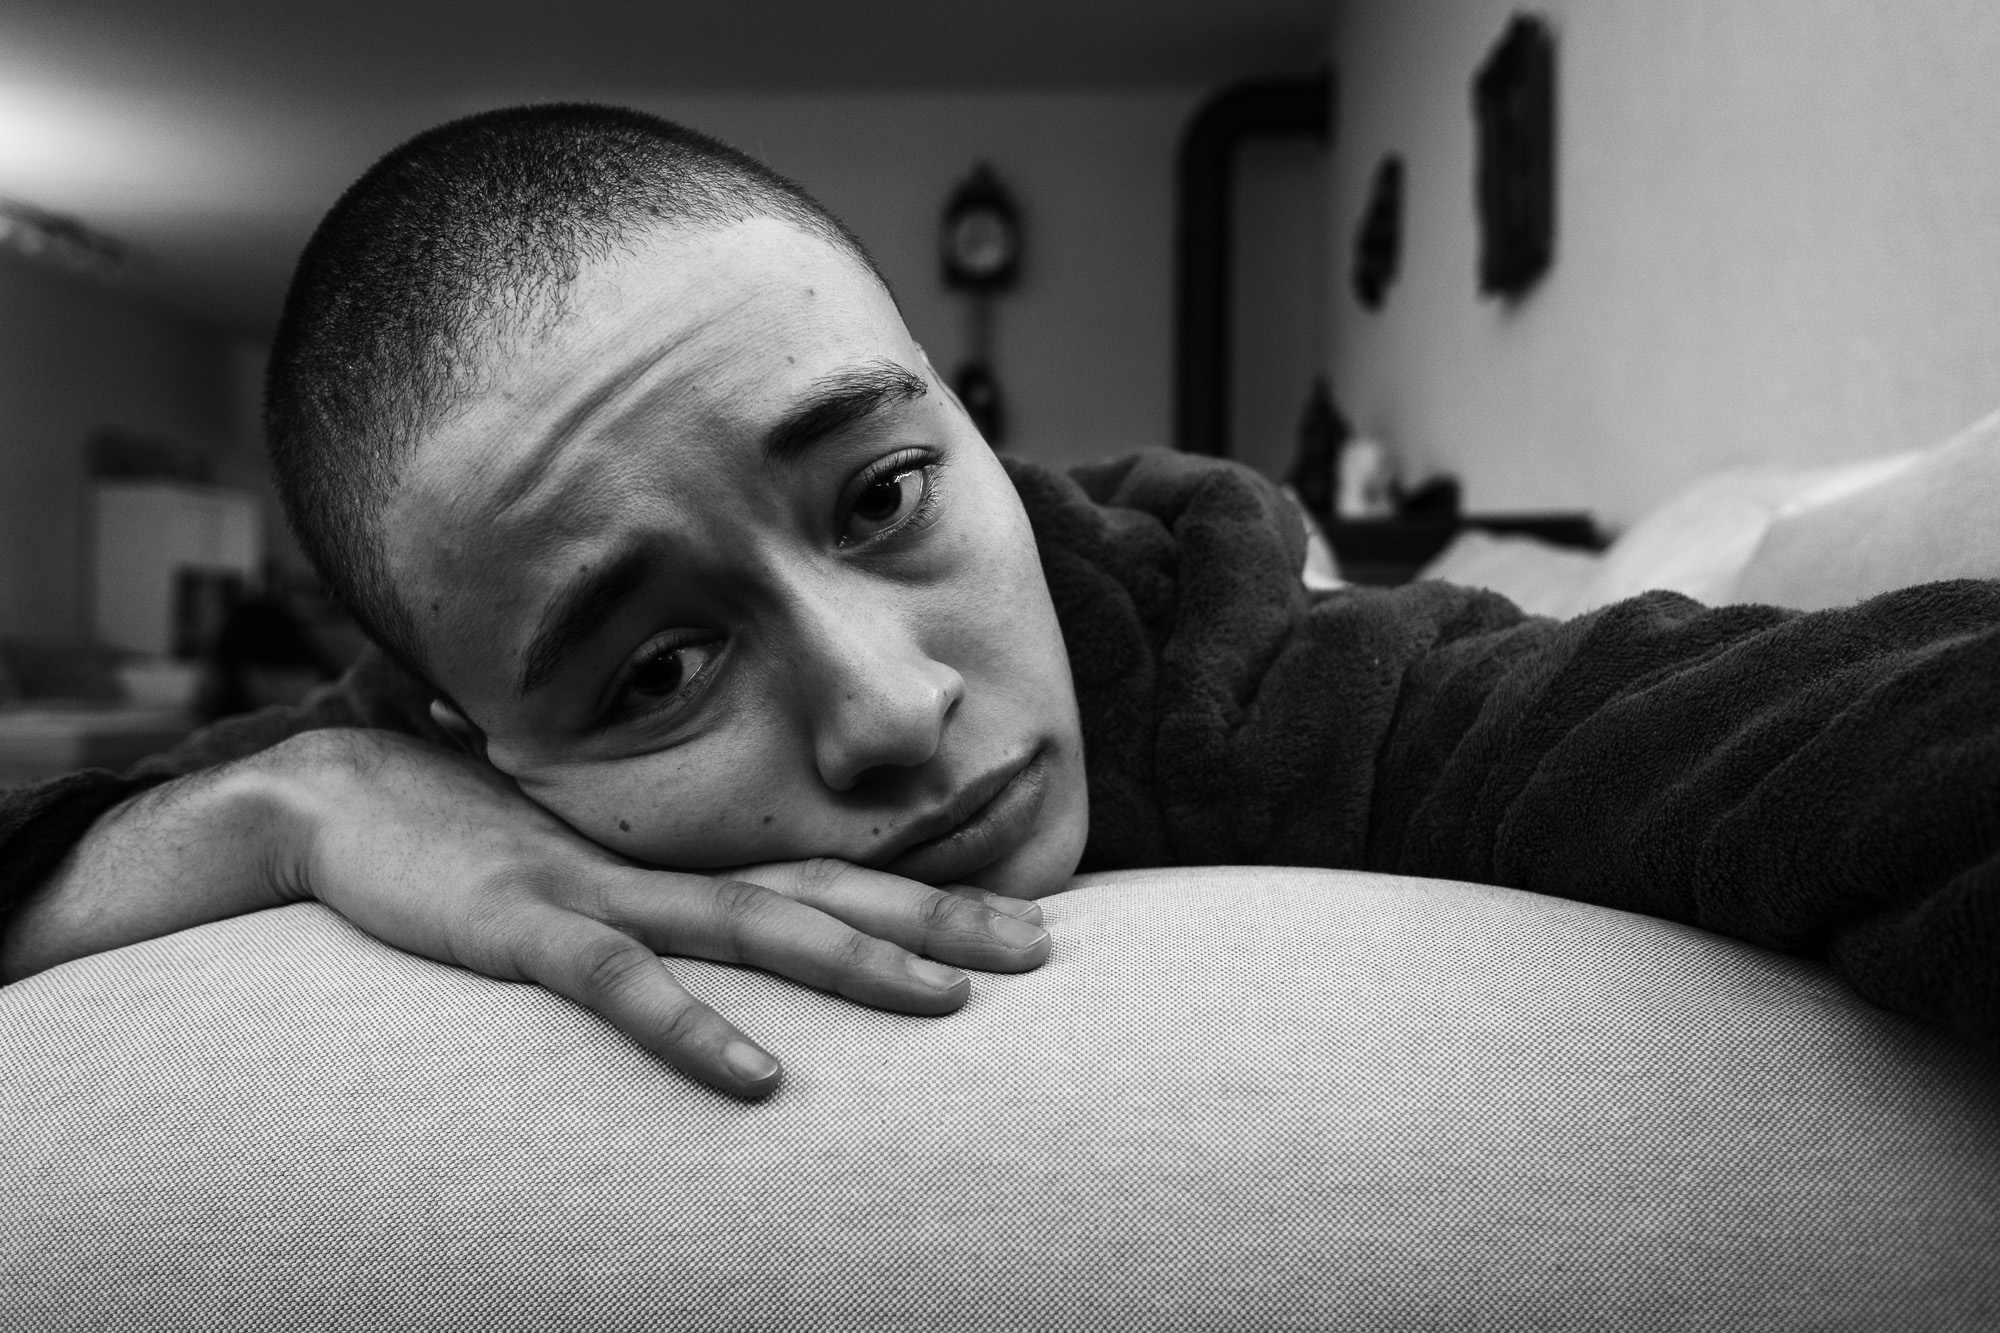
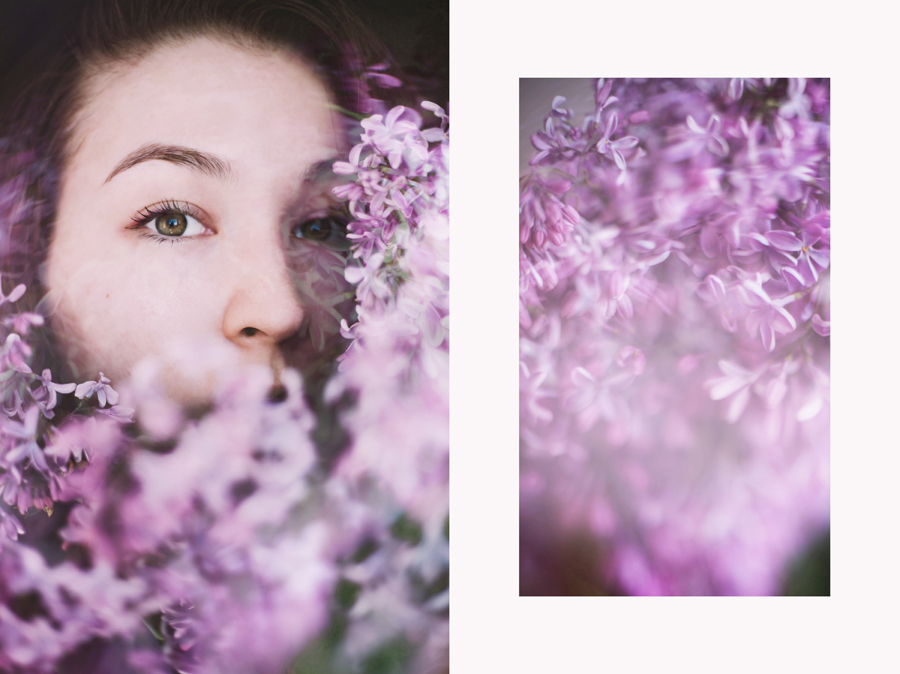
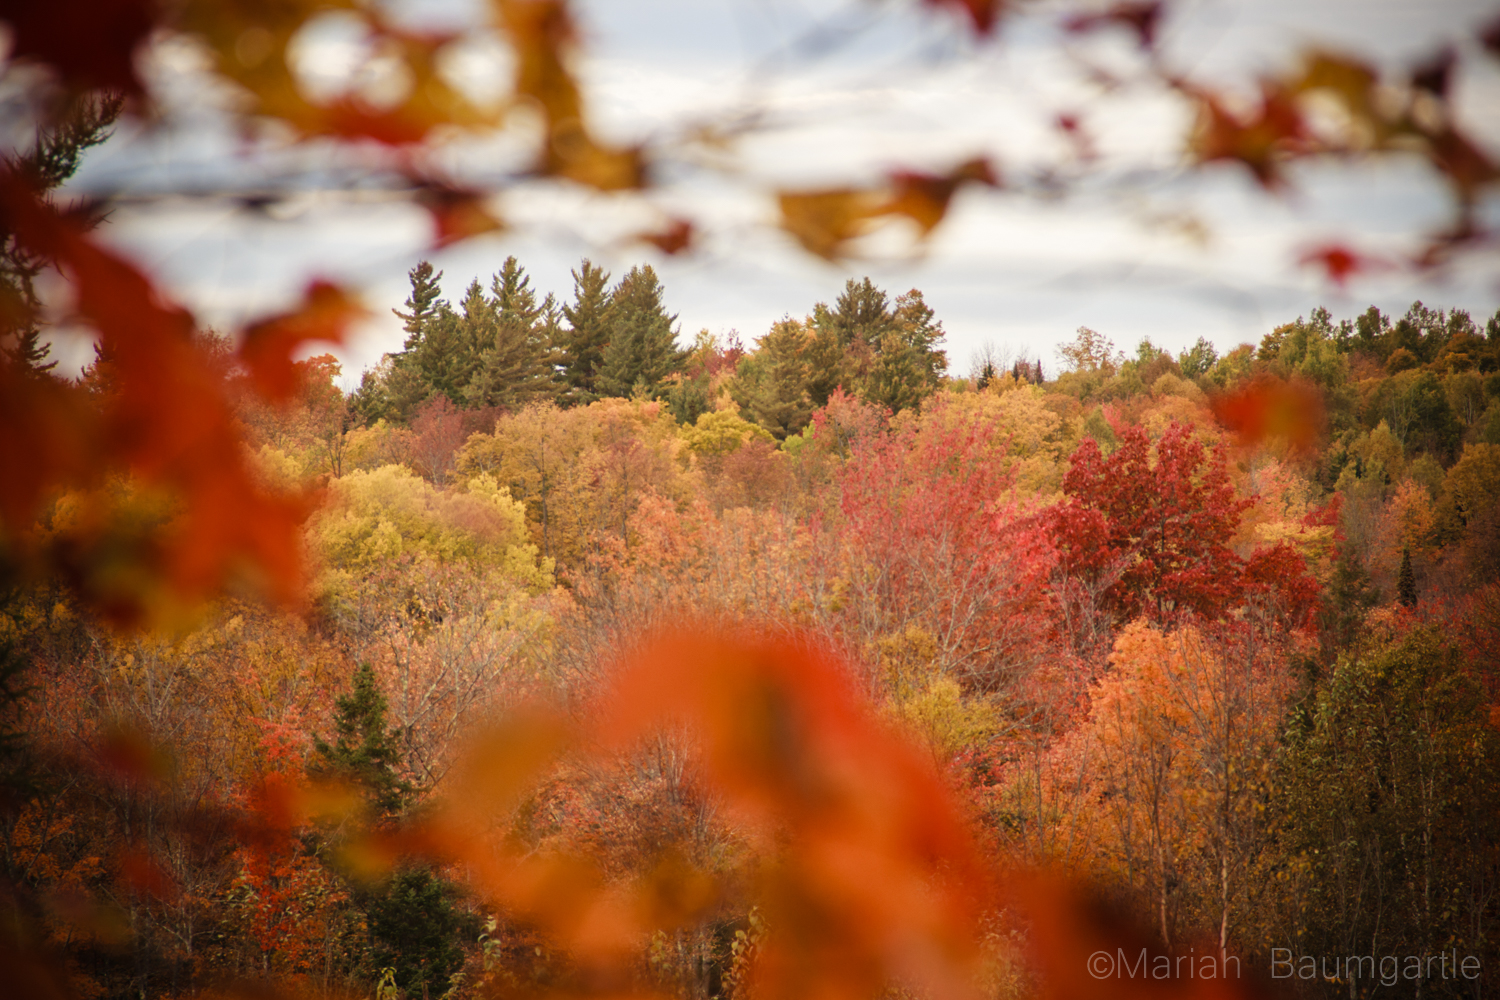
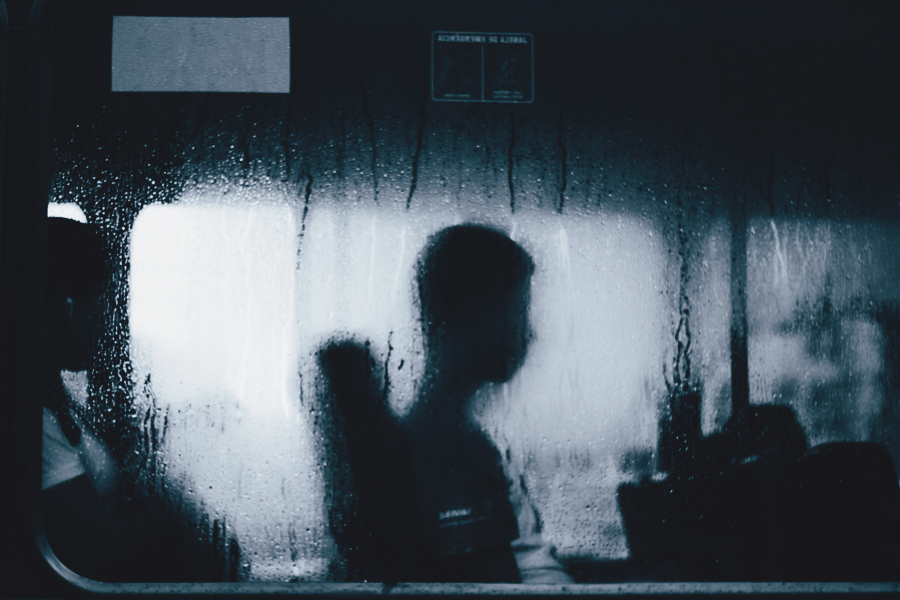
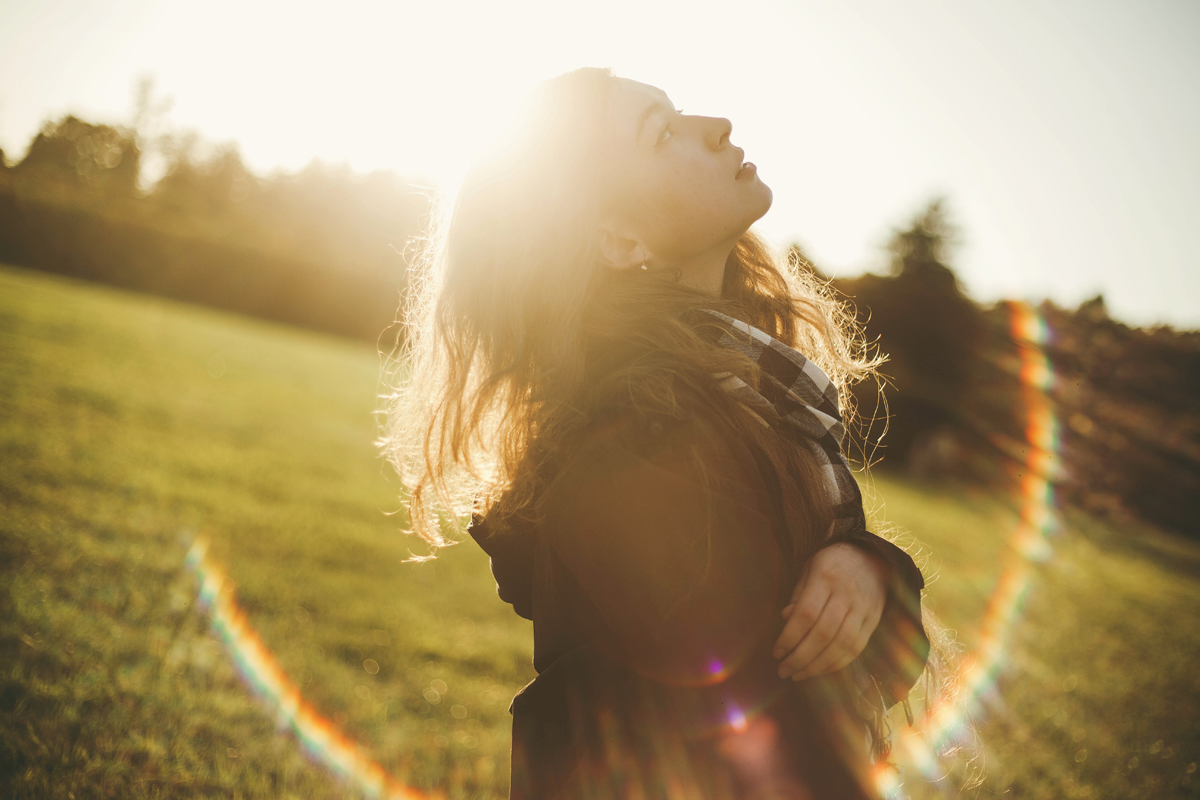
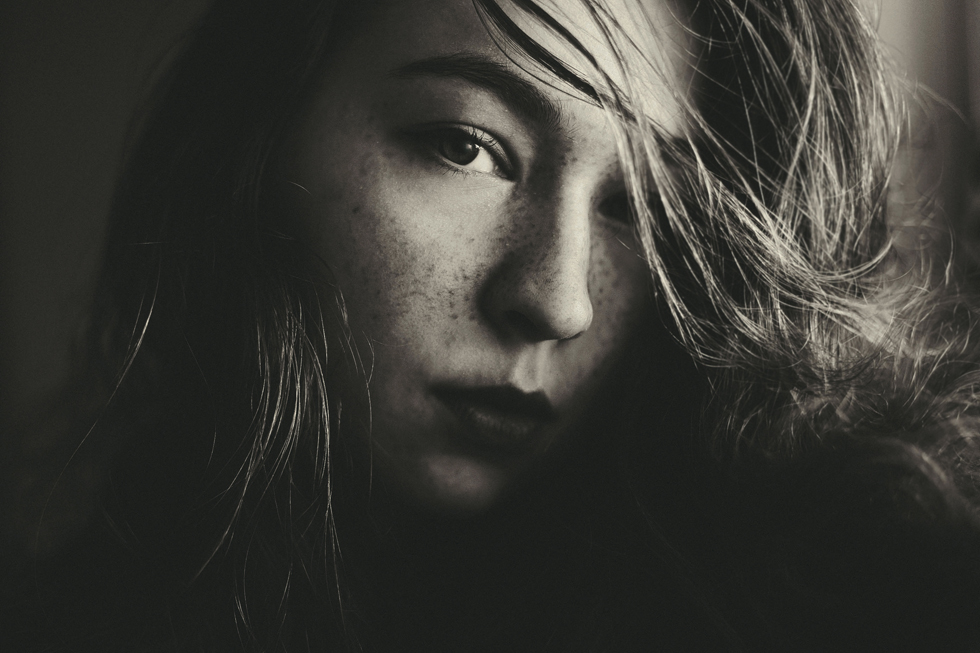
Using cellophane to take unclear yet dreamy photographs

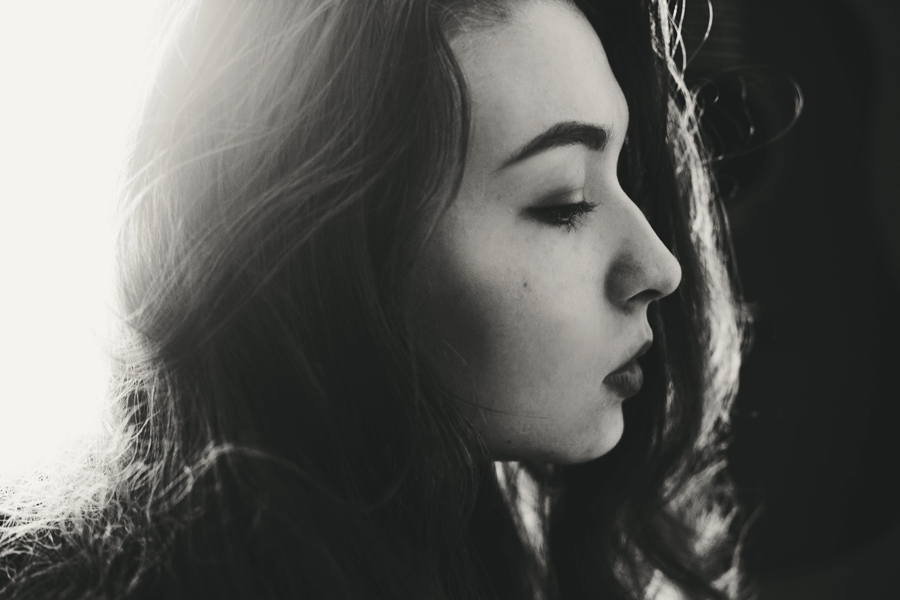
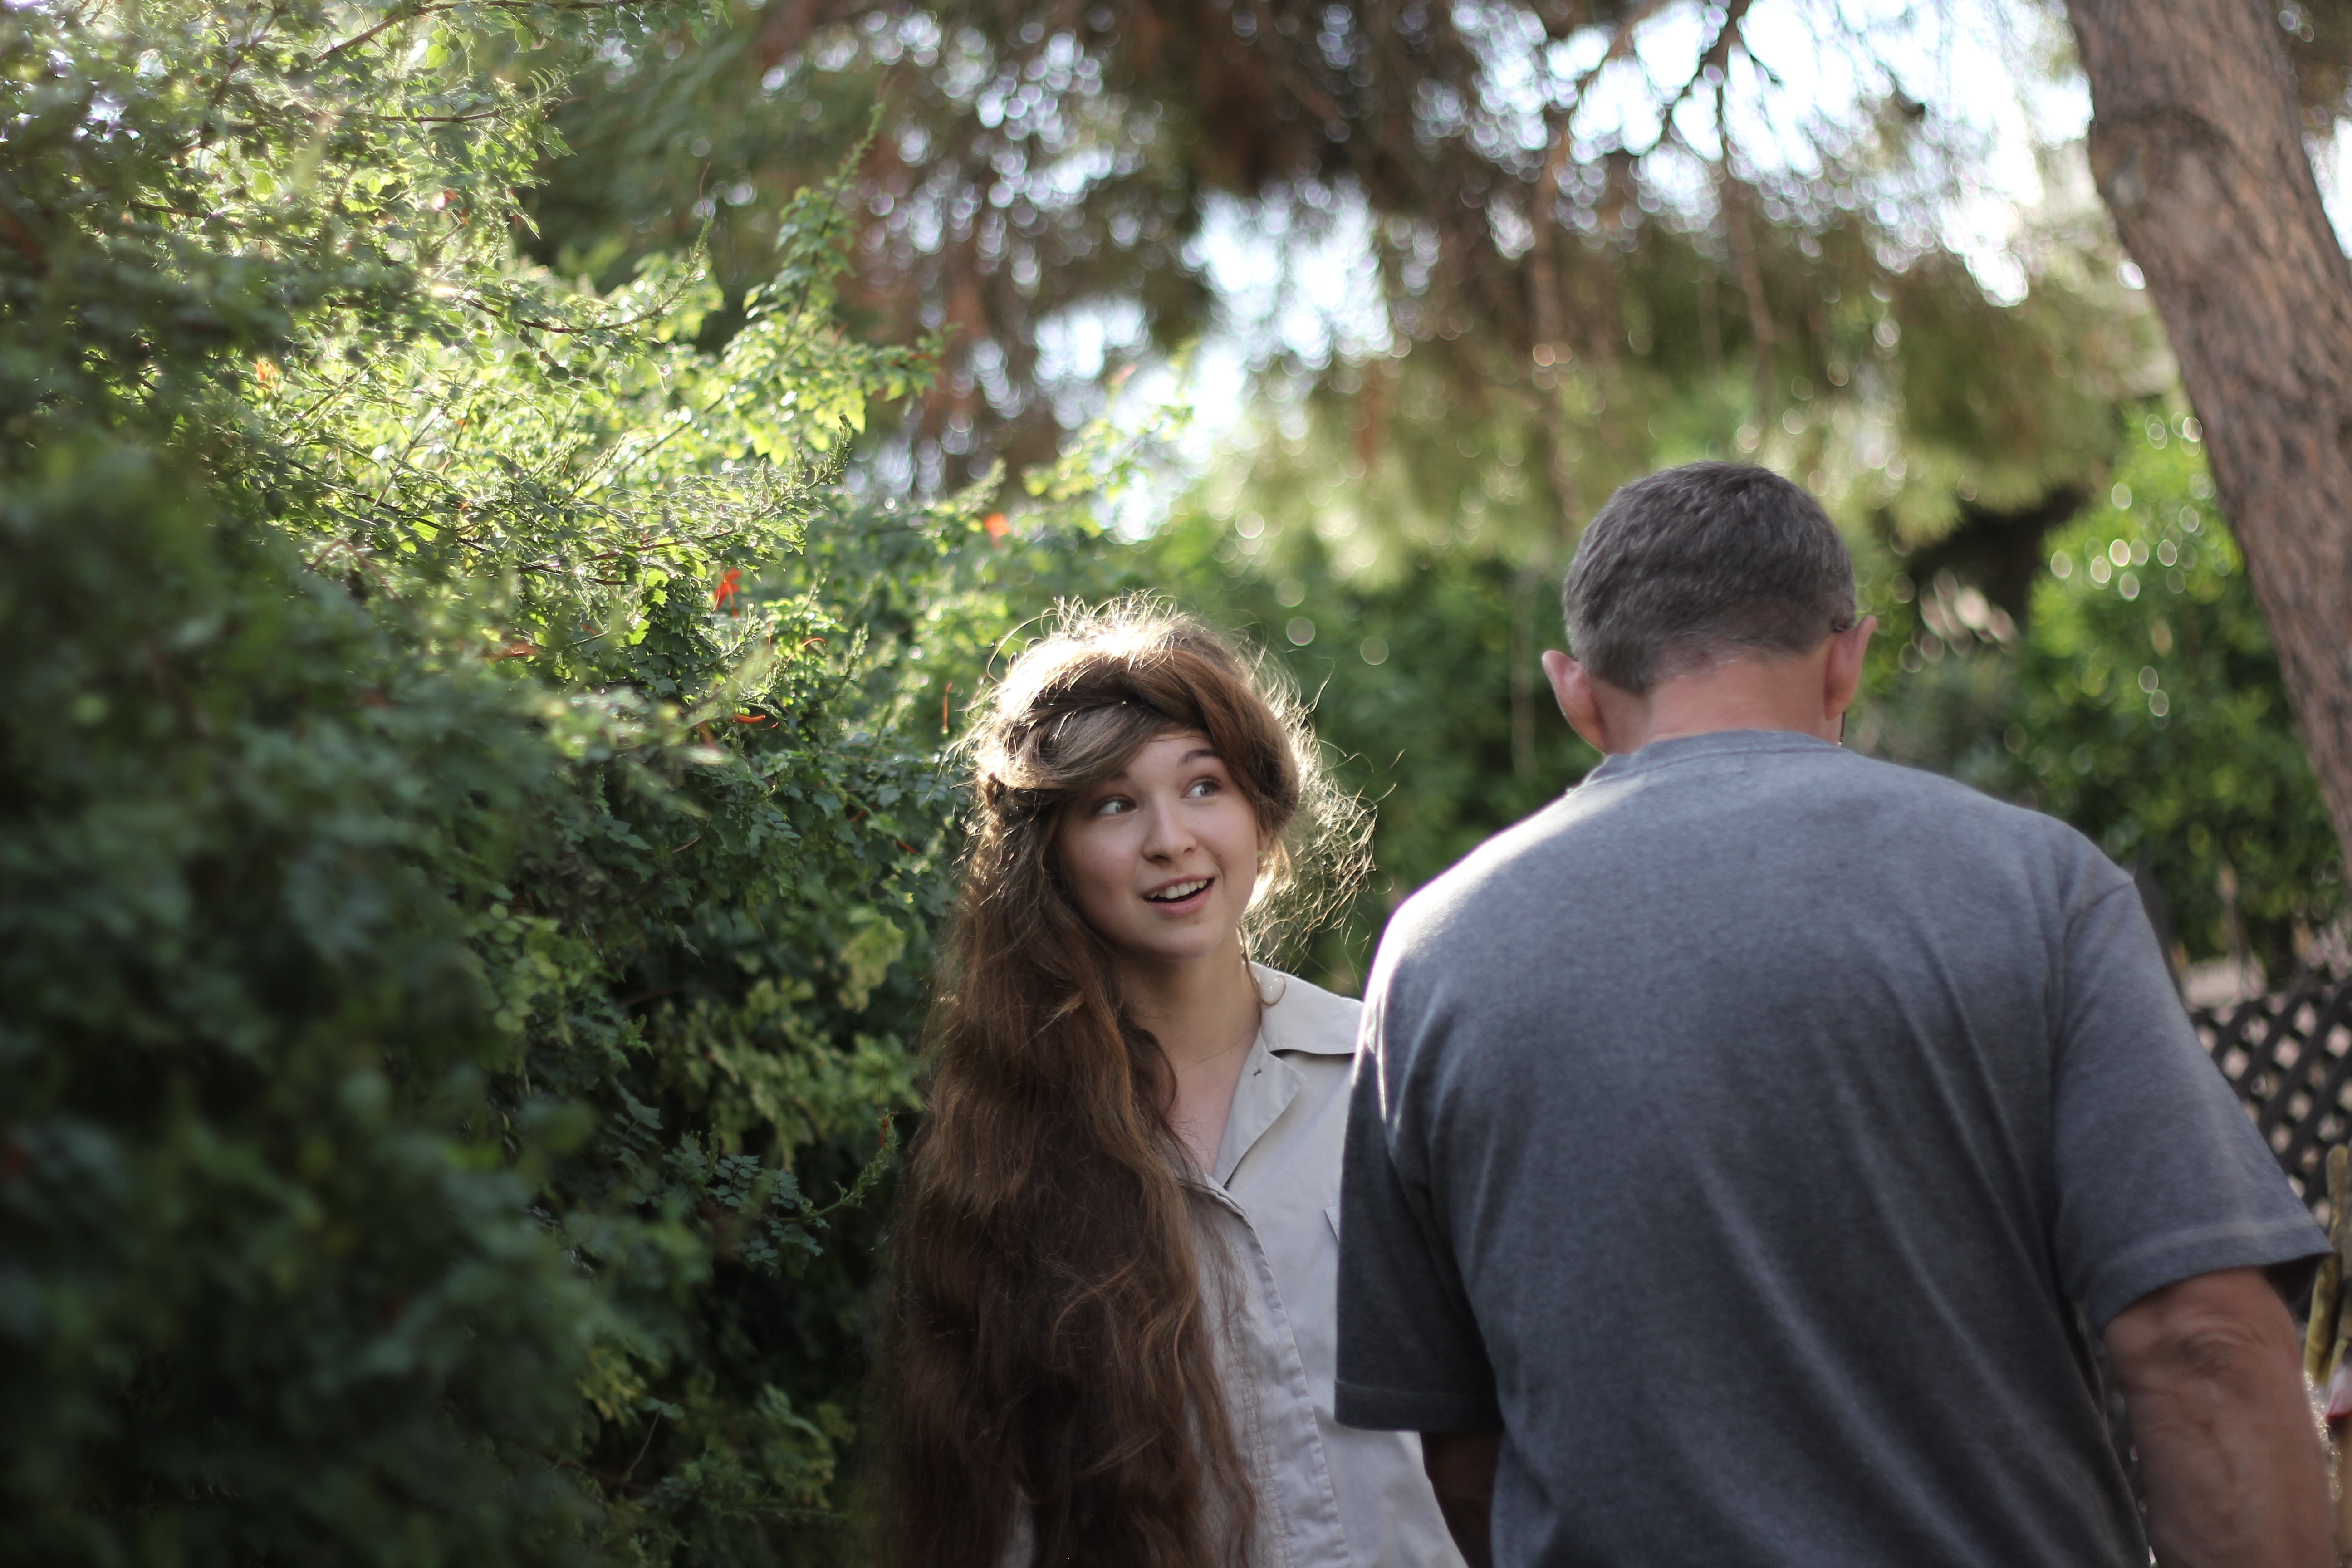
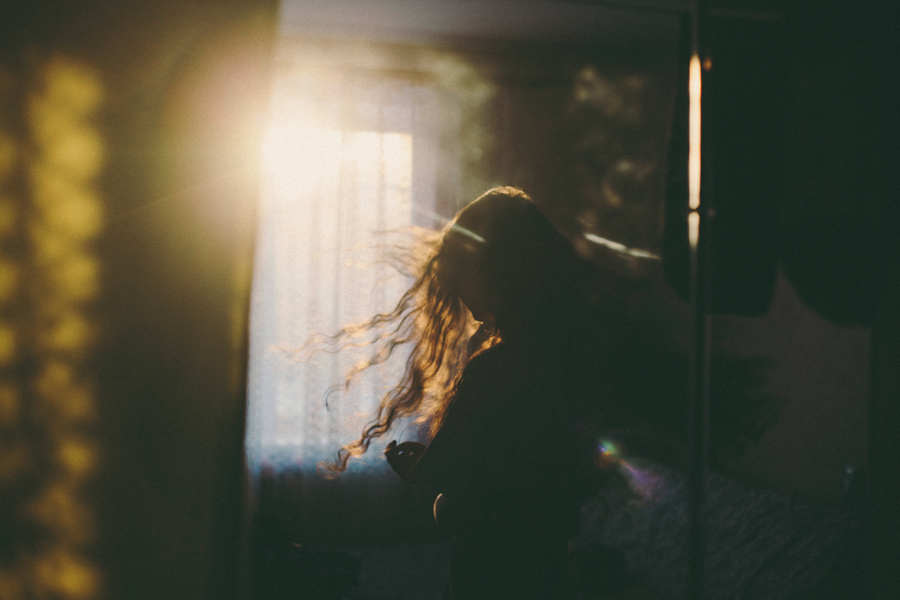
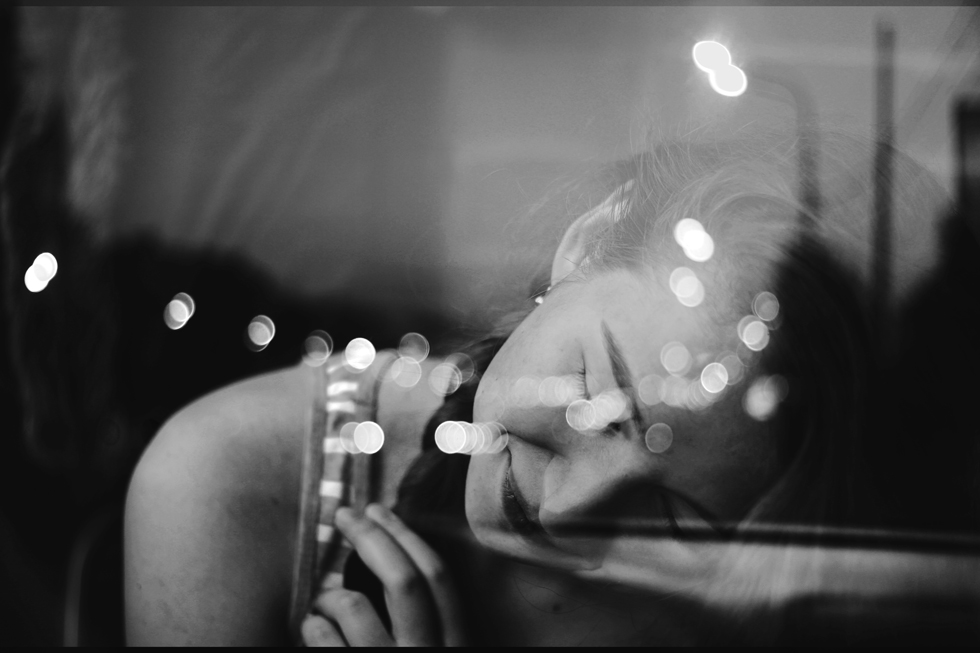
To create photographs that are beautifully textured yet slightly unclear, cover your lens with cellophane in the same way as the previous method, but without the cut-out hole. Again, wrap it in such a way that will give you the opportunity to manually focus your lens. If you use auto-focus, loosely wrap the cellophane around your lens to give it enough space to find the right sharpness. The effect will make your photographs look like they were taken straight out of a dream. A certain level of sharpness will remain, though everything will be covered in a pleasant layer of cellophane fog.

/

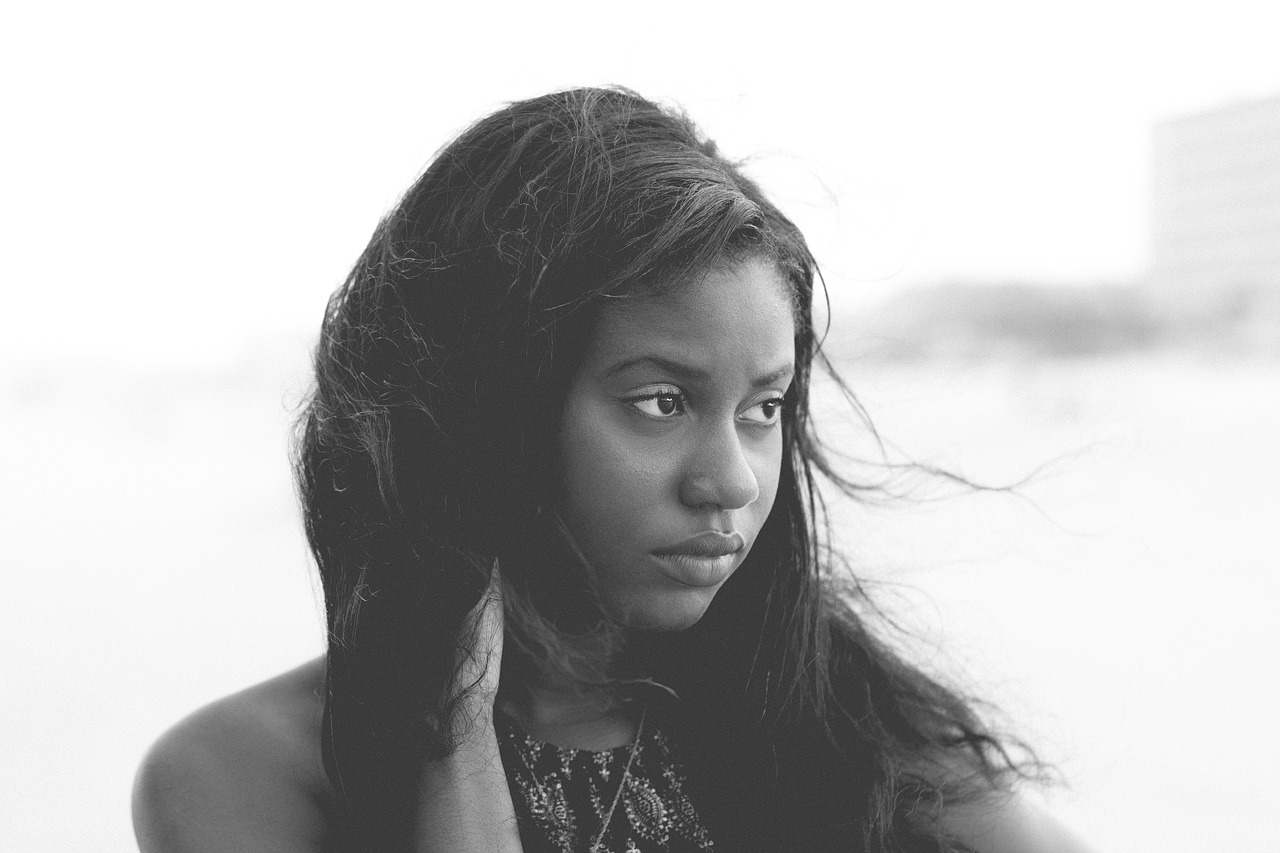
If you want to be even more creative, combine freelensing with cellophane. This will result in unique and charming photographs. For more interesting results, crumple up the cellophane before using it. Adding textures to editing programs like Photoshop will further enhance your shots. If you use Lightroom, make sure to apply your favorite preset for even more stunning results. Using all of these tools and features will transform your images into works of art you’re proud of.

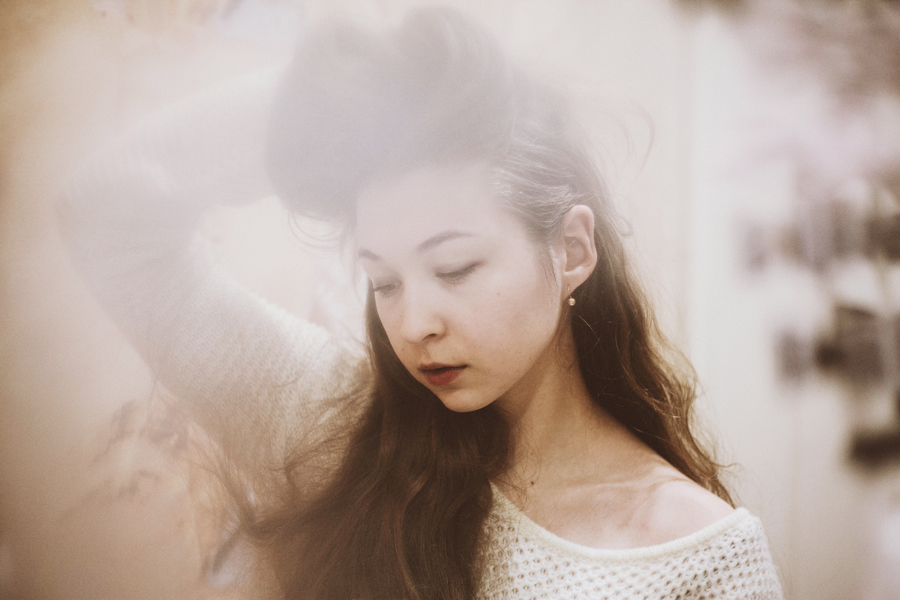
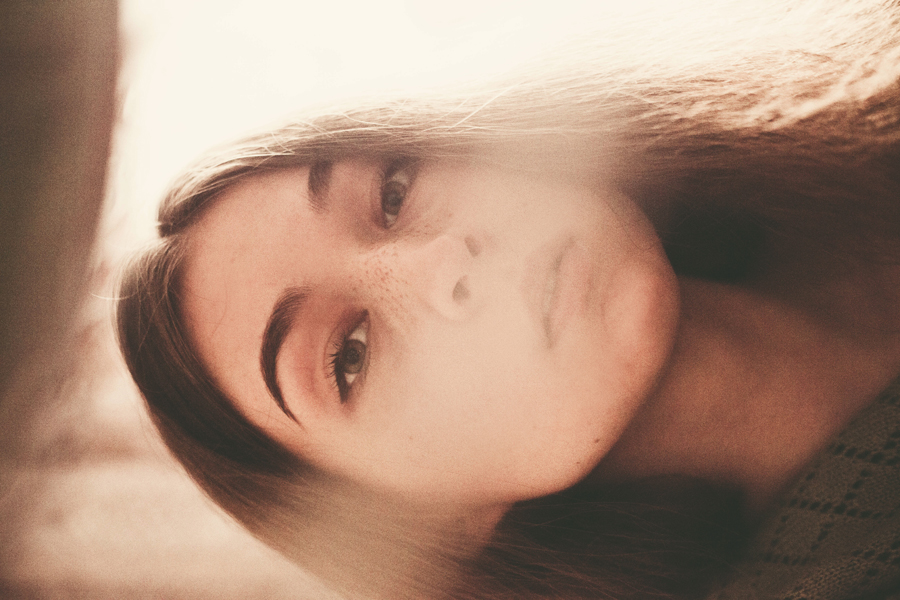
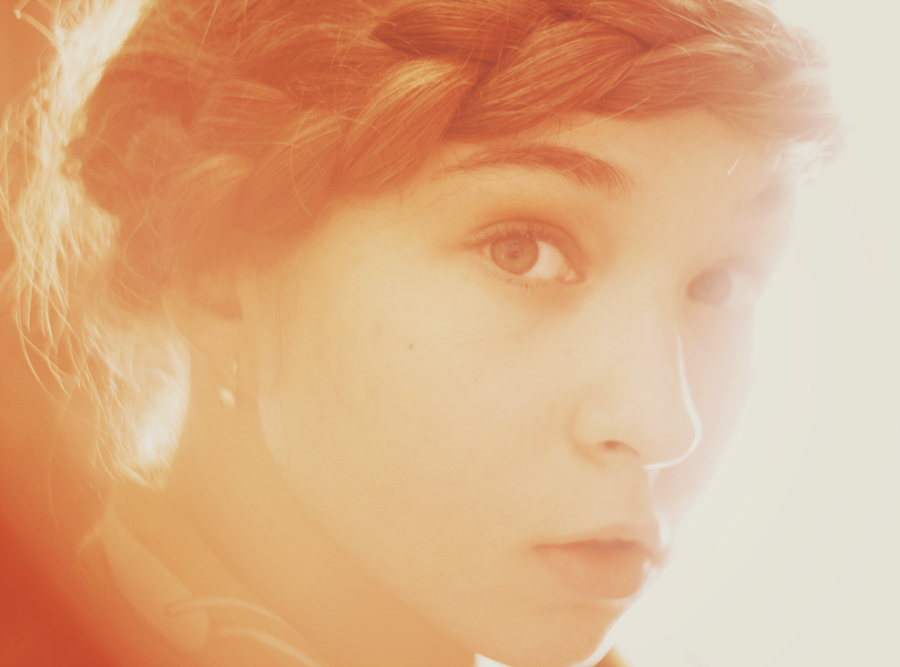
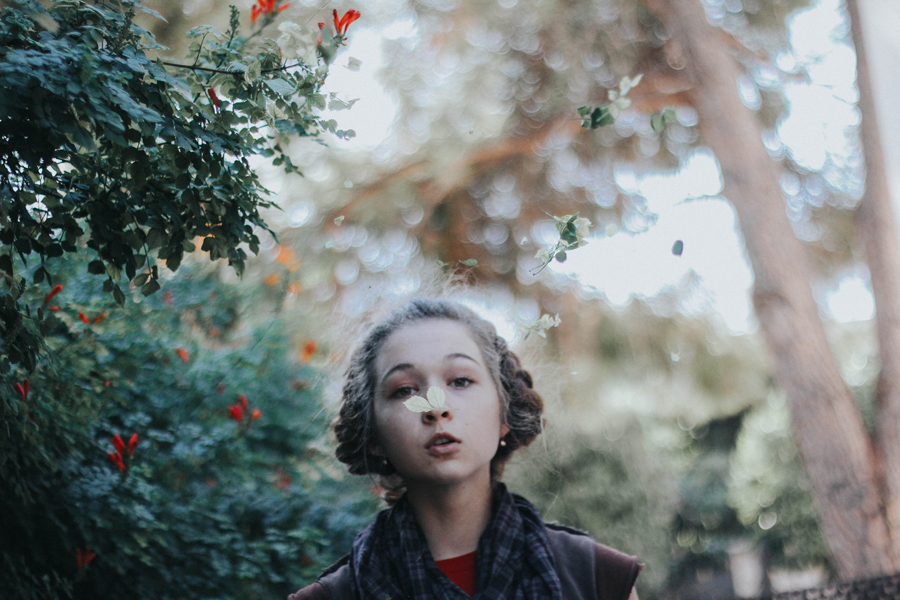
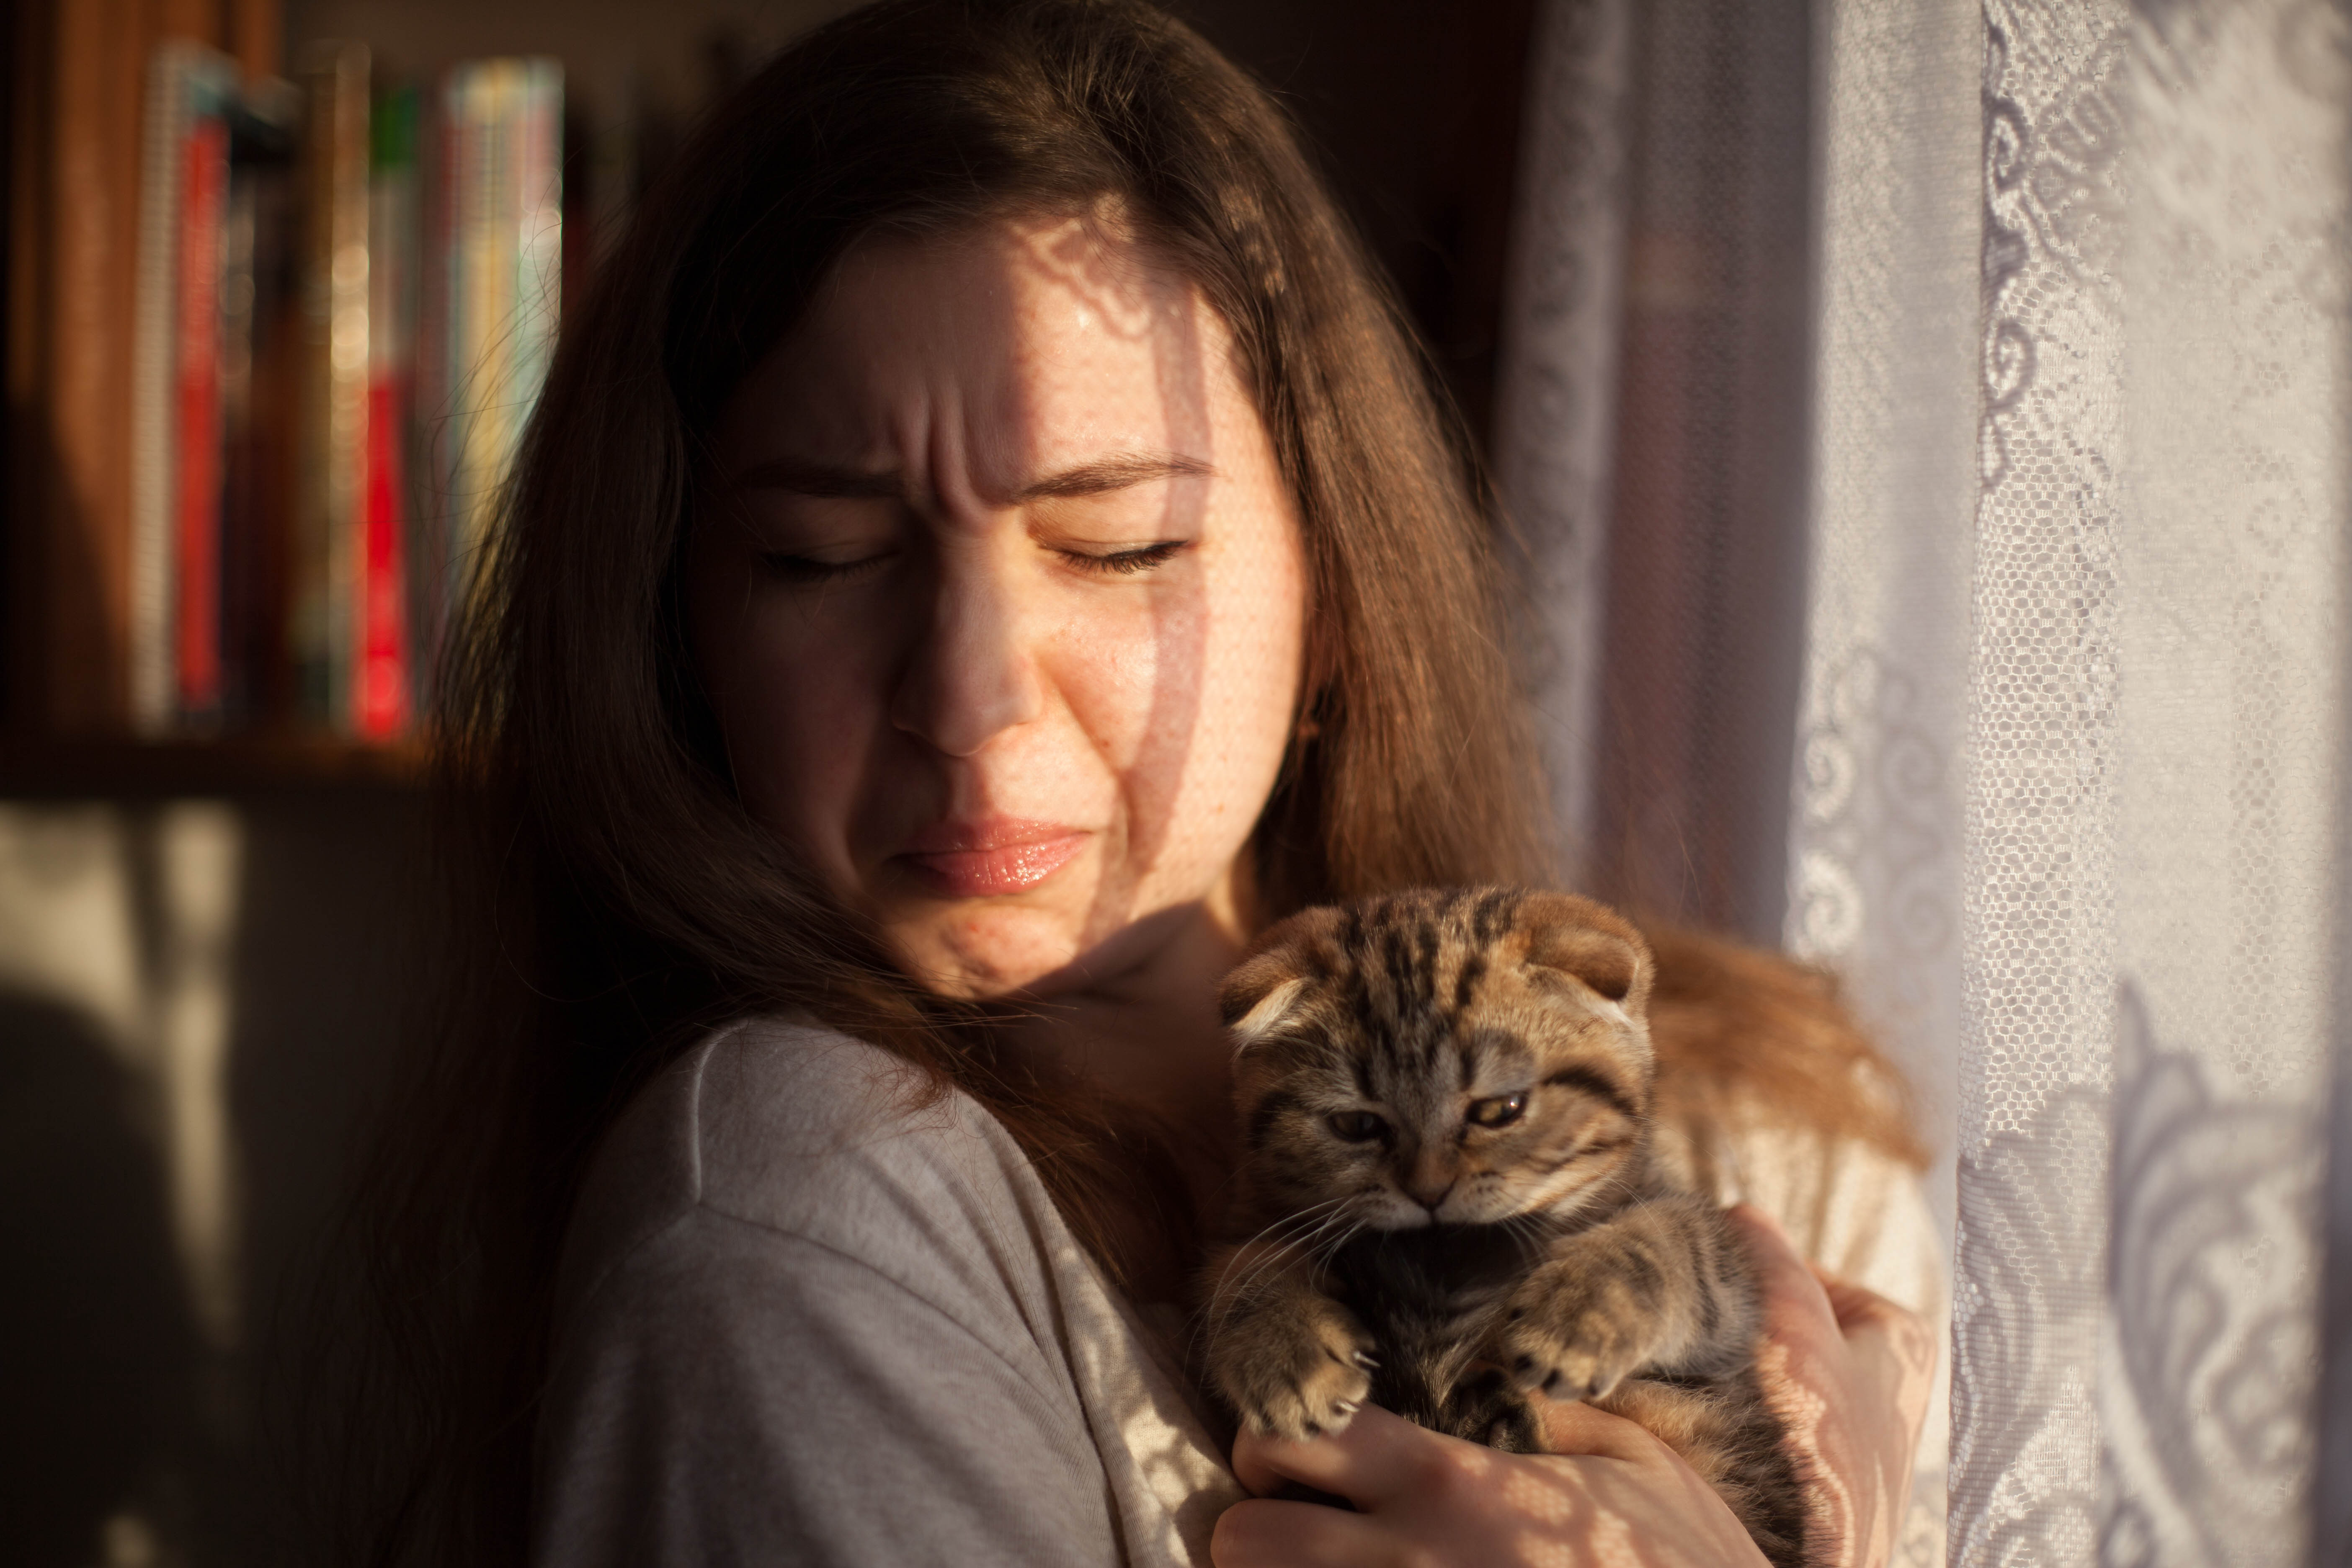
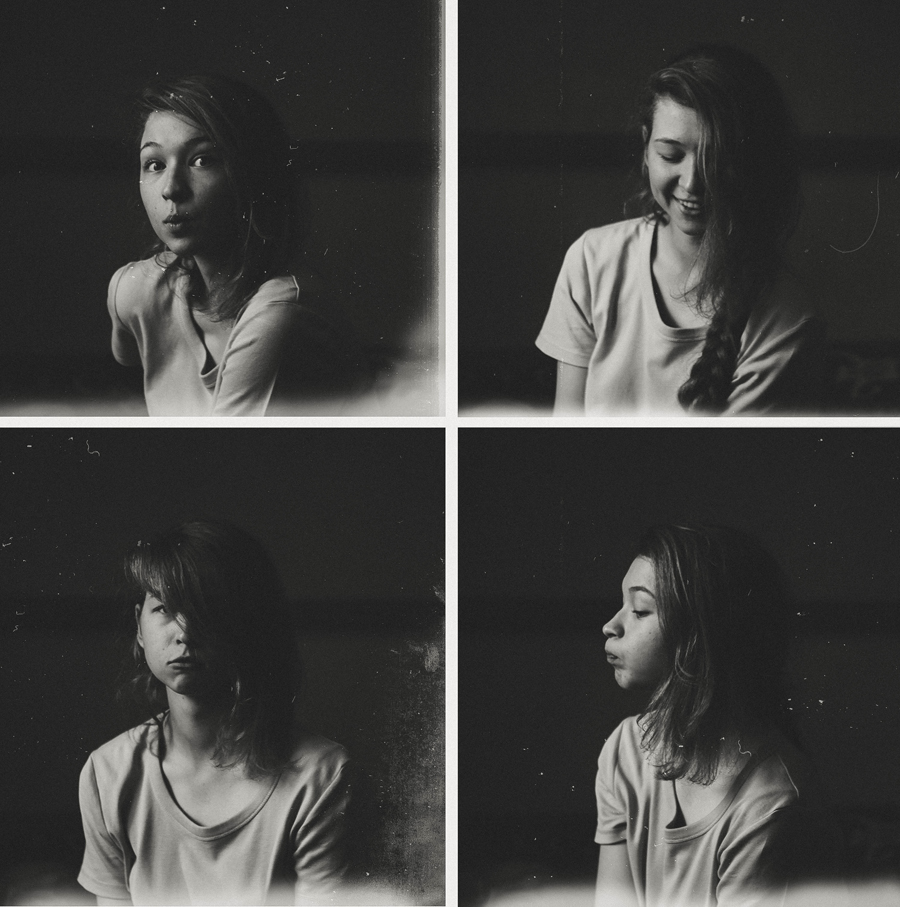
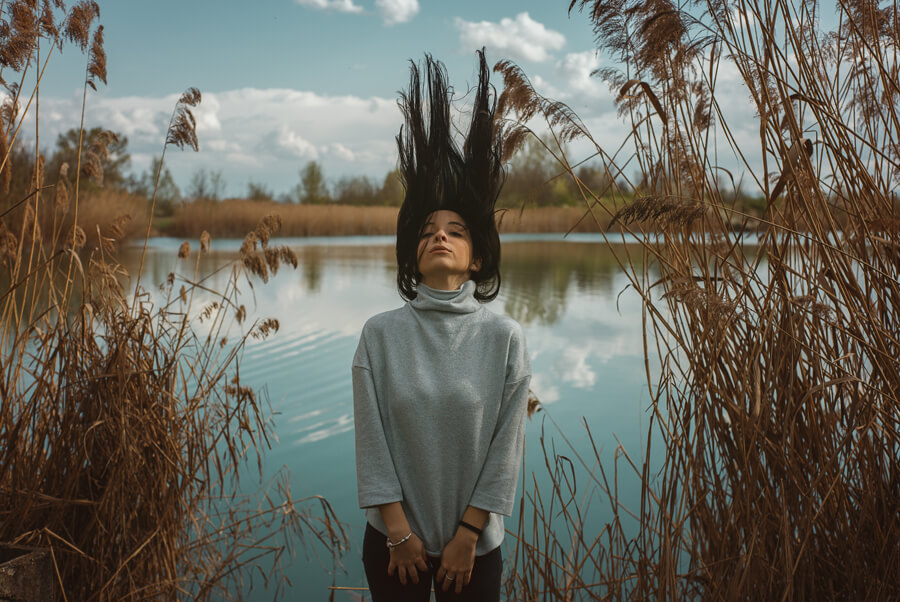
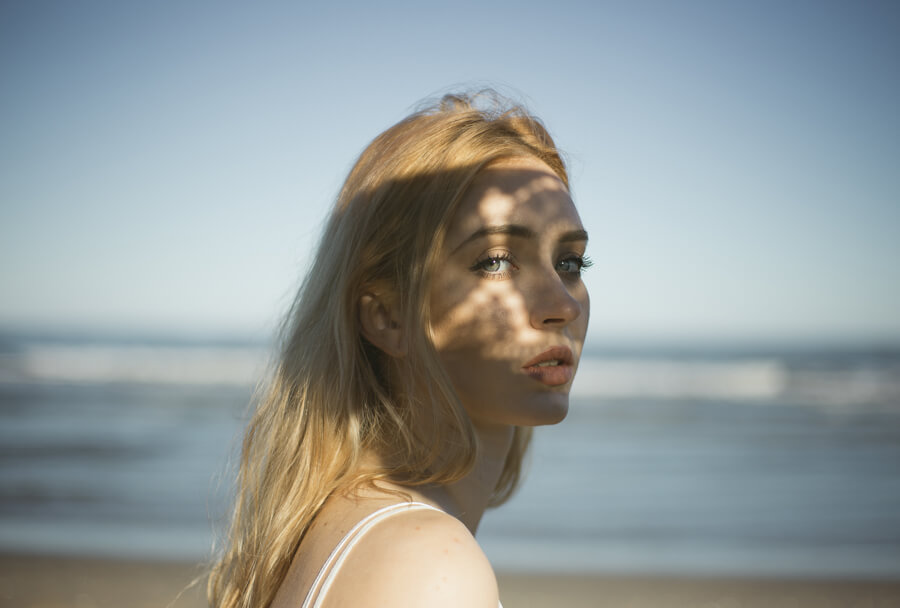
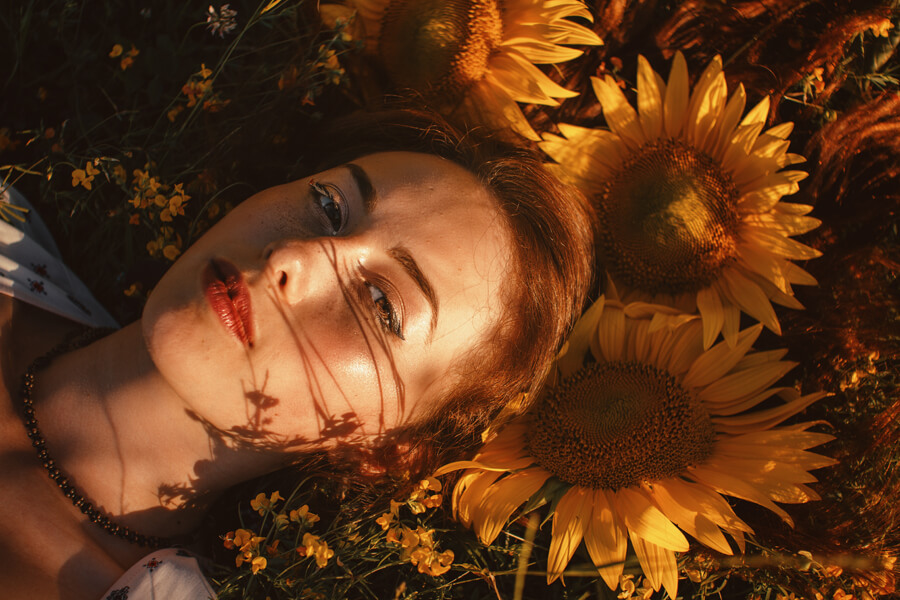
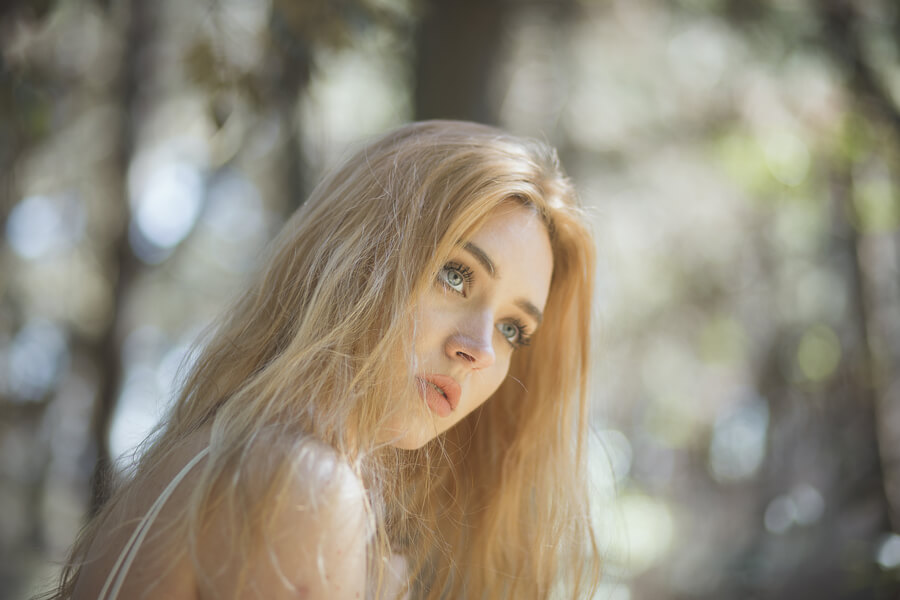
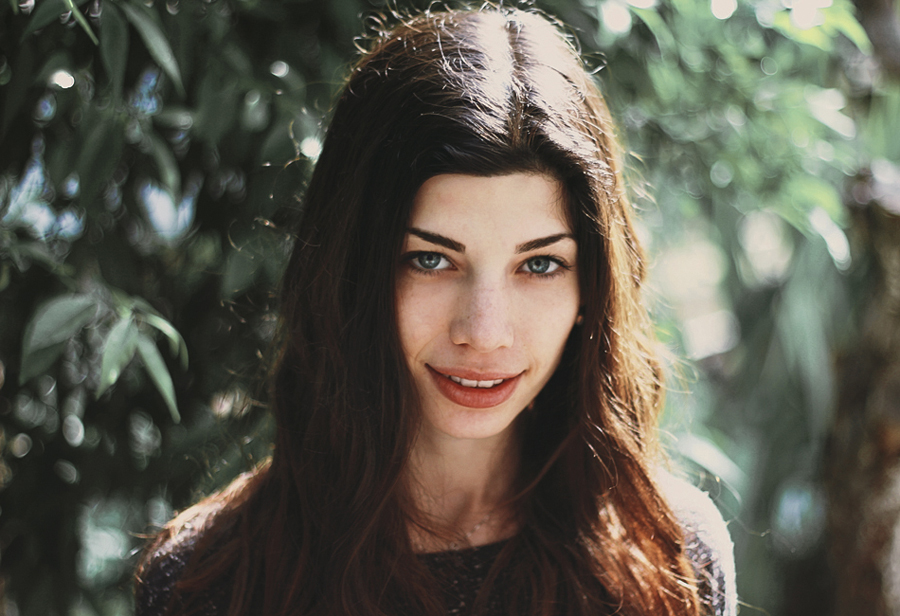
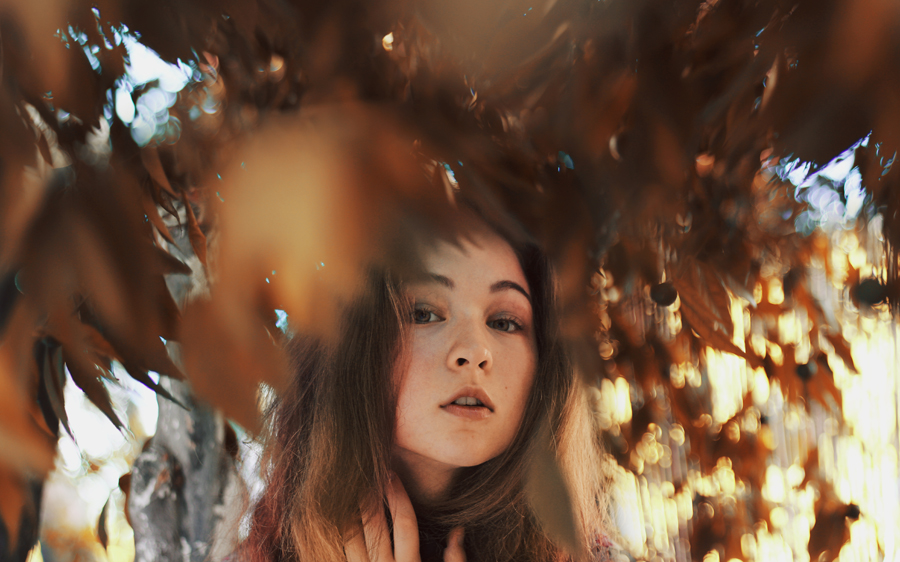
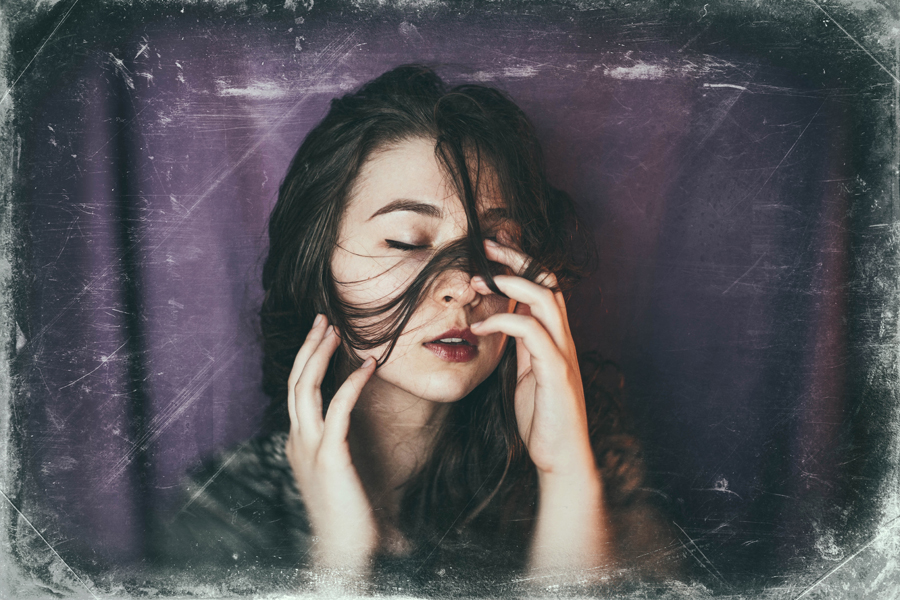
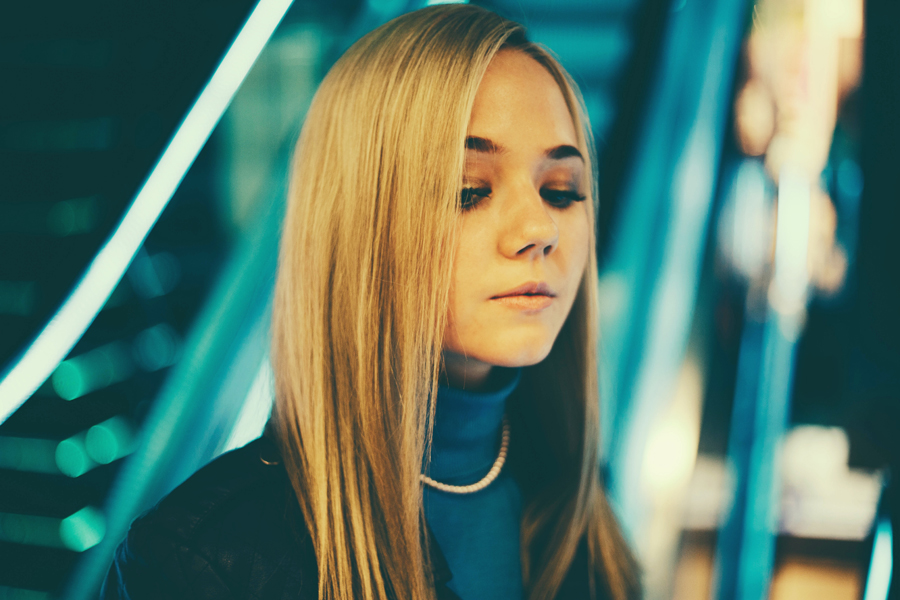
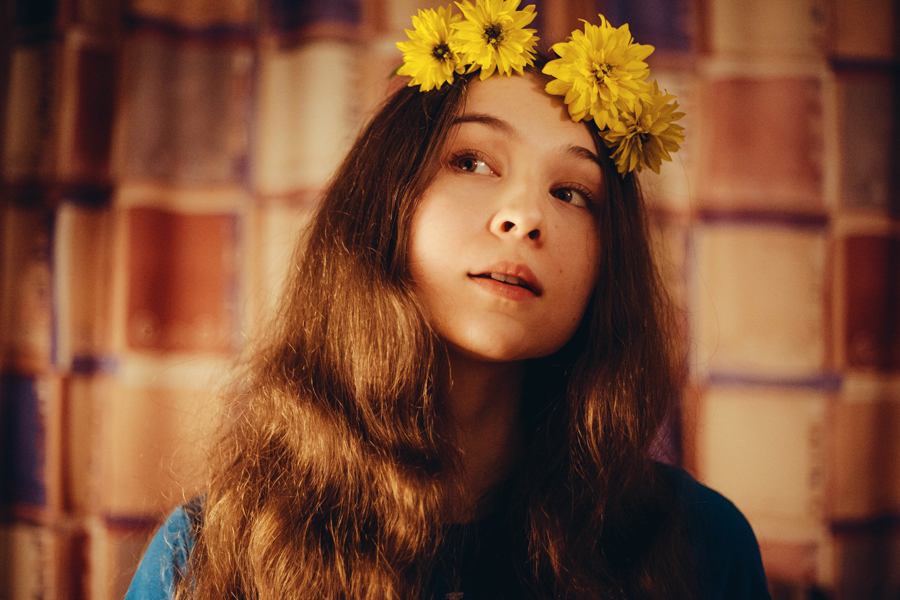
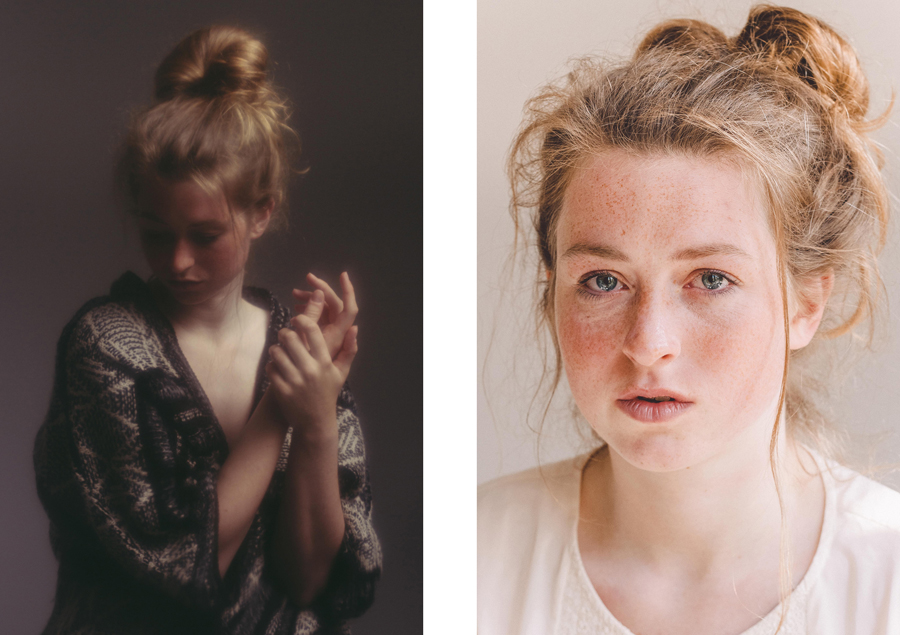
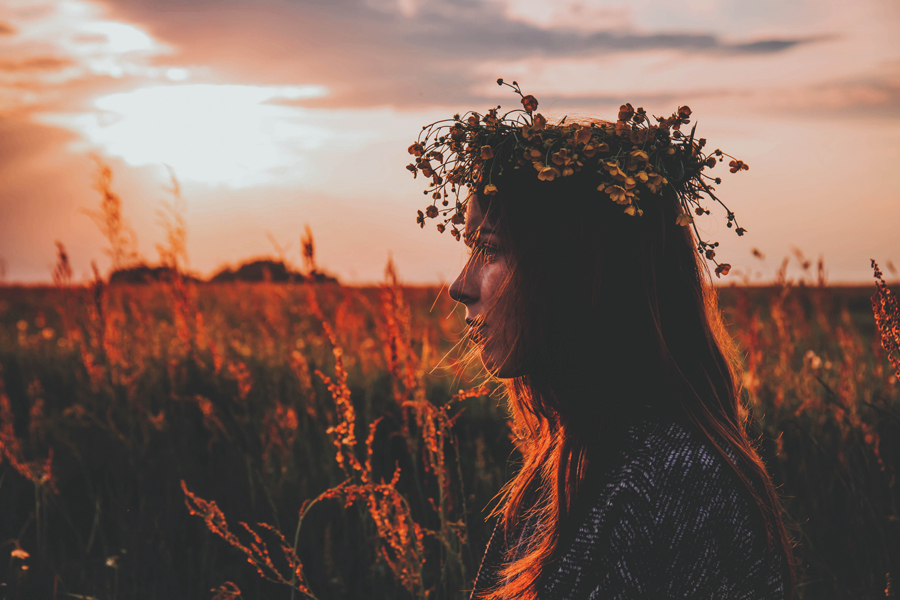
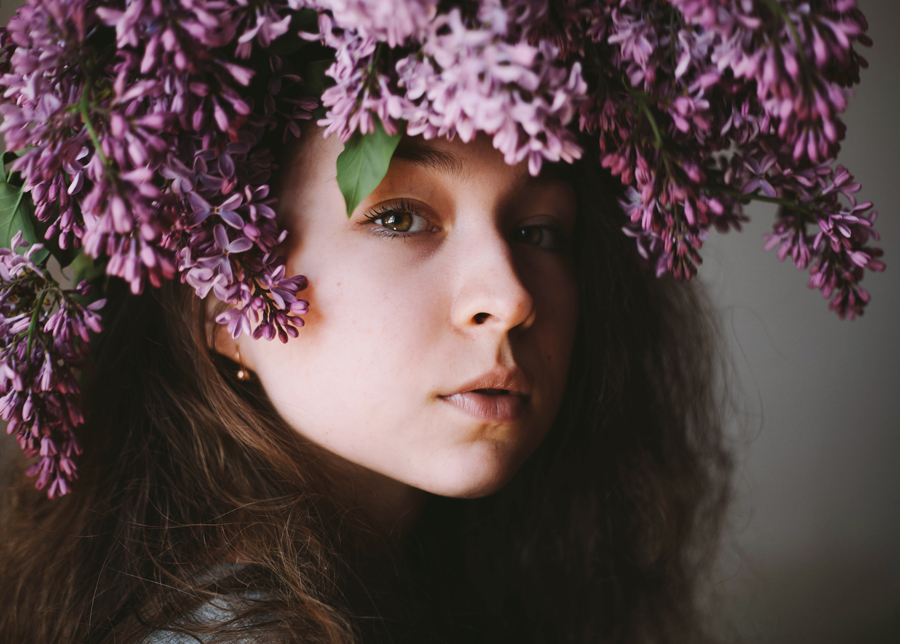
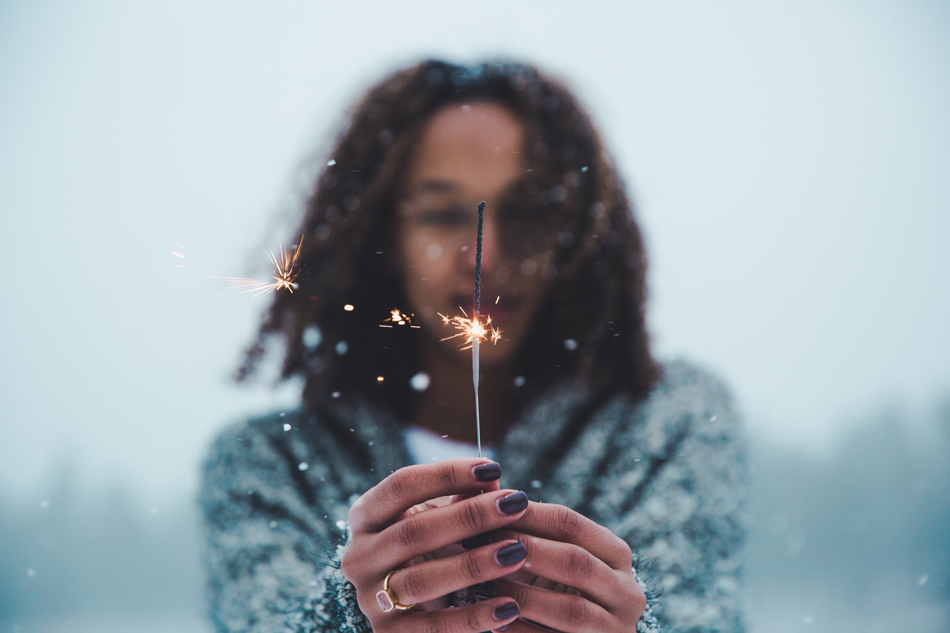
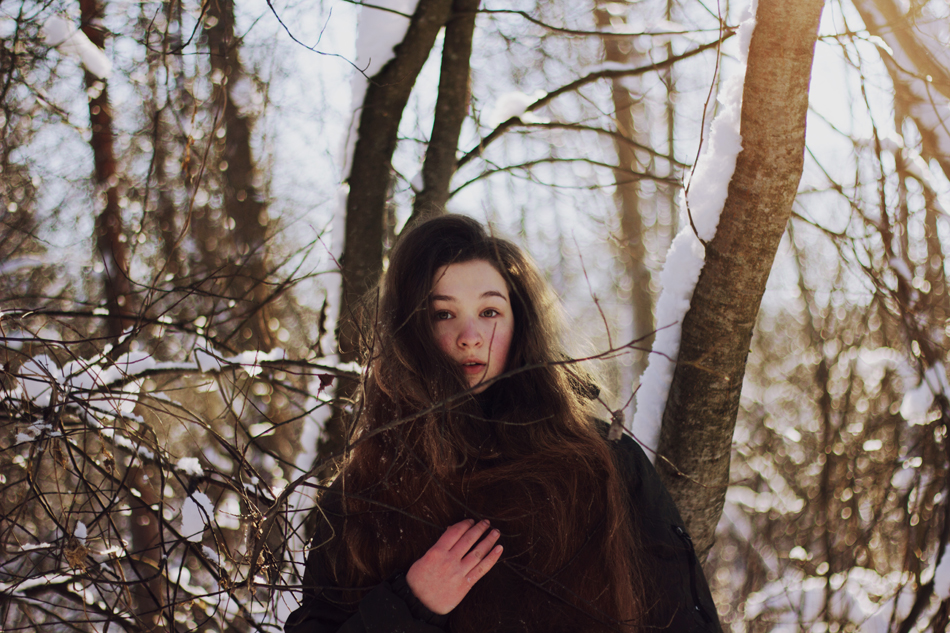
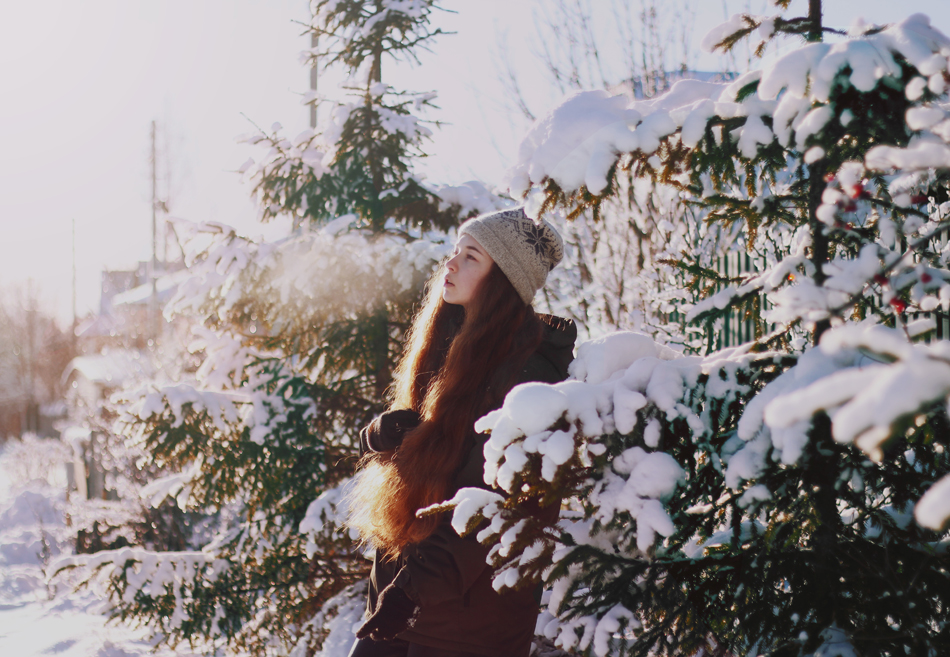
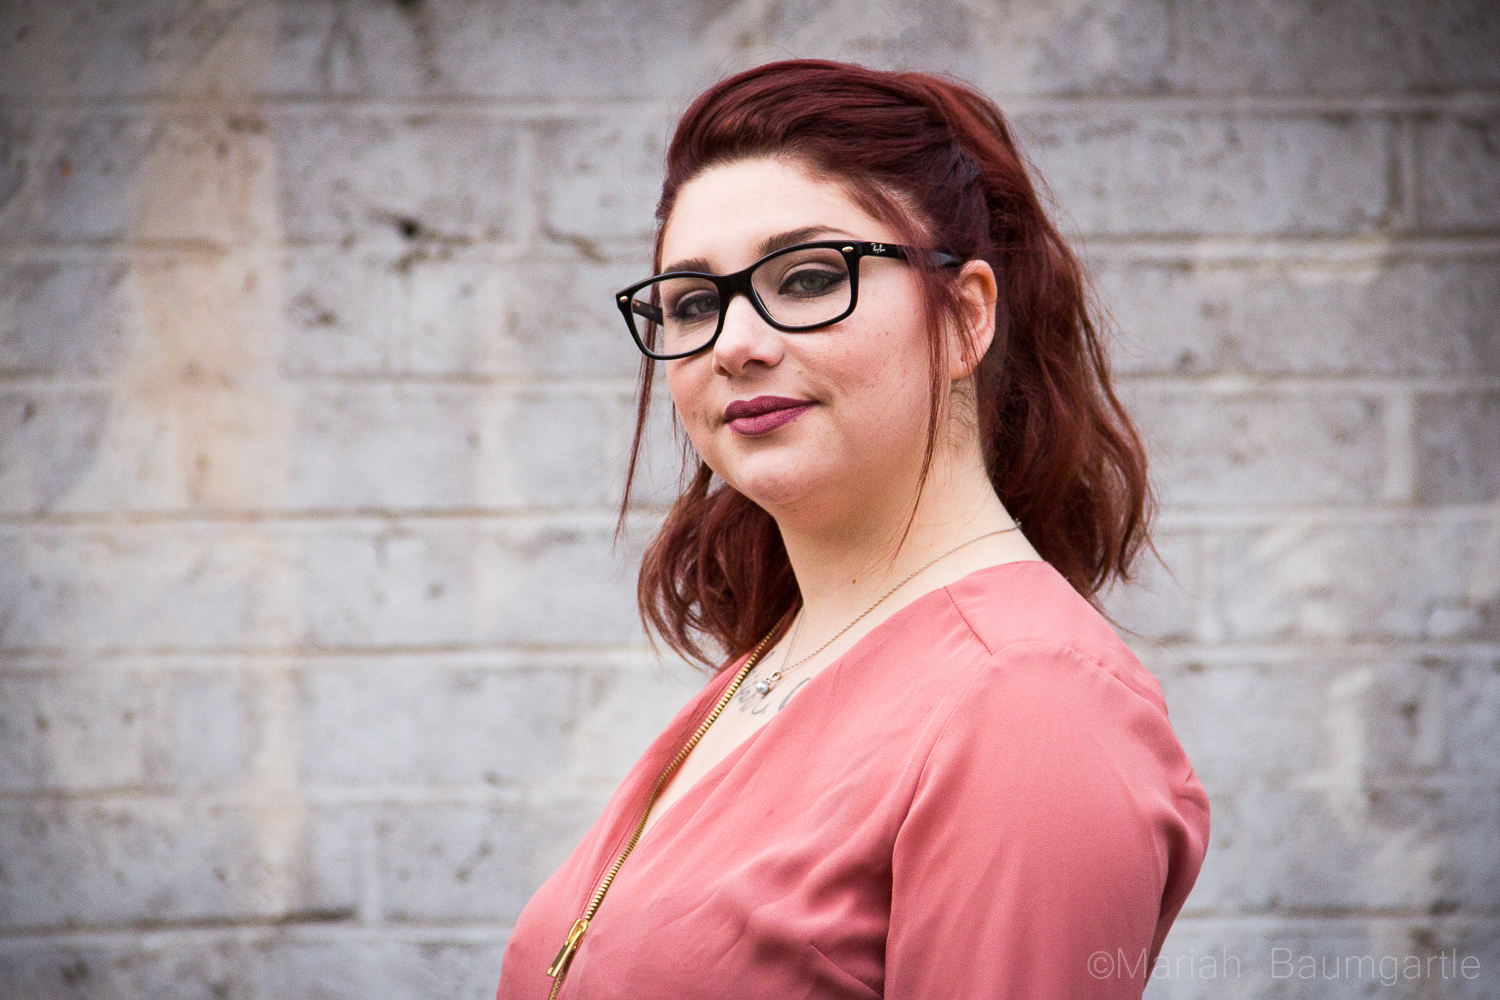
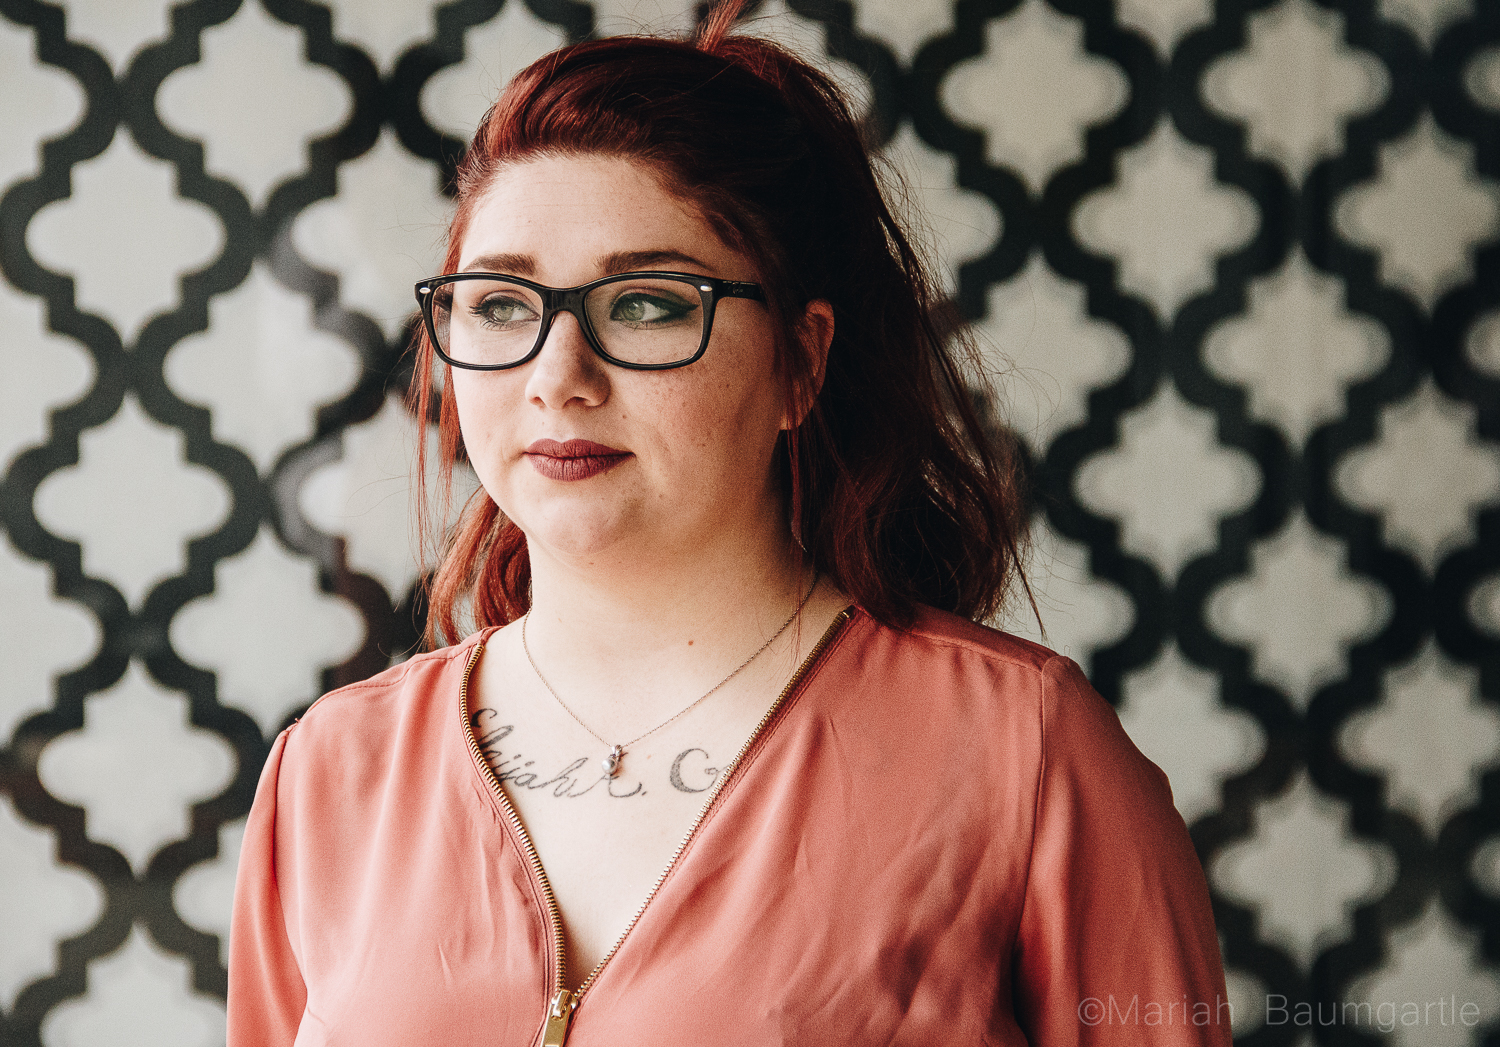
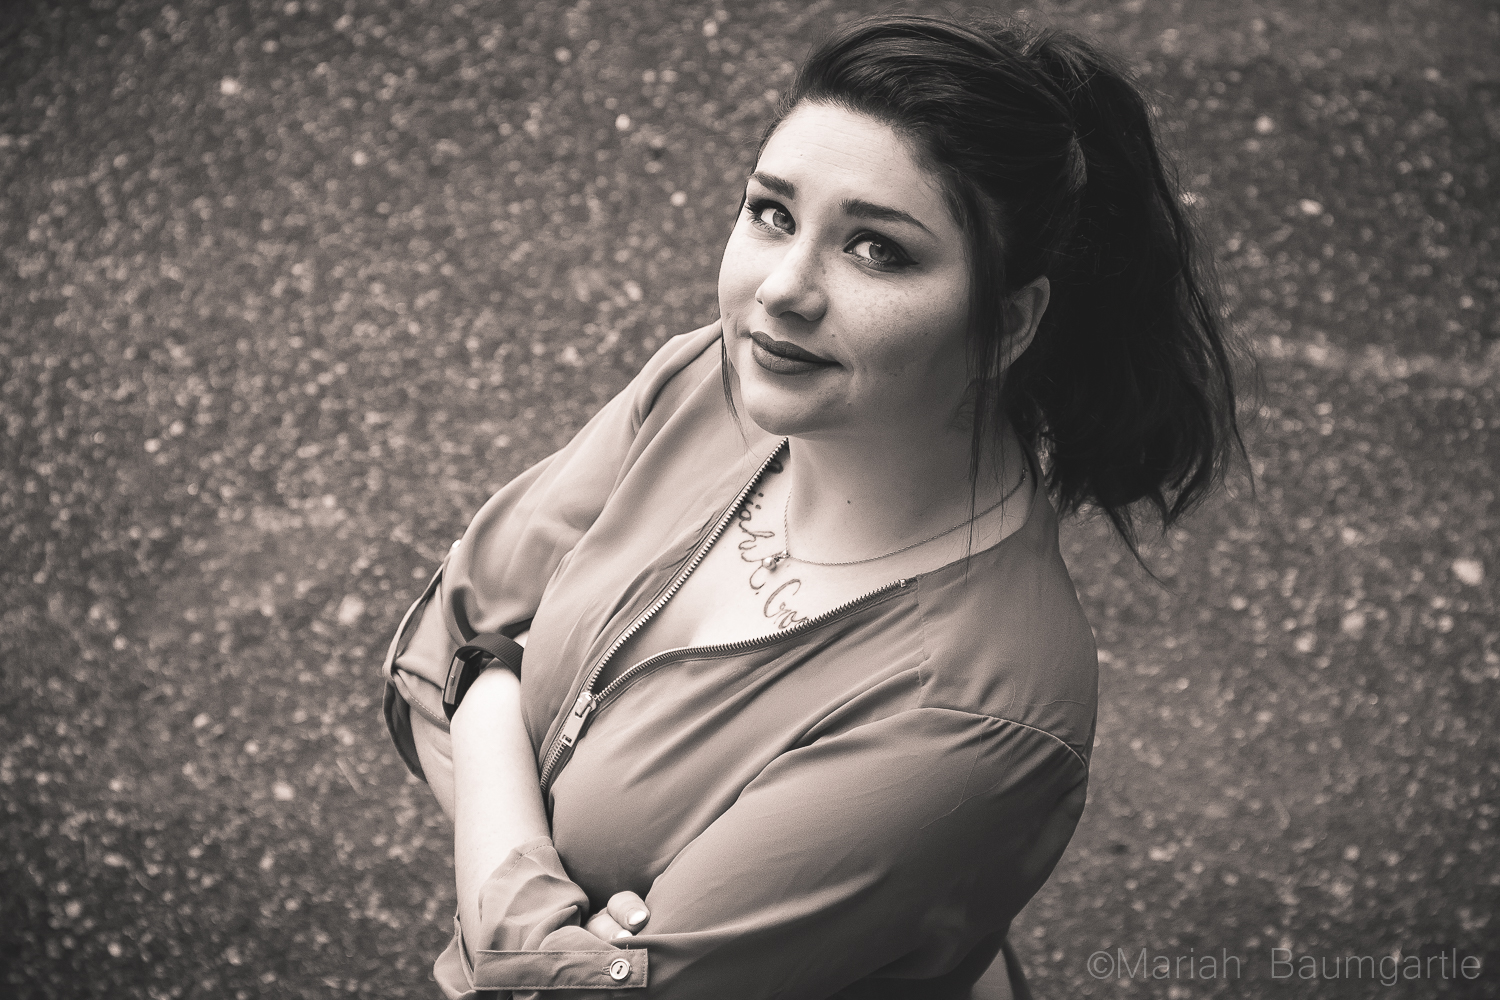
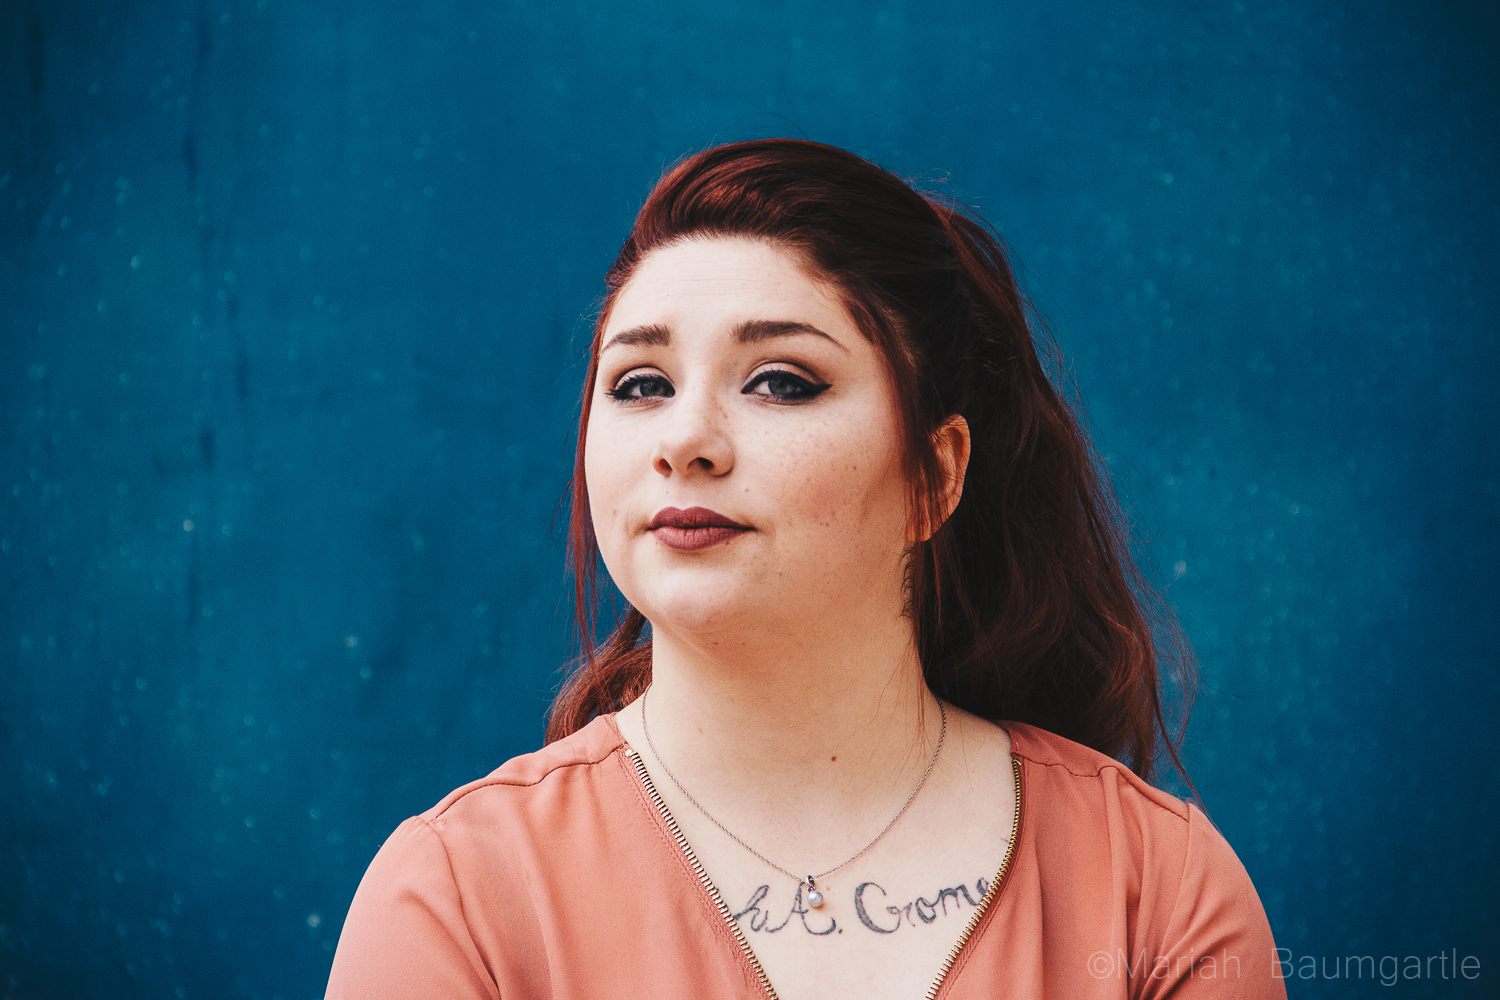
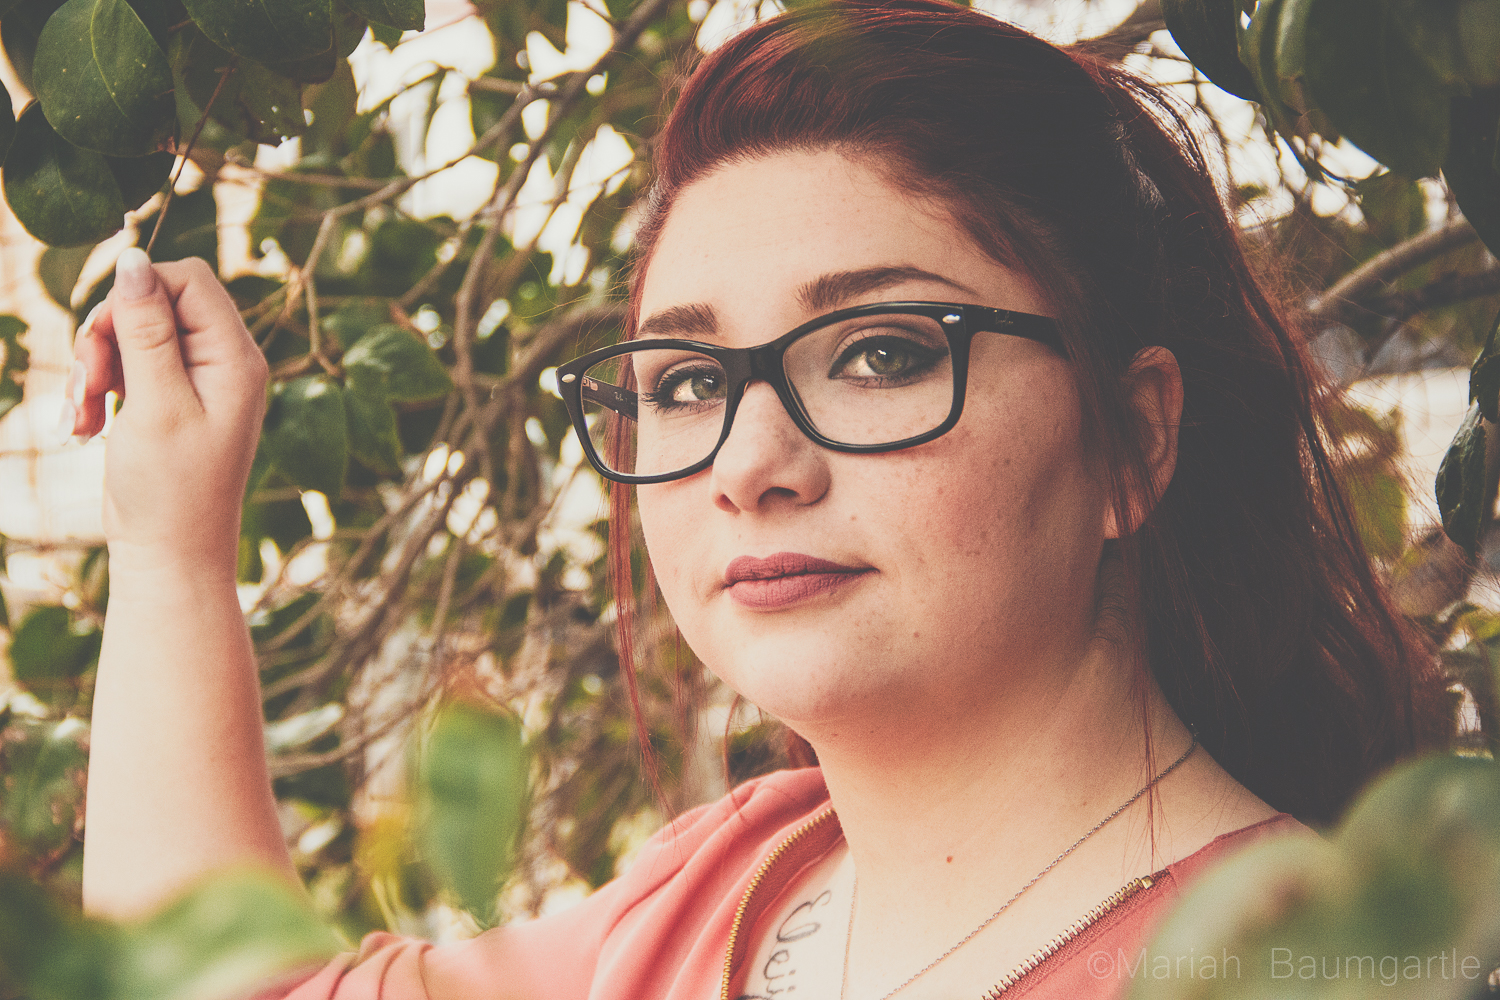
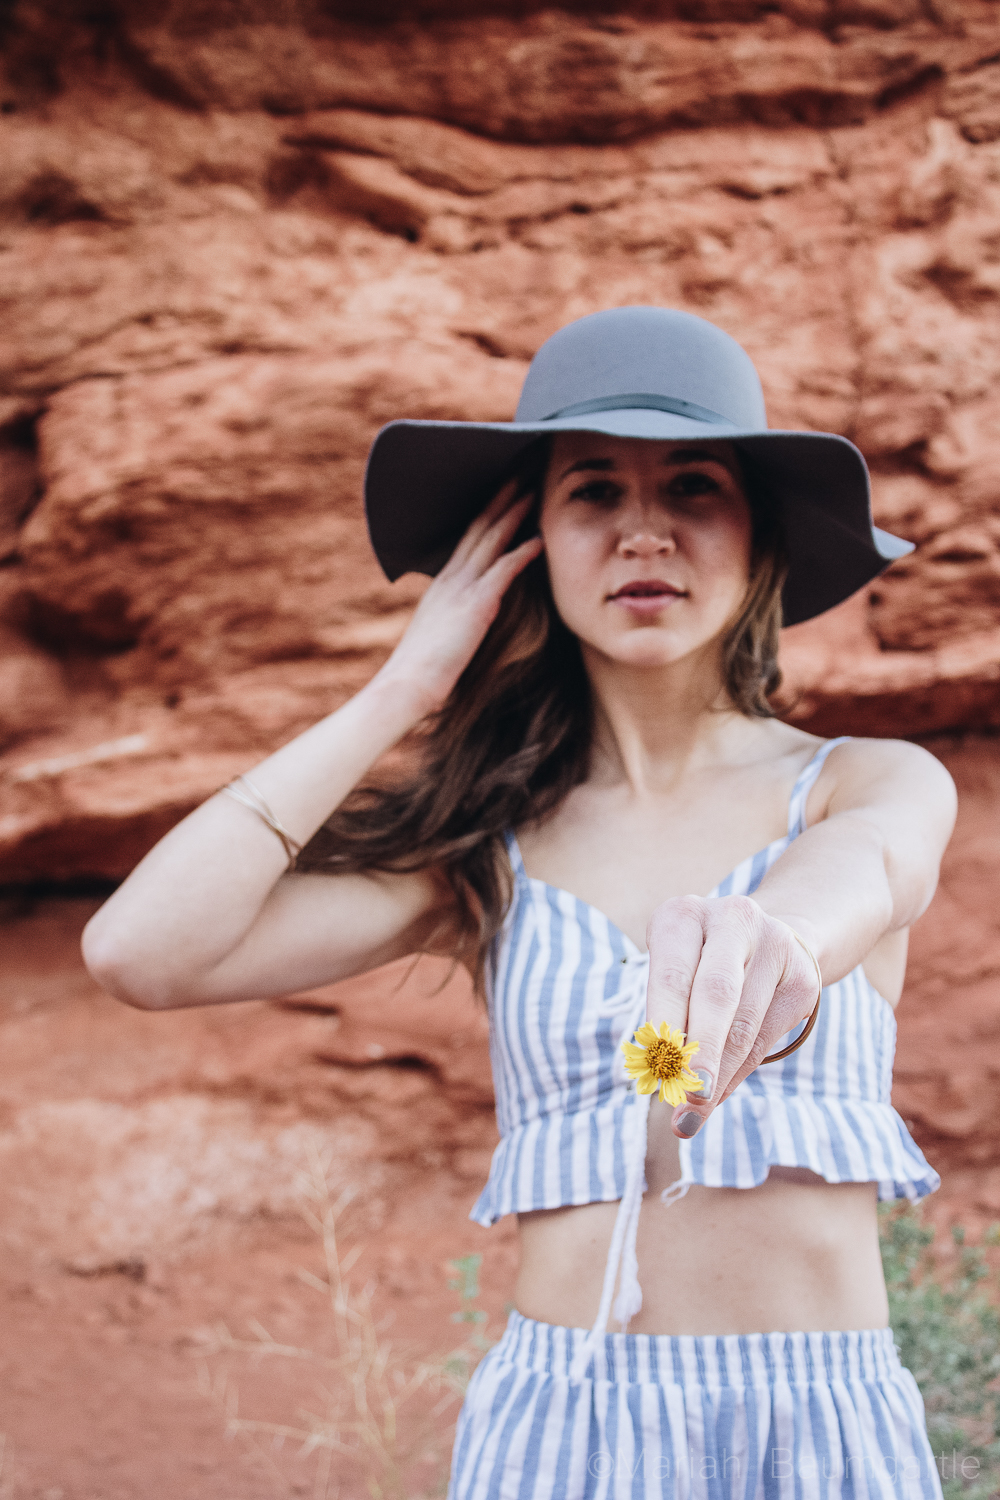
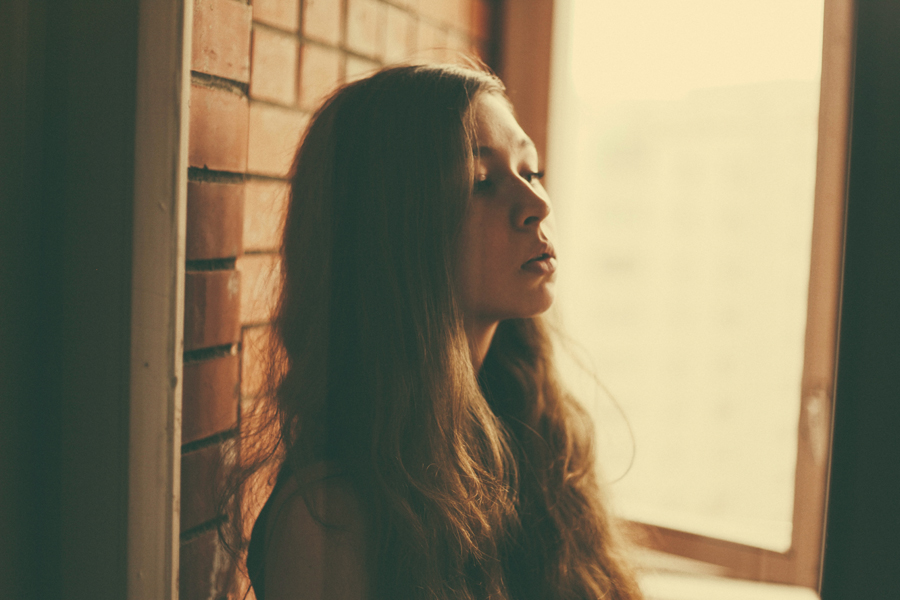
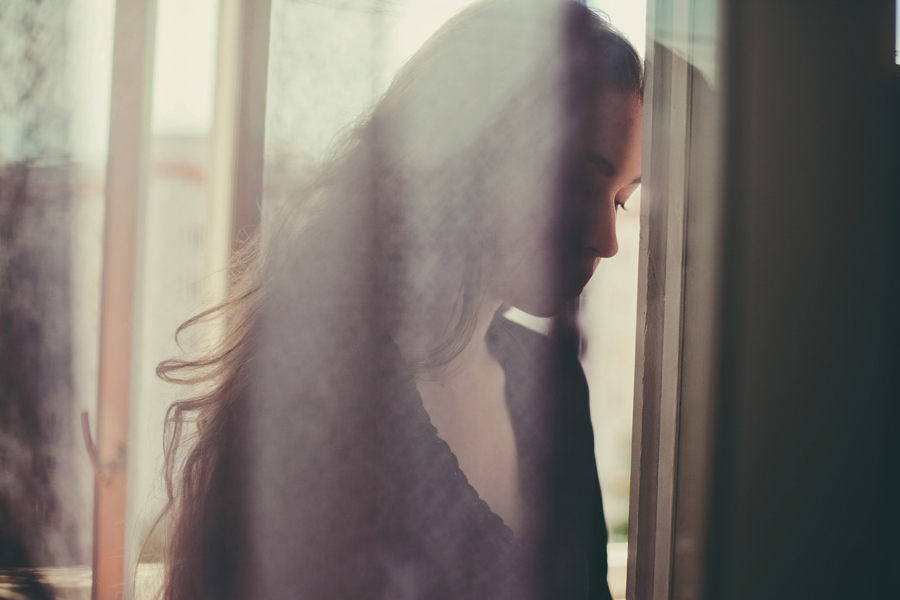
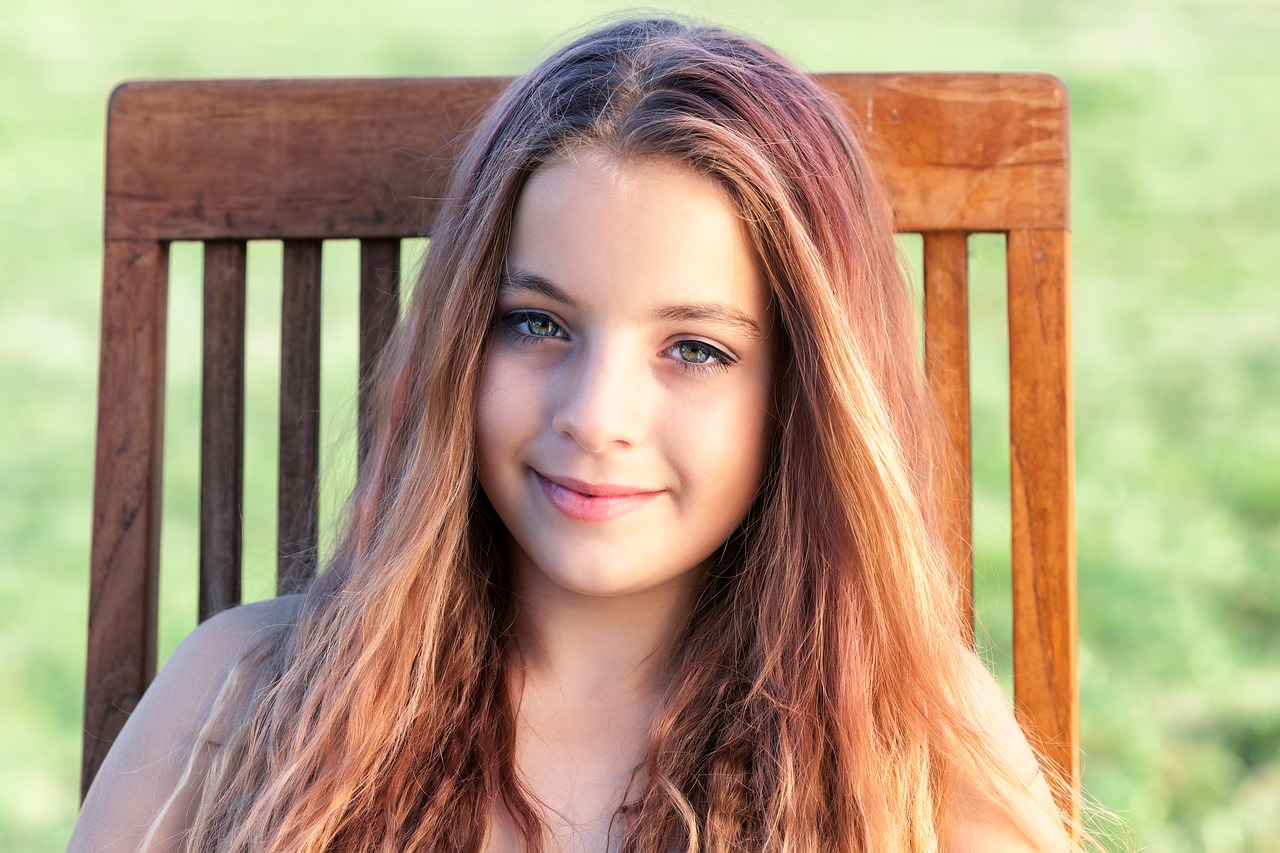
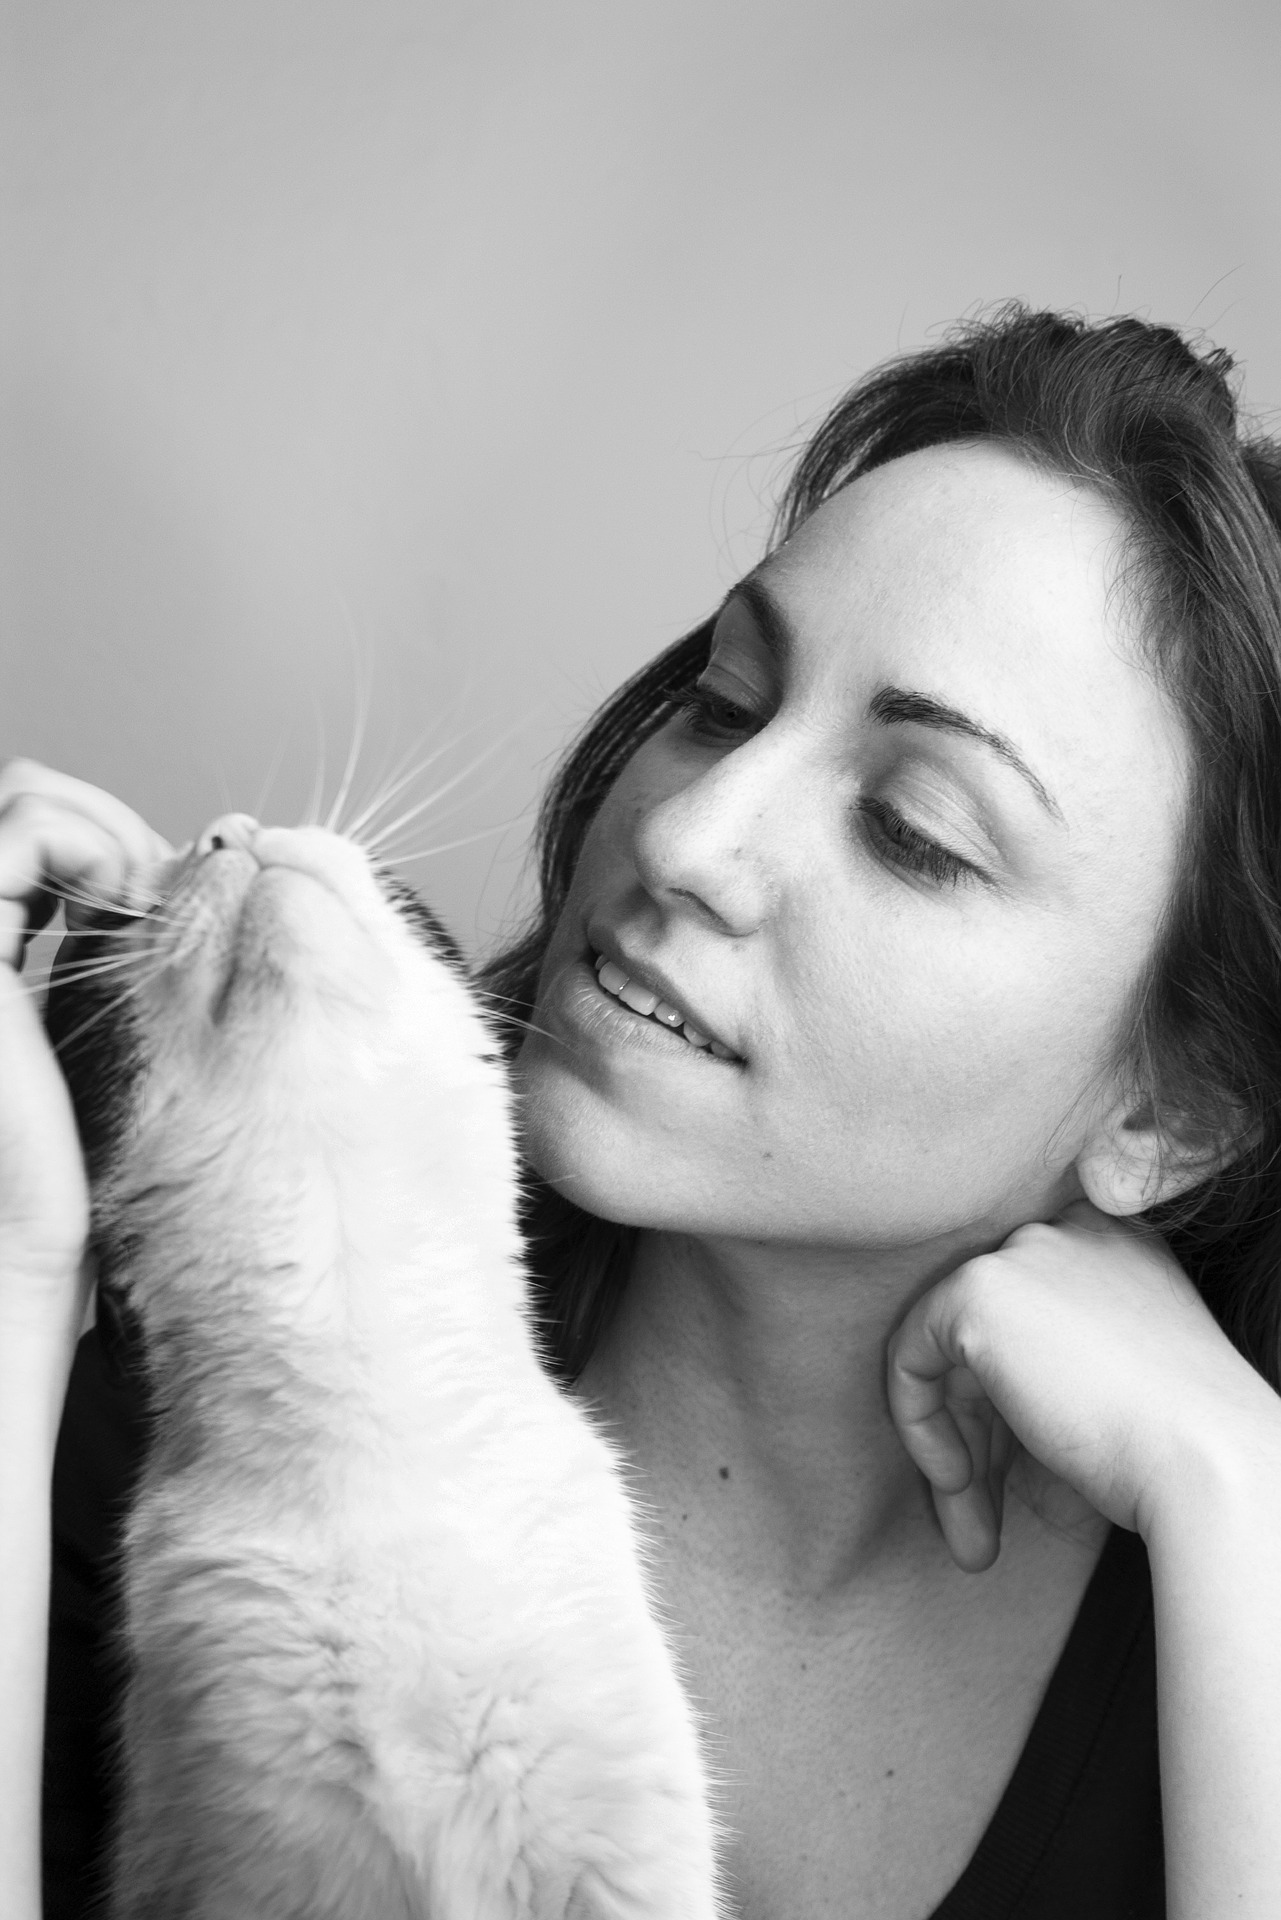
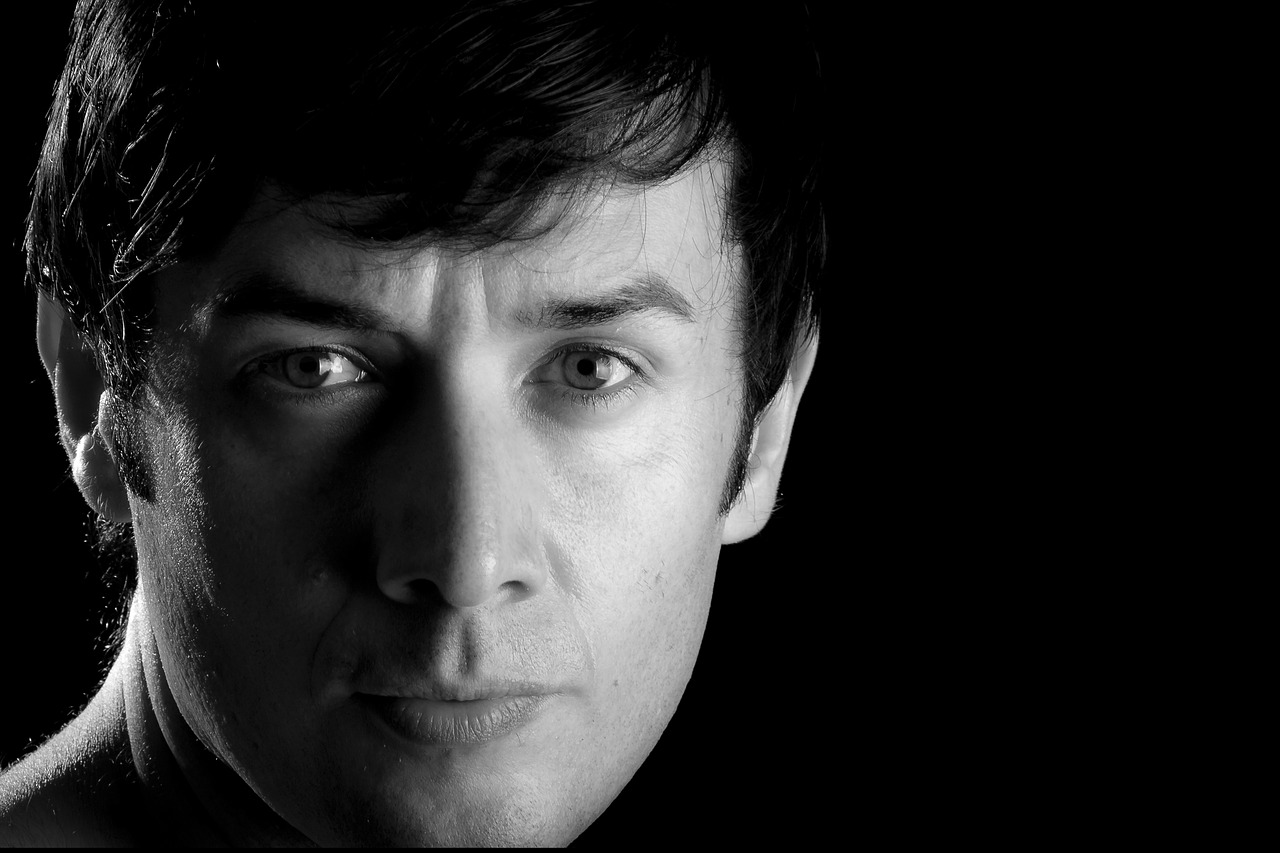
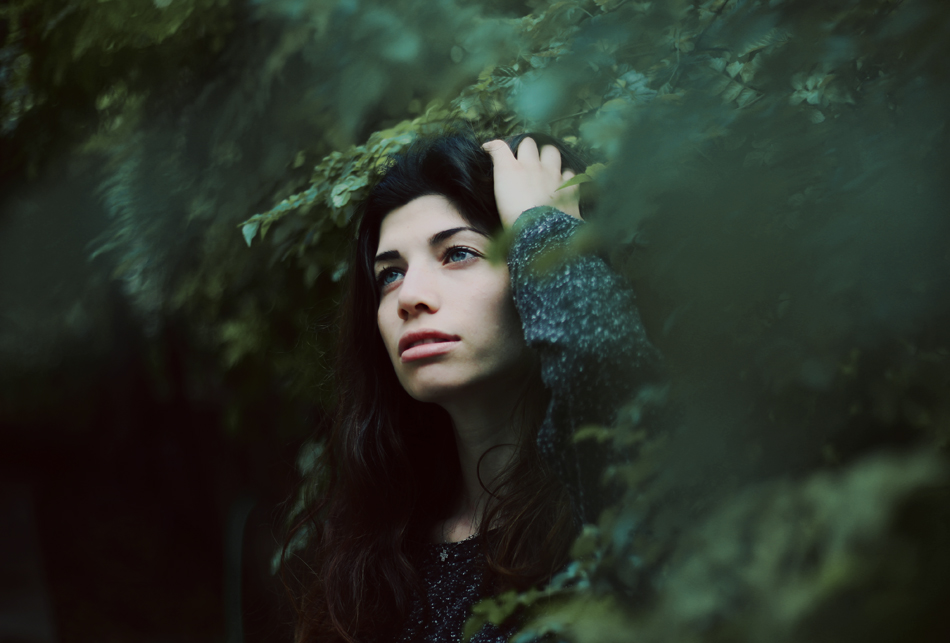
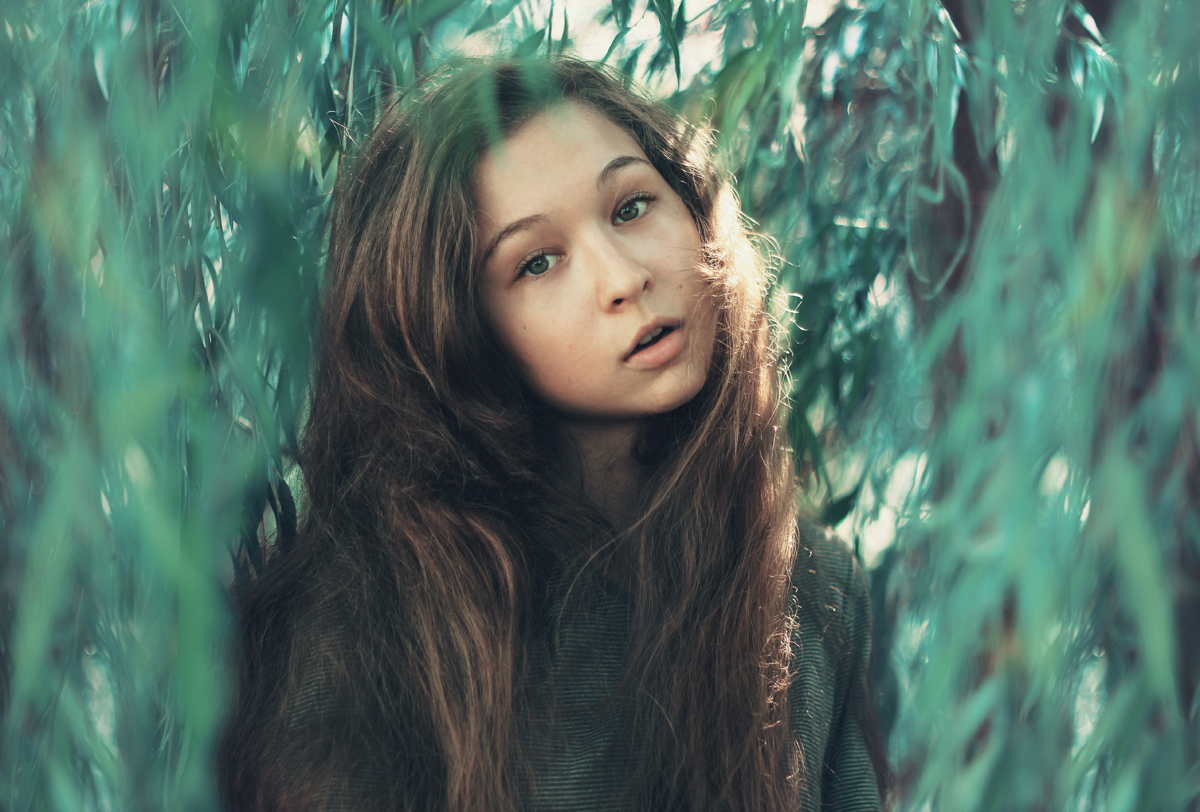
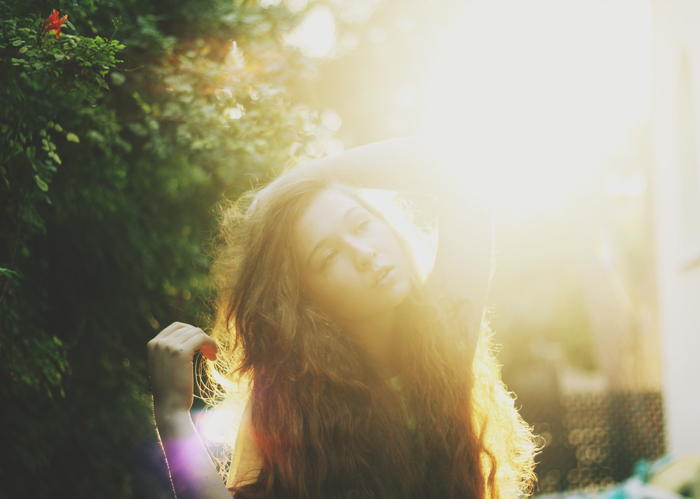
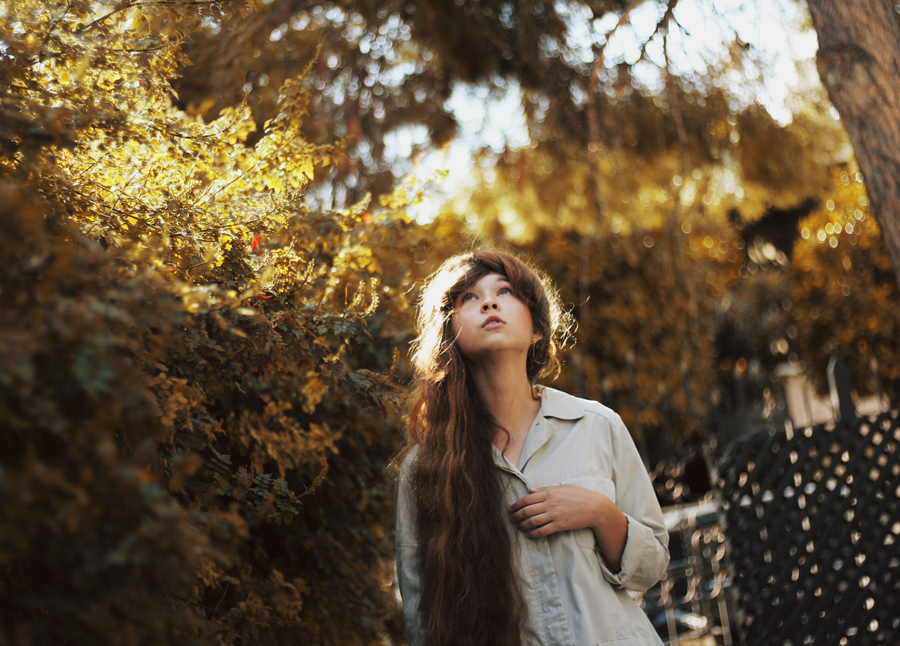
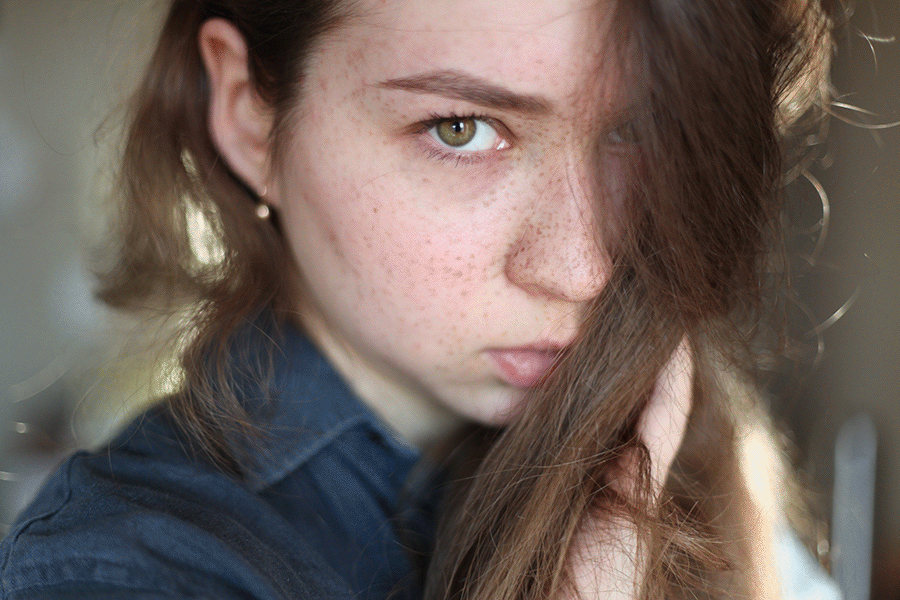
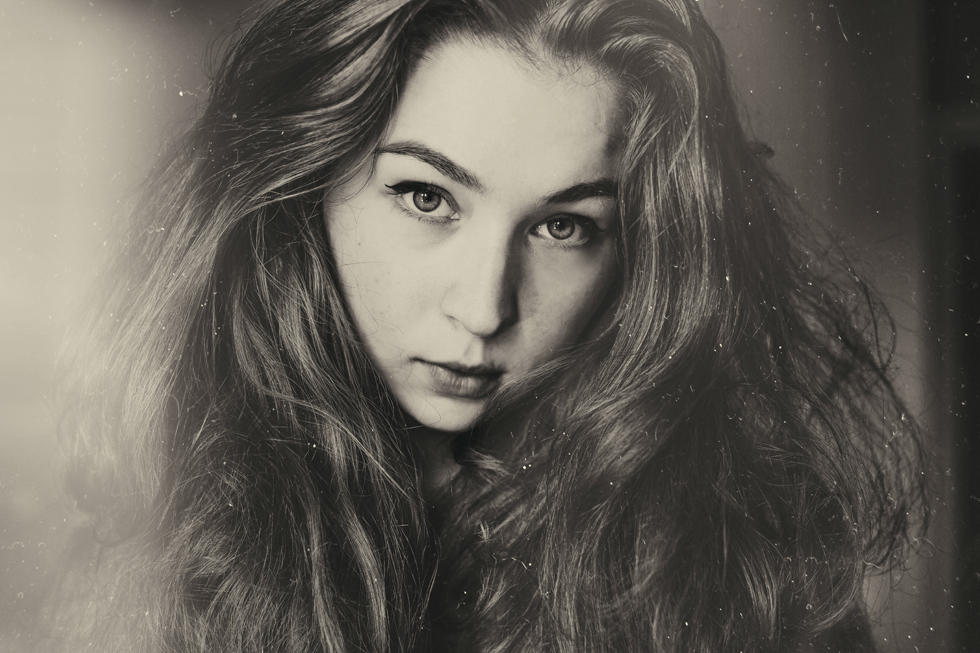
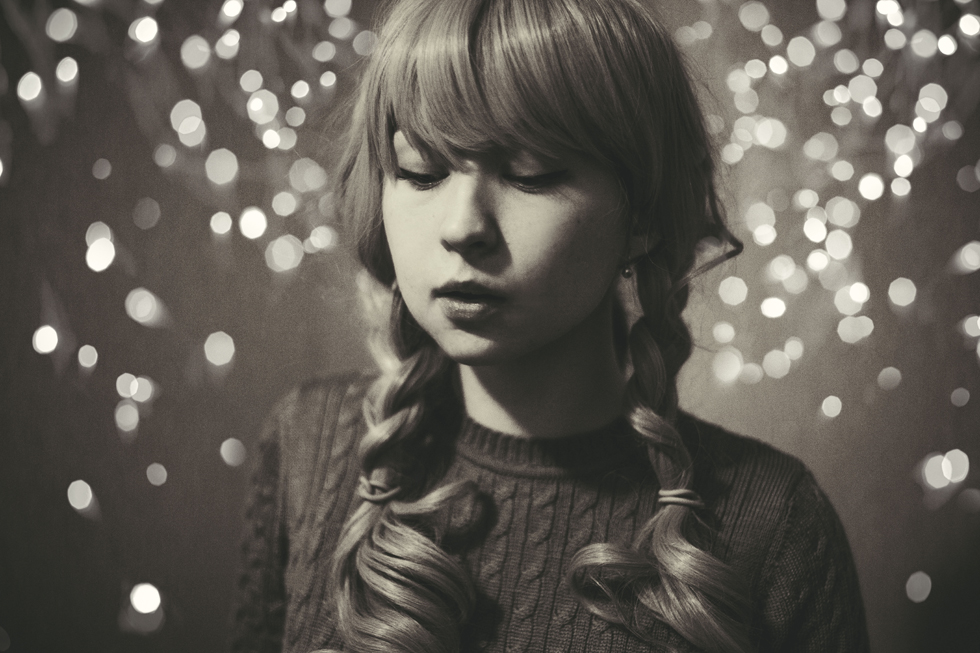
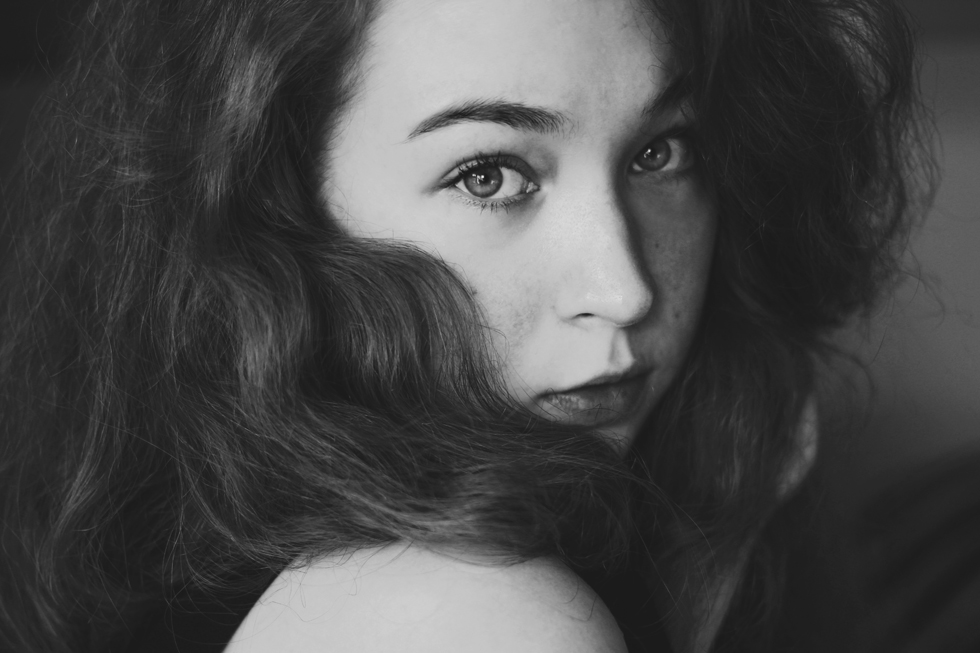
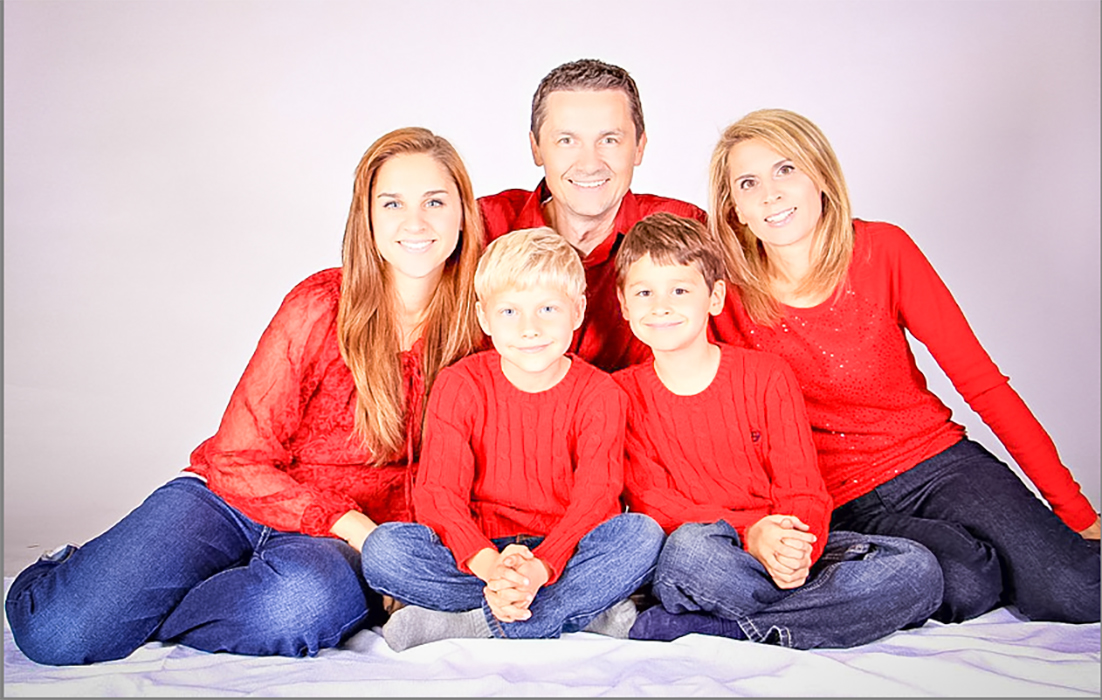
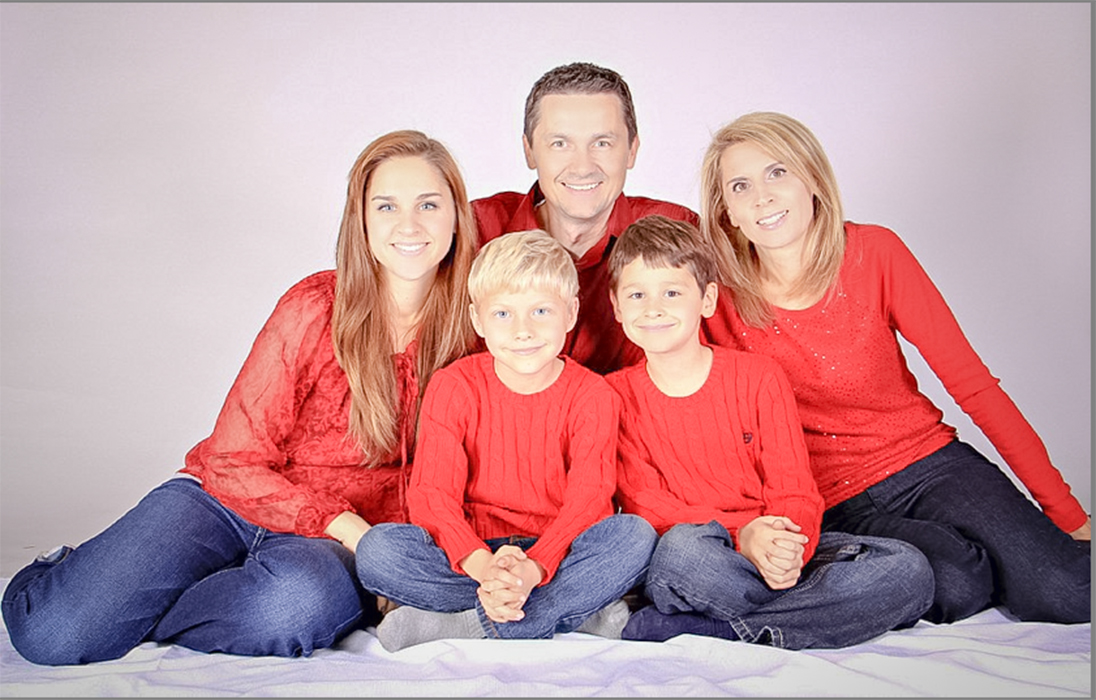
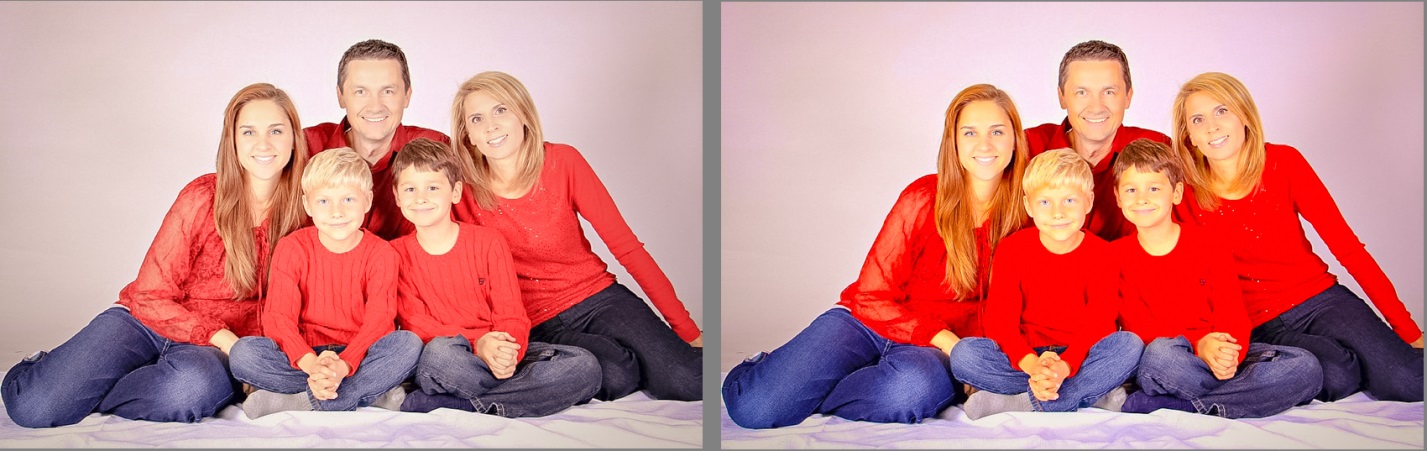
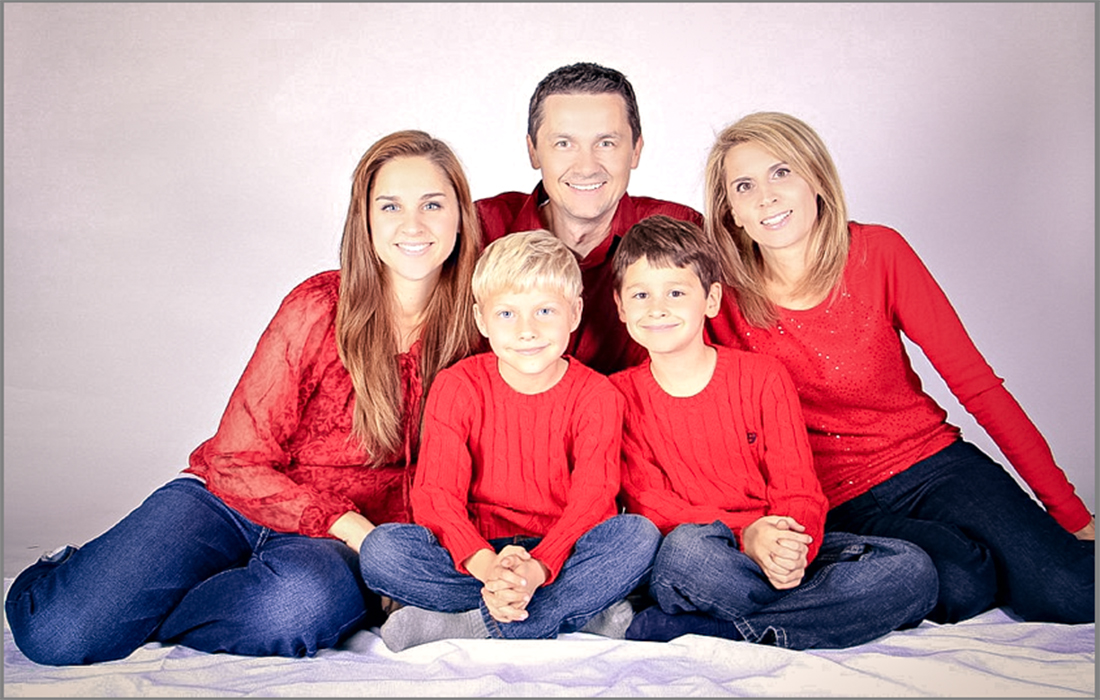
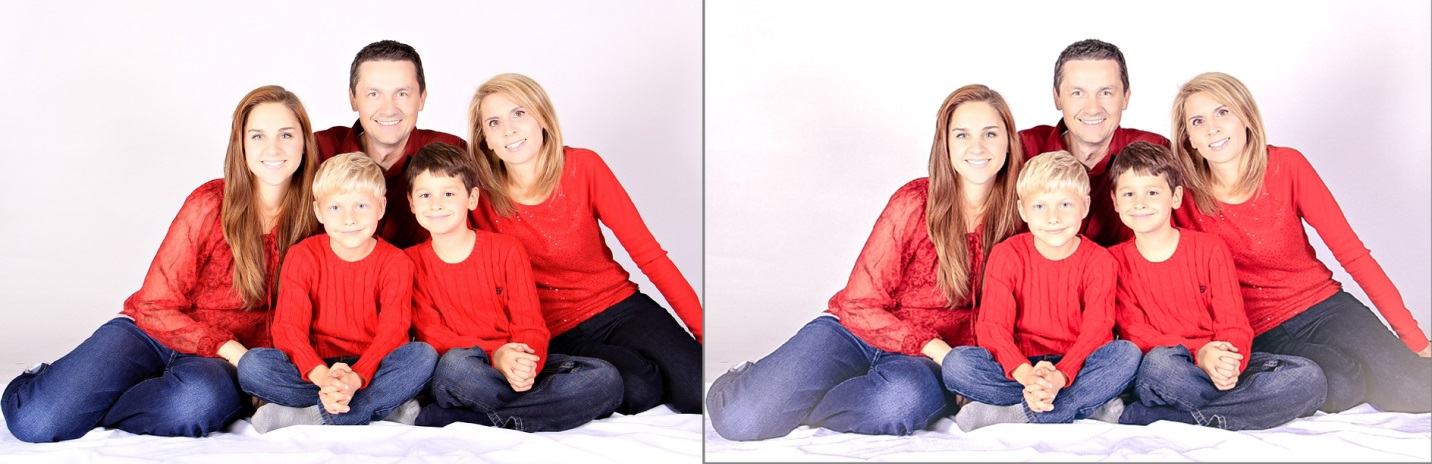
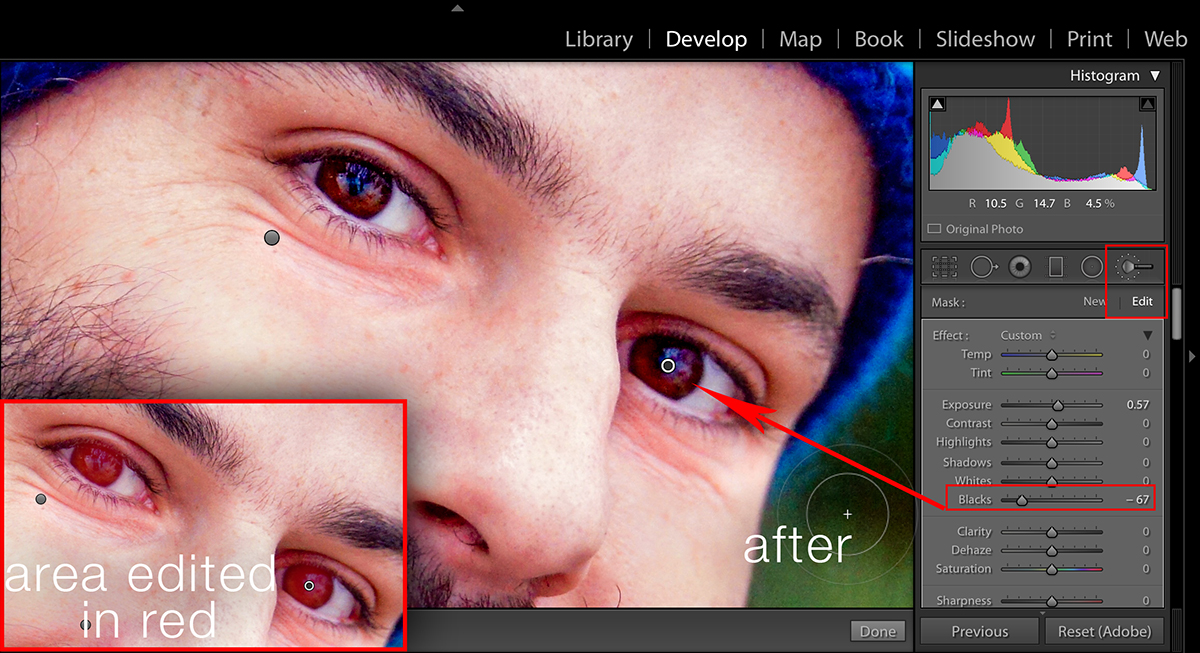
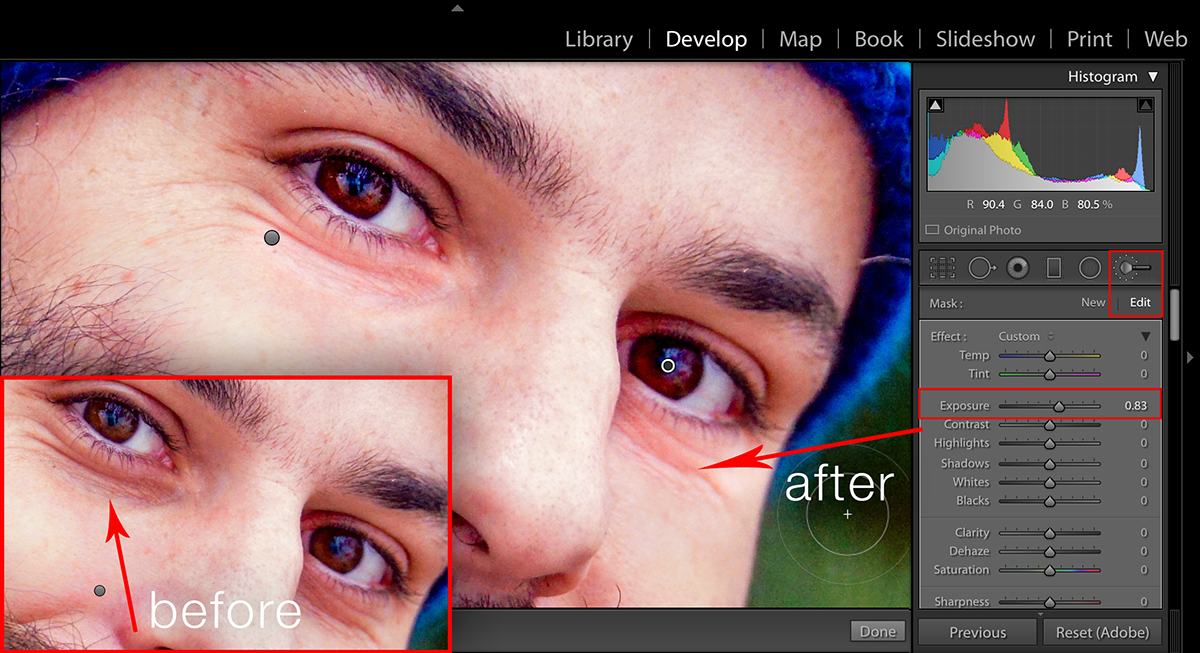
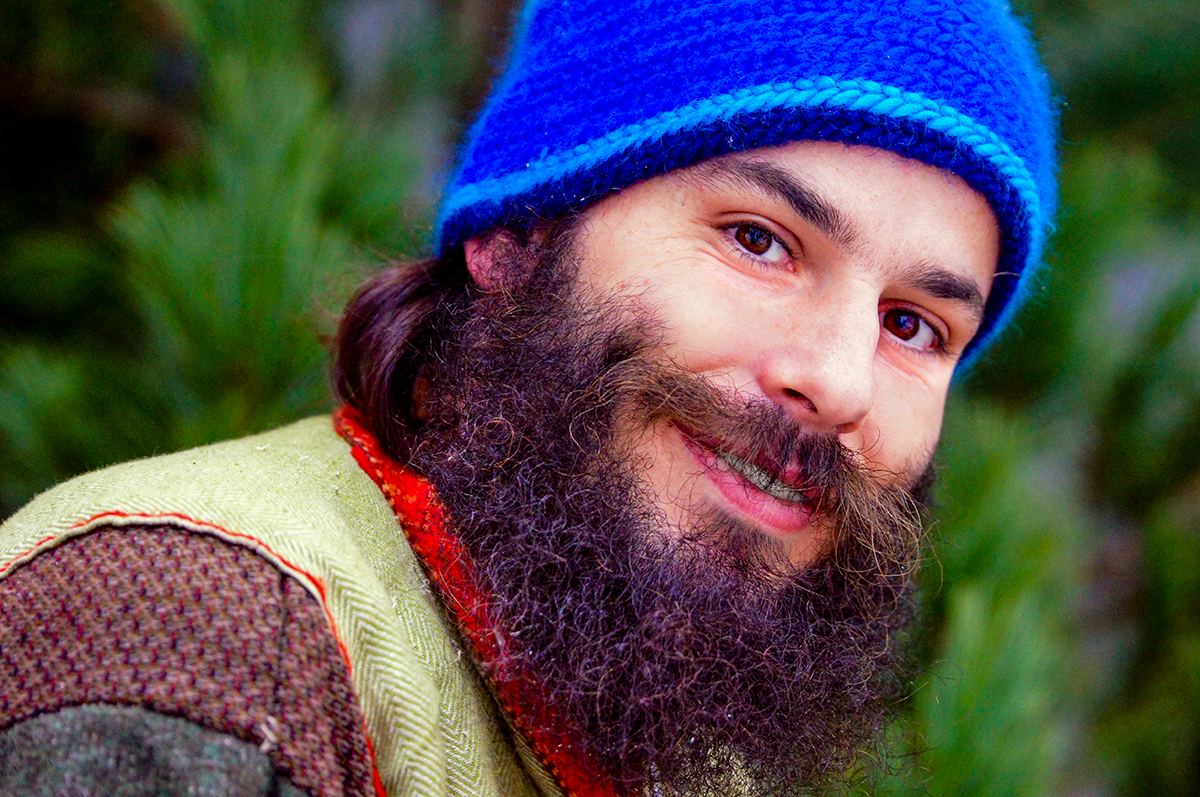
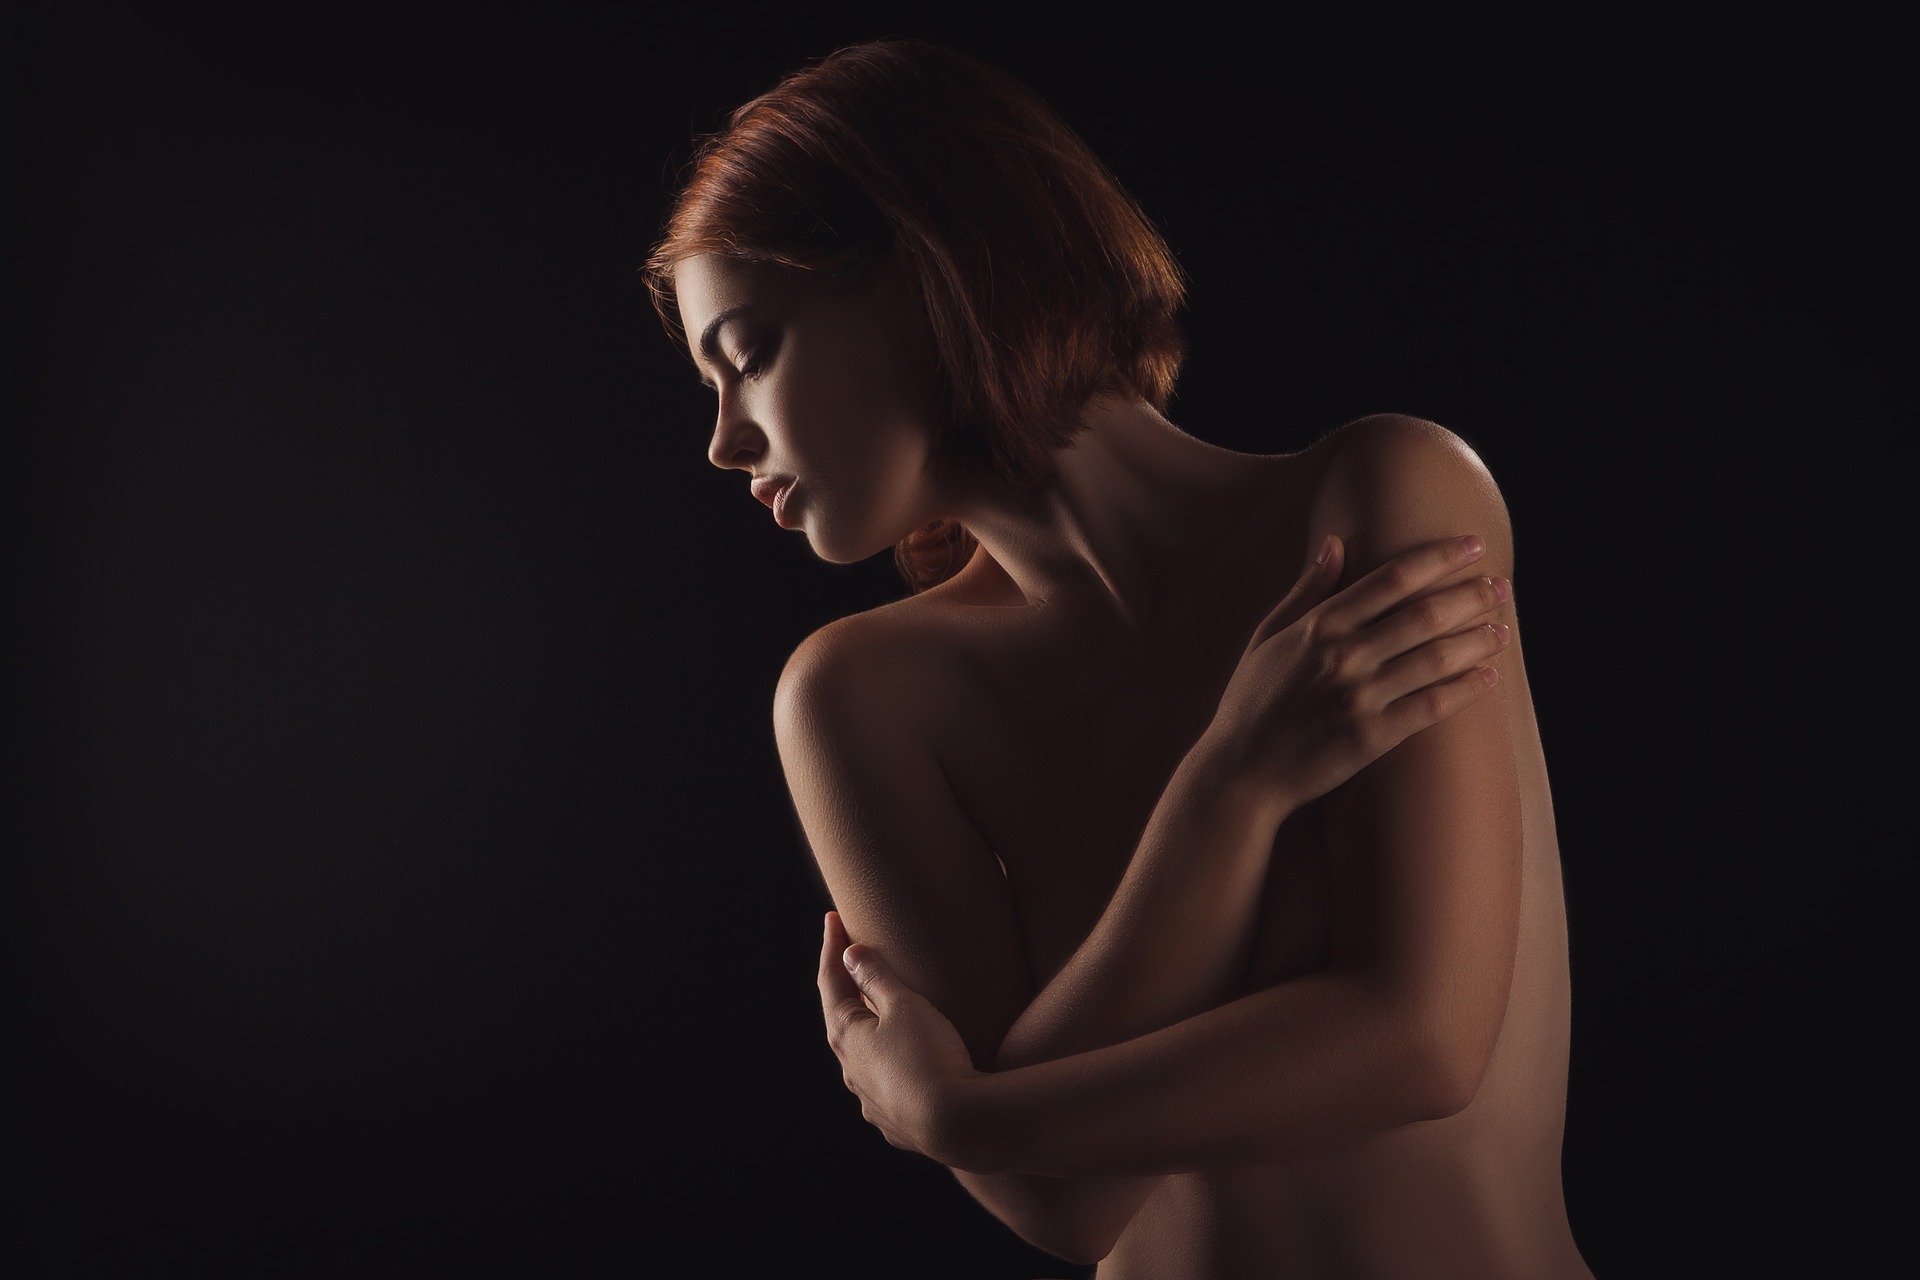
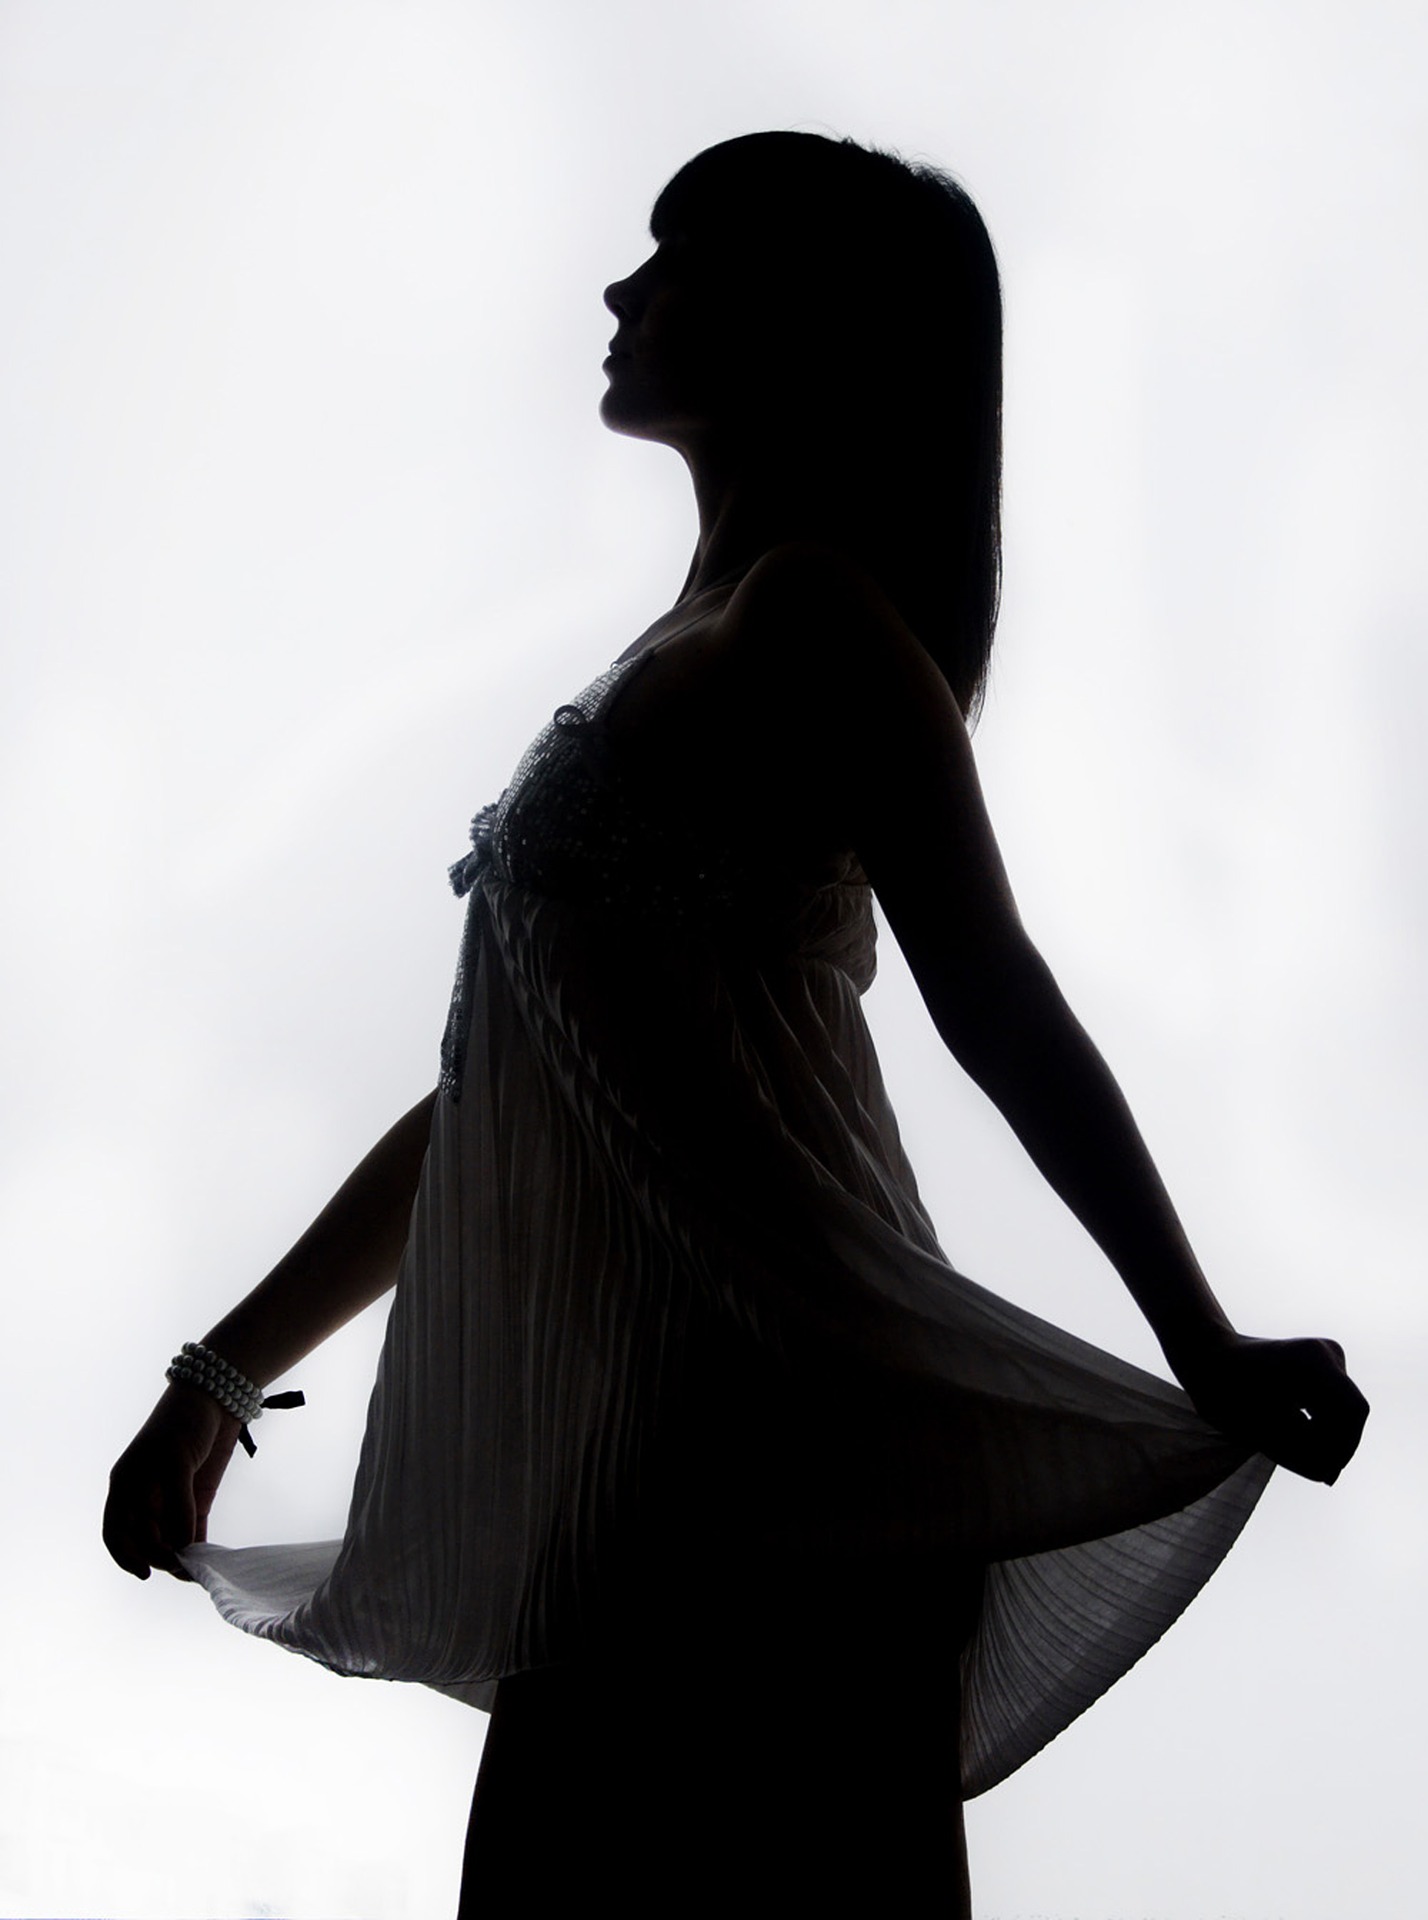
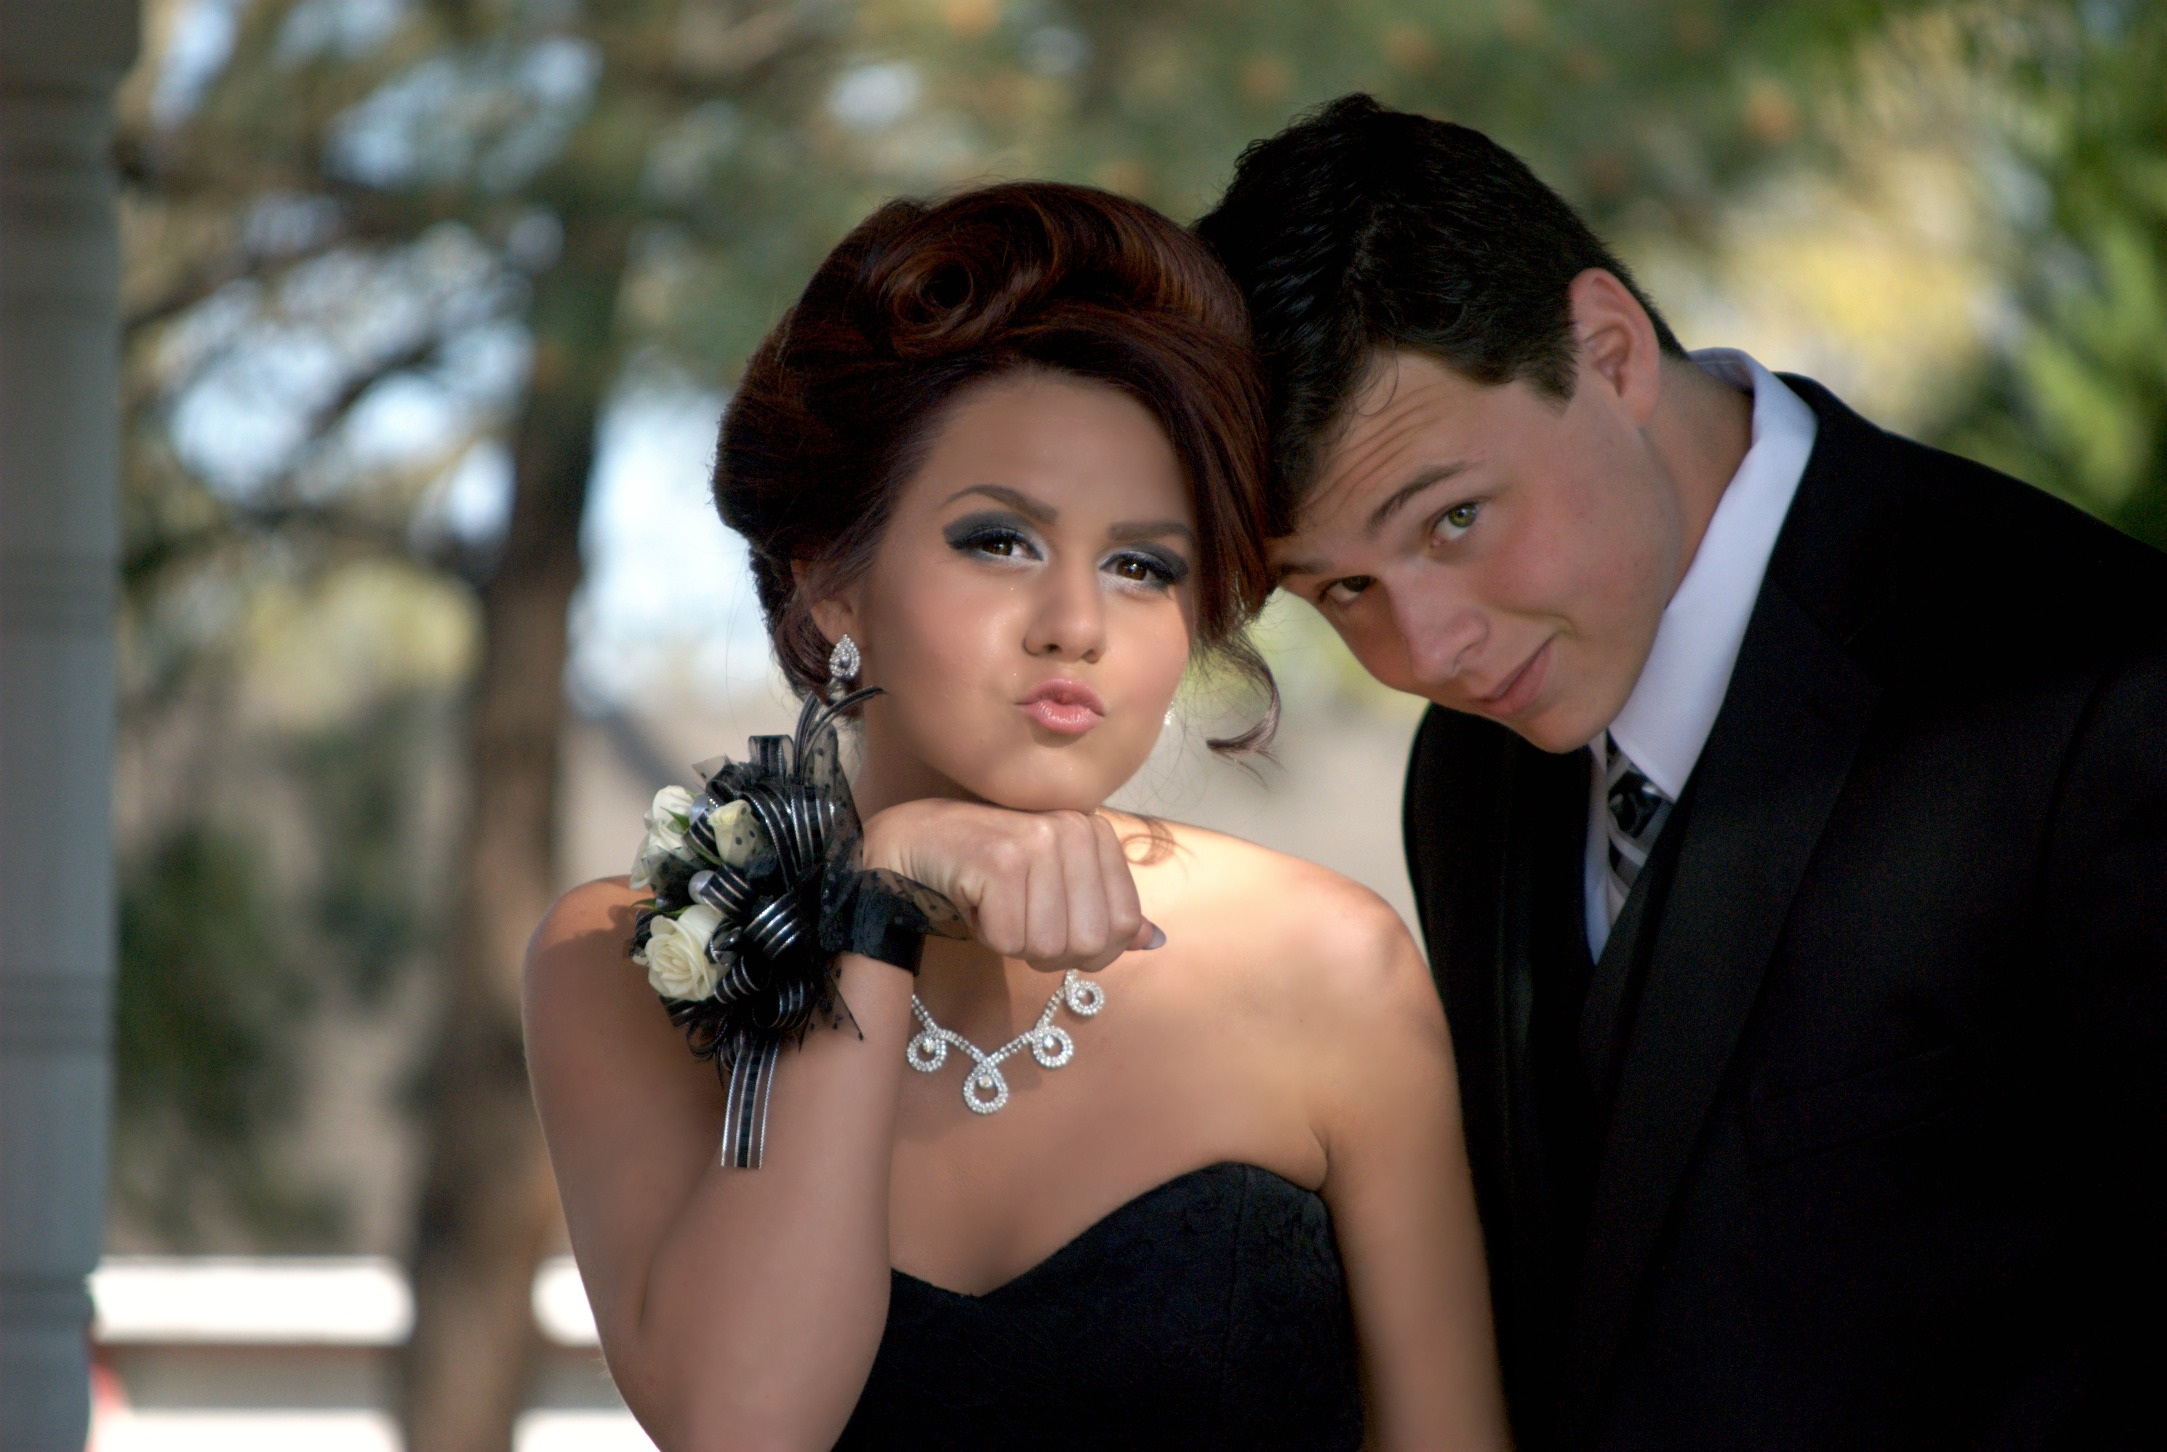
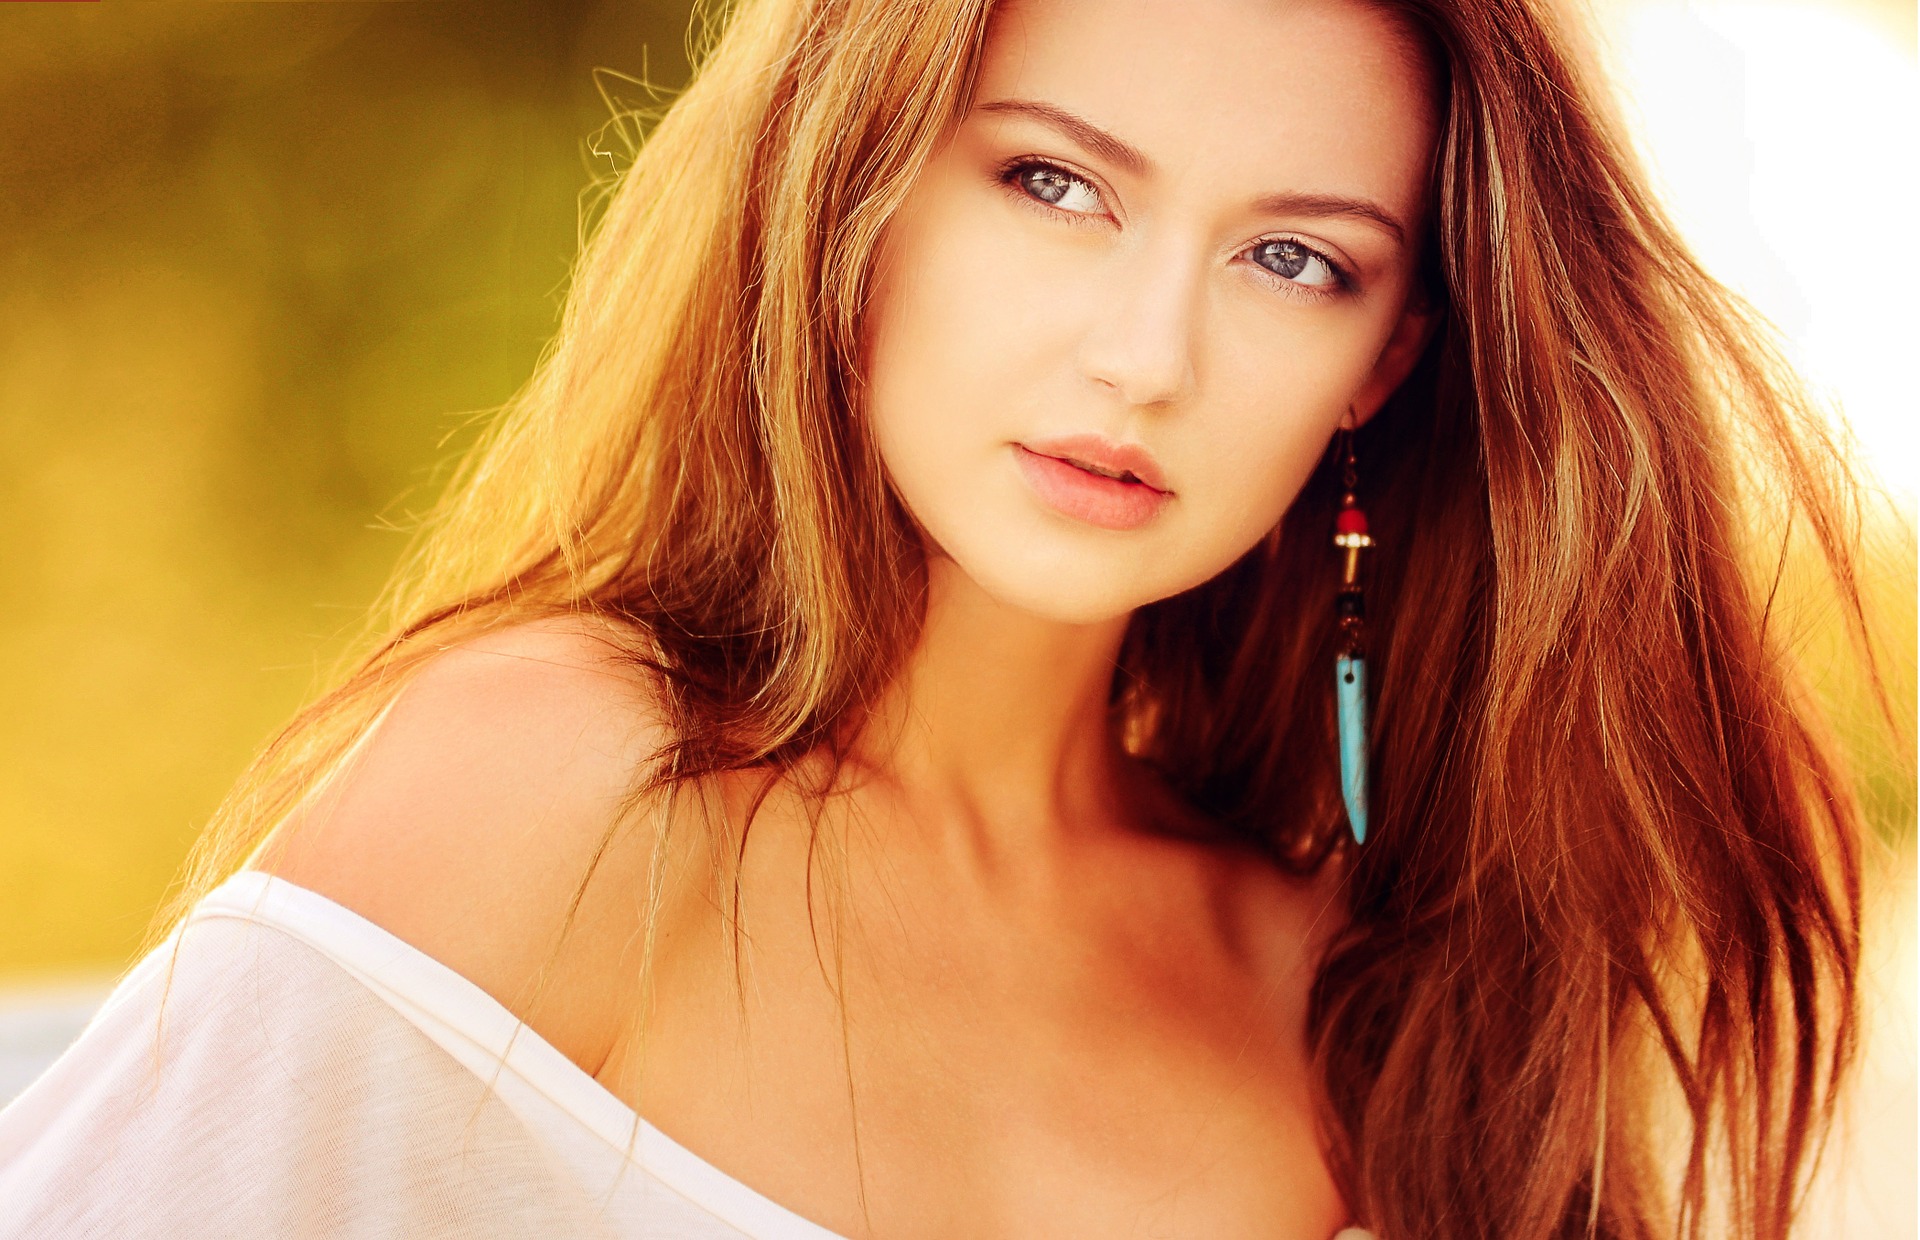
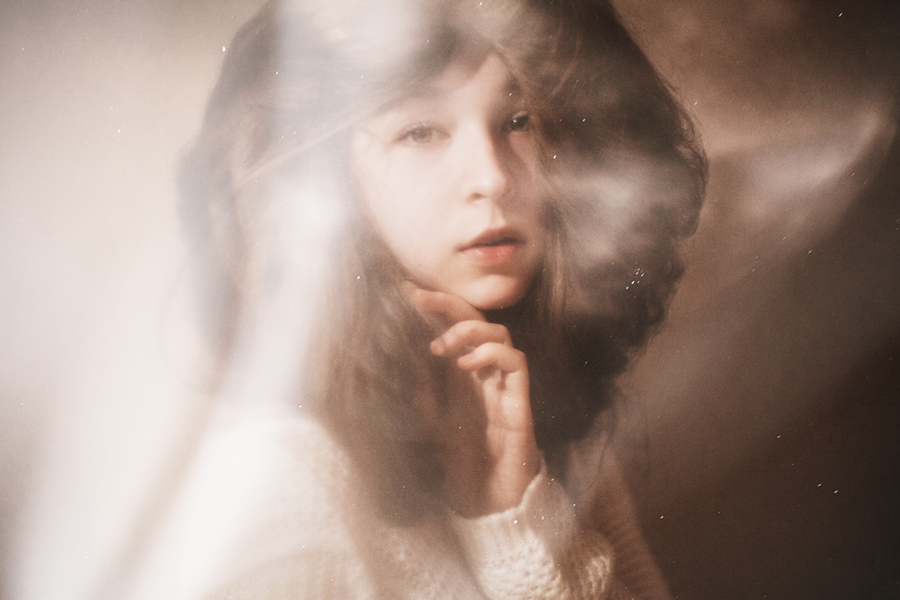
/ This portrait is a combination of cellophane, free textures, and a Lightroom preset.

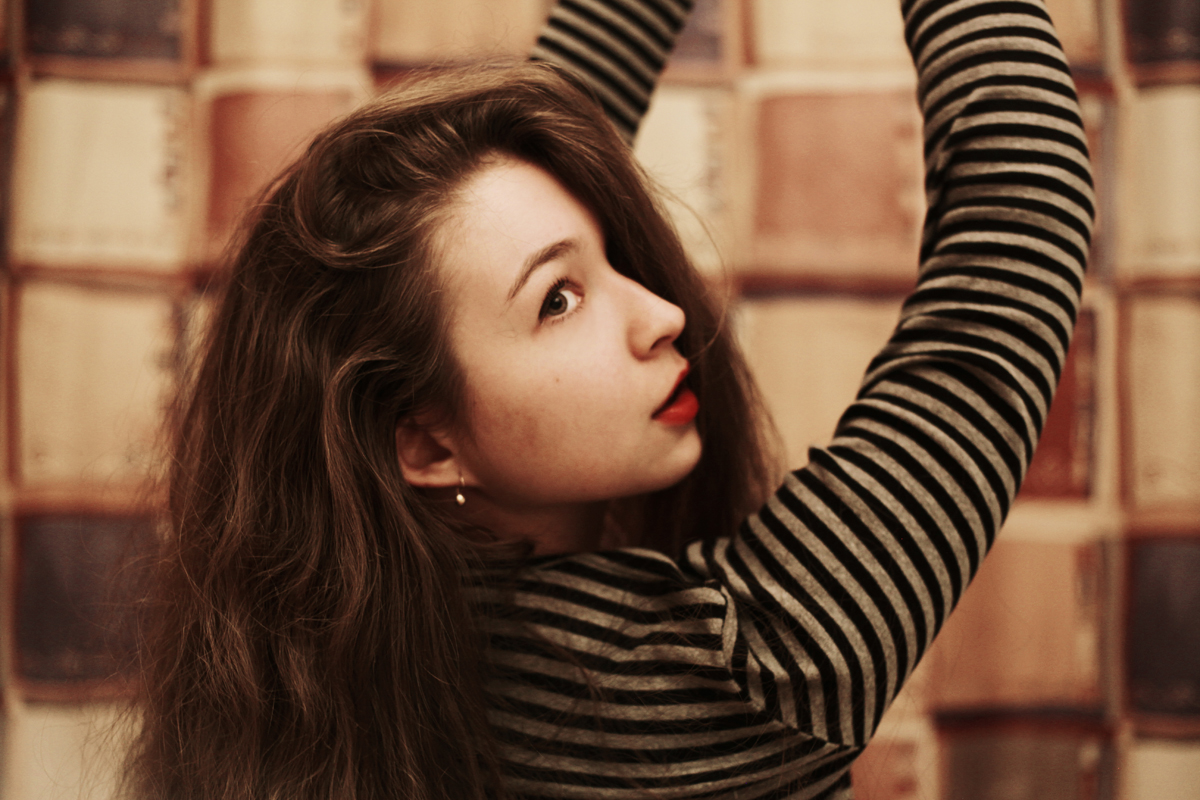
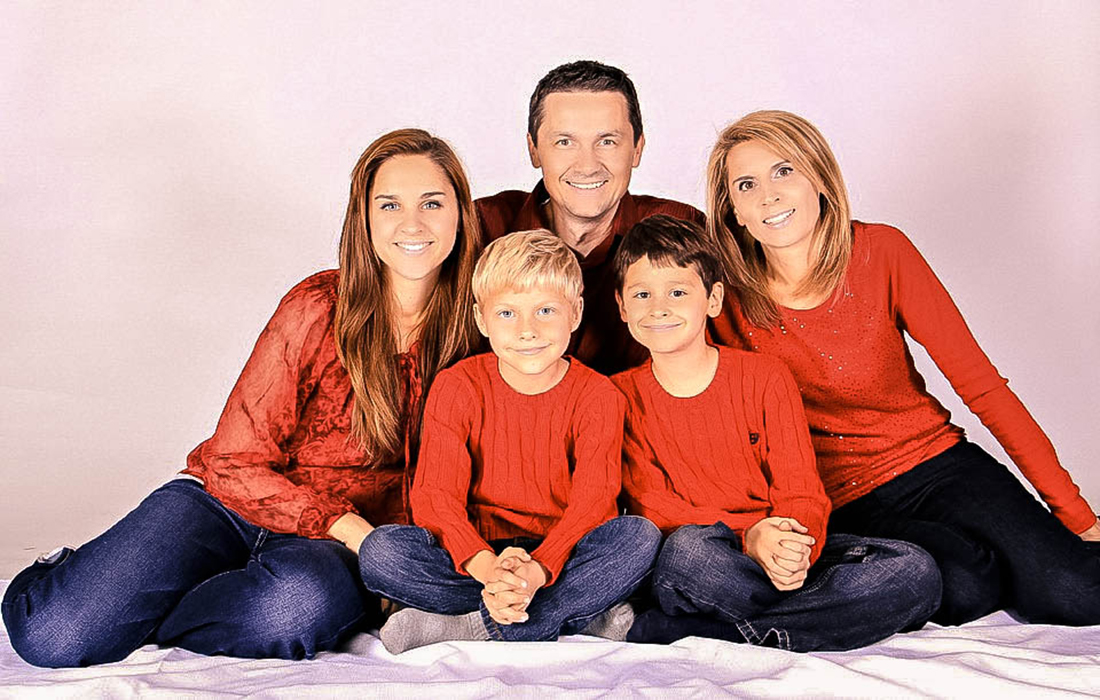
The beauty of cellophane is its unpredictability. For photographers who are interested in experimenting creatively, this is an exciting chance to grow and to learn new things. No matter what genre of photography you cherish most, use cellophane during one of your shoots. The results might surprise you, teach you new things, or show you a completely new way of looking at photography. Whatever happens, you will be closer to becoming a more experimental and open-minded photographer.

Happy shooting!

//

Using backlight to create ethereal portraits

You’ve probably come across dreamy-looking portraits, ones which possess a warm glow without appearing too harsh. It seems that the photographers behind these shots mysteriously conjured up the perfect light, creating a composition so striking that you can’t imagine recreating something equally beautiful. The secret, however, doesn’t lie in light that requires an elaborate spell – the key to taking great backlit portraits is the right kind of light and the ideal location to complement that light. Though this might sound like a tough (or vague) challenge, don’t be discouraged. If you find yourself visualizing photographs even when your camera isn’t nearby, mastering the art of backlit photography will come easily to you. Below are a few important basics to get you started:

Finding a great location

If you’d like to experiment with backlight, find a location where light roams freely. (Open spaces like fields are ideal for this.) If you live in a busy city filled with structures that block the sun, find a roof where you can safely photograph yourself or your subject. These locations will give you plenty of light to work with. (If you don’t have access to such places, shooting in front of a window on a sunny day will suffice.)
The backlight will light up not only your subject but everything surrounding your model. This is why shooting backlit portraits in a field of flowers, for example, will yield breathtaking results. If you’re shooting in a more urban location, add your own flowers and plants to enhance the composition. Challenge your imagination. When surrounded by objects which are beautifully lit, your subject will glow all the more. Furthermore, such small decorations will make the overall composition absolutely stunning.

//

//

The benefits of shooting during golden hour

Before we get into the best ways to position a camera for backlit photography, let’s focus on every portrait photographer’s favorite time of day: golden hour. The magic hour comes into being shortly after sunrise or before sunset. This is a time when the light is, as most people agree, at its best. Everything takes on a soft and warm glow during the golden hour, creating an almost nostalgic feeling wherever you look. If you’re an absolute beginner, experimenting in an open space during golden hour will inevitably provide you with the best possible lighting conditions for a successful shoot. For expert photographers, shooting in all kinds of spaces during the magic hour will add a pleasant touch of warmth to their work. If you’d like to learn more about the golden hour, read this article.

Choosing the best time to shoot

To make the most of a backlit shot, you must control the amount of light that enters your lens. Direct sunlight will ruin your shot, while completely blocking it by placing an obstacle in front of it will make your results very dark (unless you’re shooting silhouettes, this method won’t work.) For visually appealing results, make sure light enters your lens from one side. This will create a pleasant light leak which will not only brighten your composition but add a beautiful texture to it.

//

Unlike golden hour, a backlight is rarely available in limited quantities. It can be found even on overcast days when soft light is present. If you find the light is too dull on a day when the weather conditions aren’t ideal, use a reflector; this will significantly enhance any available light and make your subject’s face stand out in a flattering way. If you don’t own a professional reflector, it’s very likely that you can find one in your home: a mirror, a white sheet of paper, kitchen foil, or a Tupperware lid.

Experiment persistently

Most importantly, experiment. Break the rules: create dark silhouettes, work with overexposed shots, and photograph whatever you desire during the magical hour. Enjoy the warmth of golden hour and the softness of duller days. If portrait photography is your niche, experiment with other genres using the same methods. Try out taking photos of flowers, buildings, and objects. Broaden your creative horizons. This will be very evident in your results; additionally, it will transform you into a better photographer and observer of the world.
Whatever you do, don’t stop shooting, and you will thrive in the most surprising of ways. Just remember to embrace spontaneity, listen to your imagination (no matter how bizarre it may seem at times), and find potential in seemingly insignificant details.

Happy shooting!

//

//

The Stories Behind Funny Outtakes: Spontaneity at its Best

We’ve all taken laughable images before. From being photobombed to tripping over unexpected objects, we’ve made ourselves (or our subjects) look silly in front of the camera. While photography is an amazing opportunity to find refuge and acceptance, it’s also a great chance to humble yourself and find joy in the smallest of situations.

I’ve accumulated an abundance of hilarious photographs over the years, some of which can be viewed below. Every shot is accompanied by a short explanation and behind-the-scenes story. I hope these images bring a smile to your face. Have a wonderful, wonderful day and don’t forget to laugh. 🙂

When others spot you

Self-portraiture plays a significant part in my creative life. The wonderful places I scout are often well-known tourist locations, though it seems that my camera has the power to attract unexpected visitors even to the emptiest of places. There have been many times when I’ve had to face an inquisitive neighbor or attempt to look casual next to a group of passing tourists. Though the act of taking self-portraits (or photos in general) is nothing to be embarrassed about, we naturally feel awkward whilst posing among people who are doing normal, day-to-day things. Interestingly enough, my funniest outtakes involve friends or family members who’ve caught me trying to do a blue steel pose in front of the camera. The images below are my reactions to their laughter.

//
This was taken in my favorite backyard on a wonderful summer day. My father unexpectedly turned up while I was hiding in the bushes, startling me. His amused expression encouraged me to pull a few faces.

//

There’s a gorgeous location in the mountains of Cyprus which bathes in tranquility. Taking photos there is an absolute joy, especially on scorching days. After taking a bunch of “serious” images, I started pulling faces just for the fun of it. However, while pulling a particularly unappealing face, I was spotted by a family member.

Unruly hair flips

//

There is nothing quite as amusing as a hair flip gone wrong. Furthermore, there is nothing quite as hilarious as a blurred photo featuring a hair flip gone wrong. My hair, which has a mind of its own, has to deal with my bird-like arm movements and unflattering facial expressions. More often than not, these hindrances provide me with funny opportunities to humble myself. 🙂

Nature’s various pranks

Many of my photos end up becoming outtakes thanks to a falling leaf covering my eyes or a branch sticking out of my hair. Though these results can still be used in a portfolio thanks to everyone’s beloved cropping tool, there’s something hilariously special about sharing the uncropped versions with others. For example, the photo below was taken in the same backyard I previously mentioned; upon throwing a few fallen leaves into the air, the camera caught a strange little moment: a small decoration gifted by nature. 😉

//

Uncooperative pets

I have a darling Scottish Fold kitten whose sassy attitude often prevents me from having successful shots (though you could call funny photo shoots successful). Despite being extremely photogenic, she rarely enjoys being held for a long time, especially in the presence of a camera. Some of her photoshoot habits include, but are not limited to, eating my hair, biting her own tail, and scratching my face. The positive side of this is that her rambunctious personality makes successful shots all the more valuable. More importantly, she gives me a chance to have a shoot that’s not only creativity-fulfilling but also very fun.

//
Fur in your mouth + your cat biting her tail may or may not be a good combination. I wanted this shoot to be a calming and graceful one, but the energetic ball of fur in my arms had different plans. (Not pictured: after biting her tail, she proceeded to bite, scratch, and finally lick my fingers. I’m not sure if she loves or hates me.)

I greatly favor unexpected outtakes, but I also find beauty in intentional face-pulling and expression making. It’s important to have fun during a shoot, no matter who or what your subject is. If there aren’t enough amusing elements around, create your own world of funny situations. If you’re working with someone, remember to relax; even if your shoot isn’t a humorous one, mutual comfortability will result in equally comfortable and visually appealing images. So remember to relax, have fun, and pull a few funny faces during your shoot.

Happy shooting!

//

Photographer interview: Martina Bertacchi

Martina Bertacchi is a talented photographer from Italy who photographs people in worlds unlike our own. Her portraits are charming and striking, focusing on the subject’s raw beauty and their surroundings. In this interview, Martina talks about her inspiration, ambitions, and the tips she’d give to aspiring portrait photographers. I hope you enjoy this eye-opening conversation!

What inspired you to start taking photographs?

I started taking pictures by chance about 6/7 years ago when I was still at school, and photography became a sort of safety valve on the days of full study. I took inspiration from the smallest things, also in the house, but mostly when I went out I really liked to capture nature, leaves, and flowers. My main source of inspiration was the Internet, sites like Flickr and Facebook have helped me a lot. I saw some photographs and I remained amazed by their beauty, so much that I wanted to start playing around with my camera and make it my own. Only much later I began to get interested in portraits.

You have many stunning photos of people. What do you look for in a model?

I love spontaneity in people. I think that in every single person there is a beauty. I consider it very important to constantly look into it, details even in the face. Sometimes the imperfection can become perfection. I prefer delicate, dreamy faces that tell something.

//

The subjects in your photographs are always very sharp and well-lit. What advice would you give to aspiring portrait photographers?

The advice I would give to a young aspiring portrait photographer is to not be fooled by the desire to have super expensive equipment but to also start experimenting with a simple camera, play with the lights and natural shadows. I think good post production is more important, as that is what gives meaning and feeling to your photo. Lightroom helped me a lot in the beginning.

What does your editing process consist of?

First I shoot in RAW. I find it essential to recover the lights in the background, and it’s more appropriate for the white balance. To develop the raw format I use Lightroom – as I said before, I modify the lights, use Photoshop to work on the skin, and then I play with colors, curves, tones, and contrast.

//

//

Who are your favorite artists and why?

I do not have a favorite artist. There are so many that I admire and I esteem. I prefer to quote emerging photographers that inspired me a lot, like Marta Bevacqua, Alessio Albi, Laura Zalenga, Alexandra Sophie. They represent fully the emotions, through their stories –  almost fairy-tale atmospheres that fascinate me a lot.

Is there anything photography-related you wish you could tell your younger self?

I would say to always be themselves, to never give up, and never stop to create and experiment new things and to be inspired by anything that surrounds them.

Your models look very graceful and natural in your images. How do you make them feel comfortable in front of your camera?

I’m actually very shy. It happened several times to turn on the music and let myself and my models be carried by it. I always try to make them express themselves without forcing anything.

//

Is there a photography genre you’d like to experiment more with?

I’d like to experiment more with taking pictures indoors, with natural light, and why not also self-portraits. I find them very intimate and full of emotions.

What do you find most challenging about portrait photography?

Surely to capture the perfect moment, whatever fills my heart with joy and creates something magical and beautiful.

If a photographer approached you and asked for 3 tips, what would you tell them?

Yes, I have three pieces of advice for people who love making photography:
Let yourself be guided by your feelings and inspirations and most importantly, take the time to observe the environment in which you take pictures and always give a close look to your subject’s details in order to give value to your portraits.

You can find more of Martina’s work on her Flickr and Instagram.

//

Experimenting with backgrounds for portraits

Backgrounds have the spectacular ability to transform a seemingly uninteresting portrait into an eye-catching work of art

. Their strength lies in patterns, symmetry, and colors; elements often accidentally neglected in portraiture. Though it’s possible to take photos which possess both simplicity and outstanding beauty at the same time, experimenting with backgrounds will give you a chance to greatly boost your portfolio’s visual appearance. The more you practice noticing the uniqueness of backgrounds and the more you include them in your work, the quicker you’ll thrive both as a photographer and as an observer of the world.

Outdoor backgrounds

Making the most of your natural surroundings outdoors will sharpen your creative eye and provide you with endless photo opportunities. Nature, especially, is ideal for photos of any kind thanks to its wonderful patience – it’s always waiting to add something incredible to your images. Its endless presence and perpetual flawlessness give everyone a chance to make the most of its natural beauty. Even better, nature constantly changes, giving us new worlds to work with every season.

Flowers, bushes, leaves, branches, landscapes, etc., can all become important elements in your images if you take the time to include them in your compositions. Sharp mountains could complement your subject’s sharp facial features or, instead, serve as a dramatic contrast to the softness of their expressions. Blurred autumn leaves in the background could work in harmony with your subject’s autumnal clothing. When it comes to backgrounds and what they can contribute to any image, the possibilities are endless.

//

Nature could also be used to create powerful diptychs (a “collage” consisting of two images), stunning resources to use in future shoots, and anything you could possibly image. Similarly, cityscapes have the ability to transform your outdoor photos into truly impressive creations. Be it a crowded street or a lonely spot in a nearby park, anything can serve as an appealing background.

The key to great outdoor portrait backgrounds is making sure that your mind and eyes are constantly open, especially when you’re not taking photos. This doesn’t mean you should forcefully notice details around you all the time. Instead, find short, calm moments throughout your day when you can choose to pay attention to your surroundings instead of your phone. If you’re someone who loves adventures, spend a day looking for new and photo-worthy places. Take the time to find interesting locations, no matter how small, if you enjoy running. Eventually, these details will turn into amazing backgrounds for your images, ones that will make you proud of your work and eager to discover more.

//

//

Indoor backgrounds

The colder months often force us to sit at home with our cameras, desperately attempting to come up with creative shooting methods. Many artists don’t own professional studio gear, so the notion of giving up on shooting indoors is an understandable one. However, simple indoor images can be enhanced with the help of “handmade” backgrounds, creations which will inevitably lead you to amazing photo opportunities and unique ideas.

If painting is one of your interests, create your own backgrounds and temporarily hang them on a wall – your very own little studio. Alternatively, you can use other people’s paintings as striking additions to your portraits. If neither of these appeal to you, use wallpapers since they often consist of intricate, symmetrical patterns. Blankets and curtains are also fantastic backgrounds, especially ones that are beautifully decorated. You could even create your own forts out of them and no one would be able to tell. 😉

//

//

The beauty of shooting in your own home is having easy access to your wardrobe – experiment with various color combinations and find ones which enhance both your background and your subject’s attire. If you’re planning to shoot elsewhere, choose several outfits to use in case you come across an unusual (yet original) background. Use rental costumes and wigs to give your portfolio a fresh spark if you have the chance. If you’re shooting in a store, let artificial light be your background. Oftentimes, beautifully decorated light in shops will add an otherworldly atmosphere to your images. It’s also possible to create your own backgrounds in an editing program using other artists’ photo resources and overlays. Whatever you do, remember to use your backgrounds to the fullest and not let your fears bring you down.

No matter where you are or what time of day it is, remember to keep your mind and your eyes open. Before you know it, your images will be appreciated for their beautiful compositions and most importantly, for their eye-catching backgrounds.

Good luck!

//

//


Photographer interview: A Time with the Talented Marvel Harris

What inspired you to start taking photographs?

I bought my first camera at the age of sixteen. I started photography with self-portraits, to capture my own emotions which I found hard to deal with and difficult to talk about. While growing older, my passion to capture the vulnerable parts of myself and other people only grew. I have been battling with mental illness since the age of twelve and taking self-portraits and showing them to my parents has helped me to communicate.

I have always wanted to help others by being open about my own struggles. At first, I found it extremely scary to capture my own vulnerabilities and to share the pictures that I took of myself on Social Media, but I got such sweet private messages from people, telling me that I have helped them, that it motivated me to keep creating what I love to create and love to do.

You take stunning images of other people. What do you look for in a model?

Thank you! When I capture the imperfections and vulnerabilities of people other than myself, I want to let them feel that painful feelings can become more bearable when you share them with others. I noticed that sharing my own story made me feel less alone. Together with my models, I want to tell a story and make the invisible visible.

//

Who are your favorite artists and how have they influenced your work?

Lots of photographers have influenced my work and Facebook has helped me to get in contact with some of them. People like Ines Rehberger, Joel Robison, Laura Zalenga and Taya Iv are an inspiration to me, because they tell wonderful stories with their beautiful and outstanding images; they motivated me to capture my own stories and in my own way.

Your self-portraits are incredibly honest and touching. What does a typical self-portrait shoots look like?

Right now I am working on a project called ‘Inner Journey’ and the pictures for that series are currently taken with my Fujifilm X70. The series is about mental illness, self-love, self-acceptance and my struggle with gender identity.

I also have a Canon EOS 7D and I use a tripod to hold my camera and a remote to handle long-distance shots instead of a timer. When I grab my camera to take self-portraits, it’s mostly when I don’t know how to deal with feelings such as anxiety, emptiness, loneliness or being desperate about the future. After capturing emotions like that and after editing the picture in Adobe Camera Raw and Photoshop, I can look at myself from a distance and stop my negative thoughts from spiraling out of control; self-portraiture helps me to feel able to breathe again after an episode like that.

As you can see, photography is therapeutic to me and I think that’s why my self-portraits are as honest and raw as they are.

//

If you could photograph anyone in the world, who would it be?

I don’t have any specific person in mind. To me, it really doesn’t matter who sits in front of my camera, but if I am able to tell a story together with the person in front of my camera.

But I would love to meet the photographers that inspire me, so we can take pictures together.

What has been the most challenging creative obstacle in your life so far, and how did you overcome it?

Taking pictures with light different from natural light. Sometimes you have to step out of your comfort zone, how scary this may seem, and experiment with things different from what you are used to doing.

For me that was experimenting with hard light and hard shadows. Eventually, I found my way in there and came to the conclusion that it can also be fun to step out of your comfort zone and to explore new things.

//

When you’re faced with a creative block, what do you do?

I will start writing in my journal, because I am more connected with myself when I write; when I am more connected with myself, it will be easier to find the inspiration to start shooting again.

If you could give your younger self one piece of photography-related advice, what would it be?

Keep trying and experimenting and never stop creating because people don’t like your work. When people say left, go right for once and see where you will end. Try to improve yourself every moment and follow your own path by doing what you love the most.

//

You have a rich collection of black & white photos in your portfolio. What do you love most about monochrome photography?

We don’t see the world in black and white, but when you are fighting against a mental illness the world seems like it has lost all its colors; it seems dark.

I think when you are focusing on capturing emotions, that you are more drawn to the subject when shooting in black and white; looking into someone’s eyes, without being distracted by all the different colors, can provide a stronger emotional connection.

What, in your opinion, is the most important thing an aspiring photographer should know?

Stay true to yourself and create your own style. Accept criticism and ask people for constructive feedback, but don’t apply blindly. Never compare your own journey with the journey of someone else, because you are unique and life is a long journey of self-discovery.

marvel harris


You can find more of Marvel’s work on her website, Facebook, and Instagram 


Flower portrait ideas: Adding nature to your images

Over 7 years ago, I discovered photography for the very first time and instantly fell in love with everything it had to offer. Inspired by the spectacular array of self-portraits I had stumbled upon, I grabbed a hair clip with a flower on it and stepped outside for my very first shoot. If you were to see the results now, you wouldn’t be impressed. However, my younger self-was beyond delighted because of the creativity a single flower decoration provided. Without the crimson hair clip, my photographs would’ve lacked vibrancy. Such a seemingly insignificant addition pushed me to experiment with all types of adornments, especially flowers.

Natural and artificial flowers possess a beauty capable of enhancing any portrait. Though they’re often used in weddings, flowers can also serve as perfect floral headdresses, foregrounds, and backgrounds for any kind of shoot. Including them in your portraits, whether they’re of yourself or of your clients, will add a pleasant and natural touch to your portfolio. Since spring is just around the corner, here are a few tips on how to use flowers to take visually appealing pictures.

//

Simple portraits can be enhanced with the help of a simple bouquet of flowers. If for whatever reason, you’re running out of ideas for a client shoot, blossoms of any kind will instantly transform your portraits into stunning works of art. If natural flowers aren’t available (or if your client is allergic to them) don’t stress. Artificial flowers can possess a touch of beauty akin to natural ones. However, if the ones you own happen to look too artificial, you can use them as foregrounds. Blurred foregrounds add mystery and a striking splash of color to portraits. Since you can’t really see them due to the depth of field, you needn’t worry about unnatural looking details. (General photography tip: any type of object, when placed right in front of your lens without covering it entirely, will serve as an interesting foreground which will compel your viewers to wonder how you achieved such an effect. Try it!)

Flowers can also serve as perfect resources for diptychs. If a portrait of your client holding a lovely bouquet of flowers seems to be missing something, combine that image with one of the blooms alone (or a closeup of an individual petal, for example). This will tell a more powerful story about your subject and provide you with an opportunity to experiment with photo combinations. Since not every photo combination is appealing, experimenting with them will help you acquire your own unique style as well as a great storytelling technique. Diptychs are particularly useful for wedding photography because of this fact, though using them in your (self) portraits will boost both your portfolio and your creativity.

//

//

Golden hour is a photographer’s best friend. Almost everything it touches acquires an indescribably stunning glow. Thus, it’s ideal for portraits, especially ones which include flowers of any sort. As you can see in the photo below, golden hour illuminates plants in a seemingly magical way, perfect for those who love capturing light at its best. Combine golden hour with a happy client holding flowers and you’ll both be beyond pleased with the results.

//

For those who photograph children, flowers are perfect for moments of distraction and play. Children are drawn to nature and its exquisite colors; let them interact with nature or, if possible, give them a daisy chain to wear. Spontaneous photos of children enjoying their natural surroundings or laughing at their floral headdress will produce incredibly delightful results. Additionally, you won’t finish your shoot feeling stressed and discouraged.

Perhaps the most magnificent gift flowers give us is diversity. There are so many flowers and as a result, there are just as many themes to work with. Flowers vary in shape, size, pattern, color, etc., allowing artists to work with them in an abundance of ways. Even better, these unique features can be used to reflect emotions, situations, and stories. For example, Forget-Me-Nots could be used to positively enhance your subject’s innocence. Lilacs, on the other hand, could give your images a more romantic atmosphere. Gather or buy flowers before a shoot and study them. What do their appearances remind you of? Take notes and plan a shoot using your observations; rest assured, the results will be more than impressive. If you’re in an experimental mood, start a flower portrait project focusing on the beauty of flowers and the stories behind them.

//

//

//

Whether you’re in a mood to start a tremendous project, or if you simply wish to enhance the quality of your client work, take the time to experiment with flowers. Their natural beauty will inevitably provide you with many, many invaluable photo ideas.

Good luck!

How to take cozy outdoor portraits in the winter

Warmth is often associated with gorgeous beaches, palm trees, and the sea; freezing weather is the epitome of winter and indoor coziness. Thus, it’s natural to presume that these two elements never go hand in hand. However, snow casts a spell on the outside world, providing us with flawless and picturesque landscapes. Challenging as the winter months might be, this winter spell is as perfect for nature as it is for photographers. Using nature and your subject’s enthusiasm will allow you to naturally add warmth to your snowy portraits. Here are tips on how to achieve such warmth (and how to stay toasty in the process).

Bring something warm (and include it in your photos)

Preparing for a shoot in the winter can be a fun and cozy experience for you and the people you’re working with. Make sure you have comfortable and photogenic clothes which won’t let your subject freeze. The drinks and snacks you prepare could serve as pleasant photo additions, so remember to include them in your shots. Fun props like sparklers could also add both warm colors and a cheerful feel to your images. Take photos of everyone in your team, even if they’re assistants (or pets!). A happy team which feels accepted will warm any type of coldness, and this will inevitably add a heartwarming touch to your photographs. Make sure to take advantage of bright colors and happy smiles to create a stark contrast between your subject and their snowy surroundings.

//

//

A spontaneous behind-the-scenes snap of your subject sipping a cup of warm tea might find its way into your portfolio; a group shot of your friends staying warm and having a fun time could do the same. When it comes to inner warmth and great chemistry between you and your subjects, the time of year doesn’t matter. Remember to interact with your team, enjoy your snacks, and keep your hands and feet comfortable!

Prepare a warm location (be it a tent or a café)

When you scout for locations, make sure there’s a place within walking distance which could serve as a warm temporary refuge for you and your subject. If you’re in a deserted area, acquire a tent to stay toasty in during breaks. (If a tent isn’t an affordable option, grab a few blankets!) This will ensure that you remain toasty no matter how cruel the weather gets. Photographing your subject next to a tent, or in a café, with a stunningly snowy background will create the coziest photo atmosphere. Again, make the most of the spontaneity; if you plan to relax in a tent for a while, photograph each other in it. A tent + snow = perfect atmosphere + perfect photos.

//

Take advantage of the sun

If possible, shoot during a time when the sun is present. If you live in a place which rarely sees the light of day in the winter then use artificial light (even a torch would be enough) to create the illusion of sunshine. Either method will create interesting photo opportunities that’ll open and challenge your creative mind. The combination of (artificial) sunshine and snow will give your photos a welcoming atmosphere, a feeling of acceptance during the coldest of times.

//

Let your subject blend in with nature

Regardless of the season, nature infinitely inspires those who pay attention to it. It’s particularly attractive in the winter due to its graceful way of holding snow. Nature, when adorned with snow, is a force to be reckoned with. Not only do branches heavy with snow and perfectly white trees serve as fantastic backgrounds, but they make ideal subjects, too. Ask your subject to enjoy their surroundings and discuss what they like most. Photographing them next to the things they find most appealing will result in breathtaking images. Even visiting a park with your subject and asking them to interact with their surroundings will lead to great photo opportunities the results of which you’ll love.

Embracing spontaneity, making sure everyone is comfortable, and staying warm are the most important parts of a successful outdoor shoot in the winter. Be open to new ideas, make the most of the weather, and know that achieving warmth is possible no matter how cold it gets.

//

//

Good luck!

Finding the Perfect Backgrounds for Your Photographs

There is always an element in photography that you have to think about with every subject, and that’s background. This is true in still life, product, fashion, portraits, and even landscape. There are a few background choices for each of these different types of photography. A background can be a wide array of buildings, walls, floors, color, landscape, greenery; the sky is the limit (literally.) It is always a good idea to know what to look for while location scouting as well.

Finding Backgrounds

A lot of your background detail also has to do with your depth of field. You can either control your background with a blurred or sharpness by a shallow or deep depth of field, depending on your subject matter. A shallow depth of field is popular in portraits, so your subject is your main point of focus. You can use a deeper depth of field though to enhance your background clarity and texture. Keep your subject away from the background and not right up against a graffiti wall and tree, this is because these textures and colors can be too distracting. Shooting your subject in wide open spaces with a shallow depth of field and will give you the ability to have a subtle background of light colors and textures. Graffiti is a great example for this because it is a popular choice for a fun and colorful background but can also become a little distracting to your subject so by shooting your subject away from the background you can still gather the color and design without too much detail. Other background choices that you can use the subtle color, texture, and pattern are brick walls, wallpapers, and colorful doors. Think about the landscape in your image too and the great environment you are located in.

Finding Backgrounds

finding backgrounds
finding backgrounds

A variety of angles can also help your background choices. If you are shooting down on your subject you can use various lines on the road, grass, or any other greenery around or even just the texture. Shooting forward onto your subject will give you space and environment area that you are in. Shooting up on your subject can make you a viewpoint of the sky, clouds, or anything else above your subject matter.

finding backgrounds

Finding Backgrounds

Food and still life photography gives you an excellent array of choices with colors, textures, and backgrounds and offers a great way to be creative. You can even make your backgrounds using various woods and papers. Another background choice for smaller subjects is scrapbook paper from your local craft store where you can purchase paper patterns that look like wood, marble, and other surfaces that you enjoy.

finding backgrounds

There are some things you will want to avoid in your background. By using these guidelines, it will help you avoid distractions from the subject of your image. You usually want the brightest point of your image to be your subject; this means that you will want to avoid brighter highlights in the background or colors that could be distracting such as bright oranges, neons, etc. Poles and tree branches are common objects that can get in the way of a great photograph and something you want to avoid, especially when shooting portraits.

If you are having a difficult time finding the right kind of background texture and color you can always Photoshop out your background and replace it with a new background. There are many Photoshop actions, and Lightroom presets to help you achieve this. This is also where green screen photography comes in handy. A green screen can help you knock out the background easier to replace it later on. This color is used because Photoshop can read the color much better to separate from your subject in post editing.

Finding backgrounds

When we are talking about the background, you always want to consider foreground as a factor in your photography. The foreground is a great way to bring depth into your image and also a good use of framing. You can achieve this by setting objects in front of your still-life images. Use trees or greenery in the foreground with a shallow depth of field, or any other creative factors to frame your image. If you find your foreground is too sharp in your image and becomes a distraction you can always blur this in post-production.

finding backgrounds

Best use of foreground in your images: Enhancing your photos today

An important factor to photography is not only our background but also our foreground. Foreground can be used in many different ways in your photography by framing your subject, adding texture, and design to an image, which can all lead your eye to your main subject. Foreground can also tell more of the story in your image and pull you into the image.
To some of us photographers, foregrounds can become a little daunting and intimidating because we worry about distractions within an image. This is one factor that I think we can all grow and experiment with in our photographs. Making a foreground work in an image can really create a more artistic photograph altogether and also tell more of a story. Here are a few tips on how to create photographs with a great use of foreground.

Since photography is a two-dimensional art form you will want to add some depth into your image to let your viewer feel as though they can step into the image. Using a foreground will add some depth and dimension to your image. One of the simplest and also important ways to make a foreground work is your knowledge of the depth of field. You can use a shallow or deep depth of field depending on the subject you are trying to photograph. If you are photographing a landscape you will want to keep a deep depth of field if it is a wide-angle shot. What if it’s a telephoto photograph and your image is compressed, such as wildlife photography? In this case, a deeper depth of field could add a little bit of distraction. In this case using a shallow depth of field could frame your image and add some environment without causing distractions.

Foreground

Foreground

There are different ways to work with a foreground based on your subject. When you are photographing a landscape it can be as the reflection in a pond or body of water from your landscape or image. This is a great way to show mood in your photography. Getting lower in your image will help improve your vanishing point and bring some drama into your image. A popular landscape photography image is a road using the leading lines into your vanishing point and a simple way to show depth in your image.

Foreground

The foreground is most commonly used to frame your subject and works for people and landscapes.For example, if you set your subject behind a bush or tree you can use the leaves or greenery in the foreground to frame your subject’s face. This shows a sense of the environment that you are in, showing not only what is behind of your subject but also in the front. If you use a shallow depth of field this will show the environment without becoming distracting. One popular portrait idea that works with creative foregrounds is to have your subject hold an item out in front of them as a focus point.

Foreground

Foreground

Foreground

Foreground

Now that we have talked about foreground and background in our images we want to work all of these factors into one image. The easiest way to think of working with a foreground, middle ground, and background is if you can find three layers in an image. Your foreground doesn’t have to be far away from your subject either, it can be as simple as people walking in the foreground or a glowing sign in front of a building.

Foreground

Foreground

Some ways that your foreground could be distracting is if it’s sharper than your subject. You want to make sure that your focus is still the main point of your image and you have to remember the rules of backgrounds and incorporate that into foregrounds.When we talk about focus we are not only talking about the sharpness but what’s bringing the subject into focus. Make sure your focus point is the sharpest and also the brightest object in your subject. If you have a light background and foreground you can contrast that with a darker color. Objects that are brighter, lighter, or more saturated than your subject tend to become a distraction.

Foreground

Foreground

The foreground is not only a good technical skill to have in your photography but also a great way to boost your creativity and bring more oomph into an image.

Taking Creative Photos Through Windows

A lonely figure sits in a coffee shop, observing passing cars with a ghost of a smile. Next, to the figure, a girl speedily takes notes, her hand a messy blur of movement. The scene is a delightful one, enhanced by the ever-changing window reflections: loneliness and busyness placed together, one giving in to the world it doesn’t fully know, the other creating one of its own. It feels like a film – or better yet, a cinematograph – a moment that seems to possess an indestructible eternity. If you were a witness to this fleeting moment, would you photograph it? If you would, your image’s atmosphere would stand out partly due to the aforementioned window reflections. Had you shot the scene in the coffee shop itself, the effect would’ve been vastly different?

Windows do not simply serve as passages to a person’s soul, as the famous quote says. Windows are also a brilliant way to enter the world different to your own, a way to empathize and reflect. Photographing through windows provides viewers with a personal look into someone else’s realm of thoughts, teaching them the importance of compassion and open-mindedness. Even nature, when photographed through a window, gains a quality unlike any other. Photos of this sort seem to be whispering a story as if listening closely could teach you spectacular things. And indeed, such stories do teach fascinating and eye-opening things.

//

It wouldn’t surprise me if you’d call window photos cliché. In fact, had you mentioned this even a year ago, I would be tempted to agree with your musing. However, in the very depths of failed shoots and impatience, I have discovered a beauty and originality in what many of us often render cliché. The world cliché, by definition, is something that is mindlessly repeated over and over again until its very existence is officially deemed useless. Approaching useless objects from new angles might reveal to you a helpful piece that was ignored by everyone else, a piece that is perhaps helpful to you only. Using this in your art will enable you to add your own usefulness to the techniques and projects that seem to have lost their value long ago. Thus, windows can be approached in ways unique to you and your creativity.

Here are a few tips on how to take compelling photos of people and nature through windows.

Portraits

Taking photos of people through windows is a fun process as it gives the photographer unpredictable reflections on working with. If it’s a rainy day, the effects will be impressively abstract, since blurred foregrounds often make for stunning photo elements. Spraying water on a window could also work. In fact, the contrast between a droplet-stained window and a summery backdrop will give your photos uniqueness unlike any other. Covering parts of a window with paint or fabric could also work in your favor.

//

//

Some of the best photos taken through windows are spontaneous ones. A subject lost in their own thoughts combined with a reflection of a field tells a captivating, yet peaceful, story. Even a couple of silhouettes observing a cityscape could work. Don’t be afraid of including abstract shapes and lights in your images – these will enhance your style and make your images stand out. Literally reflecting your subject’s emotions and thoughts with the help of a window will strengthen the impact your work has on others. Your photographic courage will push other artists to reassess their own work and find new ways to challenge themselves.

Nature

Working with nature is almost effortless because it’s always around, it’s always waiting to be found. If you don’t have anyone to photograph when your inspiration is at its highest, use your surroundings instead. Look out of your window and try to find something you’ve ignored before – perhaps an exquisite little flower is growing right next to your window, waiting to be documented by you. Look near and far and find a story you could tell using everything that’s right in front of you. You could even document the view out of your window during various times of day, or throughout the year.

//

//

Working with emotional storytelling techniques will give you a brand new world to use in your art. Writing stories before a shoot might also boost your creativity and present you with an abundance of artistic possibilities. Regardless of the potential absurdity of your ideas, experiment with them and see where the results take you. It’s the unpredictable shots that end up becoming the most spectacular pieces of art.

There are a plethora of journeys you could take as a photographer. All you need is a window and a willingness to keep your eyes open, no matter what.

Good luck!

//

Posing Models Part 5: Family and Group Portraits

Posing one model can be difficult, and things naturally become more complicated when you add more people to the mix! How do you get everyone smiling at the same time, all looking in the right direction, and everyone angled correctly according to the position of the light and camera? Planning, coordination, and a good attitude, that’s how!

To properly plan, you need to know a little more about what to expect on the day of the shoot. Here are some general tips and tricks that will help you capture beautiful group portraits.

Plan Your Aesthetic in Advance

If you’re working with professional models for a consumer shoot, you’ll likely be providing the props and wardrobe from the company you’re working with. However, if you are not supplying the wardrobe, you need to make sure the subjects of your shot have a dress code. You don’t want to take a group shot where everyone is wearing bold and clashing colors! It would be hard to keep the focus of your final image on the subjects. Know what you’re going for, and make sure everyone involved in the shoot has a thorough understanding of the dress code.

outdoor family portrait

Pick the Right Setting

Are you photographing a wedding? Get to the venue early and scout out the right places for good framing and lighting. Are you working in the studio? Set up your lights according to the nature of the group photo. Is it a still shot, are your subjects going to be moving? What time of day are you creating with your lighting? Know these things going in, that way you can focus on posing and minor corrections the day of the shoot.

natural family portrait

Know the Posing Basics

Parts one and two of this series discuss how to pose models for basic fashion shoots. Parts three and four look at specific tips for posing hands, feet, and face. Take a look at these articles and take note of the basics. This will help you when posing individuals for group portraits. It will help you make sure that your perfect picture isn’t ruined by someone looking in the wrong direction, a foot in the foreground, or an odd body shape created by a stray arm. They will also help you learn how to use the limbs to frame different parts of the body.

Work from the Top Down

Once you have everyone at the shoot, dressed and ready to go, begin by organizing where everyone should be situated within the shot. You want to work with the heights and body shapes of your subjects to create an image that is visually appealing overall. Make sure everyone understands the parameters they can move within while staying in the frame of the shot. You can even mark the outlying boundary of this with tape so that it doesn’t appear in your photographs, but it does let people know not to step outside of those lines!

big group shot

From there, work with each person on their individual poses. Remember to adhere to the final tone. If you want joyful and energetic, people should either be moving or creating the illusion of movement with their poses. If you want a standard professional portrait, everyone should be looking towards the camera. If you are selling a product, the focus should be on the product. For a family portrait, you have to make sure everyone is equally represented.

First, you set the basic structure by determining where people are going to stand within the picture. Then you work with each individual on how to pose. The individual poses should work together so that the subjects are not fighting for attention within the image. If you’re shooting for fashion, your group portraits should tell a story and focus on the product. If you’re shooting for family portraiture, your final shot should capture a moment in time while focusing on the subjects.

Don’t Get Frustrated

Obviously, it can take a lot to organize a group shot. If you become frustrated, your subjects will mirror this in their facial expressions. If you have to walk away for a minute, do it. If you’re having trouble, just tell everyone to have fun and experiment with their posing. While they do this, snapshots off quickly.

family wedding photo

Give your subjects a break, and take that time to look through your initial photographs. You’ll see from them where you’re going to have problems. Who turns their face the wrong way? Is a particularly tall person overshadowing others? What unique personality characteristics do family members show, and how can you get them to portray that naturally in the final shot? Have fun and experiment, and eventually, you will capture an excellent image!

Posing Models Part 4: Facial Posing Tips for Stunning Portraits

The face is important in photography, whether you’re looking for a beautiful close-up portrait, or just the right expression for a full-body fashion shot. The only thing that will consistently land you professional shots is practice. This is especially true when it comes to photographing the human face, but a little basic knowledge can help anyone improve the quality of their pictures.

When it comes to facial posing, light and shadow become very important. The shape of the face is largely going to be determined by how the shadows fall in the final photograph. Too much light will blend the features, while too little can obscure them in shadows. You have to work the angle of the face with the lighting to get it right, all while getting the model to convey the right emotion. It sounds complicated, but some simple tricks will have you well on your way to better pictures in no time!

Decide What Kind of Lighting to Use

You should have some idea of what you want to convey with your photograph, along with some good lights for studio portraits. Are you taking a professional portrait, fashion photograph, or moody art piece? The overall mood will be determined by the model’s expression and your lighting choices. You should use the lighting to work with the basic shape of the models face as well.

For instance, a wider face can by narrowed by shadowing the side of the face angled towards the camera:

shadowing faces

The reverse is true as well. A narrow face can be widened by lighting the side of the face angled towards the camera:

lighting faces

Research different lighting methods and techniques before you begin the shoot, and make notes of what to experiment with based on what kind of shot you’re going for.

Make Sure Your Model Knows the Basics

Take a minute to see what your model knows about moving her own face in the shoot. While looking through your camera, ask her to shift her angle and expression slowly. Pay attention to the following, and work with her until she is comfortable with these basics:

  • How far she can turn her head before her nose breaks the line of her cheek in profile;
  • To follow her nose with her eyes so that the whites are not showing too much;
  • To angle her chin out and slightly down for a well-defined jawline, but to do so without looking strained;
  • To express the appropriate emotion with her eyes;
  • To keep the lips slightly parted to create a relaxed jawline—especially true for fashion;
  • More than anything, make sure your model is comfortable!

posing faces

Once you’ve spent a few minutes ascertaining how well your model understands the basics of getting a good close-up, coach them as you see fit. Instruct them to turn their head by degrees until you see an angle that works for them, ask them to hold it. Tell them why it works. Continue to do this throughout the shoot and you’ll see increasingly better photographs as you progress.

A Handy Trick to Avoid Dead Eyes

Sometimes a picture still falls flat, even though the model had the perfect expression! How does that happen? Something goes wrong with the eyes. Even if the feeling reaches them, without enough light they will simply look dead. There a simple trick that will help you correct this: make sure the angle of the camera and the face work together with the angle of the lighting, allowing you to capture a reflection of a foreground light in the eye of your subject. This will add a little sparkle to an otherwise dark eye, enhancing the feeling behind any type of mood.

facial posing tips

Experiment, Experiment, Experiment

It bears repeating: the only way to learn to take truly stunning close-ups is to practice. That’s how you’ll learn when to use butterfly lighting, or go for a standard loop lighting. Butterfly lighting is created by placing the main light source above and slightly behind the subject, resulting in a butterfly-shaped shadowing effect on the face. Loop lighting requires the light to be eye level, angled at 30 to 45 degrees from the camera depending on the subject. The only way to learn what kind of lighting will work for what kind of face, and what style of shot, is through experimentation.

Next time your friend needs a new professional photograph, why not bust out a light and your camera? With the above tips, and little experimenting, you’ll probably be able to make them look gorgeous! But first, check out the other tips in our posing series. They are full of advice that will help you make your friends and family look better than runway ready! The practice will have you well on your way to landing perfect studio shots with ease.

Tips to improve your outdoor portraits

(Though this article mainly focuses on portrait photography, almost all of the following tips can be used by other types of photographers, too.)

Outdoor photos can often end up looking dull and uninteresting. To avoid that, it’s important to seek nature, come up with stories which mean something to you as an artist, and be cunning when it comes to challenging lighting conditions. Like anything in the art world, outdoor photography requires curiosity, sharp observation skills, and patience. These three elements will enable you to take better photos outside, no matter what (or who) your subject is.
Here are ways in which your outdoor portraits can thrive.

Look for nature

It’s no surprise that humans, when given a chance to spend time in a tranquil place, feel warmth and acceptance in their natural surroundings. Even a small park at the very center of a bustling city can serve as a refuge for many. Signs of nature in any location create both hope and admiration – reflecting that in your photographs will give your work an air of familiarity. If you feel that your photographs are too simple, find a peaceful area brimming with nature and shoot there. Allow your subjects to gracefully blend in with nature and let your creativity do the rest. For example, branches can be great blurred foregrounds, and flowers in the form of bokeh can add vibrancy to a photo. No matter how insignificant a detail seems to be, challenge yourself by attempting to use it in your photograph. You’ll be surprised to notice what a tremendous difference simply adding an element can make. Sometimes, the things that are ignored by most people are the things which deserve our attention the most.

Outdoor

Outdoor

(Un)favorable lighting conditions

If portrait photography is new to you, try experimenting with soft natural light first. In the warmer months, golden hour is your best creative friend; its light will make any photograph stand out. It addition to being the perfect backlight, golden-light will illuminate your subject’s face beautifully, making it easier to enhance your results during the editing process.

If you’re willing to experiment a little more fearlessly, work with artificial light at night. Nighttime light is very flattering when it directly hits half of a subject’s face. In addition to being visually appealing, this composition creates mystery and originality. Add a few more elements to it, like a mysterious foreground or a freelensing technique, and you’ll discover an exciting world of creative possibilities. Most importantly, don’t be afraid of experimenting with light – if used properly, it will reflect your ideas in the best possible way.

If you find the lighting conditions unfavorable on a very sunny day, take photos in the shade. Nature is ideal when it comes to blocking harsh sunlight or creating interesting light patterns. If it’s a gloomy day, create your own light or use a reflector – even mild reflected light can add an attractive glow to your subject’s face. If, however, a shoot doesn’t go as planned, don’t be afraid of trying over and over again. You’ll achieve your desired results sooner or later.

Outdoor

Outdoor

A story, or two

The outside world is perfect for storytelling. While homely photos are ideal for creating cozy feelings in the viewer’s heart, images taken outdoors are wonderful for telling more elaborate stories. Photos taken in a busy crowd could reflect your subject’s fish-out-of-water feelings, while a beautiful field in the countryside could be a terrific opportunity to add a sense of belonging to your photographs. Whichever location you choose to take photos in, you can find a fitting story to keep in mind throughout your shoot.

If, for any reason, you feel you’re running out of ideas, read a book or watch a film before your photo session to give your creativity more resources to work with. There’s an abundance of themes you could work with, from isolation to exhilaration, to fascination, and the list goes on. The outdoor world, filled with unpredictable situations and all kinds of elements, can make those themes come to life. Keep your artistic eyes open at all times, and your mind will soon be filled with all kinds of ideas worth revealing.

Outdoor

Once you become more comfortable with lighting, strengthen your nature-finding skills, and become adept at coming up with photo-related stories, you’ll find your portfolio blooming rapidly. A thorough knowledge of lighting will help you find potential in all kinds of weather situations, while strengthened storytelling skills will allow you to feel more confident as a photographer. These skills will be reflected in your work, making all of your portraits, outdoors or indoors, stunning and full of meaning.

Outdoor


What is DOF? An introduction to one of the pillars of photography

Depth of field (DOF) is a crucial concept in photography on a technique and artistic scale. Since photography is a two-dimensional art form, depth of field gives us the ability to feel as though we are stepping into an image. Your depth of field is also known as your focus range. The “field” is the subject you are photographing, and the depth is the distance between the nearest and furthest objects that are sharp and in focus.

You might often hear of a “shallow” or “deep” depth of field. A shallow DOF has less focus around your main subject, and a deep depth of field shows more focus around your main subject. The aperture easily controls the depth of field. Aperture is made up of f-numbers (f/5.0, f/16, f/22) and is also known as f-stops. The higher the f-stop number, the deeper your depth of field will be and the smaller the f-stop number is, the more shallow your depth of field will be. Aperture also has an effect on your exposure. The numbers represent the lens opening diameter size, and that will also determine how much light passes into the camera. The range starts at a larger diameter size and works down. The smaller the f-stop, the larger the diameter of the lens opening, this also adds more light. The larger the f-stop, the smaller the diameter and the less light will pass through.

The easiest exercise to demonstrate aperture and how it affects your depth of field is to set your camera on a tripod and find a subject that shows a foreground, middle ground, and background. A tripod is not only important in this because you want to have a continuous shot but because your shutter speed is going to start slowing down to compensate for the light as your DOF goes up. Set your camera to AV which is aperture priority. This will let you change the aperture how you please and lets the camera choose the shutter speed and ISO for your best lighting.

apeture

You can also change your depth of field based on your camera lens; this can get a little more tricky. The more you zoom, the more depth you will receive because it is also compressing your image and you will have more of a focus on your field rather than use a wide-angle lens. Using a wide-angle lens is great if you want a deeper depth of field and more in focus. The higher the focal length, the shallower your depth of field will be because it is compressing your image.

How to DOF in your photography

Shallow depth of field is very common in portrait photography, wildlife photography, sports photography, and detail shots. Portraits are best with a shallow depth of field because it blocks out any distractions which can also apply to wildlife photography. Another good reason to use a low aperture is that it will add more light in. This will give you the ability to use a faster shutter speed to catch candid moments and a great tool to have for fast sports photography.

mariahbaumgartle_shallowdepthoffield

A deeper depth of field is common when photographing a landscape and architecture. When shooting a landscape, you will want to have your foreground, middle ground, and background crisp and in focus. The higher your aperture is, the slower your shutter speed will be to get a correct exposure so always be prepared with a tripod while shooting landscapes in lower light to avoid any camera shake.

mariahbaumgartle_deepdepthoffield

Depth of field can give you as much or as little texture that you are looking for in an image as well; this comes in handy while shooting macro photography. You can see in this example just how much the background texture changes from 2.5 to 5.0.

aperture

You can also use shallow depth of field when learning and working with bokeh, a popular style in fine art photography.

Depth of field is only one piece of the exposure triangle but, as you can see, it offers a lot of tools to make your photography stand out.

How to make your black and white photographs stand out

You’re editing an elegantly colored image and suddenly you feel compelled to use the black and white tool, just to see if it’ll make your photo even more striking. When you convert it, however, the results are unappealing – you stick to your original variegated photo instead. What if you had taken the time to experiment longer? Would the image be more striking in black and white?

img_1867_15644269483_o
Though photos, when adorned with all kinds of colours, are exotic, there’s just as much beauty in monochromatic images, albeit on a different level. If you’re seeking to add more depth and emotions to your portfolio, don’t be afraid to use the black and white tool. If you take the following tips and notes into consideration while shooting, you’ll receive pleasing and portfolio-enriching results.

xo_20898876233_o
Colours provide us with limitless possibilities. We can alter them using all kinds of handy tools in our editing programs. Colours not only present us with vibrant compositions but also offer us a world of creative freedom. Therefore, it’s easy to understand the hesitation photographers experience when a black and white option is available – it seems to be opposite of vibrant or freeing. Though those two factors are essential in any artist’s life, limiting them can yield impressive results.
Limitations are creativity boosters – let’s use the story in Room by Emma Donoghue as an example: the main characters, a mother and her child, have been unfairly forced to reside in a single room for many years. For the child, the room is the only world he has seen, but he finds endless value in every object and corner. What he sees in his few possessions and what he makes of his tiny world is eye-opening. What if we, in our tremendously large worlds, made the most of everything by carefully taking our possessions apart and finding incredible value in them? Editing your photos in  black and white is ideal for such experiments – remove all colors from your artwork and you’ll be faced with unsettling obstacles. These constraints will allow you to see possibilities in anything, be it in your personal life or in your art, giving you a chance to find comfort in the uncomfortable.

solitude_23877933852_o

You might be unsure as to how to begin this challenge of poetic self-discovery. First, try to take a few existing photographs for the sake of experimenting. If you’d like to have a proper shoot first, focus on elements such as freckles and eyes – these are beyond striking in black and white, and they will dramatically increase the overall quality of your work. (If you or your subject don’t have freckles, drawing them on with an eyebrow pencil will also work!) Take photos of your surroundings, too, in case a great double exposure will come out of your experiment. Pay attention to details, as they will be the ones standing out once you’ve removed all colour from your photos.
Contrast is of utmost importance in the black and white realm. High, but not overdone, contrast adds a certain thoughtfulness to photographs. It compels the viewer to think about the subject and the story they’re attempting to tell. Though colours have the same storytelling ability, they don’t put as much emphasis on the emotions of the subject. The clarity tool in Lightroom is also very helpful when it comes to dramatic emotions. A slight increase will enhance your image in the most beautiful way.

To take it a step further, try working with monochrome: varying tones of only one colour. This will add a unique touch to your otherwise black and white images, further allowing you to challenge yourself (this time with only one colour). A hint of colour will add a feeling of maturity to your images (think of withering vintage photographs – all kinds of ideas can emerge from that thought alone). You can also add texture (specifically dust and scratches) to your photos. The more you experiment, the more you’ll enjoy the beauty of black and white photography.

our-world_14565657687_o

img_6092

Not only do black and white images inspire you to look at daily events and objects from a fresh perspective, but they also challenge you in the healthiest of ways, proving that limitations can be incredible teachers. If intensifying the emotional aspect of your art is in your field of interests, then be fearless when it comes to black and white photography – you’ll create incredible works of art with it. Even if you end up preferring vibrant colours to desaturated ones, you will have challenged yourself and learned something refreshing, unfamiliar and eye-opening. That’s something to be proud of as an artist.

roaring-like-a-lion-in-my-heart_15320886509_o

Making Family Portraits Perfect Using the Chasing Light Lightroom Bundle

A good family portrait will hang in a house for years. Everyone who comes through that house will see that picture. So it’s important that the best family picture looks the best that it can. If you’re trying to create the perfect portrait, the Sleeklens Chasing Light Lightroom Bundle can help. The bundle is also useful for perking up any pictures your family has, but that weren’t edited properly. Here, we’ll give you an in-depth guide for turning your family portrait into a perfect memory. Follow along as we transform this picture.

family-portraits-1

The All in One

The all in one section of your Sleeklens Chasing Light bundle is perfect for a quick fix. If you’re a beginner in Lightroom this section is a great place to start. The all in one section will combine the best of the rest of the bundles. Try out the different presets until you find one that works best for you and your picture. For our example photo, we used the preset Matte Glow to darken the background and bring out the natural shape of the outfits.

family-portraits-2

Base

The base section of the Sleeklens Chasing Light bundle is the most important bundle. This will be your building ground for creating the perfect photo. For the example picture, we want to tone down the bright background and create more of a focus on the family members. To achieve this, we used the base preset in the shadows. This does create more of a highlight on the family’s skin and clothes. However, it darkens the background, and draws the attention to the family. The problems created by the highlight will be fixed in later presets.

family-portraits-3

Exposure

In order to adjust the brightness of a photo you’ll want to play with the exposure. Normally this is done when taking the photo. However, the Chasing Light workflow can help you adjust this in the editing section. To help darken the example picture we used the preset Brighten Shadows. This toned down the light of the family’s skin, and brought out their outfits.

family-portraits-4

Color Correct and Tone

For the color correct, not much needs to be done in this picture. Mostly color correct is used to tone down reds, yellows, blues, and greens. However, since the color of the family’s outfits is a focus of the picture, it’s important to leave them bright. We used the preset Fix Red Skin to bring out the family’s natural skin tone a bit.

Chasing Light’s tint/tone presets can help the colors of your photo pop rather than get toned down. However, be careful when using the preset color pop. As you can see in the picture below (on the right) bringing out the bright colors of the red tops actually drowned out the patterns on the outfits. Instead, we used Warm It Up (on the left) to bring out the colors.

family-portraits-5

Polish and Portrait

In the Chasing Light bundle Polish, you can fix errors that occurred in the editing process. This includes fixing colors and highlights. For this example, we used Base Cool. This toned down the red that’s been appearing in the background of the picture. The action also washed out the color of the outfits. However, this was fixed in the next bundle of presets.

The portrait bundles are ones that are used to specifically edit portrait shots. These are groups of settings that are made to match people’s skin tones and outfits. To help bring back the family’s clothing, we used the red/green preset to help pull out the brightness of those colors.

family-portraits-6

Vignette

Normally vignettes are used to surround the family and pull the attention to the people. For this picture, we used the Medium White preset. Sometimes a white vignette looks better than a black vignette. In this case, with the sweaters, the white vignette made the picture feel more like a winter setting.

family-portraits-8

As you can see, using the Chasing Light bundle is an excellent way to edit family portraits. You can help make a perfect picture for your clients or touch up an old family memory. Either way, this bundle is perfect to help create natural looking family portraits that will decorate your home for years.

5 Tips for Shooting Natural Family Photos

Doing portrait photography is a great way to have a career as a photographer and have fun at your job. Unlike shooting professional models, when working with a family you have the opportunity to not only be silly in the studio but also create lasting memories for said family.

Sometimes when a family, especially one with young children, goes into a studio, there’s an air of nervousness and stiffness, and that creates some unnatural and forced pictures. No one wants to look back at their pictures and see strained smiles and stiff poses. Getting natural family photos is all about having fun, and getting the right kind of reactions.

1. Bend It

A good way to remove the stiffness of any pose is to get the family to move and bend. Sitting or standing perfectly straight is not natural. Make good use of a person’s joints and have them bend at the elbows, knees, and hips. People can hook fingers in their belts or pockets to loosen up their arms. Have the family turn slightly with one knee bent and their hip pushing out toward the camera. If they’re sitting down, let them lean forward a bit, or turn to their side and extend one leg while the other stays bent.

natural-family-photos-1

2. Capture the Reaction

Most of the time when you’re shooting a family portrait you won’t be capturing the action, but rather the reaction. If youwant natural family photos, tell the family to do something, and wait for the moment after it happens. Have one person whisper a secret in the other’s ear and capture the two of them laughing afterward. Get the kids to surprise attack the parents and capture the family dissolving into laughter after. Whatever you ask the family to do, you want to shoot the aftermath, when the family is having fun and their smiles are real. Capture a true natural family moment.

natural-family-photos-2

3. Get the Lighting Right

Unlike shooting an intense fashion shot or a light and airy nature shoot, you want to get the family in a soft and fun light. Use a light colored background, white is best, and use either a large window with natural light or just one light. Make sure that the light isn’t pointed directly at them or coming from directly overhead. It’s best to have a very bright studio and to use a flash to help add contrast. Set the flash up at a 45-degree angle to avoid odd shadows.

4. Break out the Props

Especially when it comes to photographing toddlers or young children, you want to give the family something to help focus their attention on. Not every photo has to be the family in a straight line staring into the camera. It’s okay for them to let their attention wander to an object, and sometimes even creates the family’s favorite picture. Ask the parents to bring one of the children’s favorite toys or books. Encourage the family to simply play with the child and capture their reactions. If you have your own props, let the children choose what they want to play with, and shoot their play time. Let the kids be kids and have fun.

natural-family-photos-3

5. Use Flattering Poses

People tend to be self-conscious about their body. Maybe someone is concerned about their weight, or someone else has a large birthmark they can’t cover up with makeup. It’s easy to pose people in ways that flatter them and make them comfortable with the end result. Study your family as they are in the studio and notice blemishes or anything they are uncomfortable with. Then change your poses to match.

If someone is worried about their weight, have them lie down on the ground facing the camera. Having the kids climb on top of them creates a natural pose and helps hide their body. Also, in other poses, try to angle the camera so it looks slightly down on them, this will hide any double chins and help slim the body.

natural-family-photos-4

For any blemishes, have that person’s face or turn a specific direction. If they’ve got a pimple on their chin, for example, simply have them turn their head slightly so that that side of the face is always facing away from the camera.

If you’re working with a couple where there is a huge height difference, have the couple sit down. In standing poses, get the taller of the two to stand with their legs apart a bit to help bring them down. When shooting a single parent and young children, encourage the parent to lift the children into their arms. You can also get great natural family pictures by having the parent kneel on the ground and hug the children from behind.

Shooting families can seem a bit scary; you don’t want to mess up precious memories. But forcing the family to stand still and smile at the camera creates memories that family may not want to remember. Just let the family be natural and have fun. Make sure they don’t stand or sit too stiff and always try to bring the family’s original personality to the pictures.

How To Whiten Teeth And Touch Up Faces In Lightroom

Sometimes, when we are taking portraits, especially candid wedding shots, we are more focused on the emotion of the person sitting in front of us, rather than our camera settings, lighting, etc. We get caught up in the moment and when we get home, the image or photo we upload doesn’t have quite the right feeling that we were hoping for.

Here are several easy steps to know how to whiten teeth in Adobe Lightroom classic or photoshop, editing portraits and touching up faces in Lightroom presets to get stunning, lively images. The goal is to show you some easy ways to make your photos pop and give some personality back to your subject! And each step explained can be applied to almost any portrait you take! And if you want to know more, just click here.

We have the image or photo of this outdoorsy, very friendly man. He looks a bit cold, but his smile and eyes are inviting. Let’s bring him into Lightroom presets, click this link, and edit him to ensure we capture the essence of who he is!

Basic Adjustments in Lightroom

In your Basic Adjustment Panel, let’s change the contrast, shadows and blacks. Each of these makes the subject pop a little bit more by giving the image or photo some deeper blacks overall.

lightroom-face-touchup-1

Increasing contrast by +38 points eliminates some of the mid-tones of the image or photo making the image more contrasted.

Increasing shadows by +70 points ensure that we’re not losing key details in the darker areas of the image, like his beard.

Decreasing the blacks clipping by -82 points clips some of the blacks to help maintain some of the contrast going on.

We didn’t really change a lot, but he is already looking better.

Next, let’s focus on minor facial adjustments.

Blemish Removal in Lightroom

To begin touching up blemishes or other problem areas on the person’s face, click on the Spot Remover tool on the upper left side of your editing brush panel. Set your sizes, feather and opacity so that you can remove the portion you need in one click.

lightroom-face-touchup-2

If you notice, ours is set at about the size of each blemish. It’s important to ensure we are in heal mode rather than clone mode, so there aren’t any noticeable circles where we are fixing things. Then click on the portion, acne, blemishes etc that we want to get rid of. For now, he just has two noticeable blemishes. Make sure the area that is replacing the blemish is close in color and texture to your blemish area. If your subject has many blemishes, also try using the soften skin brush.

With this portrait, we avoided the soften skin brush because he started to look very “photoshopped,” and he lost a bit of his rough, outdoorsy look. The soften skin brush can help with faces that have a lot of blemishes, oily skin and lots of pores.

How to whiten teeth in Lightroom?

There are times while clicking a picture when your teeth are shown dark due to lighting effects, therefore, it is always better to use teeth whitening tools. There are many professional ways you can learn on how to whiten teeth in Lightroom but we have picked the easiest one. But if you want to know how to whiten teeth for real, then you should click on the link.

In order to get the best teeth whitening results, you first have to choose the right brush size that would fit the teeth size. If you are using a brush with a smaller size, I will take much longer to apply the teeth whitening effect. Within the Whitening Teeth tool, you can adjust the brush size as per your need.

Among various other features, Adobe Lightroom has such as the blur tool, brush tool, spot removal, etc, there is one unique tool that helps in whitening teeth. It helps in tackling with one of the biggest challenges associated with whitening teeth and that is getting the correct balance of whitening teeth. All thanks to Preset Lightroom Portrait Brushes, Whitening teeth and eyes is now an easy task.

How to choose the teeth whitening effect in Lightroom?

The Teeth Whitening effect can be found in the Develop module of Adobe Lightroom.

Even if you know how to whiten teeth in Lightroom, you should read this one. Who knows, you may end up knowing something new.

For most individuals, the teeth whitening set using the standard adjustment brush works pretty well! For this guy, his teeth aren’t showing that much, but here’s how to do it.

Like this tutorial on teeth whitening? Share the article with your friends!

lightroom-face-touchup-3

Basically, just set the brush to the right brush size with the help of a brush tool, and “paint” over his teeth! Then voila, whiter teeth! If the teeth start to look to white, play with the size, feather, flow and especially density setting to get it right.

Eye Adjustments in Lightroom

lightroom-face-touchup-4

In the adjustment brush editor of lightroom, there is an option for photo editing irises; however, since his eyes are so dark, the custom setting worked just fine. The iris brush brightened his eyes too much and he started to look like an alien! Like with the teeth whitening, “paint” over the part you want to be adjusted, but then this time, move the blacks slider to -67 to make his eyes a bit deeper and darker in colour. And there you will see teeth whitening getting done easily.

The other adjustment you can make to someone’s eyes in lightroom is removing the dark circles underneath. Similarly to how we just edited his eyes, click on new underneath the adjustment brush icon and then set the brush to exposure. “Paint” in the dark areas underneath his eyes and move the exposure slider to +.83. We don’t want to bring the exposure up too much or it’ll be noticeable that only those portions were brightened!

lightroom-face-touchup-6

And there you have it, the finished portrait. What we primarily did is increase the contrast in the original image. In the adjustments, we tweaked the blacks so that they stood out a bit more than the colors. Then we removed some blemishes, made the model’s teeth whiter and opened his eyes by darkening the irises and lightening the circles underneath.

For each portrait, this should only take you max five to 10 minutes if you know your way around Adobe Lightroom. We really strived to make the image or photo look great, but not too edited. This is a super-easy way to touch up faces in post-production for portraits that really grab the viewer’s attention. Do you like our method on how to whiten teeth in Lightroom and teeth whitening? How about our post about creating collages in Lightroom?

Have something different to say, send us a mail now.

Thanks for reading!

10 Great Softbox Lighting Techniques and Effects

A softbox is one of the most versatile tools at your disposal as a photographer. It can give you the light you need for your photos, while preventing harsh angles, deep shadows and more. It will ensure that everything in your photos is balanced. There are many options for what you can do with a softbox; all it takes is knowing some great techniques to get the right amount of light for your picture.

Here are 10 fantastic lighting effects that you can achieve with just one softbox at your disposal.

Getting the Jewel Light

A great jewelry shot is all about the lighting. To get a wonderful picture that reflects the beauty of the jewelry, all you need is one softbox, the jewelry itself, along with a shiny surface and some white poster board. Place the piece of jewelry on the surface, with the poster board off to the side at an angle. Place the softbox to the side as well. Once everything is shining and reflecting, take the picture.

softbox-lighting-effects-1

Window Softboxing

Take translucent silk and have it in front of the softbox. About five feet in front of that silk, opposite the softbox, have the model sit facing the light. This will give the light a feel of coming in through a window, and it can make for some very unique photos.

Light the Subject and Background

If you want to give equal light on the person you are photographing and the background itself, this is quite easy to do with a softbox. Just have the subject stand at an angle to you facing the light. The softbox should only be about one foot from the subject, and at nearly a 90-degree angle from them.

softbox-lighting-effects-2

Highlighting Beauty

A softbox is a great way to highlight a model’s beauty. The simple and slight light can add to the features without making them harsh on the subject. All you need is one softbox with one reflector. The reflector should be down below to catch the light, and it will fill out the features of the face. Have a plain background behind the subject.

Use it as a Rim Light

When you are doing a profile picture, you can have a front profile and you can have a back profile. With the one softbox, just place it at an angle behind or in front of the person you are getting a photo of to create that rim light and to provide a slight light on the subject.

softbox-lighting-effects-3

Movie Poster Light

Using a softbox, have it lower than the person you are photographing and off at an angle from them, about 45 degrees. The person looks down at the light as you get the picture. This will highlight their features, provide some deep shadows, and darken their back area.

Softbox as a Background

To get an amazing silhouette all you need to do is have the model stand in front of the light source itself, about one foot in front. Then take a picture of the model with the light behind them so you get clean, crisp silhouettes.

softbox-lighting-effects-4

Softbox Bouncing

In order to increase the light you have with only one softbox at your disposal, you can bounce the light off a white wall. Have the model stand in front of the camera, with the softbox next to you pointing towards a wall. This will provide a great deal of extra light as it reflects off the surface to give a lot of definition on the model, especially on the side facing the white wall.

An Element of Design

If you are taking a picture of an object, have the softbox off to one side facing towards a reflector on the other side with the object in the middle. Set your camera up between the softbox and the reflector (a foam core reflector works) and back about five feet. You will get some great light from this, especially with reflective products like bottles or glasses.

softbox-lighting-effects-5

A Group of People

If you only have one light and you want to get a group of people evenly lit, it may seem very difficult but, really, it’s not. All you need to do is have everyone stand in a line and turn the light source horizontal. At this point, you move the softbox down the line, taking one photo of each individual person as they’re lit perfectly. In post-production, you can put it all together and you will have an evenly lit photo of a group of people. It is actually multiple photos together, but with the editing it will look like it was taken with everyone all at once.

These tips will help you get the most out of your softbox, without having to buy another one, or any other form of light source. Great for photographers on a budget or just starting out.

Using a Mini Softbox for Awesome Outdoor Portraits

Shooting portraits in a studio can be great, but outdoor portaiture with natural light is just better. The problem is that when you try and take photos outside, the light doesn’t always cooperate, and you need to take matters into your own hands. This is where something like a mini softbox can really help you out when you need it.

A softbox is just a small light, used primarily in studios, but which can be adapted for use outside. The mini variety tends to be best in this regard since it is easy to transport around.

When you can control the lighting of the outdoors with a mini softbox, you can drastically change how your photos look. Subjects can really stand out, while also getting the natural setting around them. It is the best of both worlds. You have the studio and the outdoors, together in perfect harmony.

outdoor-portrait-2

The Advantages

So, why use a mini softbox for this? Why not use some other type of lighting? Why not use umbrella lights? There are several reasons why a mini softbox is just best for this situation.

The biggest advantage is the fact that these boxes are small and highly portable. You don’t need to haul your studio around, you just need to take a small box with you and you will get all the light you need. You can also use a light shaping tool to get the lighting that you want in your portraits outside. You can add definition through the use of shadows, or remove shadows to create a clean and elegant look on the subject.

outdoor-portrait-3

Why Not Regular Softboxes?

You may be asking why you can’t just use a regular-sized softbox, the type you use in the studio. After all, it is not like they are huge or anything. Well, you get all the features of the regular softbox, in a mini softbox, but without the extra space. So, there is no reason to add extra work for yourself in lugging around a large softbox.

How to Do It

Now that you know you should use a mini softbox, how do you go about using it?  It is actually very easy to use. The main thing to remember is that as you move the subject around for the photos, you may have to change the lighting depending on cloud cover, the position of the sun and more. This will allow you to get the right light for your subject with the softbox.

Don’t be afraid to try out multiple locations for your shoot as well. The light is going to be different everywhere and you may find a great spot for your photos just by random. Most mini softboxes run on batteries since you won’t be located near an outlet. Make sure that you always have batteries on hand so you don’t lose your lighting opportunities with the softbox.

outdoor-portrait-4

Use the Attachments

When you are taking your mini softbox out, make sure you use your attachments to get the most out of the mini softbox. There are many attachments that will be useful to you depending on the lighting conditions outside, and the needs you have as a photographer. These attachments, like diffusers, can be carried around easily by you and often come as part of the mini softbox. These diffusers will create many lighting effects for you, from creating very soft light to compliment the sunlight, or sharper and more focused light to create the shadows that you want.

One of the best types of diffusers to keep in mind is the gold-banded diffuser. This diffuser attaches with Velcro to the softbox itself and creates really beautiful and warm images in the outdoors. It can work great if you want a natural look on the subject but don’t want to add too much light. It is also very effective at creating the golden hour light, where the sun is setting.

outdoor-portrait-5

As a photographer, you want to get the most out of your photos, your light, and your subjects. You can leave everything to chance and allow Mother Nature to dictate the lighting, but what if it is a cloudy day and you want golden light on the subject? If that is the case, then you need to take matters into your own hands and get a mini softbox. It is highly portable. It is easy to use, and it will ensure that you get the most out of your pictures.

For incredible portraits, you should always take things one extra step. Mother Nature can be great for her lighting, but there is nothing wrong with a bit of a helping hand from technology. The mini softbox can do that for you.

Documenting the Passage of Years

I sometimes think photography doesn’t get the love it deserves for its capacity as a time machine. Especially now. We take bazillion pictures of our different adventures and life events along with some of the most mundane stuff imaginable, and it all gets shared online or on our phone’s screen for a millisecond before disappearing, maybe forever.

Because I’m sentimental, I think that’s wrong. I happen to like going through my old photos to remind me where I was at a certain moment on the calendar. That little bit of retrospection gives me a different perspective of how my life has progressed. Or not, as the case might be, which might be an inspiration for some self-improvement.

So a few years ago, I decided to take that idea to what I figured was its logical conclusion and started documenting an annual event with one of the photography’s more formal genres, the portrait. Every Christmas, our extended family meets in a secular fashion at one person’s home or another and I take advantage of the captive subjects for a round of quick photographs. I tape up a swath of gray seamless paper to whatever wall is available, set up a couple of portable flashes on light stands with softboxes and spend a half hour or so documenting everyone who happened to attend that party. It’s all quite casual.

Of course, I’m not the first person to do this. One of the more famous applications of the portraits-over-the-years category is a long series done by Nicholas Nixon who documented the four Brown sisters—one of whom is his wife—starting in 1975 on a yearly basis. Each black and white portrait maintains superficial similarities to the ones before it—the women are shoulder-to-shoulder in the same order often with penetrating stares into the lens. Occasionally, half-smiles dare to appear but they are otherwise restrained in their expressions. But it’s the passage of the years that writes the stories in these pictures—or at least we conjure up our own interpretations which turn it into a shared experience with the sisters who we will never meet but feel a connection with them nonetheless.

Theresa, Zoe & Edgar Bautista_mini

Bautista family 2_mini

Edgar, Ava, Theresa & Zoe Bautista 2_mini
The Bautista family over several years.

As for my Christmas project, I don’t spend a lot of time on each person, couple or family. I learned a long time ago that people are more patient with you blasting off, say, five frames than being the artist and struggling to get just the right characterization. In fact, I’ve taken the attitude this isn’t about personal expression—I do plenty of that with other kinds of photography—but about getting, ahem, a snapshot of that one day. It’s the accumulation of those quickie shots that’s more powerful than any one image.

For better or worse, there are the relationships that show up for a couple of years and then vanish. There’s the childless couple that gradually blooms into a family of four. Children get older. Faces, hairstyles, clothes change.

The one constant is the technique. A simple background and more or less the same lighting tie the images together. I don’t suggest poses unless someone asks. I let them choose how they want to be seen that day. Sometimes that means wonderful expressions and for others, the picture comes across as a yearbook mugshot. Doesn’t matter. Just like a single frame in a video time lapse usually can’t stand on its own, it’s how the photographs over the years tell a story that’s important. All that it takes is the dedication to the task where the payoff is years away.

The family dog, Sydney, now deceased, also took part in the portrait sessions.

Variations on the Theme

Of course, there are many other ways to take this idea. Take a portrait of a child on his or her birthday or some other annual occasion. Or document your parents once a year. Do a self-portrait on a regular basis. And I’m not suggesting you be so arch as to make these portraits on the same day every year, just be consistent.

Or, perhaps you’re a landscape photographer. Choose a scene and take a picture of it, say, once a month or so over the course of years.

bus stop dyptich_mini
The Jacobson family as it grows to four sons. The diptych was taken at the same place with a portable flash in a softbox for fill light. I got lucky as both days were overcast providing even illumination.

I’ve also taken the same idea for families under construction. That is, I photograph a couple or family while the mother is pregnant and then place them in exactly the same place after the baby is born. A simple, celebratory story is told with that one diptych.

As for the point, I made at the start about our snapshots disappearing by the billions, one of the more important aspects of this kind of documentary is making sure your images last long enough to make a statement. This means being diligent about keeping copies of everything you shoot. I maintain my archives on at least three different portable hard drives and the most important work—such as the Christmas series—also gets protected on a remote server, aka the Cloud. I use CrashPlan, but there are many to choose from.

As I said, this does take some perseverance plus cooperation from your subjects. I’ve promised them a book sometime in the future as a reward for their indulgence. The only trouble with a project like this is deciding on an end point. Not sure when that will be.