Tag: diy

Classical Portrait Photography Using Single Source of Non-Professional Artificial Light

Professional lighting equipment has helped many photographers take stunning photos of their subjects. Unfortunately, not everyone can afford an impressive set of tools like this.

Fortunately, you don’t need to use professional equipment to improve your studio photography skills.

As much as I admire studio photography, I’ve never worked with professional equipment myself. I live in a small town that doesn’t sell photography-related products, and I can’t afford the lights I’d like to work with. These obstacles have inspired me to use non-professional sources of artificial light. Here are a few you probably have at home:

  • A torch
  • Any kind of indoor light (ceiling light is fantastic)
  • A lamp

These objects can be used to take a rich variety of interesting classical portraits. Here are 5 ideas that will help you create gorgeous lighting that will make your photos look like paintings.

classical portrait silhouettes
To take this photo, I stood in front of a window at around 6 p.m. (after the golden hour) and used ceiling light to add warmth and brightness to the background.

#1 Backlight and Natural Window Light

If it’s too gloomy outside to take naturally lit portraits, try to use the remaining outdoor light to illuminate your subject’s face. Then, highlight their hair with the help of a lamp or ceiling light. This will create a soft glow that’s perfect for dreamy portraits.

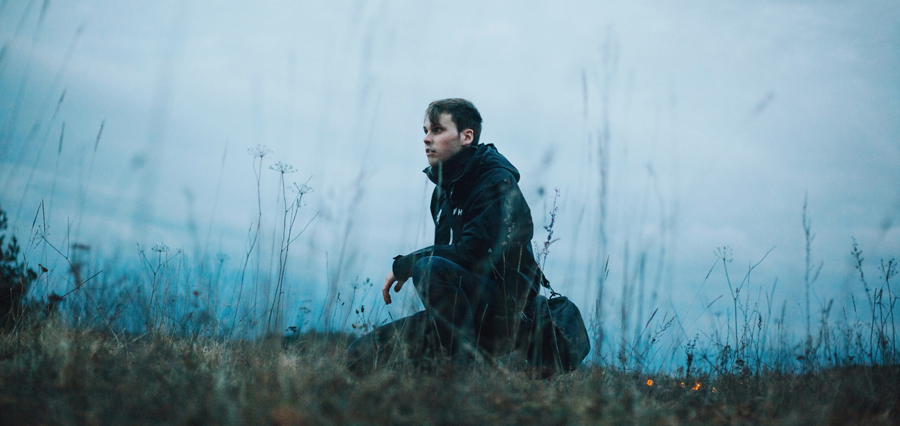
This technique can also be used to create silhouettes.

classical portrait hair shadows

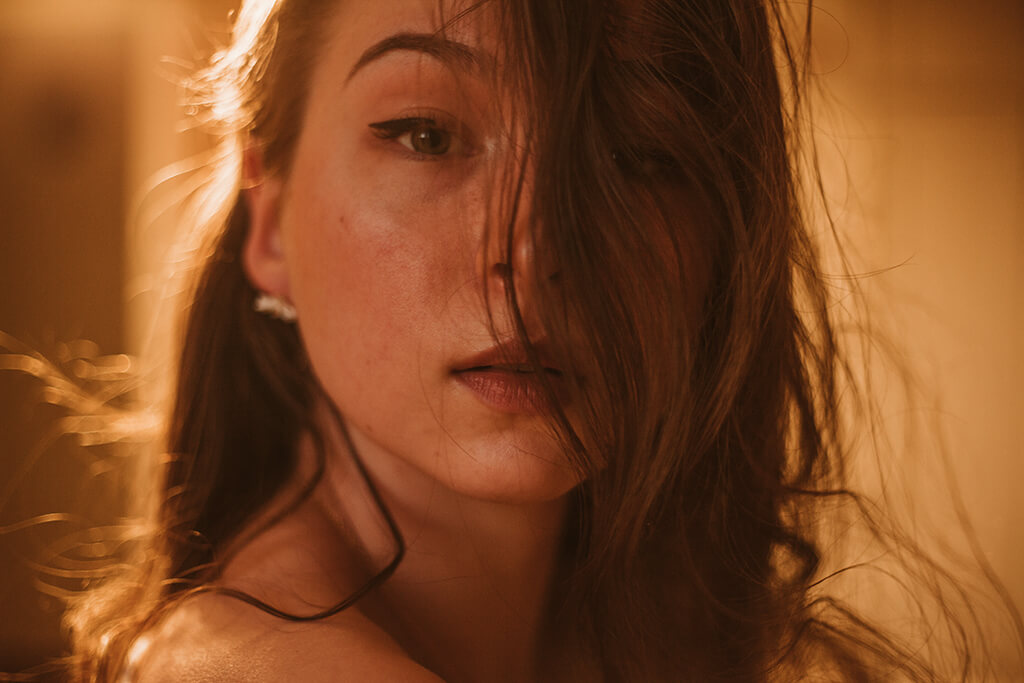
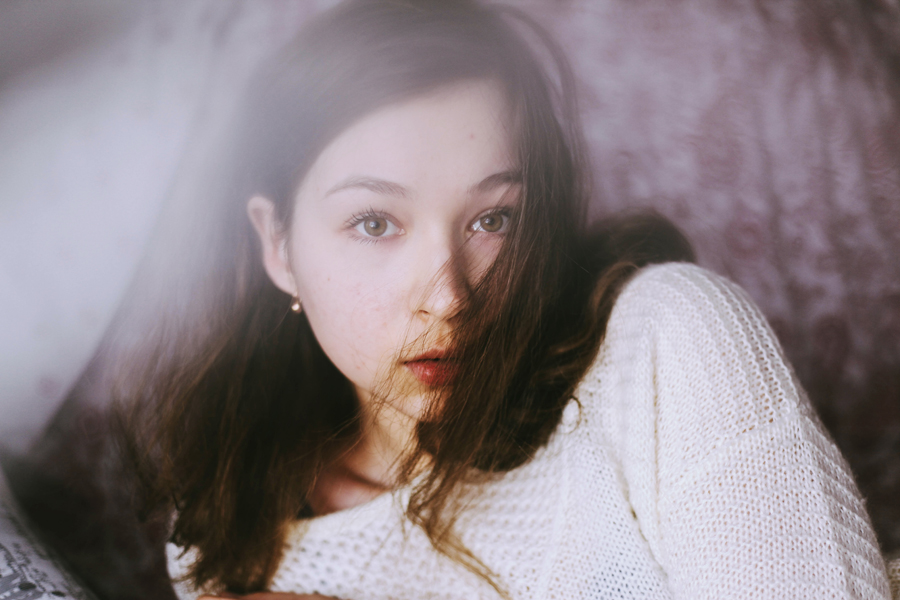
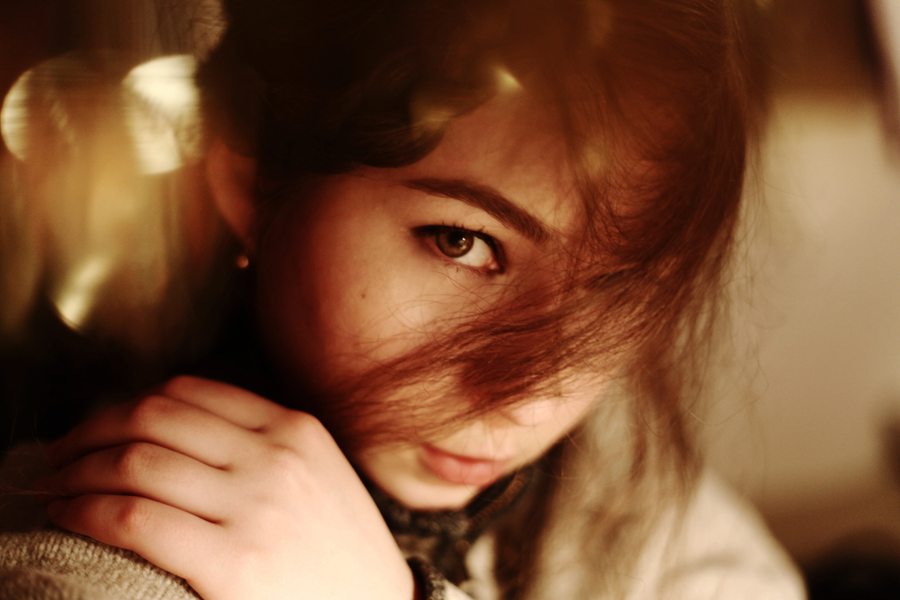
#2 Side Light and Textures

Direct artificial light is too harsh for most portraits. To soften its brightness, you can cover it using paper, curtains, or hair. Treat your source of light like the harsh midday sun; if you use it wisely, you’ll get to experiment with a lot of stunning shadows.

When I take close-ups using artificial light, I like to experiment with hair shadows. Hair is unpredictable and never looks the same, so it’s the perfect resource for unique portraits.

classical portrait lamp light

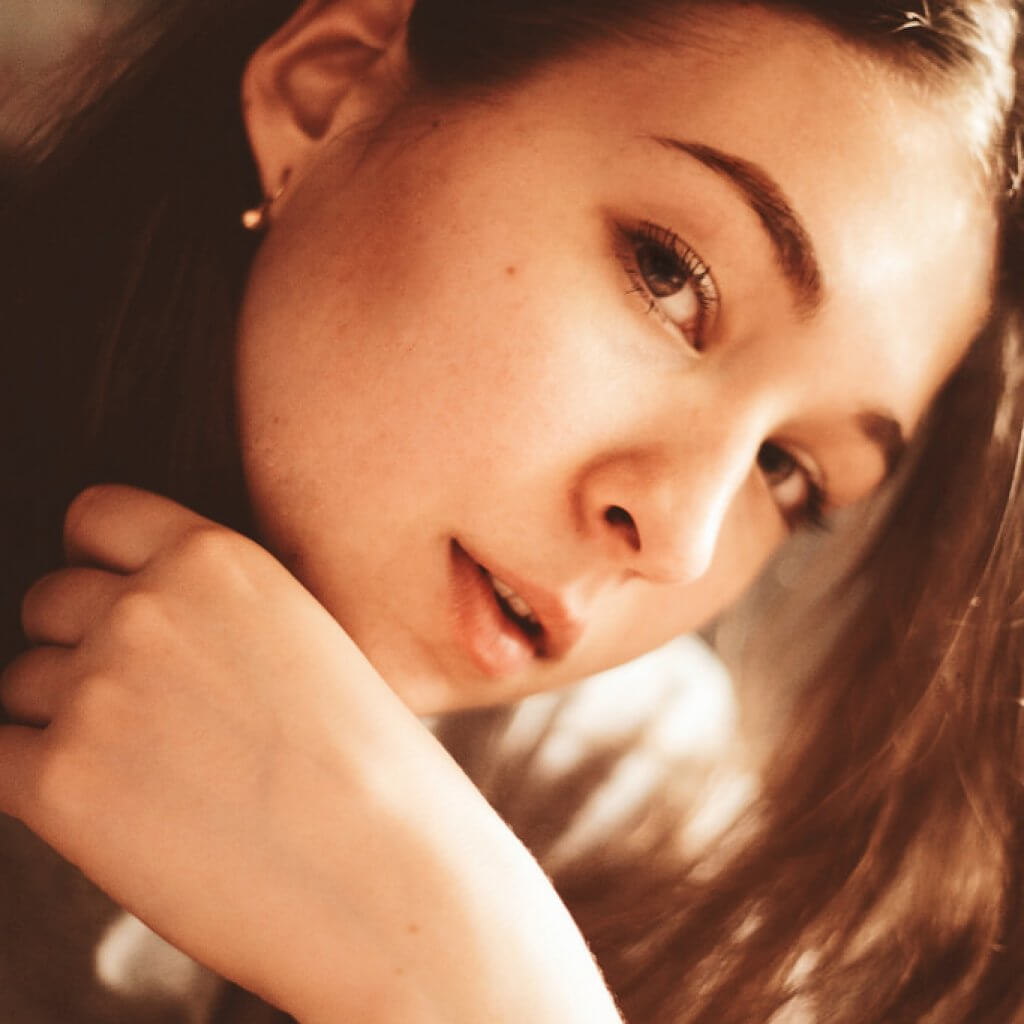
#3 Lamplight with a Natural Reflector

You can create softer light using a DIY reflector such as a sheet of paper or a white wall.

To take the photo above, I sat next to a lamp while its light reflected off a white wall. This made my face glow and highlighted my hair in the background. Since it was dark when I took this photo, this was the only source of light I used.

classical portrait desaturated lightroom

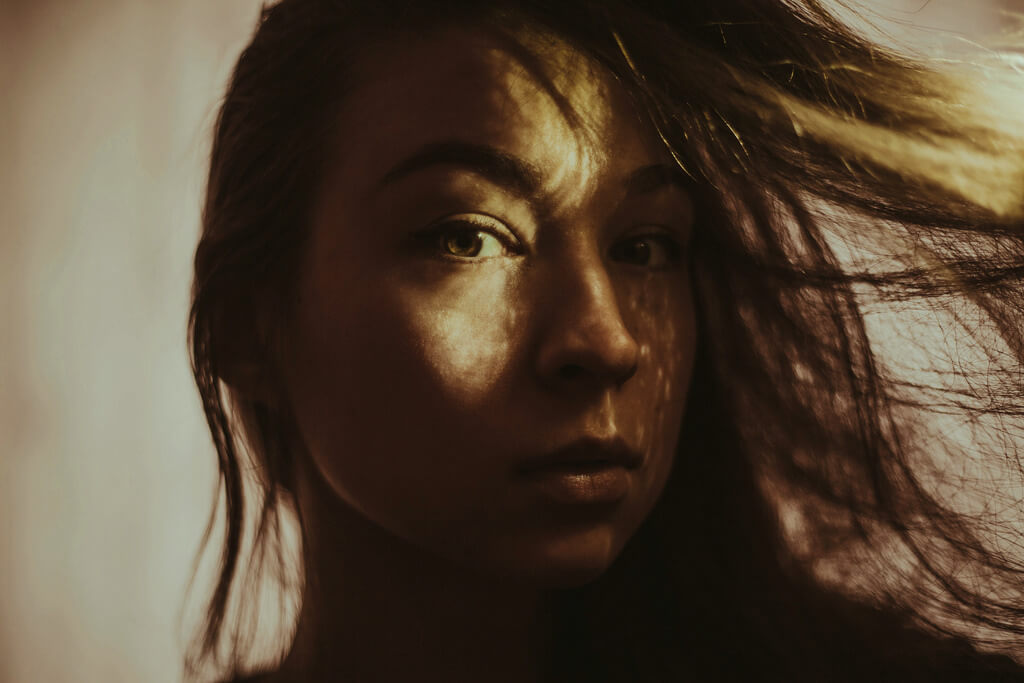
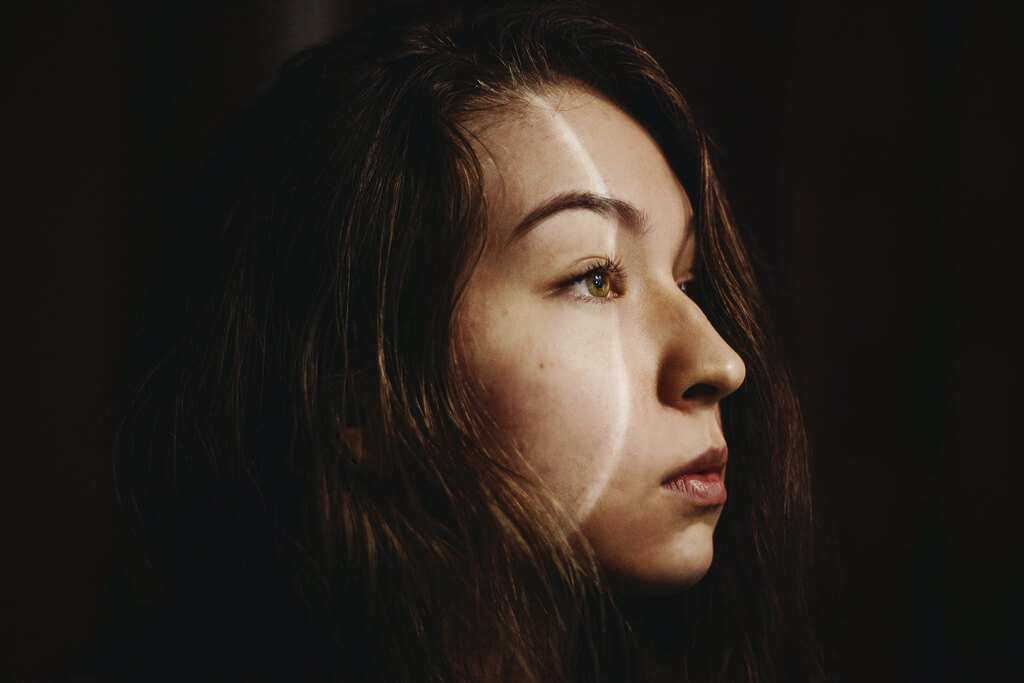
#4 Desaturated Ceiling Light

As uninspiring as ceiling light might seem, it can be used to take eye-catching portraits. To take the photo above, all I needed to do was lie down under the source of light and pose.

One minor disadvantage of using artificial light is the unusual color temperatures it might create. In this case, my photo looked abnormally orange. Fortunately, issues like this can be easily fixed in editing programs like Lightroom and Photoshop.

saturation

To desaturate only orange tones in Lightroom, I go to the Color panel and slide the Saturation panel under Orange to the left.

classical portrait mirror reflection


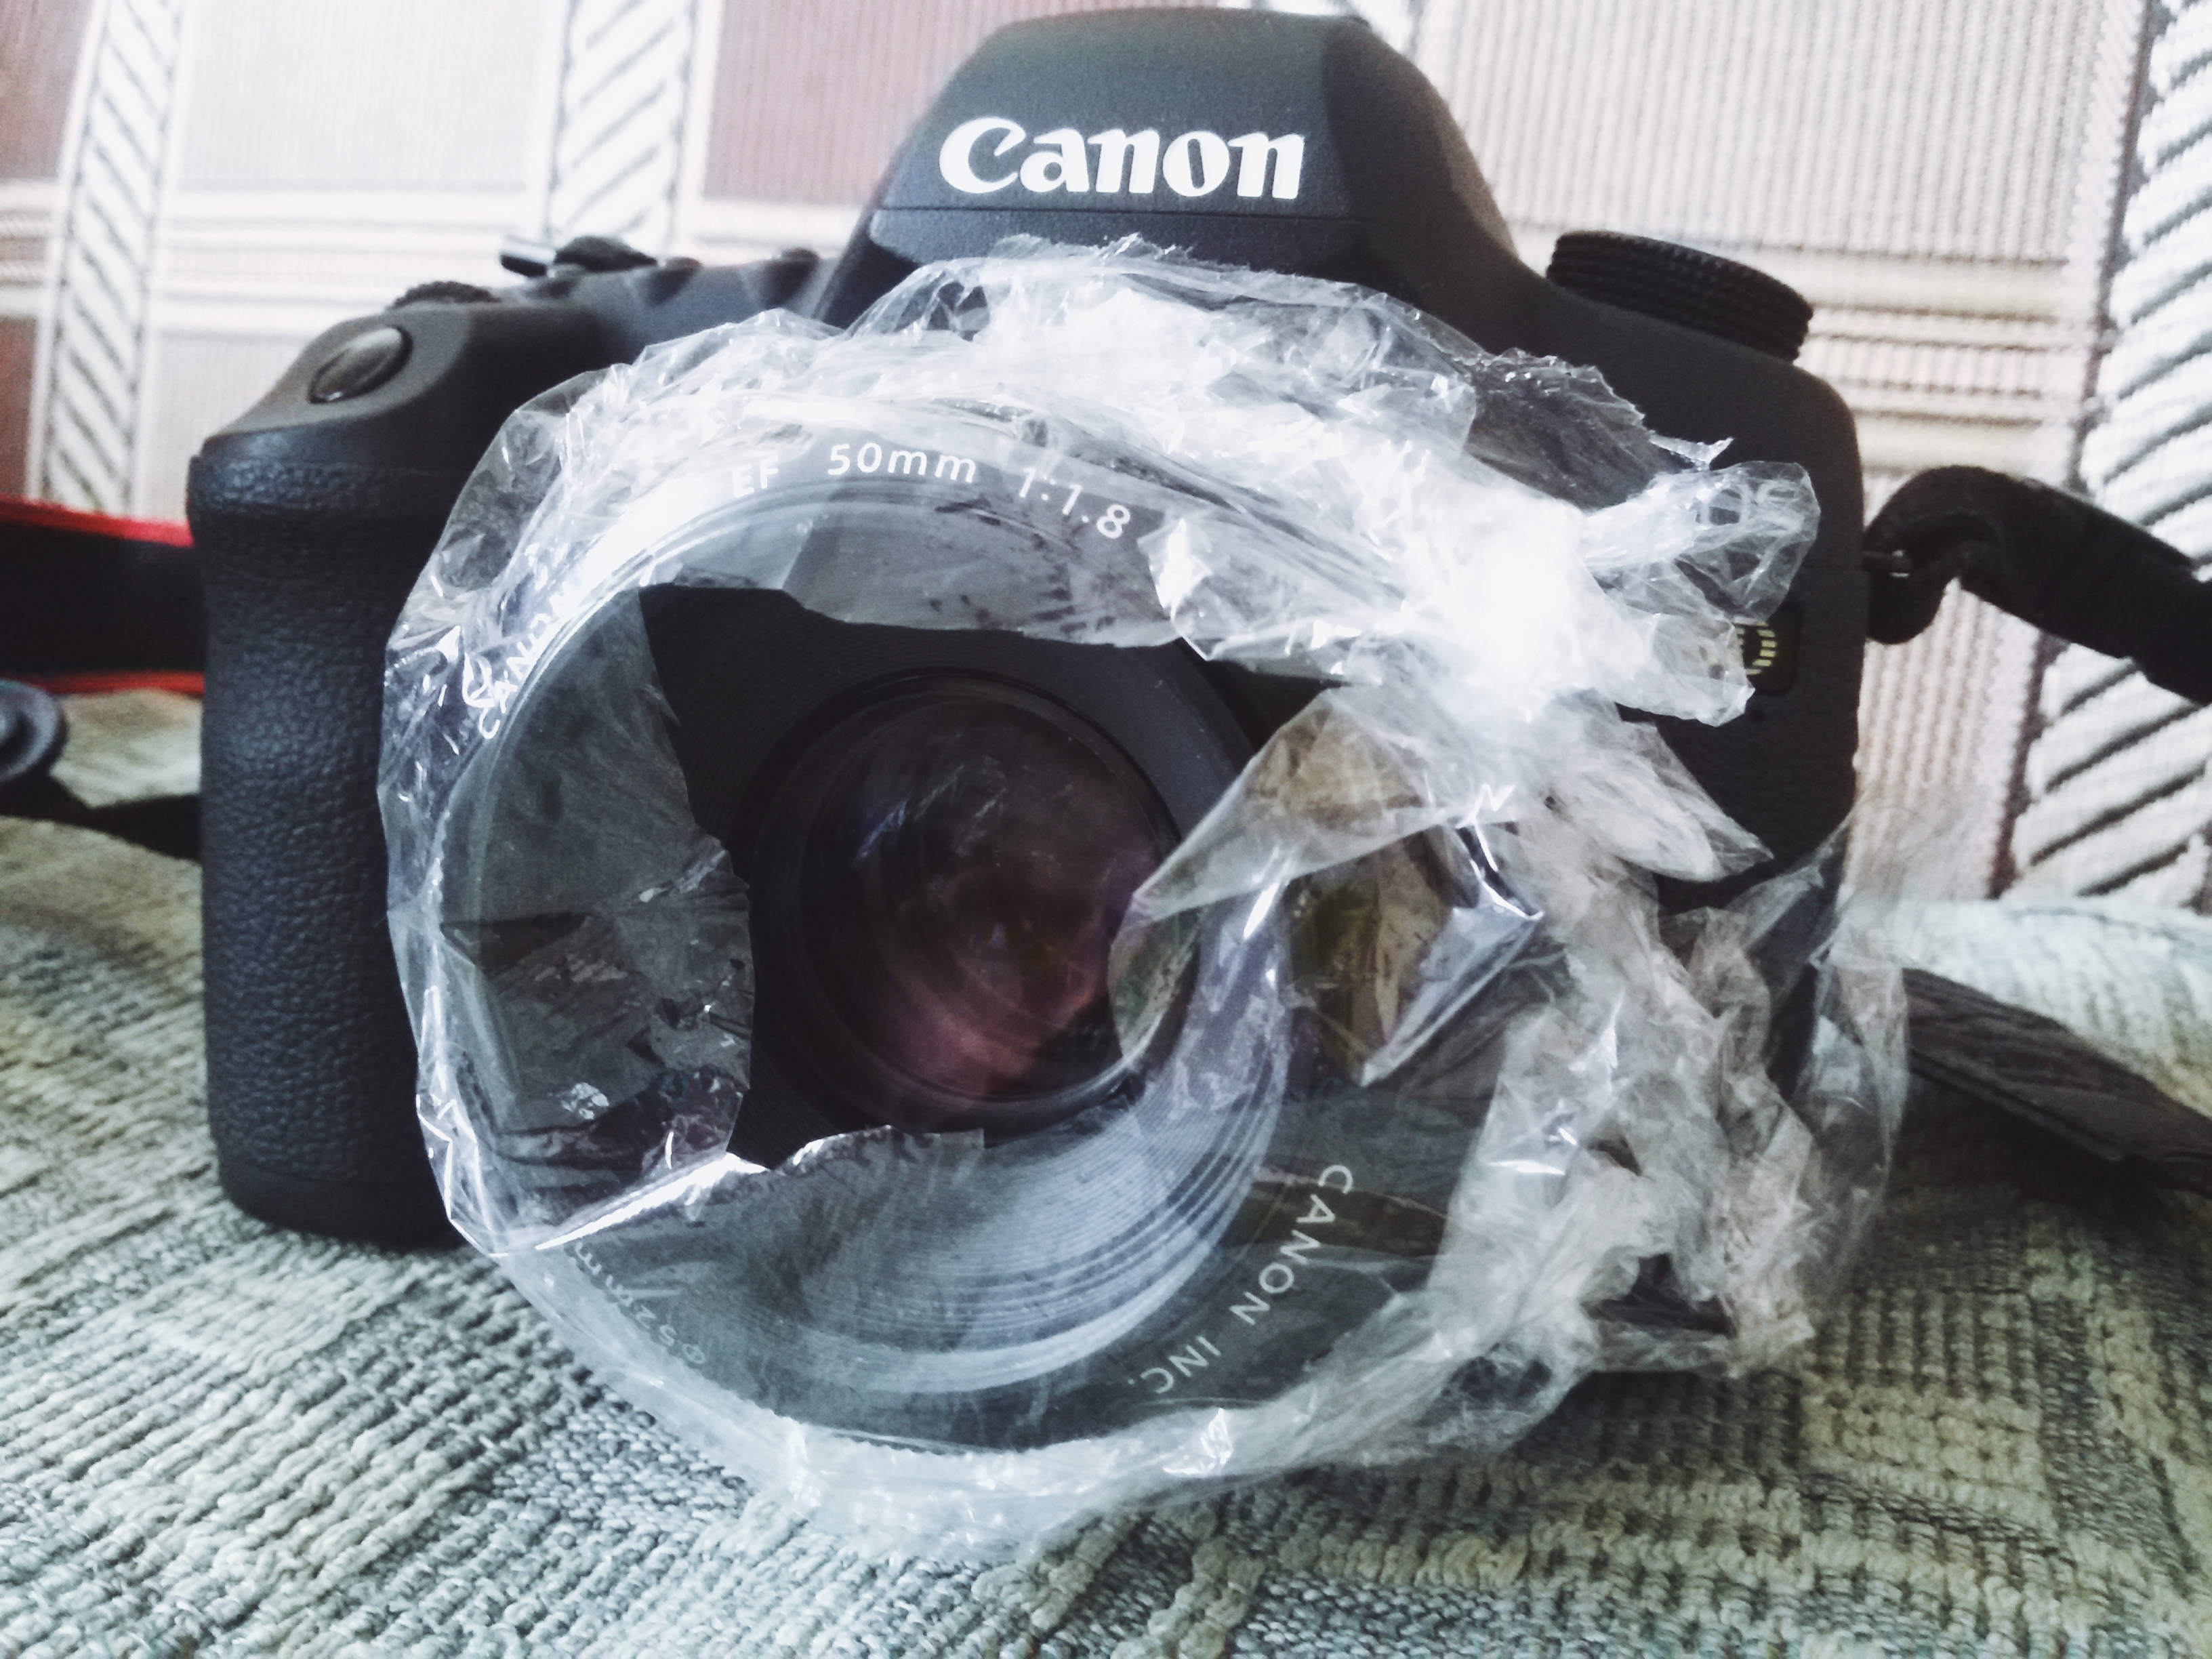
#5 A Torch, a Mirror, and Interesting Reflections

Point your torch at various glass surfaces and you’ll get interesting reflections. (If you want to create a rainbow effect, replace those surfaces with a CD.)

My favorite reflectors are mirrors, particularly those small, round ones. They can be used to create streaks of light like the one in the photo above. Even though it’s challenging to work with such details, it’s exceedingly fun to challenge yourself and get impressive results at the same time.


You don’t need to have a lot of money to take classical portraits. All you need is your beloved camera, a great imagination, and a few everyday tools.

Which of these ideas stands out to you the most? Comment below!

Where to Find Cheap Photography Props That Will Boost Your Inspiration

Photography-related products don’t always have to be expensive. Sometimes, the cheapest and most beautiful props can be found in the most unexpected places. If you take the time to look for them, you’ll find priceless gems that will boost your inspiration and make you a more creative photographer. Being able to make unusual items look graceful in photographs will give you a chance to improve as an artist. Your skills will help you make the most of any photo shoot, regardless of your budget. This will attract clients to you, give you more room to think outside the box and make you stand out as a photographer.

If you want to be a more imaginative artist, you should expose yourself to more opportunities. What every person can benefit from is the ability to find affordable items that will help him or her create a masterpiece. These items can be found almost anywhere: in thrift stores, libraries, and more. Here is a complete list of places where you can find awesome props and boost your inspiration.

girl browsing in a thrift store

Thrift Stores

Some items simply don’t look good when they reach a certain age. Others go out of fashion, are passed down to unenthusiastic family members, or lose their spark. While these possessions may not appeal to their owners, they could catch your artistic eye. Clothing items like scarves, which may not look that beautiful on a neck anymore, can be turned into props and used as elegant backdrops, foregrounds, or materials for DIY projects. There’s no limit when it comes to the potential of used items like these.

Other things you might find in thrift stores are vintage gems ideal for conceptual photo shoots, interesting items of clothing, and materials you could use to create foregrounds/backgrounds. Such props may also inspire you to embrace photo manipulation; for example, obscure items like curtains can be transformed into mighty waves or extravagant gowns in Photoshop. If you’re a fan of editing, thrift stores will open a whole new world for you!

second-hand books

Second-Hand Bookstores and Libraries

Purchasing used books will open your mind, give you creative ideas, and encourage you to experiment with something new. A fictional character’s perseverance, for instance, may become a source of empowerment for you. If you’re into fiction, look for relatable stories and characters. Finding comfort in magical realism will provide you with an unquenchable thirst for meaningful photographs.

If you prefer non-fiction, keep an eye out for coffee tables books with inspiring visual references or how-to books related to art. These guides will teach you something new about your beloved hobby or simply give you the opportunity to find pure inspiration.

flatlay - DIY materials

Online Stores

Websites like Amazon and eBay are filled with cheap props that can significantly improve your work. When you search for items, make sure you avoid products that might hurt you or damage your camera. Safe props include:

    • Backdrops
    • Wigs
    • Costumes
    • Accessories like glasses

The quirkier an item, the more striking your results will be!

children working on a diy project

At Home

Confetti garlands, giant polaroid photo frames, flower crowns, chalk drawings, dreamy photo filters, and paper masks are all things you can make on your own. (If you have children, some of these DIY projects will keep them entertained and encourage them to pose for the camera!) DIY projects can be found almost anywhere online. The ideas are unique, affordable, and fun.

If you’re interested in any of these projects, let us know and we’ll make a separate tutorial for you! 🙂

thrift store

Though investing in valuable photography equipment is necessary, you don’t have to do it all the time. Find used items, turn them into works of art, and show others how wonderfully creative you are. Once you’re happy with the results, donate your props; someone might find them just as inspiring and create incredible art of their own. It’s a beautifully organic process. Why not become a part of it today?

How to take enchanting photos using cellophane

It’s a given that professional photography equipment enhances every artist’s workflow and is an absolute joy to work with. However, professional tools aren’t the only things that can help you become a better photo-taker. There are many unlikely things in our homes which have the potential to add an extra touch of creativity to our work. Some obvious things, like lamps and mirrors, are often used by creatives because of their interesting ways of either creating or reflecting light. Other things, though occasionally used by artists, aren’t as popular. One of these handy little photo instruments can be found in almost every person’s kitchen: cellophane.

You might be wondering how cellophane, a transparent sheet mostly used for the preservation of food, can be used in the world of photography. You may have noticed that despite the sheet’s transparency, it can quickly become opaque when crumpled up. This haziness is ideal for the creation of enchanting photographs of all types. Whether you’re photographing animals, people, or something entirely different, cellophane can help you experiment with textures and clarity. This experimentation will compel your mind to absorb new ways of thinking creatively. In turn, these innovative ways of thinking will allow you to become a better, more observant, and more open-minded photographer with a bountiful supply of initiative.

Cellophane can be used in limitless ways, depending on your imagination. Though the following tips will help you look at photography from a creatively peculiar point of view, don’t stop there. Let these ideas be the foundation for even more fascinating and striking ideas.

/

//

Using cellophane to take photographs with blurred edges

If you want your images to be sharp with a vignette of blurriness, cut your cellophane into a square that’s a little larger than your camera lens. Afterward, proceed to cut a hole in the center of the square – its size depends on how unclear you want the edges to be. The smaller the cut in the center, the blurrier your image will appear and the more challenging it will be to get sharp results. Once you’re happy with the results, wrap the cellophane square around your lens, making sure that the cut-out hole is placed roughly at the center of the lens.

/

Something to keep in mind is that it might be difficult to focus your lens manually due to the tightly wrapped cellophane. To make focusing easier, don’t wrap the cellophane square around your entire lens and leave some space for your fingers to change the focus. Though using tape is optional, it could prevent the cellophane from constantly falling off. Remember that it doesn’t have to be perfect or visually appealing since the effect itself is the most important part.

Using cellophane to take unclear yet dreamy photographs

To create photographs that are beautifully textured yet slightly unclear, cover your lens with cellophane in the same way as the previous method, but without the cut-out hole. Again, wrap it in such a way that will give you the opportunity to manually focus your lens. If you use auto-focus, loosely wrap the cellophane around your lens to give it enough space to find the right sharpness. The effect will make your photographs look like they were taken straight out of a dream. A certain level of sharpness will remain, though everything will be covered in a pleasant layer of cellophane fog.

/

If you want to be even more creative, combine freelensing with cellophane. This will result in unique and charming photographs. For more interesting results, crumple up the cellophane before using it. Adding textures to editing programs like Photoshop will further enhance your shots. If you use Lightroom, make sure to apply your favorite preset for even more stunning results. Using all of these tools and features will transform your images into works of art you’re proud of.

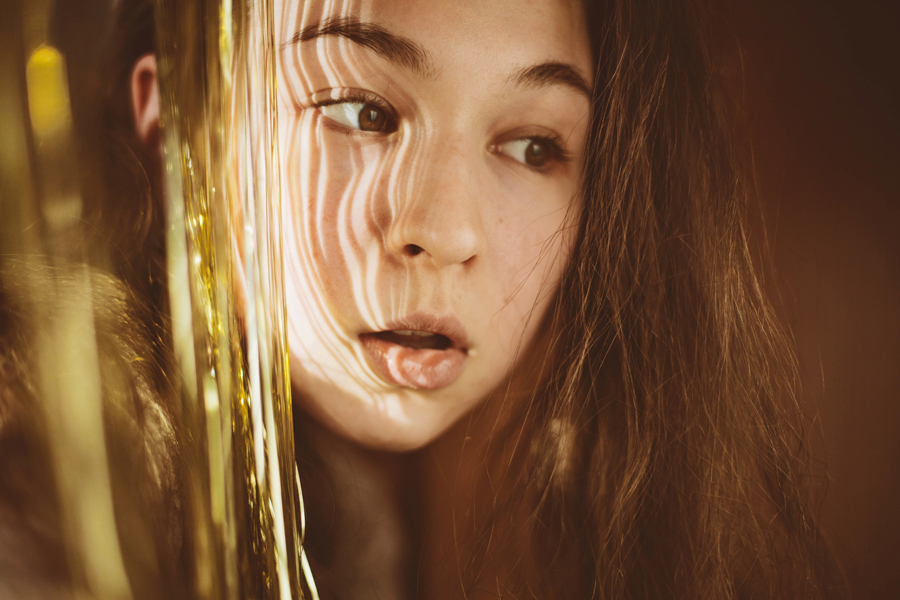
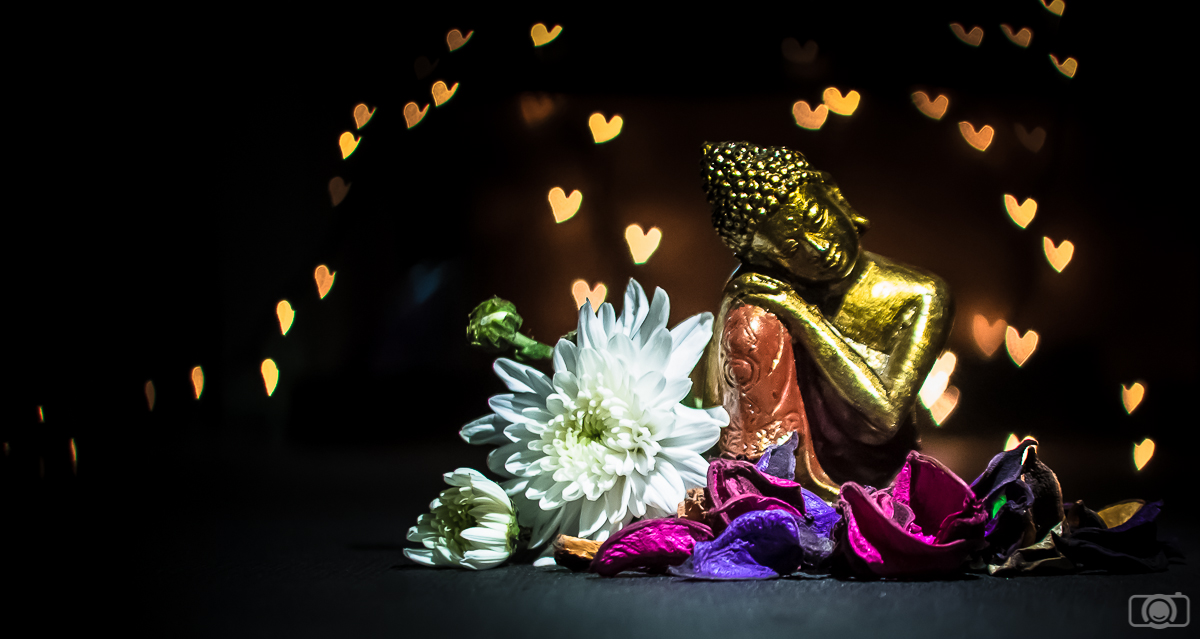
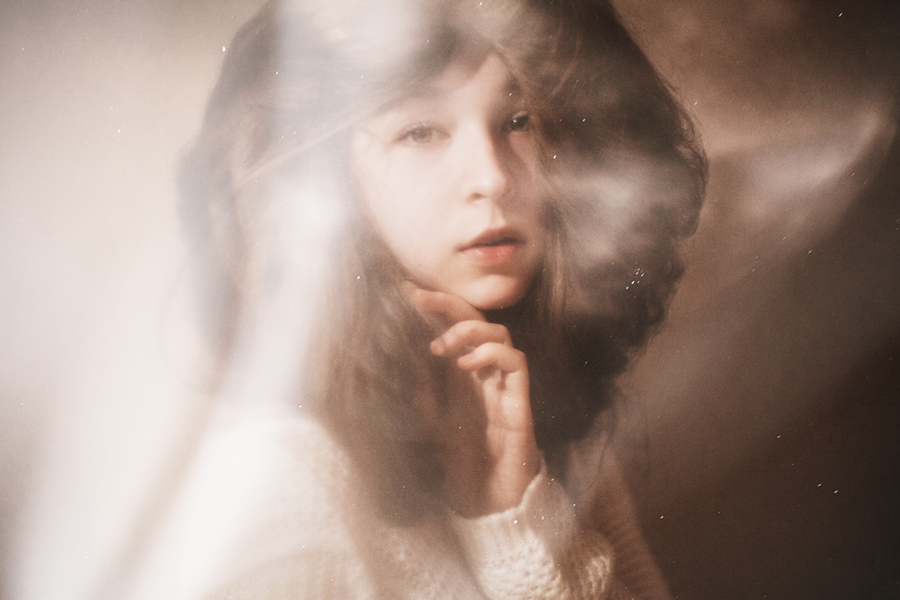
/ This portrait is a combination of cellophane, free textures, and a Lightroom preset.
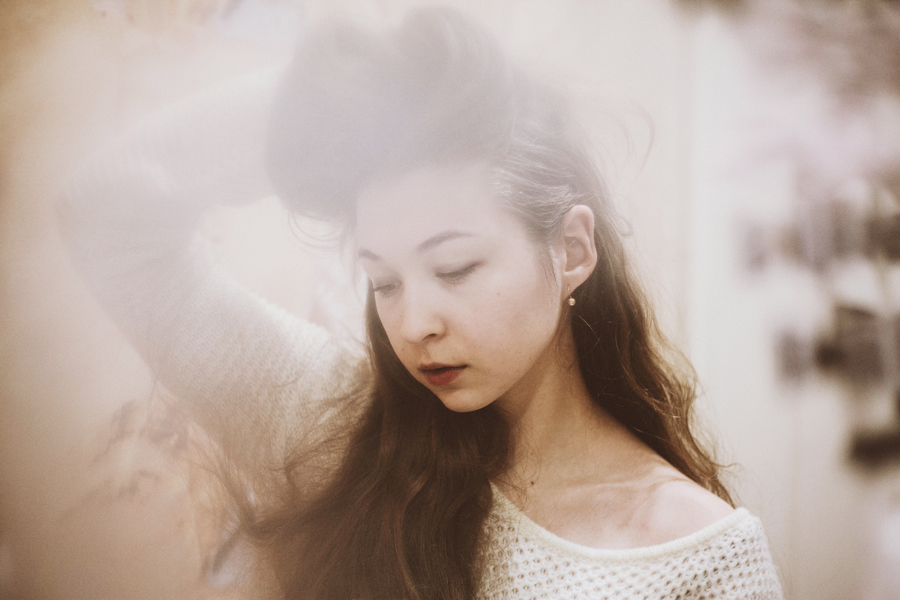
The beauty of cellophane is its unpredictability. For photographers who are interested in experimenting creatively, this is an exciting chance to grow and to learn new things. No matter what genre of photography you cherish most, use cellophane during one of your shoots. The results might surprise you, teach you new things, or show you a completely new way of looking at photography. Whatever happens, you will be closer to becoming a more experimental and open-minded photographer.

Happy shooting!

//

Getting creative with foregrounds: How to improve your portraits

When I first started taking photographs of other people, my portraits often ended up looking very similar and much too simple. Though I yearned to have inspirational and visually stunning shots in my portfolio, I couldn’t find a way to create them using the limited amount of equipment I had. Compelling self-portraits were especially difficult to make due to the fact that I had neither a remote nor a tripod at the time. Then, during a self-portrait shoot, I held an object in front of the lens for the sake of experimentation. This created a dreamy effect which slightly concealed parts of my face and highlighted others. The difference a single little thing could make a seemingly simple portrait astounded me. If I could place almost anything in front of the lens and create an interesting photograph, what would happen if I chose my foregrounds according to a theme, an item of clothing, and more?

Even if you don’t own a professional DSLR camera, chances are that placing any item close to your lens will cause blurriness. It’s even possible to create such an effect with a tiny camera phone. This kind of blur is ideal for all kinds of photographs, but it’s especially eye-catching when portraiture is involved. Hiding part of your subject’s appearance using things like flowers, hair, and hands will allow the viewer to feel like they’re a part of the story. Like well written stories, photographs that make viewers feel included will glow with potential. Furthermore, these works of art will touch friends and strangers alike, drawing more people to your photographs. Eventually, you’ll find yourself discovering all kinds of ways to include simple things in your photos to create spectacular images. Here are a few tips on how you can get creative with foregrounds:

//

Finding foregrounds at home

Whether you live in a tiny apartment or in an extravagant mansion, you’re bound to find useful, foreground-worthy products in your home. Since foregrounds are barely distinguishable when placed very closely in front of the lens, don’t worry about experimenting with items that aren’t necessarily used in the photography world all that often. For example, reflective kitchen utensils like forks and spoons can serve as great additions to a picture, allowing for shiny-looking results that direct the viewer’s eye straight to your subject. If you’re a fan of animal photography, your pet’s toys could enhance your image’s composition; in addition to having a fun time with your pet, you’ll be able to capture a beautifully framed moment. Take some time to look at your possessions from a fresh perspective, giving everything a chance to become creatively useful.

//

Finding foregrounds in nature

If your own possessions don’t spark ideas in your mind, take a walk. No matter the season, nature is always prepared to help you with your artistic endeavors. Branches, flower, grass, etc., can all serve as brilliant foregrounds. This is especially effective in the early autumn and all throughout spring when nature’s colors are at their most vibrant. Even shooting through a cluster of branches will add vibrancy and mystery to your shot. If you photograph a person using this technique, your results will be gracefully cinematic.

//

Instant foregrounds in portraiture

There are foregrounds which require little to no effort to create. If – during one of your portrait shoots – you’re out of both props and ideas, ask your model to place his or her fingers in front of the lens. By partially covering some of your subject’s facial features, this effect will make viewers wonder what the subject is hiding. Other easy foregrounds include hair and items of clothing.

//

Adding foregrounds in the editing process

If you already have a set of images you wish to enhance, you can do so by adding artificial foregrounds to your shots in editing programs like Photoshop. The Internet has an impressive amount of free texture packs. For instance, a free light leak pack will give you access to an abundance of stunning resources which will add vibrancy and brightness to your images. It’s also very likely that you already have the resources to create eye-catching photographs; look through your old work, especially your travel photos, and experiment with anything that stands out to you. Alternatively, you can look for great content on free stock photo websites; it’s very likely that you’ll find what you need there.

Working with foregrounds will give you a chance to appreciate the beauty in everything. Additionally, it will give you a chance to reinvent your style, discover new ways of photographing and find potential in the smallest details. In general, it’ll make you a better photographer. Always stay creatively curious.

Happy shooting!

DIY: Softbox in Twelve Easy Steps

One of the neat things about photography is that you don’t need a lot in order to take photos; a camera, memory cards and you can start taking photos. However, as you advance in your field, you will discover that at certain conditions you need more gear than just the mentioned above: external flash, reflectors, diffusers, lenses and the list goes on and on. Some of these accessories are a must if you want to advance, others are really helpful and cheap, and so they are worth having. But what if you can’t afford the equipment? Or the retail company doesn’t deliver to where you are? What if you just want to get a feel for the equipment to see if you will use it before you spend your money? My favorite solution is to make one myself, and today I will show you how to make your very own softbox.

What is a softbox?

A softbox is a lighting equipment which provides soft and diffused light. It is a box-like, conic or pyramid-like structure that can be attached to a light source so that it will cover it. The softbox’s inner side is light reflecting except for the portion in front of the light source, that is light diffusing.

You will need:

Aluminum foil

Baking paper

Black Bristol board (or other black thick paper)

Glue or double sided tape

Scissors

Utility knife

Ruler

Pencil

Light source (lamp or flash)

DIY softbox

Step one:

Take the measurements of your Bristol board and draw a grid of three vertical lines and three horizontal lines, creating four equal columns and four equal rows.

DIY softbox

Step two:

Flip the Bristol board over. Place strips of double sided cello tape (adhesive tape) on the unmarked side of the Bristol board so that extensive part of its surface is covered

DIY softbox

Step three:

Expose the second sticky side of the tape and attach aluminum foil to the Bristol board, cover as much as you can

DIY softbox

Step four:

Fold the Bristol board along the top and bottom vertical lines, creating two creases along the board. Unfold and repeat this action, this time on the top and bottom horizontal lines. Keep the board folded.

DIY softbox

Step five:

Fold the corners of the board towards the grid line closest to the corner, creating an octagon.

DIY softbox

Step six:

Place strips of double sided cello tape on the folded corners to attach them to the board.

DIY softbox

Do the same along the edges of the board and fold them backward, over the corners, creating lips.

DIY softbox


DIY softbox

Step seven:

Hold the each lip between your finger and your thumb and start pulling the away from each other. You will see that by doing so, the sides of the board will rise upwards to form a box.

DIY softbox

Step eight:

Strengthen the structure of the box by going over the corners, pressing on them lightly

DIY softbox

Step nine:

Take your light source (in this case I used a flash) and draw its outline around the center of the base of the box, this will be the hatch through which you will insert your light source.

DIY softbox

Step ten:

Divide the area of the hatch into eight sections and cut with a utility knife along the lines of the sections, then fold the flaps outwards.

DIY softbox


DIY softbox


Step eleven:

Take a sheet of baking paper (or other thin paper) and put it over the open side of the box, attaching it with any kind of adhesive (if you want to make the box foldable you can use Velcro  instead of glue or tape).

DIY softbox


DIY softbox

Step twelve:

Fit your light source through the hatch with the Hatch’s flaps overlapping the light source. Tighten the grip of the softbox on the light source with a rubber band.

DIY softbox

And there you have it! You very own, homemade softbox!

DIY softbox

I hope you find this article helpful, if you have any ideas and remarks for improvement, or if you would like me to make more DIY articles please let me know, have a happy shooting!!!

DIY- Lens cap for making your own creative shaped bokeh effects

Have you ever seen those photos with this effect where light sources are shaped like hearts or stars? The effect is called bokeh and to take this kind of photos you need 2 things: knowing how to create a bokeh and a  kit for the shapes.

sleeklens-33-1

So what is Bokeh? Bokeh is an effect which happens when you set the focus so that the background of the photo is blurry. When this happens, light sources in the background are also blurry and so they look in the photo like bright circles. Usually, the bokeh is achieved by using wide apertures. You will need to play with the depth of field in order to get the blurry effect you want. You can have a look at the article of our colleague Arnel Hasanovic to learn in more detail how to shoot photos with bokeh.

Today I am going to focus on the second thing you need to get this creatively shaped bokeh: the bokeh kit. You can get a kit on Amazon. However, you can also do it yourself. First of all, creating these bokeh kits is easy and cheap and you don’t need any special equipment. Second, you can get your family and friends involved in your bokeh project, making the experience even funnier. In addition, creating your own kit will allow you to be more creative because you can create any shape you want and not be restricted to the shapes that come in a commercial kit.

Let’s start with the list of things you will need to create your bokeh kit:

– A sheet of dark Bristol/thick paper (I prefer black, for not adding a color cast to your photos)

– Pencil

– Scissors and/or scalpel

–   A lens (preferably a lens with a wide aperture).

– A drawing compass,  a ring or other small round object

– Optional: glue/another type of adhesive substance

sleeklens-33-2
Here are the tools and materials I used. I also used a ruler to be more accurate but it is not mandatory to have.

Step one:

Draw a circle with the diameter of the lens that you want to use. The easiest way for me to do it was to use the lens itself as a mold (I recommend to place a filter on the lens to protect it)

Shape bokeh

Step two:

Cut out the circle, this will be your bokeh cap.

sleeklens-33-4

Step three:

Trace a second circle on the bokeh cap, about two millimeters smaller than the diameter of the cap. You can do it approximate or you can measure it with the ruler or a drawing compass.

sleeklens-33-5

Step four:

Using your scissors, make one millimeter long cuts from the cap’s circumference towards the center (the line you drew in step three will help you to do it accurately). Make the cuts as dense as possible.

Shape bokeh

Step five:

Using a drawing compass or a ring, draw another circle in the center of your bokeh cap (the ruler can be handy here as well, to place the center in the right spot). It should be small, around 2 centimeters in diameter. This circle is the maximum size of the hatch you should make in the following steps.

Shape bokeh

Step six:

Draw the shape you want for your bokeh effect inside the circle you draw in step five. Make sure to draw it as centered as possible. And now the most important thing: use a scalpel to cut out the shape of the hatch. Be as exact as you can. The more accurate you are with cutting the shape, the nicer and sharper the effect will be, make sure to trim all the edges too.

Shape bokeh


sleeklens-33-11

Step seven:

Fold the little cuts you made in step four, all in one direction and fit the cap into your lens. You can tighten the cap at the rim to the lens by using a pencil or a Q-tip (but do it gently, not to damage the lens).

Shape bokeh

Optional step:

You can make a little handle that will help you to remove the cap when you finish by gluing a small strip of paper close to the rim of the cap. I used a two-sided sticky pad.

Shape bokeh

And that’s all! You now can go and take super cool photos with a shaped bokeh effect! I took some photos with our Minion. Who is going to be your model? Have a happy shooting!

To get this photo I focused on the Minion. I needed to put some light on him because it was really dark.

"<yoastmark

7 Quick And Easy Hacks For Creative Effects

We all have to start somewhere when it comes to a new field, and photography is a little deceptive in how much equipment you might actually need to be successful. Cameras, lenses and tripods are the kind of things many people think of, though it’s still easy to undervalue these items as there are so many cheap versions around. At the other end we have monitors, editing software and other extras. After all, photography isn’t just about taking the picture, it’s about making it as good as possible with editing and touch-ups too.

For newcomers it’s best to start with a good quality camera and then look to add/upgrade their equipment as they develop. This also gives you a chance to understand equipment and the differences it can make before investing, since items like filters, lenses and tripods can easily run well over $100 a piece for good versions.

Thankfully there are some cheap and easy ways to start varying your effects and abilities before shelling out for the expensive gear:

1. Turn Your Window Into a Lightbox

creative-photography-2

Securing a piece of parchment paper to your window with a little tape is an easy and inexpensive way to create your own light box. The natural light is harnessed in a non-reflective way by the paper, giving you a perfect bright, light evenly lit backdrop to work against. This is a great trick for photographing smaller items, especially those with vibrant colors.

2. Use a Card to Bounce/Reflect Light

Attaching an angled piece of white card to your camera, right in front of the flash, can give you an effective light reflector. Average thickness card, like that used for business cards, will let enough light directly through to light up the front of your subject, while reflecting enough upwards to illuminate the subject evenly from above as well.

You may need to experiment a little with the angle and thickness of the card, though it is a next-to-free reflector.

3. Create Your Own Flash Diffuser

creative-photography-3

Any type of dish or container can be used to create a flash diffuser, though circular shapes are preferred by some photographers. One method is to use a dish/container and coat it with aluminum foil, giving you a more solid device. Another is to use a disposable aluminum dish, or even a Styrofoam cup which you can try with or without foil coating.

Often the plain, bright white surface is reflective enough without the foil. Remember to also create a reflective ‘plate’ (for which you could even use an actual plate if you go the Styrofoam route!) and place it a small distance in front of your flash, with the rest of your DIY diffuser slotted around the flash itself. This type of device is great for indoor shots where you’re trying to get even lighting or lighten shadowing.

4. Use Vaseline for a Blur or Vintage Effect

creative-photography-4

A touch of Vaseline carefully smeared around the edge of your lens can give you an excellent blur effect. This can be used for two purposes. One is to re-create a ‘vintage’ look from a time when cameras did not always capture the entire shot in perfect focus.

The second is to purposely blur out some of the background material and draw more attention to the central subject of your photograph.

5. Turn a Coffee Sleeve into a Lens Hood

Cardboard coffee sleeves and similar cardboard products can be used as a quick and easy lens hood, protecting your shots from lens flare and bright lighting. This technique is especially applicable to outdoor photography, where you might have to take shots with the sun shining down towards you.

6. Turn a Sandwich Bag into a Colorful Filter

creative-photography-5

This technique involves using a sandwich bag to create a variation of the Vaseline blur technique. Simply coloring the plastic in with a marker pen in the color of your choice can create a blurred and colorful effect around the edges of your shot instead though. Just color the plastic in and tear the bag open, placing it over your lens so that the edges just about overhang the edges, leaving the center clear to keep your photograph clear.

7. Eliminate Shaky Shots With Lentils & Old Clothes

You can create your own beanbag for use when you want to stabilize your camera. This is especially great for shooting low-down subjects and also if you have the availability of a solid surface to rest the camera on, like a ledge or table.

Cut your old clothing into a sizeable shape which you can fill with lentils and stitch up. This bean bag will now hold your camera steady whenever required and you can also make adjustments to it by pushing the lentils around and distorting its shape, giving you more maneuverability than the surface of a ledge/table or the ground would by itself.