Tag: bokeh

Interesting Blurred Foreground Ideas for Portrait Photographers

Sometimes, our photos end up looking dull and uninspiring. We know that something’s missing, but we’re not exactly sure what it is. Sometimes all you need to do is use blurred foregrounds to enhance your simple photos.

To put it simply, foregrounds are parts of an image that is closest to the camera. If you place an object in front of your camera and set your aperture to a small f-number, like f/2.0, you’ll get a blurry effect.

This effect is great for many reasons, some of which are:

  • Framing. If you cleverly frame your lens, you’ll end up with a unique composition regardless of what you’re photographing.
  • Adding a pop of color. Oftentimes, simple photos need an extra boost of color. Vibrant foregrounds can fix that.
  • Adding depth. A blurred foreground will add more depth and shape to detailed photos.

You can use professional equipment, DIY props, or random objects to frame your photos. In this article, I’ll focus on simple and accessible objects that will enhance every photo you take.
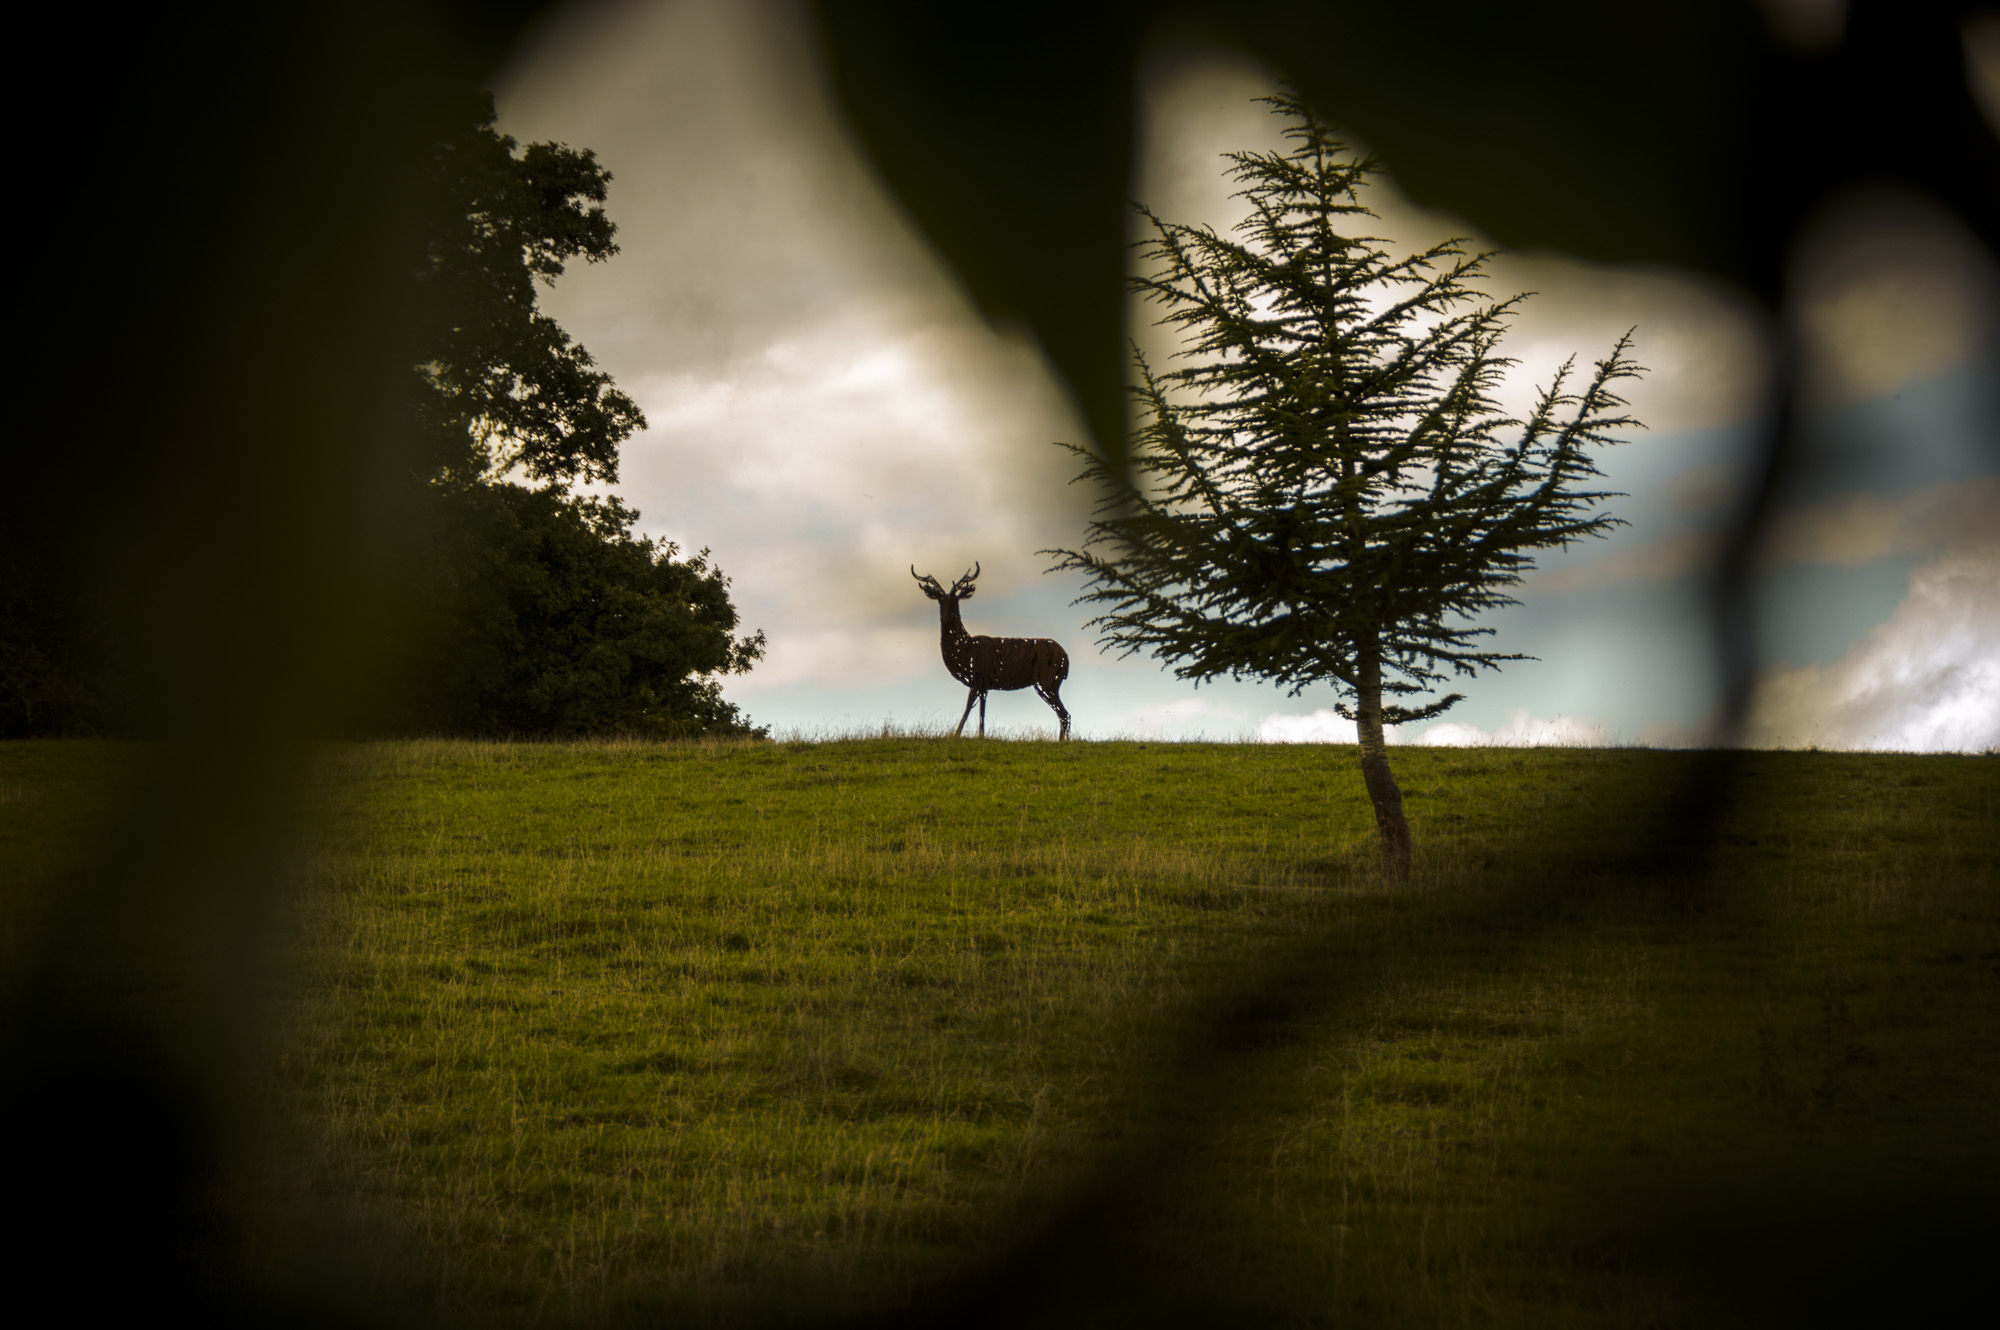
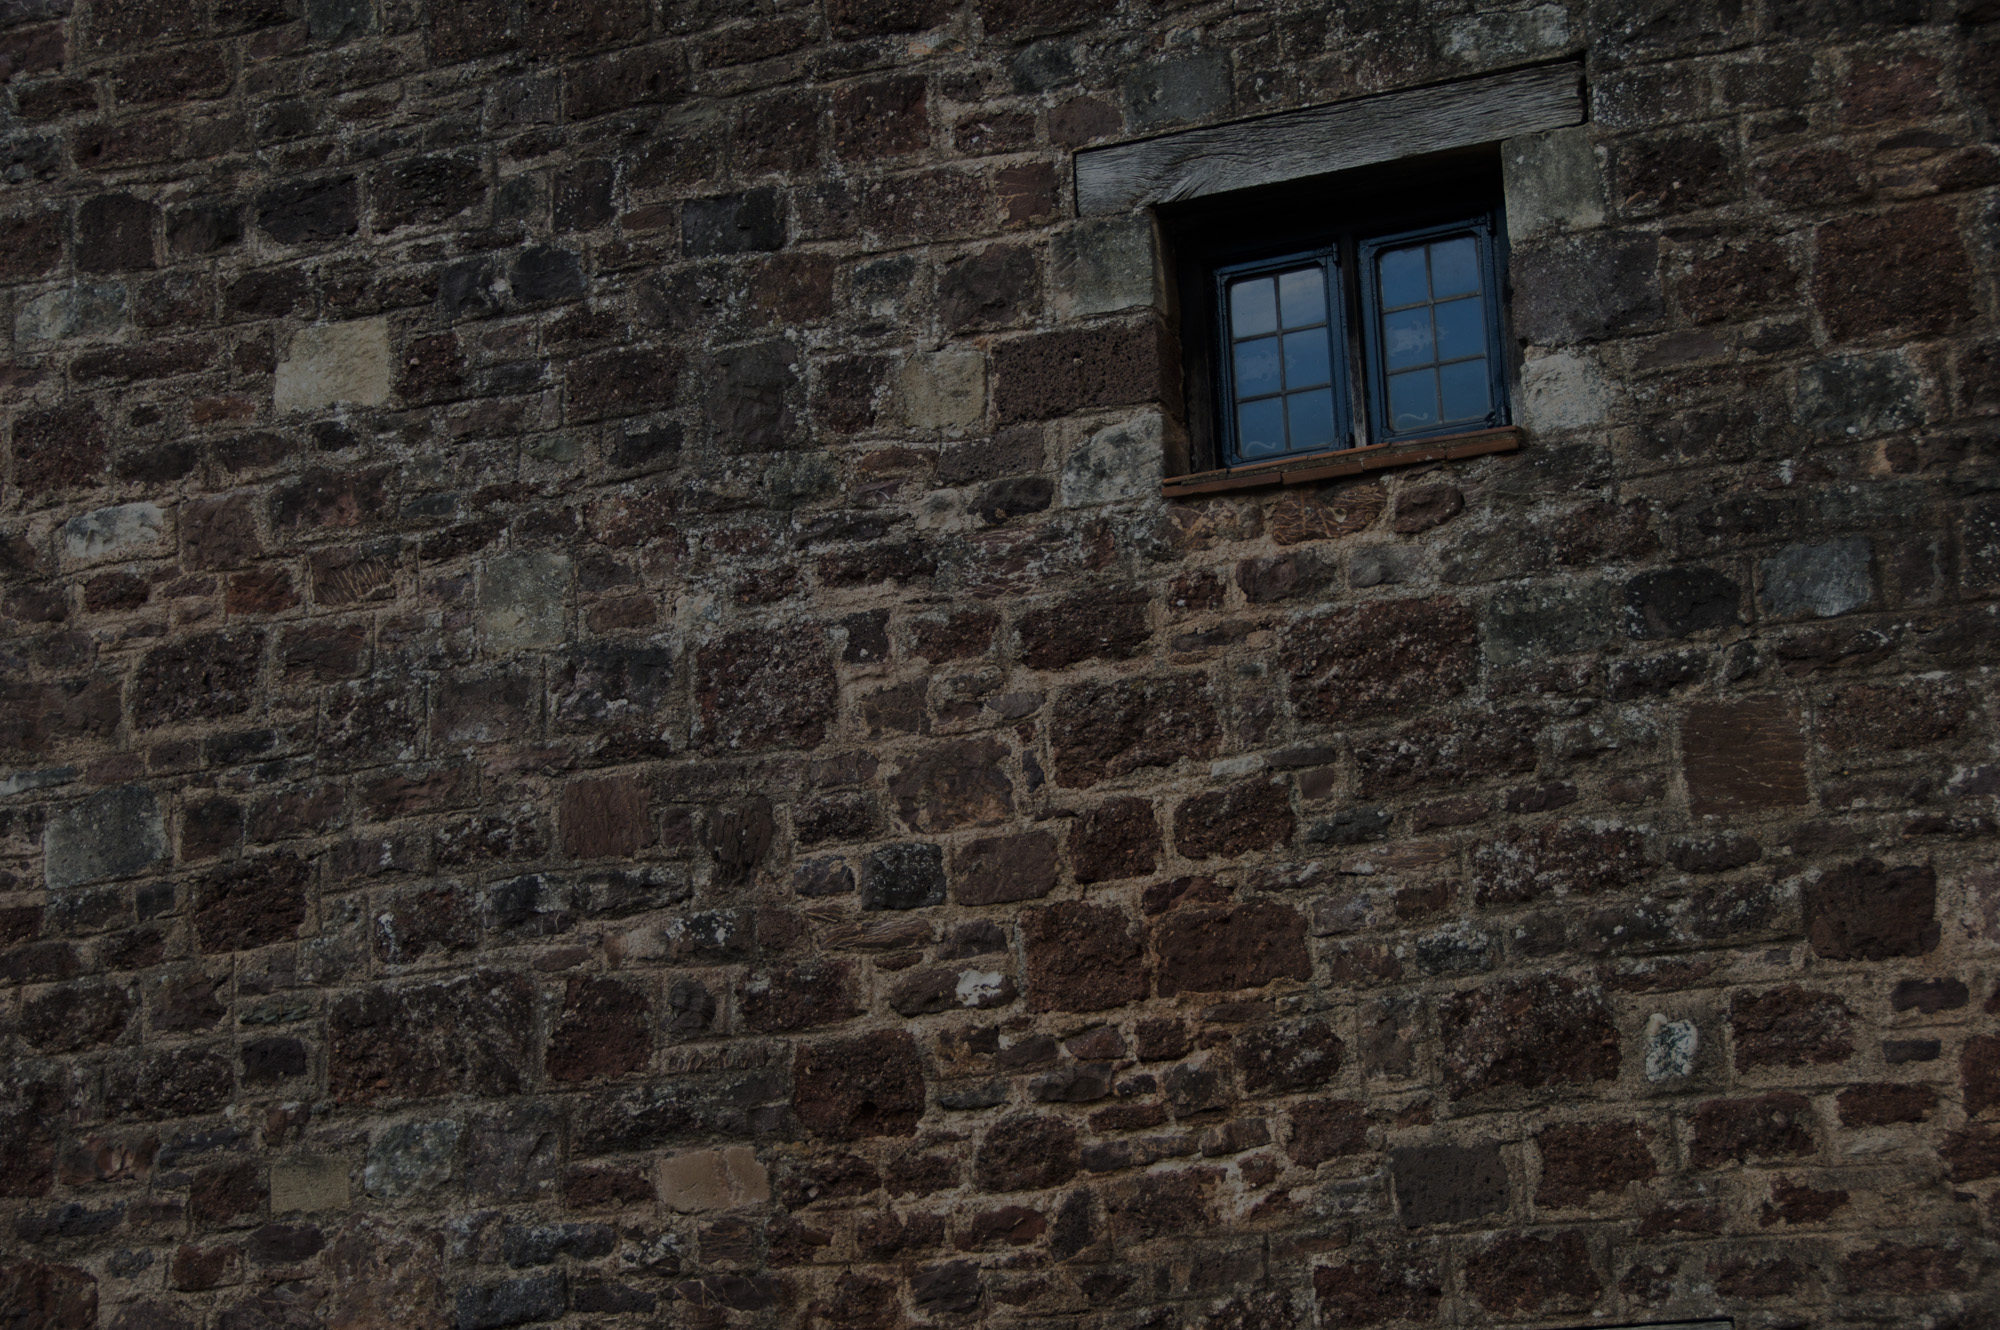
fence landscape photography

Gates and Fences

Fences have a constant pattern that’s ideal for creative photographs. A fence with a gap, like the one in the photo above, is fantastic for framing landscape photos and portraits.
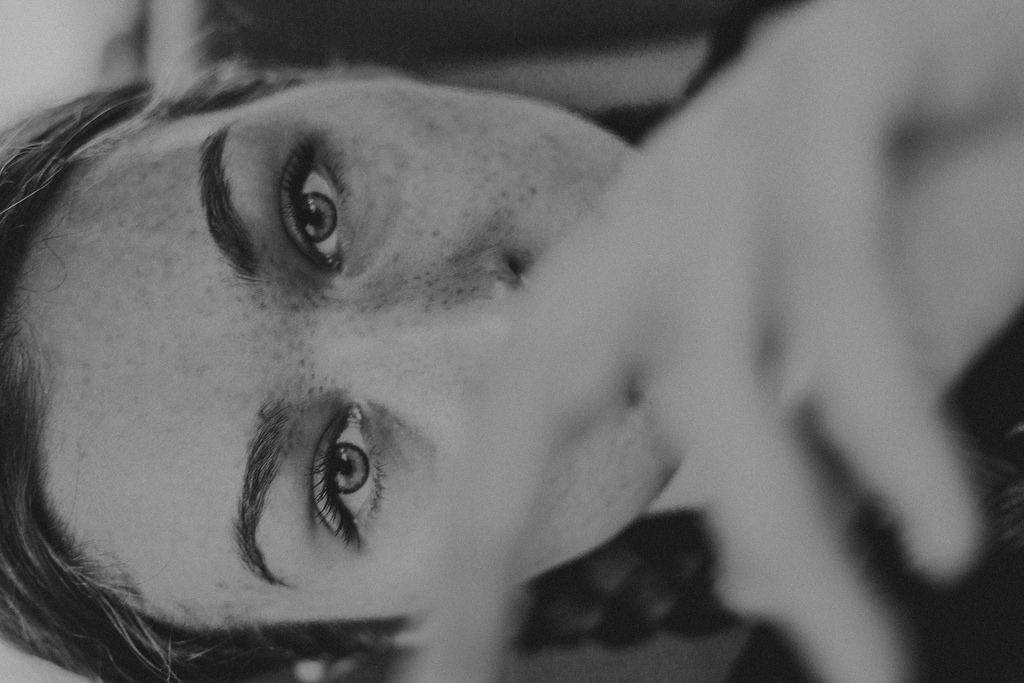
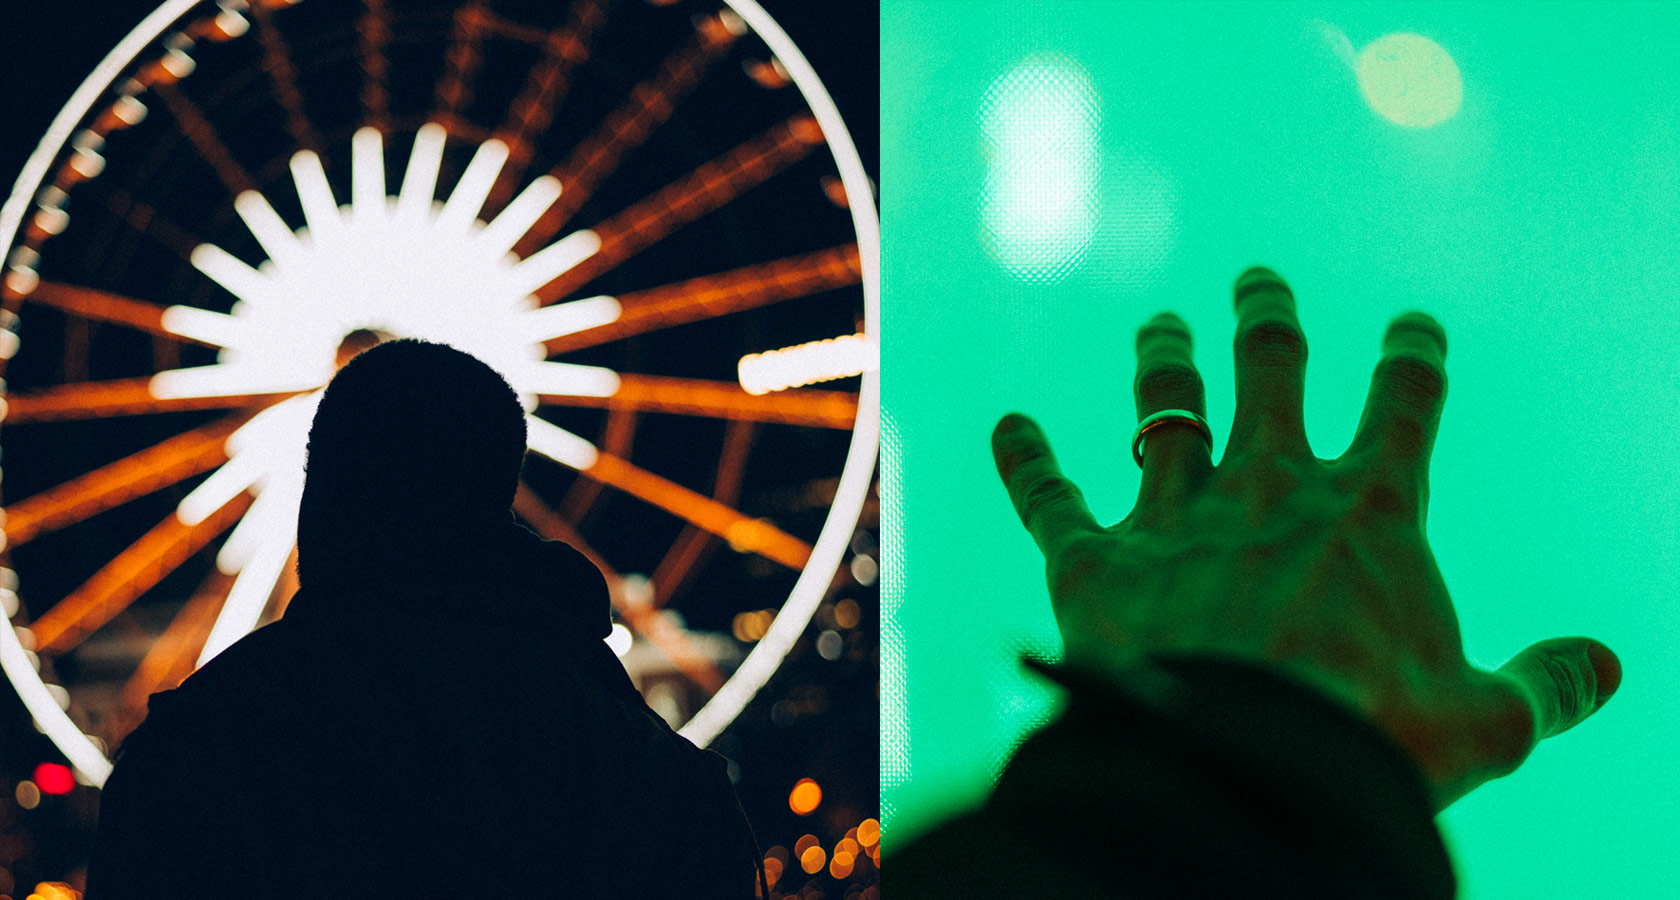
model hand foreground

Hands

If you want to include human elements in your photos, partly cover your lens with a hand.

Stretching your own hand in front of the camera can create a melancholic atmosphere or a sense of yearning.

If you’re a portrait photographer, have your model hide parts of their face with their hand, like in the photo above. You can use this technique to shape their face, highlight specific features, or simply make your portraits look more interesting.
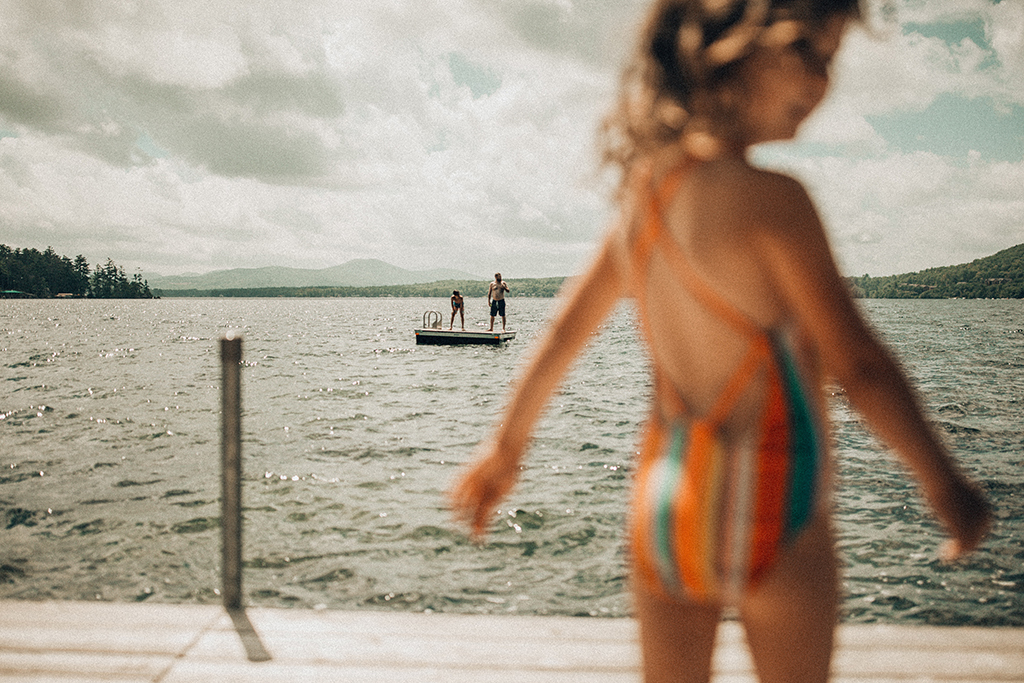
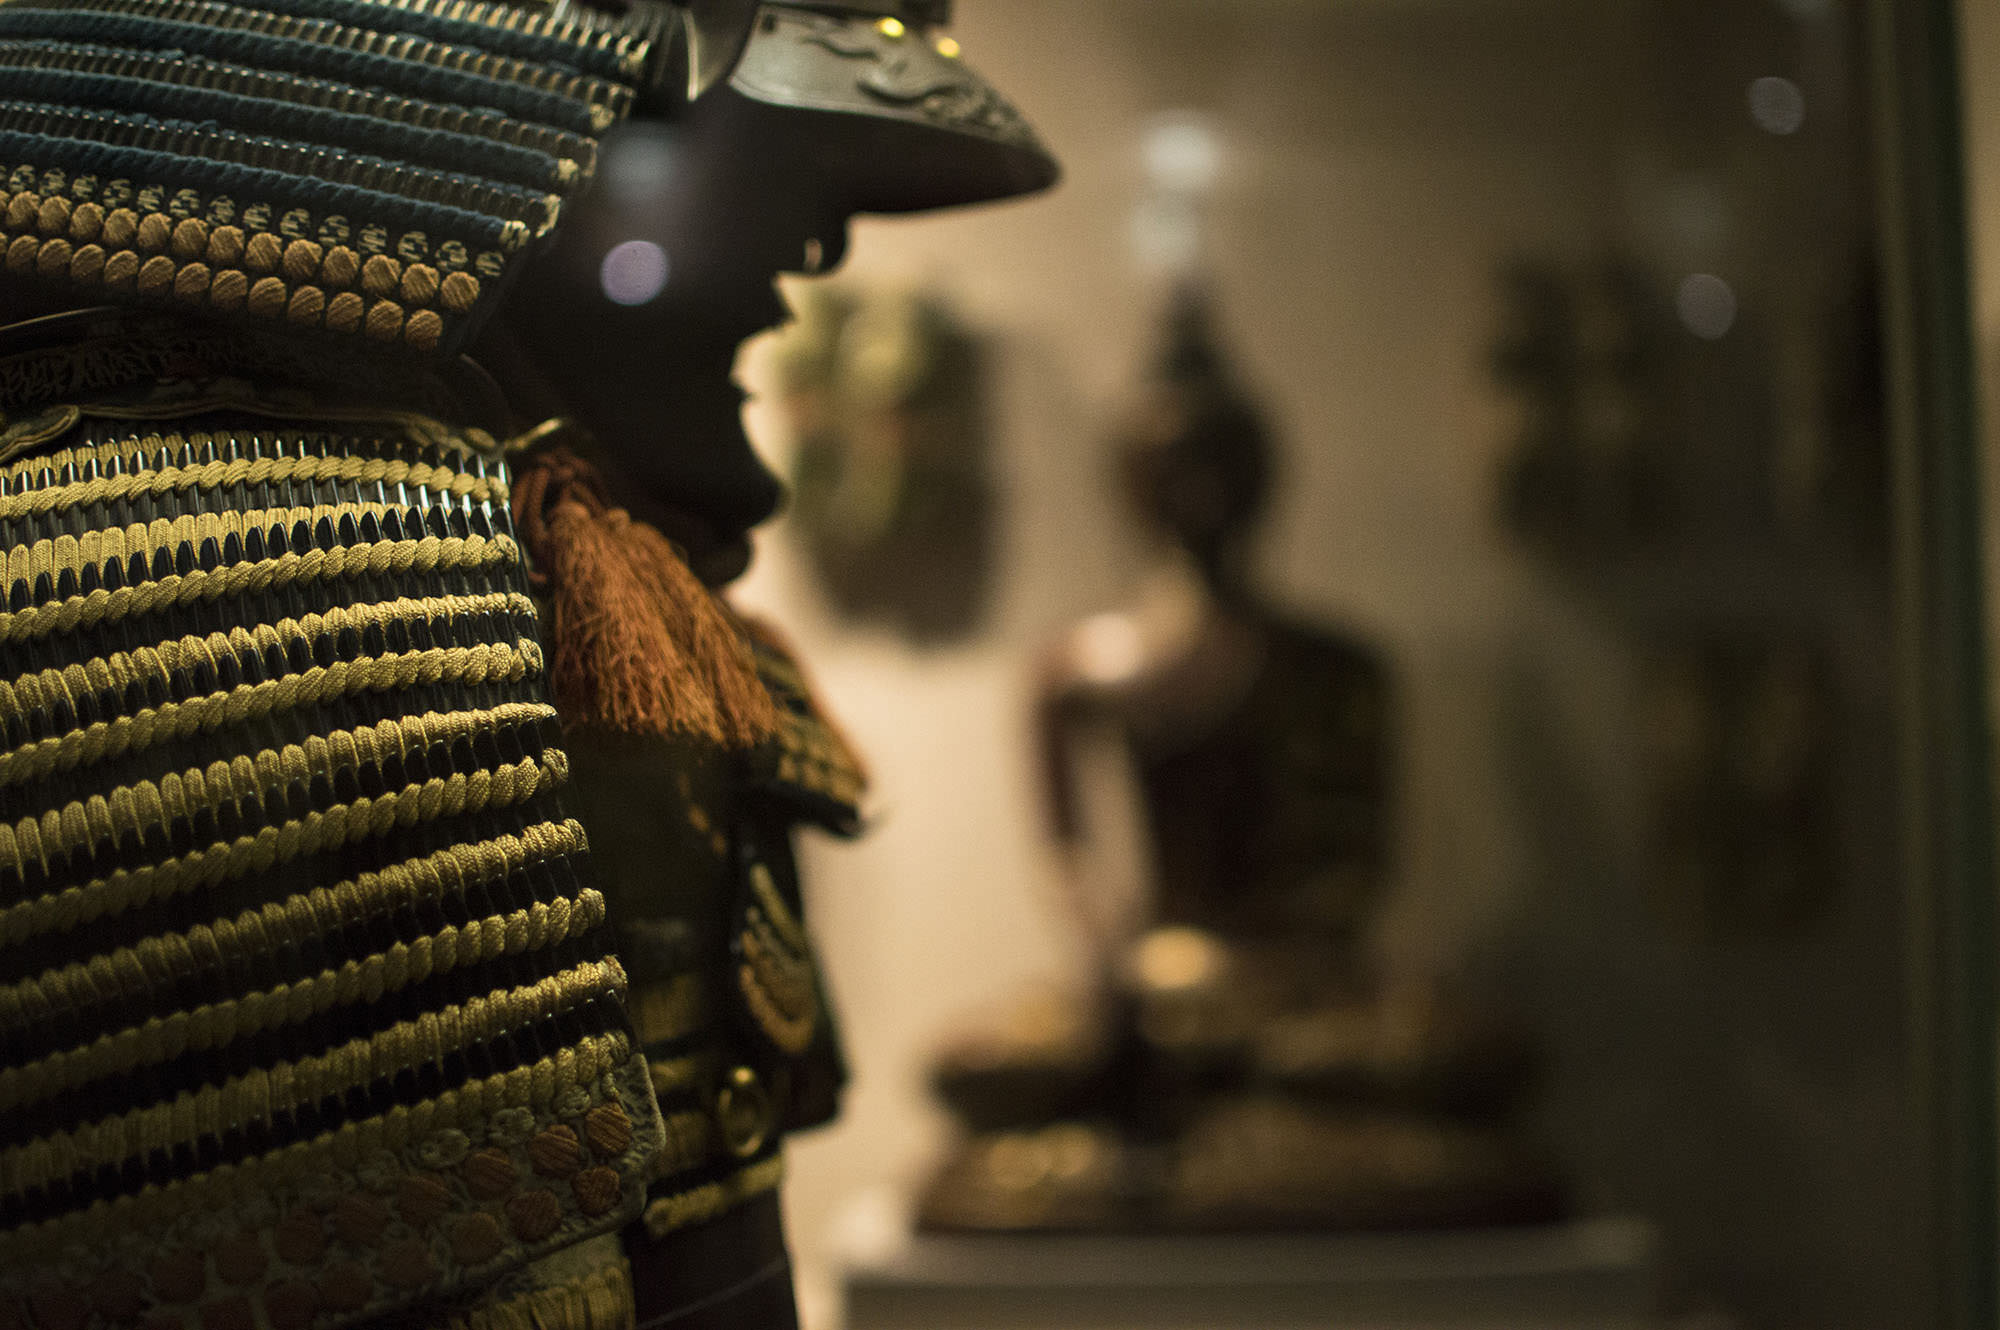
people foreground

People

Photographing through crowds of people is a popular technique used in street photography. Indirectly using people in your compositions will create a sense of familiarity.

In the photo above, the little girl is adding even more depth to the story. Even though she’s blurry, you can’t help but wonder if she’s just a stranger or if she’s related to the couple in the distance.
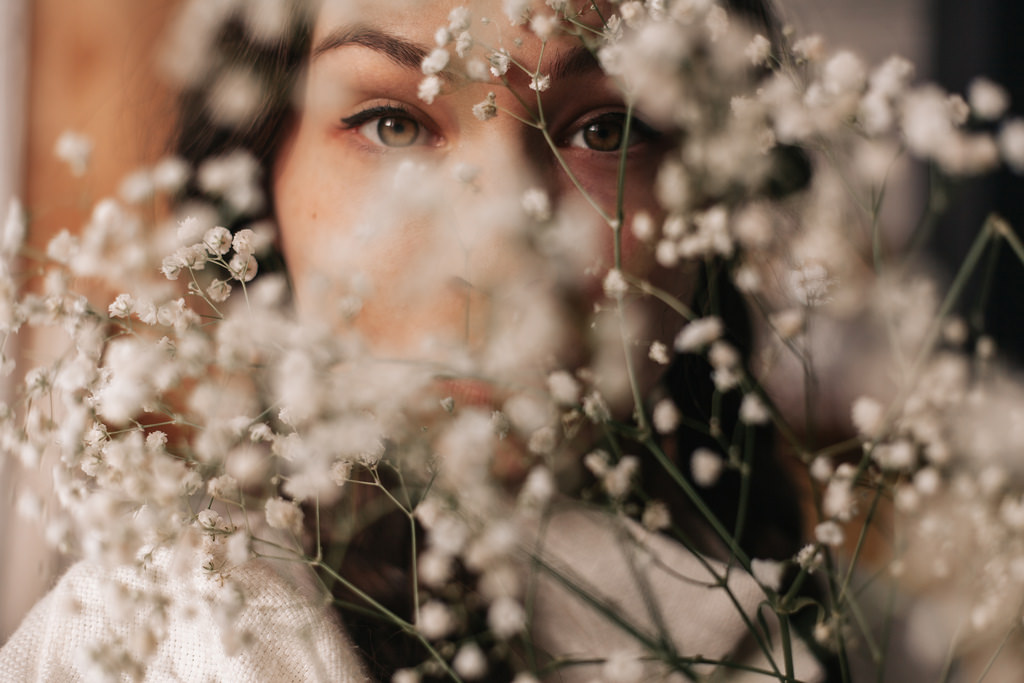
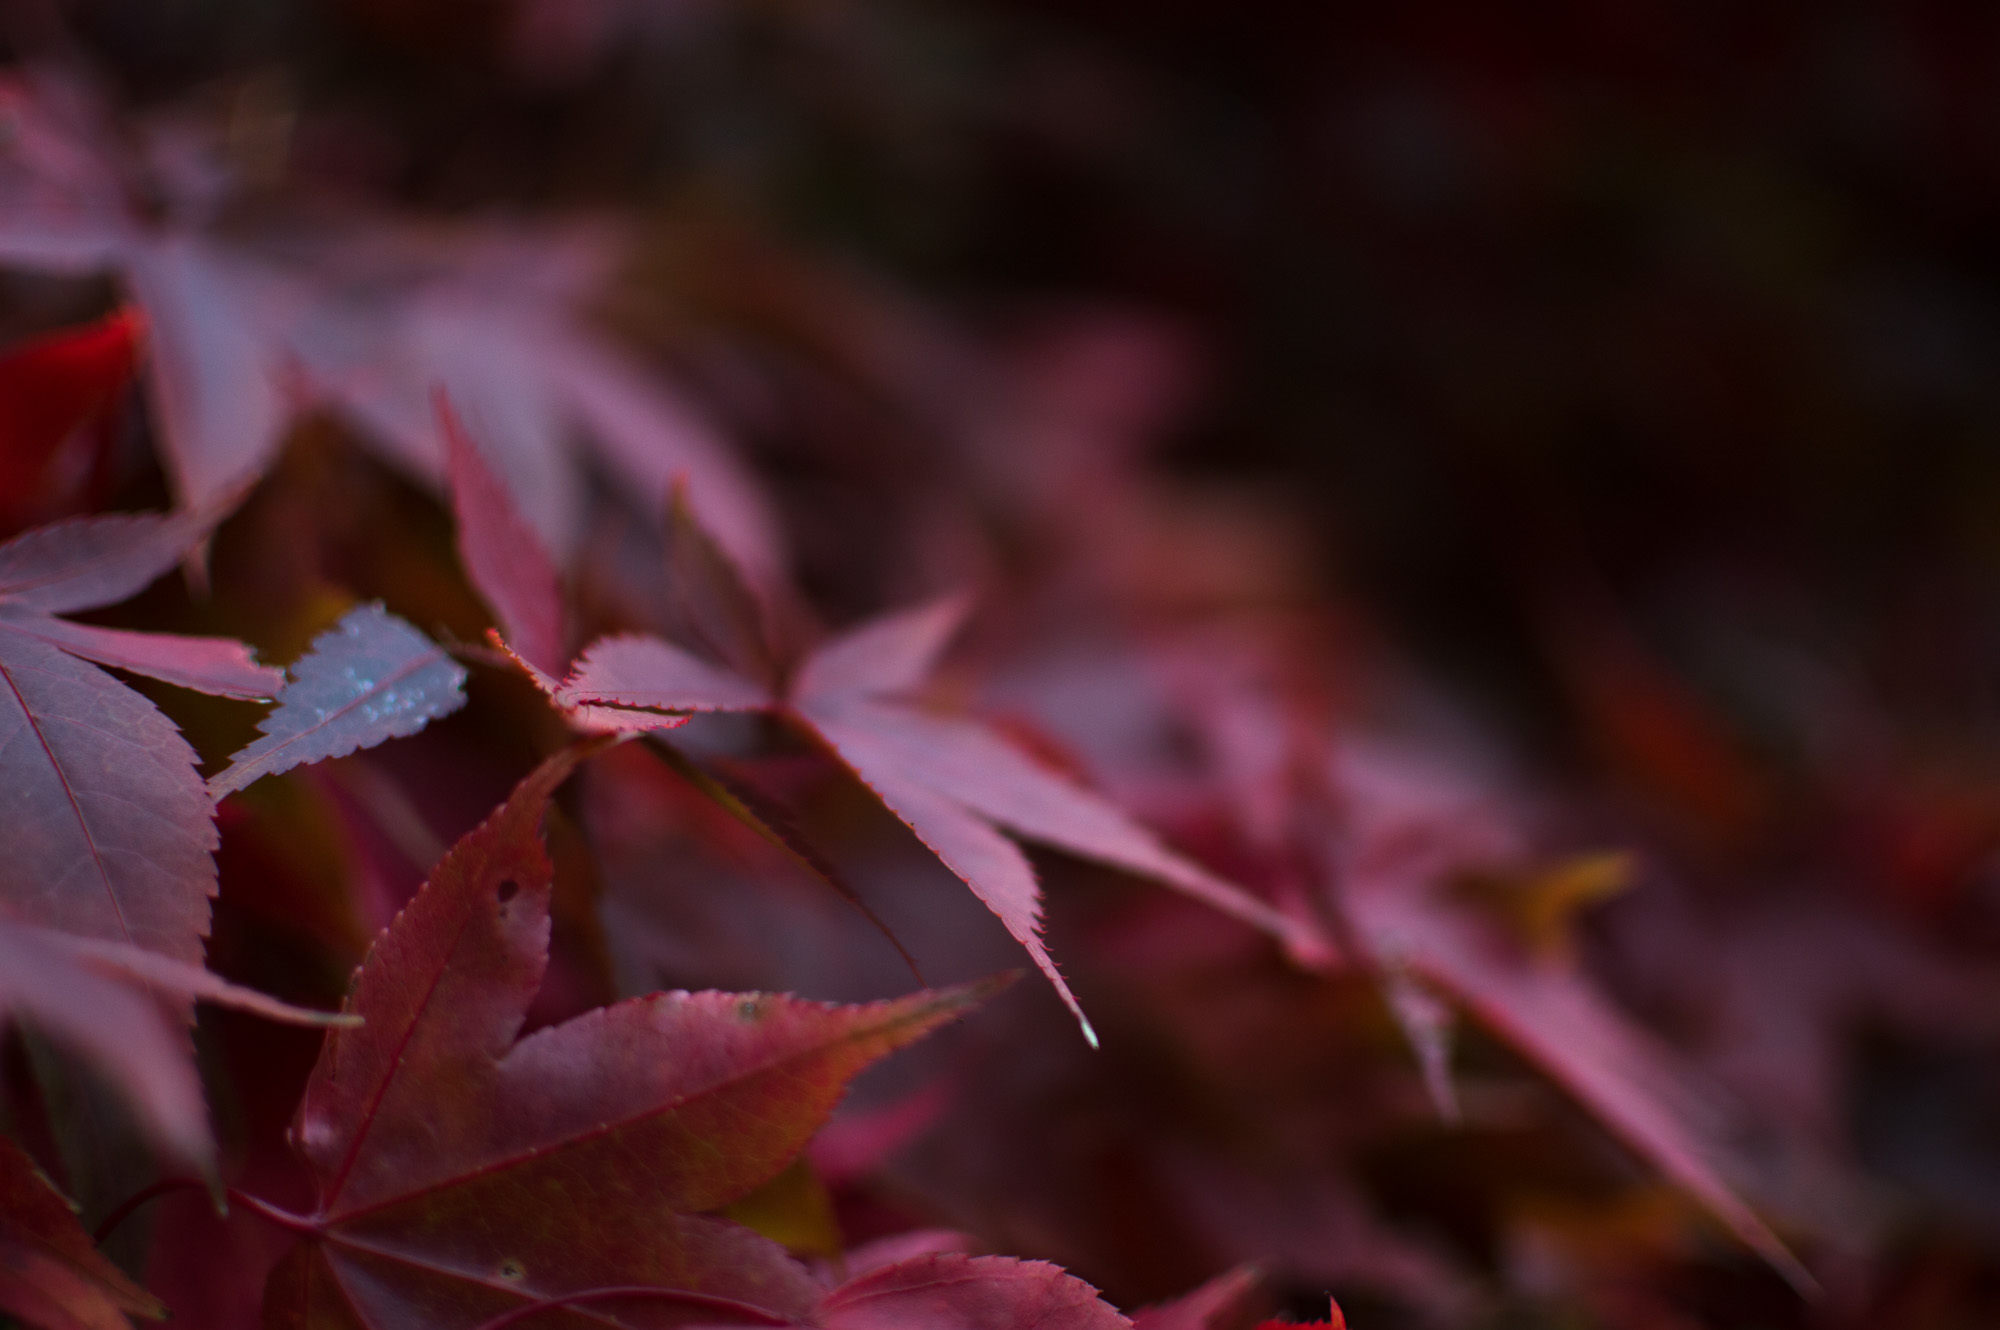
flowers foreground

Flowers and Plants

If you need to make your indoor photos look more exciting, use plants. Even if you don’t have a green thumb, chances are you own a plant or two. Flowers are perfect for enhancing simple portraits and still life shots. The more colorful they are, the better!
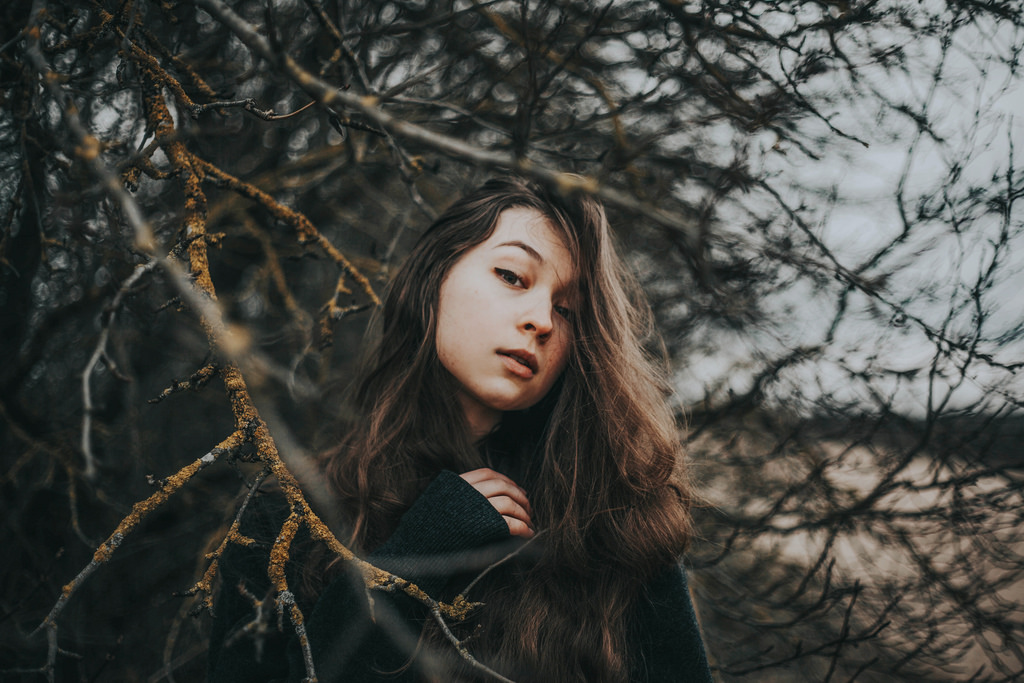
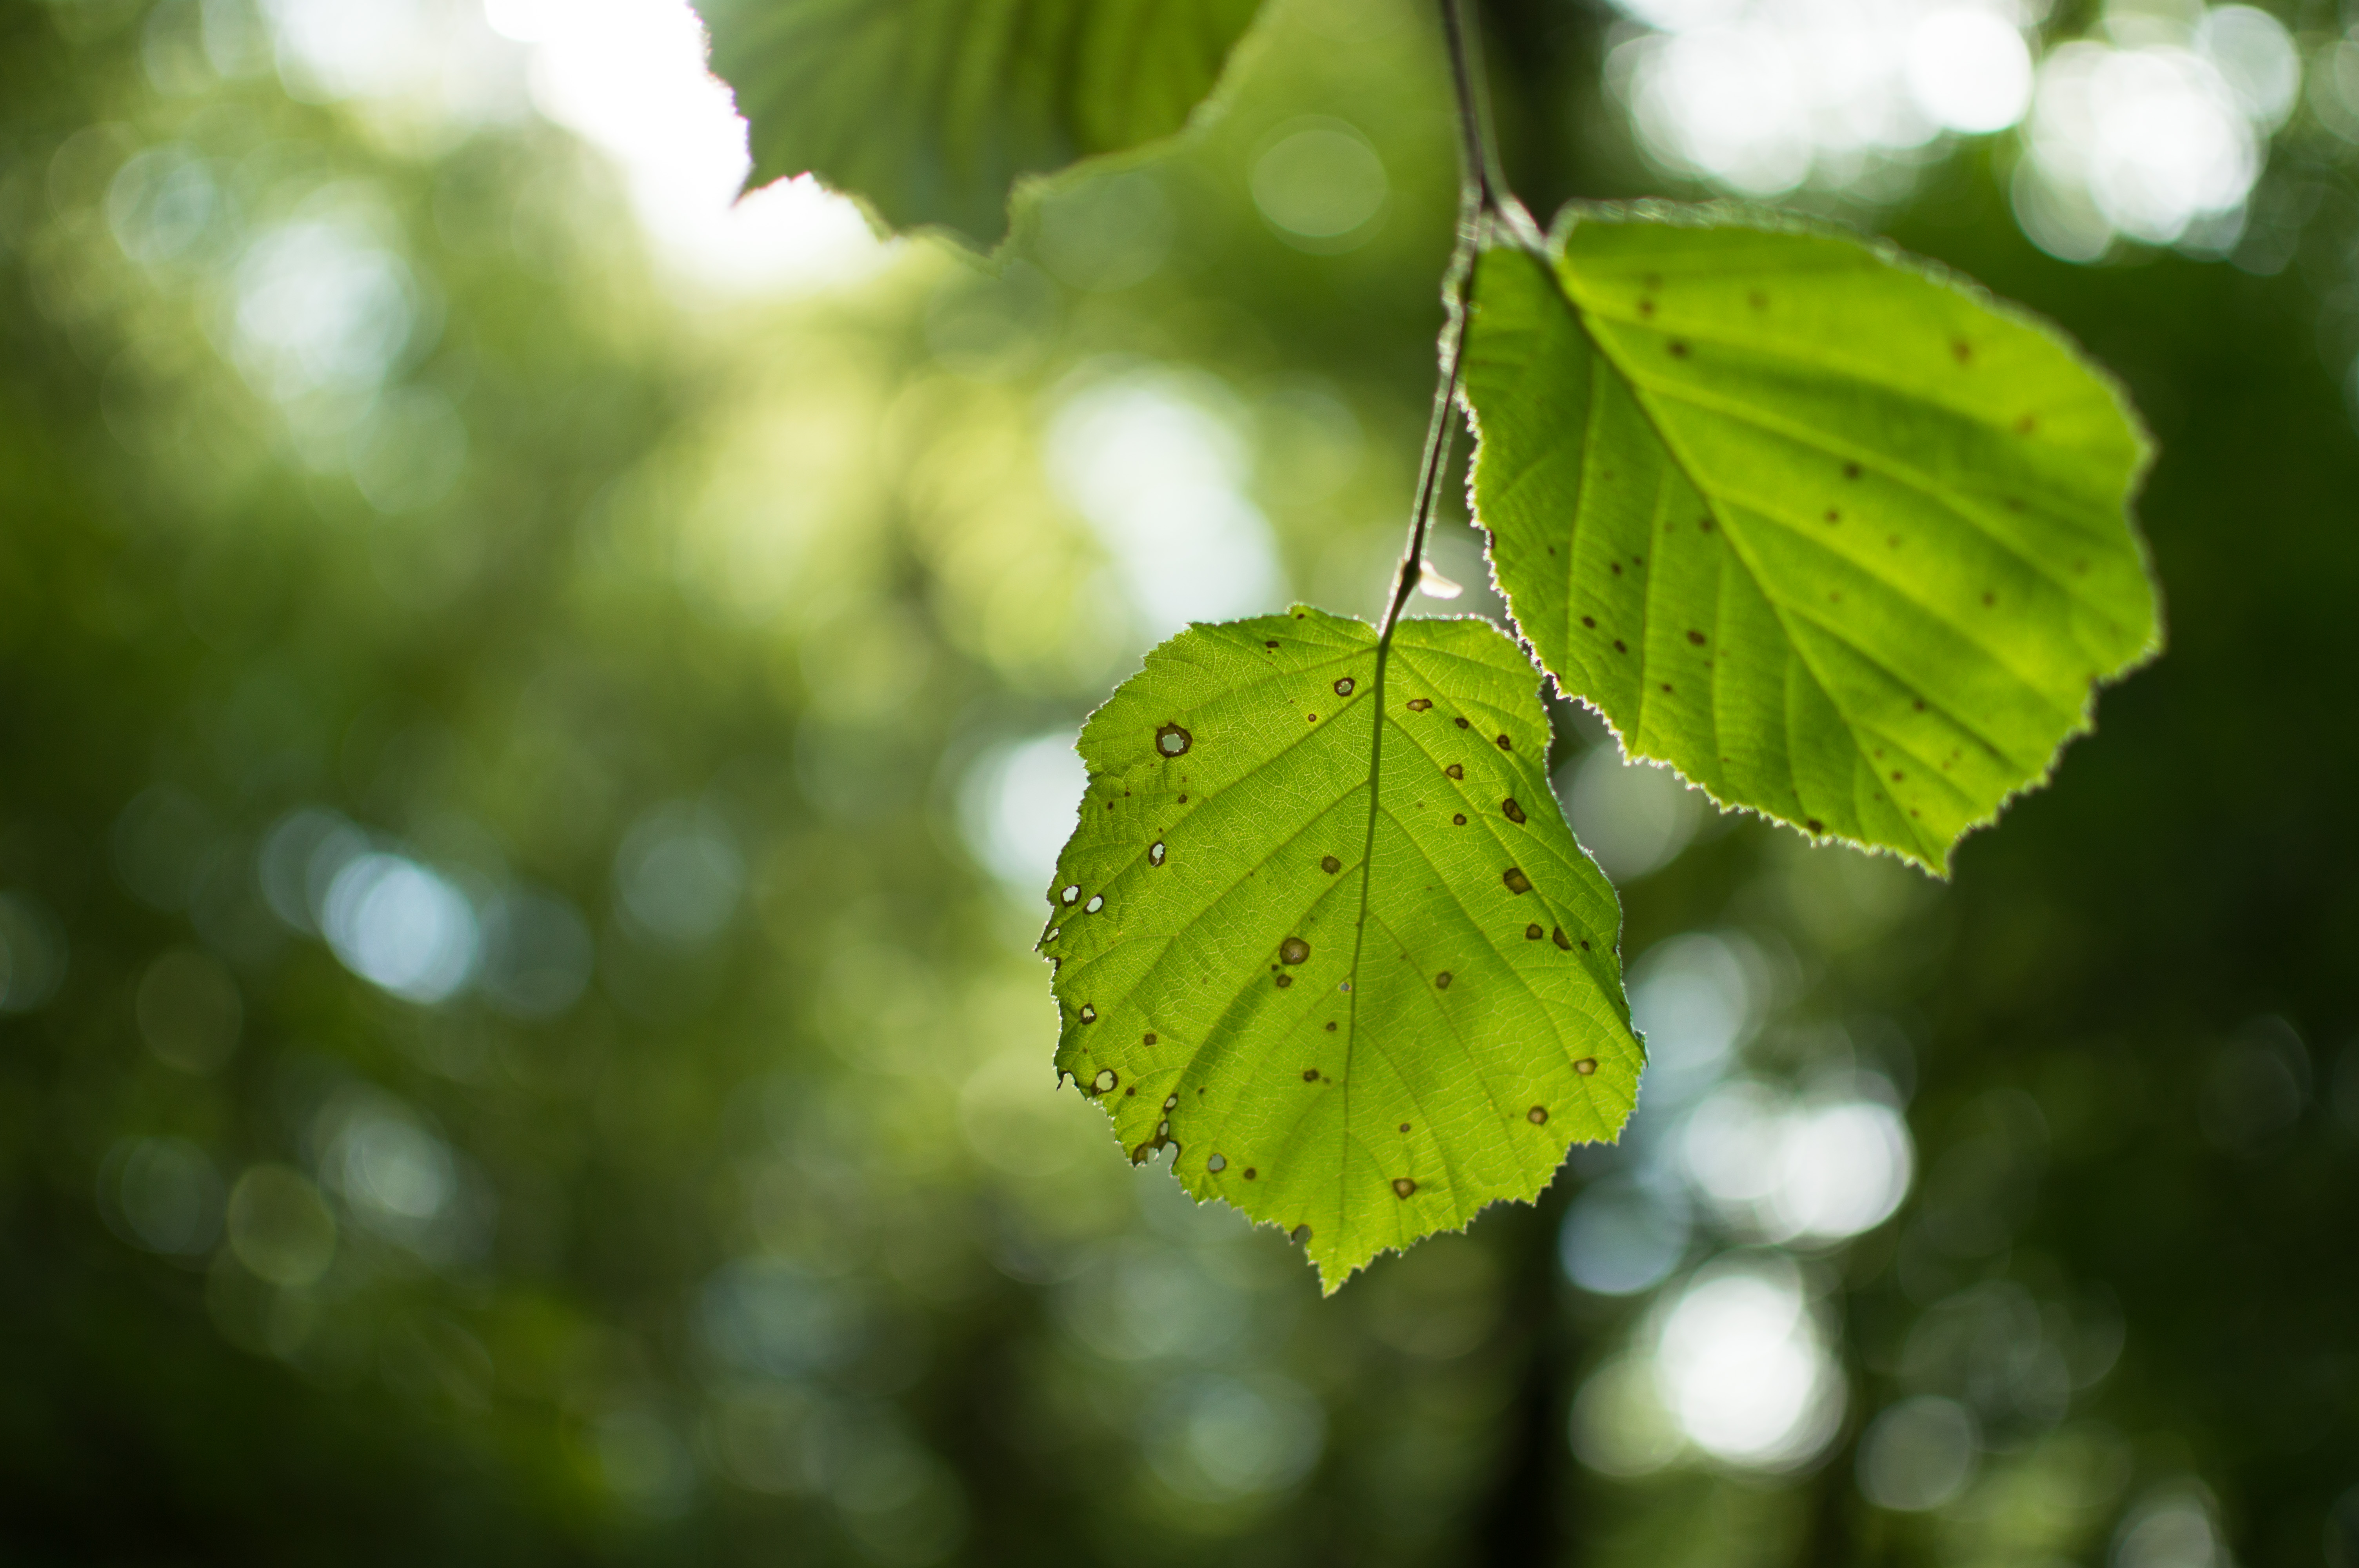
branches foreground

Branches

For fun outdoor shoots, use branches as foregrounds. Shooting through branches will create a contrast between your subject and the foreground. Curvy branches are great for creating striking compositions, while straight ones are perfect for photographers who want to experiment with leading lines.

window foreground

Windows

One of my favorite foreground styles is the combination of windows and reflections. When you shoot through a window, you’ll get beautiful blurred reflections that will add texture to your image.

Extra tip: when you photograph through a window, don’t stand directly in front of it unless you want to be visible in the shot. Shoot from the side to avoid camera reflections.
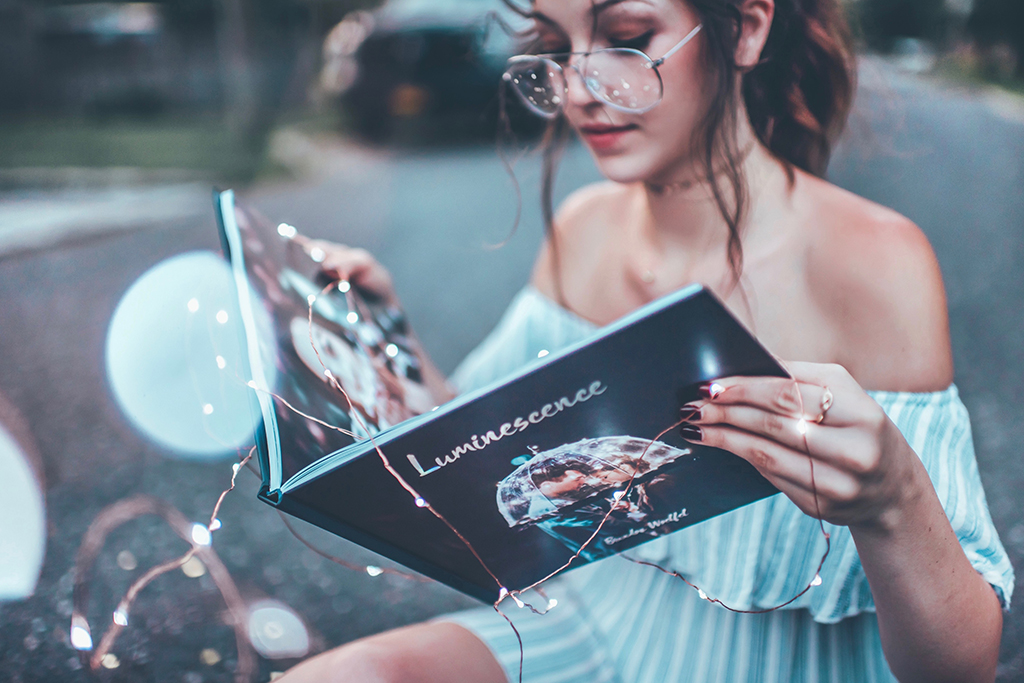
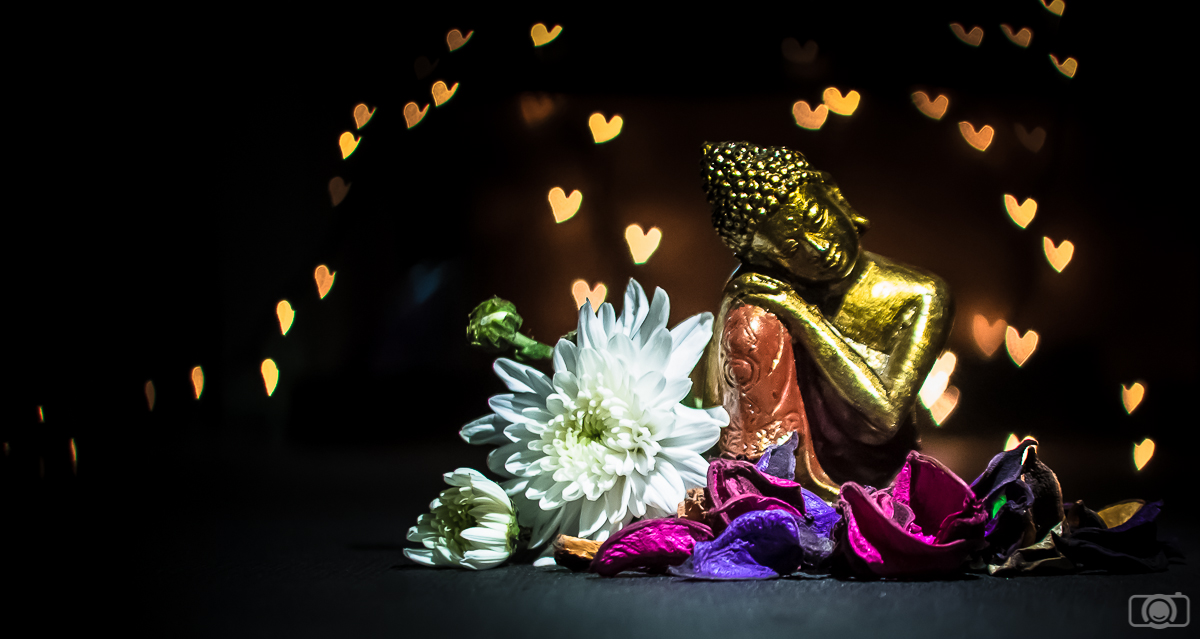
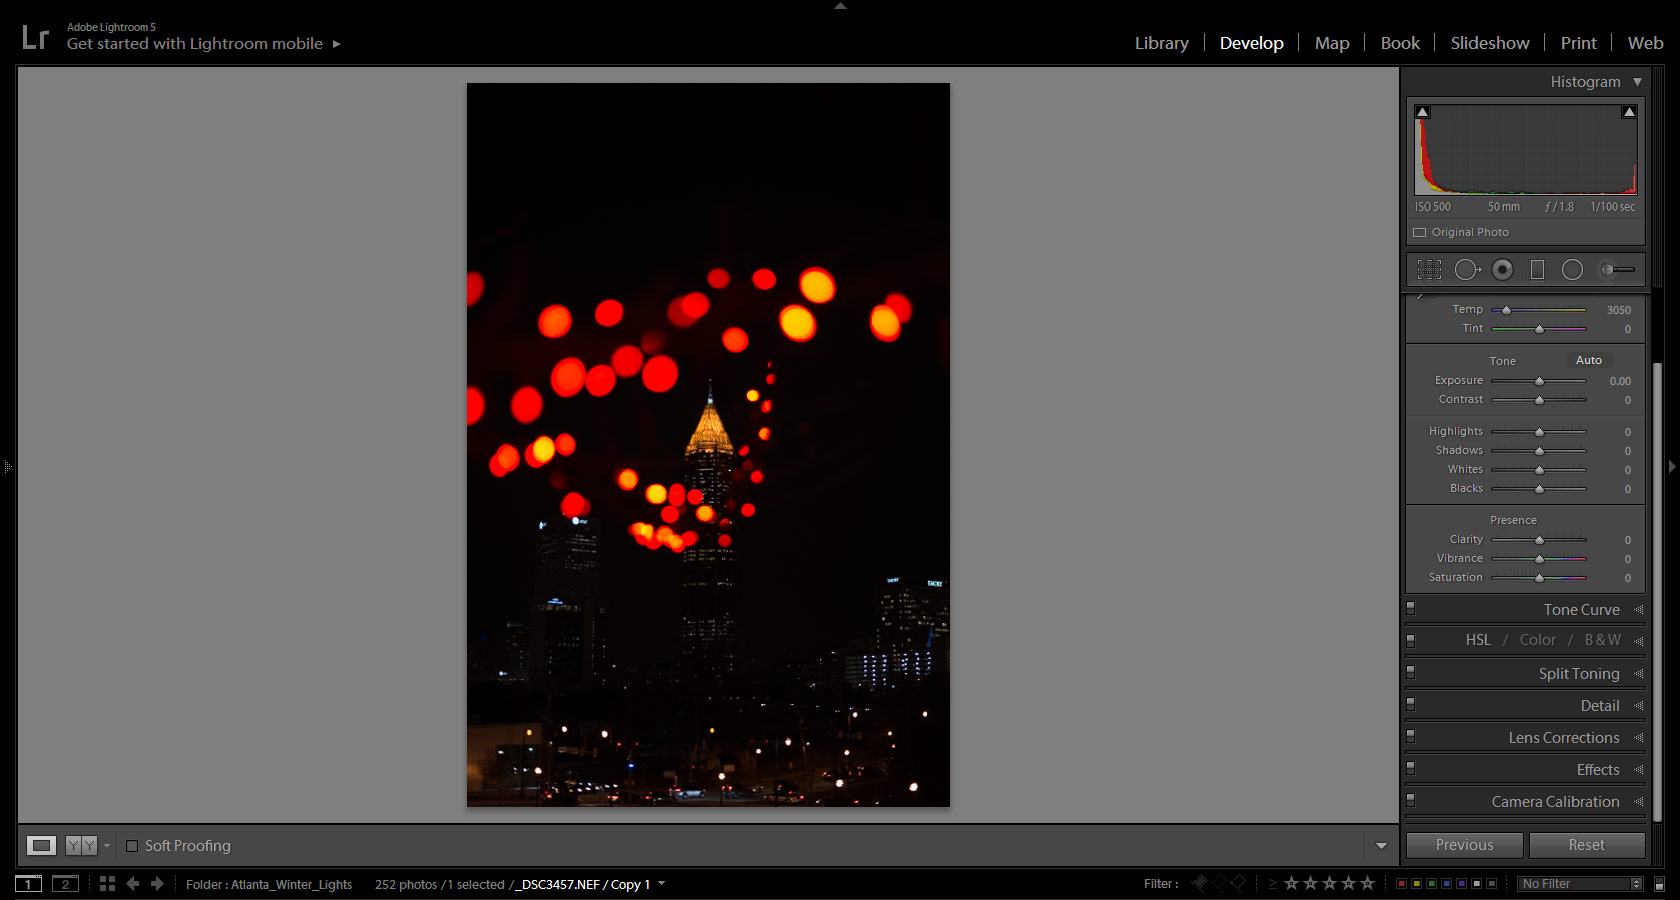
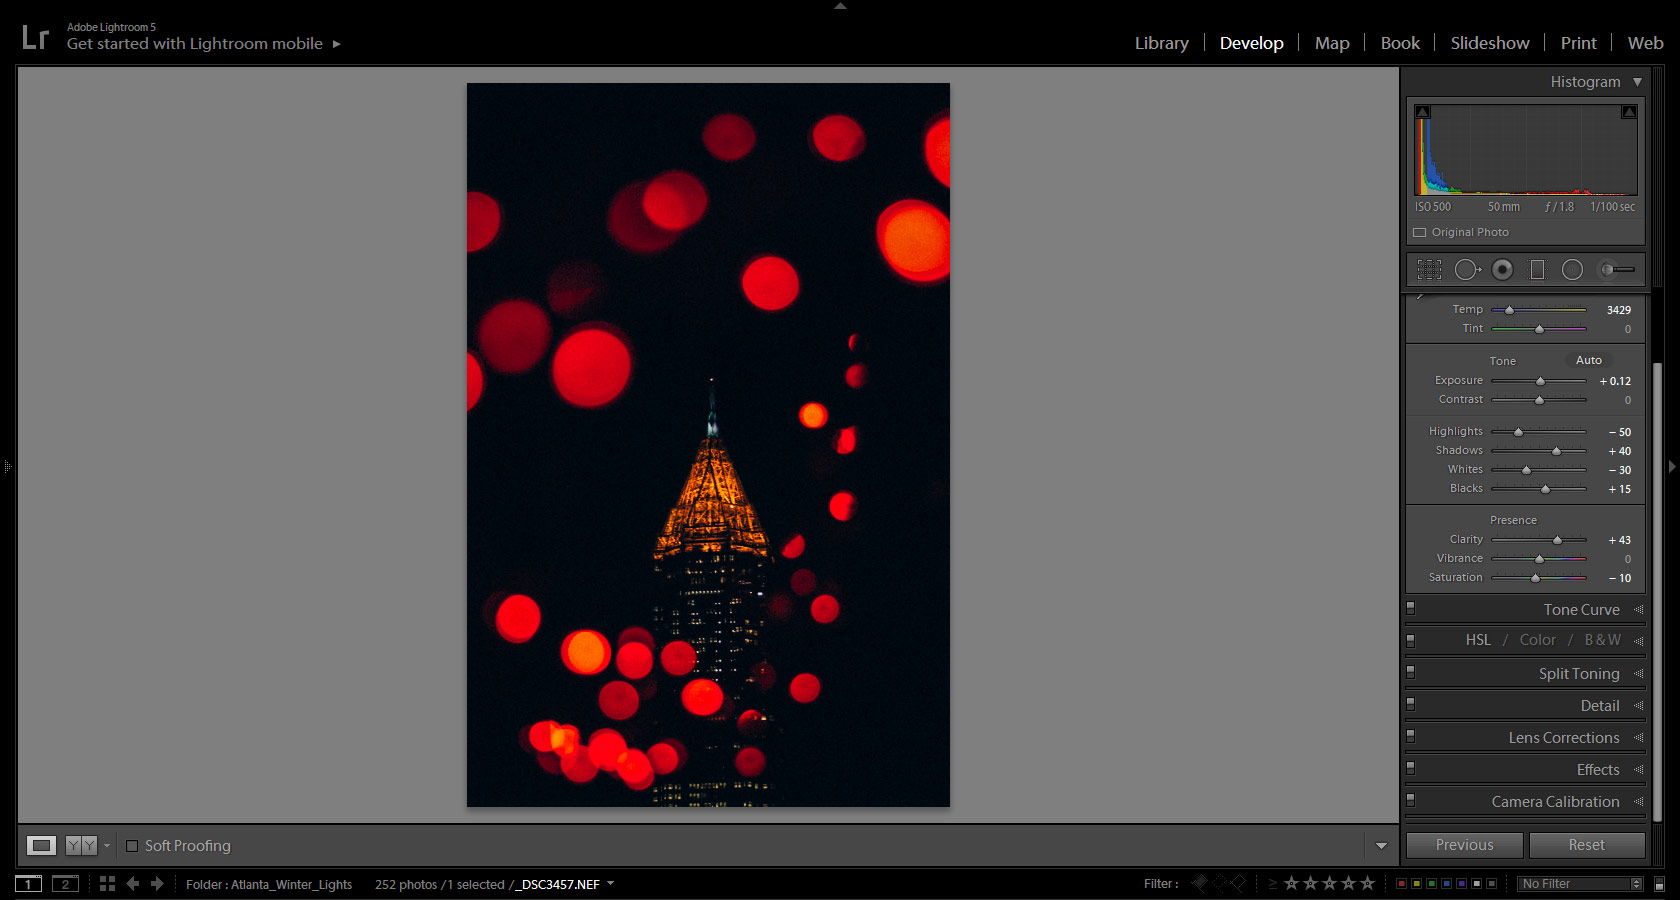
string lights foreground

String Lights

String lights, or fairy lights, are becoming increasingly popular thanks to the creativity of photographers like Brandon Woelfel. Hold them in front of your lens and they’ll create stunning bokeh. They can be stretched out to your subject, strategically framed around your composition, or simply held by you or your model. Each of these approaches will make your photos look soft and ethereal.

Whether you’re looking to take your compositions to the next level, brighten your photos, or become more detail-oriented, blurred foregrounds will help you improve your photographs. Remember to experiment as possible; even the simplest objects have the power to make your photos stand out.

What are your favorite foreground objects?

DIY- Lens cap for making your own creative shaped bokeh effects

Have you ever seen those photos with this effect where light sources are shaped like hearts or stars? The effect is called bokeh and to take this kind of photos you need 2 things: knowing how to create a bokeh and a  kit for the shapes.

sleeklens-33-1

So what is Bokeh? Bokeh is an effect which happens when you set the focus so that the background of the photo is blurry. When this happens, light sources in the background are also blurry and so they look in the photo like bright circles. Usually, the bokeh is achieved by using wide apertures. You will need to play with the depth of field in order to get the blurry effect you want. You can have a look at the article of our colleague Arnel Hasanovic to learn in more detail how to shoot photos with bokeh.

Today I am going to focus on the second thing you need to get this creatively shaped bokeh: the bokeh kit. You can get a kit on Amazon. However, you can also do it yourself. First of all, creating these bokeh kits is easy and cheap and you don’t need any special equipment. Second, you can get your family and friends involved in your bokeh project, making the experience even funnier. In addition, creating your own kit will allow you to be more creative because you can create any shape you want and not be restricted to the shapes that come in a commercial kit.

Let’s start with the list of things you will need to create your bokeh kit:

– A sheet of dark Bristol/thick paper (I prefer black, for not adding a color cast to your photos)

– Pencil

– Scissors and/or scalpel

–   A lens (preferably a lens with a wide aperture).

– A drawing compass,  a ring or other small round object

– Optional: glue/another type of adhesive substance

sleeklens-33-2
Here are the tools and materials I used. I also used a ruler to be more accurate but it is not mandatory to have.

Step one:

Draw a circle with the diameter of the lens that you want to use. The easiest way for me to do it was to use the lens itself as a mold (I recommend to place a filter on the lens to protect it)

Shape bokeh

Step two:

Cut out the circle, this will be your bokeh cap.

sleeklens-33-4

Step three:

Trace a second circle on the bokeh cap, about two millimeters smaller than the diameter of the cap. You can do it approximate or you can measure it with the ruler or a drawing compass.

sleeklens-33-5

Step four:

Using your scissors, make one millimeter long cuts from the cap’s circumference towards the center (the line you drew in step three will help you to do it accurately). Make the cuts as dense as possible.

Shape bokeh

Step five:

Using a drawing compass or a ring, draw another circle in the center of your bokeh cap (the ruler can be handy here as well, to place the center in the right spot). It should be small, around 2 centimeters in diameter. This circle is the maximum size of the hatch you should make in the following steps.

Shape bokeh

Step six:

Draw the shape you want for your bokeh effect inside the circle you draw in step five. Make sure to draw it as centered as possible. And now the most important thing: use a scalpel to cut out the shape of the hatch. Be as exact as you can. The more accurate you are with cutting the shape, the nicer and sharper the effect will be, make sure to trim all the edges too.

Shape bokeh


sleeklens-33-11

Step seven:

Fold the little cuts you made in step four, all in one direction and fit the cap into your lens. You can tighten the cap at the rim to the lens by using a pencil or a Q-tip (but do it gently, not to damage the lens).

Shape bokeh

Optional step:

You can make a little handle that will help you to remove the cap when you finish by gluing a small strip of paper close to the rim of the cap. I used a two-sided sticky pad.

Shape bokeh

And that’s all! You now can go and take super cool photos with a shaped bokeh effect! I took some photos with our Minion. Who is going to be your model? Have a happy shooting!

To get this photo I focused on the Minion. I needed to put some light on him because it was really dark.

"<yoastmark

If you go down to the woods – Tips for forest photography

Your local wood may be a nice place to go for a Sunday afternoon walk, but not always the first choice for a photography outing. Unless your local geography is particularly unique any woods or forests near you may not be obviously inspiring, but any place with an abundance of greenery, shaded areas, and clearings where the sun can burst through are great places to practice photography and learn how to find the most interesting aspects of any location.

Below are a few tips for discovering what surprises your local wood or forest has in store, and how best to capture them.

Rain and Wildlife

As with any shoot outdoors, rain can be the enemy of quick lens changes, especially if trying to capture wildlife that has suddenly appeared. A telephoto lens with a wide range is a good option if you want to be prepared for all weather conditions and for capturing far away things that might be gone by the time you’ve switched lenses. The downside is that woods can be dark places, forests darker still, especially in gloomy weather and it might hard to get the shutter speeds necessary for sharp images from a telephoto lens. Using a faster prime lens will mean you can take pictures at lower ISO settings and with higher shutter speeds, with less noise.

Deer in woods

Higher shutter speeds, from around 1/500 and upwards, will be necessary for getting crisp captures of wildlife (which unless you’re a ninja will require a telephoto lens anyway) while leaves blowing even gently in the wind will be a dead giveaway of lower shutter speeds.

All seasons, all lenses

Check out your local woods in all seasons. Autumn is an obvious time for woodland photography, offering a more vibrant colour palette, though winter can be great for creating atmospheric shots. Go rambling early in the morning and late in the afternoon during the winter months to capture longer shadows which can make pictures look more dramatic. The early morning and late afternoon light can also make it easier to expose images correctly.

Autumn leaves

Simply going armed with another lens on your camera is another reason to revisit. Walking around the woods again with a prime lens instead of a telephoto, or vice versa will make you think differently about the shots you take and possibly yield some new surprises.

Leaves and Light

Often the most photo-worthy parts of a wood are to be found in the details. This could be moss on the side of a tree or the light shining from behind a leaf with a lens pointed towards the sky. By thinking outside the box it’s possible to find more original shots than simply snapping on a horizontal plane of view along the footpath.

sleeklens-if-you-go-down-to-the-woods_005

Experiment with longer focal lengths, 50mm and higher, and the light coming through the trees to create bokeh effects, and use prime lenses to explore details such as small plants closer to the ground or textured tree barks.

Sometimes getting the best images in the woods is a waiting game. The light moving from behind a cloud can change the atmosphere in wooded areas in an instant. Not only will waiting reveal photogenic lighting conditions but details you may not have noticed before. The moss on the side of a tree may look quite dull when overcast, but can suddenly come to life if lit in the right way.

Go off the beaten bath

As long as you feel safe exploring the lesser-trodden parts of your local woods there’s much to be gained from going off the trail into the darker areas. You might stumble across a unique feature, or come across a spooky long cabin, unexpected things that can make for atmospheric images.

Coins in log

Woods are generally old places so you may find the remains of an old building, someone’s name carved in a tree or any number of random things which have been placed or created there.

Light and Dark and Lightroom

Because of the contrast between heavily wooded areas and the sky it can be hard to expose images of woods without creating areas that are too bright or too dark. Use spot metering to expose different elements correctly, and adjust the exposure level to balance out the different areas. Spot metering the sky will expose the sky correctly but leave the woods in darkness, while exposing the woods correctly will leave the sky blown out in bright lighting conditions. Using spot metering on an area between the two extremes may produce the best results. Another option to simply come back later when the sun is lower and there’s less of a contrast between the woods and sky, making it easier to balance the exposure.

If all else fails shooting in RAW mode and importing photos into Lightroom can also help to overcome this issue, as detail can be recovered in the brighter areas and enhanced in the darker ones.

Lightroom can also help when compositions are good but the light is maybe not quite right or the colours dull. As images of wooded areas tend to feature a lot of green, and a lot of brown, turning them black and white can eliminate the problem of a lack of colour variety and bring out the strength of the composition. Or add a sinister touch depending on the subject matter.

Spooky cabin in woods

The woods are one of the many common places that are close to home for many people and perfect for practising photography. There are challenges to be overcome and secrets to be uncovered, and in doing so you can learn to find interesting images in the most unlikely of places.

Focus on Fields of View – Visualising Focal Length

When it comes to composition, or even picking a new lens for your DSLR, it can be helpful to understand how different focal lengths determine what can be packed into a frame. The focal length of a lens not only determines how much it’s possible to get a shot but how fast it is and the depth of field it’s possible to achieve.

Below is a guide to what you can expect to see with different lenses (the examples below were taken on a crop sensor camera) from a wide lens to something with a narrower field of view. It’s not intended to be a super technical guide, and different lenses will produce slightly different results with varying amounts of distortion, but the goal is to help visualize what the millimeters mean on the side of your lens.

Wide – 15-35mm

On a full frame camera, wide angle is usually anything below 35mm. This would translate to about 50mm on a cropped sensor where a focal length of around 18mm, the equivalent of 28mm, would be considered wide. Extremely wide lenses start at around 10mm, though should not be confused with fish-eye lenses which are a different kind of wide lens. They may have similar focal lengths but produce highly distorted images.

The image below was taken at a focal length of 10mm on a 10-20mm lens (the equivalent of 15mm on a cropped sensor). It was taken standing as far back as possible, roughly 2m, from the building (St Nicholas Priory, an 11th century Benedictine Priory in Exeter, UK). At this focal length, there is some distinct distortion around the edges, this distortion will become more noticeable the closer you are to the subject.

Sleeklens - Fields of View

Below is same building taken from the same spot at the equivalent of 35mm on a full-frame sensor. At this focal length, you only see about half of the entire building.

Sleeklens - Fields of View

Wide lenses are perfect for taking shots of buildings and architecture, interior and exterior, where it’s not possible to get everything in with a narrower lens. Sometimes it’s impossible to fit a building in one frame with anything narrower than an extremely wide angle lens, and investing in one can make shooting in cities with narrow streets and interesting architecture a lot of fun.

Medium – 35-70mm

Lenses in the range of 35-70mm are great for taking portraits and fast prime lenses in 35mm and 50mm focal lengths are available inexpensively and can produce great results. Widely considered to be the best first lenses for photographers 35mm and 50mm cameras are the go to lens for street and documentary photography.

Sleeklens - Fields of View
St Nicholas Priory took at the equivalent of 70mm

In addition to being faster and more flattering lenses in this range (and some narrower lenses too) are also good for what’s known as the Bokeh effect. The Bokeh effect occurs when the aperture is wide open creating a narrow depth of field.

Sleeklens - Fields of View
The Bokeh Effect at the equivalent of 50mm

When there are lights in the background and a subject in focus close to the camera the narrow depth of field means the lights become blurred creating a pleasing artistic effect. It works with both natural and artificial light.

Narrow – 70-300mm

Although some consider a 50mm lens one of the best focal lengths for portraits it still produces some distortion, with an 85mm lens on a full-frame camera giving a truer depiction of the subject.

Sleeklens - Fields of View
St Nicholas Priory took at the equivalent of 300mm

Any focal length higher than 135mm will be better suited to wildlife and sports photography. Although not as fast as prime lenses telephoto lenses with a wide range are generally used outdoors in broad daylight and in addition to being the only option for shooting wildlife at a distance are also ideal for sports photography.

Telephoto lenses are great for experimenting with. If you’ve got one with a wide range, from wide to narrow, it will allow you to experiment with different fields of view although the picture quality might not be as good as prime lenses for some of the shorter focal lengths.

Within each category, wide, medium, and narrow, there is a range of different focal lengths that will be equally good for various kinds of photography – a lot of it comes down to personal preference. Sometimes if you’re struggling to get the shot you want it might be because you don’t have the right lens. Wide lenses can really open up confined spaces and enable you to take shots that weren’t possible before while narrower focal lengths are better for taking true-to-life images of people and places.

Curating Great Shots – Tips for Museum Photography

Whether you’re a tourist looking to document an interesting artifact or are just interested in capturing a unique subject, there are many ways you can improve your photography next time you’re shooting inside a museum.

Museums can be exciting places to explore – buildings filled with surprises whether they’re big or small, ancient or modern. However, they do pose plenty of challenges for photographers trying to get creative shots. Having worked at the Royal Albert Memorial Museum in Exeter, the UK for several years as a volunteer and a freelancer, often with a camera in my hand, I’m well aware of the potential pitfalls of taking photographs in museums.

Sleeklens - RAMM Museum Shoot_046 (2000px)_mini

With a couple of lenses (a fast one and a wide one), a polarizing filter, and a monopod I popped into RAMM to take some pictures and prepare some tips for this blog. Its wide range of exhibits offered the ideal opportunity to test a few key problems facing photographers in museums, and their solutions.

Working with reflections

One of the biggest problems is glass creating unwanted and distracting reflections, and all the best stuff is behind glass. There are several ways you can reduce reflections, and also make them work to your artistic advantage.

The first way you can reduce reflections is to invest in a polarizing filter. A polarizing filter will block light from one direction so that in theory you can eliminate the light rays which are causing the reflections and only let the light from behind the glass through. It’s not just a matter of slapping the filter on your lens, though, to get the best results the filter should be rotated so that the light is being filtered at just the right angle. And while polarizing filters can be great they aren’t magic, working best in certain lighting situations and not at all in others.

Sleeklens - RAMM Museum Shoot_025 (2000px)_mini

The other option with reflections is to make them part of the composition, by using a lens with a wide aperture to create a narrow depth of field and blurry reflections – in other words, bokeh. You can also try pressing your lens against the glass which will do the trick as far as removing your own reflection goes and can work well when you’re using a wide one which allows you to frame the whole subject. It makes it more difficult to create a pleasing composition but does offer the advantage of helping to steady the camera if you’re working with low shutter speeds.

Even if you do capture an unwanted reflection not all hope is lost, with the help of Photoshop and Lightroom. If the reflection falls over a particularly dark area it might be possible to make it less noticeable, or even invisible, by making the darks a bit darker in lightroom. Or if you don’t mind a more time-consuming solution the healing brush and clone stamp tools in Photoshop can also be helpful.

Sleeklens - RAMM Museum Shoot_028 (2000px)_mini

Aside from reflections museums cases are also magnets for fingerprints, so it’s worth taking a cloth with you to polish the glass before taking the shot.

Forget about flash

There are several reasons why you shouldn’t use a flash in museums. One is that they can create even more reflections on glass surfaces (and ugly reflections at that), the other is that light levels in museums are carefully controlled to protect sensitive objects. While a quick flash probably isn’t going to cause an ancient artifact to disappear in a puff of previously priceless dust it might shorten its lifespan and rob future photos of an interesting image.

Sleeklens - RAMM Museum Shoot_011 (2000px)_mini

To compensate for dim lighting a fast lens is the way to go, like a prime around f1.8. Slower telephoto lenses will make it a lot more difficult to get bright, sharp shots, especially in darker galleries. And if you want a person in your photo, and you want them to look nice and sharp, a fast lens is a must.

Raising the ISO sensitivity is another option but depending on how your camera handles higher ISOs you may find you’ll be capturing unwanted noise. If you find your images suffer from a high level of noise check out Nikolay’s blog on capturing images with less digital noise.

One leg good, three legs bad

Even larger museums with big open spaces will have plenty of areas where it’s difficult to frame a shot without walking backward and bumping into someone or something. While a little a bit of self and spatial awareness goes a long way in such environments it’s also a good idea to think about your tripod situation if you’re trying to do longer exposures or want to make sure you get a steady shot. Although not as rigid as a tripod a monopod is a great way to go to eek out that extra bit of clarity and create some interesting images, without blocking anyone’s path.

Sleeklens - RAMM Museum Shoot_010 (2000px)_mini

Go wide

The scale can be a tricky thing to work within a museum. Sometimes you’ll find lots of small things in big places, and sometimes you’ll find one or two big things in relatively small spaces (like the elephant below for example). Using a wide-angle lens will allow you to fit everything into one shot or make a composition less cramped, though it may add some distortion at the edges.

Sleeklens - RAMM Museum Shoot_041 (2000px)_mini

Sometimes 18mm isn’t wide enough, and the image above was taken at the widest end of a 10-20mm lens on a cropped sensor (so 15mm full frame). Although not the fastest lens I was shooting at a time of day when the room was particularly well lit.

Ask permission

Just because a museum is free to enter it doesn’t mean it won’t have rules about photography. If taking images for commercial purposes you’ll definitely need to ask permission from the museum (as I did for this blog), and even if the images are just for personal use they’ll probably appreciate you asking. Generally speaking, any museum that has a policy about picture taking, or the lack of it, will have clear signage and may ask you to pay a fee, whatever the reason you’re shooting for.

Don’t hog the history

Finally, it’s also worth mentioning that it can be too easy to spend a long time perfecting your shot of a single object, which may irritate other visitors. If you’re struggling to get the shot you want to move on and come back to it later, not only is this considerate to those around you but it will give you time to think about your composition and the opportunity to come back to it with fresh eyes.

Sleeklens - RAMM Museum Shoot_014 (2000px)_mini

Next time you’re planning a trip to a museum, whether local or not so local, keep these tips in mind to get best out of your trip. And if you’re not usually the museum visiting type but are looking for some creative inspiration a museum is always a good place to start.

Bokeh Photography for Beginners

Holidays are a good chance to get great color and lights in your shots. Winter, in general, is a great time to go out and experiment with ways of shooting scenes that are not always at your disposal. With all of those lights and colors for the holidays, also comes the opportunity to create some awesome bokeh. Essentially, bokeh is the way the lens renders out of focus light. It is circles of light like in the above image or the creamy background in portraits if taken with the right settings. Aside from having a nice out of focus bokeh in portraits, there are tons of objects you can use to create some great bokeh by holding objects in front of your lens. Incorporating out of focus elements can enhance your images and give it a mood you otherwise would not have.

1 – Starting Point

So what do you need to know before taking photos, and how to achieve bokeh in your images? Well, the biggest things that go into creating bokeh are the lens choice and the aperture you shoot at. The shape of the bokeh, a lot of times, is determined by the aperture blade amount. Generally, the better the lens the more blades (around 9), while the lower end lenses have about 5. The higher amount of blades creates more of a circle which creates the bokeh, more creamy and soft, where the lower blade count will create something like a hexagon. I tend to prefer the more round bokeh, but that is not to say that the less circular ones are not good and should not be done. Everyone has a preference but it is good to know the difference of why the bokeh might look different from lens to lens.

2 – Prep

If we look at one of the images I started with, we can gain a lot of information by looking at the histogram below. I mentioned above that aperture also plays a role in creating bokeh. One of the things to keep in mind if you are trying to get nice bokeh, is shooting around f 2.0 or wider. Having the lens open wider allows for a smaller depth of focus, thus giving you the out of focus bokeh in your images. What you generally see in portraits is that the subject is in focus and the whole background is out of focus. In the images I shot, I used the foreground as a framing device and made that the out of focus part. So in my image, I made the foreground out of focus and used that as a nice way to introduce some interest in my image. Going, either way, works (either creating the foreground/background out of focus), just as long as there is enough difference in the field of focus to get one of the elements to go blurry. As an artist, that is up to you to decide on how you want to incorporate things being out of focus into your images.

Arnel Hasanovic Bokeh Tutorial

3 – Shooting Bokeh

So, once you have in your head what you want the subject to be and how you want to incorporate bokeh into your shot, you then experiment! When shooting out of focus especially with the object almost touching your lens, it is often unpredictable and fun to see what slight movements will do with the light. In my case I kept adjusting, moving from angle to angle, making minute changes, to get something that looks like the image below. One thing to remember is that the color of the object out of focus can play a big role in helping you get a nice clean image. Before getting this shot I was using some more green light that did not look good against the color of the building, so I moved over to the more red holiday lights and that made all of the difference.

Arnel Hasanovic Bokeh Tutorial

4 – Experiment! Experiment! Experiment!

Did I mention experiment?! Trying out new things and making slight changes with your camera will yield two great and unexpected results that you can learn from. Shooting at night is not something I do a lot of, so when I get a chance to do something I do not normally do, I play around, knowing that there is no consequence for failing. Below is a small sample of the different angles and changes I made along the way to getting the image above. If you notice, a lot of the images look the same in a row, but one move up or down changed it. When working with light bouncing around your lens and it is so close that it almost touched the lens, the smallest change can get you to a winning shot.

Arnel Hasanovic Bokeh Tutorial

5 – Conclusion

Shooting bokeh can be a lot of fun and there are a lot of different ways to incorporate it into an image. Sometimes used just for fun, and other times to hide distracting objects. Whatever the case may be, it’s fun to take a time to try new things and play around.  Below are some other images and uses of bokeh during the night.

Arnel Hasanovic Bokeh Tutorial