Tag: composition

Using Natural Framing To Guide the Viewer’s Eye

When it comes to exceptional photo composition, there are many guidelines and techniques that can be used to draw the viewer’s eye to your subject. Theories of composition, like the Rule of Thirds, leading lines, balancing elements, shaping, viewpoint and framing work well when we can move the subject and change the elements of a scene to sit exactly where we want them to, but the photographer’s eye should be able to see the artistic potential in their natural surroundings.

Photographers don’t often have the opportunity to compose images outside of a studio; meaning, we don’t usually trek in props, lighting, and mass amounts of equipment when we’re out shooting remote landscapes, or even cityscapes. We have to do what we can with what we find.

Most of the time, the elements of a scene are in fixed relationships to each other. While there are many techniques to draw the viewer’s attention to your focal point, one method to focus the view point is to use framing.

tree branch frame photo

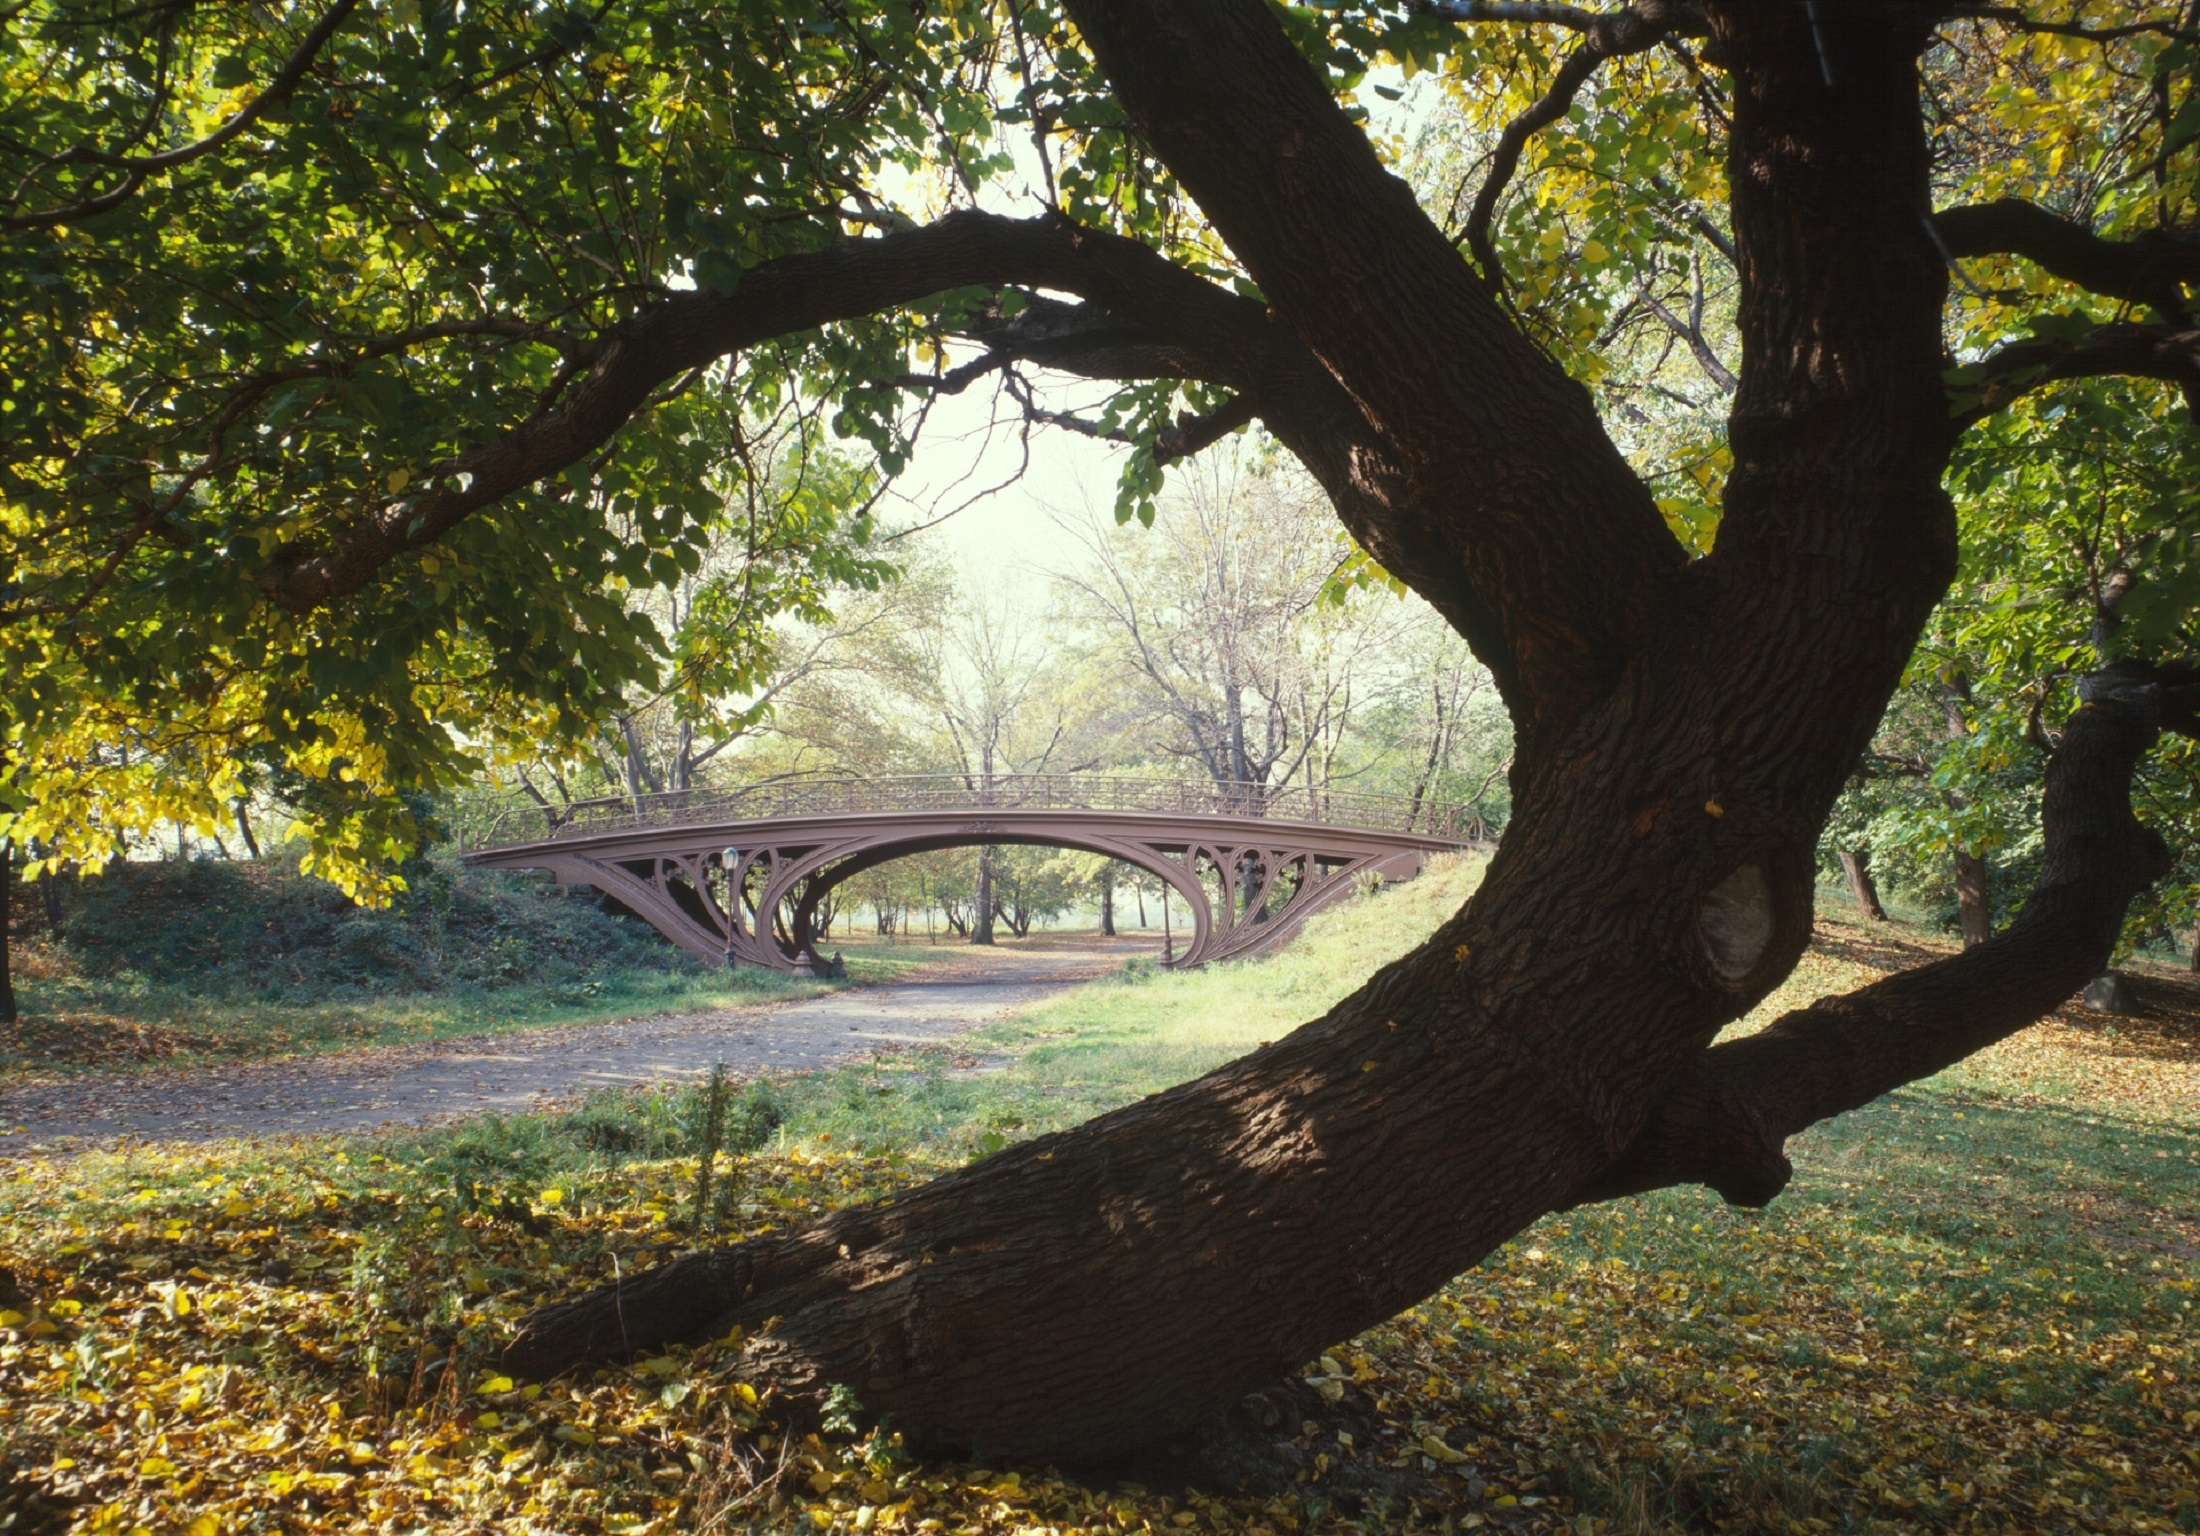
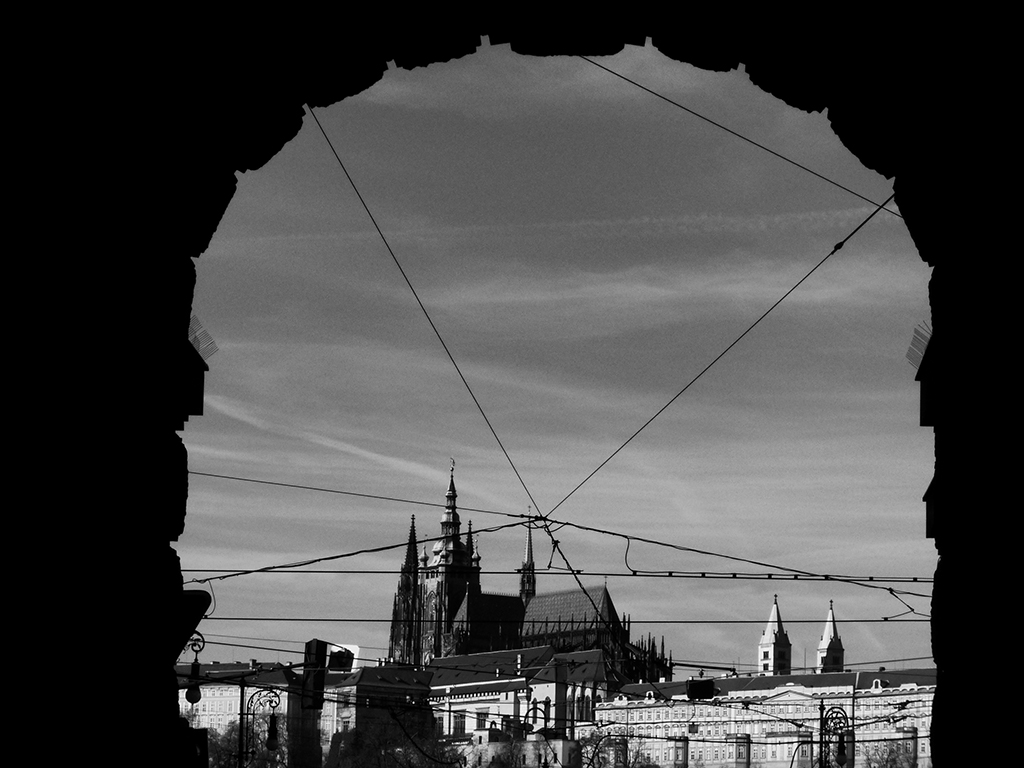
Look at the above photo, for example. By using a uniquely shaped and placed tree with some low hanging branches, but not focusing on them, the scene is framed beautifully and the viewer’s eye is drawn to the bridge, which is the subject of the image.

Creative Ways to Use Natural Framing

While it may be considered one of the easier composition techniques in photography, there are advanced and creative ways to use framing to produce award winning shots. It doesn’t have to be about just placing a frame around the subject. You can use more subtle, yet effective, techniques. A successfully framed shot should not only draw the viewer’s attention to the photograph, it should add depth to the picture and place the subject in perspective of the foreground frame. Done right, it will make the photograph much more interesting and invite different reactions from the viewers.

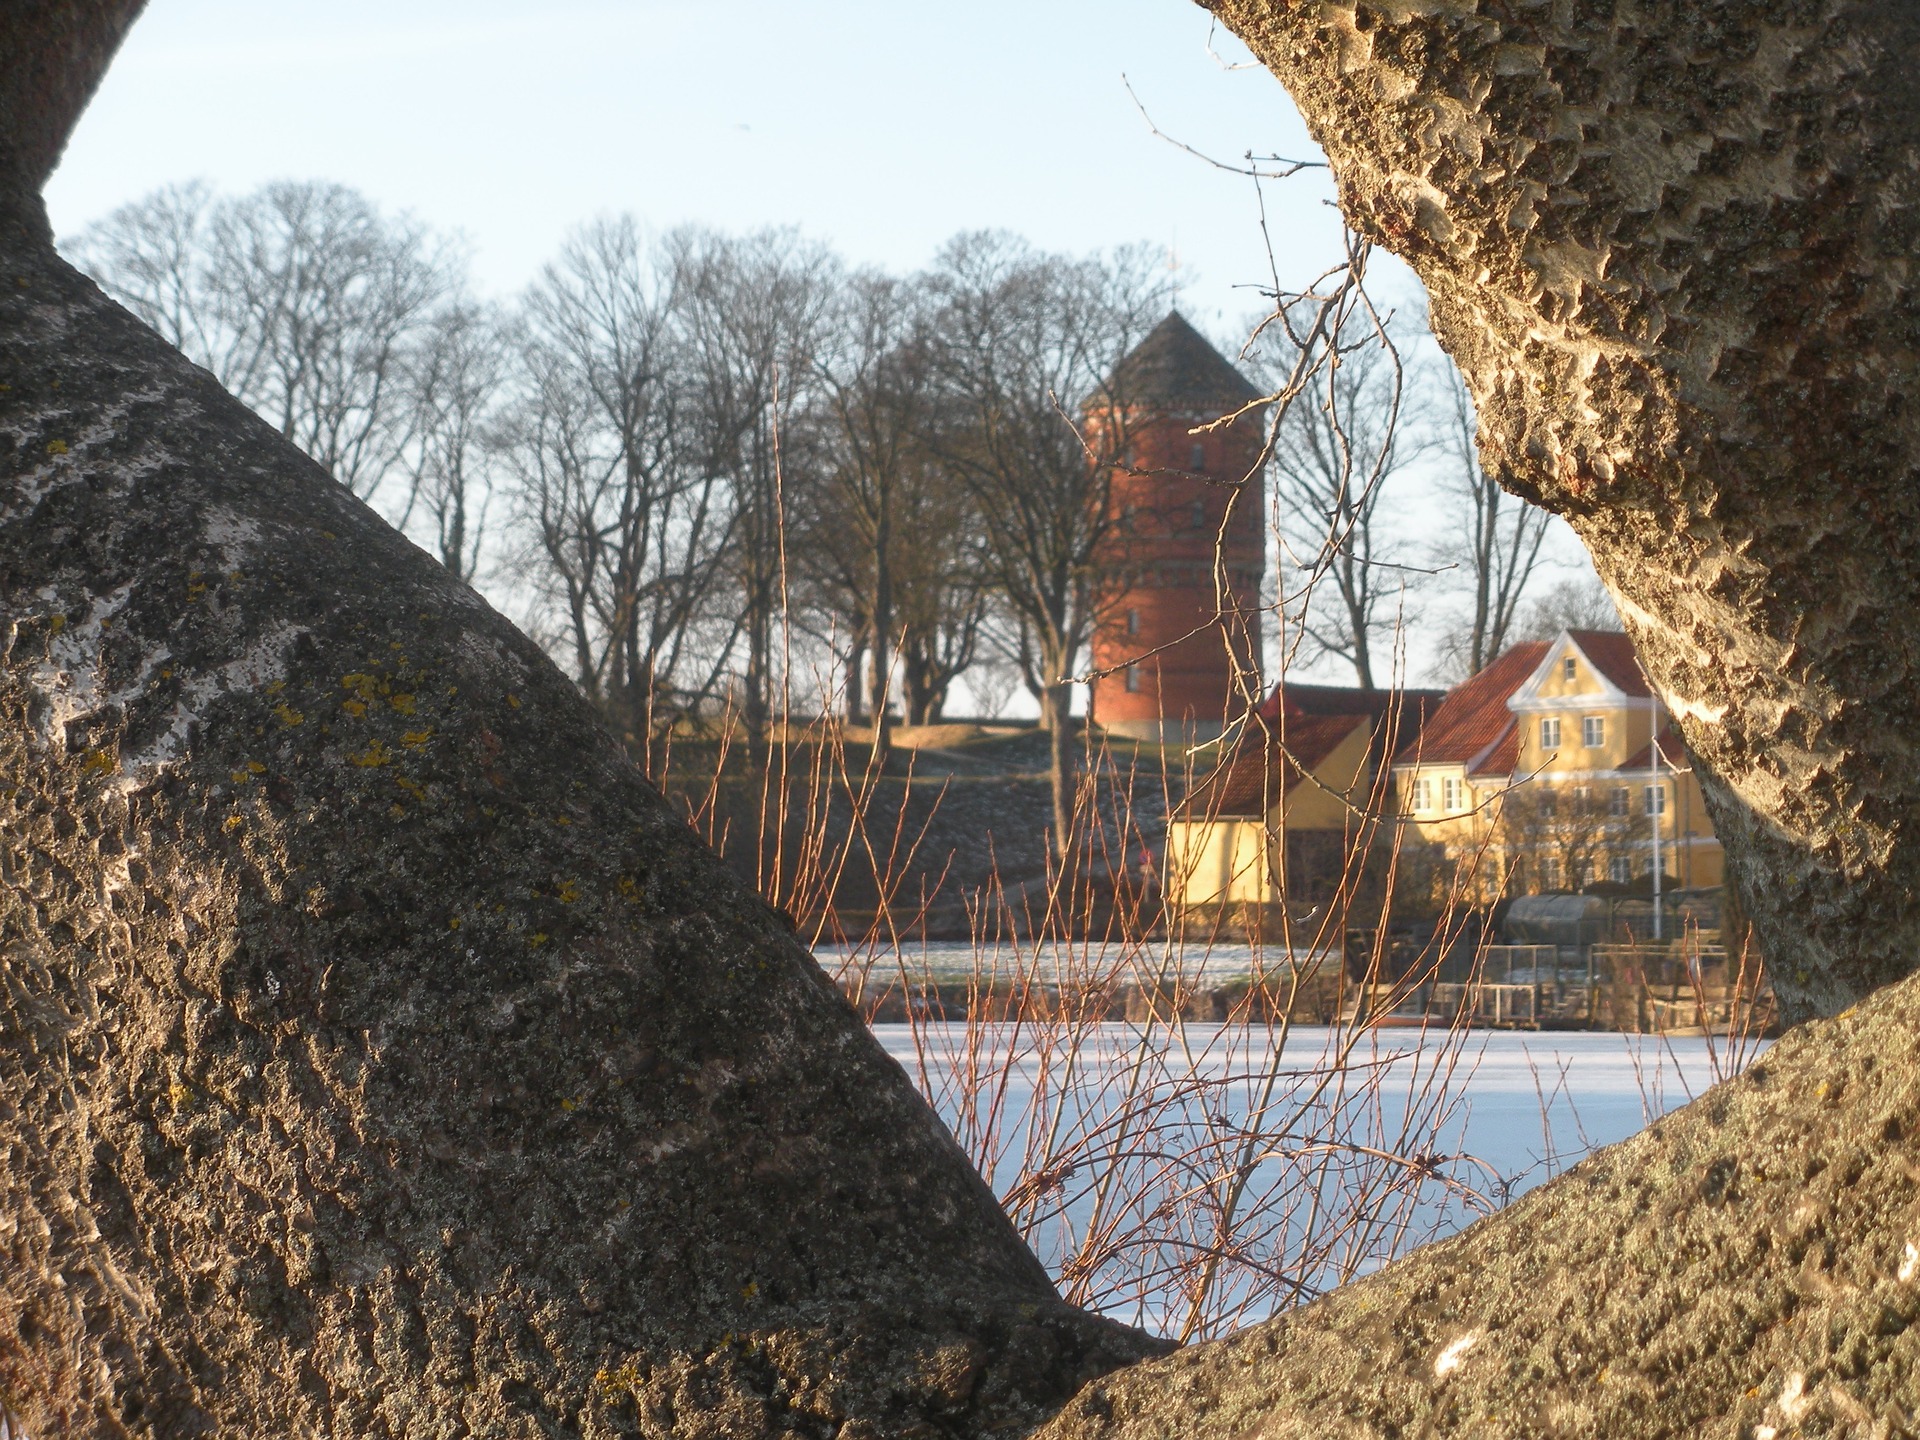
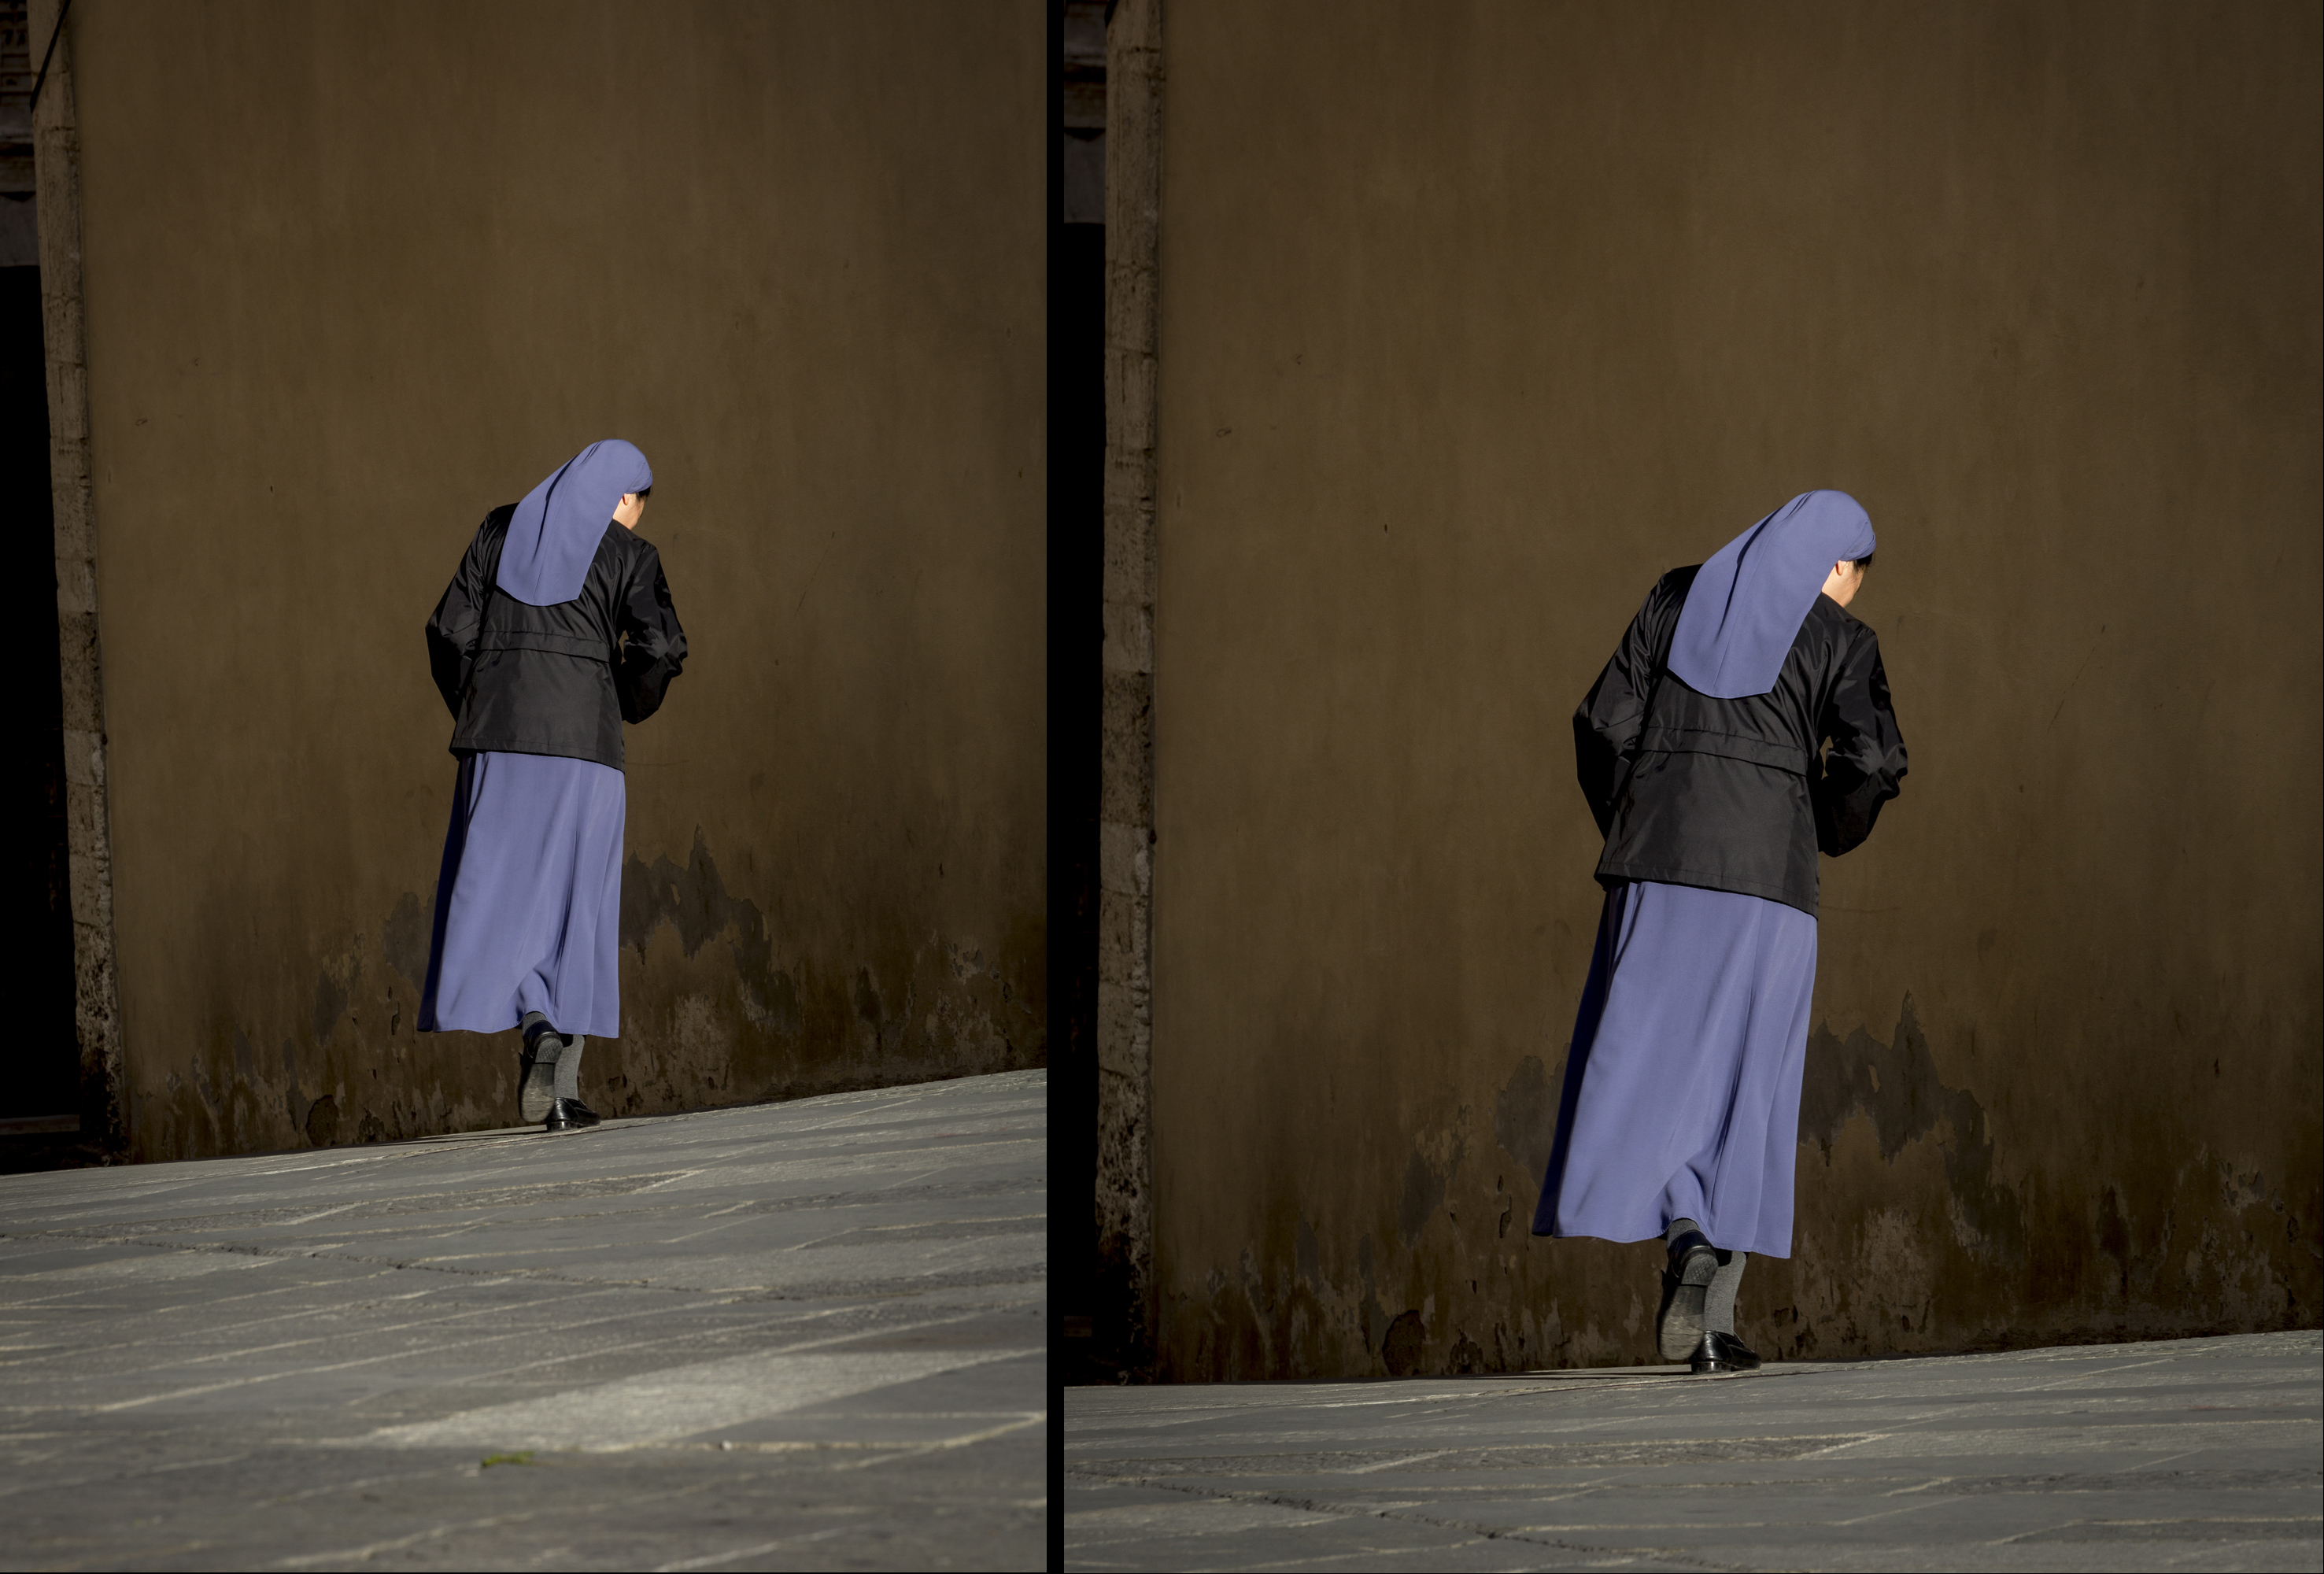
Natural framing is a composition technique where the photographer uses a framing device like tree branches, walls, archways, hills, imposing rock faces, fences or anything in their natural surroundings to create a border or partial border around the subject of the photograph.

When framing up a shot, try to position the subject within a frame to define depth and lead the viewer’s eye to the subject – the image’s focal point. Look at the scene and take the key elements of it that have the most meaning for you, then position them in a way that creates mood and interest and draws attention.

unframed photo

The same scene can change dramatically when a natural frame is added. While the pond in front of the house (above) is itself picturesque, the scene’s mood changes when a frame is included in the foreground (below). The archway not only gives a sense of secrecy, but creates depth.

archway framed photo

Natural frames can be a number of objects in any given scene. Once you start recognizing them, you will begin to see them everywhere. Doorways, windows, low hanging branches and fences are just a few objects we encounter on a daily basis, all of which can be used effectively to emphasize your photographic subject. Once you begin to use your imaginative eye to view your surroundings, you will start to see creative and artistic ways to tell your story.

How To Use Natural Framing in Photography

Why Use Natural Framing?

When done well, natural framing can add an element of cleverness and connection to your photography, effectively using the photo subject to add a compositional element, along with drawing the viewer’s eye to the central subject of your photo.

Natural framing can be both smart and creative, using elements within your subject to fill space that otherwise might be blank and uninteresting in your finished photo. The art of natural framing works best when it isn’t immediately obvious to your audience and doesn’t distract from the central image in your photograph.

8 Tips for Using Natural Framing in Photography

When it comes to using natural framing in your photography, there are a few basics you should keep in mind – we’ve listed a few below.

  1. Establish a connection
  2. Work within a theme
  3. Maximize depth of field
  4. Employ focus stacking
  5. Frame with color and more
  6. Get moving
  7. Don’t be afraid to experiment
  8. Let your framing match the subject

1. Establish a connection

Natural framing can be incredibly powerful when there is a direct connection between the framing element and the central image. For example, when shooting images of a mountain range, you might find that the sky surrounding the mountains lacks interest. In that case, you can look for surrounding tree limbs that could be used to block out the sky and frame the mountains. Because trees and mountains have a natural and intuitive connection, the trees don’t distract from or compete with the central mountain image. They simply provide balance and help disguise a visually uninteresting sky.

2. Work within a theme

Some of the best natural framing occurs when there is a visual theme that both the framing image and the central image adhere to. You might snap an image of a country road through the frame of a covered bridge, for example – the rustic, rural theme ties both elements together. A harbor scene shot through a porthole is another good framing example, with the nautical elements tying everything together.

3. Maximize depth of field

Maximizing your depth of field can help provide the sense that your viewer is actually looking through the frame you’ve created. Getting as close as possible to your foreground interest can increase the sense of depth in your photo by appearing more out of focus than your central subject. In addition, using a wider aperture can help achieve similar results. Each situation and each subject are different, though, so it’s important to experiment with different aperture values until you get the result you’re aiming for. You can also check out some online photography courses to help you get more familiar with adjusting your aperture settings for certain effects.

When using natural framing in your photography, you can maximize the depth of field when your subject is close to your lens by using your camera’s hyperfocal setting. The simple physics associated with your lens insists that from the point of focus, as the lens is stopped down, a given focus amount will fall in front of that point and a given focus amount will fall behind the same point. A simple smartphone hyperfocal app can help you set your lens to a specific distance based on its focal length, your sensor size, the aperture you’re working with, and how far away from the front element your central subject is positioned.

4. Employ focus stacking

With focus stacking, you’ll take several images of the same subject, focused at various distances. You then can use specialized software to blend those images into one final version. Sometimes, you might want your framing element to be sharply in focus, while at other times, you can better reach your desired effect by having your framing element out of focus. Snapping the photo both ways and other focus options allow you to play with the final effect you’d like to achieve.

5. Frame with color and more

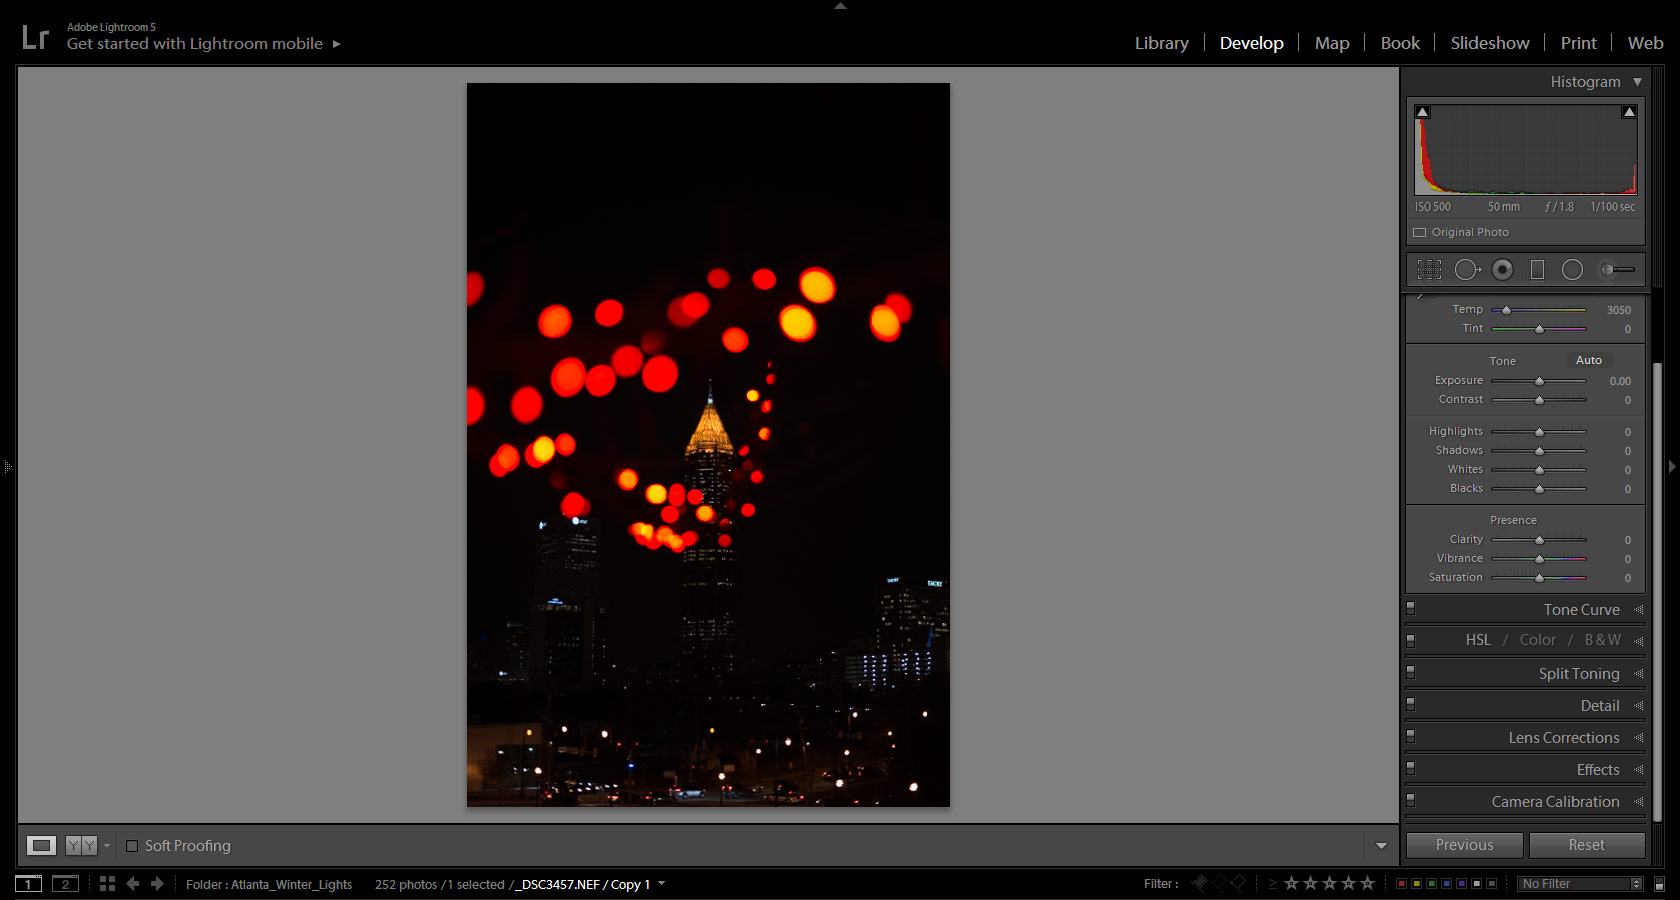
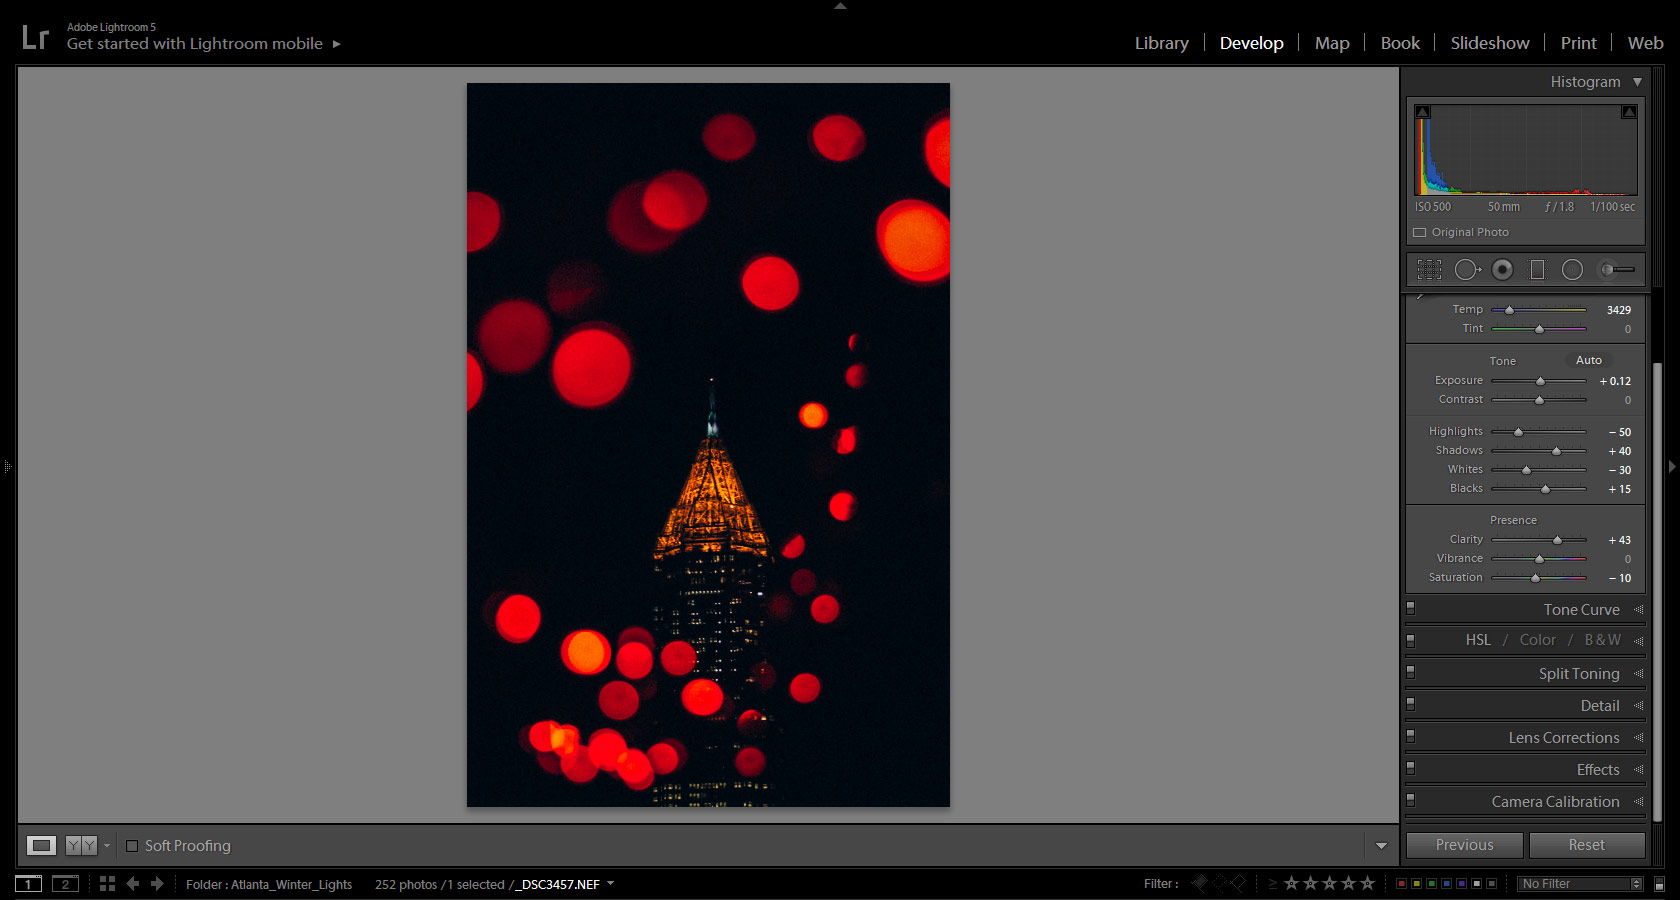
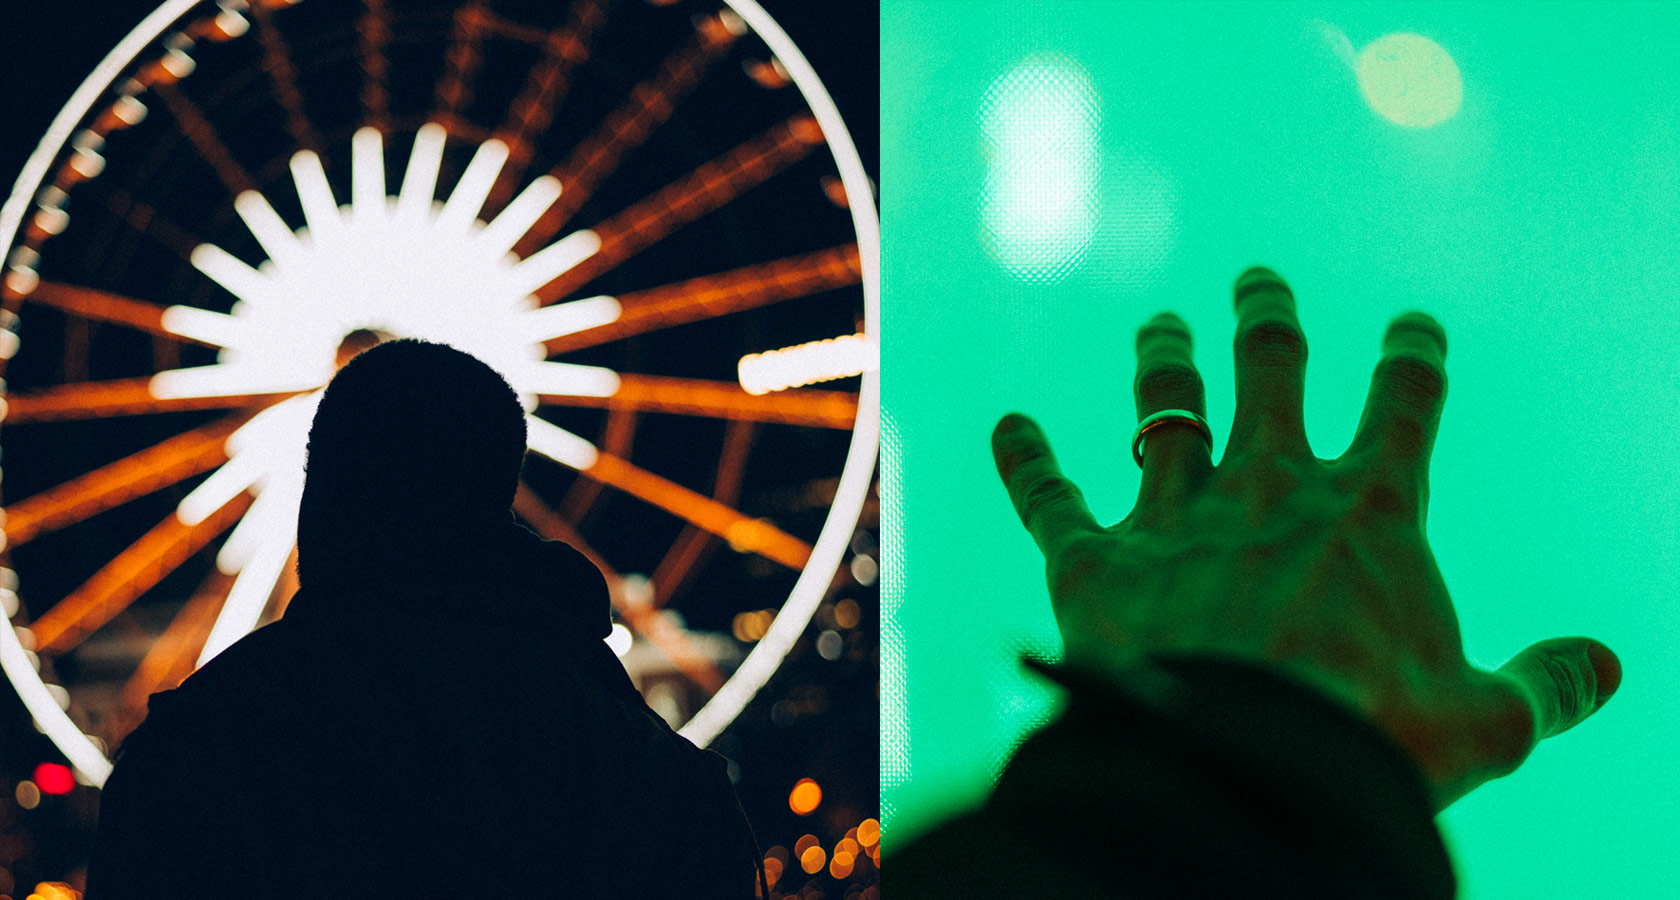
Keep in mind that framing doesn’t have to be limited to real-life objects and recognizable shapes. You also can frame with color, texture, brightness, contrast, and more – anything that provides a tangible border around your central subject so that the eye is drawn to it as it separates from the background of your photo. A good example is adding a backlight that creates a ring, or halo, around your central subject, instantly framing them.

In general, the viewer’s eyes will be drawn to the brightest object in the photo frame, so keeping this in mind can help you use light to frame your subject. In addition, you can flip that paradigm and use a silhouette against a white background for effective framing. You might find some other good options by using Lightroom presets in your photo editing.

6. Get moving

Be careful not to lock yourself into a static position as you shoot your photos. Sometimes even the slightest movement of your feet, your upper body, or just your camera can make a big difference to your framing. In addition, moving can provide a different or unexpected perspective that can really bring your photo subject to life. Moving around your subject and experimenting with various placements and types of natural framing can be a great way to practice your natural framing techniques and continue to hone your craft.

7. Don’t be afraid to experiment

It can be difficult, but try not to be too rigid in your approach to natural framing. Try something new, and don’t get disheartened when some of your experiments don’t work out. That’s the whole point of experimenting – to separate what doesn’t work from what does. For example, try taking photos where you frame all four sides of your hero image, plus some with only three or even two sides framed. Try to exhaust all possibilities while you’re snapping photos so that you have a lot to work with once you start editing. You might even play with images in which the central subject is framed, and that frame exists within another frame. Your possibilities are nearly endless.

Most of all, you have to realize that good natural framing takes practice – lots of it. Engage your family and friends in helping you practice, and take tons of photos trying everything you can think of. You may only get a few usable images at first, but you’ll get better every time you shoot if you stick with it and are intentional about honing your techniques. This is especially important if you’re just learning how to become a freelance photographer.

8. Let your framing match the subject

Above all, good photography tells a compelling story – as you snap photos, make sure to keep in mind the ultimate story and effect you want to see. For example, if you’re capturing intimate images, you’ll probably want to use a tighter frame, while photos that convey freedom and open spaces will likely be more effective with a wide open frame. You are in complete control of what your viewer sees in your final image, so never forget that.

photography framing techniques

Things to Remember When Framing

There are a couple key points to remember when using the technique:

  • A frame in the foreground of a picture adds point of view. It tells the viewer a story through the perspective of the photographer. Since framing guides the eye to the subject, the technique can be used to draw the viewer’s focus inside the photograph and keep it there.
  • The frame doesn’t need to be sharply focused, in fact, it is almost better for the image if it is out of focus or under-exposed since a detailed frame can be distracting. Remember, you want the focus to be on the subject.

Intelligent composition is key in the creation of a captivating shot. The use of natural framing can be tricky, but if done right, your picture can benefit greatly. A beautifully framed shot gives the photo context, defines a third dimension of depth, and gently guides the eye into the subject in the picture.

Use good judgement when framing a shot, keeping in mind that not every foreground element frames a subject and not every subject is complemented by a frame.

6 Ways to Add Depth and Dimension to Your Photos

One of the main challenges photographers face when trying to accurately capture any scene is achieving a realistic sense of depth, whether you’re shooting a portrait or a landscape. For centuries, artists have struggled to effectively portray a three-dimensional object in a two-dimensional image. In the absence of physical depth, artists and photographers are forced to incorporate optical illusions to create a convincing sense of visual dimension.

These techniques will help you capture a more satisfying scene, and will help viewers feel completely immersed in your work. By composing your images to enhance the feeling of depth, you’ll find that your resulting images are more powerful and dynamic. Bring your scenes to life by using these tips to make them feel more three-dimensional, interesting, and realistic.

1. Use Leading Lines

This is one of the most common composition rules artists use to achieve a sense of perspective. Look for leading lines like winding paths, city streets, or natural shore lines to draw the viewer’s eye into the distance. You can also create this effect with things like fences, walls, even fallen trees. While this method is primarily used in architectural or landscape shots, you can incorporate it into portrait compositions for a more dynamic result.

leading lines photo

Leading lines can be found almost everywhere you look, so keep your eyes open and start finding ways to incorporate them into the frame. These lines are an easy way to give your image a stronger feeling of dimension.

2. Layer Objects of Interest

Make sure your shot includes a variety of information for the viewer, to help establish a sense of space. By keeping some foreground details in the frame, as well as interesting background elements, you can effectively build a scene with substantial depth and dimension. Each composition should include a foreground, middle ground, and background, and try to find a way to connect each layer.

layer objects photo

If there’s nothing particularly interesting in the foreground, try framing the scene with branches, leaves, or grass. This can be done when shooting both landscapes and portraits to create interesting compositions with a strong element of dimension.

3. Separate Your Subject

Using a shallow depth of field, you can selectively focus on your subject and allow the rest of the photo to fade away. This will not only make your subject pop, but it increases the feeling of distance between the background, the subject, and you. This effectively creates a sense of depth and dimension, without having to adjust your composition.

separate subject photo

This technique works even better when you can leave an element in the foreground out of focus. Like mentioned above, try using leaves or branches to frame the selective focus on your subject. That way, you can maintain the three planes of your image while still highlighting one specific element, like the model in a portrait.

4. Find Repetition

A staircase, a fence, or even rows of seats in a theater can all help create a visual sensation of depth. As they decrease in size through the frame, the viewer can recognize their distance from the foreground. This information is then used by the viewer to establish a sense of space within the image.

repeating patterns photo

Repetition also allows for interesting, unique compositions, so use this technique to your advantage. You can find repetition all over. Keep your eyes open and search for opportunities to benefit from the depth it can add to your images.

5. Adjust Your Viewpoint

Shooting at eye level is great, but you’ll be able to exaggerate a scene’s perspective by crouching down and shooting from a low angle. You’ll be able to pull in more foreground elements, create a vanishing point, and force viewers to look at a scene in a completely new way.

change viewer perspective

Angling down and shooting from above can also provide this exaggerated perspective by using converging lines in a more interesting way. Just a simple change in viewpoint can often be enough to make a well-composed shot much more dynamic and dimensional. This can give viewers a new look at a familiar scene.

6. Use the Light

Often, this isn’t something you can control. However, when conditions are right, you can use light to your advantage to capture a scene with dramatic depth. The glow of the sun can help build an impressive 3-D effect, illuminating certain elements of the scene and effectively building the three planes you need in your image.

three-dimensional lighting

It doesn’t have to be sunny out for lighting to impact the dimension of your photo, though. An overcast day with clouds and fog can offer some interesting and exciting ways to achieve a great sense of depth.

The next time you’re out shooting, keep these tricks in mind. With them, you can create intriguing compositions with a strong sense of dimension. Let your viewers explore the frame by giving them the depth they need to feel drawn in. The more you practice these techniques, the easier they will become. Soon, shooting in a way that creates a feeling of depth and dimension will be second nature.

Finding the Perfect Backgrounds for Your Photographs

There is always an element in photography that you have to think about with every subject, and that’s background. This is true in still life, product, fashion, portraits, and even landscape. There are a few background choices for each of these different types of photography. A background can be a wide array of buildings, walls, floors, color, landscape, greenery; the sky is the limit (literally.) It is always a good idea to know what to look for while location scouting as well.

Finding Backgrounds

A lot of your background detail also has to do with your depth of field. You can either control your background with a blurred or sharpness by a shallow or deep depth of field, depending on your subject matter. A shallow depth of field is popular in portraits, so your subject is your main point of focus. You can use a deeper depth of field though to enhance your background clarity and texture. Keep your subject away from the background and not right up against a graffiti wall and tree, this is because these textures and colors can be too distracting. Shooting your subject in wide open spaces with a shallow depth of field and will give you the ability to have a subtle background of light colors and textures. Graffiti is a great example for this because it is a popular choice for a fun and colorful background but can also become a little distracting to your subject so by shooting your subject away from the background you can still gather the color and design without too much detail. Other background choices that you can use the subtle color, texture, and pattern are brick walls, wallpapers, and colorful doors. Think about the landscape in your image too and the great environment you are located in.

Finding Backgrounds

finding backgrounds
finding backgrounds

A variety of angles can also help your background choices. If you are shooting down on your subject you can use various lines on the road, grass, or any other greenery around or even just the texture. Shooting forward onto your subject will give you space and environment area that you are in. Shooting up on your subject can make you a viewpoint of the sky, clouds, or anything else above your subject matter.

finding backgrounds

Finding Backgrounds

Food and still life photography gives you an excellent array of choices with colors, textures, and backgrounds and offers a great way to be creative. You can even make your backgrounds using various woods and papers. Another background choice for smaller subjects is scrapbook paper from your local craft store where you can purchase paper patterns that look like wood, marble, and other surfaces that you enjoy.

finding backgrounds

There are some things you will want to avoid in your background. By using these guidelines, it will help you avoid distractions from the subject of your image. You usually want the brightest point of your image to be your subject; this means that you will want to avoid brighter highlights in the background or colors that could be distracting such as bright oranges, neons, etc. Poles and tree branches are common objects that can get in the way of a great photograph and something you want to avoid, especially when shooting portraits.

If you are having a difficult time finding the right kind of background texture and color you can always Photoshop out your background and replace it with a new background. There are many Photoshop actions, and Lightroom presets to help you achieve this. This is also where green screen photography comes in handy. A green screen can help you knock out the background easier to replace it later on. This color is used because Photoshop can read the color much better to separate from your subject in post editing.

Finding backgrounds

When we are talking about the background, you always want to consider foreground as a factor in your photography. The foreground is a great way to bring depth into your image and also a good use of framing. You can achieve this by setting objects in front of your still-life images. Use trees or greenery in the foreground with a shallow depth of field, or any other creative factors to frame your image. If you find your foreground is too sharp in your image and becomes a distraction you can always blur this in post-production.

finding backgrounds

Shooting From the Hip: Taking Pictures at a Low Angle

I saw this woman charging across the market square in Cuernavaca, Mexico, and fired away with the camera at my side. This frame had the best feeling of that random, kinetic moment.

There are times when I need a new perspective to my photography. That means shooting blind. Well, not literally blind, or even with my eyes closed. I mean I’m not looking through the viewfinder or the LCD. Just pointing the camera at my subject and blasting away. In a way, it’s the purest form of visualization because I’m imagining the photo and trusting my motor skills to properly aim my camera. I do this mostly with the camera anywhere from hip height to my ankles. Literally point and shoot. (On occasion, I will also raise the camera above my head for a higher angle than my short legs will otherwise allow.)

I’m sure you’ve already figured out why I do this: to get a unique angle on my subject, or, in the case of street photography, to not draw attention to the fact I’m taking someone’s picture. And lest you think this is something that depends more on hit or miss luck than a true photographic skill, I consider this a technique that can only be successful with lots of practice. In a way, you become one with the camera and get to know what it’s recording just by where you point the lens at a scene.

Street Photography

 I’ve always thought that some of the best street photographs are ones that are dripping in spontaneity. You can’t always get that by bringing the viewfinder to your eye which signals to anyone in front of you they’re about to have their picture taken. You have to be fast and unobserved. So I hold my camera at my side in a vertical position, my finger on the shutter and when the moment’s right, grab my shot. I know I have the composition relatively nailed because I’ve developed an instinct for what’s included in the frame just by pointing the lens in the right direction. I don’t worry if the camera is tilted a bit. In fact, that sometimes adds to the kinetic quality of the picture, adding a little-implied movement.I also have to trust my camera settings to help get the shot and that starts with focus. In a crowd, I’ll disengage autofocus so it doesn’t get distracted by foreground objects and adjust the lens focus for close quarters (say, 10-15 feet). I then stop down the aperture to at least f/8 or f/11 to let the depth of field pull more elements in focus. I set ISO to auto, exposure to manual and then turn up the shutter speed to around 1/250 to compensate for any unsteadiness on my part as well as the subject’s movement. Lastly, I set the drive to silent, which on my Canon DSLRs isn’t exactly stealth mode, but quiet enough to not draw attention to itself. (This is how I shot the opening image of the shopkeeper in Rosarito, Mexico.)Where there’s nothing in the way to throw off the autofocus, I’ll set the focus points to full auto and with utter recklessness, let the camera decide what should be in focus. Amazingly, it gets things right most of the time.My lens setting is a usually a wide one, somewhere between 24mm and 35mm (I do most of my street work with a 24-70mm lens). This also helps keep things in focus while the wide angle brings a greater feeling for the viewer of being smack in the scene.

Our dog, Sydney, a little concerned about the cat, Stinky, who had a habit of whacking her for no apparent reason. Taking this from floor level gives the scene from the dog's perspective and connects the two animals, something I couldn't have gotten from a higher angle.
Our dog, Sydney, a little concerned about the cat, Stinky, who had a habit of whacking her for no apparent reason. Taking this from floor level gives the scene from the dog’s perspective and connects the two animals, something I couldn’t have gotten from a higher angle.

The Bug’s Eye View

There’s something about an image taken from a low angle that can really add a dynamic element to the scene. Of course, it depends on the subject. Children, pets, and some landscapes just look better if you take the position of a bug on the ground, seeing the world from their perspective. A lot of cameras have tilting LCDs that make this kind of shot much easier to compose so go head and make use of that feature. Canon, with its bizarre notions of what a pro camera should have and not have, doesn’t make the 5D or 1Dx line-ups with a tilting screen. Then again, in bright light or if you are trying to get that bit of spontaneity from a subject—children and puppies won’t hold still while you stare into the LCD screen trying to get the composition lined up—you may still need to set the camera on the ground, angle it toward the subject and shoot as quickly as you can without concern for getting it perfect in-camera.

Christmas from a child's perspective. With the camera resting on the floor, the autofocus nailed it.
Christmas from a child’s perspective. With the camera resting on the floor, the autofocus nailed it.

If you’re not dealing with a moving target, then, by all means, use the tilting screen. If you don’t have one, there’s no reason to get cocky—check each shot after you take it and recompose by angling the camera differently until you get exactly what you want. Okay, you should do that anyway—whoever dismissed the “chimping” habit was nuts—but it’s triply important if shooting “blind.” In addition, this is how I learned to take pictures without using the viewfinder. I would point the camera at the scene, take a shot, see what it got me and then do it again until I got a feel for what the camera saw at any particular angle.

Canyoneering in Suicide Canyon, located in the San Gabriel Mountains near Los Angeles. The camera was practically touching the leaves when I shot this. I wanted to show Rich rappelling into this thick floor of colorful leaves and the only way to express that was from as low as I could get.

To Crop or Not To Crop

Because I use a wide angle lens setting, I’m often confronted with an image that might be great in the center but has too much business surrounding the subject. So I crop without shame.

The raw file taken in the market square in Cuernavaca, Mexico.
The raw file is taken in the market square in Cuernavaca, Mexico.
cuernavaca-el-centro-scene-2_mini
. . . And the finished, cropped image showing a nice moment between the three.

Sometimes, this will involve straightening the picture which necessarily cuts out the corners, although as I said before, I like these pictures to be slightly out of kilter. Other times, I’ll crop to a square which I find to be a great format for street photography. There’s something about the equidistant sides that relaxes the eyes and draws them to the subject, thus involving the viewer even more. My advice—never be afraid to crop.

I consider shooting from the hip just another way to present the world through my photographs and I think it’s a skill worth pursuing. Hey, who needs a viewfinder?

Juxtapositions: Adding Dimension to Images

Sometimes, even when you’re uninspired, you get lucky. There I was, about to take a straightforward, blah picture of Piramide del Sol (Pyramid of the Sun), which is located in the ancient city of Teotihuacan near Mexico City, when this woman sat down in front of me with an umbrella cocked to shade her from the sun. Generally speaking, I get a bit annoyed when someone does something like that, but then I have to remind myself she has as much right to the scene as I do and I try to work with what I’ve got. (As an aside, just because you have a camera doesn’t mean you’re in charge of crowd logistics; some photographers have to be reminded of that.)

Pyramid of the Sun, Canon 5D with 16-35 f2.8 lens set to 26mm and f/22, 1/80 sec, ISO 400

I quickly saw she had done me a favor. Instead of what I call a record shot of the pyramid with the only saving component being the sky, I got a juxtaposition. In this case, that meant the angular relic from some 2,000 years ago contrasted with the curved shape of a modern umbrella. I didn’t think of it at the time, but there’s also the notion of an umbrella, used to protect the woman from the sun, which was pretty hot that day, sitting in front of the Pyramid of the Sun. There’s no great cosmic meaning in that, I suspect, but it adds to the idea of a juxtaposition.

(That’s the thing about photography. Sometimes you don’t always see the other interpretation until after you look at the picture for a few years.)

Rome. I first saw these two women deep in conversation which would have made for a nice shot, but then the third woman appeared carrying a shopping bag with the picture of a young woman and suddenly there were a couple of more layers to the shot. Canon 5D MIII with 24-70mm lens set to 70mm, 1/350 sec. ISO 800
Rome. I first saw these two women deep in conversation which would have made for a nice shot, one brightly dressed, the other not so much, But then the third, kind of grumpy-looking woman appeared carrying a shopping bag with the picture of a young woman and suddenly there were a couple of more layers to the shot. Canon 5D MIII with 24-70mm lens set to 70mm, 1/350 sec. ISO 800

Another Layer

I’m always looking for juxtapositions in my images. That is, elements in the composition that contrast with each other in interesting or revealing ways. And, in some cases, the juxtaposition involves the elements complementing each other. Either way, a simple photograph ends up a bit more intriguing.

Rue Xavier Privas, Paris. Maybe you need to know this is Paris to get the idea of a French fry statue on a side street but there's also the element of this silly-looking thing up against elegant, old buildings
Rue Xavier Privas, Paris. Maybe you need to know this is Paris to get the idea of a French fry statue on a side street but there’s also the element of this silly-looking thing up against elegant, old buildings

I think you need to consider that point. This world is bursting with beautiful images, so much so that getting eyeballs to stick to yours for any length of time (which these days is measured in microseconds) is really tough. But add in a little juxtaposition and it has the effect of arresting the impulse to blast ahead to the next image. Viewers pause to suss out the meaning or the irony in the shot. It might make them smile, or, gosh, I don’t know—think? Kind of rare, sure, but you can always dream.

Atlas Canyon, Nopah Range, California. Canon 1Dx, 24-70mm lens set to 26mm, f/22 at 1/80 sec, ISO 400

The Challenge

The point isn’t so much to get an extra “like” or two but to communicate with the viewer for an extra moment. To create an interesting image that helps add a little clarity to the subject or even make a broader statement about our world. Take the image above from a canyoneering trip in the Nopah Range near Death Valley National Park. The small figure descending the rope shows how large and dramatic the cliffs are.

elephant-seals-1_mini
Elephant seals, near San Simeon, California coast. Canon 1Dx, 70-300mm set to 300mm, f/5.6 at 1/3000, ISO 400

In other cases, the juxtaposition might create a little tension such as this shot of the elephant seal poking its head up among its dozing buddies as if alert to something. Or the contrast between the statue of three people hugging while a lone person walks by (below). There’s the hint of a story in either image that allows the viewer to participate in what might be happening.

Museo Nacional de Arte, Mexico City. Canon 5D, 16-35mm lens set to 27mm, f/2.8, 1/500 sec. ISO 1600

Bottom line: When you pursue juxtapositions, you’ll find that your images start developing layers of meaning, some of which you may not see until long after you’ve processed the picture.

Here are some ideas of what to look for:

  • Old object with new, or, young person with old
  • Soft and hard
  • Bright color and monotone
  • Wealthy and poor
  • Modern and ancient, or, technology with low-tech
  • Different or similar shapes
  • Slow and fast
  • Happy and sad

Always the Composition

One last thing: you may have a great juxtaposition but you need to convey that to the viewer. Here’s where I think simple works best. Make it obvious what you’re trying to show by carving out anything that’s not relevant. Crop, crop, crop. The woman with the umbrella had a young daughter with her who was cute and at one pointing running about, but to throw her into the picture would have just muddled things.

Or, take the opening shot of the two tsessebes photographed in South Africa’s Addo Elephant National Park. I concentrated on the horns for the juxtaposition of their shapes, both similar and different at the same time. No reason to show the entire animals.

Juxtapositions are found and created at the same time. Keep alert to them and then compose to ensure the viewer shares your discovery. It takes practice. But when you get in the habit of looking for juxtapositions, it makes photography even more fun.

Using Lines In Your Compositions – Photography for Beginners

Given the inherent optical nature of photography as an art, geometrical shapes are ubiquitous. However, using some shapes intentionally in your compositions can greatly improve your final results. In this post I want to talk about lines and how to use them on your favor.

First of all, when I say lines I mean both straight and curved ones. There are different situations where you can benefit from either of them and when and where to use them will depend on the specific elements present in the photo you are trying to take.

Guiding the viewer’s eye

One of the most useful, abstract and at the same time common ways of using lines is in such a way that they guide the viewer’s eye to a given spot in your composition. Even if you don’t actively try, chances are that you have a couple of photos in your personal collection where you actually made good use of lines that were present at the location for this purpose. The reason is simple. They not only work once the photo is produced, but also when you look at the scene in real life. Having those lines there will actually help catch your attention and decide to make a photo in the first place.

lines01

The human brain has a natural tendency to find patterns and follow edges. In fact, if you think about how we actually follow any moving object, what we basically do is follow the shape given by a closed line forming the edge of that given object. This way, when we are presented with an image where strong lines are present, our eyes will naturally tend to follow those lines and, if your main subject (or an important one at least) is located at the end of those lines, the viewer will automatically pay special attention to that subject, making it easy for you to declutter your image.

Natural frames

Another appealing use of geometrical shapes is to frame a photo. It is obvious that we humans like frames. Otherwise, most of the art in museums and photos hanging on our walls would not have different types of frames. It actually is pretty common to find photos posted on the internet with some sort of digitally created frame around.

lines02

Nature and man-made structures can provide very appealing frames as well. Be it the arches of a bridge, a natural rock formation or even the frame of a window, using lines to frame the main part of your image can provide a completely new point of view and drastically change your original composition, sometimes for better but sometimes for worse.

Architecture

Architecture photography, by definition, is full of geometric elements. While older styles like Gothic (e.g. Cologne cathedral in Germany) are more cluttered, modern architecture tends towards a more minimalist approach and straight lines are present everywhere. This allows you as a photographer to create interesting compositions where you can used those lines again to guide the viewer’s eye towards a specific point, or simply produce abstract images that sometimes are classified as fine art (these work especially good in black and white). Some styles like the Baroque (e.g. St. Peter’s Basilica) contain arches and large columns that can also help you achieve interesting effects both in terms of including the lines formed within your composition or using them as frames.

lines03

Another type of structures that are definitely worth looking at are bridges. Once again, modern and older bridges present completely different shapes and lines that can help you create images out of the ordinary. As with everything in photography, one of the most important (and frequently overlooked) aspects is looking at things from non-conventional points of view. This will help you both develop your own style and train your eye to get interesting compositions faster as you practice more and more.

Light trails

A great option to create dynamism and lines in any image is by using light trails. Depending on the path followed by the light source (cars, bikes, planes, etc.), the lines left behind can be straight or curved and they have the power of capturing the attention not only due to their shape but also because of their bright nature.

lines04

In general, while lines will always be present in your images in some way or another, actively thinking about how to use them when composing an image will provide you with new ways of looking at your subjects, so next time you are out making photos, remember to look for them and have fun!

Photo Walks: A Way of Improving Your Photography Skills

According to Wikipedia a photo walk is the act of walking with a camera for the main purpose of taking pictures of things that the photographer may find interesting. For me a photo walk is much more than just walking and taking photos. I see it as a way of improving your photographic skills. Photo walks are commonly considered group activities.  The groups might be formed by amateur photographers that organize themselves or they might be also activities offered by a professional that set some guidelines and teach along the walks. Although I like the idea of group photo walks, I didn’t have the chance to do it yet. I hope I’d get the chance to do it in the near future. For now I have a less communal approach: either I go by myself, or with a friend. In group or alone, I highly recommend you to try photo walks.

Photo walks partner
I usually go on photo walks alone or with one or two people. My husband is one of my photo walks partners (here is a challenge for you: can you find where I am in the photo?).

Theme photo walks help you develop your creativity

Choosing a theme for a photo walk is an interesting thing to do. You can choose any subject such as shapes (triangles, circles…), colors (yellow, blue..), numbers or things (windows, doors, traffic signs…). If that day I am unable to decide a subject, I just ask somebody to tell me either a color, or a shape. And whatever they say I do. I saw that this helps me to develop my creativity because it forces me to take photos of things that I wouldn’t choose by myself. Trying to take nice photos of things that you don’t find attractive at first sight might push you out of your common thinking box.

Thematic photo walks
I did a photo walk about circles. This subject pushed me to take photos that I wouldn’t usually take.

Photo walks help you to improve your composition

You can pick a composition subject and focus on it in your photo walk. You can work on finding leading lines, look for patterns, rule of thirds, symmetry… Practicing composition when you are enjoying a relaxed photo walk will take you to the point that you can create well composed images even under stress (as for example in the middle of a portrait photo session).

Composition and photo walks
Using leading lines is a technique of composition where you lead the eye of the viewer through different elements of photo by using lines. They also give a sense of infinity. I like doing photo session focusing on leading lines.

Photo walks give you the chance to experiment with new things

Have you been reading about a new photography technique that you would like to try? Go on a photo walk focusing on that technique and you could see how you get better at it along the walk. You can try night photography, macro,  HDR, long exposure photography

Night photo walks
I am not a night photographer. But planning photo walks at night took me out of my comfort zone and made me experiment with my camera.

Photo walks help you to find your photographic style

I learnt this from the photographer Marlene Hielema. When you photowalk, you don’t have to focus on the technical aspects of photography. You don’t have to take perfect photos. You can even set the camera on program mode (I know it can be hard to do it, but give it a try). What can you do if you don’t need to take care about the technicalities? You are left with just the creative side of photography.  Focus on the way you see things. Once you return home, check the results of your walk. Pick the photos that show better what you wanted to express and analyze them. Do they follow a pattern? Finding these patterns will help you to understand your style.

Photo walks are a great way of networking

If you are going in a group photo walk you will have the chance to meet new people. If you are going alone, you will have the chance to talk with the people you are taking photos of, and you will probably meet a few curious people who would want to know what you are doing. You can interchange details with these people (phone number, social media) and share your photo walk images with them.

Photo walks might improve your mood

A photo walk is a physical activity done outdoors (sometimes even in the sunlight and the fresh air!). Walking is good for your health and being outside will bring refresh your mind.

Outdoor photo walks
Going outdoors and enjoying the fresh air is always good for your mind.

And finally some tips:

Take only the essentials

You will be walking for a while, so if you carry a lot of gear and other stuff it will become heavy and will make the photo walk a not so nice experience. Be brave and take just one lens. Take out unnecessary things from your camera bag.

I do recommend to take with you water (and maybe a hat and sunglasses) and a small snack, just in case your walk turns a bit longer then you expected.

Be safe

When you are focused on taking pictures you can disconnect a little from the surroundings. But you should keep all the time a certain amount of awareness. Don’t walk into the road without looking for coming cars. Don’t walk into other pedestrians. If you are in a place with a lot of people, keep an eye out for possible thieves. If you are going alone on a photo walk, tell somebody where you are going and for how long. Although a photo walk can also be a great chance to disconnect for a while, evaluate the area you are going to be at before leaving the phone behind, on long walks, walks in the wild, or in unfamiliar neighborhoods, it might be better to have your phone with you (just in case).

Keep safe in your photowalks
If you are taking photos in a place with a lot of people and traffic, you need to take care to be safe and not to disturb the others.

Be respectful (with people and with the law)

If you are taking photos of people, it is important that you keep a respectful attitude. Remember that it is nice to ask people for permission to take their portrait (it is also an opportunity to meet new people). Depending in which places, you must do it. For that reason it is always good to know the laws regarding photographer’s right (They change in every country). You should know beforehand what you are allowed and not allowed to do with your camera. It can save you a lot of problems.

Sit from time to time

I know that the activity is called photo walk, but you can also sit from time to time to rest. Sitting is also good for observing. You can study the place where you are and take other kind of photos.

Sitting during your photo walks
I decided to sit for a while. It was then when this little bird came close enough for me to be able to take a photo. This wouldn’t have happened if I was walking and moving around.

Do you like photo walks? Have you ever tried them? Are you going alone or with a group? Share your experiences with us, we would like to hear form you! 🙂

Have a happy shooting!!

Cropping in Photography – Unleash Your Composition Potential

When I started to write this, I wanted to learn a little about why we have the 3:2 aspect ratio that is the sensor format for full-frame digital cameras and before that, 35mm film in the analog days of yore. Good luck getting a straight answer from history. My theory is there wasn’t a good reason and it was all just arbitrary.

Film lore has it that in the late 1880s, the inventor Thomas Edison and his assistants needed a film format for their movie cameras and Kodak happened to have film strips 70mm wide (don’t ask me why George Eastman—Kodak’s founder—chose that size). I suppose 70mm would have made the movie cameras a tad large, so they split the film in half and the 35mm result became Hollywood’s standard.

About 30 years later, Oskar Barnack of Leitz invented a “miniature” the camera which he loaded with rolls of movie film. Again, rather arbitrary if you ask me; the film format was there and he adopted it. And for many, many decades people were pretty much stuck with 35mm cameras whether they liked it or not. There are times when we consumers are mere sheep.

This completely over-abbreviated history lesson leads me to the topic of cropping. There are people out there who fervently believe proper photography technique involves “cropping in the camera,” or, “filling the frame.” That is, moving in, zooming in, moving out, zooming out until they absolutely nail the composition without a single wasted pixel in the final picture. They abhor the idea of cropping an image after they’ve shot it and as a matter of pride, won’t trim anything out of the frame. I will admit this makes sense to a degree. For the price of, say, getting a little closer, you won’t lose any resolution by having to crop deep into the image.

Yeah, but history suggests the format many of us use was arbitrary from the beginning, so to shackle our freedom of expression to someone else’s idea of size and proportion seems pretty ridiculous. Instead, I make my cropping decisions based on the subject I’m photographing. Many times, as I look into the viewfinder I visualize the final product and realize it will be better as perhaps a square or trimmed on the ends to 4:5 ratio. Or, hey, let’s throw out conventional formats altogether and go panoramic wide! Whatever makes sense for the image.

forest scene 6_mini
I found this cedar in the Hoh River rainforest. Uncropped, it’s not bad, but I found whenever I looked at it, I couldn’t decide where my eyes should go.

Granted, I occasionally forget my own advice and try to stick with what the camera gives me. Take this shot of a monster cedar in the Hoh River rain forest of Washington state’s Olympic National Park. After passing many specimens, some even larger than this lad, I chose a tree for its fluted bark surrounded by enough open space that I could set up my camera, a Canon EOS-1D X with a 16-35mm lens set at 32mm. The light, although a tad flat (it had been raining off and on), was pleasantly diffuse and was made for a black and white rendering.

So here’s the trap I stepped into: I felt as though I had to choose between landscape or portrait formats. Well, after all, it was a tree, I thought, so portrait made perfect sense. That would suggest the trunk went way beyond the top of the frame. That’s how I shot it.

Unfortunately, as I worked on it in Lightroom and Photoshop, trying to bring out the bark’s texture and contours, I found my eyes uncomfortably flitting about the image unable to settle on the very thing I was trying to show. Yet, at first, I insisted that I keep the original framing without any cropping. Sometimes, you just get dogmatic without knowing why. Finally, I allowed myself the freedom to experiment by setting Lightroom’s cropping tool to a 1:1 ratio.

cedar_mini
With the top and a sliver of the bottom cropped off, the beautiful bark at the base is obviously the focal point of the shot. Plus, there’s something calm about a square picture.

Boom! My eyes stopped wandering in search of a subject and the photograph was reborn.

With this example in mind, here are some of the things I consider when cropping:

What’s the real subject?

If there’s too much surrounding background because of the sensor format, crop it out and zero in on what you want to show. That background is often unnecessary and usually distracting. Yeah, I know, there are exceptions, but first understand your reasons for why you composed the shot the way you did and why you want to keep whatever it is you save from cropping destruction.

Tuscany
There was just a little too much sky in the original, uncropped image (left) and it competes with the beautiful field in the foreground. So I admitted my lack of compositional judgment at the time I took the picture and knocked off a little piece of the shot. No pixels were harmed and it looks better to me.

Is there a bright area?

That’s pulling the viewer’s attention away from the subject? Sometimes you can easily deal with this by bringing down the bright areas with Lightroom’s Highlights slider in the Develop module. Then again, if that doesn’t work, trim out part or all of the offending brightness. I can’t tell you how many times I cropped out a bright sky just because it was annoying and completely improved the image.

Experiment

If something doesn’t seem right, play around with Lightroom’s crop tool. Nick a little off a corner and see what happens, or just try the different ratios supplied with the tool.

Don’t be afraid to fix mistakes

Maybe you allowed a wayward tree branch to stick through a corner and it can be easily chopped out. Or, there’s too much space above your portrait subject’s head. Perhaps, you blew the composition, but by simply readjusting the crop, it will look better. Whatever you do, don’t feel like a failure just because you didn’t get it right in the camera.

nun
This was a hastily shot photo of a nun in Siena, Italy. In Lightroom, I first leveled the road a bit, but not all the way and cropped to a 4:5 format to not only zoom in a bit on her but to crop out the out-of-focus, bright pavement in the foreground. Her blue habit now contrasts nicely with the old wall without anything else getting in the way of a simple moment.

You need to fix a horizon line or straighten out a building

Oh, well, distortion happens. There are several ways to tweak an image to eliminate the issue. I usually start at Lightroom’s Transform tab and go for the automatic solutions. Is the horizon off? Hit Level and see what happens. A building looks like it’s tipping over? Try Auto, Vertical or Full. One of them might correct the image.

Overall, I’m not suggesting you be a slob about composition, thinking you can fix the picture later, but I am saying that just because some engineer or designer thought your camera’s aspect ratio was just right, doesn’t mean you have to obey them.

(The opening photograph was taken in Yosemite National Park on the Pacific Crest Trail. Shot with a 10-stop neutral density filter to get a 30-second exposure and thus smooth out the water, I cropped to about a 4:5 aspect ratio because the sides were dark shadows that added absolutely nothing to the picture.)

Bokeh Photography for Beginners

Holidays are a good chance to get great color and lights in your shots. Winter, in general, is a great time to go out and experiment with ways of shooting scenes that are not always at your disposal. With all of those lights and colors for the holidays, also comes the opportunity to create some awesome bokeh. Essentially, bokeh is the way the lens renders out of focus light. It is circles of light like in the above image or the creamy background in portraits if taken with the right settings. Aside from having a nice out of focus bokeh in portraits, there are tons of objects you can use to create some great bokeh by holding objects in front of your lens. Incorporating out of focus elements can enhance your images and give it a mood you otherwise would not have.

1 – Starting Point

So what do you need to know before taking photos, and how to achieve bokeh in your images? Well, the biggest things that go into creating bokeh are the lens choice and the aperture you shoot at. The shape of the bokeh, a lot of times, is determined by the aperture blade amount. Generally, the better the lens the more blades (around 9), while the lower end lenses have about 5. The higher amount of blades creates more of a circle which creates the bokeh, more creamy and soft, where the lower blade count will create something like a hexagon. I tend to prefer the more round bokeh, but that is not to say that the less circular ones are not good and should not be done. Everyone has a preference but it is good to know the difference of why the bokeh might look different from lens to lens.

2 – Prep

If we look at one of the images I started with, we can gain a lot of information by looking at the histogram below. I mentioned above that aperture also plays a role in creating bokeh. One of the things to keep in mind if you are trying to get nice bokeh, is shooting around f 2.0 or wider. Having the lens open wider allows for a smaller depth of focus, thus giving you the out of focus bokeh in your images. What you generally see in portraits is that the subject is in focus and the whole background is out of focus. In the images I shot, I used the foreground as a framing device and made that the out of focus part. So in my image, I made the foreground out of focus and used that as a nice way to introduce some interest in my image. Going, either way, works (either creating the foreground/background out of focus), just as long as there is enough difference in the field of focus to get one of the elements to go blurry. As an artist, that is up to you to decide on how you want to incorporate things being out of focus into your images.

Arnel Hasanovic Bokeh Tutorial

3 – Shooting Bokeh

So, once you have in your head what you want the subject to be and how you want to incorporate bokeh into your shot, you then experiment! When shooting out of focus especially with the object almost touching your lens, it is often unpredictable and fun to see what slight movements will do with the light. In my case I kept adjusting, moving from angle to angle, making minute changes, to get something that looks like the image below. One thing to remember is that the color of the object out of focus can play a big role in helping you get a nice clean image. Before getting this shot I was using some more green light that did not look good against the color of the building, so I moved over to the more red holiday lights and that made all of the difference.

Arnel Hasanovic Bokeh Tutorial

4 – Experiment! Experiment! Experiment!

Did I mention experiment?! Trying out new things and making slight changes with your camera will yield two great and unexpected results that you can learn from. Shooting at night is not something I do a lot of, so when I get a chance to do something I do not normally do, I play around, knowing that there is no consequence for failing. Below is a small sample of the different angles and changes I made along the way to getting the image above. If you notice, a lot of the images look the same in a row, but one move up or down changed it. When working with light bouncing around your lens and it is so close that it almost touched the lens, the smallest change can get you to a winning shot.

Arnel Hasanovic Bokeh Tutorial

5 – Conclusion

Shooting bokeh can be a lot of fun and there are a lot of different ways to incorporate it into an image. Sometimes used just for fun, and other times to hide distracting objects. Whatever the case may be, it’s fun to take a time to try new things and play around.  Below are some other images and uses of bokeh during the night.

Arnel Hasanovic Bokeh Tutorial