Do you have any romantic photographs of you and your significant other? Well, besides those increasingly boring selfies taken with a cell phone. You call those romantic? Come on, now. You’re a photographer! Devote a little time to getting some pictures of the two of you. It’s at least as important as nailing a great sunset-lit landscape.It’s what I call a canoodling selfie. Let’s break that apart: canoodling means interacting with each other and not mugging the camera. Selfie means you took the picture yourself, which in this case requires a little strategy and forethought. Pretty much what you do as a photographer anyway, but in this case it’s a picture of you hugging your romantic partner or otherwise ignoring the fact there’s a camera pointed at you. I’ll have a suggestion for what you can do with these pictures in relation to Valentine’s Day at the end of this post.
Santa Barbara Canyon, New Mexico. The best romantic selfies are those that look entirely spontaneous, such as this moment among the autumn foliage.
Gear Talk
I’m not saying these pictures are necessarily spontaneous, they just have to look that way. And the means to do that is with the right equipment. This will allow you to get in front of the lens and pose for the picture without the need of a 20-foot long arm (or selfie stick).Camera—Kind of obvious. Learn how to operate the 10-second self-timer. Some cameras have more flexibility in the menu for longer times which helps if you need more time to run from the camera to where you’re posing. While the next piece of equipment on this list eliminates the need for the self-timer, it doesn’t hurt to have this as an option.Wireless Remote—I use the Vello ShutterBoss II. It has a claimed range of 250‘—I’ve gone as far as about a 100 feet and it worked like a champ—and allows me to take multiple pictures at whatever interval suits me. It comes in two pieces. There’s the receiver that attaches to the camera’s hotshoe with a cord for my Canon three-pin connection (it’s also compatible with several other brands). The other half is a transmitter I take with me to activate the camera. (Some cameras allow you to remotely take pictures with an app and smart phone, so check your options.)Tripod—Oh, I know. You hate carrying a tripod. But by having it, you’re afforded all the flexibility you need to get a great shot of you and your sweetie. So what’s more important?
Calle Florida, Buenos Aires, Argentina. Sometimes you just have to lock lips and forget about the crowds around you.
Posing
Here are a few things to think about:Take a moment to think about the composition. Do you want to tell a story about the place in which you’re canoodling? Look around for an element that helps you with that. Maybe it’s just the background, or a prop. I have more than few shots of my wife and I hiking down a trail, our loaded backpacks making it clear what we’re doing. It’s simple and it tells a little of our story. Pose the other person first. Set the focus on them.Decide where you’ll be in the shot and try to make it within the same plane of focus as the other person. If necessary, stop down the aperture for greater depth of field so you’ll both be in focus.
Coliseum, Rome, Italy. It was raining but so what? We got lucky here because headlights from a bus lit our faces while we cuddled in the cold.River Seine, Paris, France.
Ask your partner to “act naturally.” The nice thing about a wireless remote is you can always pop off pictures without getting up to reset the camera, which is distracting and ruins whatever mood you’re trying to create in pixels.
Make sure neither of you will be casting a shadow on the other’s face.
Always check the picture after it’s taken to be sure it worked as you envisioned it.
Leadfield, Death Valley National Park, California. We were exploring this ghost town and came upon a shack with a wide doorway. The perfect framing device.
The Ultimate Valentine’s Day Gift
Okay, so you’ve devoted months, maybe years to collecting all these canoodling selfies. You’ve probably shared a few on Facebook or Instagram and gotten the requisite pile of likes. Wonderful. What’s next?I compiled mine into a book and gave it to my wife as a gift. (Check out my post on producing photography books for more.) There’s something quite renewing about seeing all those shots of us, one after another, that made me realize just how much in love we are. I also discovered the inestimable value in taking a few minutes to canoodle in front of the camera and record the memory for life.
I go to museums not just for the art and artifacts, but for the photographic possibilities. In fact, truth be told, I would be bored by some of the world’s museums if it weren’t for a camera in my hand. I recently visited the Vatican Museum and its over-the-top collection of religious-themed paintings and pope-abilia pretty much left me numb, but I gleefully went about the halls with my Canon 5DMIII and 24-70mm lens recording everything but the exhibitions. A great way to spend the morning.
There’s an amazing variety of people strolling museums. You have those geeking out over the displays while others are a little less committed—usually companions of the first category. They’re all fascinating to watch and if the moment is a right photograph.It’s easy to do this stealthily so you get unselfconscious poses (see my post for more about shooting from the hip). After all, you’re in a museum and even if a camera is pointed towards someone, they assume you’re actually photographing the collections. It may sound silly, but I have a whole portfolio of people taking pictures of paintings. For some reason, it seems odd to me how some will blow through a room, pausing only long enough to stretch out their arms, peer through an LCD and record the artwork. Oh, sure, if you want to look at it in terms of efficiency, they’re maximizing the time and they can view the art at a more leisurely pace at home. But there’s something about sticking your nose up against a Van Gogh and examining the brush strokes that makes seeing the original so special.
Getting back to image making, I set my shutter to the quietest setting Canon’s engineers were able to manage on a DSLR and juice the ISO to whatever is tolerable in terms of noise. Usually, anything from 1600 to 3200 will do the trick so I get a decent balance of hand-holdable shutter speeds and not too much noise. The color temperature of the lighting is anything but consistent in these places, so I wing it with a manual, tungsten setting and figure I’ll have to adjust the color later in Lightroom.
Then again, forget the exhibitions and the people. Many museums are amazing structures and deserve to be photographically appreciated. That goes for the outside as well as on the inside. For example, the D’Orsay in Paris (the opening photograph) is a converted train station and a wonderful subject for interiors. A few museums have amazing, sometimes ornate, stairways that are worth seeking out.Some museums exhibit outdoor sculptures. Sometimes the building itself is a sculpture disguised as a museum. In either case, you have the opportunity for playing with the curves and lines, often in abstract compositions.
There are also water fountains and some courtyards. Depending on the time of day, sunlight streams through in beautiful, playful ways. Shadows interplay with that light as well as the structure itself. You could spend all day just photographing a museum’s grounds and never step inside.
Rules
Okay, I hope I’ve disabused any notion you might have that museum can be stuffy places, but just the same, those who run them can be rather protective of their spaces. That means, of course, there are usually rules as to what you can and cannot do with a camera. Rarely, a museum will restrict photography altogether, but make sure you know what they do allow.
Norton Simon Museum, Pasadena, California
Often, where the collection involves older, fragile artwork, flash isn’t allowed to prevent the bright pops from fading the work over time (I wonder if anyone has actually tested this to see if it’s scientifically provable). No matter. These days just pump up the ISO if you’re truly interested in photographing the displays. A little noise in the picture is better than no picture at all.
Perhaps the larger issue, don’t bother bringing a tripod. I haven’t been to a museum yet that allowed them and it’s just bad form to spread the tripod legs out in a crowd of people. True, a monopod won’t cause the same hazards as a tripod, but they look a little dangerous nonetheless and I suspect you’ll have a guard swooping in on you with finger wagging. If I need a little extra support, I’ll brace the camera against a doorway or there might be some piece of furniture that works. Or, as I said before, I’ll just raise the ISO.
Lastly, I suggest bringing nothing more than a camera body with one lens, my favorite being a 24-70mm. The museum may have a rule against you carrying a large bag with you—you’ll have to check it at the door—and besides it’s much easier to operate in a confined space if all you’re lugging is a single camera.
Whether traveling or just bopping about your hometown, I highly recommend checking out a museum or two. You might get a little education, which isn’t such a bad thing, plus you’ll likely come away with some fun, or even great, images.
Along with being an art, photography can also be a matter of patience.
So there I was, sitting on a rock ledge above a cluster of ancient buildings in Chaco Canyon, New Mexico, waiting for the sun to set. The stormy clouds started to burst with color. Click. If nothing else, I thought, I’ve got a decent shot. And then the sunset kicked in with more drama in the clouds. Click. Okay, forget that first photo. This is one is the winner. The light started to fade a bit and I thought, well, maybe it’s time to pack up. After all, the park rules were pretty clear about exiting at sunset.
But then you can never trust the light at the end of the day to be a linear event. It doesn’t always just fade into nighttime. Some unseen cloud could blow one way or the other and suddenly there’s a burst of sunlight more spectacular than anything that happened a minute before. There’s also alpenlight, that somewhat mysterious (at least to me) post-sunset light that magically appears usually just as you toss your gear into the car.
So I waited. Let the rangers yell at me for being a little late. I was going to give the scene a chance to be absolutely amazing. I sat for another few minutes and then boom! there was an explosion of light and color that added incredible dimension to the clouds. Click. Best shot of the bunch.
Never Turn Your Back on a Great Scene
Sometimes good images are sneaky things. They first tiptoe in front of you with hardly inspiring light, and then just as you decide your time could be better spent doing something else—and you’ve put away your camera—they spring out as if to say, Ha! Fooled you again!
So invest a little more time and patience at sunset and just wait a few more minutes. Those photons bouncing around in the sky and reflecting off the ground might just do something wonderful you couldn’t predict. At the very worst, you’ll be packing up in the twilight with a flashlight to guide you to your car or camp. But there’s often a good chance you’ll also record magic.
Monarola, Italy, part of Cinque Terre, a national park. This was taken after the sun had set and I waited a few minutes more while all the other photographers started packing up. Suddenly, a wonderful soft alpenlight bathed the buildings and made for a wonderful scene.
The Wonders of Alpenlight
There’s this kind of lingering light following sunset called alpenlight that every landscape photographer should wait for. You can’t predict it. Sometimes it’s about 15 minutes following sunset, sometimes it doesn’t happen at all. Sometimes it lasts 10 seconds, sometimes a few minutes. The effect is special, a soft glow bouncing off the sky, clouds and land that’s dreamlike and truly mystical. Just stand there and look all around you because the alpenlight can scatter across the sky.
Bring a tripod for alpenlight. You’re going to need it. Exposures will be long, in the seconds or even minutes. And bracket like crazy just to make sure you get a good exposure for both sky and foreground. And, oh, yeah, be sure you have a headlamp or flashlight with you, because once the alpenlight fades, so does any other light and you’ll be stuck in the dark trying to find your way out.
The Dull Light Gamble
I’m probably one of the most guilty people when it comes to walking away from a scene if the sky is overcast making the overall photography pretty blah. But it behooves one to sit tight for awhile and see what happens. Just like alpenlight, the sun—especially just after sunrise—has a way of sneaking into the landscape in magical ways, but you have take the gamble you’ll be wasting your time. And I admit it’s usually a longshot that anything photographically wonderful will happen. Mostly, that bald sky will stay bald. Then again . . .
Dusy Basin sunrise.
Take the above shot from Dusy Basin in Kings Canyon National Park. The sky at sunrise was clear and uninteresting leaving me with a dull light over what is often an incredible landscape of rugged rocks and scattered lakes. I kept my camera on the tripod and decided to simply drink in the solitude for a moment. Sometimes, you have to do that, by the way. Not everything is about getting a great picture!
Suddenly, some clouds above the 12,000’ ridgeline slid into place right where the sun was rising. And then a few seconds later, sun rays poured through. This lasted just long enough for me to set up a decent composition and knock out a few bracketed exposures before it disappeared again. If I had turned my back to start packing, I would have missed it.
My point is simple: The patient photographer gets the magical image.
[The opening photograph was taken of the Alaska Range from the Denali Highway in central Alaska, about a half hour after sunset with alpenlight transforming the scene.]
I suppose anyone who has used Photoshop for awhile finds themselves relying on certain tools more than others because they best fit the type of image processing they do. For me, one of those basic implements is the fade tool. It doesn’t produce flashy results. In fact, it’s pretty subtle. But I find I go to it so often, I actually memorized the keyboard shortcut (shift-control-F/shift-command-F). Trust me, that means something.Found fourth down on the list under the Edit menu, the fade tool has one basic purpose: to reduce the effects of anything you just did by adjusting a single slider. It’s a bit persnickety because you have to do this right after your previous action or the keyboard shortcut will do nothing (the menu item will be grayed-out). However, there’s a way or two around that and I will show you how to do that a little later.
Fade to Black
Here’s a simple example of how I use it. I needed to darken the above image’s overall exposure with a curves adjustment, but when I did, the sky went too gray and the foreground water turned too dark. However, they still needed to be a little darker but not as much as the entire picture.Given that I have a layer mask, I could just grab the brush tool, guess at the amount I need to reduce the shadows, set the opacity to, say, 80% and start painting with black. Oops. That’s too much. Okay, so I hit control-Z/command-Z to undo that and try again. This time, I try 50% opacity, but that still isn’t right. Too dark. Too light. Guess again and re-brush. Repeat and repeat. Pretty darn clumsy.
Darkening the image with a curves adjustment made parts of the image too dark.
Or, I can save myself some work, and go to the Fade tool. I start by simply painting 100% black over the portion that I want to lighten, which will obviously eliminate the effect completely. Then I hit shift-control-F for the Fade tool where the slider will be set to 100%, that is, the full effect of whatever I just did. Then I begin moving the slider to the left and watch as the previously erased darkening in the shadows changes until I get the right look. The slider might land on only 18% or it might be 91%. Whatever works for the image.
As you see in the layer’s thumbnail, I painted with black over the sky and background hills, but that completely eliminated the curves adjustment, which I didn’t want.
I’ve backed off the black mask in the sky to 41% of the total while retaining the 100% curves adjustment elsewhere.
Here are all the other adjustments I made to the one mask.
Garrapata State Park, California coast. Canon 1Dx, 24-70 f/2.8 lens set to 65mm, 2 seconds at f/22, ISO 100
Fade to Light
Another instance where I use the Fade tool a lot is when I want to lighten up a person’s eyes. For example, this environmental portrait of Siphokazi Titi who managed the incredibly remote Narina Bush Camp in South Africa’s Addo Elephant National Park. Again, there are lots of ways to do this, but typically I’ll create a new adjustment layer—doesn’t really matter what you choose, but out of habit I click on Curves—and then tap control/command-I to invert the mask to make it black. Next, I change the blending mode to Screen. You won’t see any change until you start painting with white over one eye. It will probably be way too much.
Her eyes are just a smidge dark, but each one needs to be adjusted independent of the other. Out comes the Fade tool.
Not a problem. After the first eye is lightened, go to the Fade tool and change the adjustment until it’s right. And then repeat for the second eye, which may require a different percentage of fade (that’s why I do it one at a time). As you can see the screenshot of the mask, I lightened each eye by different amounts.
I’ve adjusted her left eye with the Fade tool.
Here are the two different masks. The one on the left held back the effect a little more than the one on the right.
Cheating the Fade
Okay, so say you’ve done this not only with the eyes, but other parts of the picture, and then you realize you didn’t go far enough with the fade on the right eye. Supposedly, you can’t use the Fade tool once you take another action, but actually, there is a way. Simply brush over the one eye (or whatever part of the mask you want to adjust) with black so that you essentially wipe out the entire effect, and then pull up the fade tool again to readjust. Problem fixed without breaking a sweat.Another workaround is, say, you used the Fade tool to decrease part of an adjustment layer, and you decide you’d like to paint that same percentage of gray on another part of the image. Unfortunately, you can’t consult the now-closed Fade tool to see what the amount of fade was that you used. Simple. Alt/option-click on the mask which will now show you the mask itself. Take the eyedropper tool, click on the part of the mask you want to paint elsewhere. The paint swatch for the brush tool will now turn to that shade of gray. Alt/option-click on the mask again to bring back the image and you can now duplicate the effect elsewhere on the image.As I said, the Fade tool isn’t something that will transform your images into brilliant works of art, but it just makes life a little easier.
I saw this woman charging across the market square in Cuernavaca, Mexico, and fired away with the camera at my side. This frame had the best feeling of that random, kinetic moment.
There are times when I need a new perspective to my photography. That means shooting blind. Well, not literally blind, or even with my eyes closed. I mean I’m not looking through the viewfinder or the LCD. Just pointing the camera at my subject and blasting away. In a way, it’s the purest form of visualization because I’m imagining the photo and trusting my motor skills to properly aim my camera. I do this mostly with the camera anywhere from hip height to my ankles. Literally point and shoot. (On occasion, I will also raise the camera above my head for a higher angle than my short legs will otherwise allow.)
I’m sure you’ve already figured out why I do this: to get a unique angle on my subject, or, in the case of street photography, to not draw attention to the fact I’m taking someone’s picture. And lest you think this is something that depends more on hit or miss luck than a true photographic skill, I consider this a technique that can only be successful with lots of practice. In a way, you become one with the camera and get to know what it’s recording just by where you point the lens at a scene.
Street Photography
I’ve always thought that some of the best street photographs are ones that are dripping in spontaneity. You can’t always get that by bringing the viewfinder to your eye which signals to anyone in front of you they’re about to have their picture taken. You have to be fast and unobserved. So I hold my camera at my side in a vertical position, my finger on the shutter and when the moment’s right, grab my shot. I know I have the composition relatively nailed because I’ve developed an instinct for what’s included in the frame just by pointing the lens in the right direction. I don’t worry if the camera is tilted a bit. In fact, that sometimes adds to the kinetic quality of the picture, adding a little-implied movement.I also have to trust my camera settings to help get the shot and that starts with focus. In a crowd, I’ll disengage autofocus so it doesn’t get distracted by foreground objects and adjust the lens focus for close quarters (say, 10-15 feet). I then stop down the aperture to at least f/8 or f/11 to let the depth of field pull more elements in focus. I set ISO to auto, exposure to manual and then turn up the shutter speed to around 1/250 to compensate for any unsteadiness on my part as well as the subject’s movement. Lastly, I set the drive to silent, which on my Canon DSLRs isn’t exactly stealth mode, but quiet enough to not draw attention to itself. (This is how I shot the opening image of the shopkeeper in Rosarito, Mexico.)Where there’s nothing in the way to throw off the autofocus, I’ll set the focus points to full auto and with utter recklessness, let the camera decide what should be in focus. Amazingly, it gets things right most of the time.My lens setting is a usually a wide one, somewhere between 24mm and 35mm (I do most of my street work with a 24-70mm lens). This also helps keep things in focus while the wide angle brings a greater feeling for the viewer of being smack in the scene.
Our dog, Sydney, a little concerned about the cat, Stinky, who had a habit of whacking her for no apparent reason. Taking this from floor level gives the scene from the dog’s perspective and connects the two animals, something I couldn’t have gotten from a higher angle.
The Bug’s Eye View
There’s something about an image taken from a low angle that can really add a dynamic element to the scene. Of course, it depends on the subject. Children, pets, and some landscapes just look better if you take the position of a bug on the ground, seeing the world from their perspective. A lot of cameras have tilting LCDs that make this kind of shot much easier to compose so go head and make use of that feature. Canon, with its bizarre notions of what a pro camera should have and not have, doesn’t make the 5D or 1Dx line-ups with a tilting screen. Then again, in bright light or if you are trying to get that bit of spontaneity from a subject—children and puppies won’t hold still while you stare into the LCD screen trying to get the composition lined up—you may still need to set the camera on the ground, angle it toward the subject and shoot as quickly as you can without concern for getting it perfect in-camera.
Christmas from a child’s perspective. With the camera resting on the floor, the autofocus nailed it.
If you’re not dealing with a moving target, then, by all means, use the tilting screen. If you don’t have one, there’s no reason to get cocky—check each shot after you take it and recompose by angling the camera differently until you get exactly what you want. Okay, you should do that anyway—whoever dismissed the “chimping” habit was nuts—but it’s triply important if shooting “blind.” In addition, this is how I learned to take pictures without using the viewfinder. I would point the camera at the scene, take a shot, see what it got me and then do it again until I got a feel for what the camera saw at any particular angle.
Canyoneering in Suicide Canyon, located in the San Gabriel Mountains near Los Angeles. The camera was practically touching the leaves when I shot this. I wanted to show Rich rappelling into this thick floor of colorful leaves and the only way to express that was from as low as I could get.
To Crop or Not To Crop
Because I use a wide angle lens setting, I’m often confronted with an image that might be great in the center but has too much business surrounding the subject. So I crop without shame.
The raw file is taken in the market square in Cuernavaca, Mexico.. . . And the finished, cropped image showing a nice moment between the three.
Sometimes, this will involve straightening the picture which necessarily cuts out the corners, although as I said before, I like these pictures to be slightly out of kilter. Other times, I’ll crop to a square which I find to be a great format for street photography. There’s something about the equidistant sides that relaxes the eyes and draws them to the subject, thus involving the viewer even more. My advice—never be afraid to crop.
I consider shooting from the hip just another way to present the world through my photographs and I think it’s a skill worth pursuing. Hey, who needs a viewfinder?
Sometimes, even when you’re uninspired, you get lucky. There I was, about to take a straightforward, blah picture of Piramide del Sol (Pyramid of the Sun), which is located in the ancient city of Teotihuacan near Mexico City, when this woman sat down in front of me with an umbrella cocked to shade her from the sun. Generally speaking, I get a bit annoyed when someone does something like that, but then I have to remind myself she has as much right to the scene as I do and I try to work with what I’ve got. (As an aside, just because you have a camera doesn’t mean you’re in charge of crowd logistics; some photographers have to be reminded of that.)
Pyramid of the Sun, Canon 5D with 16-35 f2.8 lens set to 26mm and f/22, 1/80 sec, ISO 400
I quickly saw she had done me a favor. Instead of what I call a record shot of the pyramid with the only saving component being the sky, I got a juxtaposition. In this case, that meant the angular relic from some 2,000 years ago contrasted with the curved shape of a modern umbrella. I didn’t think of it at the time, but there’s also the notion of an umbrella, used to protect the woman from the sun, which was pretty hot that day, sitting in front of the Pyramid of the Sun. There’s no great cosmic meaning in that, I suspect, but it adds to the idea of a juxtaposition.
(That’s the thing about photography. Sometimes you don’t always see the other interpretation until after you look at the picture for a few years.)
Rome. I first saw these two women deep in conversation which would have made for a nice shot, one brightly dressed, the other not so much, But then the third, kind of grumpy-looking woman appeared carrying a shopping bag with the picture of a young woman and suddenly there were a couple of more layers to the shot. Canon 5D MIII with 24-70mm lens set to 70mm, 1/350 sec. ISO 800
Another Layer
I’m always looking for juxtapositions in my images. That is, elements in the composition that contrast with each other in interesting or revealing ways. And, in some cases, the juxtaposition involves the elements complementing each other. Either way, a simple photograph ends up a bit more intriguing.
Rue Xavier Privas, Paris. Maybe you need to know this is Paris to get the idea of a French fry statue on a side street but there’s also the element of this silly-looking thing up against elegant, old buildings
I think you need to consider that point. This world is bursting with beautiful images, so much so that getting eyeballs to stick to yours for any length of time (which these days is measured in microseconds) is really tough. But add in a little juxtaposition and it has the effect of arresting the impulse to blast ahead to the next image. Viewers pause to suss out the meaning or the irony in the shot. It might make them smile, or, gosh, I don’t know—think? Kind of rare, sure, but you can always dream.
Atlas Canyon, Nopah Range, California. Canon 1Dx, 24-70mm lens set to 26mm, f/22 at 1/80 sec, ISO 400
The Challenge
The point isn’t so much to get an extra “like” or two but to communicate with the viewer for an extra moment. To create an interesting image that helps add a little clarity to the subject or even make a broader statement about our world. Take the image above from a canyoneering trip in the Nopah Range near Death Valley National Park. The small figure descending the rope shows how large and dramatic the cliffs are.
Elephant seals, near San Simeon, California coast. Canon 1Dx, 70-300mm set to 300mm, f/5.6 at 1/3000, ISO 400
In other cases, the juxtaposition might create a little tension such as this shot of the elephant seal poking its head up among its dozing buddies as if alert to something. Or the contrast between the statue of three people hugging while a lone person walks by (below). There’s the hint of a story in either image that allows the viewer to participate in what might be happening.
Museo Nacional de Arte, Mexico City. Canon 5D, 16-35mm lens set to 27mm, f/2.8, 1/500 sec. ISO 1600
Bottom line: When you pursue juxtapositions, you’ll find that your images start developing layers of meaning, some of which you may not see until long after you’ve processed the picture.
Here are some ideas of what to look for:
Old object with new, or, young person with old
Soft and hard
Bright color and monotone
Wealthy and poor
Modern and ancient, or, technology with low-tech
Different or similar shapes
Slow and fast
Happy and sad
Always the Composition
One last thing: you may have a great juxtaposition but you need to convey that to the viewer. Here’s where I think simple works best. Make it obvious what you’re trying to show by carving out anything that’s not relevant. Crop, crop, crop. The woman with the umbrella had a young daughter with her who was cute and at one pointing running about, but to throw her into the picture would have just muddled things.
Or, take the opening shot of the two tsessebes photographed in South Africa’s Addo Elephant National Park. I concentrated on the horns for the juxtaposition of their shapes, both similar and different at the same time. No reason to show the entire animals.
Juxtapositions are found and created at the same time. Keep alert to them and then compose to ensure the viewer shares your discovery. It takes practice. But when you get in the habit of looking for juxtapositions, it makes photography even more fun.
Ah, fall is the season when I start thinking about the desert. Temperatures are beginning to cool and I can go to some of my favorite places without worrying I’ll get baked to a crisp in the typical 110-degree summer heat. Not only that, but the weather shifts to sometimes stormier conditions which are far more photogenic than the usual searing, clear skies.
So my opening advice is consider planning a winter trip to a desert near you.
My next advice is to put Death Valley National Park on the top of your list of desert locations. Don’t let the name fool you. I know it sounds like some notorious hellhole that only brave or demented people visit. Instead, the 3.4 million acre park has an overwhelming number of photo ops to choose from, most of them landscapes. Unfortunately, when you drive into the park for the first time, the place is so huge, it’s hard to pinpoint where those photo ops are.
That’s why you’ve got me! In this post, I’ll take you to a few of the best, image-rich locations that are easily accessible by paved road. In the next post, we’ll get away to the backcountry where things get really spectacular.
Dried mud at the edge of the sand dunes. Bronica SQ-A/80mm lens, Tri-X film (yeah, that’s right, film).
Mesquite Flat Sand Dunes
Located just east of Stovepipe Wells Village along Highway 190, the sand dunes are easy to access from either a parking lot or if you like, you can park on the road’s wide dirt shoulder and simply hike a short distance into the thick of them. (Do yourself a favor and as you leave your car, look behind you for landmarks so you can steer your way back.) The dunes shift in form throughout the year but there’s always one over-achieving pile that reaches higher than the rest and if you’re feeling energetic, you can head for that. Or, just wander around. Closer to the road, there are patches of dried, cracked earth that make for great foregrounds or abstracts. As for the dunes, the curving lines where one sandy ridge curls around into another are great for various compositions. In all directions, you’re surrounded by mountains which create great backgrounds, or there are multiple opportunities for abstracts by framing nothing but curves, shadows, and sand. I recommend taking several lenses. Use wide angles to accentuate the sensuous lines and telephotos to compress the landscapes into abstracts or to bring the background mountains into the shot. A tripod is a good idea, too, because you’ll probably want to use small apertures for more depth of field and that brings with it, of course, longer exposures which require more than a steady hand.
Early morning light brings out the curving lines in the dunes. Canon 5DMII, 70-300mm set at 300mm, f/8, 1/180, ISO 400.
Shot with a telephoto lens to compress the scene into something slightly abstract.
The best time to arrive is about 30-45 minutes before dawn but there’s enough light wander out to a suitable location and wait for the sunrise to magically transform the dunes. Granted, for all the effort, this magic will only last a few minutes before the sun stops delineating the dunes’ shapes and it all becomes rather bland. Sunrise is another good time, but be careful because once it gets dark, it’s really dark and you might have a hard time finding your way back. Bring a flashlight or, better, a headlamp. Lastly, in the winter, the dunes are pretty popular and can be trampled with footprints, marring otherwise good photos, so you may have to hike about a bit to find an unspoiled shot.
Manley Beacon at sunrise with the Panamint Mountains in the background. Bronica SQ-A, 80mm lens, Ektachrome film.
Zabriskie Point
This is just outside of Furnace Creek, again on Highway 190. There are a large parking lot and a short, somewhat steep paved path to a high point where you look down on a pretty tortured landscape of twisting canyons that lead out to Death Valley’s main playa and then in the distance the Panamint Mountains. The main attraction for most photographers’ memory cards is Manley Beacon, a pointy outcrop the shape of a shark’s tooth. In the right light—sunrise is best—Manley Beacon gets hit by a brief blast of warm sunlight while the rest of the foreground is still in shadow. Get here early, before sunrise, to get a spot on the overlook among a usual crowd of other photographers. If there are clouds, sunset can also provide great images. Again, bring a tripod and be prepared to bracket for the extremes in light.
Death Valley’s playa as seen from Dantes View. Eleven frames stitched into a panorama. Note the snow in the Panamint Mountains, which you’ll see in the winter. The high point below and a little to the right of the moon is Telescope Peak. Canon 5D, 28-70mm set to 36mm, f/8, 1/30, ISO 400.
Dantes View
For another spectacular view without so many tripods, Dantes View at an elevation of 5475′, gets you a plunging, straight-down shot of Death Valley’s below-sea-level playa running through the middle of the park with the Panamint Mountains shining in the background. The time it right for a sunrise with the moon setting at the same time near the Panamints’ 12,000′ Telescope Peak. The drive there will take about 45 minutes from Furnace Creek and involves a 14-mile climb up a winding road off Highway 190. So if you spend the night at one of the hotel rooms in Furnace Creek, you’ll need to get up horribly early to reach the viewpoint before sunrise. Well worth it. One note of caution. It gets really windy on the top of Dantes View and in the winter, adds to that bone-rattling cold. Dress for the Arctic and you’ll be fine. There’s also a trail that leads off from the right side of the parking lot to more great views of both Death Valley and to the east into Nevada. You’ll need a tripod just to hold your camera steady in the howling wind.
Scotty’s Castle: There are many archways that make great framing elements. Canon 5D, 16-35mm set at 22mm, f/22, 1/30, ISO 400.
Scotty’s Castle
On the opposite side of the park, way north of Dantes View (about 80 miles away, which says something about how big Death Valley is), you’ll find the one manmade attraction inside the park that should be photographed. I won’t get into the entire history of this colossal home built in the middle of nowhere by a wealthy man who wasn’t, by the way, named Scotty, but the architecture alone is worth an hour of your time. There’s a tour of the grounds and buildings, but photography inside the house is prohibited. However, if you get there early in the morning, you can wander about the grounds unfettered and have wonderful shadows and light, and no people.
Sadly, flood damage to the surrounding roads has meant Scotty’s Castle is currently closed and perhaps won’t be reopened until 2019, but keep it in the back of your mind because it is well worth a visit.
Ubehebe Crater at sunrise shot not far from the parking lot. How easy was that? Canon 5D, 16-35mm set 16mm, f/16, 1/40, ISO 400.
Ubehebe Crater
That’s pronounced U-be-hee-bee. Just so you know. This is around the corner from Scotty’s Castle and is available for photography. Best in the morning or evening. The volcanic crater, some 600 feet deep, was formed a mere 300 years ago when rising magma hit ground water and the resulting trapped steam exploded. There is a soft, steep trail to the bottom of the crater but photographically, not really worth the difficult climb back out. Besides setting up near the parking lot for sunrise shots, try wandering around the crater rim for other angles, especially in the late afternoon. Consider doing panoramas here to get it all in.
The water-logged playa near Badwater shot in the winter. A rare sight. Bronica SQ-A, 80mm, Ektachrome film.
Badwater Basin
There is something entirely weird about driving along Highway 178, south of Furnace Creek, and seeing a sign saying “Sea Level,” while you continue descending. That descent ends at Badwater, the lowest elevation in North America at minus 282 feet. The best light here is either sunrise or sunset. You can take a path from the parking lot out into the playa, which, during the winter, is often a shallow lake, making for nice photos. If you luck out, you’ll get the Panamint Mountains reflecting in the water. A rare sight.
Travel Guide Stuff
For more information, go to the Death Valley National Park website, Keep in mind, that winter is a popular time and you’ll have to book the few in-park hotel rooms several months in advance. You can also camp at several, somewhat dreary campgrounds but they don’t take reservations. If you don’t mind a half-hour drive out of the park, try getting a hotel in Beatty, Nevada. It’s at least cheaper but farther from the good stuff.
[The opening image was shot from Zabriskie Point looking down into the canyons during a winter sunset.]
When all else fails to inspire me while photographing a scene, I can sometimes depend on one optical phenomenon to save me: the sunburst. As you can see in my sample shots, the sun goes from a blah ball of brightness to a multi-pointed explosion of light rays. Not only does this add an extra bit of visual interest to the overall image, but it suggests movement—the sun is peeking above a distant or not-so-distant object and about to rise or set. It appears as if you’ve nailed a “decisive moment” with the sun at the peak of action. Sort of.
Kayak camp on the Green River, Colorado. This was two different exposures blended together in Photoshop. A tricky shot because I had just a few seconds to nail it before the sun rose above rocks.
The Importance of Camera Settings
In fact, a sunburst does take a bit of timing and forethought. First, the technical stuff. In order to get the flare effect, the lens needs to be stopped down to f/16 or f/22. As you might know, small apertures cause diffraction where light rays coming off a subject whack about as they travel through your lens and hit the sensor not quite as sharp as they could be with a wider aperture (obviously, this isn’t the most scientific way to describe it). Normally, people wring their hands over the image softening diffraction creates, but it’s also what causes the sun to flare out into a burst of light. Wide angle lenses also help to amplify the effect.
Buckskin Gulch, Utah. I had to move around a bit in order to follow the sun as it rose in order to get it smack dab in the center of the crook in the rock. Again, the timing was all important as I had just a few seconds to get it.
The other technical concern is exposure because you’re dealing with extremes in brightness, namely the sun versus everything else. Start with aperture priority so the f/22 setting is locked in. Select an ISO that either allows you to handhold the camera or if you have a fetish about noise, as low an ISO as possible. After that, I believe in covering my butt by setting the camera to auto-bracketing and knocking out five shots which are one stop apart in exposure, running from under- to over-exposed. I’m thus assured of having the right exposure. Plus, because scenes with the sun in them can really test a camera’s dynamic range, I have the potential for selecting the best exposure for the sun and sky, and the best for the foreground and then blend them later in Photoshop. My preference is to shoot with a tripod, but it’s not necessary unless your shutter speeds are slow.
The Window of Opportunity
Then there’s that timing thing. In the case of the golden hour (sunrise/sunset), you need to be in a spot just as the sun is about to rise above something—mountains, trees, buildings, whatever—or just as it’s about to disappear behind said objects. Or, if the sun is higher above the horizon, look for objects that will still block part of the sun ball. Trees or buildings work rather well here. The idea is to catch just a slice of the sun which adds to the fleeting feeling of the shot. Lastly, depending on where you are on the earth, you may only have a few seconds to get the right moment where the sun is barely left of the shot.
Climbing the final pitch to the summit of Thunderbolt Peak, Kings Canyon National Park. I was belaying my friend and only took my hands off the rope when he was in a secure position, just as the sun peaked above the rock. No climbers were hurt in getting the shot.
Now that we’ve got that out of the way, let’s talk about the arty part. I look for foreground elements that lead the viewer’s eye to the sunburst. I particularly like it when I can position the camera so the sunburst pops out of a V in, say, a ridgeline. Being a fan of the law of thirds, I don’t like to center the sunburst but, rather, place it off to the side a bit.
A word about positioning the camera. As the sun gets closer to the spot where you want to photograph it, you’ll probably have to tinker with your composition, moving left or right a little, especially if you want the sun rising/setting at a specific location in the image. There are apps that can help you plan for the sun’s path, but none of them know about that little tree on the top of the ridge behind which you want the sun to rise. Also, depending on the tightness of your composition, you might be able to lower or raise the camera in order to get a second or third chance at the sunburst. That is, if it’s sunrise, you shoot the sunburst, lower the camera until the sun is once again behind the object, and then wait for the sun to “rise again” for another try.
Processing
Look at your bracketed images and after choosing the best one, see if you can simply use the Lightroom highlights and shadow sliders to adjust the shot to your liking.
A five-exposure bracket taken on a fire road near La Canada-Flintridge, California.
If that doesn’t work, you can process two bracketed images. I typically select the shot where the sun and background sky have some tone to them (the rays jutting out from the sun will probably be still over-exposed). In the case of the five shots shown above, I chose the darkest sky shot and the middle, “correct” exposure because both would give me that feeling of the evening where the light is a little darker. In Lightroom, I’ll adjust the exposure/highlights/shadows of both to taste. In most cases, I want some detail in both images while maintaining a sense of place and time. I sometimes try Lightroom’s HDR program but it usually fails to get the right look.
After the above adjustments, I control-click on both frames, right-click to get the contextual menu and choose Edit In>Open as Layers in Photoshop. And then . . .
1) Once the two layers are loaded, align them by choosing both layers, go to Edit>Auto Align Layers. Make sure “Auto” is checked and then click OK.
2) Select the top layer. Then click the “add layer mask” icon at the bottom of the layers panel (third from the left).
Top: Select Align from the Edit menu Middle: Add a mask to the top layer and make a loose selection with the lasso tool of the foreground Bottom: With the foreground color black, click alt/option-Backspace.
3) If the layer with proper sky exposure is on top, make a loose selection around the foreground with the lasso tool. If the layer with the proper foreground exposure is on top, make a loose selection around the sky. Making sure the foreground color is black, tap alt/option-backspace which will fill your mask selection with black and reveal the layer below.
4) In the Properties panel, move the “feather” slider to the right to about 200 pixels which will soften the edges of the mask until they virtually disappear. While you may have to fiddle a little with the mask by additionally painting in black or white to get it right, this will usually blend the two exposures fairly closely.
The final image.
I’m not saying a sunburst will magically transform otherwise dull scenes, but it does add a kind of kinetic feel to sunrise/sunset pictures you won’t otherwise get.
[About the opening image: A different kind of sunburst taken in Vinegaroon Canyon, Death Valley National Park. It was hot as blazes that day and I wanted to illustrate that feeling with the sun blasting in the sky. I exposed for the foreground knowing the sun would completely over-expose, looking even more menacing.]
On a recent backpacking trip in the Sierra Mountains, the weather one morning was in a tediously sunny state. Fine for hiking, but blah for photography. You know what I mean—an unattractive, contrasty combination of deep shadows and bright highlights where the landscapes just had a dusty, baked look about them. As is so often the case when I’m backpacking, I started to lament how I was passing scenes that had great photographic potential if the light was a little gentler. (These were fairly remote places I would probably never return to, making it even more frustrating.)
Then, while my friend, Allen, and I were resting near a shady stream surrounded by wildflowers covered in blotchy sunlight, I remembered how some photographers have experimented with shaking their cameras to blur a scene into a lusciously soft, impressionistic rendering. The effect, when done well, could reduce the scene to its basic colors, shapes and even textures giving the viewer a different way to see the world (which also happens to be my favorite reason for taking pictures).
I slowly moved the camera up and down. Canon 5DMIII set to ISO 100, f/16, 1/4 sec., 24-70mm lens set at 70mm.
A New Way to Overcome Bad Light
So given how I felt like my inner artist wasn’t being served by the current conditions, I decided that perhaps a blurry version of the scene—in particular, the flowers—might overcome the otherwise tragic lighting. Somewhat randomly, I chose an exposure of ¼ second, ISO 100, and let the camera select the f-stop which turned out to be f/8. (Under the circumstances, I figured depth of field wasn’t an issue.) With the drive mode on my Canon 5DMIII set for high-speed continuous (six frames a second), I then held down the shutter release and gently tilted the camera up and down over and over until I had taken, oh, 15 shots or so.
I was absolutely stunned by some of the images. Those splotchy highlights turned creamy. Distracting details became broad brush strokes of color. Ordinary objects felt magical. Even on my LCD, the images were so compelling, I just wanted to stare at them. There was something about the pictures that was both kinetic and soothing at the same time. I excitedly jumped from spot to spot as if I had just discovered the next best thing in the world. Allen, an engineer at Jet Propulsion Laboratory, was slightly amused that anyone could get so enthusiastic overtaking blur effects with expensive, ultra-sharp lenses.
I tried to move in one direction, downstream. Canon 5DMIII set at ISO 100, f/9.5, 1/8 sec, 24-70mm lens set to 35mm.
I spent the rest of the five days on the trail exercising this new creative muscle, especially when the light would have otherwise kept me from even looking at my camera.
Experiment, Experiment, Experience
I’ve since played with different scenes, settings and lenses. And I have a few suggestions based on what I’ve learned so far.
Slow but not too slow—Getting the right shutter speed is key. I found ¼ to 1/8 works best, but see if something else works better for you. Going too long, however, just turns the image into pixel soup, which might just want you want, but I think I lose too much of the scene’s basic flavor that way.
Manually set the exposure—One thing I discovered with those first shots was the wild variation in exposure depending on what the camera was pointed at. If the lens was aimed toward shadows, the overall exposure was lighter than if I started out aiming toward the brighter parts of the scene. So to be consistent, I just pick an average exposure, manually plug it into the camera and stick with that throughout the picture-taking.
Compriano estate, Tuscany region, Italy. Canon 5DMIII set at ISO 100, f/16, 1/6 sec. 24-70mm lens set to 35mm.
Handhold the camera—No need for a tripod here. You want the freedom to move the camera in various ways.
Keep the camera moving—Instead of taking one picture at a time, I hold down the shutter while continually waving the camera up and down, side to side or in circles. Each renders the scene differently and one might work better for the subject than another.
Be prepared to waste a lot of pixels—Take hundreds of pictures because only a few will ever make the cut. What criteria you use for editing is up to you. I like something that strongly hints at what was there while having an impressionistic aesthetic all its own. You might want something more or less defined.
Compriano estate, Tuscany region, Italy. Canon 5DMIII set at ISO 100, f/16, 1/4 sec. 24-70mm lens set to 35mm.
Restrict your framing—I’ve had some success with broad landscapes, but overall, I find this works best if I stick to concentrating on just a few trees or rocks or whatever happens to be there rather going wide.
Play with depth of field—I was wrong when I first thought this isn’t a factor. Wide-open apertures definitely render a scene differently than stopped-down ones. Try both.
Play with focus—Definitely set the lens for manual focus but experiment with focusing on a single object and then try the same shot with something else in focus. I’ve even tried shooting with the entire scene out of focus, which worked a few times but isn’t quite as magical as focusing on one thing before I start to move the camera.
In some ways, blur effects require as much skill and persistence as taking pictures with a steady hand. It’s also highly personal—as is most photography—where the images you show the rest of us are picked based on what you like and what you want to say about the subject. Plus, the amount of creative experimentation that goes into deliberately on blurred photos can renew your excitement and enthusiasm for the art of photography.
Photographs have never been permanent. Back in the days of film, negatives faded, prints faded. Sometimes, younger generations in a family simply toss out snapshots they either don’t care about or don’t understand the relevance of the people in the images. People who don’t know that prints come from negatives—no doubt, most people—trash the developed film like rusty paperclips.
Digital cameras haven’t made the medium immortal, either. It’s so easy to delete files by mistake. Or, if you’re really old, lose files to obsolescence when they’re stored on media that have no machines left to decipher them (I’m talking about floppy discs). And certainly, once you die, there’s the distinct possibility that your relatives won’t save all those tiffs you so lovingly stored in triplicate on hard drives.
So I’m here to talk about the long term saving of your work. And I do mean really long term. Like, after you die. Something that your children and other family members might actually choose to save after they’ve thrown out the hundreds of thousands of your digital pictures you’re not around to defend. (If you don’t believe me, look around you. Do you honestly think these people are going to take the time to look at all those shots? I didn’t think so.)
Three consecutive pages from my book about my adventures climbing the 14,000′ peaks in California. They flow in story fashion from one image to the next. Note the simple, sans-serif typeface.
Going For Immortality
So you need to choose the images that are most important and preserve them in a way that might be interesting to future generations, or, at least, appear to be important enough to save. And by that, I mean making books of your work. Not only are the inks in the books good for decades, but the books themselves are a convenient way for those who are yet to be born to see your work and get an idea of who you and your immediate family were. For the time being, books are relatively obsolescence-proof.
This starts with a program as simple as Lightroom’s Book software. You have several templates to work with: 7×7, 8×10 (portrait and landscape), 13×11 and my favorite, 12×12. I like the large square because I can use either portrait- or landscape-oriented images and they nicely fit the pages. Also, going large shows off the photos best in my opinion.
Jon passing Crater Lake. From my book about my experiences hiking the Pacific Crest Trail. Notice how the horizontal image fits nicely on a square page.
My intention here isn’t so much to give a tutorial in using the program, although I have to say it’s easy enough to figure out and gives you the kind of flexibility required to follow my advice in the next paragraph. You can easily lay out and order images, caption them and send them off to the publisher, Blurb, without being an expert designer. The point isn’t so much to wow people with the clever look of your book but to impress them with your photography.
To do that, I say stick with the simplest and oft-used layout you can—one photo per page. That’s it. Don’t get crazy. Give each image it’s due. Show those grandchildren how you loved these pictures so much, they should be appreciated one-by-one instead of competing in a collage of other pictures. Also, give them some white space all around. That’s about it.
Pine Creek Canyon, Zion National Park. A page from my book on canyoneering. A simple layout. Just an image and brief caption. All you need.
Keep Your Future Audiences Interested
Okay, I’ve got some other pointers, too, if you want your books to look professional and therefore worthy of treasuring.
Collect similar images in each book—The themes can be as simple as your vacation to Paris or more complicated like that project you spent 20 years photographing poppies. The point is, when there’s a common thread or story running through the book, people are more likely to keep flipping the pages until the end.
Choose only the best images—I know. You’ve heard that before. As I’ve implied, this isn’t just about pleasing yourself, but keeping future viewers intrigued enough to want to look at your pictures and even do that more than once. If you have pages of shots that all look the same and should have been culled down to one best picture, you’ll lose your audience real fast. And if that happens, they may decide the value of your book or books isn’t great enough to keep them. This not only goes for the aesthetic quality of each image but making sure the images are perfect. No sensor dust spots, processing is clean, cropping is tight or relevant to the image. All that stuff. And carefully consider what you use for the cover, choosing an image that will intrigue potential viewers and invite them to the photo party within.
From a book about a trip to South Africa: A simple example of pairing photos that tie into each other. My wife took the right-hand picture while I was taking the left-hand one.
Carefully order the pictures—This might be just sticking to a chronological format. Or using interesting juxtapositions. That is photographs that pair together in some way. Look for how the images flow from page to page, especially if you’re trying to tell a story.
Keep it short—Blurb’s page limit is upwards of 240. That doesn’t mean you have to go there. It’s a little daunting for someone to pick up a book and leaf through a mountain of material. Instead, give them a bite-sized chunk of images. This blends with the previous advice of going with a theme, which tends to naturally restrict the book’s length. Again, think of your future audience. If attention spans are getting shorter, so should your book.
Always write captions—One of the biggest reasons, I think, that old photos are junked is because no one knows what, or who, they’re looking at. Even if your captions are prosaic (“Uncle John at the Eiffel Tower, January 20, 2011”), they will be more valuable than if viewers have to guess who that is in the hat and sunglasses. Even better is to take some time and explain the shot a little. If these are art photos, say something about the subject and why you took it. Even classier is providing a snippet of metadata. Most people won’t know what an f-stop is, but for the ones who do, you’ve just given them a little insight into your work and they will appreciate it. Also, choose a simple font style. I prefer a sans-serif type such as Arial because it’s easy to read and doesn’t draw attention to itself.
Polish and edit—Try to make the final product as tight and professional as possible. Compare it to photography books you might have and admire. Let it sit for a few days and return to it. Is there anything missing from the captions? Are the pictures redundant or the absolute best you have to offer? Be picky. And, as always, think of your future audience and if they will want to spend time with your book.
Don’t be sloppy—Proof your final work several times over the course of a few days. Have someone else take a look at it, too, after your eyes start to blur. Remember, once you publish, any mistakes are permanent.
Choose a good paper—After all, this bother, you don’t want to go cheap on the production values. I prefer premium luster for the light sheen it gives my images.
The final product won’t be inexpensive. Most of my books, which end up being about 60-80 pages, cost upwards of $100. But I have both the satisfaction of paging through my work—and showing it to others—without having to crank up the computer, and a little comfort knowing that perhaps my photography will live a few more years after I’m gone.
More and more, I read how unhealthy constant sitting is—geez! it can even trim years off your lifespan!—and how simply walking for an hour a day is all the antidote you need to retrieve that mortal time you would otherwise lose to inactivity. (It’s worth noting that you don’t even have to do the hour all at once, but can break it up if your schedule is so hectic, you can’t devote more than, say, 20 minutes at a stretch.)
While I do exercise just about everyday—along with spending hours in front of the computer—I’ve tried to get into another habit whenever I go for those life-expanding walks: I bring my camera and record the neighborhood while I travel it on foot. It’s not complicated, really. I just hook up my Canon 5DMIII to a BlackRapid strap and it hangs upside-down at my side within easy reach. I’ll vary the lens just for kicks. Some days it’s the 16-35mm. Other times I’ll endure the heavier 70-300mm. Or more often, I bring a 24-70mm, my favorite lens.
And if I miss a shot because I had the wrong lens? Doesn’t matter. This is about exercising my heart and my eyes at the same time. If I snag a good picture now and then, wonderful. If I don’t, my life isn’t ruined.
The Hidden World Down the Street
Someone left this nearly empty bottle next to a light and the mundane became an interesting juxtaposition of objects.
I’ve come to believe that having a camera for my local walks is relates to that miracle of photography when having that camera at my side that turns my curiosity and visual awareness loose. Rather than allowing the normal complications of life to distract me, my eyes become lenses in a way, focusing on usually obscure details or how the light hits the trees a certain way at a certain time of day. My brain turns into a sensor of sorts and I visualize every scene I pass, seeing it as a photograph that may or may not hang on the wall or be posted.
Perhaps even more miraculous is how the mundane becomes special and I record it for that reason. And even if I don’t photograph it, I see it, sometimes for the first time after passing it for weeks.
Most people have probably passed this telephone pole a thousand times without seeing the nails and staples on it. I might have done the same thing if I didn’t happen to have a camera with me at the time. It made for a great jumble of shapes and tones.
One of the great achievements of photography has always been how it shows other people the slices of life they wouldn’t experience themselves. In a way, walking through the neighborhood with a camera does the same thing for me. I see bits of the world I didn’t know existed. Sometimes, it’s silly stuff like the Coke bottle someone set next to a light fixture at the entrance to a parking lot, the glass in each mimicking the other. Or the telephone pole with an armor of staples from so many people putting up garage sale notices on it. Or the moments when my wife—who accompanies me on most of my walks—suddenly does something so heartbreakingly photogenic, it seems like a crime not to freeze the moment in pixels.
Mulholland Drive, Los Angeles. My wife, Gloria, removing her fleece while on a walk would have been a lost opportunity had I not been with my trusty Canon.
The Historical Record
There are other reasons, as well, for bringing a camera on your walks. Change is constant. Can’t stop it. And I’m always thankful I have records of the neighborhood where I’m living because I never know when something could suddenly be transformed or just disappear. Put another way, what would we do without the photographers of the past who took pictures of what must have seemed at the time like nothing special scenes that eventually disappeared? Here in Los Angeles, that’s the dirt streets of the past that ran through orange groves and years later are now car-choked thoroughfares lined with stores and offices. If nothing else, thanks to those photographers, we’ve gained a little perspective on the direction of urban evolution and perhaps a lesson on where things are headed.
The 2 Freeway overpass, Montrose, California. An urban detail that may be there for years or disappear tomorrow. Who knows?
Memories are unreliable. After your neighborhood has changed over 10 years, details of its past get hazy pretty quickly. Take a picture of it now! History is important and it’s always the simple stuff that gets forgotten. Be that photographer who people later thank for showing what the congested avenue looked like before . . . who knows?
A shopping cart dangling above the Los Angeles River. Yeah, that’s right, the LA River. At the moment a concrete flood control channel, but in 30 years, maybe it will be green and verdant again. You never know.
Practicing Your Craft
There’s also the matter of exercising that visual skill we should all keep toned and ready for possibly more consequential images. Look for compositions in everything you pass. Notice the light, the shadows, the juxtapositions of objects. The more you do this the more you’ll spot possible images. This pays off for me when I’m in a place I’ll never visit again, or only have a limited amount of time to photograph. I don’t miss as much because my eyes are more attuned to what could end up a good photo. I also find that keeping this skill for quickly evaluating possible photos makes a huge difference when I’m the recipient of a great scene with fantastic light and only have maybe a moment or two to compose an image before the shot disappears. I make decisions faster and more decisively so I don’t miss as many opportunities as I used to.
A sublime sunset over La Canada-Flintridge, California with the San Gabriel Mountains. I’m convinced the only way to get this right was to have a big ol’ DSLR hanging at my side.
Speaking of those ephemeral moments, I’ve never regretted lugging the DSLR with me, the brick that it is. I know, I know—the best camera is the one you have with you and so why not just pull out my phone and shoot with that? After all, it’s a lot lighter. Here’s why. No matter how good a camera phone is, it’s still not going to get the sublime way a sunset lights up a cloud like a regular ol’ camera—set for RAW—will. Or any other scene for that matter. If I’m going to take advantage of a rare moment, then I’m going to do it right! (That is, I want all the processing ability a RAW image gives me to get the final image as perfect as I can.)
I suppose the bottom line is we all need to exercise in order to be healthy and perhaps add a few more fruitful years to our lives, and life for me is just a little bit more joyful when I can go for a walk and return to that deadly desk chair carrying a great picture I just took.
[The opening image was taken on Mulholland Drive in the Los Angeles’ Santa Monica Mountains.]
Back during the days when I worked in a darkroom to produce my black and white and color prints, I loved going to galleries to see other photographers’ work for inspiration. (With the Internet in full bloom in images, I’ve regrettably not seen a gallery show for years.) Part of the experience was examining the prints for clues as to how they (or someone they hired) transformed a simple film negative into a sometimes magical image hanging on the wall.
One such photographer was Ansel Adams. I remember one exhibit where some of his more famous photographs were older prints and then later seeing a show of the same shots but printed more recently. Something didn’t look right. They were different. More contrasty. The blacks, in particular, were so deep they lent an occasionally menacing feel to the scene. What happened?
Turns out ol’ Ansel simply changed his mind as to how he rendered his vision. While I found something jarring about his new attitude in many of his prints, I had to applaud him for rethinking his images, no matter how famous, and applying fresh emotions to them.
These days, it’s so easy to rework past photos, I think it’s almost mandatory to revisit one’s older work for fresh ways to approach the images. What might have been a product of so-so processing a few years can turn into sparkling examples of your best work today.
With that in mind, I believe there are three reasons to go back to old photos. Here they are.
A Change in Attitude
In moments of self-aggrandizement, I like to think that I’m evolving, getting better with age. As such, my slant on interpreting an image changes from time to time and I refuse to stick with one approach forever. How boring. This being the case, I think it’s always worth my time to go back through the archives and find pictures that could use a fresh coat of pixels.
How I handle my landscapes has definitely gone through stages of retooling. I used to think starting up a shot with contrast and saturation made it more noticeable in the overcrowded pantheon of landscape photographers. Now, I’ve mellowed a bit and prefer to suggest how it felt to be there, known as a sense of place. It’s less dramatic but more honest, I think.
I had processed the top shot of a lake in Dusy Basin with Isosceles Peak in the background several years ago and went a little overboard with the Photoshop sliders. The bottom version is far more relaxed and restrained—just the way I like it these days.
Take the above sunset shot from Dusy Basin in Kings Canyon National Park. It got a little crunchy when I first processed it eight years ago. So much so, it’s hard for me to look at it. The contrast and saturation take away from a sense of place. If I saw this for the first time, I couldn’t imagine what it was like to sit there as the sun went down.
So I went back to work and produced the version you see below the first. Ah, much better. It’s not that I put a lot of work into the revision (it takes longer to describe than do). I first took the four bracketed exposures I made the scene and ran them through Lightroom’s HDR menu. The nice thing about this software is how natural—even restrained—the results can be.
I then applied to the result a healthy amount of highlight adjustment to bring back the sky and shadow adjustment to bring out details primarily in the rocks and water. I then asked Lightroom for its opinion on the whites and blacks by holding the shift key while double-clicking on the words “Whites” and “Blacks.” This auto action adds contrast and counteracts the softening that opening the shadows usually produces. I then took the image to Perfect Effects 9, clicked on Dynamic Contrast (natural), lowered the result by 50% and then added Color Enhancer (fall enhancer) and again lowered it about 50% along with reducing the amount of orange. Lastly, I opened the file in Photoshop where I dodged the rocks a little bit, darkened the peaks and added a vignette to the bottom half.
I’m now happier with the photograph. It’s darker and softer, more like how it felt to sit there on a rock and watch the sunset.
A Change in Software
The Adobe alchemists are always introducing some new feature that I could have used a few years ago on a group of photographs. There are all sorts of examples here. I fell in love with Lightroom’s radius tool for its ability to shine a light, if you will, on an isolated part of the image. I went back through my catalog of canyoneering shots and re-processed innumerable pictures of canyoneering rappelling, a subject the radius tool seemed especially adept at improving. A more recent update is with Boundary Warp in the Photo Merge/Panorama menu.
The top image after going through Lightroom’s panorama software. The middle is after it had to be cropped to eliminate the dead spots caused by the stitching. And the bottom is the same shot but run through Boundary Warp which left more of the image.
That’s where the above example comes in. I’m not the fussiest person when it comes to shooting panoramas and hence Lightroom’s stitching program once left me with bizarre distortions in order blend the individual components into one. But now there’s Boundary Warp and I’m able to hold on to far more of the image without cropping out the distortions.
As you can see in the first go-through without Boundary Warp, I had to severely crop to get rid of the dead spaces the stitching program left behind. In the second, using Boundary Warp which figures out how to fill in those places, I was able to retain more of the image that in my opinion preserves the original intention of the shot to show this pipsqueak of a woman in a huge canyon.
A Change in Skill
I offer as evidence how I’ve learned a thing or two since I started working with digital files the following example taken at Marie Lakes along the Pacific Crest Trail in the Sierra Mountains of California.
Marie Lakes at sunrise. The top image went through an HDR program (done poorly, I might add), and then the bottom is a simple blending of two exposures.
That first one is a pretty egregious execution of bad HDR. Hey, what did I know? But after a few years, I developed the ability to blend bright skies with darker foregrounds using Photoshop rather than an HDR program. I simply take, say, five bracketed exposures (usually with the camera on a tripod, but not always), and then back at the computer I choose the best exposure of the foreground and of the sky. After doing some minor adjustments to each in Lightroom, I select both, right click, go to the Edit In menu and select Open As Layers in Photoshop (at the very bottom of the list). Once in Photoshop, I move the shot with the properly exposed sky to the top of the layer stack. I next select both layers, go to Edit/Auto Align Layers and leave it at the default Auto. Once the layers are aligned, I alt/option-click on the Add Mask icon (this makes the mask black) at the bottom of the layers panel. I then take the lasso tool and draw a very loose selection around the sky on the top layer—really loose! With white as the foreground color, I press Backspace-Alt (Option on Mac).That creates a pretty ugly mask which you now have to soften in the Properties panel, cranking up the Mask feathering all the way up to 200. Most times this method works for me a lot better than HDR software (but not always—your pixels may vary).
This is what I did for my second processing attempt at this picture and it worked far better.
In a way, going back through old work and re-processing it can be fun and rewarding. Previously mediocre images can often be livened up simply because after a few years you know so much more about your craft and how to wield that Photoshop ax a little more gently.
I’m a firm believer that life is full of second, third, fourth chances. I freely admit I’ve screwed up a whole bunch of times, picked myself up and then screwed up again. I’m probably lucky to be alive. Finally, along with the way, I’ve gained a bit of wisdom—at least I think so—and figured out how to do some things right.
This equally applies to photography, although I doubt having the wrong f-stop could have killed me. There are so many places that I visit and photograph that is worth returning to. Sometimes, it’s because I was there at the wrong time of day or wrong season, and I optimistically figure the most amazing image of my life will be waiting if I just hit the right moment on the next trip. Other times, I’ll go back because I simply blew it the first time—wrong compositions, wrong lenses, wrong angles, etc. Lastly, as in the case of a national park, I’ll keep coming back because there’s so much more to photograph. I’ve lost count how many times I’ve been to Death Valley National Park and each time, I get something different.
The Art of Persistence
Let me cite one example. I spent years driving out to the desert to photograph landscapes by moonlight and one of my favorite locations was California’s Joshua Tree National Park. This place is a wonderland of photographic possibilities, and working under the full moon meant I wasn’t restricted to just a few minutes of perfect light in the morning or night, but hours. (But that’s another blog.)
One spot I mined for images month after month was Jumbo Rocks, a labyrinth of boulders and other rock formations all easily accessible from the road. In there, atop a slab of gritty granodiorite sat a boulder that had split apart and out of the top grew a small, weathered juniper. I immediately visualized how I wanted to photograph it: I would squeeze into the crack from behind, pop off a flash to make it look like a light was shining through. That light, of course, had to be “moonlight,” so I would double-expose the full moon above the rock. While this looked pretty good in my mind, I just had to get it down on film.
That’s correct. In those days, I was using a film which required 20-minute exposures and no ability to check if I had gotten the picture as I envisioned until it was developed back in town a day later.
It took me four months to get that shot. Each time I went out, I would improve upon the last one. Once, I placed the moon in the wrong place above the crack. Or, I didn’t put enough light in the crack. Given certain ground limitations, I had to shoot up from below the boulder and the angle wasn’t right. So I rented the tallest tripod I could get, which raised the camera to the correct pitch. And then finally on a cold December night, I nailed it. The picture, titled, “Jumbo Rocks, 7 p.m.”, has been a big seller for me ever since.
Jumbo Rocks, 7 a.m. I saw this shot in my mind long before I was able to get it on film Persistence was the key.
Digital Deja Vu
Does this mean if I had a digital camera I could have gotten it right the first time? Maybe yes, maybe no. Even under more usual circumstances, that is, during the day as opposed to the night, you may not realize what you have done correctly—or not—with a subject until after you see the images in Lightroom’s grid and, then, oops: If I had done this instead of that, this picture would be amazing. So often that’s the routine with photography—you need some mental space between the time of exposure and when you see it on a monitor to fully appreciate what you’ve done.
However, if the pictures didn’t work out, it’s not a total loss. Go back if you can. Shoot again with another lens, aperture setting, angle or different ideas. Here are a few factors I consider:
Do I like my compositions? Unfortunately, ideas for how to shoot something don’t always immediately hit me. No matter how much I think I’ve milked a scene, if I go back, I’ll see new ways to tackle it photographically.
The unpredictable things, such as weather or light. Perhaps the weather was really awful or too good, that is, clear skies. There are so many places where the weather is different from day-to-day or even hour-to-hour. Photography is always a bit of a crapshoot when it comes to light. Go back for another roll!
Would a different season make a difference? I might find myself hiking through a grove of quaking aspens in the summer when the leaves are green. If I went back in the fall, perhaps those trees would be aflame in color. Worth a shot.
Mt. Muir, Sunrise I’ve passed this spot many, many times on the Mt. Whitney trail in the Sierra Mountains, but on this morning, I purposely left the trailhead extremely early to get to this spot at sunrise.
Time of day. Not every excursion puts you in a place at the golden hour. I figure if something looks good at noon, it’ll be spectacular at sunset or sunrise. So I make a mental note to return in the future and time it so I’m there at the right hour. I’ve even backpacked into a location and camped there just to be around for better light after passing it by on another trip.
More explorations. There are people who have invested most of their lives photographing one grand location. One of my favorite photographers, Michael Frye, lives near Yosemite National Park and has gone there over and over for years. He still manages to surprise me with his fresh perspective on the park. Not only that but repeatedly going back to the same place is a learning experience. You get to know its rhythms, its variations through the seasons. You can then draw on that to up your odds of being at the right place at the right time.
Palisades Basin, Kings Canyon National Park. This is a huge place to explore and it takes many, many trips to even scratch the surface of what’s possible. This was taken in a remote location while on a climbing trip to North Palisade Peak.
Lastly, even if you can’t go back, learn from the experience. Why were your images just so-so instead of great? Not only go through your photographs to choose the good ones but deeply analyze the horrible ones and figure out what you did wrong so you can apply that lesson in the future.
One of my canyoneering friends once said she couldn’t understand why I bring my camera gear with me on canyons I’ve done before. The reason is pretty simple. I see something different every time I go back. I also have a chance to build on mediocre pictures and even good pictures, and that gets me—occasionally— to great pictures.
A note about the opening image: This was Mono Creek, a spot on the Pacific Crest Trail I’ve passed at least three times, knowing each visit I had to go back just to take pictures. I finally got a chance to camp here and devote an evening to photography.
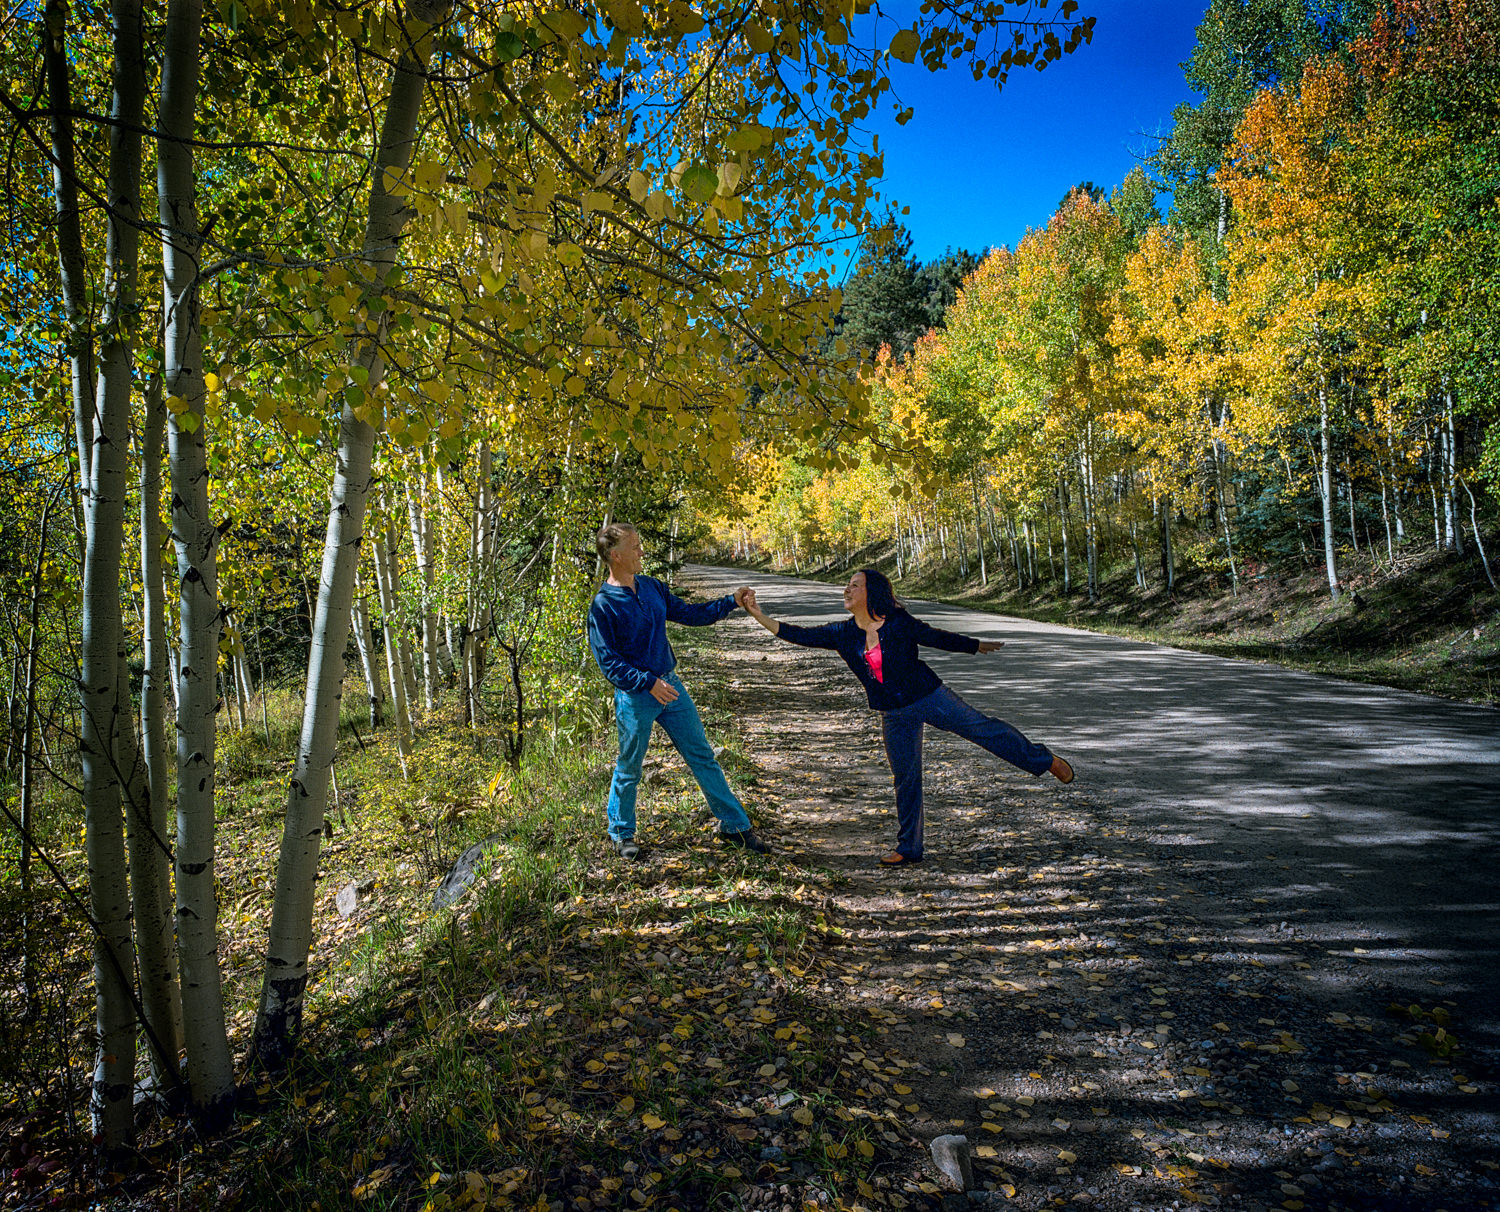
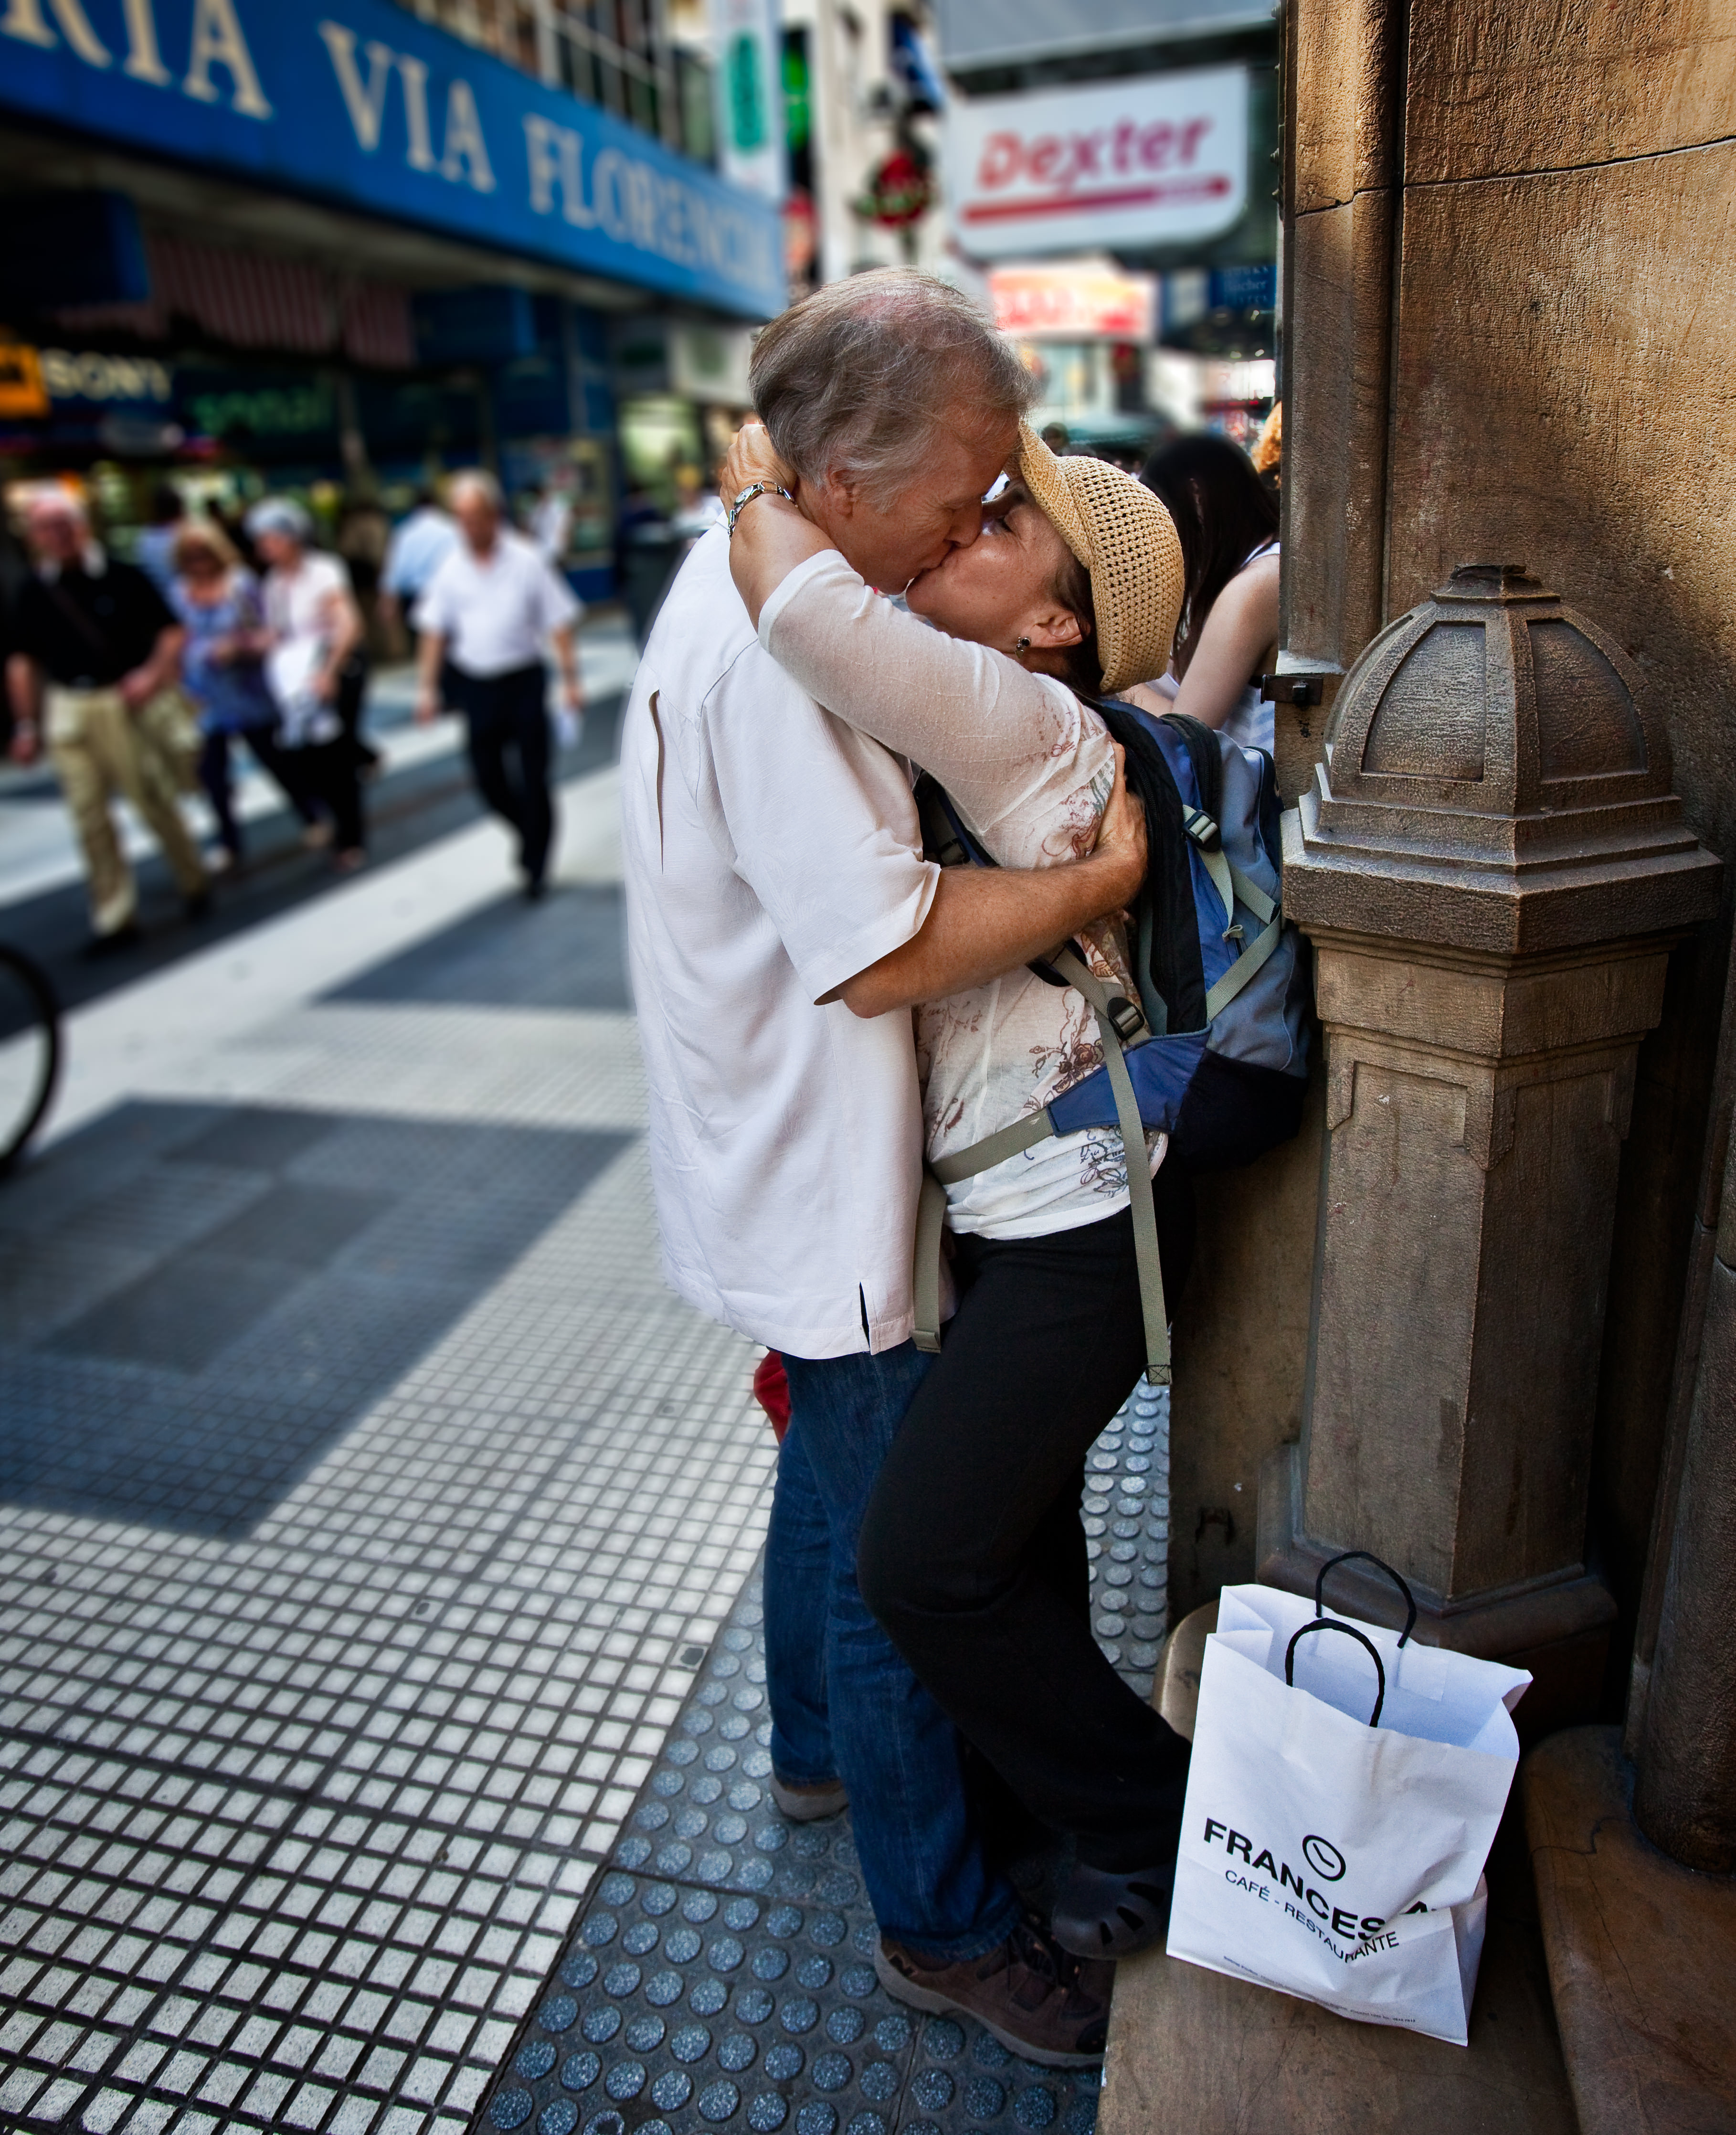
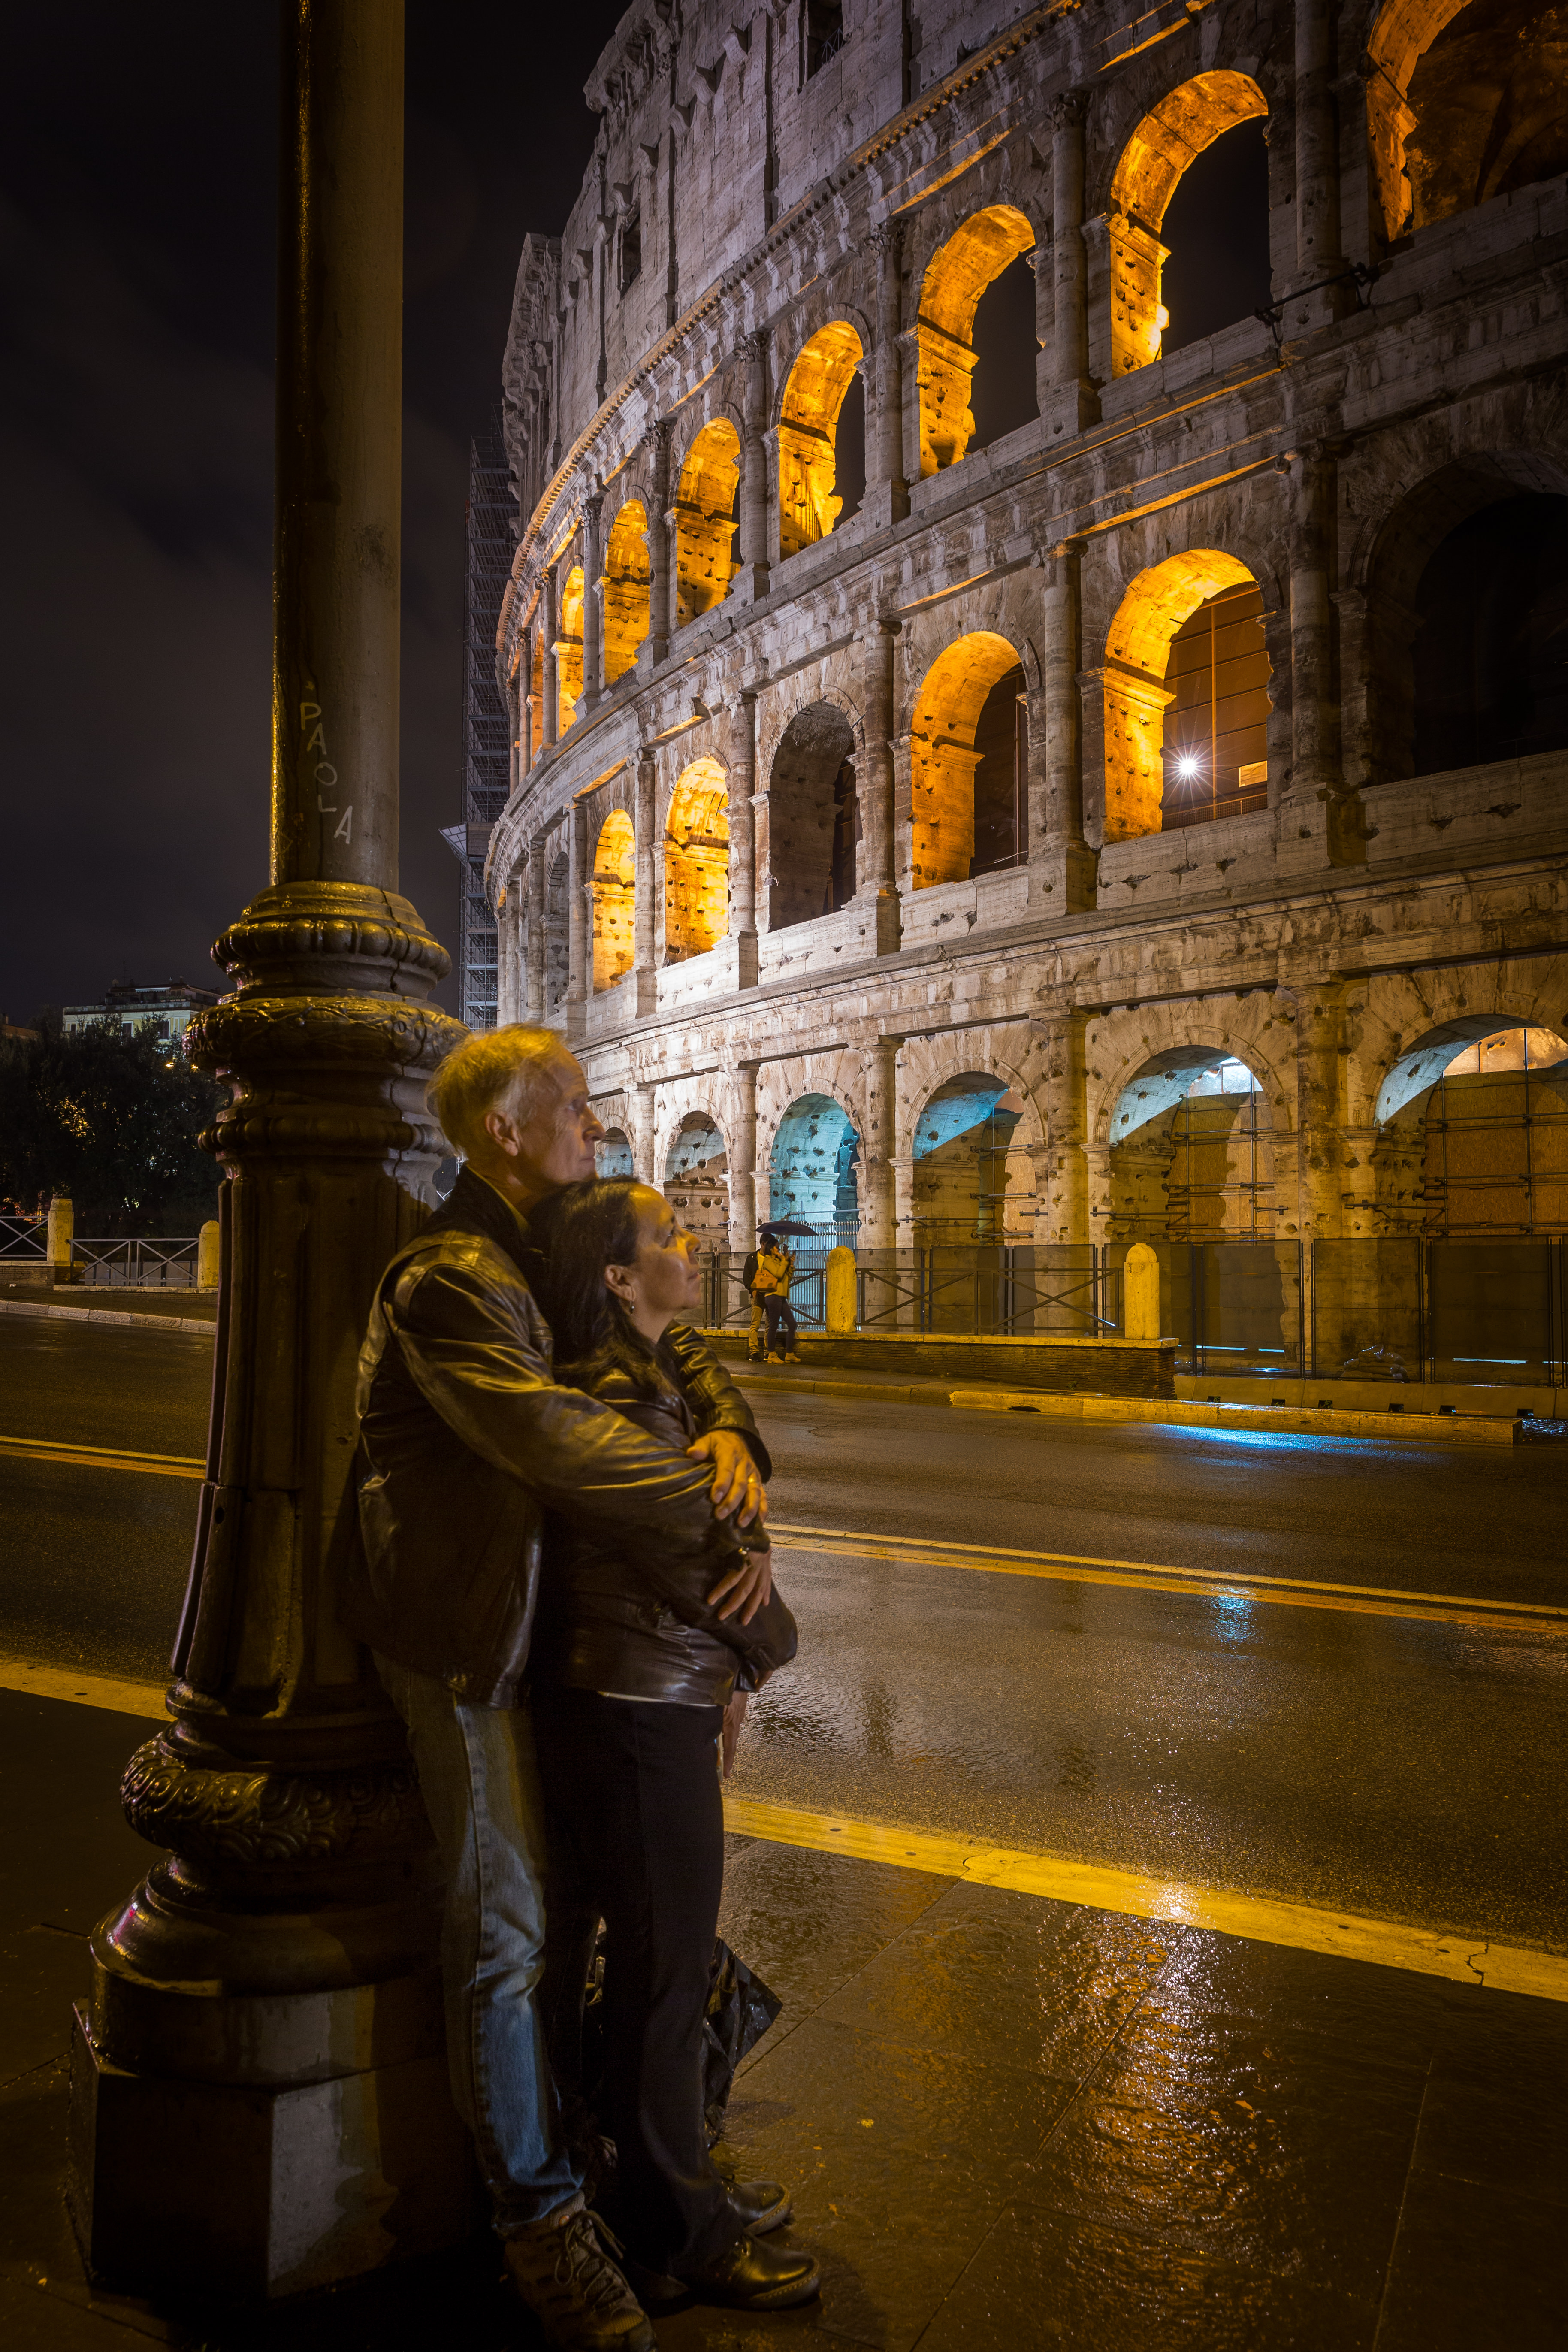
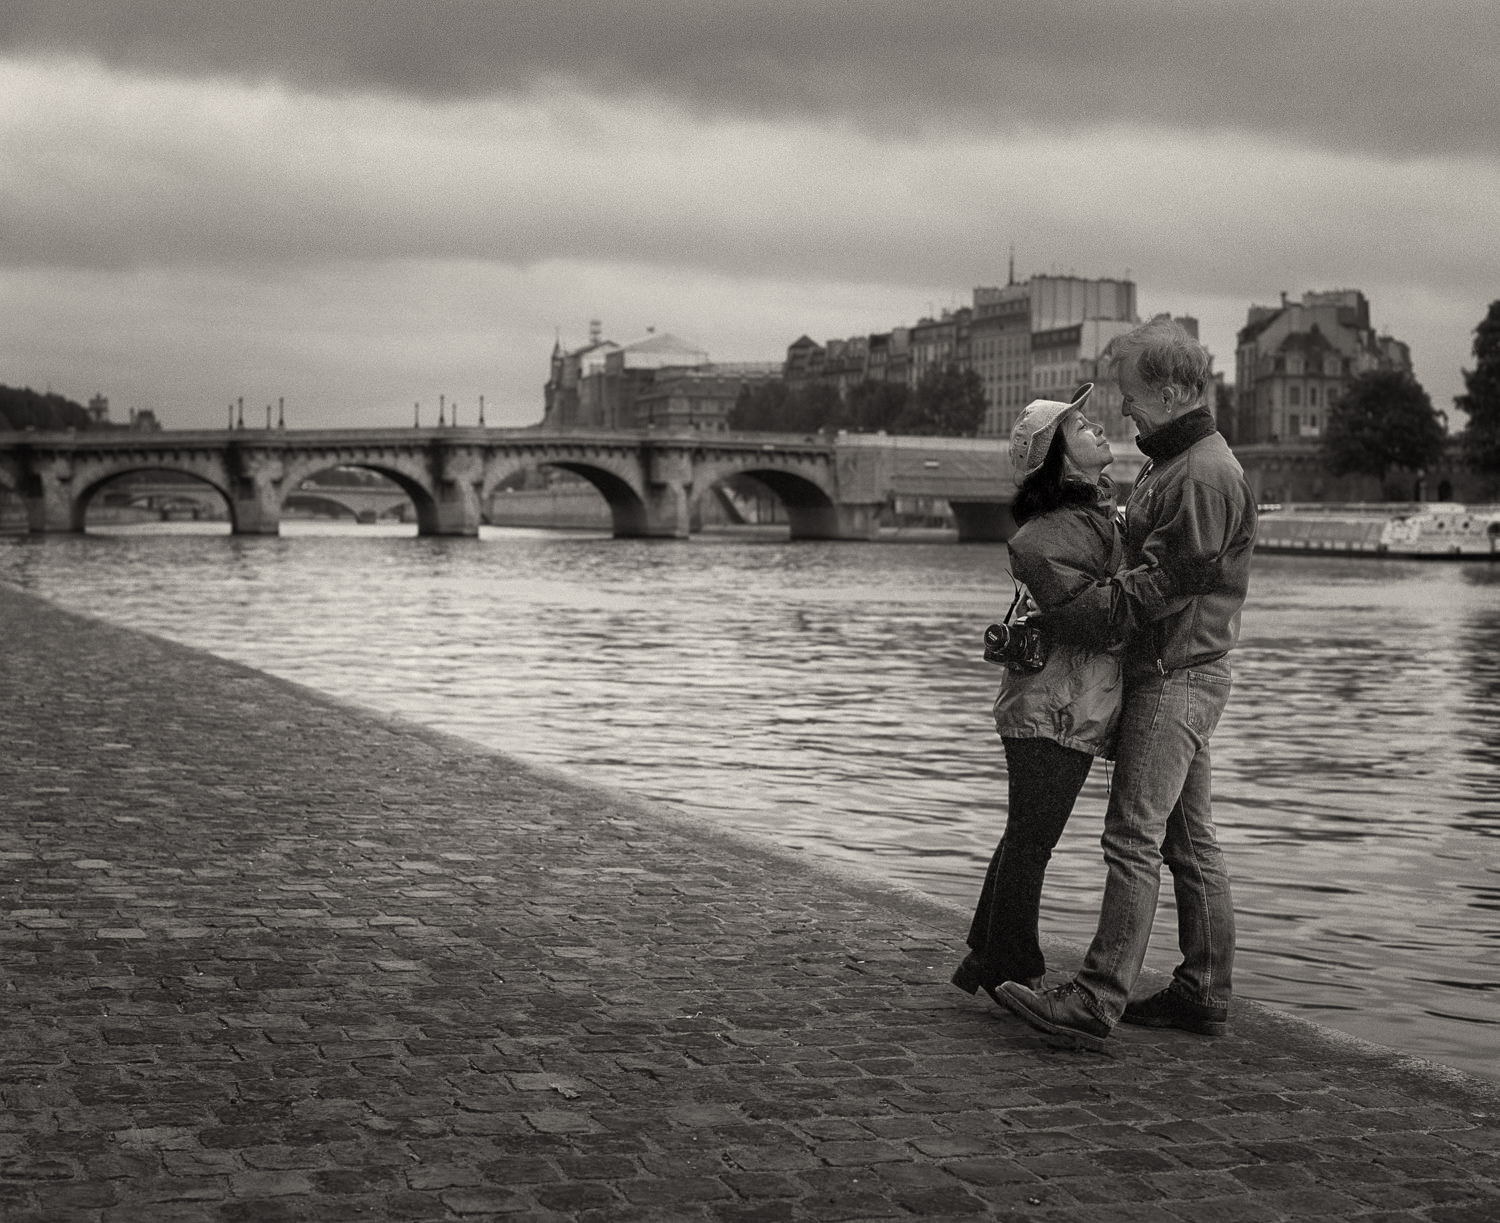

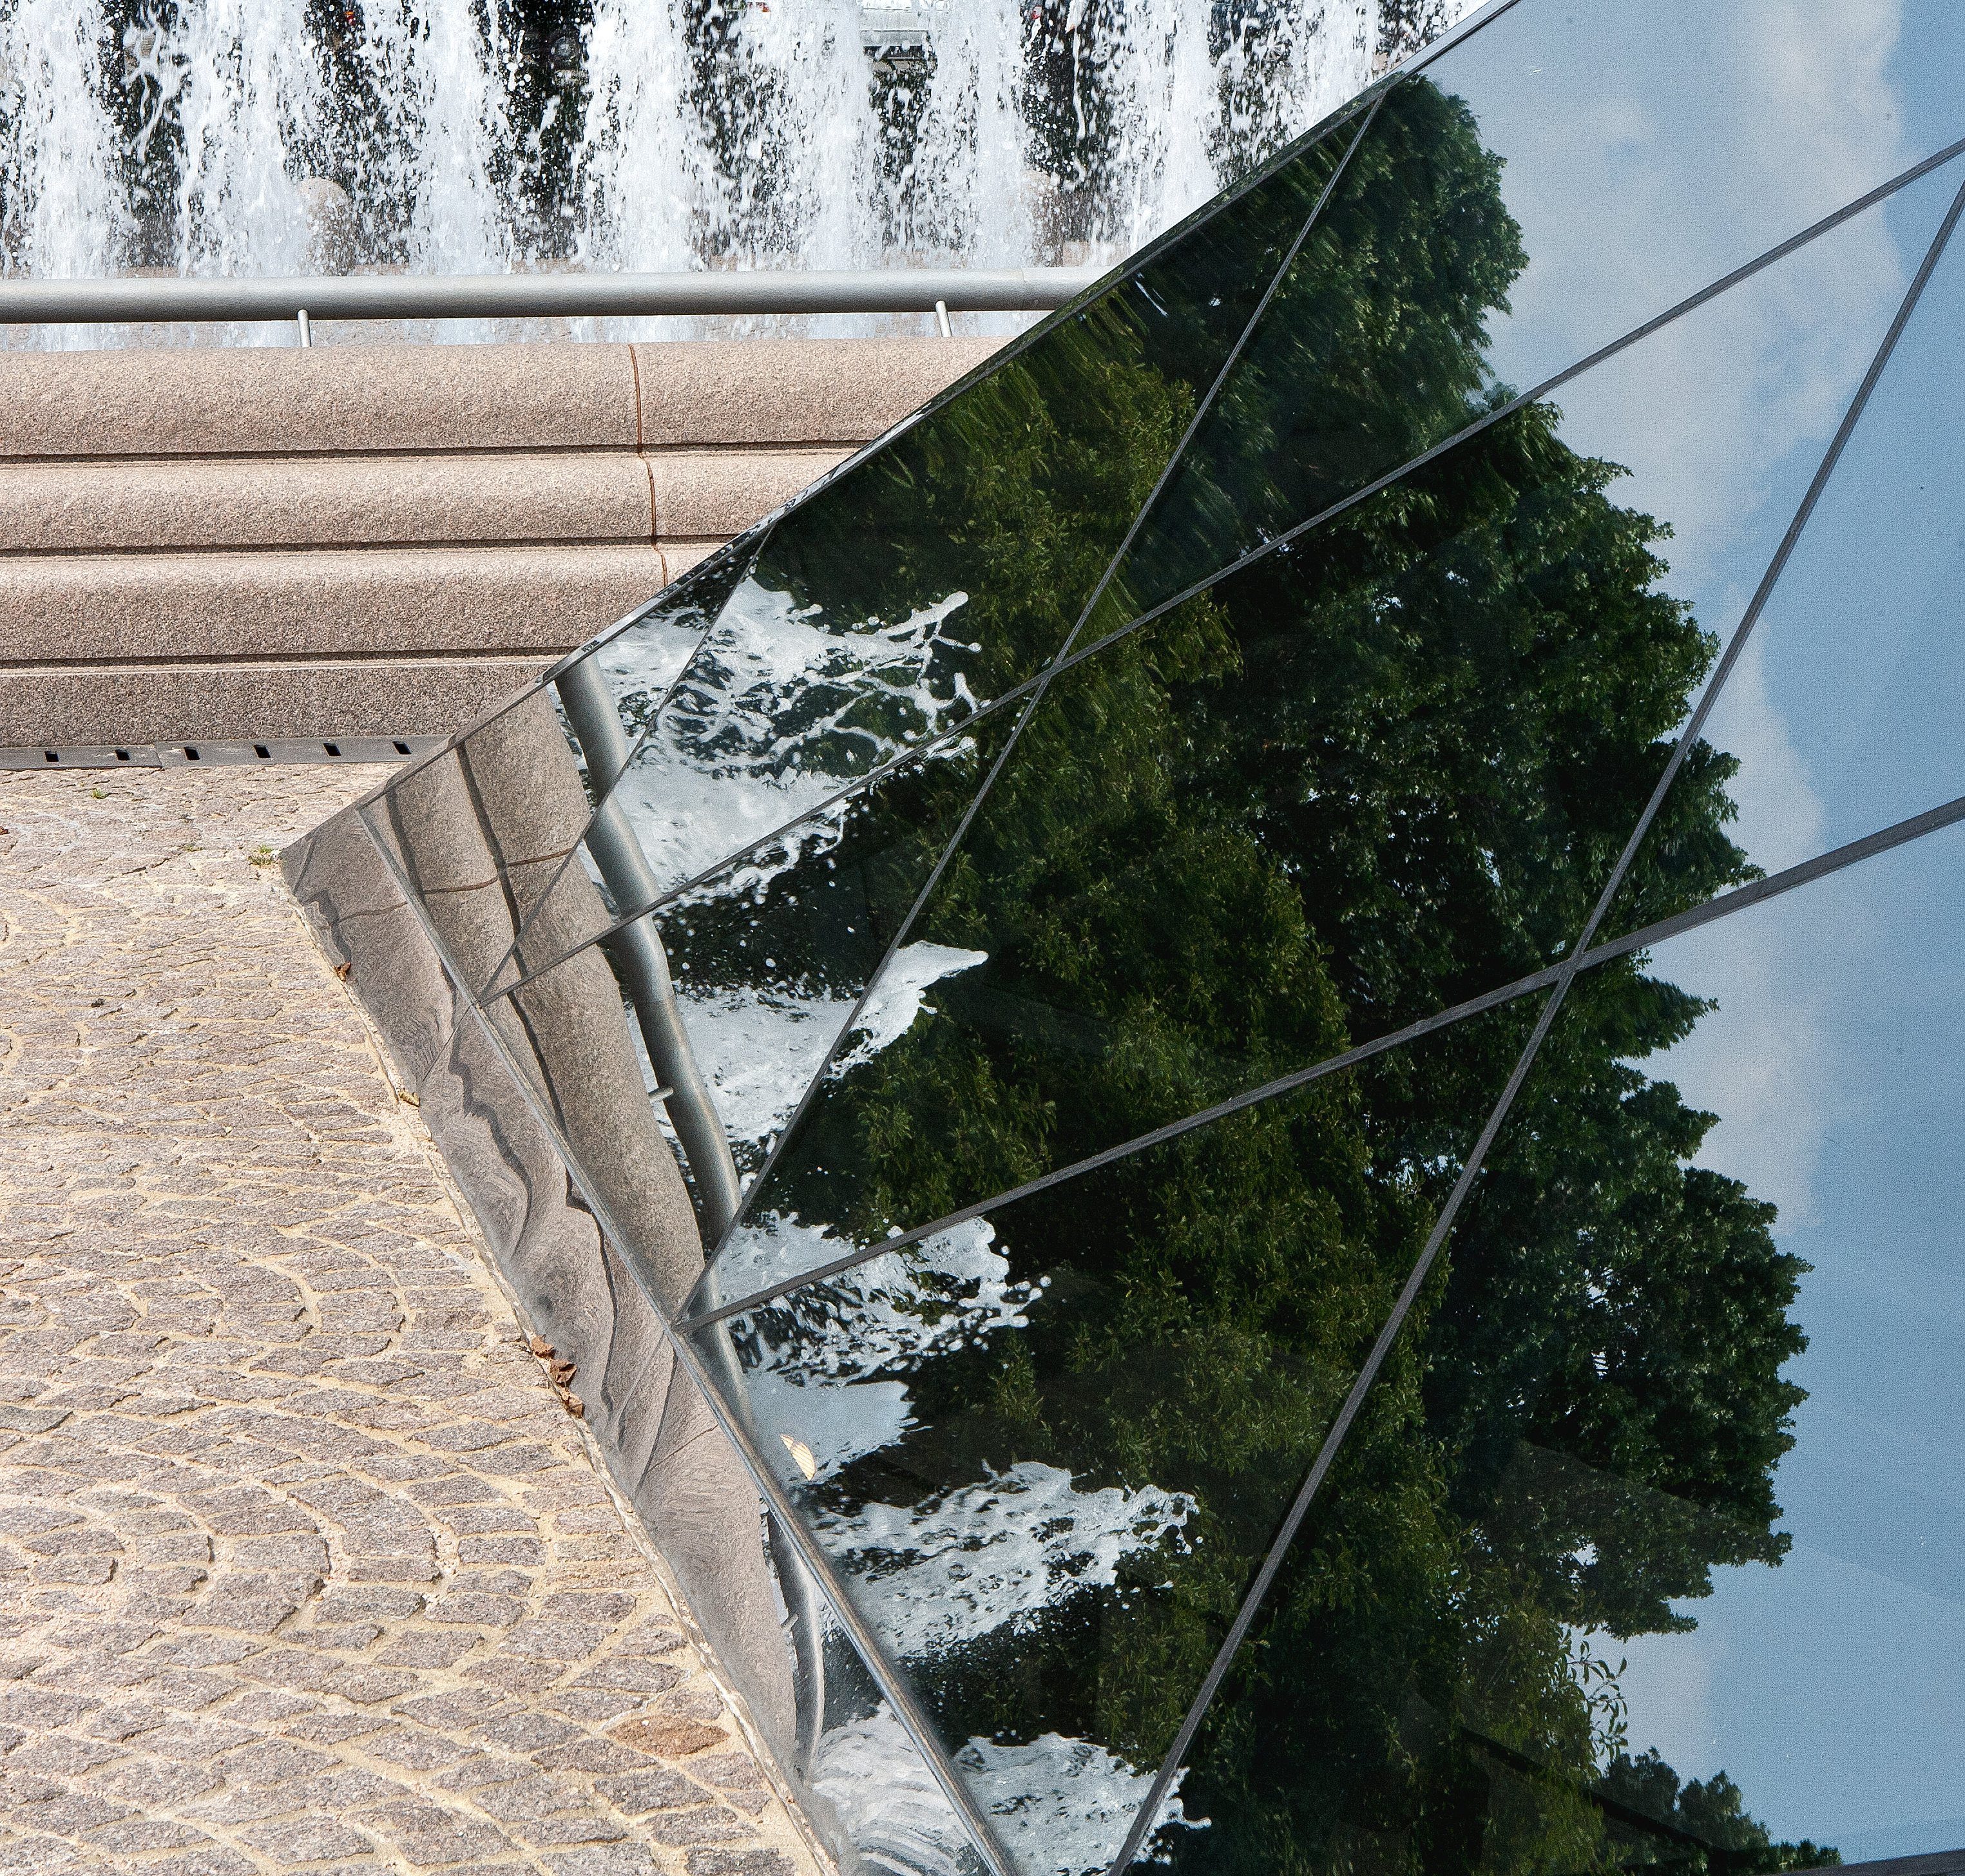
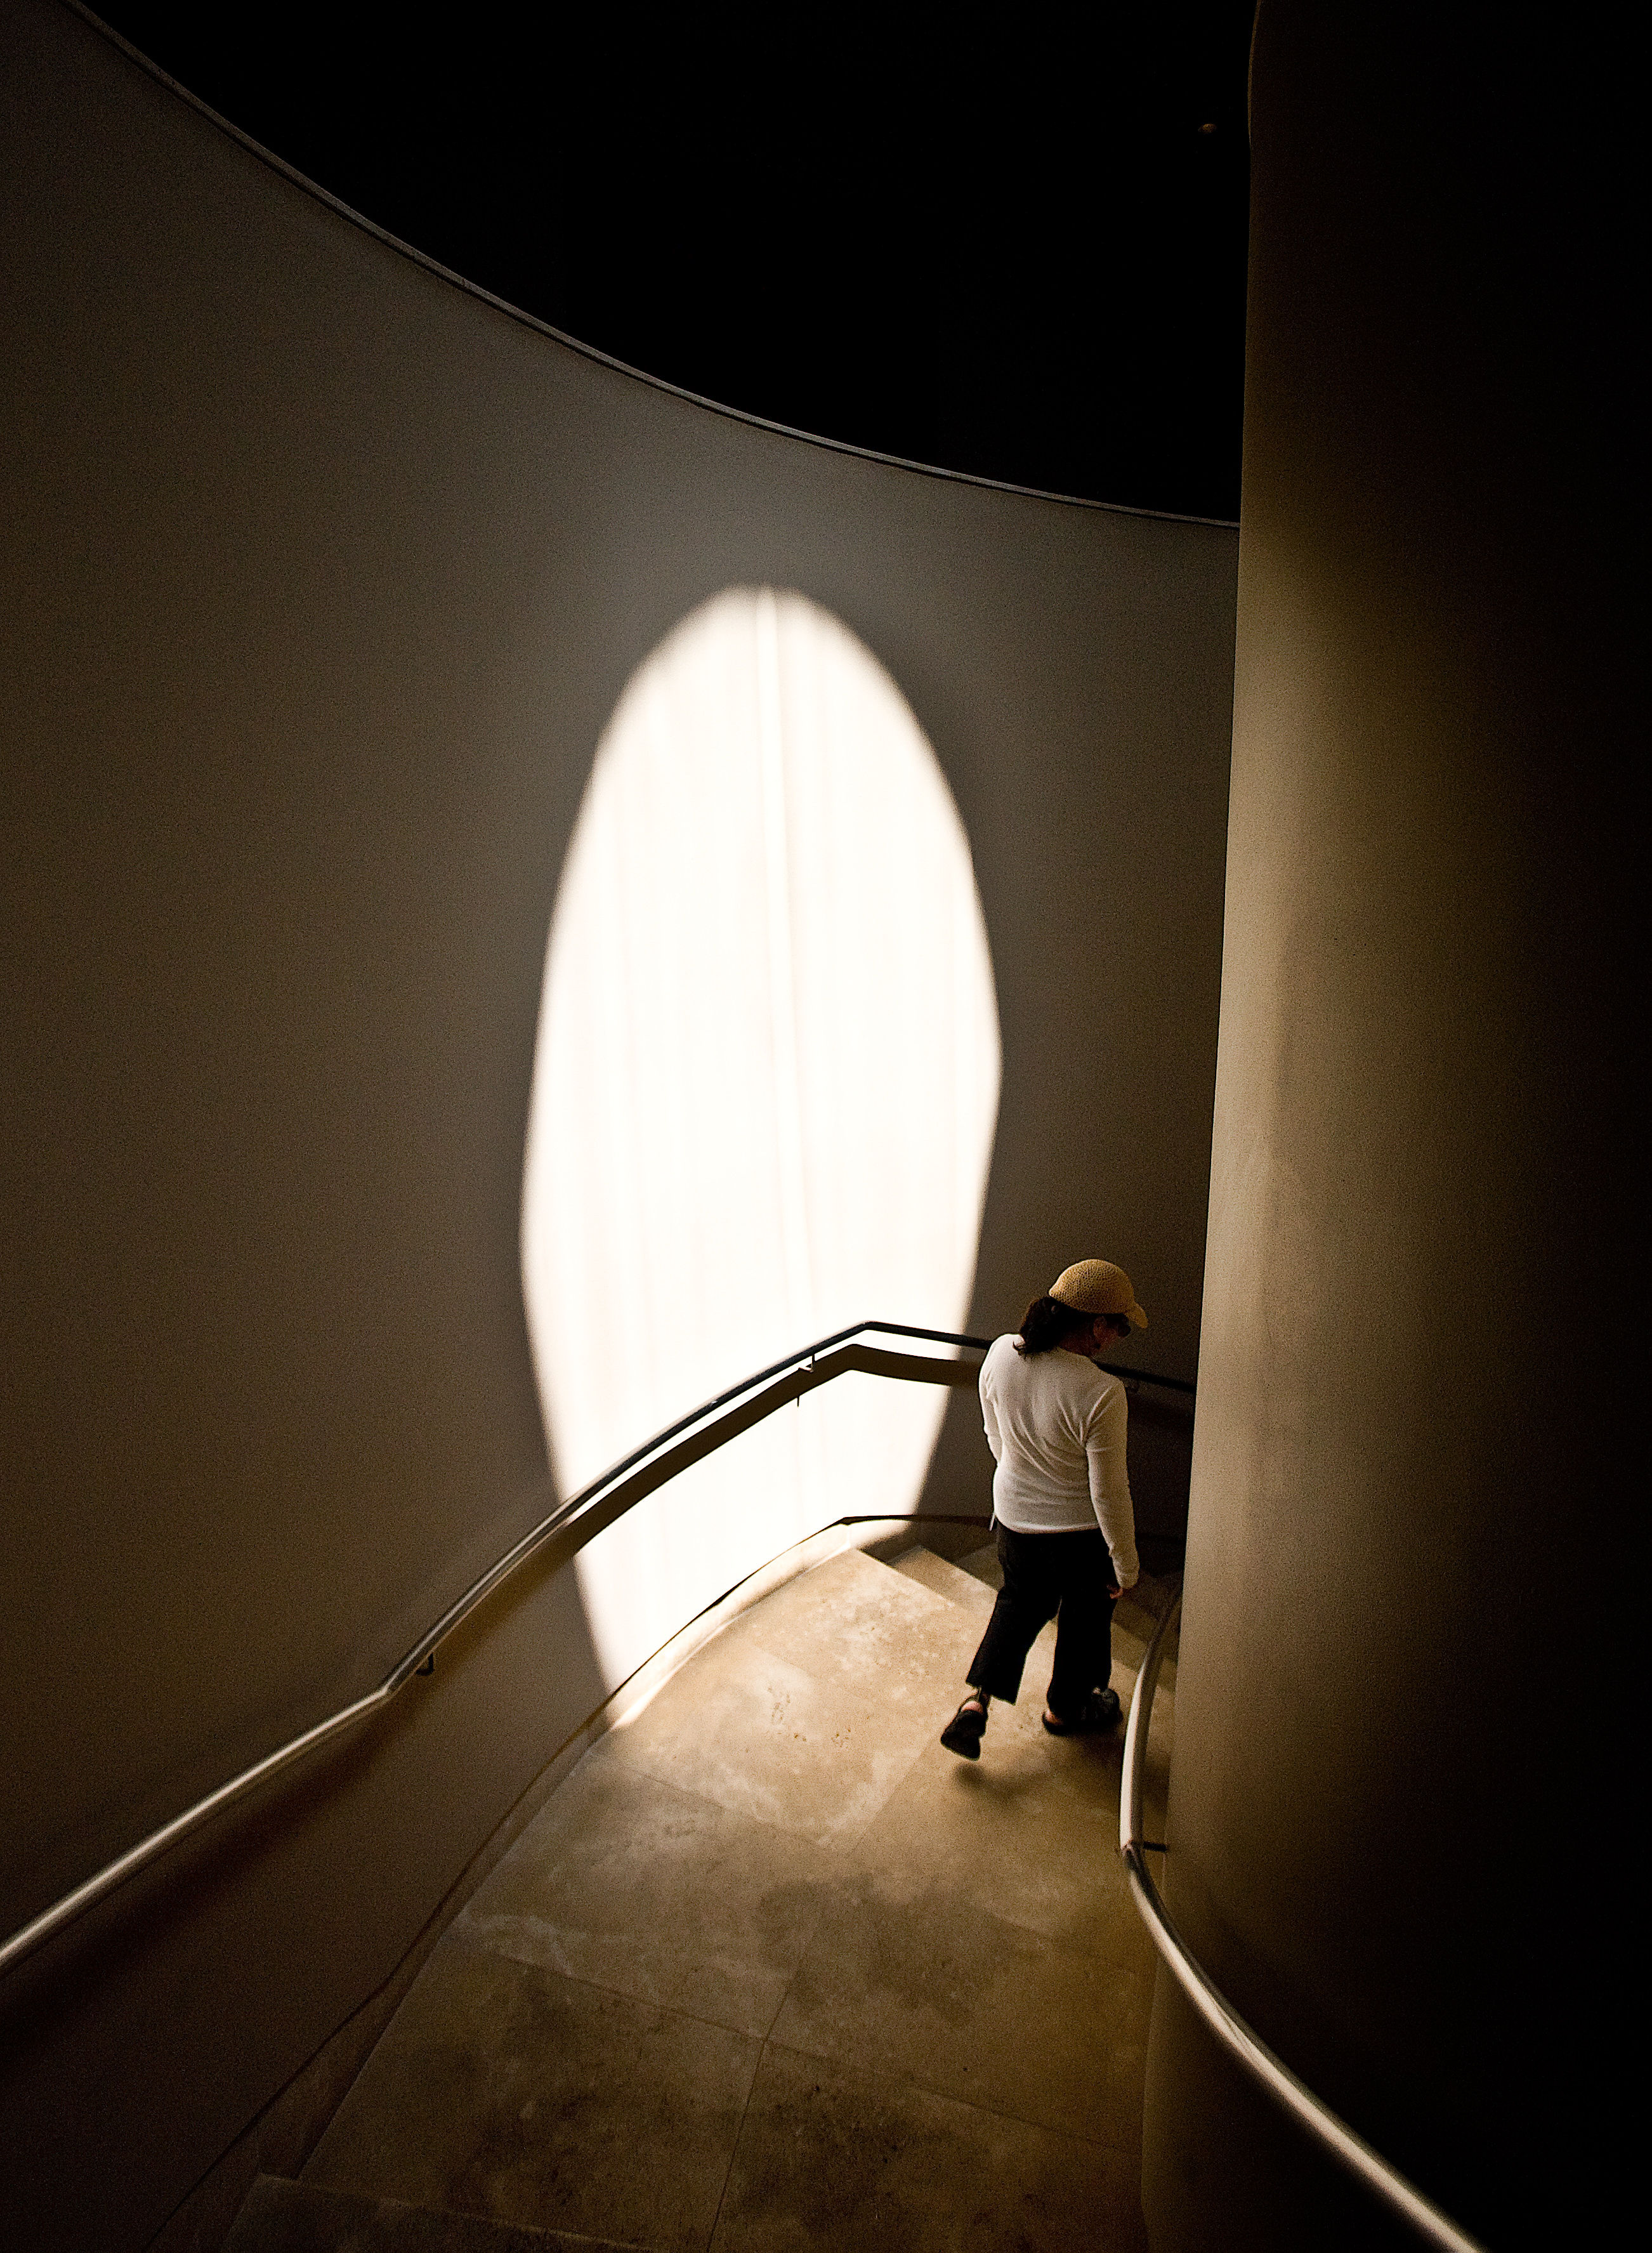
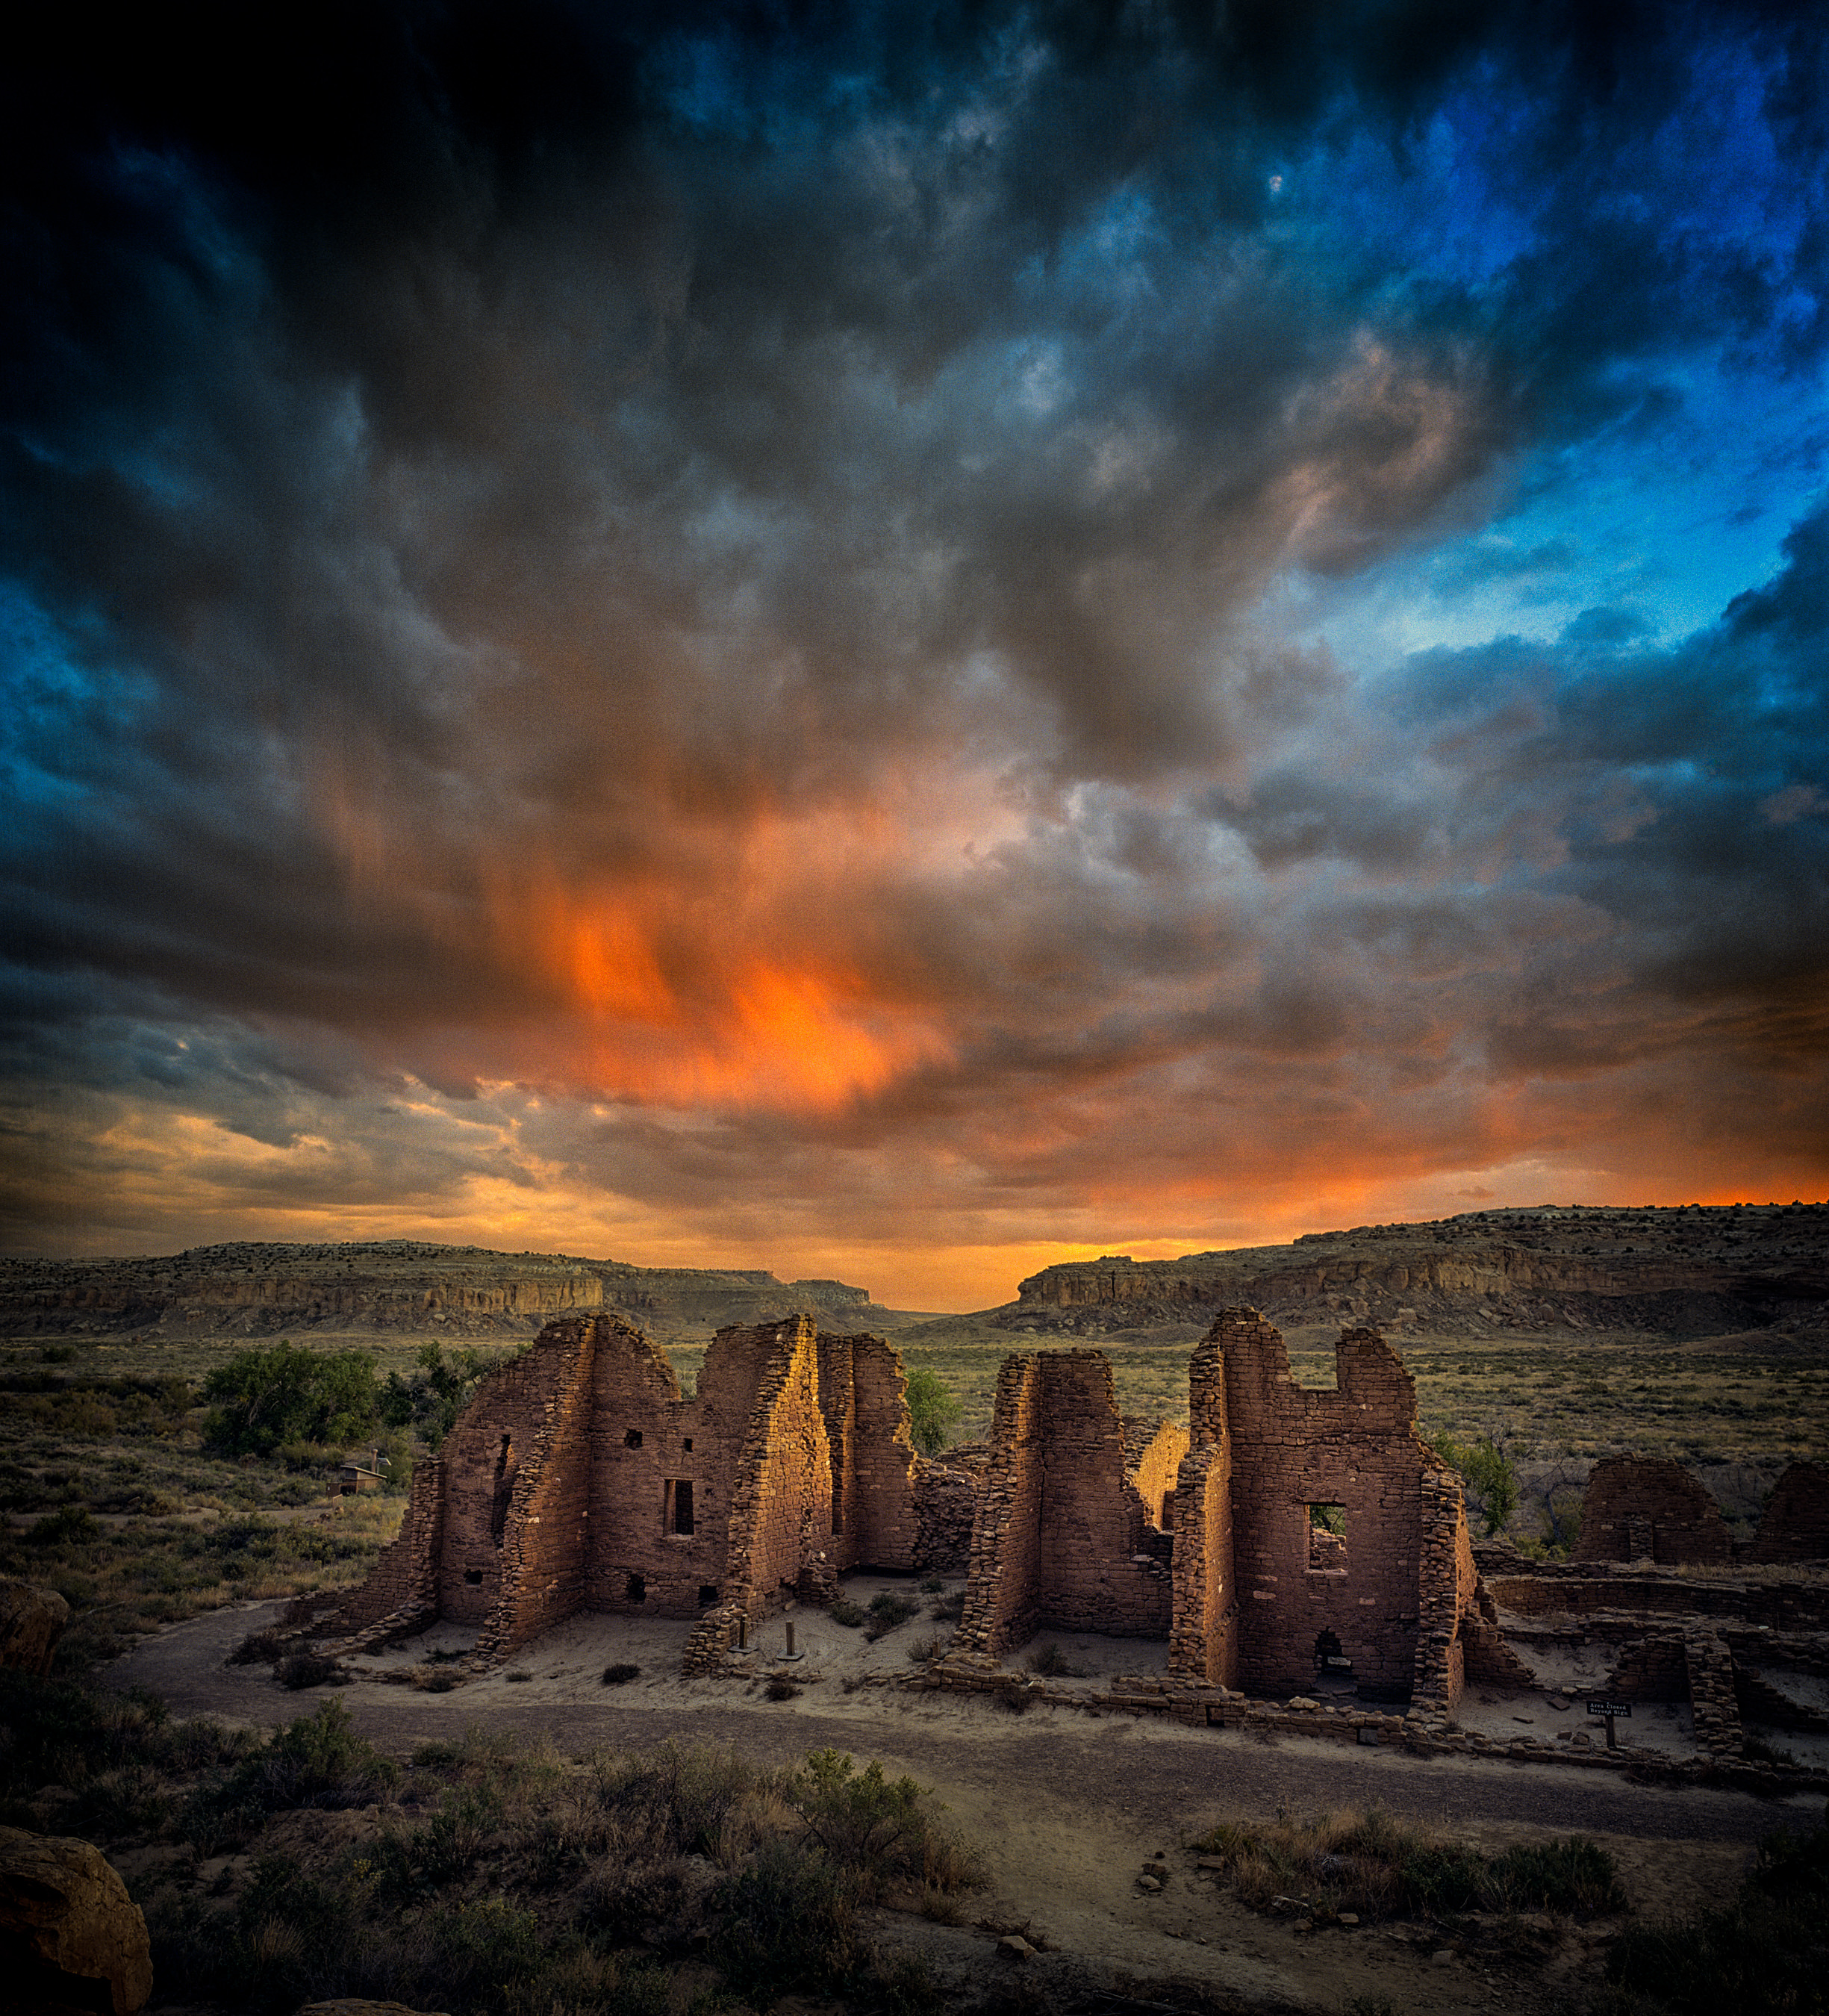
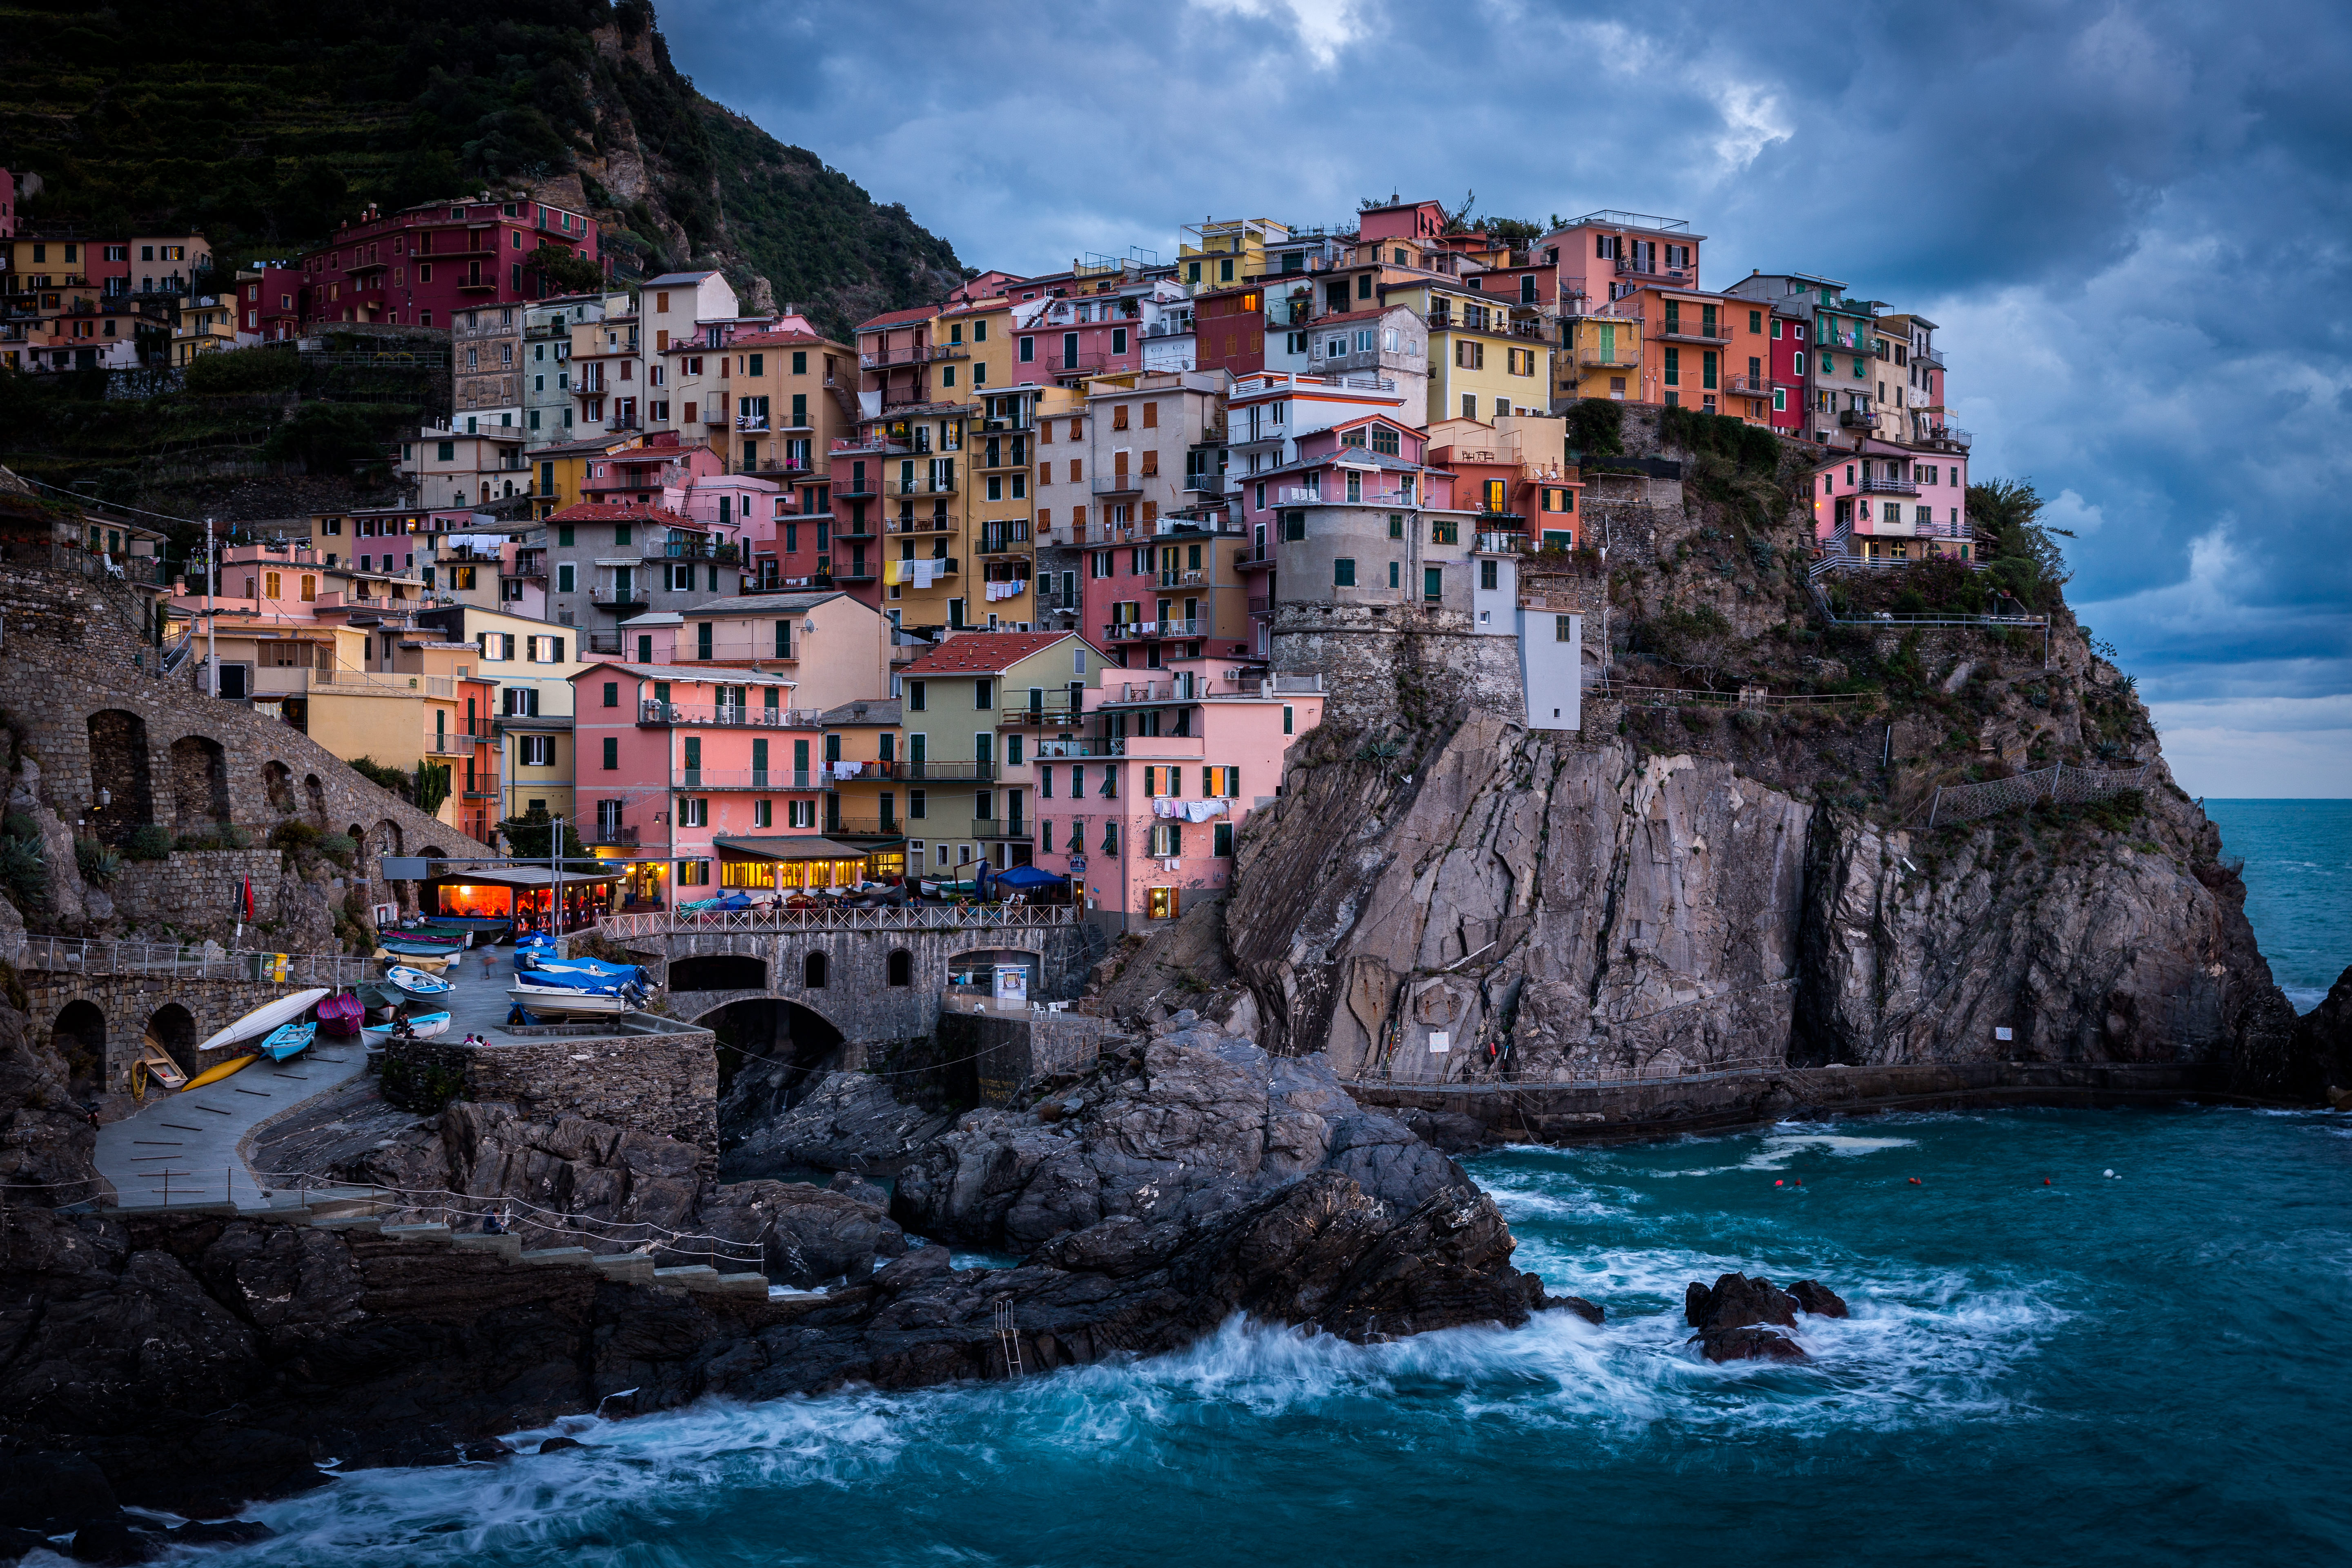
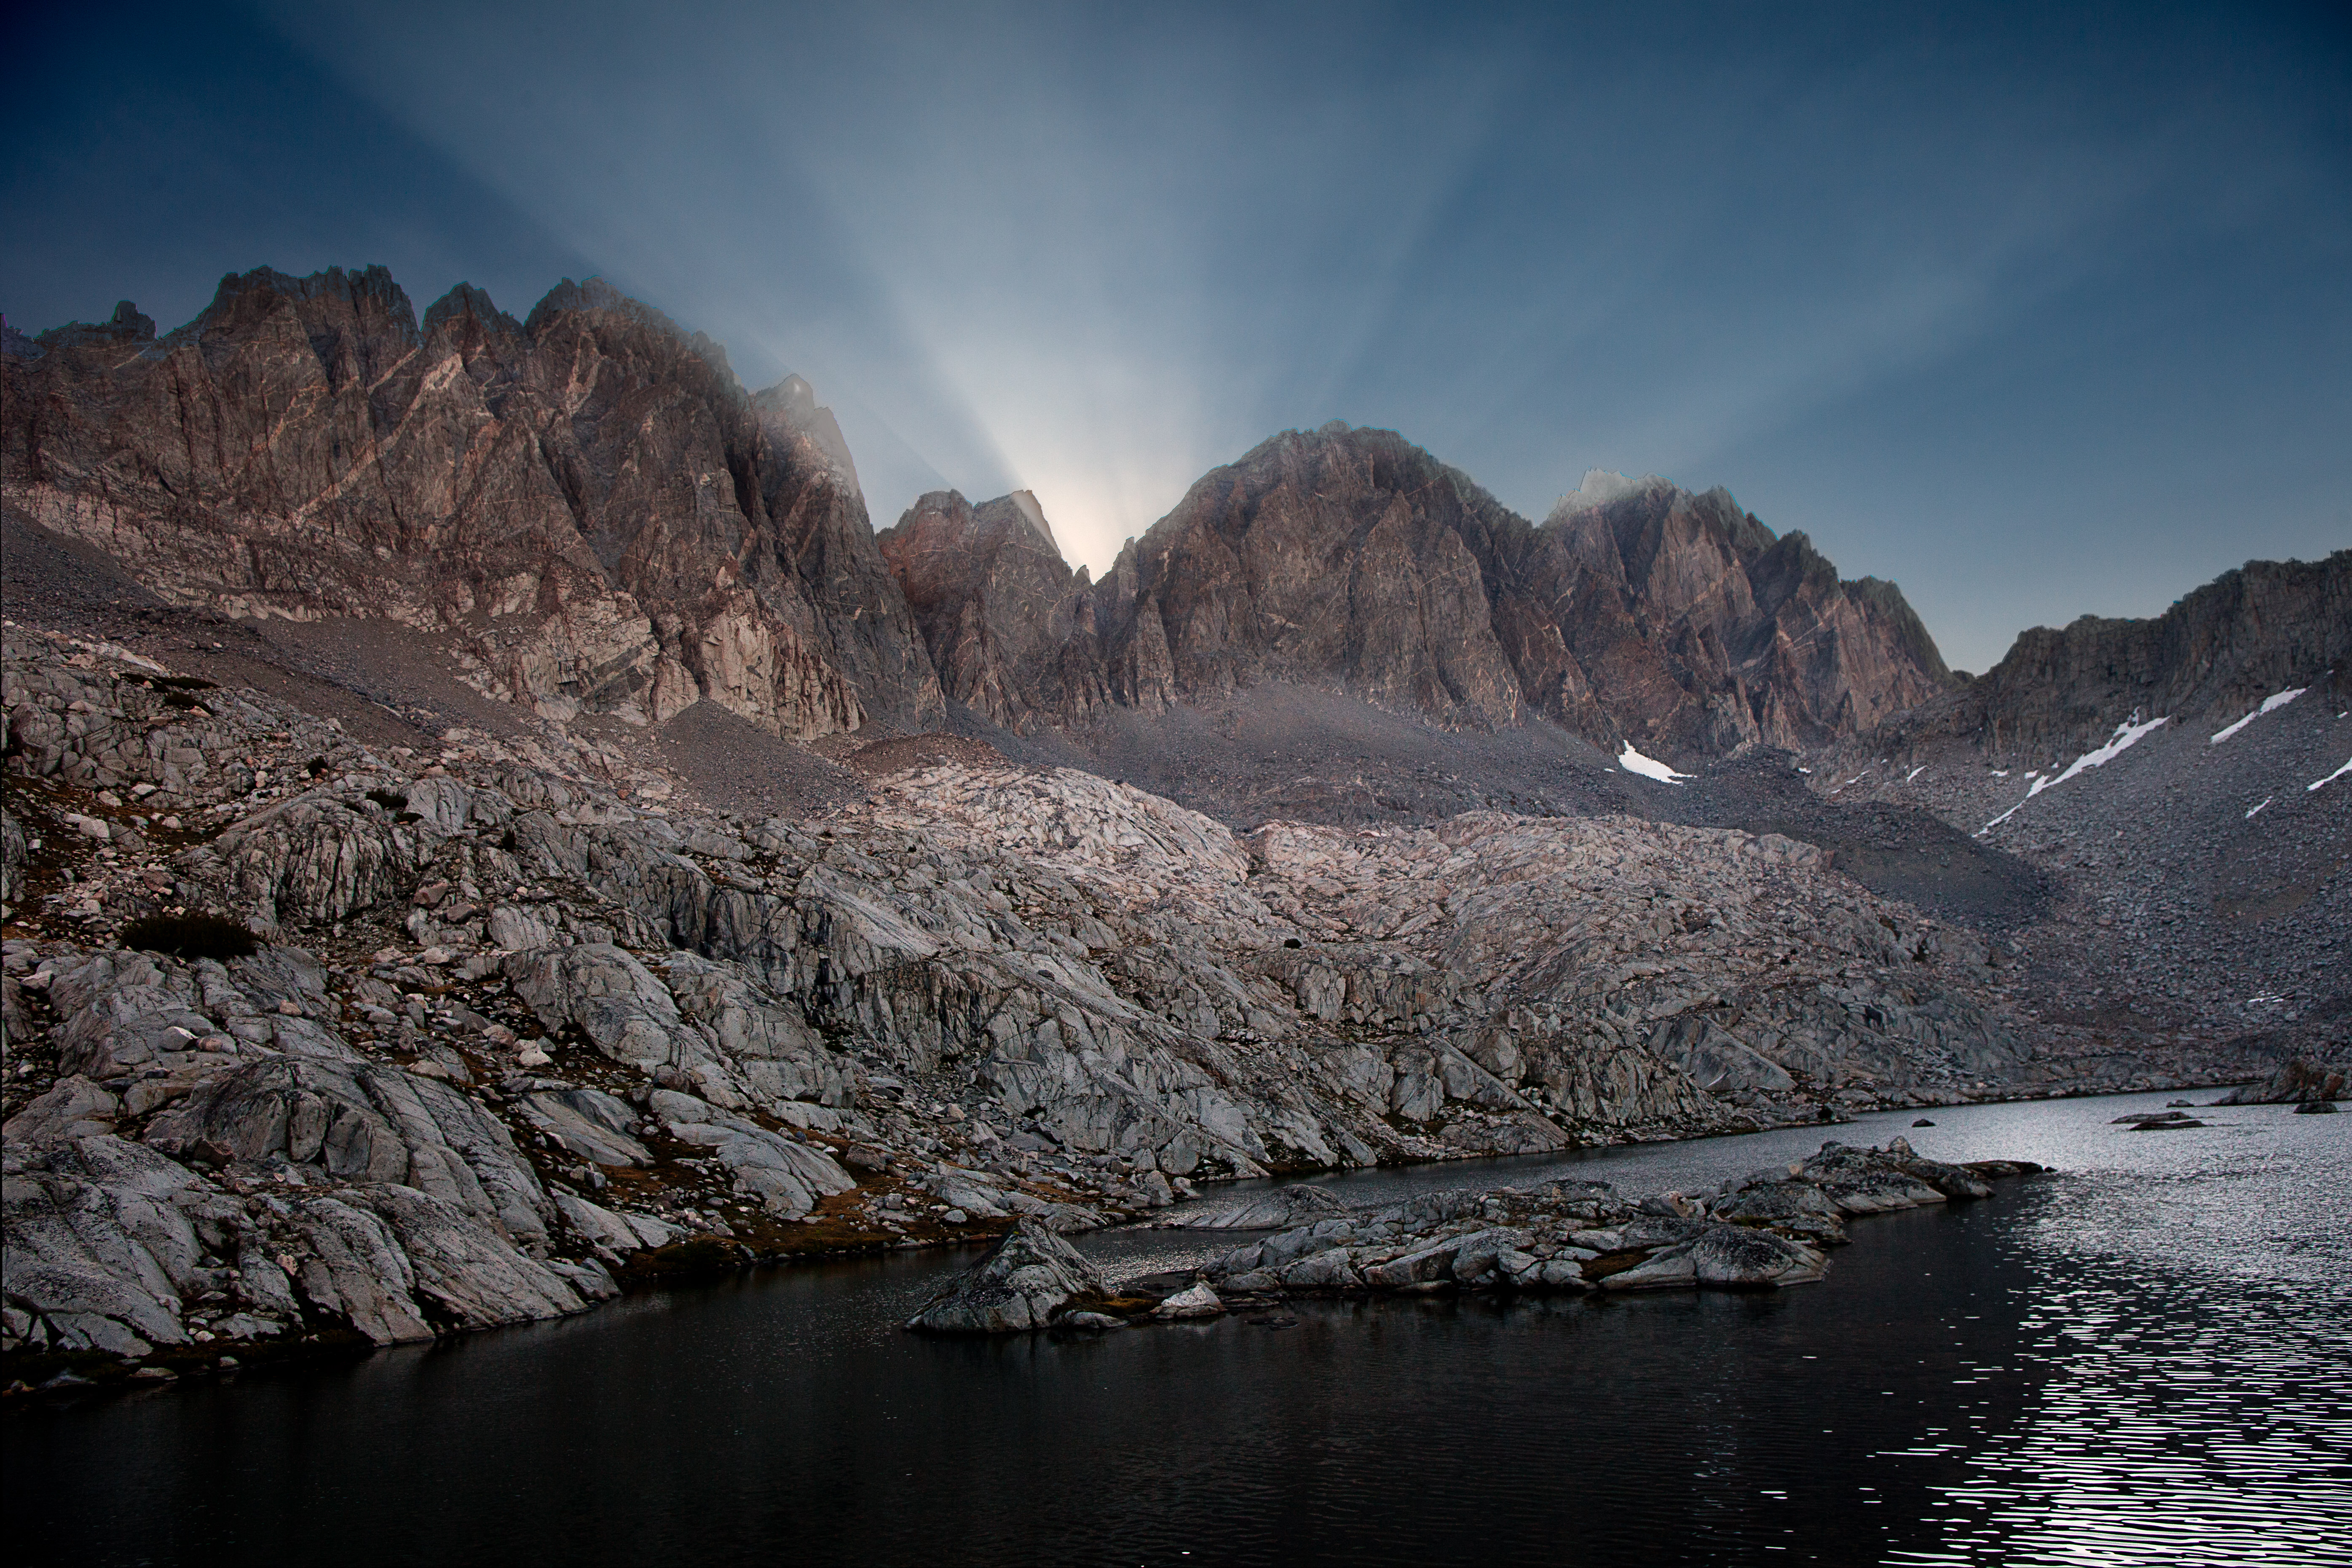
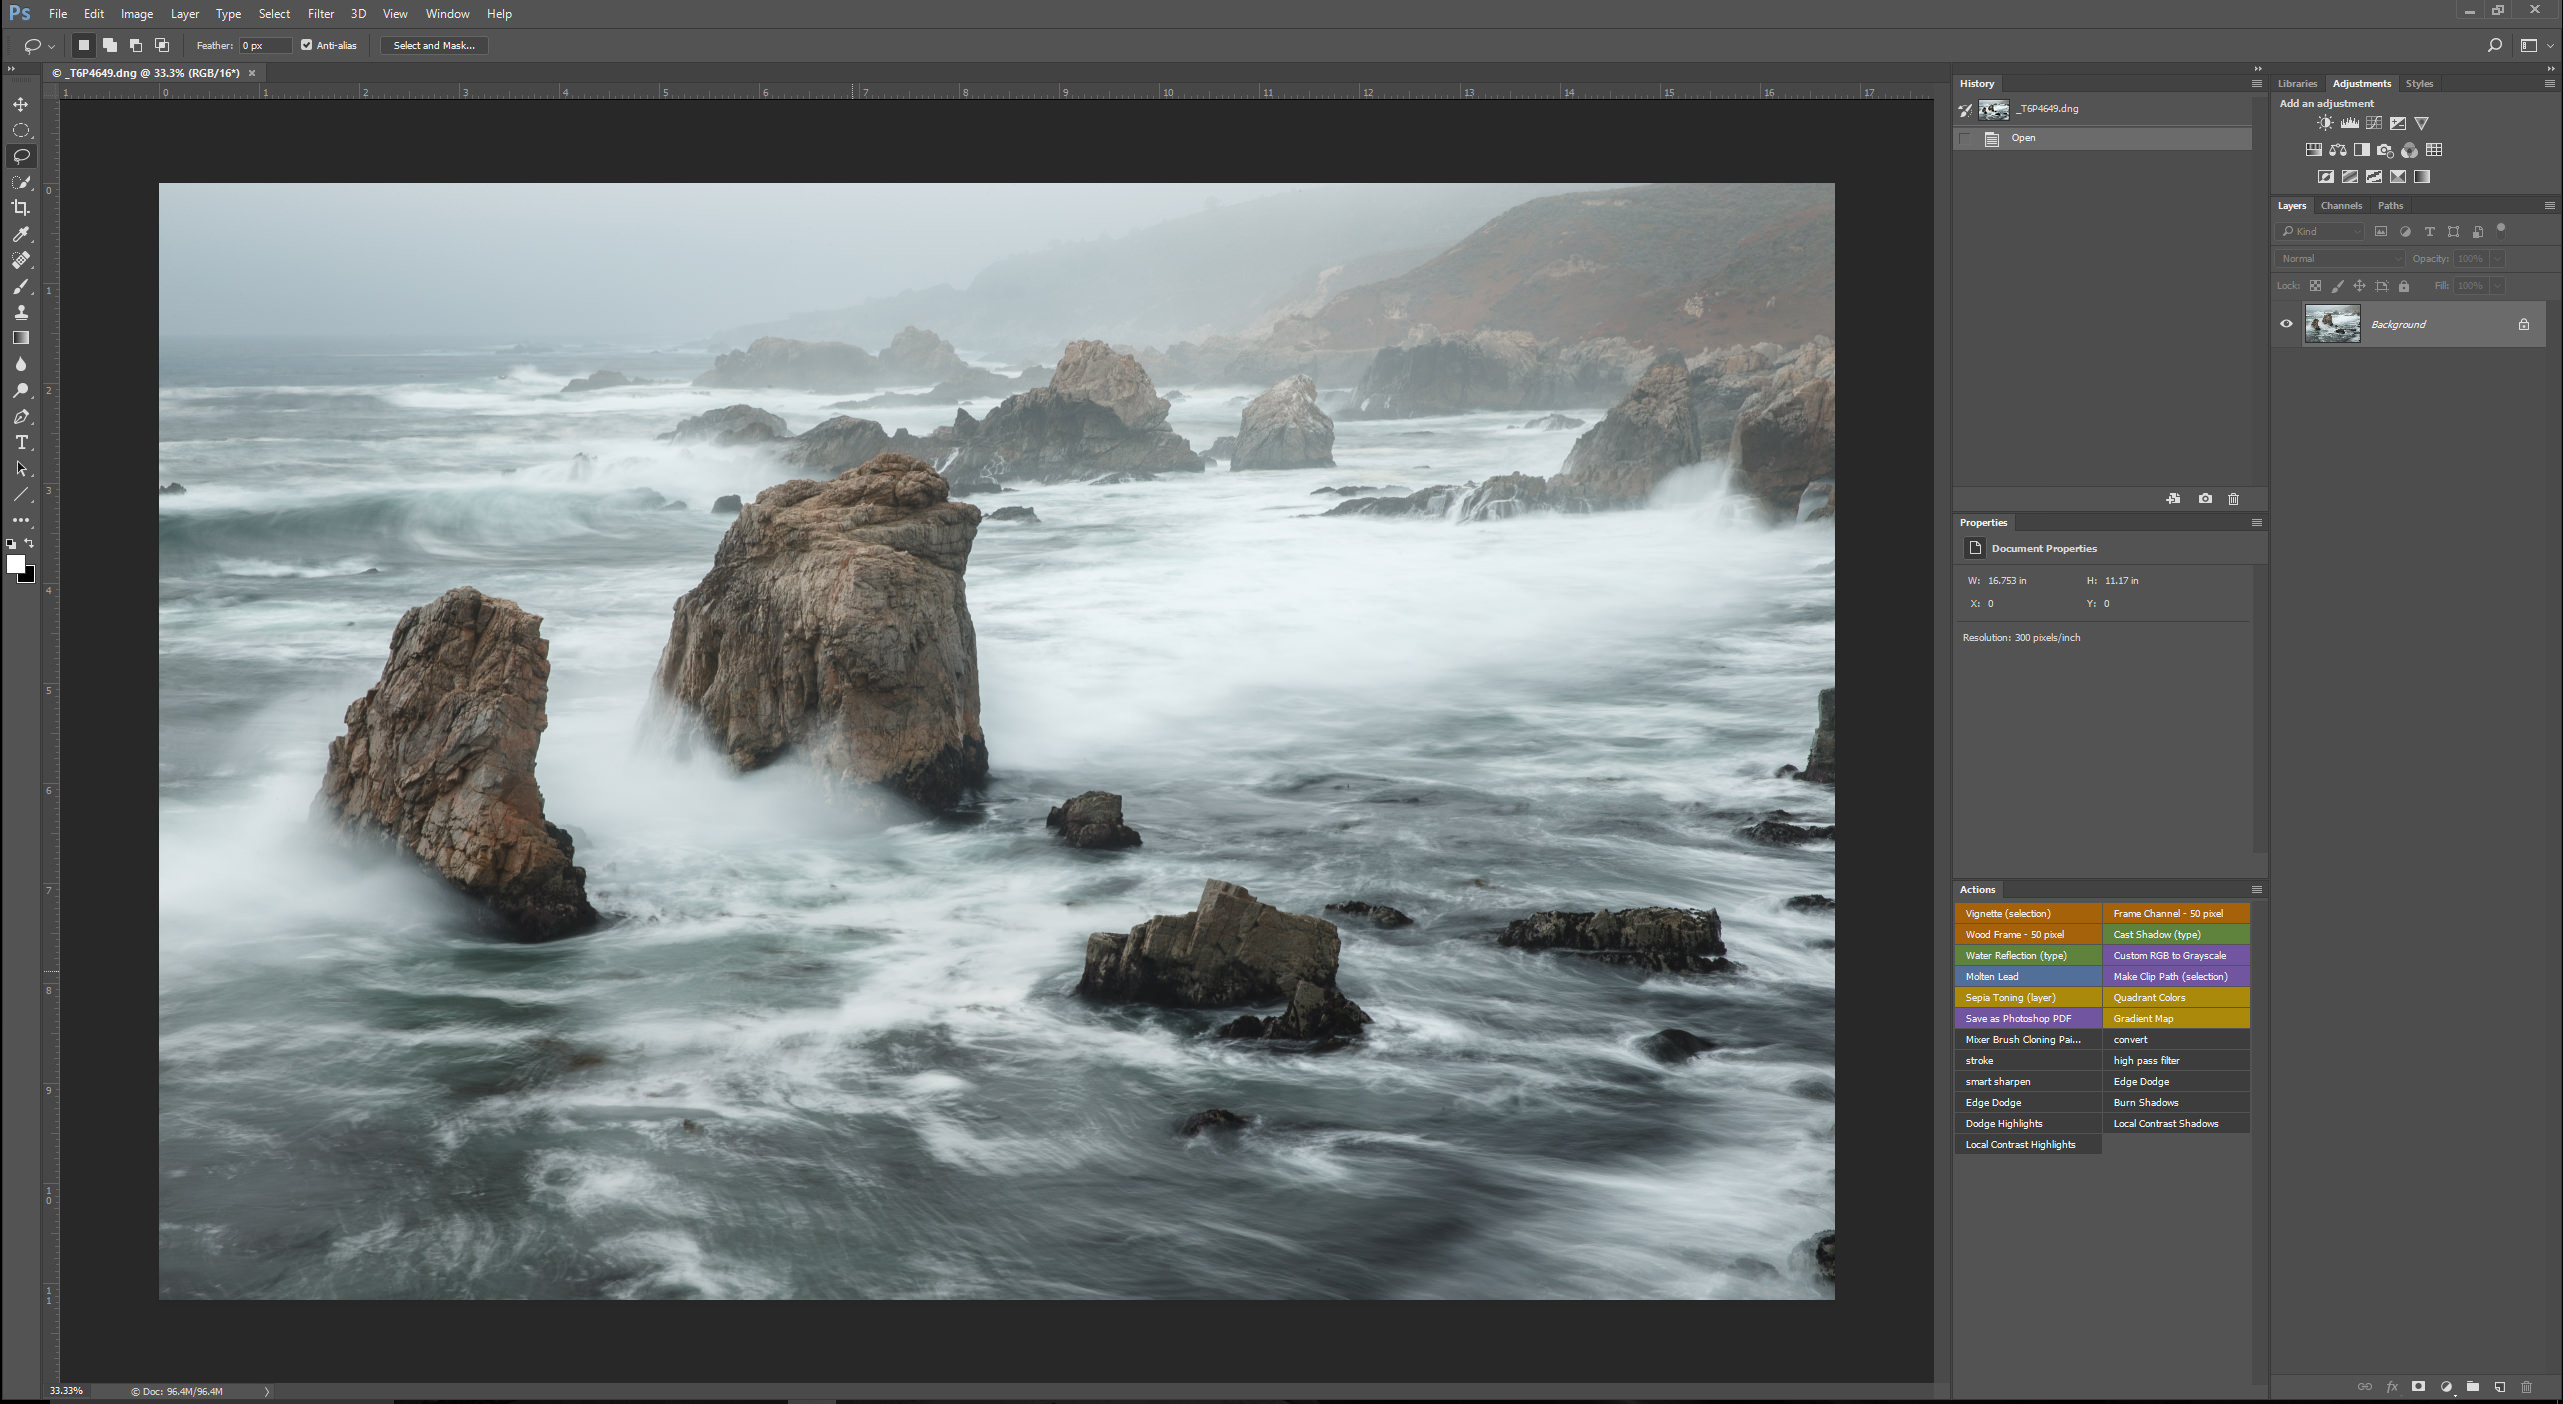
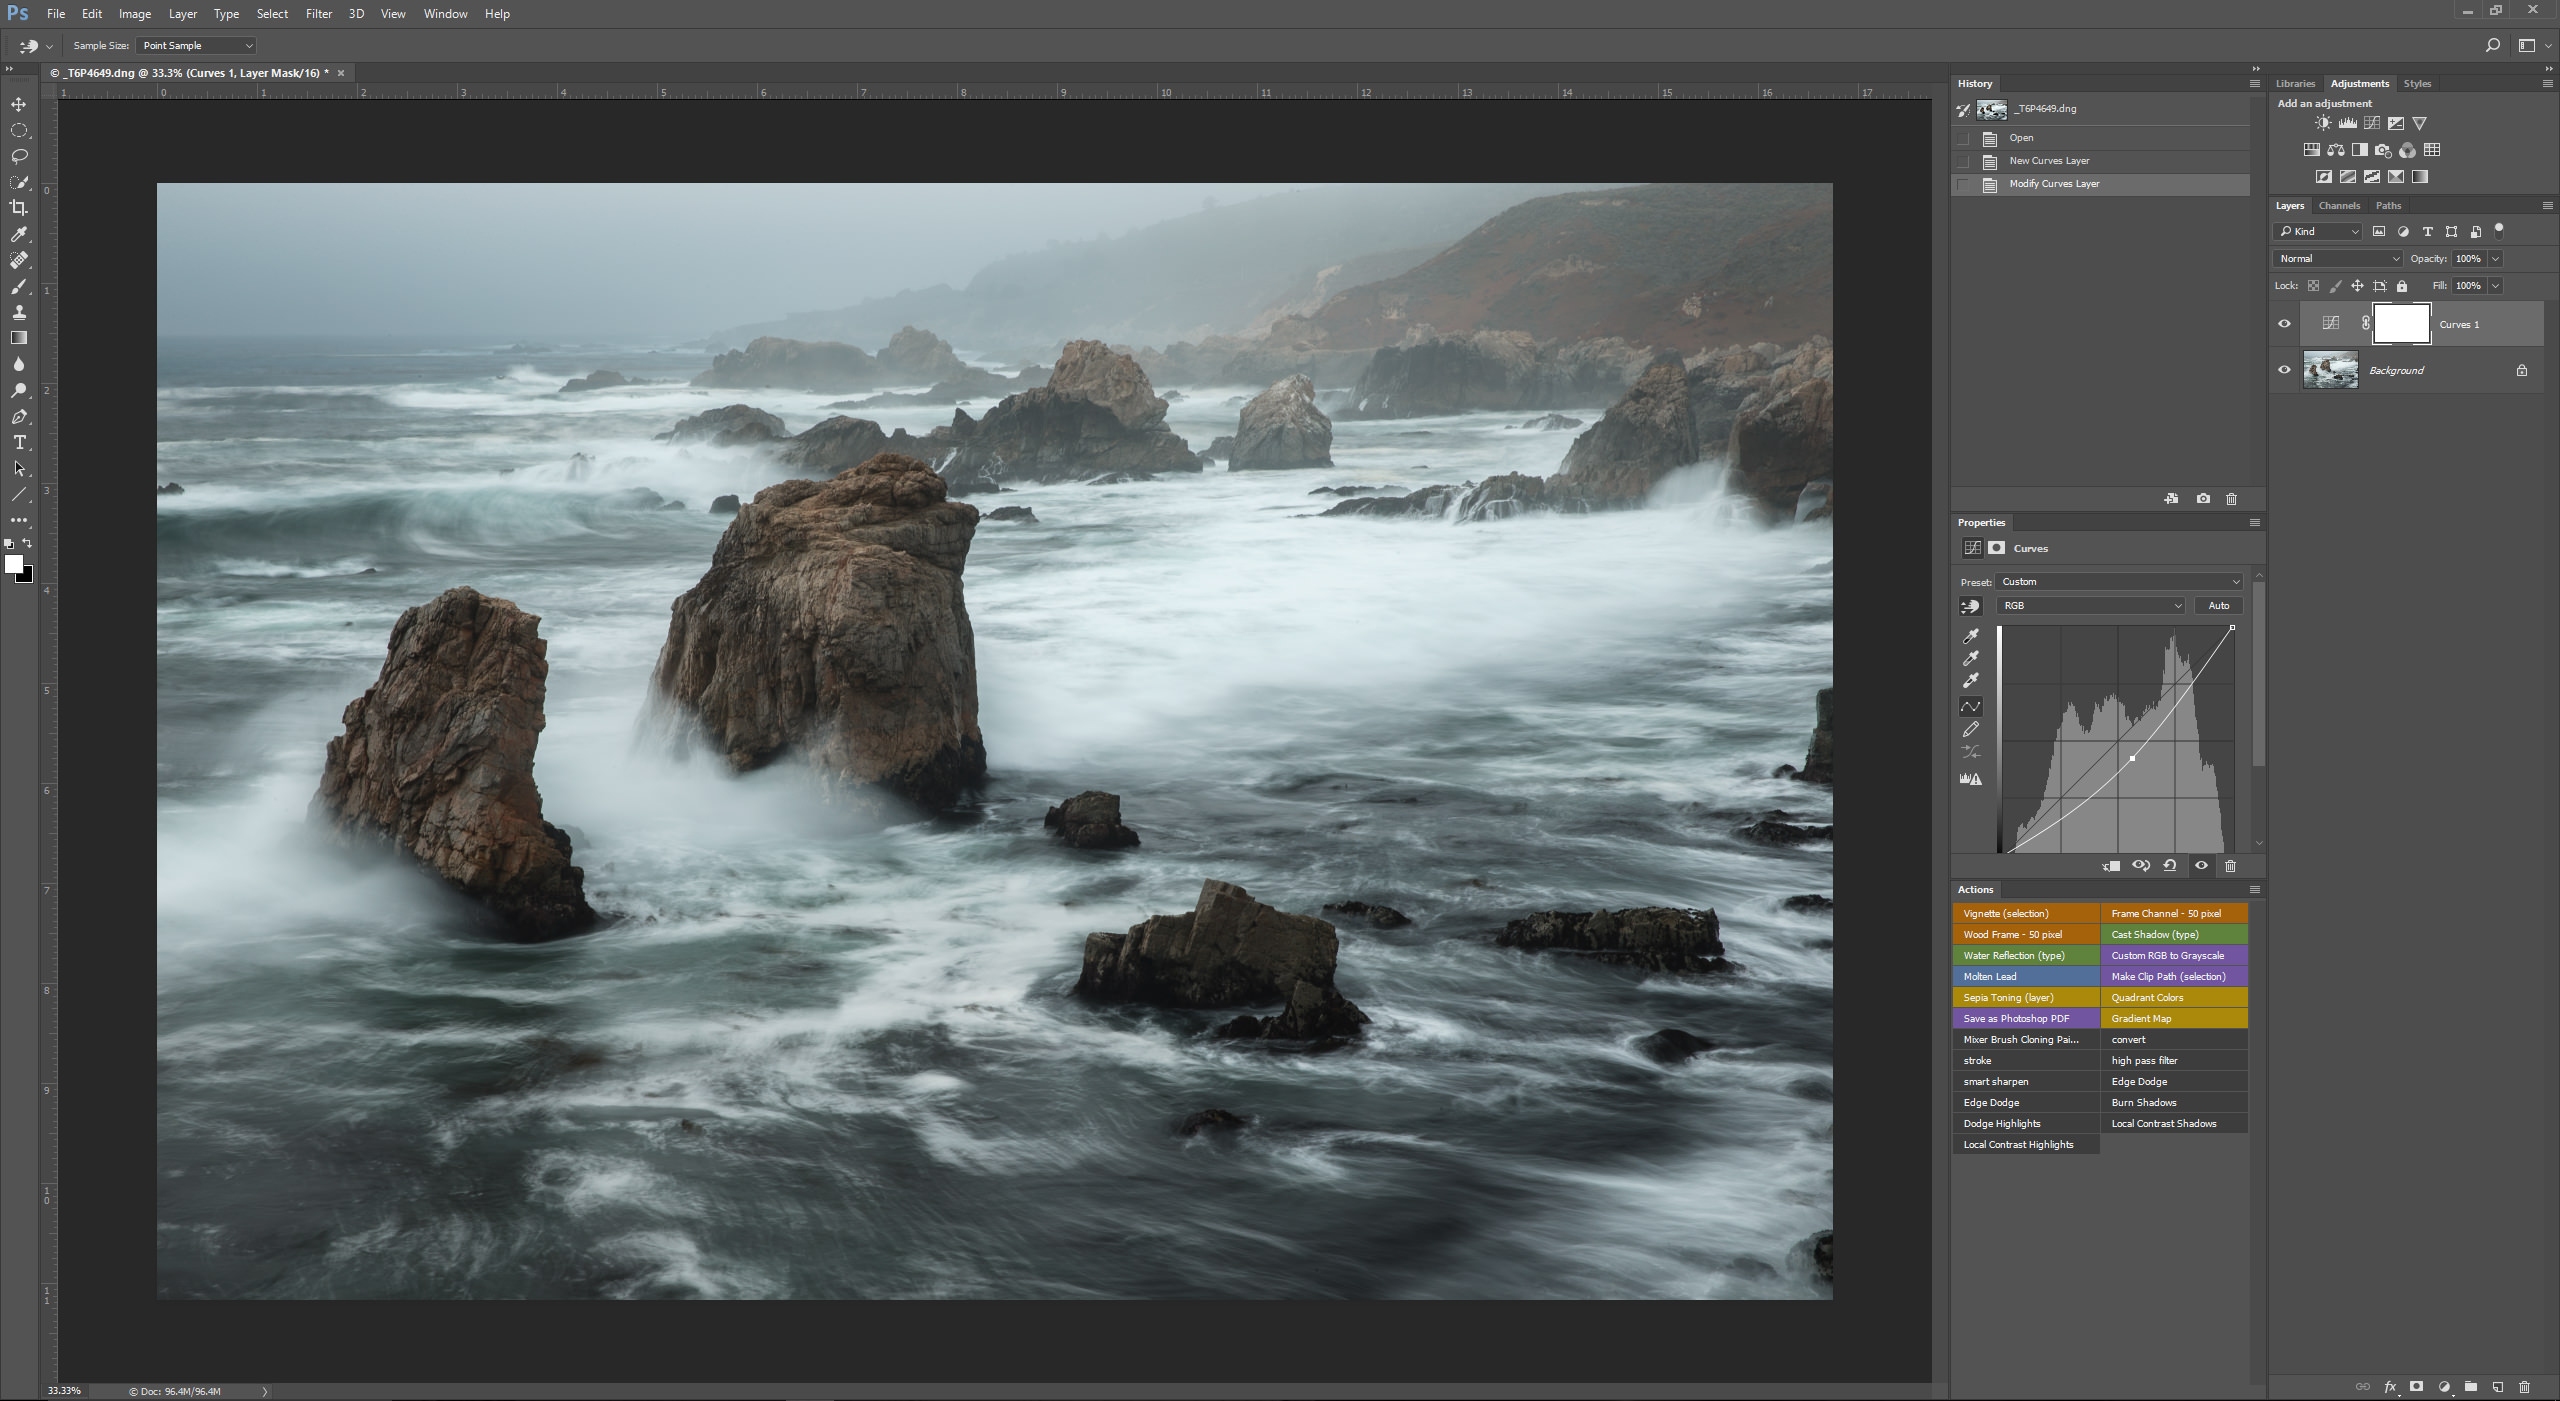
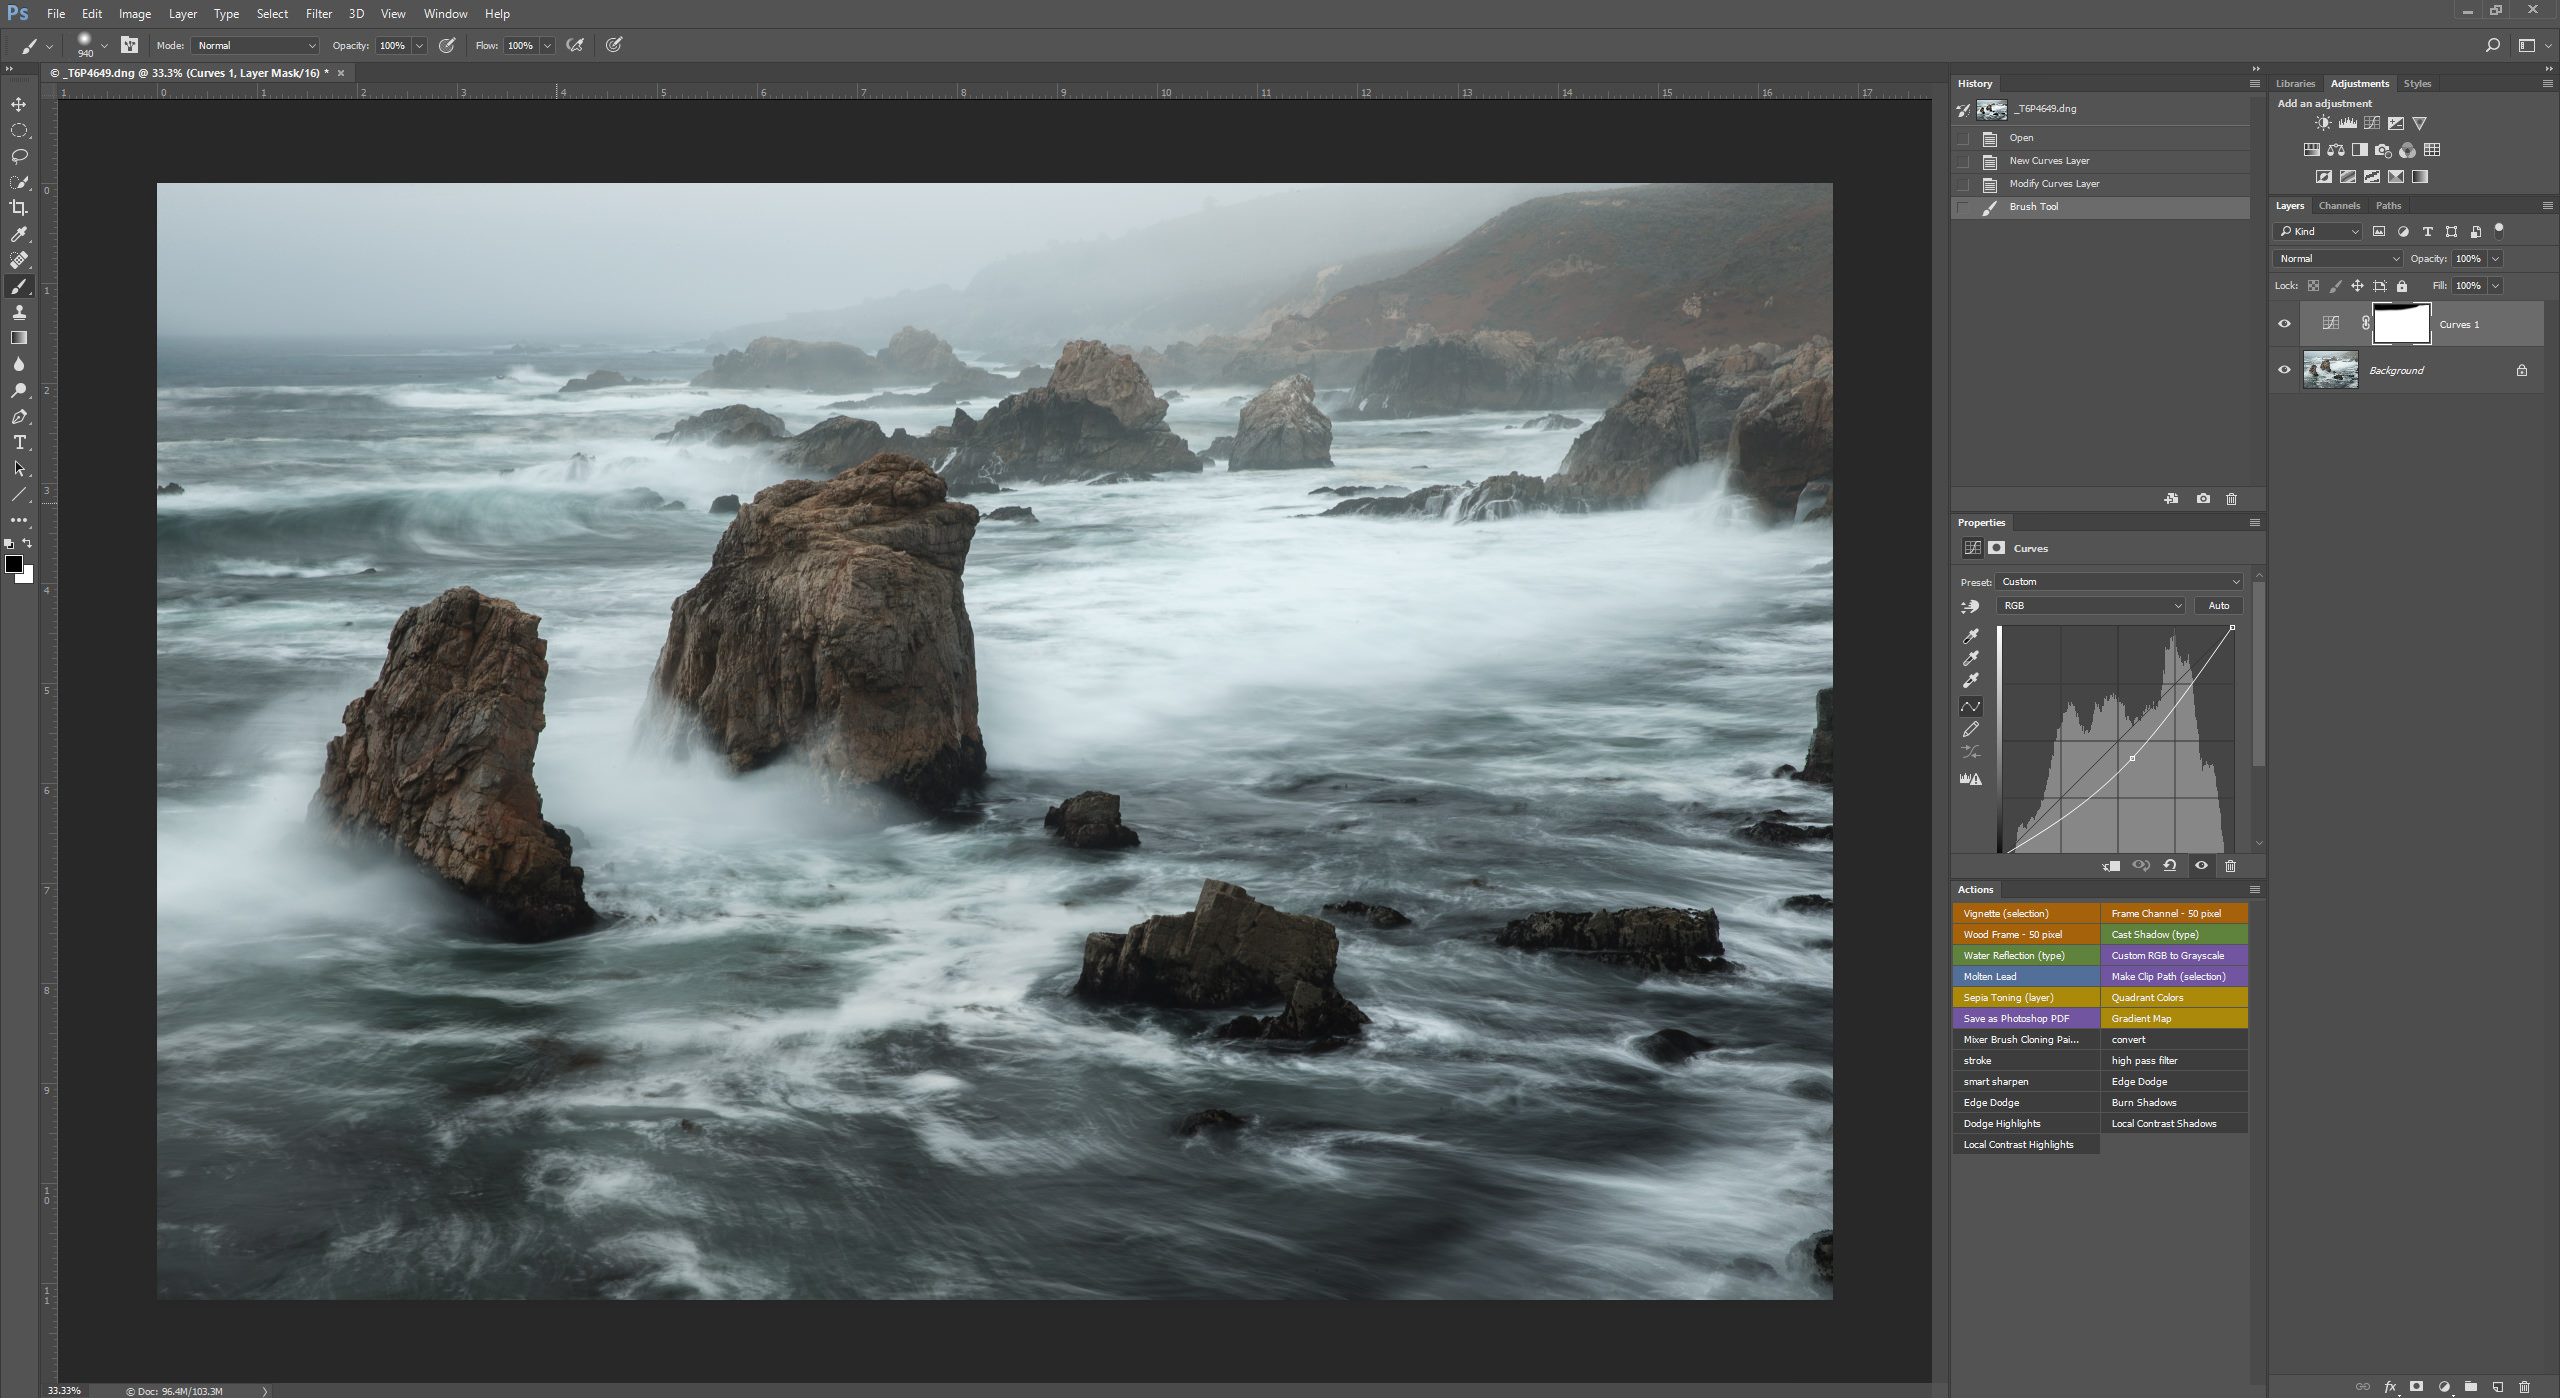

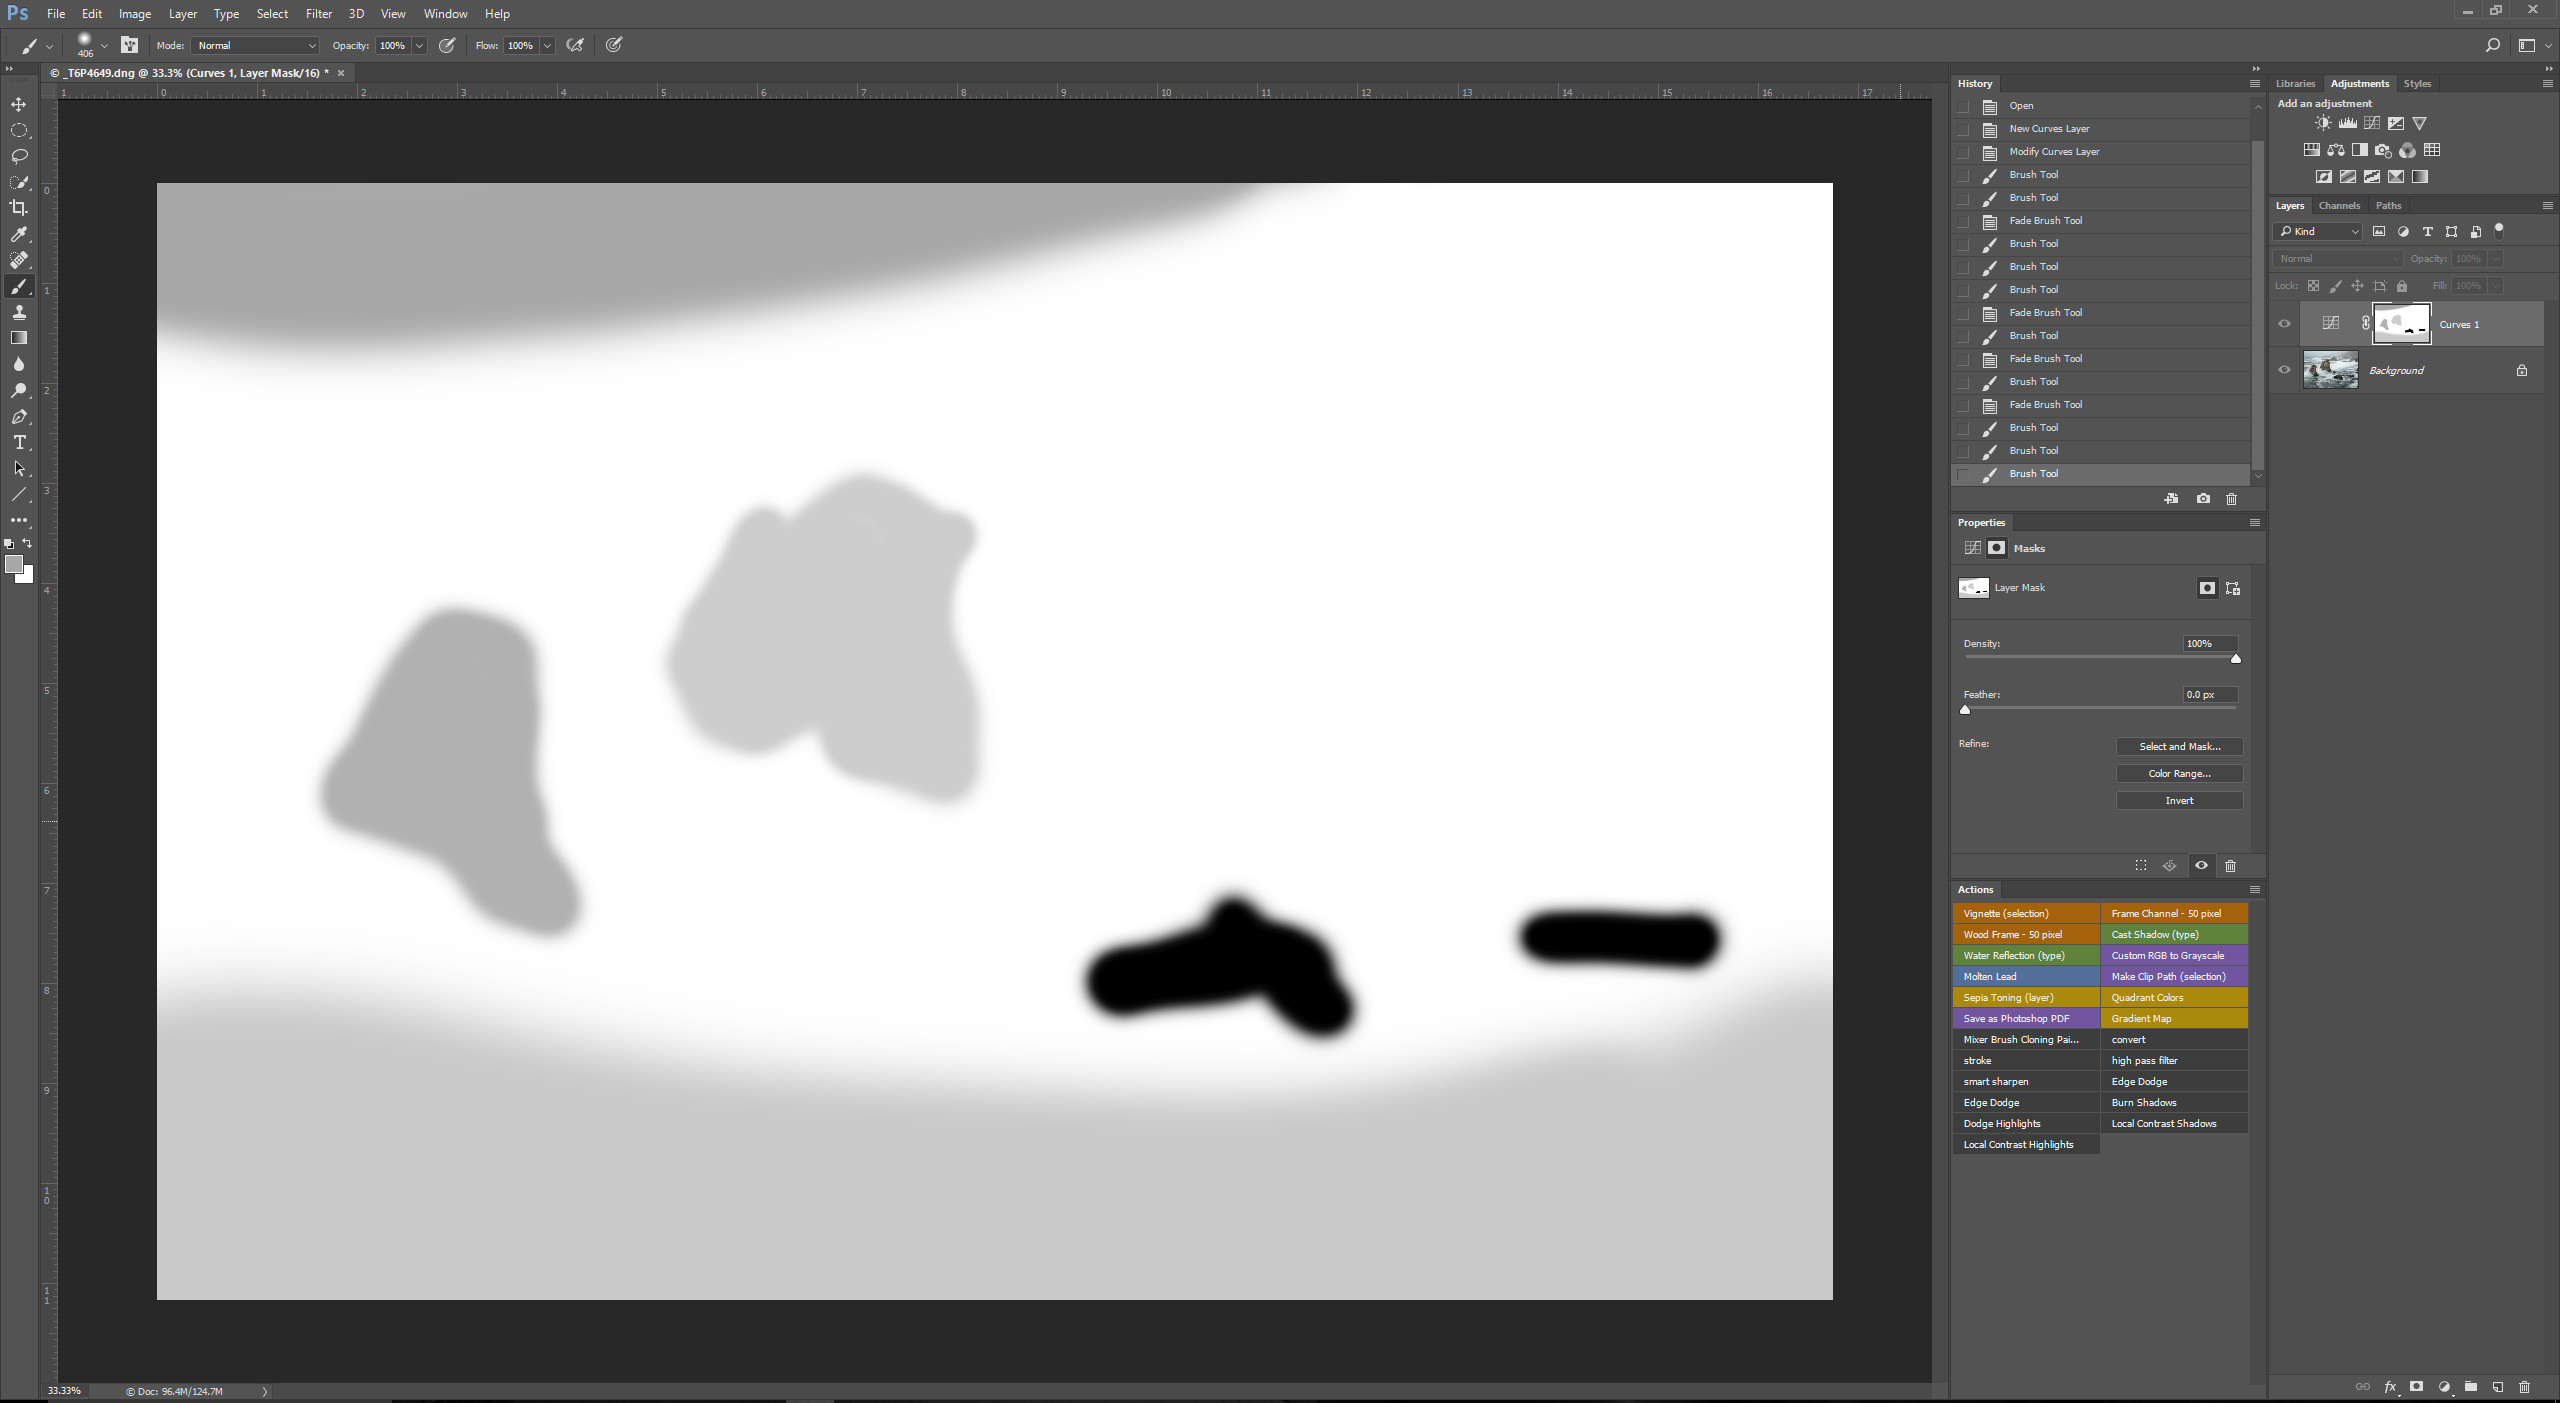
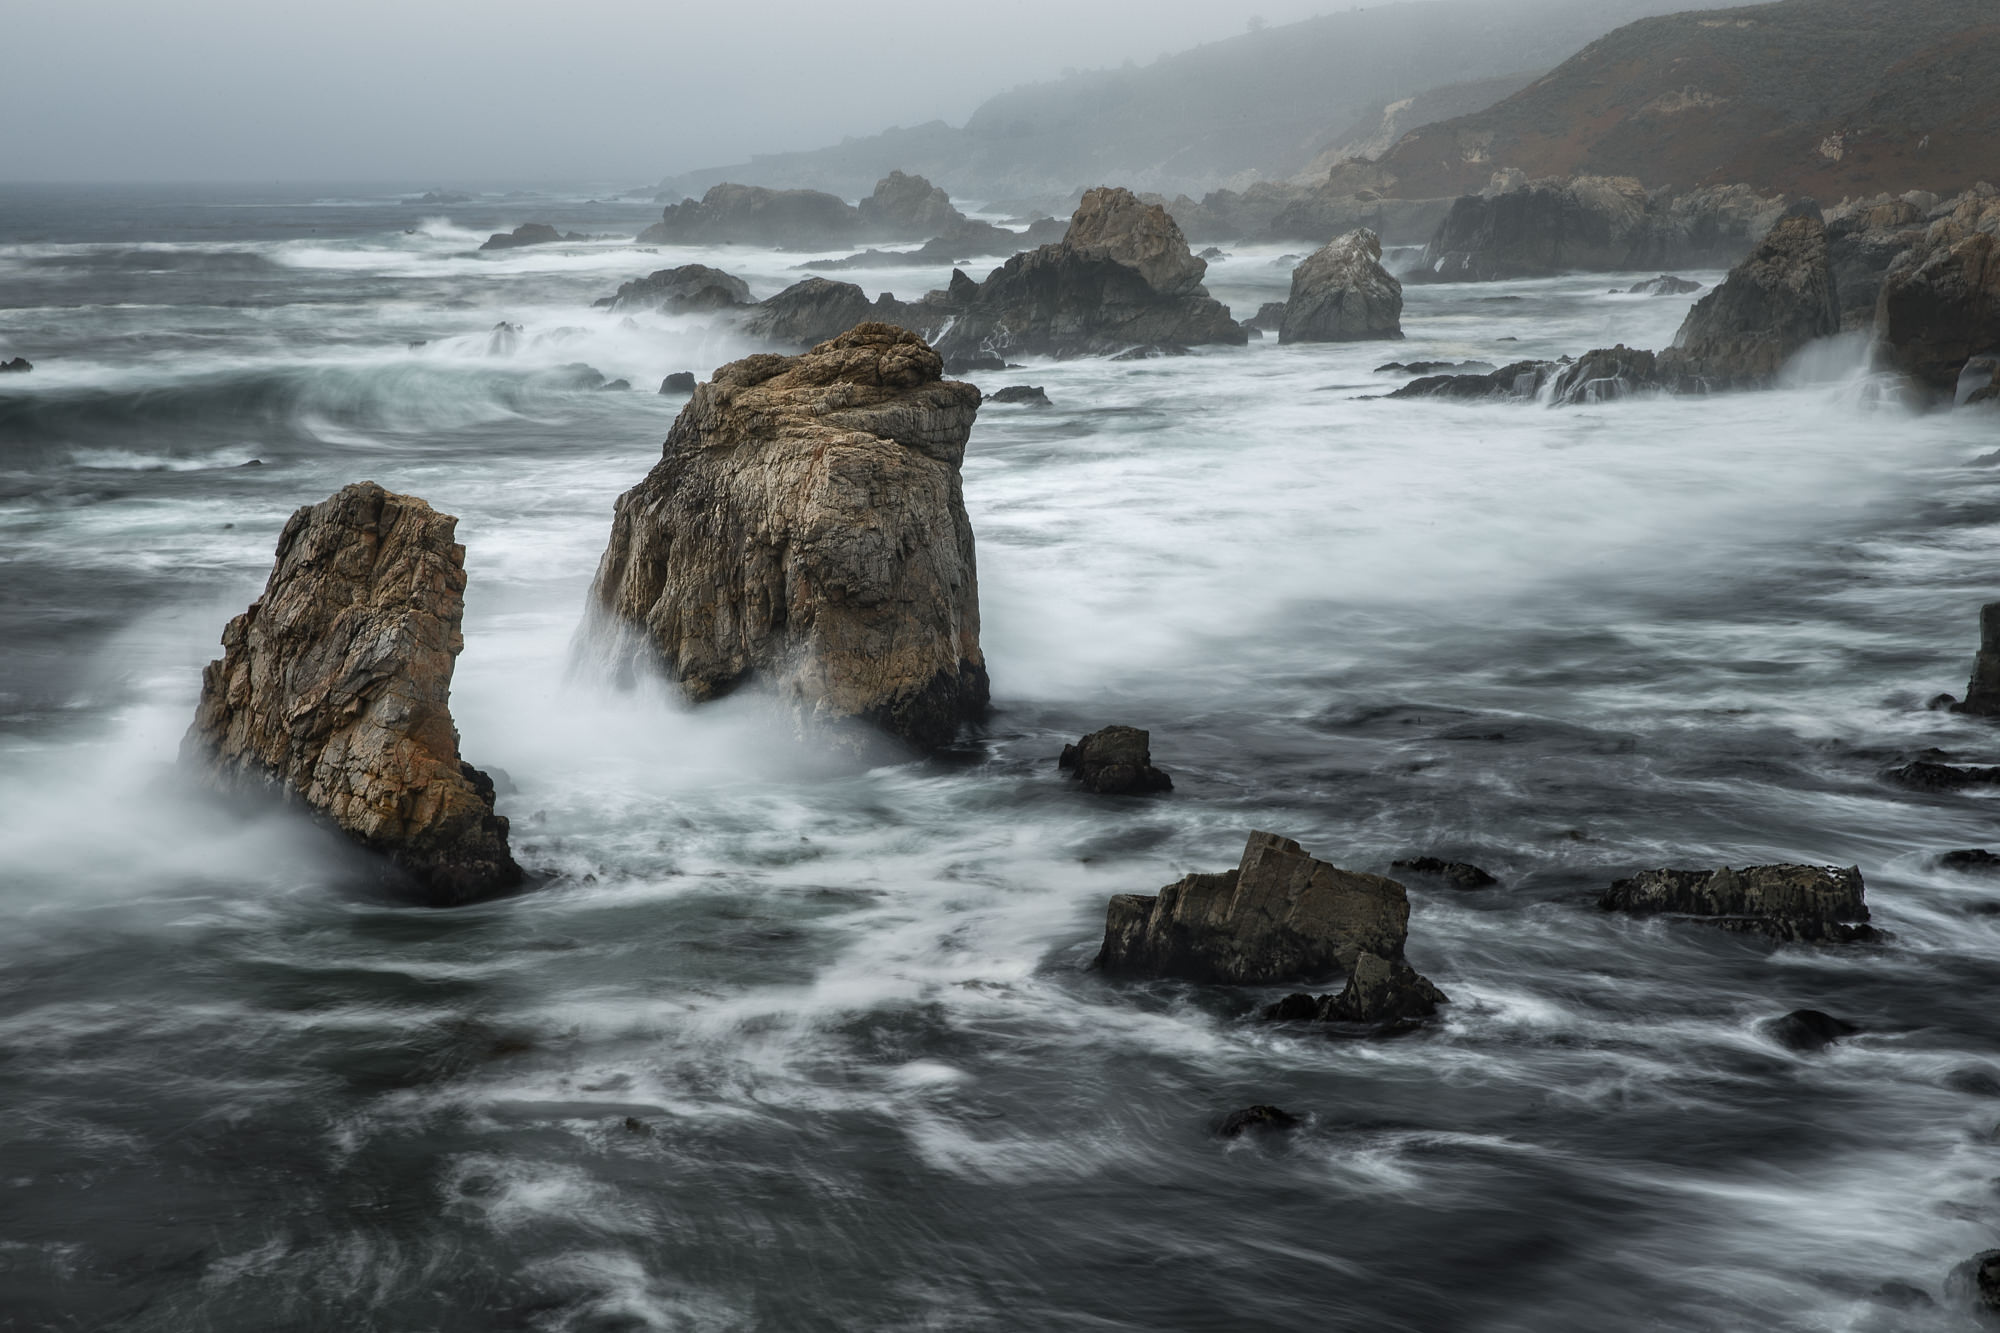
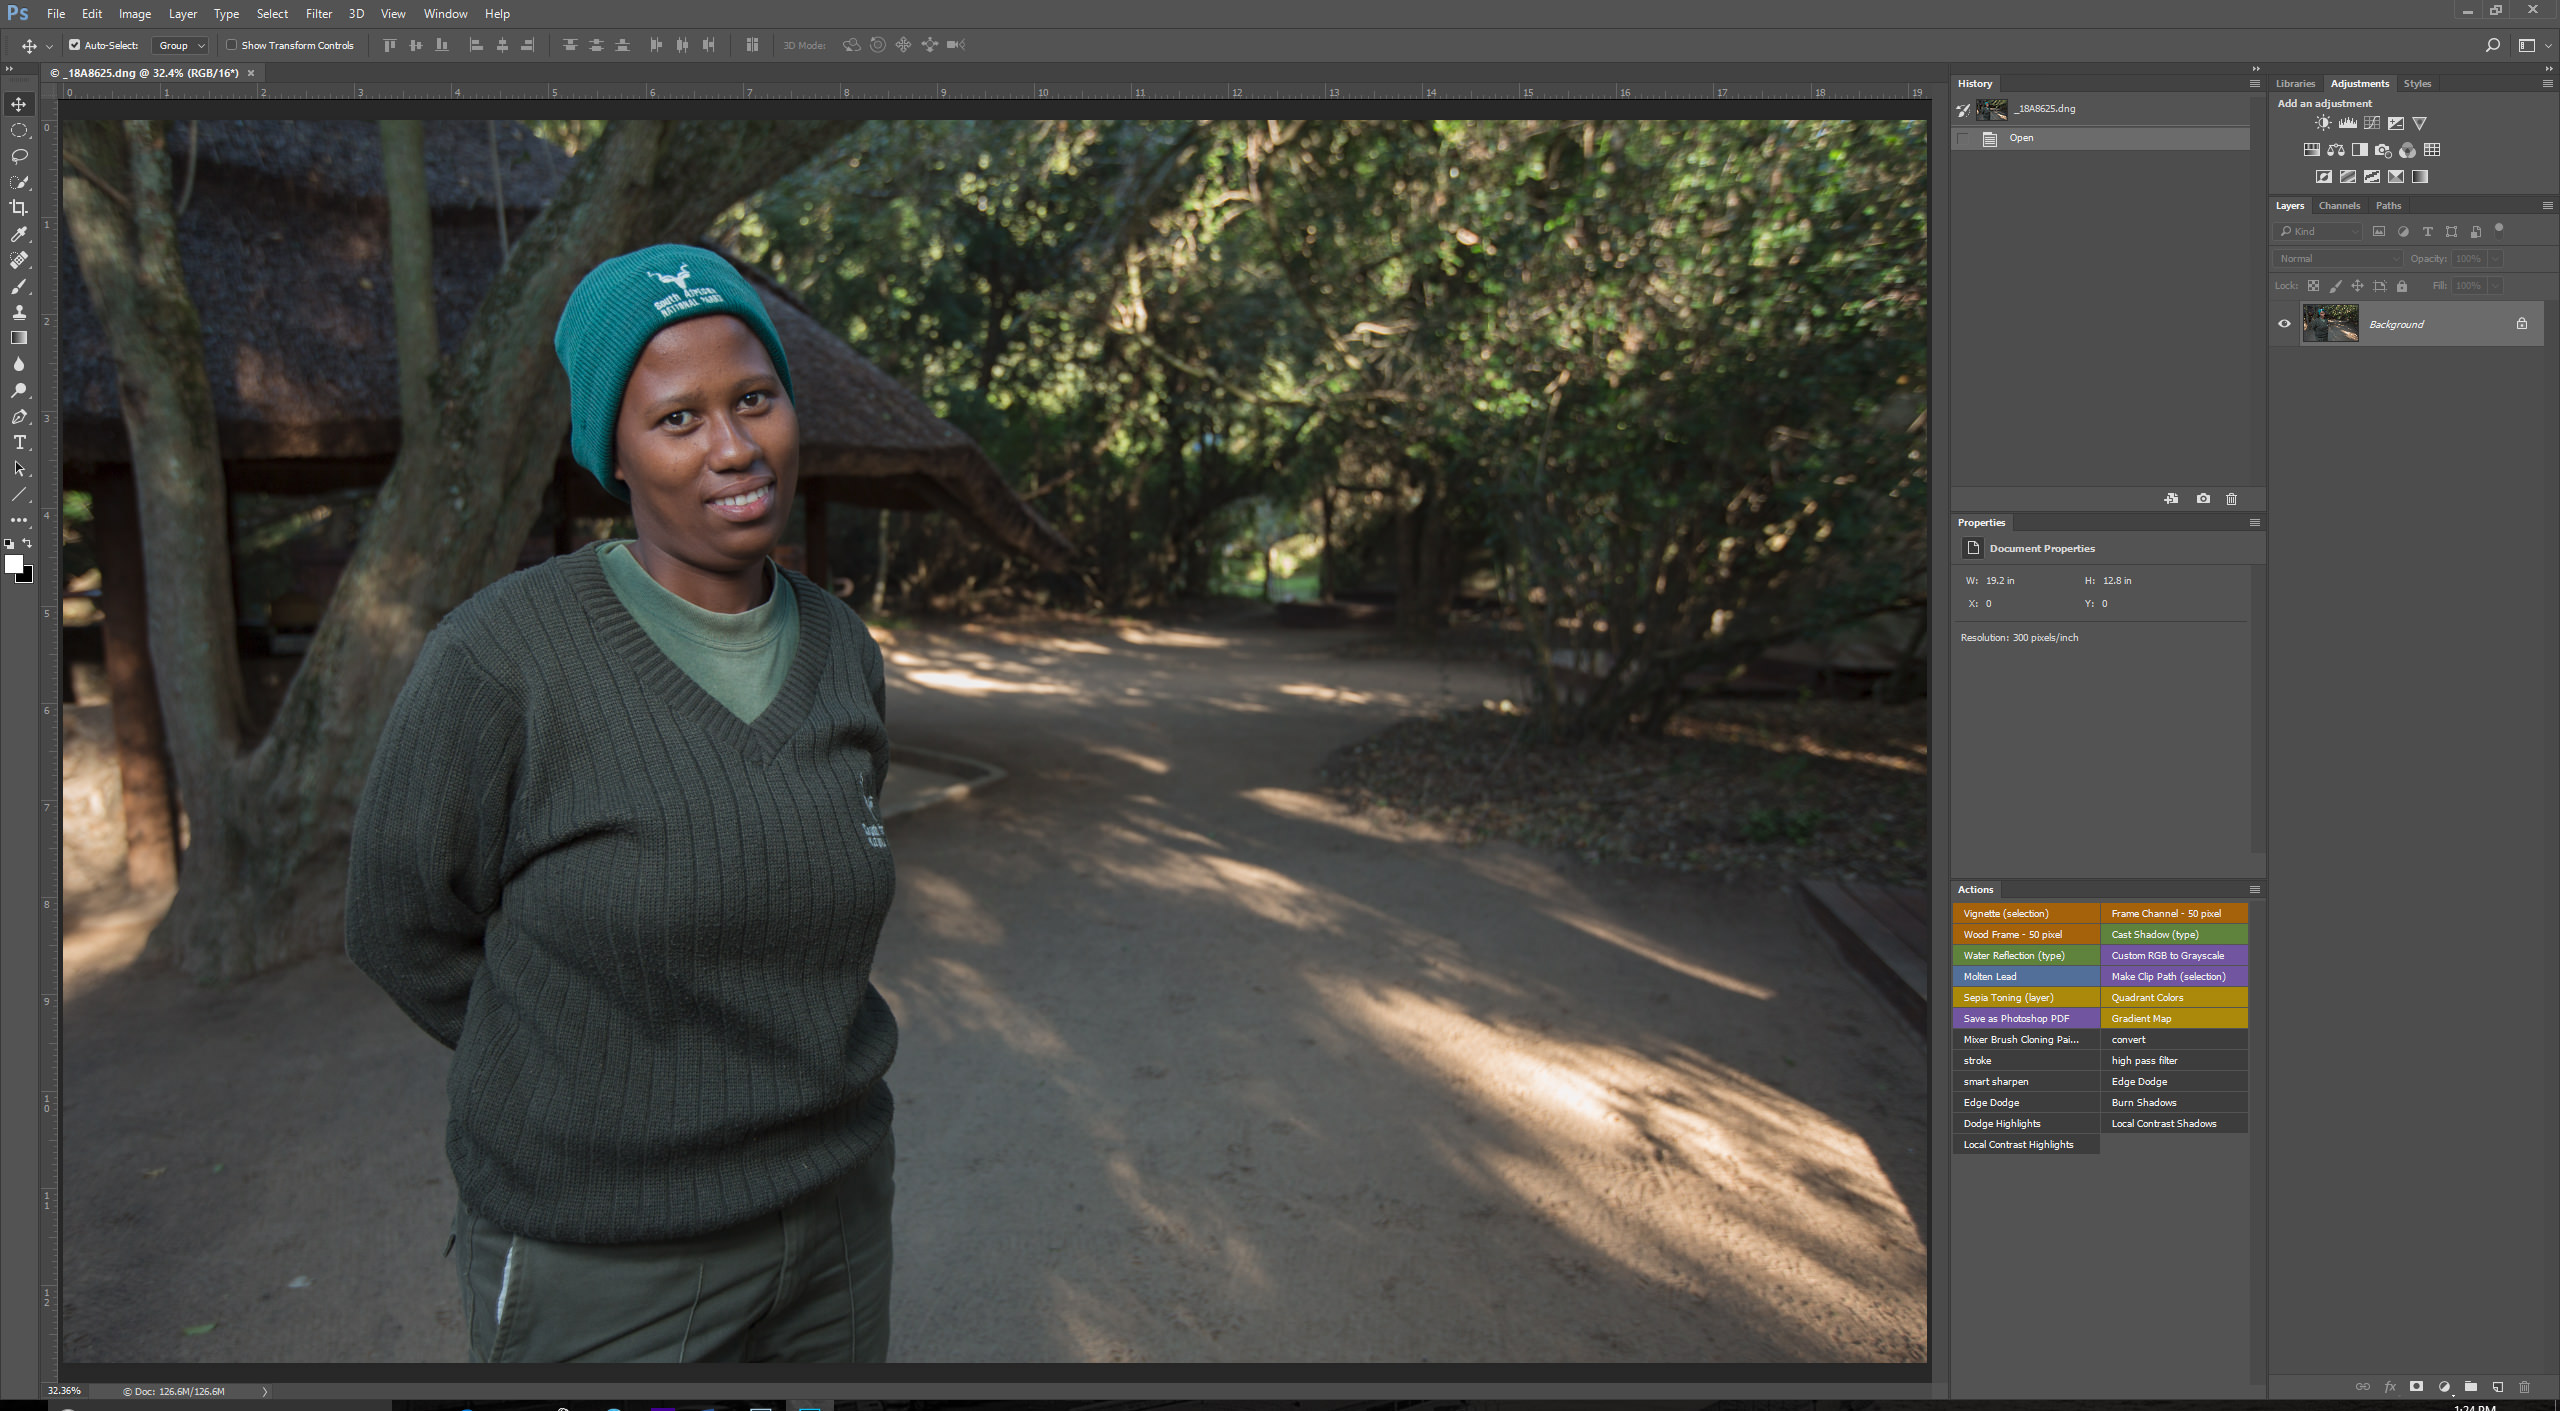
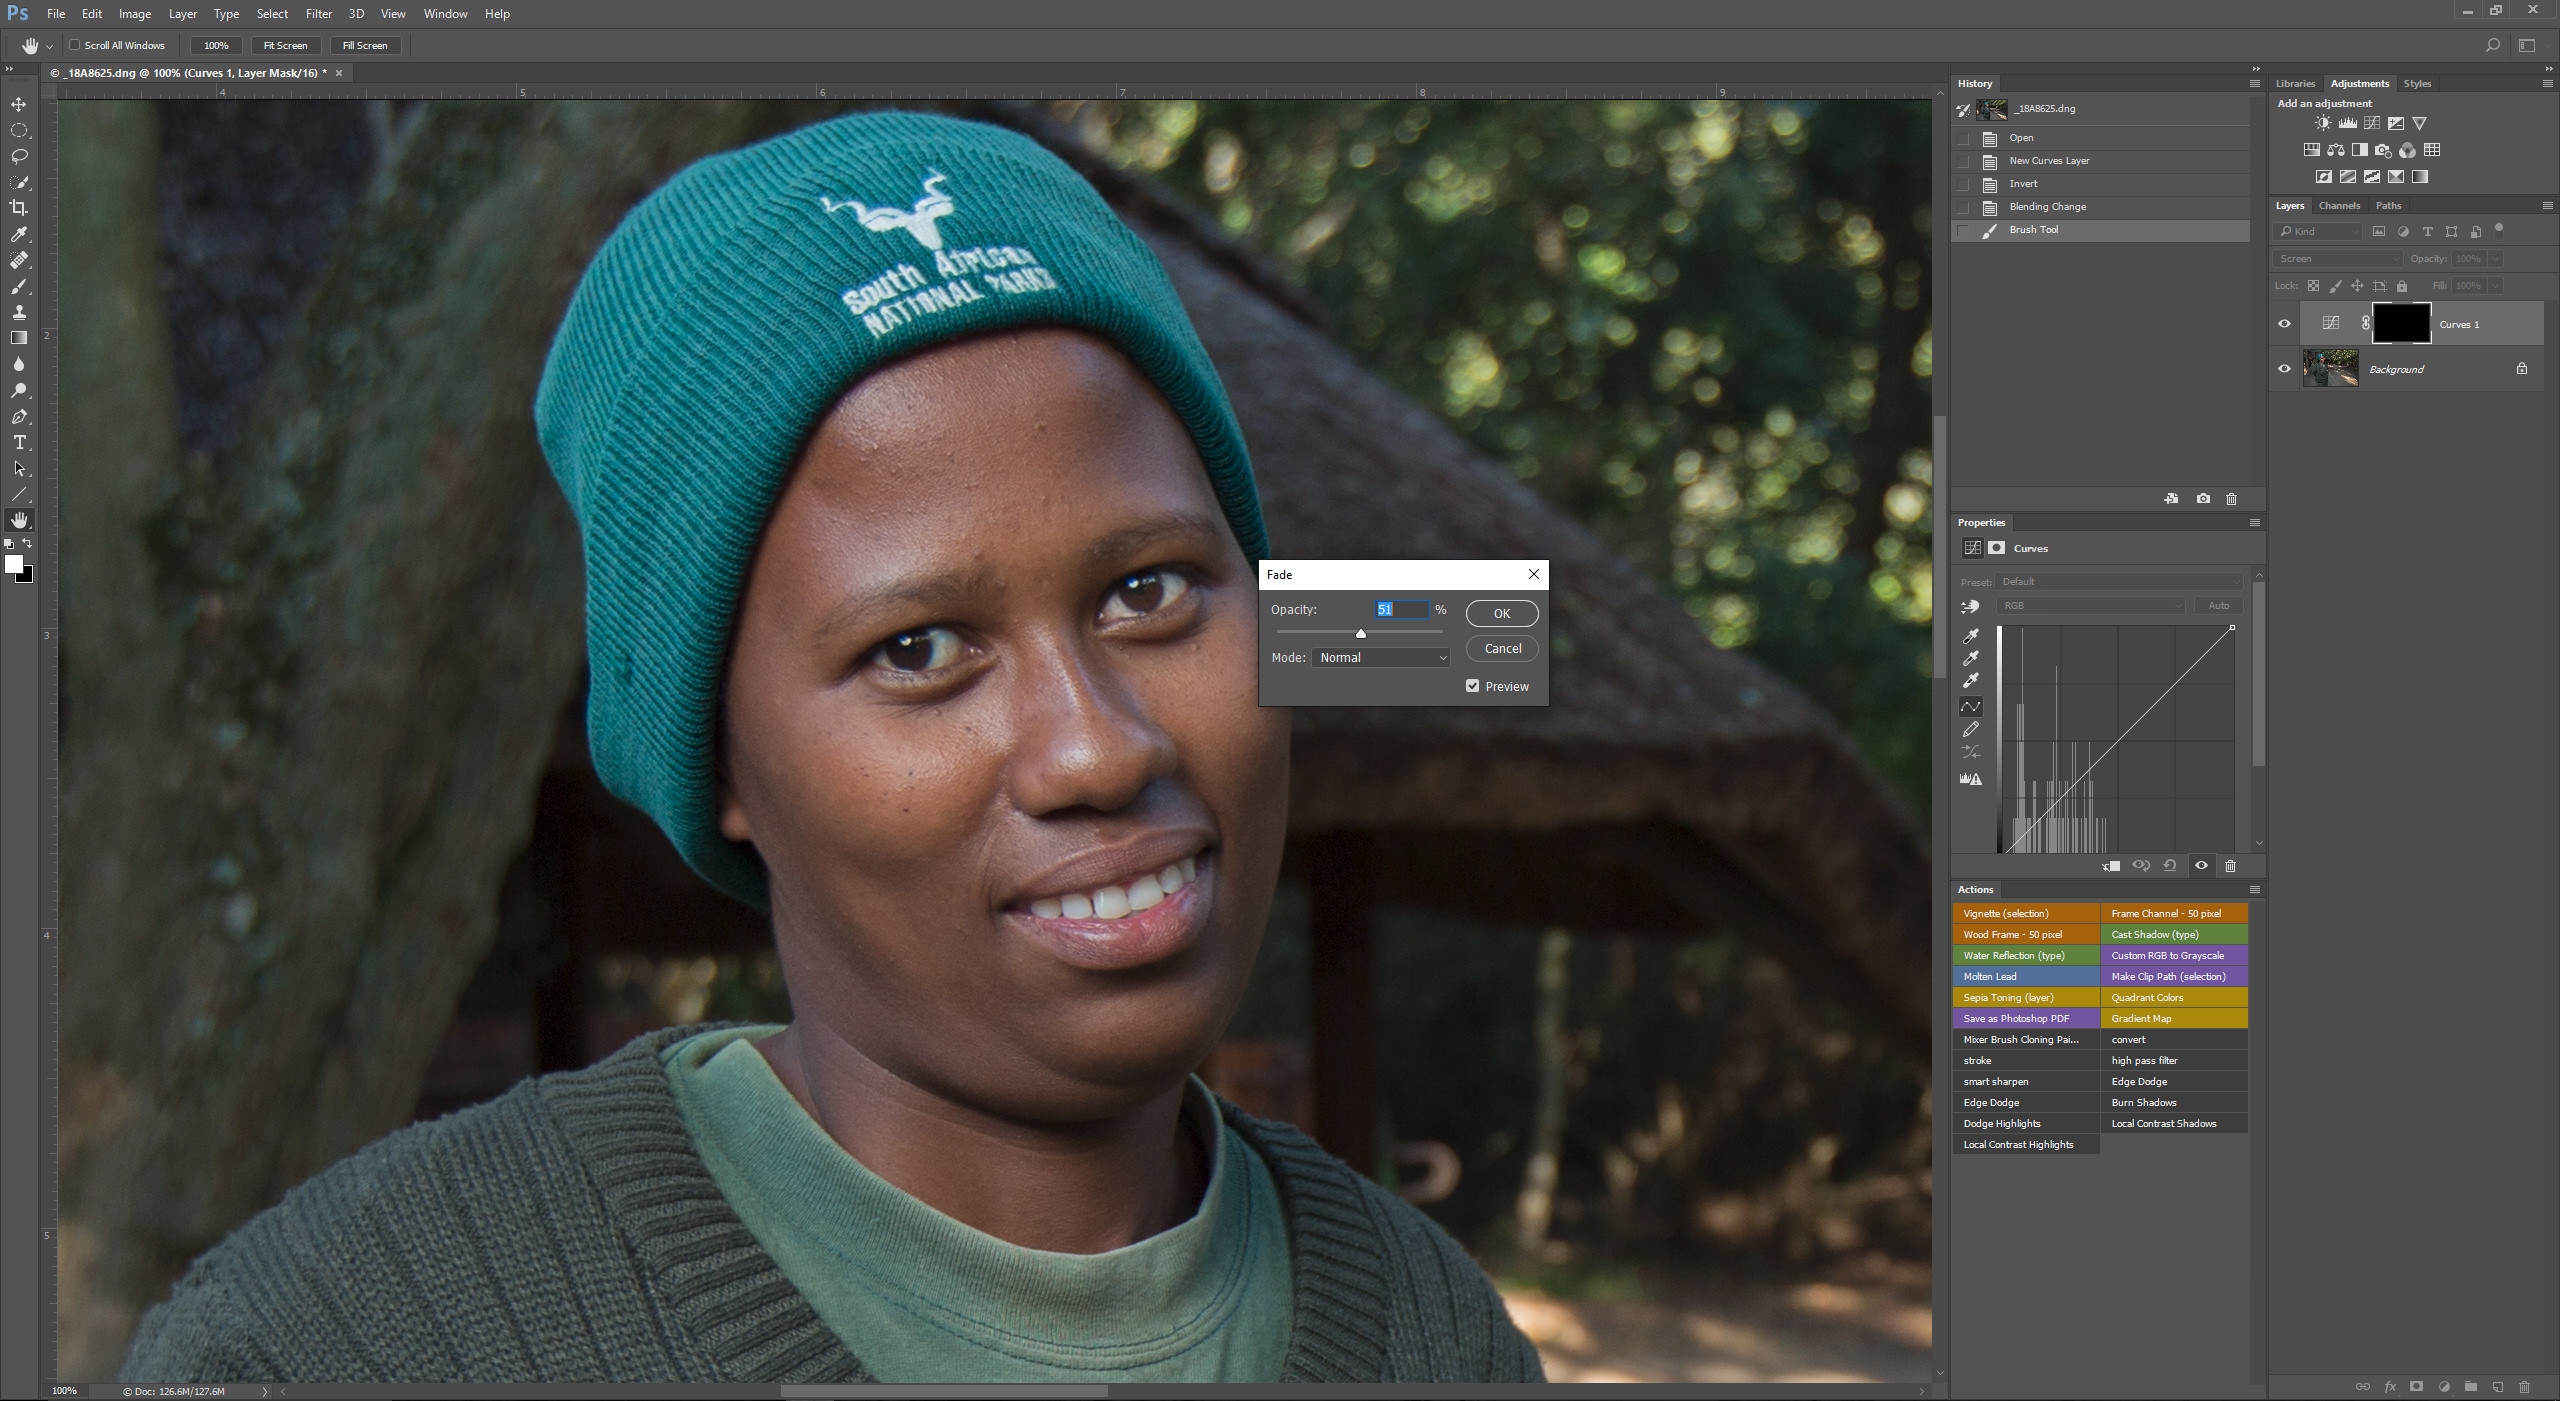
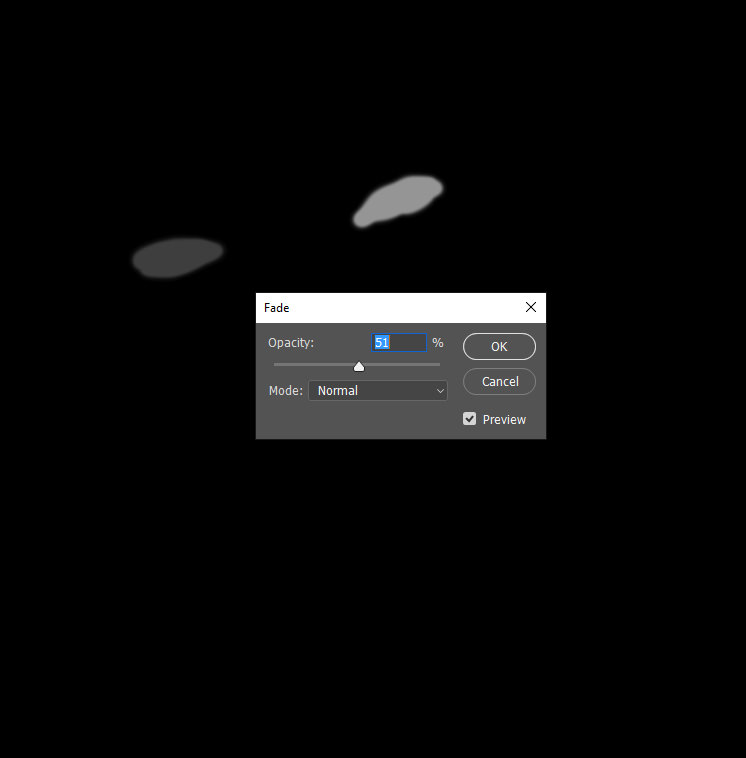

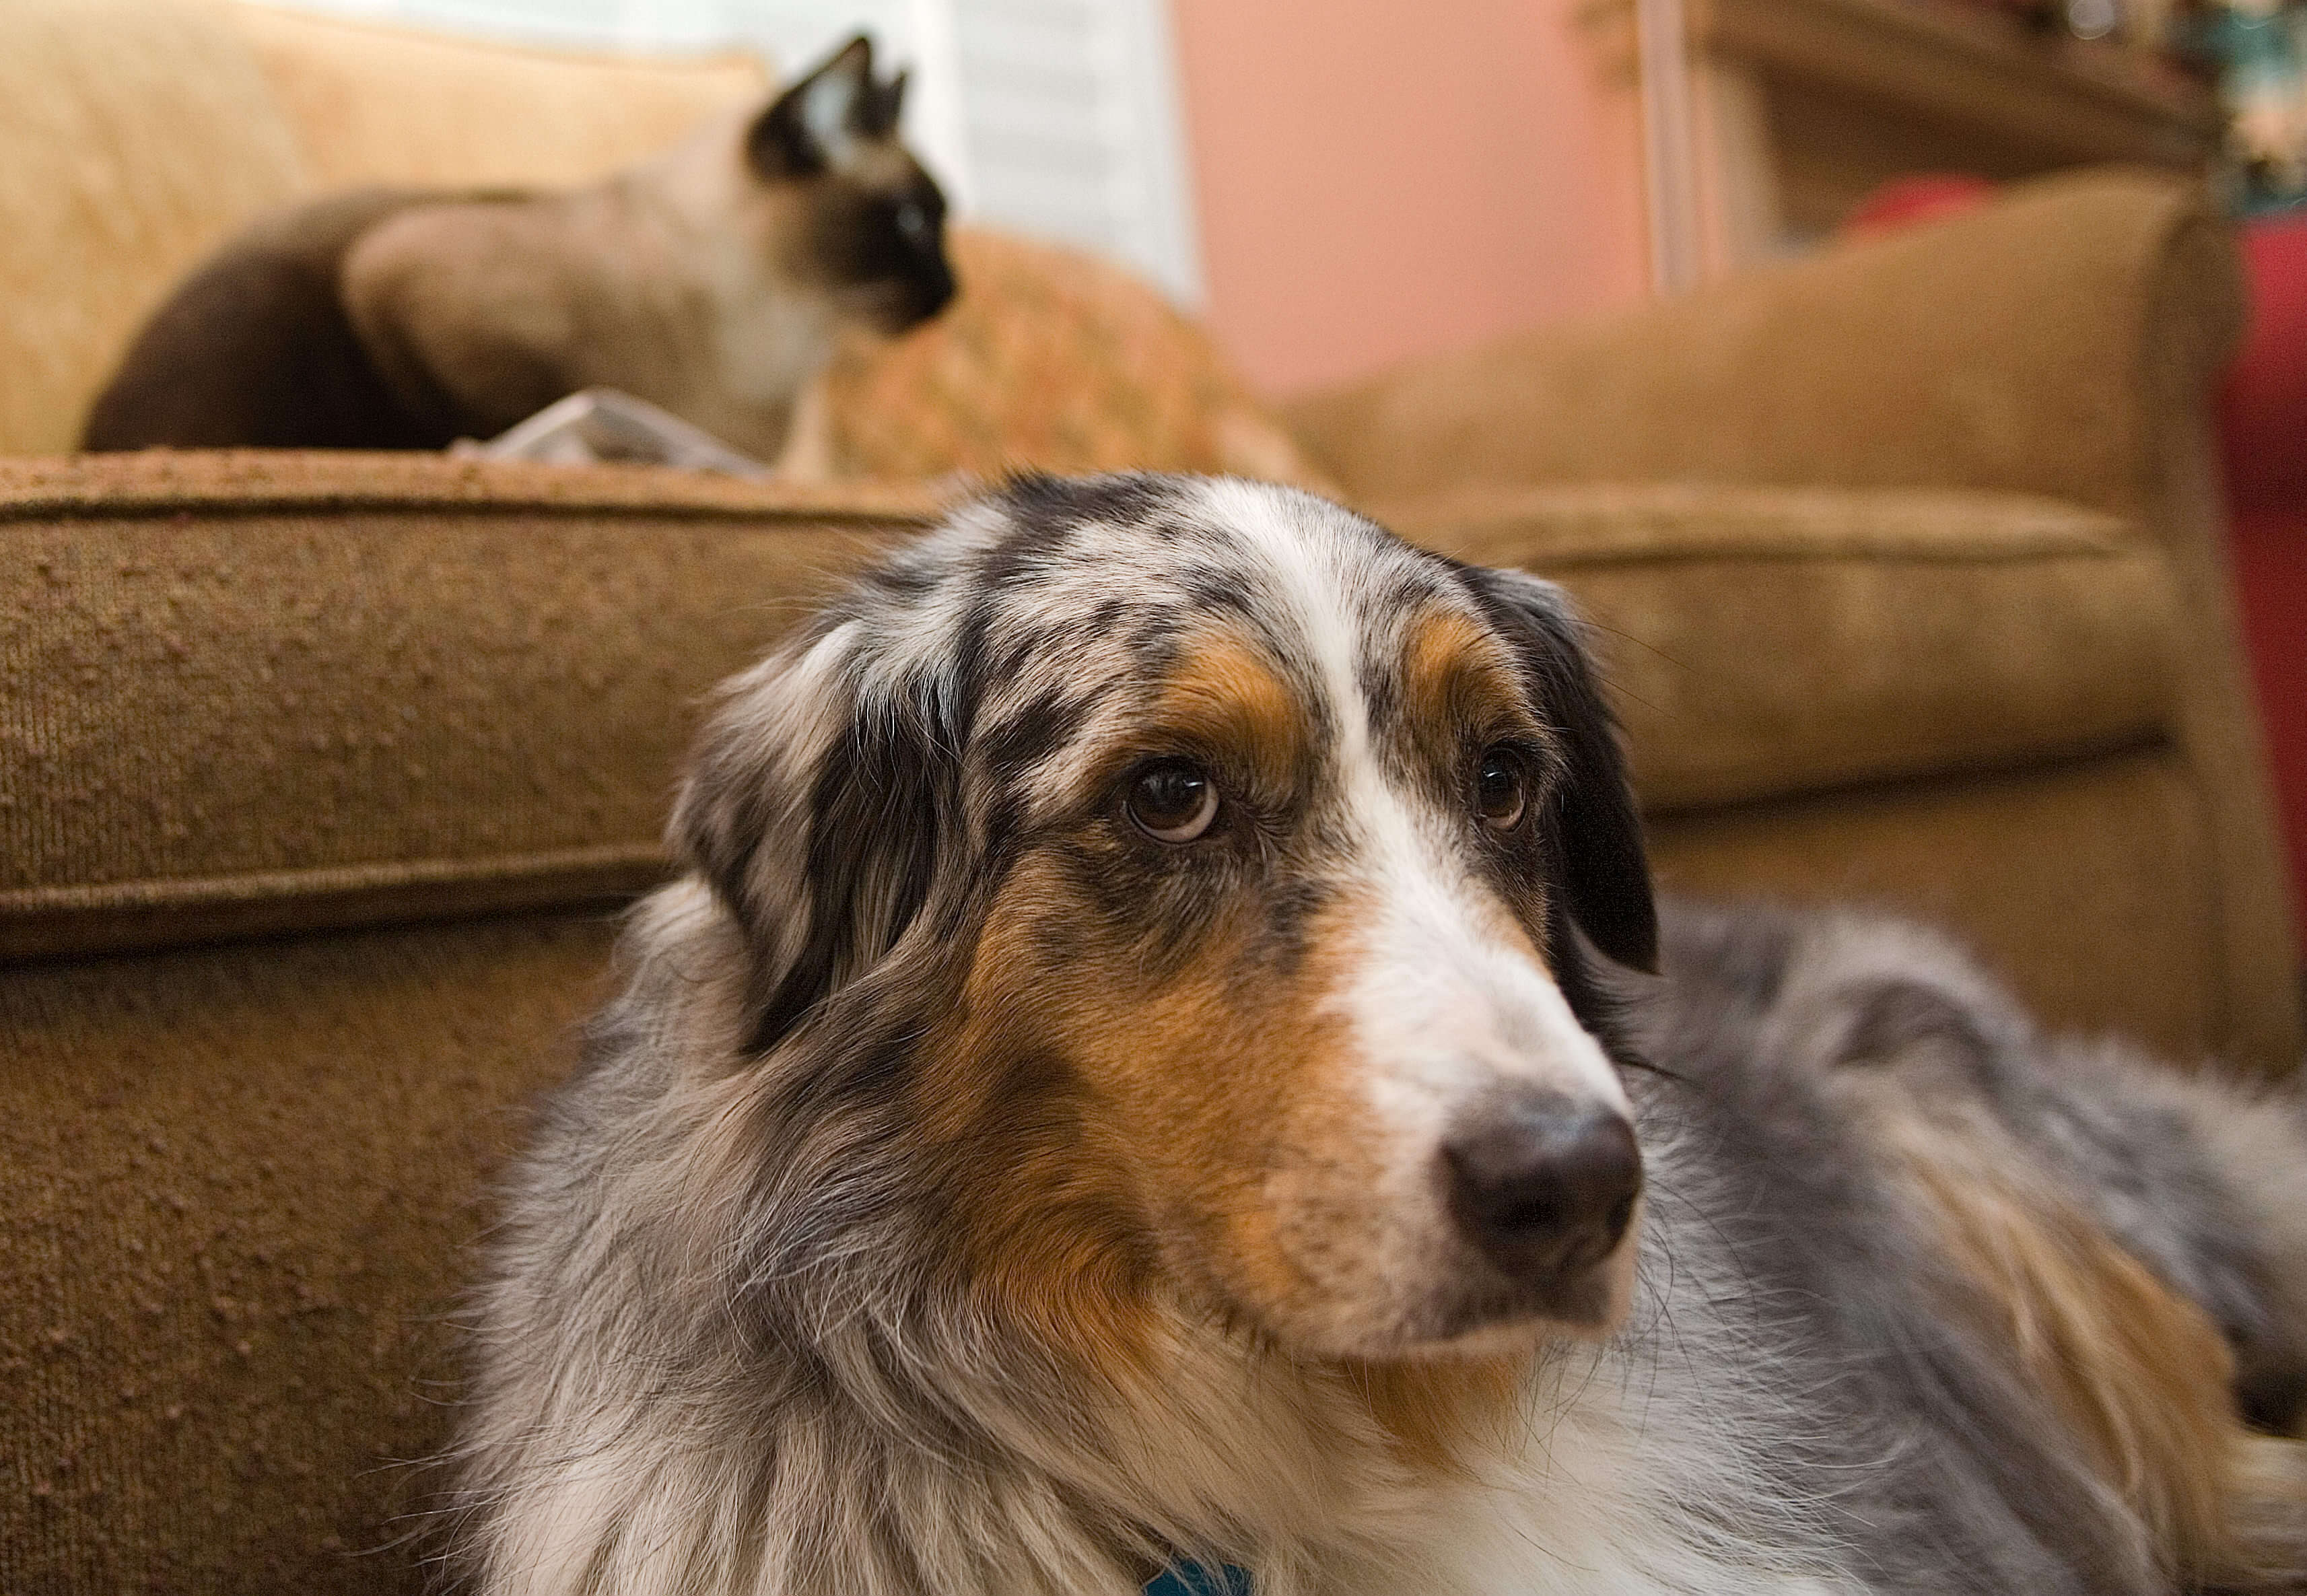


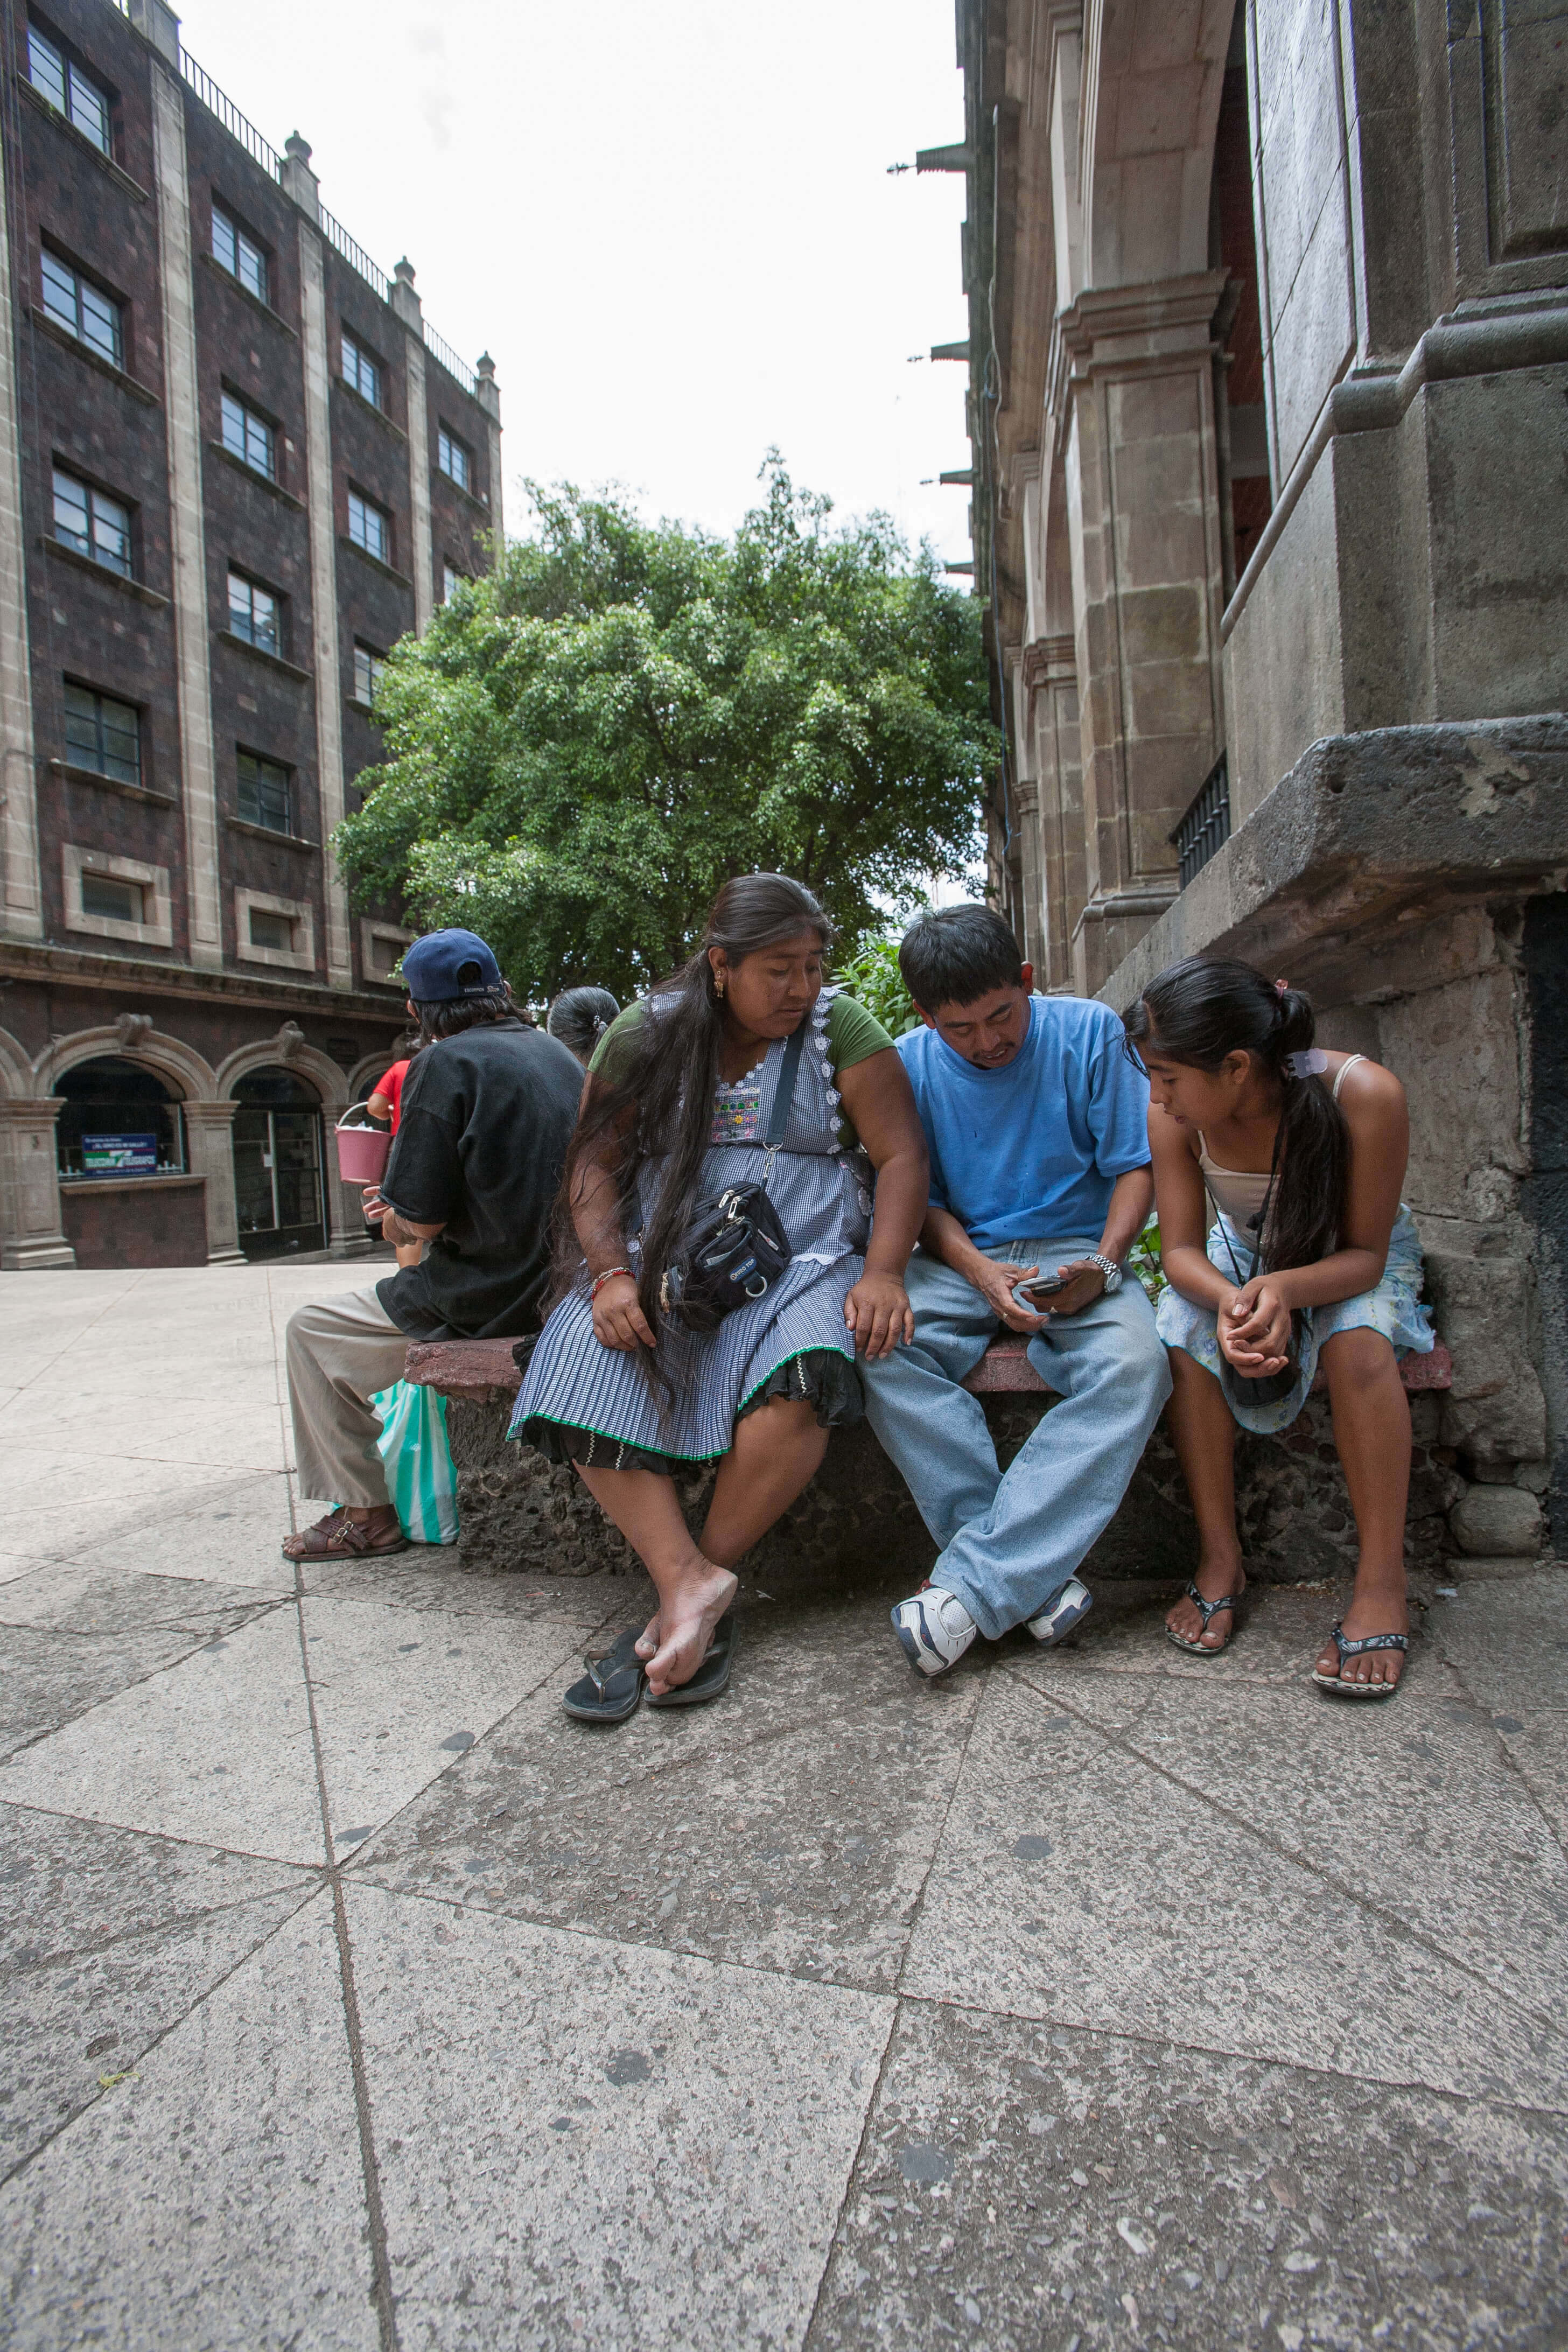
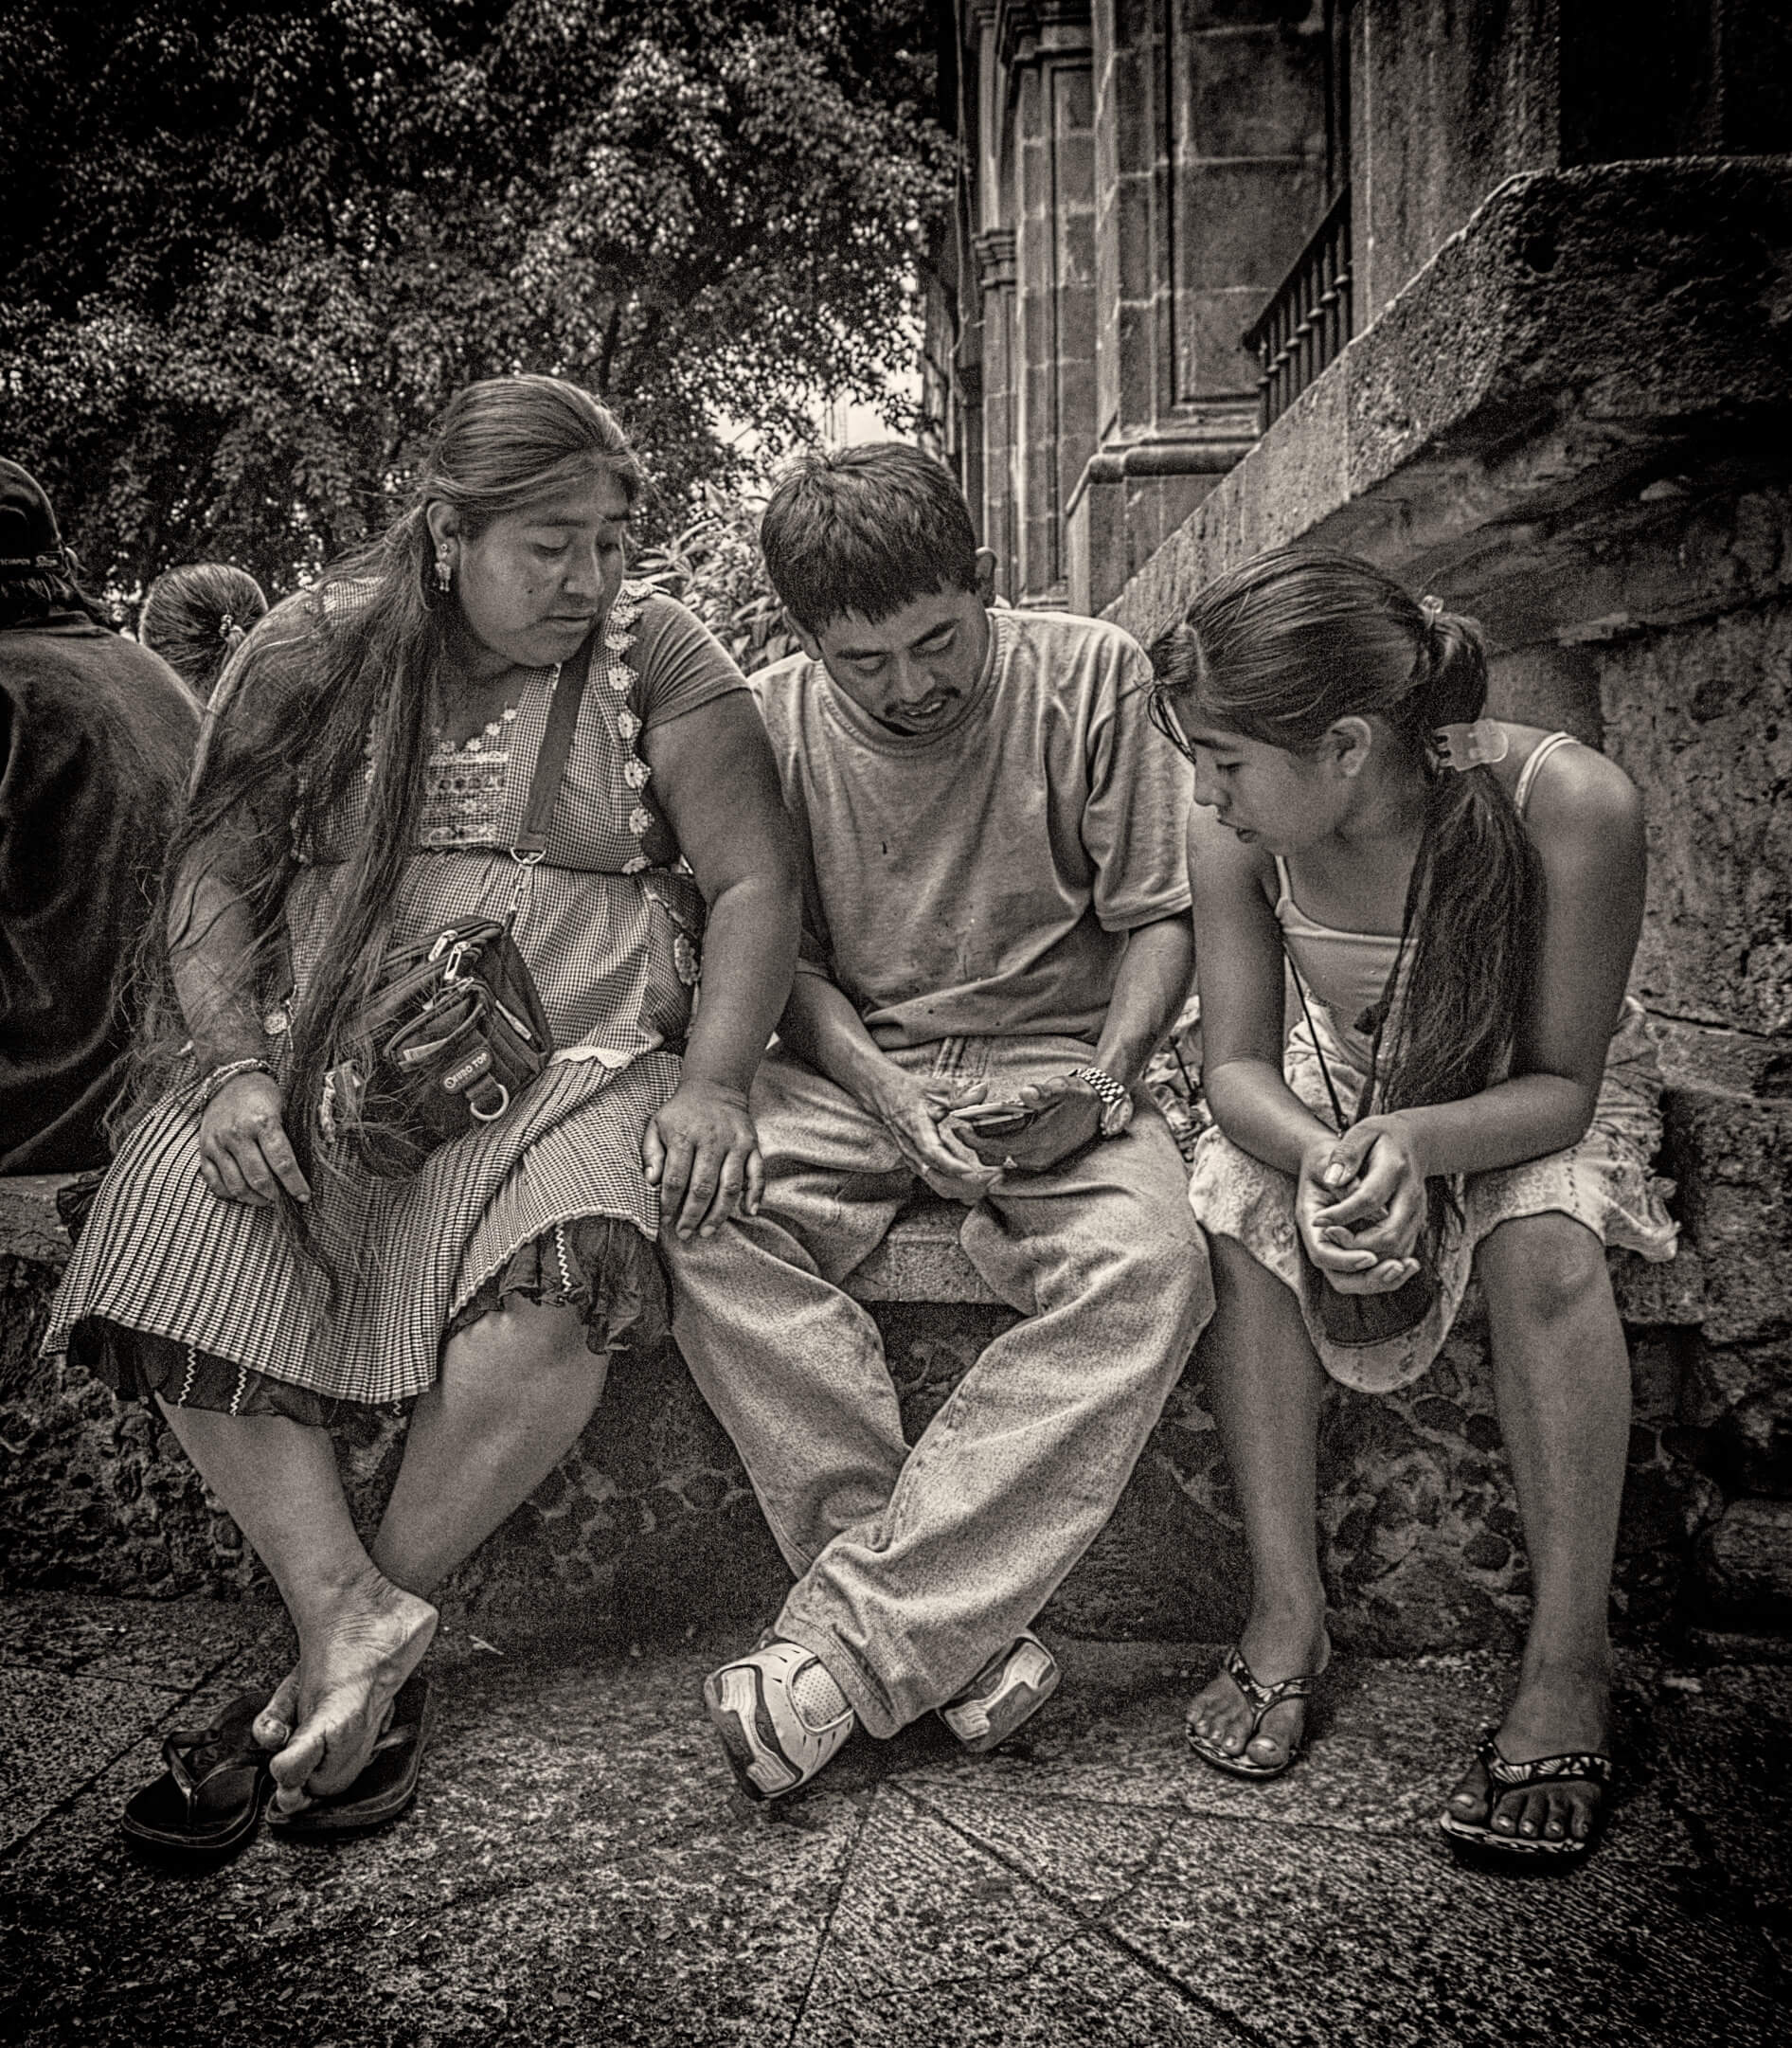
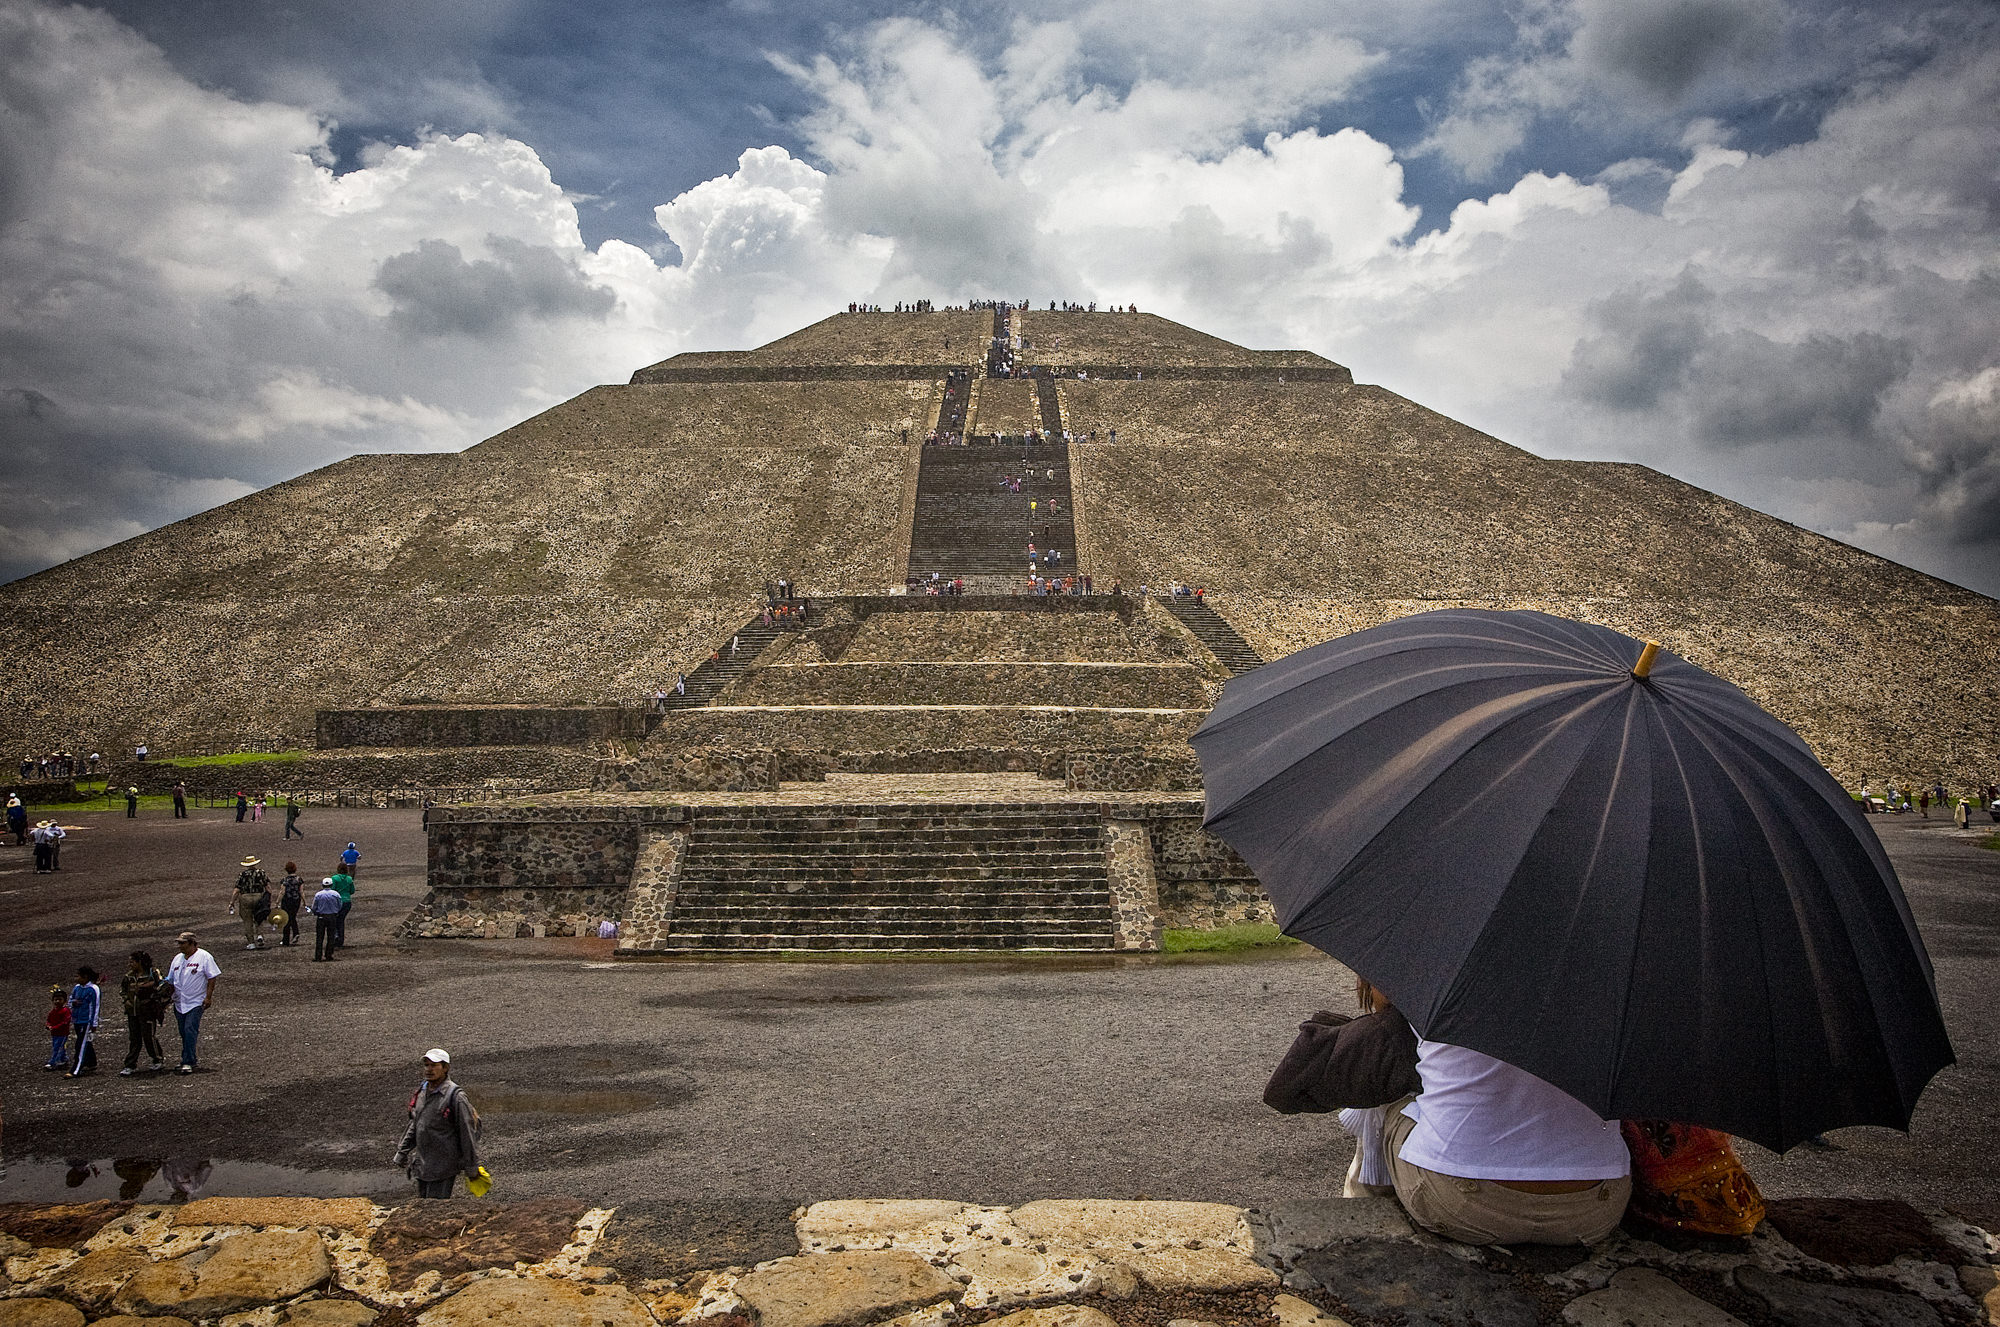
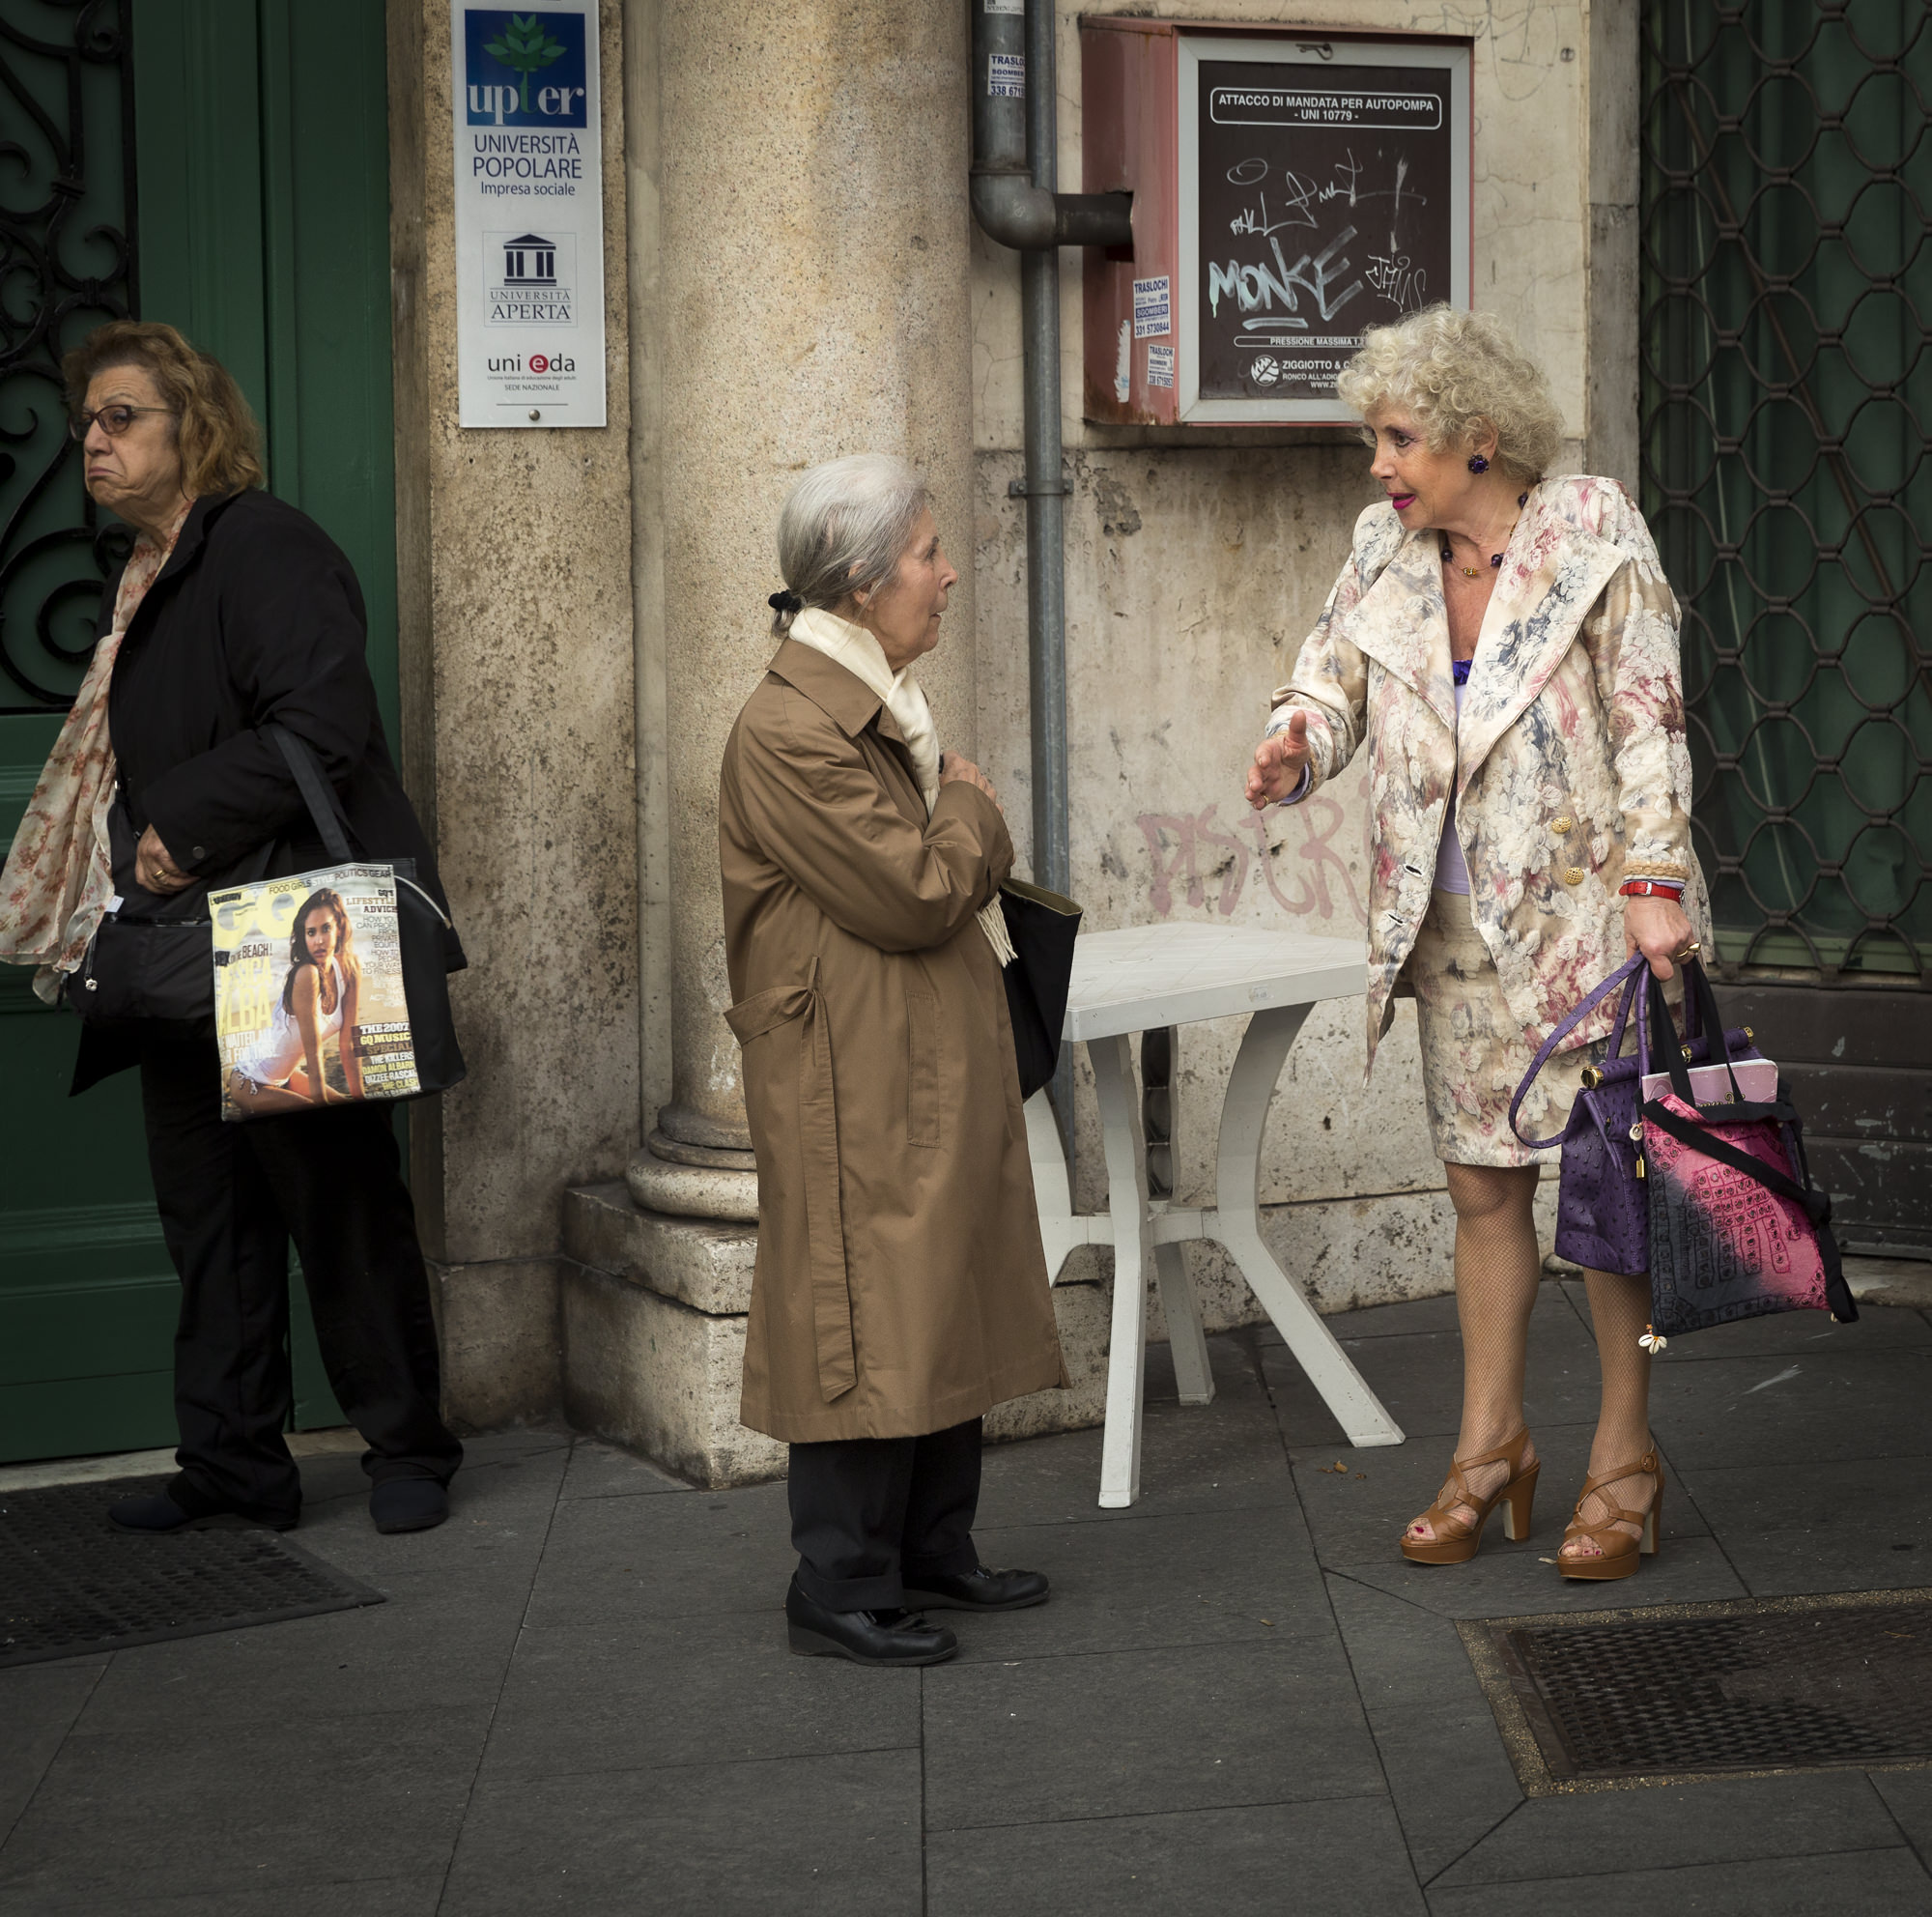
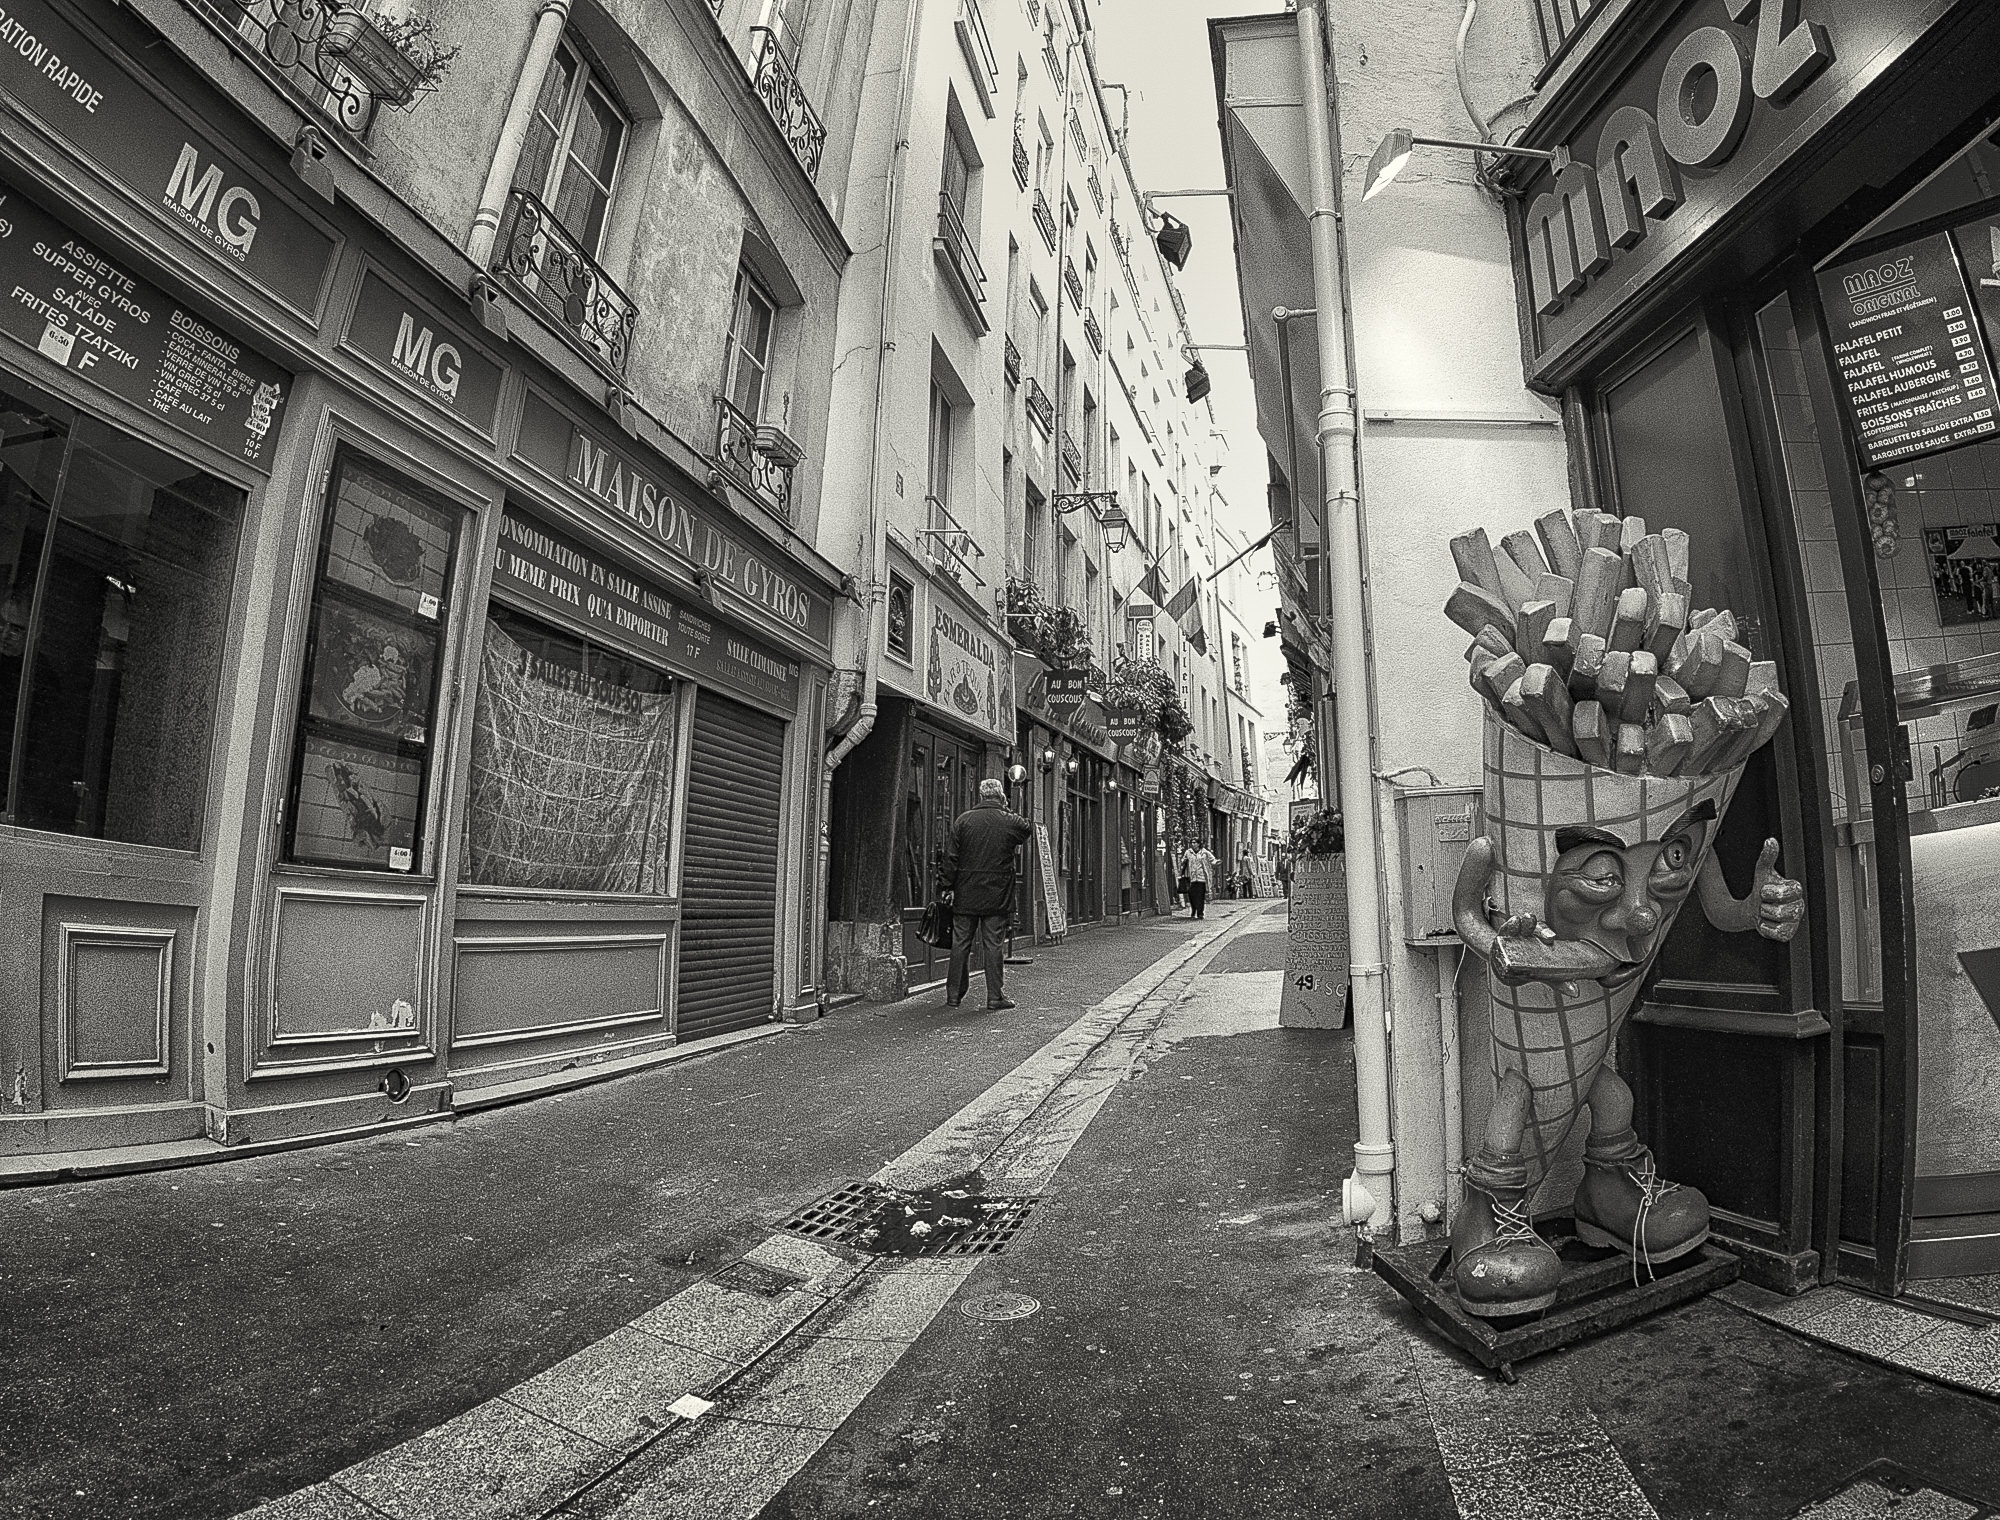
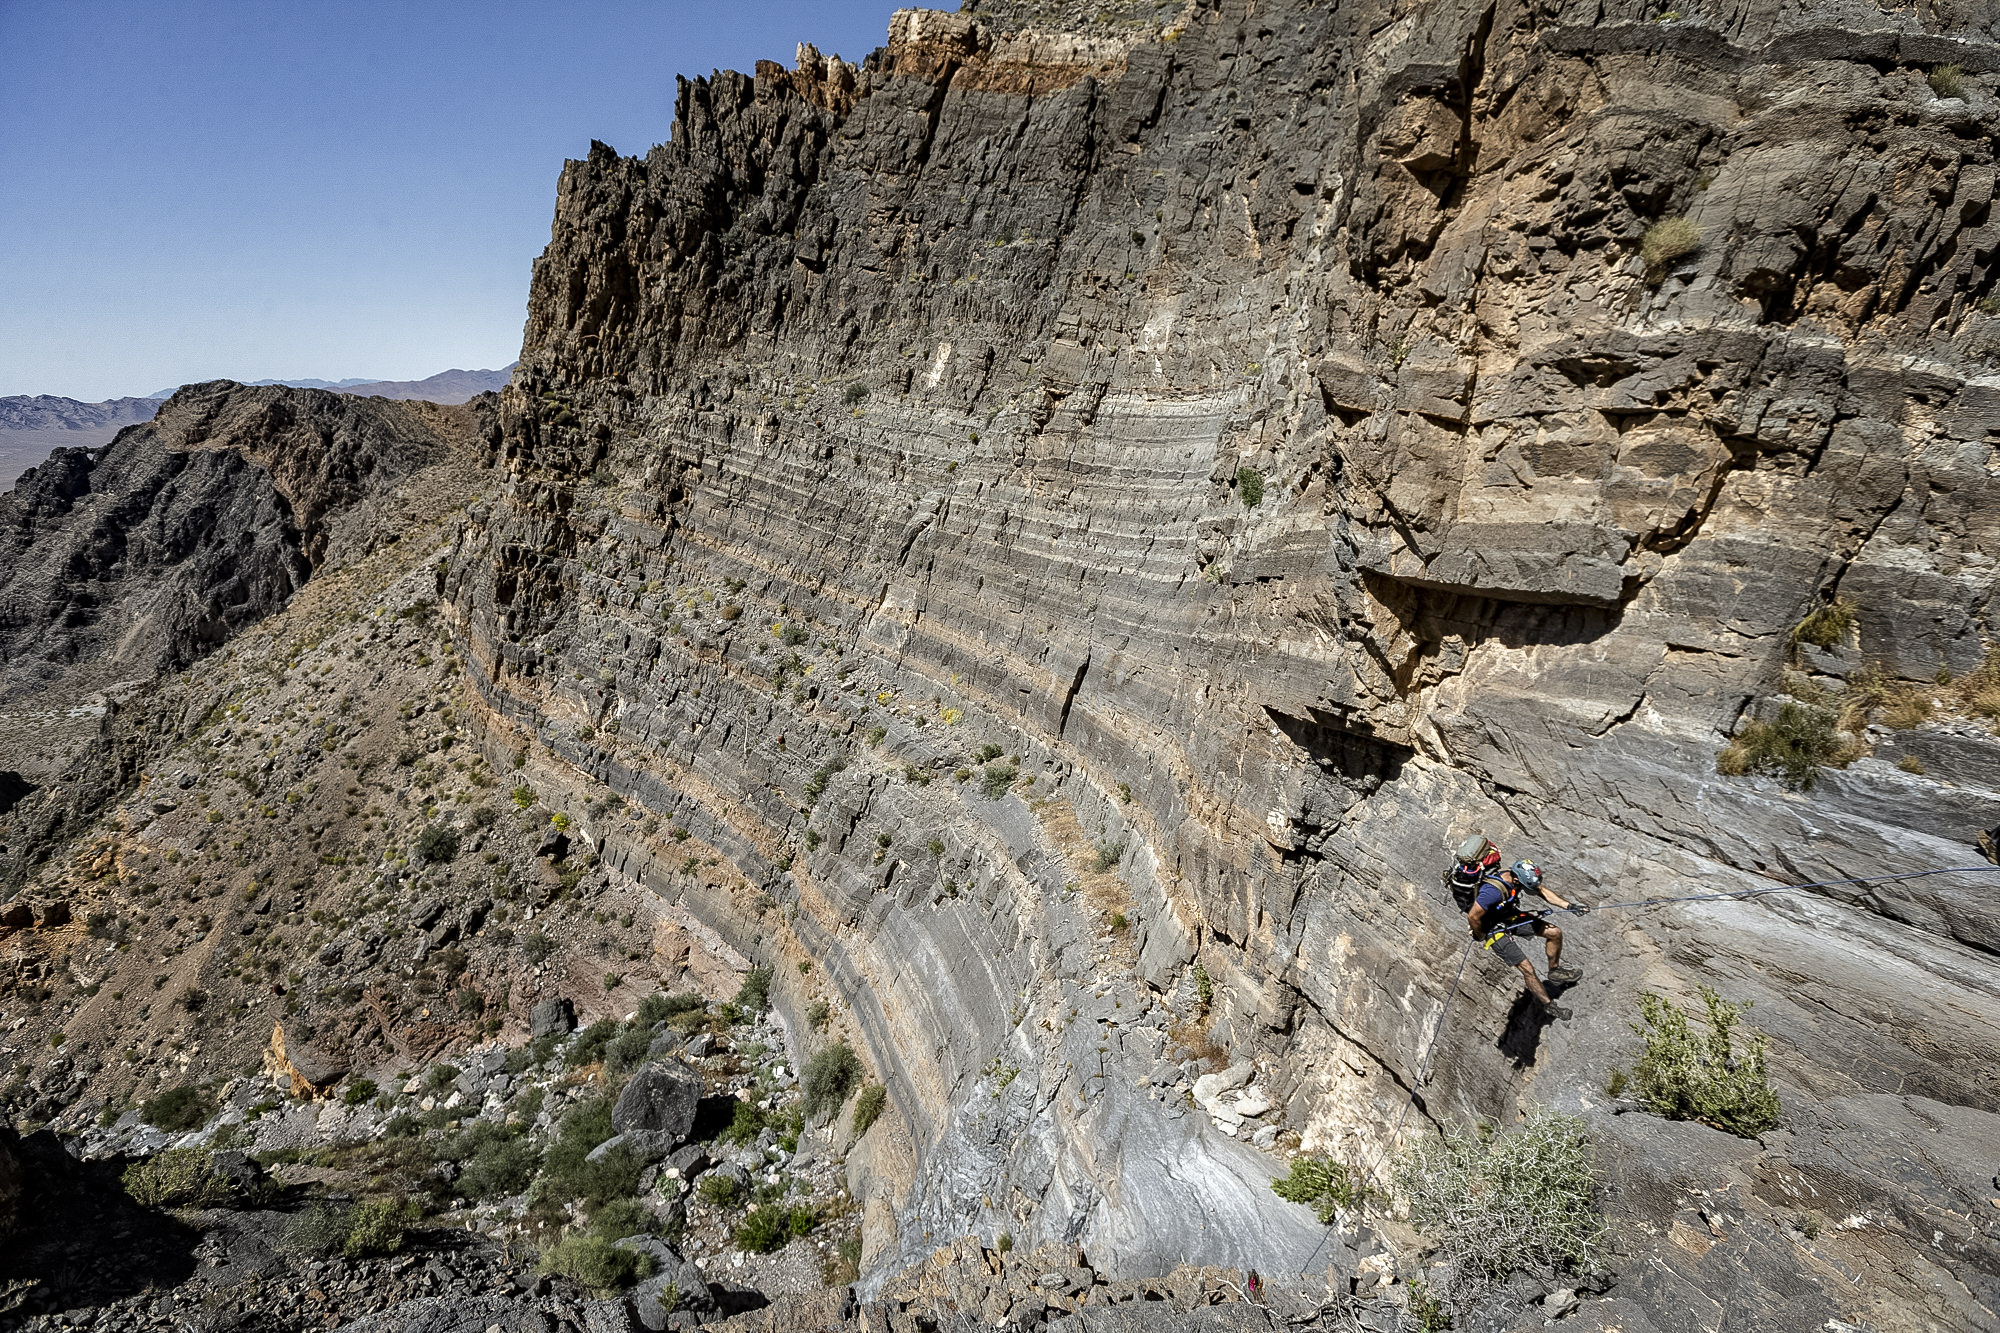
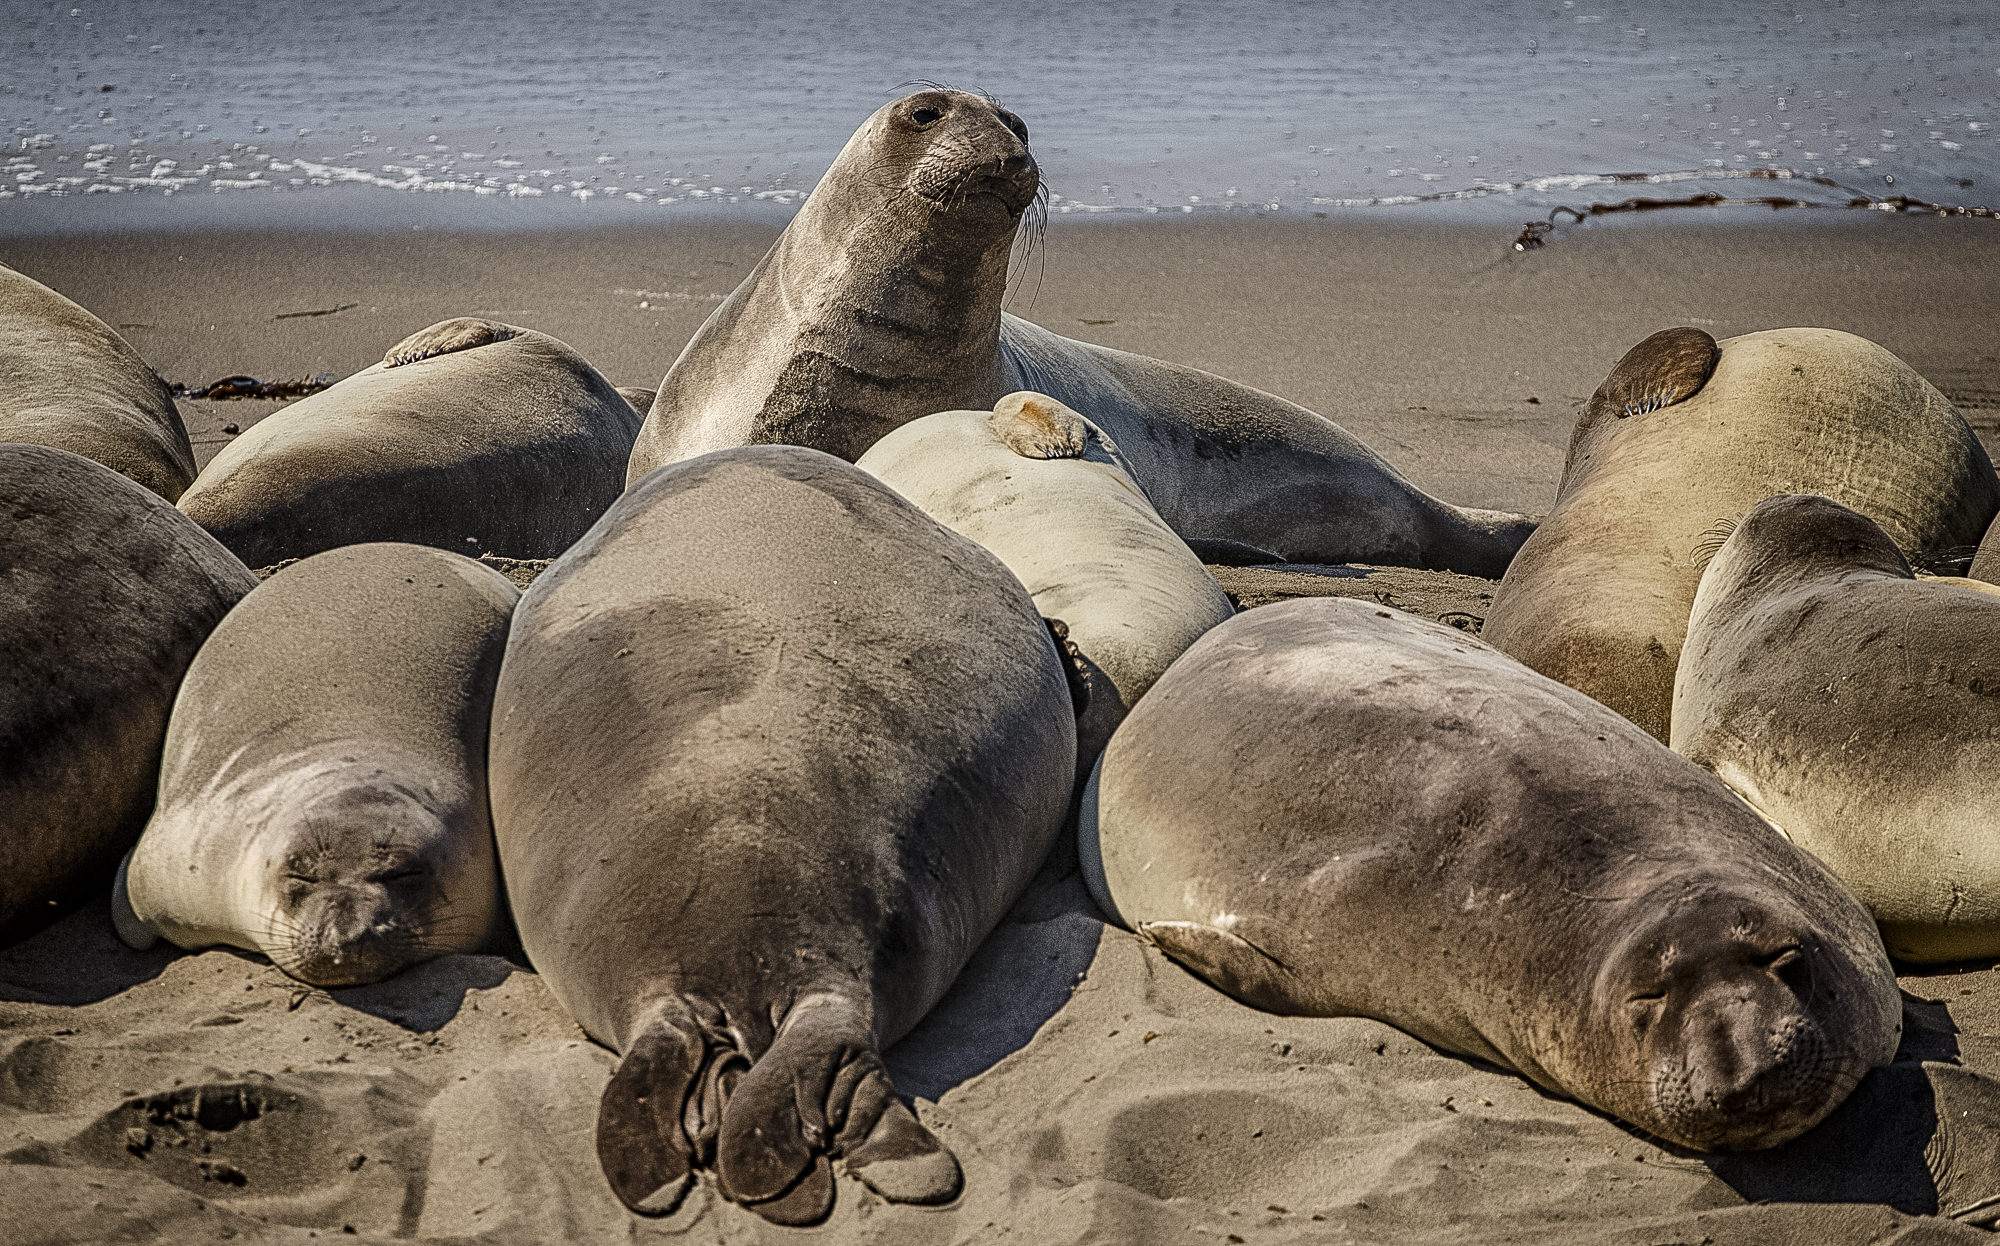
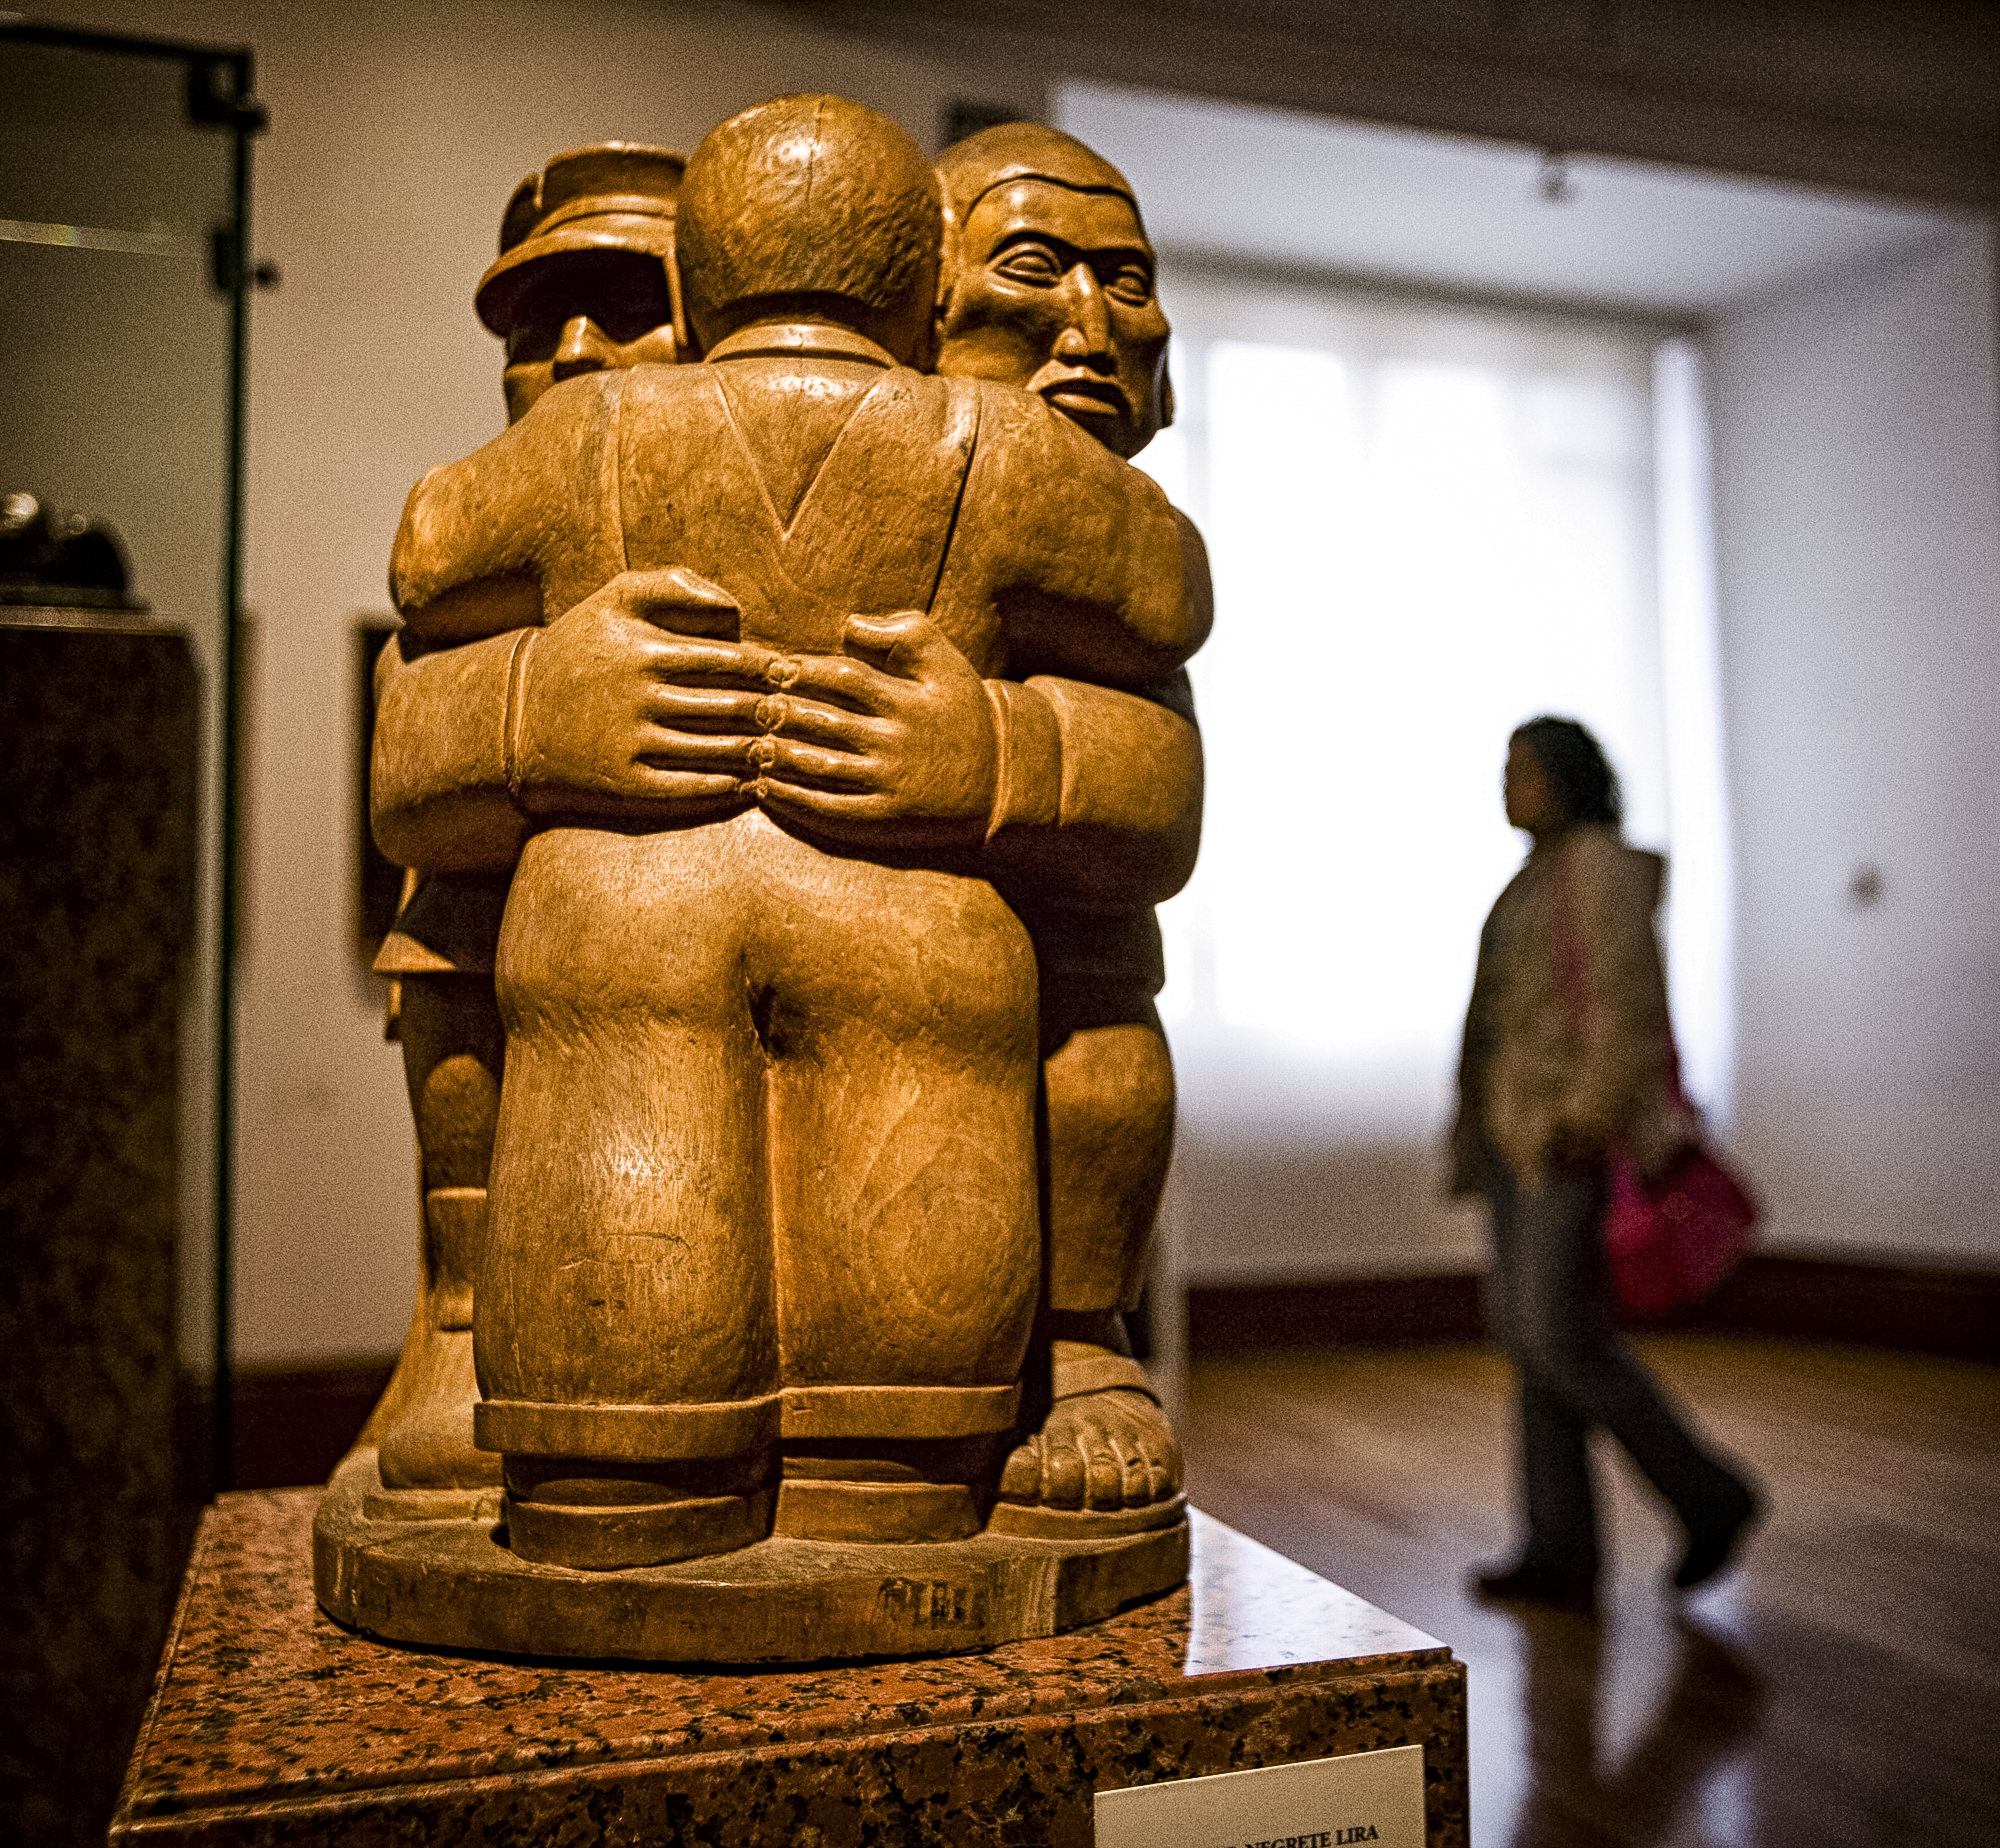

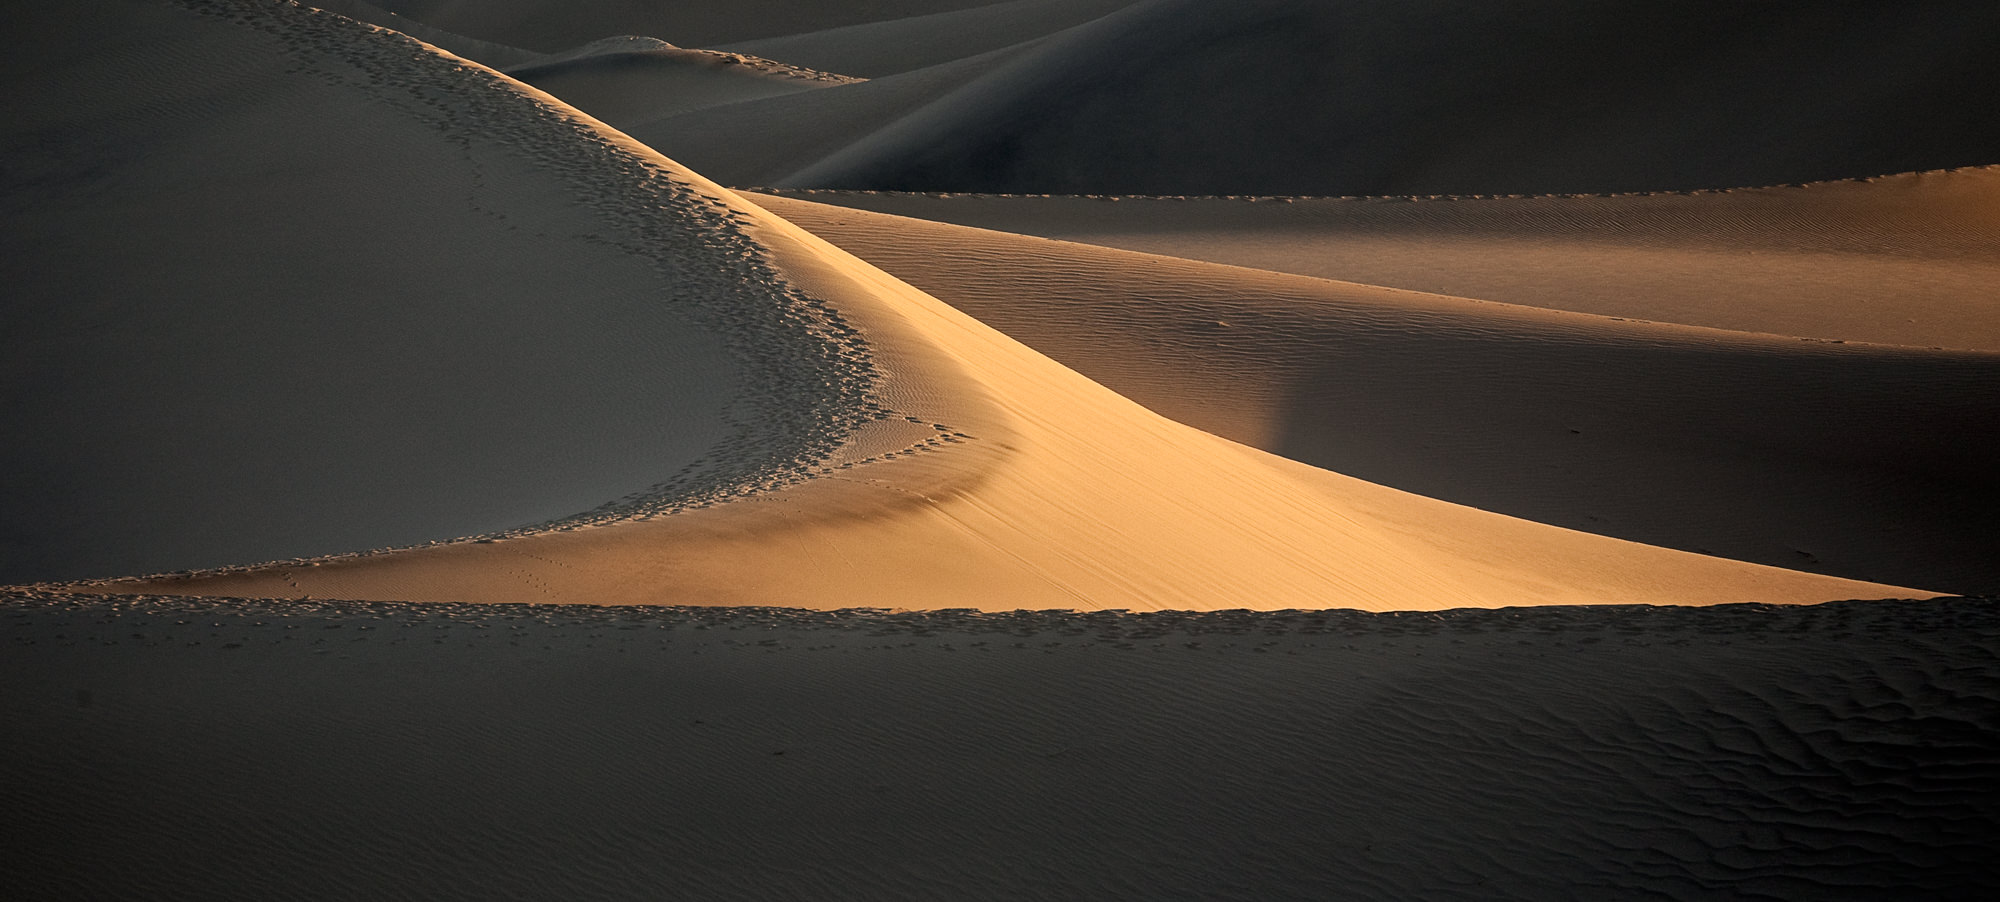
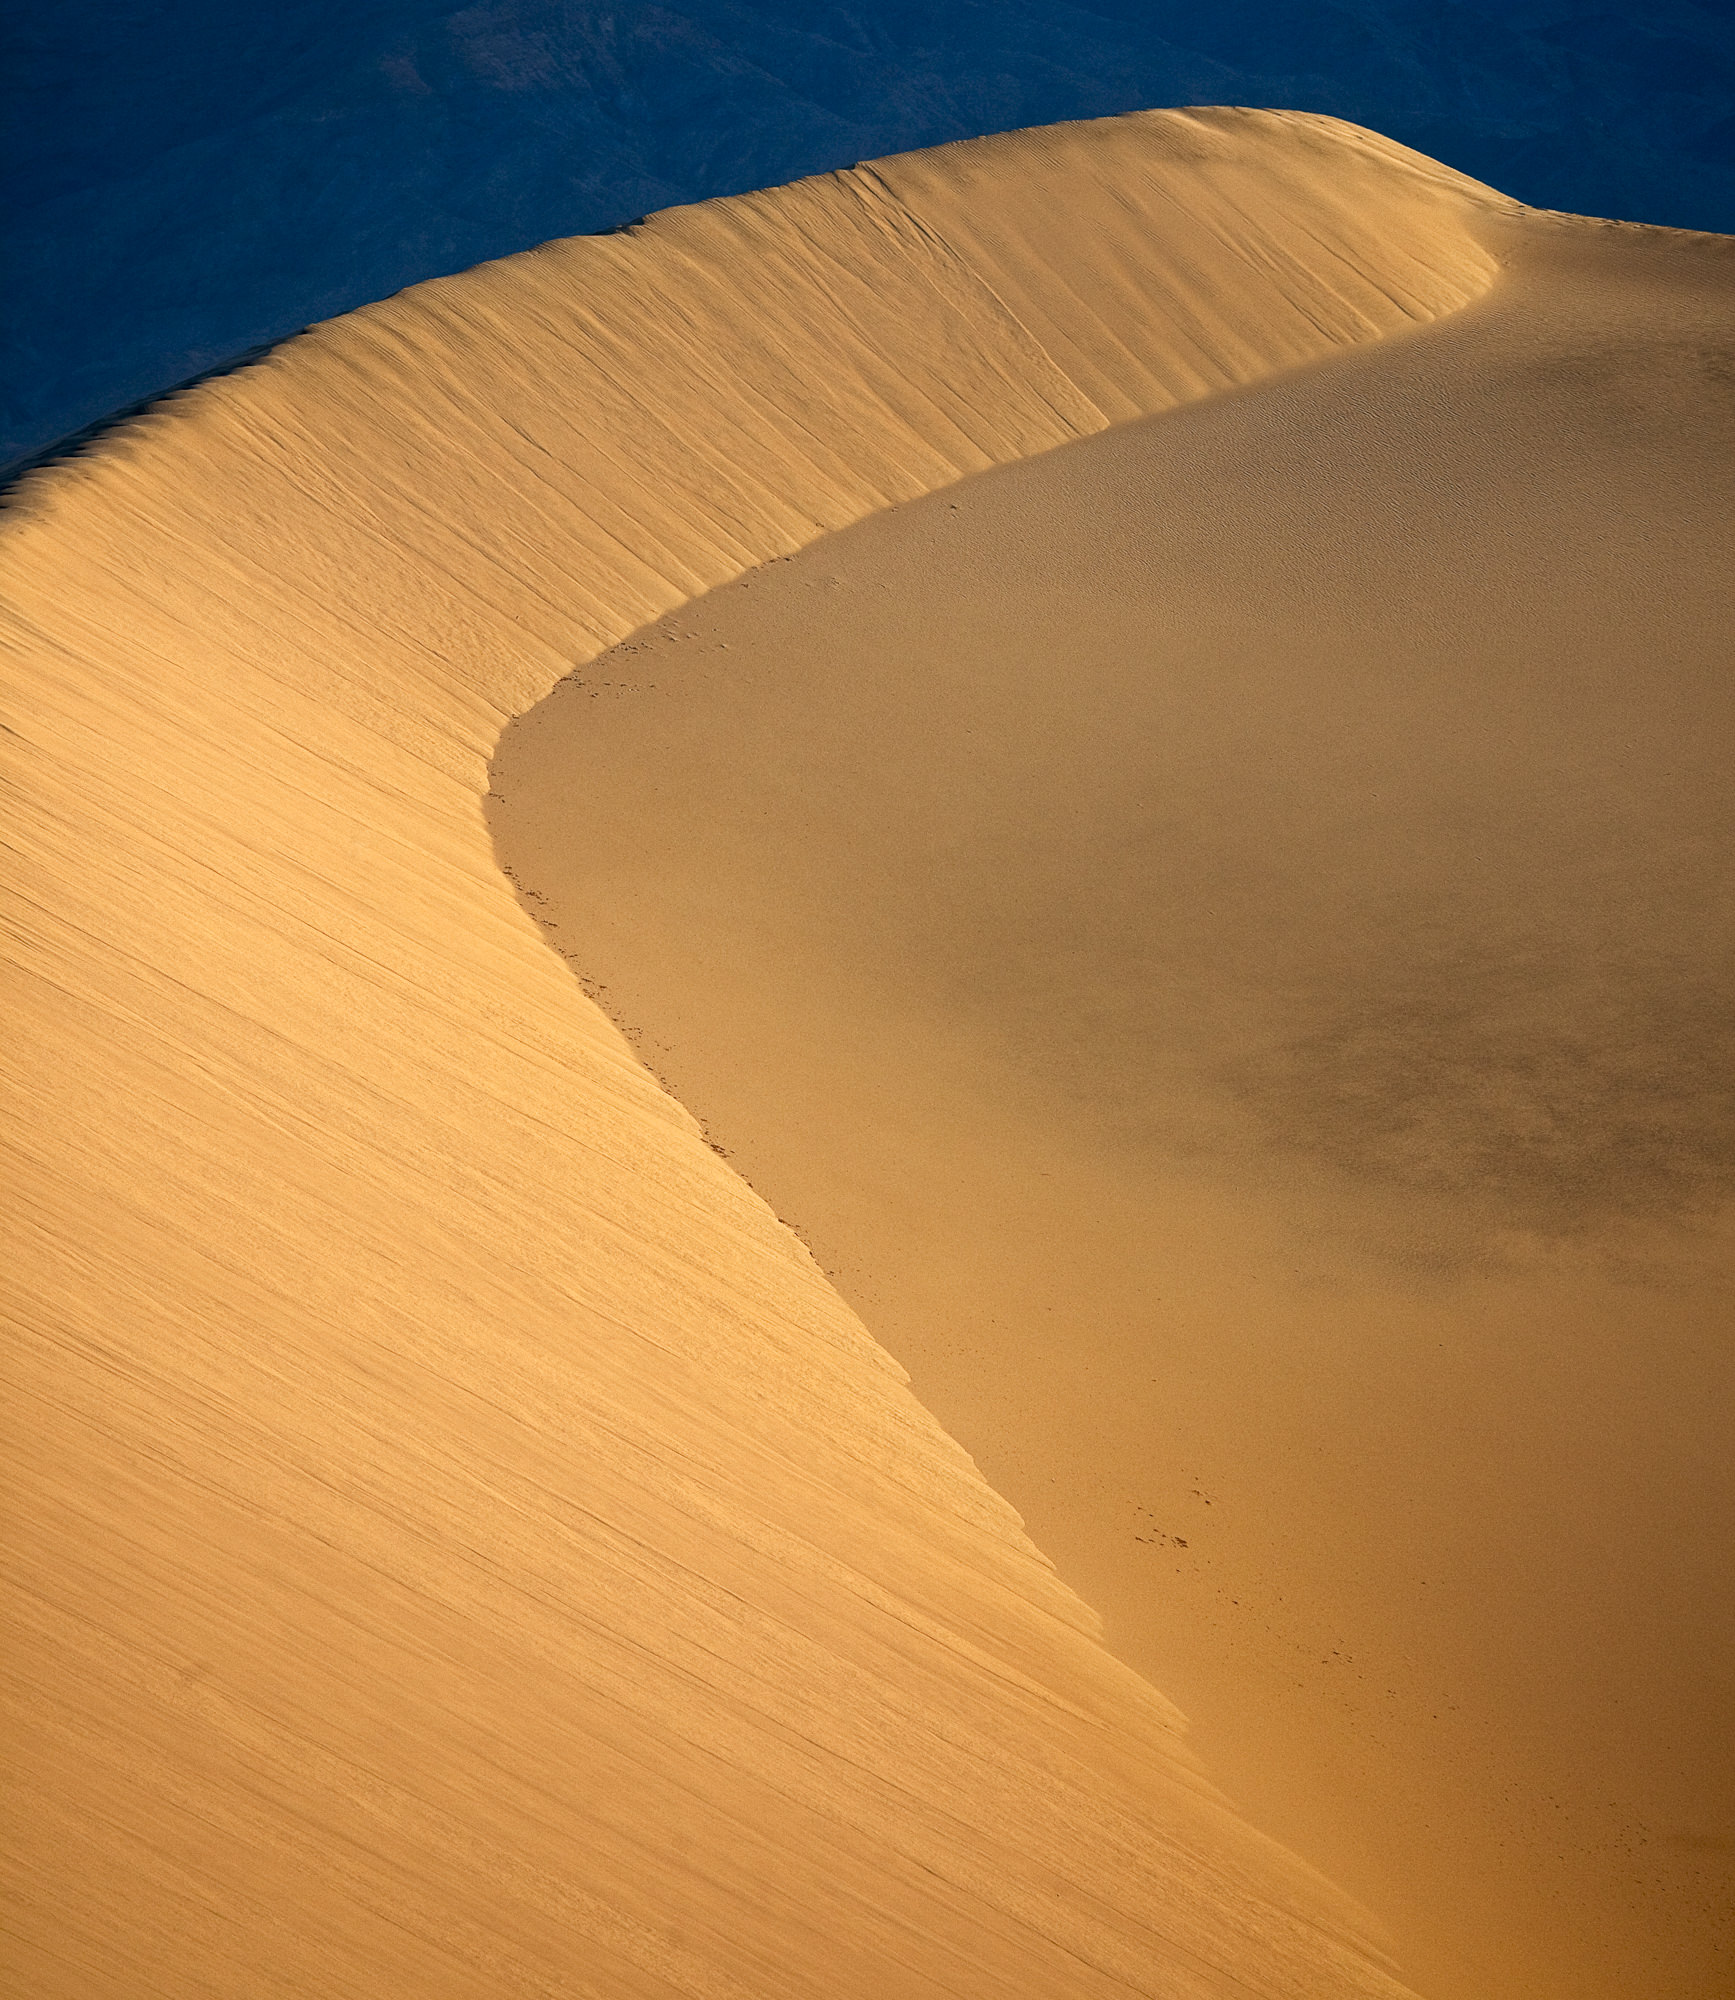
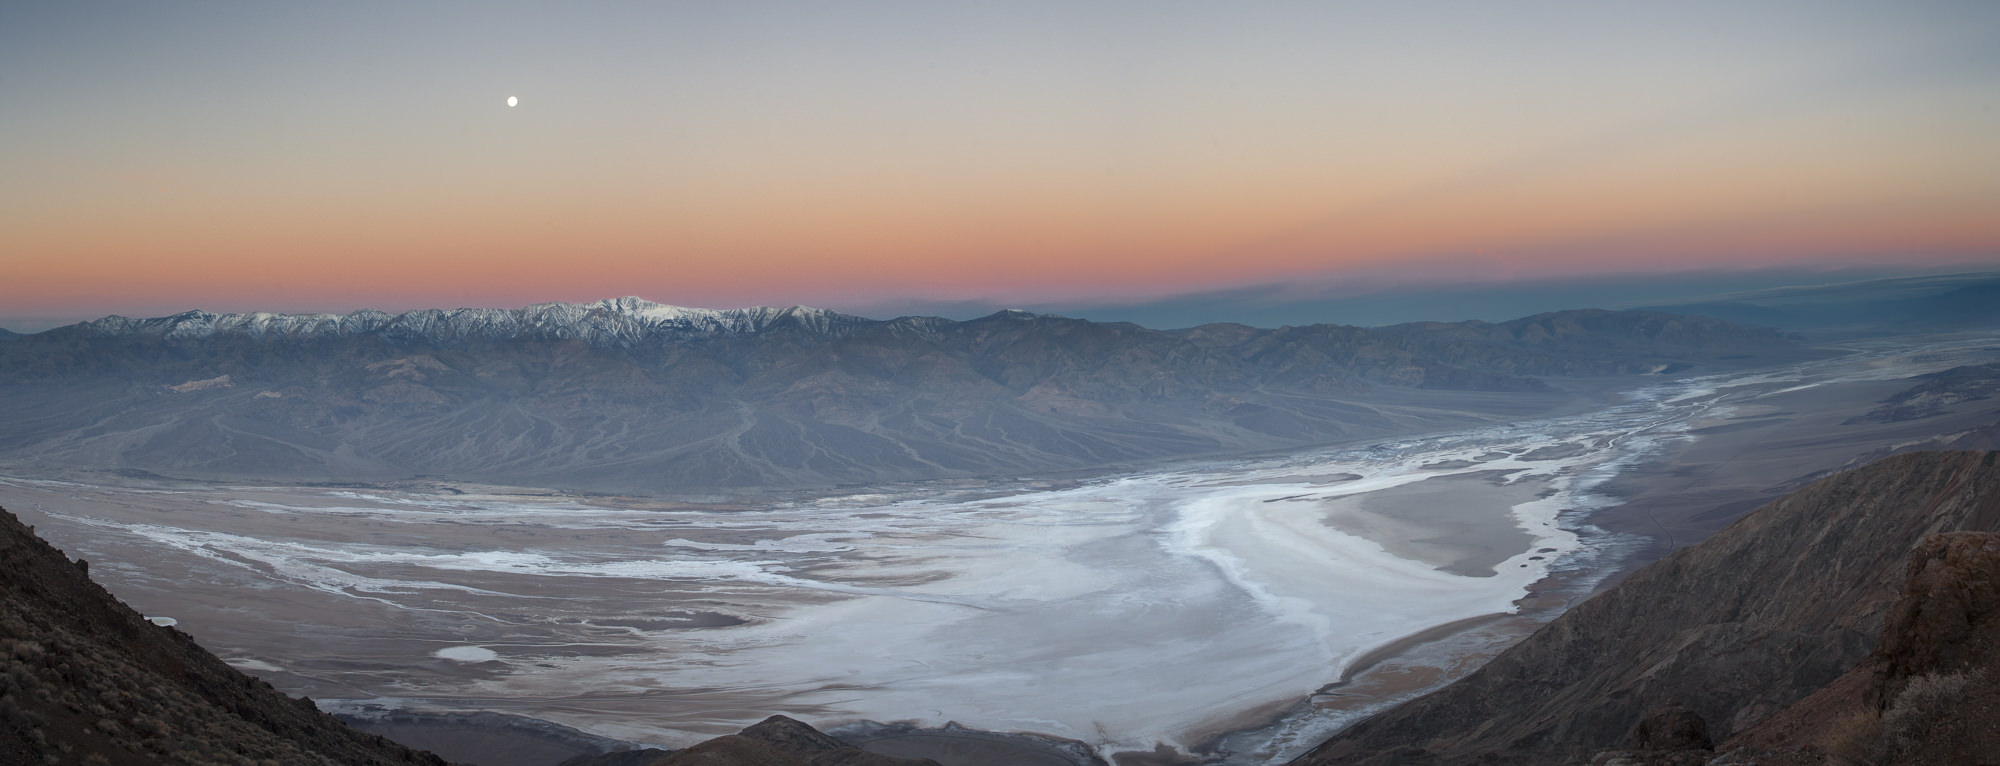
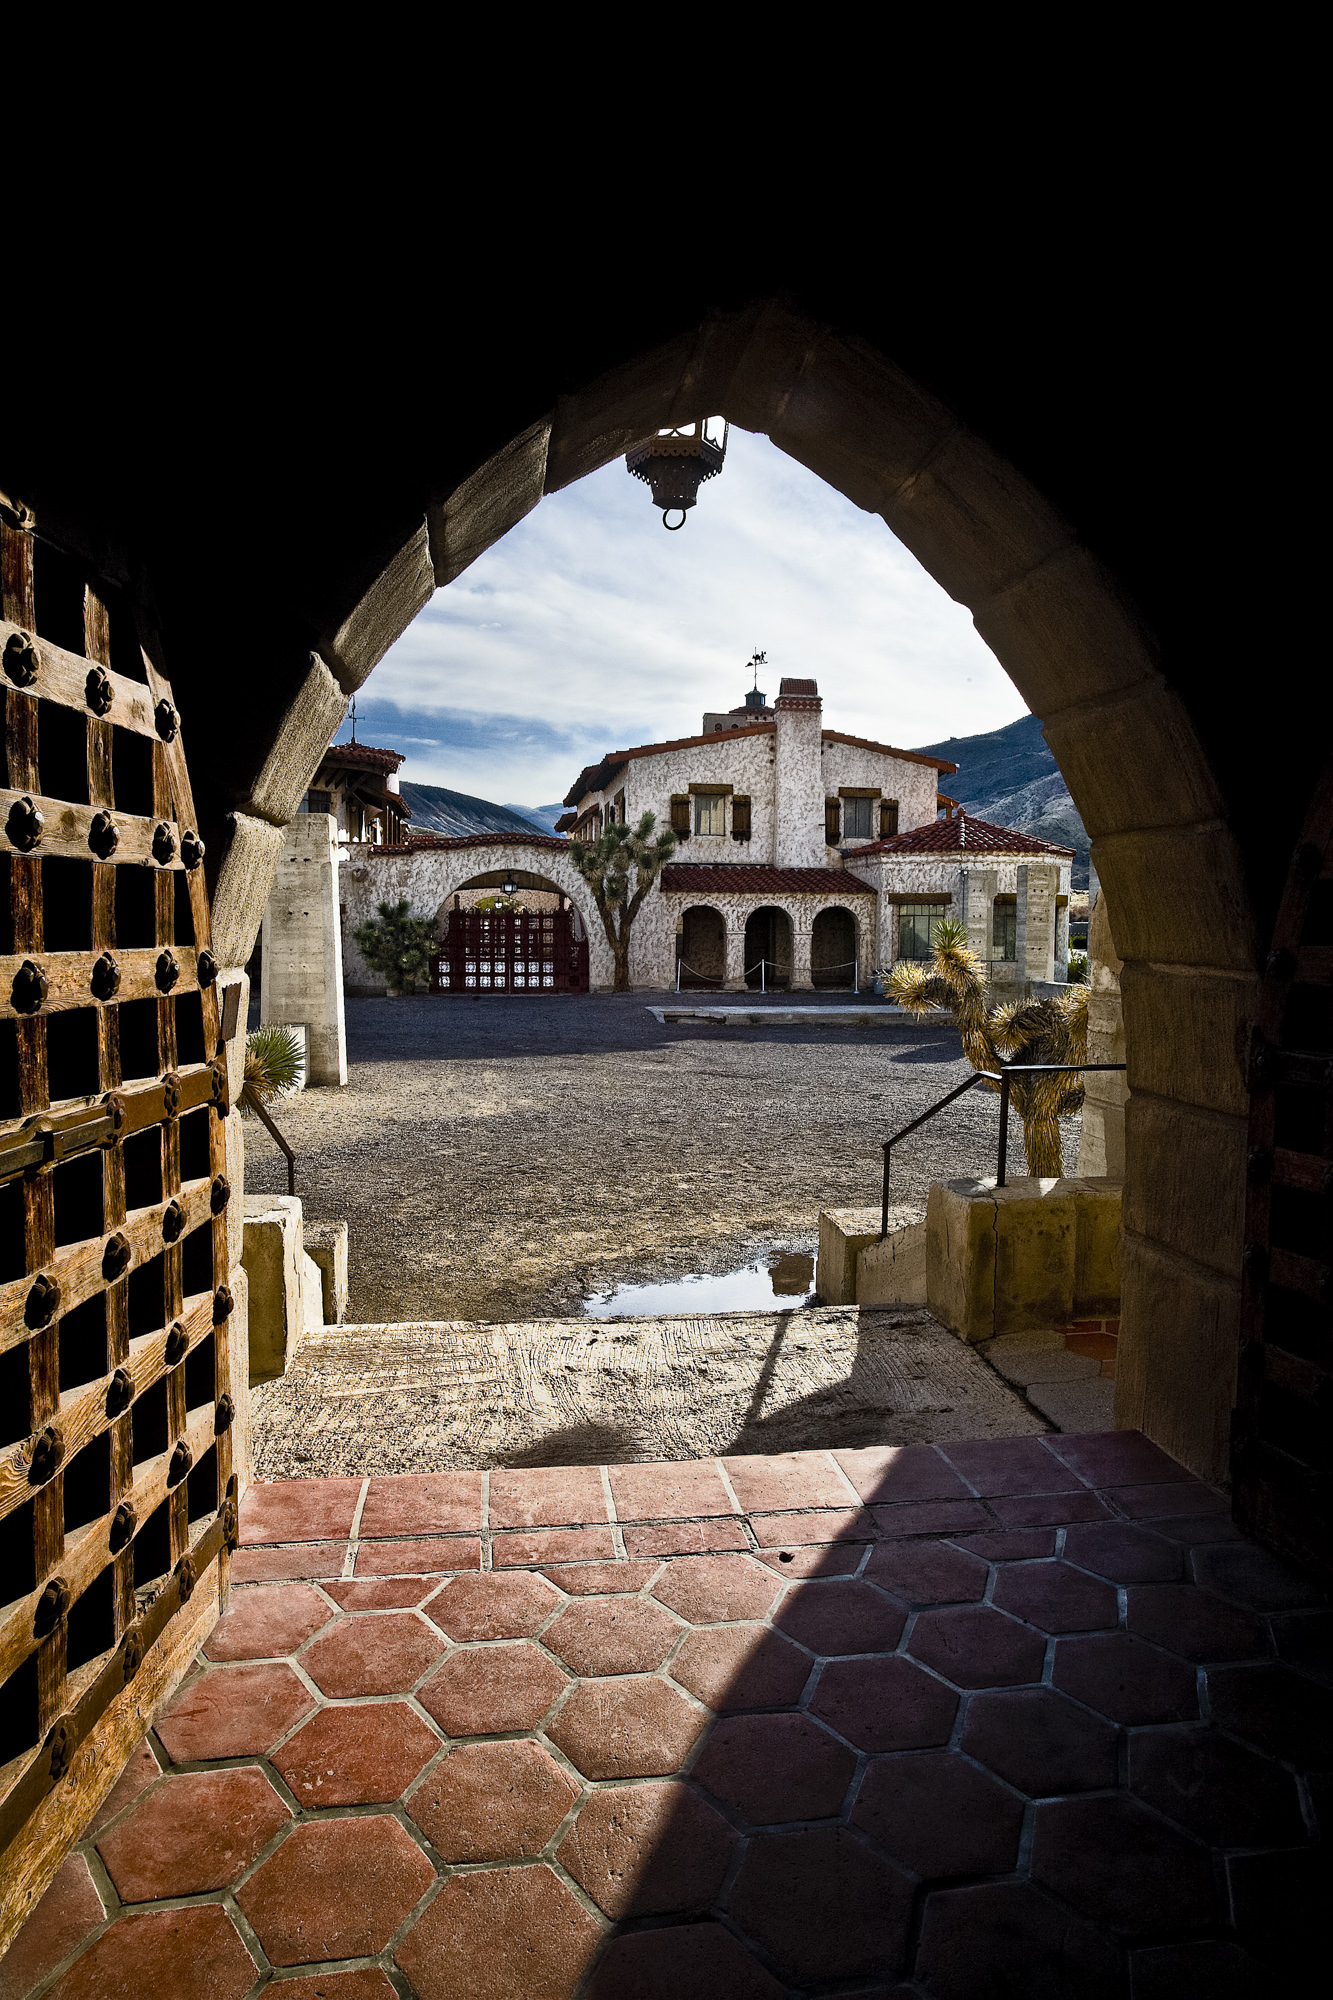
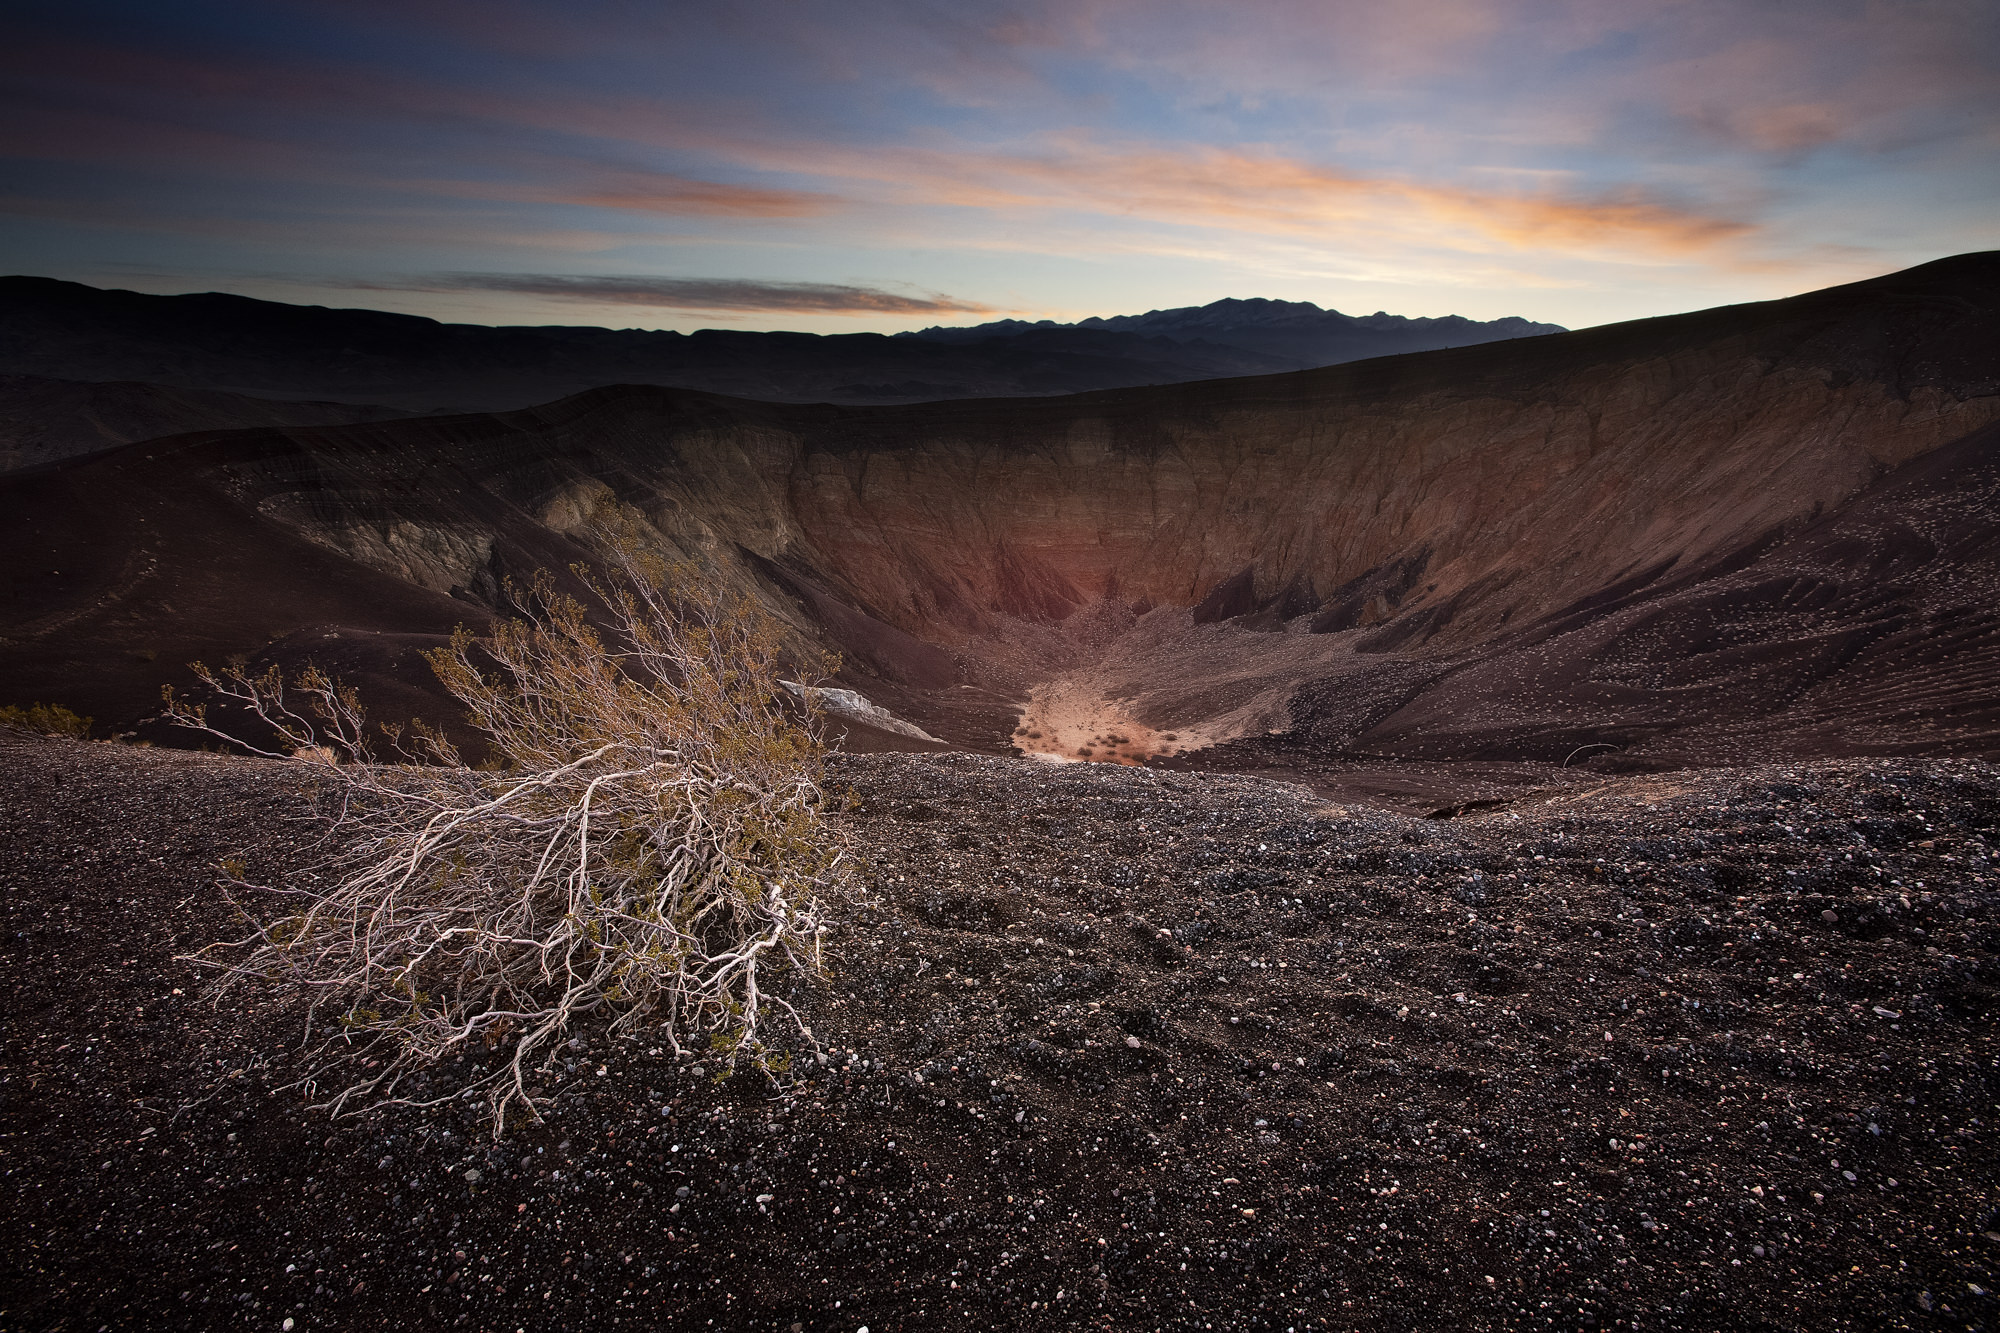
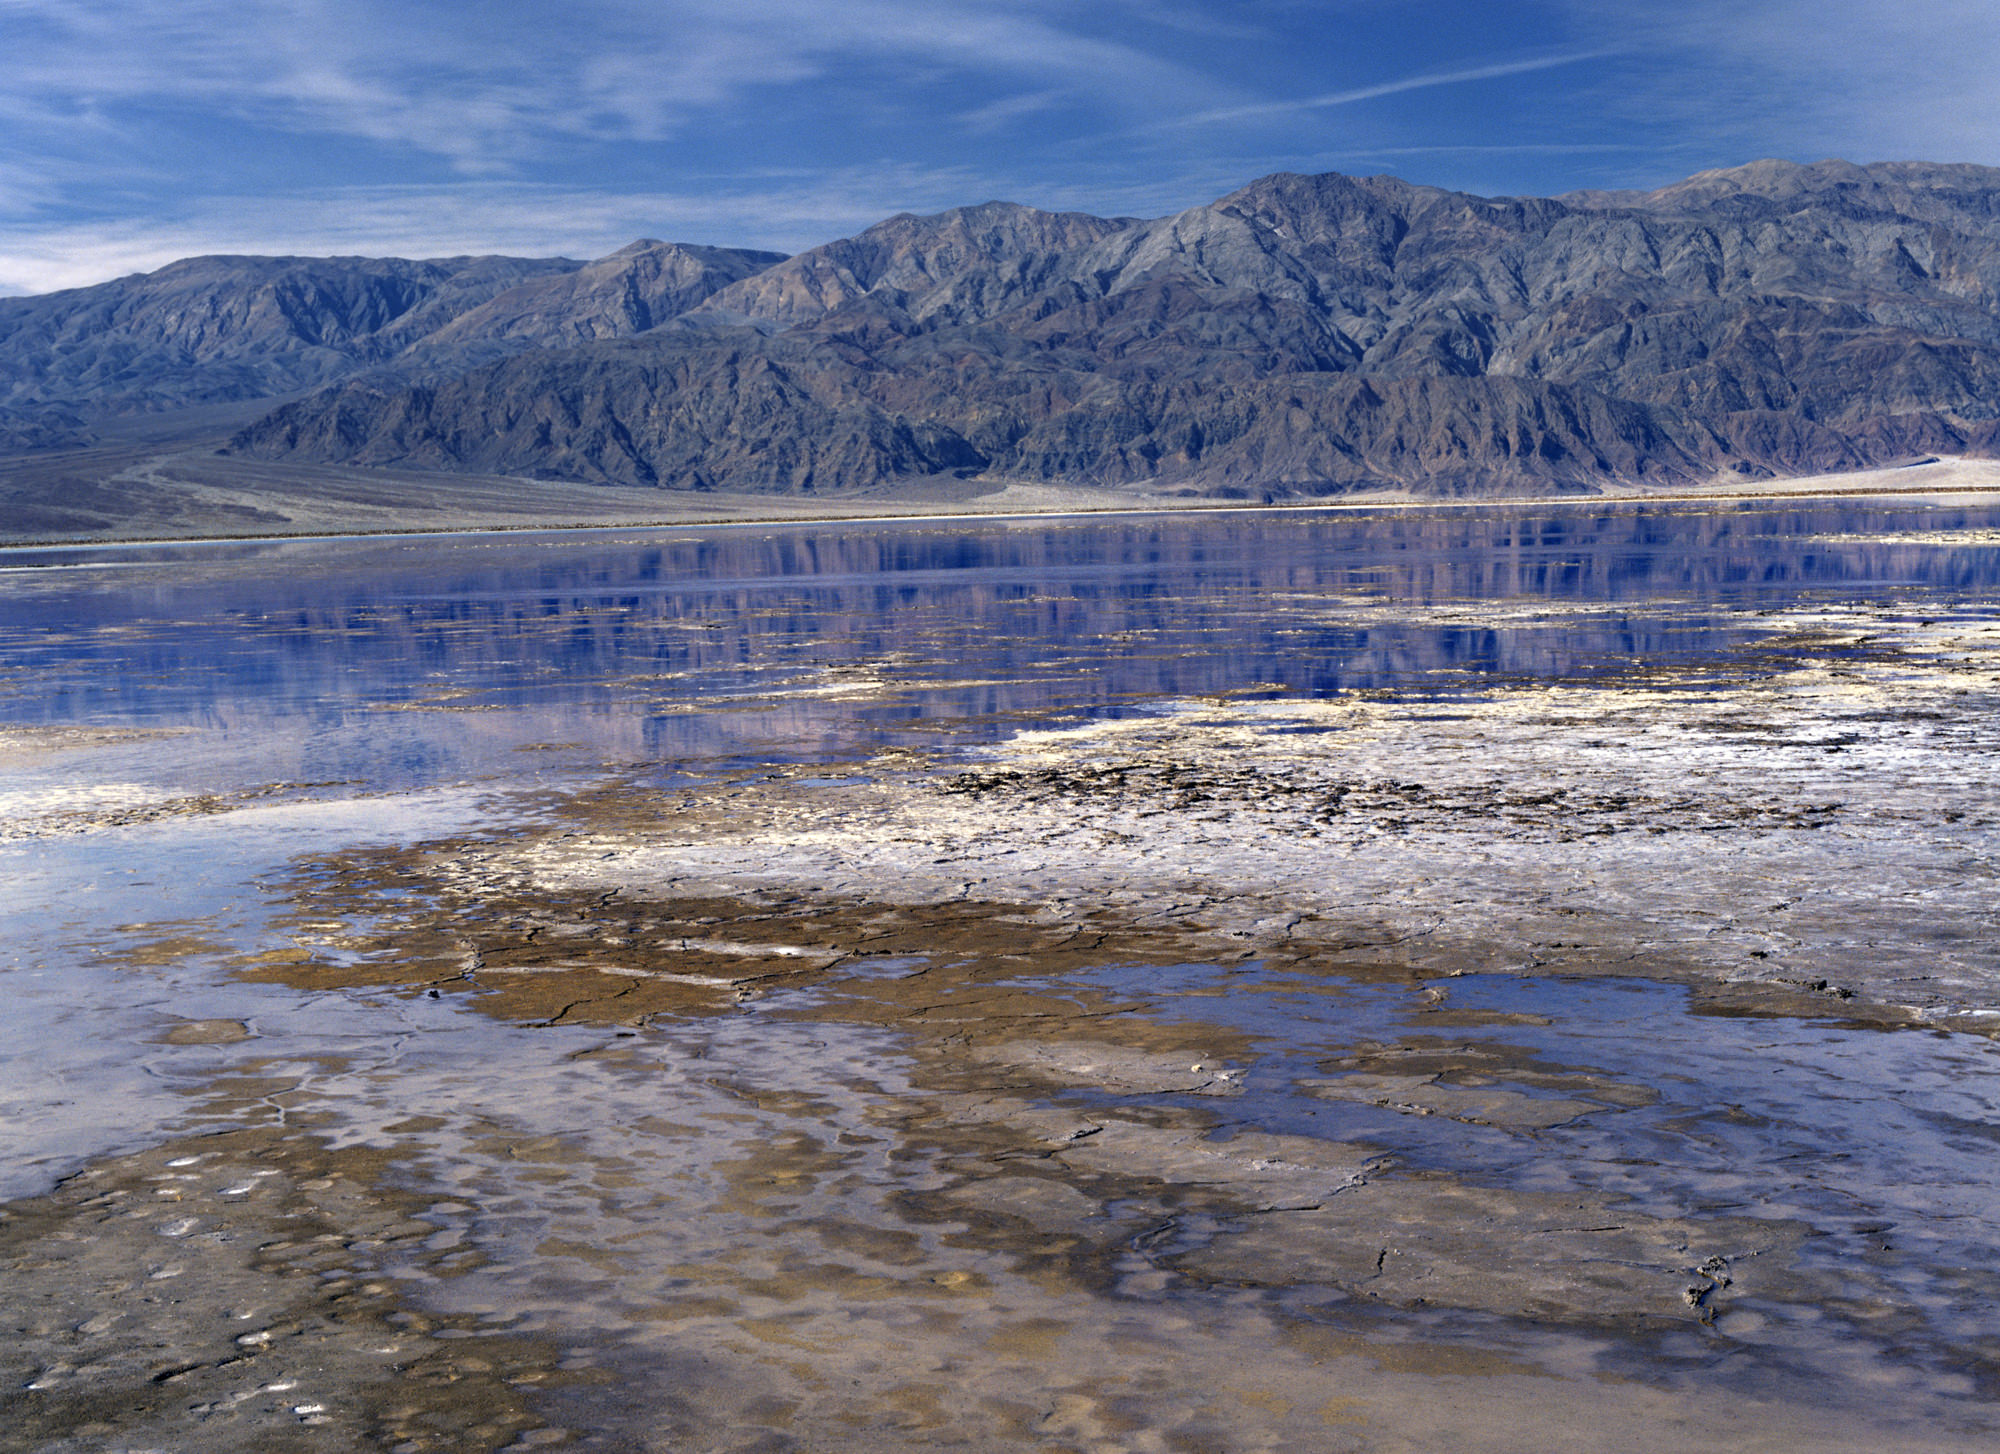
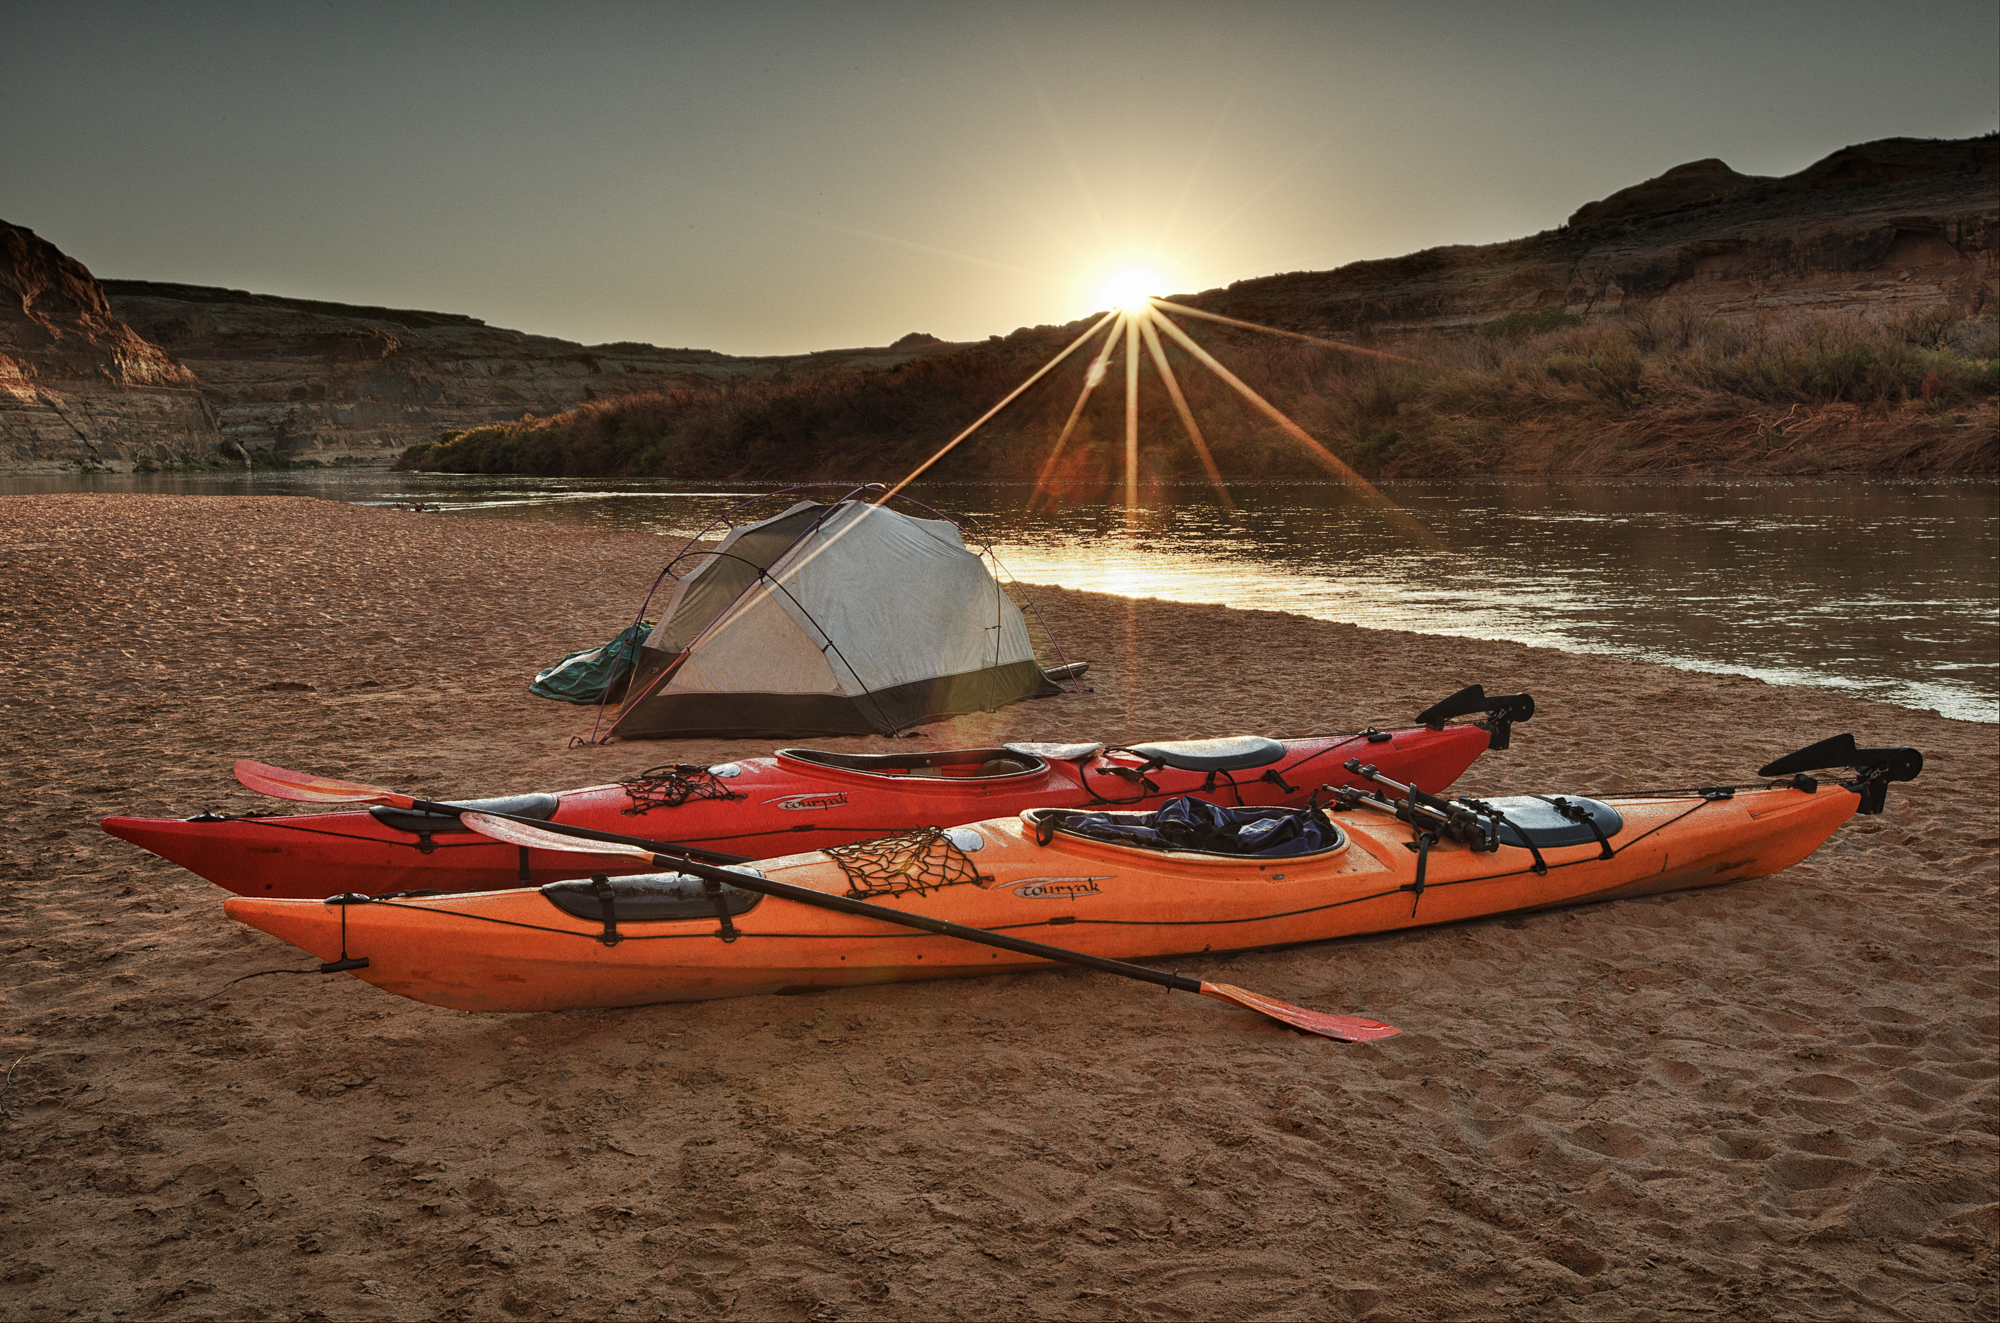
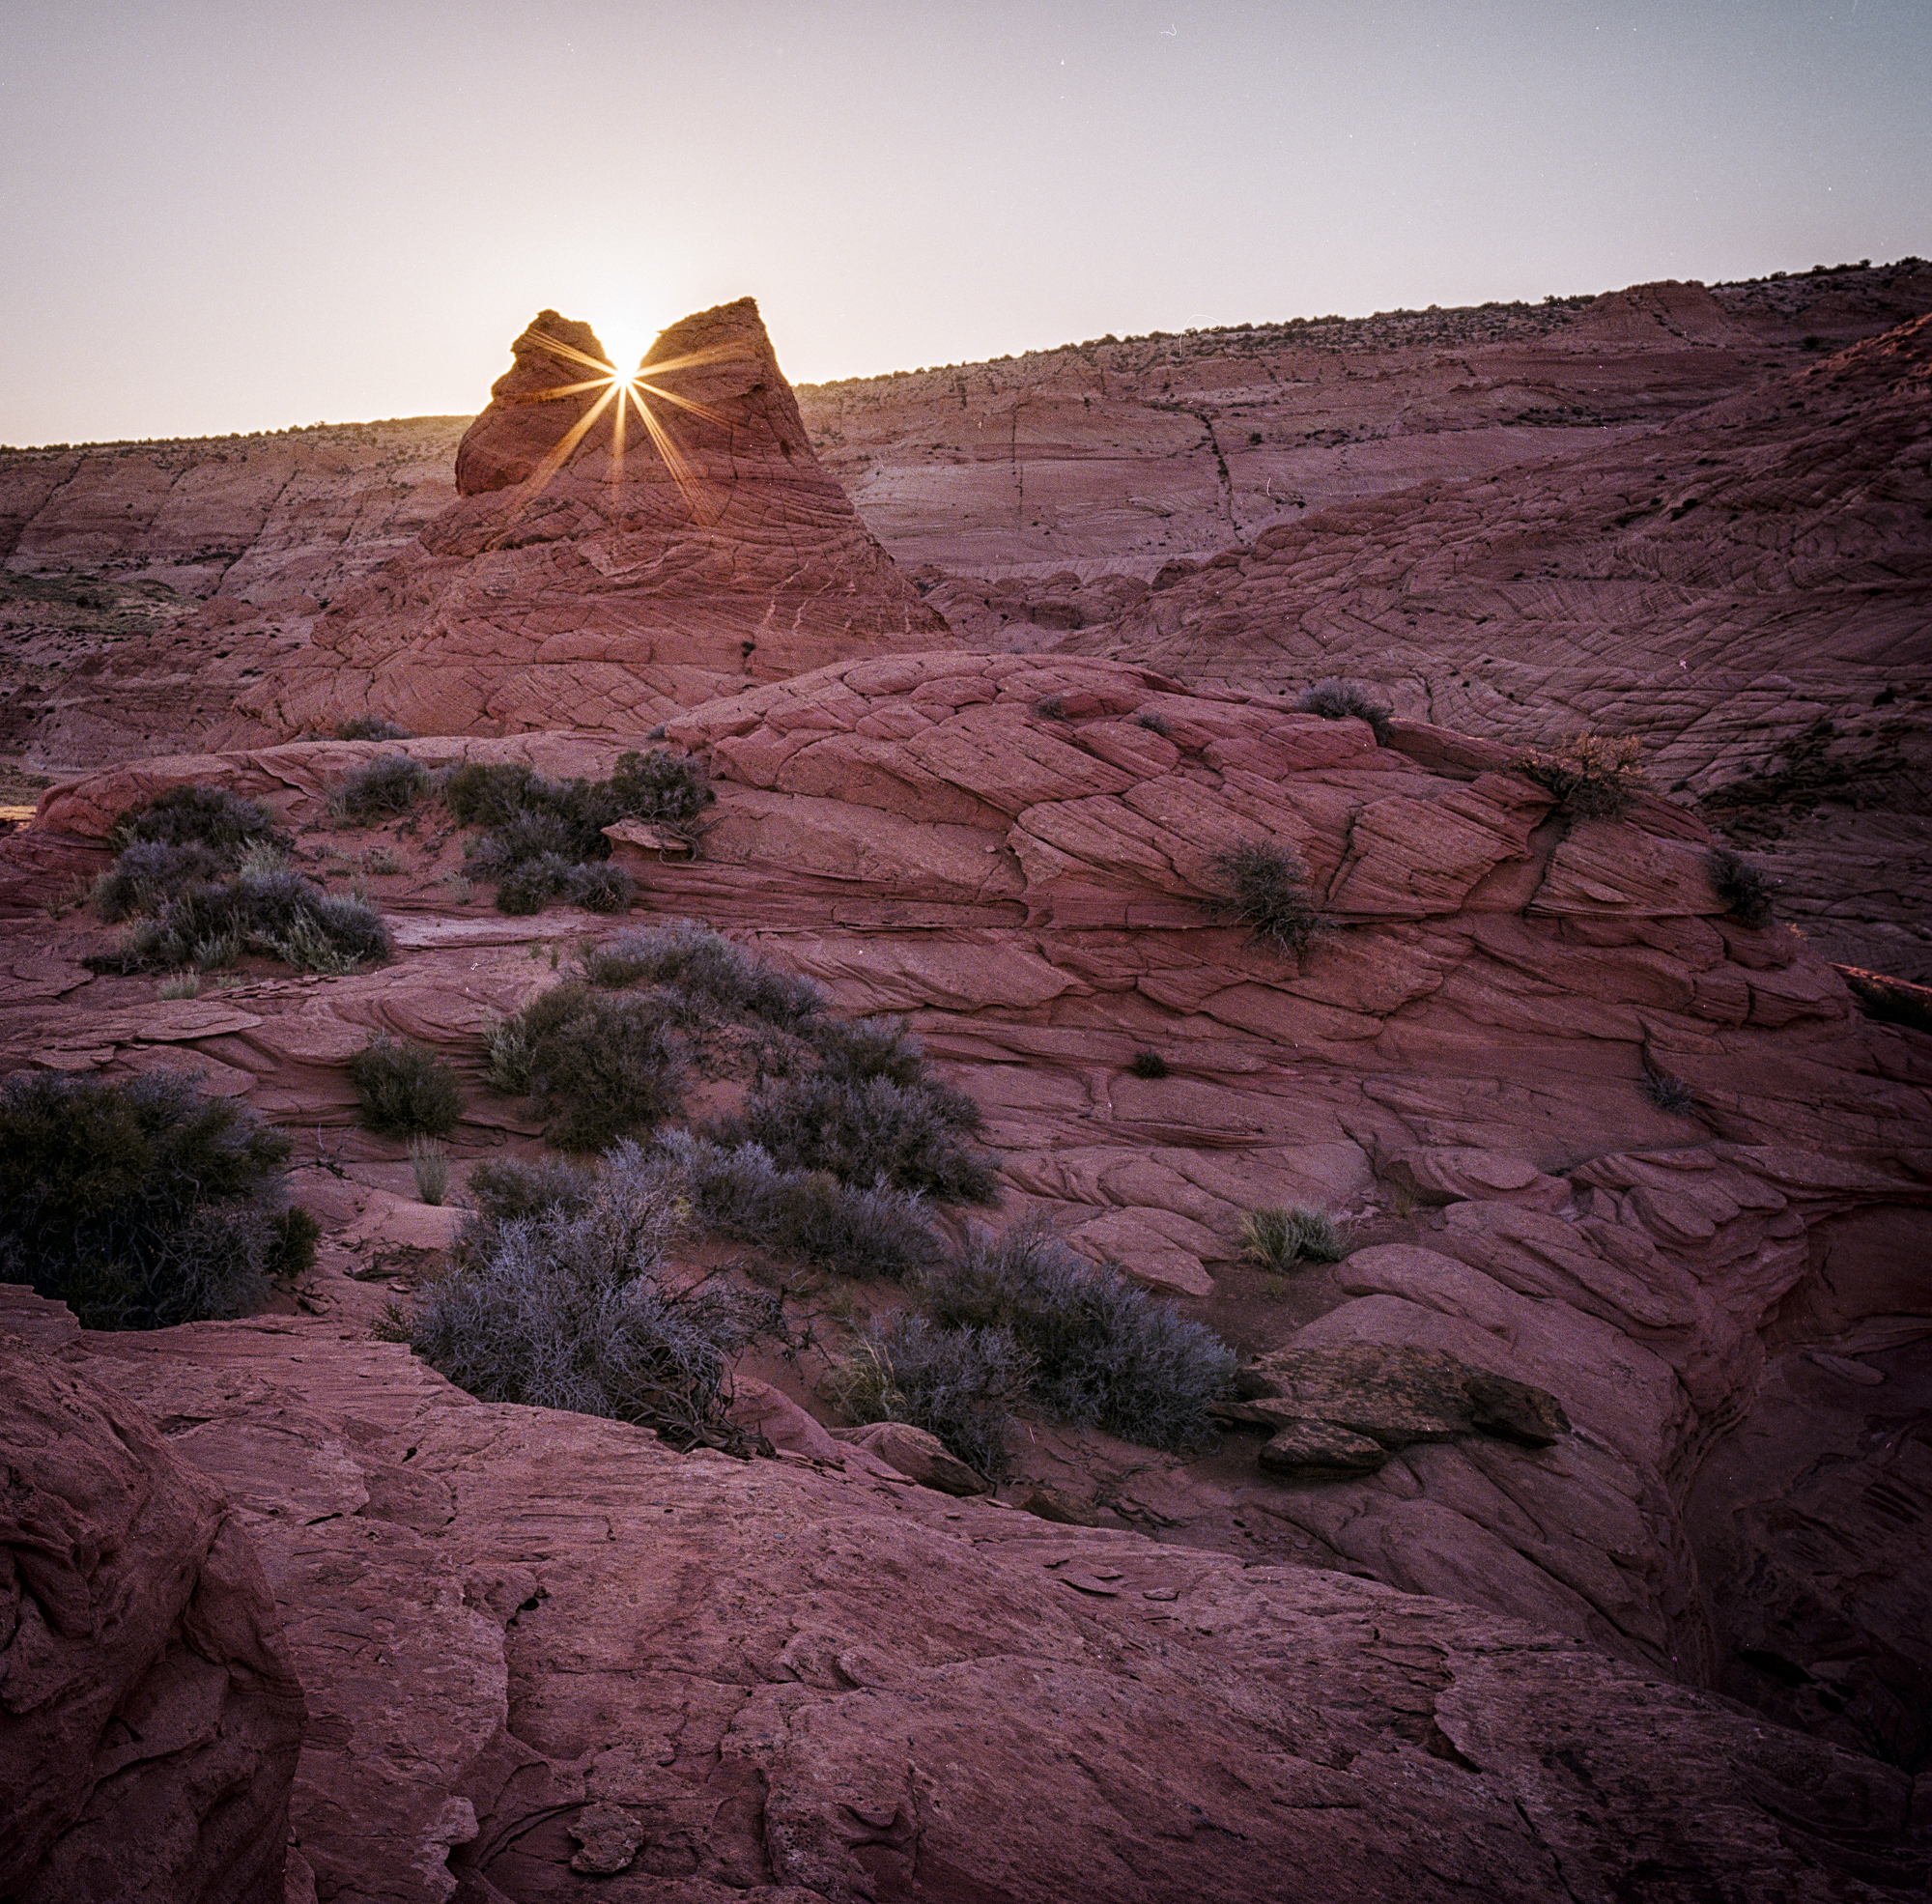
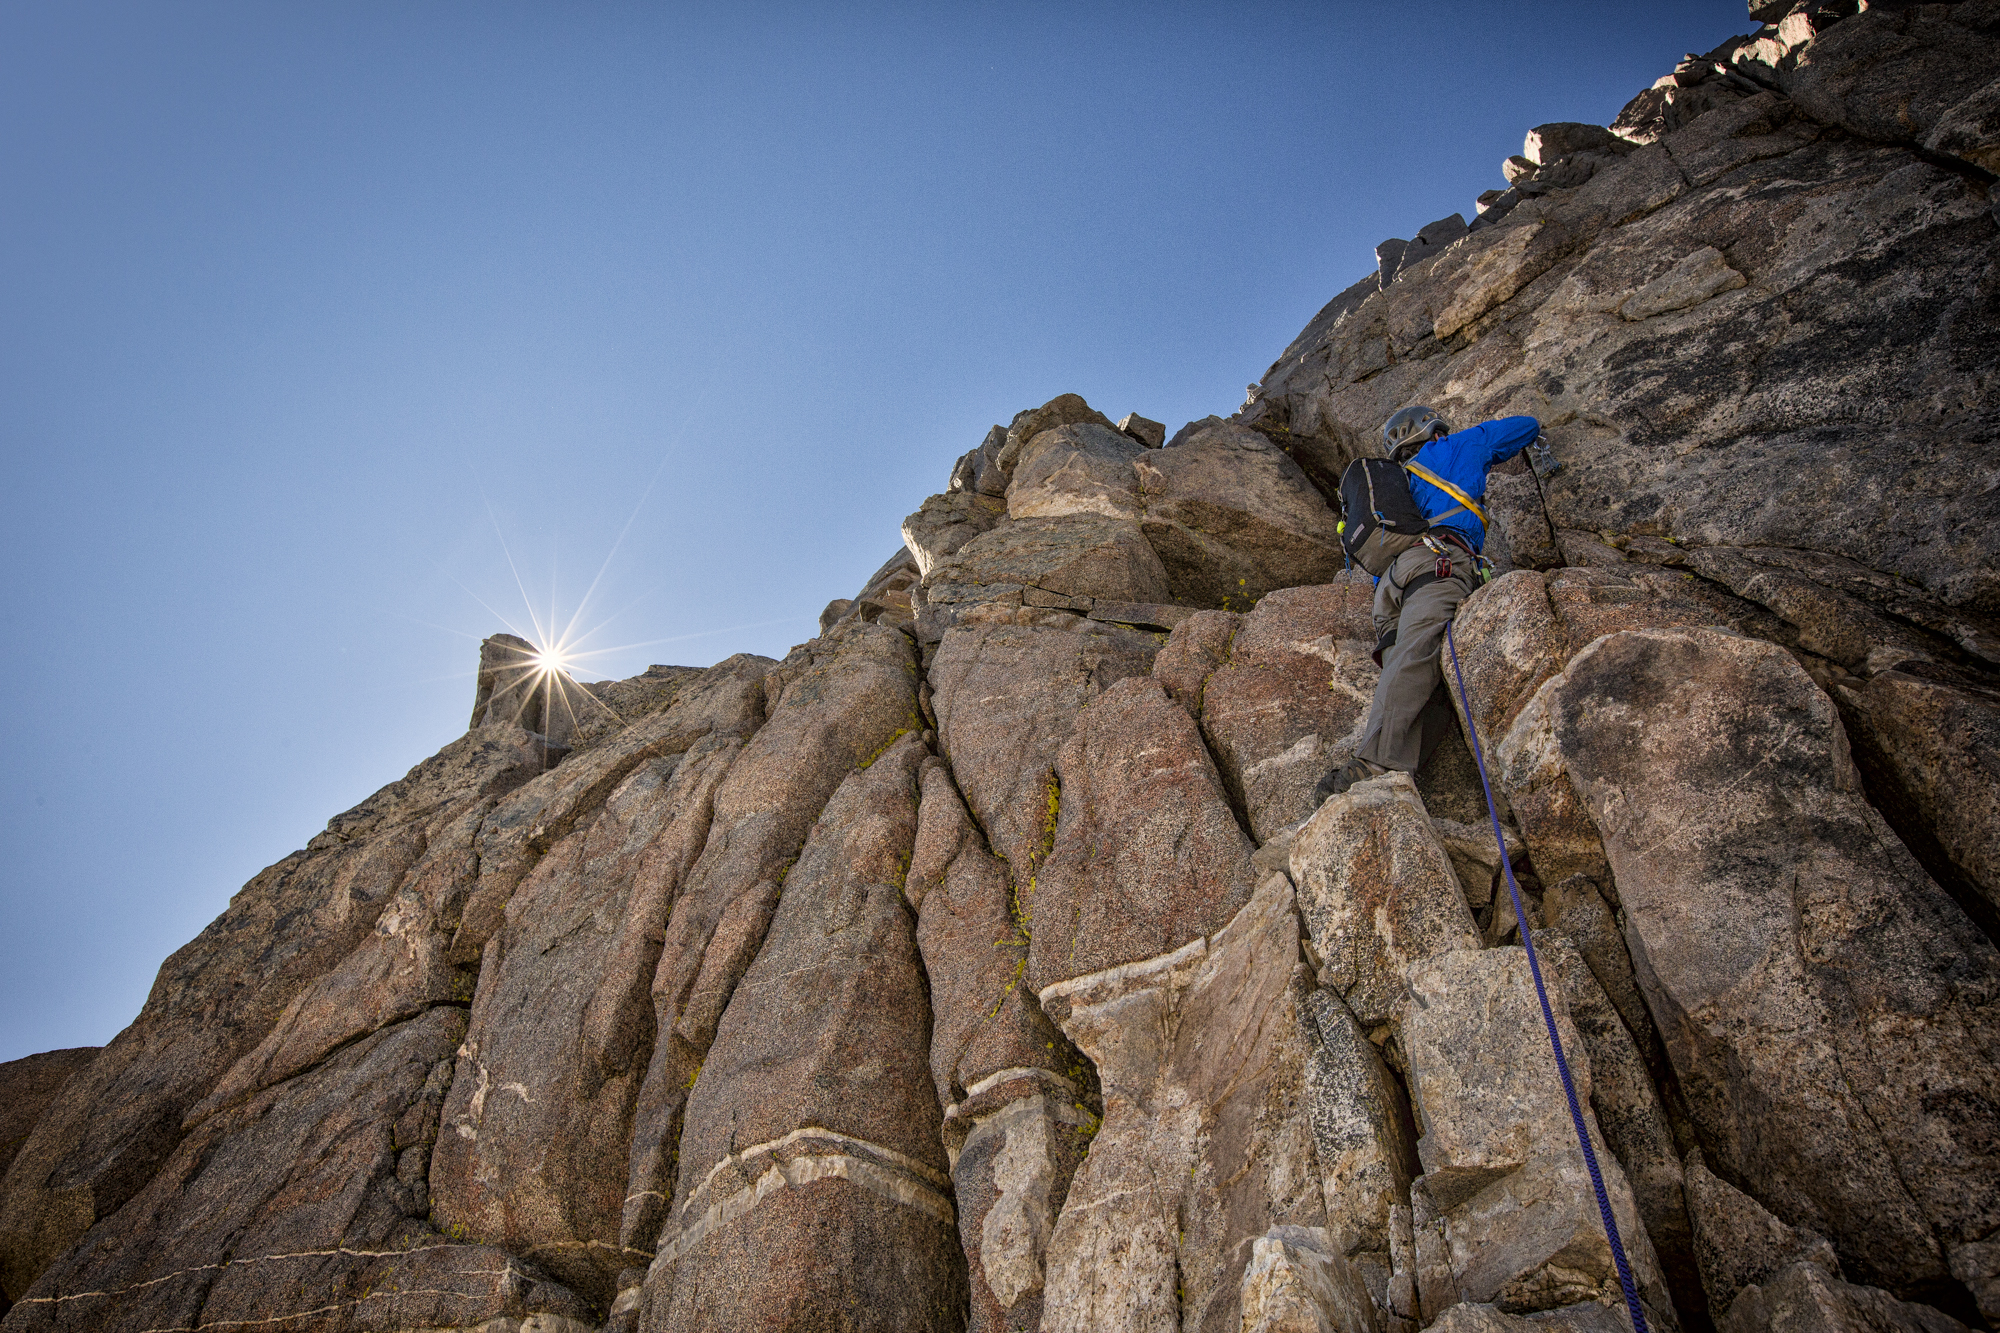
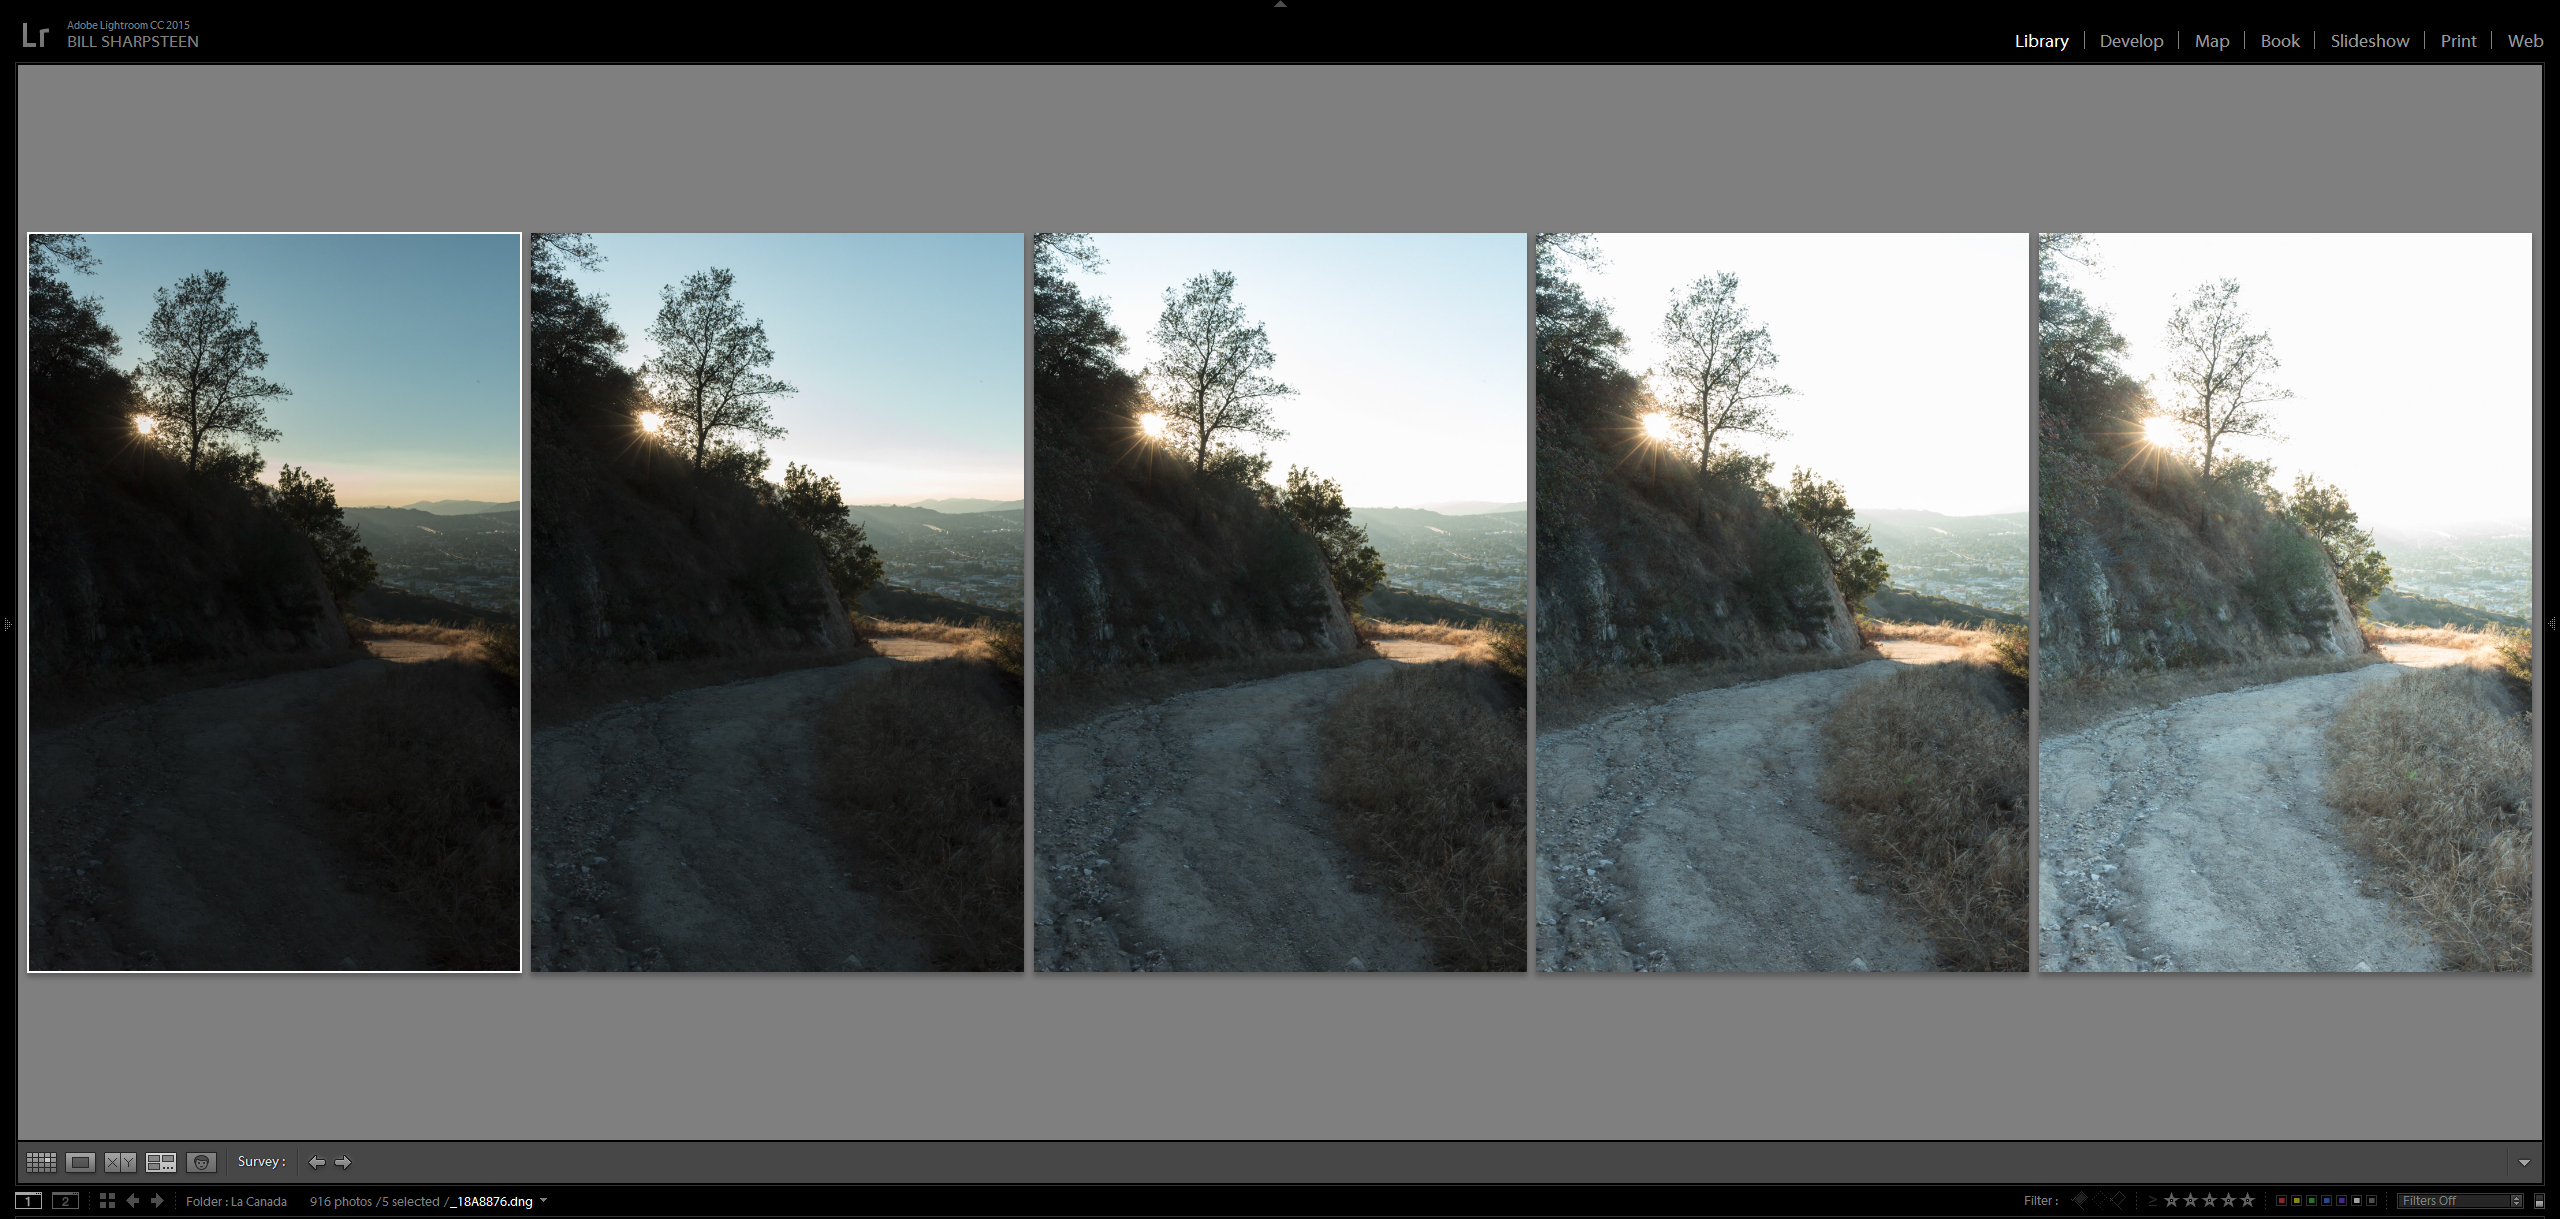

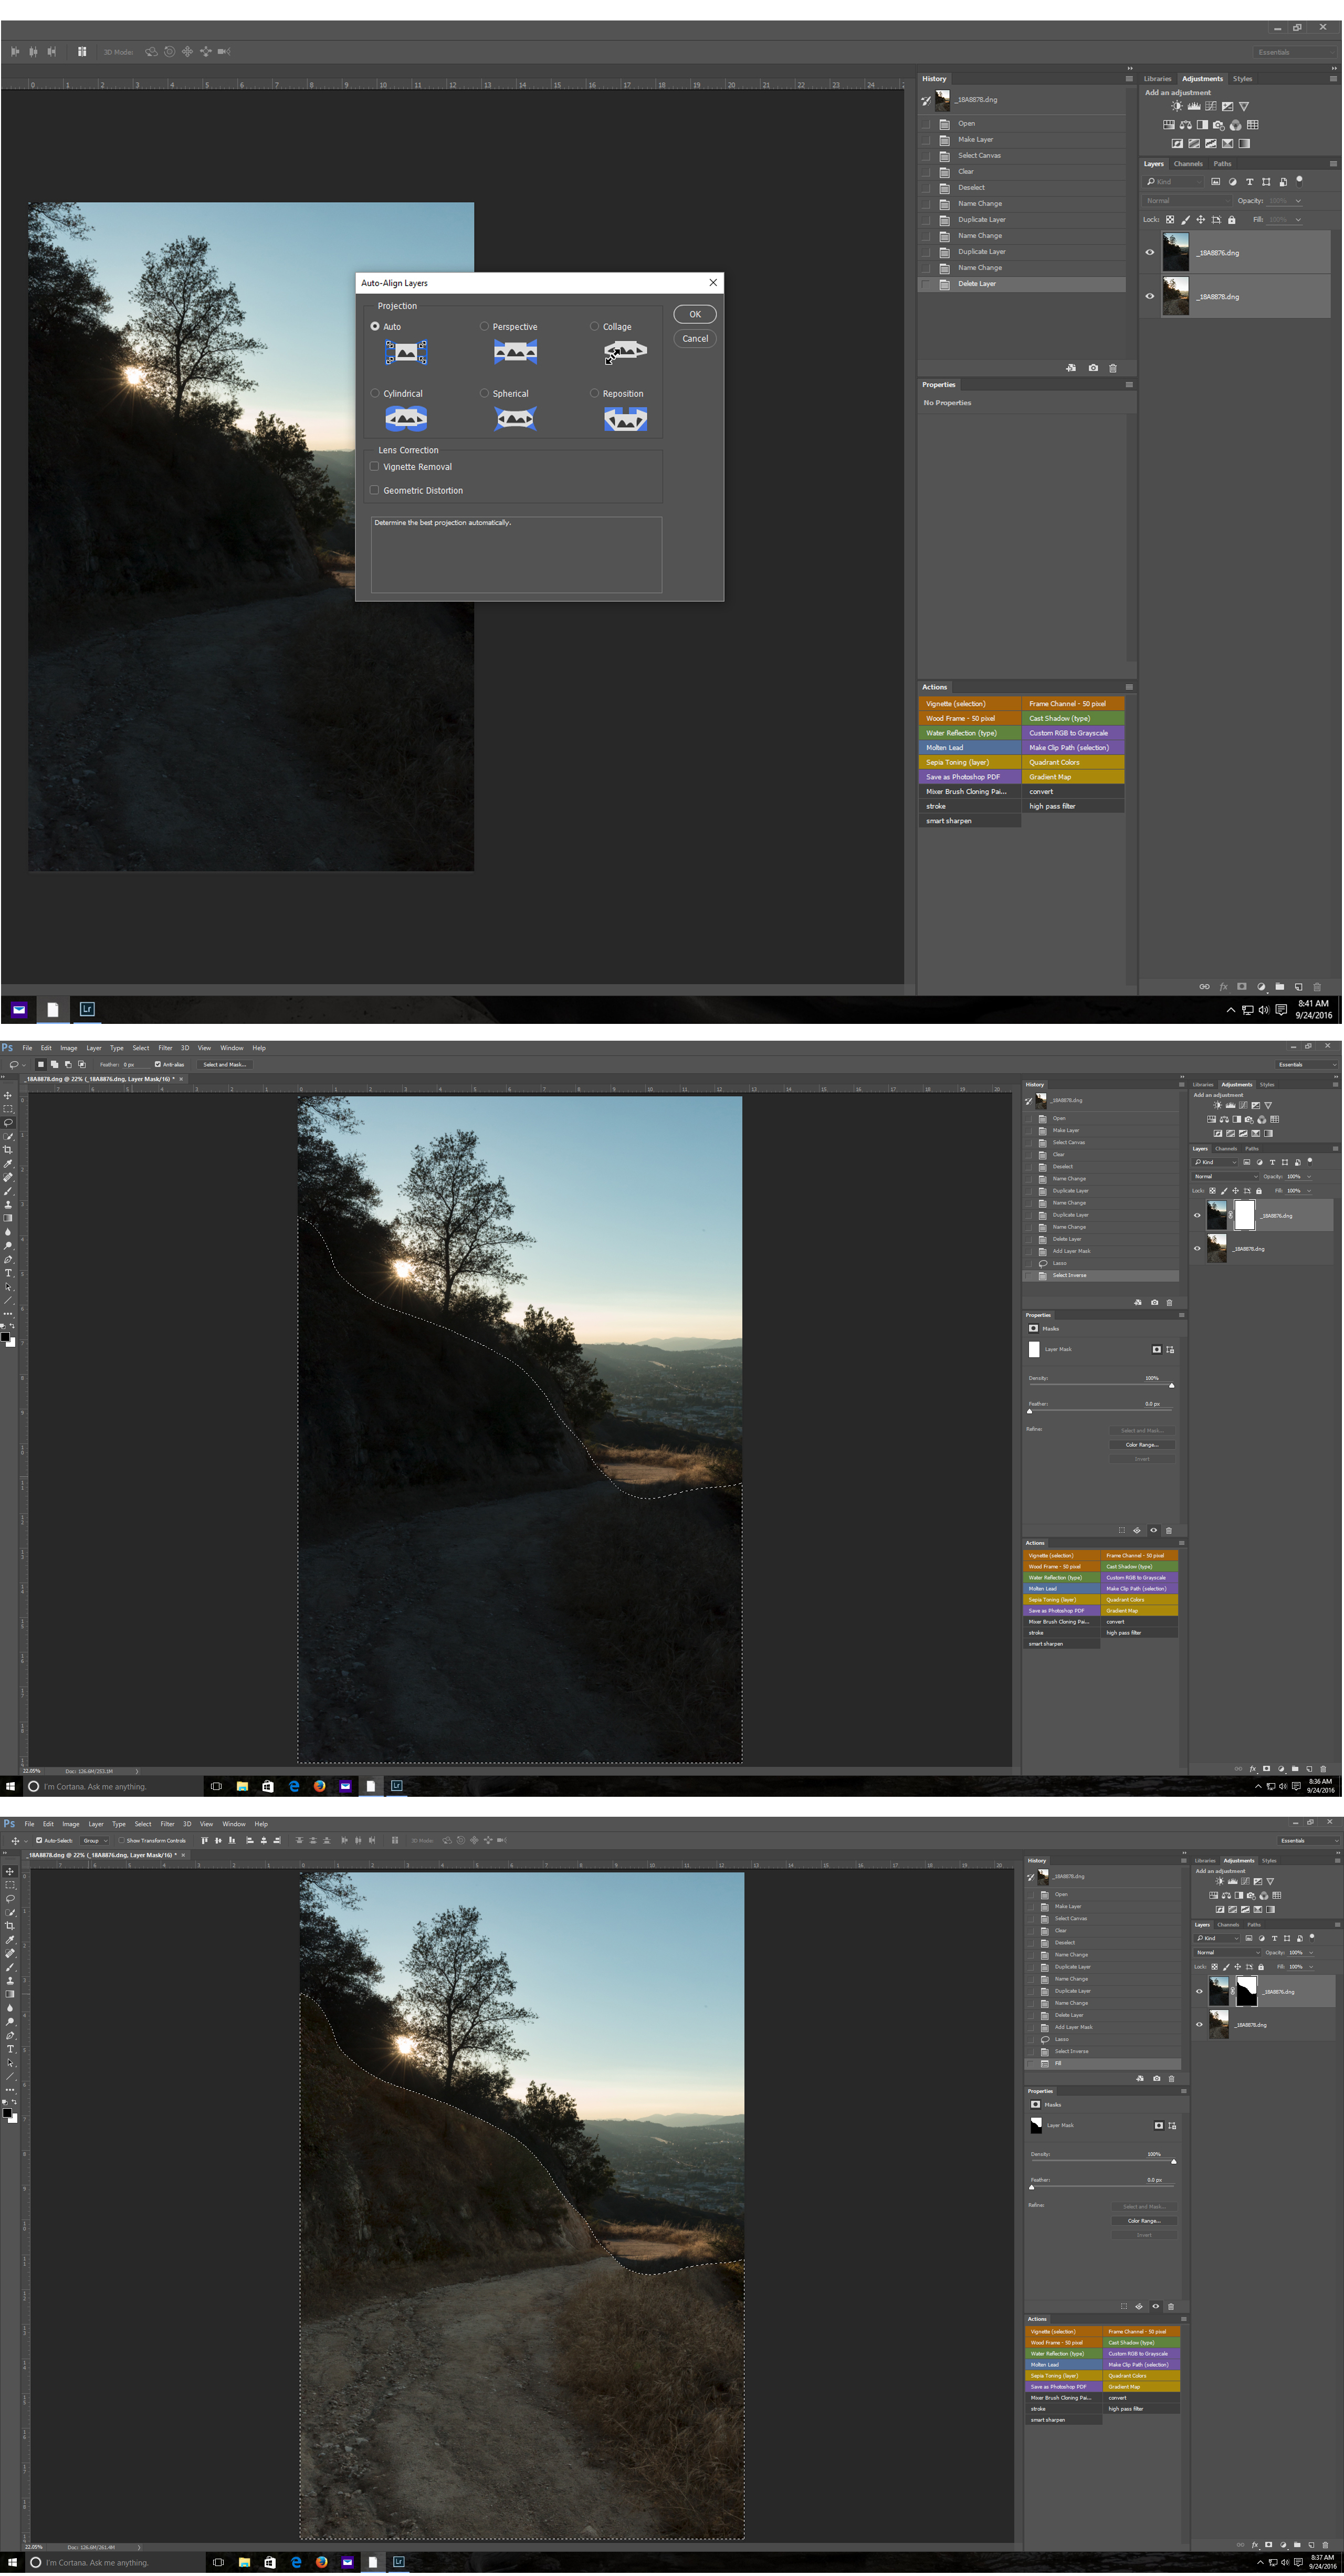
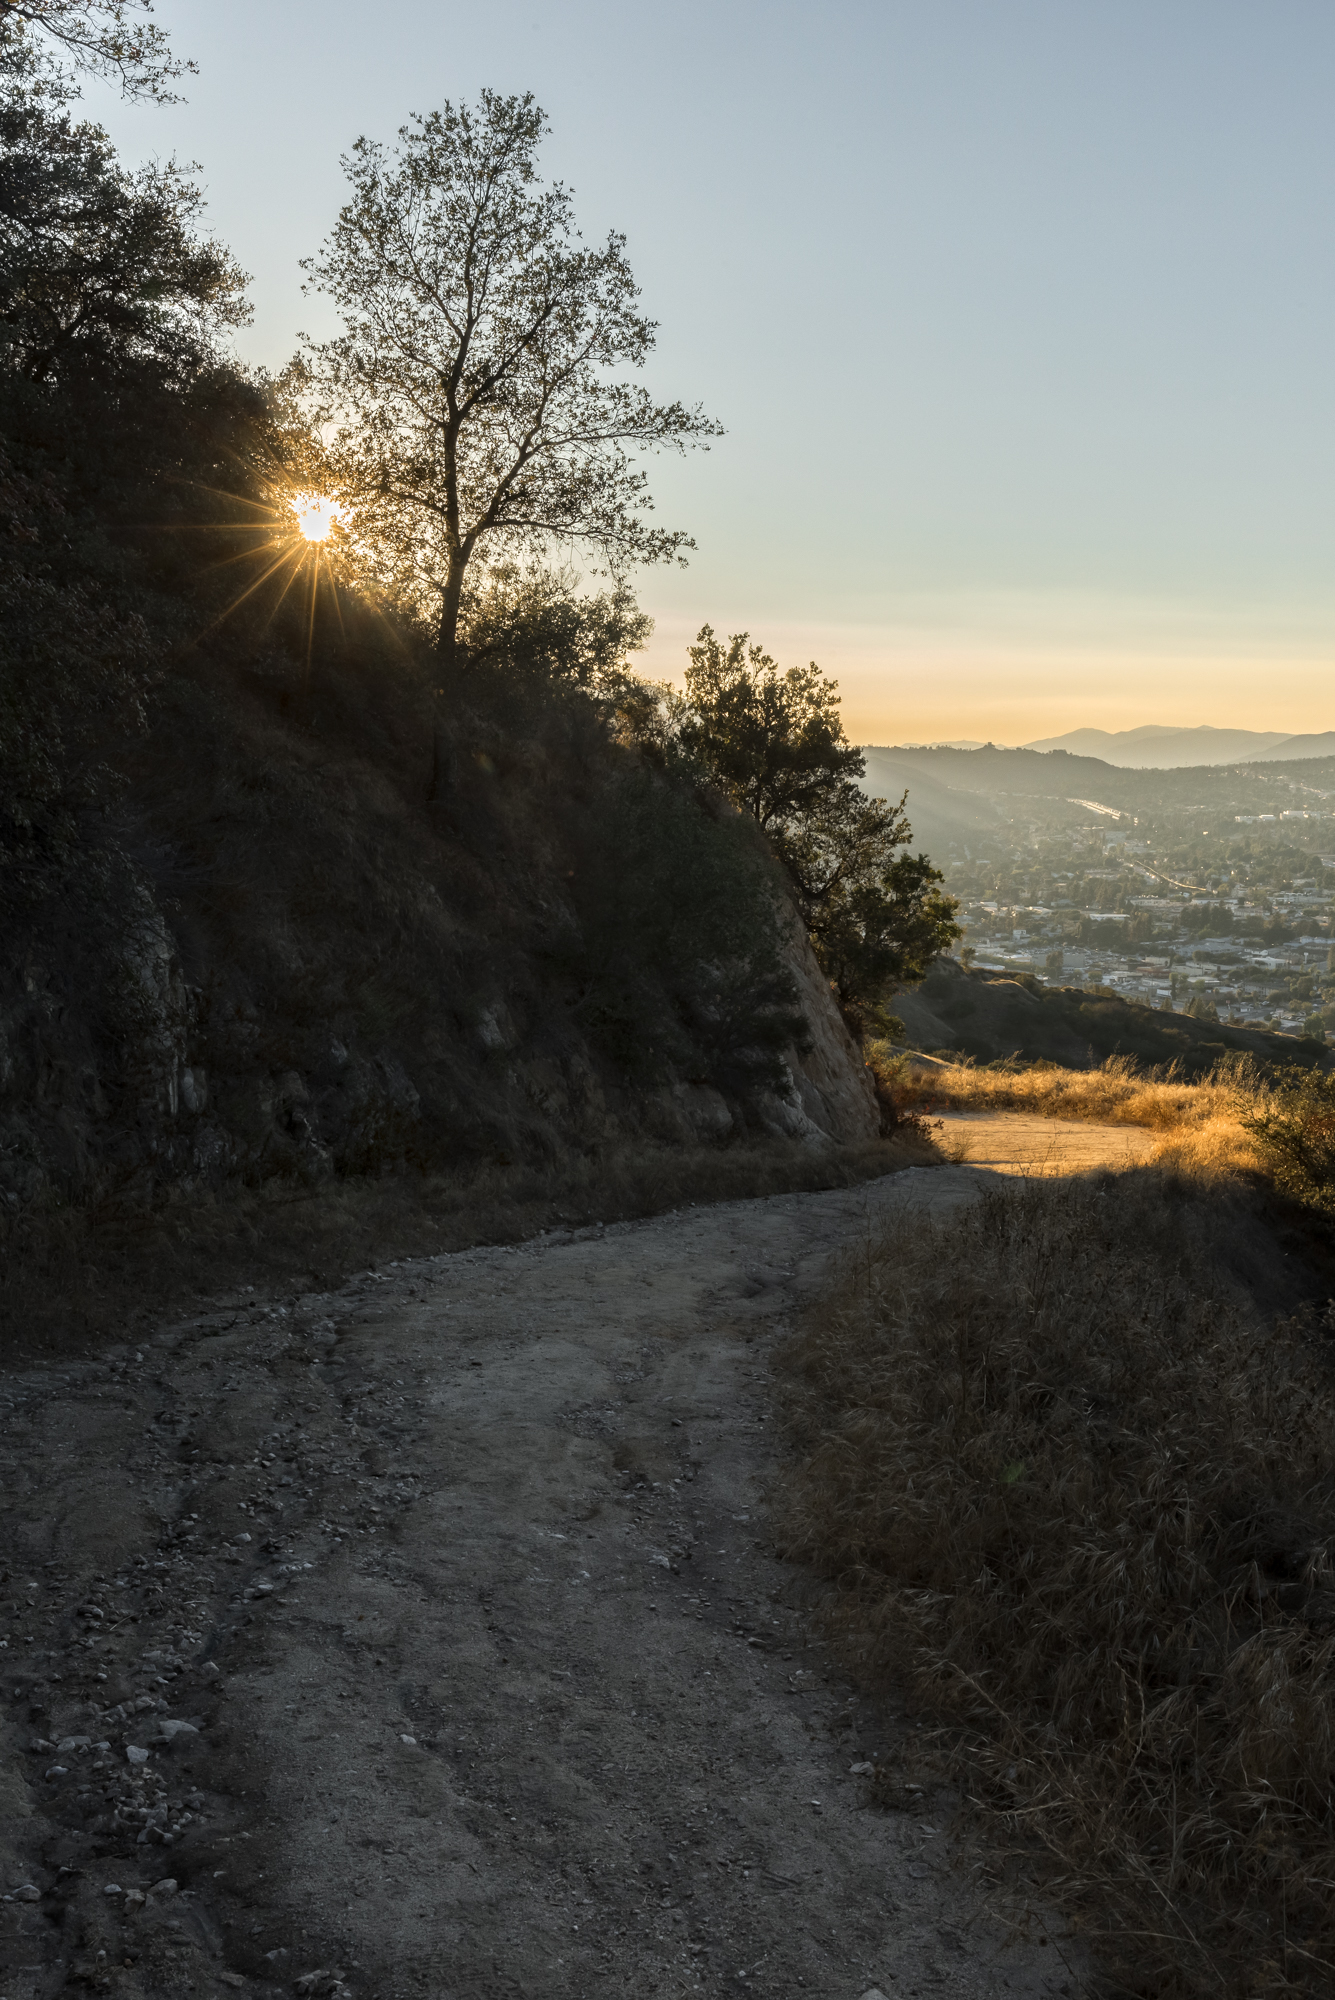
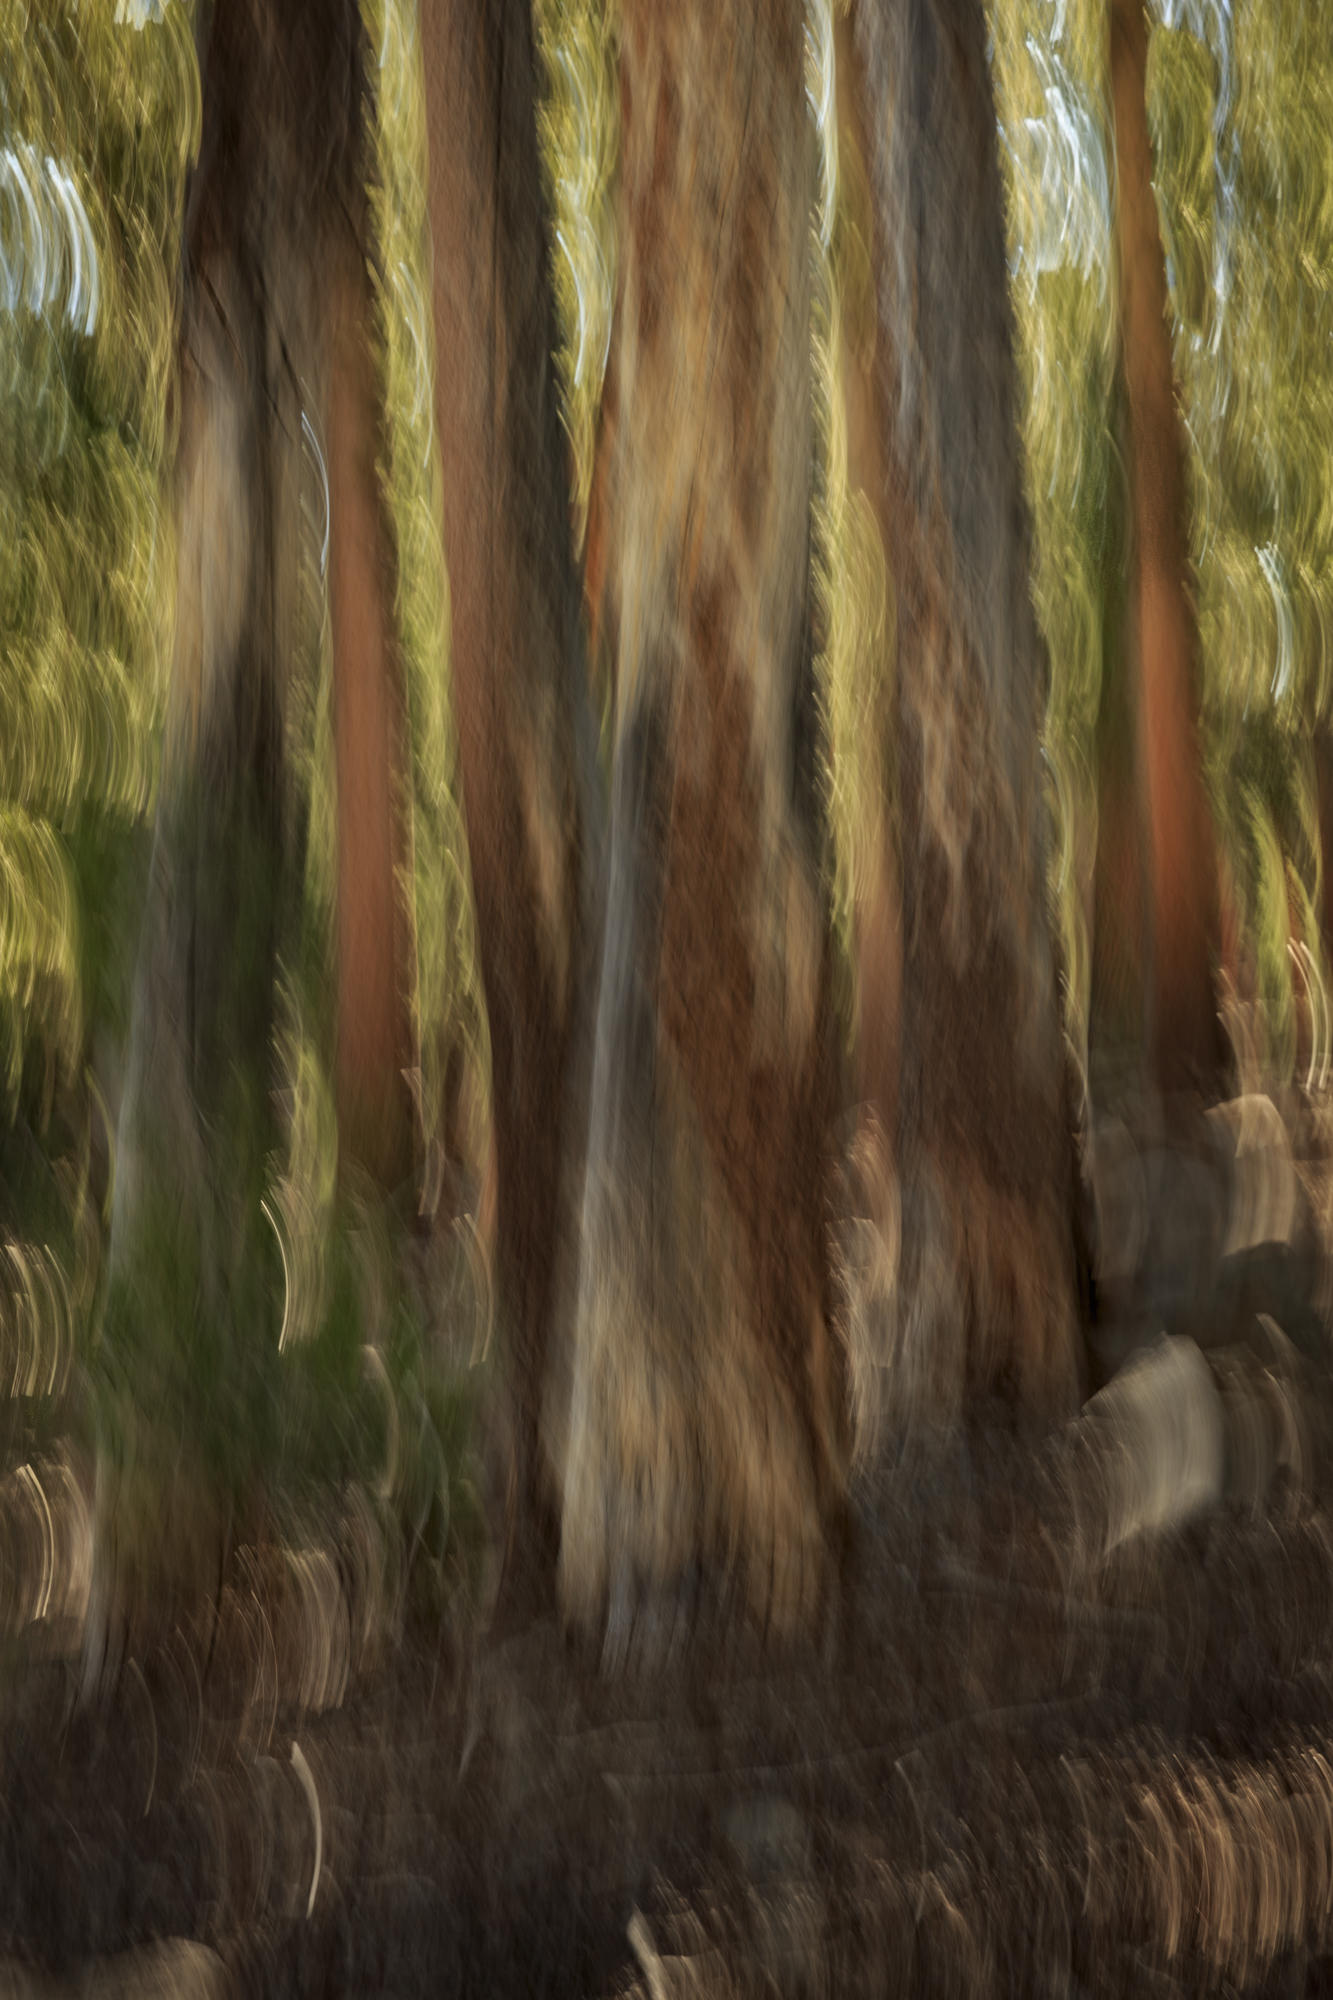
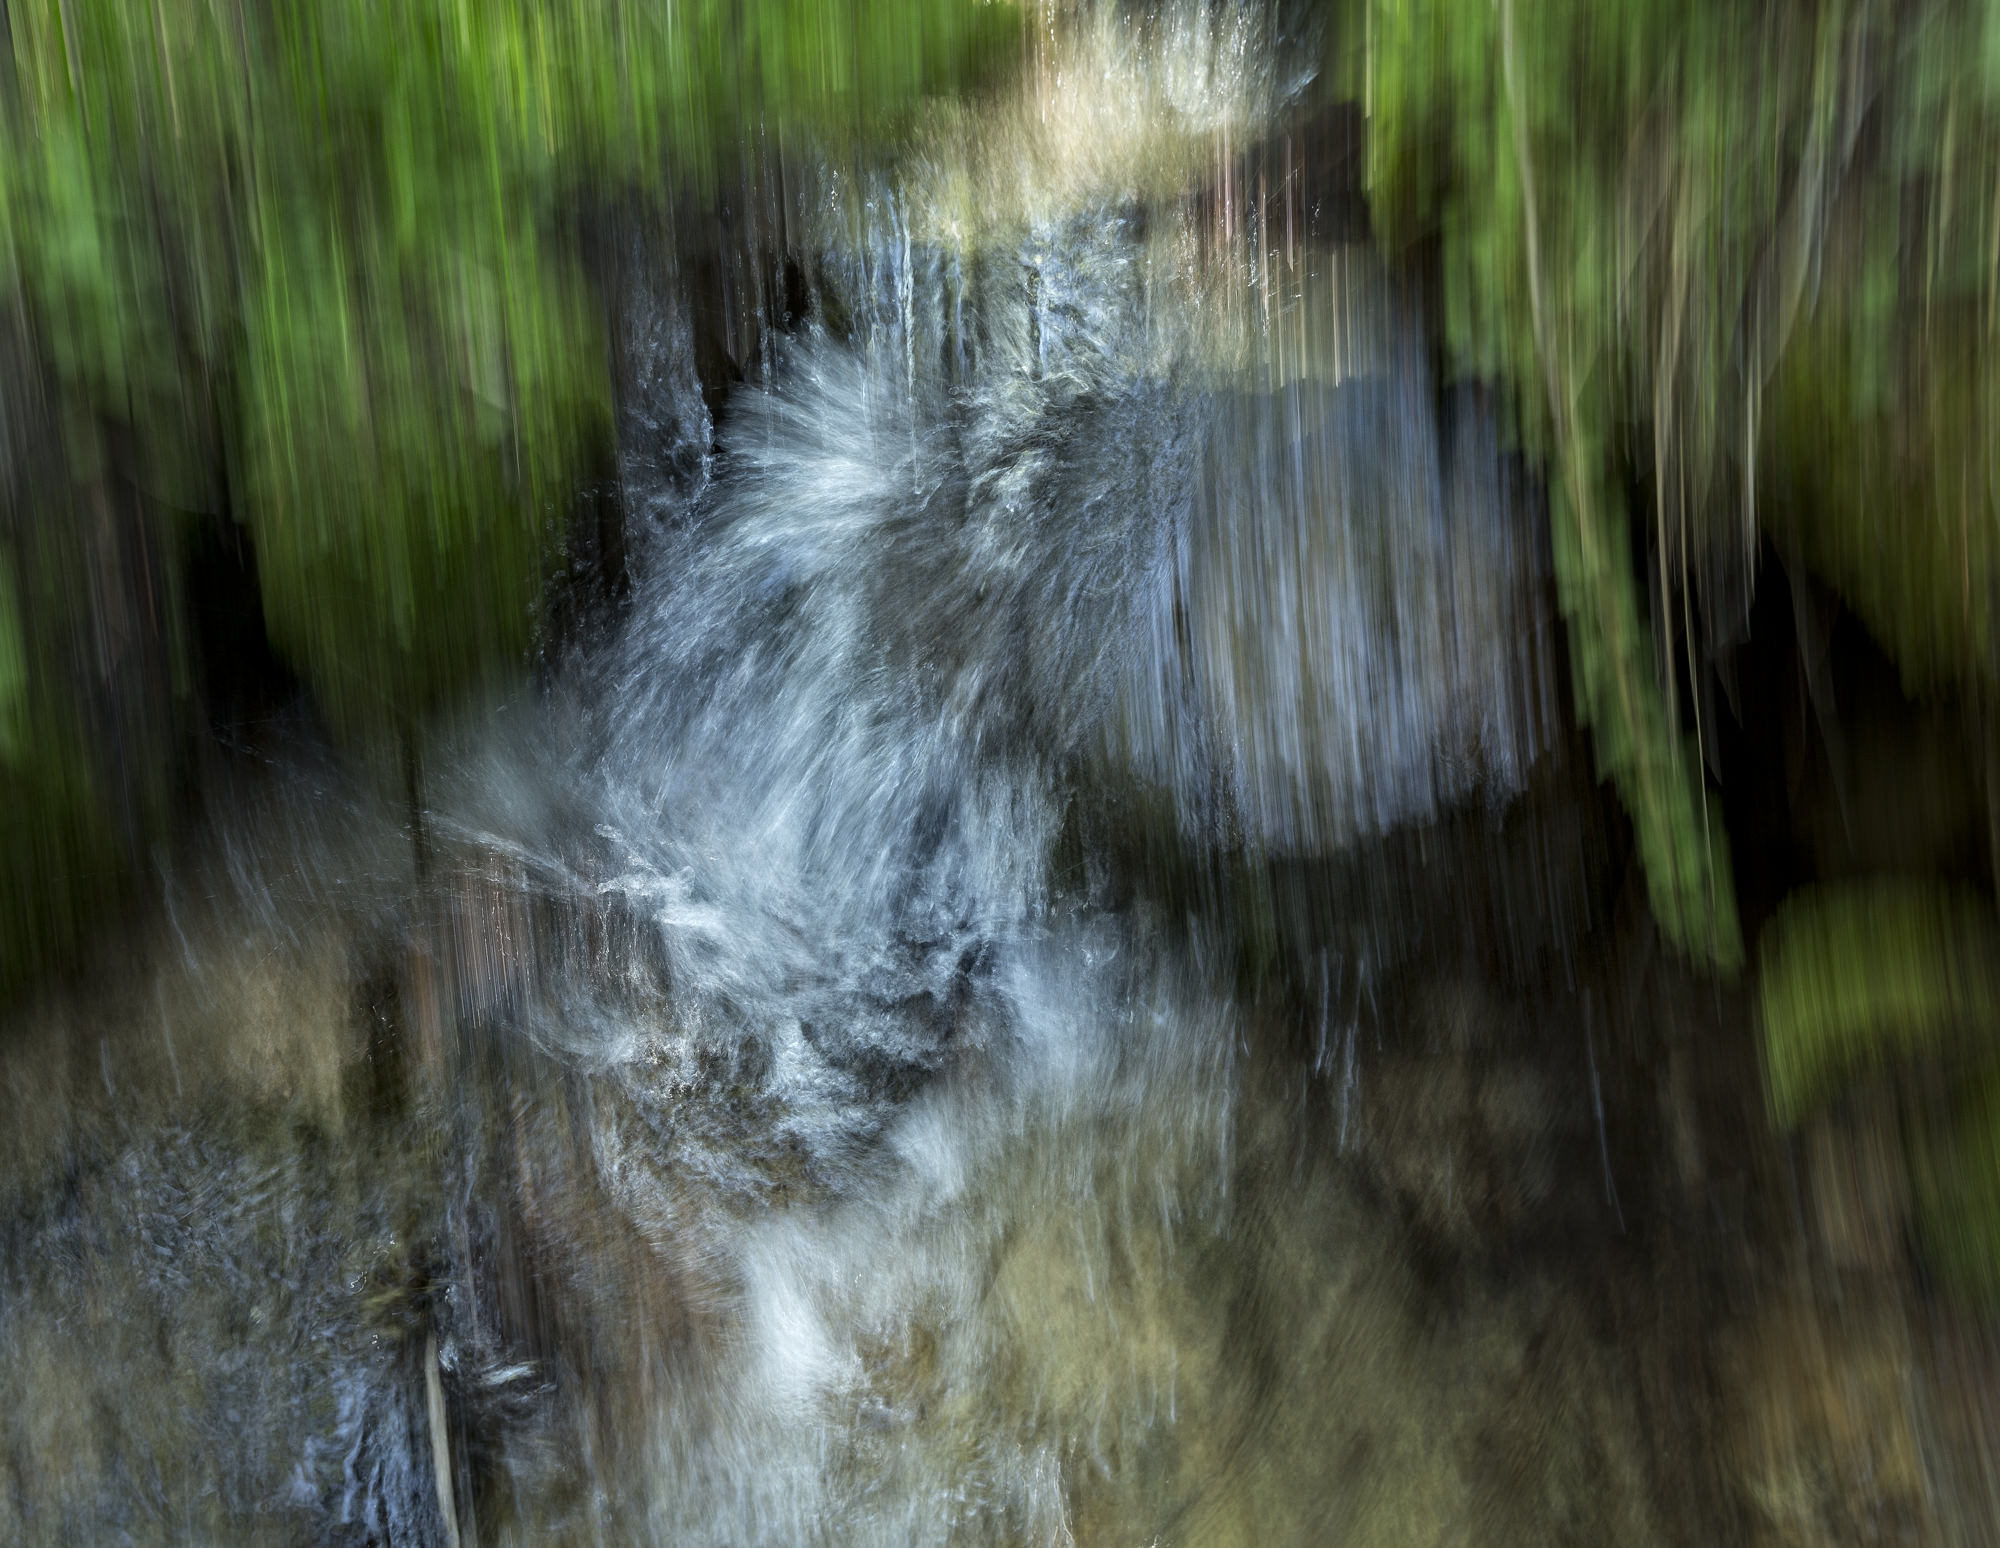
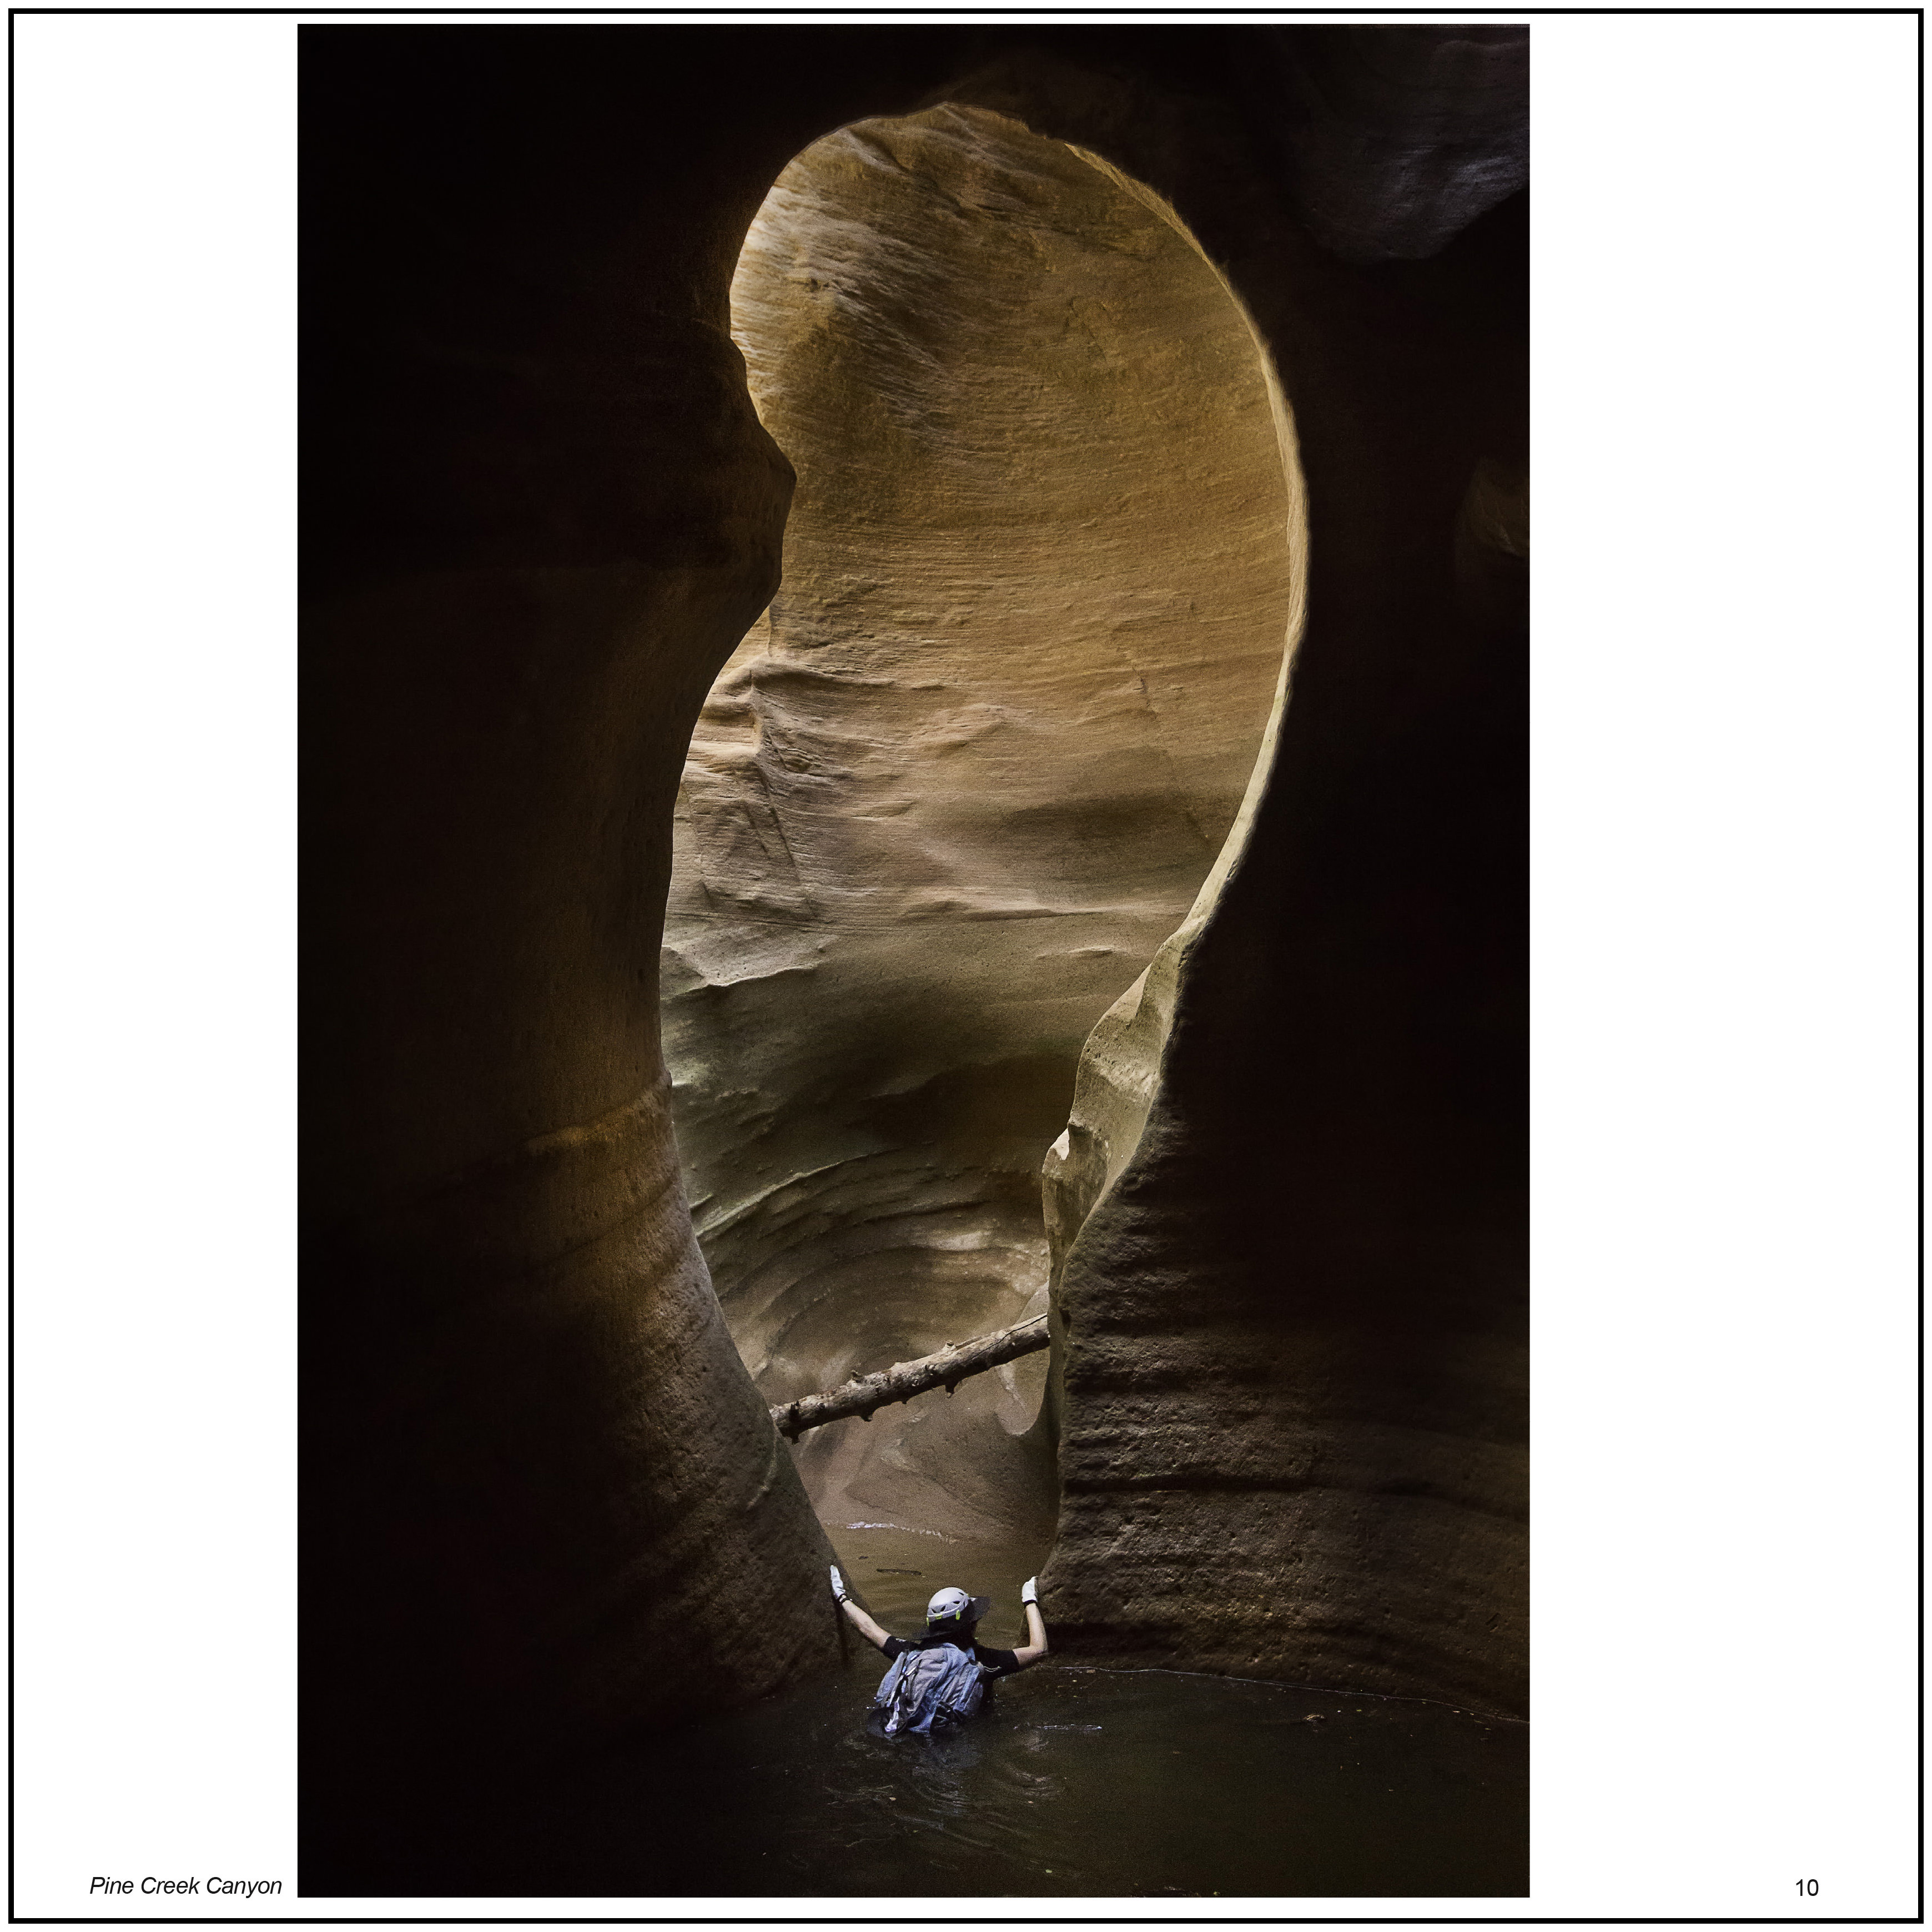
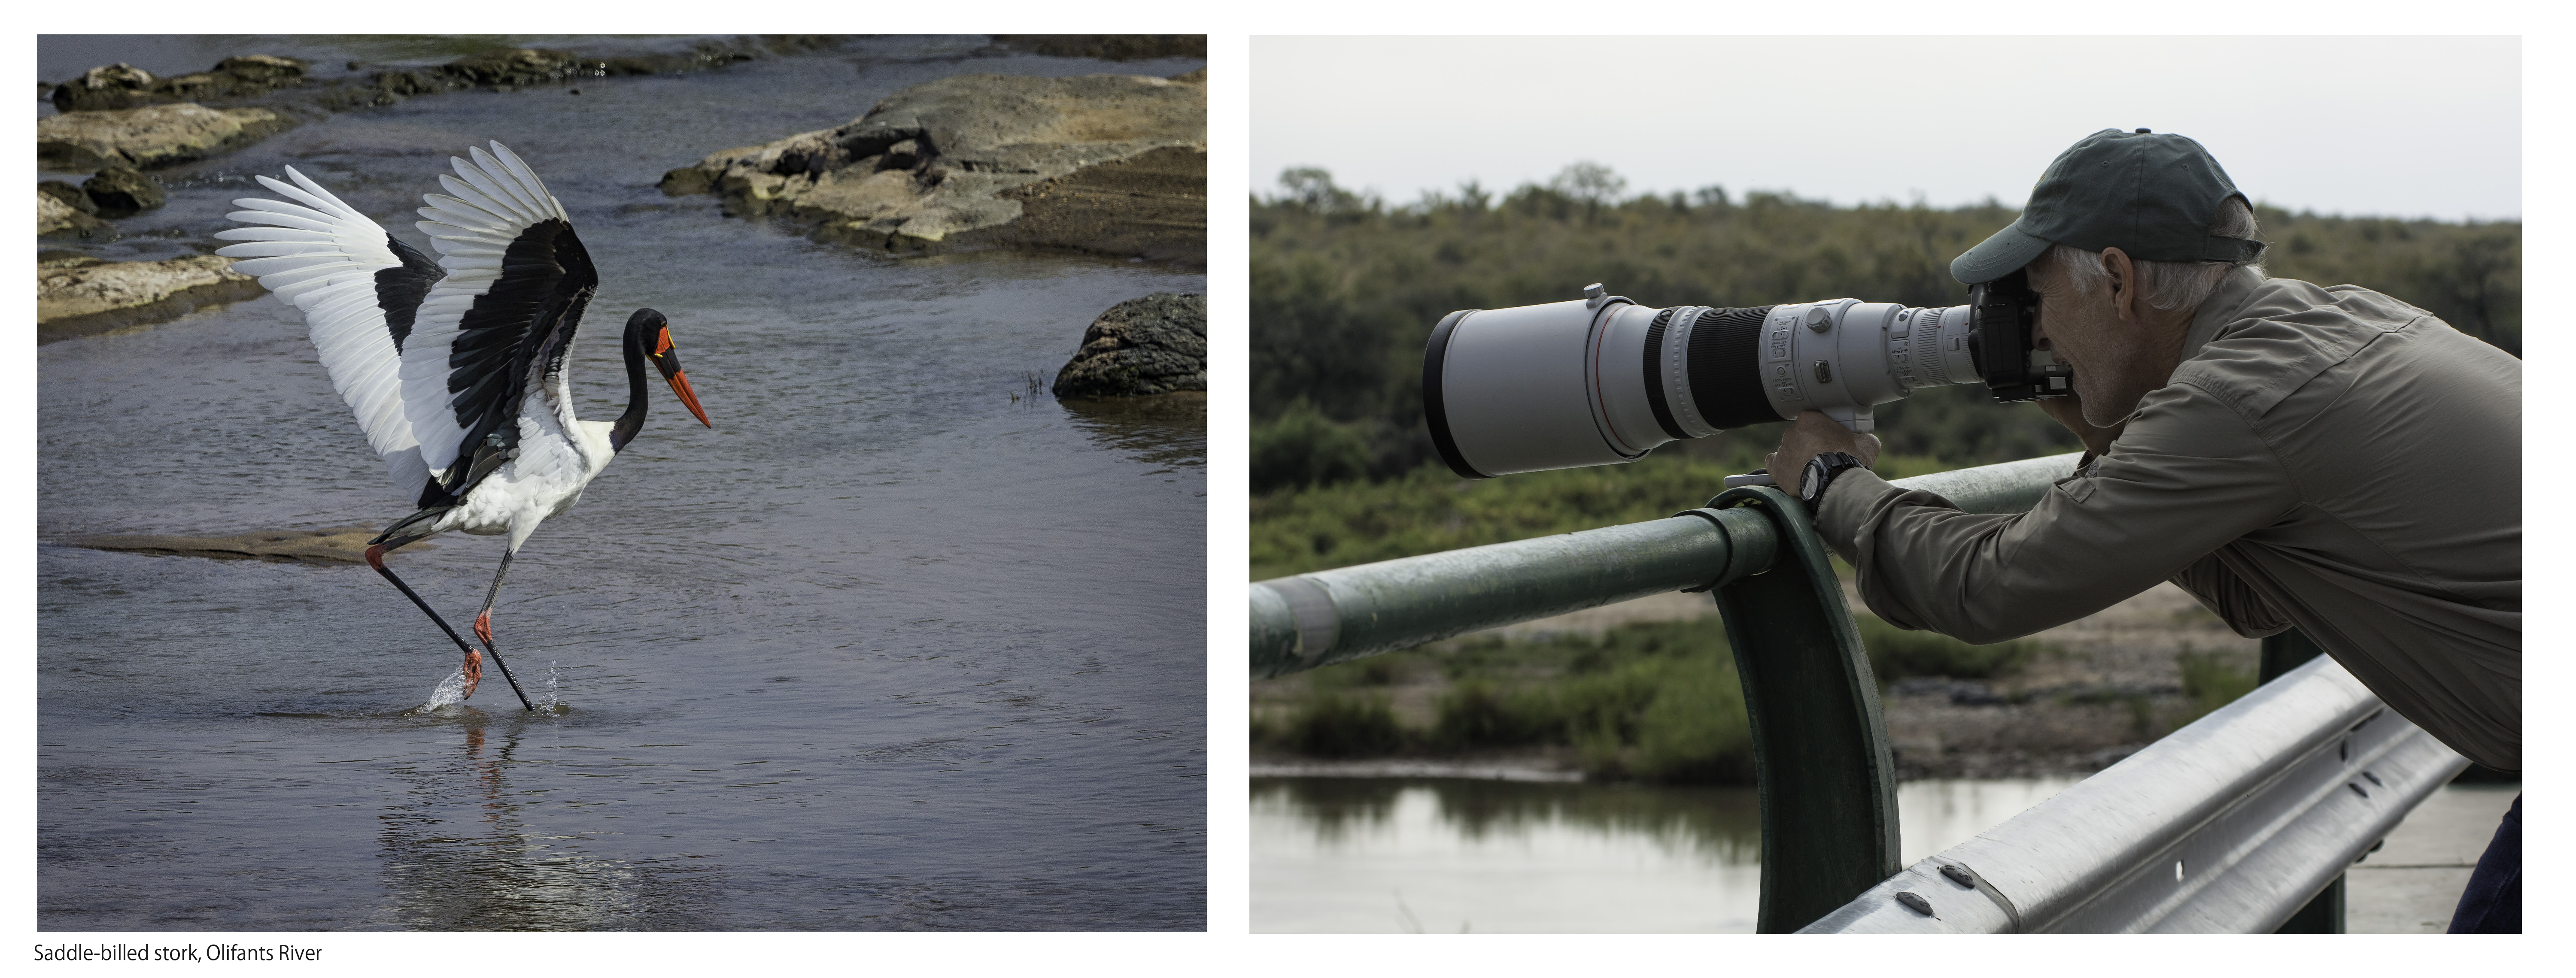
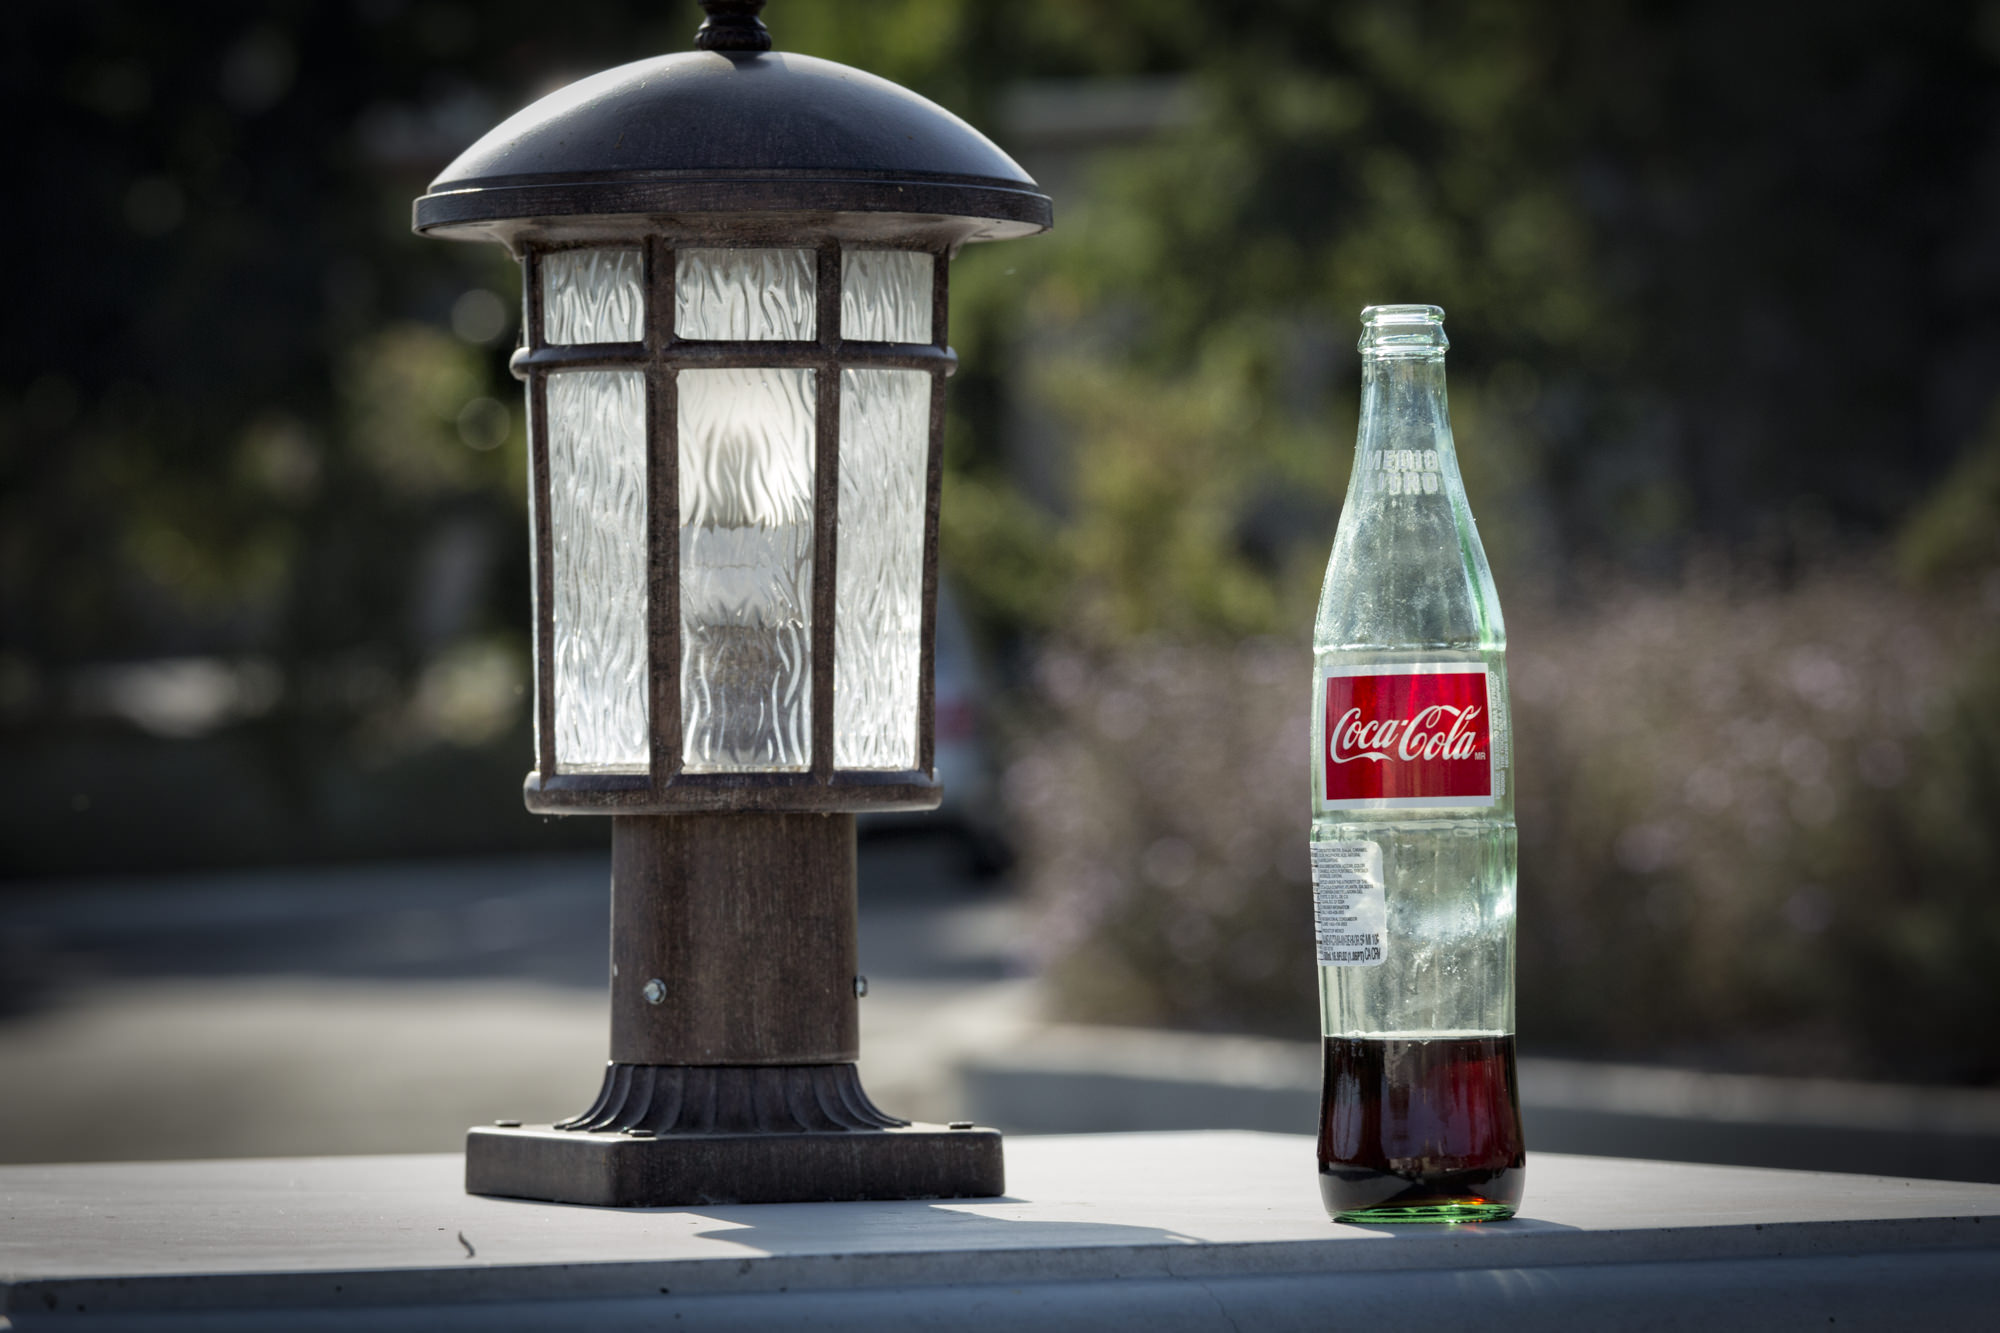
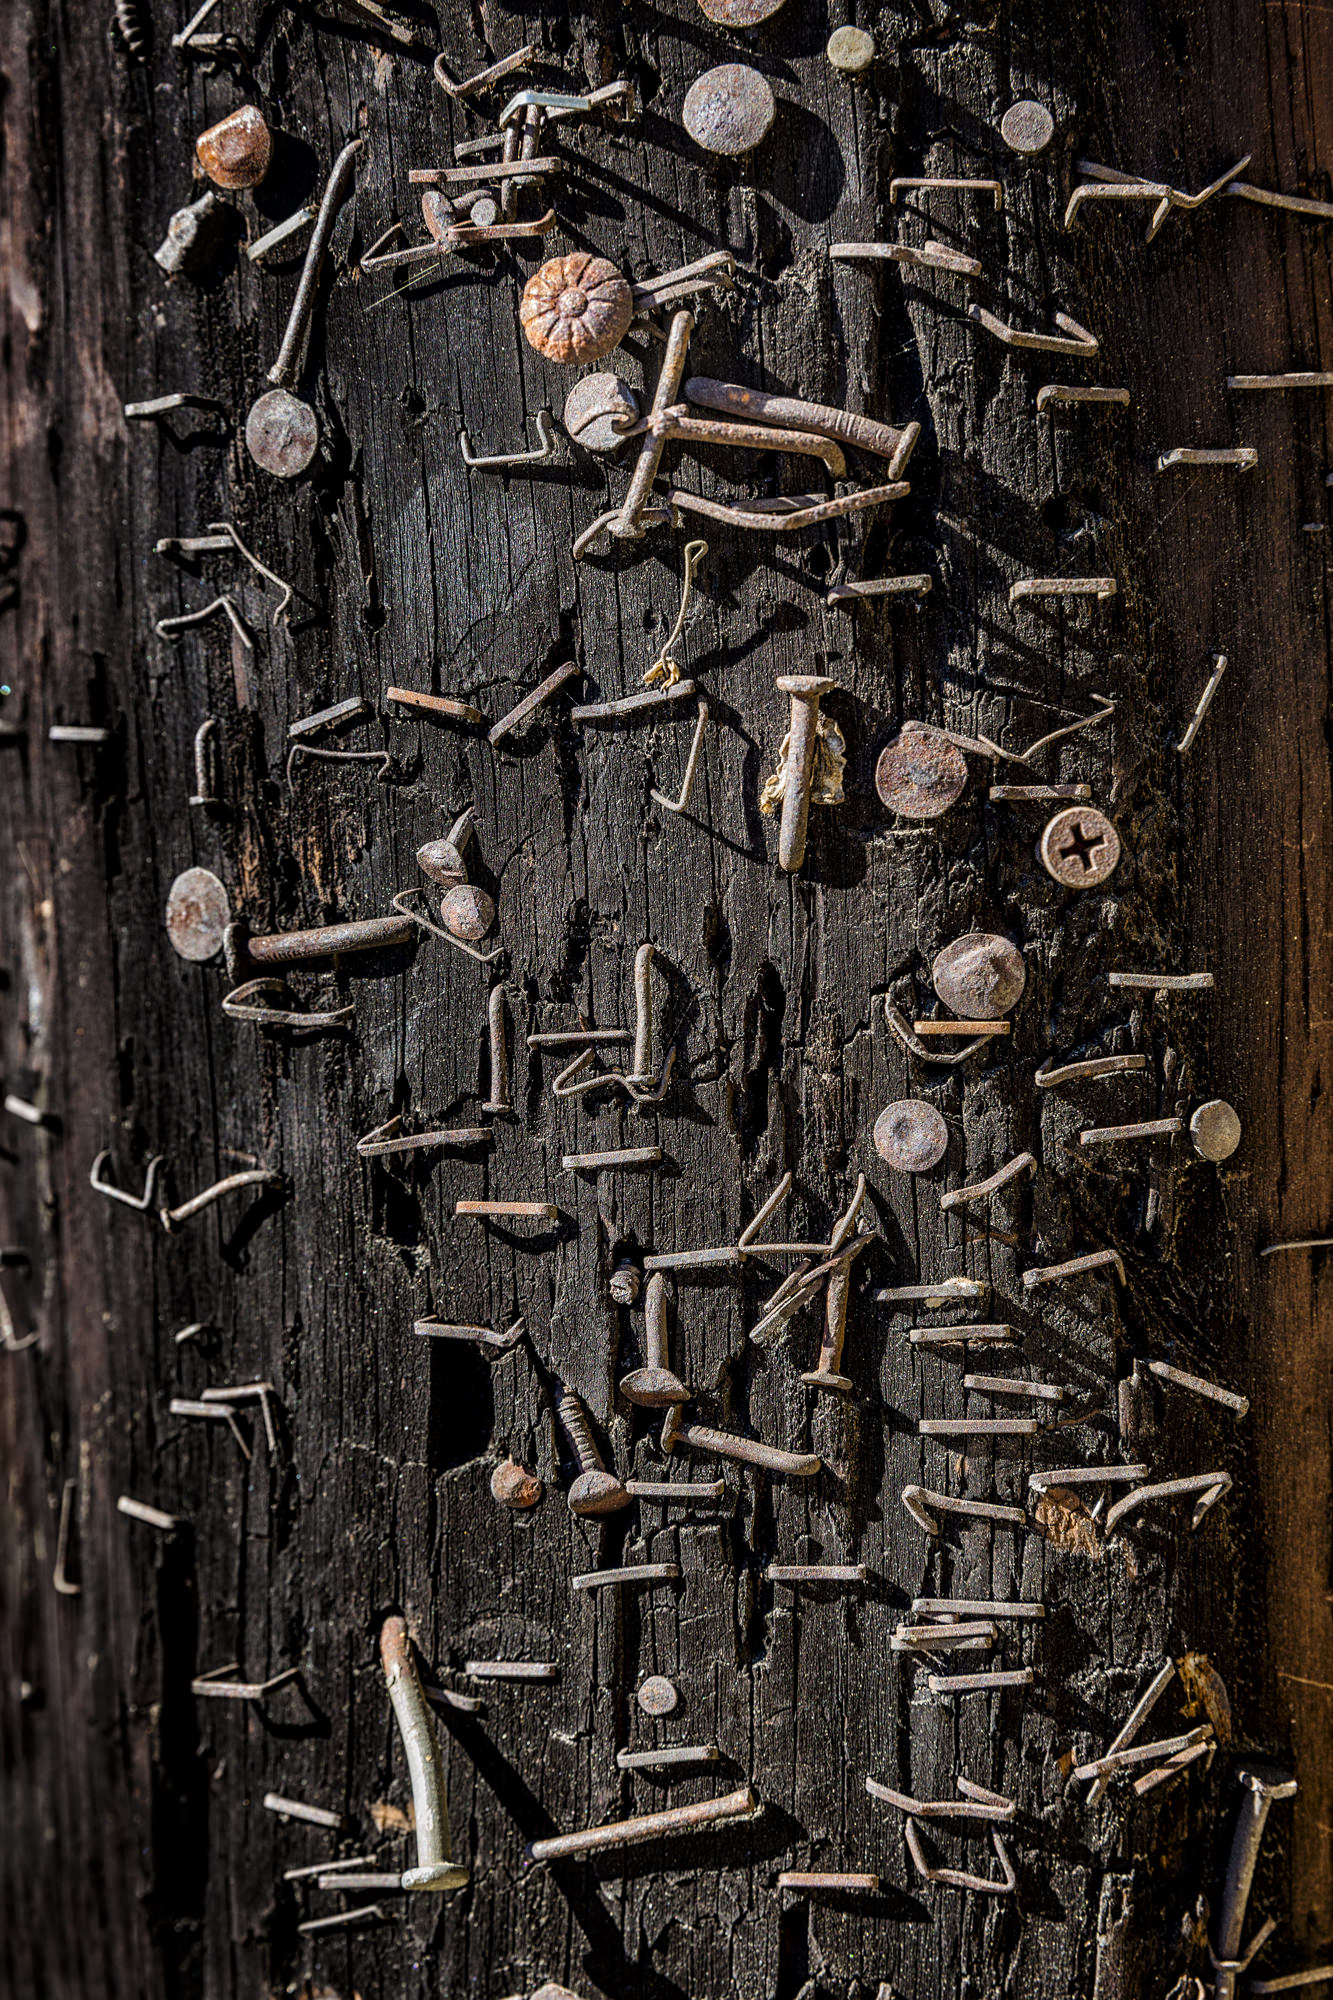
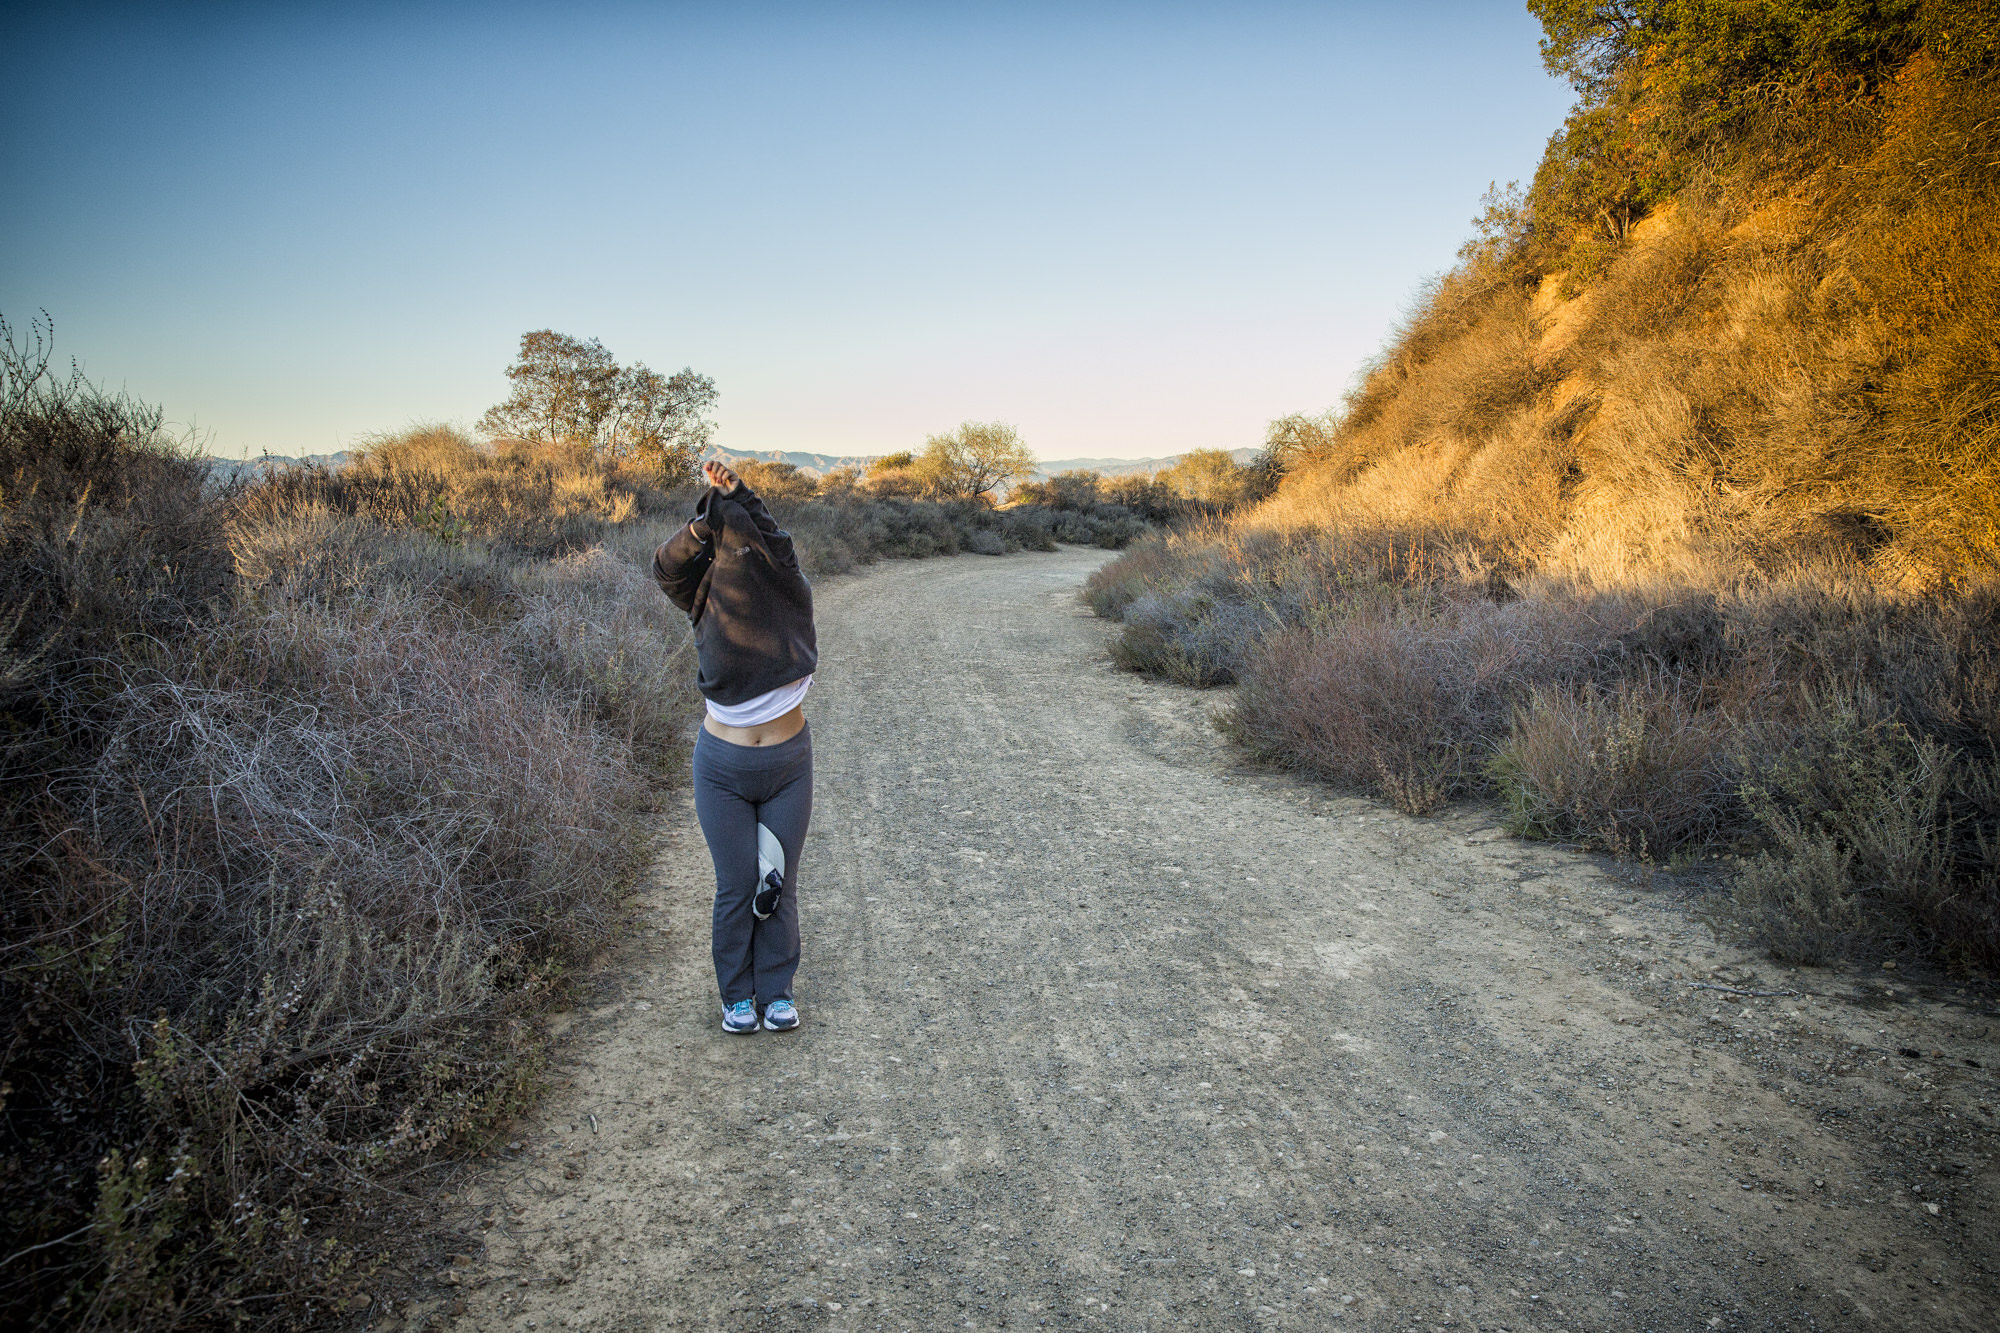
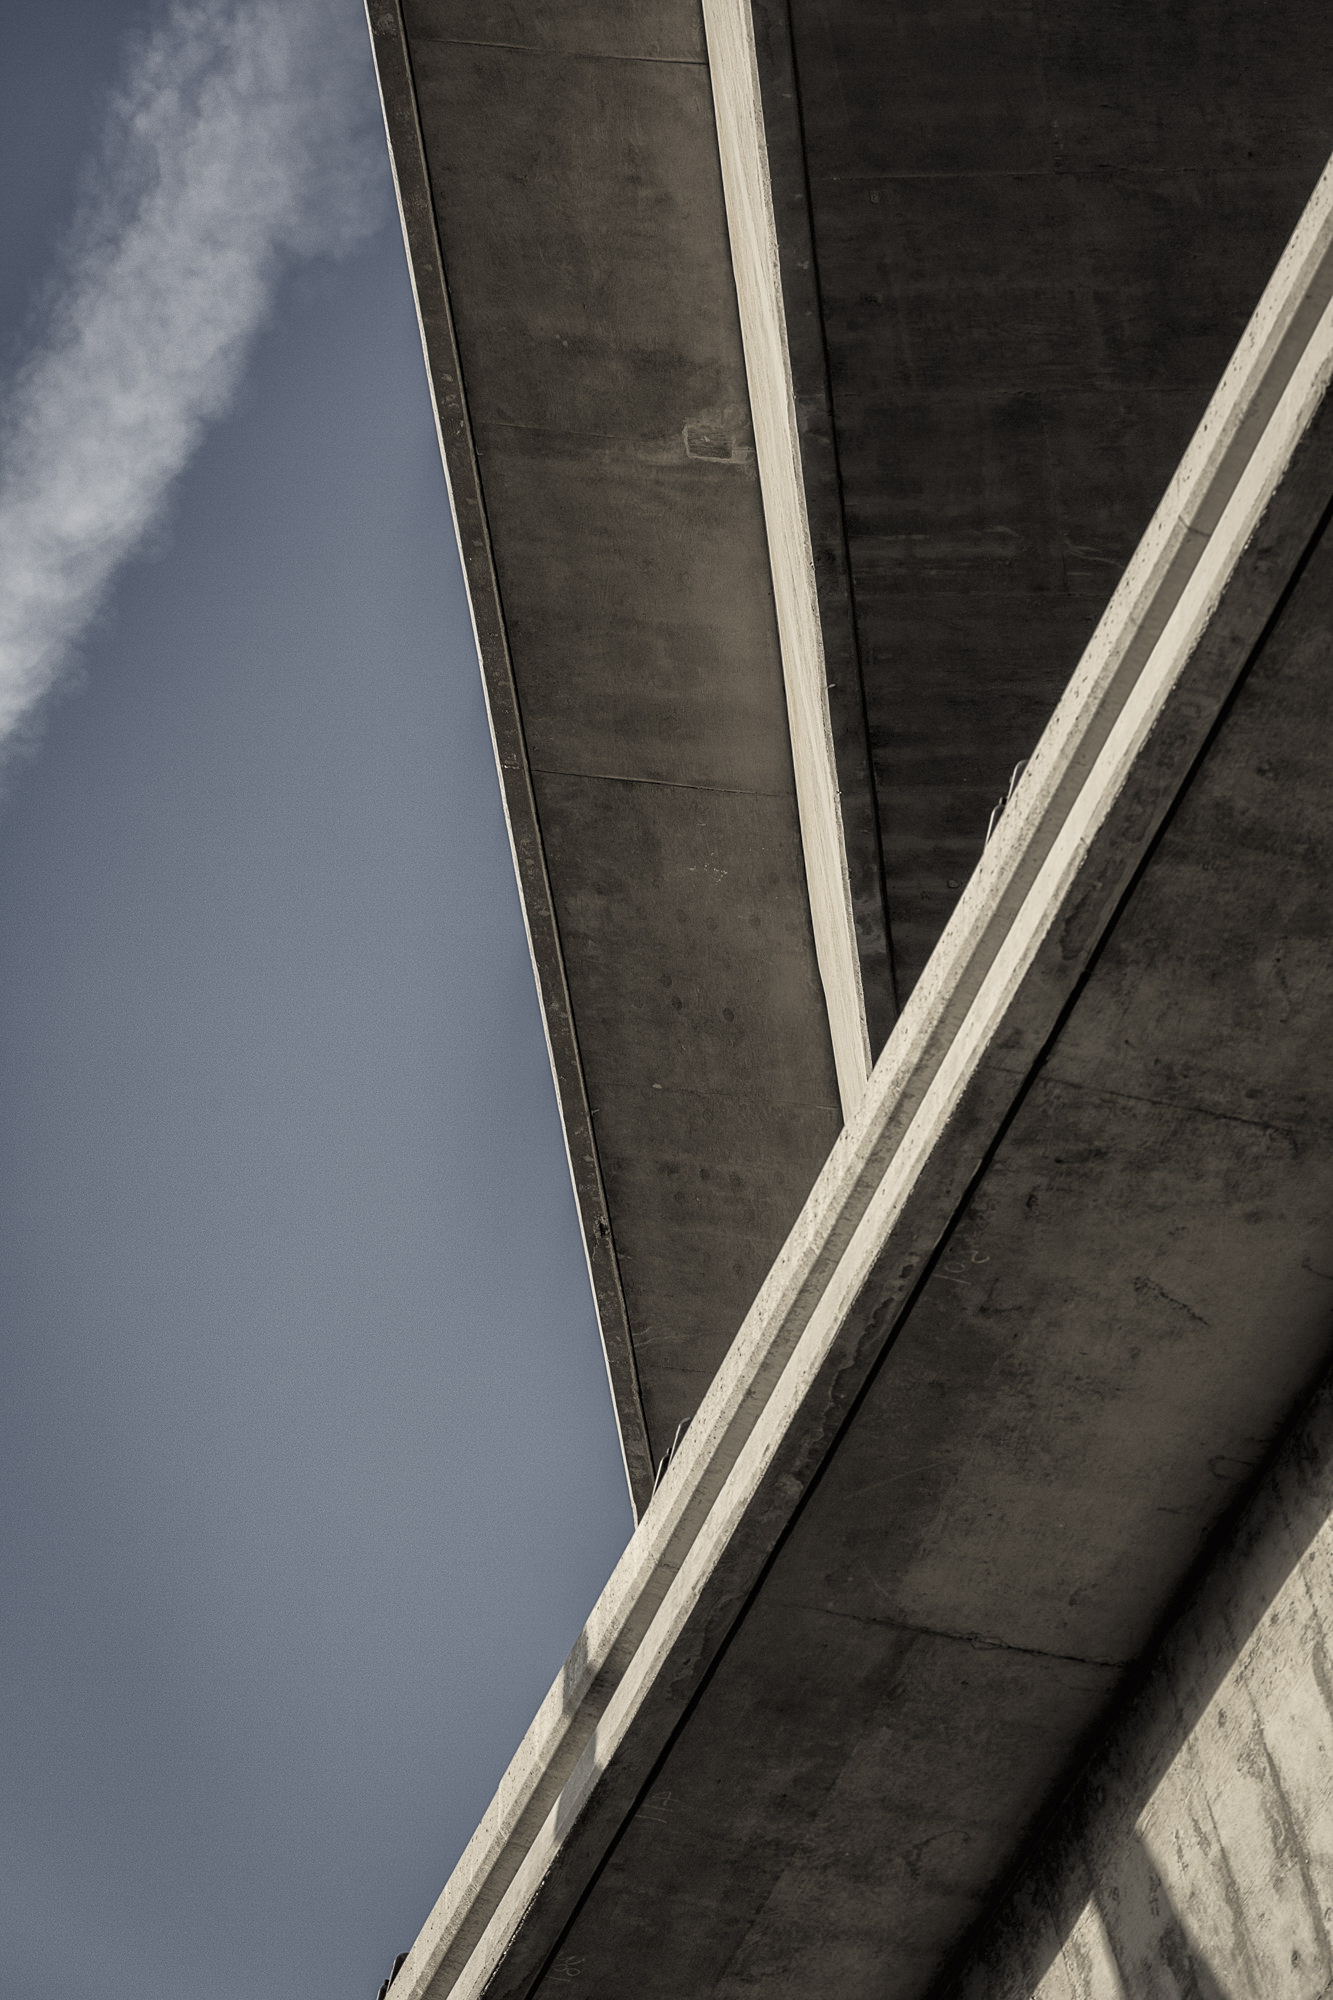


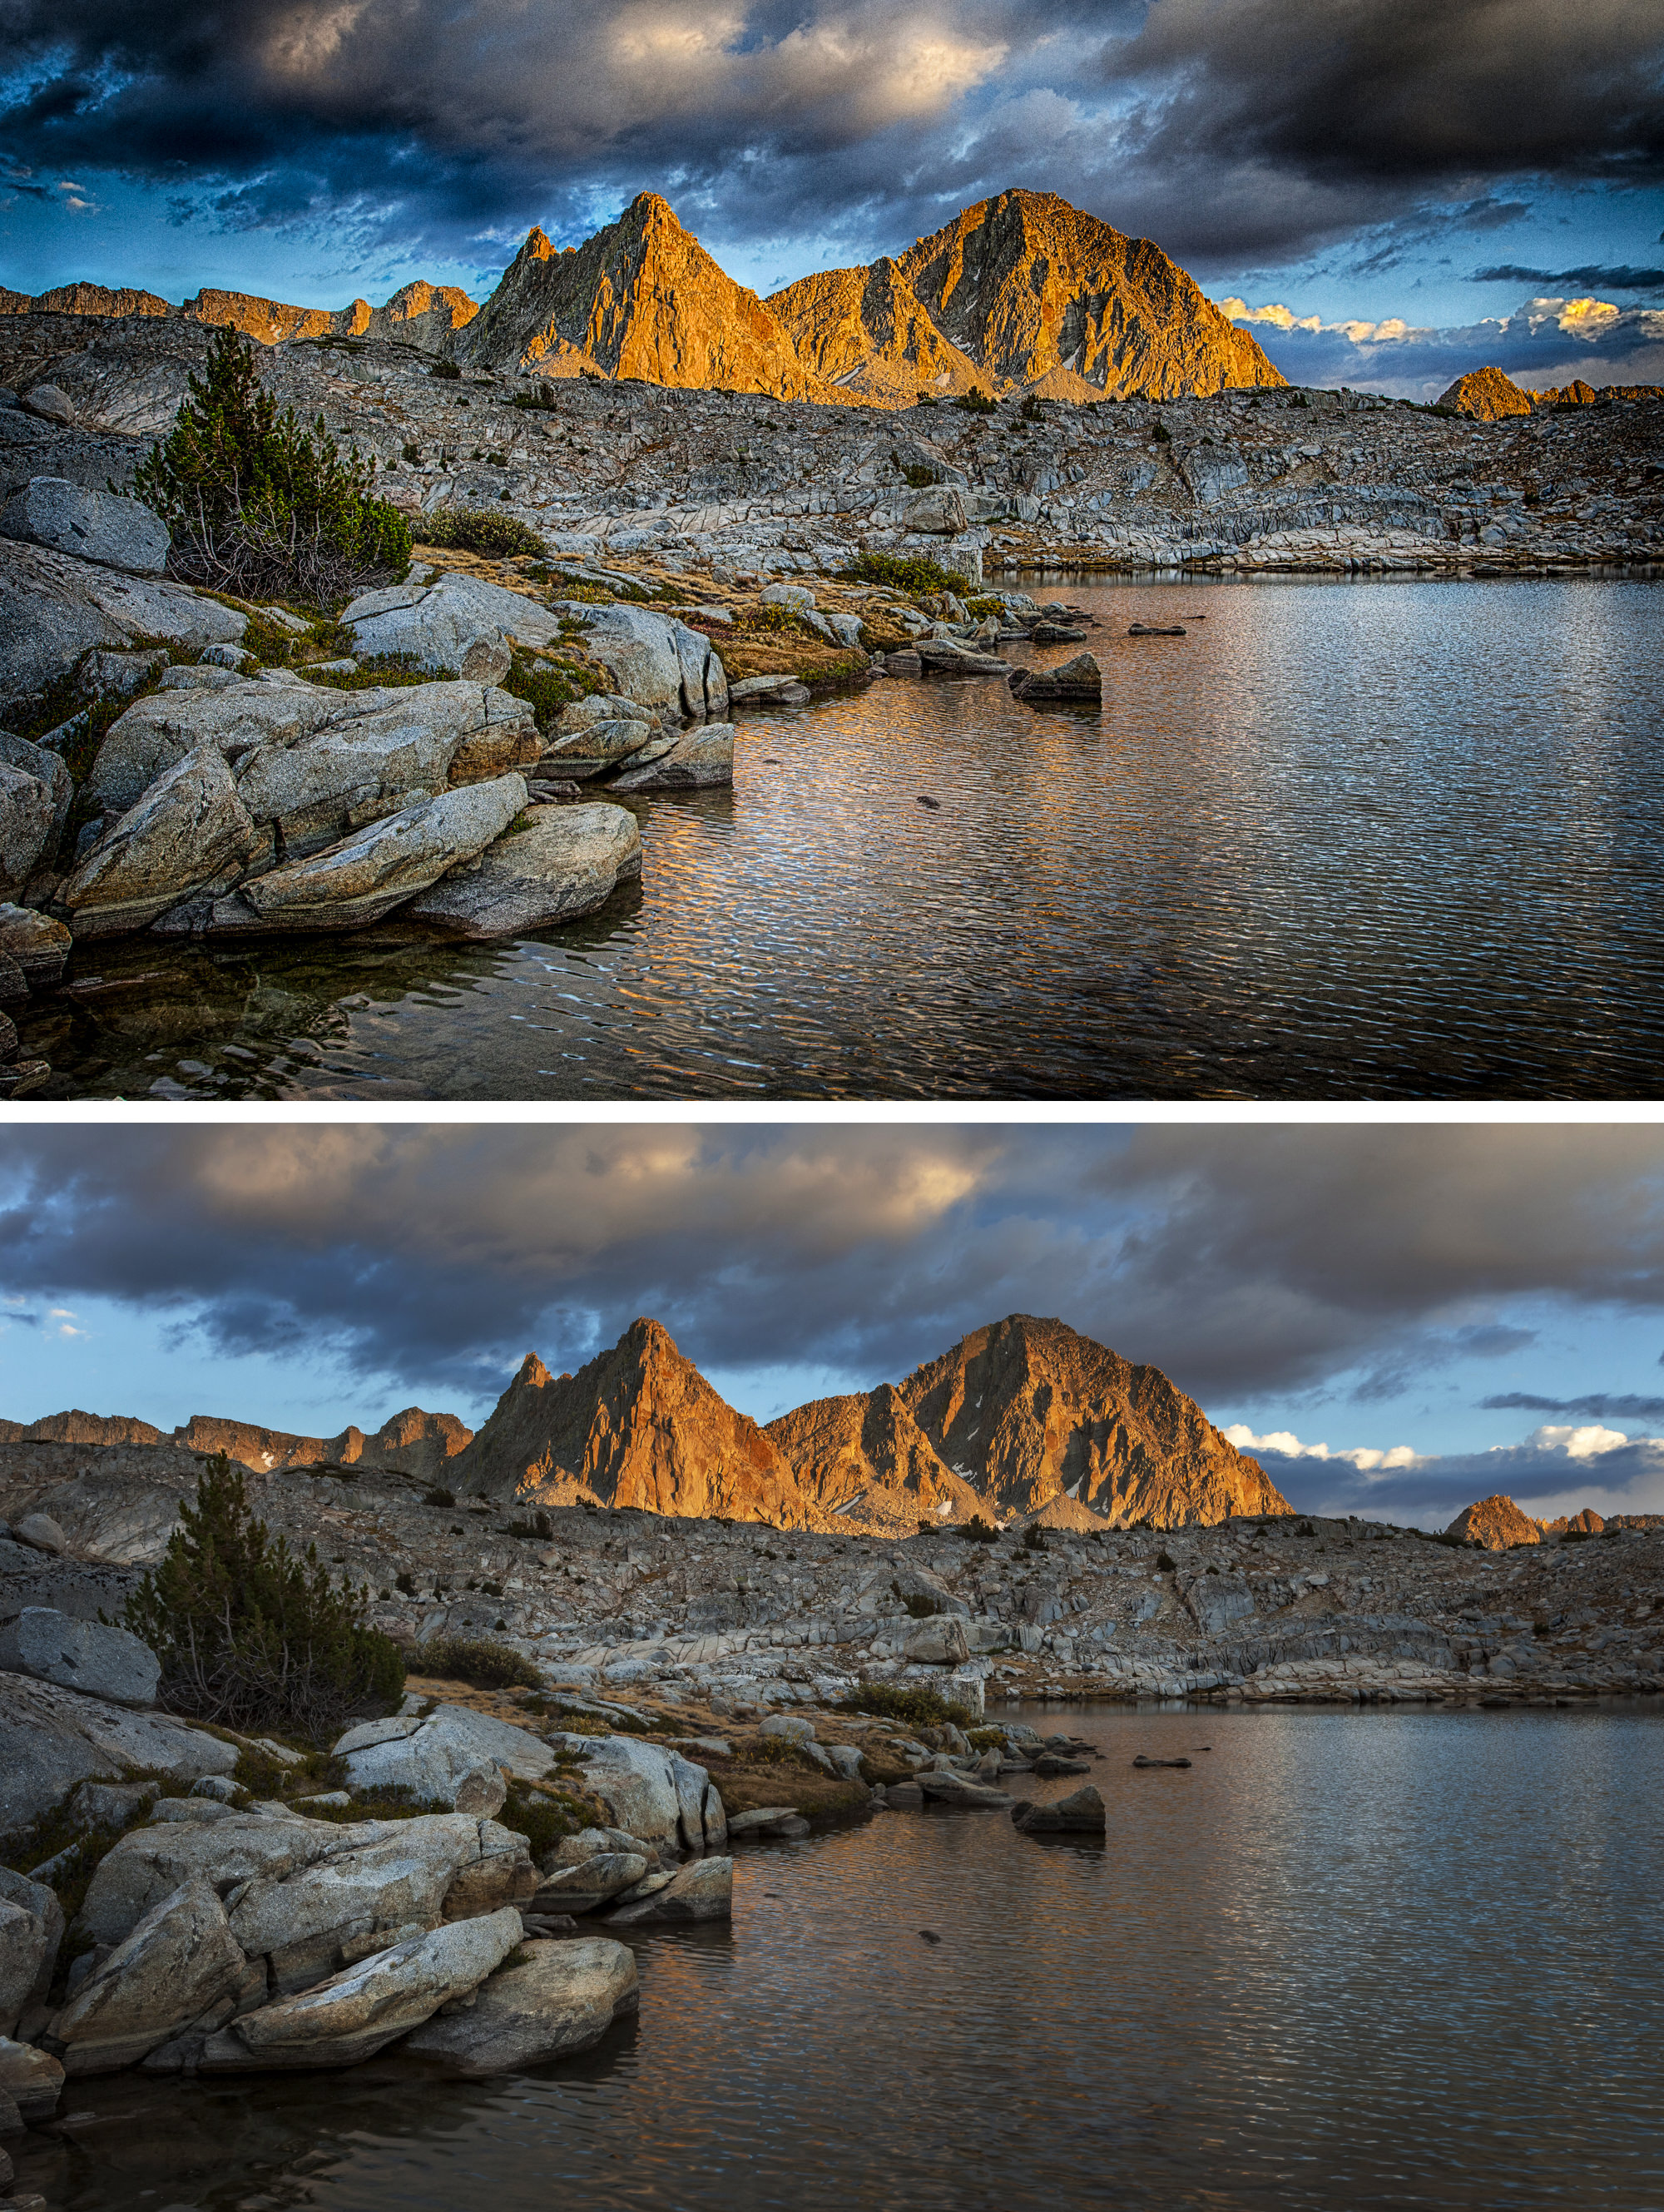

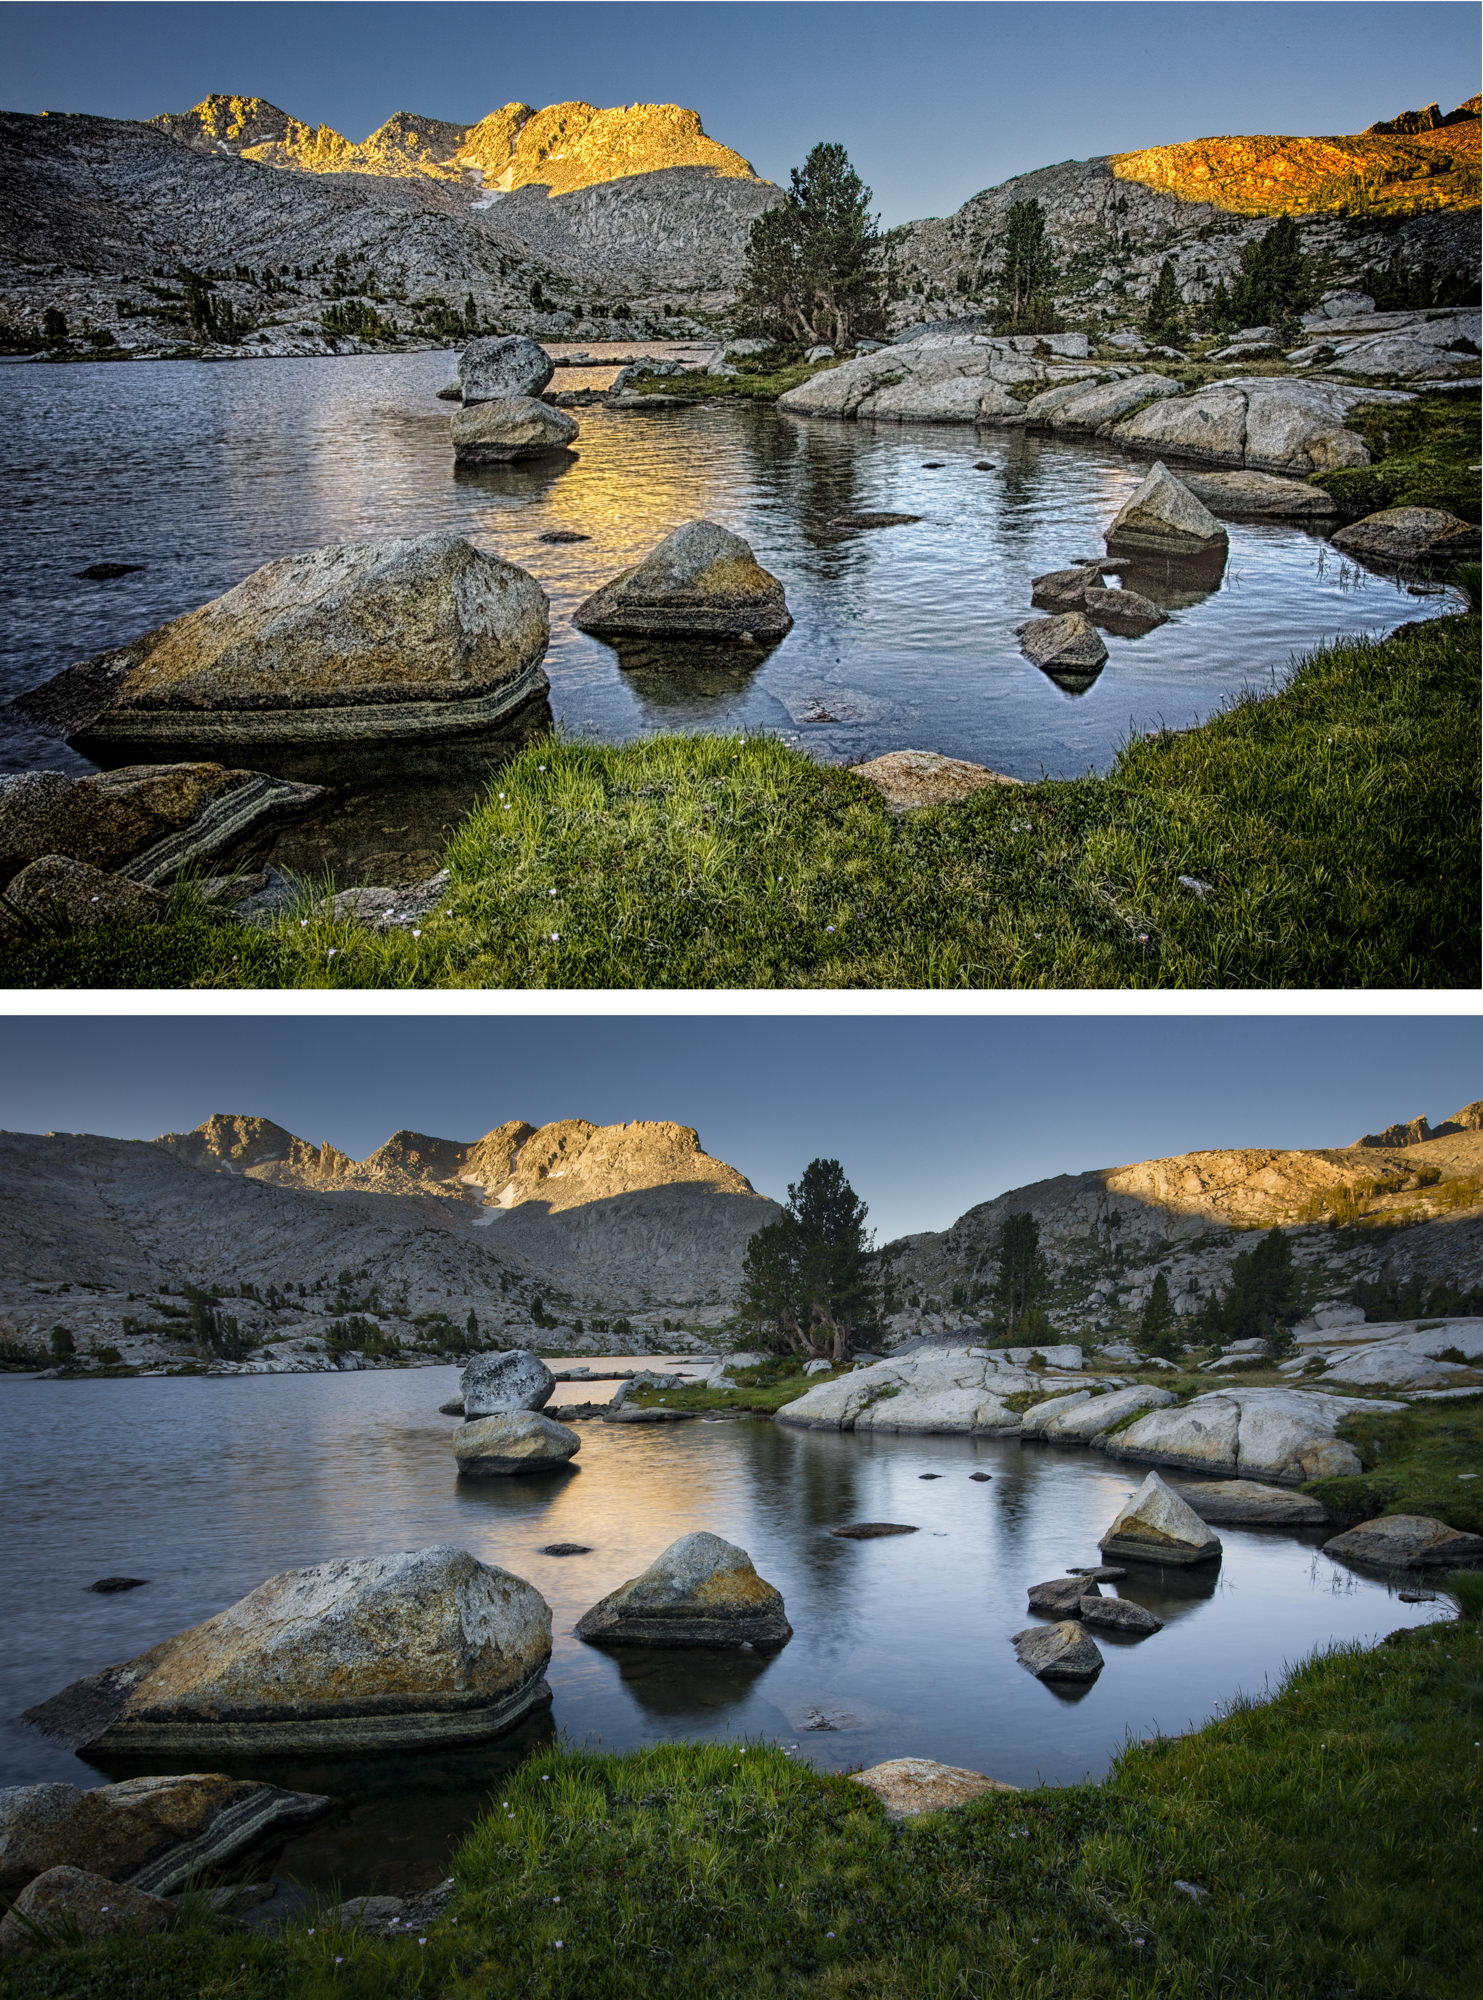
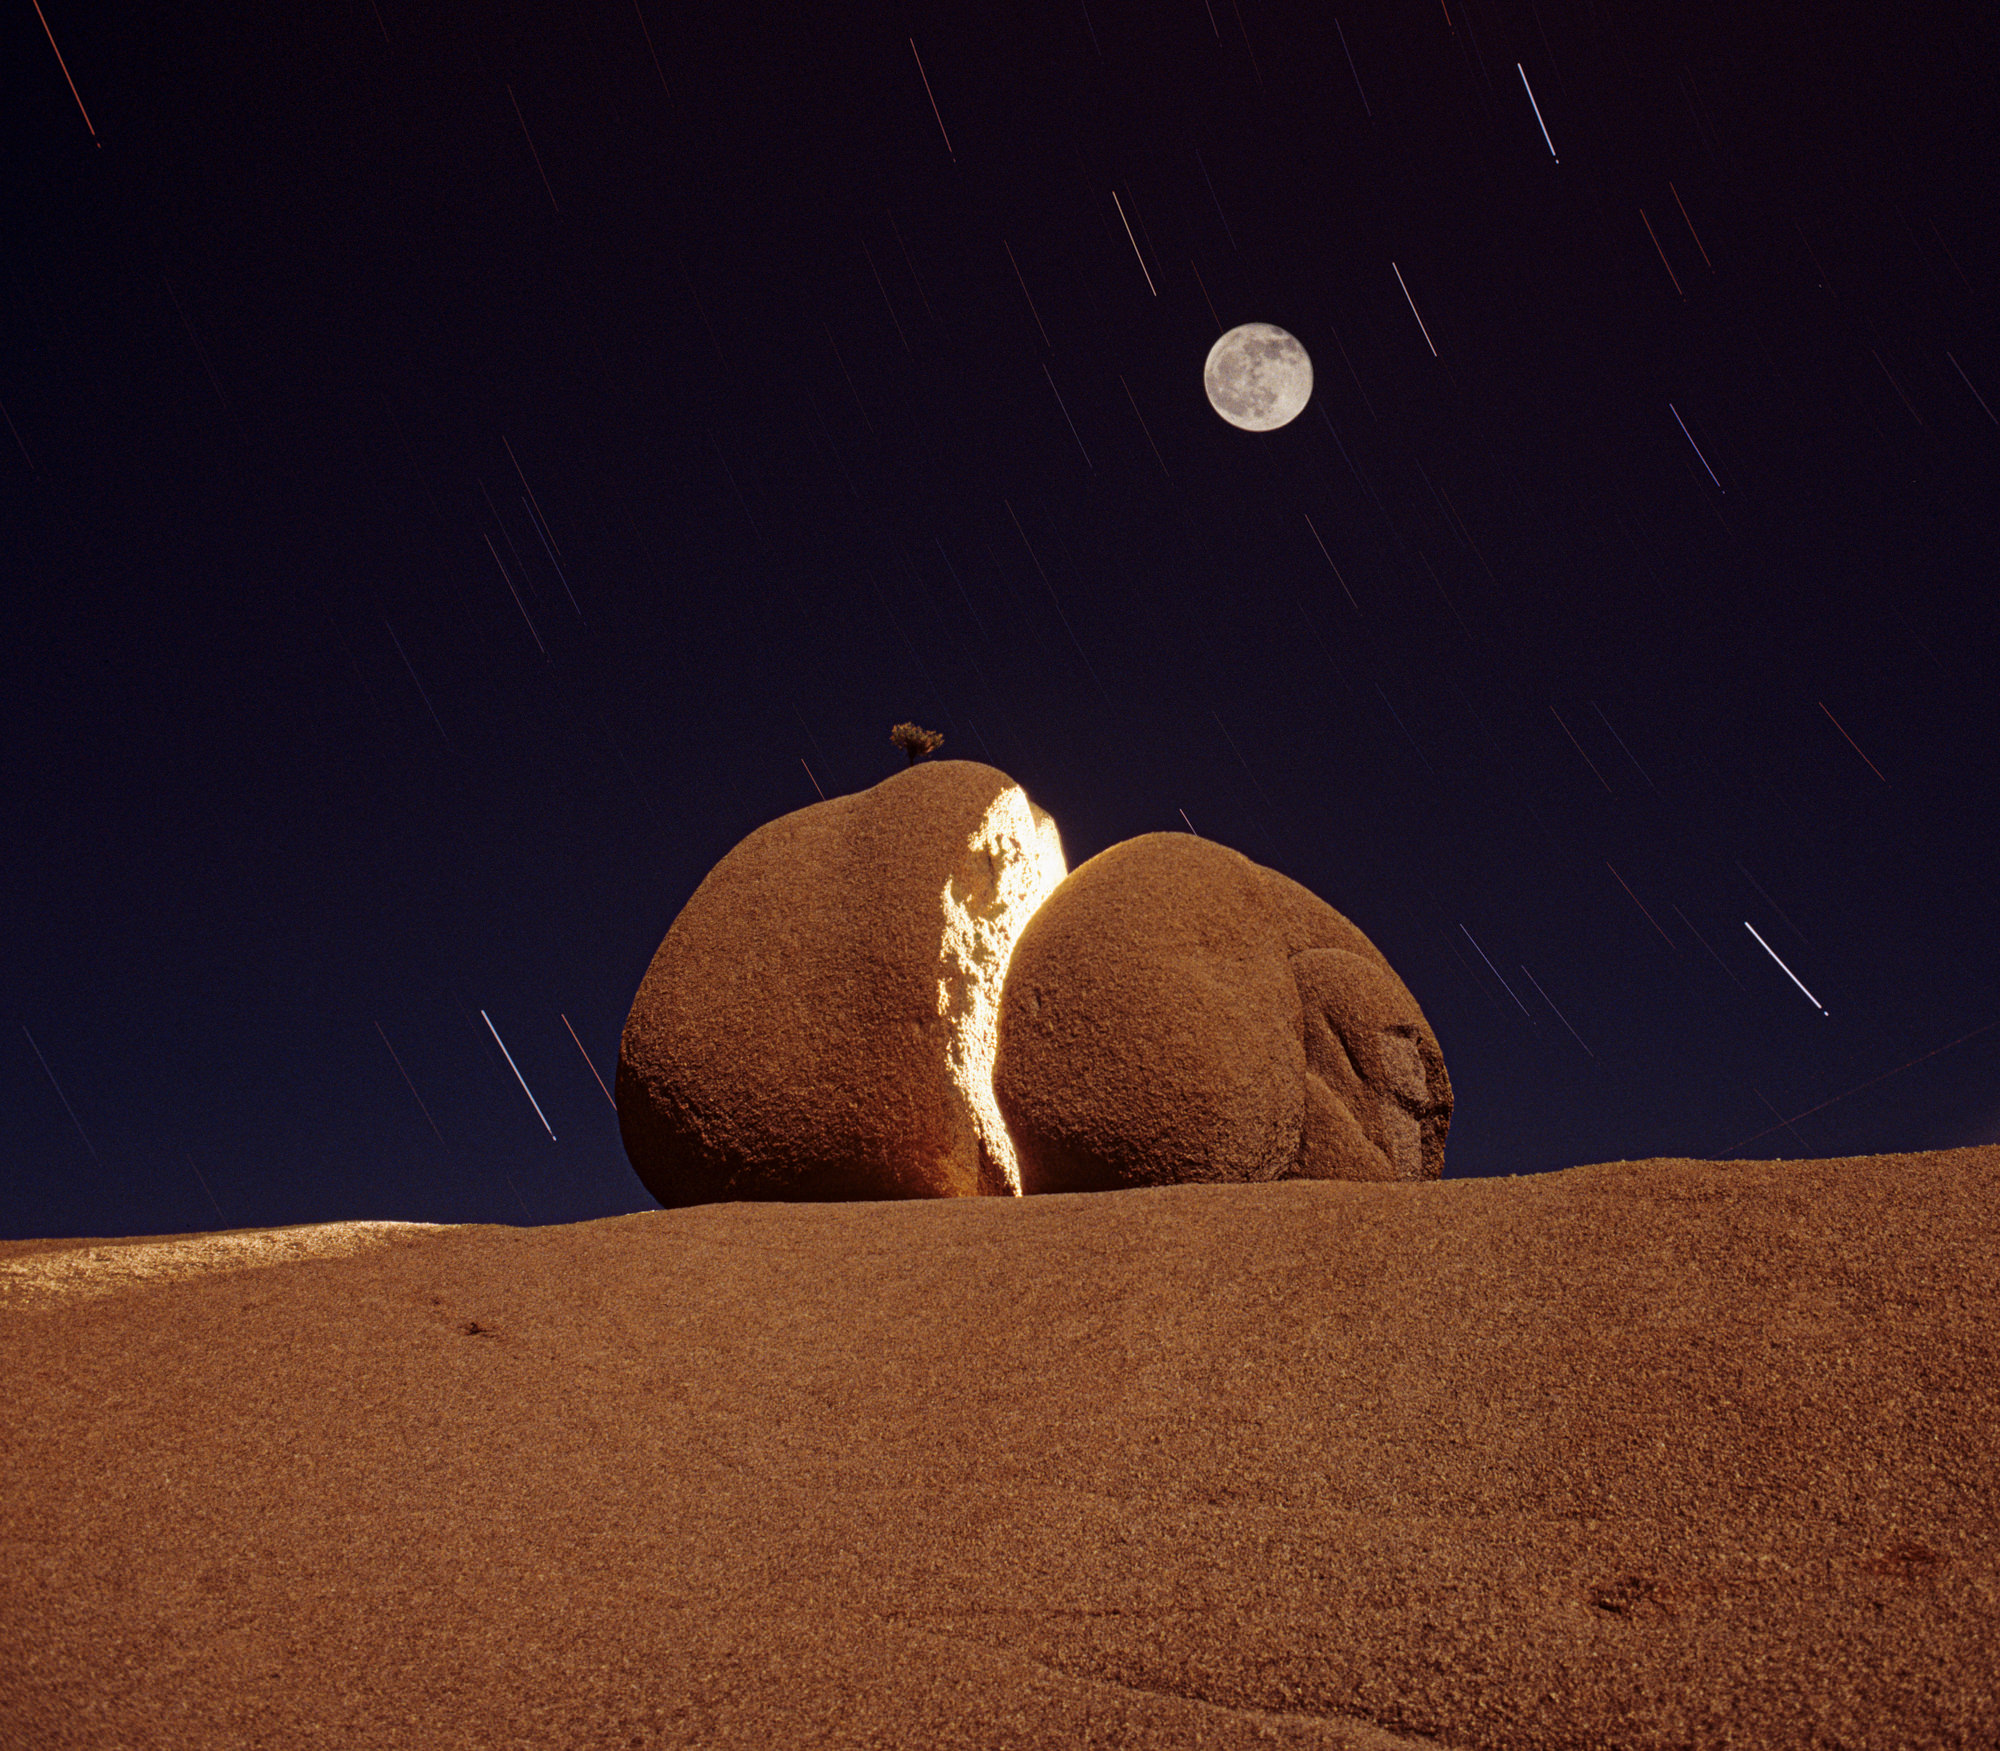
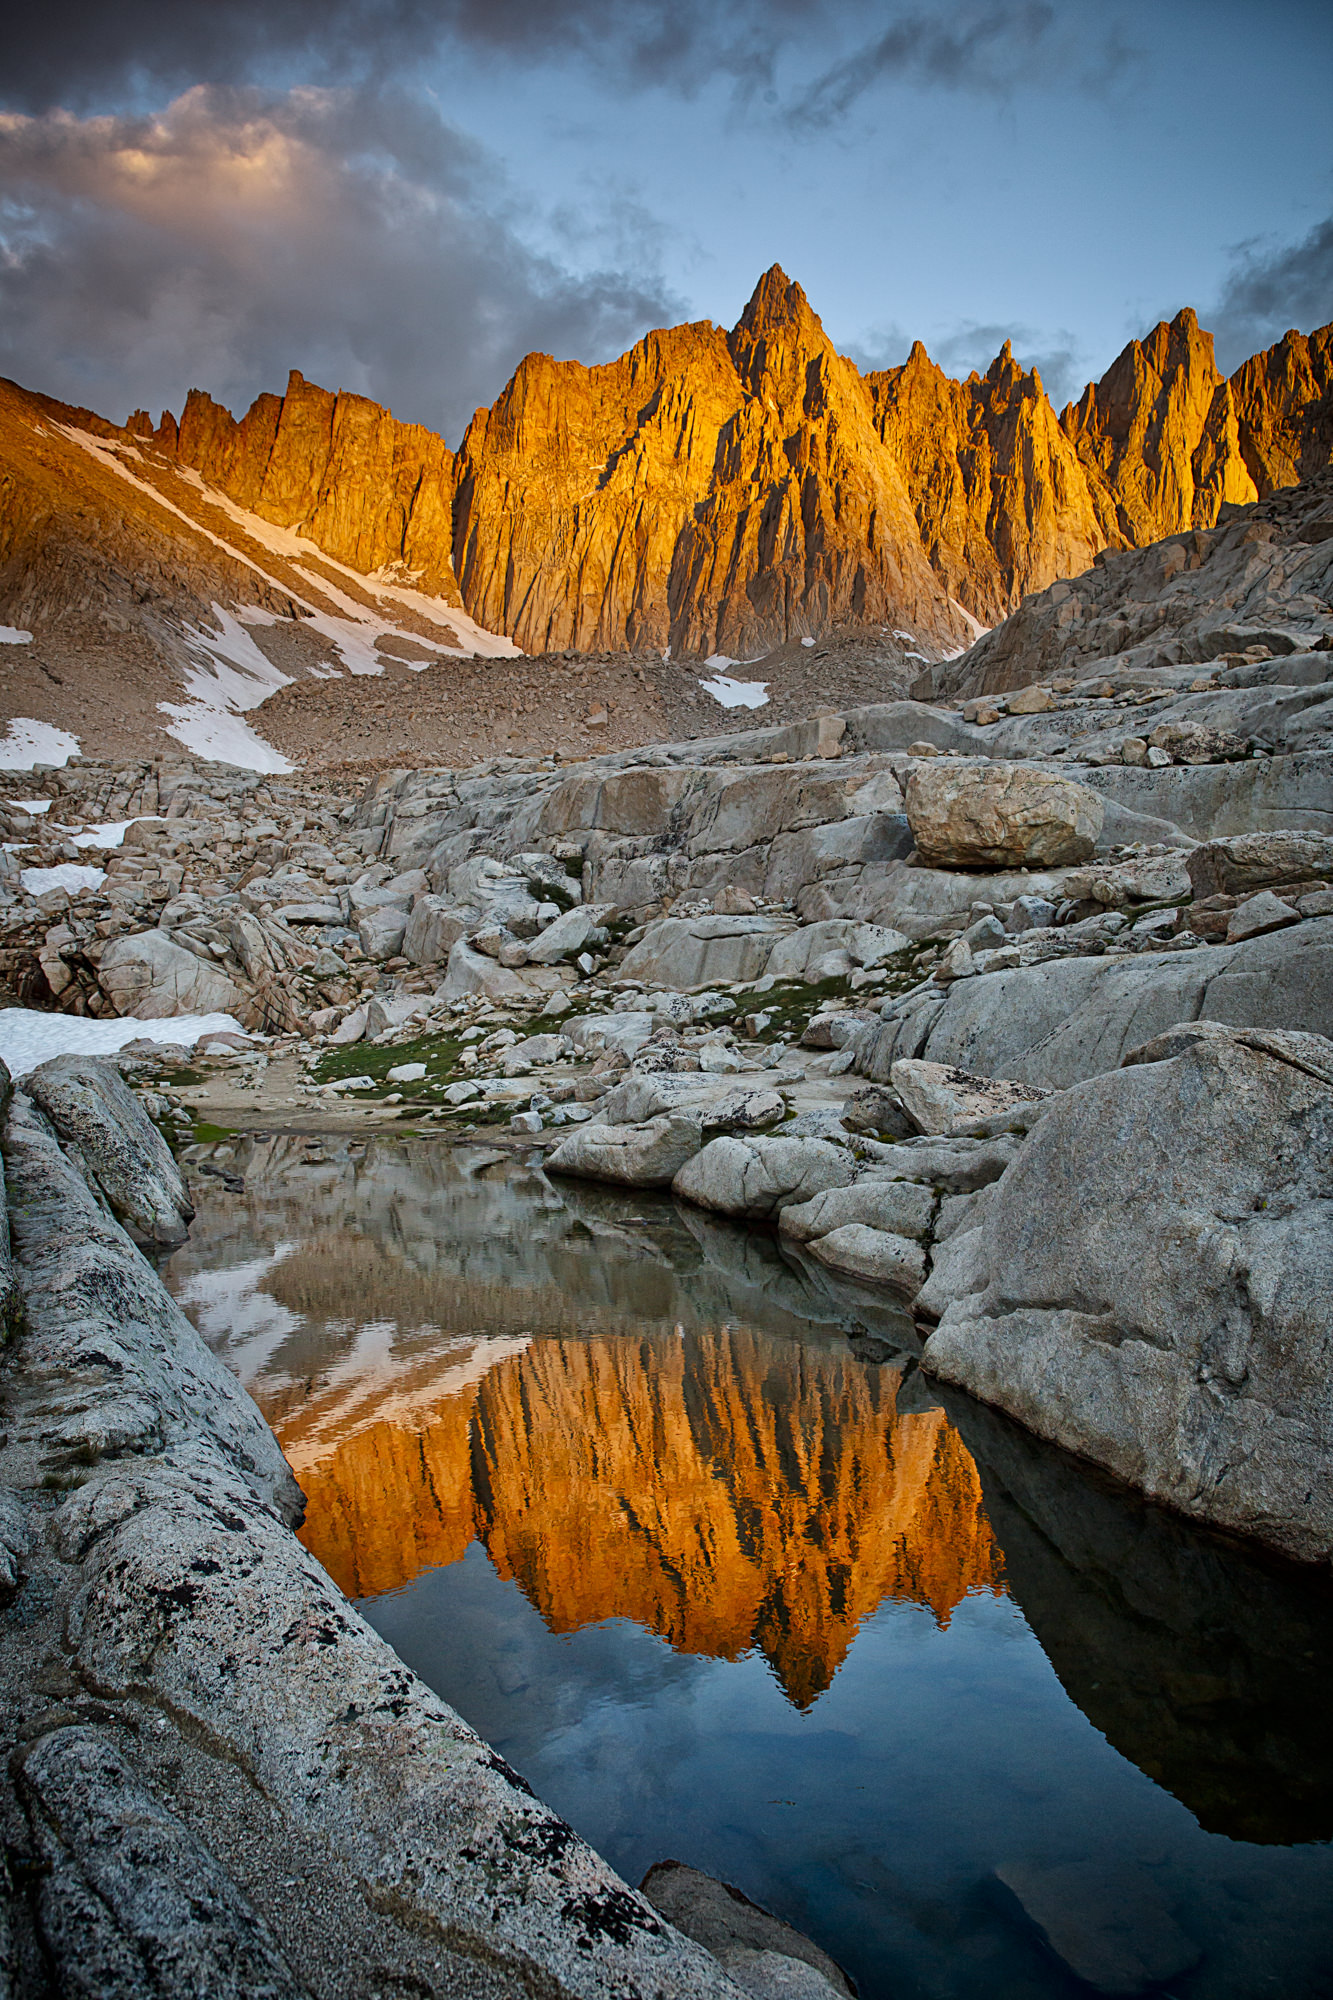
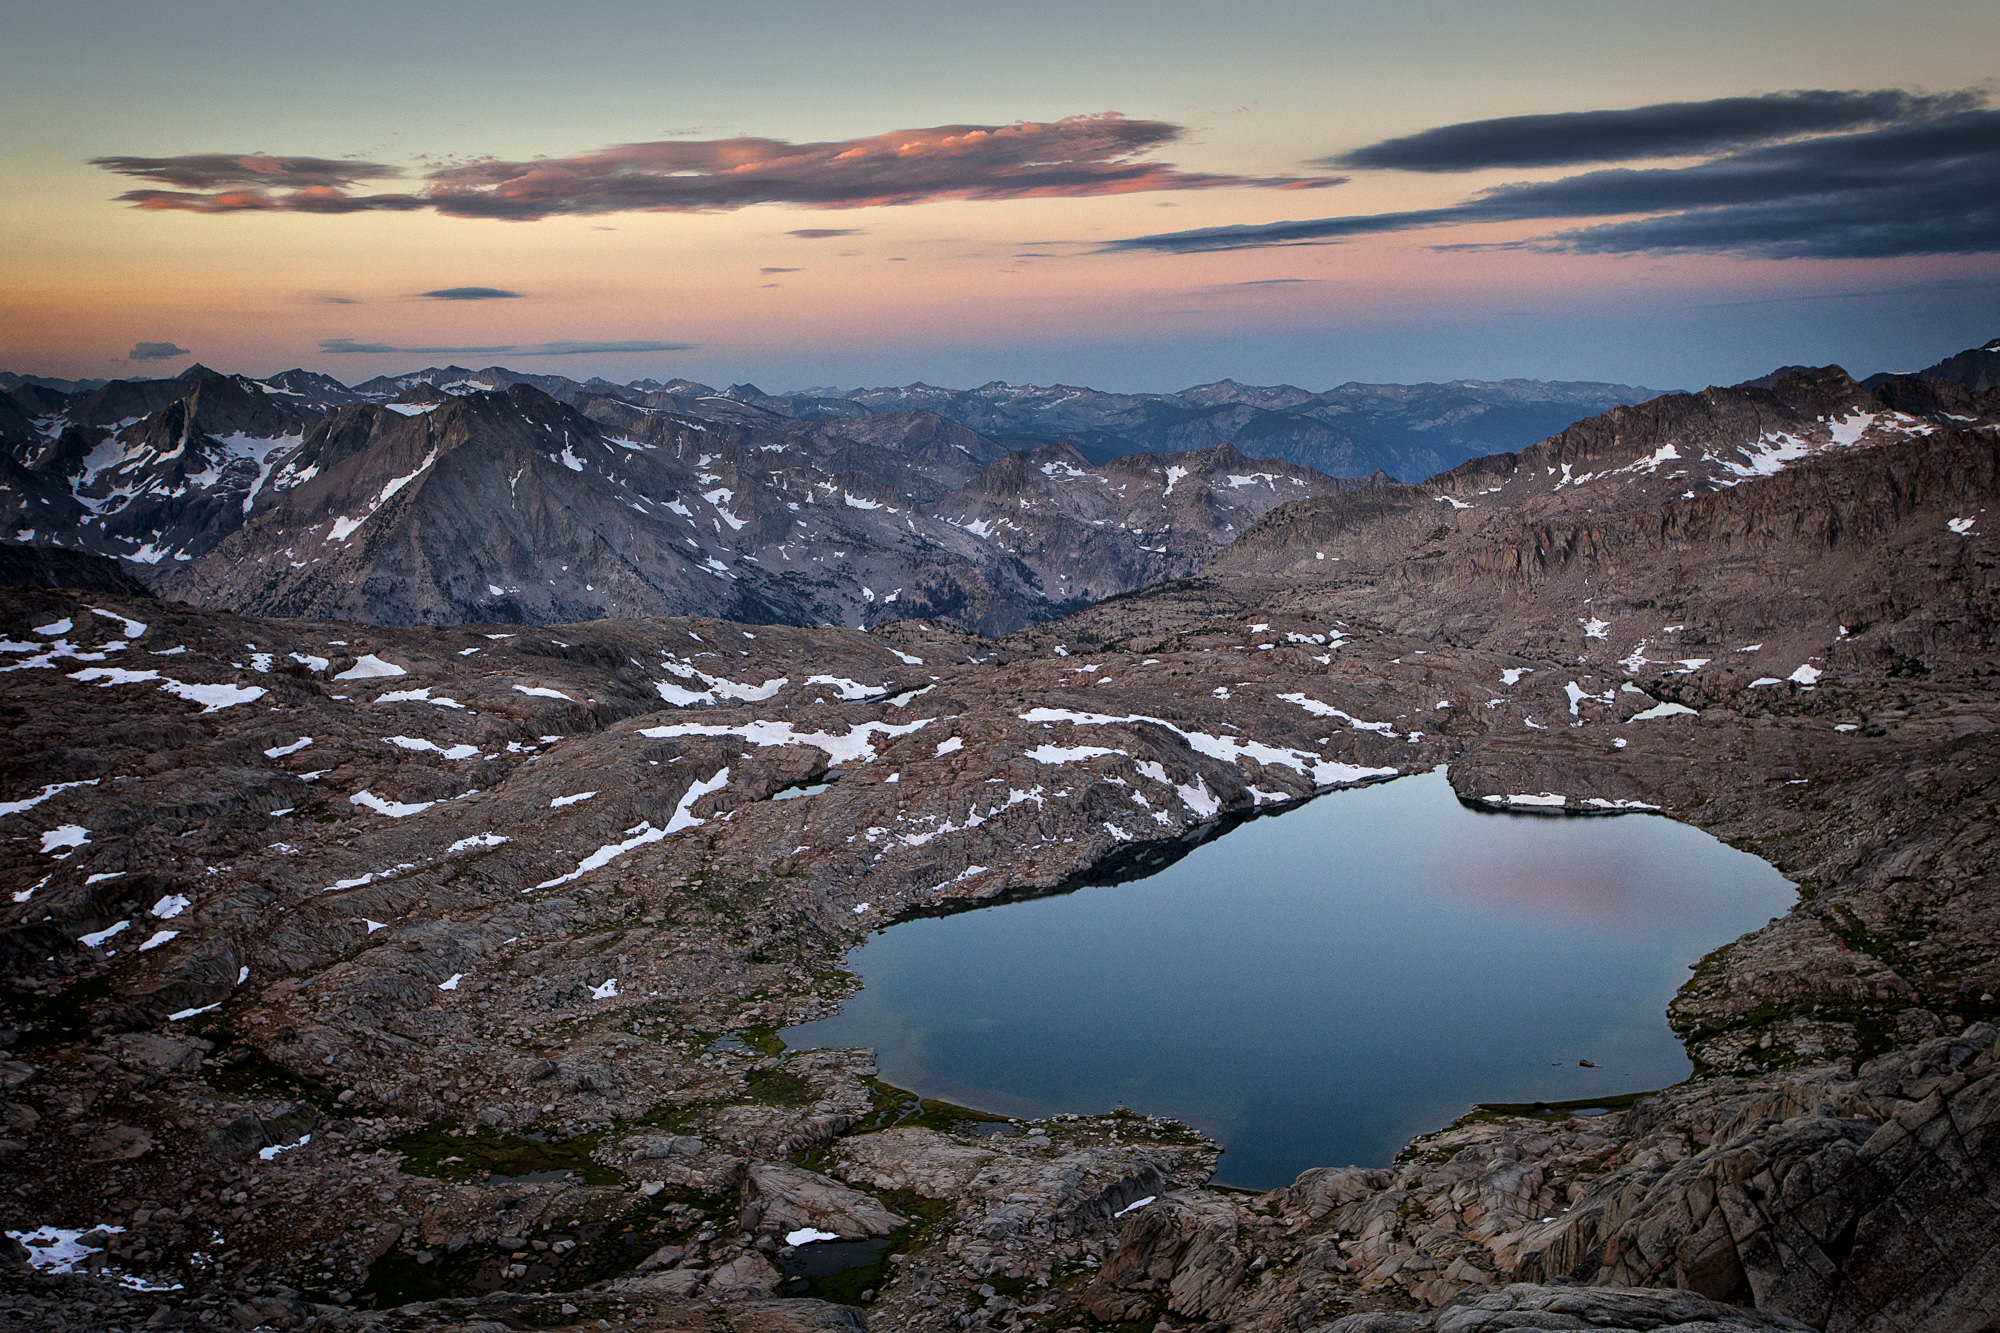

 Facebook
 Google +