Tag: HDR

How to Do HDR Photography

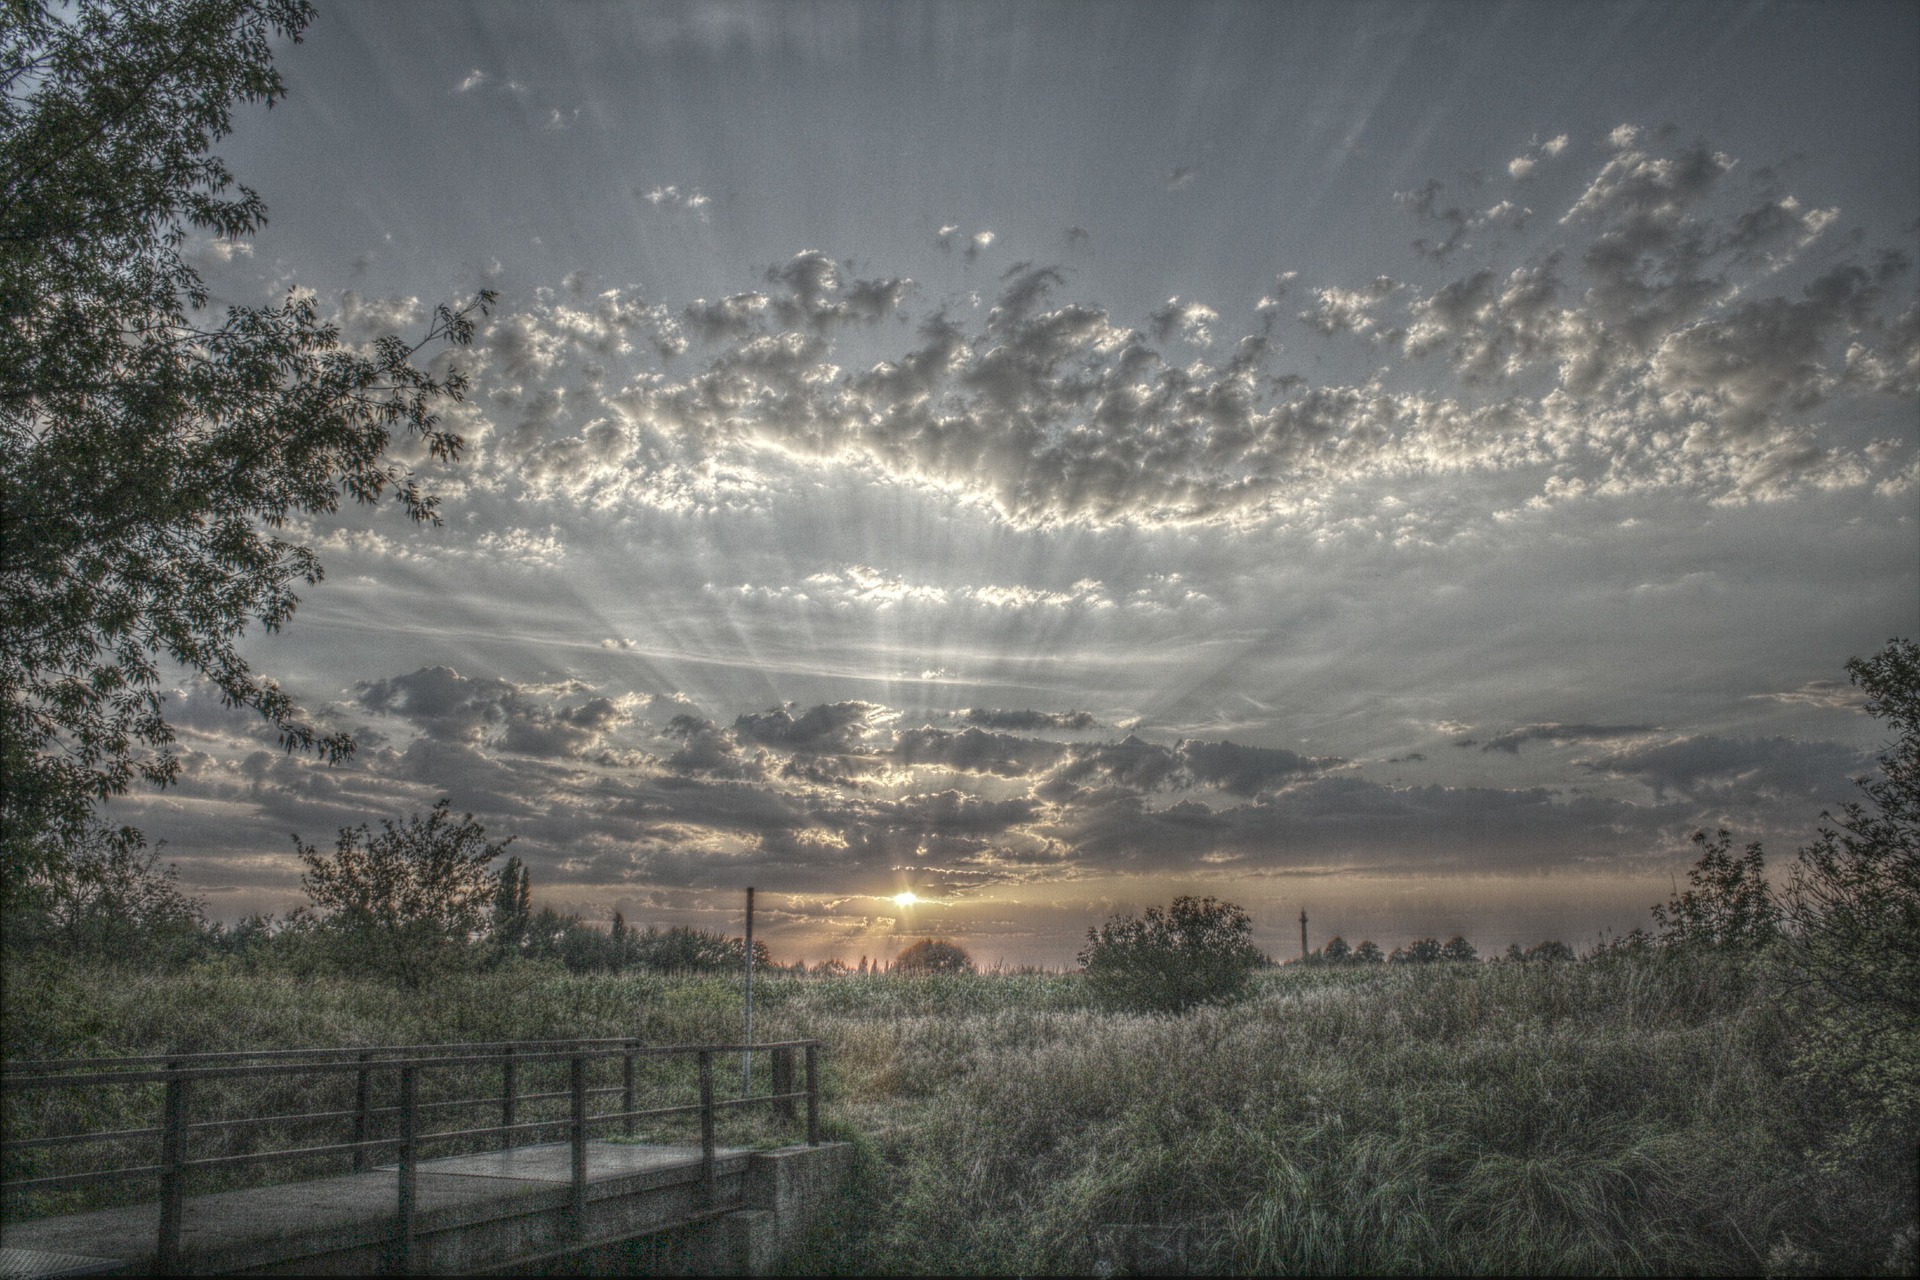
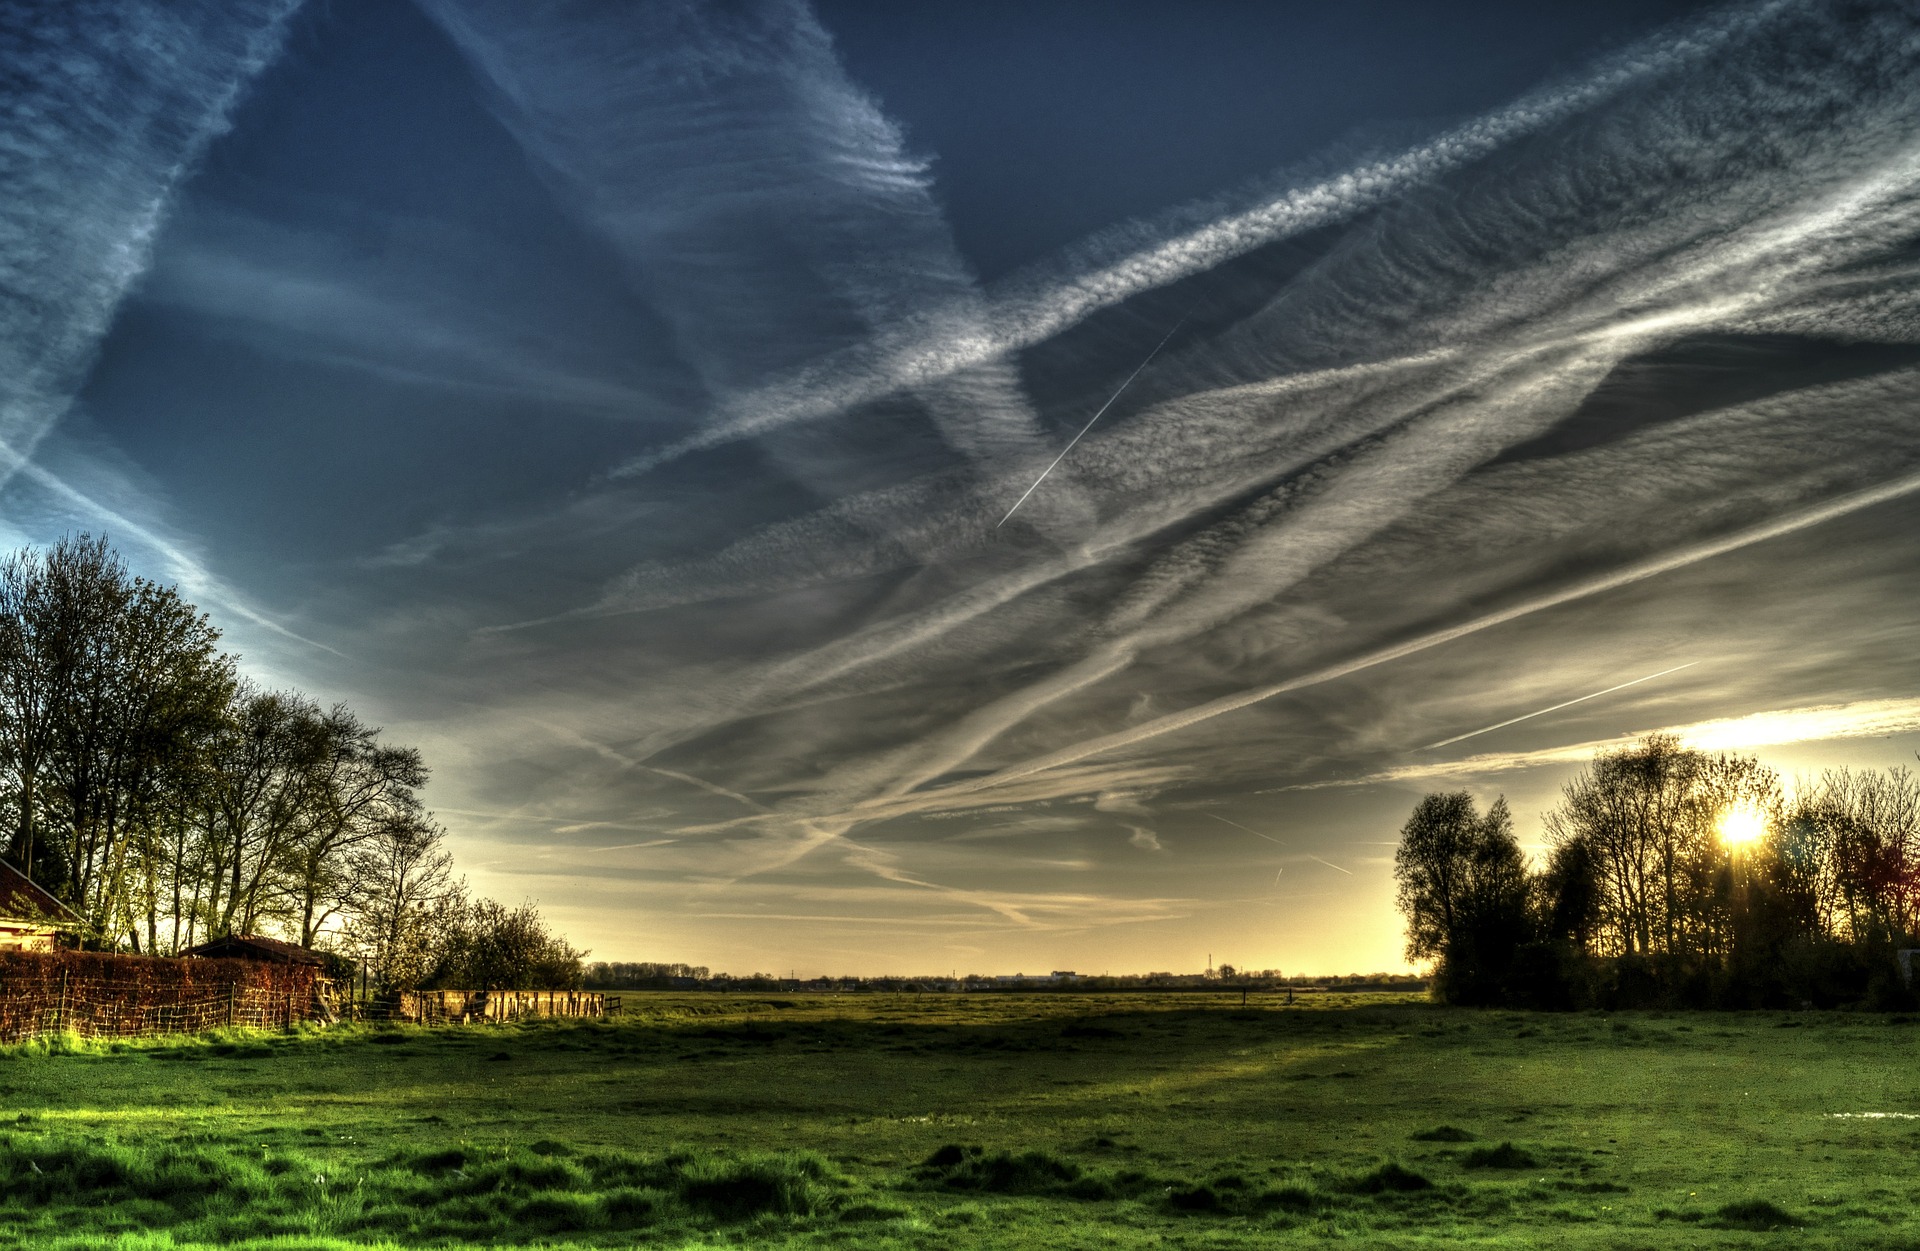
High dynamic range photography, also known as HDR photography, is a growing sector that many photographers are very excited about. This type of photography can create stunning photographs that are hyper-realistic; but sometimes overly so. There are ways to create realistic HDR images, though, and we’re here to help.

In our age of high-definition everything, HDR photography is a great trend, and one that you should really look into working with. The great thing is that while there are ways to do this all yourself in Lightroom, you can use presets and brushes like Sleeklens HDR presets. These will take out a lot of the work that you have to deal with to streamline the entire process for you.

What is HDR?

High Dynamic Range photography (HDR) is a combination of multiple exposures captured photographs combined into one single image, this process is used to fill in the lack of capability of the camera to capture different intensities of light. For example, when you photograph a subject under a bright sky, either the background comes out great and the subject underexposed or vice-versa.

realistic-hdr-1

HDR was used in the past quite heavily, but it is popping up more and more in digital cameras as well as smartphones. When you use HDR, the camera will take three photos, at different exposures. Then you use software like Adobe Lightroom to take those three photos and put them together to create an HDR photo for you. The result is what your eyes see, and a more realistic photo that will be very pleasing to the eye of anyone who sees it.

Where to HDR Photography?

Why would you want to do HDR photography and what situations should you do HDR? Typically, HDR is not done for portraits or anything like street photography. It is primarily used in landscape photography, as well as architecture photography, real estate photography, and interior photography.

  • Landscapes: In landscapes, HDR is used to create the proper contrast between the sky and the land, which is something a camera can’t do without editing for realistic HDR.
  • Sunlight Photos: Whether you are taking a portrait in the sun or getting a picture of a building, the sun has a habit of washing things out. HDR will give a more balanced look to the picture, and keep the light from the sun from consuming everything on the screen.
  • Low-Light: If you are dealing with low-light scenes, then an HDR picture will balance out the light, and bring more light into the picture. This is often used instead of a flash because it creates a more natural look for the picture instead of a washed-out flash look.

realistic-hdr-2

What is Dynamic Range? 

If you are dealing with HDR, you need to know more about the dynamic range. The dynamic range is essentially the difference between the darkest point on the image and the brightest point on the image. Our eyes are pretty amazing, and we can see more than a camera can. The estimate is that we can see 11 stops of difference between brightness and darkness, while a camera only sees five. For this reason, the landscape outside a window from inside is not always captured properly by a camera, even though we can see it fine. This is where HDR comes in, it balances all that out.

How to Create HDR Photos

HDR has been around for decades but it only became widespread in recent years. There are numerous ways to create an HDR photo. We will go through four HDR processing methods that suit any HDR photographer—no matter their skill level.

Beginner Method: HDR Mode on Cameras

This method is quite straightforward. You can actually shoot HDR photos on most of the today’s cameras and smartphones. You may simply switch to HDR mode on your device and start shooting right away. It is recommended to shoot with your camera mounted on a tripod, since the camera will capture at least three consecutive shots while shooting in HDR mode. They will be shot with three different exposure value (EV), which will give you an underexposed, normally exposed, and overexposed photo respectively. It is important to stabilize your camera so as to ensure your camera merge the three images into one single HDR image successfully.

In spite of the relative ease of this method, it offers the least flexibility among the three methods. Basically, you will have no control over the blending and merging of the three exposures. Your camera will do all the work for you. In my opinion, this method is for beginners and those who aim at instant sharing on social media. On the other hand, if you are serious about photography, you should always avoid the HDR mode on your DSLR and go for the following two other methods.

Intermediate Methods: Take Multiple Exposure Shots with Your Camera

In order to do the next HDR photography tutorial, you’ll need to take multiple photos and merge them into one. Here are a few photography tips to ensure you capture the best photos possible:

  • Shoot RAW images, you will have more data to work with.
  • With your digital camera, take multiple exposure photographs, ideally shooting a range of 3 to 7 photos.
  • Make sure to alter only the shutter speed from each shot, with increments of 1, 2 or 3 stops. For example, if you were taking a single photograph and you use a shutter speed of 1/30.
    • 1 stop increments using 1/30 as a base for shooting 5 images – you will end up with 1/8 1/15 1/30 1/60 1/125.
    • 2 stops increments using 1/30 as a base for shooting 5 images – you will end up with 1/2 1/8 1/30 1/125 1/500.
  • Do not change the aperture of the camera, for example, if you use an aperture opening of F11, make sure you use it in every single shot.
  • It is highly recommended that you use a tripod, unless it’s not possible, you can use the bracketing function on your camera, the one that takes a multiple bursts of images with different exposure.

01_taking_pic

HDR Pro of Adobe Photoshop

This is an ideal HDR tutorial for those who want to have some controls over their merged HDR images and need to get the job done quickly. HDR Pro offers you a certain degree of controls. The parameters that you can play around with include Gamma, Highlights, Shadows, Edge Glow, etc. The workflow is quite simple for this one. I will go through the steps of using HDR Pro with you in the following paragraphs.

Screen Shot 2016-07-18 at 3.35.27 PM

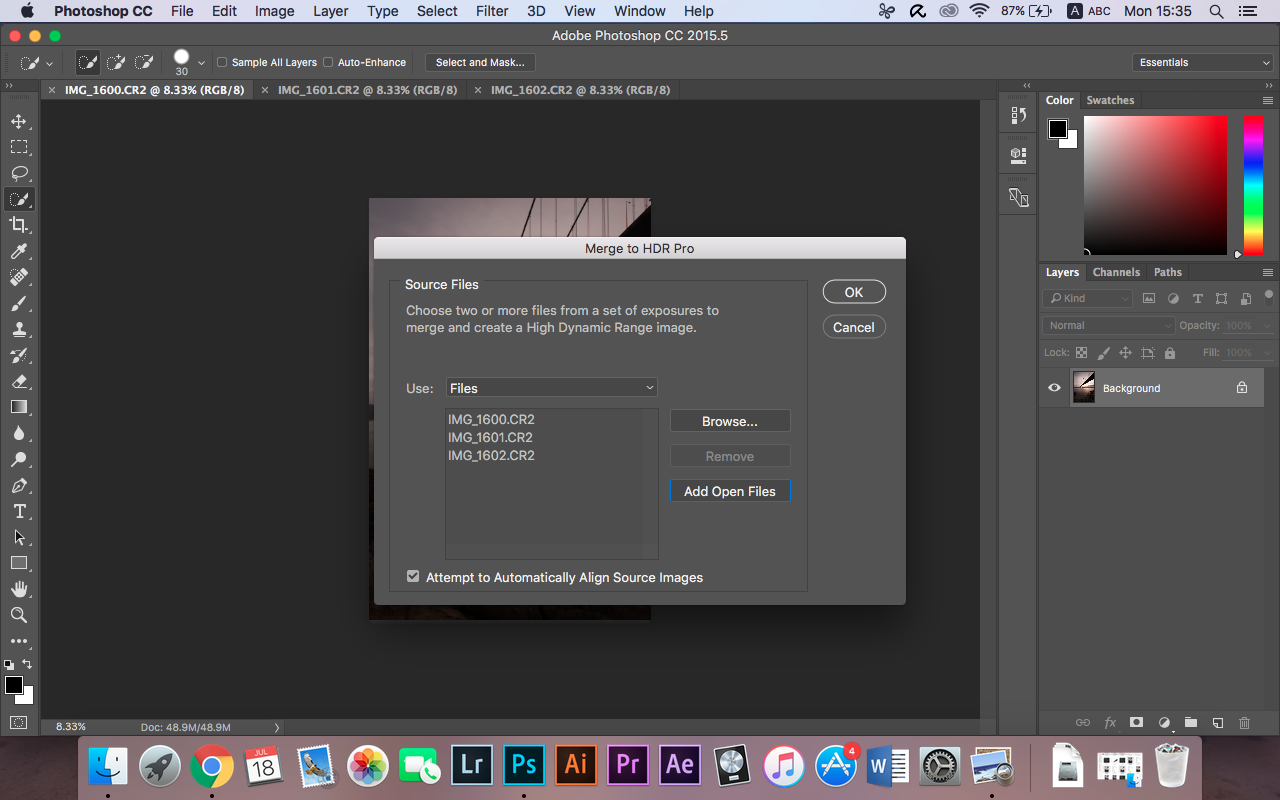
First, navigate to File > Automate > Merge to HDR Pro. A window will pop up. You may browse the photos you need and import them to Adobe Photoshop here—or if you have already opened the required files in Adobe Photoshop beforehand, you may simply click Add Open Files. All the opened files will be listed in the pop-up window. Click OK once you have finished importing.

Screen Shot 2016-07-18 at 3.32.47 PM

This window will appear once you import the photos. You may edit settings of your merged photo here. There are numerous presets available on the top right-hand corner. You may stick to one preset if you want an instant result. You will probably want to look into the settings of Edge Glow. It determines the strength of the HDR effect. If there are unwanted glows on the edges, you may check the option “Remove ghosts”, which is located above the panel of Edge Glow. When you finished editing, you may simply proceed by clicking OK on the bottom right-hand corner. That’s all.

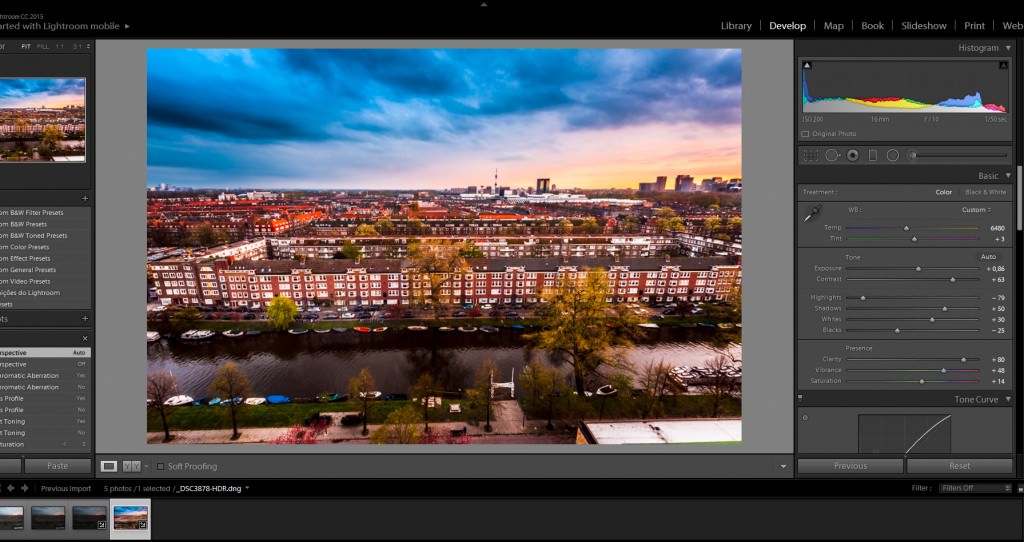
Realistic HDR in Adobe Lightroom

Camera setting calibration is very important. Every camera has its own settings, and you can choose any of these within Lightroom to get the HDR effect you want, including Camera Faithful, Camera Portrait and Camera Landscape.

realistic-hdr-3

Now we get to the meat and potatoes of this, and how to create the realistic images that show everything clear, without focusing on only one thing in the picture or darkening something that shouldn’t be.

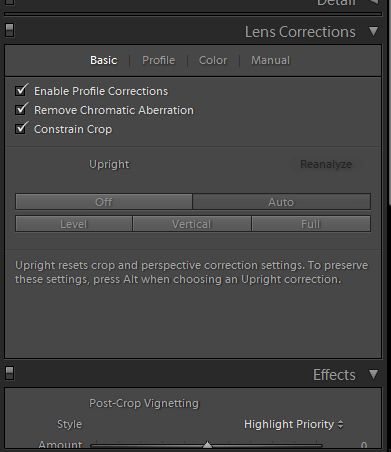
The first setting to understand is Chromatic Abberation. This is the color fringing around the image, and it can be dealt with by going to Lens Corrections-Basic and then Remove Chromatic Aberrations.

Import and Select Images in Adobe Lightroom

  • Import the images that you have photographed.
  • File/Import Photos and Video
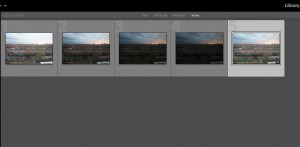
  • Select all the images that will be used.
  • Shift+click the first image and click on the last image in order to select all the images.
  • If your images are not in sequence, (cmd+click on the Mac or ctrl+click on the PC) on each image to select them.
  • There is no need to adjust your images on the Develop Module at this stage. We will do it afterwards, on the final image.
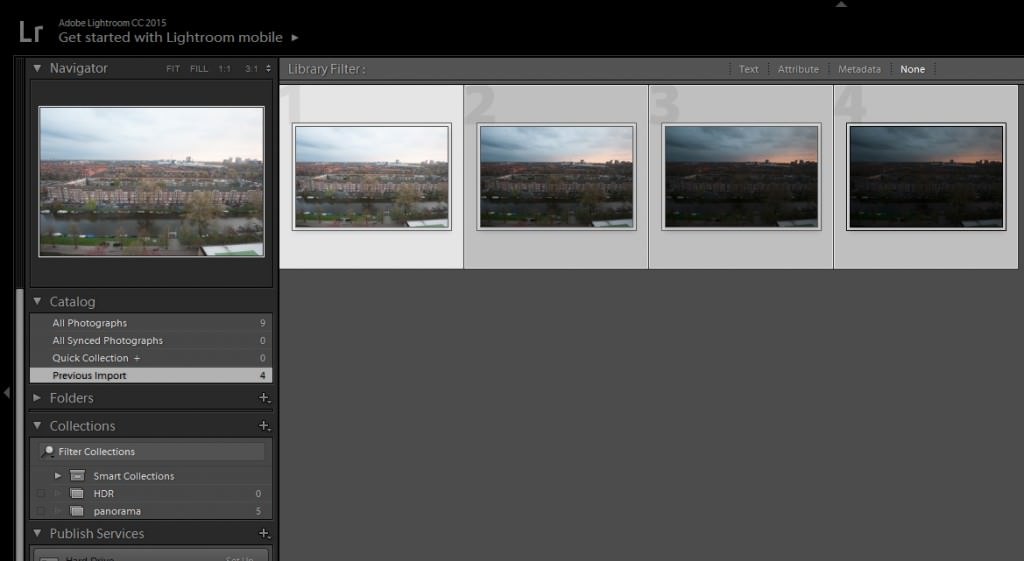
02_selecting

Merge the images to HDR

03_mergeHDR

After selecting the multiple photos, go ahead and merge them together.

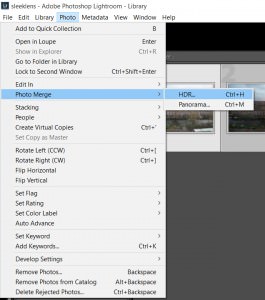
Photo / Photo Merge / HDR (cmd+H on the Mac or ctrl+H on the PC)

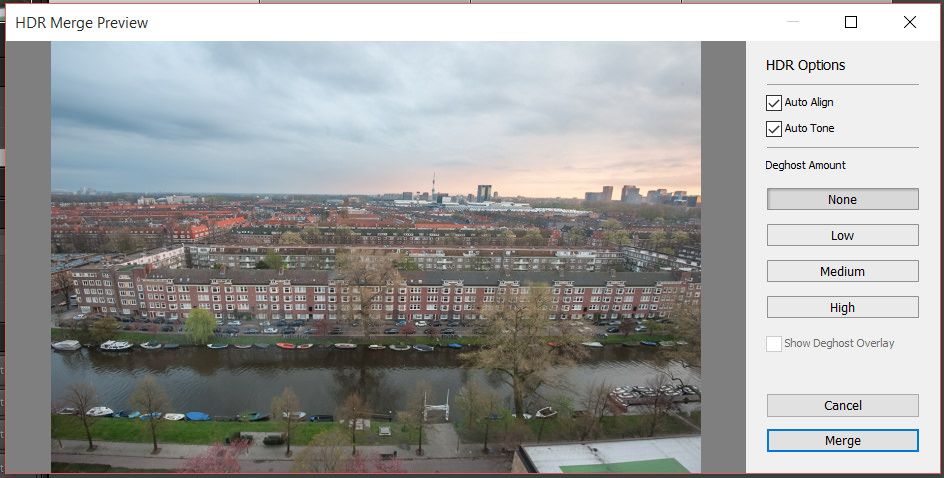
04_HDRpreview

  • Auto Align – Will be selected by default and will align automatically the multiple exposures that were captured with your camera and also crops uneven edges of the images.
  • Auto Tone – Nondestructively tries to enhance based on the dynamic range automatically the combined images.
  • Deghost amount – Will try to fill in parts of the image that had changed between exposure, like birds flying over or leaves in the wind.
  • Low: Minor changes of movement between images
  • Medium: Considerable changes of movement between images
  • High: Cures high changes of movements between images
  • Show de-ghost overlay – shows what areas of de-ghosting that has been changed.

After you click Merge Lightroom will process the images in the background. Depending on your machine, it may take some time to process the multiple images.

05_newimage

The neat thing is that, Lightroom will create a brand new RAW file and renames it with -HDR at the end, that means that you will end up with the maximum capability for editing your image.

Adjust the Final HDR image

06_lens correction

If needed, make any adjustments regarding Lens Correction at this stage, since you are doing it to one image, it will save you time.

07_exposure

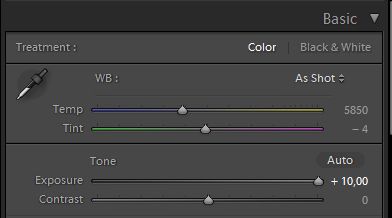
In the Basic tab, when we mess up with the exposure, you can see that we have a much broader dynamic range going from -10 stops to +10 stops, whereas in a regular image it ranges from -4 stops to +4 stops.

08_develop

Now we can enhance the merged image with the develop module, as we would do to any other image. In the end, you can get a beautiful High Dynamic Range image.

Advanced Method: Luminosity Masks

This is the most advanced way to create HDR photos among the methods in this article. It offers you the greatest flexibility but it takes quite a lot of effort to master the skills. If you are serious enough, this approach is for you.

Here is the workflow. You will need to import the base photo, which is the one exposed to normal EV. Then, you may use the Photoshop actions created by professional photographers to create luminosity masks. Basically, the action divides the base photo into multiple channels, according to the brightness of different areas in the photo. You will get something like Highlight, Midtone and Shadow channels after it is done. Then, you can create a mask with these channels and put your underexposed or overexposed shots under these masks. I am not going through the steps in detail. You may head to Jimmy McIntyre’s website for more information.

HDR Photography to Create Hyper-Realistic Photos

High dynamic range photography is the process of using multiple images to create one high-quality image that is closer to what the human eye sees in real life. We hope you found this HDR photography tutorial useful. If you’re looking to improve your HDR technique, be sure to check out our Sleeklens HDR presets and brushes. It’s a simple way to create some really amazing HDR imagery.

Repeat Performance: Going Back to Old Photos For New Inspiration

Back during the days when I worked in a darkroom to produce my black and white and color prints, I loved going to galleries to see other photographers’ work for inspiration. (With the Internet in full bloom in images, I’ve regrettably not seen a gallery show for years.) Part of the experience was examining the prints for clues as to how they (or someone they hired) transformed a simple film negative into a sometimes magical image hanging on the wall.

One such photographer was Ansel Adams. I remember one exhibit where some of his more famous photographs were older prints and then later seeing a show of the same shots but printed more recently. Something didn’t look right. They were different. More contrasty. The blacks, in particular, were so deep they lent an occasionally menacing feel to the scene. What happened?

Turns out ol’ Ansel simply changed his mind as to how he rendered his vision. While I found something jarring about his new attitude in many of his prints, I had to applaud him for rethinking his images, no matter how famous, and applying fresh emotions to them.

These days, it’s so easy to rework past photos, I think it’s almost mandatory to revisit one’s older work for fresh ways to approach the images. What might have been a product of so-so processing a few years can turn into sparkling examples of your best work today.

With that in mind, I believe there are three reasons to go back to old photos. Here they are.

A Change in Attitude

In moments of self-aggrandizement, I like to think that I’m evolving, getting better with age. As such, my slant on interpreting an image changes from time to time and I refuse to stick with one approach forever. How boring. This being the case, I think it’s always worth my time to go back through the archives and find pictures that could use a fresh coat of pixels.

How I handle my landscapes has definitely gone through stages of retooling. I used to think starting up a shot with contrast and saturation made it more noticeable in the overcrowded pantheon of landscape photographers. Now, I’ve mellowed a bit and prefer to suggest how it felt to be there, known as a sense of place. It’s less dramatic but more honest, I think.

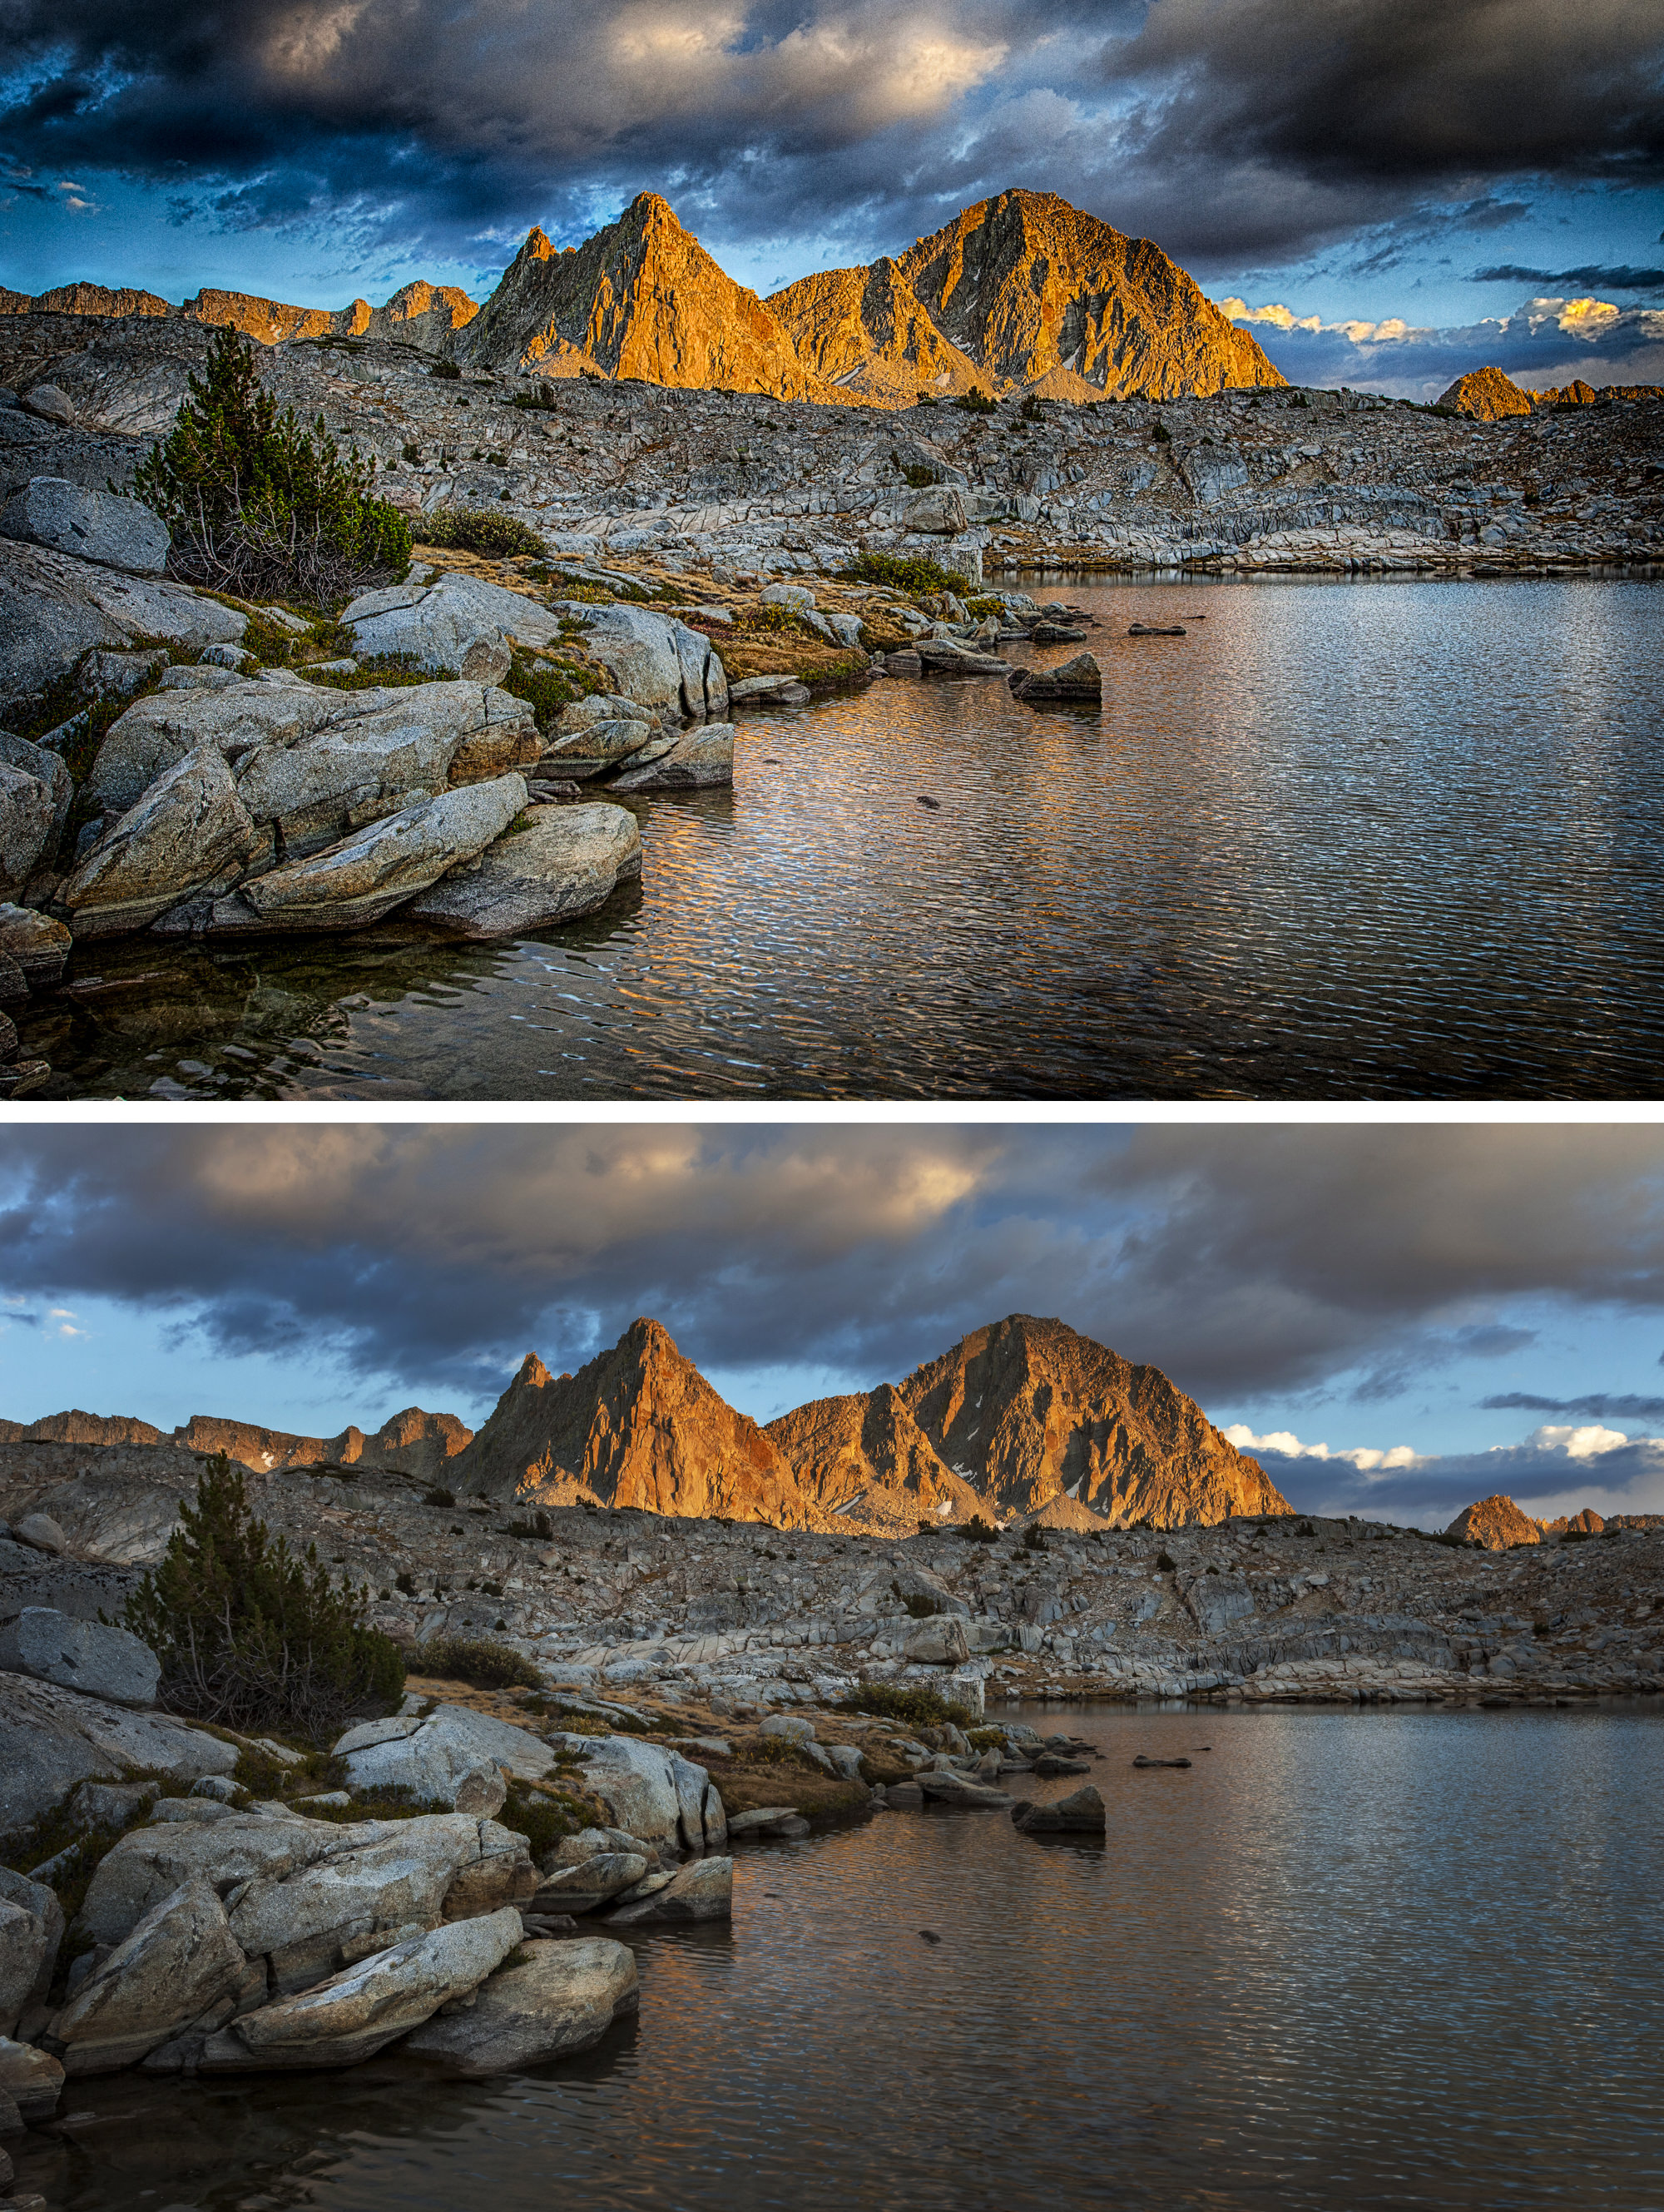
I had processed the top shot of a lake in Dusy Basin with Isosceles Peak in the background several years ago and went a little overboard with the Photoshop sliders. The bottom version is far more relaxed and restrained—just the way I like it these days.

Take the above sunset shot from Dusy Basin in Kings Canyon National Park. It got a little crunchy when I first processed it eight years ago. So much so, it’s hard for me to look at it. The contrast and saturation take away from a sense of place. If I saw this for the first time, I couldn’t imagine what it was like to sit there as the sun went down.

So I went back to work and produced the version you see below the first. Ah, much better. It’s not that I put a lot of work into the revision (it takes longer to describe than do). I first took the four bracketed exposures I made the scene and ran them through Lightroom’s HDR menu. The nice thing about this software is how natural—even restrained—the results can be.

I then applied to the result a healthy amount of highlight adjustment to bring back the sky and shadow adjustment to bring out details primarily in the rocks and water. I then asked Lightroom for its opinion on the whites and blacks by holding the shift key while double-clicking on the words “Whites” and “Blacks.” This auto action adds contrast and counteracts the softening that opening the shadows usually produces. I then took the image to Perfect Effects 9, clicked on Dynamic Contrast (natural), lowered the result by 50% and then added Color Enhancer (fall enhancer) and again lowered it about 50% along with reducing the amount of orange. Lastly, I opened the file in Photoshop where I dodged the rocks a little bit, darkened the peaks and added a vignette to the bottom half.

I’m now happier with the photograph. It’s darker and softer, more like how it felt to sit there on a rock and watch the sunset.

A Change in Software

The Adobe alchemists are always introducing some new feature that I could have used a few years ago on a group of photographs. There are all sorts of examples here. I fell in love with Lightroom’s radius tool for its ability to shine a light, if you will, on an isolated part of the image. I went back through my catalog of canyoneering shots and re-processed innumerable pictures of canyoneering rappelling, a subject the radius tool seemed especially adept at improving. A more recent update is with Boundary Warp in the Photo Merge/Panorama menu.

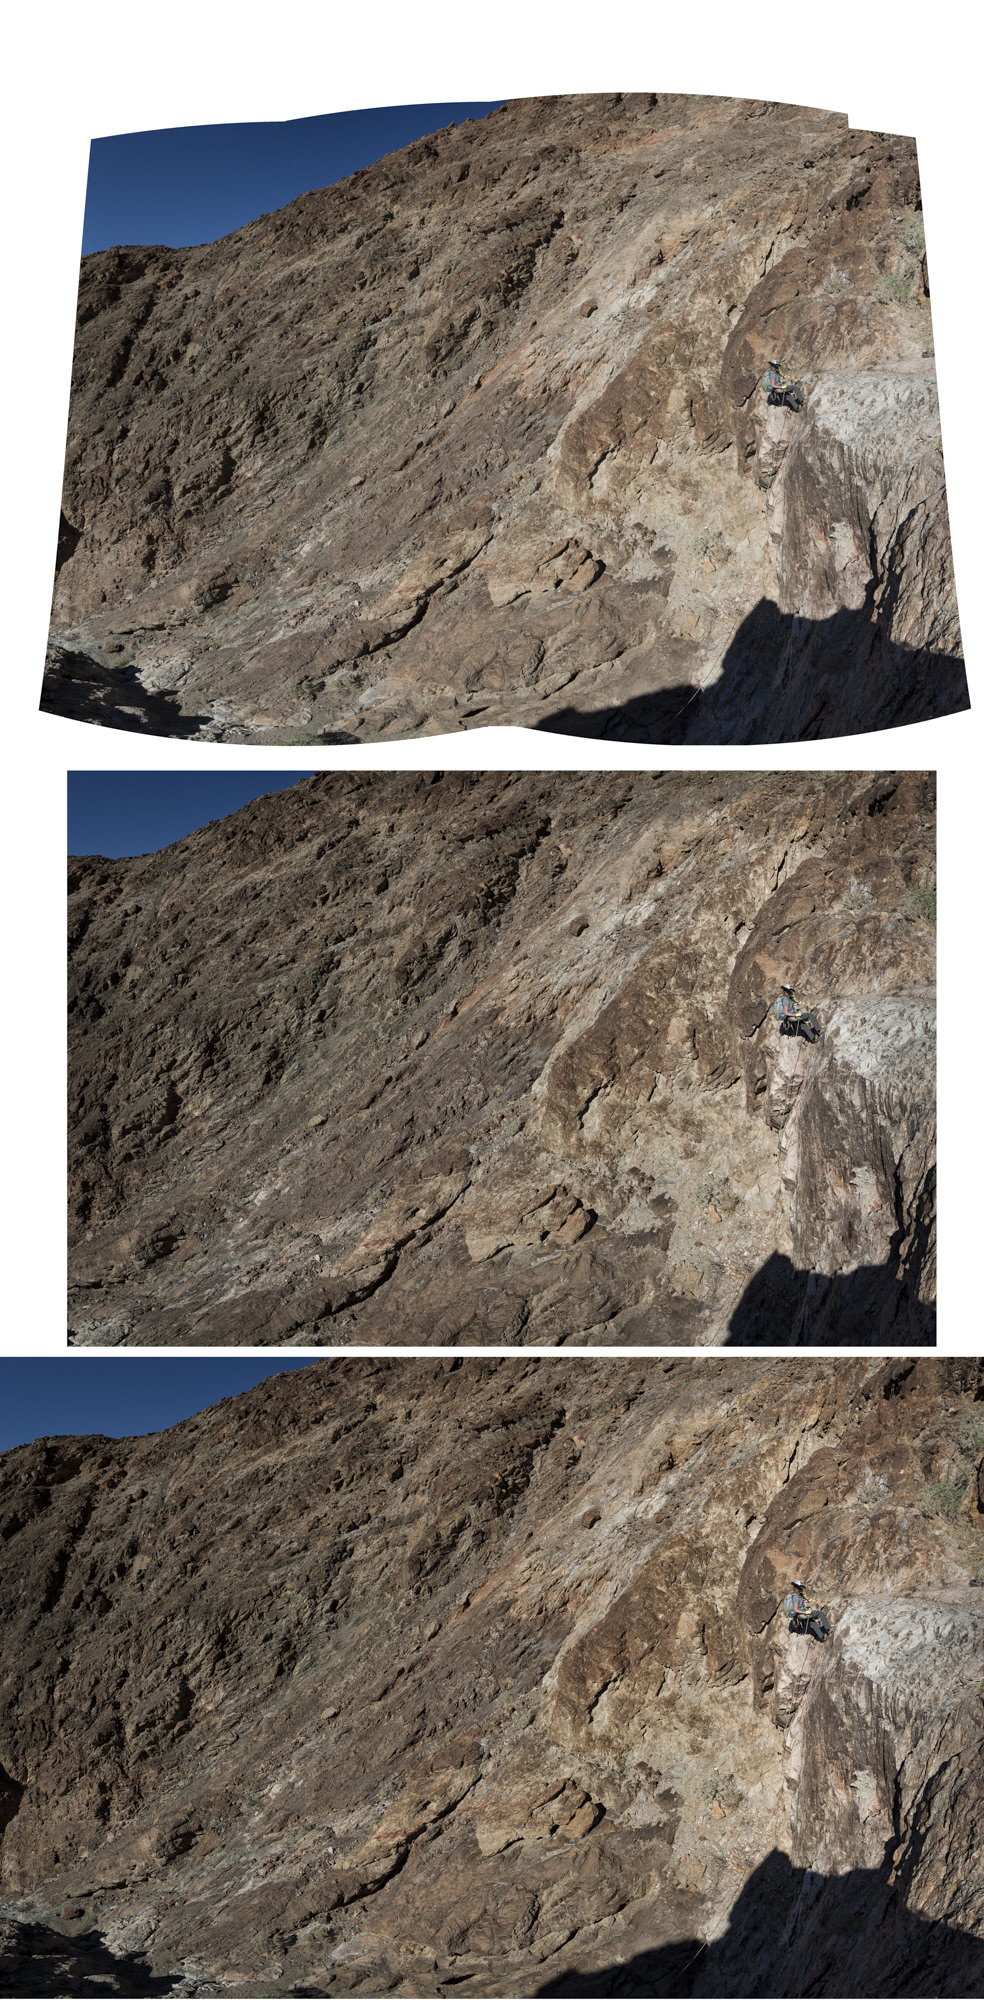
The top image after going through Lightroom's panorama software. The middle is after it had to be cropped to eliminate the dead spots caused by the stitching. And the bottom is the same shot but run through
The top image after going through Lightroom’s panorama software. The middle is after it had to be cropped to eliminate the dead spots caused by the stitching. And the bottom is the same shot but run through Boundary Warp which left more of the image.

That’s where the above example comes in. I’m not the fussiest person when it comes to shooting panoramas and hence Lightroom’s stitching program once left me with bizarre distortions in order blend the individual components into one. But now there’s Boundary Warp and I’m able to hold on to far more of the image without cropping out the distortions.

As you can see in the first go-through without Boundary Warp, I had to severely crop to get rid of the dead spaces the stitching program left behind. In the second, using Boundary Warp which figures out how to fill in those places, I was able to retain more of the image that in my opinion preserves the original intention of the shot to show this pipsqueak of a woman in a huge canyon.

A Change in Skill

I offer as evidence how I’ve learned a thing or two since I started working with digital files the following example taken at Marie Lakes along the Pacific Crest Trail in the Sierra Mountains of California.

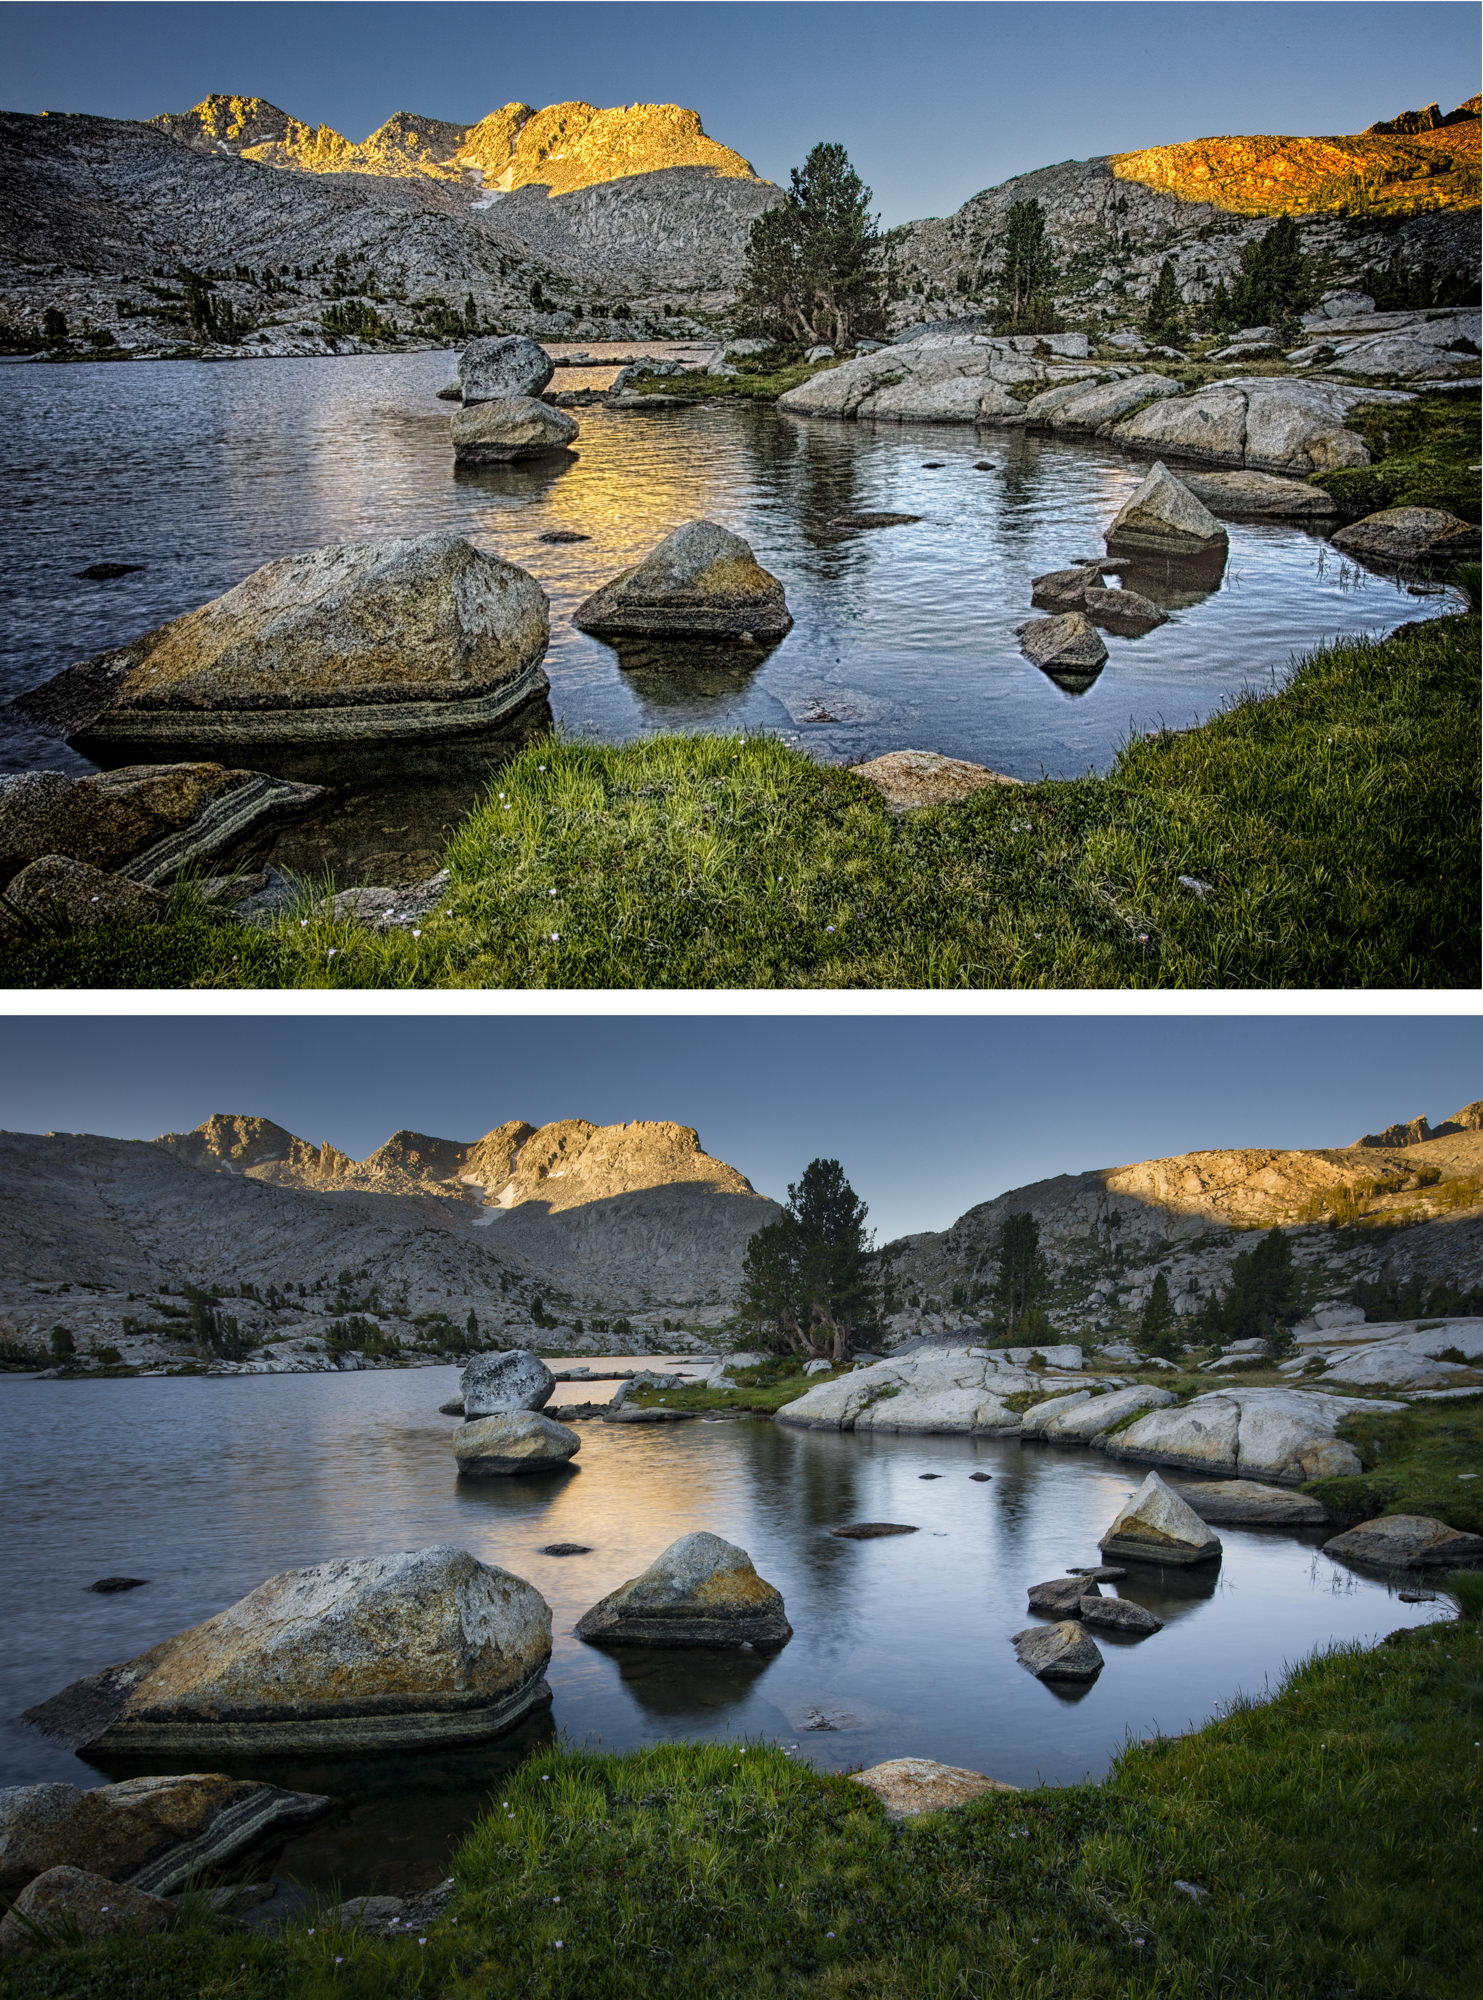
Marie Lakes at sunrise. The top image went through an HDR program (done poorly, I might add), and then the bottom is a simple blending of two exposures.

That first one is a pretty egregious execution of bad HDR. Hey, what did I know? But after a few years, I developed the ability to blend bright skies with darker foregrounds using Photoshop rather than an HDR program. I simply take, say, five bracketed exposures (usually with the camera on a tripod, but not always), and then back at the computer I choose the best exposure of the foreground and of the sky. After doing some minor adjustments to each in Lightroom, I select both, right click, go to the Edit In menu and select Open As Layers in Photoshop (at the very bottom of the list). Once in Photoshop, I move the shot with the properly exposed sky to the top of the layer stack. I next select both layers, go to Edit/Auto Align Layers and leave it at the default Auto. Once the layers are aligned, I alt/option-click on the Add Mask icon (this makes the mask black) at the bottom of the layers panel. I then take the lasso tool and draw a very loose selection around the sky on the top layer—really loose! With white as the foreground color, I press Backspace-Alt (Option on Mac).That creates a pretty ugly mask which you now have to soften in the Properties panel, cranking up the Mask feathering all the way up to 200. Most times this method works for me a lot better than HDR software (but not always—your pixels may vary).

This is what I did for my second processing attempt at this picture and it worked far better.

In a way, going back through old work and re-processing it can be fun and rewarding. Previously mediocre images can often be livened up simply because after a few years you know so much more about your craft and how to wield that Photoshop ax a little more gently.

Five Editing Mistakes Beginning Photographers Make

When you’re first starting out in photography, it’s easy to fall victim to a few common mistakes. When I look back at my work from seven years ago, it’s apparent to me (and probably any other photographer) that I fell into many of the same traps as a lot of other beginners. Things that draw attention to your subject don’t necessarily improve the photo–they can simply be distracting.

In this list below we’re going to get in touch with the five most common mistakes beginners tend to make during their journey towards becoming professional photographers:

Heavy Vignetting

2_vinette-1

Exaggerated vignettes are a tell-tale sign of an amateur photographer. Beginners like them because they draw attention to the center of the frame where they are most likely to compose their focus. What they’re effectively doing, though, is underexposing the sides of the image and detracting from their talent. A good photographer ought to use the whole shot, utilizing natural elements to frame the subject. Amateur photographers also like to use vignettes in an attempt to add some drama to the photo. Luckily, there are natural ways to do this–mastering the sun flare technique can really enhance an otherwise lifeless image.

Overusing Presets

3_Going over the top with presets-1

It’s easy to go overboard with presets. Overuse can make a photo look unnatural and unflattering. If you suspect you’ve done too much, you’re probably right. Keep it simple. Instead of over-editing the entire photo, use local adjustments to accentuate specific areas.

Histogram tool can be your best friend under situations like this, as you’re constantly checking over clipped values (mostly at highlights or shadows), but also Lightroom’s before/after mode can be extremely handy for checking where things went wrong.

Overdoing Black and White

4_Only editing in black and white-1

This is the mistake I’m most guilty of in my early work. Converting an image to black and white does not generally make it more artistic. Of course, there are ways to use black and white to effectively enhance a photo, but many new photographers end up using this style as a crutch. The number of variables that color adds to the editing process can be intimidating. Be sure to learn about complementary colors and incorporate them into your photos. However, do try to avoid photographing bright and heavily saturated colors because camera sensors don’t tend to register these colors well. If you’re unsure which way to go, this post can help you decide whether to edit your photo in color or black and white, but also keep in mind that not only black and white effects count as the only range of monochromatic effects – sepia or cyanotype effects also looks appealing for most clients.

Heavily Retouching Skin

5_Over Retouching-1

Most photographers fear that their clients won’t like their photos because of the way they themselves look (by no fault of the photographer). It’s tempting to heavily retouch skin in an attempt to flatter your client, however, it’s best to edit only what is necessary. A good rule of thumb is to touch up or remove only imperfections that are impermanent, such as acne or bruises – try, also, to find flattering angles and accentuate those.

Overdoing such adjustments will end up in unnatural results, mostly if you don’t happen to ace post production tools such as Lightroom Presets & Brushes or Photoshop Actions. In the end, you’re prone to ruin all your hard work by just trying to make it look better.

HDR Processing

6_Going crazy with the clairity slider-1-1

Every photographer wants to learn new techniques; more often than not, though, HDR processing looks a bit over the top. While it can be tempting to bracket exposures, it’s best to avoid it until you’ve mastered basic photography skills first. Instead, if you don’t have enough dynamic range in a shot, bracket the exposure and brush locally in the post.

A quality image ought to appear natural, polished, and simple:

1_original-1

Now that you’re familiar with these common mistakes, you can easily avoid them by mastering photography techniques that surely will take your photographs to the next level! Don’t feel disappointed by making mistakes during your first attempts – everybody had a starting point and a goal to reach, therefore it’s your right to learn from bad experiences and add all that knowledge to your future work.

Hope this guide was useful and keep shooting!

Quick-fix Your Pictures with Lightroom in 5 Easy Steps

Hi everybody, my name is Eduardo and this is my first Lightroom tutorial here in Sleeklens. For this first tutorial, I would like to show you a little trick I use when I’m in a hurry and want to do a quick-fix on a preview image for a project I’m working on, or for a set of pictures for a client to choose from. It’s very simple and only takes 5 easy steps. I recommend you check out the Lightroom Presets and brushes that Sleeklens sells if you want to create more professional edits.

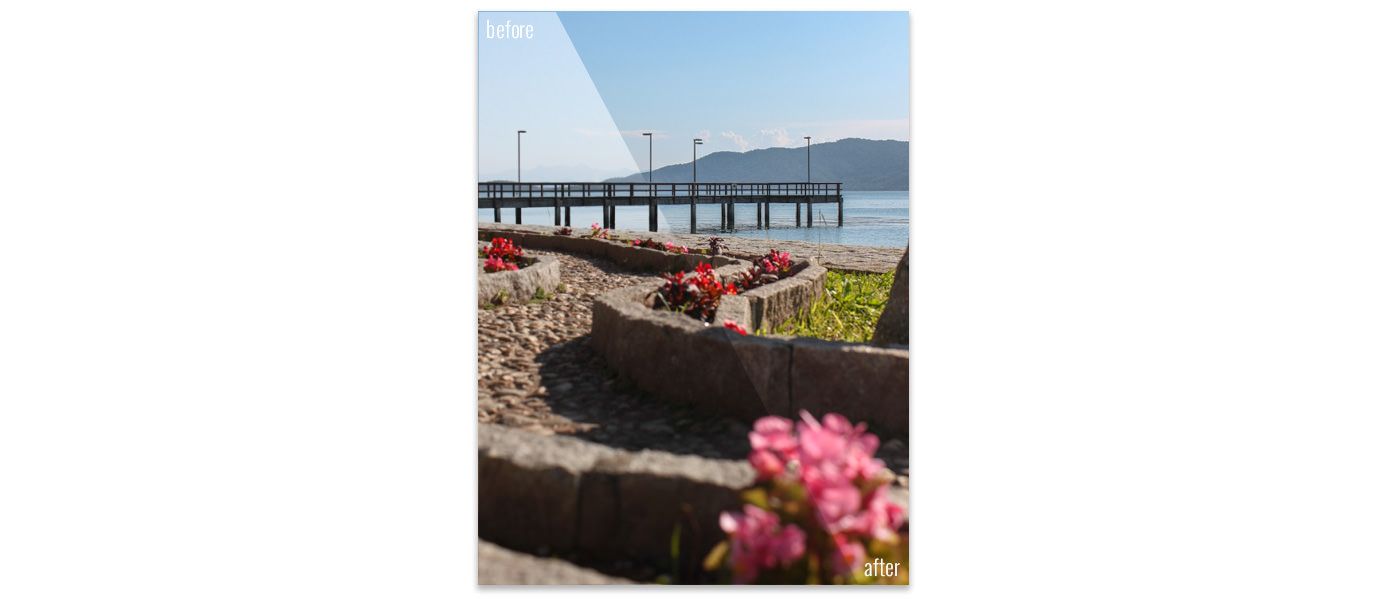
Before and after

I’m going to use an image that I took a while back that unfortunately, was with too much highlight with the sky, clouds, and background blown out. So, I’m gonna tweak the tone control and bring those highlighted areas to life, increasing the details and washing the shadows a little bit. Above is the before and after, so you can see the difference. Let’s get started!

Step 1) The first step is to import the image into Lightroom, select it and go to develop mode. (in case you have no idea how to do this step, you can start with THIS tutorial)

Entering Develop Mode

Step 2) What we’ll basically do is make some adjustments in the tone controls, decreasing the shadows and highlights levels:

Basic Panel

In the basic panel, under the tone control tab, we’ll tweak the highlight levels until we can clearly see the details of the highlighted area coming to life (in my case, the mountains in the background). Also, we’ll increase the value of the shadows, that way we can soften the shadows a little bit, and the ending result will get closer to the ambient lighting at the very moment we’ve taken the picture, almost like an HDR picture. (you can check a great tutorial on how to add an HDR look to your BW photos HERE )

Adjusting Tone control

Step 3) To increase even more of the details in the highlight areas, we can also tweak the contrast and clarity controls, but it may vary from image to image. In my case I’ve used the values below:
Tewaking Contrast and Clarity

Step 4) The next thing we can do is to adjust the vibrance, located in the presence control tab, bringing the original colors back to the image. In these steps, you can work with different values depending on your style of post-processing and/or subject you´re shooting.

Vibrance control

Step 5) The final step is totally optional, but I like to tweak with the sharpening tool, located in the detail tab, so that way you can improve the quality of the image and sharpen some details in the foreground or background, that may get a little blurred when you took the picture.

Final Sharpening

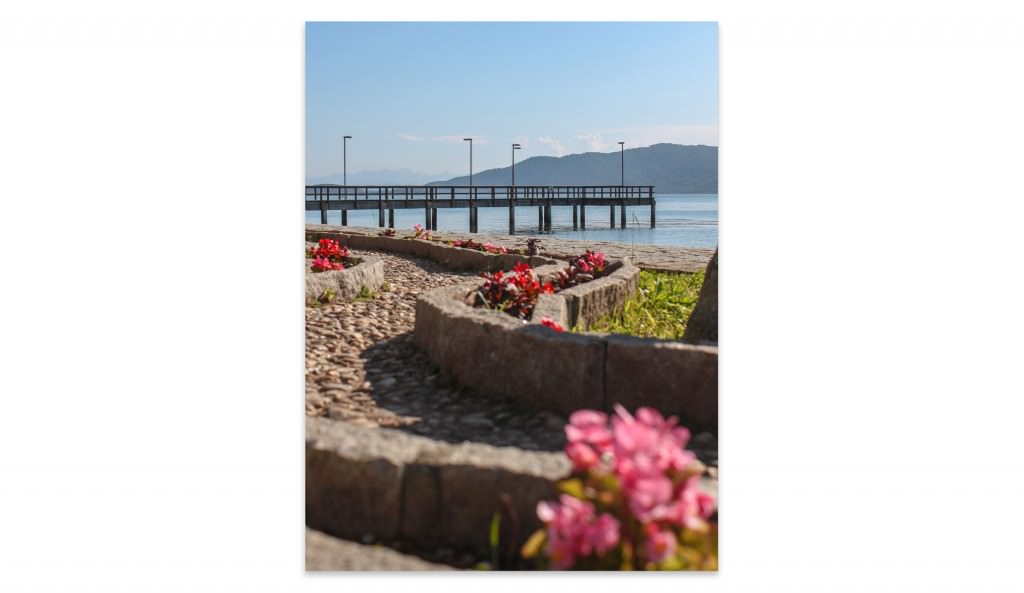
This is the final result and we can note how really simple it is to improve your images, using only small tweaks and adjustments, and the final result is great!

Final Result

Hope you guys liked my first tutorial, and I’ve got plenty more to come. If you have any suggestions or doubts you can write a comment below or contact me directly. See you next time!