Tag: landscape photography

Photographer Focus: Stephanie Johnson Photography – An Iowa based Abstract, ICM and Landscape Photographer

In my latest installment in my Photographer Focus series, I talk to Stephanie Johnson Photography. An Iowa based Landscape photographer. Her aim, to Re-imagine The Landscape using ICM (intentional camera movement) techniques and Abstract styles of shooting.

Stephanie Johnson, owner of Stephanie Johnson Photography was actually a student/client of mine several years ago. Before going on to launch Stephanie Johnson Photography as a business, Stephanie attended a two-day Landscape Photography Workshop with me in the south west of Ireland. Since that time, Stephanie has further progressed her photography skills and has developed a unique style. Stephanie Johnson Photography certainly has a refreshing outlook on life and photography.

Read on to find out more about Stephanie and her photography vision.

Who is Stephanie Johnson – Tell us about yourself?

I’m an abstract ICM (intentional camera movement) and landscape photographer. I left the business world about 15 months ago to build a more creative life for myself. I came to the realization that if I didn’t take the chance to pursue my creative desires more passionately, I’d be living a less fulfilling life. So, I stepped out onto the path of following my inner voice. And I haven’t looked back!

When did your photography journey begin?

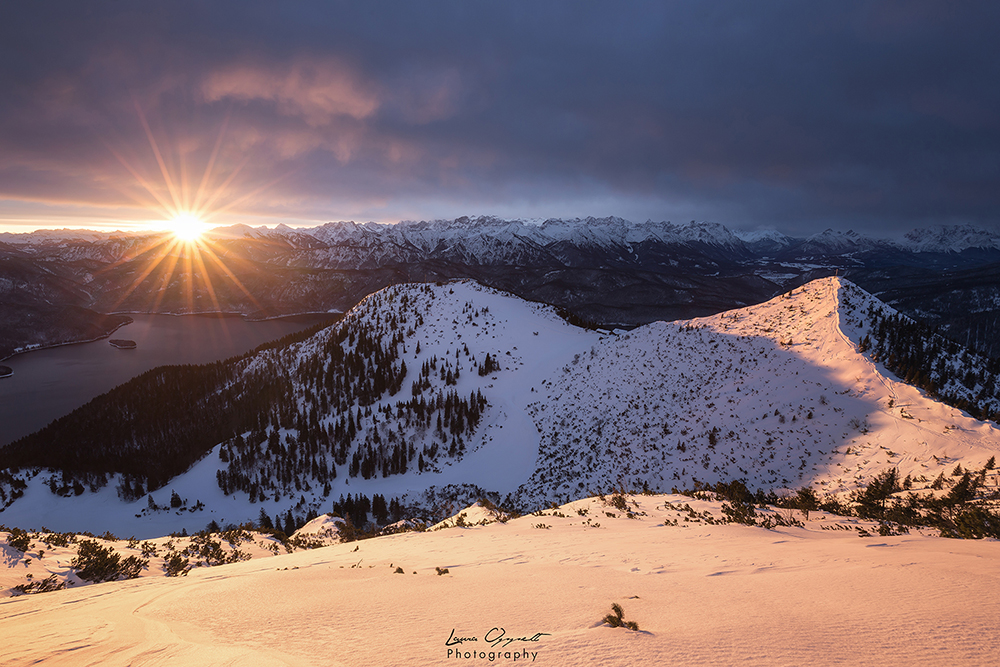
I first became interested in landscape photography in 1996. Some of my first favorite experiences were shooting sunsets over the East China Sea when I lived in Okinawa, Japan. Soon after, I moved to Southern California, where Joshua Tree National Park became my playground. And from there I further immersed myself in the world of landscape photography. These early experiences really set the stage for what would later become the passion work I do now.

Stephanie Johnson Photography

What was your first camera?

The first ‘real’ camera I owned was a Canon EOS A2E 35mm film SLR. This is the camera I learned to shoot within Okinawa and California. I made the switch to digital (a Canon Rebel XT) in 2005. But interestingly enough, I only did so in order to photograph my daughter playing various sports during her school years. I did not do much landscape work at that time. I upgraded to a Canon 7D in 2012 while living in Kansas City. And there I learned to enjoy shooting scenic skylines and cityscapes.

What camera are you shooting with now?

After traveling a few times to shoot the magnificent landscapes of Ireland with the 7D in 2015-2016, and as my passion began to really move me in a new direction with my life, I decided it was again time to upgrade to the full frame Canon 5D Mark III in late 2016. I still have and frequently use the 7D, though. As well as an advanced compact, the Canon G7X Mark II. These three cameras cover all my shooting needs. And I generally always go out with all three at hand. And all my lenses are Canon f/4L series lenses. I’ve had a longstanding relationship with Canon, I guess you could say.

Stephanie Johnson Photography

What type of imagery do you love to shoot/produce?

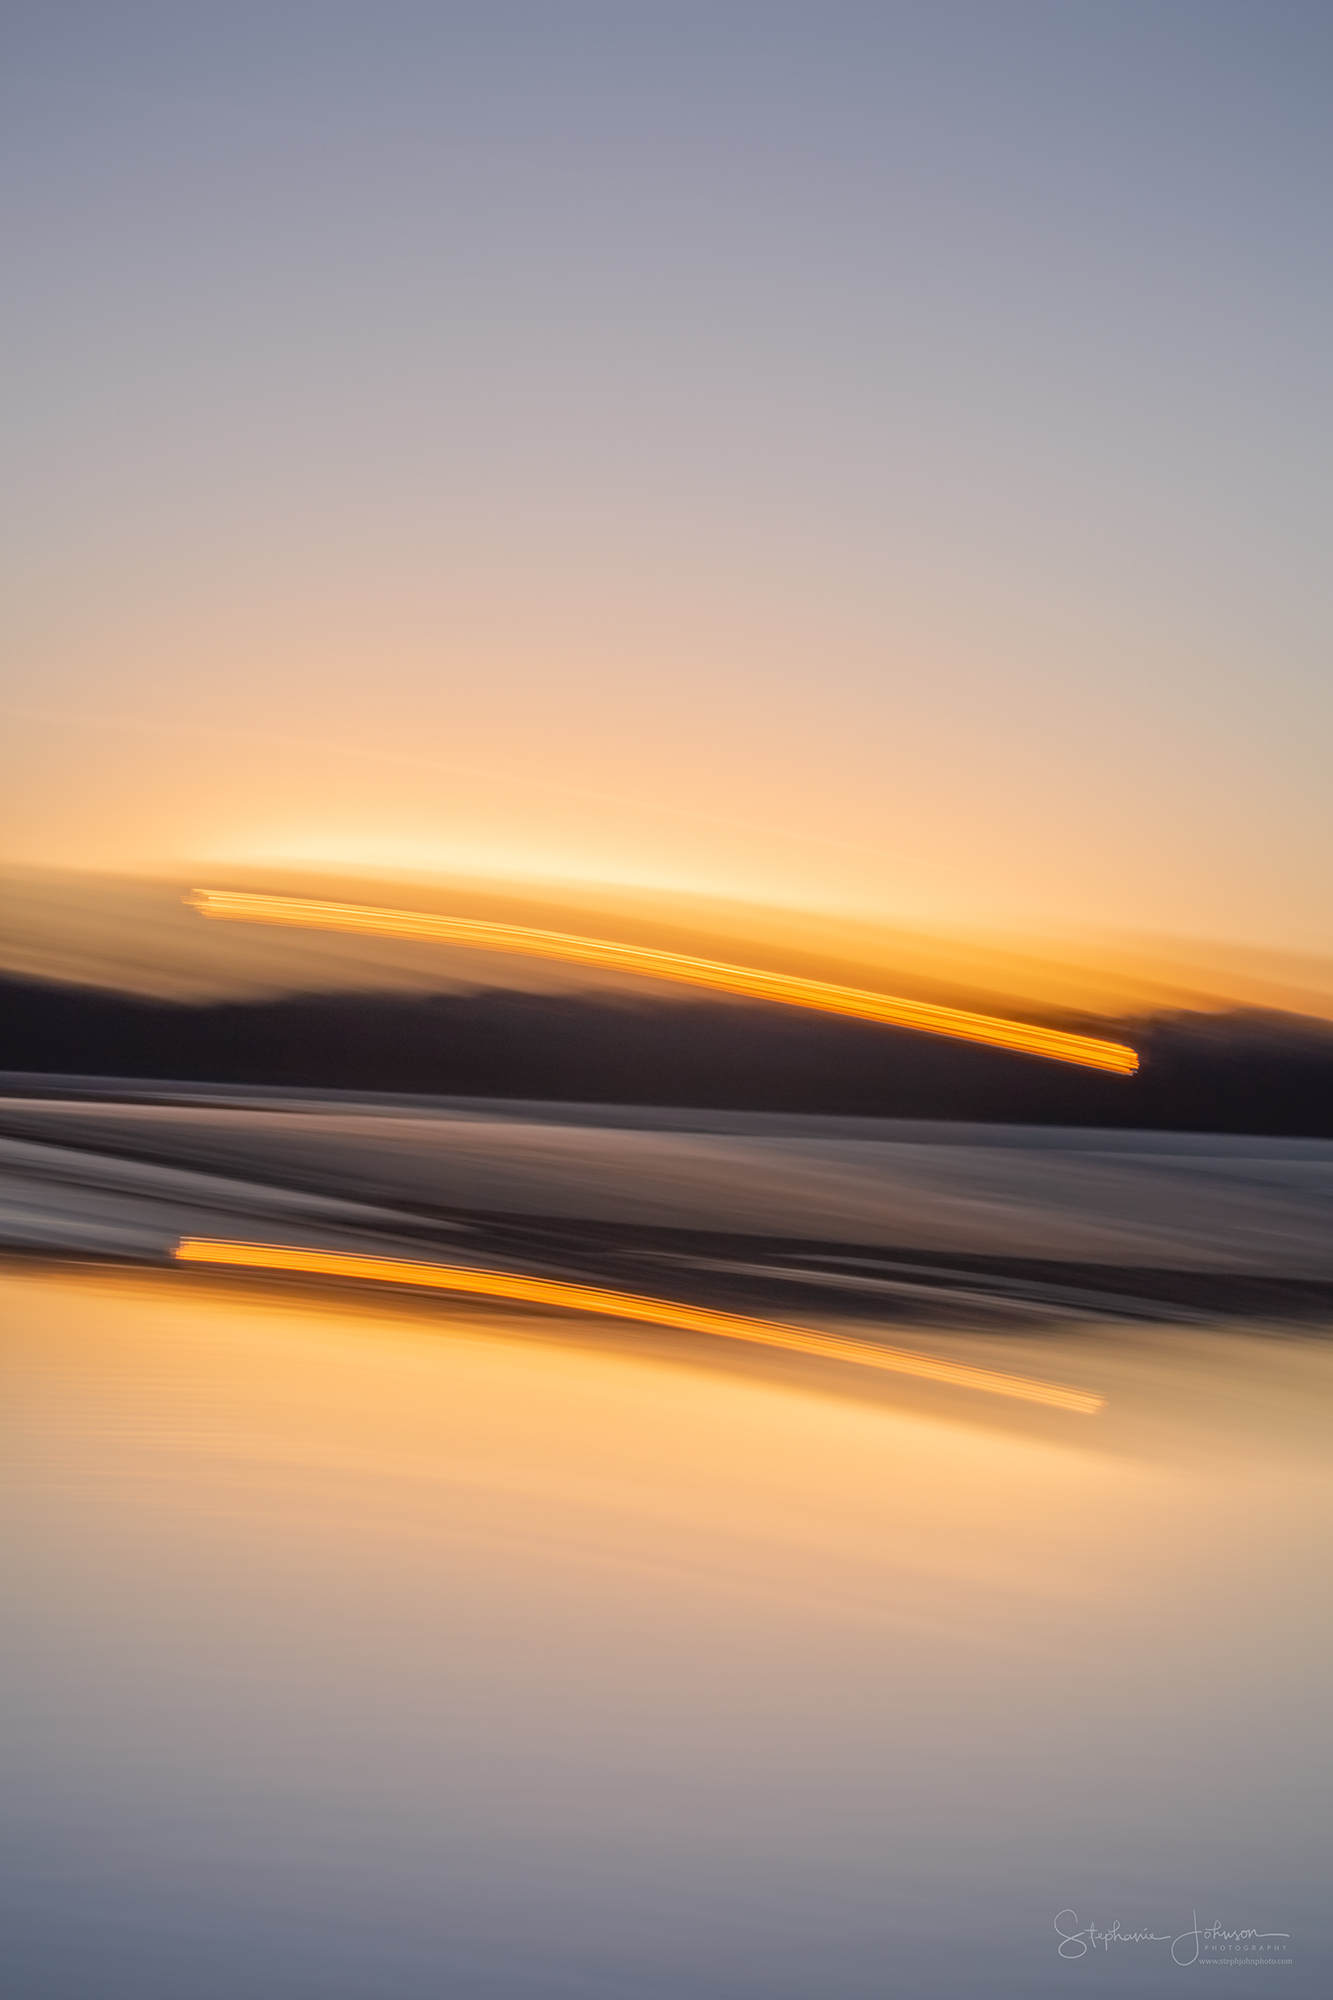
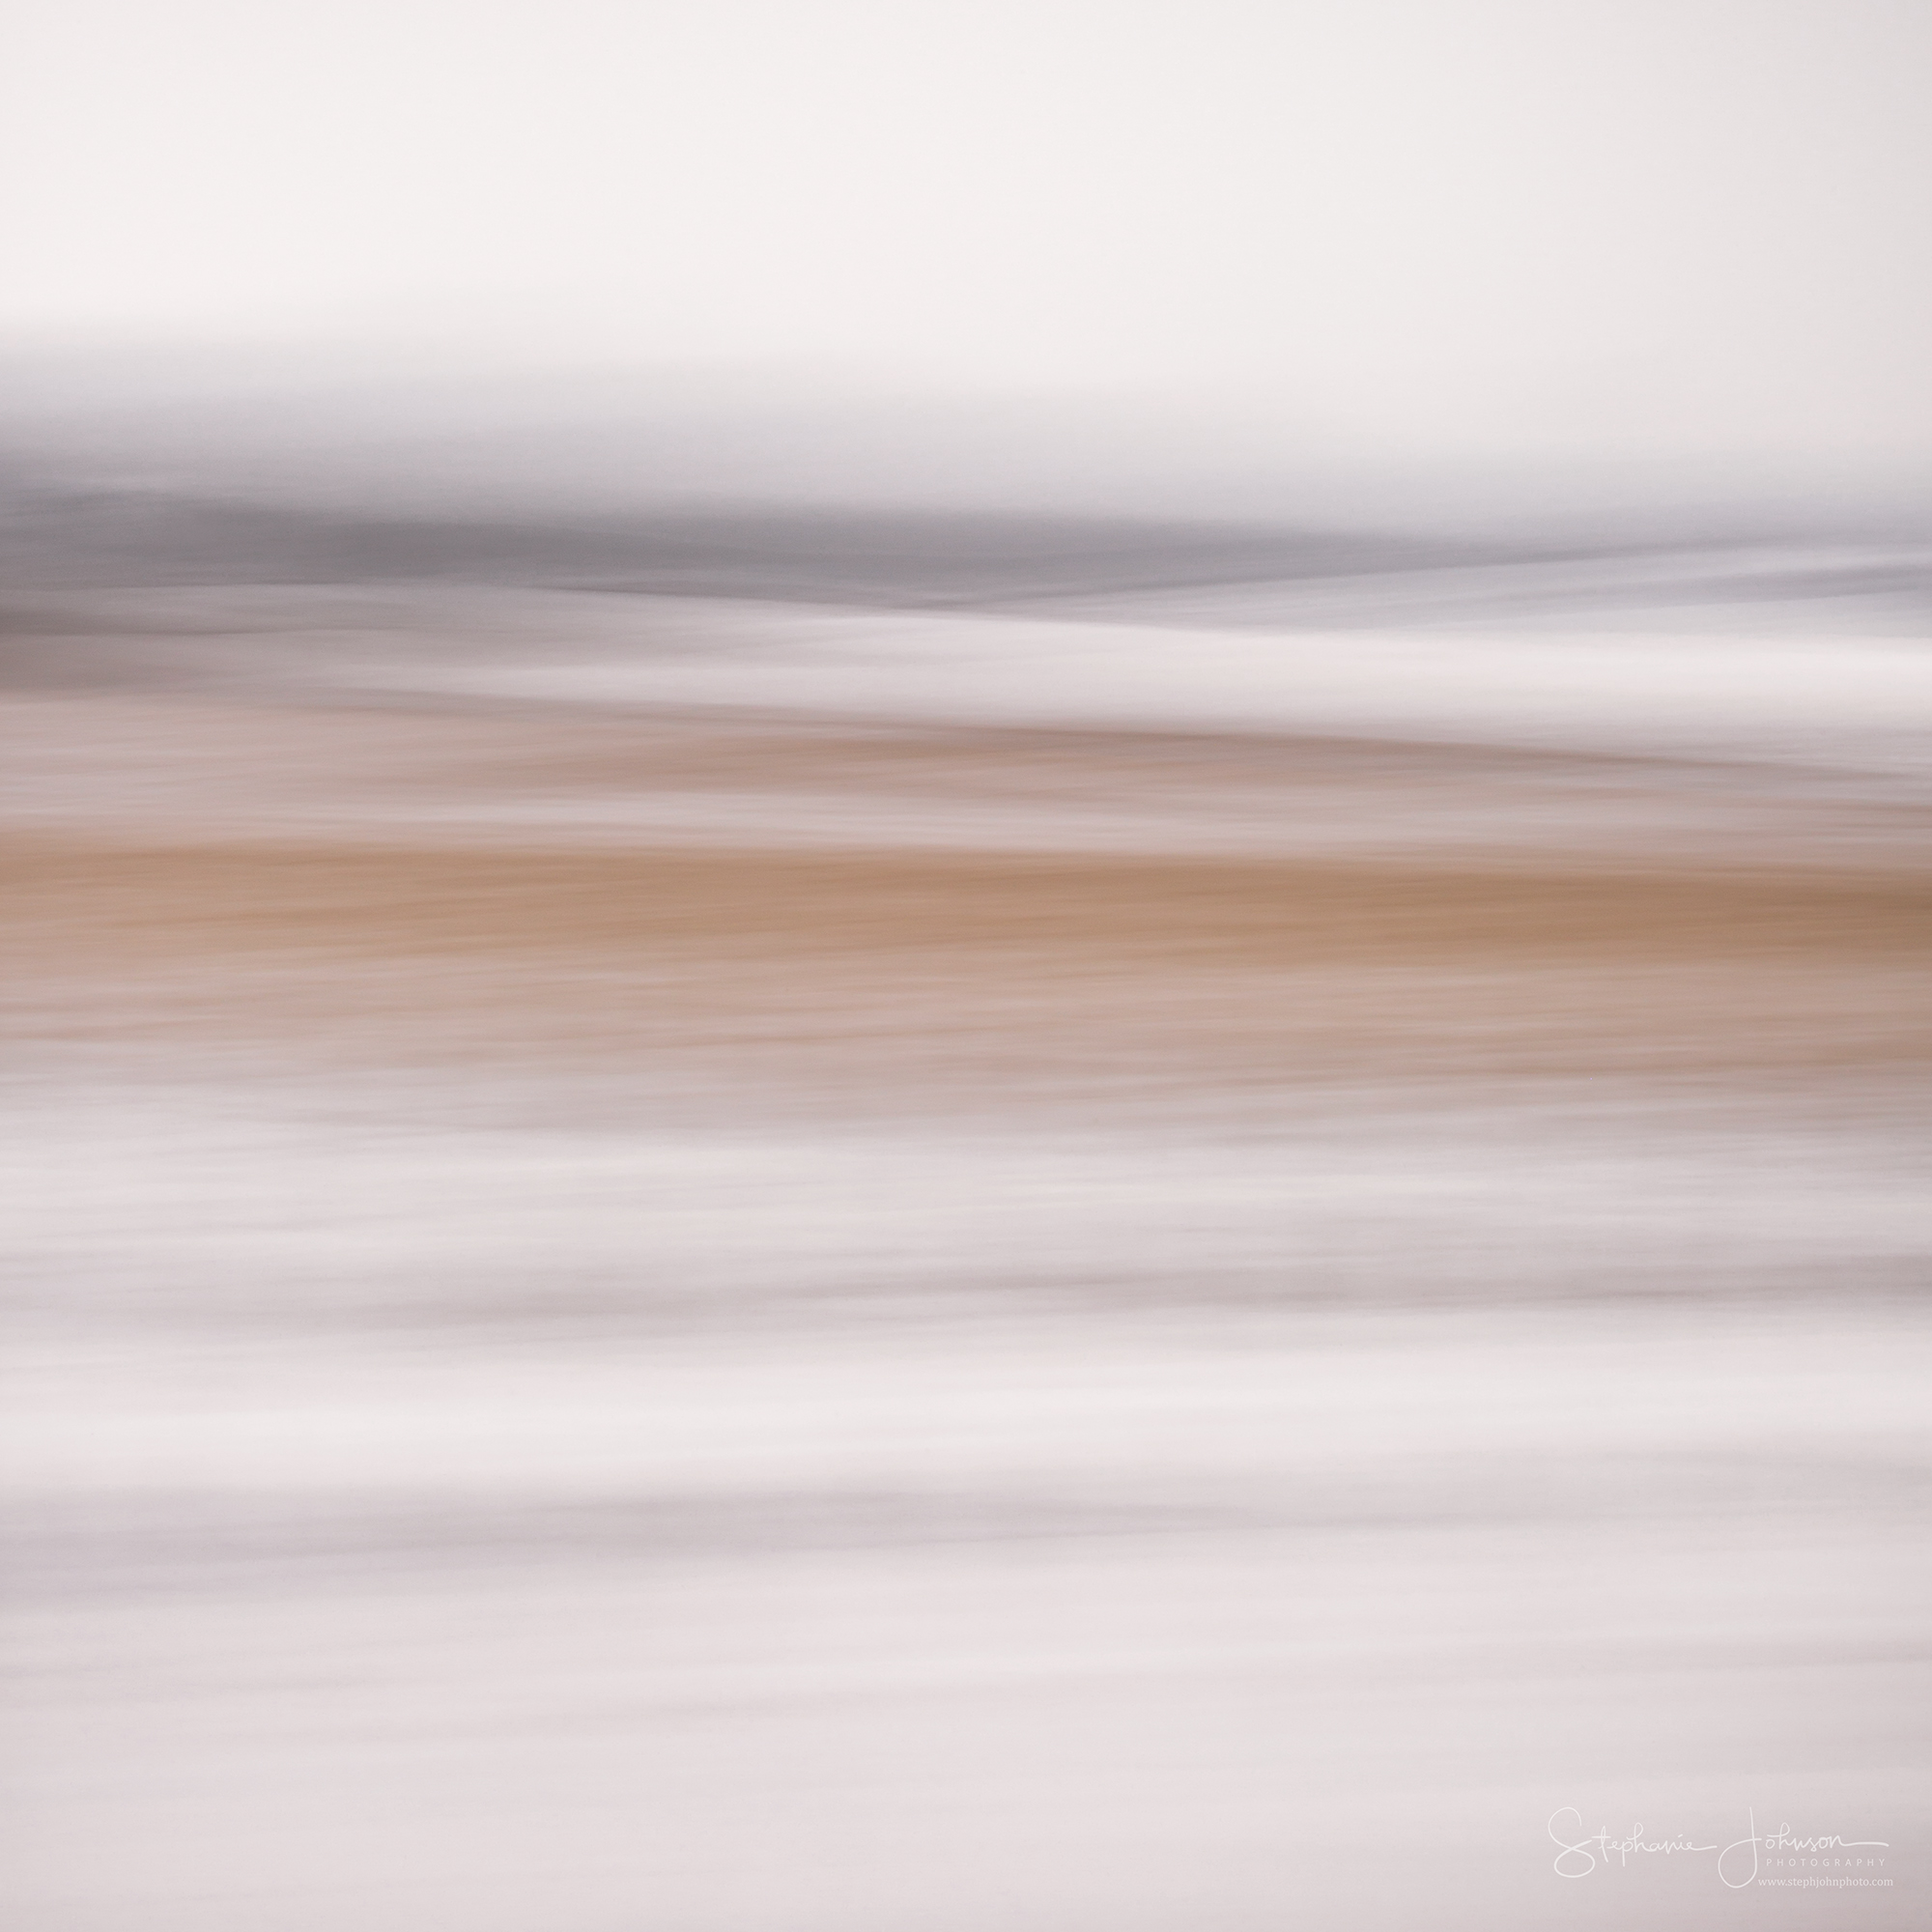
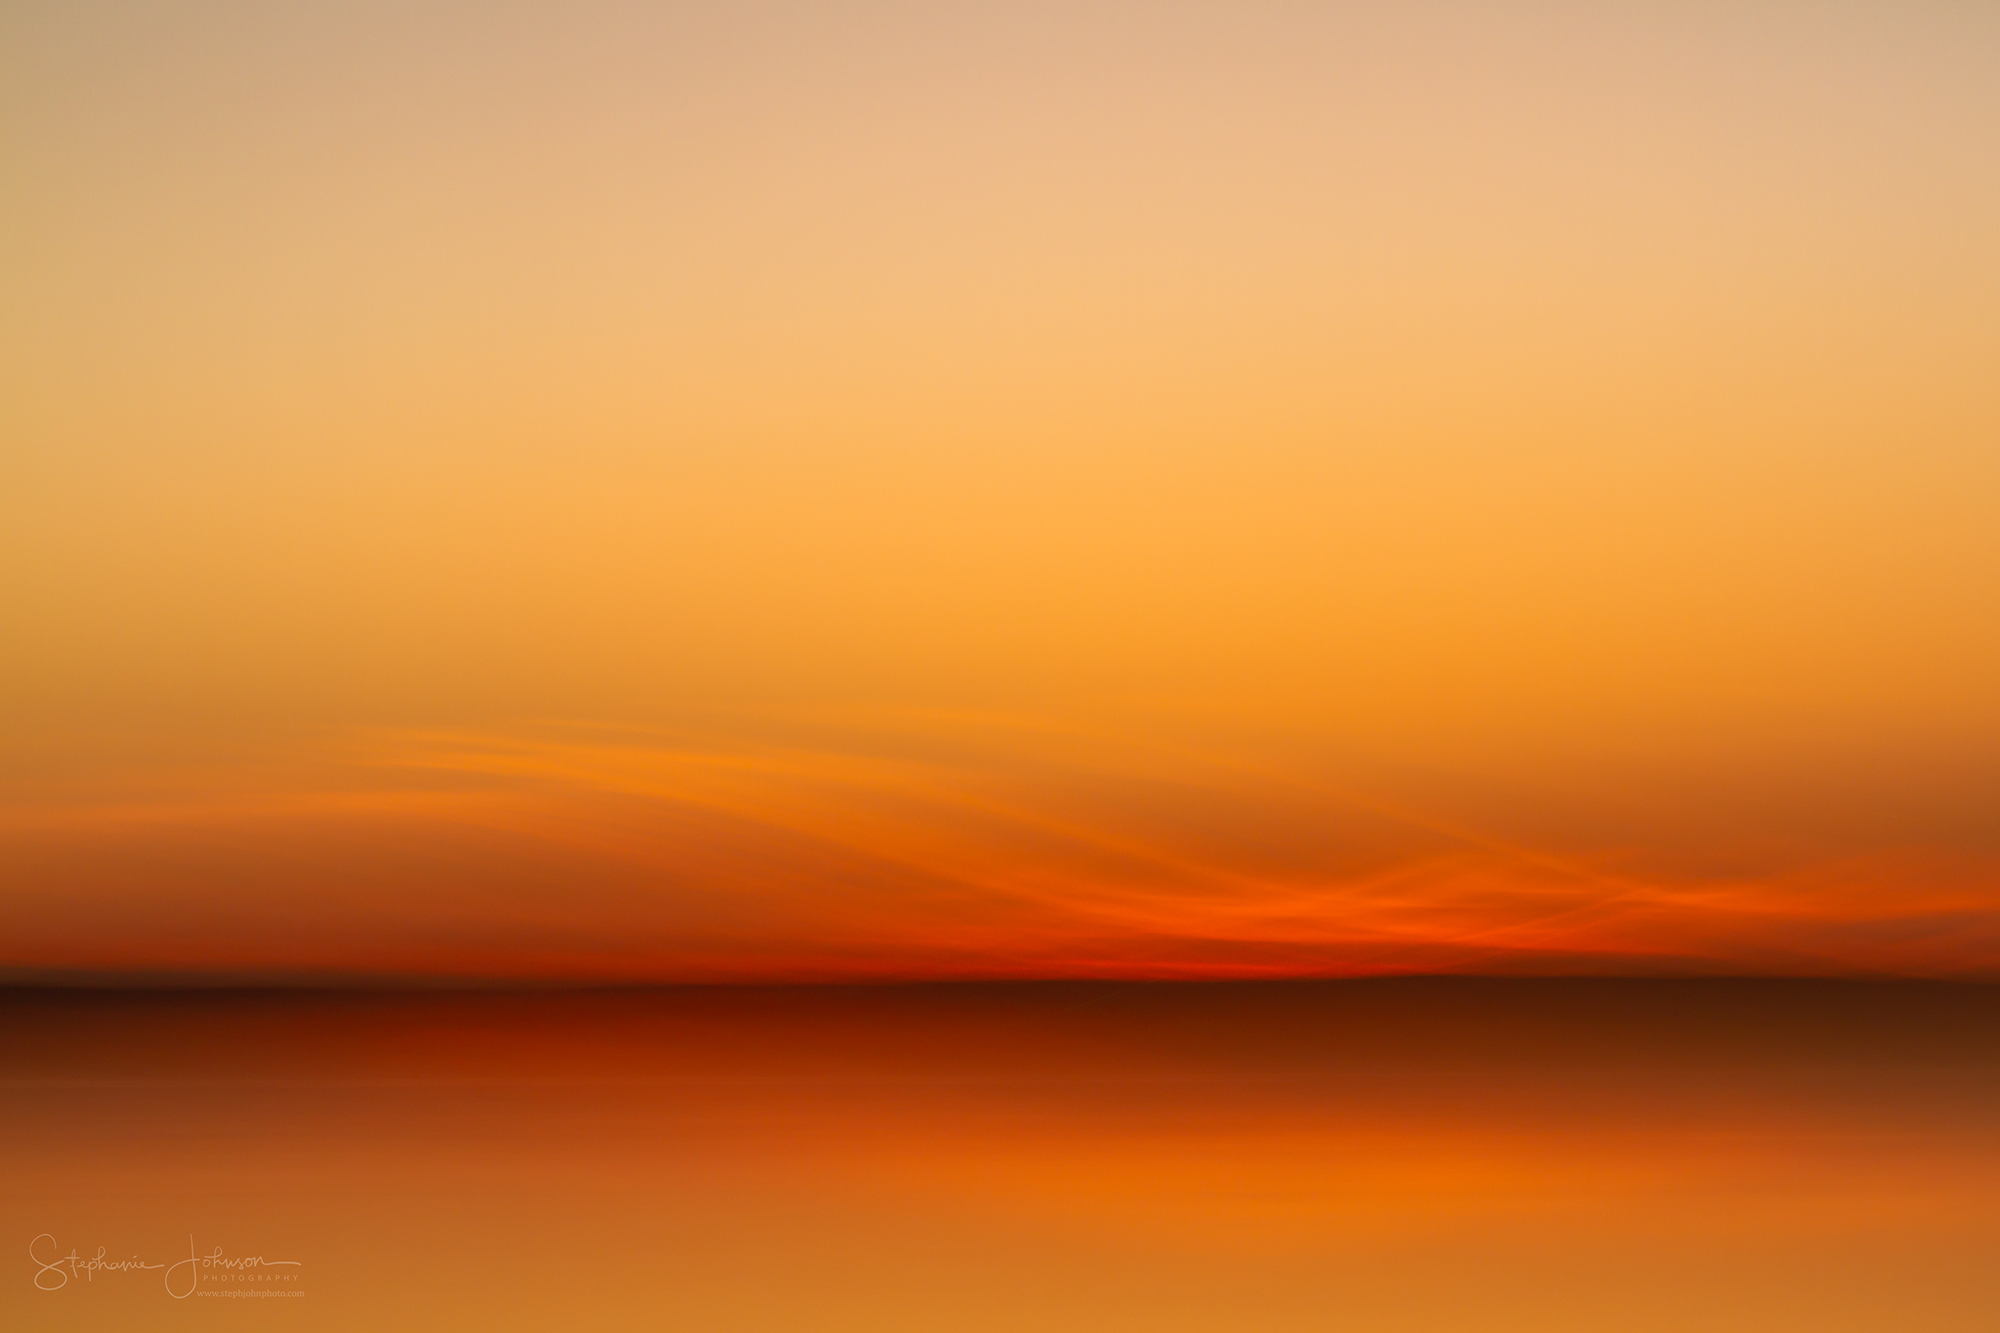
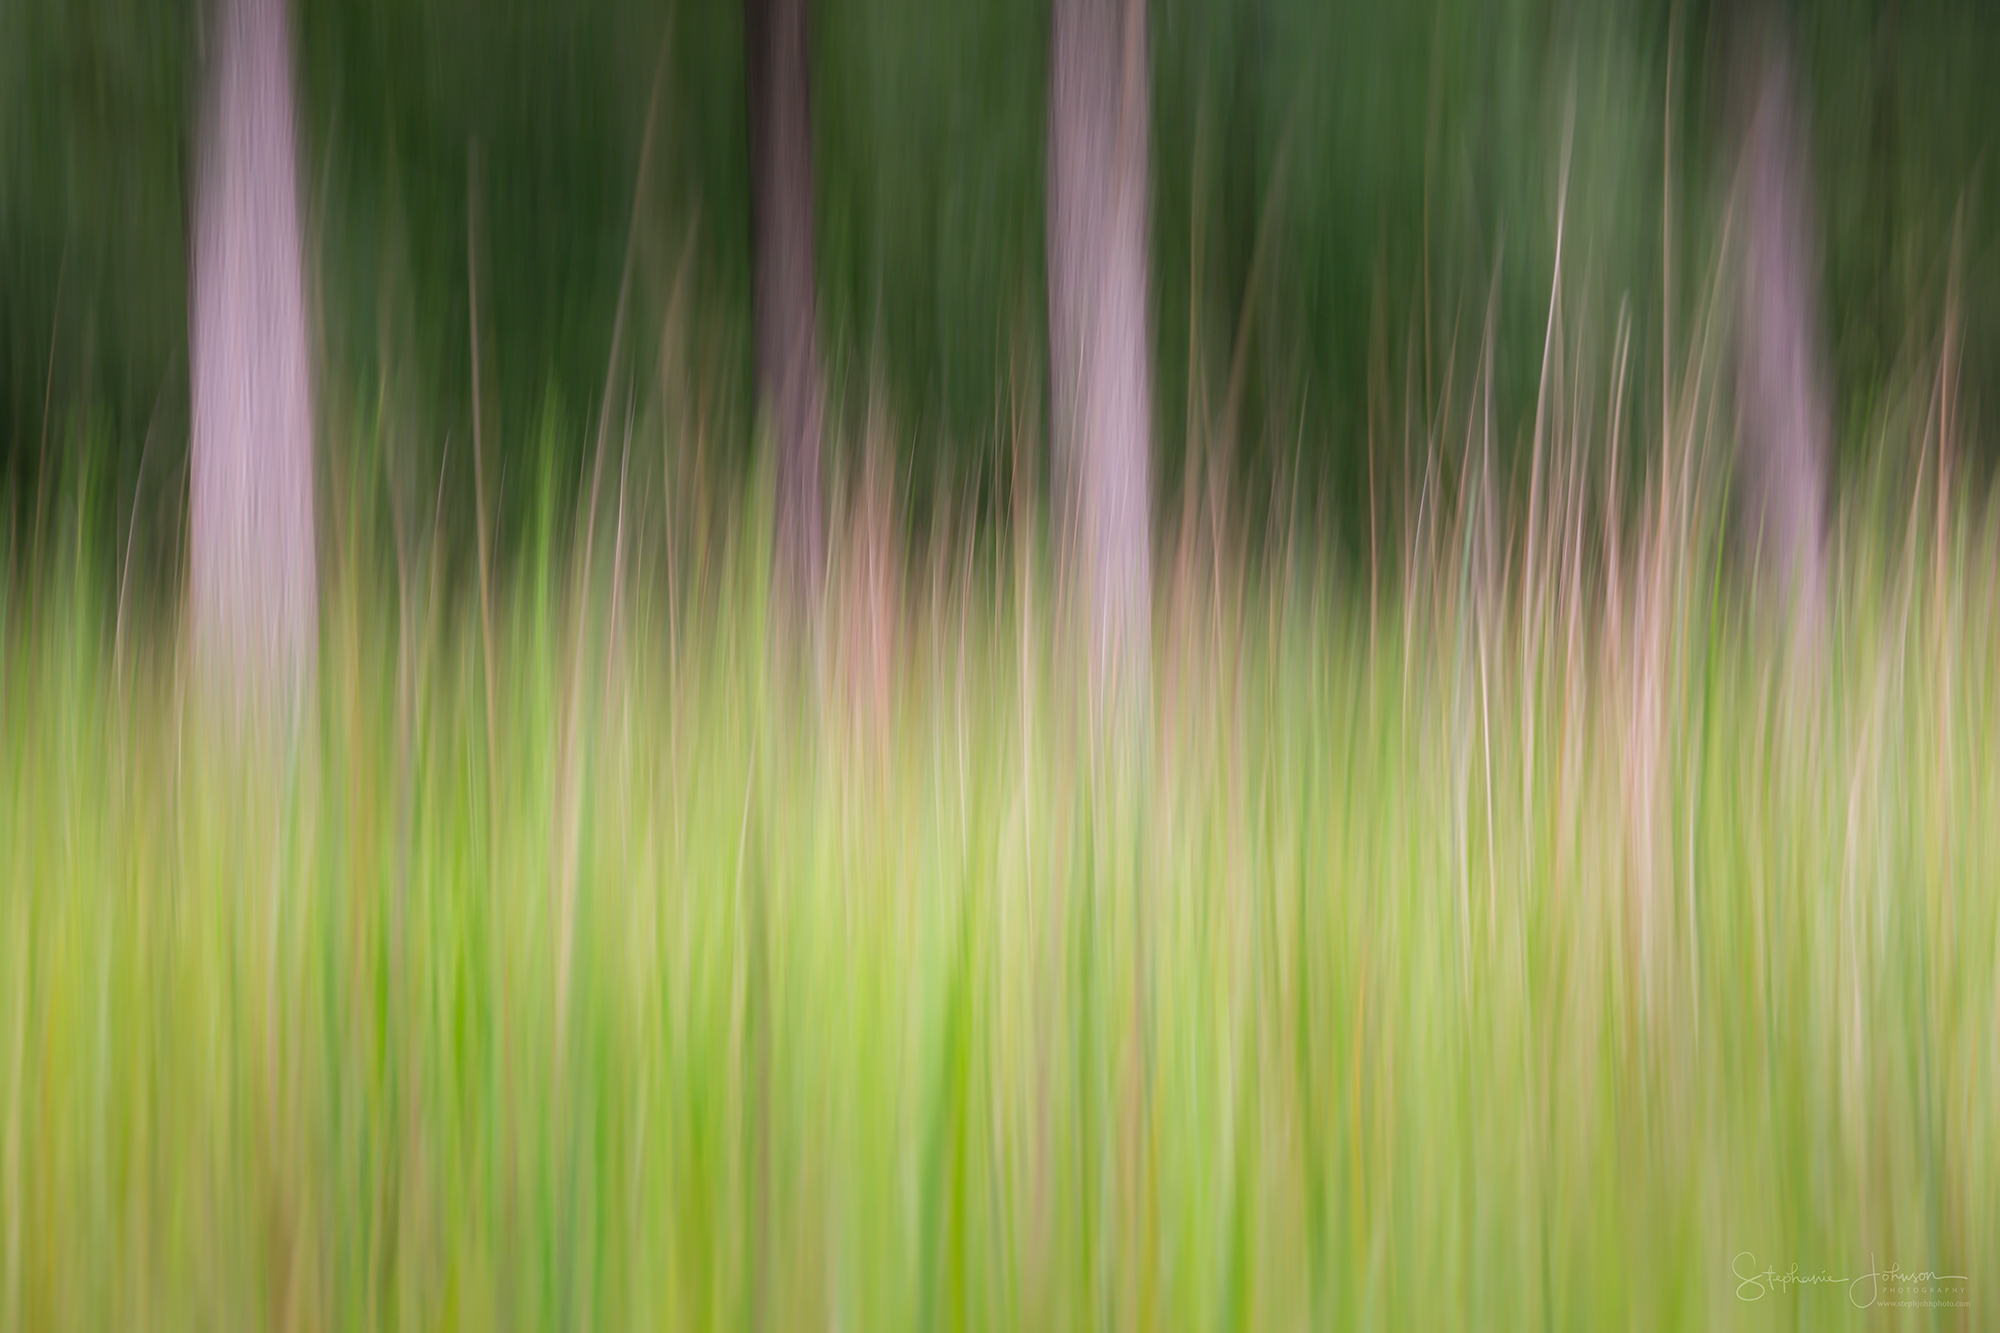
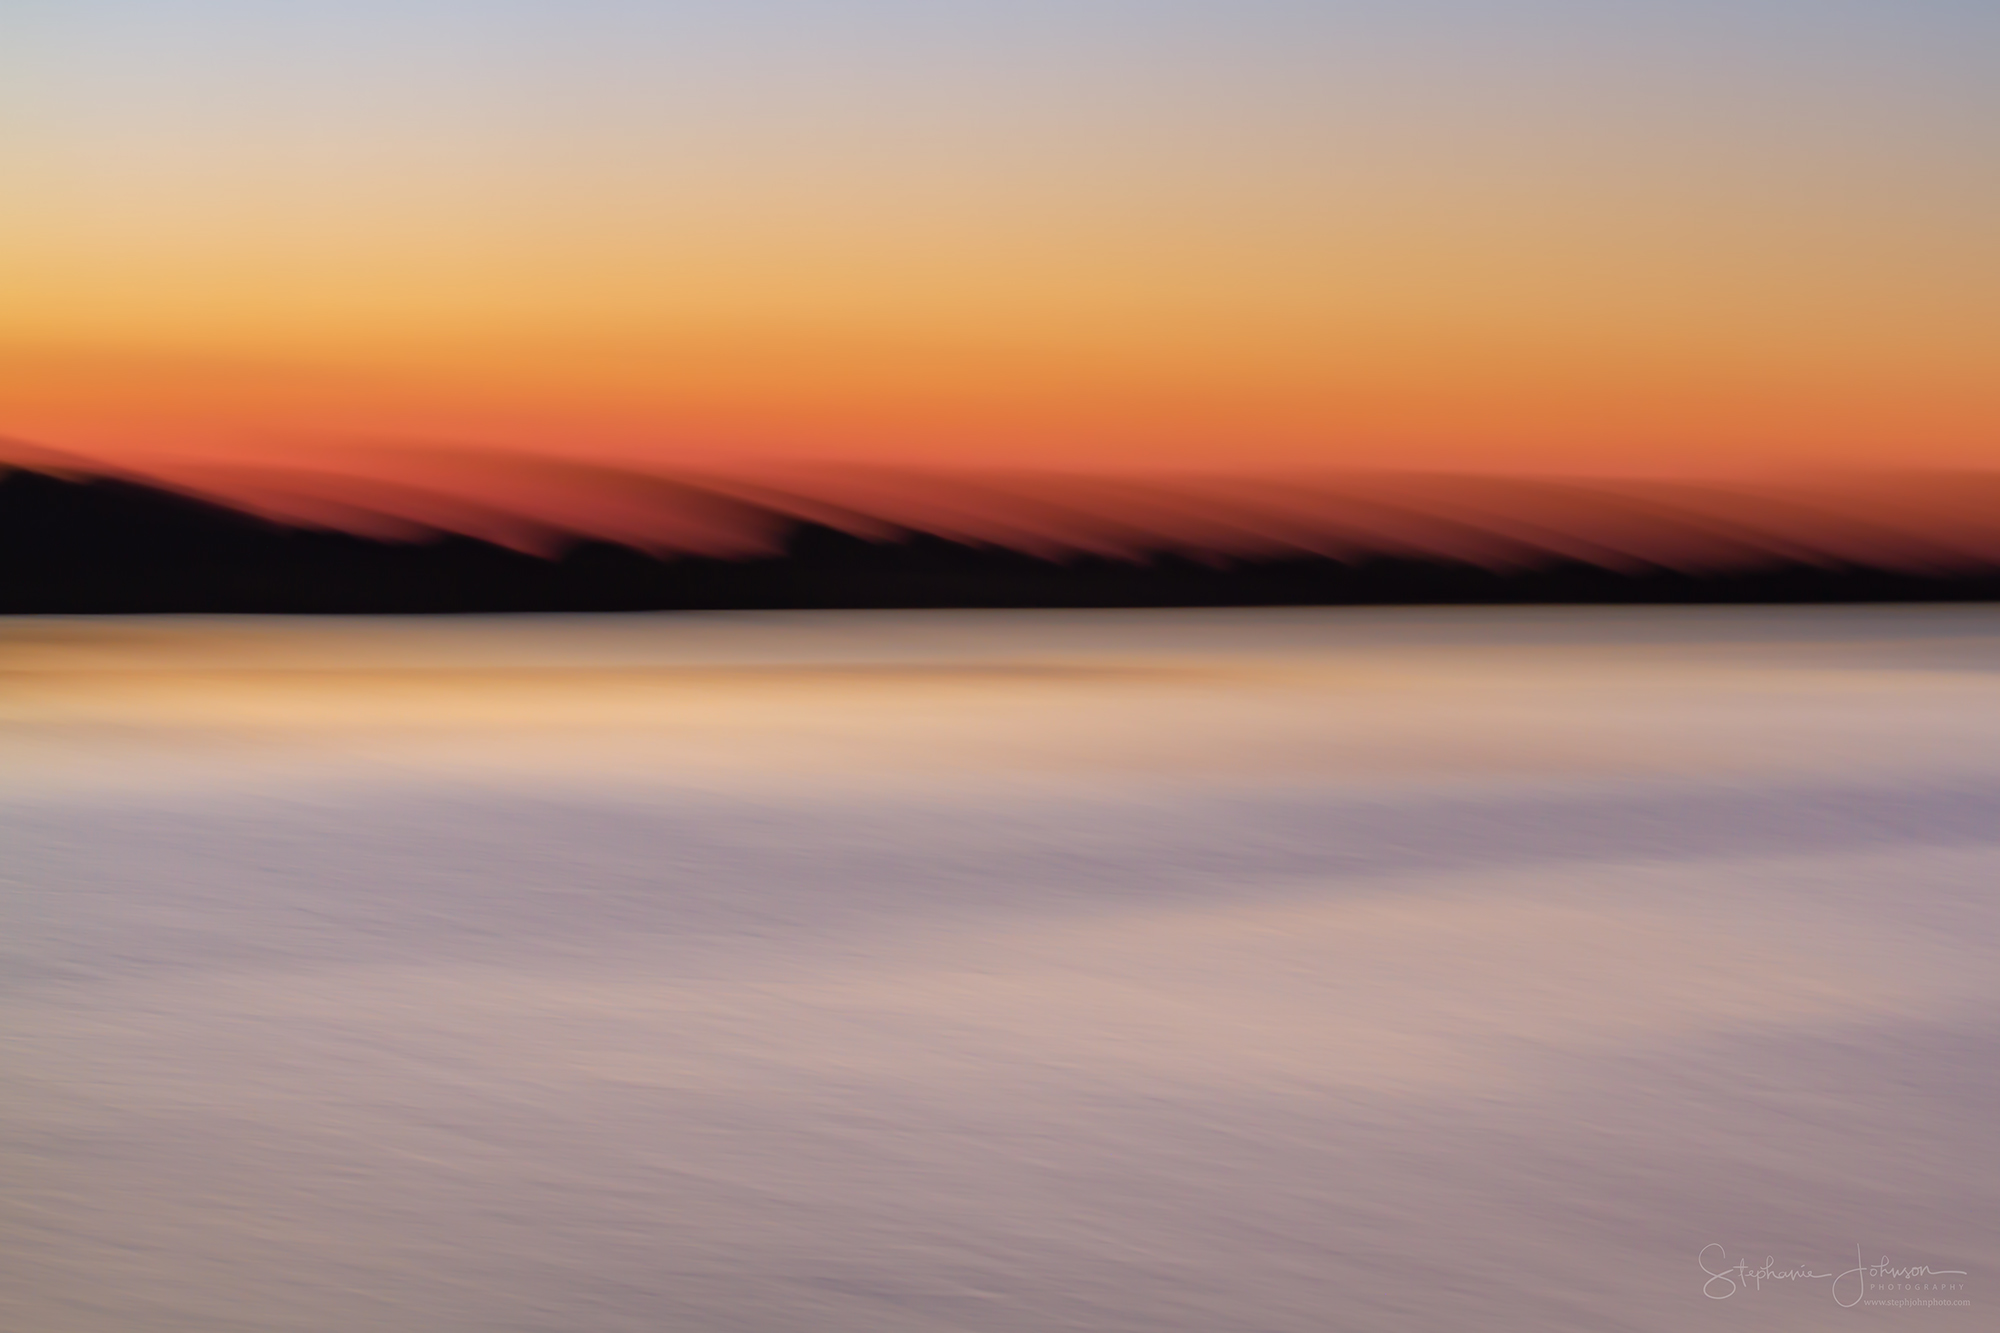
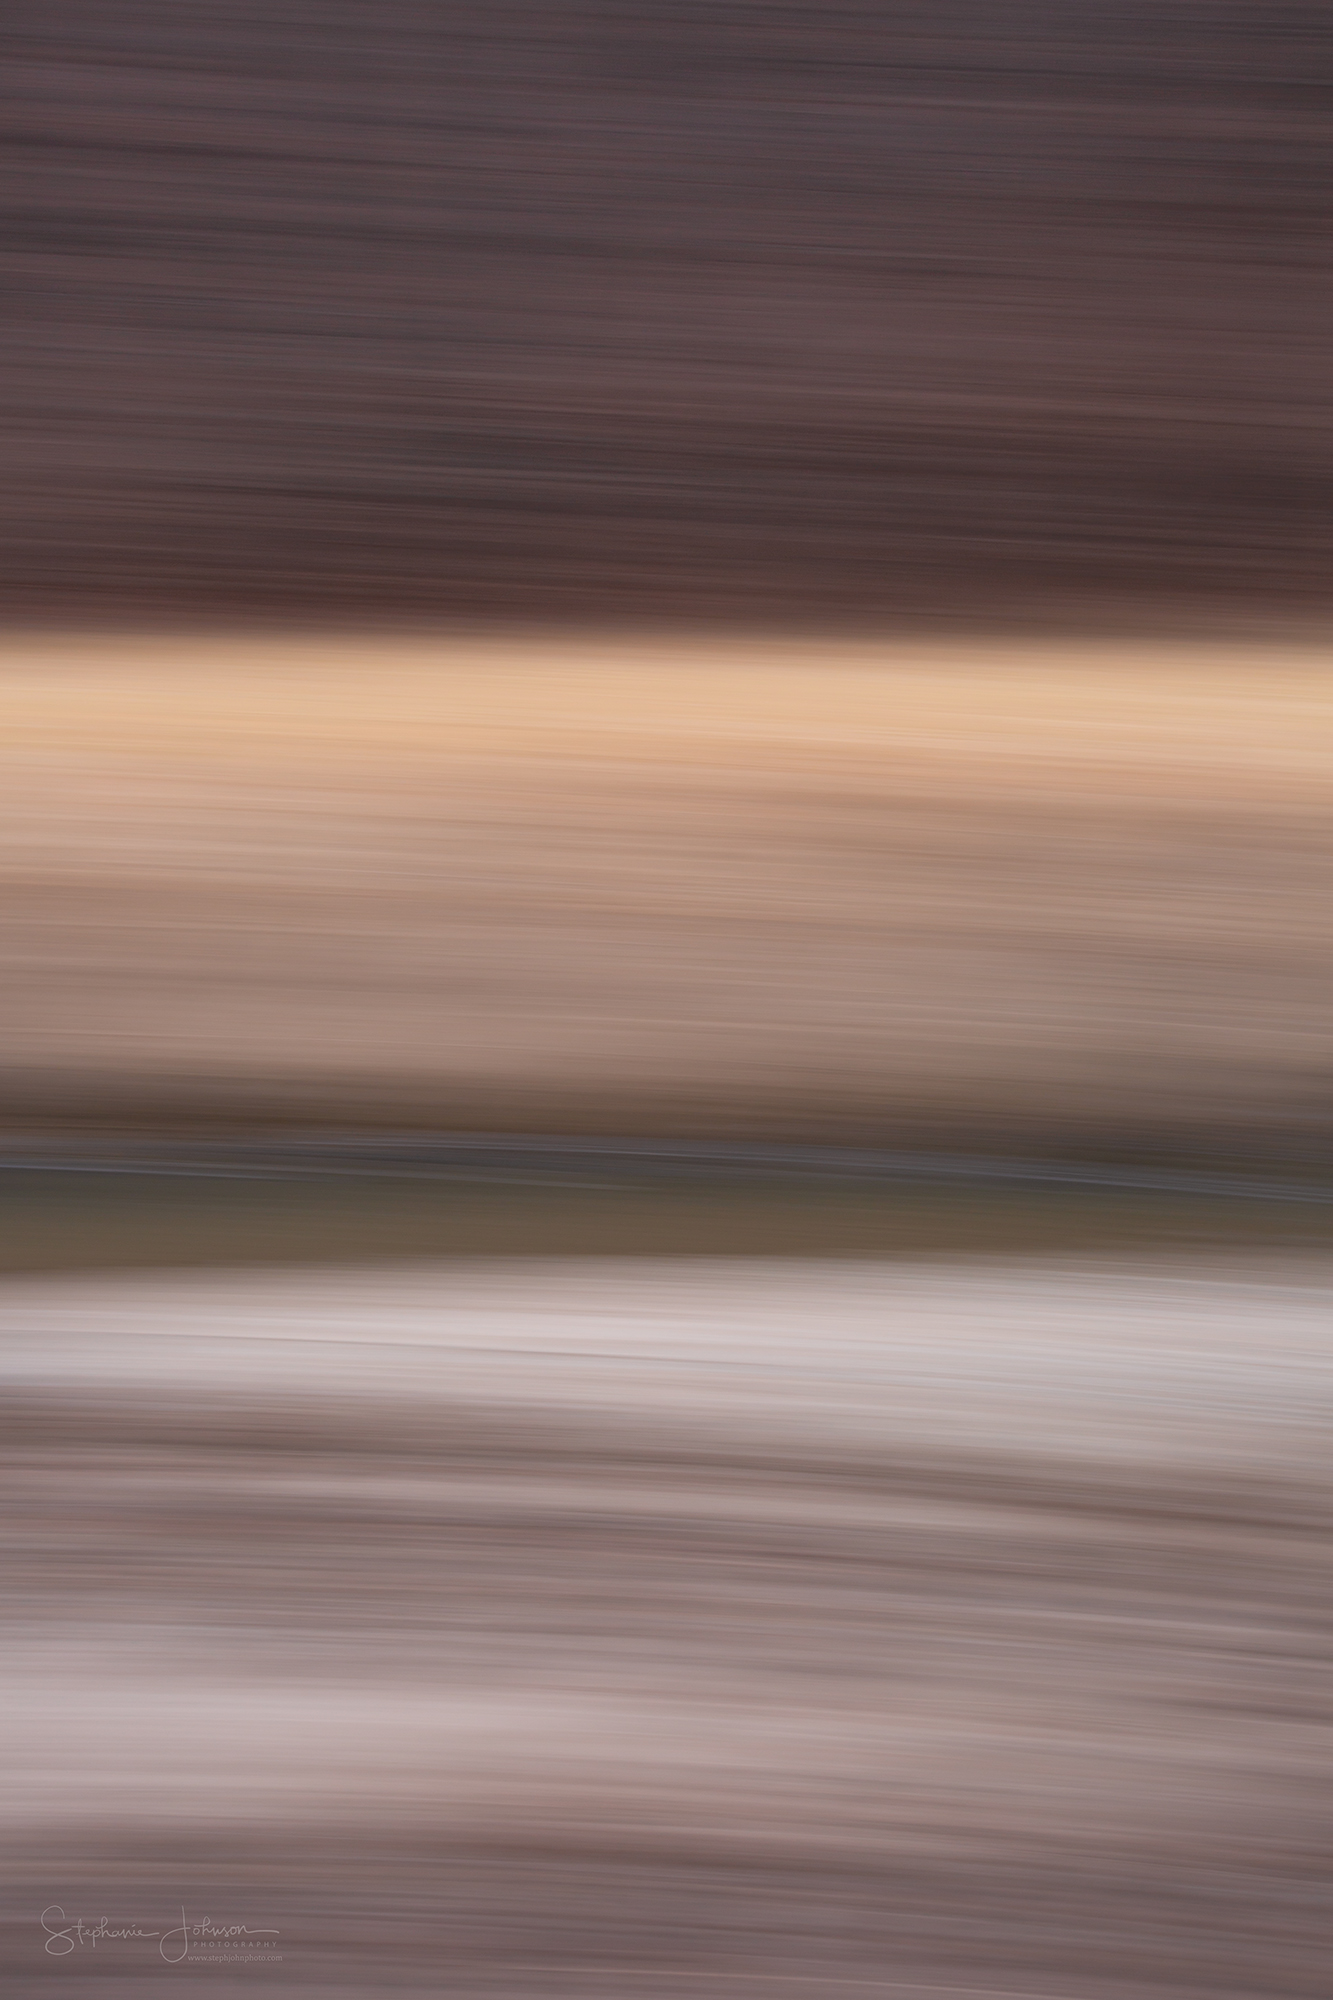
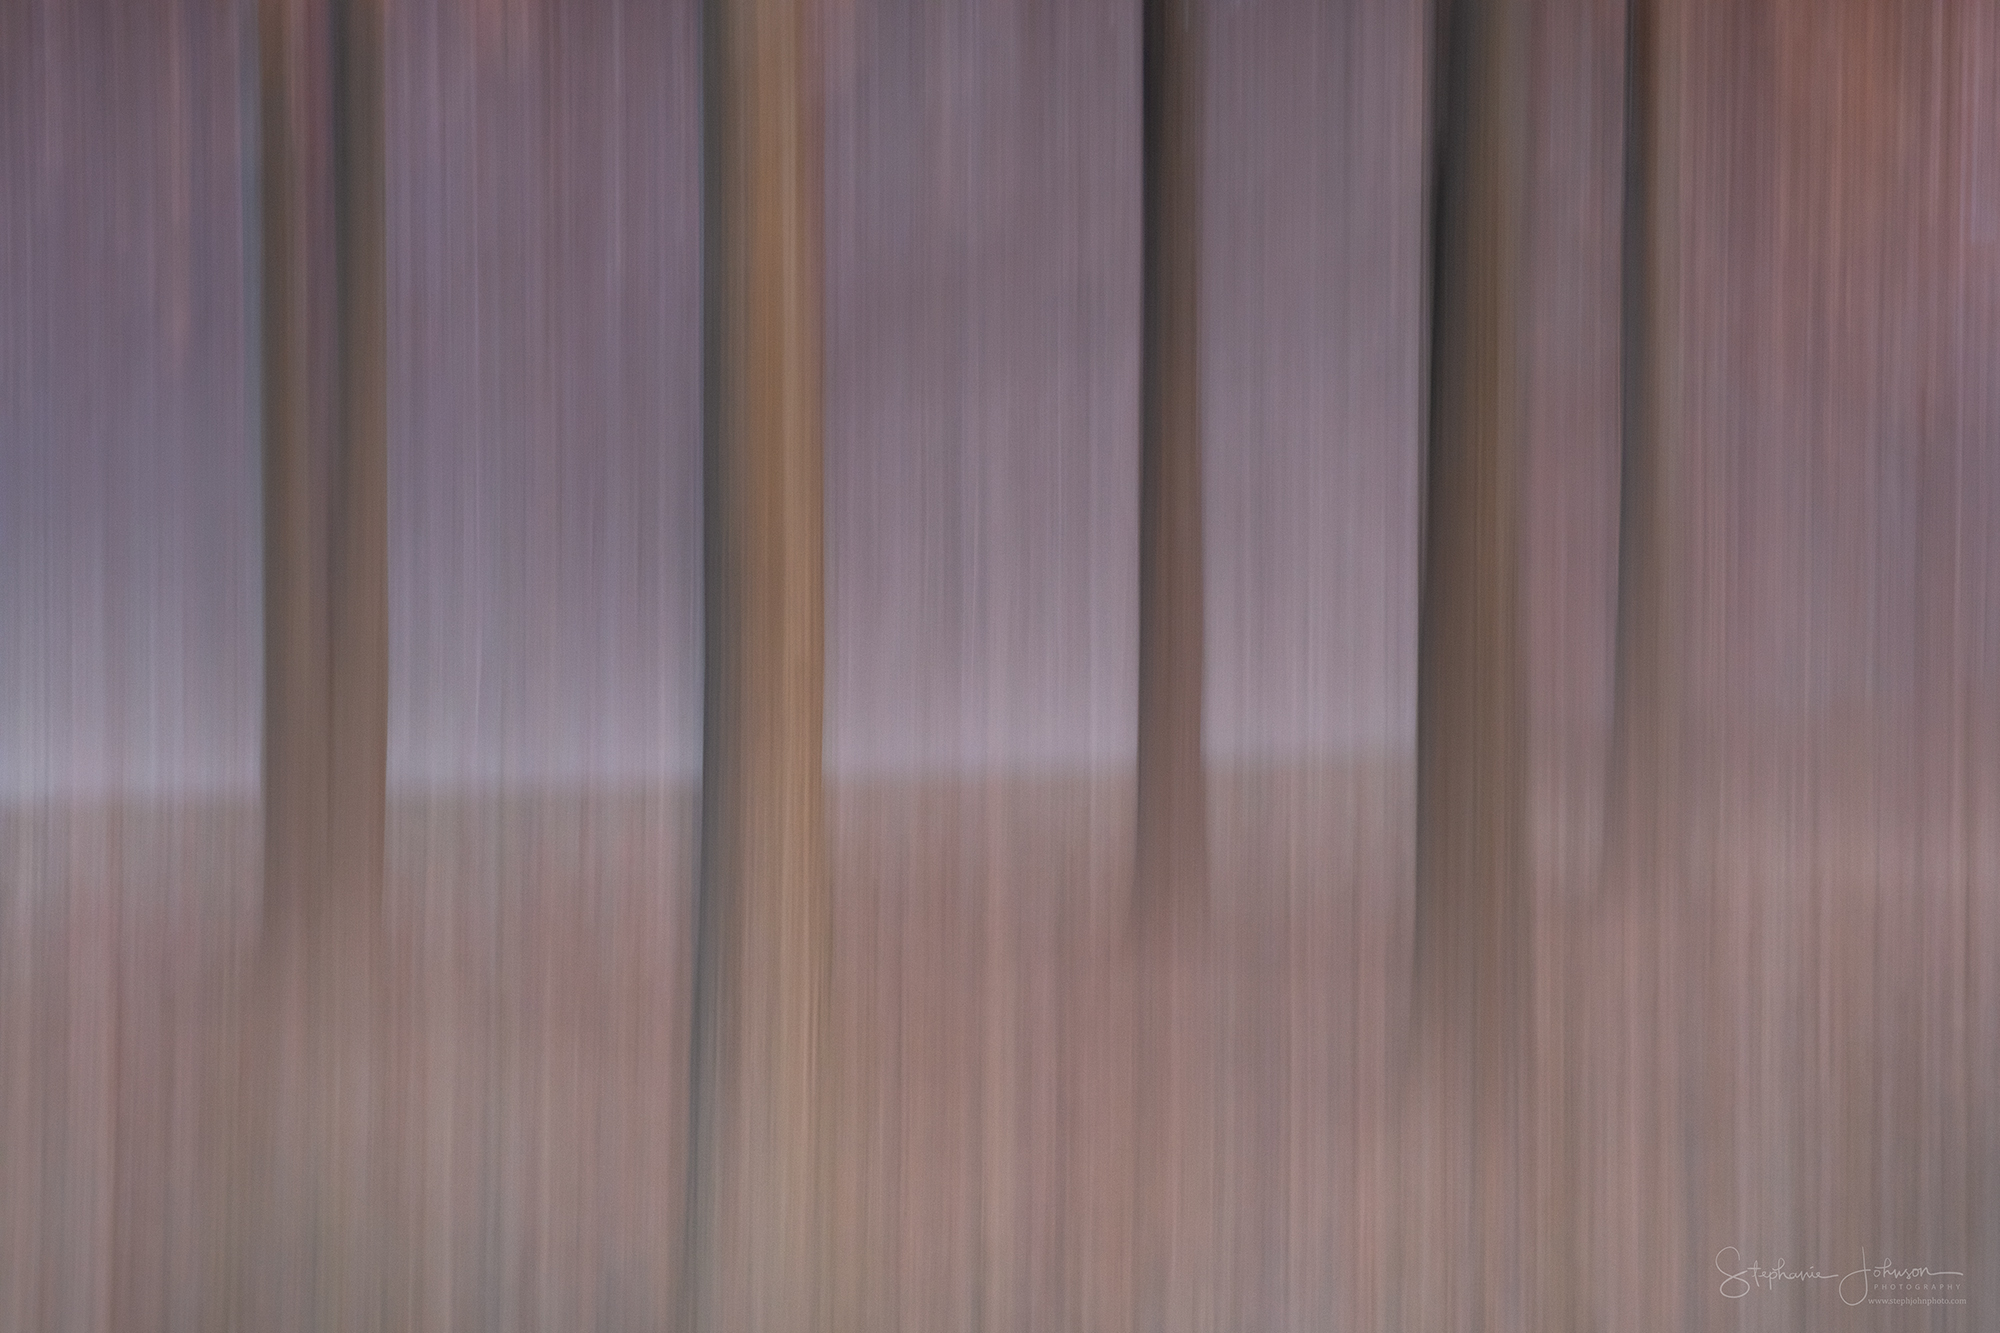
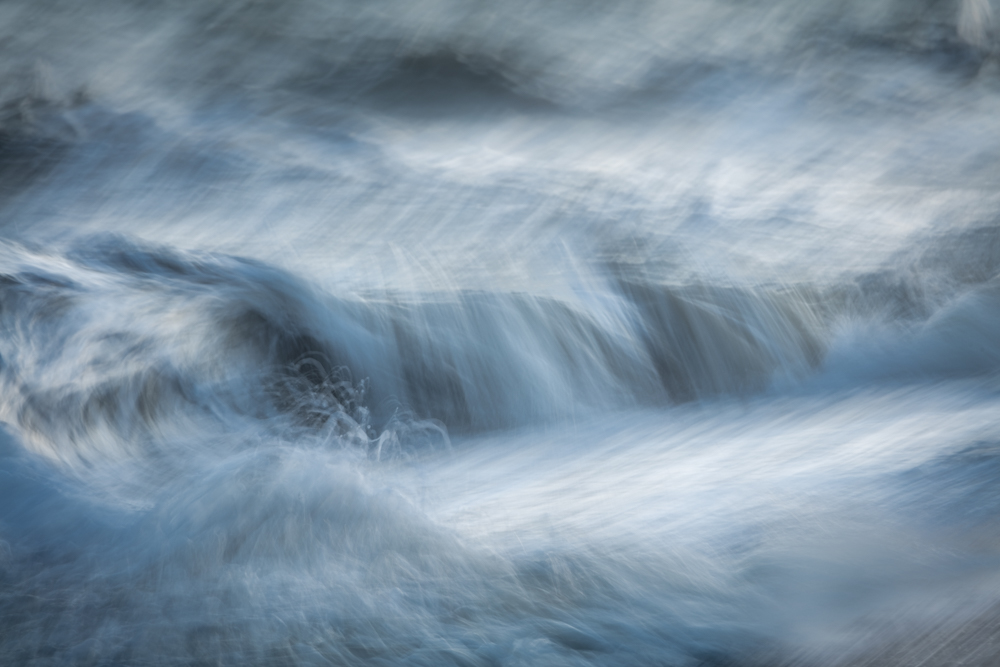
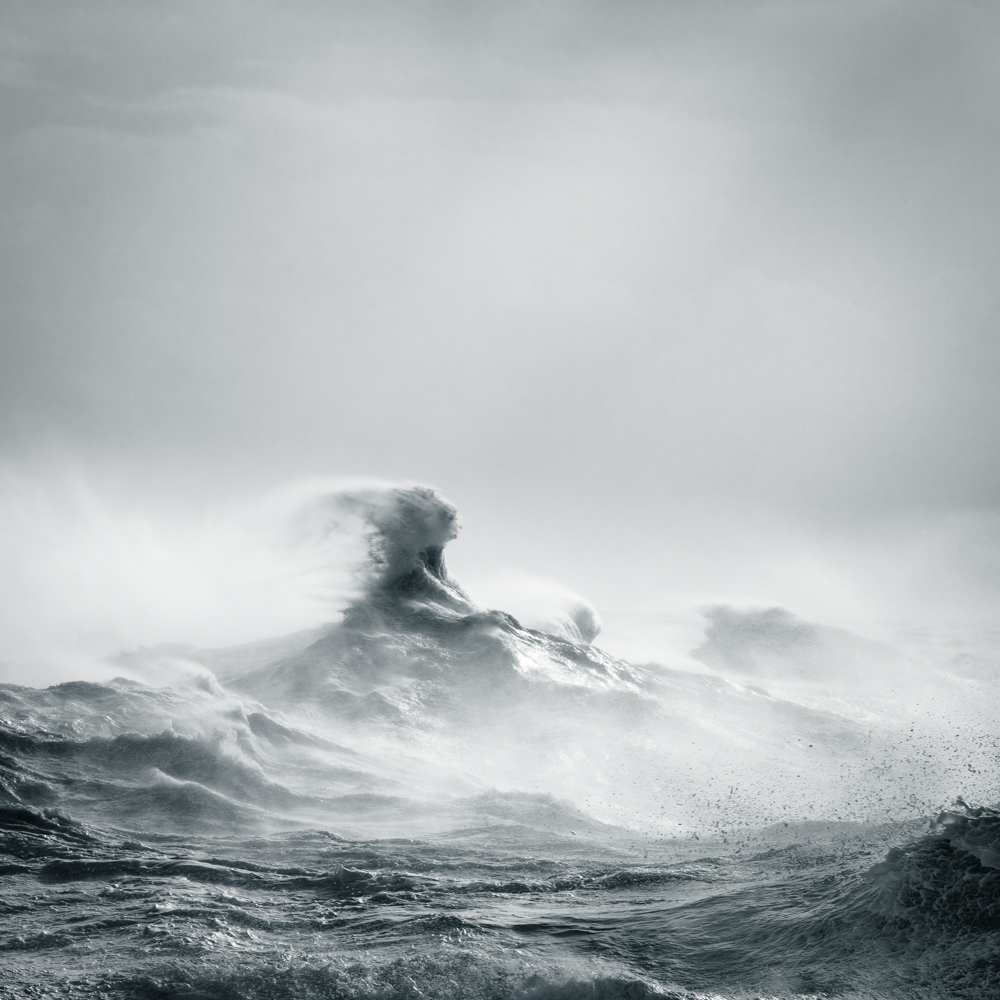
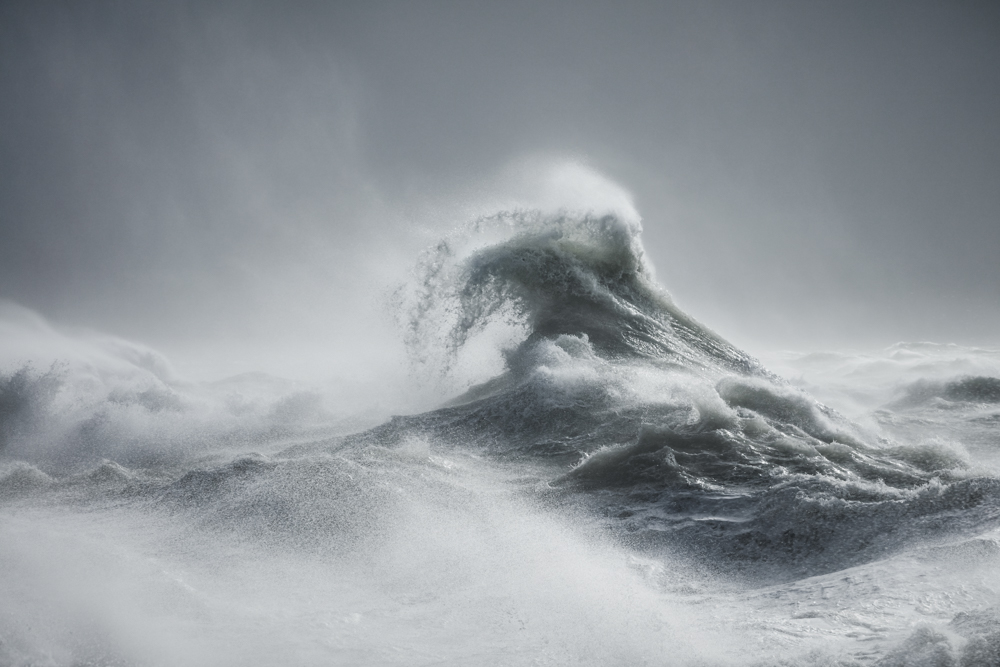
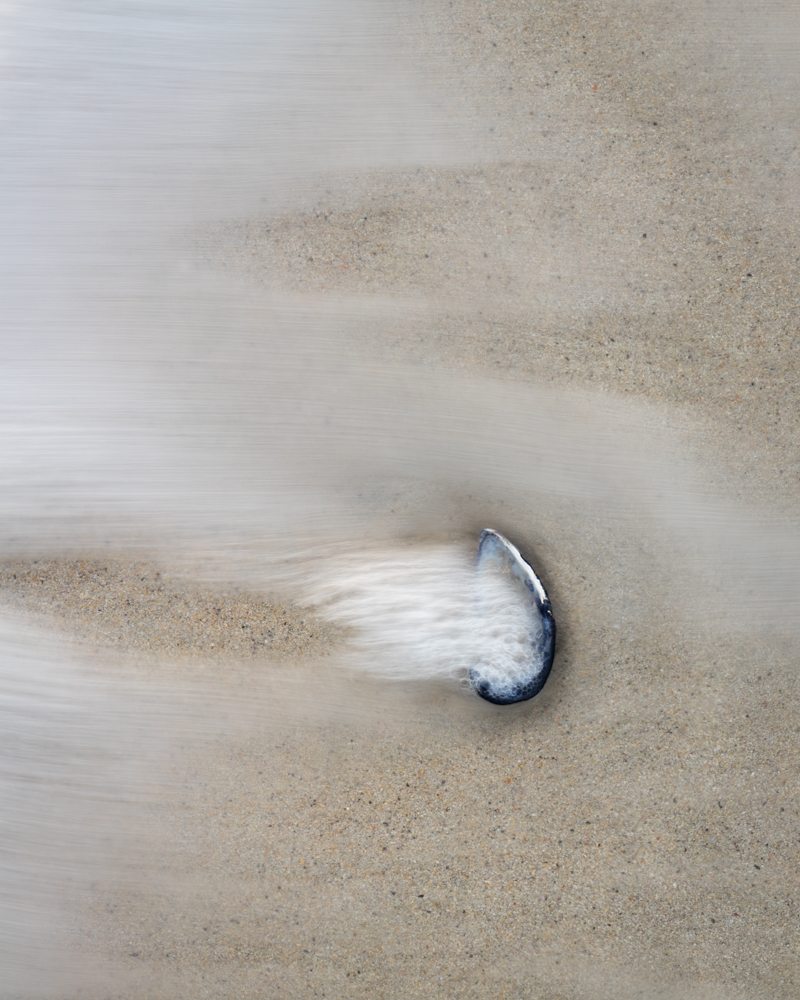
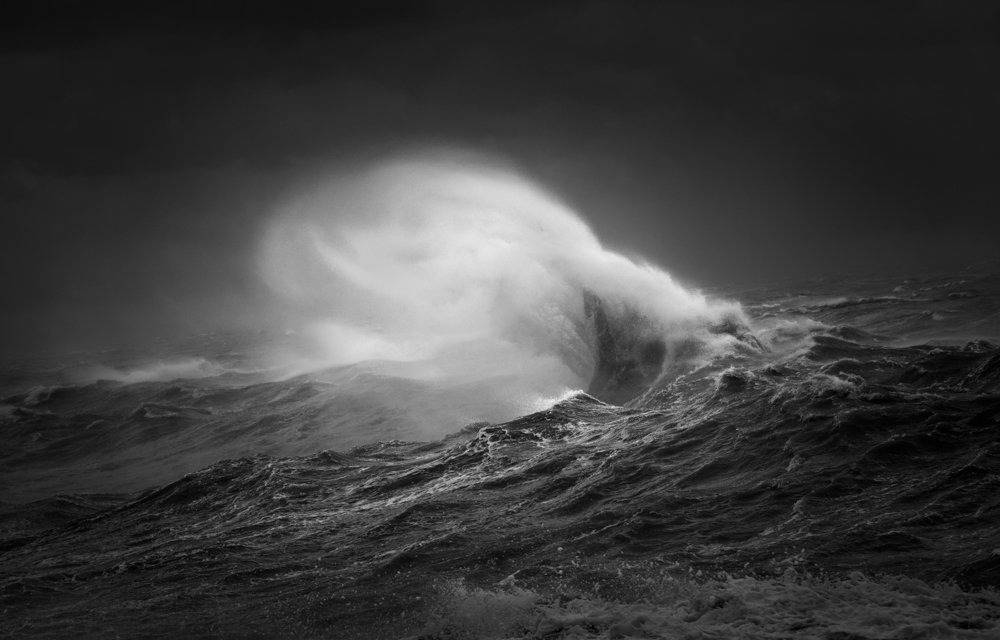
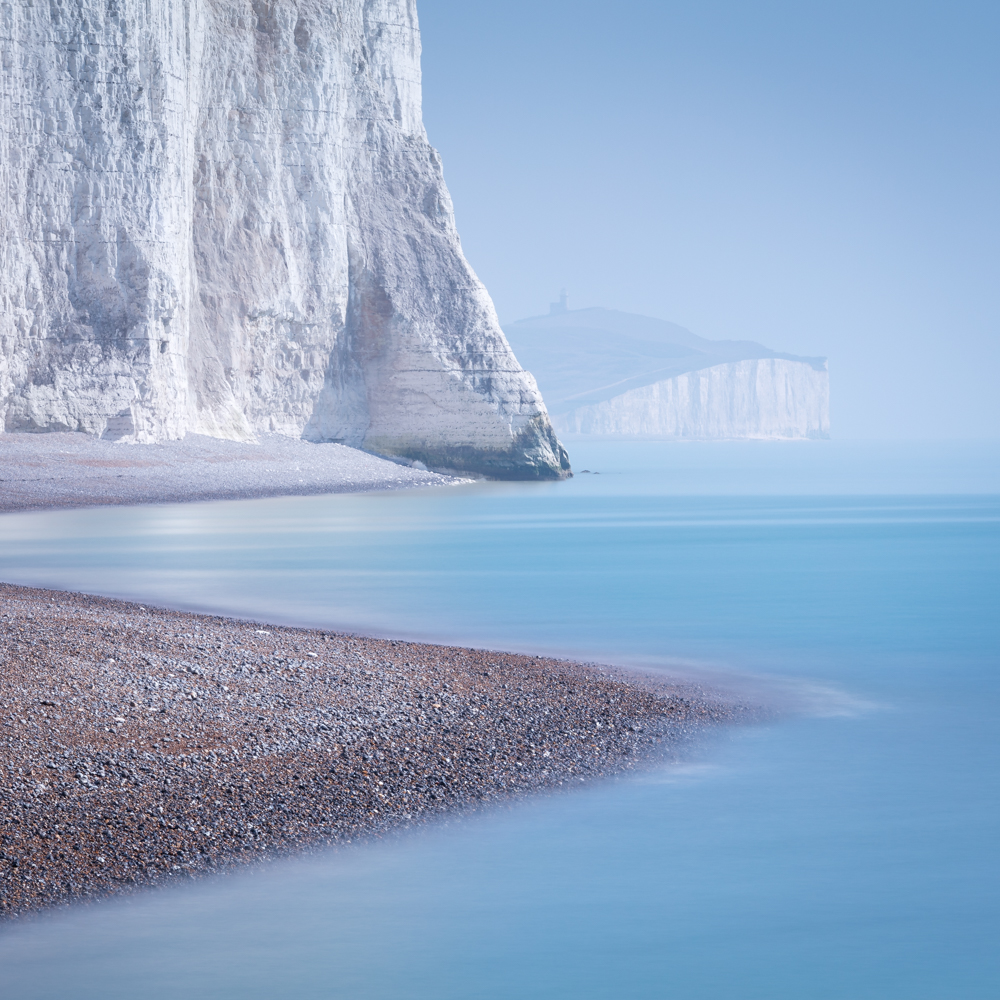
I consider myself first and foremost a landscape photographer. Landscapes are what I love to shoot. It is essential for me to spend time out in the natural world. My energy comes from connecting to nature and landscapes in an intimate way. This need to be immersed in nature actually led me to a new way of seeing landscapes. As a result, I have been primarily focused on shooting abstract ICM landscapes for the past 15 months or so. I still love to shoot traditional landscape images. But abstract ICM landscapes are what I have become known for. And I developed a somewhat recognizable style apart from what a lot of other ICM photographers are doing. My ICM work is all done in-camera. Using various types of movements, speeds of movement, and settings to create the effects seen in the images.

Do you have a favorite piece of kit – what is the one item that Stephanie Johnson Photography could not do without?

I have two favorites, actually.

The first is my Canon f/4L 70-200mm lens. It has been permanently attached as my go-to lens on either the 5D Mark III or the 7D for doing my abstract ICM work. Traditionally, most consider wider lenses best suited for landscape work. But for the abstract ICM work I do, this lens better enables me to achieve the results I’m going for with the images I create.

The second is, believe it or not, the advanced compact G7X Mark II. It offers most of the features of my DSLRs. Shooting in manual and RAW, and it shoots at 20MP, which is actually more than the Canon 7D. So, it is very handy to carry with me everywhere I go, especially when carrying the larger DSLRs might not be ideal. So, I never leave home without it.

Stephanie Johnson Photography

Tell us about Stephanie Johnson Photography as a Business? (When/how did it start? Where is it currently at? And where do you want it to go in 2019?)

I consider the official start of my photography business as 2016 when I realized the passion I had for it was more than just a hobby, it was what I wanted to do with my life. But, I did at the time continue to work a regular job while I continued to learn, and grow, and evolve my personal vision.

November 2017 is when I stepped out on my own and began devoting my time and energies full time toward building a creative life.

Currently, I feel I’m in the best place I’ve ever been with my photography, with my creativity, and with my business. Momentum is on my side these days, and I’m very positive about the forward progress I am making. I have a lot of ideas flowing for how I want my creative work to influence and impact the world, as well as for where I want to go with it in 2019.

Biggest challenges faced so far?

The biggest challenges for me have been more internal than anything else, I would say. Sure, there are always the typical challenges with moving a photography career or business forward. Because everyone wants to be a photographer these days. And it is a very highly competitive environment for anyone choosing to do it. My internal challenges have been about learning to think and see beyond fear and doubt and limitations. As well as to have faith in the knowledge that I am on the right path. That I have something different to offer and that the work I do makes a difference. I don’t measure success in monetary terms. Success for me is about having an impact and making a difference.

Stephanie Johnson Photography

How do you see your photography journey and Stephanie Johnson Photography as a business progressing?

I envision my photography journey progressing to become something that is about so much more than just my own journey and my own work if that makes sense. My vision is to start a movement and to build a community of like-minded landscape and nature photographers who “see” the world differently.

I am working very diligently to create and build a global project that will be mutually beneficial and meaningful for all who are involved in the project.

Any projects that Stephanie Johnson Photography is currently working on?

Landscapes Reimagined is the global project near and dear to my heart. And it was borne out of my own personal desire to see landscapes and nature differently. The world, and especially social media is saturated with grand-scale images from so many of the iconic locations around the world. I want to be different. I don’t want to shoot what everyone else shoots. And, I want people to realize there is beauty right in their own backyard if they will just take the time to think about it differently and to see it.

So, this project is about seeing the beauty in new ways. About capturing the essence of the natural world through less traditional methods, and about creating a new path forward in landscape photography, rather than following in the thousands of footsteps that lead to all the same places around the globe.

All of this is with the goal of also bringing awareness to the fact that the natural world needs more careful attention to conservation and preservation. We, as photographers, should be more mindful about caring for the environment, and we really can use our cameras to speak for a different way of seeing the natural world.

Part of the path forward for the Landscapes Reimagined project is also the development of a charitable fund/organization, Cameras for a Cause. This will be used to support other environmental charities, and at some point will be a platform for photographers to actually do charitable environmental work around the globe.

Stephanie Johnson Photography

Any advice or tips that you can give to others looking to pursue photography as a career?

My biggest piece of advice for anyone looking to pursue photography as a career is really to spend a good bit of time immersed in their own work and their own creativity in order to find the true vision for what they want their work, their career, their photography, and their art to represent and express to the world.

In today’s extremely competitive landscape photography environment, I feel it’s really important to stand apart from all the noise. By having something new to say. By having a recognizably unique vision. And by creating work that has a different kind of impact.

Stephanie Johnson Photography

Where can people follow Stephanie Johnson Photography?

My personal website is at www.stephjohnphoto.com. And I am identified as @StephJohnPhoto on Facebook, Instagram, Flickr, and Twitter.

Stephanie Johnson Photography

Book Reviews – BEARA – A stunning collection of landscape imagery by Irish Photographer Norman McCloskey

Welcome to my new series of articles here on Sleeklens simply titled “Book Reviews”. In these articles, I review and discuss various photography books that I encounter and look through. First up on my list is BEARA. This book features a stunning collection of landscape imagery by Irish Photographer Norman McCloskey. Read on to get my thoughts and opinions about this photography book.

BEARA – First Impressions

The old adage “First Impressions Are Lasting Impressions” may be a cliche but a valid and solid truth none the less. First impressions really do matter. And when it comes to making a lasting impression, BEARA lands a knockout blow. The cover is quite simply one of the best photography book covers that I have ever seen. It is simple and yet sophisticated. Clean and yet not void of substance. Bold and visually striking, yet humble and not overpowering. The plain dark grey of the cover contrasts ever so nicely with an orange coloured text. In fact, here orange represents the Copper mined in this region in times gone by. The dark grey cover delicately embellishes the landscape which also features this same orange/copper colour. The cover really shines and invites you to the exquisite landscape imagery found within.

Beara Book By Norman McCloskey

BEARA – Looking Inside The Book

Once you slowly go past the exciting cover and proceed to enter the book, an enchanting Irish landscape awaits. The content of this book focuses on a particular section of Ireland in the south west. The location in question is of course the Beara Peninsula. One of several peninsulas located in the south west in counties Cork and Kerry. The Beara peninsula is certainly less traveled when compared to the Dingle Peninsula. Looking for a good coffee shop down within the Beara Peninsula will be a tough ask. However, the isolation is part of the appeal of the Beara Peninsula. You really get a sense of connecting back with nature down there!

Regarding the the layout of the book, beyond the cover greets you with a nice sketching of the Beara Peninsula. Across the page, a foreword from Irish Film Director Neil Jordan. Next, you will find an introduction to the book from the author Norman McCloskey. And at the end of the book, you will find thumbnails of each image along with the EXIF data for those images. Now, it is between the opening and closing pages where the real magic lies.

The images presented throughout Beara are a mixture of wide open vistas and more close up/detail style shots. Norman must have had a difficult time going through the editing process and selecting which images were included or excluded from the final version. Nevertheless, Norman did a great a job of varying the types of images on display. It is hard to pick a favorite image, although I am sure every reader will have their own favorite!

BEARA – A Word With The Author

When I called down to Norman’s Gallery located in Kenmare, County Kerry in the south west of Ireland, I asked him some questions concerning his latest book project. The first question on my mind was “How long did it take to create the book, from conceptualization to publishing?“. Norman’s answer; In total about two and a half years. With two years photographing two or three times a week. It was a tight turn around, and I very nearly considered extending the project for another year. But sometimes you have to just press the button and say it’s finished!

Next question was “What attracted you to the concept of the book?“. Norman answered; Beara has been my main source of inspiration from the very first time I picked up a camera and took my first landscape images. It’s a magical place to work, with great variance in light throughout the year. Lots of challenges and different terrain and no one had done a book like this on this part of Ireland before.

As I also have Norman’s first book PARKLIGHT, I wanted to ask him “In what ways was this book project different from the “PARKLIGHT” project?“. Norman’s reply; It was conceived as a far more personal project and I think you can see that in the result. PARKLIGHT had a ready made list of go to spots and must have images as it was so well known. The focus of the book was the very defined Killarney National Park. And so there were scenes and views that people would expect. I had a blank canvas with BEARA and chose to work in a more personal style, exploring details, form and texture and trying to avoid cliched well known views where possible.

Lastly, I wanted to throw a final question to Norman and that was “Any ideas for your next book project?“. Norman enthusiastically responded with; Yes ! I have two definite book projects in the pipeline. One is already started and the other a huge project that I would need a lot of time and resources for. I’m currently editing a commissioned book on Donegal as well as working on a project on offshore islands which also has lots of potential.

Beara Book By Norman McCloskey

BEARA – My thoughts?

Beara really is a visual delight for a Landscape Photographer such as myself. As a photographer who is native to the south of Ireland, the images contained within certainly inspires me to grab my bags, hop into my Landrover and drive the two and half hour drive down to the Beara Peninsula! As stated at the start of the article, I was really impressed by the cover of the book. It is just so beautiful. But I was equally as impressed with the print quality of the images within the book. The 170 gsm paper certainly helps with that aspect.

Because the default image aspect ratio on modern APS-C and Full Frame DSLRs is that of 3×2, a lot of the images that you will see on Facebook feeds are the default 3×2. Not that there is anything wrong with that! However, it was great to see Norman utilizing different aspect ratios such as 1×1 (square crop). I personally find 1×1 aspect ratio images to be very appealing. However, one needs to be careful about composition. While the Rule of Thirds lends itself nicely to the default 3×2 aspect ratio, I find 1×1 images of better-suit compositions containing more symmetry. And that certainly comes across in a lot of Norman’s images. Thoughtful compositions and no sense or rushing when capturing the image.

BEARA – Where can you get yourself a copy?

The best place is probably directly on Norman’s website https://www.normanmccloskey.com/books/beara/.  It is high quality 120 page hardback featuring 90 images that comes in two editions. It would really make a great addition to any book shelf or coffee table.

Beara Book By Norman McCloskey

Interesting Blurred Foreground Ideas for Portrait Photographers

Sometimes, our photos end up looking dull and uninspiring. We know that something’s missing, but we’re not exactly sure what it is. Sometimes all you need to do is use blurred foregrounds to enhance your simple photos.

To put it simply, foregrounds are parts of an image that is closest to the camera. If you place an object in front of your camera and set your aperture to a small f-number, like f/2.0, you’ll get a blurry effect.

This effect is great for many reasons, some of which are:

  • Framing. If you cleverly frame your lens, you’ll end up with a unique composition regardless of what you’re photographing.
  • Adding a pop of color. Oftentimes, simple photos need an extra boost of color. Vibrant foregrounds can fix that.
  • Adding depth. A blurred foreground will add more depth and shape to detailed photos.

You can use professional equipment, DIY props, or random objects to frame your photos. In this article, I’ll focus on simple and accessible objects that will enhance every photo you take.

fence landscape photography

Gates and Fences

Fences have a constant pattern that’s ideal for creative photographs. A fence with a gap, like the one in the photo above, is fantastic for framing landscape photos and portraits.

model hand foreground

Hands

If you want to include human elements in your photos, partly cover your lens with a hand.

Stretching your own hand in front of the camera can create a melancholic atmosphere or a sense of yearning.

If you’re a portrait photographer, have your model hide parts of their face with their hand, like in the photo above. You can use this technique to shape their face, highlight specific features, or simply make your portraits look more interesting.

people foreground

People

Photographing through crowds of people is a popular technique used in street photography. Indirectly using people in your compositions will create a sense of familiarity.

In the photo above, the little girl is adding even more depth to the story. Even though she’s blurry, you can’t help but wonder if she’s just a stranger or if she’s related to the couple in the distance.

flowers foreground

Flowers and Plants

If you need to make your indoor photos look more exciting, use plants. Even if you don’t have a green thumb, chances are you own a plant or two. Flowers are perfect for enhancing simple portraits and still life shots. The more colorful they are, the better!

branches foreground

Branches

For fun outdoor shoots, use branches as foregrounds. Shooting through branches will create a contrast between your subject and the foreground. Curvy branches are great for creating striking compositions, while straight ones are perfect for photographers who want to experiment with leading lines.

window foreground

Windows

One of my favorite foreground styles is the combination of windows and reflections. When you shoot through a window, you’ll get beautiful blurred reflections that will add texture to your image.

Extra tip: when you photograph through a window, don’t stand directly in front of it unless you want to be visible in the shot. Shoot from the side to avoid camera reflections.

string lights foreground

String Lights

String lights, or fairy lights, are becoming increasingly popular thanks to the creativity of photographers like Brandon Woelfel. Hold them in front of your lens and they’ll create stunning bokeh. They can be stretched out to your subject, strategically framed around your composition, or simply held by you or your model. Each of these approaches will make your photos look soft and ethereal.

Whether you’re looking to take your compositions to the next level, brighten your photos, or become more detail-oriented, blurred foregrounds will help you improve your photographs. Remember to experiment as possible; even the simplest objects have the power to make your photos stand out.

What are your favorite foreground objects?

Photographer Focus: Steven Morris Photography

Want to be excited by truly inspiring Astrophotography and Landscape Photography images? Then check out this latest Photographer Focus article featuring Steven Morris Photography.

Who Is Steven Morris Photography?

My name is Steven Morris and I own/operate Steven Morris Photography. I am thirty-six years old and I live in Adelaide, South Australia.

When Did You First Take Up Photography?

In 2014 it was announced that my job was going to become redundant. I had worked for the company for twelve years. It was during these stressful times, working out how I was going to keep paying my mortgage, that I needed to find something to take my mind off things. So I decided to purchase a telescope and do some star gazing. Something I was always fascinated by but knew very little about.

A friend of mine was capturing and producing Landscape and Milky Way imagery. I became drawn to that and wanted to give it a go. I borrowed my dad’s Nikon D300s and Tokina 11-16 2.8 wide angle lens. And I asked my friend if she would like to show me how to photograph the milky way. Well, my first images were mostly out of focus blobs. My friend was a Canon shooter and didn’t know how to set the optimum Nikon settings. After this, I bought my first Nikon DSLR which was the Nikon D5100.

The telescope that I had at the time was a Celestron 6SE. I had found out that I could connect my Nikon DSLR to this telescope. So I did!

It was that first thirty-second exposure of the Trifid Nebula that made my jaw drop. At that moment my passion for Astrophotography began. And with it many sleepless nights researching and developing my own Astrophotography abilities.

Lanscape Image by Austrailian Photographer Steven Morris

Have you turned “Pro”?

I don’t like the word “Pro”. Mostly because I’m just like everyone else who has a passion for photography. However, I do get paid for my work and running workshops, so then the answer is yes I’m a professional photographer. I turned pro about one and a half years ago.

What styles of photography do you mostly shoot for yourself?

I shoot mostly Astrophotography and Landscape Photography. Well, that is basically all I shoot!

Lanscape Image by Austrailian Photographer Steven Morris

What styles of photography do you shoot for clients?

I get requested now and then to shoot a landscape for someone as they admire my work and have always wanted a photograph of a landscape that is close to them. Other than that, I don’t have many clients as I consider my work to be art and sell it via very low numbered limited edition prints. I do have some people who keep coming back to purchase my prints to be framed for their houses though.

Lanscape Image by Austrailian Photographer Steven Morris

What was your first camera and what do you shoot with now?

My first camera was a Nikon D5100 DSLR. I now photograph with a Nikon D810a DSLR. I also use a Nikon 1 V3 for video footage for upcoming YouTube adventures I wish to create. An inspiration for this has been from Thomas Heaton. But it is strange being in front of the camera!

What is your favorite piece of kit in your camera bag?

My favorite piece of kit would have to be the Nikon D810a. It is Nikon’s first ever dedicated Astro camera. It captures additional detail throughout the milky way by picking up the H-Alpha gasses in space. Also, I like the colors this camera produces for my landscape imagery too.

I would also have to say my favorite lenses so far are the Nikon 14-24 F/2.8, Nikon 35mm F/1.8G, Nikon 70-200 F/2.8, and Nikon 300mm F2.8. And let’s not forget all my Haida Filters and Manfrotto Tripod. I guess I love all my gear!

Lanscape Image by Austrailian Photographer Steven Morris

Any new gear on the horizon that you will be investing in?

Ultimately, I would love to own two 200mm F2 Nikon lenses with 2 x Nikon D810a for some wide field deep space imaging. That is a long-time dream and something that will have to wait for now.

I see you are sponsored by Nikon and by Haida. How did those opportunities come about and what responsibilities does a Brand Ambassador have?

I was introduced to Nikon when I was imaging deep space and they bought out the Nikon D810a Astro camera. It was through this relationship of sharing images that I had taken with my D810a of deep space and Nightscapes that lead to me now teaching Nightscape photography with Nikon through Nikon MySchool Australia in various locations around Australia.

Haida had seen my Astrophotography and asked me if I would like to test out the Haida Clear Night Filter. This is a filter which I absolutely love for Nightscape photography. I use it all the time regardless of dark sky locations because it can also protect the front element of the lens during those cold dewy winter nights. After sending them some images that I had taken, they were so impressed that I was asked to be an Ambassador for the brand here in Australia which I thoroughly enjoy doing because their filters are stunning.

Lanscape Image by Austrailian Photographer Steven Morris

What has been your greatest photography achievement to date?

Greatest photography achievement…..That is a hard one because there are a few. Working with Nikon and Haida are two of my greatest achievements along with my most recent Nightscape image in which I had to wait one whole year for the right conditions to present themselves.

What have been your biggest photography challenges to date?

The biggest photography challenge was shooting a Nightscape image consisting of a hundred and fifty images stitched together. It was fair to say that my computer didn’t like handling a 20Gb file. So the image was kind of scrapped. I also don’t shoot with a robotic pano tool like a Gigapan because it just adds to weight. So in the dark shooting at 70mm focal length whilst trying to maintain a fifty percent overlap between image. It was very challenging.

Lanscape Image by Austrailian Photographer Steven Morris

What photographic projects do you have planned for the rest of 2018?

I have a few images I would still like to capture before the Milky Way season is over. The next shot I’m currently planning is an image of the Milky Way rising above some large sand dunes. I have a location in South Australia I wish to shoot at. Now it is just a matter of scouting the location and waiting for the right moment.

I’m also very excited about 2019. In April I will be in the United Kingdom for a few weeks. My brother had moved to the UK a few years back and is now happily in love and getting married. So I hope to head up to Scotland and Wales (Snowdonia) to shoot some landscapes in my spare time. I don’t know how if the weather will allow me to shoot some Astro. But it will be great if I can!

Lanscape Image by Austrailian Photographer Steven Morris

What advice or tips can you offer to anyone looking to make a career or a lifestyle switch to that of Professional Photography?

My biggest advice would be that it takes time. Don’t rush into it. I mean, don’t quit that job you may dislike and the next day begin your dream as a photographer. Build into it. Build up your portfolio and ask questions to those photographers that inspire you to live the dream you wish to live.

Where and how can people follow your work and keep updated with your photography adventures?

You can head to my website www.stevenmorris.com.au for my latest collections and print purchases. Also, you can follow my work or occasional live feeds on Facebook https://www.facebook.com/stevenmorrisphotographer or over on Instagram at https://www.instagram.com/stevenmorrisphotography.

Graham Daly Photography: My Love Affair With The Milky Way

The Milky Way – I Fell In Love With Shooting It!

Since picking up my first proper DSLR camera several years ago, I was quickly drawn to shooting landscapes. And I spent many an early morning and late evening chasing after those magic sunrise and sunset colors. I still like heading out in search of those golden hour images and I am happy when I get them. But I must admit, they are no longer my first love. Over the past two years, I have been seriously attracted to photographing the night sky. I have totally fallen in love with shooting the Milky Way.

Whenever there is a slight chance of clear skies, I will drop all of my other plans, grab my gear and head out to a predetermined location in order to spend several hours admiring and shooting the Milky Way. Nothing brings me more photographic joy than standing beneath the Milky Way arching across the night sky. I am blown away by the sheer beauty of the Milky Way. I count my blessings each time I get to see it. And I can tell you, that those occasions are rare enough over here in Ireland. Our climate produces a lot of clouds!

In future articles, I will dive into more detail around my Milky Way Processing Workflow. I will also highlight other photographers who inspire me with their Milky Way images. But for now, you can read about the equipment that I use and how I plan my Milky Way images.

Milky Way Photography Image By Graham Daly Photography

My “Go To” Equipment For Shooting The Milky Way?

Unlike regular Landscape shoots where I have to take several lenses with me, along with other gear such as my NiSi Filters in order to handle whatever lighting conditions that might arise, thankfully my Astro Photography & Milky Way shooting setup is a lot smaller and simpler.  When it comes to shooting the Milky Way, I need not worry about controlling the dynamic range with filters. Nor do I need to drag along various focal length lenses to create different image compositions.

My typical equipment for Landscape images (Canon 16-35mm ƒ/4, Canon 70-200mm ƒ/4, and NiSi 100mm Filters) are left at home and instead, the only lens that I pack along with my trusty Canon 6D is that of the seriously inexpensive but excellent value Samyang 14mm F2.8 IF ED UMC Aspherical lens. In certain regions of the world, this lens is also sold/branded as Rokinon. This 14mm lens provides a very wide angle of view on a Full Frame sensor. This enables me to capture large portions of the Milky Way in the night sky. The lens is very sharp (if you get a good copy!) and handles comatic aberration (otherwise referred to as “coma”) and chromatic aberration very well. How well a lens handles comatic aberration is important for shooting the Milky Way and the night sky in general. Because if the lens does not control coma effectively, then the captured stars will result with comet-like tails. However, the lens does produce a horrible mustache-distortion and a strong vignette.

Milky Way Photography Image By Graham Daly Photography

I also bring the following items out with me on when I head out shooting the Milky Way:

  • Rollei Rock Solid Alpha Tripod + Rollei T3S Ball Head
  • Really Right Stuff L Bracket
  • Hahnel Capture Pro Wireless Remote Shutter Release
  • Spare batteries for my Canon 6D (OEM Canon + Hahnel Extreme varieties)
  • Hahnel Modus 600RT Speedlights (for light painting + images featuring myself within the scene)
  • Various Head Torches (for finding my way around in the dark + light painting/images featuring myself within the scene)
  • Terrascape Lens Cloths (useful keeping lens clean and wiping off any condensation)
  • A thermos flask filled with strong coffee!!

Planning & Preparing For Milky Way Shoots

There are several key parts to my Astro Photography Preparation Workflow. When I am out at various locations shooting regular landscape images, I pay attention to interesting objects (man-made structures, trees, coastal rock formations, etc..) that might make good foreground interests within my Milky Way images.  I make note of these locations and objects for future Milky Way shots.

While I am at these locations, if mobile data coverage/access is available, I then use the PhotoPills app on my phone to verify how/when/if the Milky Way will line up with the desired foreground object at the specific location. The PhotoPills app is really useful as it allows me to not only to clarify sunrise/sunset times and directions on any given date for a particular location but it also tells me the moon rise/set times along with the moon phase as well for that given date. The PhotoPills app also shows me when/where the Milky Way core will rise and set as well as showing the location within the night sky relative to the location for a specified date.

In many ways, shooting the Milky Way and the night sky is a lot easier and less complicated than shooting regular landscapes on account of the fact that you do not need to worry about how the sunlight is going to interact with the landscape, what parts of the landscape will be in shadow, what the contrast and dynamic range will be like or even whether or not there will be just the right amount of clouds present in the sky in the correct location in order to capture any light/color from the rising/setting sun.

Milky Way Photography Image By Graham Daly Photography

Clear Skies – The Vital Ingredient For Milky Way Shooting!

The main requirement for shooting the night sky and the Milky Way, of course, is that of a cloudless sky. Clouds are the enemy for the Astro Photographer and those looking to capture beautiful images featuring the Milky Way. In order to get the best images of the Milky Way and stars in general, you will need a sky that is free from clouds during a two-week window throughout the month when the moon phase is before or after a New Moon. While moonlight can be great for illuminating the landscape under the night sky and thus removing a lot of unwanted digital noise from your images when shooting, moonlight will cause luminosity of the stars in the night sky to be diminished and will thus cause the Milky Way to be washed out.

Along with using the PhotoPills app for checking the moon phase and moon rise/set times for a particular location on a specified date, I also use several weather forecasting sites to check whether or not clear skies will be potentially possible for that date. Of course, while I can use the PhotoPills app at any stage throughout the year to check out the various planning information points as I eluded to in the preceding paragraphs, I really can only verify the cloud cover and potential for clear skies within a short period of time.

Milky Way Photography Image By Graham Daly Photography

Typically I use five-day forecasts to check for the possibility of clear skies in a given week. When I spot a potential for clear skies on the long-range forecasts, I then start to focus in on those potential days and start paying more attention to the forecasts in the forty-eight (48) and twenty-four (24) hour time periods building up to that date in question. If cloud forecasts look good on the day in question, I then grab my gear, load it into my Land Rover and then I hit the road to get to my desired location and pray for the skies to stay clear while en route!

High-Level Overview Of My Milky Way Processing Workflow

There are certainly more steps involved in my Milky Way Processing Workflow as opposed to my Landscape Processing Workflow. Not that there is any additional complexity. But rather the processing workflow just has more steps and thus requires a bit more time per image. I will write about my Milky Way Processing Workflow in more detail in a follow-up article. So I will just keep things brief and at a high level here in this article.

The following is a generic overview of the workflow that I apply when processing all of my Milky Way images:

  1. While on location, I capture several exposures of the same image composition using the exact same settings. Exif settings are typically [ 14mm | ƒ/2.8 | 20 seconds | ISO 12,800 ]
  2. The duplicate exposures captured while on location will be used for “Stacking” when processing for Noise Reduction purposes.
  3. When I get back home, I then prepare to offload the images from the camera’s memory card to my workstation. To facilitate this I create three folders within a directory specific to that shoot. A folder for the original RAW files, a folder for the processed TIFF files that will be used for the Stacking process and a folder where the final processed JPEGs will be exported to.
  4. Once the RAW files are on my workstation, I import them into Adobe Lightroom Classic CC.
  5. After importing the RAW files, I preview all of the potential image files that I want to process/keep and dump the files that did not turn out correctly for whatever reason (condensation, not sharp, stray and unwanted light pollution, etc…). I use the Lightroom Rating feature to help identity which files I think to hold the greatest potential for processing.
  6. Once I have identified the image composition I want to process first, I select and highlight the range of exposures for that given image composition. This is usually between eight and twelve exposures
  7. I apply basic adjustments to one of the selected RAW files. The adjustments are synced across the rest of the RAW files that will be used as part of the Stacking process. I will go through the exact adjustments that I apply to my Milky Way images in a future article.
  8. Next, I export all of the processed RAW files as full sized TIFF files to the designated “Image Stacks” folder on my workstation. Once exported, I select all of them and I open them within Starry Landscape Stacker. This great application then aligns all of the exposures and stacks them with just a few simple mouse clicks. The stacking process applies a “Median Noise Averaging” process which greatly reduces the amount of total digital noise that will be present in the final outputted image file.
  9. Once the stacking process has been completed, I then export the new composited TIFF file and I then import this into relevant folder structure within my Lightroom Library.
  10. Lastly, I apply some further adjustments to the stacked TIFF file within Lightroom and exports JPEGs with relevant settings.

Milky Way Photography Image By Graham Daly Photography

Top Tips For Capturing The Milky Way

  • Plan Your Shots – Use PhotoPills to research Milky Way visibility, rise/set times for a specified location on a particular date
  • Include strong foreground interest
  • Use large (fast) aperture lenses – ƒ/2.8 would be a minimum aperture to yield the best potential
  • Shoot several RAW exposures for each image composition while on-location. These can be stacked for noise reduction purposes
  • Bring plenty of spare batteries, suitable clothing, and coffee!

Milky Way Photography Image By Graham Daly Photography

Graduated ND Filters: Still essential for Landscape Photography?

The question “Are Graduated ND Filters still essential for Landscape Photography?” is one that has been doing the rounds for the last number of years. And it will almost certainly continue to be debated within photographic circles for the next few years to come. With continuing camera sensor developments and progressions, allowing for better dynamic range capabilities, the question is certainly worth some consideration.  In this post, I want to explore this question and share my personal opinions on this much-debated topic.

Picture of camera with graduated nd filters in use

Historical importance of Graduated ND (Neutral Density) Filters

Before we consider their importance in today’s digital arena, let us first remember the reasons why Graduated Filters were important for the photographers who applied their trade during the analog days. Before the arrival of digital sensors and the “magic sliders” in Adobe Photoshop, photographers of yesteryear had to do a lot of their image adjustments at the time of capture. If a darkened moody sky was the desired result, film photographers would often use graduated filters to control the exposure levels for the sky portion within the scene. And because so many of the landscape photographers shot using black and white film, the graduated filters mostly had color casts.

The requirement for true neutral density in their graduated filters was not such a big deal at that time. The desire for neutral density graduated offerings would come to a later stage as more and more photographers shot with color film. And even more so when digital photography came into the picture.

Graduated ND Filters in the Digital Age

Where we are today with respect to digital photography is very different to that of the introduction of digital sensor technology. In the early days of digital photography, sensors had rather small pixel counts. Anyone remember those days where you would jump for joy at the sight of a 4-megapixel camera!

Dynamic range was a major issue for those brave souls who first adopted and started to shoot with digital cameras. Yes, they were the trendsetters and were smart enough to see where the future of photography was heading but they definitely had their share of shooting challenges to deal with. Compared to film, the early digital sensors had the very poor dynamic range and struggled to control the luminosity and contrast difference between the white and black points within the scene. This was actually one of the reasons why so many shooters delayed going digital for as long as they possibly could!

So, even in the early years of digital cameras, landscape togs were still very reliant on graduated filters for the purpose of helping them to control the dynamic range within the scene. Yes, they now had the magic sliders in Adobe Photoshop and later Adobe Lightroom and could adjust the highlights/shadows but the flexibility afforded by early digital file formats with respect to processing was a lot less than we shooters have today.

NiSi 4 Stop Medium Graduated ND Filter

Digital alternatives to Graduated ND Filters

The landscape of digital photography and digital sensors has most certainly changed a lot since their introduction. Technology has progressed to the point now where some full frame sensors are now able to capture up to 14 stops of dynamic range. With the improved dynamic range capabilities, our reliance on graduated ND filters is fast diminishing.

Not only are the digital sensors better equipped to handle dynamic range, there are now several means and methods available to landscape photographer to control, extend or even overcome any issues concerning dynamic range. We have in-camera features such as HDR (High Dynamic Range) and Exposure Bracketing. Then there are the advancements at the processing end where we now have access to powerful tools such as Luminosity Masks and various other less complex blend modes available within Adobe Photoshop.

These days, landscape photographers can easily just take two separate exposures, one for the sky and one for the foreground, and then simply blend the layers together in Photoshop using a simple layer mask. In many ways, one could argue that graduated filters are no longer necessary when using today’s digital sensors.

Photo camparison with and without graduated nd filter

Graduated ND Filters versus Exposure Bracketing/Blending

As mentioned above, the necessity for graduated ND filters is definitely no longer there. However, there are still shooters who prefer to control the dynamic range while out in the field via graduated filters. Quite often, these shooters would state that they prefer to spend more time out shooting and less time at home or at their studio processing. Hard to argue with that! I would most certainly include myself in this group. I too, prefer to use graduated filters while shooting so that I can capture the scene in a single RAW file when possible. Although I have the knowledge and skills to create masks and blend exposures together in Photoshop, I definitely prefer spending time behind the camera.

These days though, there are lot more photographers falling into the other group who prefer to do away with the use of graduated ND filters while shooting and opt to blend exposures together instead. Whether you fall into the former or latter group, there are certain pros and cons to consider and be aware of concerning the decision to use graduated filters or to go down the blended exposure route.

Will Graduated ND Filters serve you’re better than Exposure Blending?

The biggest advantages of using graduated filters when shooting are as follows:

  • Ability to see/review the correctly exposed image in-camera
  • Requires less processing time and allows you to spend more time away from your processing software
  • Requires less processing knowledge/skills
  • Enables to capture a correct exposure in a single RAW/JPEG file – especially vital for the latter!

The biggest disadvantages of graduated filters:

  • Requires a Filter System – costly investment
  • Takes more money out of your pocket
  • More gear to carry around with you
  • Can be a struggle to keep clean and free from raindrops/sea spray when shooting
  • They can get scratched or fall and break
  • When the dynamic range is very large, you will still have to take two exposures and perform a simple blend in Photoshop anyway

On the other hand, Exposure Blending methods have the following advantages:

  • No additional costs or investments
  • Less gear to carry around with you
  • Less time spent trying to control the dynamic range when shooting
  • Easier to keep lens clean and free from raindrops when shooting because you can keep your lens-hood attached

The disadvantages of Exposure Blending are:

  • Requires a greater knowledge and familiarity with blending techniques within Photoshop
  • Will require larger memory cards and storage as you will need to capture more exposures and store them
  • Will cause you to spend more time at the computer processing your images
  • Unable to review and visualize the image in a single file/in-camera
  • Increases the need to shoot in RAW – uncompressed files allow for greater latitude when blending/processing the images

Picture of camera with graduated nd filter in use

What does the future hold?

The future definitely looks interesting. How long before we have digital sensors that can handle dynamic range like our own optical system (our eyes)? Already we have been introduced to in-camera features such as seen within the Sony cameras and their “Digital Filter” app. This allows for simulation graduated neutral density filters. Also, the effects seen from colored graduated filters. In essence, the app splits the scene into three sections. Each section can have different exposure settings. They are then merged together in-camera by clicking the shutter. Obviously, this app is not going to provide the same level of image fidelity or blending control as Photoshop. But is this app from Sony a picture of things to come?

Conclusion – My thoughts

Personally, I would agree that graduated ND filters are definitely no longer essential for the modern landscape photographer. However, I think I will remain old-school for the foreseeable future. I have already made the investment with respect to my LEE and NiSi Filter systems. So it is only right that I extract every bit of value and return on that investment! Also, I just happen to like working more in-the-field and spending less time on my computer screen.

Seascape image by Graham Daly Photography

But that is just me. What are your thoughts? Are you ready to dispose of your graduated filters and become an exposure blending guru? Or will you stick with the graduated filter tradition for a little while longer?

SaveSave

Photographer Focus: Coastal Photography with Rachael Talibart

Ever hear of Rachael Talibart or see her photographic work? Well, when you reach the end of this article I hope you will ask yourself “why have I not heard of this amazingly talented photographer before!”. In this second edition of my Photographer Focus series, I am placing the focus on Rachael Talibart who is a Professional Photographer based in the United Kingdom (UK).

1) Who is Rachael Talibart?

I’m a full-time professional photographer specializing in fine art coastal imagery. I live in Surrey, England now but I grew up on the South Coast, in a yachting family. For the first twelve years of my life, every weekend and all of the school holidays were spent at sea. Those years left me with a lifelong fascination for the ocean. Although I now live in a landlocked county, I go to the coast at least once a week.

I first became interested in photography during my teen years when I was given a little cartridge-film camera for Christmas, one where the case folded down to make a handle. The obsession really set in when I took my first 35mm camera on a 9-week solo backpacking trip around the world. I had just qualified as a solicitor in a big City of London firm. This job allowed me to take unpaid leave before settling into the rigors of practice. When I returned, I spent my first paycheck as a qualified solicitor on an SLR. And that was it – I was completely hooked!

Photo by Rachael Talibart

2) A question we ask all photographers – What is in your kit bag?

My main camera is a Canon 5DSR. That is accompanied by the usual selection of Canon lenses, a Benro tripod, and LEE Filters. I’m proud to say that LEE Filters now support my photography and workshops. I like the flexibility of a DSLR and I’ve been using Canon for so long now that the cameras are like an extension of my hand. This means I can concentrate on creating without any distractions. While my preferred cameras have stayed the same, my preferred lens focal lengths have changed in recent years.

My Canon 16-35mm lens used to be the most often-used lens in my kit bag but now I use it the least. I like the Canon 24-70mm and even more the Canon 70-200mm, which is probably my go-to lens these days. Using telephoto lenses and longer focal lengths enable me to simplify my compositions, allowing me to think carefully about what I want to depict.

Photo by Rachael Talibart

3) How crucial is post-processing to your photography?

I try to spend as little time on post-processing as I can. This is not because I have an attitude about it or think it’s more ‘pure’ to get the shot in camera but rather because I like being outside and not on my computer. So, obviously, I am going to be more creative in a place I enjoy. However, I do shoot RAW so I must process my images and I do almost all of that in Adobe Lightroom. I rarely need to go into Photoshop but if Photoshop helps me create the picture in my mind’s eye, then, of course, I will use it.

The other important thing for me is to try to leave a decent gap between taking an image and processing it. Sometimes, if I look at the pictures on my computer too soon after a shoot, I can feel disappointed. I’m sure we’ve all had that feeling at some point in time or another. A time gap between the capture and processing stages enables the emotion of the experience to subside and that results in a more considered edit.

Photo by Rachael Talibart

Photo by Rachael Talibart

4) Do you have a favorite image?

I find it hard to choose a favorite image but if pushed, I would probably pick Poseidon Rising. This image is one of my Sirens series, the set of images that has done most to raise my profile. Although all the photographs in this series were taken with very fast shutter speeds, they were a long time in the making. I had worked it out that the beach at Newhaven in East Sussex often had good surf. I had been going there almost every week all winter, capturing the sorts of images everyone else makes there. Essentially that of waves crashing against the lighthouse.

But I was frustrated because I felt I was making photographs similar to other people’s photographs, and I hate that. However, all those visits, while yielding no ‘keepers’, were very useful because I was working out exactly what sort of image I wanted to make there. One day, I captured a photograph of a wave, with no lighthouse and no other landmarks. Next thing I knew, an idea clicked in my head. I wanted to capture a series of waves that looked like monsters and name them after mythological maritime creatures. And so my Sirens were born.

I picked Poseidon Rising in particular because it most typifies what I was trying to achieve. A wave of attitude, named after a Greek god with plenty of attitudes, in an interesting light and unlike the images made by everyone else on that stormy day. I am so glad to see that my Sirens project has been well received. They have been winning multiple awards including Black and White Photographer of the Year and the Sunday Times Magazine’s award in Landscape Photographer of the Year. The series is being published as a fine art book, due to be released in February.

Photo by Rachael Talibart

Photo by Rachael Talibart

5) Are there any challenges to being a Landscape/Nature Photographer?

I think the most challenging part of being a nature/landscape photographer is that title! I do not really see myself as such, but that’s how I am often pigeonholed. Photography struggles to be considered as an art, in the UK especially, but to a certain degree everywhere. I think that is even worse with ‘landscape/nature’ photography. People expect images in that category to be records of recognizable places or creatures. With that sort of photography, there is still plenty of scope for artistry, skillful composition, beautiful light and subtle editing. I admire and enjoy photographs produced by many excellent photographers in this genre but it is not what I am trying to do.

I am less concerned with representing a place. When I go out on location, I am not trying faithfully to show the scene as it might have appeared to you if you had been standing right next to me. Instead, I want to show you the one thing in that scene that appealed to me personally. I want to convey how it felt to me to be there in that moment. Perhaps we should call it ‘interpretative photography’ rather than ‘fine art’ but it is all semantics in the end. Some might even argue that all photography is interpretative on some level and I can hardly disagree!

Photo by Rachael Talibart

6) Any tips for other photographers?

One piece of advice I give to my workshop clients – find a place you love, and return there repeatedly! When we travel to far-flung places, that we may never visit again, we are likely to capture the obvious and clichéd shots. We become ‘photography tourists’ to some extent. It is difficult to avoid influence from photos we have seen, that were produced by others at that place. When we return to somewhere often, we can just relax. We can risk wasting time on experiments because we know that we will be back. I think that is when people start to find their own unique vision.

Photo by Rachael Talibart

7) What does your photography future hold?

I have a lot of plans in the pipeline for 2018. There is the Sirens launch, several exhibitions, and I would like more gallery representation by the end of this year. My Workshops and Photo Tour business are continuing to grow. In fact, it is becoming hard to satisfy demand! I’m also starting to lead residential photography holidays/workshops for Ocean Capture, a leading fine art photography workshops business owned by Jonathan Chritchley.

I have a full schedule of speaking engagements and I will take on writing commissions whenever they come up, as I enjoy them. The category winners of Outdoor Photographer of the Year had been announced at the time of writing this interview. I was one of the judges for that competition this year and I’m looking forward to continuing in that role. Creatively speaking, I want to continue refining my compositions to simplify them, and seeking subjects in the smaller details. However, even if I knew I would never win another award, sell another print or run another workshop, I can honestly say that I would still be out there, in the teeth of a storm, having the best time ever and I hope to be able to do that for a very long time to come.

8) Lastly, where can we see more of your great work?

Photo by Rachael Talibart Photo by Rachael Talibart

Photographer Focus: Laura Oppelt Photography

Several weeks ago I was contacted by Sleeklens and interviewed  [ Graham Daly Spotlight Interview ]. Needless to say, I was delighted to be interviewed and allowed to share my photographic journey and insights with the Sleeklens audience. Now, I am also delighted to actually be writing and contributing content towards this very same great audience – how cool is that!

To start things off, I wanted to introduce a new “Photographer Focus” series whereby I intend to place the focus on various photographers that have caught my own attention and whose photographic work inspires me to head out with my own camera. In this edition, I am focusing on Laura Oppelt, an incredibly talented 20-year-old landscape photographer from Germany.

Laura Oppelt Landscape Photo

1) Who is Laura Oppelt?

My name is Laura Oppelt and I was born in 1998 in a small town near Munich, Bavaria, Germany. Growing up in the countryside, I enjoyed being outdoors and discovering nature. When I was younger, I got a cheap camera and started to literally photograph everything around me. The images were poor in terms of photographic quality and just snapshots really but I kept going and later decided to save money for my first DSLR. Since that time back in the summer of 2013 I really worked hard on improving my photography knowledge (a continual work-in-progress!) and I decided to focus my attention and energy on landscape photography.

The greatest step so far in my development took place in 2016 when I switched to a Full Frame DSLR. Even though the camera is just a tool for taking pictures and by far not the most important thing, it gave me a more satisfied feeling and afforded me new possibilities. But the best teacher is practice! The importance of trial and error really cannot be underestimated. During my travels, I learned a lot, discovered stunning places and experienced the beauty of our world, which is the basis for all my pictures. I still consider myself as a learner and search for my own style but I’m very curious what will come next.

Laura Oppelt Landscape Photo

Laura Oppelt Landscape Photo

2) Do you find that your passion for photography consumes a lot of your time?

Yes! I try to head away on photo trips as often as possible and especially on the weekends I’m really busy with photography. As it’s my biggest hobby, I love spending time with it, but that’s not always possible of course. A very time-expensive aspect of photography is also the post-processing. I’ve still got loads of unprocessed images and I don’t know if they will ever be processed!

3) A question that all photographers are asked – What is in your kit bag?

I’m shooting with the Canon 6D and the Canon wide 16-35mm f/4 lens. I also always carry a Sigma 20mm f/1.4 in my camera bag for night photography. Let us also not forget the Canon 24-105mm f/4 lens. Lastly, I use a Sirui tripod and LEE Filters.

Laura Oppelt Landscape Photo

4) What is your general workflow when taking pictures?

That depends on the conditions and the scene. I always use the Live View function of the camera to compose the image and try to find leading lines as well as foreground interest. Then I decide if filters are necessary or not and if yes, which specific filter (e.g. a graduated hard or soft filter). Besides that, I often take three different exposures, in case that I need them later in post-production.

5) What is the key ingredient that you always look for when producing images?

I think an interesting foreground is always a great way of strengthening your image composition, especially in landscape photography. Sometimes I include people in my images as well to add some scale.

Laura Oppelt Landscape Photo

6) How crucial is post-processing to your photography?

It’s an important issue for me because I want to make the best out of my images and with some very easy steps, such as boosting contrast or adding a vignette, you can increase the overall effectiveness of the image. But I also don’t want to spend too much time with the post-processing and I try to keep the image as natural as possible.

7) Do you have a favorite image?

That’s a quite difficult question because I’ve got different favorites due to different reasons. There are favorite images because of the experience I had when taking them and there are favorites because I’m very satisfied with the editor the composition or the light captured within the image. If I had to pick only one photo, I would choose a photo I took during a backpacking tour on the Faroe Islands in the summer of 2017 because everything just came together perfectly: the landscape (a mountain above the sea with a great view over the fjords and the villages at the coast line), the light (right before sunset) and the experience (it was pure freedom on top of that mountain peak with an incredible view). I titled the photo “Experience for a Lifetime“ because it had such a great impact on me.

Laura Oppelt Landscape Photo

8) Are there any challenges to being a Landscape Photographer?

Yes! The constantly changing weather situations and that it sometimes takes huge power and resolve to overcome your own laziness! And of course that you manage to make the people who look at your images feel the same that you felt in the moment when you pressed the shutter. That is probably the most difficult and challenging aspect of all.

9) Any tips for other photographers?

Maybe that the most important thing about photography is that you like what you do and that you have fun. Take the images for yourself and not for somebody else. Try to develop your own style which is very challenging in its own right because I think this is a never-ending process.

Laura Oppelt Landscape Photo

10) What inspires you?

Our beautiful world has so much to offer that I think inspiration can come from everywhere. Other photographers who have a lot of impact on my own motivation are Dennis Polkläser, Nicholas Roemmelt, and Bruno Pisani, to just name three of them.

11) What does your photography future hold?

A challenging question because there are so many possibilities. I would like to just improve my image making abilities further and to experience some new photography adventures. I would also really love to publish some of my pictures in magazines or to have an own exhibition someday … But that’s very far away from now.

Laura Oppelt Landscape Photo

12) Is there anything else you want to say?

Go out, explore and enjoy life! Simple, but so difficult at the same time!

Laura Oppelt Landscape Photo

13) Lastly, where can we see more of your great work?

I have a brand new website now at www.laura-oppelt-photography.de . My 500px account is https://500px.com/laura_oppelt. You can find me on Facebook at https://www.facebook.com/lauraoppeltphotography and my Instagram profile at https://www.instagram.com/oppdager/.

SaveSave

Epic Polar Lights: How to Photograph Aurora Borealis

I’ll dedicate this topic to one of the most loved phenomenon in landscape photography: Aurora.

Aurora is a natural dancing light in the Earth sky, visible in the night at high latitudes. This is why it can be called borealis or australis.

When I observed aurora borealis for the first time, I was almost crying.

It’s a great emotion and, as a photographer, I would like to give you some advice on how to capture it forever.

What is Aurora exactly?

Before taking shots to a phenomenon like this, you should learn about what it consists and how it works.

It’s very curious to know that the interaction between the terrestrial magnetosphere and the solar winds produces the dancing lights.
You’ll see colored bands or vortices in the night sky (when the lights are visible and bright).

Aurora can be diffuse or discrete. The first seems like a big colored glow; the second consists of spirals, curls or bands and is the strongest.
Its unit of measurement is Kp scale and goes from 1 to 10 (in order of strength).

The colors of the lights: not always green!

The composition and density of the atmosphere and the altitude determine the color of the aurora light.

An excited atom that returns to the ground state sends out a photon with a specific energy. This energy depends on the type of atom and on the level of excitement. We’ll perceive this energy of the photon as a color.

At very high altitudes, in addition to normal air, there is atomic oxygen. Molecular nitrogen and molecular oxygen compose it.
Aurora is made energetic electrons that are strong enough to split the molecules of the air into nitrogen and oxygen atoms. The photons that come out of Aurora have therefore the signature colors of nitrogen and oxygen molecules and atoms. Oxygen emits green and red photons.

lofoten isabella tabacchi aurora

Usually, the green is the main color of the polar lights color mixture.
When Aurora is very strong, you can observe a purple-red band on the highest part of the photon emission.

At the highest strength of the polar lights, nitrogen molecules get a mixture of blue and red emission and create a purple edge at the bottom of the aurora.

So, the polar lights can be not only green. Indeed, the strongest auroras appear in lower latitudes as enormous red glows: the rare “blood auroras”.
Images from the International Space Station show the rings of aurora near the poles: when the polar lights are very strong, the rings expand and the red emission on the top of the green lights comes down to the lower latitudes.

Popular culture believes red lights as a portent of disgrace.

“Blood auroras” are said to have foretold the death of Julius Caesar (44 BCE) and they presaged the American Civil War (1860), the second World War.
A rare red aurora appeared also in November 2003, in the sky of the Dolomites, when I was a child.

Nothing bad happened and you can take a vision of that phenomenon at this link: http://www.cortinastelle.it/aurora20112003.htm .

Where and when?

Aurora occurs usually in the “auroral zone”, above 60° north or south of the equator. Australis are the lights appear in the Southern hemisphere, Borealis in the Northern.

As written in the previous paragraph, it’s very rare in the lower latitudes.

We can mainly observe aurora, for instance, in the north of Norway, Iceland or Alaska in the north of the planet, or in New Zealand, Tasmania in the south. We have always to be in the “auroral ring” around the poles.

But when? Well, usually not in the Summer, when the sky is too bright in that latitudes (the daytime is almost 24h long during that season); the best time frame is from September to April and the highest solar activity is usually during the Equinox time.

During my travel in Lofoten Islands, I’ve found very useful some apps about aurora forecast; you can find them in the App Store (IOS or Android). You’ll get a vague idea about the activity in the evening you’ll plan your shooting.

How to take a great aurora shot

Is not difficult to immortalize a polar aurora (if you are in the best place in the best moment).
The best aperture and ISO sensibility are the same of a classic night sky shot but the shutter speed has not to be too long.

I usually keep it under three seconds, or I wouldn’t capture the shape of the lights movement.
For example, I took this shot in Uttakleiv beach, in Lofoten Islands.

lofoten isabella tabacchi

How to edit an aurora shot in Adobe Camera Raw (Photoshop)

The tastes of the people are various. I can see every day thousand kinds of aurora images post-processed in different ways. I’m going to explain my own method.

Here you can see a RAW file opened in Adobe Camera Raw. This is a discrete aurora I saw in Uttakleiv, in Lofoten Islands. The lights are very bright and the shape is almost great as I observed it that evening, but I’d like to improve the luminosity of the aurora and the contrasts.

aurora processing 1

The first thing I do when I begin to edit an aurora shot, is to go in Camera Calibration section.

I change the Camera profile Adobe Standard with Camera Flat. The lights become less bright and the shadows more open; this allows me to manage the lights, the shadows, and the contrasts better.

aurora processing 2

The following image shows the adjustments I usually set on an image like this.

I usually prefer to give a colder white balance that goes well with the green color.

aurora processing 3

aurora processing 4

But you can also prefer a white balance that shows well the colors of Aurora, like the brown-purple in the top of the green.

I usually decrease the highlights to increase much more the whites. I’ll have a much more contrasted, well shaped and brighter aurora.

I also open the shadows and the blacks a little bit and decrease the exposure to balance everything.

As you’ve just read Aurora it’s not difficult to capture and needs a very soft post-processing. So, plan your travel and reach the highest latitudes; you’ll live amazing emotions.


SaveSave

Six Dolomitic Destinations a Landscaper Couldn’t (And Shouldn’t) Miss

For who don’t know, Dolomites are a group of many mountains located in Italy, between the regions of Veneto and Trentino-Alto Adige.These peaks are known for their bizarre shapes, formed millions of years ago because of many erosions.Over the years The Dolomites became among the most visited mountains in the World and many tourists from different countries go for miles on foot to admire the magnitude of that peaks or enjoy atomic sunsets.As that places are so peculiar and full of drama, many landscapes photographers search inspiration there and the business of photo workshops is greatly fruitful.  seceda dolomitesThis is why, as I explored The Dolomites for years, many foreign photographers asked me a lot of information about spots and places to visit there.Of course, every angle of this area should be explored, and there are wonderful locations are not included in this article cause I should write a book about all the places to visit in the Dolomites… this is why I’ve chosen the six most powerful locations where I tried the strongest feelings as a photographer and as human.

1. Mount Seceda 

Seceda is part of the Odle group, in Val Gardena, in the province of Bozen. You can reach the summit of the mountain with a cable car from Ortisei and be at about 2500 min 15 minutes. There you can admire the imperiousness of the inclined Seceda peak turned towards the valleys and other mountains of South Tyrol, until the Austrian peaks like mount Großglockner. Behind your sight, you will recognize some of the most famous mountains and massifs in the Dolomites, like Langkofel, Plattkofel, and Sella group. As a photographer you can use many different kinds of lenses there; I think the best focal length to immortalize Seceda is 24mm even if telephoto lenses are necessary to create images of the far peaks, that are very fascinating, especially in a misty nightfall.  According to my photographic tastes, I think that the best time to take great shots of Seceda is in the foggy days, especially when fast clouds, lower than the summit of the mountain, move against this one; this kind of weather can be present in every season, particularly in Autumn and Spring.

 2. Seiser Alm

Coming up by car from Kastelruth you will arrive in a little town of hotels named Compatsch. If you park and proceed by a walk on a restricted traffic route, you’ll discover a little and pacific rural environment at the foot of the majestic Langkofel and Plattkofel mounts.During your shooting time you can play with the curves of hills, and little details of them, like trees and little alpine lodges. I recommend focal lengths from 24mm to 70mm even if also telephoto lenses could be used to capture details of the valley and far mountains.A foggy weather is perfect to take pictures in Seiser Alm; I really love when the light of the sun or the moon creates visible oblique rays that illuminate the fog and are contrasted by the shadows of the elements in the valley. My award-winning picture “The magic of the night” is an example of the disarming beauty of Seiser Alm bounded by the mist at the moonlight.The best months of the year to visit this fairy location are May, June, July, during the flowering of the meadows, October, November and in the wintertime (but only if the hills are covered by the snow).seiser alm dolomites

3. Lagazuoi hut   

Lagazuoi is a mount located in the Dolomites near Cortina D’Ampezzo, lying at an altitude of 2835 m. It contains a mountain hut, accessible by cable car in few minutes, which has one of the best panoramic views in the Dolomites.   This is why I consider it a landscaper friendly location: every kind of lens, especially from a focal length of 24mm to higher, is addicted thanks to a view rich of peaks, valleys, trees and every kind of detail.Every month of the year is great to visit Lagazuoi hut, above all, when low clouds form a kind of “sea” and only the highest peaks come out from them. The funniest thing is that, at that altitude, the weather changes very fastly! This is why you can take shots of a red sunset and immediately after of some lightning.lagazuoi pelmo croda da lago cortina sorapiss sorapis

4. Lake Sorapiss

At the foot of the Dito di Dio (God Finger) peak is located the most colorful body of water in the Alps. Sorapiss is characterized by an intense turquoise water, given by the rocks at the bottom of the lake.You can arrive at this fairy place from Passo Tre Croci, near Misurina (district of Auronzo di Cadore), in about two hours and it’s possible to book at the Vandelli hut, near the lake.A colored sunset or a shiny sunrise can help you to take a memorable capture of this location, even if the totality of the lake makes the most of the “wow effect”.I recommend a wide-angle lens to get a large visual of the mountains and the water, with some rocks in the foreground.You can visit Sorapiss lake from the thaw in May until the first ices at the beginning of November.

  5. Vajolet Towers

When you reach the “Gartl” hollow after a sloping rocky trail, you may think to be in another lonely world; and on your right, there are three majestic bastions called Vajolet Towers. On your left, there is a yellow house which is the Re Alberto I hut and in front of it is placed a little pluvial lake. The rocky garden of the “Gartl” hollow is located at 2621 m between the Fassa valley and the municipality of Tires, in South Tyrol. Photographers can take shots from many points of view like the lake and use some rocks as foreground.The best lens for this location is a wide angle, that’s especially addicted to the nightscapes lovers, cause the sky at that altitude is very clear and deep.The way to reach Re Alberto I hut from Pera di Fassa is long but you can get really warm hospitality and discover the taste of Italian and Tyrolean food at the hut; I will never forget the polenta with cheese before my shooting time.Re Alberto I hut is open from the end of June to the end of September and the best weather is, of course, a red cloudy sunset but if a dark night follows it.stars vajolet towers milky way

6. Tre Cime di Lavaredo

I couldn’t avoid writing about Tre Cime (Three Peaks), a place that every tourist knows, a classic postcard of the Italian Alps. You can reach the Locatelli hut from Auronzo hut by a more than one hour walk. The trail is boring, but when you are in front of the Three Peaks can’t stop to admire their majesty.I suggest you take a look also at lakes of Piani, two bodies of water behind the Locatelli hut.I recommend you to use a wide angle lens and a telephoto lens only to take shots at far peaks like Cadini di Misurina or Dreischusterspitze. Tre Cime di Lavaredo are fascinating in every period of the year, with every weather (even if I personally prefer a partially cloudy sky in the daytime and a clear night). Be sure that in Winter the trail is walkable and there isn’t ice on it.tre cime

5 Tips for Capturing Spectacular Low Light Landscapes

Shooting landscapes mean giving up a bit of the control that comes with studio photography, but it can often produce some spectacular results. With landscape photography, especially with rapidly changing light conditions, like low light, time is of the essence.

That’s why it’s important that you know how to work quickly and understand how to make the light work with your camera to get the best photo you can in as little time as possible. Having a solid game plan in mind before you go out shooting can keep you from getting frustrated and ensure your final product is an impressive capture.

The directional light coming at a low angle, like when the sun is dipping below the horizon, can fool your camera’s light meter and make it hard to adjust your setting correctly. But when you’re shooting on the edge of light, there are some tips and tricks you can apply to achieve a solid image.

1. Timing is Everything

Golden hour

is how photographers refer to the 60 minutes after sunrise, and the 60 minutes before sunset. Blue hour is the time right before morning golden hour begins and just after evening golden hour ends. Both these times offer ideal low light shooting conditions.

golden hour

The ideal time for a low light landscape, though, is the half hour before sunset to the half hour after. That’s when you’ll find the beautiful colors in the sky – pink, purple, red, and orange before they eventually fade into the rich, velvety blue that becomes a blanket of blackness and stars. This time of day also offers a flattering light temperature, giving images captured during this time a particularly emotive atmosphere.

Shooting at night offers some unique challenges as well, but landscape shots benefit from a bit of color in the sky. This helps keep exposure times lower and adds a bit of contrast and definition to help viewers see the subjects within your composition.

2. Plan Your Attack

Try to visit your location ahead of time, to find a position where you’ll make the most of the available light and create a satisfying composition. Some landscapes work best at a distance, but some can benefit from the addition of dramatic elements included nearer to the camera. This will depend on the scene you’re shooting and what your light actually looks like.

low light long exposure

Take some test shots to find the right balance of scale, context, and aesthetics. Once the sun starts to sink, you’ll only have about a half hour to shoot your low light landscape with the conditions you’re looking for.

3. Hold Steady

It’s always better to have a tripod when shooting in low light because a long exposure is necessary to get as much detail as possible, while reducing blur and noise. If you can’t haul around a large tripod on everyday trips, consider investing in a portable and flexible GorillaPod, which can help you achieve some especially unique angles and perspectives.

different landscape angles

However, you might be able to get away with using some other form of support. Try shooting with your camera balanced on a wall, garbage bin, a fence, or even the ground. If you can’t find anything to rest your camera on, find something to lean on and brace yourself while you shoot.

4. Go Hands-Free

A remote shutter release is a key tool for shooting in low light. Once you’ve set your ISO, exposure, and white balance to capture the scene as accurately as you can, use a remote to shoot without having to touch the camera with your hands. This way, you’ll be able to eliminate any camera shake caused by physically pushing the shutter release.

aurora borealis photo

Alternatively, you can use your camera’s timer, but a remote trigger is a sound investment for any photographer, especially if you plan to do more low light projects.

5. Use Your Technology

One of the most valuable things about digital photography is that it provides you with instant feedback. By checking the image on your camera, you can use the histogram to get an idea of how balanced your exposure is. Feel free to adjust your settings and experiment to achieve the result you’re hoping for.

Note that you may see that some parts of the image are over or underexposed, which is what you’re looking for with low light landscape photography. A perfect capture will show a richly exposed sky with dark shadows, but still highlighting important details in the foreground.

low light exposure

Now that you know how you can work with your camera and your landscape to get a gallery-worthy scenic shot, get out and find yourself a photo. No matter where you live, you’re never far from a spectacular location, and scouting one out is part of the adventure!

With these tips, you’ll always be prepared to shoot a stunning landscape, whatever lighting conditions you might encounter.

La Garrotxa: a photographer’s destination in Catalonia

I feel lucky about the fact of being from Barcelona (Catalonia). It is a beautiful city with a great atmosphere and as a photographer I am aware of how charming it is. But as a local I also know that there are other places in Catalonia that are also paradises for photographers. Today I want to introduce you to one of my favorite regions in Catalonia: la Garrotxa. Although I will focus just in the places I have recently visited, I want you to know that this region has much more to offer. My objective today is to make you curious about this photographer’s travel destination.

What la Garrotxa is?

La Garrotxa is a county in the northeast of Catalonia. In the north of the county you find the Pyrenees mountains. But today I am not going to talk about this (also beautiful) part of the county. Instead, I am focusing on the central/southern part, that it is known for its volcanos. Yes, I said volcanos! Over 40 inactive volcano and lava flows cover much of the center/south part of the county. With my description, you might imagine this region as a dark and rocky area. But the reality is far from it. The region is green and fertile.  I like to go there because of its impressive natural landscapes and its beautiful towns and villages. You will be surprise for the diversity in architectural styles and you will be delighted by the local gastronomy. You won’t stop shooting.

Sant Esteve Church, in the city of Olot (capital of la Garrotxa)

How to get there and other useful information

You can check the website of La Garrotxa turism to check options about how to get there, where to eat  or where to sleep. It can be really handy to rent a car for the freedom this will give you to move around the villages and to get to starting points of hiking trails. But you can also get there by bus (the company bus is called Teisa). If you are a hiker, you will have great times in this region because they make a lot of effort in developing their hiking trails. I would like to point out that tourism in la Garrotxa is mostly local (a lot of Catalans like to go there, as I do). The place keeps all its authenticity. On the other hand, you will find a lot of travel information and guides also in English.

What to photograph in la Garrotxa?

The list of things to photograph are endless: medieval villages, art noveau or modernism, forests, volcanos, regional gastronomy… all kind of photographers will find this region interesting because of its variety. In order to keep it short, I selected some photogenic spots in the region, mostly in the city of Olot and nearby.  I hope I will manage to show you the beauty of la Garrotxa and the love I feel for it.

Old city of Olot

Olot is the capital of the county. It is located at 92km from Barcelona and in 2015 its population was 34000. The first reference to Olot is from the year 872 (Middle Age). The original medieval city was destroyed by earthquakes in the fifteenth century. The city was reconstructed. Further on, it also suffered diverse wars. But besides all the historical inconveniences, the city grew and developed industrially.  Today we can enjoy its beautiful streets, churches and old shops.  Walking around the old city is a pleasure. The streets are quite typical from Catalonian villages and the colorful buildings are perfect models for any urban photographer.

One of Olot’s main streets (Tomas de Lorenzana street)

The streets of Olot are charming

You will also be impressed by the Sant Esteve Church, from 1763.

Sant Esteve Church, Olot. I edited this photo using the Brik and Mortar Workflow

The old city is full of old little stores where you can have a look (and buy!) local products. I find these old stores interesting because they kept their authenticity. These stores have the same look already like this 40 or even 50 years ago!

Perfume and beauty products store in Olot old city

Little store that sells local meat products (mainly pork)

If you like to take photos of local products, you must also pay a visit to Olot’s market.

You can find interesting products in Olot’s market

Photography tip: Locals are friendly and they wouldn’t mind that you take photos of their stores or the products they sell…if you ask them first! I saw that when I take photos without telling me, they give me strange looks. However, if you just ask them in catalan “Puc treure una foto?” that means “Can I take a photo?”, they will not just allow you to take the photo, they will also show you other interesting products or things to photograph! People in Olot are really hospitable.

Catalan Modernism in Olot

You might be familiar with the catalan modernism because of the works of Antoni Gaudi. Tha Sagrada Familia church in Barcelona is maybe the most well-known modernist icon. Modernism buildings usually have detailed decorations, a dominance of curved lines over straight ones and a dynamic use of forms.  This cultural movement can be also enjoyed outside the outskirts of Barcelona. In Olot you can follow a route that will take you to several modernist buildings spread around the city center. Some examples are: Gaieta-Vila house, Casa Pujador or Casa Gassiot.

Gaieta-Vila House in Olot Casa Gassiot, Olot Casa Pujador

Photography tip: if you like to take photos of buildings or streets when there is nobody next to them, take advantage of the lunch break. You can walk around the city center almost alone between 14h and 17h because at that time the locals are at home having lunch and the stores are closed.

Volcano Montsacopa: Viewpoint in Olot

The Montsacopa Volcano is in Olot center. It is an interesting place to visit for several reasons. First of all, it is a good spot for nature photography without even leaving the city.

The Volcano Montsacopa is a place where you can take wonderful nature photographs without leaving the city (Olot) Volcanic stone. The area is full of them.

Another reason is that once in the top the volcano provides you will an all-round views to the city and its natural surroundings.

Views of Olot from the top of the Volcano Montsacopa

If this was not enough for you, once you get to the top, you can also take photos from two watchtowers that were built during the Carline war (in the second half of the XIXth century).

One of the two watchtowers that were built during the Carline war on the top of Montsacopa Volcano

If you are more an architectural photographer, your desires will also be satisfied in this volcano: there is a church (Church of Sant Francesc) on the top.

Church of Sant Francesc on the top of Montsacopa volcano

You can also go down and step on the 120m diameter circular crater.

Mostsacopa volcano has a 120m diameter crater

La Moixina

La Moixina is a natural area not far from the old city of Olot that is a must for nature photographers. This area is characterized by its oak woods (it is the type of forest that once covered the whole Olor region) and the marshy woodland. The landscape of la Moixina is not a common one in the area, so it is worth it to visit it.

La Moixina marshy woodland

La Fageda d’en Jorda

La Fageda d’en Jorda is another must-to-go place for nature photographers. It is close to Olot, You can access by car, a local bus or even walking (1h30min walk). It is a magnificent beech forest (Fagus sylvatica) that stands on the lava flow from a nearby volcano (called Croscat).

La Fageda d’en Jorda is a beech forest (Fagus sylvatica)

This forest change a lot between the seasons. In winter, the trees lose all their leaves.  In spring and summer the forest is green and in autumn it turns totally golden. At any time, this forest has a fairy tale mood that makes this place almost magic.

La Fageda d’en Jorda

Photography tip: The golden colors of autumn are pretty spectacular. Lots of people come to visit the forest, especially in the weekend. If you want to photograph a relatively  empty forest in autumn, you will need to schedule your visit for week days and walk a bit inside the forest in order to avoid the crowds that stays close to the parking lots that are near la Fageda.

I hope you to be interested in La Garrotxa. Feel free to contact me with any question. I will be happy to tell you whatever I know. Have a happy shooting!!!

Must Have Accessories For Landscape Photography

Imagine you’re standing at Glacier Point, shooting the beautiful morning sun as it rises behind Half Dome. Sipping on hot chocolate, you adjust your settings accordingly to the flooding light. The air is wet and there’s a faint vanilla scent from the surrounding Jeffrey Pines. You screw in your Graduated Neutral Density filter and take a couple shots. The sun is rising slow and you are in no rush, savoring each moment you have, just you and the camera this morning. Nothing else matters.

Landscape Photography

Compare this to someone who ran up, took a shot, and then ran back to their computer for post-processing. They don’t care about crafting the perfect image in the camera, they know they can fix it in post. No hot chocolate for them, no smell of the Jeffrey Pines. No memories other than the photograph.

Where would you rather spend your time? Perfecting the image in camera on location, or spending the majority of your time behind a computer trying to fix the image in post? This answer should not be difficult. What draws photographers to landscape photography is the promise of long afternoons hiking up to the perfect spot and setting up the camera, the sole focus for the next few hours is to get the shot, nothing more.

To ensure you can maintain this lifestyle, you will need a couple accessories in your camera bag. While you can find lists of up to 30 must have accessories, you really just need a few essentials to get started, the rest is up to your creative vision. You cannot buy that, nor can you buy experience. So get out there!

Landscape Photography

Landscape Photography Filters

Polarizing Filter

A polarizing filter is great for stopping down the entire image. It will reduce glare from reflective surfaces, like water or even from leaves, by stopping down up to 3 stops, depending on which filter you purchase. A polarizing filter will also help to increase saturation in an image. While you may think these are easily replicable in post-processing, there are certain aspects of reducing glare that will be difficult to adjust in Lightroom, requiring more advanced knowledge of the program.

Neutral Density Filter

While you may be able to get away with not carrying a polarizing filter in your bag, a neutral density filter is a must. These filters are offered anywhere from 3-10 stops on average. What’s great about a neutral density filter is it’s ability to block out light, which will allow you to adjust one or more of you camera settings to more of an extreme. You can see this in an image of a waterfall or river, where the water is blurred, the result of a long exposure. The neutral density filter allowed for the slow shutter speed, while still maintaining proper exposure in the image. This is something you could not achieve in post-processing.

Landscape Photography

Graduated Neutral Density Filter

A graduated neutral density filter works in much the same way as a neutral density filter, but as the name suggests, the filter intensity fades from one end to the other. The purpose of this is for scenes where the sky is too bright when exposed for the landscape. We’ve all seen images like this, where the sky is blown out. Just having a graduated neutral density filter can make the difference between an ok and mind-blowing landscape photograph. While this can be applied in post processing as well, getting it right in camera will ensure the most natural looking image, while allowing for more time in the field and less at your computer. Where would you rather process your image? In front of a beautiful landscape or inside on your computer. Again, not a hard choice to make.

Landscape Photography

Other Must-Have Accessories

Tripod

An essential accessory for landscape photography, a tripod will allow for those beautiful long exposure shots of star trails and blurred waterfalls. Even if you are shooting a classic landscape image, a tripod is essential to have, in case exposure requires a slow shutter speed. This will happen often, when you want the entire sweeping landscape in focus. The wide aperture requires a slower shutter speed, and increasing ISO introduces more noise into the image. When shooting blurred water to create a dreamy landscape, you’ll need to pair your neutral density filter with a tripod, otherwise there’s no way to achieve this look. When deciding which tripod to get, first confirm what you need. Does it need to be lightweight? Will it get wet? Does it need to hold up heavy lenses? Once you know what you are looking for, then you can narrow down your options and decide which to buy based on price point. There are options at every price point now.

Landscape Photography

Remote Shutter Release

Pairing well with a tripod, a remote shutter release will ensure there is no camera shake when taking long exposures. Even with a camera on a tripod, the act of pressing the shutter can cause unwanted blur. Remove shutter releases are inexpensive and small, not taking up much space in your bag. It really adds no extra bulk to carry one along with you, you’ll be happy to have it. It could even force you to become more creative with your shooting, trying multiple long exposure options where you normally would shoot handheld. It could add a new dimension to your photography.

Landscape Photography

While there are more accessories you can carry in your landscape photography, these are the essentials. Don’t get bogged down thinking you need a ton of gear just to get a good image. You can take beautiful photographs without even using the above. The most important is to get out there with what you have and start shooting. Buying more accessories will not make you a better photographer if you don’t know your camera. As your skills grow, so too can your equipment, but for now, keep it simple and enjoy the journey.

Repeat Performance: Going Back to Old Photos For New Inspiration

Back during the days when I worked in a darkroom to produce my black and white and color prints, I loved going to galleries to see other photographers’ work for inspiration. (With the Internet in full bloom in images, I’ve regrettably not seen a gallery show for years.) Part of the experience was examining the prints for clues as to how they (or someone they hired) transformed a simple film negative into a sometimes magical image hanging on the wall.

One such photographer was Ansel Adams. I remember one exhibit where some of his more famous photographs were older prints and then later seeing a show of the same shots but printed more recently. Something didn’t look right. They were different. More contrasty. The blacks, in particular, were so deep they lent an occasionally menacing feel to the scene. What happened?

Turns out ol’ Ansel simply changed his mind as to how he rendered his vision. While I found something jarring about his new attitude in many of his prints, I had to applaud him for rethinking his images, no matter how famous, and applying fresh emotions to them.

These days, it’s so easy to rework past photos, I think it’s almost mandatory to revisit one’s older work for fresh ways to approach the images. What might have been a product of so-so processing a few years can turn into sparkling examples of your best work today.

With that in mind, I believe there are three reasons to go back to old photos. Here they are.

A Change in Attitude

In moments of self-aggrandizement, I like to think that I’m evolving, getting better with age. As such, my slant on interpreting an image changes from time to time and I refuse to stick with one approach forever. How boring. This being the case, I think it’s always worth my time to go back through the archives and find pictures that could use a fresh coat of pixels.

How I handle my landscapes has definitely gone through stages of retooling. I used to think starting up a shot with contrast and saturation made it more noticeable in the overcrowded pantheon of landscape photographers. Now, I’ve mellowed a bit and prefer to suggest how it felt to be there, known as a sense of place. It’s less dramatic but more honest, I think.

I had processed the top shot of a lake in Dusy Basin with Isosceles Peak in the background several years ago and went a little overboard with the Photoshop sliders. The bottom version is far more relaxed and restrained—just the way I like it these days.

Take the above sunset shot from Dusy Basin in Kings Canyon National Park. It got a little crunchy when I first processed it eight years ago. So much so, it’s hard for me to look at it. The contrast and saturation take away from a sense of place. If I saw this for the first time, I couldn’t imagine what it was like to sit there as the sun went down.

So I went back to work and produced the version you see below the first. Ah, much better. It’s not that I put a lot of work into the revision (it takes longer to describe than do). I first took the four bracketed exposures I made the scene and ran them through Lightroom’s HDR menu. The nice thing about this software is how natural—even restrained—the results can be.

I then applied to the result a healthy amount of highlight adjustment to bring back the sky and shadow adjustment to bring out details primarily in the rocks and water. I then asked Lightroom for its opinion on the whites and blacks by holding the shift key while double-clicking on the words “Whites” and “Blacks.” This auto action adds contrast and counteracts the softening that opening the shadows usually produces. I then took the image to Perfect Effects 9, clicked on Dynamic Contrast (natural), lowered the result by 50% and then added Color Enhancer (fall enhancer) and again lowered it about 50% along with reducing the amount of orange. Lastly, I opened the file in Photoshop where I dodged the rocks a little bit, darkened the peaks and added a vignette to the bottom half.

I’m now happier with the photograph. It’s darker and softer, more like how it felt to sit there on a rock and watch the sunset.

A Change in Software

The Adobe alchemists are always introducing some new feature that I could have used a few years ago on a group of photographs. There are all sorts of examples here. I fell in love with Lightroom’s radius tool for its ability to shine a light, if you will, on an isolated part of the image. I went back through my catalog of canyoneering shots and re-processed innumerable pictures of canyoneering rappelling, a subject the radius tool seemed especially adept at improving. A more recent update is with Boundary Warp in the Photo Merge/Panorama menu.

The top image after going through Lightroom's panorama software. The middle is after it had to be cropped to eliminate the dead spots caused by the stitching. And the bottom is the same shot but run through
The top image after going through Lightroom’s panorama software. The middle is after it had to be cropped to eliminate the dead spots caused by the stitching. And the bottom is the same shot but run through Boundary Warp which left more of the image.

That’s where the above example comes in. I’m not the fussiest person when it comes to shooting panoramas and hence Lightroom’s stitching program once left me with bizarre distortions in order blend the individual components into one. But now there’s Boundary Warp and I’m able to hold on to far more of the image without cropping out the distortions.

As you can see in the first go-through without Boundary Warp, I had to severely crop to get rid of the dead spaces the stitching program left behind. In the second, using Boundary Warp which figures out how to fill in those places, I was able to retain more of the image that in my opinion preserves the original intention of the shot to show this pipsqueak of a woman in a huge canyon.

A Change in Skill

I offer as evidence how I’ve learned a thing or two since I started working with digital files the following example taken at Marie Lakes along the Pacific Crest Trail in the Sierra Mountains of California.

Marie Lakes at sunrise. The top image went through an HDR program (done poorly, I might add), and then the bottom is a simple blending of two exposures.

That first one is a pretty egregious execution of bad HDR. Hey, what did I know? But after a few years, I developed the ability to blend bright skies with darker foregrounds using Photoshop rather than an HDR program. I simply take, say, five bracketed exposures (usually with the camera on a tripod, but not always), and then back at the computer I choose the best exposure of the foreground and of the sky. After doing some minor adjustments to each in Lightroom, I select both, right click, go to the Edit In menu and select Open As Layers in Photoshop (at the very bottom of the list). Once in Photoshop, I move the shot with the properly exposed sky to the top of the layer stack. I next select both layers, go to Edit/Auto Align Layers and leave it at the default Auto. Once the layers are aligned, I alt/option-click on the Add Mask icon (this makes the mask black) at the bottom of the layers panel. I then take the lasso tool and draw a very loose selection around the sky on the top layer—really loose! With white as the foreground color, I press Backspace-Alt (Option on Mac).That creates a pretty ugly mask which you now have to soften in the Properties panel, cranking up the Mask feathering all the way up to 200. Most times this method works for me a lot better than HDR software (but not always—your pixels may vary).

This is what I did for my second processing attempt at this picture and it worked far better.

In a way, going back through old work and re-processing it can be fun and rewarding. Previously mediocre images can often be livened up simply because after a few years you know so much more about your craft and how to wield that Photoshop ax a little more gently.

John De Bord – Landscape Photographer

Landscape photography has the power to transport us to a particular place, evoke certain feelings and often, to fill us with wanderlust!

John De Bord is a landscape, nature and travel photographer based in Denver, Colorado. I spoke with John to find out what ignited his passion for landscape photography and how he captures such stunning scenes time and time again.

Landscape Photography by John De Bord

Is landscape photography a job, a hobby or a passion for you?

I originally started out as an illustrator and have a BFA in the field with a minor in fine art from Rocky Mountain College of Art & Design. It was there I began my love affair with photography while taking a B&W traditional film darkroom class which was required for my degree. I wound up taking the class twice because I loved it so much!

I shot with a Ricoh KR5 and a Minolta X370 shooting Kodak TMAX and Ilford film and started out photographing the rockabilly scene in Denver; hot rods, live shows, pinups and the overall lifestyle. While this was going on, I really wanted to learn more about landscape photography, as I studied some of the great painting masters while attending college. People like J.W. Turner, Albert Bierstadt, and others. There is no question that they have a tremendous influence on my work and style as they taught me a great deal. In fact, in many respects, I learned more from them than photographers.

Landscape Photography by John De Bord

Colorado is beautiful, what’s it like to have somewhere like that on your doorstep?

Colorado is a paradise for photographers, there’s no question about that. The terrain is so varied and offers an endless supply of subject matter. You can literally go out on the eastern plains to photograph wildlife and abandoned farms then stand on a mountain peak the next day.

I have my favourite haunts, places like Rocky Mountain Arsenal National Wildlife Refuge and Rocky Mountain National Park, both of which I photograph on a regular basis. There are several local spots close to me that I photograph often such as Sloan’s Lake which has been the subject of many of my photographs.

I also enjoy just getting out there and exploring because the state offers something to capture with the camera around every corner and you never know what you might find. That’s one of the things that I love about living here, the beauty and excitement of it all. In some ways, it can be a tad overwhelming because there are so many choices. Of course, it also depends if I want to wake up at 3 am or at 6:30 am!

Landscape Photography by John De Bord

How important is the right light when you’re shooting landscapes?

Definitely, try and shoot in the best light possible. Light is so very important in photography and adds such a sense of drama and atmosphere to a scene.

I don’t plan for much outside of my fall and summer trips. Usually, I just pick a place and set my alarm and go knowing that 99% of the time I will come away with something I’m happy with. Many times, I find myself photographing wildlife, usually “big game” and the occasional predator such as coyotes.

As far as landscapes go, I do wake up at crazy hours in order to catch the best light and I find myself more of a morning shooter than an evening shooter. I think it’s because I enjoy the light at that time of the day, the quiet, and the tranquillity. I usually have a location to myself and it’s something I’ve grown to love and adore. The world seems at ease and happy; I think a lot of that plays into my photography.

I don’t really shoot exotic locations, in fact quite the opposite. I have made it my mission to photograph areas that the general public can access and enjoy. I want to show everybody that the world is still beautiful despite what might be going on it and that it isn’t difficult to find that beauty, either.

In order to get the shot, I use a variety of filters; almost all of which are Fotodiox brand. Generally, it’s the usual stuff; circular polarizers graduated and neutral density filters. This is mandatory in terms of “getting it right“, at least for me. I do try to get it right as best as I can in camera but I admit I’m not a photojournalist either.

Landscape Photography by John De Bord

Your images are so striking and full of colour, what’s your post-processing routine?

I don’t use JPEG and only shoot in RAW, which unfortunately eats up storage. My routine is pretty average, I start in Lightroom and export 16-bit TIFF files into Photoshop. I use Nik Efex extensively in almost all my work as well as some Lightroom presets. Photoshop actions are used for sharpening and minor clean-up.

I do take some artistic liberty with my images a lot of the time unless it is wildlife in which case I usually don’t. I don’t think it’s anything major, mostly colour adjustments, levels, curves, that sort of thing.

Time is always of the essence and I try to be as fast as possible and I’m currently examining ways to enhance that. I usually spend 5-15 minutes on wildlife images and 15-30 minutes on a landscape image. If I decide to do a variation of an image, it can take longer. I tend to do that a lot because I want to see how it looks both in B&W and colour. Sometimes an image works really well in B&W and I feel we have gotten away from that style.

Landscape Photography by John De Bord

For anyone wanting to shoot some impressive landscapes, what advice would you offer them?

I would say start off reading a book titled Understanding Exposure by Bryan Peterson. The book is invaluable and one of the very best books I’ve read. I would also say that everything is a learning experience. Don’t get down because someone gave you honest feedback on something. It can be tough, but you have to look at it knowing that it will help you. I’ve seen people hang up their camera because of negative feedback.

Nothing happens overnight, and the more you shoot the better you get. Don’t be afraid to ask questions, we were all there at some point and most are more than happy to help you improve.

I’d also say that immersion is a really good way to go about things. Seek out as much as you can, but don’t overwhelm yourself. YouTube is one of the greatest assets we have, there is a wealth of information on there about photography and post processing.

Don’t be afraid to bend and break the rules either, experimentation is always good and it allows for growth as a photographer.

Landscape Photography by John De Bord

What can we expect from you in the future?

I’d love to be able to teach people photography on a regular basis. I’ve given thought about teaching online, but it’s only in the beginning stages and at this time. In the near future, you can expect me to start offering workshops and tours. I also anticipate a major website design change in the not too distant future.  I’m also exploring ways to expand the licensing and dissemination of my images.

Landscape Photography by John De Bord

If you’d like to see more of John’s work,  you can catch up with him via:

Facebook: https://www.facebook.com/jdebordphotography

Website: http://jdebordphoto.com/

500px: https://500px.com/jdebordphoto

DeviantArt: http://kkart.deviantart.com/

Twitter: https://twitter.com/kkartPhoto