Tag: forest

Tips for Post-processing Forest Images in Lightroom

If you like nature and landscape photography you probably take photos of forests, your local wood or even parks. I can teach you how to install presets if you want. In Mark Jones’ article you will find nice tips for forest photography. I take a lot of forest photos in autumn, so in winter I usually find myself with a bunch of photos to post-process. In today’s article, I am going to give you some tips that will help you on the post-processing in Lightroom of all the forest images you already collected. This is a lot different from editing a macro photography in Lightroom.
forest images

Decrease shadows and increase blacks

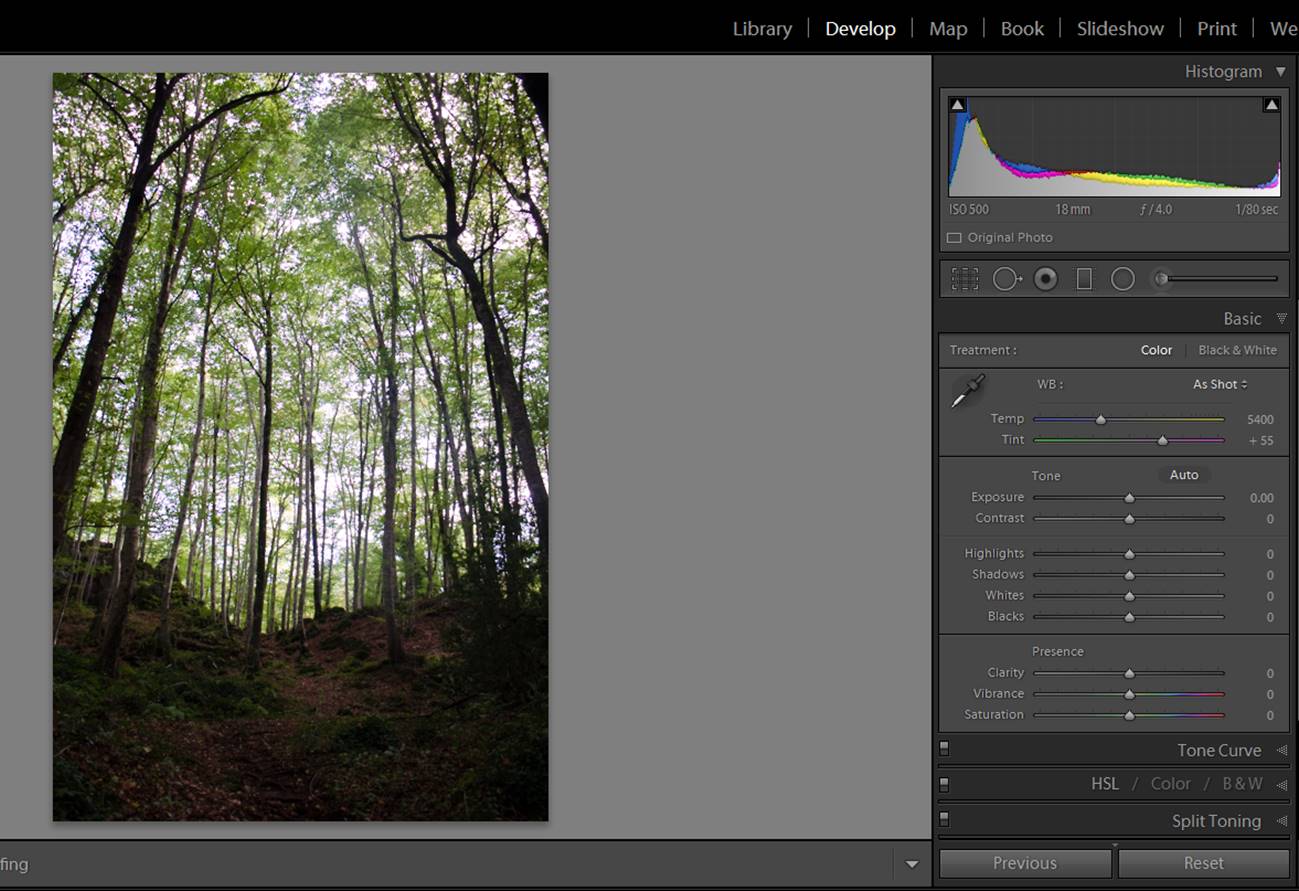
When you take photos of trees, with the light coming from up and going through leaves you usually get the upper part of the image with a nice exposure but the soil remains in the shadow.
forest images
This is the non edited photo. As you can see, the leaves are well exposed, but the earth is way too dark.

You can improve your photo by opening the shadows (moving Lightroom preset Shadows slider to the right). Maybe this will make you lose a bit of contrast, but you can fix it easily by darkening the Blacks (moving the Blacks slider slides to the left). With these two adjustments you will make appear the details in the shadows without losing contrast in the blacks.
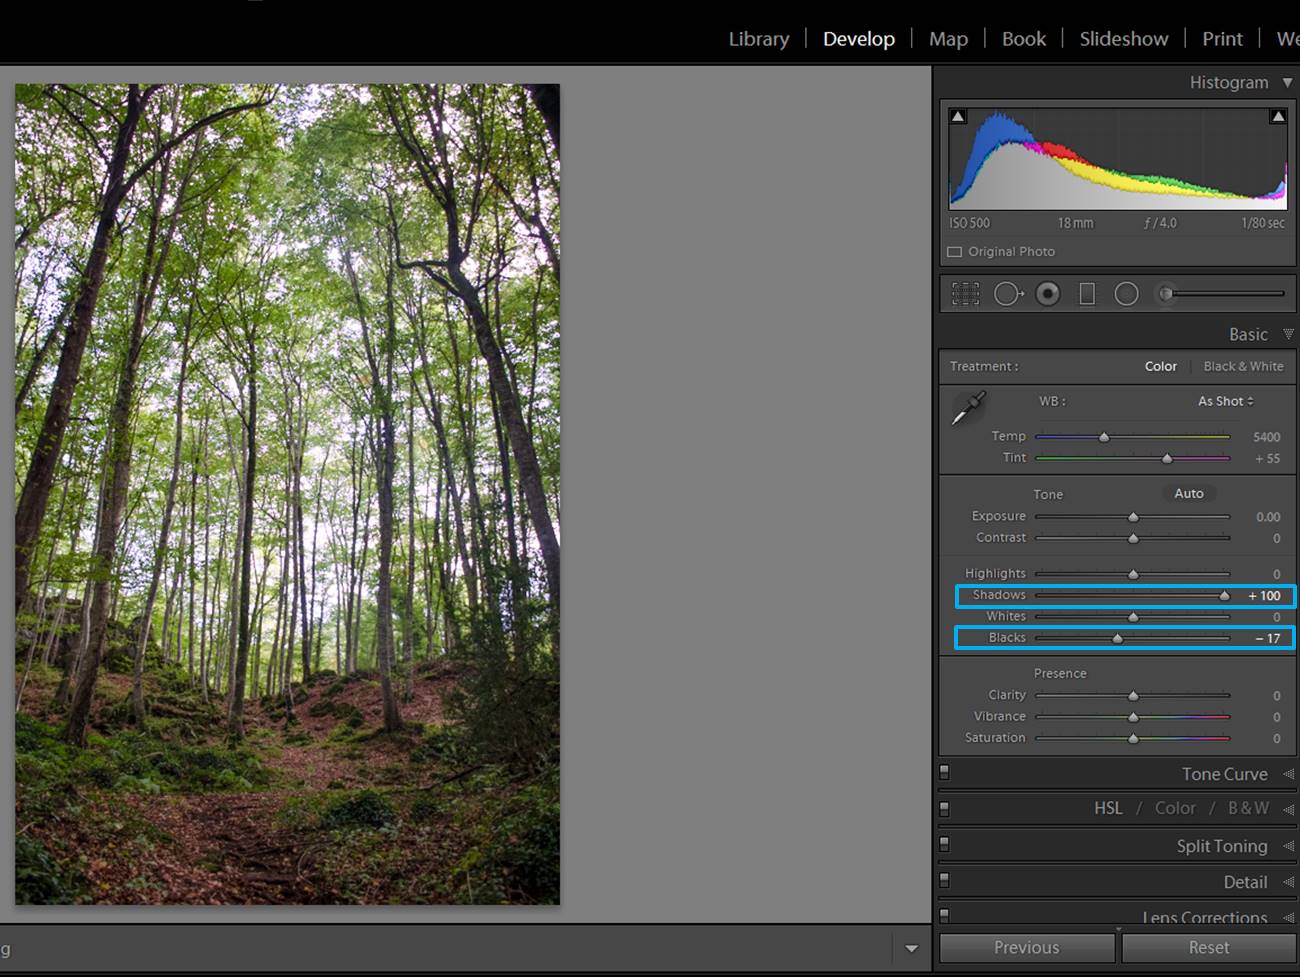
forest images

If you want to open the shadows a bit more, you can do it using the brush tool. Select a brush with the shadows slider towards the right and “paint” the area you want to work with.
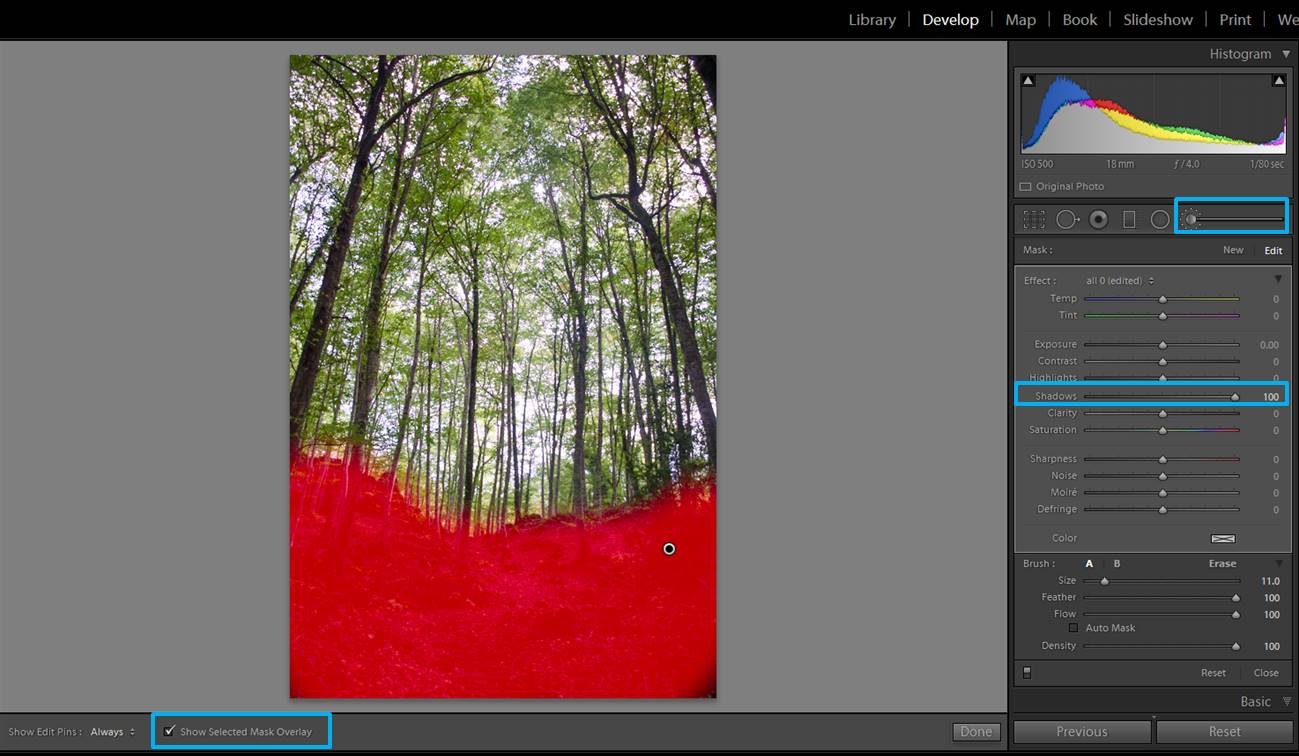
forest images
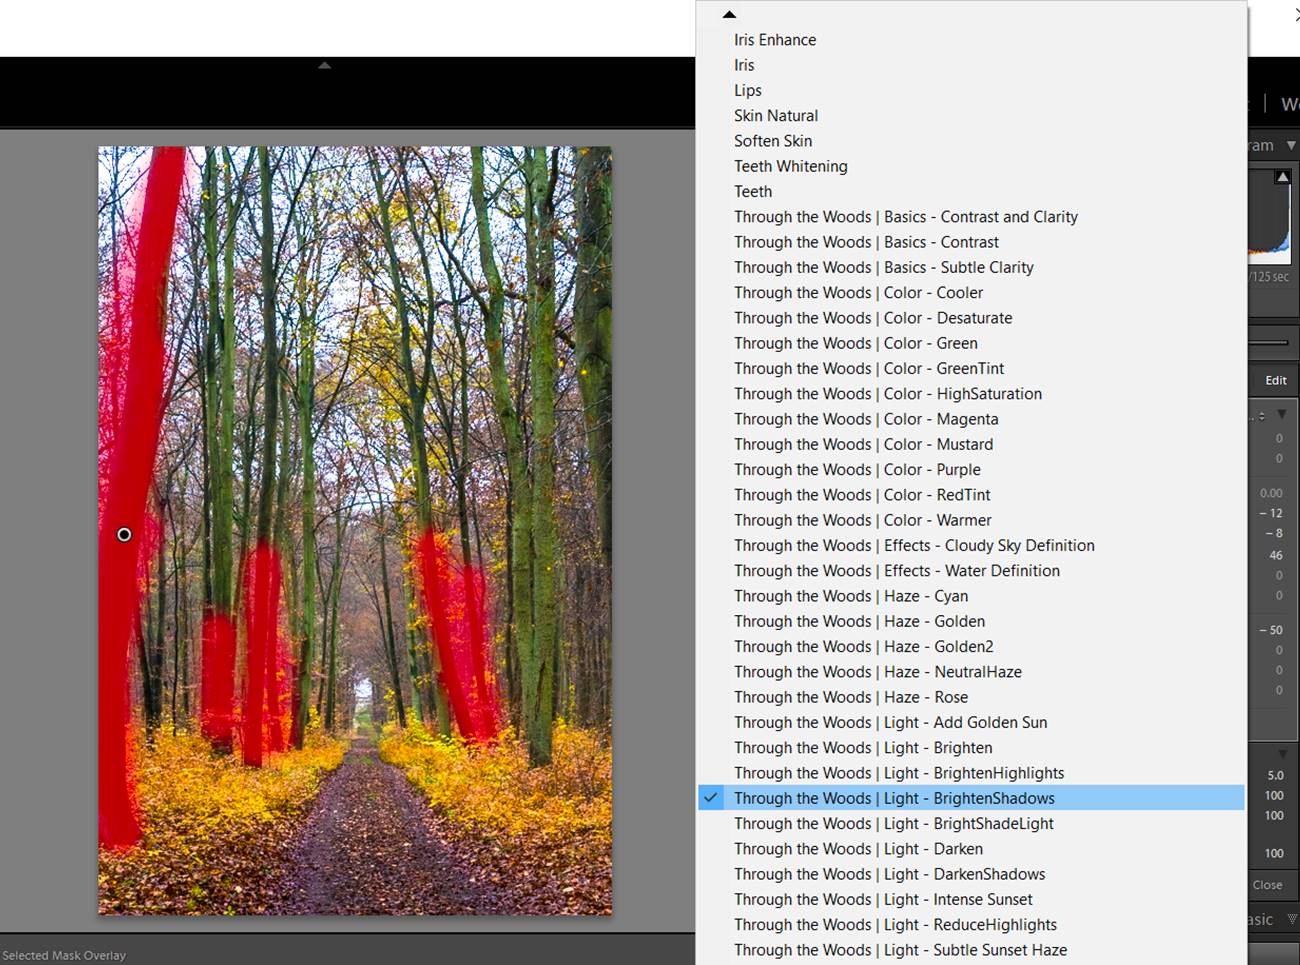
You can “paint” areas of your image with a brush that will brighten the shadows even more (Shadow slider towards the right side). If you check the box that says “Show Selected Mask Overlay” you will see in red the area you are painting in.

With these adjustments you can improve a lot a photo with a combination of light and shadow
forest images
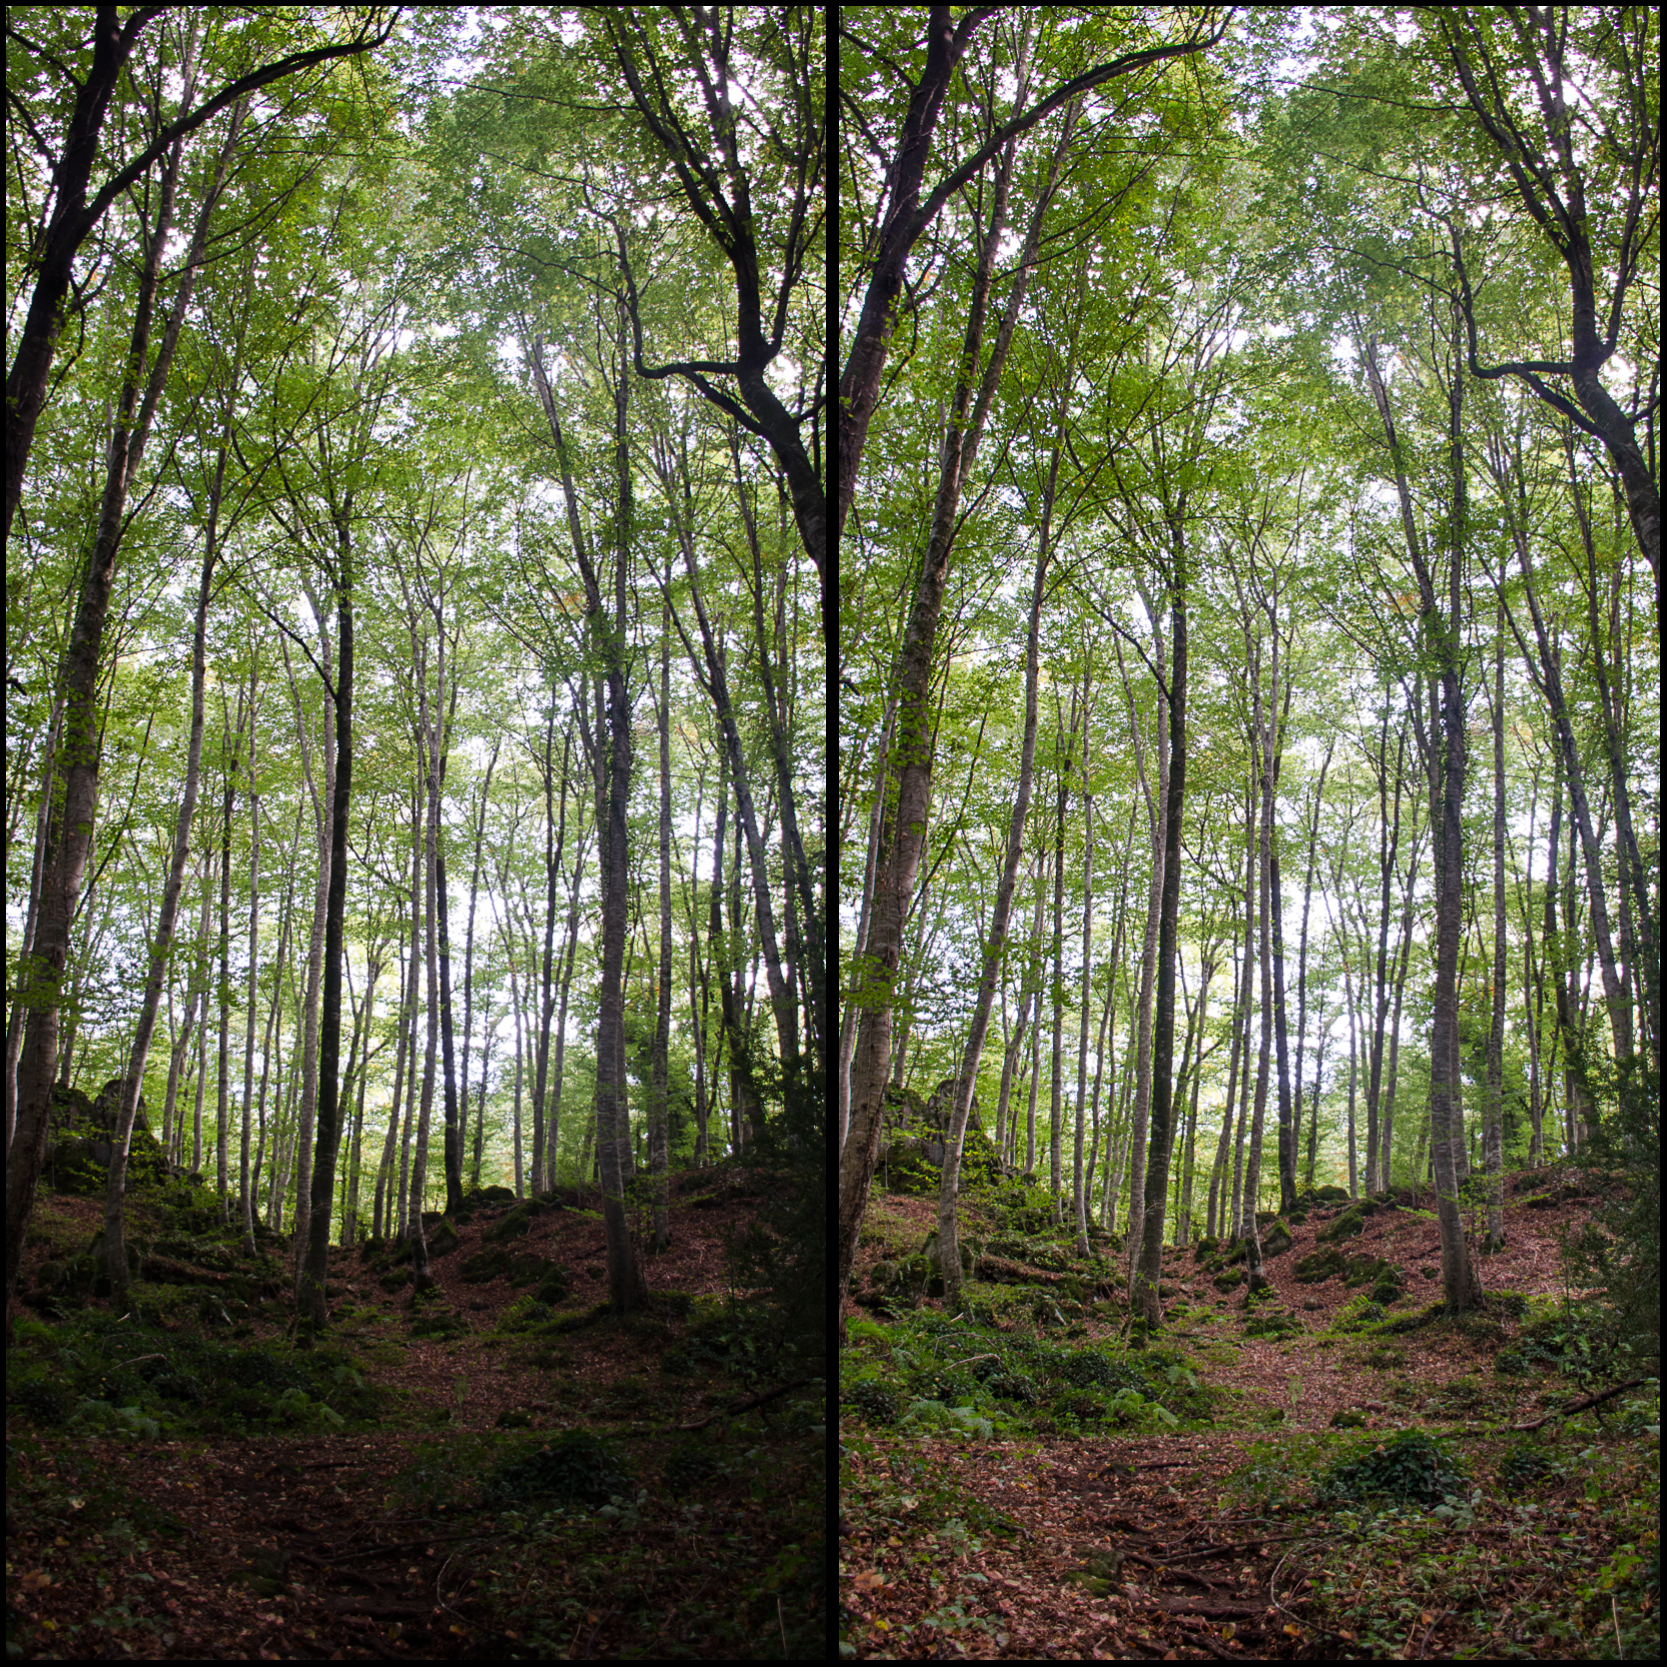
On the left, the non-edited photo. On the right the image after brightening the shadows and darkening the blacks. I will probably work a bit more in this image (color, highlights…), but as you can see, just with these simple adjustments you can improve a photo a lot.

Adjust the highlights

When you take photos of forests you will end up with images that are well exposed in some areas, but others are quite overexposed. It happens for example when you take photos of a tree from its base.
forest images
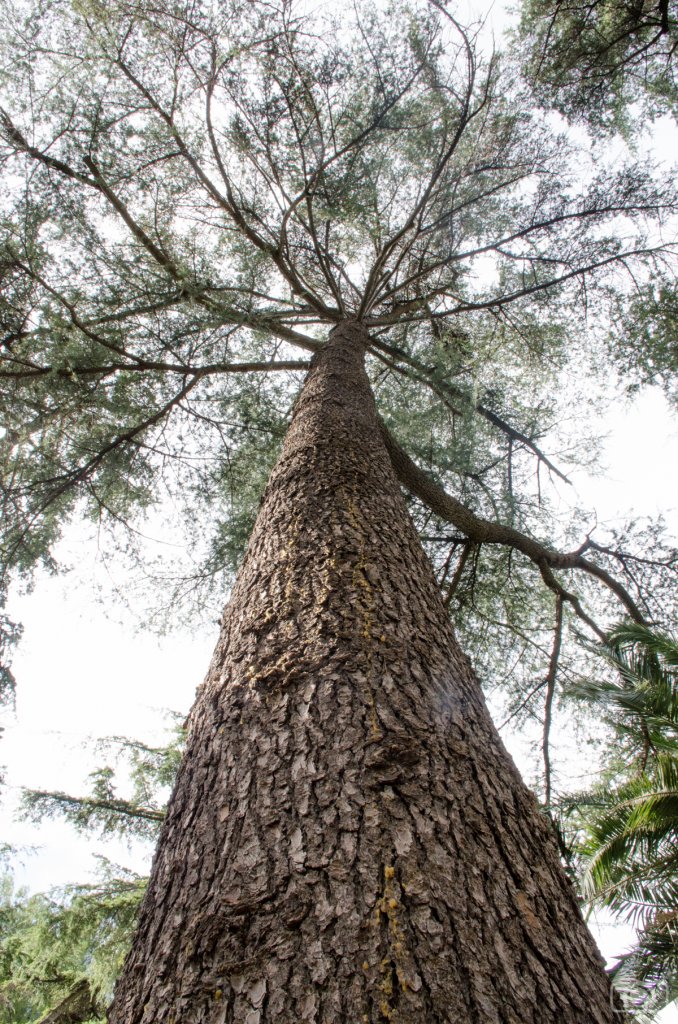
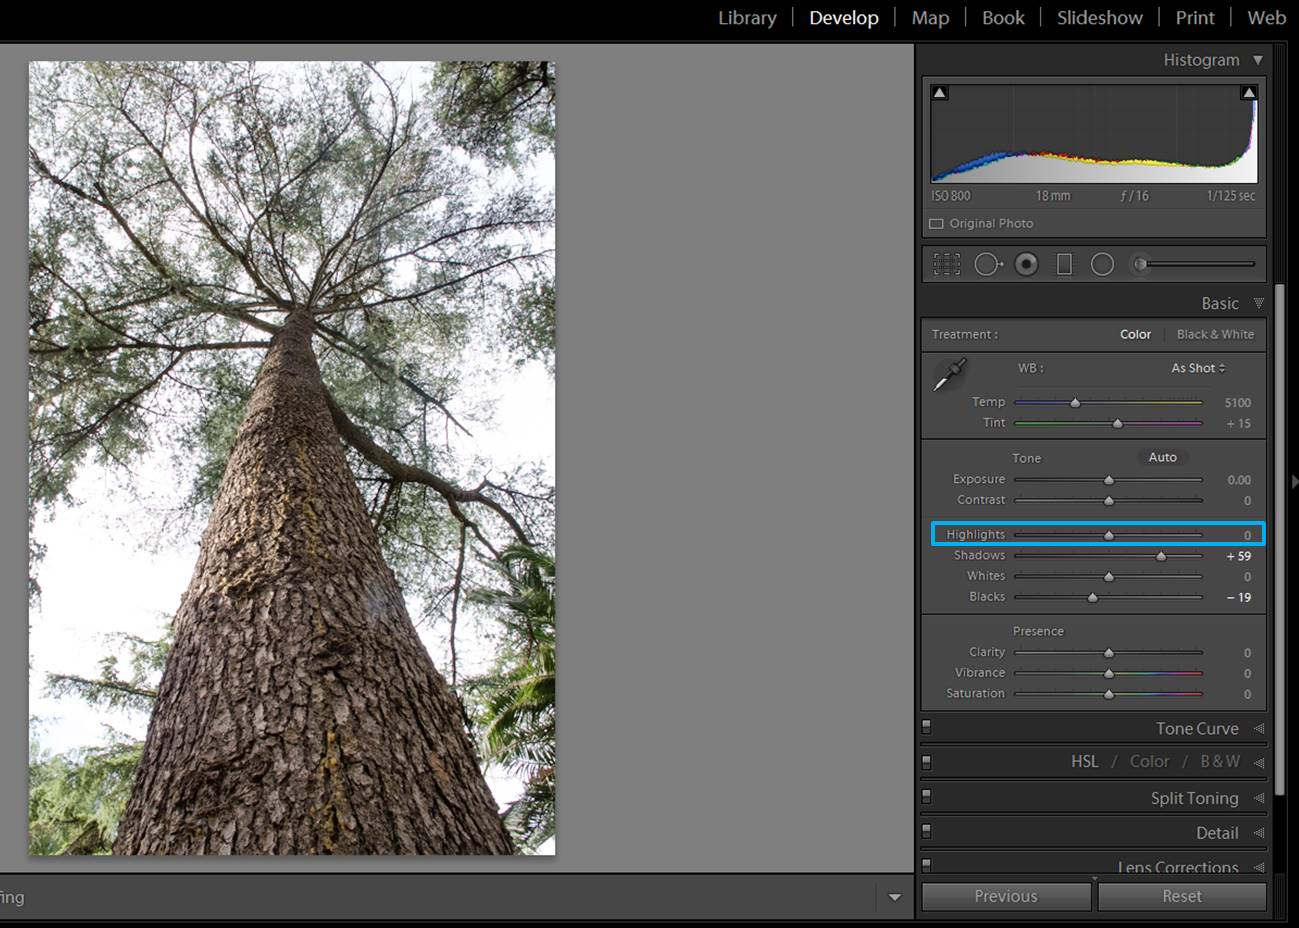
This is the non edited photo. The sky and some of the higher branches are clearly overexposed.


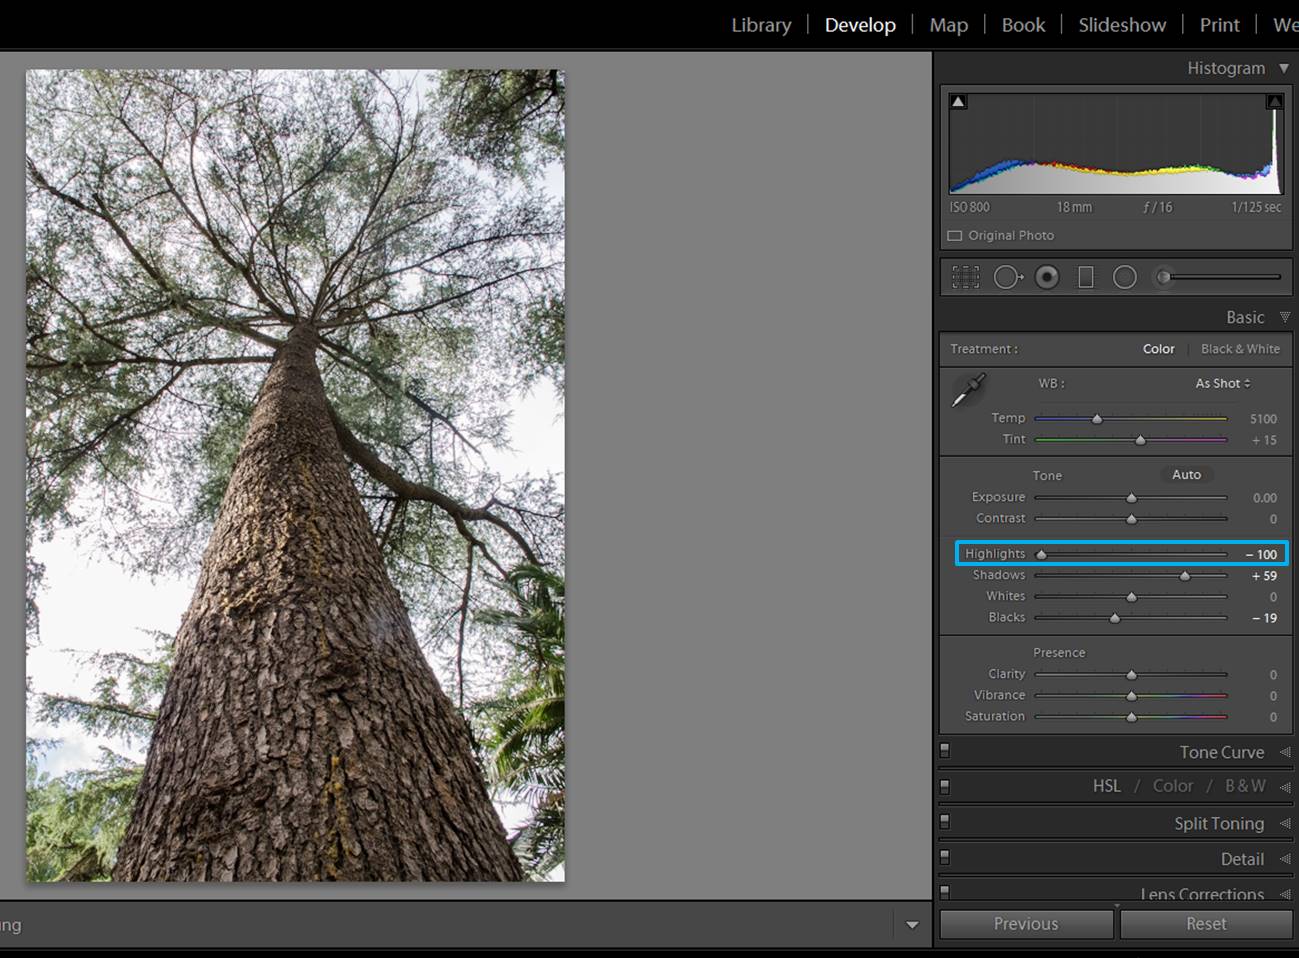
The tree is well exposed, but some branches and the sky can get quite overexposed. In these cases, adjusting the highlights might help you. You can do it in the whole image.
screenshot-tree-1
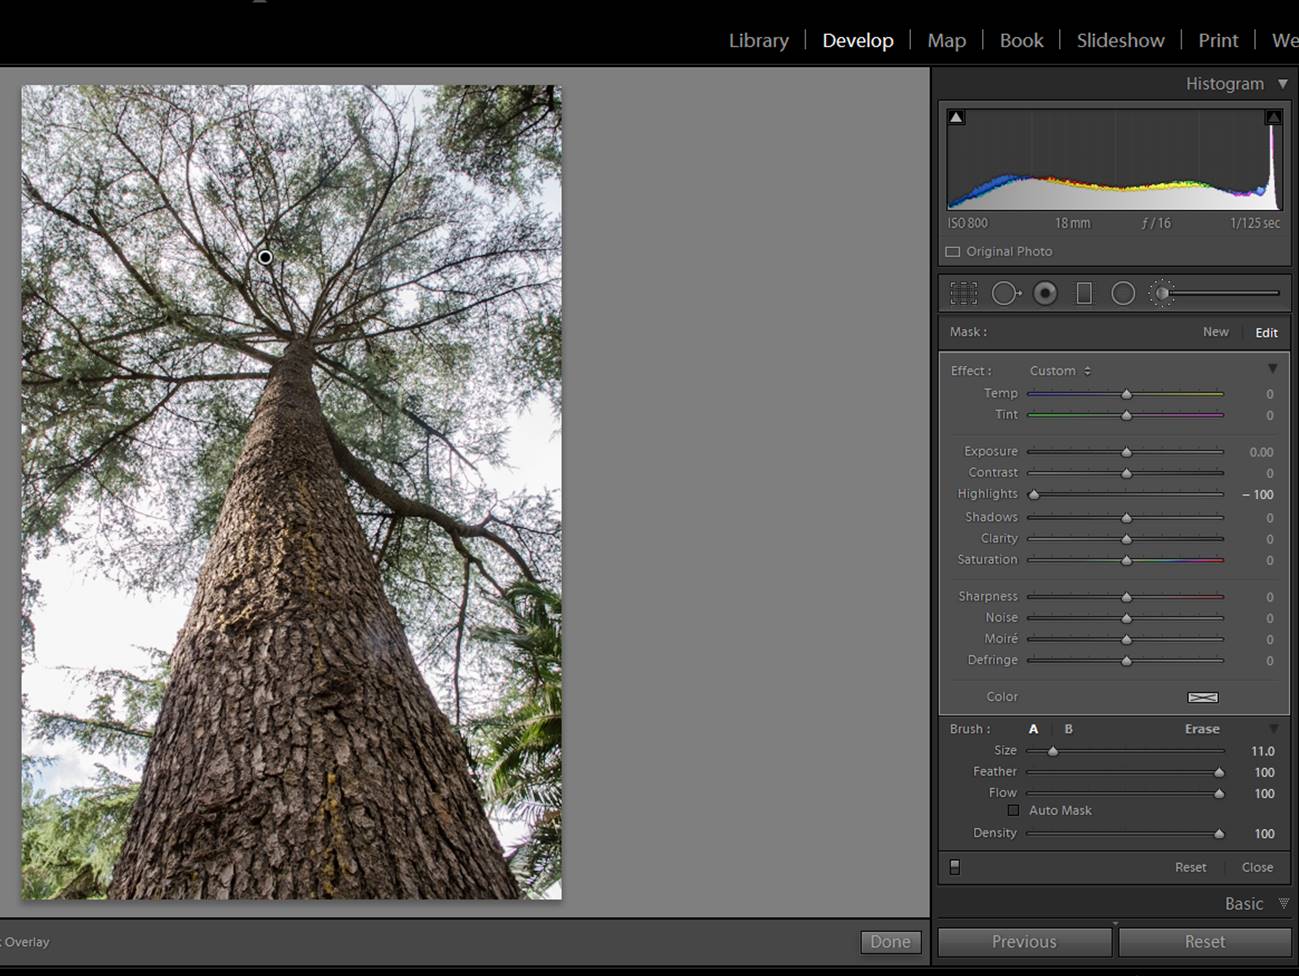
As you can see, in the non edited photo the Highlights have a value=0.
screenshot-tree-4
Once you slide the Highlights to 100, you will see that you recover detail form the overexposed area.

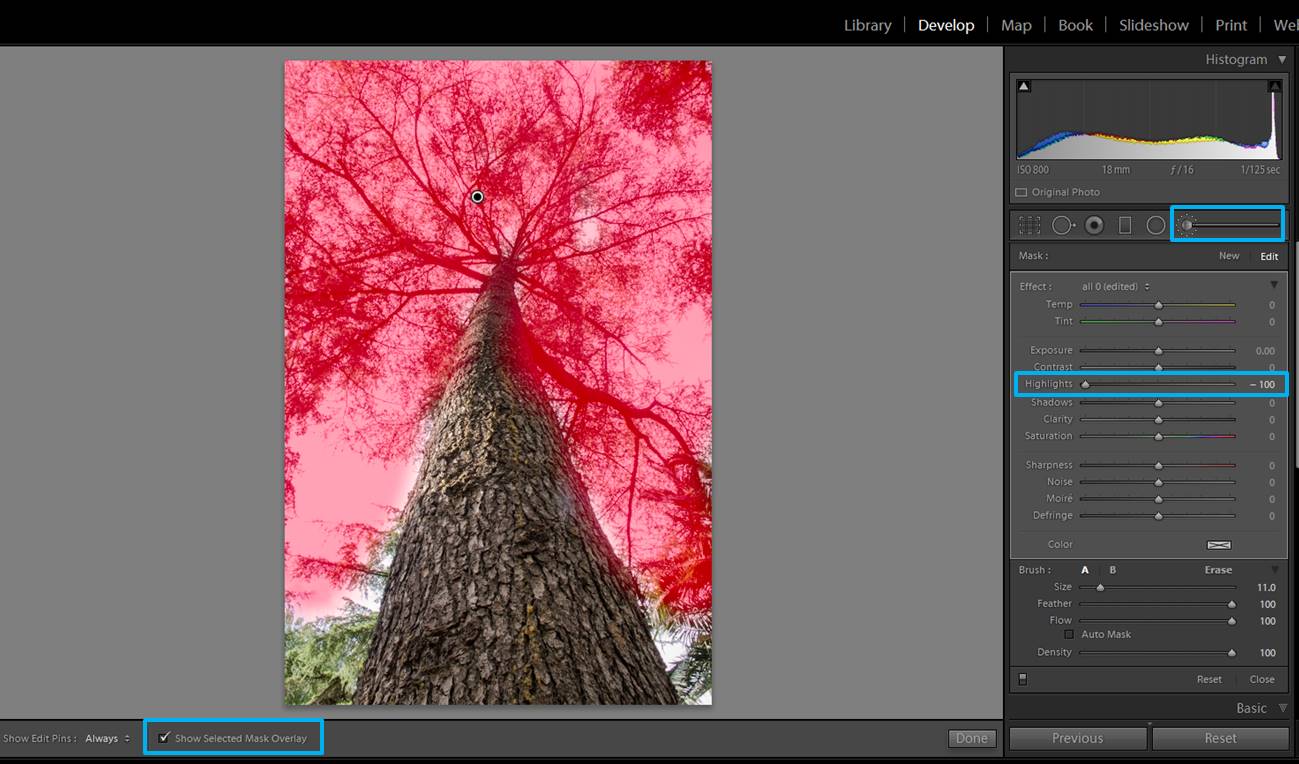
Or you can do it in just some areas by using the brush tool.
screenshot-tree-2
As before, you can “paint” areas of your image with a brush. This time its setting will affect the Highlights (slider towards the left side).
screenshot-tree-3
This is the final edited image.

Adjust colors

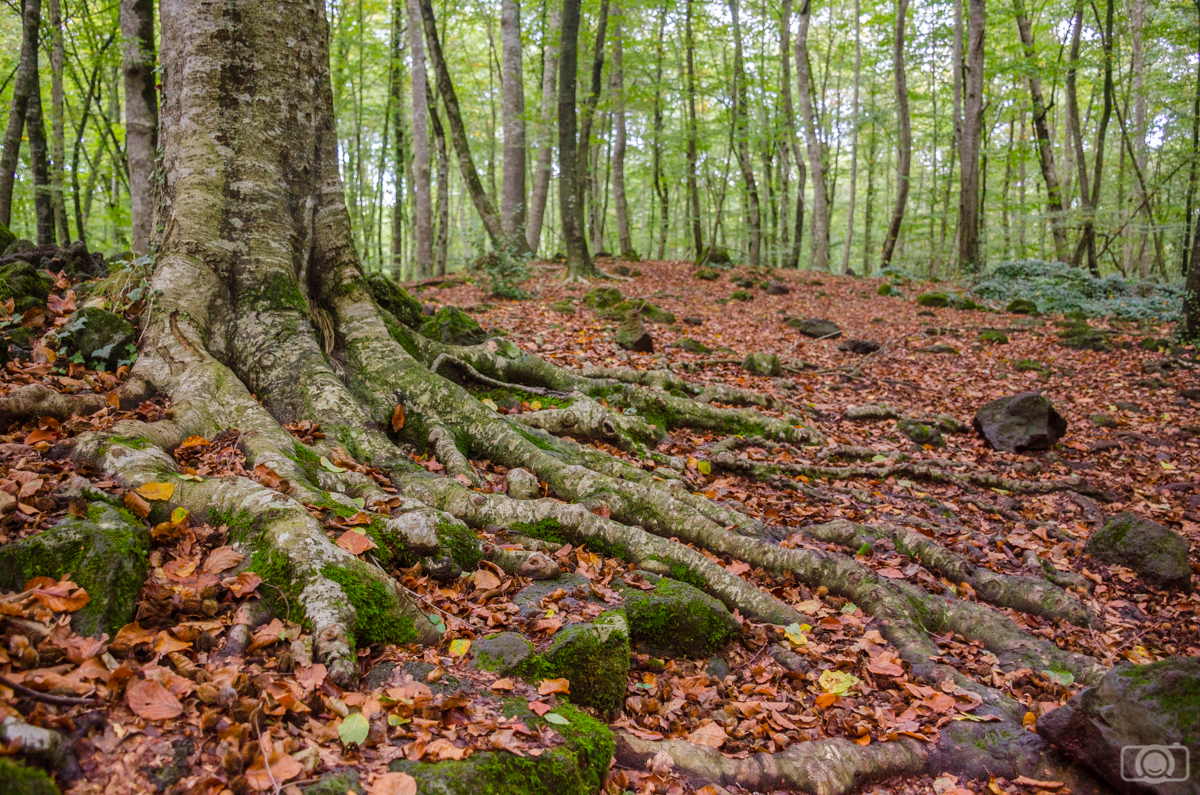
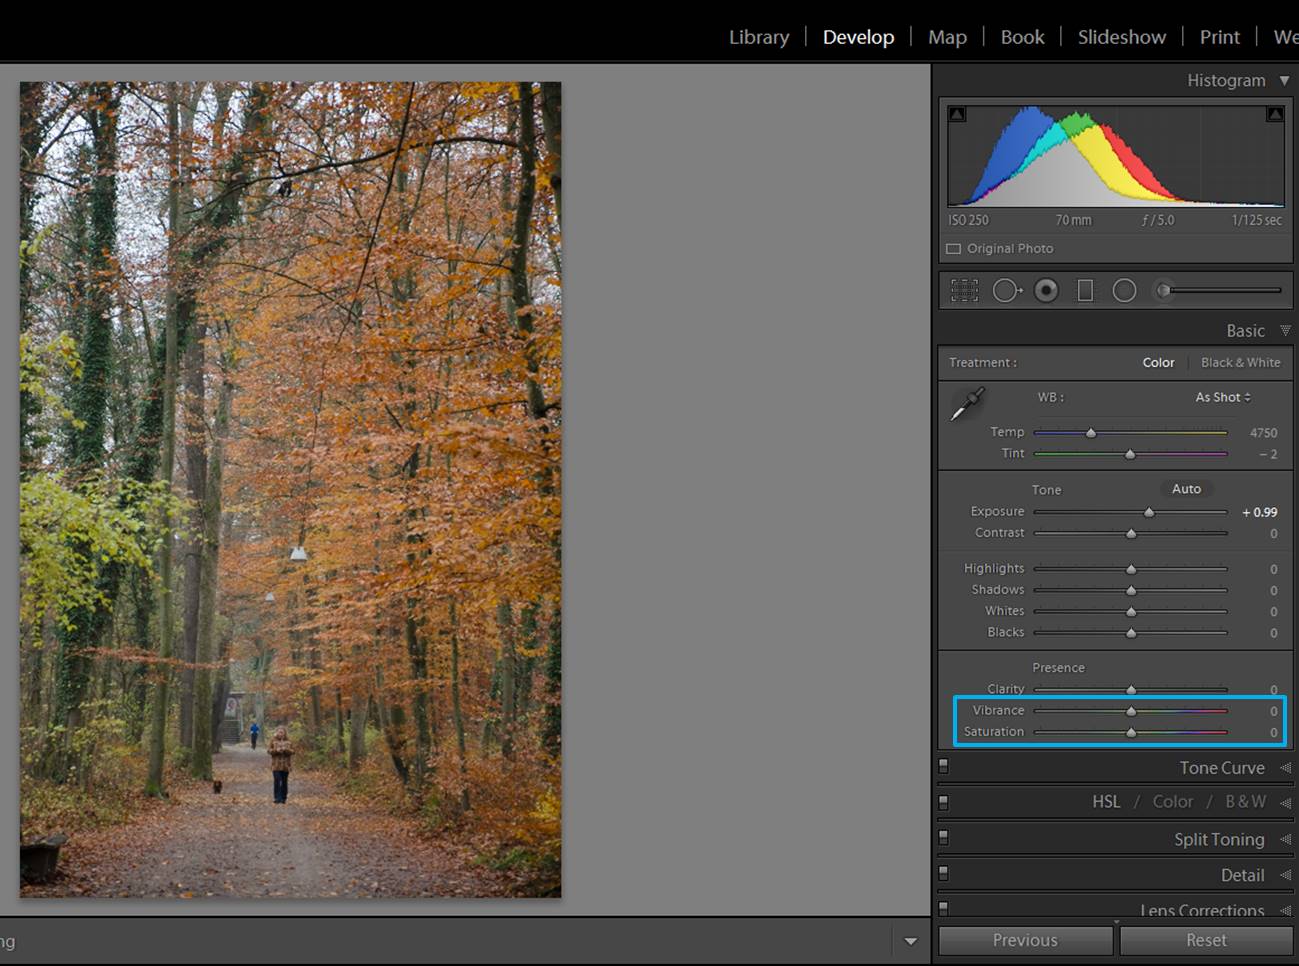
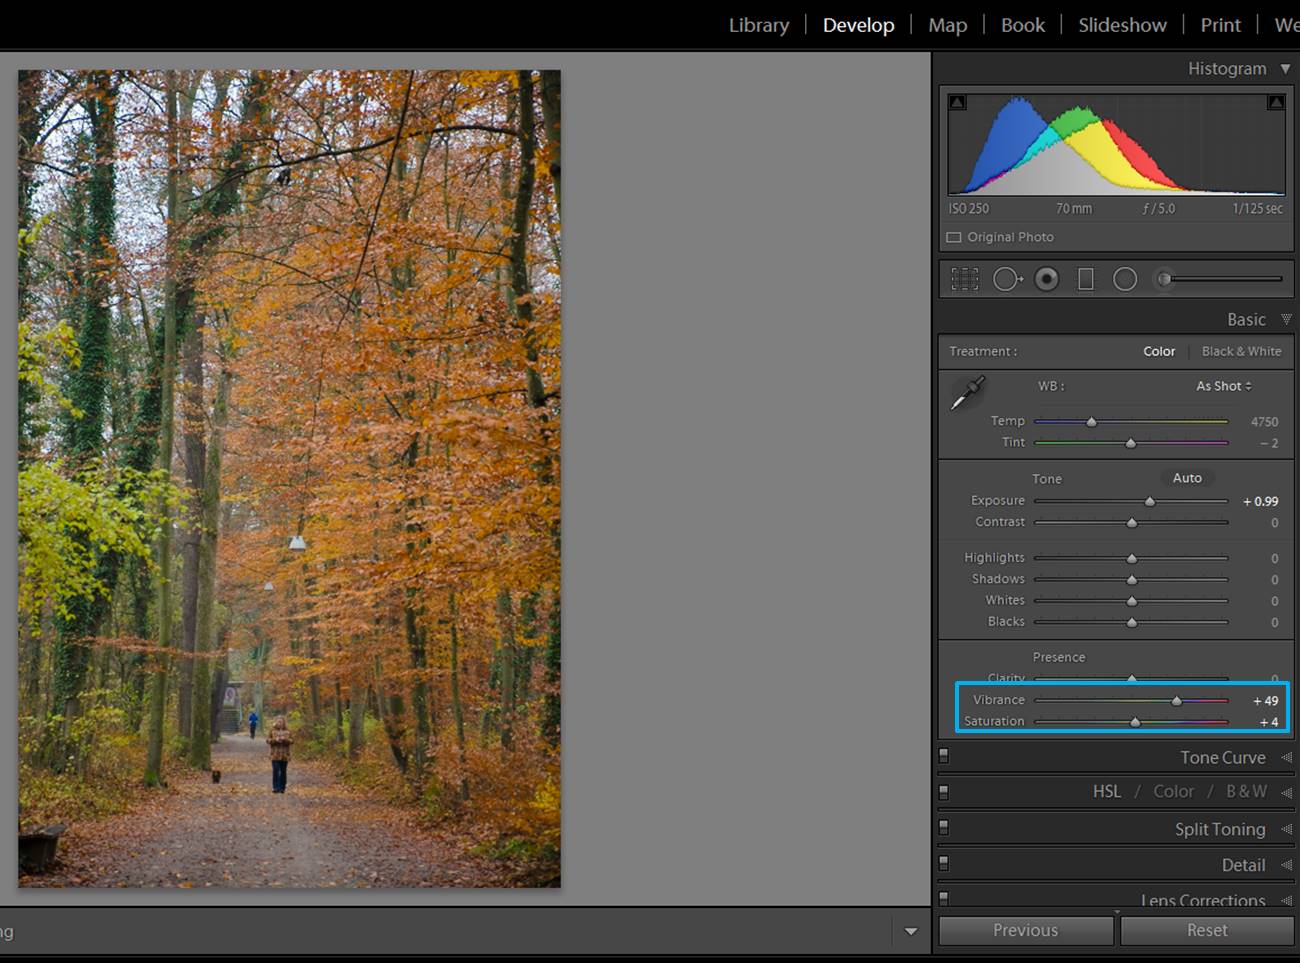
Colors are an important element in forest photography. The way you adjust the colors will depend on what you want to communicate with your photo, so it is quite subjective. With forest photography, increasing the intensity of the colors might work quite well. To do that, you can increase the vibrance and/or the saturation by moving its sliders to the right.
forest images
Here the non edited photo. The values of both vibrance and saturation are 0.
forest images
You can increase both vibrance and saturation, but take care because too much color might look unnatural. Try to find a balance.

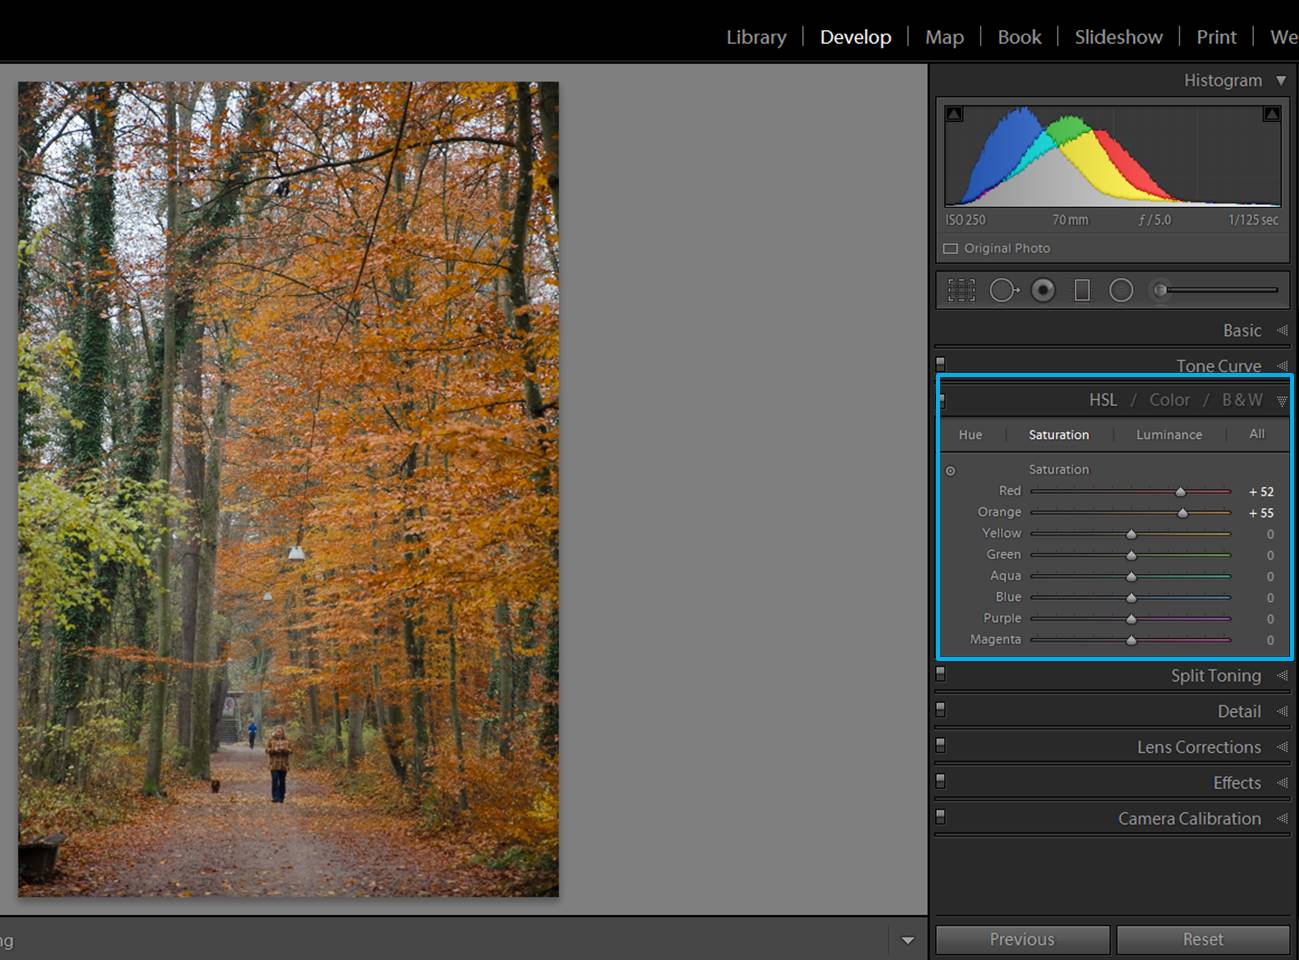
You can be more selective by adjusting individual colors in the HSL/Color/B & W section. You can see that each color has its own slide of hue, saturation and luminance. I usually modify just the saturation.
forest images
In autumn forest photos, increasing the saturation of just red and orange might be enough.

Highlight the main subject of your photo

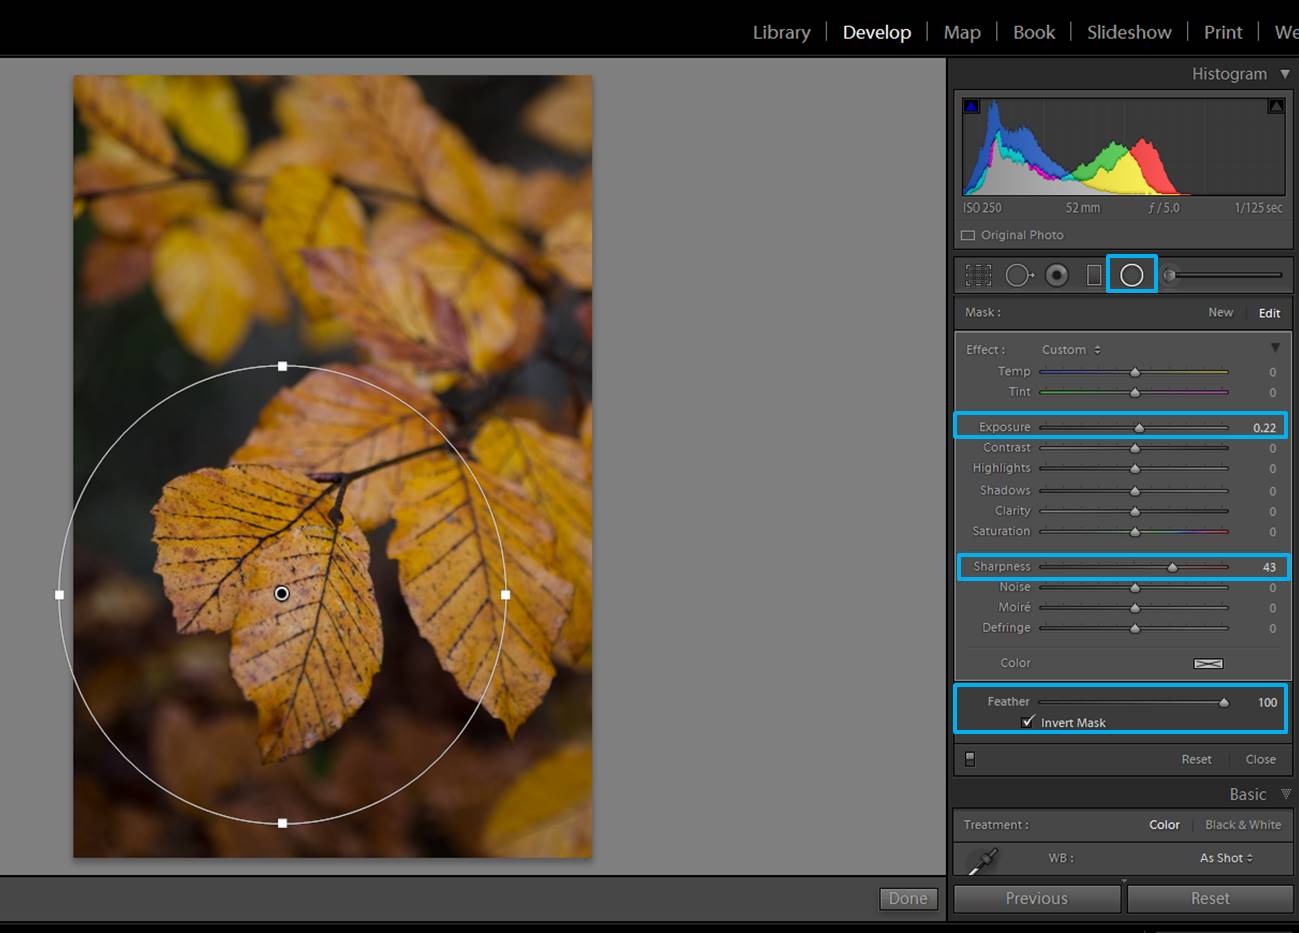
You can highlight the main subject of your image by making it a bit lighter or a bit sharper. This is easily achieved by adding a circular filter.
forest images
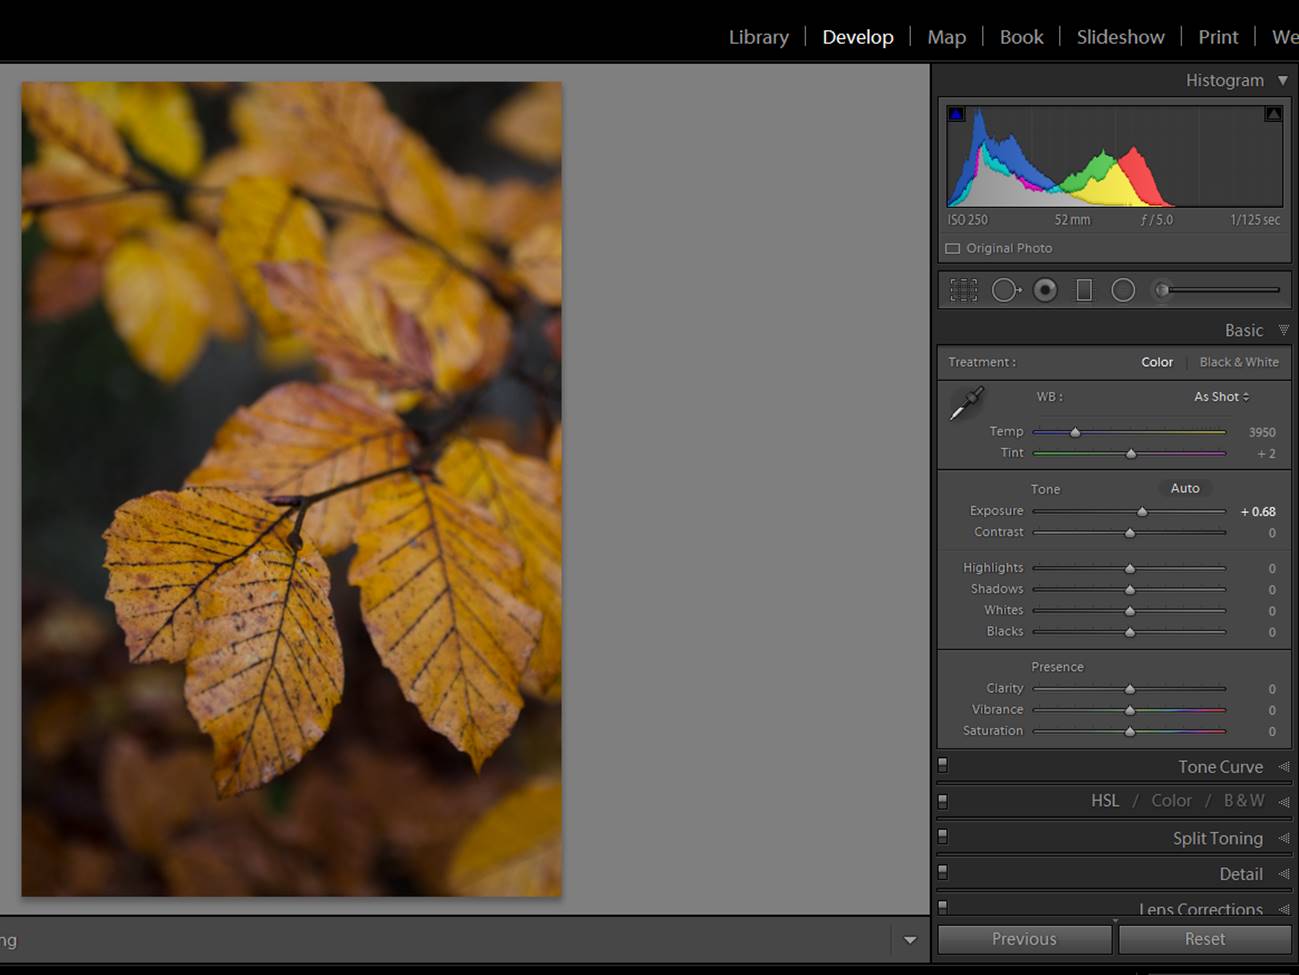
This is the original photo. I would like to highlight a bit more some of the leaves in the foreground.
forest images
If you add a circular filter, to make adjustments inside the circle you need to check the box “Invert Mask. A Feather value of 100 makes changes in exposure and sharpness (in our particular case) look smooth.

Add a dreamy look

If you are looking for a dreamy mood, you can achieve it by blurring some parts of the photo and adding a matte effect.
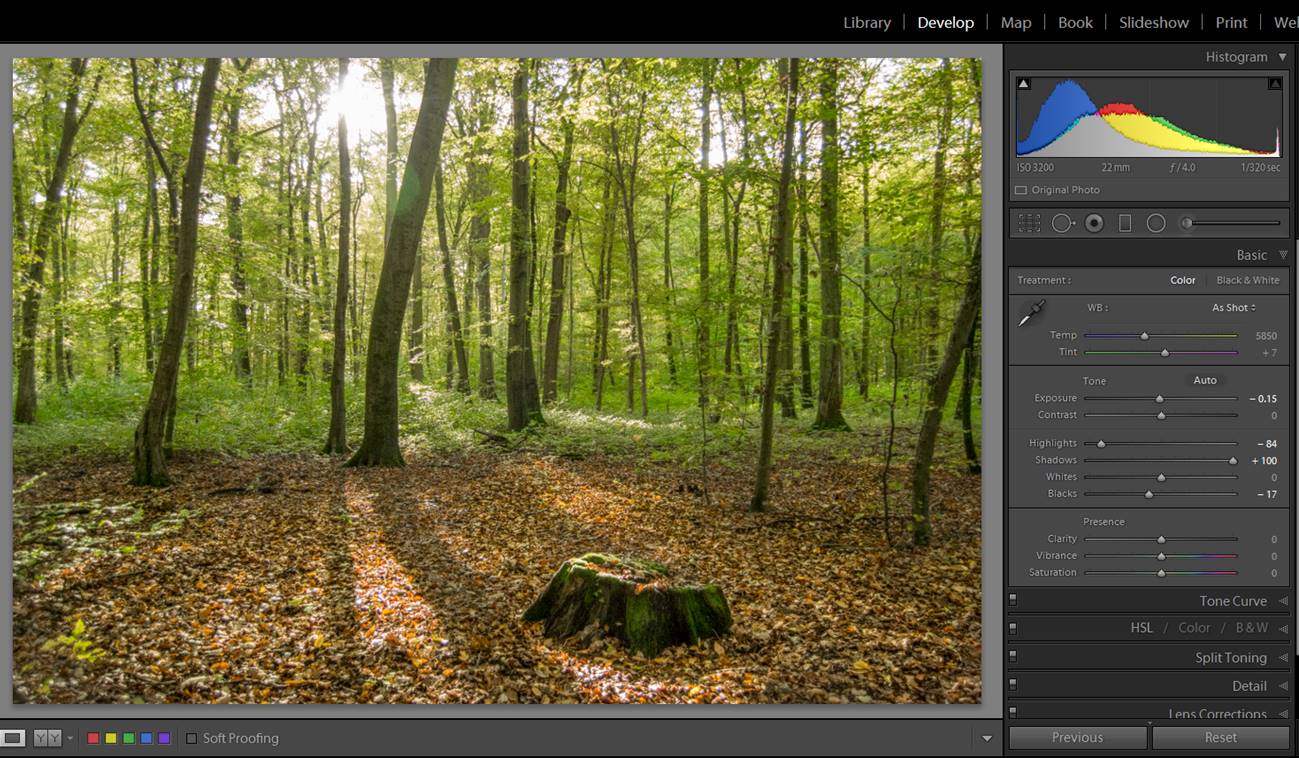
forest images
I made some little adjustments in this image (exposure, highlights…). Now I would like to add a more dreamy look.

To blurry some parts of the photo you can either use the brush tool or the circular filter tool. In both cases, you need to decrease the sharpness and/or clarity.
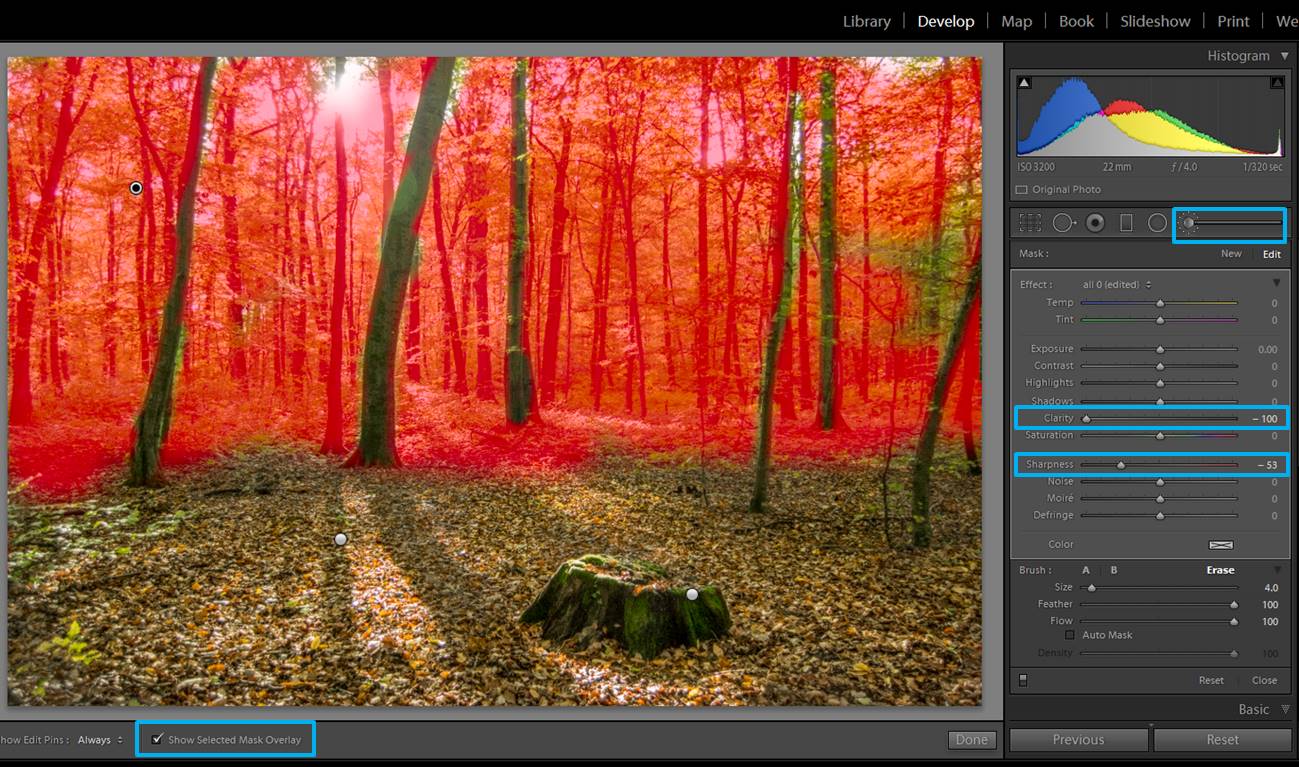
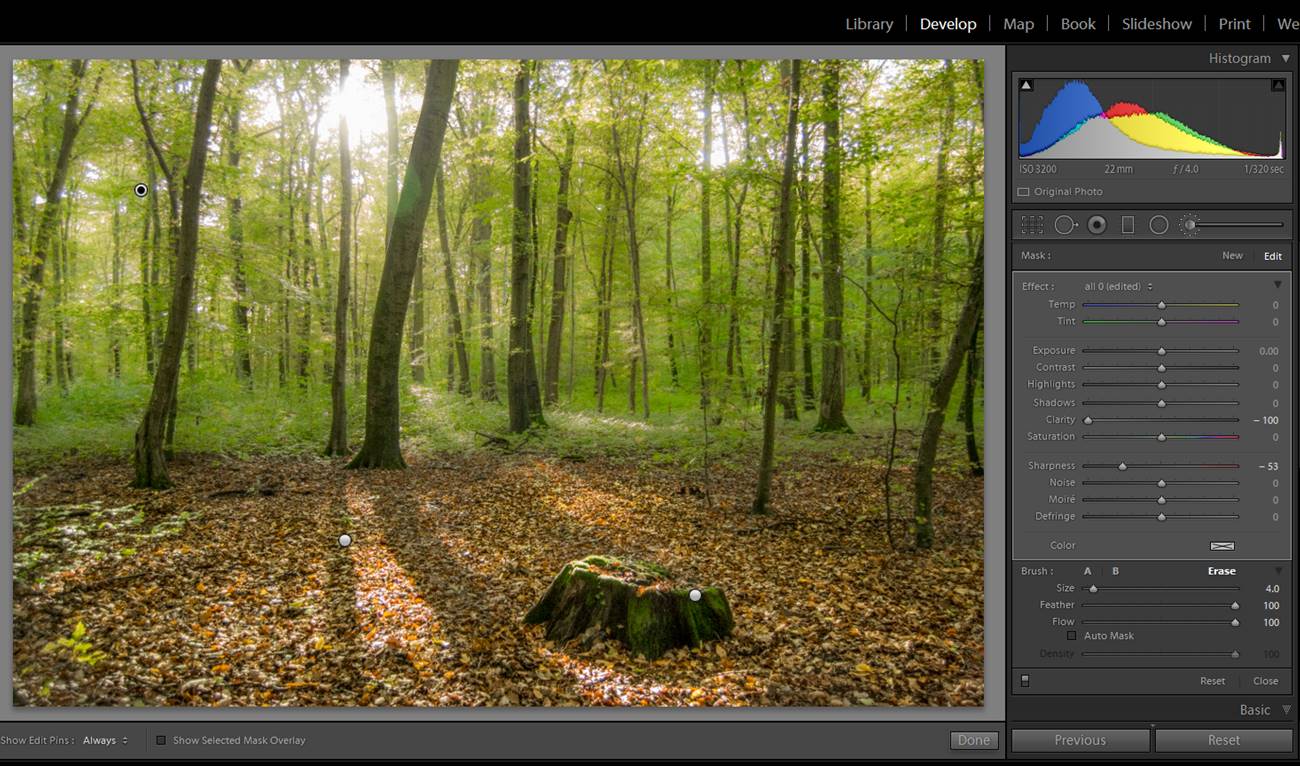
forest images
Here I applied a brush to decrease both the clarity and the sharpness of just the leaves.
forest images
You can see like the blurriness achieved by the brush give to the trees a more dreamy effect than when they are sharp.

To achieve a matte effect you will need to make some changes in the Tone curve.
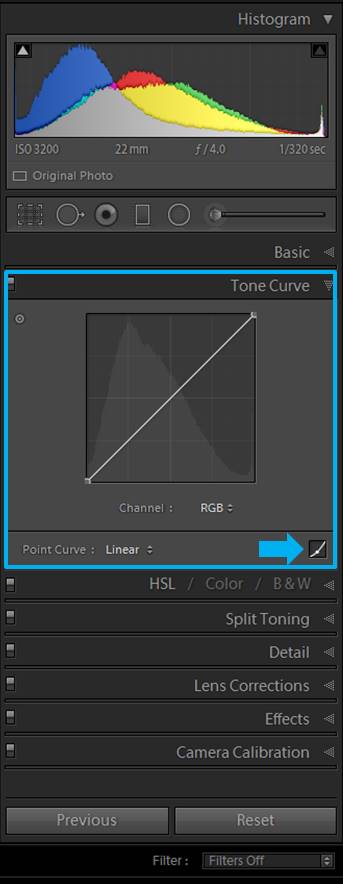
forest images
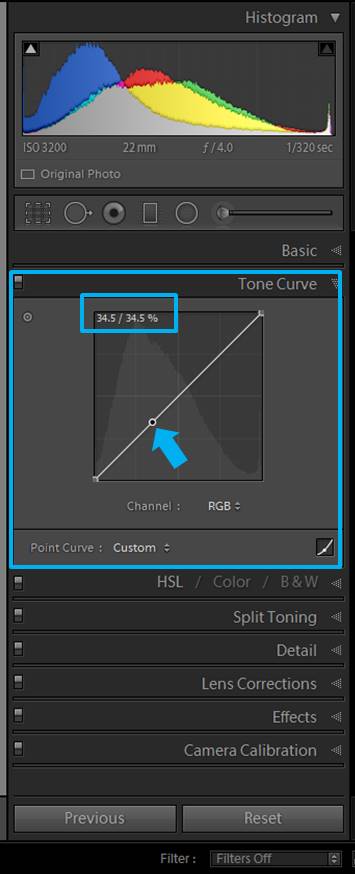
This is the Tune curve adjustment panel. When you move the cursor on top of the curve it might appear as a little cross. If it does not, click on the little box mark here with a blue arrow.

You can select a point in the curve that it is around 30%-40% to anchor it. When you select it, you see a circle in the curve. This means that you can move any other part of the curve, but this particular spot will remain there.
forest images


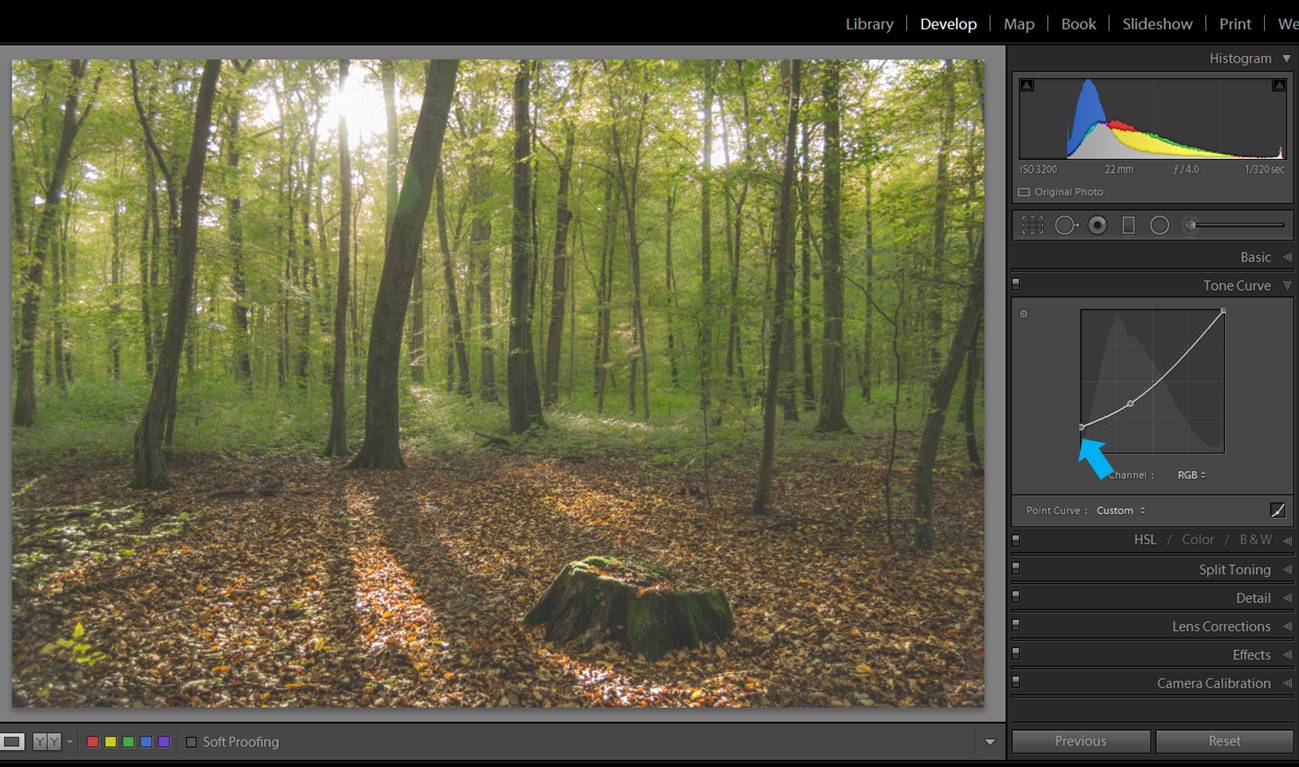
Then you can drag up the left bottom of the Tone curve. You can try with 10% up and adjust it according to your taste.
forest images

Try some presets

If you need to post-process a lot of photos you might find useful to check some made presets as the Through the Woods Workflow. They will speed up your editing.
forest images
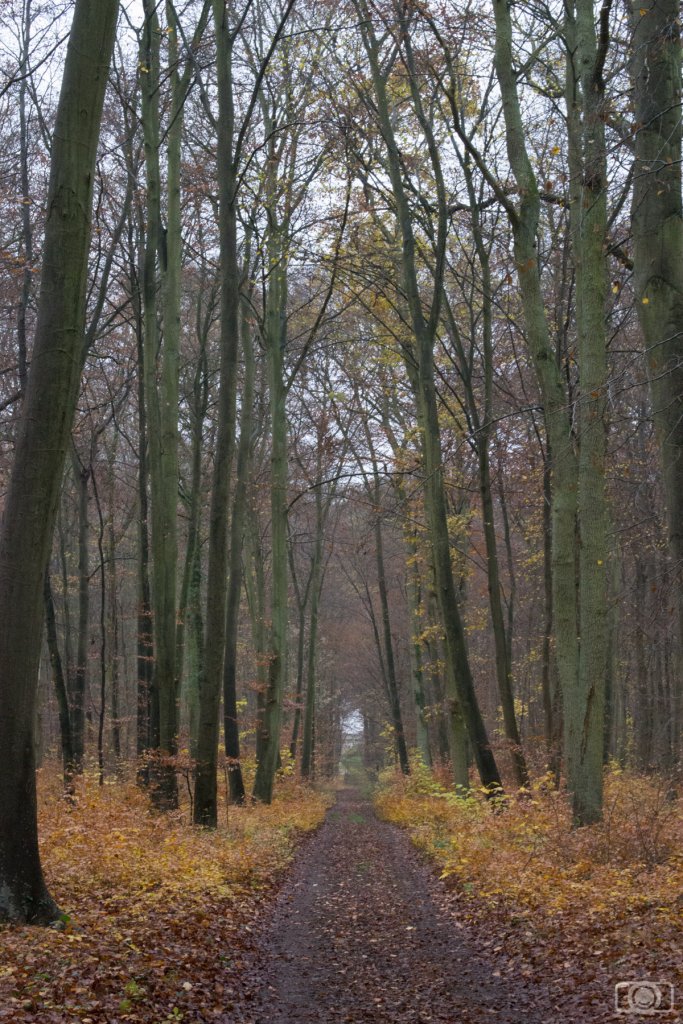
This original photo has potential, but it seems a bit dull right now.

The good thing of these particular presets is that they have been designed for landscape photography. You can stack several presets on one single image, giving you a lot of flexibility.
forest images
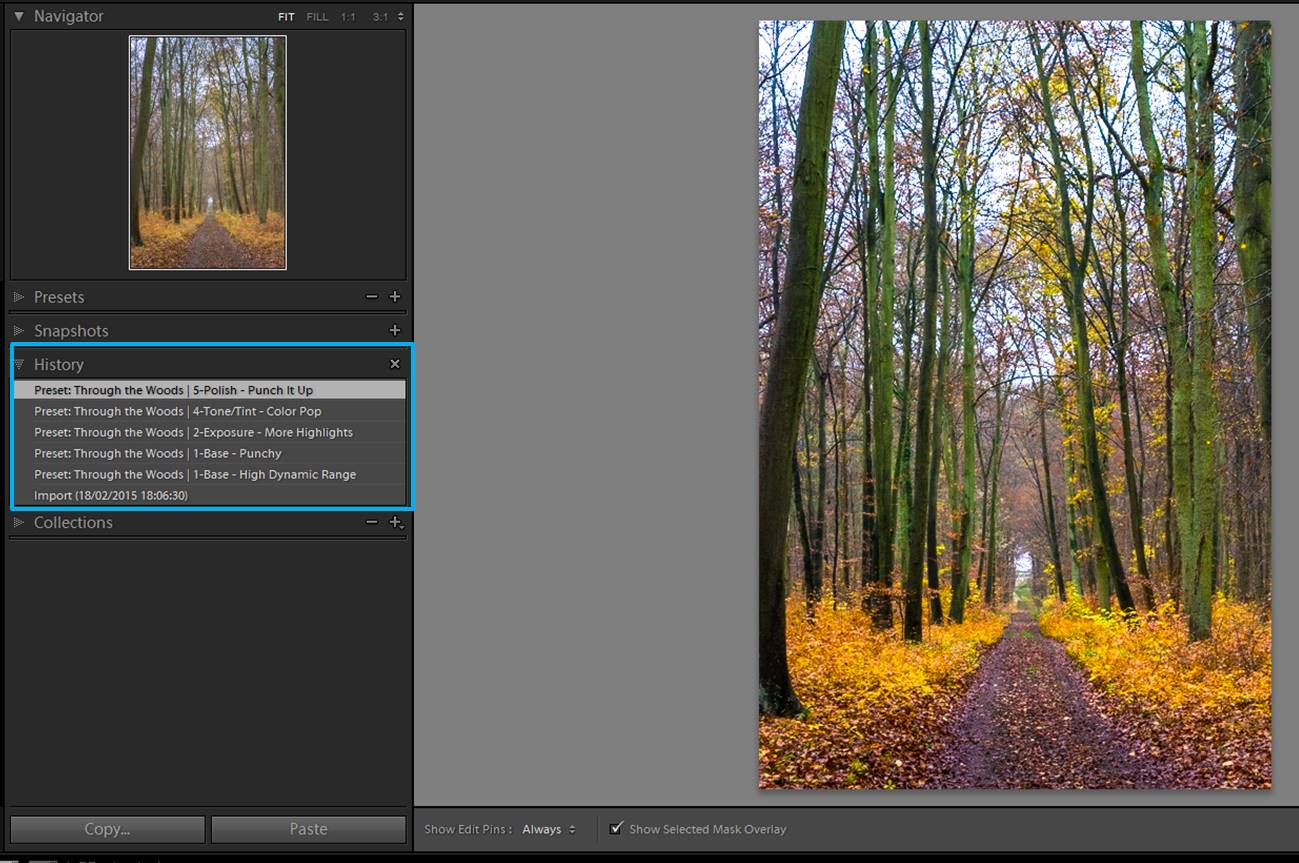
In the History panel you can see that I applied 5 presets and their effects stack on top of each other. The photo looks totally different now.

They also provide you with brushes.

forest images
Here you can see all the brushes provided for doing local adjustments In this case, I chose the one for Brighten the shadows and I applied in some of the trees.

Another thing I also like is that the names given to the presets and brushes are intuitive, so you can easily find the ones you need. And if they are not exactly fitting your needs, you can always adjust them a little. However, they already gave you a good starting point.
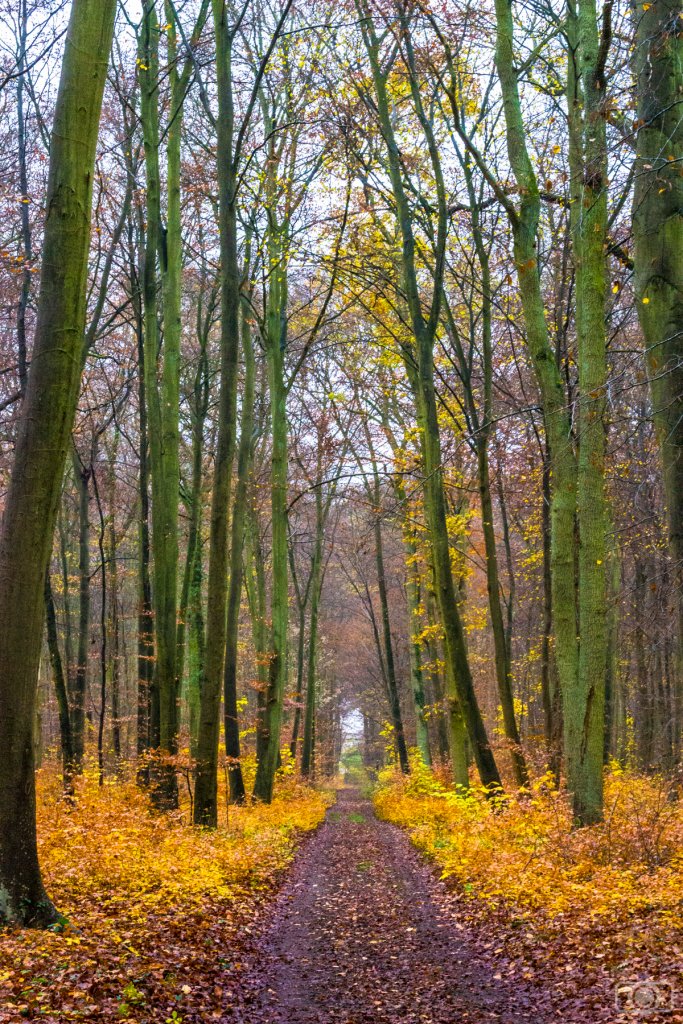
forest images
Final image. It took me to edit it just 2 minutes.

I hope you liked this tips for post-editing your forest photographs. Do you have any other tip? I would love to hear about it! Have a happy post-processing!!!

La Garrotxa: a photographer’s destination in Catalonia

I feel lucky about the fact of being from Barcelona (Catalonia). It is a beautiful city with a great atmosphere and as a photographer I am aware of how charming it is. But as a local I also know that there are other places in Catalonia that are also paradises for photographers. Today I want to introduce you to one of my favorite regions in Catalonia: la Garrotxa. Although I will focus just in the places I have recently visited, I want you to know that this region has much more to offer. My objective today is to make you curious about this photographer’s travel destination.

What la Garrotxa is?

La Garrotxa is a county in the northeast of Catalonia. In the north of the county you find the Pyrenees mountains. But today I am not going to talk about this (also beautiful) part of the county. Instead, I am focusing on the central/southern part, that it is known for its volcanos. Yes, I said volcanos! Over 40 inactive volcano and lava flows cover much of the center/south part of the county. With my description, you might imagine this region as a dark and rocky area. But the reality is far from it. The region is green and fertile.  I like to go there because of its impressive natural landscapes and its beautiful towns and villages. You will be surprise for the diversity in architectural styles and you will be delighted by the local gastronomy. You won’t stop shooting.

Sant Esteve Church, in the city of Olot (capital of la Garrotxa)

How to get there and other useful information

You can check the website of La Garrotxa turism to check options about how to get there, where to eat  or where to sleep. It can be really handy to rent a car for the freedom this will give you to move around the villages and to get to starting points of hiking trails. But you can also get there by bus (the company bus is called Teisa). If you are a hiker, you will have great times in this region because they make a lot of effort in developing their hiking trails. I would like to point out that tourism in la Garrotxa is mostly local (a lot of Catalans like to go there, as I do). The place keeps all its authenticity. On the other hand, you will find a lot of travel information and guides also in English.

What to photograph in la Garrotxa?

The list of things to photograph are endless: medieval villages, art noveau or modernism, forests, volcanos, regional gastronomy… all kind of photographers will find this region interesting because of its variety. In order to keep it short, I selected some photogenic spots in the region, mostly in the city of Olot and nearby.  I hope I will manage to show you the beauty of la Garrotxa and the love I feel for it.

Old city of Olot

Olot is the capital of the county. It is located at 92km from Barcelona and in 2015 its population was 34000. The first reference to Olot is from the year 872 (Middle Age). The original medieval city was destroyed by earthquakes in the fifteenth century. The city was reconstructed. Further on, it also suffered diverse wars. But besides all the historical inconveniences, the city grew and developed industrially.  Today we can enjoy its beautiful streets, churches and old shops.  Walking around the old city is a pleasure. The streets are quite typical from Catalonian villages and the colorful buildings are perfect models for any urban photographer.

One of Olot’s main streets (Tomas de Lorenzana street)

The streets of Olot are charming

You will also be impressed by the Sant Esteve Church, from 1763.

Sant Esteve Church, Olot. I edited this photo using the Brik and Mortar Workflow

The old city is full of old little stores where you can have a look (and buy!) local products. I find these old stores interesting because they kept their authenticity. These stores have the same look already like this 40 or even 50 years ago!

Perfume and beauty products store in Olot old city

Little store that sells local meat products (mainly pork)

If you like to take photos of local products, you must also pay a visit to Olot’s market.

You can find interesting products in Olot’s market

Photography tip: Locals are friendly and they wouldn’t mind that you take photos of their stores or the products they sell…if you ask them first! I saw that when I take photos without telling me, they give me strange looks. However, if you just ask them in catalan “Puc treure una foto?” that means “Can I take a photo?”, they will not just allow you to take the photo, they will also show you other interesting products or things to photograph! People in Olot are really hospitable.

Catalan Modernism in Olot

You might be familiar with the catalan modernism because of the works of Antoni Gaudi. Tha Sagrada Familia church in Barcelona is maybe the most well-known modernist icon. Modernism buildings usually have detailed decorations, a dominance of curved lines over straight ones and a dynamic use of forms.  This cultural movement can be also enjoyed outside the outskirts of Barcelona. In Olot you can follow a route that will take you to several modernist buildings spread around the city center. Some examples are: Gaieta-Vila house, Casa Pujador or Casa Gassiot.

Gaieta-Vila House in Olot Casa Gassiot, Olot Casa Pujador

Photography tip: if you like to take photos of buildings or streets when there is nobody next to them, take advantage of the lunch break. You can walk around the city center almost alone between 14h and 17h because at that time the locals are at home having lunch and the stores are closed.

Volcano Montsacopa: Viewpoint in Olot

The Montsacopa Volcano is in Olot center. It is an interesting place to visit for several reasons. First of all, it is a good spot for nature photography without even leaving the city.

The Volcano Montsacopa is a place where you can take wonderful nature photographs without leaving the city (Olot) Volcanic stone. The area is full of them.

Another reason is that once in the top the volcano provides you will an all-round views to the city and its natural surroundings.

Views of Olot from the top of the Volcano Montsacopa

If this was not enough for you, once you get to the top, you can also take photos from two watchtowers that were built during the Carline war (in the second half of the XIXth century).

One of the two watchtowers that were built during the Carline war on the top of Montsacopa Volcano

If you are more an architectural photographer, your desires will also be satisfied in this volcano: there is a church (Church of Sant Francesc) on the top.

Church of Sant Francesc on the top of Montsacopa volcano

You can also go down and step on the 120m diameter circular crater.

Mostsacopa volcano has a 120m diameter crater

La Moixina

La Moixina is a natural area not far from the old city of Olot that is a must for nature photographers. This area is characterized by its oak woods (it is the type of forest that once covered the whole Olor region) and the marshy woodland. The landscape of la Moixina is not a common one in the area, so it is worth it to visit it.

La Moixina marshy woodland

La Fageda d’en Jorda

La Fageda d’en Jorda is another must-to-go place for nature photographers. It is close to Olot, You can access by car, a local bus or even walking (1h30min walk). It is a magnificent beech forest (Fagus sylvatica) that stands on the lava flow from a nearby volcano (called Croscat).

La Fageda d’en Jorda is a beech forest (Fagus sylvatica)

This forest change a lot between the seasons. In winter, the trees lose all their leaves.  In spring and summer the forest is green and in autumn it turns totally golden. At any time, this forest has a fairy tale mood that makes this place almost magic.

La Fageda d’en Jorda

Photography tip: The golden colors of autumn are pretty spectacular. Lots of people come to visit the forest, especially in the weekend. If you want to photograph a relatively  empty forest in autumn, you will need to schedule your visit for week days and walk a bit inside the forest in order to avoid the crowds that stays close to the parking lots that are near la Fageda.

I hope you to be interested in La Garrotxa. Feel free to contact me with any question. I will be happy to tell you whatever I know. Have a happy shooting!!!