Tag: photo

How to Create Panorama in Lightroom CC

Have you ever desired to take a panoramic photograph and your camera doesn’t have the panorama feature? Do you want to do panoramas without switching to Photoshop or other specialized software? Have you forgotten to take your wide angle lens with you on your vacation? Do not give up on the amazing scenery that is in front of you. Following this tutorial, all you will have to do is photograph some parts of the scene and the software will process your images to produce a panoramic image within Lightroom CC (2015).For those who are not familiar with Panoramic Photography, it is a technique of photography that captures a series of images using a photographic camera and aligns them all together, to make a single photograph with a wider aspect ratio than a commonly used photograph.

Before Lightroom CC (2015) came out, in order to stitch together multiple images, you needed to switch between Photoshop or use other specialized software. Even though there are some cameras that have the panorama feature built into them, but most professional DSLR cameras do not.

Recently, after the latest update, you can create your panorama images inside Lightroom CC itself. The best part is that after the software process all the images, it will create a brand new seamlessly stitched RAW file from the images without rendering the images in pixels, with this new raw file, you will be able to retouch the panorama preset in Lightroom as you would any other image. So, you have to know first how to install Lightroom preset and once it has been installed, you can now create your panorama images inside the Lightroom CC.

Panorama is a feature that has been missing for a long time in the software. In order to create breathtaking panoramas, just follow the simple steps below.

Step 1 – Take multiple shots with your camera

  • With your digital camera take multiple pictures from left to right or from bottom to top, depending on the scenery you have chosen.
  • After the first shot is taken, while shooting the subsequent photos, make sure to get a little bit of the scene of the previous image so that Lightroom has data to render them together.
  • If you are using a DSLR or a camera that can manually change its settings, do not change the aperture of the camera. For example, if you use an aperture opening of F11 make sure you use it in every single shot.
  • I did not use a tripod to shot the images used in this tutorial, although it is not crucial, the use of a tripod is recommended.

import

Step 2- Import your images into Lightroom

Import the images that you have photographed.

File/Import Photos and Video 

import_select

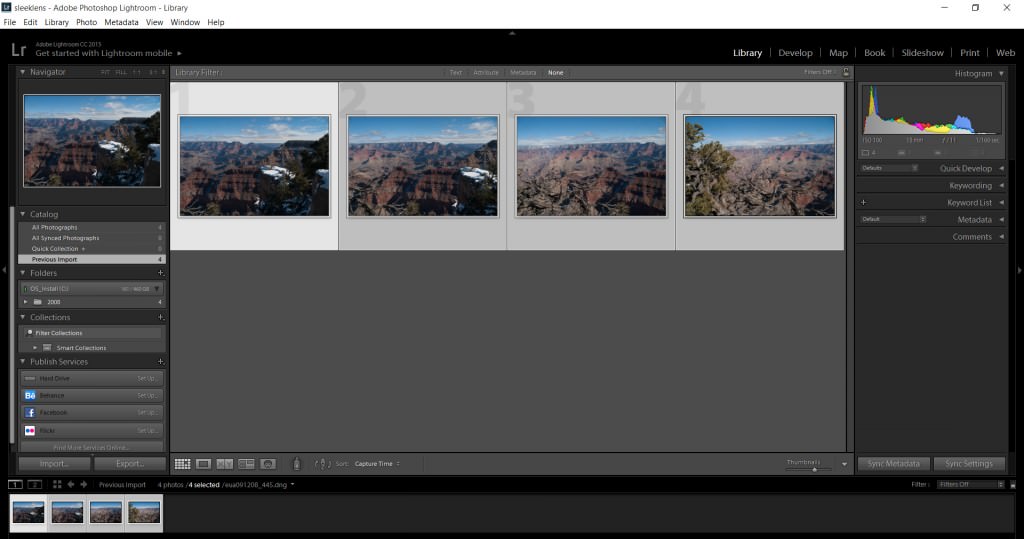
Step 3 – Select the images

Select all the images that will be used. Shift+click the first image and click on the last image in order to select all the images.

If your images are not in sequence, (cmd+click on the mac or ctrl+click on the PC) on each image to select them.

There is no need to adjust your images on the Develop Module at this stage. We will do it afterward, on the final image.

photomerge-panorama02

Step 4 – Merge the images 

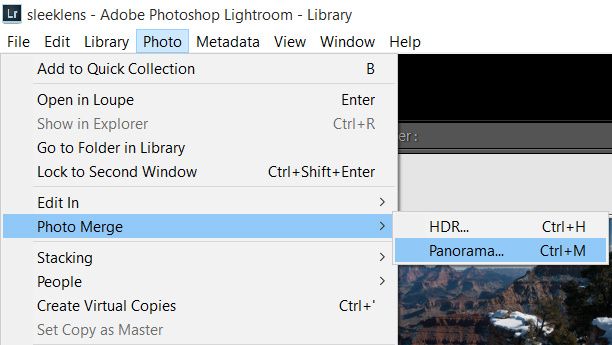
After selecting the images, go ahead and merge them together.

Photo / Photo Merge / Panorama (cmd+M on the Mac or ctrl+M on the PC)

pano_autosphe

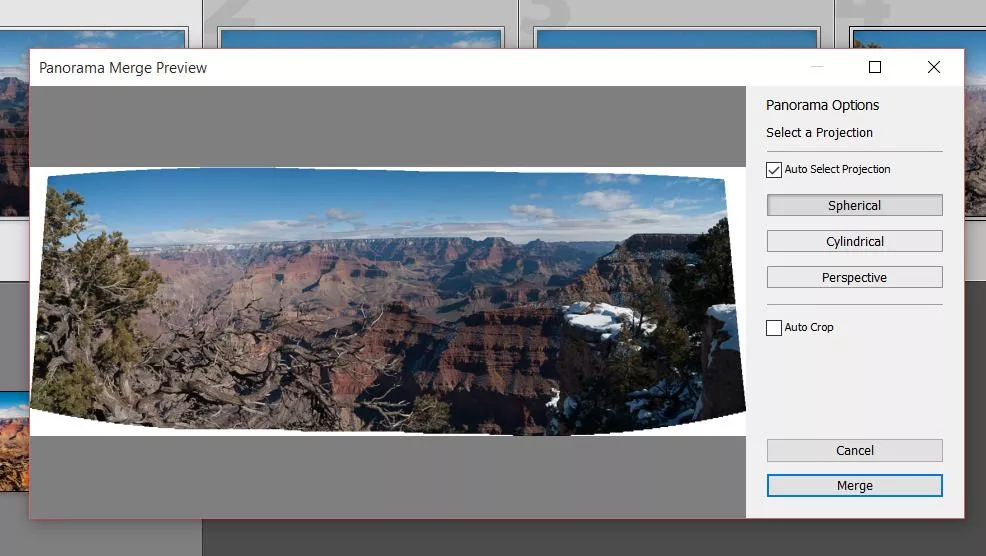
Panorama Merge Preview box will appear.

  • Auto Select Projection: Lightroom will choose automatically which projection fits better.
  • Spherical: The images will be aligned and transformed as they were inside a sphere. Best for wider or multi row panoramas.
  • Perspective: The images will be aligned and transformed as they were mapped to a flat dimension. Best for architectural photography.
  • Cylindrical: The images will be aligned and transformed as they were inside a cylinder. Best for wide panoramas, but with straight lines.
  • Auto Crop: The white edges will automatically be cropped. You can also crop it later on even crop it inside Photoshop, that way you can recover these white areas.

click Merge after the best settings are chosen.

After that, Lightroom will render all the images together. Depending on your machine it may take some time to do the renderings.

newpano

Step 5 – Adjust the final stitched image

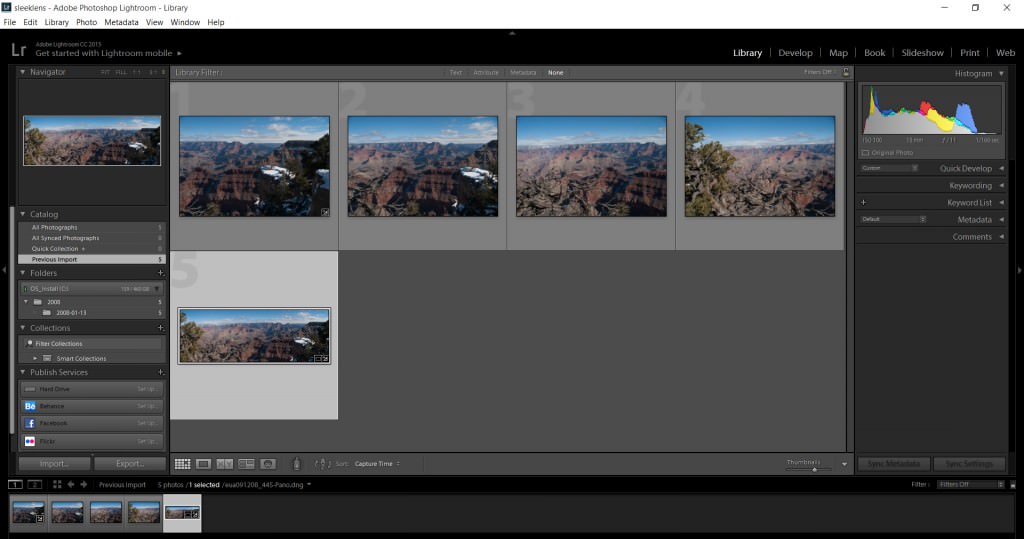
The neat thing is that Lightroom creates a brand new RAW file, that means that you will end up with the maximum capability to edit your image.final01
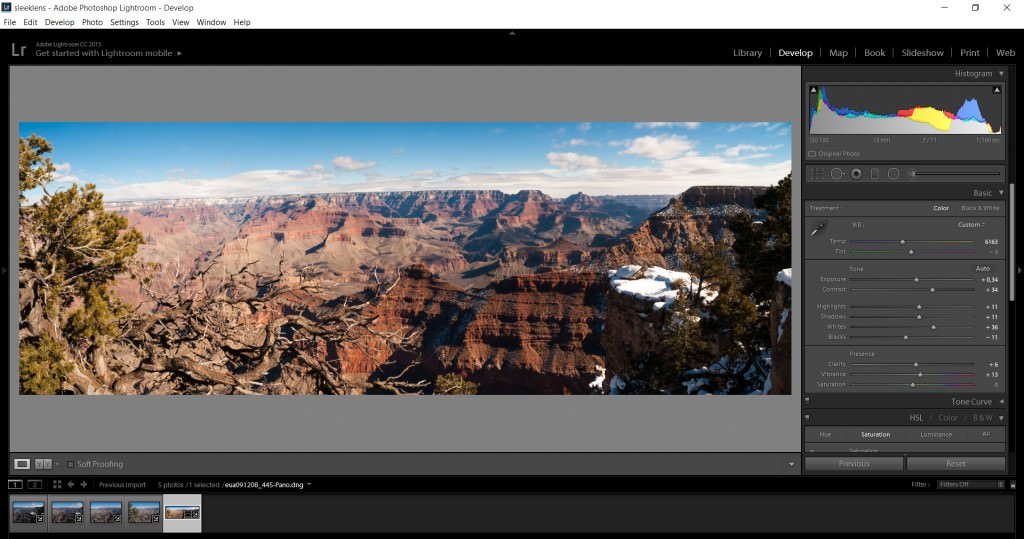
Select the new file and adjust it on the Develop Module as you would normally do in any other image.

In the end, you will end up with a nice panoramic picture.  So, did you enjoy our tutorial?  You may want to check on other tutorials such as How to Correct White Balance in Photoshop and let me know if you find it helpful.

final02

You can watch this helpful video to learn how to make a panorama photo in Adobe Lightroom. This feature has been there for quite a while much like the HDR feature and they were kind of added at the same time. The feature is super easy and does a very good job of stitching together all the images no matter how many you have.

As we begin, you can see that we have eight images at the bottom which I took. These are almost 180 panorama and this was handheld since I did not have a tripod with me. As such, it’ll take a little bit more work for the program to go ahead and stitch them together. This is also a very tricky scene since as I was taking the image, the waves were constantly moving so it’ll also stitch those as well.

To get the panorama, I will highlight on all the images, right click on them, and then choose “Photo Merge” and then Panorama. This gives us a final rendering for the preview and it is clear that this is a little bit low quality and this is just to give Lightroom a little bit easier time to mess with it since it has many pixels to play with especially with eight photos.

We have several projection options to work with including spherical, cylindrical and perspective. The spherical was great for a wide panorama especially that transitions into objects that are kind of in the frame and so it’ll be the best one for the image we have because of the sphere that we have on the bridge. Cylindrical is kind of has the same effects as spherical but does a better job in making vertical line stay straight. However, we are interested more in the horizontal lines than in the horizon of the image, as this makes spherical much better. On the other hand, perspective is mainly suitable for real estate and architectural stuff as it seeks to do a lot of distortion.

We will, therefore, stick with the spherical projection. We have a couple of features such as auto crop which takes away the white space and kind of automatically crops it in so you don’t have to do it later. We also have boundary warp which is a new feature in Lightroom and kinds of take all the white features and stretches the image to try and fill out spaces in the image. We will use the boundary warp and increase the cover size to 100 and this fills in space very easily thus giving us an image that is perfectly fitting in the available space. We can opt to reduce the numbers and then do some cropping but this will mean going back into Photoshop to try and fill in the spaces.

With all the white spaces filled, we will click “Merge” and wait for the program to put all the images together. Once done, we will have an extra image on top of our initial eight. This is the panorama image which looks great and everything is stitched together perfectly.

The next step will be to fix some of the distortions which arise when we shoot panorama images especially if you have them handheld. To fix some of these distortions we will go to Lens Collection and enable for Profile Collection and then go to Transform and try auto to see whether it’ll collect things for us. However, this only does some minimal collections and therefore we will need to play around with the distortion. We will, therefore, go back to Lens Collection and try playing around with the distortion so as to get some straight line. We will need to change things such as scale, aspect, and the rest until we get the best results possible.

This done, we can go ahead and do the fun bit of changing the effects including the shadows, highlights, vibrancy, clarity and temperature to make it look like a sunrise. Once this is done, we will have our panorama image which includes all the eight images combined into a single image. If we want a large image, we will have a lot of data to play with. We can even crop this image to make it narrow one or crop parts of it to make different size photo print if we want to. All these will come out looking perfect since we have all the data to play with which is a combination of the eight images we had. This is the beauty of making panorama images since you have different cropping aspects and know that your image will come out very clear because of the data you have.

You can check more of our Lightroom tutorials as well as Lightroom Presets and Photoshop Actions to help you do your post-processing edits in an easy and remarkable way.

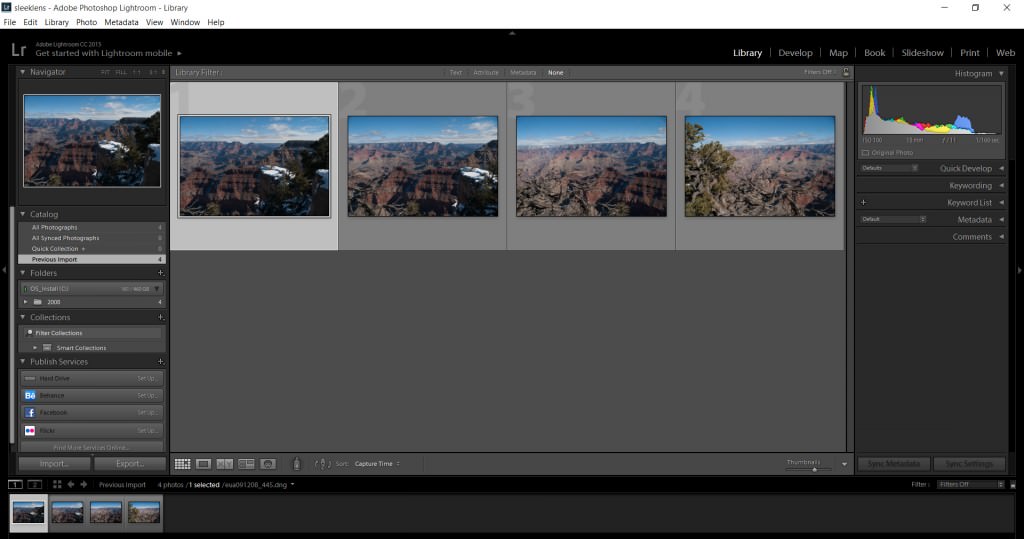
Photo ideas when you have no idea what to photograph

Rainy day? Stuck at home? Few spare hours? Bored? But your camera is within your reach, you love photography and want to practice your photo-taking abilities. There is just one thing standing in your way – you have no idea what to shoot. No problem at all – as here are few ideas of things you can photograph at your house and garden.

food-o-graphy
Photo ideas: Food-o-graphy
  1. Food-o-graphy

Vegetables, fruits, sauces, pasta, desserts… take out whatever you have in your fridge and place it by the window as a side or back natural light is the key. You can also take photos of actions in the kitchen while preparing food, but if are not a good cook – no worries, order a pizza and take photos of it. Remember, a lot can be learned about lighting by doing food photography.

  1. Plates and cutlery

Everyone has spare plates and cutlery laying around in the kitchen. Position only plates, or only cutlery or make a combination of both in an unusual, evocative way. Imagine storylines involving them and illustrate those stories from start to finish by moving the objects in different directions.
  1. Consumer products

Shoes on shelves or in your hands closed or opened perfume bottles, clothes on hangers or on the bed, wrist watches, wall clocks, toys, jewelry and the list of consumer products that are in your house goes on and on. If you keep their original boxes, even better – you can play with them as well, as long as you think outside the box. The number of objects in your house you can shoot is only limited by your imagination.

Photo ideas: Things on the floor
  1. Things on the floor

A big vase, a candle holder, an antique, a potted plant or even your sleeping baby can take the center stage in the middle of your floor and be photographed from above. You can be as creative as you want with different objects and shooting angles.

  1. Portraits and self-portraits

It doesn’t matter whether you shoot a self-portrait or portraits of people currently in your house, nor whether you show happy or sad emotions. You can create a simple portrait studio at home and experiment with different poses and expressions of your subjects. If the people in your house are camera-shy, then just focus on their hands, feet, lips, silhouette or anything else that captures that person without showing their face.

  1. Animals and insects

If you like animals

, here is a challenge for you. Photograph your pets or your neighbour’s pets, the fish in your aquarium, the insects on your window sills, the bird in the tree outside your window or flying over your house. If you have an aquarium or terrarium at home – you don’t need an underwater camera, just use a polarizing filter to be able to cut out the glare on the glass.

Photo ideas: Water drops
  1. Water drops

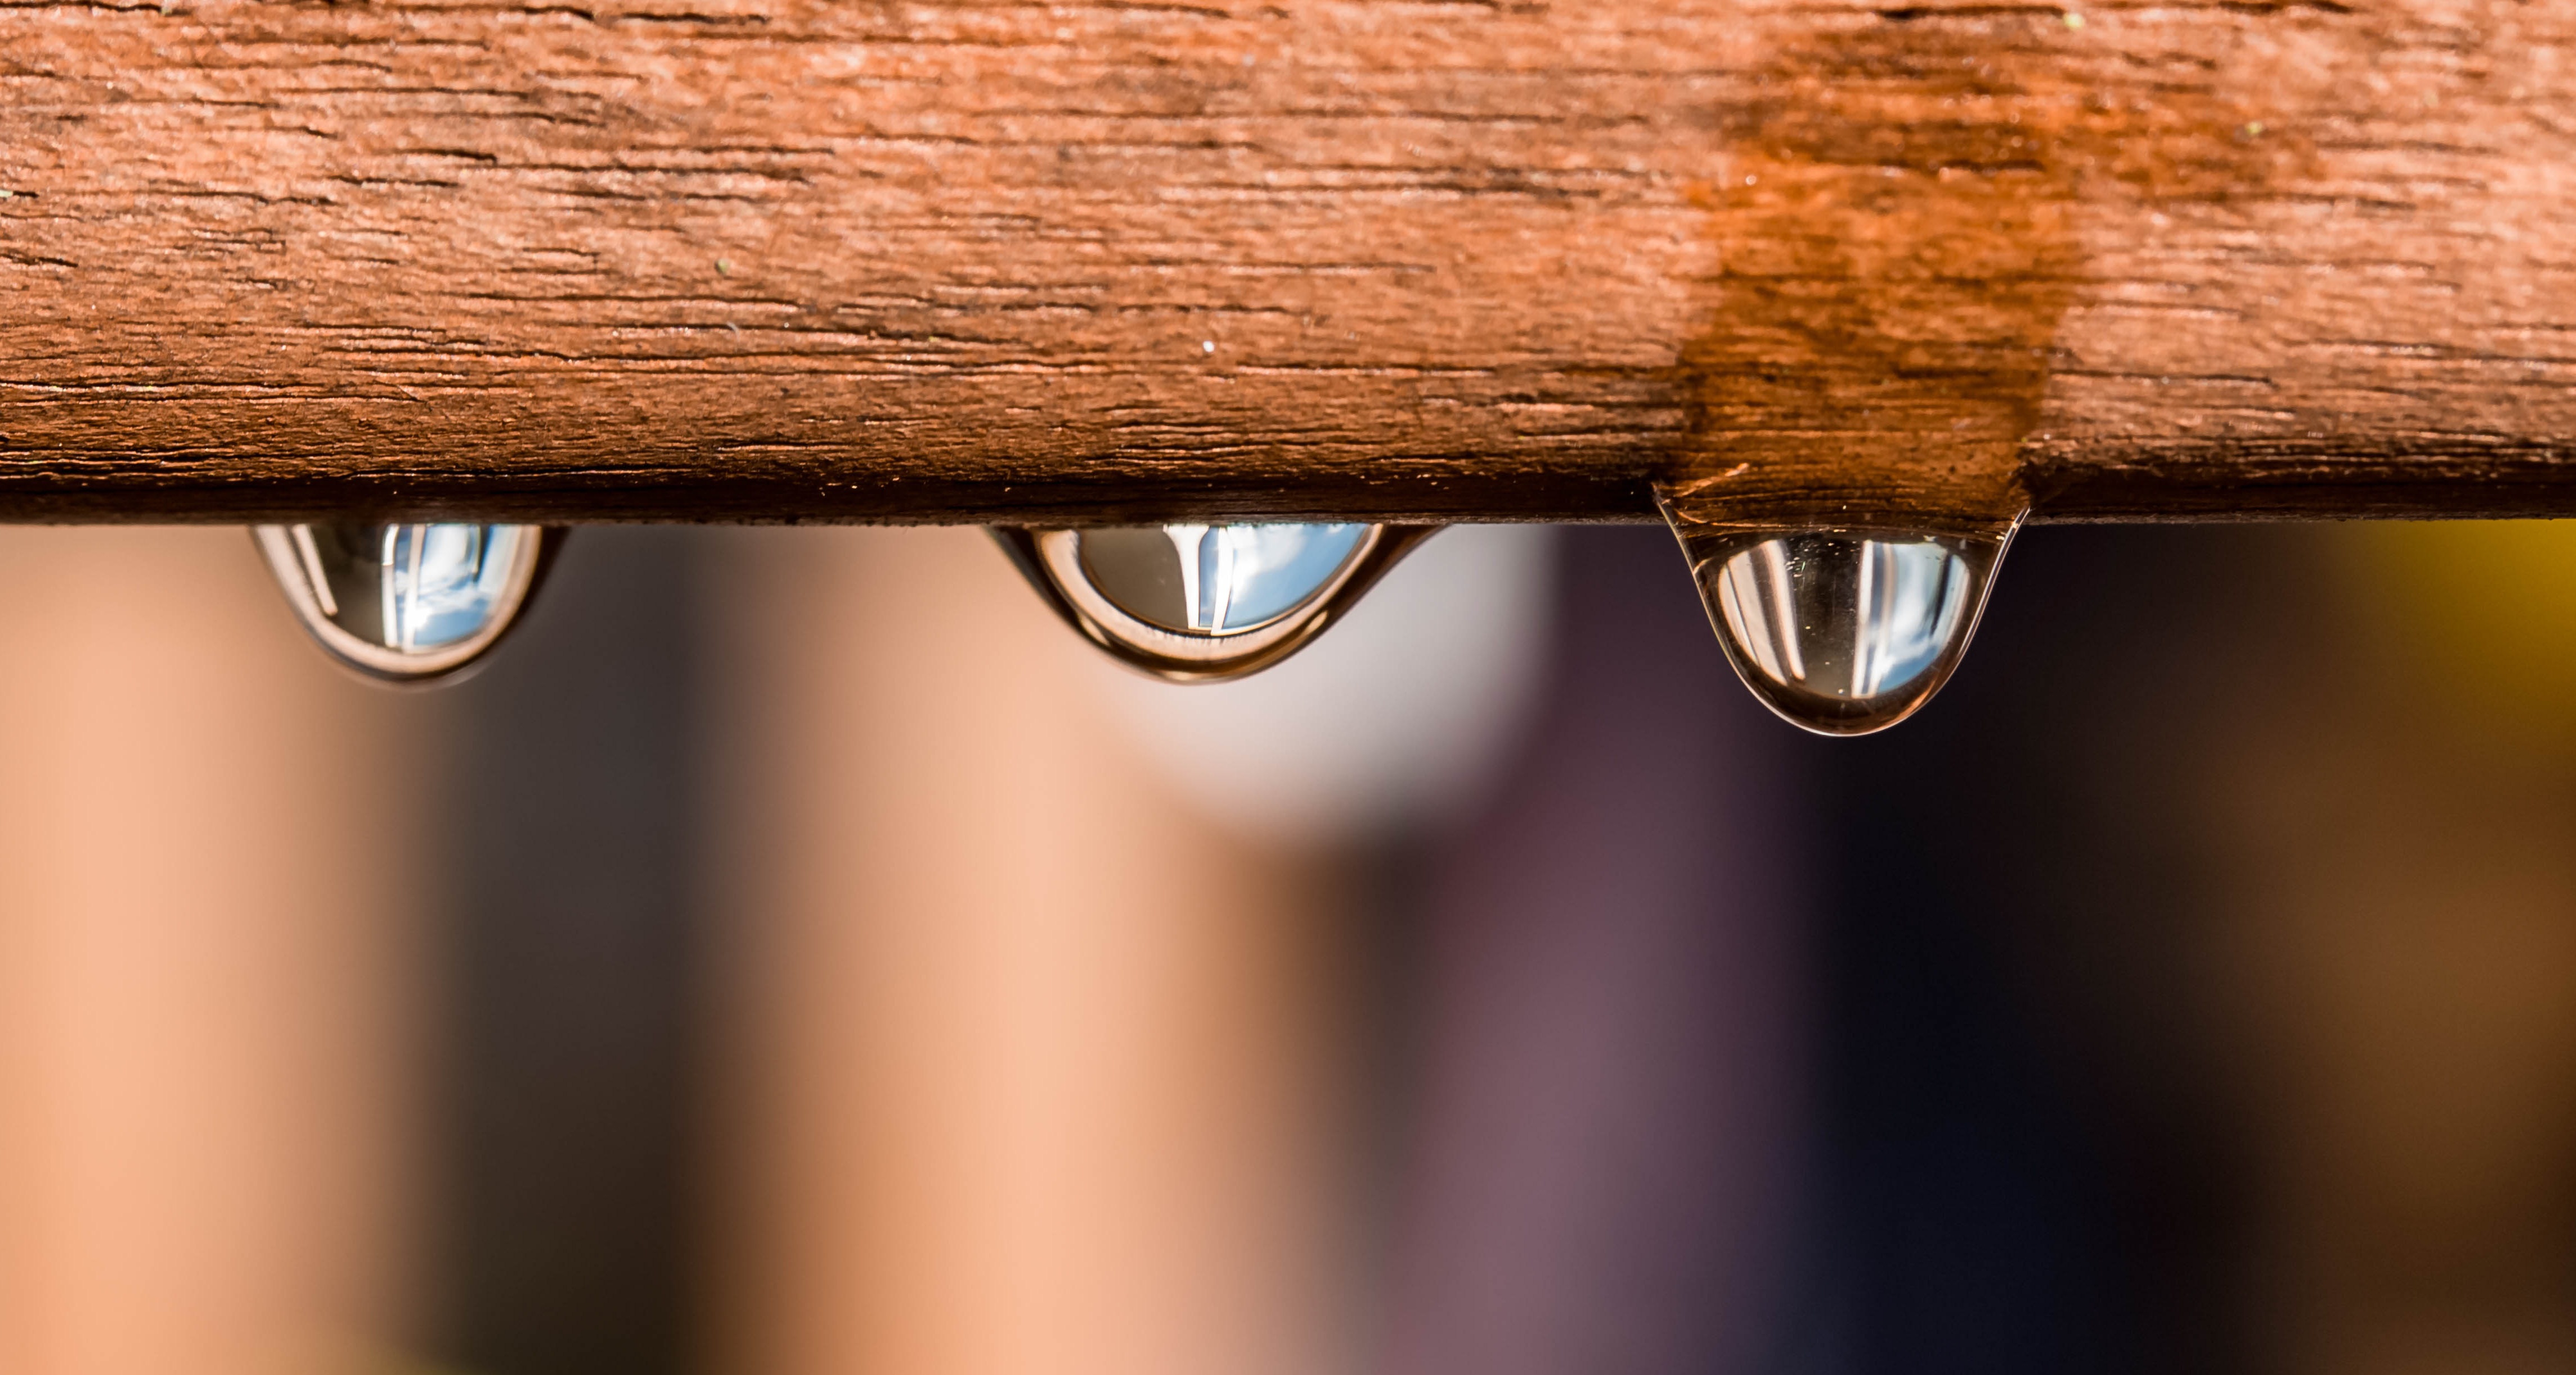
Another cool photography idea is to capture rain drops on windows or water droplets on glasses and plants. A variation on this topic would be to have the water drops on portable small items frozen in the freezer. You will have only a short time to shoot them before they melt but that would add the excitement and increase your focus on extreme close-ups. After the droplets melt and combine they will create fascinating patterns on the dry surface.

  1. Street life outside your window

The everyday life right outside your window can be a theme for many photo projects. For example, shoot the ever-moving clouds, mystical sunrises, magical sunsets, busy road workers, random passing strangers and cars. Take your tripod out, set your camera to take single images or time-lapse and always be mindful not to take photos of people’s faces without their permission first.

  1. Garden photos

Flowers, fruit trees, vegetable plants or even grass – all of them can be reasons for colourful and unique series of narratives. If it has been raining for days and no beautiful flowers are available in your garden – then check for worms, insects or wild weeds. Beauty can hide in the most unsuspecting things.

  1. Fun with photos

If you have photo prints or photo negatives you no longer wish to keep or you can print duplicate photos, you can either burn parts of them or poke holes and shine light through them and re-shoot them . You can also cut and fold them in different ways from unusual angles to create dramatic photographs.

Have fun with any or all of these 10 ideas and really go after it. Give yourself a mission to try them out at the first moment you feel like wasting time and find the beauty that is often overlooked – photography has the power to bring it out your creativity.

Tips for Post-processing Forest Images in Lightroom

If you like nature and landscape photography you probably take photos of forests, your local wood or even parks. I can teach you how to install presets if you want. In Mark Jones’ article you will find nice tips for forest photography. I take a lot of forest photos in autumn, so in winter I usually find myself with a bunch of photos to post-process. In today’s article, I am going to give you some tips that will help you on the post-processing in Lightroom of all the forest images you already collected. This is a lot different from editing a macro photography in Lightroom.

forest images

Decrease shadows and increase blacks

When you take photos of trees, with the light coming from up and going through leaves you usually get the upper part of the image with a nice exposure but the soil remains in the shadow.

forest images
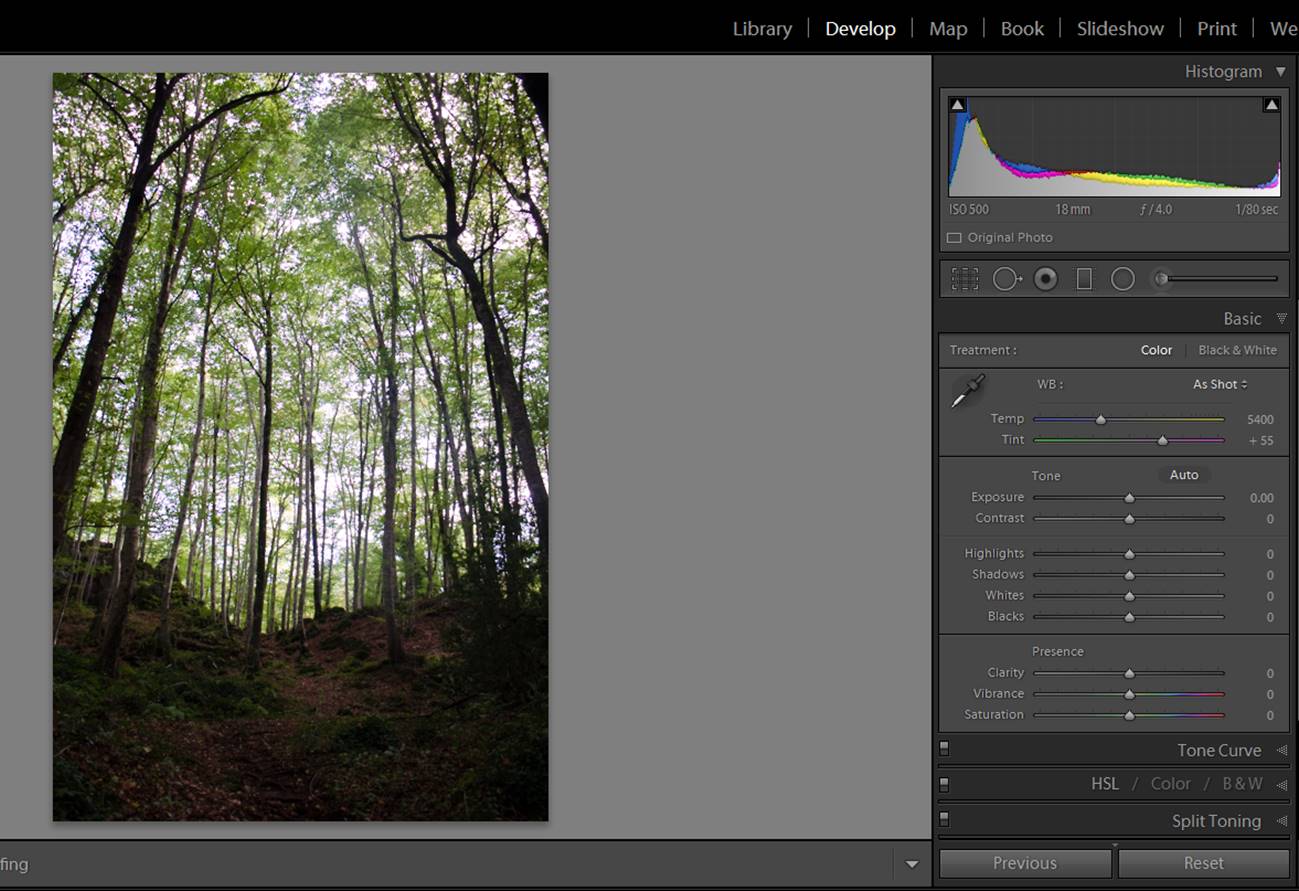
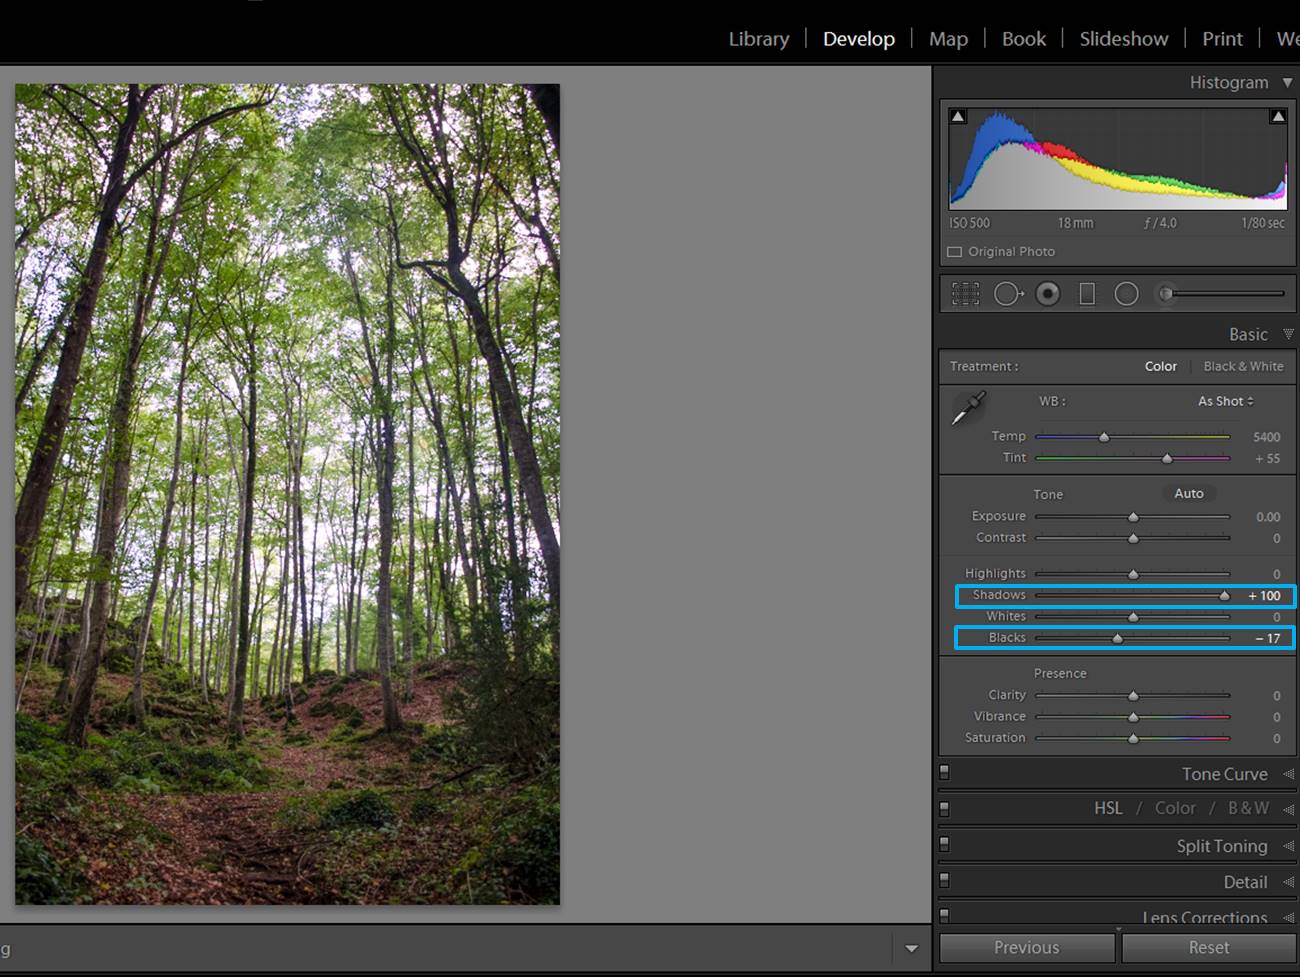
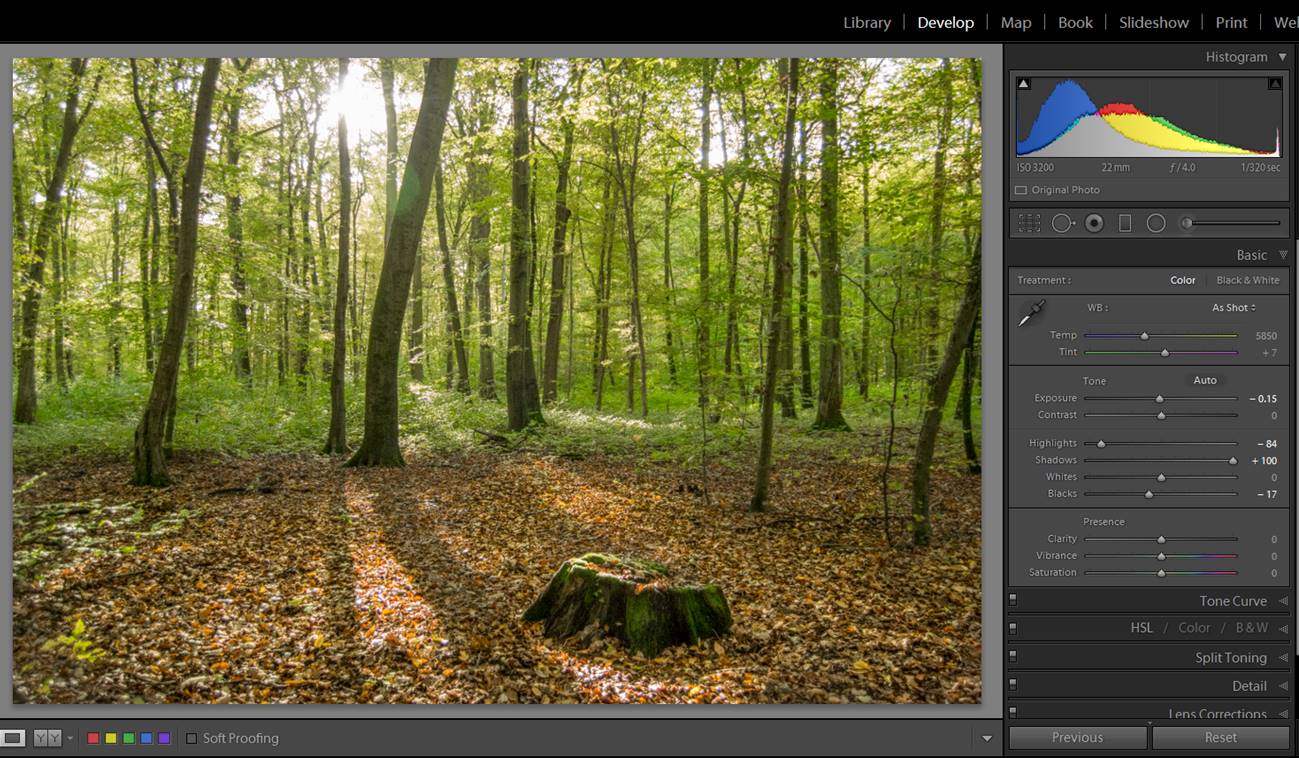
This is the non edited photo. As you can see, the leaves are well exposed, but the earth is way too dark.

You can improve your photo by opening the shadows (moving Lightroom preset Shadows slider to the right). Maybe this will make you lose a bit of contrast, but you can fix it easily by darkening the Blacks (moving the Blacks slider slides to the left). With these two adjustments you will make appear the details in the shadows without losing contrast in the blacks.

forest images

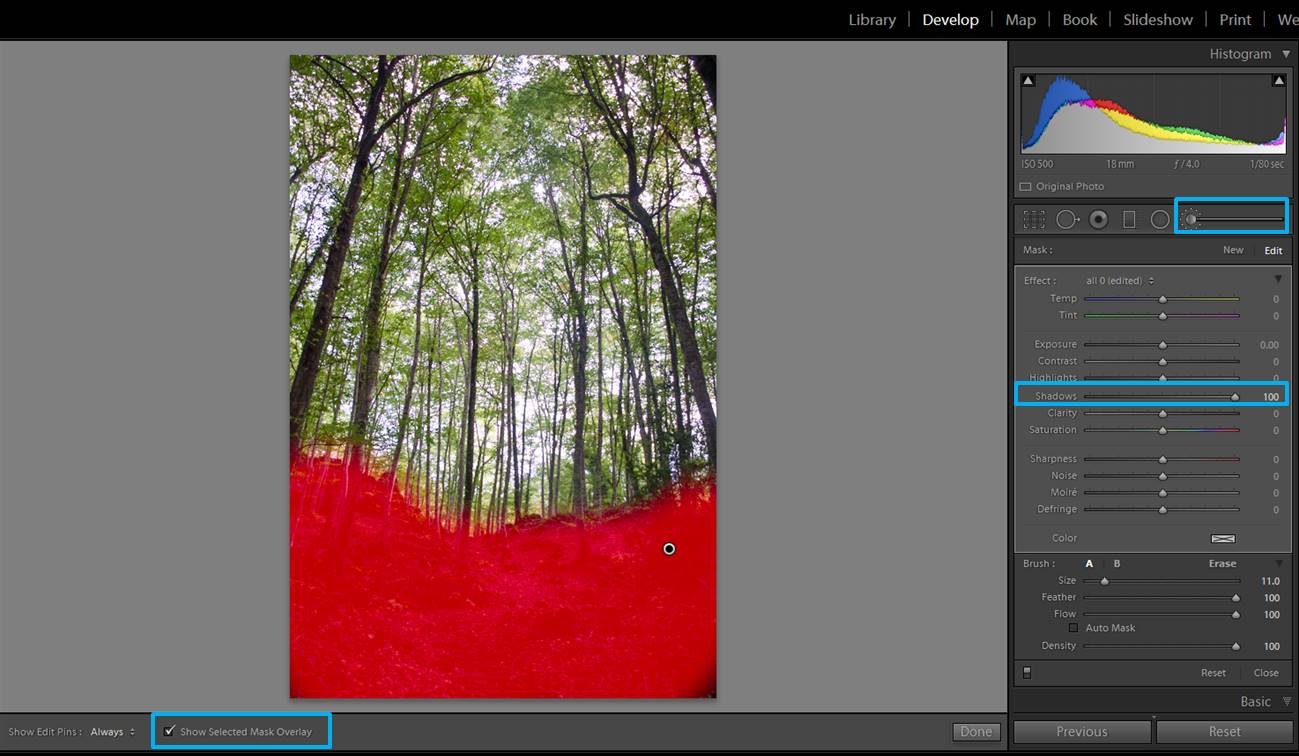
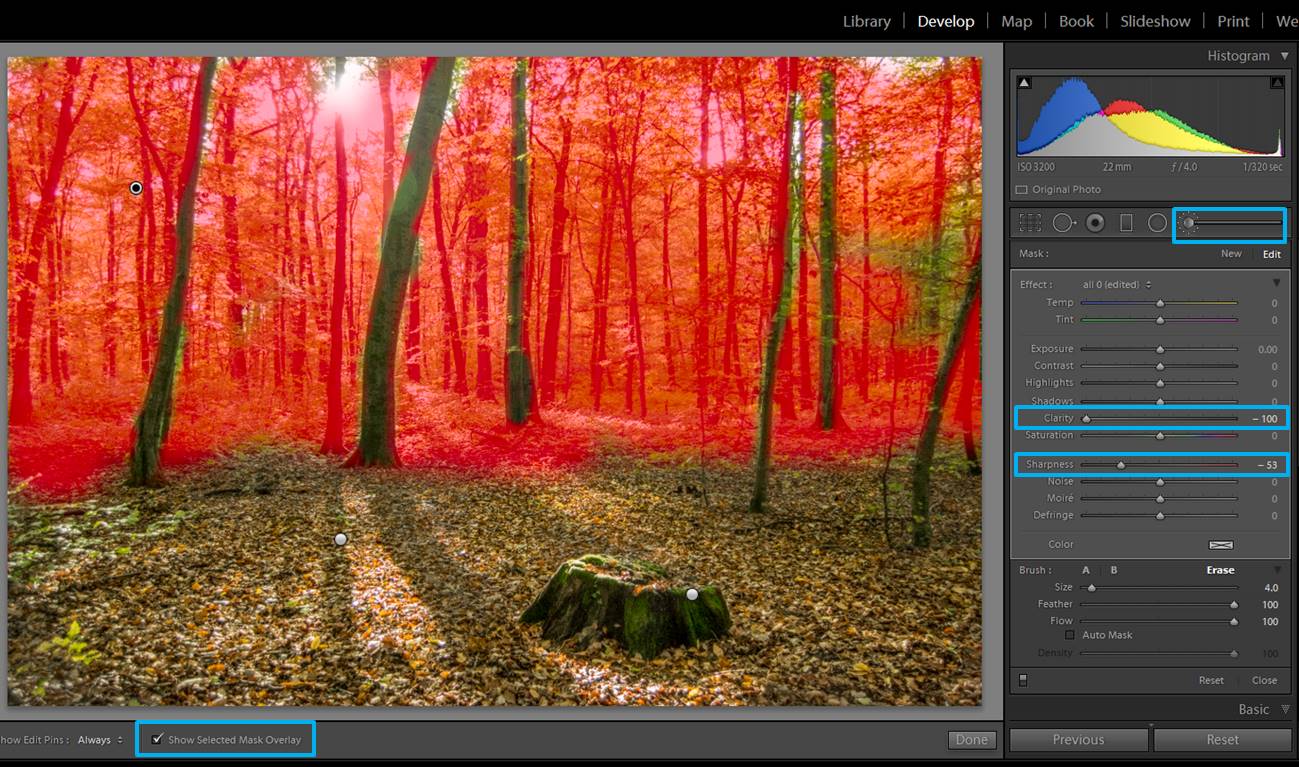
If you want to open the shadows a bit more, you can do it using the brush tool. Select a brush with the shadows slider towards the right and “paint” the area you want to work with.

forest images
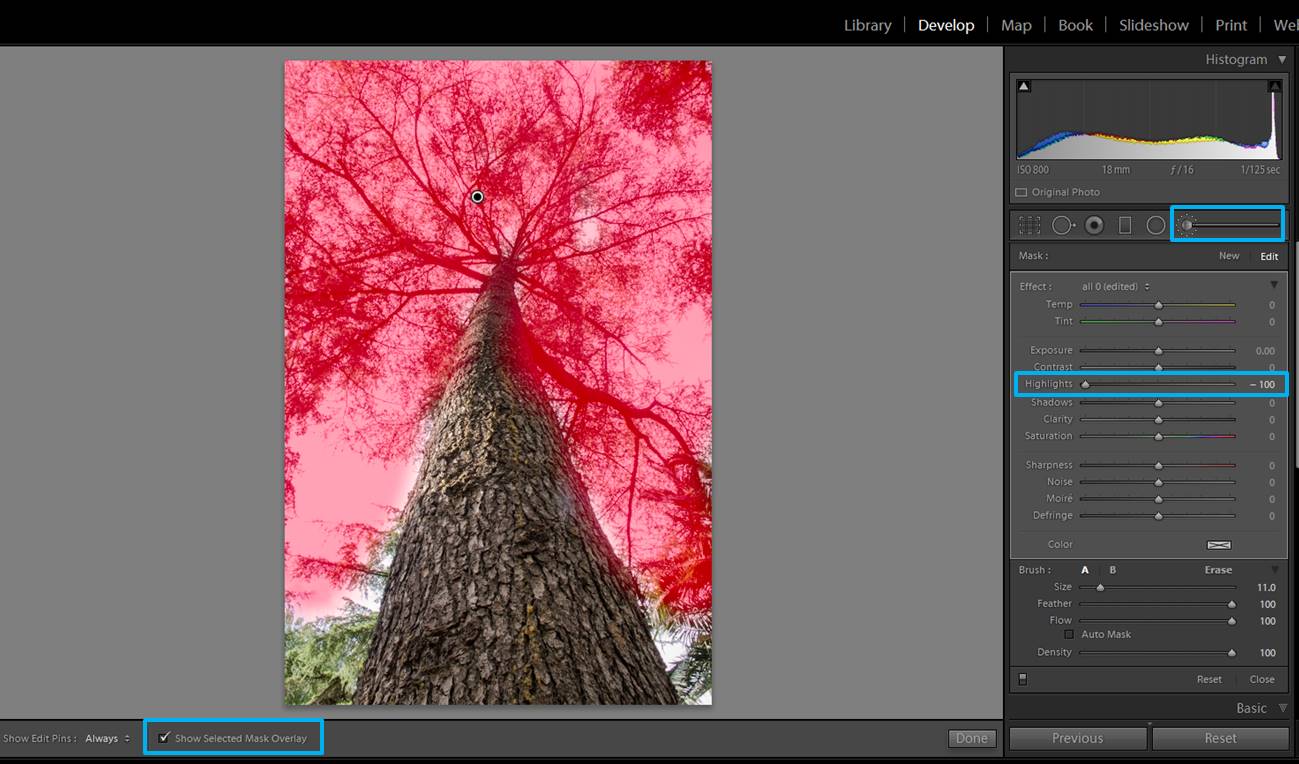
You can “paint” areas of your image with a brush that will brighten the shadows even more (Shadow slider towards the right side). If you check the box that says “Show Selected Mask Overlay” you will see in red the area you are painting in.

With these adjustments you can improve a lot a photo with a combination of light and shadow

forest images
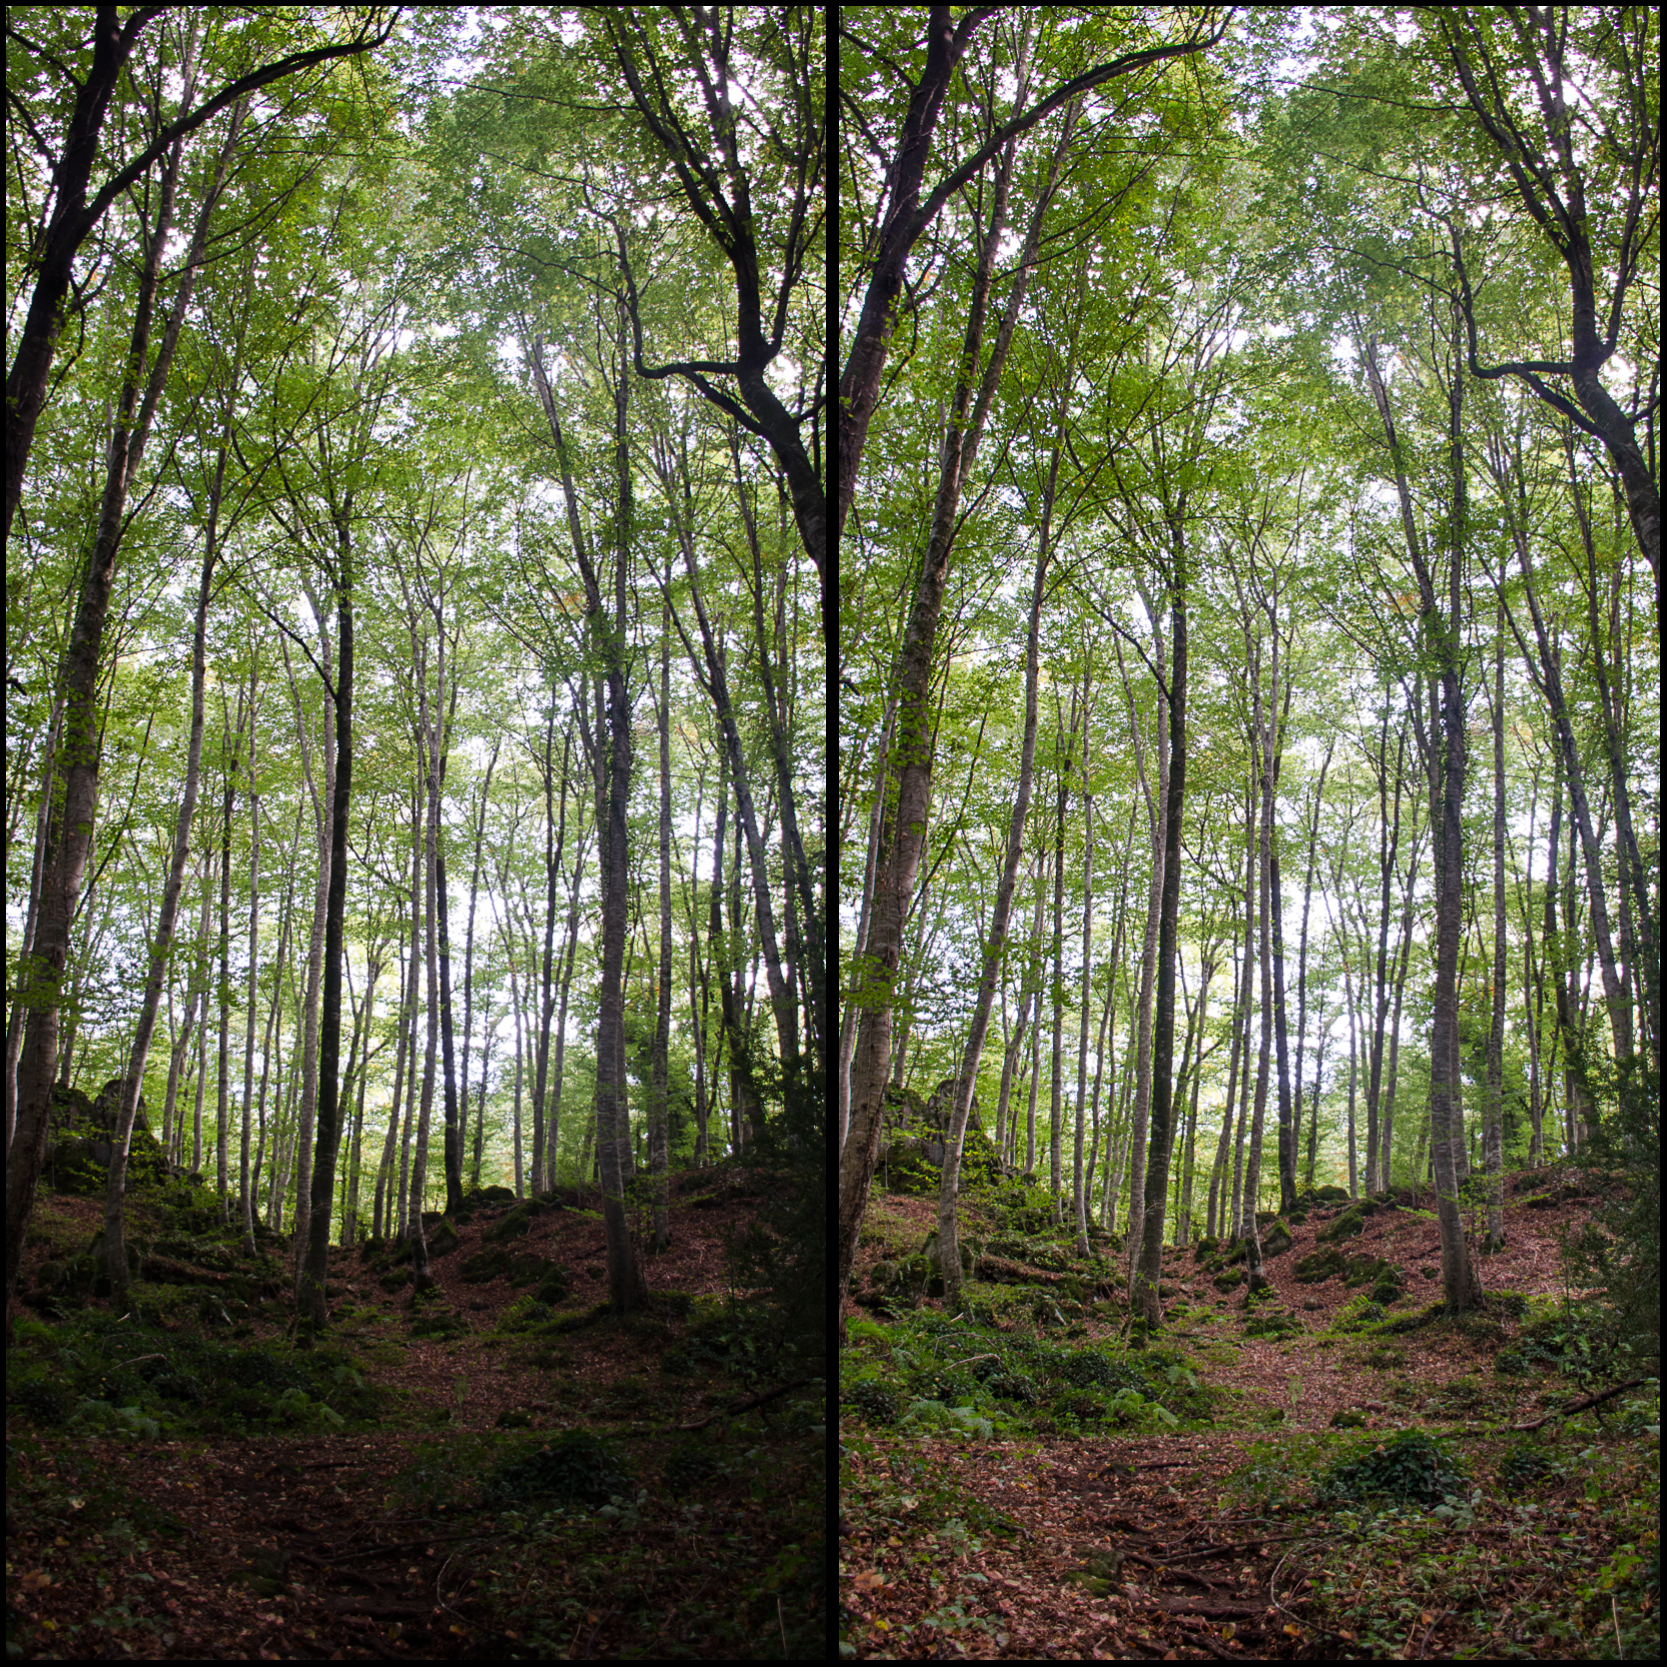
On the left, the non-edited photo. On the right the image after brightening the shadows and darkening the blacks. I will probably work a bit more in this image (color, highlights…), but as you can see, just with these simple adjustments you can improve a photo a lot.

Adjust the highlights

When you take photos of forests you will end up with images that are well exposed in some areas, but others are quite overexposed. It happens for example when you take photos of a tree from its base.

forest images
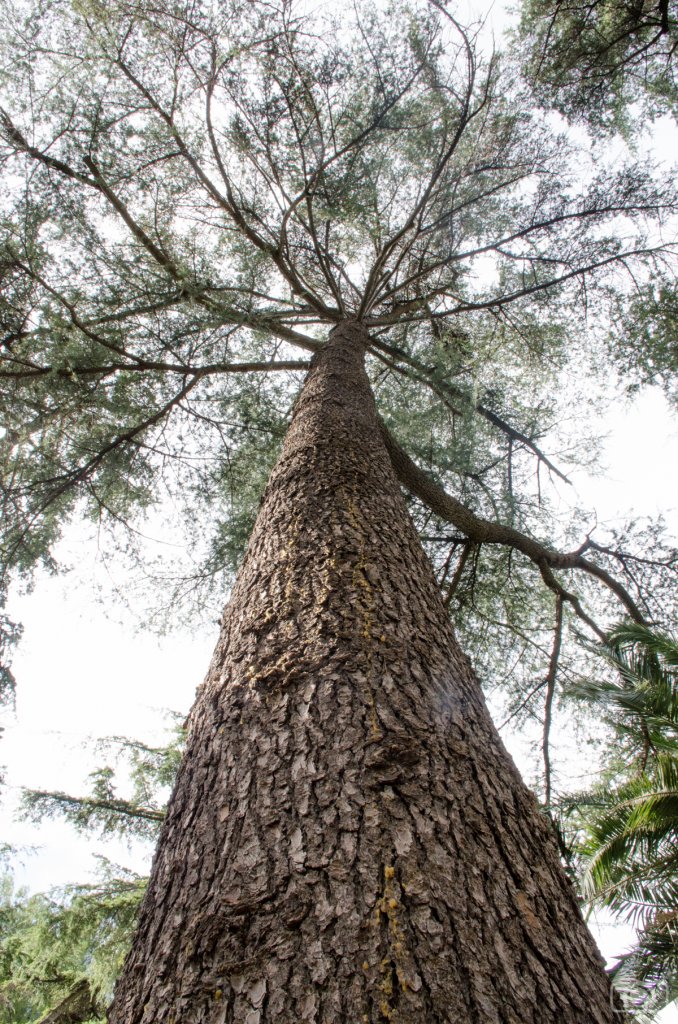
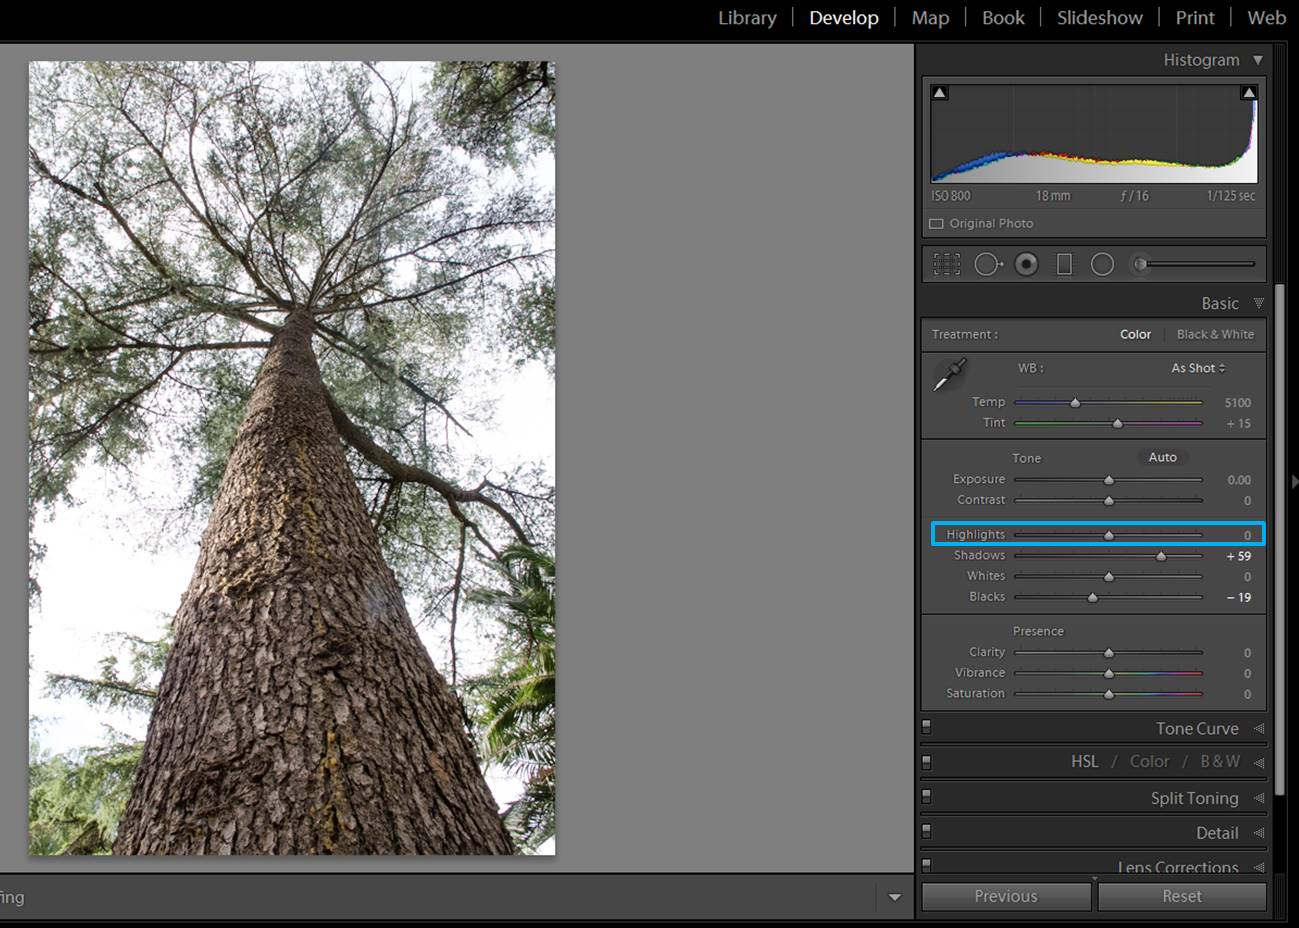
This is the non edited photo. The sky and some of the higher branches are clearly overexposed.


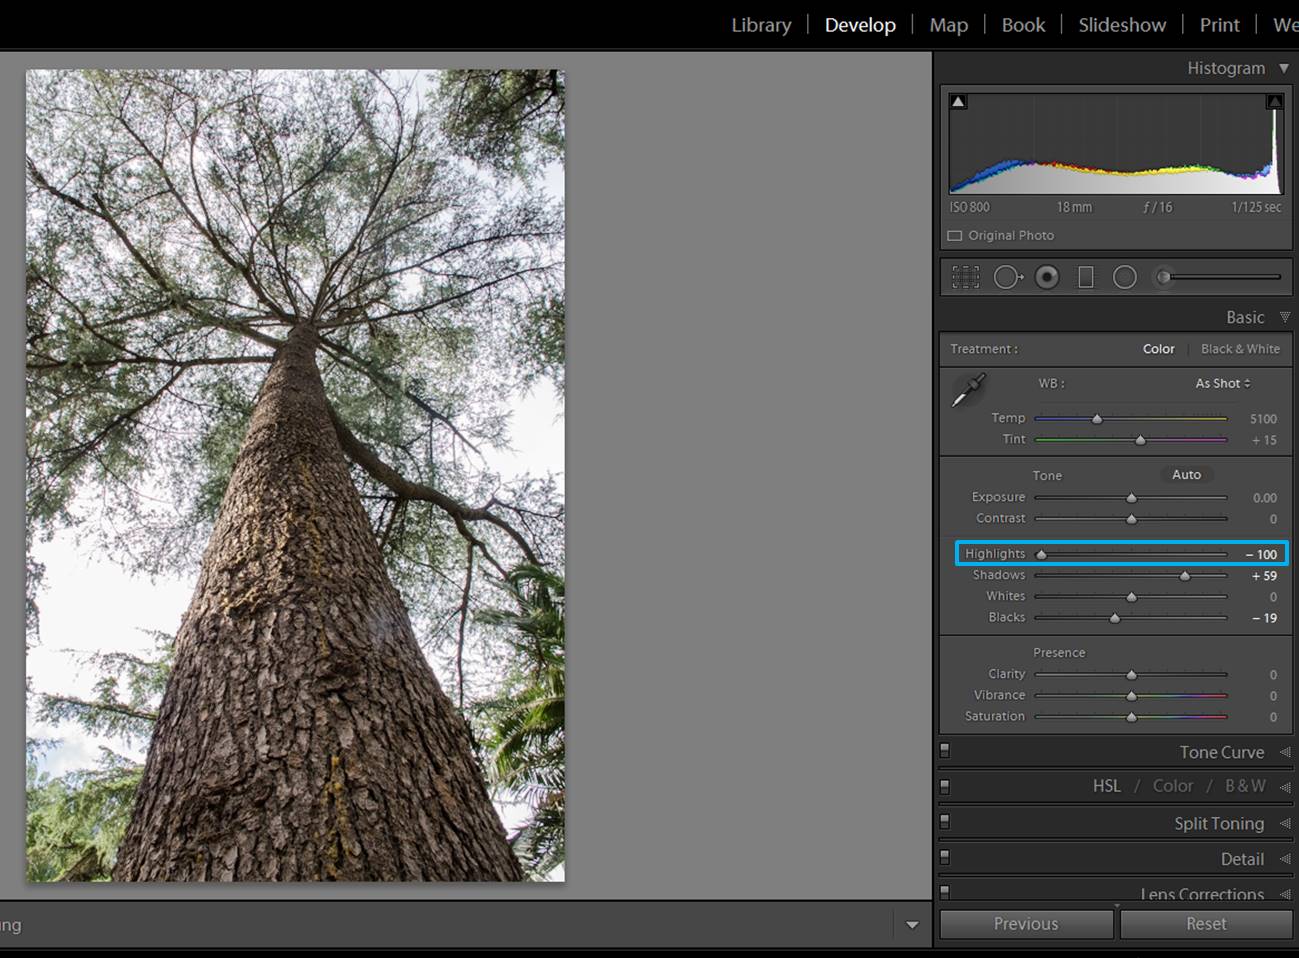
The tree is well exposed, but some branches and the sky can get quite overexposed. In these cases, adjusting the highlights might help you. You can do it in the whole image.

screenshot-tree-1
As you can see, in the non edited photo the Highlights have a value=0.
screenshot-tree-4
Once you slide the Highlights to 100, you will see that you recover detail form the overexposed area.

Or you can do it in just some areas by using the brush tool.

screenshot-tree-2
As before, you can “paint” areas of your image with a brush. This time its setting will affect the Highlights (slider towards the left side).
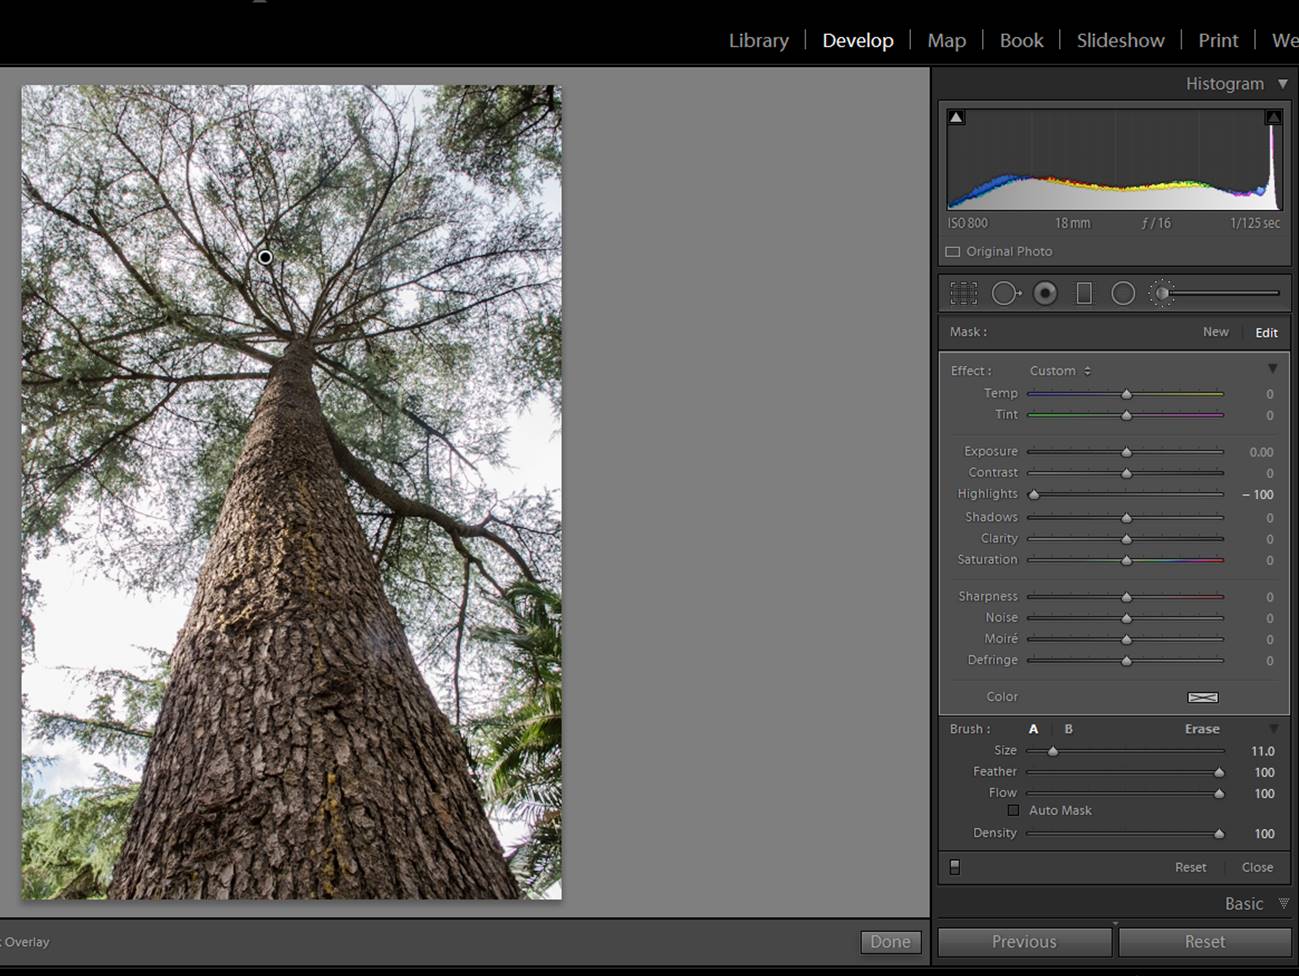
screenshot-tree-3
This is the final edited image.

Adjust colors

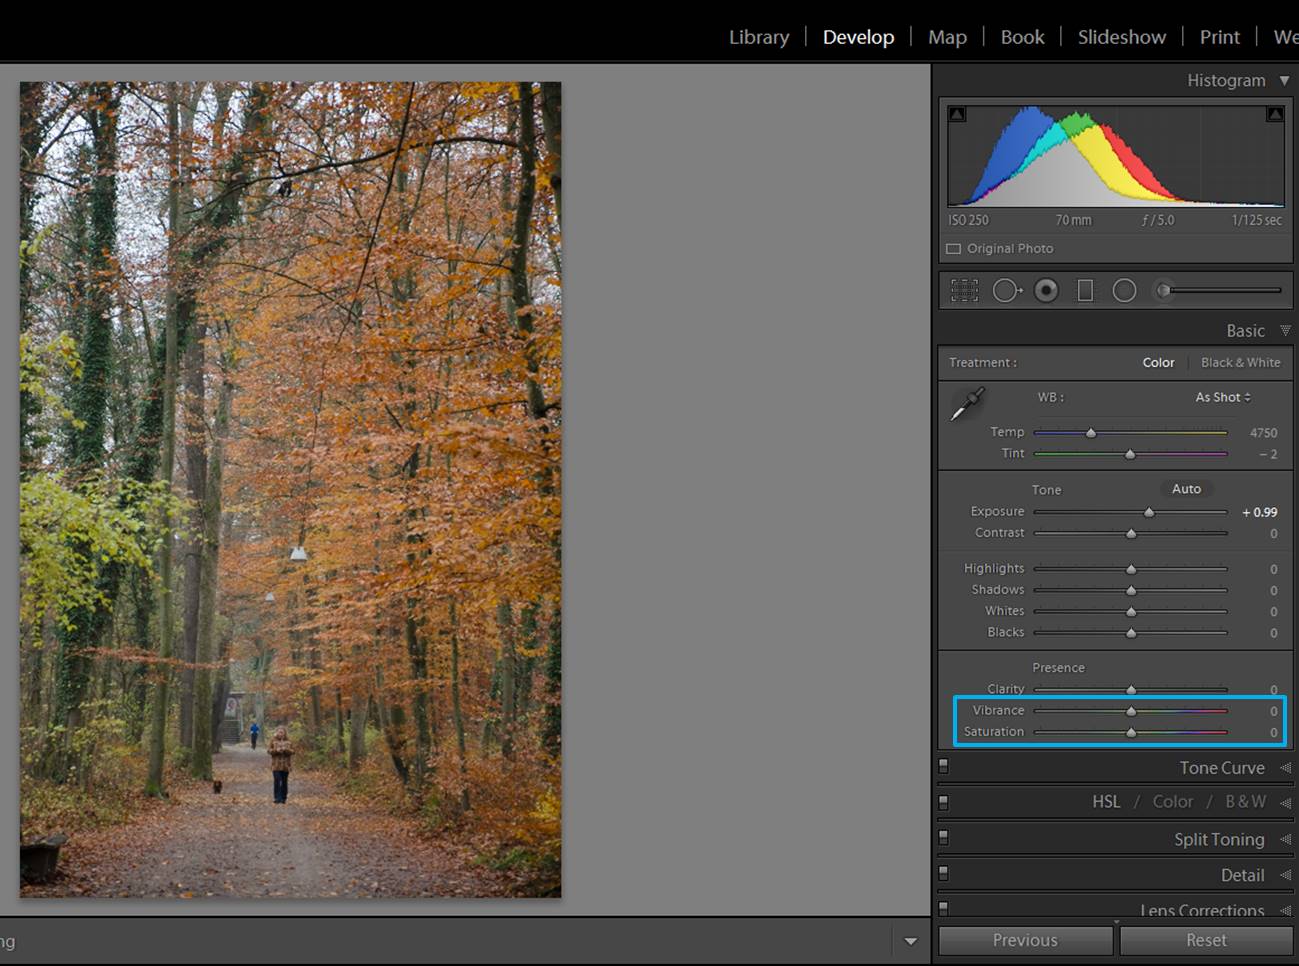
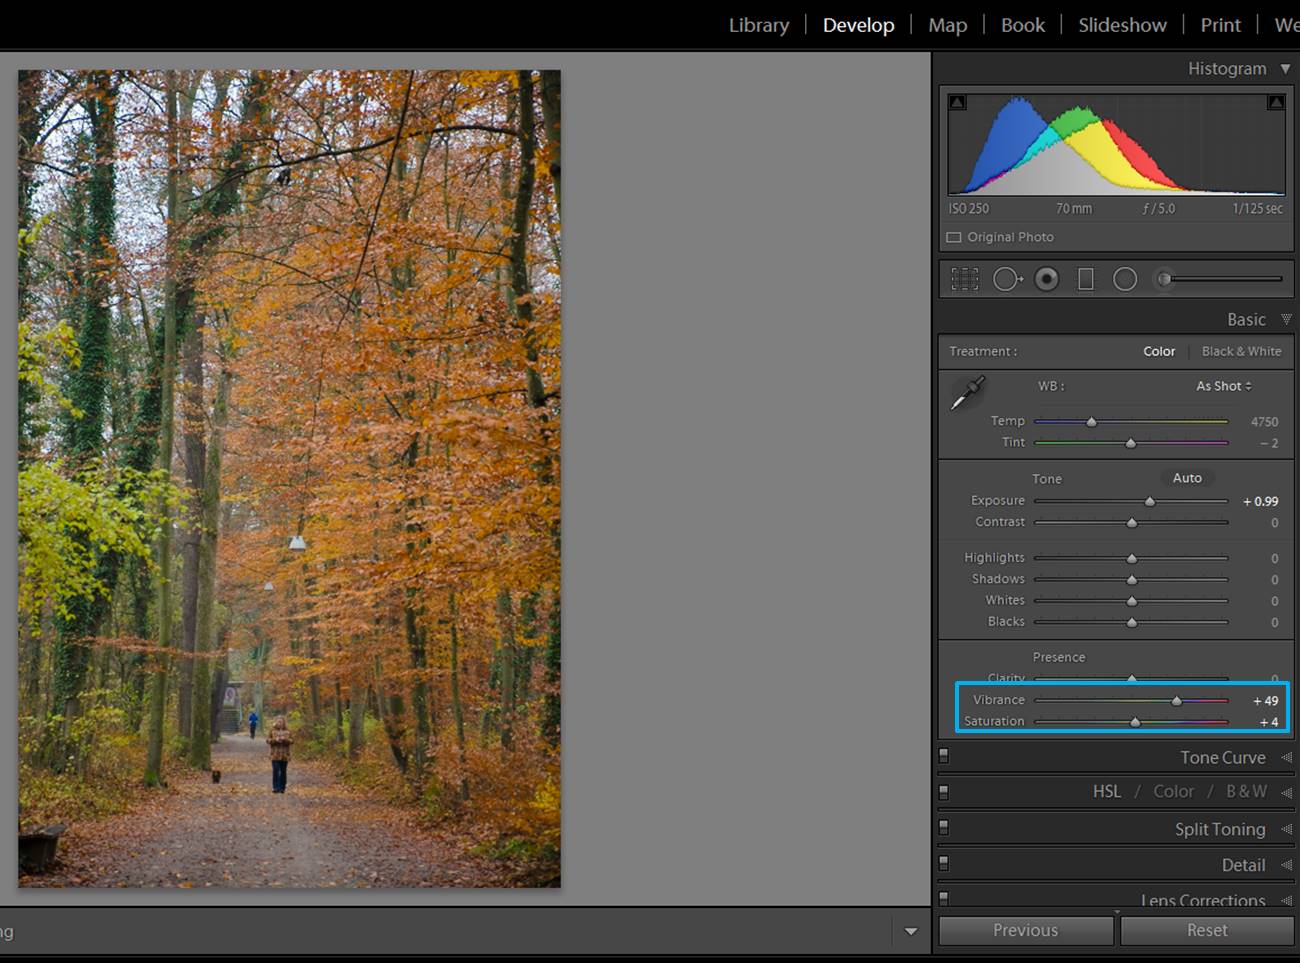
Colors are an important element in forest photography. The way you adjust the colors will depend on what you want to communicate with your photo, so it is quite subjective. With forest photography, increasing the intensity of the colors might work quite well. To do that, you can increase the vibrance and/or the saturation by moving its sliders to the right.

forest images
Here the non edited photo. The values of both vibrance and saturation are 0.
forest images
You can increase both vibrance and saturation, but take care because too much color might look unnatural. Try to find a balance.

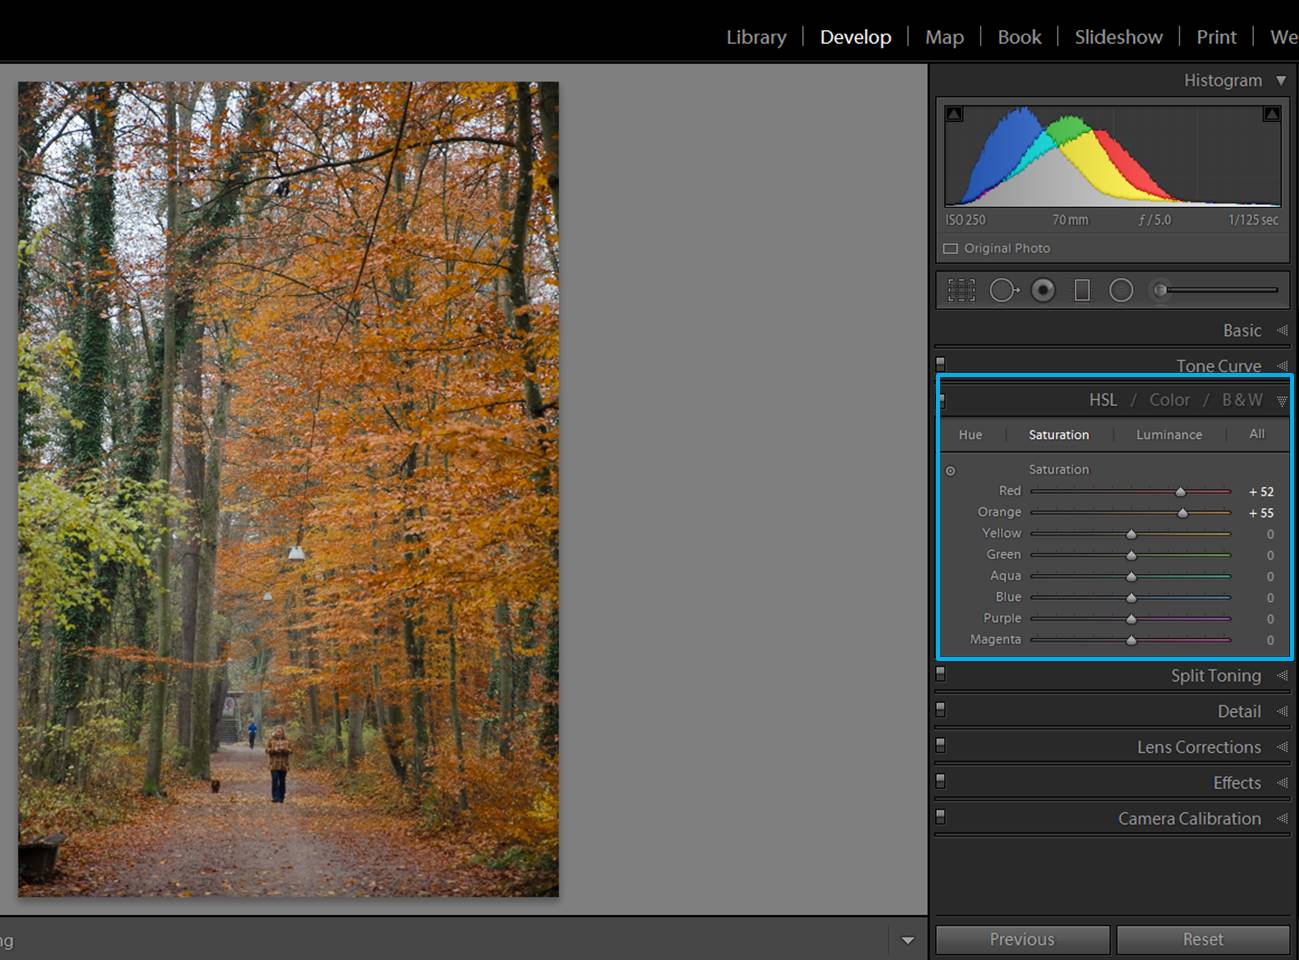
You can be more selective by adjusting individual colors in the HSL/Color/B & W section. You can see that each color has its own slide of hue, saturation and luminance. I usually modify just the saturation.

forest images
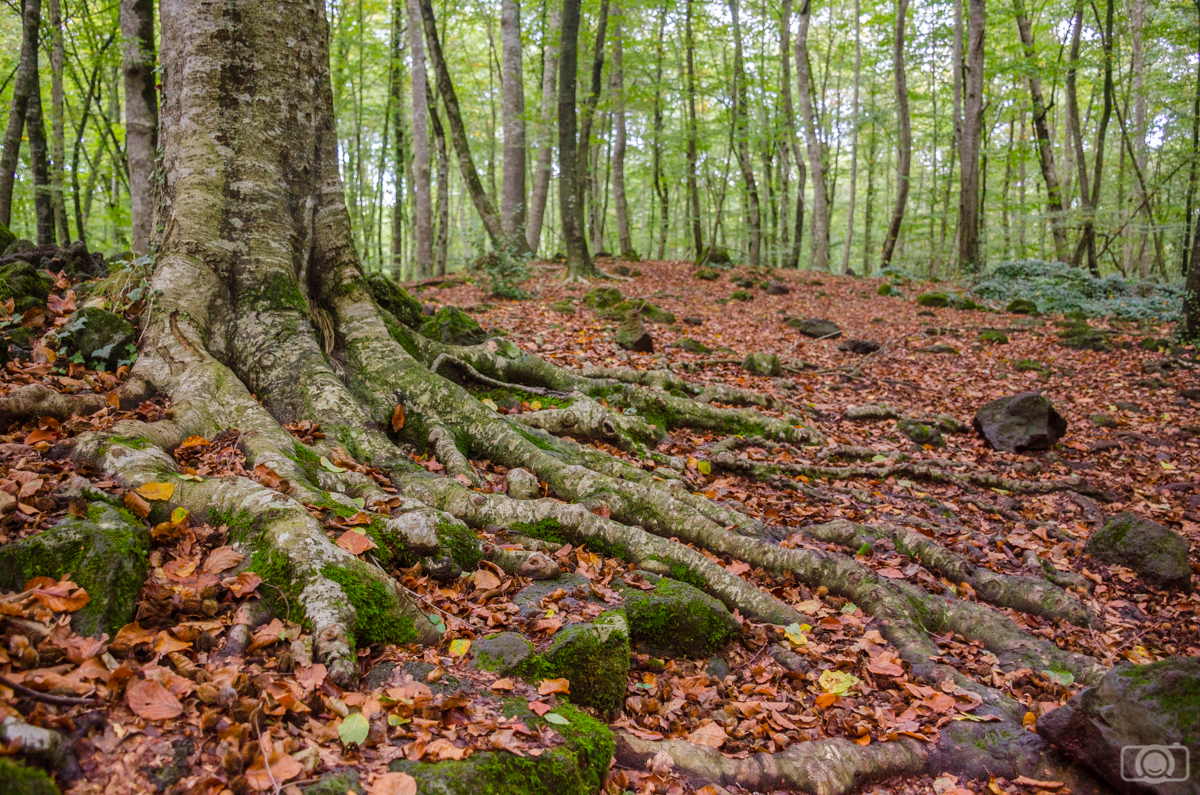
In autumn forest photos, increasing the saturation of just red and orange might be enough.

Highlight the main subject of your photo

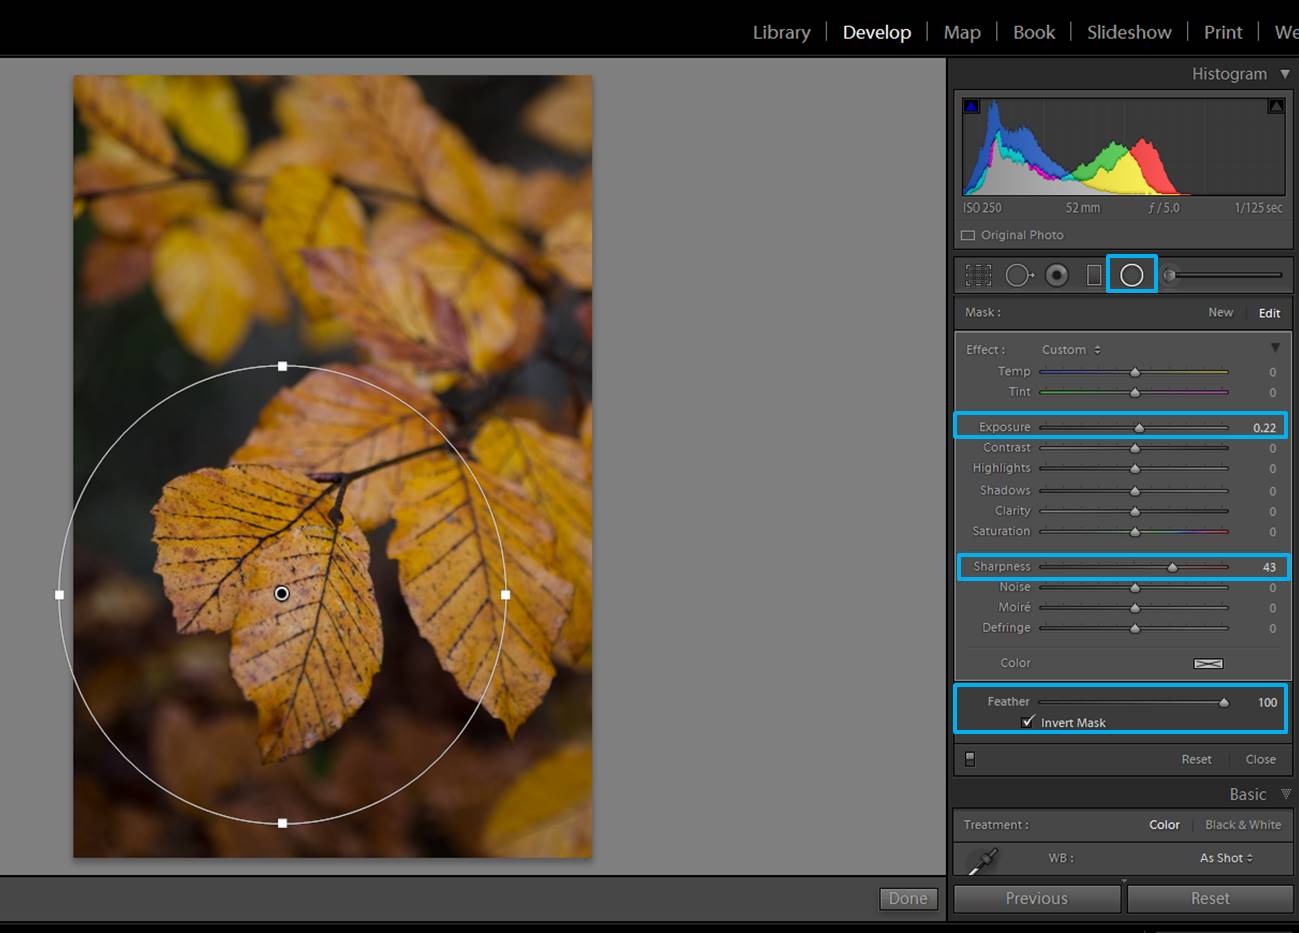
You can highlight the main subject of your image by making it a bit lighter or a bit sharper. This is easily achieved by adding a circular filter.

forest images
This is the original photo. I would like to highlight a bit more some of the leaves in the foreground.
forest images
If you add a circular filter, to make adjustments inside the circle you need to check the box “Invert Mask. A Feather value of 100 makes changes in exposure and sharpness (in our particular case) look smooth.

Add a dreamy look

If you are looking for a dreamy mood, you can achieve it by blurring some parts of the photo and adding a matte effect.

forest images
I made some little adjustments in this image (exposure, highlights…). Now I would like to add a more dreamy look.

To blurry some parts of the photo you can either use the brush tool or the circular filter tool. In both cases, you need to decrease the sharpness and/or clarity.

forest images
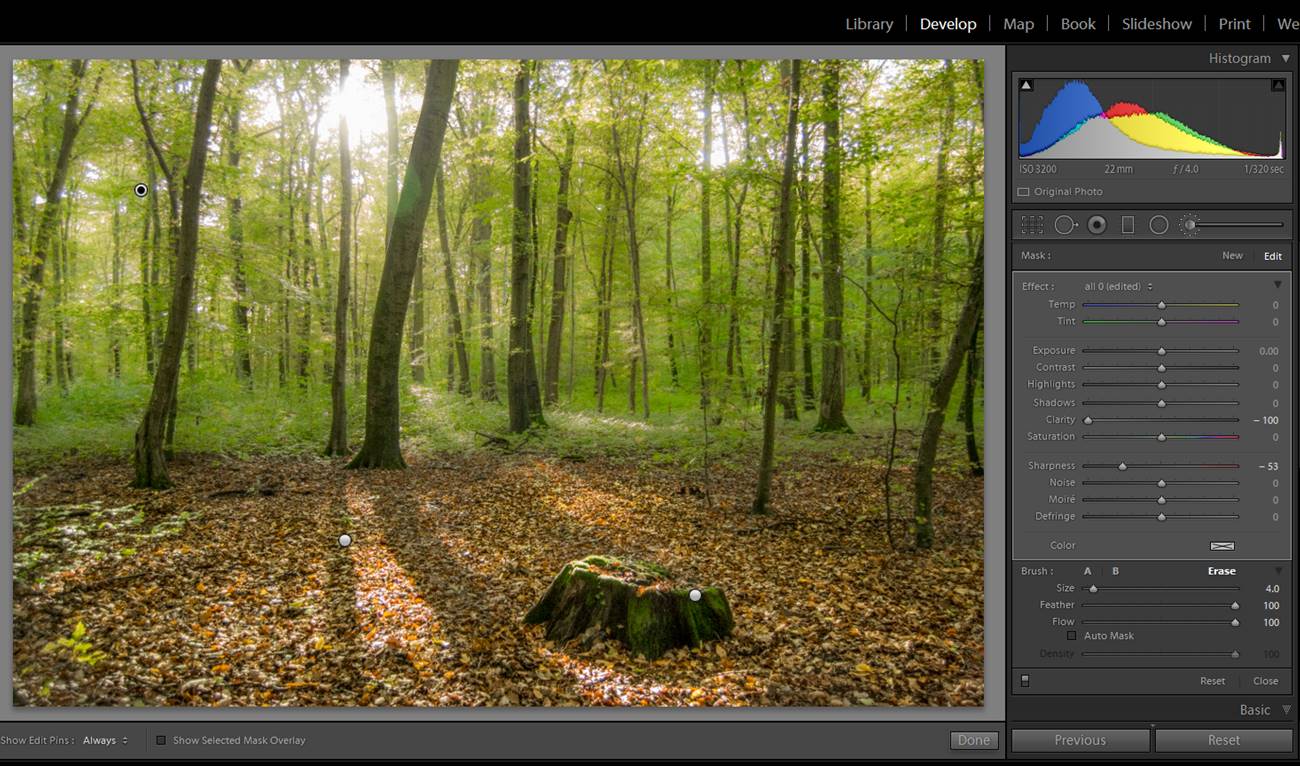
Here I applied a brush to decrease both the clarity and the sharpness of just the leaves.
forest images
You can see like the blurriness achieved by the brush give to the trees a more dreamy effect than when they are sharp.

To achieve a matte effect you will need to make some changes in the Tone curve.

forest images
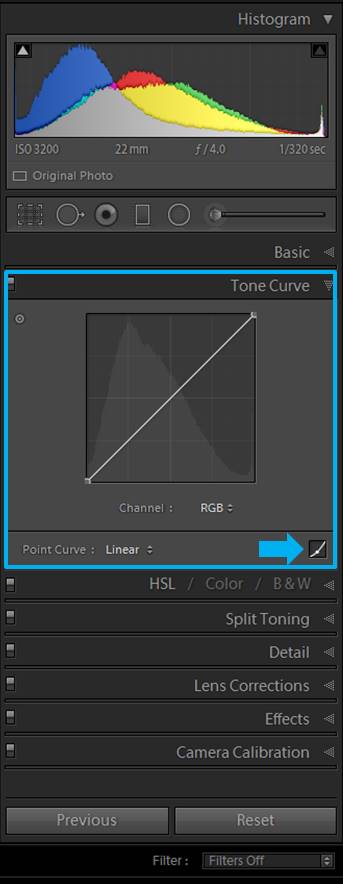
This is the Tune curve adjustment panel. When you move the cursor on top of the curve it might appear as a little cross. If it does not, click on the little box mark here with a blue arrow.

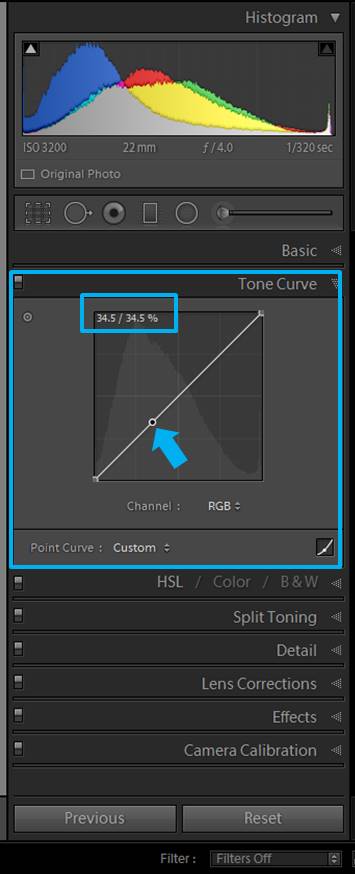
You can select a point in the curve that it is around 30%-40% to anchor it. When you select it, you see a circle in the curve. This means that you can move any other part of the curve, but this particular spot will remain there.

forest images


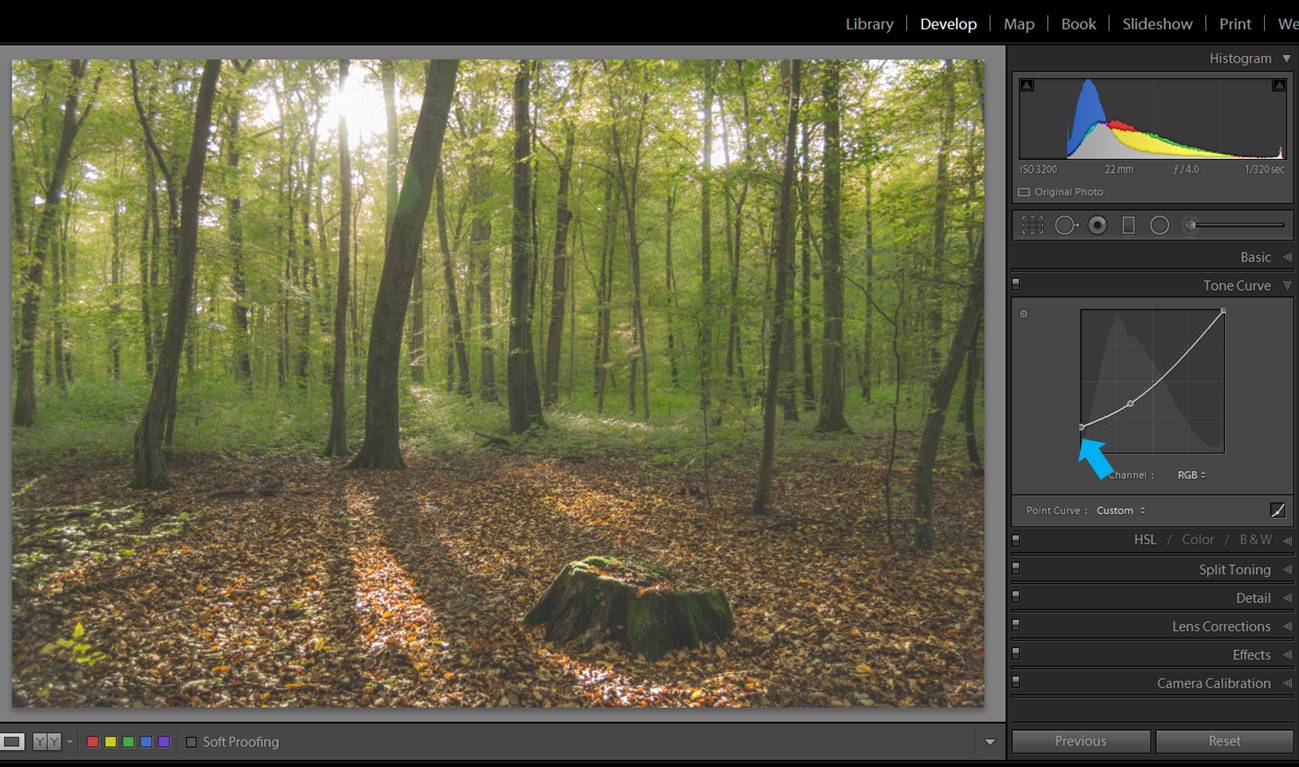
Then you can drag up the left bottom of the Tone curve. You can try with 10% up and adjust it according to your taste.

forest images

Try some presets

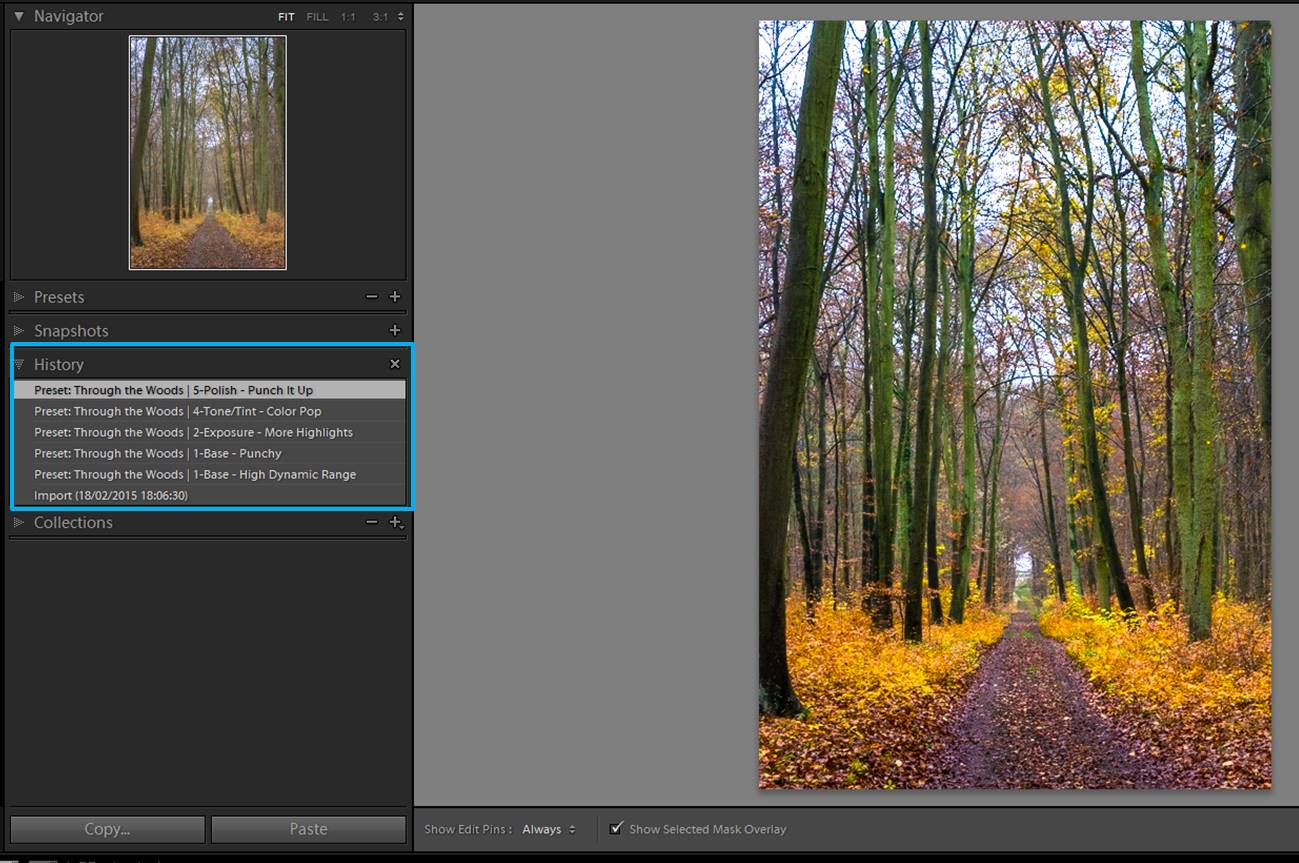
If you need to post-process a lot of photos you might find useful to check some made presets as the Through the Woods Workflow. They will speed up your editing.

forest images
This original photo has potential, but it seems a bit dull right now.

The good thing of these particular presets is that they have been designed for landscape photography. You can stack several presets on one single image, giving you a lot of flexibility.

forest images
In the History panel you can see that I applied 5 presets and their effects stack on top of each other. The photo looks totally different now.

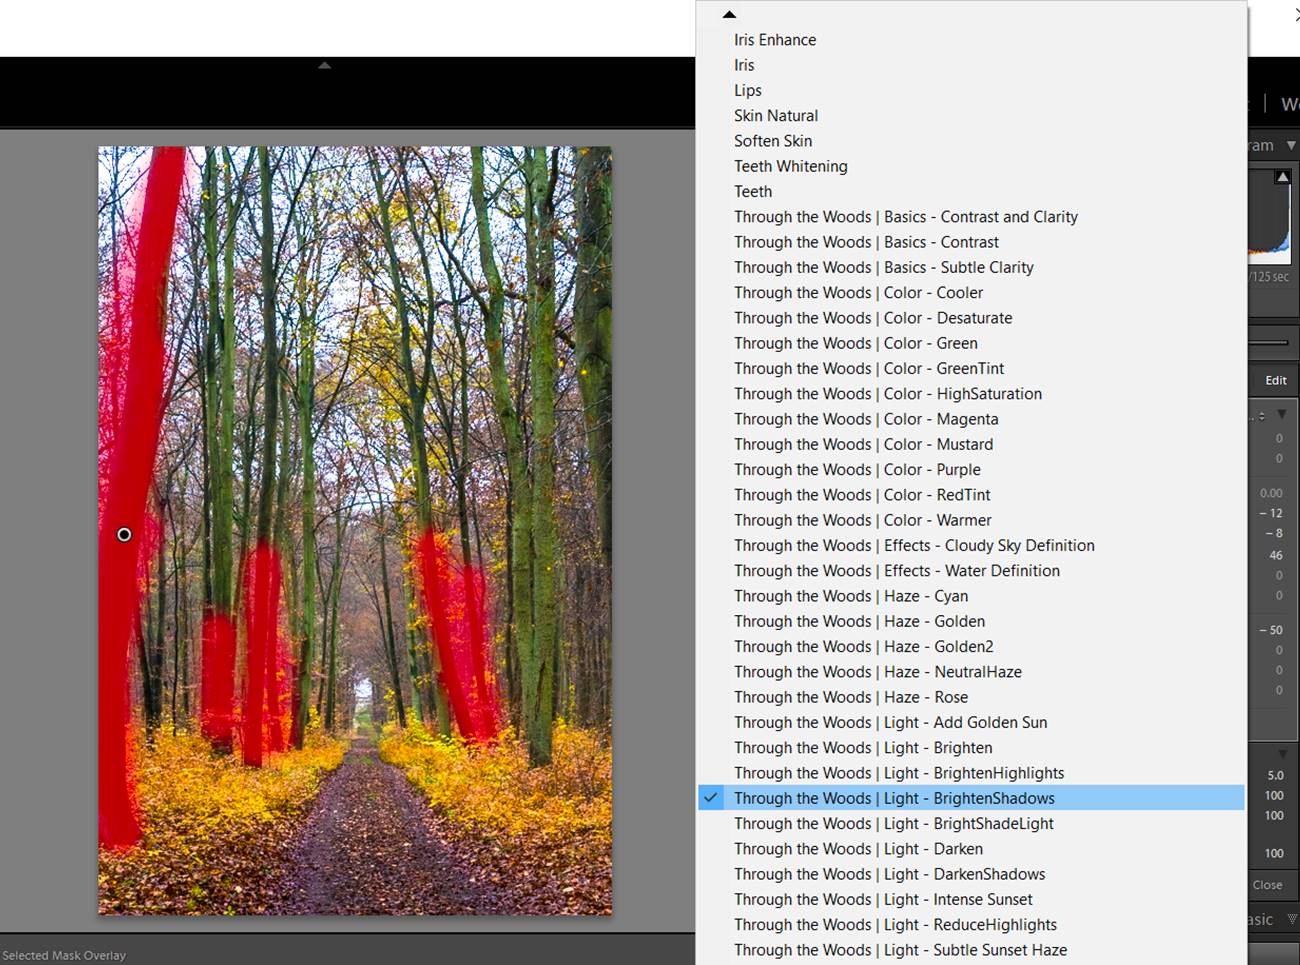
They also provide you with brushes.

forest images
Here you can see all the brushes provided for doing local adjustments In this case, I chose the one for Brighten the shadows and I applied in some of the trees.

Another thing I also like is that the names given to the presets and brushes are intuitive, so you can easily find the ones you need. And if they are not exactly fitting your needs, you can always adjust them a little. However, they already gave you a good starting point.

forest images
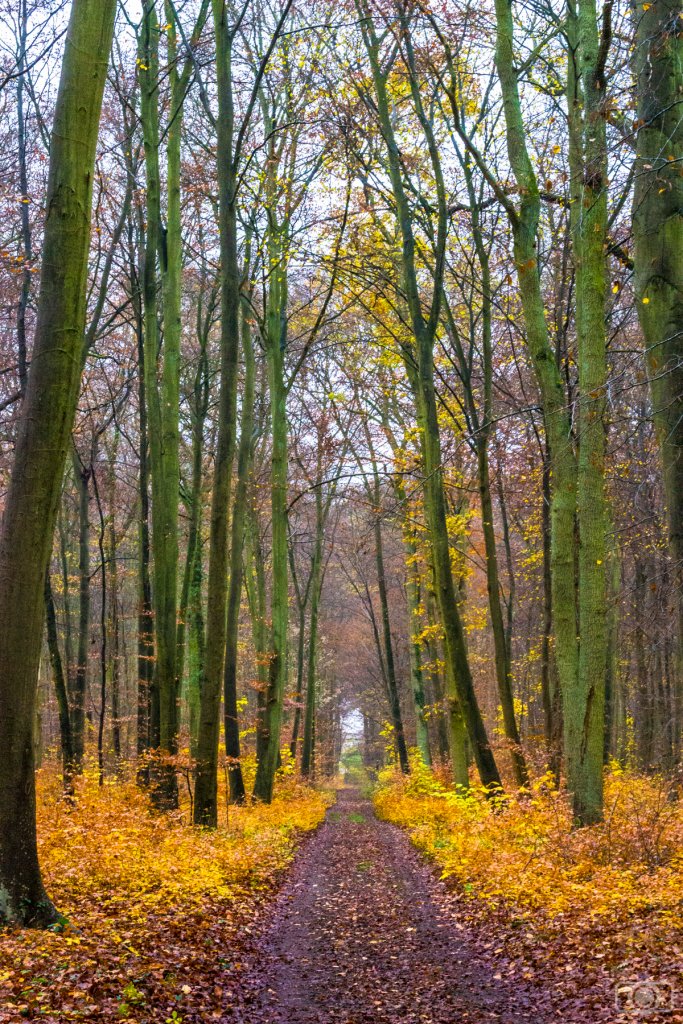
Final image. It took me to edit it just 2 minutes.

I hope you liked this tips for post-editing your forest photographs. Do you have any other tip? I would love to hear about it! Have a happy post-processing!!!

How to Work with Forever Thine: Vintage Aesthetics in Lightroom

Welcome back! Today we’ll be taking a look at how to work with the “Forever Thine” wedding themed workflow, more specifically, how to apply a vintage looking aesthetic to your photographs.

This is becoming more popular, especially with weddings that are outdoors, in the spring or fall. The effects give the photographs a nice homegrown, vintage wedding look.

Let’s go ahead and get started with my first photograph, which is of a bride and groom walking from their outdoor wedding ceremony.

To start this one off, we will use a “Forever Thine” Base preset. Let’s scroll through those and select Base – Camellia, which will lighten the photo up just a bit.

Next, we’ll move on to a Tone & Tint preset and to help create that vintage, faded matte effect, we will apply the Fading Dream preset.

Another nice aesthetic that is really popular is a matte effect. With several different matte effects included in the “Forever Thine” presets, there many choices. In this photo we are going to go with the Matte – Wanderlust preset. Once applied it has added some contrast, but also added some matte finish to the darker areas.

To adjust this preset a little we will go into the Tone Curve, by dragging the bottom of the lineup some we will add to the matte effect.

Other presets that add a nice vintage look are the Film presets, so let’s scroll down to those and go with Film – Sunset Boulevard, which will change the color and tone a bit.

Next, we’ll move over the “Forever Thine” brushes, starting off with the Light – Darken Shadows brush. Making the brush larger and lowering the exposure, we’ll apply this brush to the background to help darken the shadows some, making sure to get in close to the subjects so they aren’t outlined by a ring of light. The point of using this brush is really to bring the focus to the subjects of this photograph.

In the before and after, starting out with a nice wedding photograph, we added an old school or vintage effect which goes along nicely with the fall theme already in the photograph.

So now we’ll move on to another photograph, this time of a bride and groom on a shoreline with the bride’s veil blowing in front of them. Like the previous photograph, we will give a vintage effect to this one as well.

Getting started, we are going to go back to our “Forever Thine” Film presets and like the previous photo, we’ll apply Sunset Boulevard.

Next, we will scroll down to the Wedding Vintage presets and apply First Class.

The really nice thing about these presets is that they are completely stackable, so while applying one on top of another, you aren’t canceling out the effects of the one previously applied.

Now just to tweak this preset a little, we’ll go over and open the Basic tab, then move the Clarity up just a bit.

Those are the only two presets that I’m going to apply, now we’ll move over to our “Forever Thine” brushes.

Starting out, we will use the Light – Brighten Highlights brush. Let’s turn the Exposure up and apply this brush all around the bride’s veil as well as the groom’s suit.

Now let’s go back into the “Forever Thine” brushes, then scroll down to the Wedding – Clarity & Detail brush and apply this brush to the veil and dress, to help bring some more of the detail out.

Next, I am going to open up the Basic tab and move the Exposure and Contrast up slightly.

Now when we applied one of the presets, we lost a lot of the blue in the sky. To fix that and bring it back we’ll open up the controls for the colors, then slide the Blue up some. I’ll push the Red down a tiny bit as well.

Finishing up with this photograph, we can see that we have given it an older looking sepia effect with a nice brown tone. The picture that we started with was a nice photograph, we just gave it more of a vintage look, which is really trending right now.

Now, on to our third photograph. In this photo the bride and groom are standing in front of a white fence, a little further back from the camera. This is a nice photograph, however above the subjects it looks like some of the highlights coming through the trees are a bit blown out, so we will have to fix that as we go.

Getting started, we are going to go into our presets and apply Wedding Vintage – Pine, which darkens the photo and gives it a warmer tone. Once applied, let’s open the Basic tab and slide the Highlights down quite a bit, so we can get some of that detail back in the background. It has really darkened the photograph, but we will bring some like back to the subjects as we go along.

This photograph is framed naturally by the trees in it, but we are going to enhance that by adding a vignette. In this photo we will use Vignette – Black Heavy. Since this is really dark, we will go over the Effects tab and Slide the Highlight Priority Amount up a little so it isn’t as dark around the edges.

Let’s now move over to the “Forever Thine” brushes and select Wedding – Fix Underexpose which will help bring some light back. So, we’ll make the brush a little bigger and run this all around the subjects and the center of the photo, turning up the Exposure, Contrast and Clarity while we go.

Now going back into the brushes, let’s use the Wedding – Clarity & Detail brush. Turning the Exposure up, we will run this brush right around the bride and groom to bring a bit more detail and light back to them.

That’s all that we will do with this photograph. By adding this vintage effect, we have focused a lot of light on the subjects while giving it a nice warm tone and color.

I hope that you enjoyed this tutorial and found it helpful. Hopefully you’ll be able to try our “Forever Thine Workflow” for yourself soon.

Adding Light Leaks In Lightroom

It can be fun to shoot in the summer or when it is sunny outside. Capturing light flares and light leaks add a little extra to your photos, improve dull photos in Lightroom, and creating more interest.

In both situations it takes light hitting your camera to create the effect. So what happens when you do not the right light or you are not in the right position to create these effects, which are sometimes looked as mistakes. Well, what you do is you create your own effect on location or in post processing. Today we are going to create a light leak using the Forgotten Postcards Vintage preset and the brush from the Chasing Light Workflow bundle. Know more about Lightroom presets here.

1 – What is a light leak?

A light leak is when there is a gap or hole in the camera body where light can get in and expose the sensor to unintended light. This is often seen as a problem or unintended mistake that happens, but it can look great and be used as an artistic choice in certain images. Now that we know what a light leak is let’s look at the starting point of the image for this tutorial. And if you want to know more about presets, click here.

Arnel Hasanovic Creating Light Leak in Lightroom

2 – Color Editing

I first start out with editing the colors of the image. I had a lot of the sky that was blown out because of the light I was facing. I was indoors where the subjects back were facing a dark area with not much light hitting it. In order to get a good exposure on the back of the hair and the subject, I have to expose enough which in turn gave me some blown out highlights. Losing the highlights was not that big of a concern for me as the subject is what I was really focusing on. You can see that I wanted the colors of the shorts to pop against the white shirt. I also cropped the image to get rid of some of the distracting elements and to get a little tighter crop.

Arnel Hasanovic Creating Light Leak in Lightroom Tutorial

3 – Adding the Preset

After I had the colors I wanted I then went into the Forgotten Postcards Bundle and used the Light Leak 9 Preset. What this did is add a preset of color on left and right sides of my image. You can achieve a similar and more customized leak using the Adjustment Brush panel which is in the next step.

Arnel Hasanovic Creating Light Leak in Lightroom Tutorial

4 – Using Adjustment Brush

To achieve a customized light leak you can use the Adjustment Brush to add your desired color, size and shape of the leak. After installing the brush set from the Chasing Light Workflow I chose the “Add Golden Sun” brush and brushed the bottom right corner of the image to fill in more of that light leak effect to the image that the preset did not cover.

Arnel Hasanovic Creating Light Leak in Lightroom Tutorial

5 – Conclusion

If you look on the bottom right you can see the area I used the brush to add more own desired light leak. You can use this technique for the whole image and create all of the light leaks or you can start with a preset and fine tune it using the Adjustment Brush. To mimic it better or to match the light in the image you can sample a color and use that color for your brush if the red/orange in the presets does not fit the color you want to achieve. If you need a refresher on how to import brushes and presets then check out our tutorial.

Arnel Hasanovic Creating Light Leak in Lightroom Tutorial