Tag: sun

Shooting in Sun vs Shade: When is Best?

Have you ever been excited for a bright, sunny day to plan a portrait session only to find harsh lights, extreme shadows, and unflattering lighting? There’s a big misconception about the best time of day to shoot and what kind of weather to hope for. And it may not be what you’re expecting.

Shooting in the Afternoon

Between the hours of 10am and 4pm, depending on the time of year, the sun is at its highest points in the sky. This means your light source will be coming from one of three places:

1. Behind your subject, causing your background to be extremely bright and the subject to be dark

2. Above your subject, which will cast harsh and unattractive shadows on their face

3. Or in front of your subject, making them squint their eyes and scrunch up their face

If you want to make shooting in direct sunlight work, there are a few extra pieces of equipment you can carry with you. You can bring a reflector onto the field, which will allow you to fill in harsh shadows. This works by bouncing light back onto the subject and can give a more overall light. Another option is to use a fill in flash. Your camera may be equipped with a flash but you will get better results from an off-camera flash.

sun-vs-shade-1

The best way to make shooting in direct sunlight work if there is no other option is to expose for the face and keep the sun behind the subject. This may mean your background is blown out but the most important part of the photo, the face, can be properly seen. You can also try shooting from different angles instead of straight on. Kneel down and shoot up or climb up high and shoot down.

However, if your subject is willing to move, there is a better option.

Shooting in the Shade

During your time as a photographer, you will hear the terminology “diffused light” coming up again and again. Diffused light is a soft light that spreads evenly across your entire subject. This does away with any harsh shadows or highlights and has an overall flattering look. When shooting outdoors, you don’t always have the luxury of controlling the light. Many times, the last thing you want to do is haul a bunch of gear out into the field. This is when shade can be your best friend.

sun-vs-shade-2

The tricky part to shooting in the shade can be getting the correct exposure. Your subject is now in a darker area so your exposure will have to be brought up. You can achieve this by opening your lens aperture (opening it up is the equivalent to smaller numbers) or slowing your shutter speed down. Another option is to shoot in Auto mode and allow the camera to determine the appropriate exposure.

Depending on where your subject is positioned in the shade, you may find your background getting overexposed or blown out. You can fix this by changing your position so that the background behind your subject is equally in the shade or allowing the bright background to be a creative addition. It can add highlights to the hair or a nice edge glow behind the subject.

sun-vs-shade-3

Best Times for Shooting

The best times of the day to plan your portrait shoots are actually early morning and late evening. These times of the day are referred to as the “golden hour”.  The exact times will depend on the current season as it impacts the position of the sun. Ideally what you’re looking for is the sun to be low in the horizon.

During this time of the day you will have the most flexibility for subject vs sun position and also creative lighting. With the sun behind you and in front of your subject, they will be cast in a warm tone and the low horizon light will reduce squinting. Or, you can try positioning your subject with the sun behind them to create an outer glow.

sun-vs-shade-4

Remember, the best time to shoot is when the light is diffused or low on the horizon. Try to plan for cloudy days or dusk hours. If you’re stuck in the direct sunlight, look for some shade to move your subject into. All is not lost however if you’re out on an afternoon with no clouds in sight. You can shoot into the sun by putting the sun behind your subject, expose for their face, and try to adjust the angle that you’re shooting from to reduce harsh lights and shadows.

Sunrise and Sunset Photography – Shooting into the Sun

Warning: this article deals with capturing images of the Sun. Looking into the Sun with bare eyes or through a photography lens can produce irreversible damage to your eyes. Be extremely cautious when trying the techniques shown in this article!

Photography is based on light. In fact, the mental picture of photography being a way of painting with light is a common place. And while it is true that the process of painting is in principle more complicated than pressing a shutter button, getting to understand how light is transported and reflected to finally reach the sensor is a lifelong process.

When shooting an evenly lit scene, getting the right exposure is usually a straightforward process, with even point and shoot settings usually giving pretty good results. In these occasions, what distinguishes a good photographer from the rest is the composition of the image, another skill that can be improved throughout a lifetime.

sun01

However, when light conditions are far from ideal, the way we capture our images needs to be adjusted and point and shoot settings become pretty much useless. The more extreme the conditions, the harder it can get to get the right exposure for our photos, even getting to the point where exposure bracketing and blending in post-processing becomes necessary.

The most extreme condition is arguably the one where a strong light source is included in the composition of an image. Given the limited dynamic range of cameras, what we can expect from a photo taken with the Sun in the frame differs significantly to what we actually see.

In this post, I want to show you some tips on how to take photos of sunrises or sunsets and what you can do to get interesting shots in general when you shoot directly into the Sun.

sun02

The first thing you have to get used to is how your camera captures light. If the conditions are so that the light will be more or less evenly distributed even with the Sun being part of the frame, you can get colors and details at many different parts of your final image. This happens, for instance, when the Sun is relatively high on the sky and the foreground is a highly reflecting surface like snow, or even sand.

However, when the scene is rather dark, the objects are opaque or simply no direct light shines on them due to their position with respect to the Sun, you have to start thinking in terms of silhouettes.

sun03

This is probably the most difficult part of the learning process. Silhouettes can actually make very eye-catching photos, but the brain needs to get used to how they look, since when you are standing there you don’t see any silhouettes. So basically this is one of those points where the only thing you can do is practice as much as you can until your eyes and brain get properly trained.

During sunrises and sunsets, the Sun is low enough as to be located on the background of your image, literally behind any other subject. This means that if you want to capture the Sun in your frame during those times, you need to think about how your foreground will look as a silhouette.

In that sense, a great place to capture nice photos of this time of the day is anywhere close to the sea. On the one hand, piers and lighthouses usually provide low and extended silhouettes and, on the other hand, a complete lack of subject means that you will have a classical sunrise or sunset over the sea shot, which are always nice.

sun04

Given the incredible brightness of the Sun, it will simply outshine anything else in the picture, most of the times making it impossible to extract any brightness or color information from other areas. This is simply because, in order to have the Sun as a distinguishable object, the rest of the image will be underexposed.

If you want to retrieve the information in those areas, you will most of the time need to resort to image blending techniques. For this, in the simplest case, you just need to make a photo with the foreground correctly exposed and one in which the areas of the sky surrounding the Sun still have valid information. The Sun itself will usually be overexposed anyway, but that’s fine for the purpose of landscape photography.

After you have both exposures, you can used Photoshop or any other image processing software to combine them so that your final image has enough information all over.

sun06

Unfortunately, in many occasions, even with the relatively good dynamic range of modern DSLRs, this is the only way to go. So that’s basically a short list of situations where you can include the Sun in your images. Even though it might seem strange at the beginning, shooting into the Sun can provide great results that are quite different from what you are used, so give it a try.

To finalize, a few important tips that you should take into account:

  • First and most important: use the LiveView of your camera when shooting into the Sun. Never look through the viewfinder since this will cause irreversible damage to your eyes!
  • Evaluate the scene: make a quick inspection of the conditions in general to plan whether you want to capture silhouettes or a full scene.
  • If you want to go for a full scene and the foreground is not very reflective, you will have to do more than one exposure.
  • Use a tripod: whether you are doing bracketing or a single shot, a tripod will make it much easier to compose your image and get everything in focus before pressing the shutter button.
  • Clean your lens!: this is an important one. When shooting into strong light sources, any small dust particle in your lens (or sensor) will cause a flare that needs to be removed during post-processing and sometimes it can be difficult to do it, so simply plan ahead to avoid the hassle.

Mercury Transit: How to Capture it? | Astrophotography Series

Warning: this article deals with capturing images of the Sun. Looking into the Sun with bare eyes or through a photography lens can produce irreversible damage to your eyes. Be extremely cautious when trying the techniques shown in this article!

For most of us, astrophotography is one of the most challenging types of photography that we can think of. First of all, it usually happens at night, which makes it difficult already from the logistics point of view, not to mention the noise problems, focusing difficulties, etc. Also, when we look at those fantastic images of galaxies and nebulae, we feel it is beyond our reach both in terms of gear and capacity. And the truth be said, many times that is indeed the case. For starters, many of those images were captured with specialized Earth-based telescopes or even the Hubble space telescope, so there is no way, for most of us, to be able to reproduce them.

There are, however, some subjects that we a decent gear and enough planning can be easily captured by anyone interested. The most popular ones are probably the moon, star trails, meteor showers, artificial satellites like the International Space Station, aurorae and the Milky Way.

The one I want to address here is surprisingly not so popular and, even better, is visible during the day. I am talking about the Sun.

mercury1

Mercury transit

And next Monday (May 9, 2016), it is a very special day to try your first (well, it might be worth practicing a bit before) photo of the Sun, since Mercury, the innermost planet of the Solar System, is going to be passing right in front of our central star, making for a nice subject.

Mercury has an orbital period around the Sun of about 88 days. If we compare this to the 365 days that the Earth takes to complete a full orbit around the Sun, that means that Mercury should pass in front of the Sun almost 4 times a year. However, due to differences in the inclination of the planetary orbits, this actually occurs in a not so regular basis. While the last transit occurred in 2006, the next one will be in 2019 and the following one in 2032!

A good thing about the transit is that it lasts for several hours (more than 7 hours this time), so you will have many chances to get it right and you can also get many exposures to combine them together afterwards in Lightroom or Photoshop. So now let’s see how to capture this phenomenon.

Making photos of the transit

But first of all, a very important warning: DO NOT EVER LOOK INTO THE SUN, UNDER NO CIRCUMSTANCES!!! Looking directly into the Sun with bare eyes for just some seconds can damage your sight permanently, and looking through a photographic lens for just a split of a second will cause irreversible damage, so really, DO NOT LOOK DIRECTLY INTO THE SUN. If you do not understand the risks, please do not try this.

mercury2

Now, apart from a DSLR camera, you will preferably need a zoom lens and definitely a tripod and dark neutral density (ND) filter, preferably an ND1000 that provides a 10 f-stop reduction of the amount of light reaching the sensor. The zoom lens is to get the Sun’s disk to cover an important part of the frame so that the resulting photo is interesting and the ND filter to get the necessary exposure. The Sun is simply too bright so even a very fast shutter speed like 1/4000 will not be enough to avoid overexposure. In fact, even with the ND1000 filter on, you need to set your shutter speed at 1/4000 and the aperture at f/25 (at least those should be good starting points; you can play around with these values until you get the exposure you want).

Whenever I take photos of the Sun or the Moon (both objects look roughly the same size from the Earth!), I use a Canon 90-300 mm zoom lens at its maximum focal length (300 mm). This focal length is enough to get a good size, even though a slightly larger one would fill the frame even more, so if you have a 400 or 500 mm, go ahead and use it.

So once you have your camera with the zoom (or telephoto) lens attached to it, attach the ND filter, look for a good spot to set your tripod and, WITHOUT LOOKING INTO THE SUN (sorry, I cannot stress this enough) point your camera roughly at the Sun.

The next step is to properly set the Sun in the frame of your camera and to accurately focus. Now this is another delicate point where people do not agree. Since you cannot look directly into the Sun, you will need to complete these two steps by using the Live View of your camera (the screen).

mercury3

I’ve read many times that pointing your camera to the Sun with the internal mirror up can damage your sensor, especially when taking long exposure photos. This might be true especially without using ND filters but, from my experience, with the ND1000 I’ve taken many photos of the Sun and so far I’ve never had any issue with my sensor. In any case, if you want to minimize the time your sensor will be directly expose to direct sun light, you can first set the focus by focusing at any object that is very far from you, the farthest object you can see around you. That should set the focus to the ‘infinity’ point of your lens which should work well for the Sun as well. If for any reason this does not work for you, you can always perform manual focusing using the Live View mode of your camera.

Then, the final preparation step comes in, and that is framing the Sun. For this, you don’t have any other option but to activate the Live View and move your camera (already placed on the tripod) until the Sun is right on the middle of the back screen (again, remember to always look at the screen, and not at the Sun!).

Once everything is set, you can stop the Live View mode. If you did everything right, the whole process should take not more than 10 seconds and, taking into account that you have your ND1000 filter on, everything should be fine with your sensor and your eyes.

That’s pretty much all you need to get a nice photo. Just take your photos in normal mode (no Live View) as you would with any other subject. If you have a remote controller for your camera use it. Otherwise, set the timer of your camera to 2 or 10 seconds. This will avoid any motion from you pressing the shutter that would be very visible with such a large focal length.

An extra thing to take into account is that, with a focal length of 300 or 500 mm, the relative motion of the Earth and the Sun will become noticeable, meaning that you will have to make adjustments on the pointing of the camera from time to time. For this, simply activate the Live View mode, move the camera accordingly, and repeat the process.

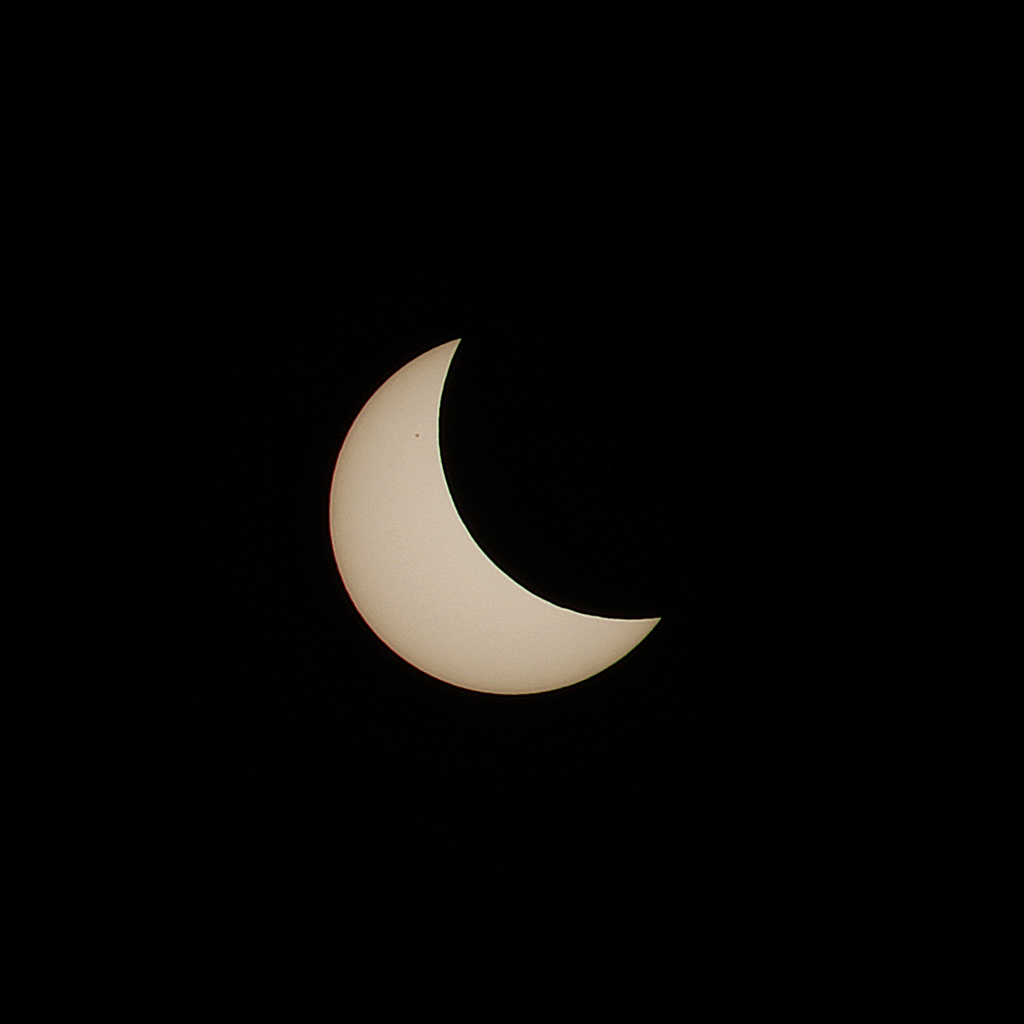
Now, take into account that getting the right focus to get very sharp details on the planet itself or the sunspots (yes, if there are sunspots you will actually capture them as well!) is very difficult (in fact I have not been able to get completely sharp photos myself so far!) so don’t get frustrated. Try to improve the focusing using Live View (remember to leave the Live View mode activated only for short periods of time) until you are happy with the results.

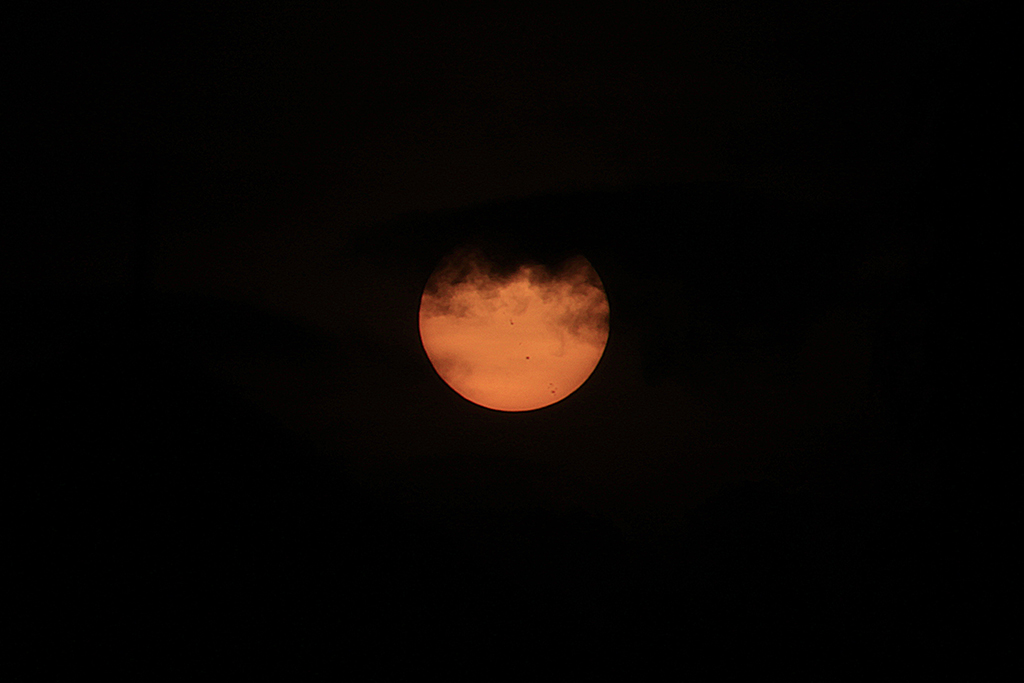
Finally, it is intuitive (it was for me at least!) to overexpose your picture when capturing the Sun or the Moon. This is probably because we expect them to be bright objects. However, if you want to capture details, you will need to underexpose so play with the settings of your camera until you get the right results. In any case, the settings should be close to 1/4000 and f/25.

Summary

So let’s take a look at the steps one by one:

  1. Do not look directly into the Sun, either with bare eyes or through the lens. Seriously!
  2. Attach a zoom or a telephoto lens (preferably a focal length greater than 300) to your camera.
  3. Focus to the most distant object you can.
  4. Attach the ND1000 filter to your lens taking care of not changing the focus (this might be tricky if the filter thread is located at the focusing ring, so be careful while doing it).
  5. Set your tripod on a nice location, put your camera on the tripod and point it roughly towards the Sun.
  6. Set the exposure time of your camera to 1/4000 and the aperture to f/25.
  7. Activate the Live View and, using the screen of your camera, point your camera so that you can see the Sun roughly at the center of the screen.
  8. Adjust the focus if you think it is necessary (try to leave the Live View mode on for as short a time as possible).
  9. Turn off the Live View mode and take photos as you would usually do using either a remote controller or the timer of your camera. If needed, adjust the exposure time and/or aperture.
  10. Adjust the pointing direction of your camera once the Sun starts to get out of the frame.

Adding Light Leaks In Lightroom

It can be fun to shoot in the summer or when it is sunny outside. Capturing light flares and light leaks add a little extra to your photos, improve dull photos in Lightroom, and creating more interest.

In both situations it takes light hitting your camera to create the effect. So what happens when you do not the right light or you are not in the right position to create these effects, which are sometimes looked as mistakes. Well, what you do is you create your own effect on location or in post processing. Today we are going to create a light leak using the Forgotten Postcards Vintage preset and the brush from the Chasing Light Workflow bundle. Know more about Lightroom presets here.

1 – What is a light leak?

A light leak is when there is a gap or hole in the camera body where light can get in and expose the sensor to unintended light. This is often seen as a problem or unintended mistake that happens, but it can look great and be used as an artistic choice in certain images. Now that we know what a light leak is let’s look at the starting point of the image for this tutorial. And if you want to know more about presets, click here.

Arnel Hasanovic Creating Light Leak in Lightroom

2 – Color Editing

I first start out with editing the colors of the image. I had a lot of the sky that was blown out because of the light I was facing. I was indoors where the subjects back were facing a dark area with not much light hitting it. In order to get a good exposure on the back of the hair and the subject, I have to expose enough which in turn gave me some blown out highlights. Losing the highlights was not that big of a concern for me as the subject is what I was really focusing on. You can see that I wanted the colors of the shorts to pop against the white shirt. I also cropped the image to get rid of some of the distracting elements and to get a little tighter crop.

Arnel Hasanovic Creating Light Leak in Lightroom Tutorial

3 – Adding the Preset

After I had the colors I wanted I then went into the Forgotten Postcards Bundle and used the Light Leak 9 Preset. What this did is add a preset of color on left and right sides of my image. You can achieve a similar and more customized leak using the Adjustment Brush panel which is in the next step.

Arnel Hasanovic Creating Light Leak in Lightroom Tutorial

4 – Using Adjustment Brush

To achieve a customized light leak you can use the Adjustment Brush to add your desired color, size and shape of the leak. After installing the brush set from the Chasing Light Workflow I chose the “Add Golden Sun” brush and brushed the bottom right corner of the image to fill in more of that light leak effect to the image that the preset did not cover.

Arnel Hasanovic Creating Light Leak in Lightroom Tutorial

5 – Conclusion

If you look on the bottom right you can see the area I used the brush to add more own desired light leak. You can use this technique for the whole image and create all of the light leaks or you can start with a preset and fine tune it using the Adjustment Brush. To mimic it better or to match the light in the image you can sample a color and use that color for your brush if the red/orange in the presets does not fit the color you want to achieve. If you need a refresher on how to import brushes and presets then check out our tutorial.

Arnel Hasanovic Creating Light Leak in Lightroom Tutorial