Tag: Sunrise

Six Dolomitic Destinations a Landscaper Couldn’t (And Shouldn’t) Miss

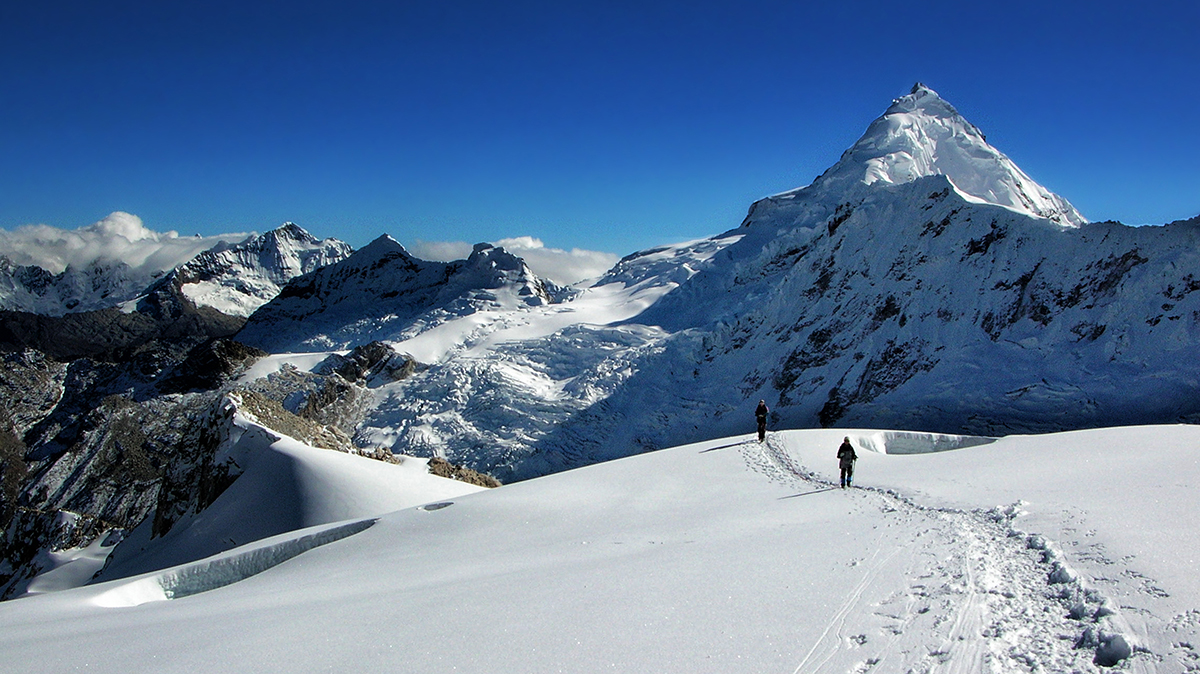
For who don’t know, Dolomites are a group of many mountains located in Italy, between the regions of Veneto and Trentino-Alto Adige.These peaks are known for their bizarre shapes, formed millions of years ago because of many erosions.Over the years The Dolomites became among the most visited mountains in the World and many tourists from different countries go for miles on foot to admire the magnitude of that peaks or enjoy atomic sunsets.As that places are so peculiar and full of drama, many landscapes photographers search inspiration there and the business of photo workshops is greatly fruitful.  seceda dolomites
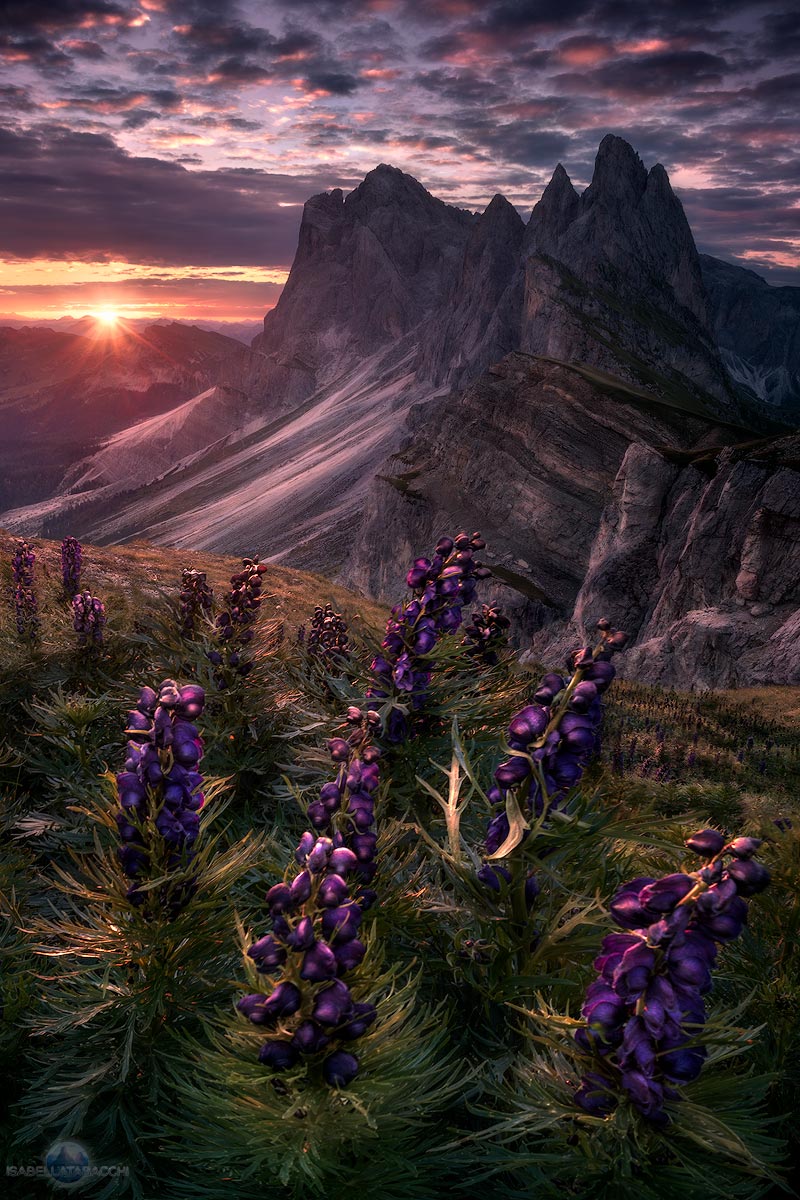
This is why, as I explored The Dolomites for years, many foreign photographers asked me a lot of information about spots and places to visit there.Of course, every angle of this area should be explored, and there are wonderful locations are not included in this article cause I should write a book about all the places to visit in the Dolomites… this is why I’ve chosen the six most powerful locations where I tried the strongest feelings as a photographer and as human.

1. Mount Seceda 

Seceda is part of the Odle group, in Val Gardena, in the province of Bozen. You can reach the summit of the mountain with a cable car from Ortisei and be at about 2500 min 15 minutes. There you can admire the imperiousness of the inclined Seceda peak turned towards the valleys and other mountains of South Tyrol, until the Austrian peaks like mount Großglockner. Behind your sight, you will recognize some of the most famous mountains and massifs in the Dolomites, like Langkofel, Plattkofel, and Sella group. As a photographer you can use many different kinds of lenses there; I think the best focal length to immortalize Seceda is 24mm even if telephoto lenses are necessary to create images of the far peaks, that are very fascinating, especially in a misty nightfall.  According to my photographic tastes, I think that the best time to take great shots of Seceda is in the foggy days, especially when fast clouds, lower than the summit of the mountain, move against this one; this kind of weather can be present in every season, particularly in Autumn and Spring.

 2. Seiser Alm

Coming up by car from Kastelruth you will arrive in a little town of hotels named Compatsch. If you park and proceed by a walk on a restricted traffic route, you’ll discover a little and pacific rural environment at the foot of the majestic Langkofel and Plattkofel mounts.During your shooting time you can play with the curves of hills, and little details of them, like trees and little alpine lodges. I recommend focal lengths from 24mm to 70mm even if also telephoto lenses could be used to capture details of the valley and far mountains.A foggy weather is perfect to take pictures in Seiser Alm; I really love when the light of the sun or the moon creates visible oblique rays that illuminate the fog and are contrasted by the shadows of the elements in the valley. My award-winning picture “The magic of the night” is an example of the disarming beauty of Seiser Alm bounded by the mist at the moonlight.The best months of the year to visit this fairy location are May, June, July, during the flowering of the meadows, October, November and in the wintertime (but only if the hills are covered by the snow).
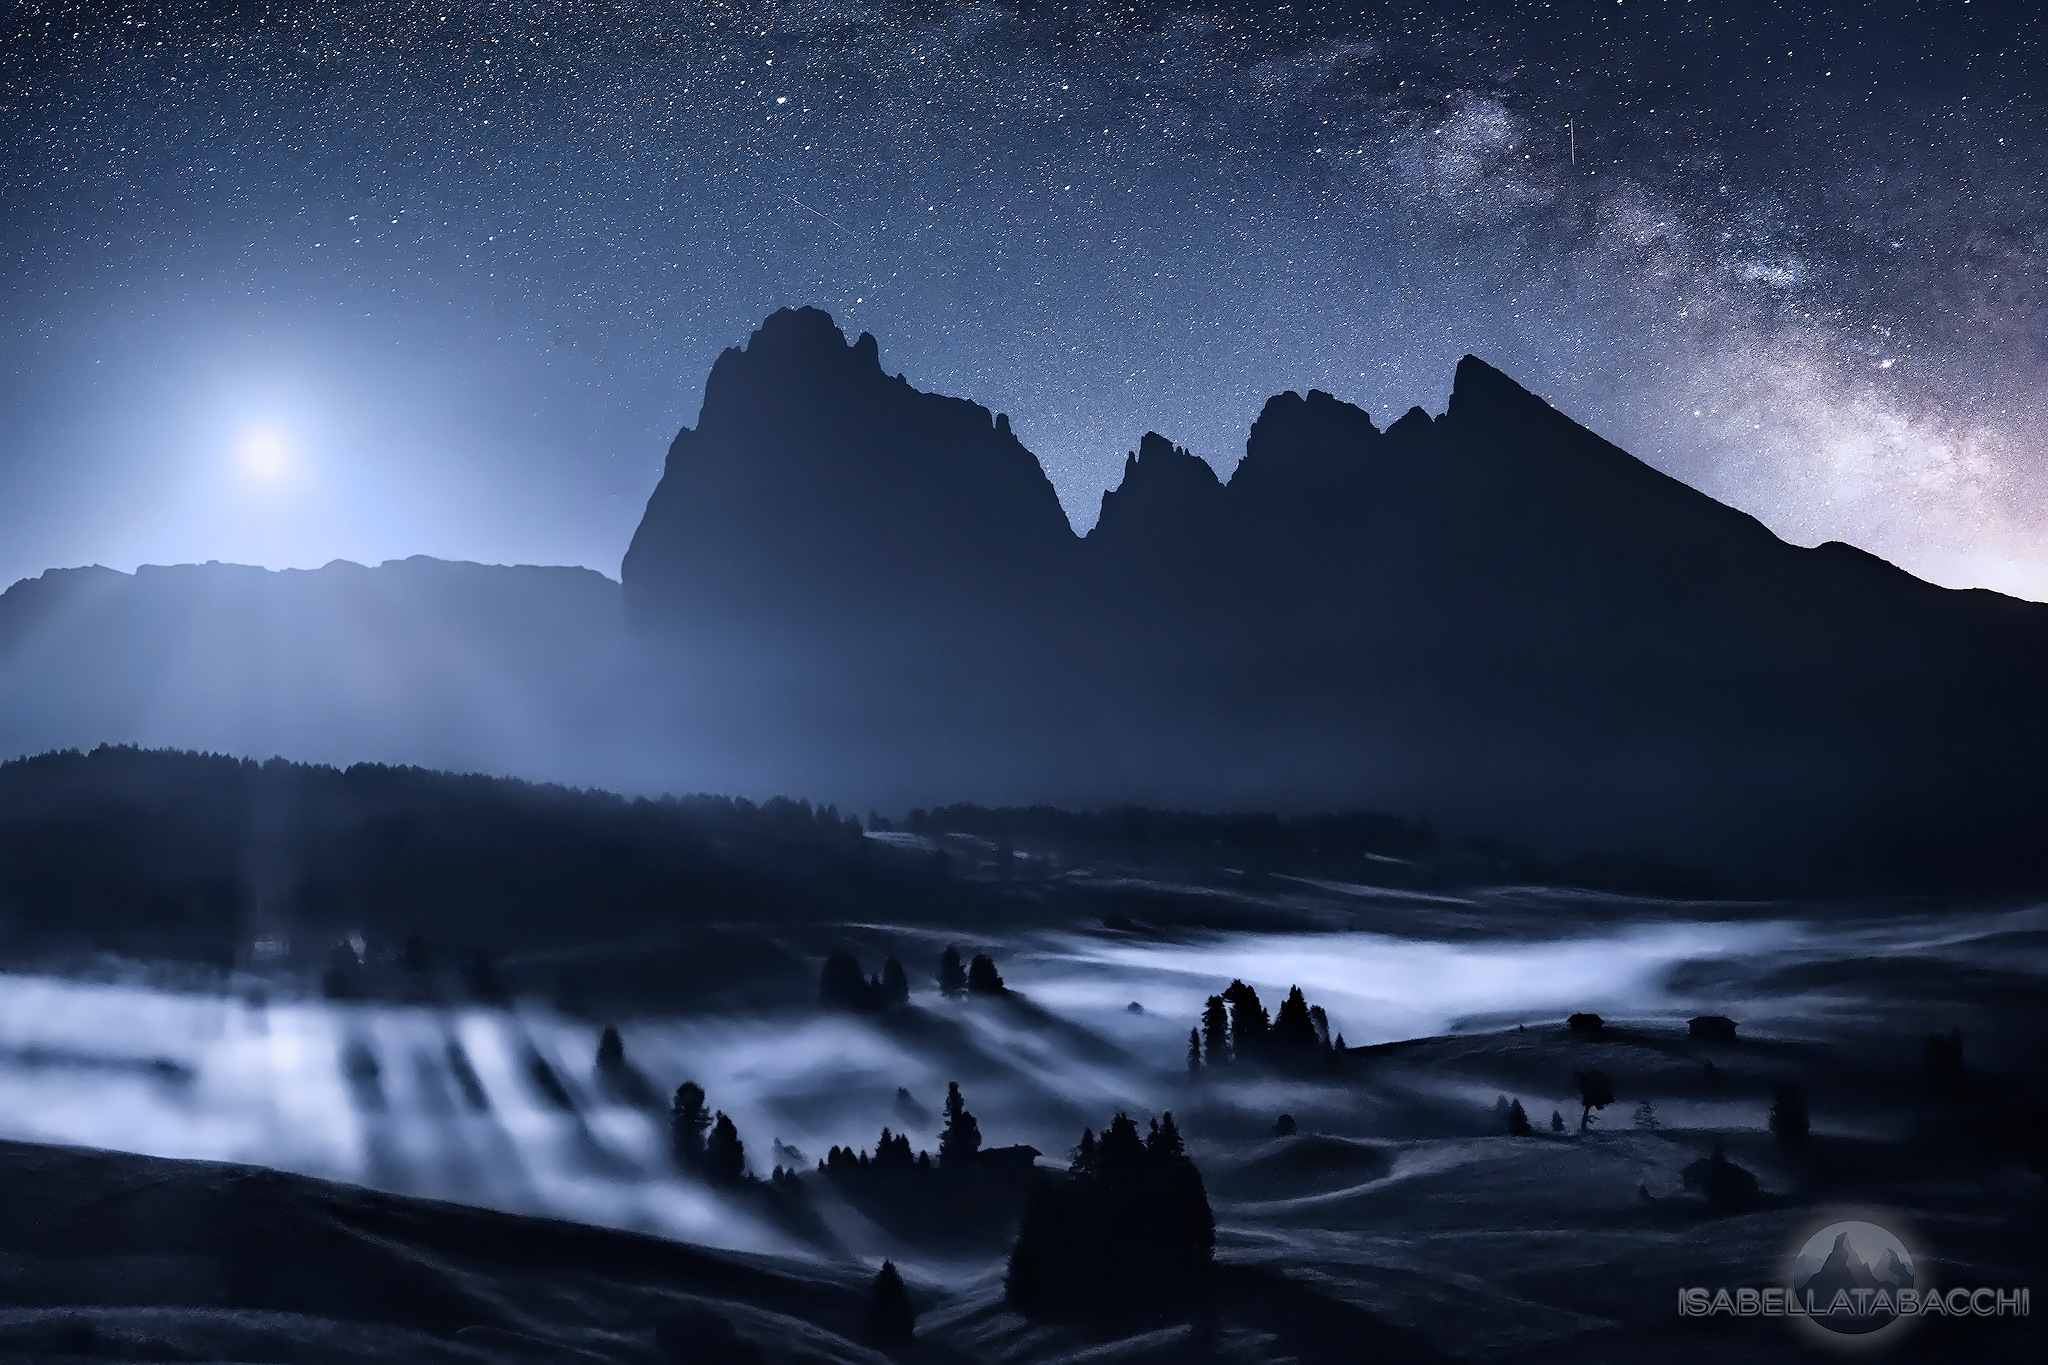
seiser alm dolomites

3. Lagazuoi hut   

Lagazuoi is a mount located in the Dolomites near Cortina D’Ampezzo, lying at an altitude of 2835 m. It contains a mountain hut, accessible by cable car in few minutes, which has one of the best panoramic views in the Dolomites.   This is why I consider it a landscaper friendly location: every kind of lens, especially from a focal length of 24mm to higher, is addicted thanks to a view rich of peaks, valleys, trees and every kind of detail.Every month of the year is great to visit Lagazuoi hut, above all, when low clouds form a kind of “sea” and only the highest peaks come out from them. The funniest thing is that, at that altitude, the weather changes very fastly! This is why you can take shots of a red sunset and immediately after of some lightning.
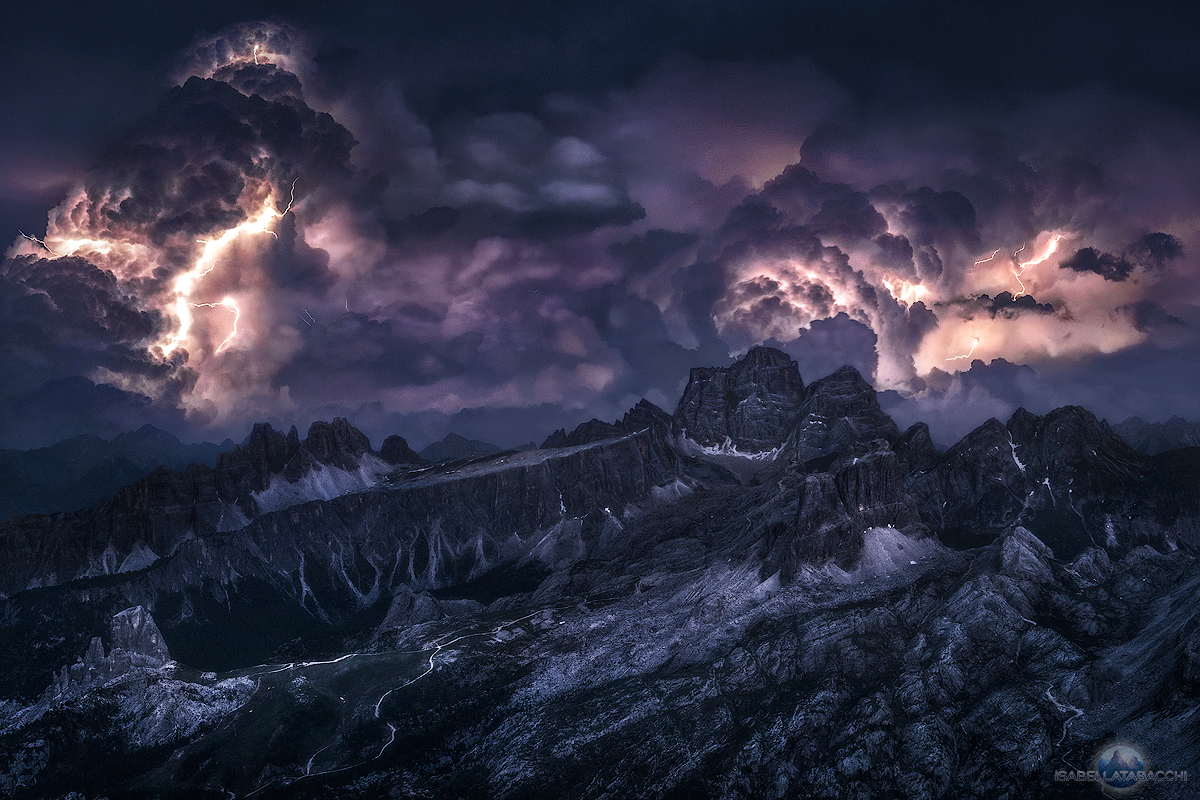
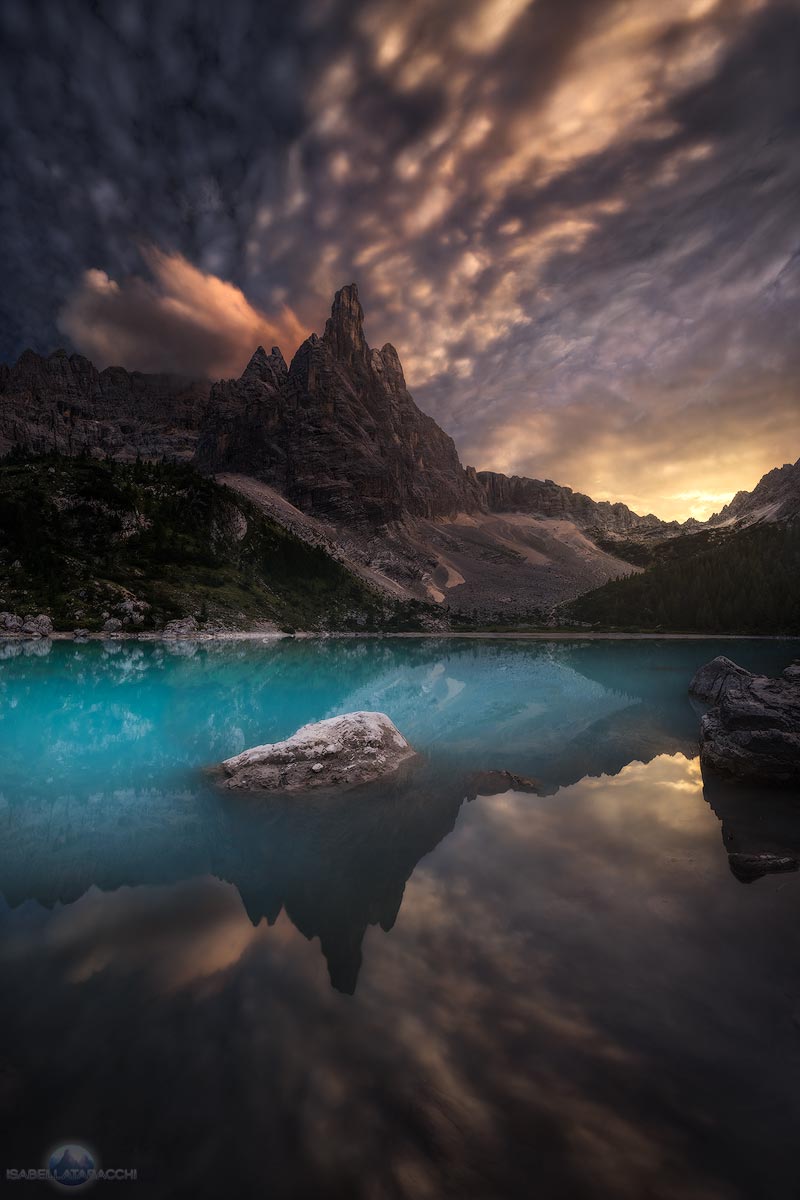
lagazuoi pelmo croda da lago cortina sorapiss sorapis

4. Lake Sorapiss

At the foot of the Dito di Dio (God Finger) peak is located the most colorful body of water in the Alps. Sorapiss is characterized by an intense turquoise water, given by the rocks at the bottom of the lake.You can arrive at this fairy place from Passo Tre Croci, near Misurina (district of Auronzo di Cadore), in about two hours and it’s possible to book at the Vandelli hut, near the lake.A colored sunset or a shiny sunrise can help you to take a memorable capture of this location, even if the totality of the lake makes the most of the “wow effect”.I recommend a wide-angle lens to get a large visual of the mountains and the water, with some rocks in the foreground.You can visit Sorapiss lake from the thaw in May until the first ices at the beginning of November.

  5. Vajolet Towers

When you reach the “Gartl” hollow after a sloping rocky trail, you may think to be in another lonely world; and on your right, there are three majestic bastions called Vajolet Towers. On your left, there is a yellow house which is the Re Alberto I hut and in front of it is placed a little pluvial lake. The rocky garden of the “Gartl” hollow is located at 2621 m between the Fassa valley and the municipality of Tires, in South Tyrol. Photographers can take shots from many points of view like the lake and use some rocks as foreground.The best lens for this location is a wide angle, that’s especially addicted to the nightscapes lovers, cause the sky at that altitude is very clear and deep.The way to reach Re Alberto I hut from Pera di Fassa is long but you can get really warm hospitality and discover the taste of Italian and Tyrolean food at the hut; I will never forget the polenta with cheese before my shooting time.Re Alberto I hut is open from the end of June to the end of September and the best weather is, of course, a red cloudy sunset but if a dark night follows it.stars vajolet towers milky way

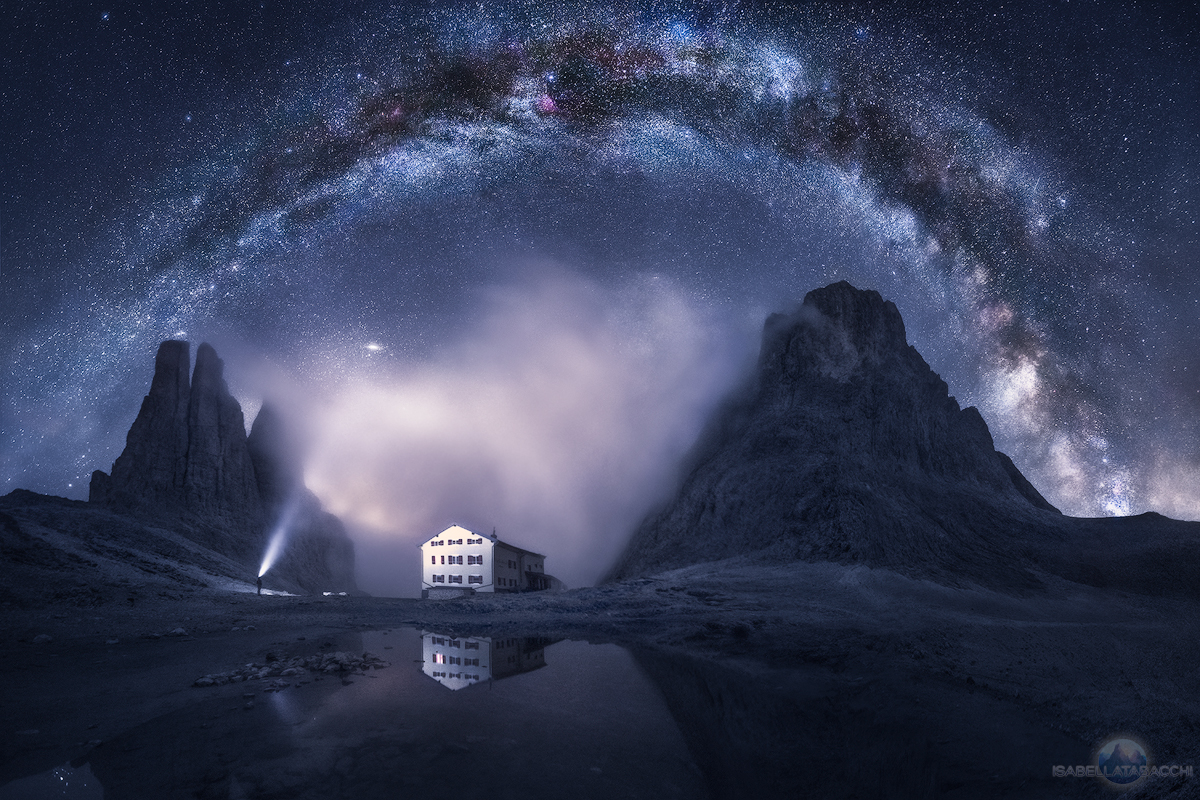
6. Tre Cime di Lavaredo

I couldn’t avoid writing about Tre Cime (Three Peaks), a place that every tourist knows, a classic postcard of the Italian Alps. You can reach the Locatelli hut from Auronzo hut by a more than one hour walk. The trail is boring, but when you are in front of the Three Peaks can’t stop to admire their majesty.I suggest you take a look also at lakes of Piani, two bodies of water behind the Locatelli hut.I recommend you to use a wide angle lens and a telephoto lens only to take shots at far peaks like Cadini di Misurina or Dreischusterspitze. Tre Cime di Lavaredo are fascinating in every period of the year, with every weather (even if I personally prefer a partially cloudy sky in the daytime and a clear night). Be sure that in Winter the trail is walkable and there isn’t ice on it.
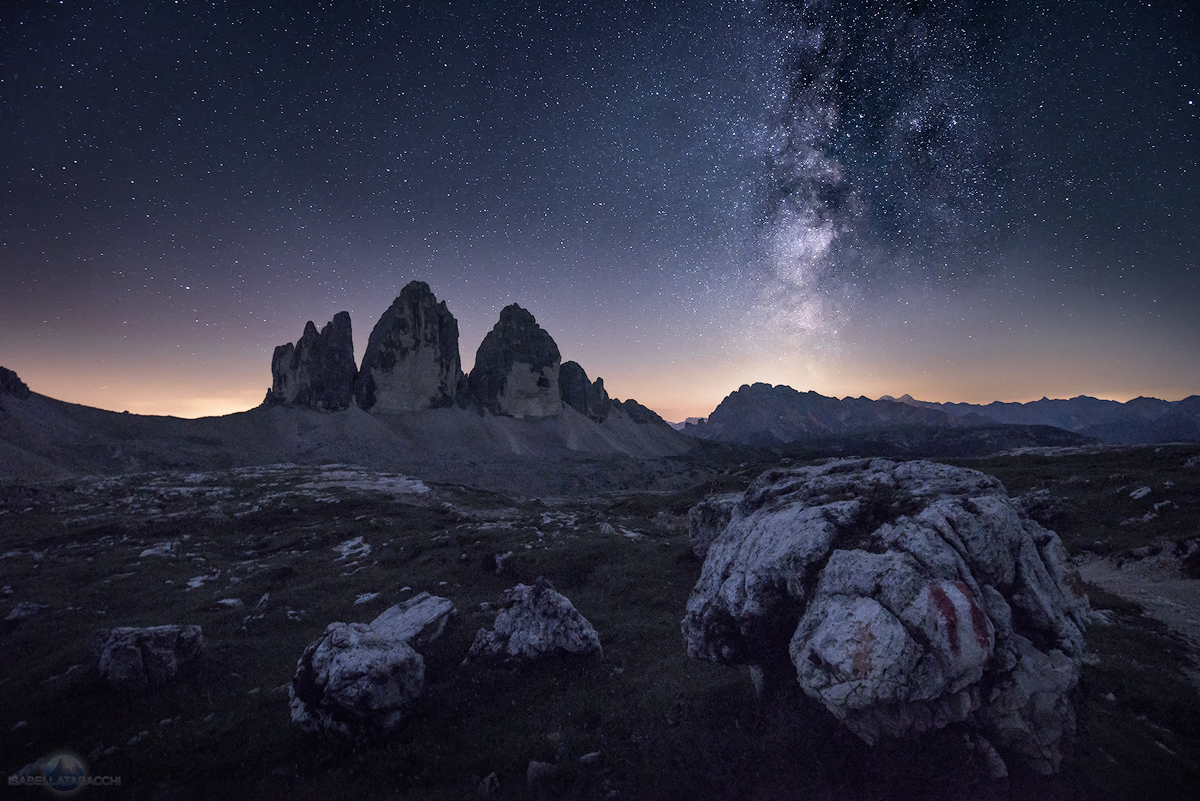
tre cime

Little Rays of Sunshine: Photographing the Sunburst

When all else fails to inspire me while photographing a scene, I can sometimes depend on one optical phenomenon to save me: the sunburst. As you can see in my sample shots, the sun goes from a blah ball of brightness to a multi-pointed explosion of light rays. Not only does this add an extra bit of visual interest to the overall image, but it suggests movement—the sun is peeking above a distant or not-so-distant object and about to rise or set. It appears as if you’ve nailed a “decisive moment” with the sun at the peak of action. Sort of.

Kayak camp on the Green River, Colorado. This was two different exposures blended together in Photoshop. A tricky shot because I had just a few seconds to nail it before the sun rose above rocks.

The Importance of Camera Settings

In fact, a sunburst does take a bit of timing and forethought. First, the technical stuff. In order to get the flare effect, the lens needs to be stopped down to f/16 or f/22. As you might know, small apertures cause diffraction where light rays coming off a subject whack about as they travel through your lens and hit the sensor not quite as sharp as they could be with a wider aperture (obviously, this isn’t the most scientific way to describe it). Normally, people wring their hands over the image softening diffraction creates, but it’s also what causes the sun to flare out into a burst of light. Wide angle lenses also help to amplify the effect.

Buckskin Gulch, Utah. I had to move around a bit in order to follow the sun as it rose in order to get it smack dab in the center of the crook in the rock. Again, timing was all important as I had just a few seconds to get it.
Buckskin Gulch, Utah. I had to move around a bit in order to follow the sun as it rose in order to get it smack dab in the center of the crook in the rock. Again, the timing was all important as I had just a few seconds to get it.

The other technical concern is exposure because you’re dealing with extremes in brightness, namely the sun versus everything else. Start with aperture priority so the f/22 setting is locked in. Select an ISO that either allows you to handhold the camera or if you have a fetish about noise, as low an ISO as possible. After that, I believe in covering my butt by setting the camera to auto-bracketing and knocking out five shots which are one stop apart in exposure, running from under- to over-exposed. I’m thus assured of having the right exposure. Plus, because scenes with the sun in them can really test a camera’s dynamic range, I have the potential for selecting the best exposure for the sun and sky, and the best for the foreground and then blend them later in Photoshop. My preference is to shoot with a tripod, but it’s not necessary unless your shutter speeds are slow.

The Window of Opportunity

Then there’s that timing thing. In the case of the golden hour (sunrise/sunset), you need to be in a spot just as the sun is about to rise above something—mountains, trees, buildings, whatever—or just as it’s about to disappear behind said objects. Or, if the sun is higher above the horizon, look for objects that will still block part of the sun ball. Trees or buildings work rather well here. The idea is to catch just a slice of the sun which adds to the fleeting feeling of the shot. Lastly, depending on where you are on the earth, you may only have a few seconds to get the right moment where the sun is barely left of the shot.

Climbing the final pitch to the summit of Thunderbolt Peak, Kings Canyon National Park. I was belaying my friend and only took my hands off the rope when he was in a secure position, just as the sun peaked above the rock. No climbers were hurt in getting the shot.

Now that we’ve got that out of the way, let’s talk about the arty part. I look for foreground elements that lead the viewer’s eye to the sunburst. I particularly like it when I can position the camera so the sunburst pops out of a V in, say, a ridgeline. Being a fan of the law of thirds, I don’t like to center the sunburst but, rather, place it off to the side a bit.

A word about positioning the camera. As the sun gets closer to the spot where you want to photograph it, you’ll probably have to tinker with your composition, moving left or right a little, especially if you want the sun rising/setting at a specific location in the image. There are apps that can help you plan for the sun’s path, but none of them know about that little tree on the top of the ridge behind which you want the sun to rise. Also, depending on the tightness of your composition, you might be able to lower or raise the camera in order to get a second or third chance at the sunburst. That is, if it’s sunrise, you shoot the sunburst, lower the camera until the sun is once again behind the object, and then wait for the sun to “rise again” for another try.

Processing

Look at your bracketed images and after choosing the best one, see if you can simply use the Lightroom highlights and shadow sliders to adjust the shot to your liking.

A five-exposure bracket taken on a fire road near La Canada-Flintridge, California.

If that doesn’t work, you can process two bracketed images. I typically select the shot where the sun and background sky have some tone to them (the rays jutting out from the sun will probably be still over-exposed). In the case of the five shots shown above, I chose the darkest sky shot and the middle, “correct” exposure because both would give me that feeling of the evening where the light is a little darker. In Lightroom, I’ll adjust the exposure/highlights/shadows of both to taste. In most cases, I want some detail in both images while maintaining a sense of place and time. I sometimes try Lightroom’s HDR program but it usually fails to get the right look.

sunburst 2

After the above adjustments, I control-click on both frames, right-click to get the contextual menu and choose Edit In>Open as Layers in Photoshop. And then . . .


1) Once the two layers are loaded, align them by choosing both layers, go to Edit>Auto Align Layers. Make sure “Auto” is checked and then click OK.

2) Select the top layer. Then click the “add layer mask” icon at the bottom of the layers panel (third from the left).

sunburst 4-5
Top: Select Align from the Edit menu Middle: Add a mask to the top layer and make a loose selection with the lasso tool of the foreground Bottom: With the foreground color black, click alt/option-Backspace.

3) If the layer with proper sky exposure is on top, make a loose selection around the foreground with the lasso tool. If the layer with the proper foreground exposure is on top, make a loose selection around the sky. Making sure the foreground color is black, tap alt/option-backspace which will fill your mask selection with black and reveal the layer below.

4) In the Properties panel, move the “feather” slider to the right to about 200 pixels which will soften the edges of the mask until they virtually disappear. While you may have to fiddle a little with the mask by additionally painting in black or white to get it right, this will usually blend the two exposures fairly closely.

fire road at sunset 1
The final image.

I’m not saying a sunburst will magically transform otherwise dull scenes, but it does add a kind of kinetic feel to sunrise/sunset pictures you won’t otherwise get.

[About the opening image: A different kind of sunburst taken in Vinegaroon Canyon, Death Valley National Park. It was hot as blazes that day and I wanted to illustrate that feeling with the sun blasting in the sky. I exposed for the foreground knowing the sun would completely over-expose, looking even more menacing.]

Sunrise and Sunset Photography – Shooting into the Sun

Warning: this article deals with capturing images of the Sun. Looking into the Sun with bare eyes or through a photography lens can produce irreversible damage to your eyes. Be extremely cautious when trying the techniques shown in this article!

Photography is based on light. In fact, the mental picture of photography being a way of painting with light is a common place. And while it is true that the process of painting is in principle more complicated than pressing a shutter button, getting to understand how light is transported and reflected to finally reach the sensor is a lifelong process.

When shooting an evenly lit scene, getting the right exposure is usually a straightforward process, with even point and shoot settings usually giving pretty good results. In these occasions, what distinguishes a good photographer from the rest is the composition of the image, another skill that can be improved throughout a lifetime.

sun01

However, when light conditions are far from ideal, the way we capture our images needs to be adjusted and point and shoot settings become pretty much useless. The more extreme the conditions, the harder it can get to get the right exposure for our photos, even getting to the point where exposure bracketing and blending in post-processing becomes necessary.

The most extreme condition is arguably the one where a strong light source is included in the composition of an image. Given the limited dynamic range of cameras, what we can expect from a photo taken with the Sun in the frame differs significantly to what we actually see.

In this post, I want to show you some tips on how to take photos of sunrises or sunsets and what you can do to get interesting shots in general when you shoot directly into the Sun.

sun02

The first thing you have to get used to is how your camera captures light. If the conditions are so that the light will be more or less evenly distributed even with the Sun being part of the frame, you can get colors and details at many different parts of your final image. This happens, for instance, when the Sun is relatively high on the sky and the foreground is a highly reflecting surface like snow, or even sand.

However, when the scene is rather dark, the objects are opaque or simply no direct light shines on them due to their position with respect to the Sun, you have to start thinking in terms of silhouettes.

sun03

This is probably the most difficult part of the learning process. Silhouettes can actually make very eye-catching photos, but the brain needs to get used to how they look, since when you are standing there you don’t see any silhouettes. So basically this is one of those points where the only thing you can do is practice as much as you can until your eyes and brain get properly trained.

During sunrises and sunsets, the Sun is low enough as to be located on the background of your image, literally behind any other subject. This means that if you want to capture the Sun in your frame during those times, you need to think about how your foreground will look as a silhouette.

In that sense, a great place to capture nice photos of this time of the day is anywhere close to the sea. On the one hand, piers and lighthouses usually provide low and extended silhouettes and, on the other hand, a complete lack of subject means that you will have a classical sunrise or sunset over the sea shot, which are always nice.

sun04

Given the incredible brightness of the Sun, it will simply outshine anything else in the picture, most of the times making it impossible to extract any brightness or color information from other areas. This is simply because, in order to have the Sun as a distinguishable object, the rest of the image will be underexposed.

If you want to retrieve the information in those areas, you will most of the time need to resort to image blending techniques. For this, in the simplest case, you just need to make a photo with the foreground correctly exposed and one in which the areas of the sky surrounding the Sun still have valid information. The Sun itself will usually be overexposed anyway, but that’s fine for the purpose of landscape photography.

After you have both exposures, you can used Photoshop or any other image processing software to combine them so that your final image has enough information all over.

sun06

Unfortunately, in many occasions, even with the relatively good dynamic range of modern DSLRs, this is the only way to go. So that’s basically a short list of situations where you can include the Sun in your images. Even though it might seem strange at the beginning, shooting into the Sun can provide great results that are quite different from what you are used, so give it a try.

To finalize, a few important tips that you should take into account:

  • First and most important: use the LiveView of your camera when shooting into the Sun. Never look through the viewfinder since this will cause irreversible damage to your eyes!
  • Evaluate the scene: make a quick inspection of the conditions in general to plan whether you want to capture silhouettes or a full scene.
  • If you want to go for a full scene and the foreground is not very reflective, you will have to do more than one exposure.
  • Use a tripod: whether you are doing bracketing or a single shot, a tripod will make it much easier to compose your image and get everything in focus before pressing the shutter button.
  • Clean your lens!: this is an important one. When shooting into strong light sources, any small dust particle in your lens (or sensor) will cause a flare that needs to be removed during post-processing and sometimes it can be difficult to do it, so simply plan ahead to avoid the hassle.