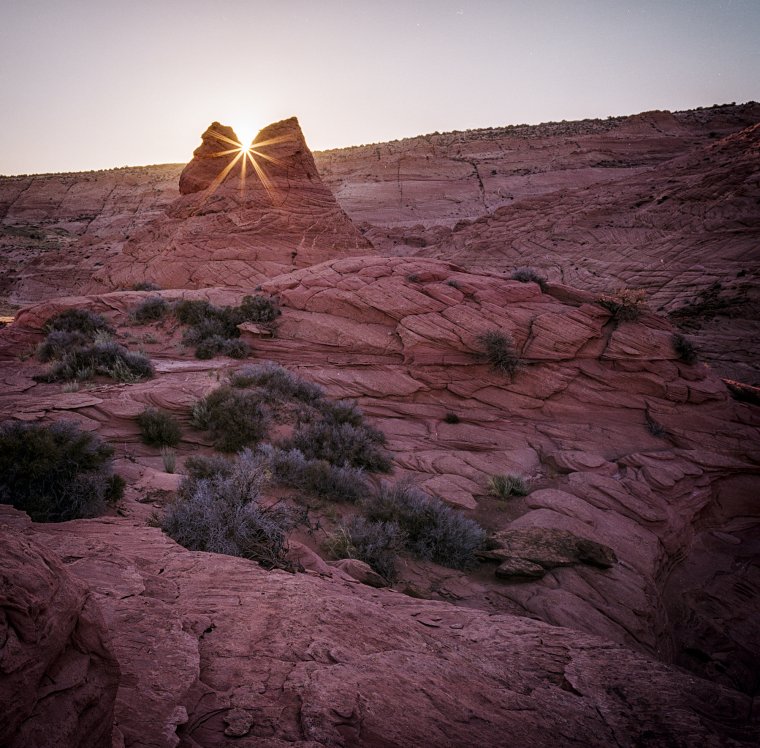
When all else fails to inspire me while photographing a scene, I can sometimes depend on one optical phenomenon to save me: the sunburst. As you can see in my sample shots, the sun goes from a blah ball of brightness to a multi-pointed explosion of light rays. Not only does this add an extra bit of visual interest to the overall image, but it suggests movement—the sun is peeking above a distant or not-so-distant object and about to rise or set. It appears as if you’ve nailed a “decisive moment” with the sun at the peak of action. Sort of.
In fact, a sunburst does take a bit of timing and forethought. First, the technical stuff. In order to get the flare effect, the lens needs to be stopped down to f/16 or f/22. As you might know, small apertures cause diffraction where light rays coming off a subject whack about as they travel through your lens and hit the sensor not quite as sharp as they could be with a wider aperture (obviously, this isn’t the most scientific way to describe it). Normally, people wring their hands over the image softening diffraction creates, but it’s also what causes the sun to flare out into a burst of light. Wide angle lenses also help to amplify the effect.
The other technical concern is exposure because you’re dealing with extremes in brightness, namely the sun versus everything else. Start with aperture priority so the f/22 setting is locked in. Select an ISO that either allows you to handhold the camera or if you have a fetish about noise, as low an ISO as possible. After that, I believe in covering my butt by setting the camera to auto-bracketing and knocking out five shots which are one stop apart in exposure, running from under- to over-exposed. I’m thus assured of having the right exposure. Plus, because scenes with the sun in them can really test a camera’s dynamic range, I have the potential for selecting the best exposure for the sun and sky, and the best for the foreground and then blend them later in Photoshop. My preference is to shoot with a tripod, but it’s not necessary unless your shutter speeds are slow.
Then there’s that timing thing. In the case of the golden hour (sunrise/sunset), you need to be in a spot just as the sun is about to rise above something—mountains, trees, buildings, whatever—or just as it’s about to disappear behind said objects. Or, if the sun is higher above the horizon, look for objects that will still block part of the sun ball. Trees or buildings work rather well here. The idea is to catch just a slice of the sun which adds to the fleeting feeling of the shot. Lastly, depending on where you are on the earth, you may only have a few seconds to get the right moment where the sun is barely left of the shot.
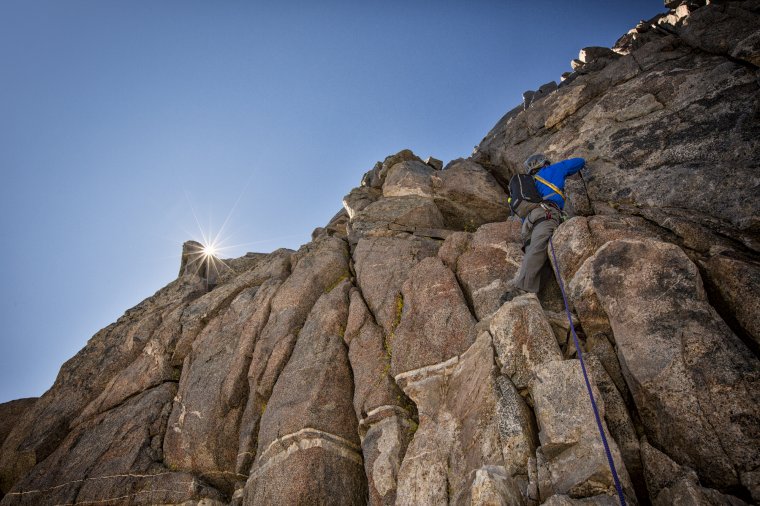
Now that we’ve got that out of the way, let’s talk about the arty part. I look for foreground elements that lead the viewer’s eye to the sunburst. I particularly like it when I can position the camera so the sunburst pops out of a V in, say, a ridgeline. Being a fan of the law of thirds, I don’t like to center the sunburst but, rather, place it off to the side a bit.
A word about positioning the camera. As the sun gets closer to the spot where you want to photograph it, you’ll probably have to tinker with your composition, moving left or right a little, especially if you want the sun rising/setting at a specific location in the image. There are apps that can help you plan for the sun’s path, but none of them know about that little tree on the top of the ridge behind which you want the sun to rise. Also, depending on the tightness of your composition, you might be able to lower or raise the camera in order to get a second or third chance at the sunburst. That is, if it’s sunrise, you shoot the sunburst, lower the camera until the sun is once again behind the object, and then wait for the sun to “rise again” for another try.
Look at your bracketed images and after choosing the best one, see if you can simply use the Lightroom highlights and shadow sliders to adjust the shot to your liking.
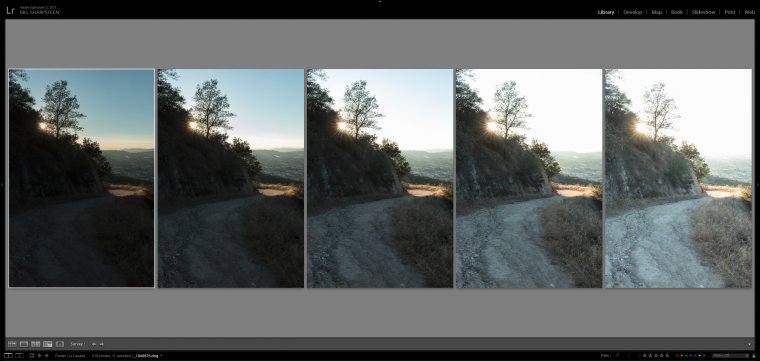
If that doesn’t work, you can process two bracketed images. I typically select the shot where the sun and background sky have some tone to them (the rays jutting out from the sun will probably be still over-exposed). In the case of the five shots shown above, I chose the darkest sky shot and the middle, “correct” exposure because both would give me that feeling of the evening where the light is a little darker. In Lightroom, I’ll adjust the exposure/highlights/shadows of both to taste. In most cases, I want some detail in both images while maintaining a sense of place and time. I sometimes try Lightroom’s HDR program but it usually fails to get the right look.
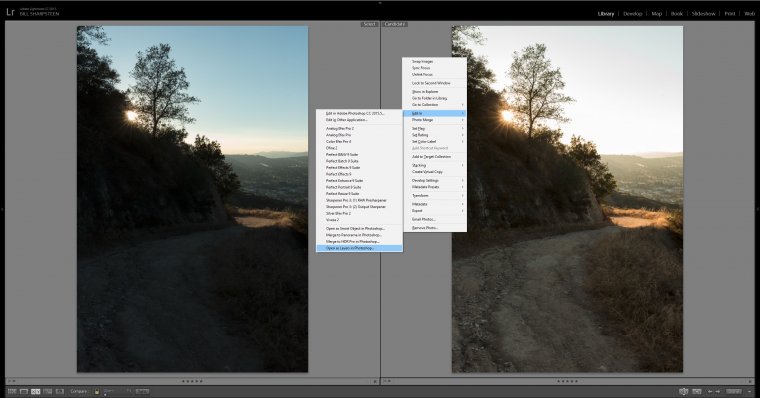
After the above adjustments, I control-click on both frames, right-click to get the contextual menu and choose Edit In>Open as Layers in Photoshop. And then . . .
1) Once the two layers are loaded, align them by choosing both layers, go to Edit>Auto Align Layers. Make sure “Auto” is checked and then click OK.
2) Select the top layer. Then click the “add layer mask” icon at the bottom of the layers panel (third from the left).
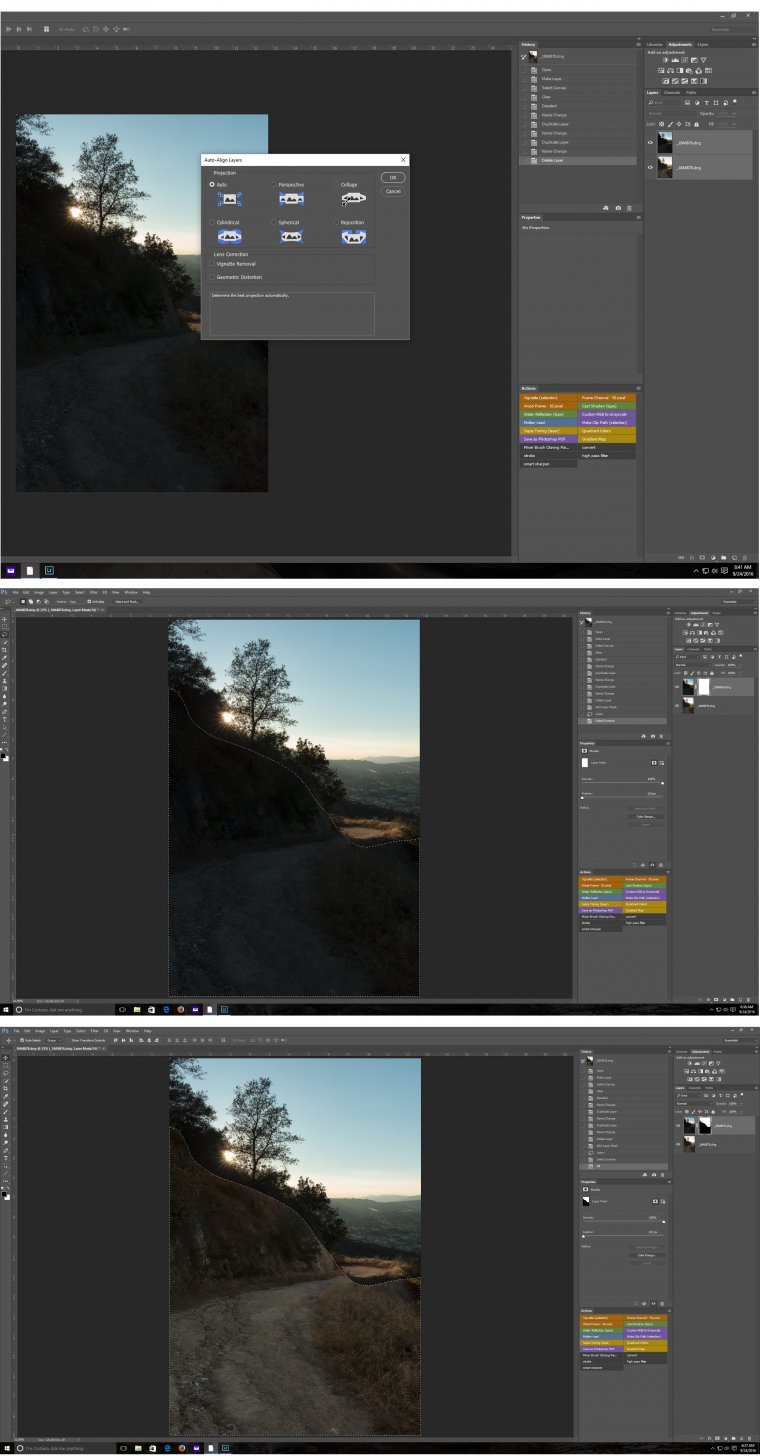
3) If the layer with proper sky exposure is on top, make a loose selection around the foreground with the lasso tool. If the layer with the proper foreground exposure is on top, make a loose selection around the sky. Making sure the foreground color is black, tap alt/option-backspace which will fill your mask selection with black and reveal the layer below.
4) In the Properties panel, move the “feather” slider to the right to about 200 pixels which will soften the edges of the mask until they virtually disappear. While you may have to fiddle a little with the mask by additionally painting in black or white to get it right, this will usually blend the two exposures fairly closely.

I’m not saying a sunburst will magically transform otherwise dull scenes, but it does add a kind of kinetic feel to sunrise/sunset pictures you won’t otherwise get.
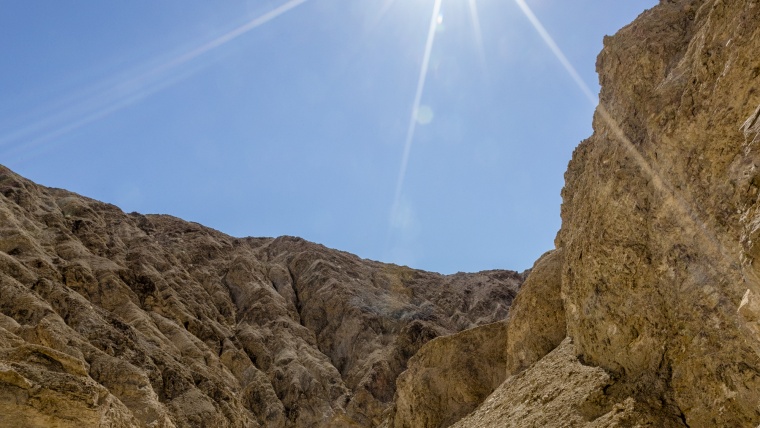
[About the opening image: A different kind of sunburst taken in Vinegaroon Canyon, Death Valley National Park. It was hot as blazes that day and I wanted to illustrate that feeling with the sun blasting in the sky. I exposed for the foreground knowing the sun would completely over-expose, looking even more menacing.]


Please verify your software version before proceeding.
 I’ve verified my software version


 Facebook
 Google +
Comments (0)
There are no comments yet.