Today, cities and urban metropolises are sprouting all over the world. These vast urban landscape photography creates a world of opportunity for photographers. An urban space is a lot of fun for photographers because there are so many angles, heights, styles, and exposure settings available for them to play with. Many urban landscape photographers like to travel around the world to different cities, like New York and Hong Kong, to capture the unique features of each location.
In fact, cityscapes are one of the most captured scenes in the world. Tourists are taking hundreds of photographs with their mobile devices every time they visit a city and share them on social media. But, how can you stand out of the mass? Here are a few tips to get started:
Table of Contents
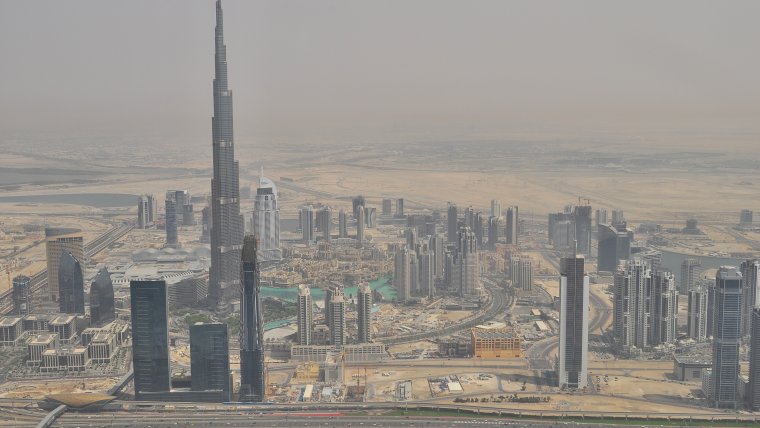
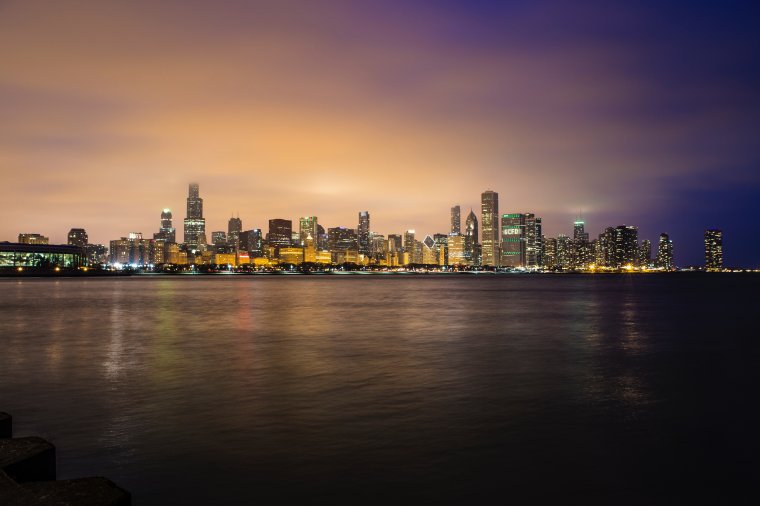
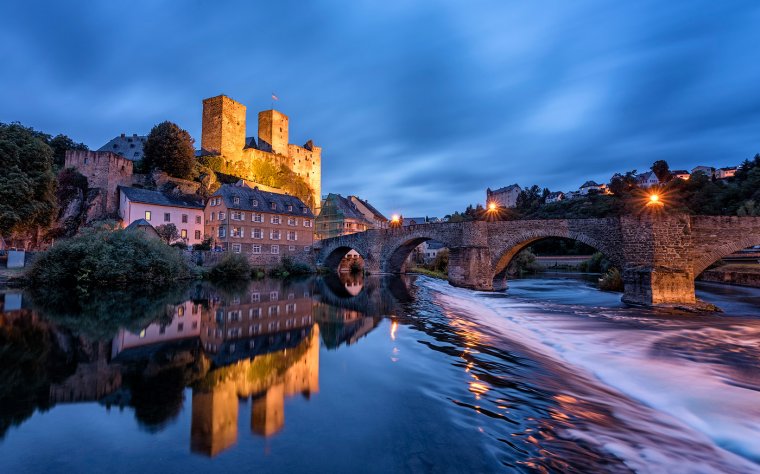
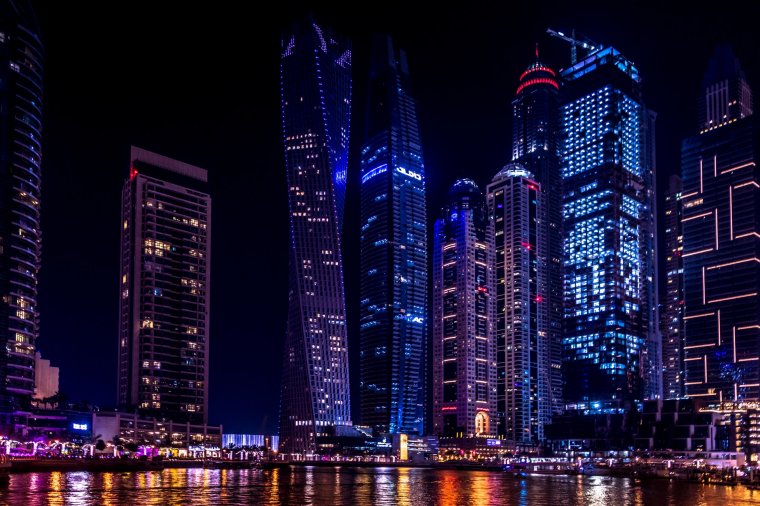
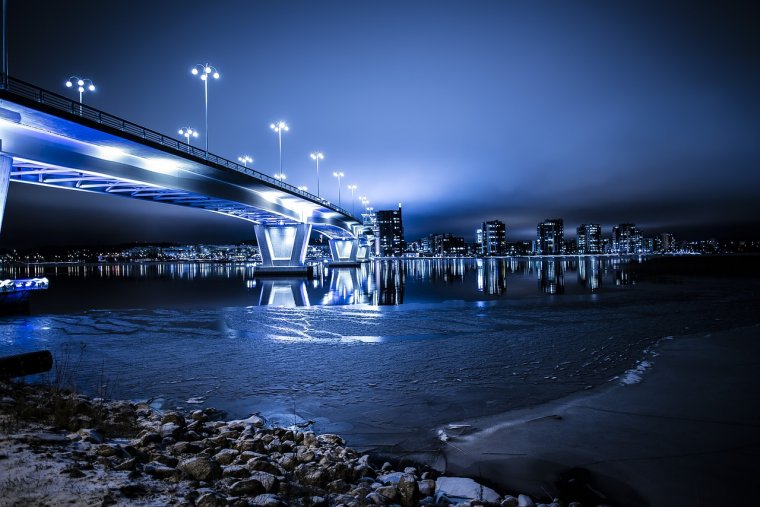
One of the most common practices when shooting urban landscape photography is to use a long exposure setting. This is easily achieved and produces great results. Long exposure records the light over time, so it helps the viewer recognize and sense the movement of light throughout the scene.
For example, in the urban photo above we can see light streaks from the movement of the traffic on the streets below. This technique is most often used at night. During the day, a long exposure setting is not very practical because the photo can get blown out if there is too much light. The length of the exposure will depend on how muc h light there is, and what f-stop you are using. Between 10 and 30 seconds is a good place to start experimenting. The shorter the exposure, the more defined the light will look. Longer exposures will create a smoother look. The key is to find the balance between the two.
When taking long exposure photos, the key is to keep the camera steady. The best way to do this is to use a stable tripod with the self-timer setting or a remote control to control the shutter. This is especially important because, oftentimes, urban landscape photos are taken from on rooftops or other high areas where the wind can cause issues with blurriness.
Cities look entirely different at night. During the day, the hue and color is determined by the sun. At night, the colors are determined by the lights—from buildings, street lamps, headlights, and other light sources. Because of this, try taking urban landscape photos not only during the day but also at night.
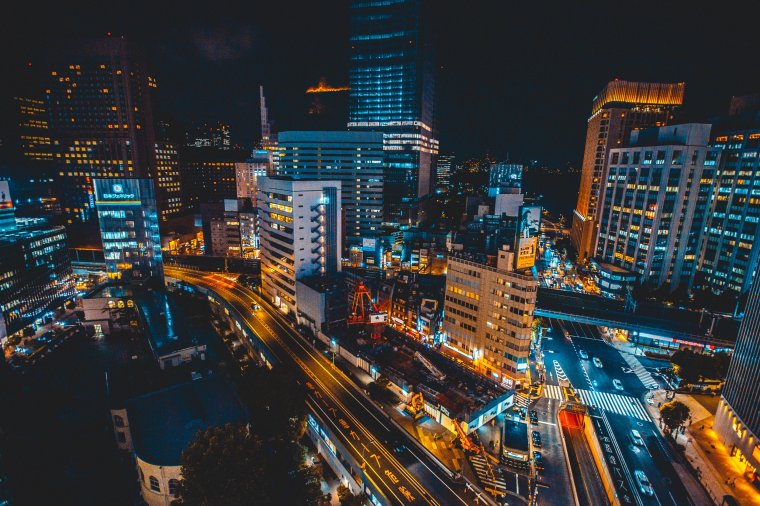
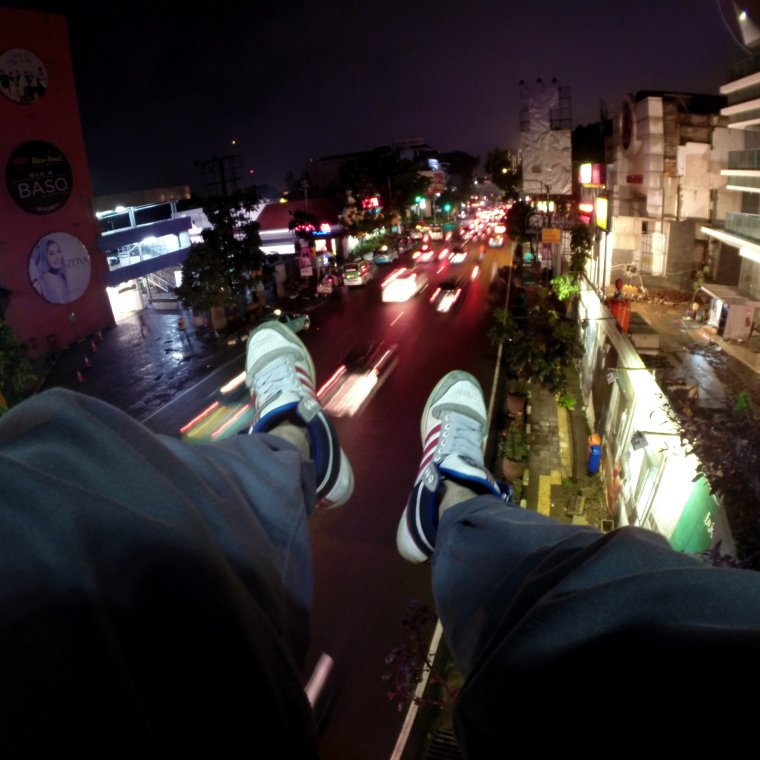
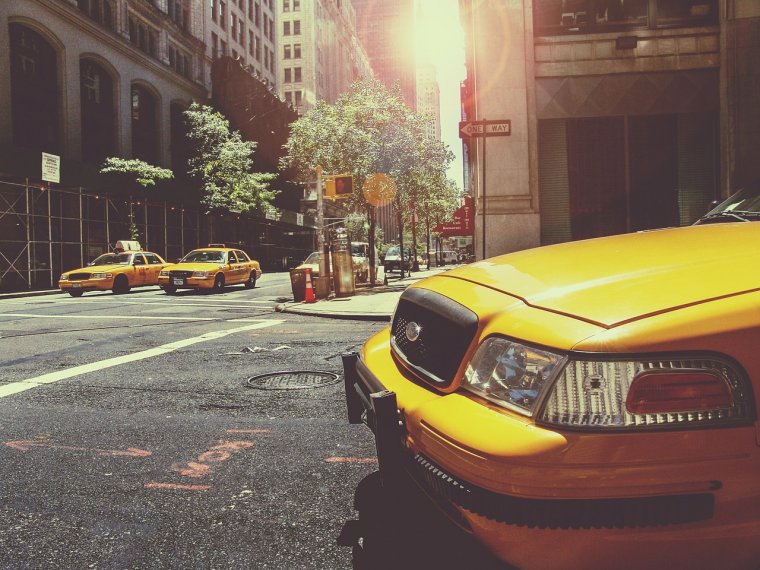
Although long exposure settings look great at night, as the previous paragraph has highlighted, they are not strictly necessary. Take a look at the urban photo above. It perfectly captures a single moment in time in this large and bustling Asian city. To take an urban portrait like this on a short exposure, a fast lens is needed.
A fast lens is generally one in which the aperture can open to f/2.8, f/2.0, or bigger. When the maximum aperture is big like f/1.8, more light can enter the camera and hit the sensor. This results in a shorter exposure time. Another option to take short exposures is by increasing the ISO. Certain full-frame cameras, such as the Canon 6D, provide great image quality, even when set at high ISO settings.
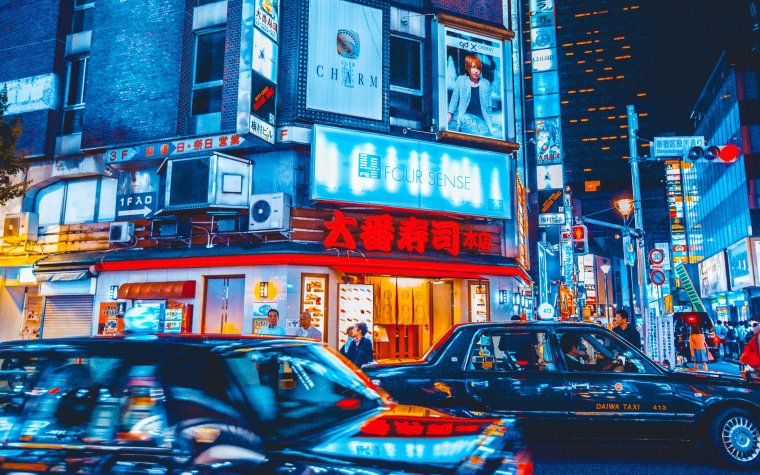
When taking urban landscape photos, it is easy to forget that sometimes getting in the middle of all the action can provide spectacular photos as well. Instead of setting up a tripod and sitting in your hotel room all night, why not try getting out into the urban life and taking some street photos? This gives your wide-angle shots some context and relevance. A good place to start is in the downtown area of the city. Or, if you know of a district that you’d like to check out, feel free to explore the nightlife of the town.
Another technique to try out with urban landscapes is high dynamic range photos, also known as HDR. Dynamic range refers to the range of tones from black to white in your picture. A high dynamic range means that there is a large range of colors between white and black.
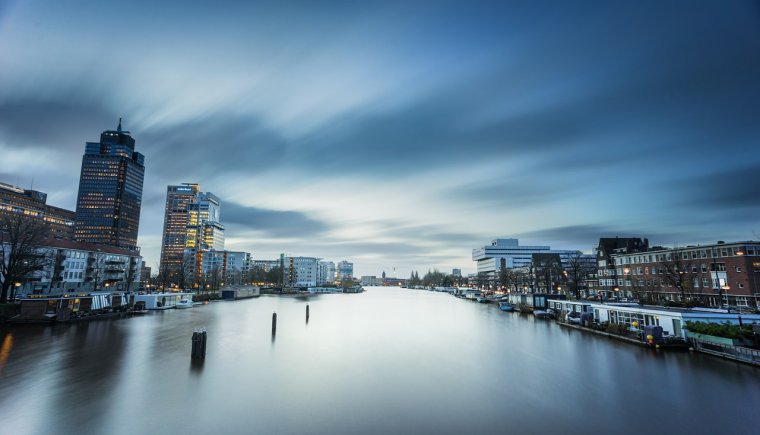
The easiest way to recognize an HDR photo is by determining how much detail you can see in the grays of the photo. For example, the photo above has a lot of detail in the water (grays). To take HDR photos, the most common method is by using the bracketing method on your camera. This enables you to take several pictures of the same scene at different exposure levels. Then, in post-production software, you can combine the images to create an HDR photo.
For my photographs, I arrive up to two hours before sunset on my location. This extra time gives me the opportunity to check out different compositions and choose my favorite one. Another advantage of arriving early is that I don’t have to set up my gear in the dark.
If it’s possible, I recommend you to scout your location before photographing. So you can find special situations, like checking out where the sun goes down, when does the sunlight shines through the buildings, or when the lights of the bridge are turning on. This information is all you need to find the perfect vantage point.
If your camera can shoot in RAW you should definitely do so. The advantage of shooting in RAW is that you can always change the white balance and do a better post-processing later in Adobe Photoshop. When shooting in JPEG, you only get a compressed image file, while RAW files stay uncompressed and give you the possibility to adjust lights and darks in Adobe Photoshop.
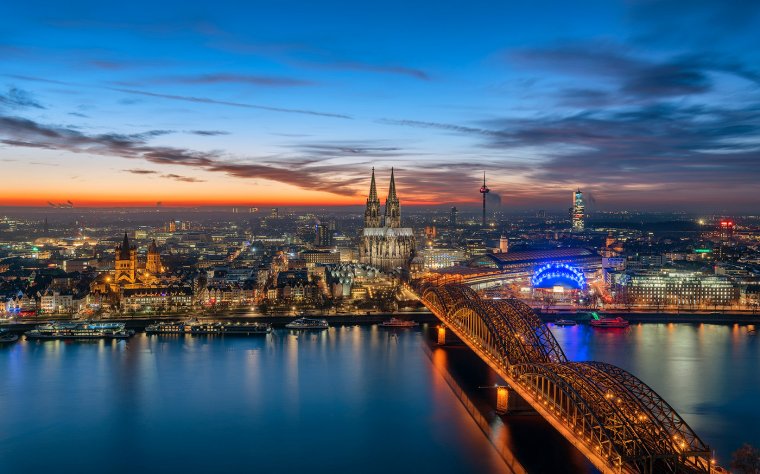
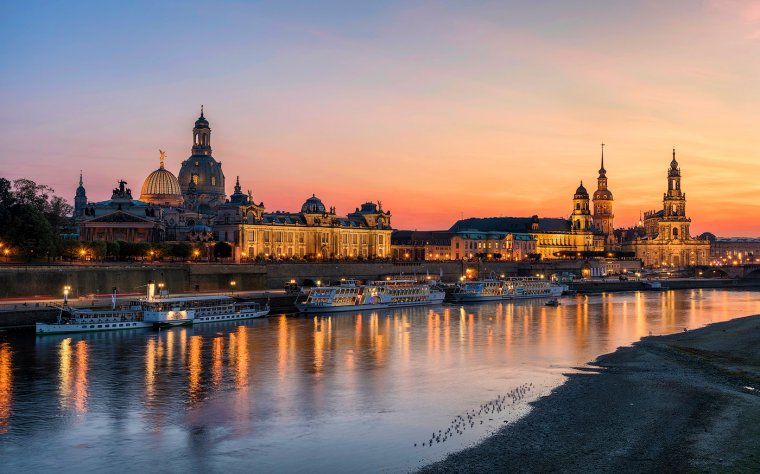
The best time shooting cityscapes is the time around sunset or sunrise. Right after sunset, the sky is getting darker and the buildings turn their lights on. The clue to shooting wonderful cityscapes is to wait for the perfect balance between the natural light and artificial light. The peak of blue hour is especially perfect for shooting cityscapes. The contrast between the blue sky and the yellow lights gives a nice touch to your images.
First of all: You don’t need expensive gear for shooting cityscapes! Every beginner camera with a kit lens, a tripod, and a cable release is everything you need. Using a tripod is always a good idea because you have to take a closer look at your composition by setting it up. When you are shooting at the blue hour, it’s necessary to use a tripod anyway because you are getting long exposure times up to 30 seconds.
Another important tool is the remote shutter release. To get sharp and crisp images your camera has to be absolutely still. Even pushing the shutter release on your camera causes vibrations. To avoid these vibrations you should always use a remote shutter release.
But always remember not to block the sidewalk with your tripod and the rest of your gear while shooting at busy places.
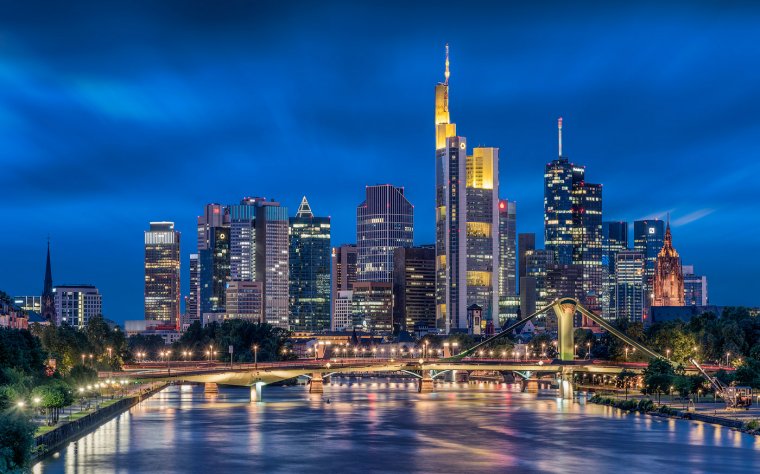
You always have two possibilities to shoot the blue hour. You can shoot in the morning or in the evening. Both sunrise or sunset can be beautiful. But you have to think of what type of urban life you want to capture. In the evening, it is usually busier than during the early morning hours. For example, if you are shooting skyscrapers in a financial district, most of the lights will be turned on in the evening because there are people working. In the morning, nearly everybody is sleeping, so there are fewer lights and less traffic on the roads.
So, do you want a busy atmosphere or a sleeping city? There is no wrong choice but it influences your shot.
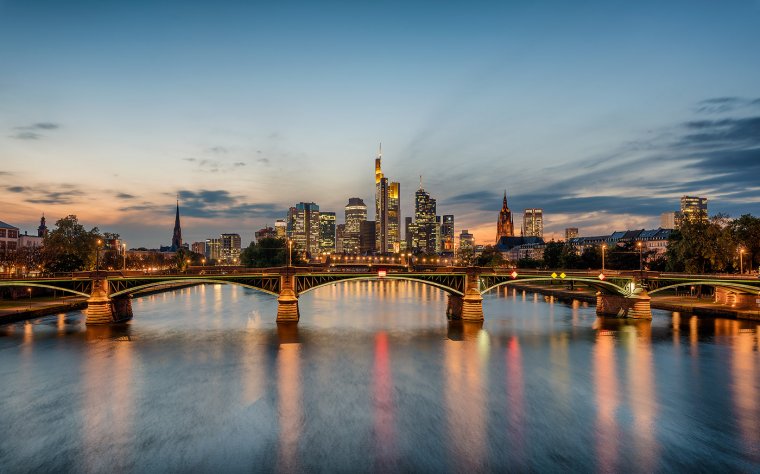
Where you live, you may not always have amazing landscape photography opportunities around you. That’s the advantage of cityscape photography. Nearly every city can be used. A good composition is what you need for shooting beautiful cityscapes. By choosing your vantage point, you can make sure you look for leading lines.
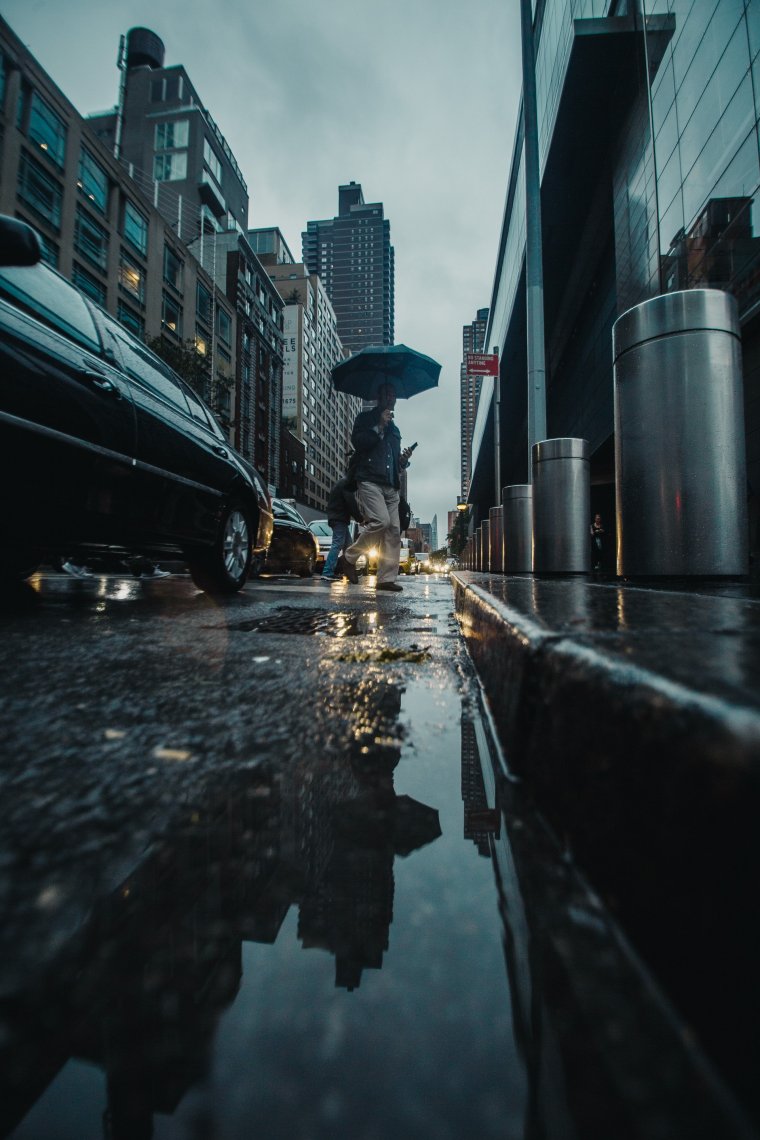
In cities, you always have bridges, streets, or train tracks. Try to use them to let them lead into your image. This will focus the viewer’s eye right into your cityscape. For cityscape photography, you don’t need perfect weather. If it’s raining you can use the reflections of water puddles to create amazing photographs. Even a sky with clouds drifting into your image can be used as leading lines. Just be creative.
Another important point for well-balanced compositions is the rule of thirds. Just try to compose your picture section into thirds: one-third sky and two-thirds cityscape. Rules are meant to be broken, but if you’re not sure about your composition this is a good way to play safe.
Besides creativity, please don’t get yourself into dangerous situations just for taking the perfect shot. That’s not worth it.
When shooting architecture and cityscapes, make sure that the horizon is straight and all the parallel lines in your image do not converge. The problem with converging lines is that the buildings look like they are falling backward. When you have to tilt your camera to get everything in your image, always remember to correct it in Adobe Photoshop or Adobe Lightroom.
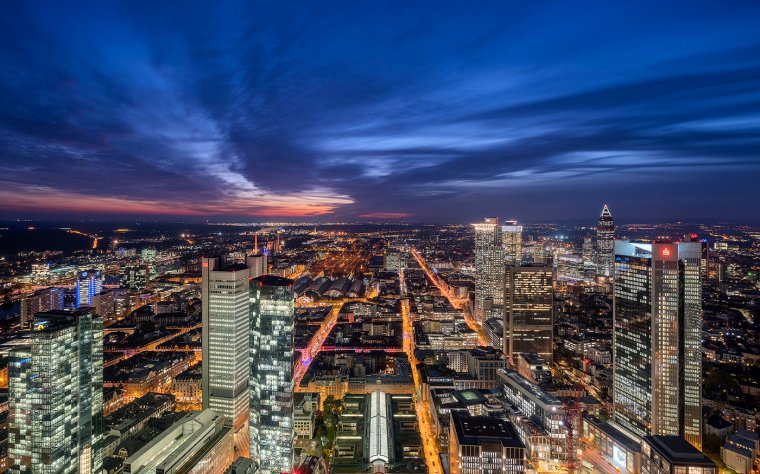
As you are working with a tripod, long exposures are no problem. To get a really sharp image, you should shoot in aperture priority mode using an aperture around f8 to f14 and set your ISO to the lowest native value of your camera (Mostly 64, 100 or 200). If your camera can’t focus because it’s already too dark, you can switch to manual focus and focus on the city lights. Zoom in 100% in live view, and focus until the lights get as small as possible. Let the camera choose the shutter speed automatically.
Most cityscapes are taken with a wide angle lens. But why not try something different? Due to the bigger focal length, you get something called telephoto distortion. If you look through your camera, everything becomes closer and gets compressed. Two skyscrapers which were far apart seem closer now. This effect on a complete skyline looks great, and I really recommend you try it.
The essence of urban photography is documenting the unique things happening in front of and around you as you travel. These images can sometimes yield some interesting stories and have the potential to be pure gold. When venturing out to do a bit of urban photography, the key thing to remember is to travel light. The gears listed below is subjective to your style of photography, but will generally come in handy if you’re a beginner or a professional.
When it comes to doing urban photography, most of your shots will be candids of different strangers To successfully do this, you need to make sure you’re not too noticeable or draw attention to yourself. Nothing screams photographer more than having a huge telephoto lens mounted onto your camera or using a flash.
To blend in during urban photography, I recommend using one of these three lenses. The first lens I recommend is what’s popularly known as the pancake lens, which is your 24mm f/2.8. This focal length is pretty wide, so if you’re looking to capture some wide angle shots, this is your go-to lens. The 24mm lives up to its nickname, and is pretty flat, but this works in your favor when it comes blending in. I can promise that no one will notice you’re taking a picture of them with a 24mm mounted onto your camera.
The second lens I would recommend is one of my favorites, which is the 50mm f/1.8. The 50mm f/1.4 is amazing as well, but the choice is yours depending on how wide you need your aperture to be when doing low light photography. I don’t do that much low light photography in urban settings, so I pretty much stick to using my 50mm f/1.8. The 50mm is a great focal length to shoot at when doing urban or street photography, as it creates great portraits with a noticeably nice bokeh that adds an extra layer of beauty to your images. The 50mm is twice the size of the 24mm while still being unnoticeable to strangers when doing candid photography. In my opinion, this is one of the go-to lenses for urban photography, as it produce some amazing photos.
The last but not least on the list of lenses to pack in your camera bag is the cousin of the 50mm, which is the 85mm f/1.8. This lens is a little bit bigger than the 50mm, but it is definitely not nearly twice the size. It produces great images with amazing bokeh and the craziest subject isolation. With any or all three of these lenses in your camera bag, you’re bound to create some magic.
You can never go wrong packing extra batteries in your bag. Many times, I’ve ended up shooting longer than expected, and from my bad experiences, I ended up missing some amazing shots due to me being unprepared and not carrying extra batteries.
When doing urban photography, you can never tell what might happen at the last minute when you thought you’d be done shooting, so it’s always better to be too prepared than to be sorry. There is also the option of considering a battery grip for your DSLR or mirrorless camera as well. Some street photographers are against using them as they make your camera much bulkier and add additional weight. Nonetheless, it gives you the capability of using two batteries at once, which will save you from having to pack batteries in your bag while extending camera duration.
Make sure to always travel with extra memory cards as well, so you don’t end up in a situation where you have to be deleting old shots to store new ones. This can be very time consuming and stressful when doing urban photography. In addition to that, the time taken to scroll through and delete the old images on your camera will hinder your process of capturing key shots right in front of you. Don’t make the same mistake I did by not packing extra memory cards.
No matter how long you’ve been practicing photography, adjusting to urban photography takes a bit of practice, and comes with its own challenges and nuances. Here are four common mistakes I see photographers making when they first venture into urban photography.
The first mistake I made when I decided to start experimenting with urban photography was letting my mind overthink everything I was doing. I was more concerned about the results of my images, and if I was even capturing the right subject rather than letting my creativity flow and speak for itself. This left me unsatisfied with the images I captured, and I felt as if I was doing urban photography all wrong. To remedy this problem, I made it my duty to do some research. Instagram is a powerful tool that can come in handy when looking for inspiration or just some ideas like Pinterest.
Simply search a particular hashtag of interest and you are guaranteed to see at least a few images you like. I used this tool to gain a better understanding of how urban photography should look, and the creative tricks I could use while out practicing. After doing my research, I gained a better understanding of urban photography and realized it is not as strict as other photography genres in the sense that it has no rules and is open for your creative interpretation. What I mean by that is, urban photography is a representation of what you see and enjoy in an urban environment. One urban photographer might enjoy capturing yellow cabs in different urban settings, while another might be more focused on street art. The same logic applies to you as well. Urban photography is a beautiful art that is driven by creative flow and imagination, so try not to overthink while shooting too much—just enjoy what you’re doing.
Try to travel as light as possible because you will more than likely be doing a lot of walking, which can be annoying if you’re carrying a heavy load. You don’t need to walk with too much when it comes to urban photography, so try to only pack the things you need.

In addition to that, traveling with too much on your back can also hinder your creative process, especially if you’re in a heavily congested area, such as a popular city location or high traffic area. You will find that having too much of a load on your back can be a huge hinderance.
I know doing urban photography for the first time can be very exciting, but try not to rush the process too much and forget to capture the things you need. It is easy to get distracted with all that’s happening around us and forget why we’re doing exactly what we do. Photography is a craft that is driven by passion and love for the art itself. Once this passion and love are shown, then you are almost guaranteed to be rewarded with the same love back. Take your time and create the magic you want naturally through the images you take.
Great things can be created when you don’t push yourself too much and enjoy the moments leading up to the magic. Take a look around and wait for things to happen with your camera ready, and when the right moment comes, you will know.
Photographing strangers can no doubt be a bit intimidating, as you’re never completely sure how they will react to you taking a street portrait of them without them knowing or without permission. You cannot let this hold you back from capturing the shot you want, because more than likely, you will run into this problem or issue very often during urban photography.
You can remedy this situation in two ways, such as asking the stranger permission first before capturing the street photograph—which may not always work in your favor. Many times the best urban photo is candid, and as a result of that, sometimes when you ask for permission, it ruins the nature of the photo itself. I often make this my last resort when doing city photography.
The second option is to be completely discrete and hide in plain sight to capture your shot. This leaves your subject completely unaware, and can work in your favor more than asking for permission. I’ve always told myself that it’s easier to say sorry than to ask for permission and in this case, and its never failed me yet. After all, you can always offer to delete the photo if the subject isn’t comfortable being photographed.
One of the best ways to learn urban photography is to study the professionals. So, here are the top street photographers to study when venturing into urban landscape photography:
The science behind white balance and digital photography can be difficult to understand. But, the ways you can use your camera’s white balance settings to give your urban photography images a warm, vibrant look or a cool film noir look is straightforward. If you want to be able to add these effects to your photos, check out the tips below.
White balance came about as an issue with digital photography because camera sensors detected light differently than the human eye. Light can be understood to have different “temperatures” (which optical engineers measure in degrees Kelvin). When we look at a dim light, which has a lower “temperature” than bright light, such as a candle or a sunset, the light appears to be orange. Bright light, such as a clear blue sky or a fluorescent light bulb, has a higher “temperature” and seems to be blue. Visualize how much hotter a gas burner (which burns blue) is than a burning match (which burns yellow and orange). This will give you an idea of the difference between various color temperatures.
When light from that candle or the sky shines on a white sheet of paper, our brains do not interpret the paper to appear differently, even though a different color light is shining on it. Digital cameras, on the other hand, do see the white piece of paper to be different colors, depending on what sort of light is present. You can use your camera’s white balance settings to either display your image neutrally or enhance its mood.
There are a bunch of different white balance settings in today’s cameras, but they can be broken down generally as follows:
If you shoot in RAW, you can edit white balance in post processing.
If you are shooting indoors or under streetlights and forget to pay attention to your white balance, you’ll find that your images have a sickly green pallor. In most cases, you can avoid this problem by setting your white balance to “auto white balance” or to the appropriate setting, given your shooting conditions.
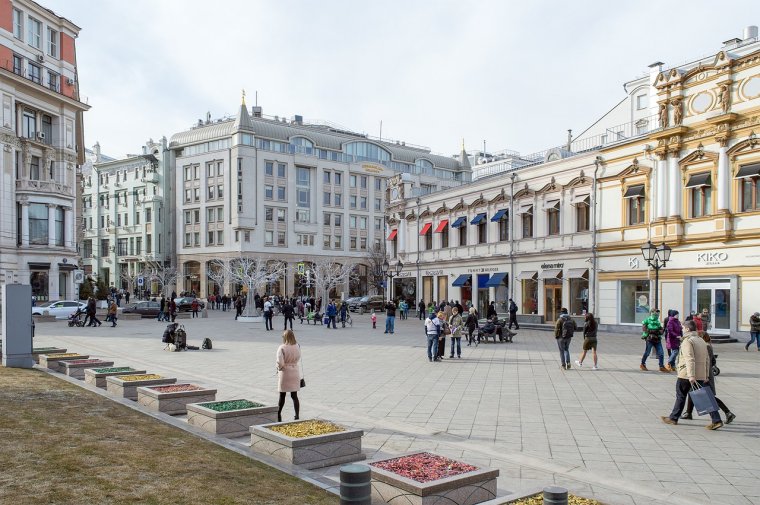
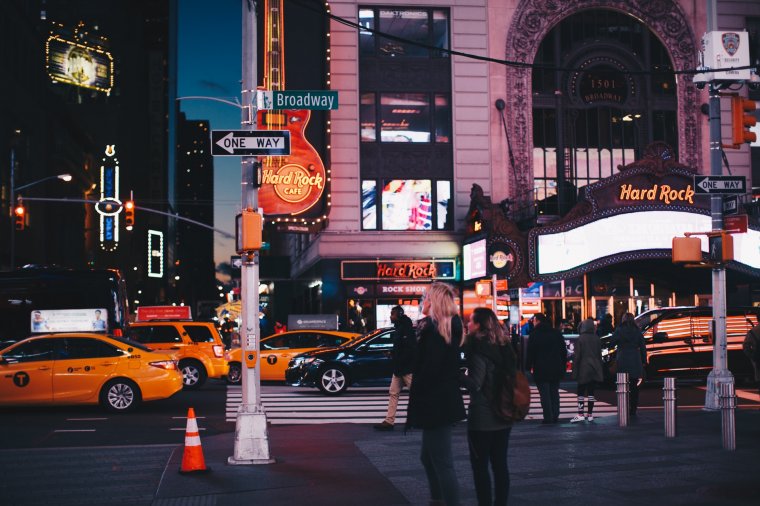
A more advanced method of setting your white balance is to use a white balance card. These cards are specially designed to help you adjust your camera’s white balance settings. You can use one to get an entirely neutral image. Just place the white balance card in front of your lens and adjust your camera’s white balance to tell your camera’s sensor that “white” is the color of the white balance card. The daylight setting also provides a fairly close-to-neutral white balance for imagery. A neutral street scene, like the above image, is critical for highlighting color elements in the photo, such as the awnings and planters.
Urban photography often relies on a cool blue tone that captures the moodiness of a city. You can see this technique used in crime dramas or advertising images that showcase modern or sleek design. You can create this effect using the tungsten/incandescent setting outside, particularly at dusk. Using a high color temperature is an excellent way to change the time of day of an image from afternoon to early evening, as people typically associate blue tints with the hours just after sunset.
A classic street scene does not always need to have a cold, dramatic look. If you’re shooting an urban scene at sunrise or sunset, you can increase the warmth and vibrancy of the image by manually selecting the overcast setting.
If you want to go to extremes with the warming effect in your urban photography, manually set your white balance to a low-temperature white balance setting, such as 3,000 k or lower (depending on your camera’s capabilities). Shooting with a low color temperature gives a richness to summertime shots, and conveys the idea of heat in an image.
If you want to go to extremes with the cooling effect, manually set your white balance to a high-temperature white balance setting, such as 10,000 k or higher (depending on your camera’s capabilities).
White balance, while it initially seems tricky, can be used to convey different moods by changing how the camera’s sensor interprets light. You can use it to compensate for overcast skies or electric lights (with the fluorescent and incandescent settings) or to create a natural, pure look for your images. You can also use white balance to change color to convey a mood or tone, much like colored filters on film cameras.
Urban photography is an amazing niche for photographers who are constantly on the move. It can take you on many adventures, and unlock a creative viewpoint you never knew you had. The trick is to pack light, remain inconspicuous, and put lots of planning into your shots. With a bit of practice, we’re confident you’ll take urban photos that motivate viewers to do their own exploring.


Please verify your software version before proceeding.
 I’ve verified my software version


 Facebook
 Google +
Comments (0)
There are no comments yet.