Tag: lightroom cc

How to Create Panorama in Lightroom CC

Have you ever desired to take a panoramic photograph and your camera doesn’t have the panorama feature? Do you want to do panoramas without switching to Photoshop or other specialized software? Have you forgotten to take your wide angle lens with you on your vacation? Do not give up on the amazing scenery that is in front of you. Following this tutorial, all you will have to do is photograph some parts of the scene and the software will process your images to produce a panoramic image within Lightroom CC (2015).For those who are not familiar with Panoramic Photography, it is a technique of photography that captures a series of images using a photographic camera and aligns them all together, to make a single photograph with a wider aspect ratio than a commonly used photograph.

Before Lightroom CC (2015) came out, in order to stitch together multiple images, you needed to switch between Photoshop or use other specialized software. Even though there are some cameras that have the panorama feature built into them, but most professional DSLR cameras do not.

Recently, after the latest update, you can create your panorama images inside Lightroom CC itself. The best part is that after the software process all the images, it will create a brand new seamlessly stitched RAW file from the images without rendering the images in pixels, with this new raw file, you will be able to retouch the panorama preset in Lightroom as you would any other image. So, you have to know first how to install Lightroom preset and once it has been installed, you can now create your panorama images inside the Lightroom CC.

Panorama is a feature that has been missing for a long time in the software. In order to create breathtaking panoramas, just follow the simple steps below.

Step 1 – Take multiple shots with your camera

  • With your digital camera take multiple pictures from left to right or from bottom to top, depending on the scenery you have chosen.
  • After the first shot is taken, while shooting the subsequent photos, make sure to get a little bit of the scene of the previous image so that Lightroom has data to render them together.
  • If you are using a DSLR or a camera that can manually change its settings, do not change the aperture of the camera. For example, if you use an aperture opening of F11 make sure you use it in every single shot.
  • I did not use a tripod to shot the images used in this tutorial, although it is not crucial, the use of a tripod is recommended.

import

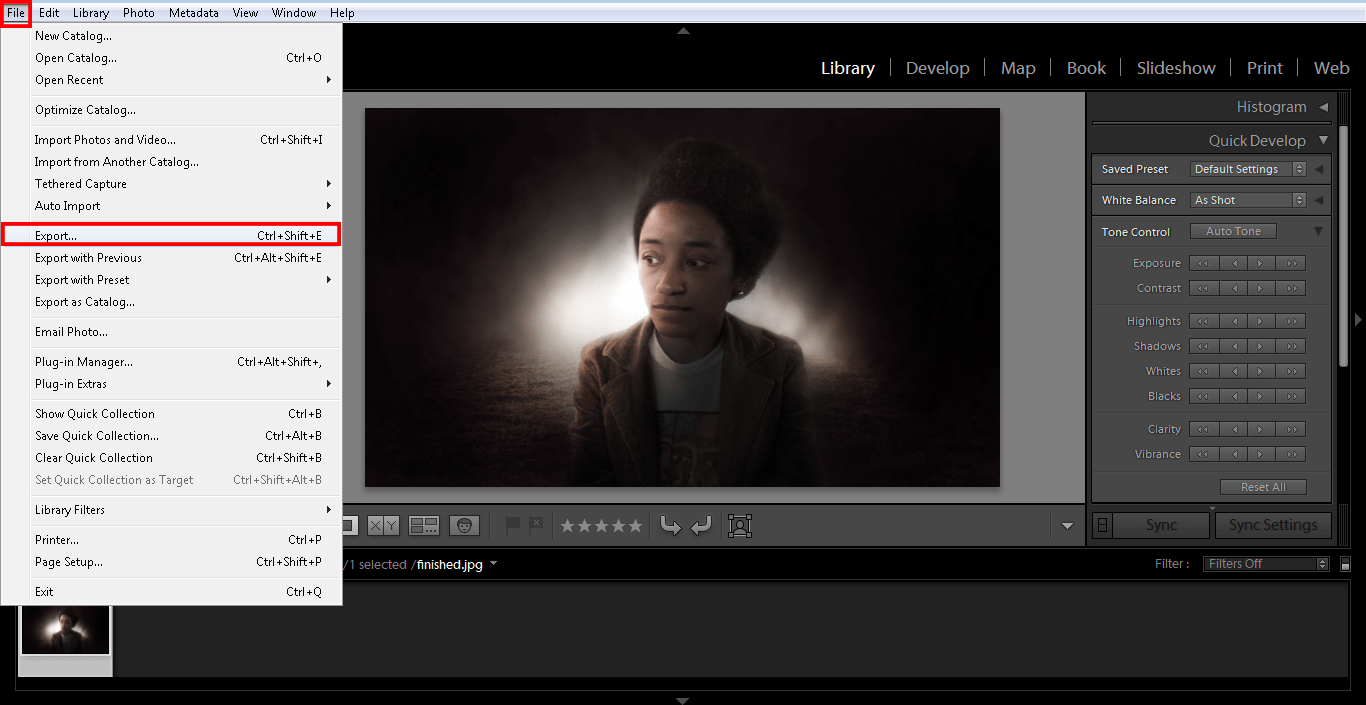
Step 2- Import your images into Lightroom

Import the images that you have photographed.

File/Import Photos and Video 

import_select

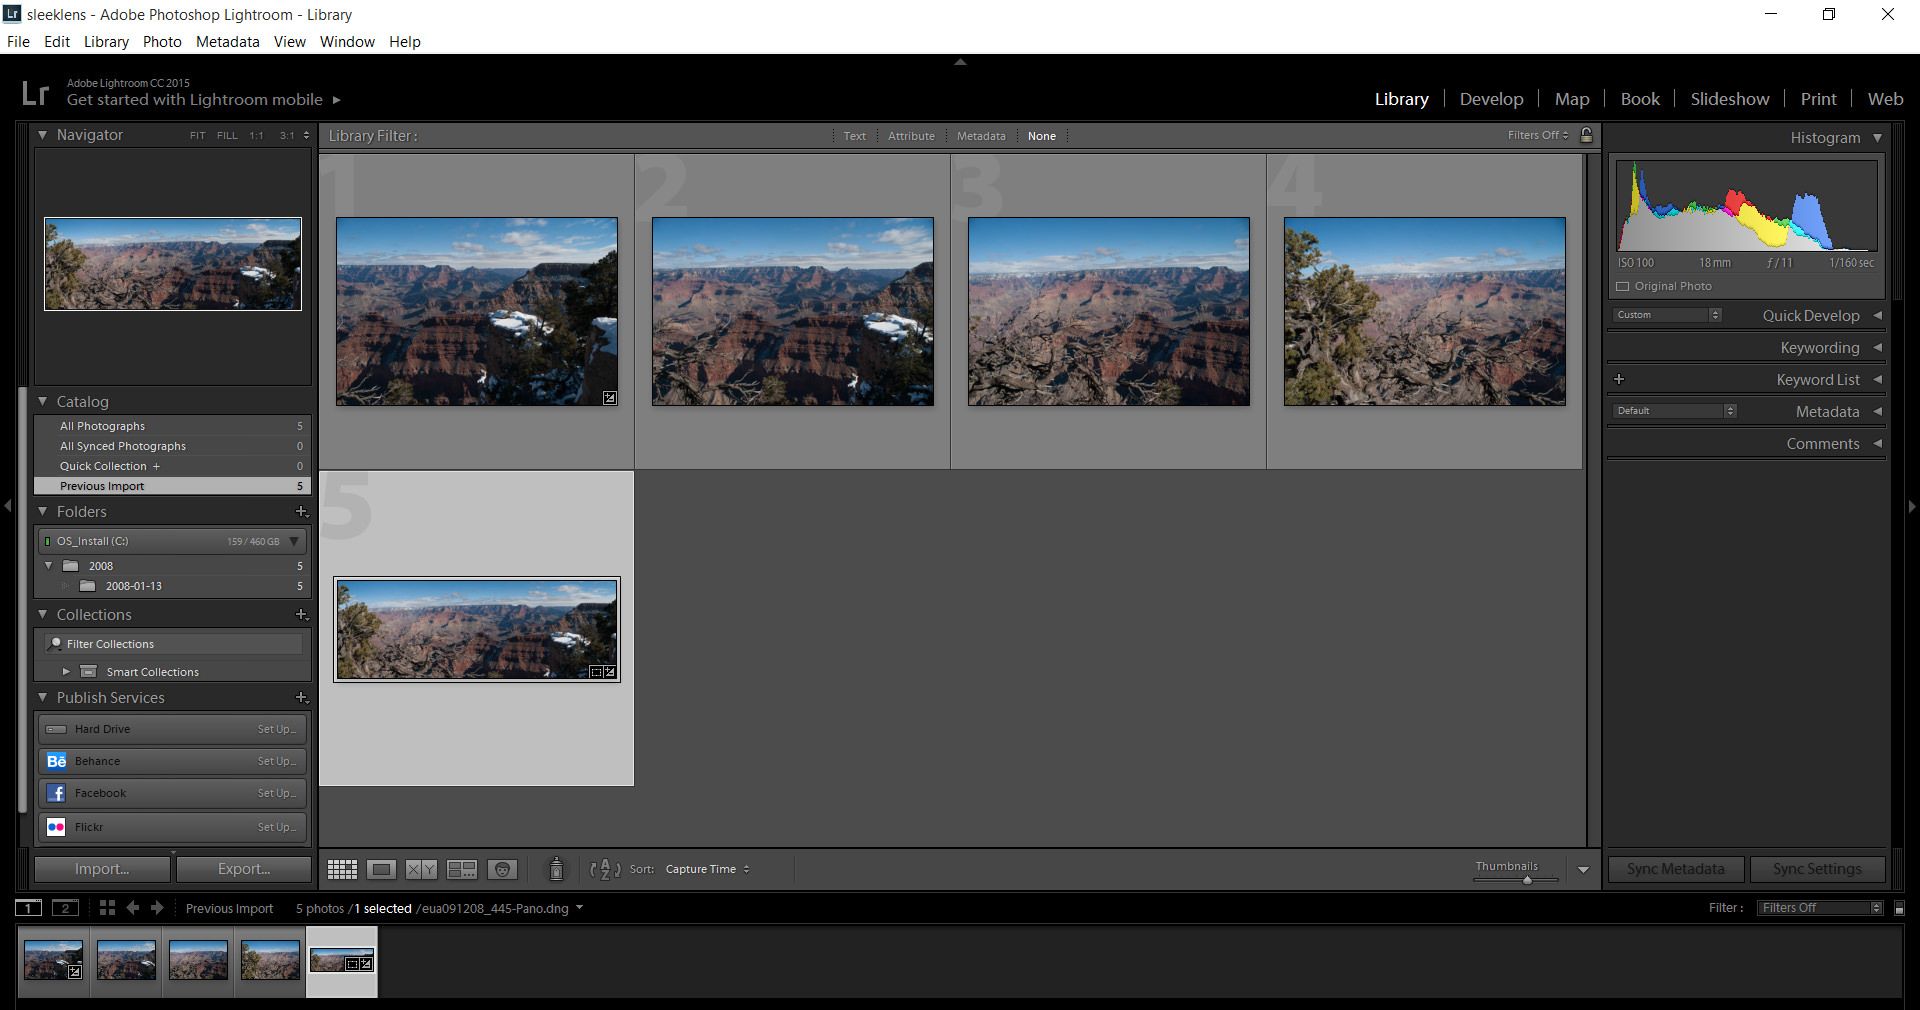
Step 3 – Select the images

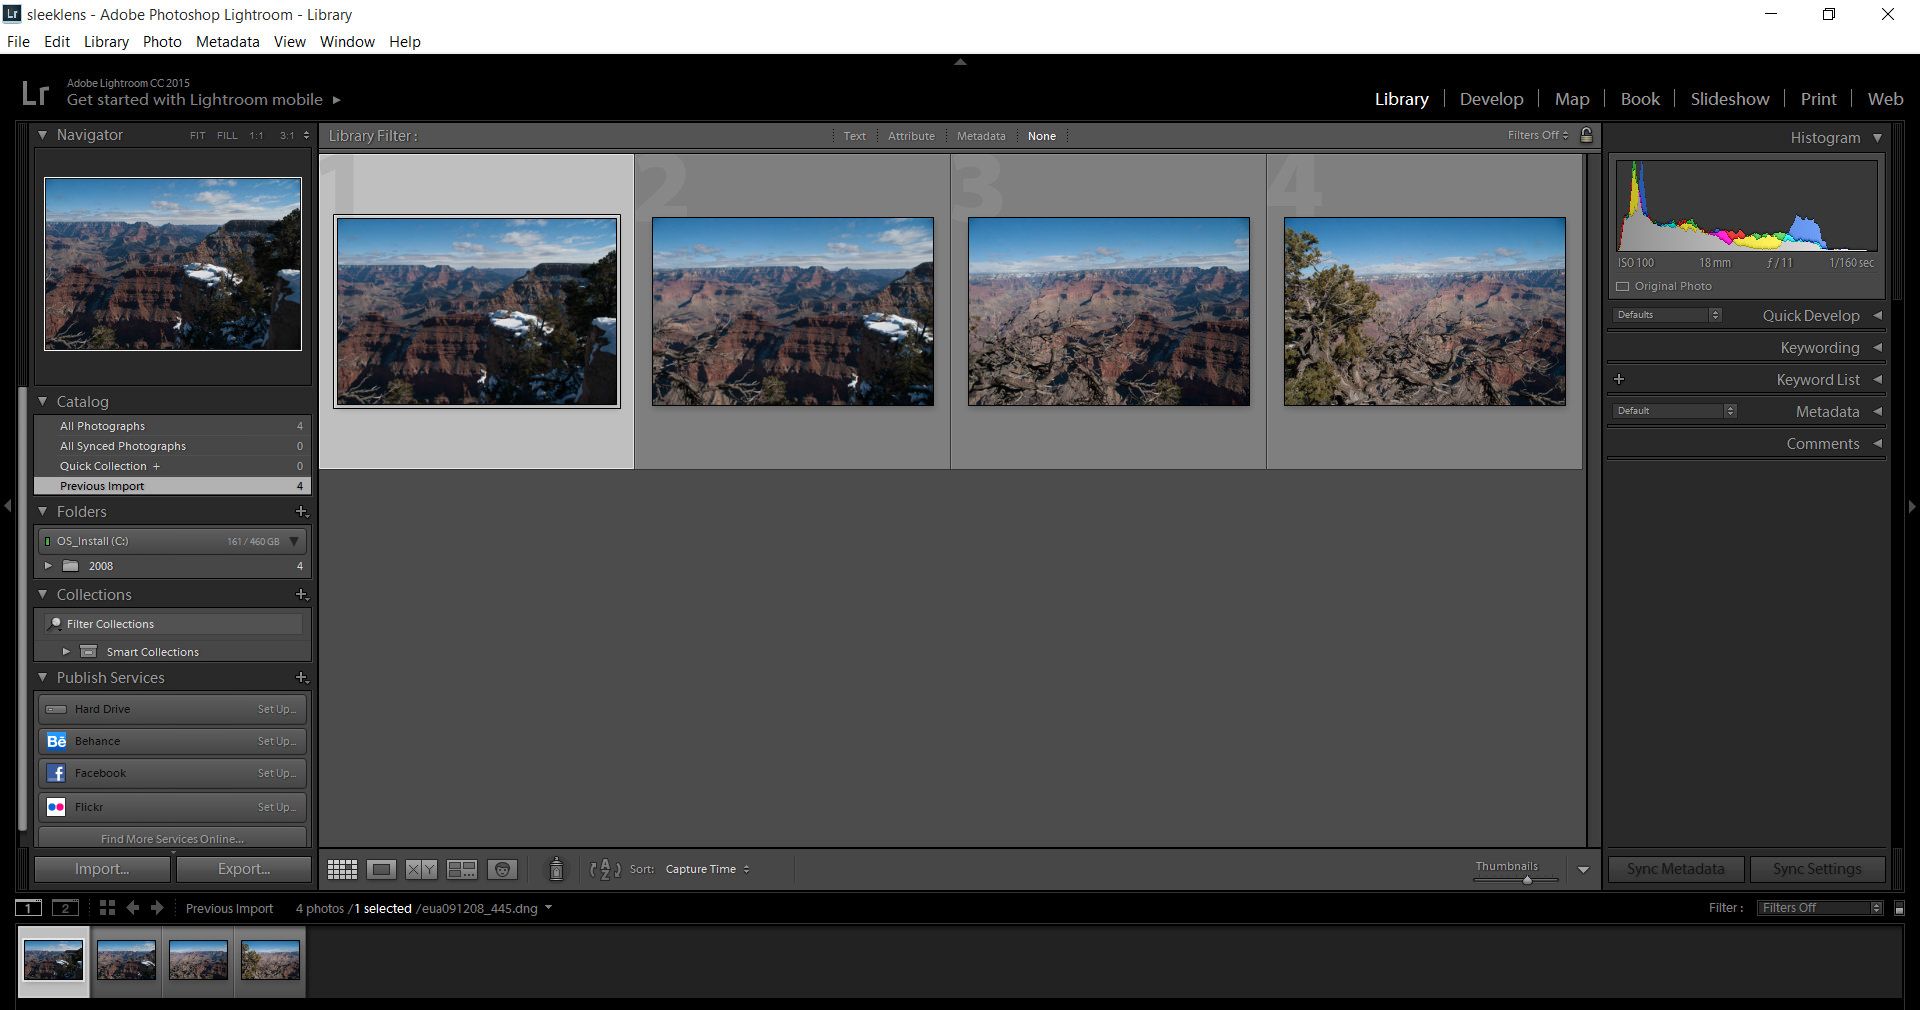
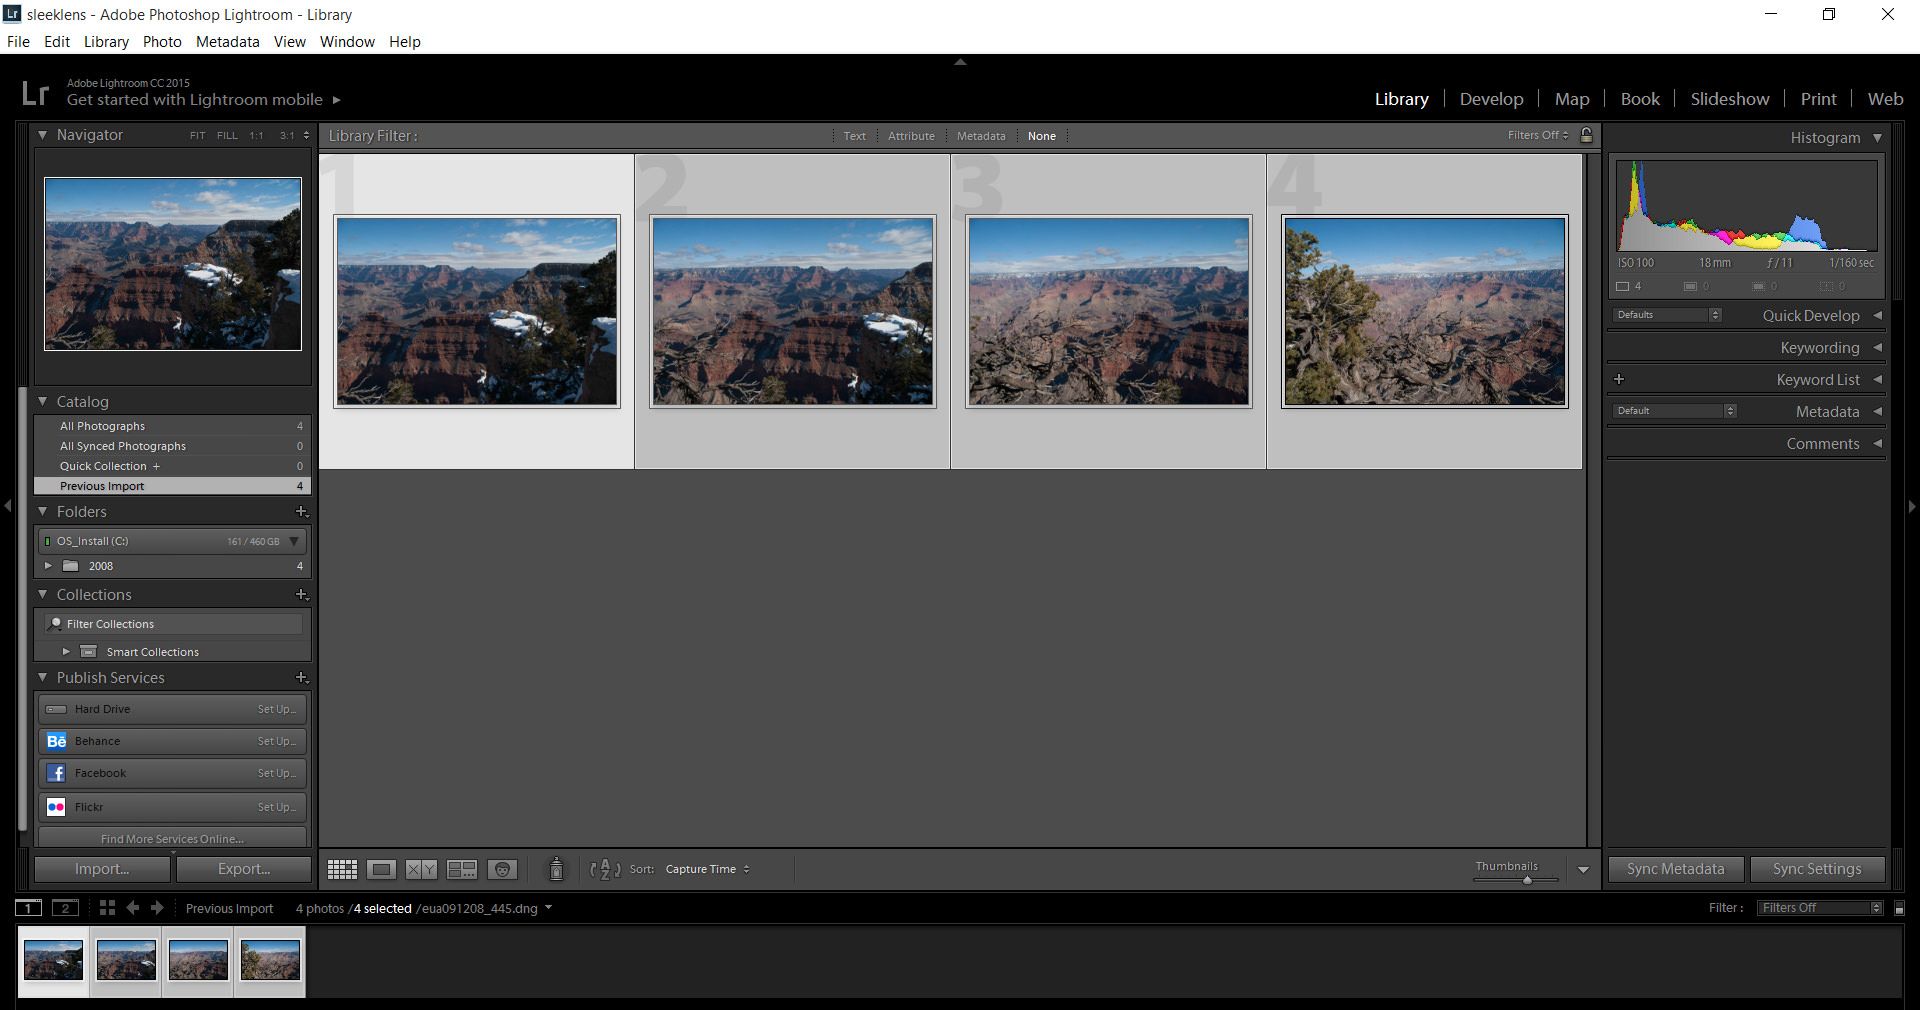
Select all the images that will be used. Shift+click the first image and click on the last image in order to select all the images.

If your images are not in sequence, (cmd+click on the mac or ctrl+click on the PC) on each image to select them.

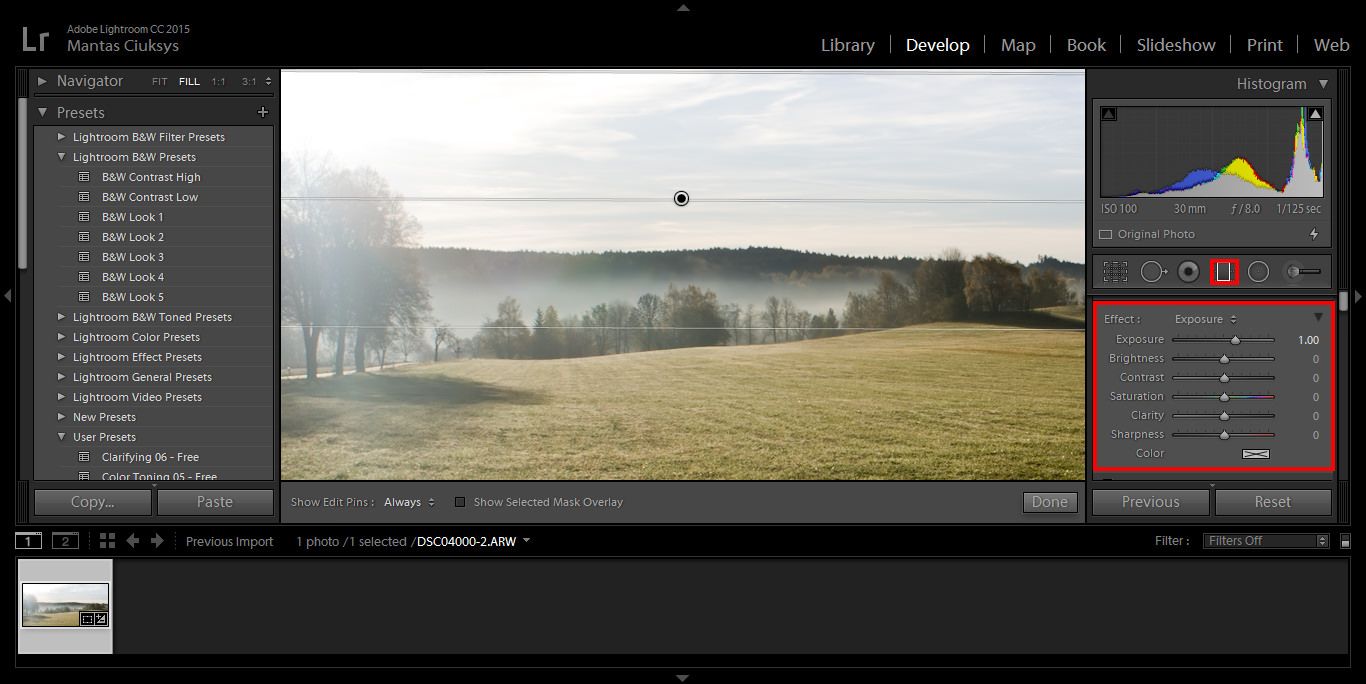
There is no need to adjust your images on the Develop Module at this stage. We will do it afterward, on the final image.

photomerge-panorama02

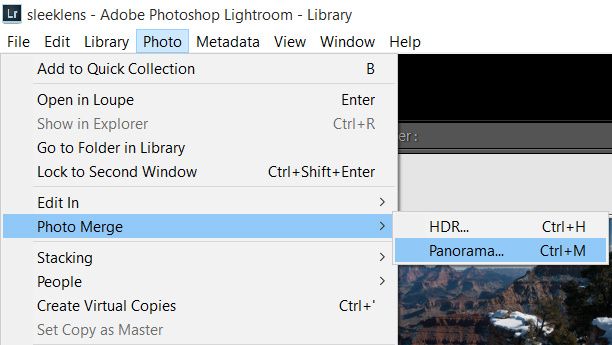
Step 4 – Merge the images 

After selecting the images, go ahead and merge them together.

Photo / Photo Merge / Panorama (cmd+M on the Mac or ctrl+M on the PC)

pano_autosphe

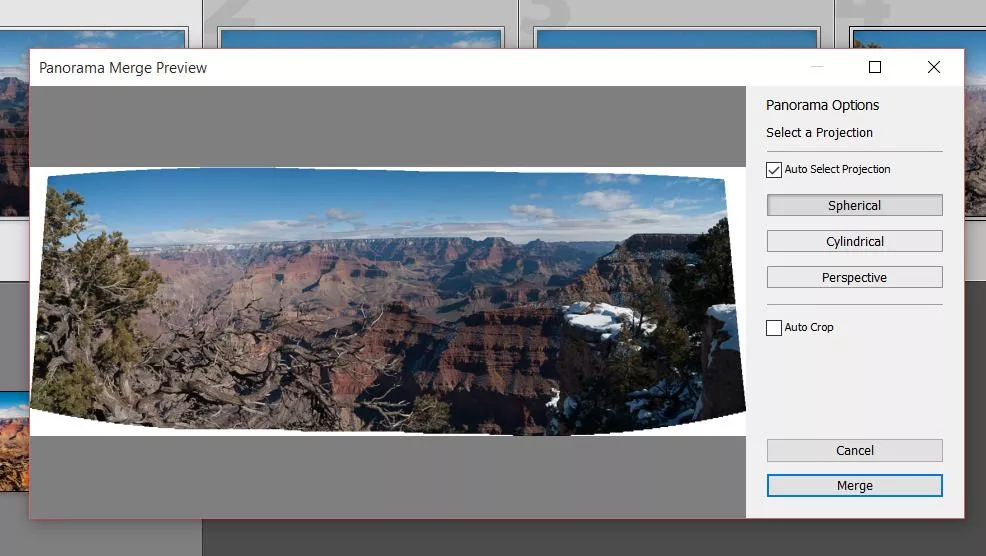
Panorama Merge Preview box will appear.

  • Auto Select Projection: Lightroom will choose automatically which projection fits better.
  • Spherical: The images will be aligned and transformed as they were inside a sphere. Best for wider or multi row panoramas.
  • Perspective: The images will be aligned and transformed as they were mapped to a flat dimension. Best for architectural photography.
  • Cylindrical: The images will be aligned and transformed as they were inside a cylinder. Best for wide panoramas, but with straight lines.
  • Auto Crop: The white edges will automatically be cropped. You can also crop it later on even crop it inside Photoshop, that way you can recover these white areas.

click Merge after the best settings are chosen.

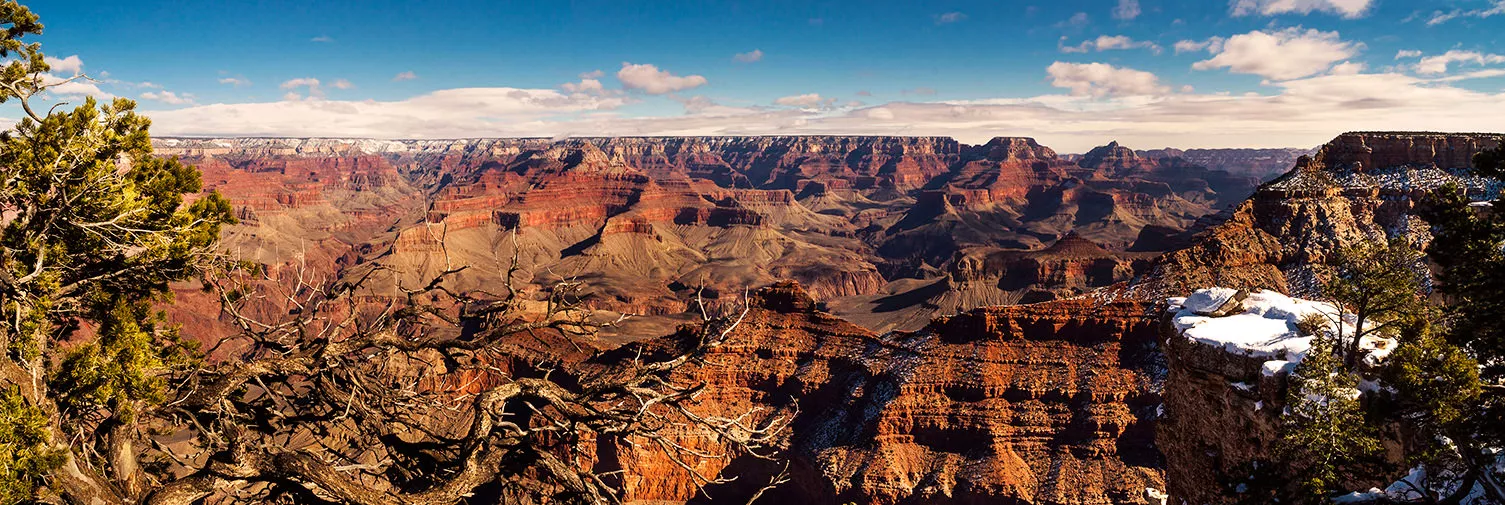
After that, Lightroom will render all the images together. Depending on your machine it may take some time to do the renderings.

newpano

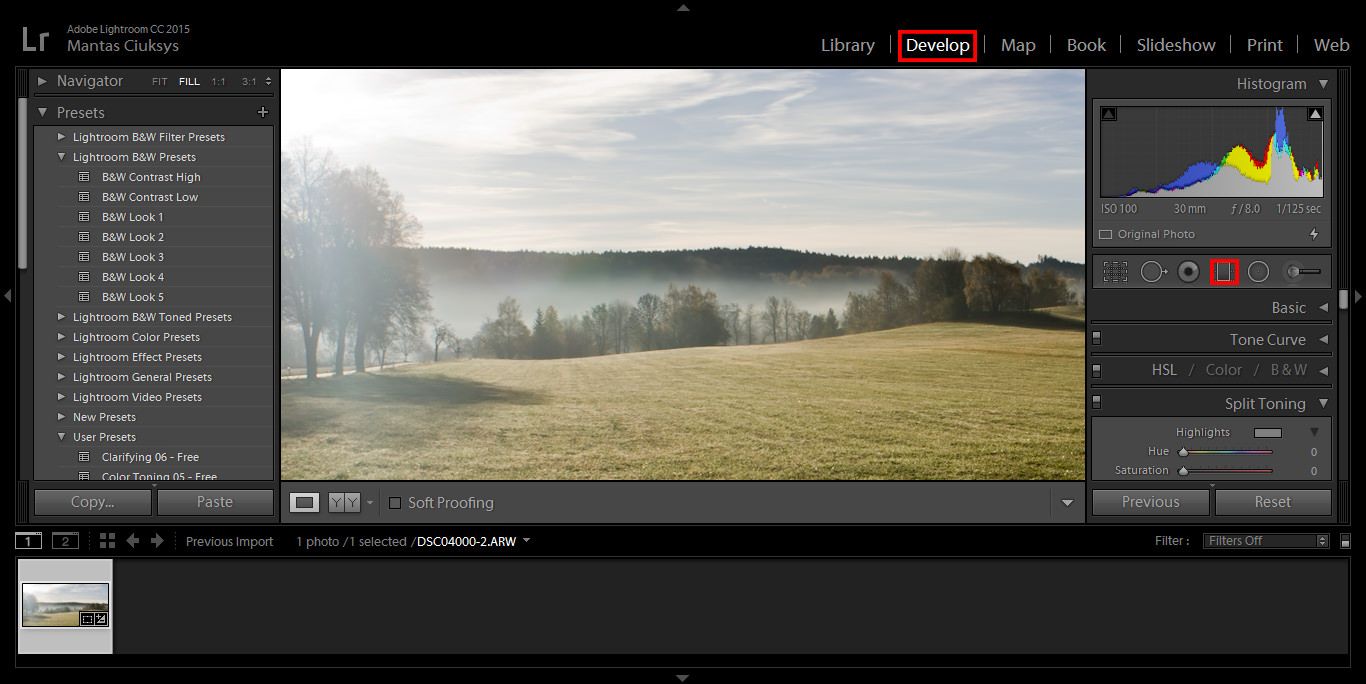
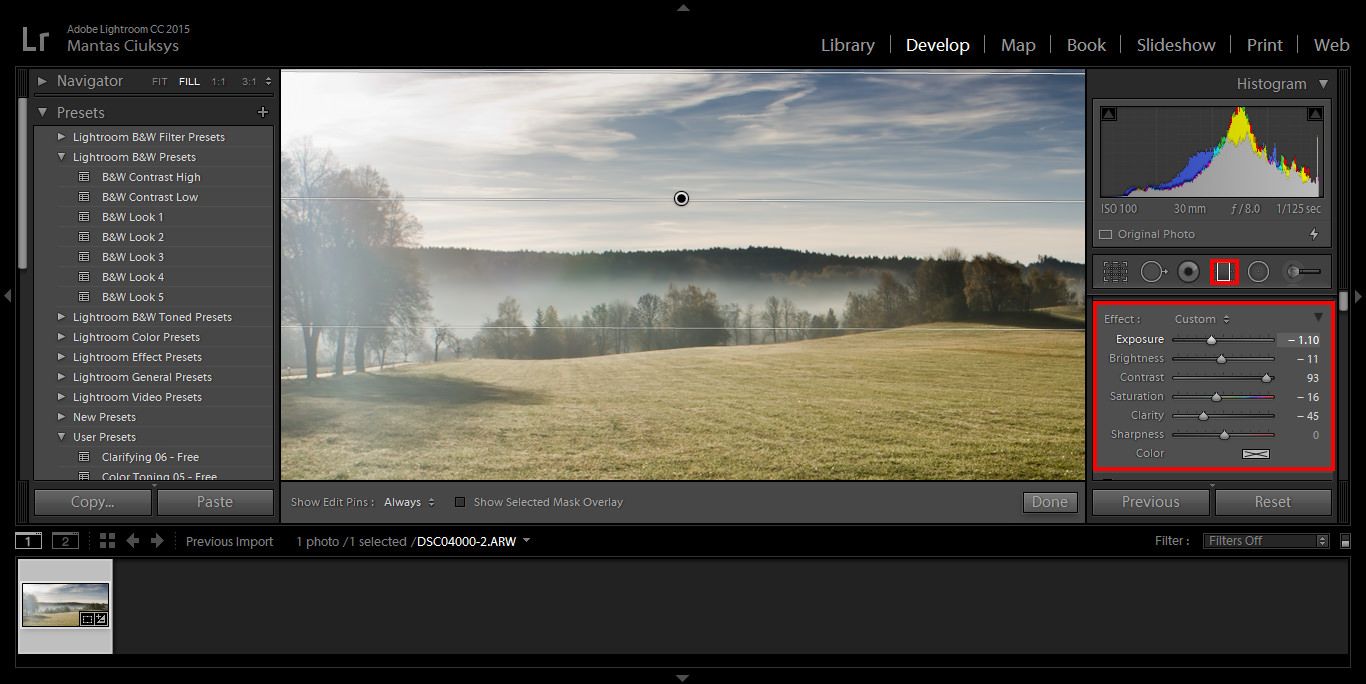
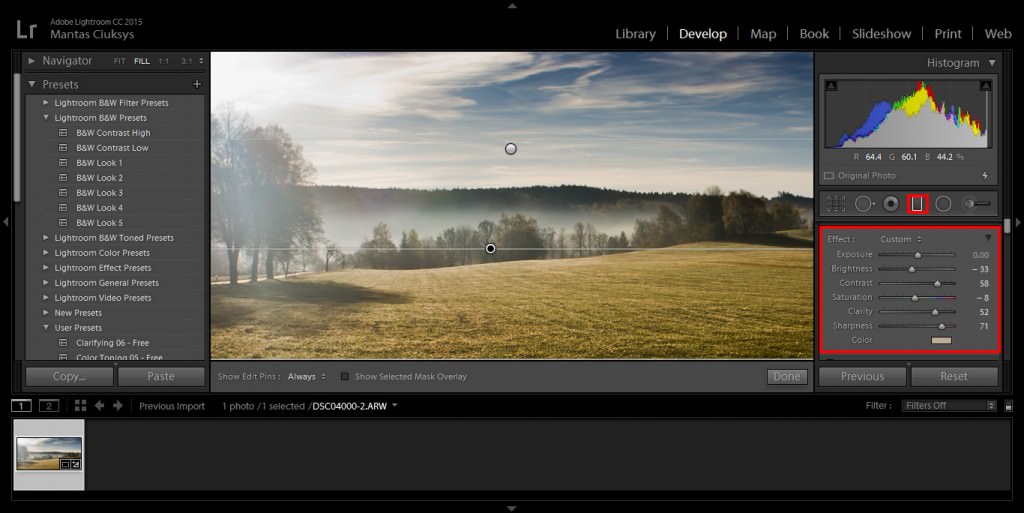
Step 5 – Adjust the final stitched image

The neat thing is that Lightroom creates a brand new RAW file, that means that you will end up with the maximum capability to edit your image.final01

Select the new file and adjust it on the Develop Module as you would normally do in any other image.

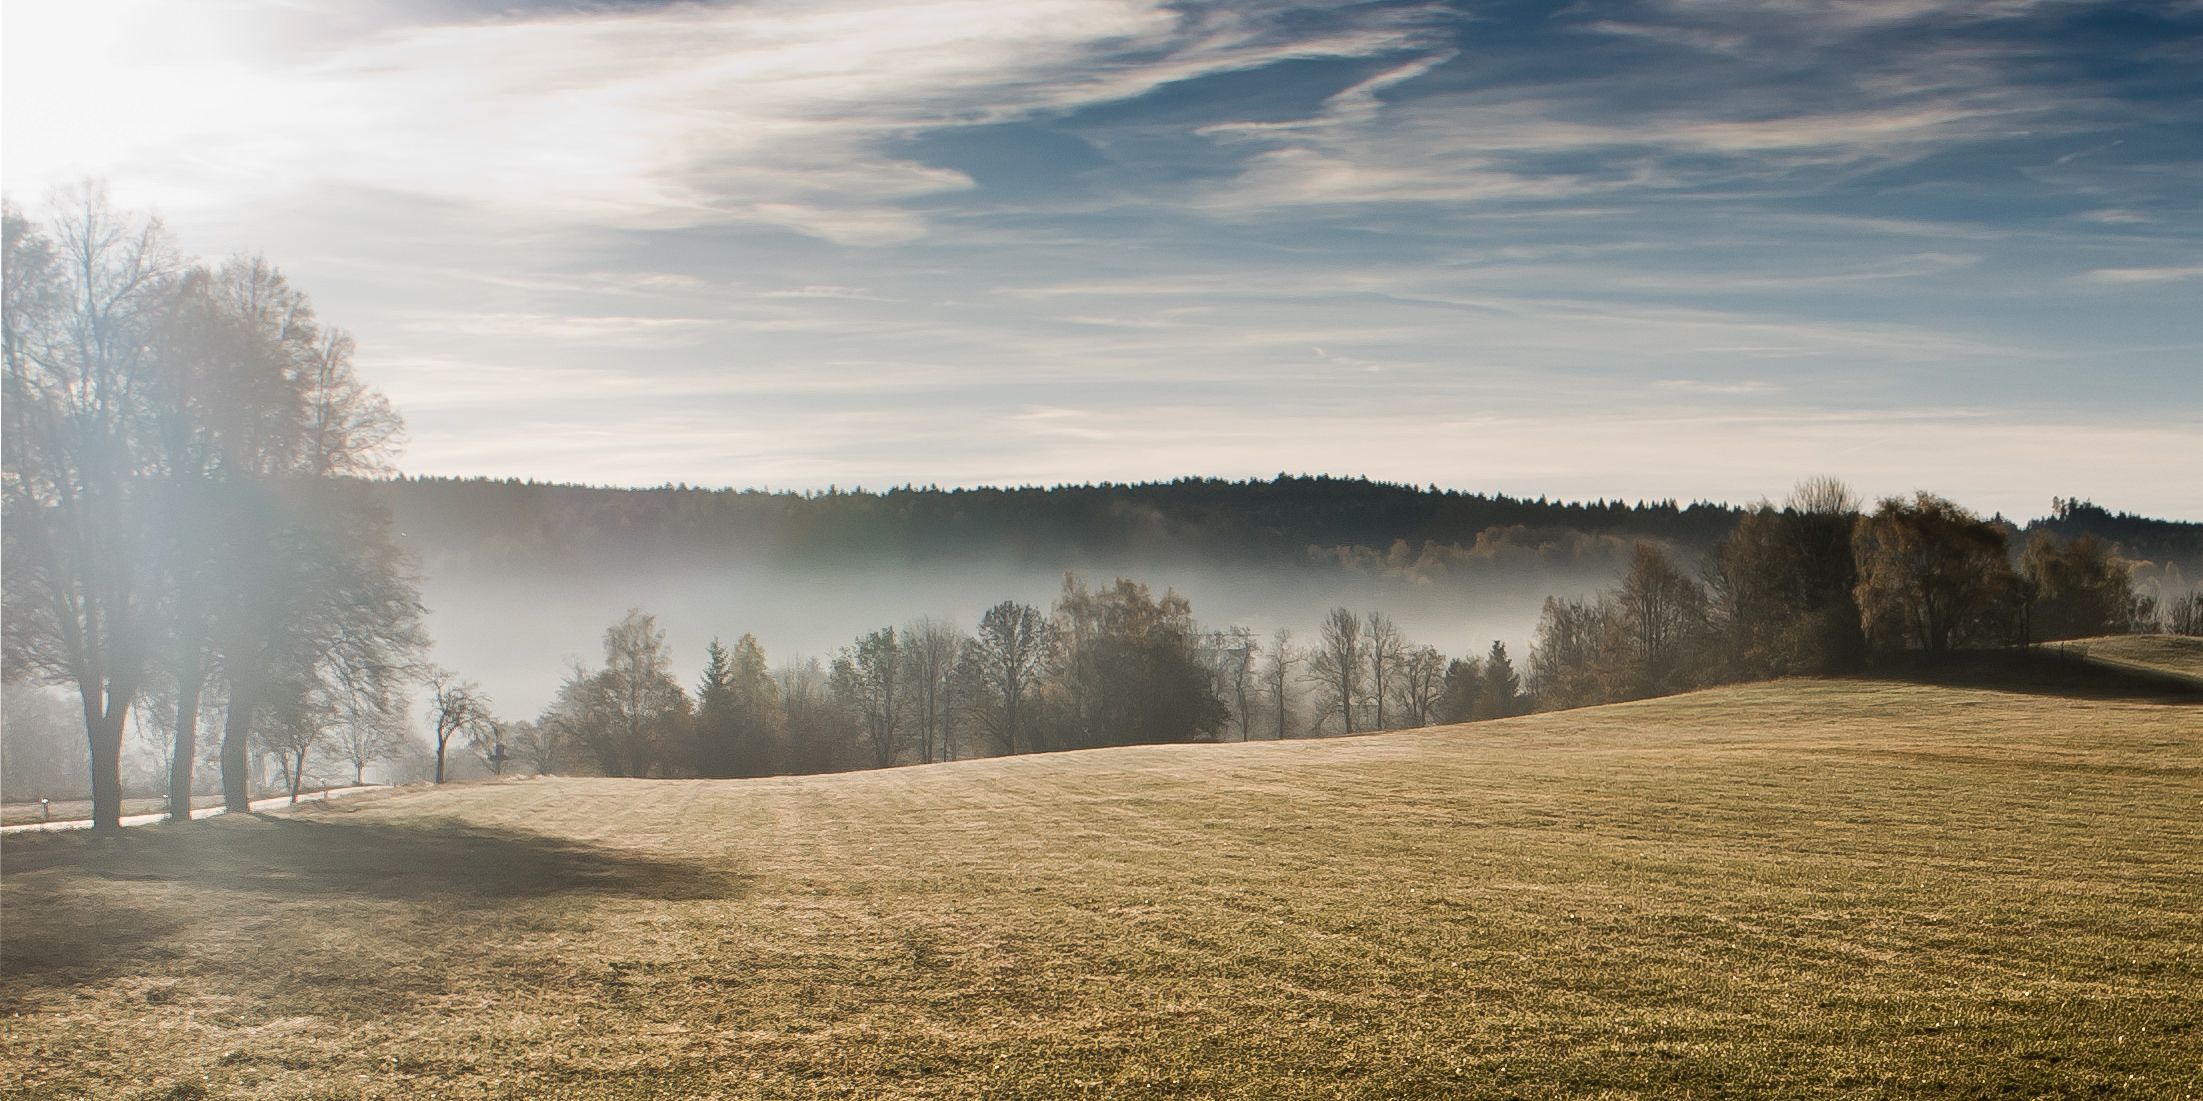
In the end, you will end up with a nice panoramic picture.  So, did you enjoy our tutorial?  You may want to check on other tutorials such as How to Correct White Balance in Photoshop and let me know if you find it helpful.

final02

You can watch this helpful video to learn how to make a panorama photo in Adobe Lightroom. This feature has been there for quite a while much like the HDR feature and they were kind of added at the same time. The feature is super easy and does a very good job of stitching together all the images no matter how many you have.

As we begin, you can see that we have eight images at the bottom which I took. These are almost 180 panorama and this was handheld since I did not have a tripod with me. As such, it’ll take a little bit more work for the program to go ahead and stitch them together. This is also a very tricky scene since as I was taking the image, the waves were constantly moving so it’ll also stitch those as well.

To get the panorama, I will highlight on all the images, right click on them, and then choose “Photo Merge” and then Panorama. This gives us a final rendering for the preview and it is clear that this is a little bit low quality and this is just to give Lightroom a little bit easier time to mess with it since it has many pixels to play with especially with eight photos.

We have several projection options to work with including spherical, cylindrical and perspective. The spherical was great for a wide panorama especially that transitions into objects that are kind of in the frame and so it’ll be the best one for the image we have because of the sphere that we have on the bridge. Cylindrical is kind of has the same effects as spherical but does a better job in making vertical line stay straight. However, we are interested more in the horizontal lines than in the horizon of the image, as this makes spherical much better. On the other hand, perspective is mainly suitable for real estate and architectural stuff as it seeks to do a lot of distortion.

We will, therefore, stick with the spherical projection. We have a couple of features such as auto crop which takes away the white space and kind of automatically crops it in so you don’t have to do it later. We also have boundary warp which is a new feature in Lightroom and kinds of take all the white features and stretches the image to try and fill out spaces in the image. We will use the boundary warp and increase the cover size to 100 and this fills in space very easily thus giving us an image that is perfectly fitting in the available space. We can opt to reduce the numbers and then do some cropping but this will mean going back into Photoshop to try and fill in the spaces.

With all the white spaces filled, we will click “Merge” and wait for the program to put all the images together. Once done, we will have an extra image on top of our initial eight. This is the panorama image which looks great and everything is stitched together perfectly.

The next step will be to fix some of the distortions which arise when we shoot panorama images especially if you have them handheld. To fix some of these distortions we will go to Lens Collection and enable for Profile Collection and then go to Transform and try auto to see whether it’ll collect things for us. However, this only does some minimal collections and therefore we will need to play around with the distortion. We will, therefore, go back to Lens Collection and try playing around with the distortion so as to get some straight line. We will need to change things such as scale, aspect, and the rest until we get the best results possible.

This done, we can go ahead and do the fun bit of changing the effects including the shadows, highlights, vibrancy, clarity and temperature to make it look like a sunrise. Once this is done, we will have our panorama image which includes all the eight images combined into a single image. If we want a large image, we will have a lot of data to play with. We can even crop this image to make it narrow one or crop parts of it to make different size photo print if we want to. All these will come out looking perfect since we have all the data to play with which is a combination of the eight images we had. This is the beauty of making panorama images since you have different cropping aspects and know that your image will come out very clear because of the data you have.

You can check more of our Lightroom tutorials as well as Lightroom Presets and Photoshop Actions to help you do your post-processing edits in an easy and remarkable way.

Batch-Process Cleverly on Lightroom

So, remember all those times when you come back home from a shoot with a hundred shots with varied light set-ups? Remember, struggling and pushing to process all those beautiful shots one by one? Will I make your day better if I told you how to cleverly batch-process these images? Maybe, yes.

So, the easiest way to processes your images without consuming too much time would be to split them into batches. When you go for a wedding shoot, or some indoor event, you end up with over hundreds of images in varying light set-ups. So what you can do is split these images into batches of 5 or batches of 10 and apply a setting/edit common to all these selected photographs.

Ideally, a “shoot” indicates that you’ve used various lenses, applied different ISO speed settings, etc. And different images look different depending on the kind of light that got reflected in that moment or depending on the kind of colours that got captured in that particular moment. So how do you cleverly segregate these images into different batches? How do you figure out which ones to group together?

The fundamental idea is to choose a set of photographs where you can apply a group of similar settings. Follow the steps below to make your work progress a lot faster, easier, and a lot more efficient.

Step – 01

Choose a set of photographs (it can range from a set of 4 photographs to almost 20 photographs), this is what we call a “Batch”. Start correcting the first photograph in that set – adjusting Exposure, White Balance, Tint, Tone curve, Sharpness, etc. Remember, you’re going to apply all these settings later to the rest of the batch, so make sure that your corrections will apply similarly for the remaining images as well.

Screenshot 2016-07-19 13.37.35
The first three images are the ones I’ve combined into a batch for similar processing.

Tip: Do not make major adjustments with the local correction tools, as this might vary from one image to another. What you correct for one image might not apply to the next, even though you’ve grouped them all in the same batch.

Step – 02

The next step is to copy the develop settings from the first photograph, and paste them to the rest of the images in that particular batch. Or alternatively, select the first image, press and hold the ‘Shift’ key and select the remaining photographs. Then, click on the “Sync Settings” button that appears on the lower right bottom of the Library Module.

Batch Processing – Synchronize settings.

Tip: Shortcut to Sync settings is Command + Shift + S

Once you click the sync settings button, a dialog box will open asking about the settings which you would like to copy to the remaining photographs. Make sure that you deselect all the local corrections, and select everything else. Remember, local corrections vary from image to image. So it is advisable to work on the images individually for those changes.  

Step – 03

Repeat the above steps 1 and 2, until you are done with all the photographs in the batch. 

Step – 04

This is the stage that takes up considerable amount of time. True, it depends on the number of images we’re dealing with and the kind of correction it requires, but this stage also calls for some care and concentration so we don’t go wrong.  All the local correction tools namely Crop tool, Adjustment brush tool and Spot removal tool shall be applied manually to each and every photograph in that particular batch. And there we go, you’ve now learned how to speed up your work process while cleverly using the batch process method.Just like how you copy paste the settings from one image to another, you can copy paste noise correction settings as well. The trick is to filter out your images based on a particular ISO setting. Use the filter tool, and filter out images with similar ISO settings. Let’s look at an example. Say, I’m looking for images with an ISO of 1600. Use the filter tool, and filter out all the images in my collection with similar ISO settings. Let’s say Lightroom provides me with a set of 80 images. What do I do no? Pick one image, apply noise-correction changes to this one image, and sync these settings to the remaining 79 images. Tada!

So, use the batch process method effectively, and reduce stress, time-consumption and make your work a lot more fun. We hope this article helped you out, and if yes, let us know about our experience in the comments below.

Local Correction Tools – Lightroom

Color correction is an art form that relies on your perception, experience, and interpretation of the image. We can do this correction if we have an installed Lightroom presets. The fundamental difference between Global & Local correction tools is simple:Global edits are the enhancements we make to the whole photograph.Global correction does apply the changes across all the pixels in the frame. Global editing shouldn’t be used to correct one part of an image, to the detriment of the remainder.Too often I’ve seen people adjust the white balance of an entire photo to try to achieve “perfect” skin tones. Not only is this quite difficult, it frequently makes the rest of the photo look strange. Good global edits are essential, but they don’t negate the need for local editing. Well-executed local edits are the difference between a nice photo and a great one.Whereas local correction tools apply the changes only based on the areas we choose to apply. Some of the Basic Lightroom tools and Photoshop’s Shadow/Highlight act locally and do not treat all pixels with the same brightness values as identical. Some of the Local correction tools in Lightroom  Presets are:
Crop tool(R)
Spot removal tool(Q)
Red eye removal tool
Graduated filter(M)
Radial filter(Shift+M)
Adjustment brush(K)

Local Correction Tools - Toolbar
Local Correction Tools – Toolbar

These tools are available only in develop module and are placed right below the histogram on the right side.

  • Crop tool ( R)
    Crop tool helps us to recompose the photograph that we have taken, to make it aesthetically better or to simply make it more pleasing to the eye. The kind of cropping we do, without a doubt, will vary from one photograph to another. Some might require minor corrections on the horizon while some others might require vertical alignments. Regardless, the crop tool provides the photographer with an opportunity to play around with the proportions, perspective, and the way a photograph looks ultimately. This tool plays a vital role in the post-processing of a photograph.

    Click the Develop tab at the top of your workspace. Locate and select the Crop & Straighten tool icon in the toolbar, which opens the options for the tool. Alternatively, press “R” on your keyboard to open the Crop & Straighten tool options. 

    The Crop & Straighten tools are often the first step many photographers use when editing photos in Lightroom. Use these options to crop a photo for Instagram, straighten crooked photos, or prepare photos for printing.

    Crop Tool features
    Crop Tool features
  • Spot Removal (Q)
    In the Develop module, select the Spot Removal tool from the tool strip, or press Q.

    The Spot Removal tool in Lightroom lets you repair a selected area of an image by sampling from a different area of the same image. It helps us remove dust speckles, insignificant or unnecessary elements from the photograph, remove skin blemishes, etc. On an advanced level, the spot removal might also help to us to remove certain elements from the photograph, like a person, overhead electrical wiring, etc. 
    The two spot removal techniques are Clone and Heal.

    Heal matches the texture, lighting, and shading of the sampled area to the selected area.
    Clone duplicates the sampled area of the image to the selected area.
  • Spot removal tool - features.
    Spot removal tool – features.
  • Red eye removal tool
    Red Eye will remove the red discoloration of a person or a pet’s eyes that can result from a camera flash going off. Unfortunately, there aren’t any shortcuts available for this particular Lightroom feature, but this is yet another vital tool when it comes to post-processing photographs. To remove a red eye from an eye on a photograph, you can use this tool to remove the red eye and to enhance the eye.
  • Spot removal tool.
    Red-Eye Removal Tool.
  • Graduated Filter Tool
    Graduated Filter Tool
  • Graduated filter (M)
    In the Develop module, select the Graduated Filter tool from the tool strip, or press M.
    The Lightroom Graduated Filter is a versatile tool for making local adjustments to your photos.This tool is a huge help for landscape photo retouch as it can be used to enhance the details from the foreground and the skies.
  • Radial Filter (Shift + M)
    The background or elements surrounding the primary object of your photograph can distract the viewer. To draw attention to the subject, you can create a vignette effect. The Radial Filter tool enables you to create multiple, off-center, vignetted areas to highlight specific portions of a photograph.

    In the Develop module, select the Radial Filter tool from the tool strip, or press “Shift + M”.
  • Radial Filter Tool
    Radial Filter Tool

    Adjustment Brush (K)

    The Adjustment Brush tool, literally, works like a brush. The changes or corrections get applied to those regions that you select or brush over. This is one the major advantages of this particular tool – make changes to specific areas or regions of the photograph. The Adjustment Brush tool lets you selectively apply Exposure, Clarity, Brightness, and other adjustments to photos by “painting” them onto the photo.

    In the Develop module, select the Adjustment Brush tool from the tool strip, or press K.

Adjustment Brush Tool

The adjustment brush tool combined with the graduated filter tool are a deadly combination. These two tools together have the power to create/produce magical outputs even out of the most simple photographs.

Lightroom is great for processing your photos and understanding how its tools work will help you use it more effectively. Use these features, play around with the tools and tell us about your experience in the comments below. 🙂 

How to Get Perfect White Balance in Lightroom Using a Color Chart

Imagine that you have spent an awfully long amount of time editing a photograph for the cover of a magazine and as soon as you get the copy, the colors did not match what you had on your monitor. Trying to get accurate colors can be quite challenging and the process of getting an efficient color management in lightroom can be a nightmare at first.

From time to time, a client will have some doubts regarding color, saying that the color of a certain product that he sees on his computer is not right or even after printing an image and the color is not the same that you had on your monitor. As photographers, we want to make sure our photographs are printed or delivered to our clients with the correct color that we see on our monitor. Therefore, we have to be certain that the problem is not in our process. That’s why getting accurate colors is such an important factor that can’t be ignored in the photography workflow.

There are some products available on the market, like monitor calibrating devices from brands like X-rite or Datacolor and professional high-end monitors like Eizo and LaCie. Although, it can be quite expensive for someone starting out in photography, color charts can be an affordable way to get the colors right every time, and there are a lot of types and brands to choose from.

In this tutorial, I will show you how to manage colors using only a color chart, while not having to spend a lot of money.

01_all_imgModel:  Jessica Waldow / Photo: Luiz Kim

I did a series of photographs for a fashion lookbook (images 3 to 6) using the same light setting and, on purpose, messed with the white balance on my camera, since I photographed in RAW I could tweak the white balance as much as I wanted, nondestructively.

As I mentioned in my last white balance tutorial, studio strobes are set up to 5000K – 5500K, therefore I should have photographed using the setting for the white balance to the flash icon or manually change the setting to 5000K on my camera. The bluish photographs were set up around 2000K and the one with a more yellowish color around 7000K. Even if you set up the white balance on your camera, you will never be a 100% sure if the colors are correct, either because the flash strobe is not giving 5000K – 5500K, or the tint of the photograph appears green or magenta.

Step 1: Photograph the subject with the color chart, position it accordingly to the main light source

After you have set up the lighting for the photo shoot, position the color chart near the main subject and face it toward the main light source.

Click on the White Balance Selector (W), which looks like an eyedropper tool.04_checker_a01

Step 2: select the gray area of the color chart

With the White Balance, Selector tool selected, click on the gray box of the color chart. Each color chart may differ, depending on the manufacturer.

With the White Balance Selector, hover over the image. We can see the preview in the navigator window before we even click it.

04_checker_a03

As you can see, it will automatically correct the white balance of the image, even if your monitor is not calibrated, Using this method guarantees that the white balance is correct.

At this stage, you can edit your image as you would normally do, remembering not to tweak the white balance too much, since the whole purpose is to correct it.

After correcting one image, you can adjust the others as a batch. It doesn’t matter if there are a thousand images, you can match it with the steps below.

Step 3: batch correcting the white balance

Click on the image you have corrected and press shift+click on the last image of the series, that will select the images you want. If you want to select images that are not in order, Ctrl+click for PC, or Cmd+click for mac, selecting the images one by one. Just make sure that the highlighted image is the one with the adjustments.

05_sync_a01

Step 4: Synchronize the settings

Click on the ”sync” button, which is located in the bottom right corner.

The ”synchronize settings” panel will pop up, you can either check just the white balance to sync all the images with the same white balance, or check whatever you want to sync with the settings.

Hit the synchronize button and Lightroom will synchronize the settings.

01_all_img_a02

As you can see, no matter how many photographs you have taken with the same light source, you will always get the correct white balance.

A Guide to Using the Adjustment Brush in Lightroom

Correcting exposure, color balance, and contrast are likely how you begin editing the majority of images in Lightroom presets. Often, it might be all that is required to finish editing the image; however, to take your images a step further Lightroom has given its users a tool called the Adjustment Brush. It allows for photographers and retouchers to localize their editing by carefully selecting specific parts of the image to enhance, hide or correct. The Adjustment Brush is a fairly easy tool to master, but it comes with a few settings that need to be understood, to use this tool well. This is the complete guide to using the Adjustment Brush in Lightroom.

The Adjustment Brush tool is found in the Develop module of the Lightroom panel which can be found if you have an installed Lightroom presets.  You can quickly access the Develop module by using the keyboard shortcut ‘D’. The Adjustment Brush tool is marked as a dotted circle with a brush coming out of it – make a habit of using keyboard shortcut ‘K’ to access the tool, to save time when retouching.

Adjustment Bursh

Once the tool is selected, you will see that the mouse pointer turns into a circle. It marks the area affected by the Adjustment Brush. Further, you will notice that it opens a number of options that change what affect the Adjustment Brush will have on the image.

The first two sliders control the temperature and color tint of the image. These, in short, control the white balance settings of the Adjustment Brush. For example, you could use this tool stylistically to add a complimentary color in the shadows of an image for a more saturated photo.

Adjustment Bursh2

Moving forward, the next six sliders control the exposure and tone settings of the Adjustment Brush. Exposure will change the overall tone shift of the area affected by the Adjustment Brush. The contrast will control the ratio between the black and the white values of the image, which can be the further adjusted by the last two ‘Whites’ and ‘Blacks’ sliders. The Highlights slider will control the extent to which the Adjustment Brush affects the brightest sections of the adjusted area, while the Shadows slider will control the darker areas. Adjusting these settings can help you bring certain parts of the image forward or hide other areas in shadows.

Adjustment Bursh3

The next section allows for changes in clarity (one of the features you have to consider for rating system in Lightroom), which controls the contrast of the lines in the image, and saturation, that affects the intensity of the colors in the area of the adjustment brush. Often clarity can be great in revealing the amount of detail present in the image; however, usually you want to avoid adding it to faces as it will accentuate lines and creases in the skin – to avoid that we can use the Adjustment Brush tool to only increase clarity outside those areas.

Adjustment Bursh4

The next section is responsible for correcting the issues caused by the camera sensors. First, are the Sharpness and Noise sliders that can be used to make parts of the image stand out from the rest or used to reduce noise and grain caused by the camera sensor. The Moire slider is there to compensate for the Moire effect that occurs when a frequency of pattern in the image aligns with the pixels of the sensor, resulting in a distortion of that pattern. The Defringe slider reduces the chromatic aberration caused by lens shortcomings.

Adjustment Bursh5

Further, the Color option of the Adjustment Brush allows you to select a color cast that the brush will add to the affected area of the image. Last part of the Adjustment Brush options controls the Size, Feather, Flow and Density of the Adjustment Brush. A quick way to adjust the size of the brush while retouching is to use the keyboard shortcut ‘[‘ to make it smaller and ‘]’ to increase its size. The Feather of the Adjustment Brush controls how quickly the Adjustment Brush will fade into the rest of the image. The larger the Feather level – the more gradual the fade will be.

Adjustment Bursh6

Flow affects how quickly the Adjustment Brush is applied to the image. If it is set to 100%, it means the Adjustment Brush will affect the area to a maximum level. If it is set to 50%, only half of the effect of the Brush will be seen.

The Density slider is similar to Flow and controls the amount of change that can be applied by the Adjustment Brush; however, unlike Flow, it will limit the effect indefinitely, meaning that once it is set to a specific value that area will always remain affected at that percentage, unless the Adjustment Brush settings are changed.

Last, the Auto Mask options attempts to guess, which parts of the image you aim to be affected by

the Adjustment Brush. It does so by checking for contrast ratios between pixels, meaning that if you have a subject in the image that clearly stands out from the background, it should be able to easily identify that you only want the subject affected; however, if the background is very cluttered, likely, it will not be able to distinguish the subject well.

Adjustment Bursh7

If you are finished with the first set of adjustments, you can create a new brush. Simply click the ‘New’ option in the Adjustment Brush settings panel, set the new settings for the Adjustment Brush and start applying it to the image. Note, that you will be painting on top of the first Adjustment Brush that you used. A quick way to undo the changes made by the Adjustment Brush is to hold the ‘Alt’ key while brushing the areas you want to be undone.

A Guide to Sharpening in Lightroom

Getting a sharp image is key in photography. If your image will be sharp, naturally, will have a lot to do with how the image was shot; however, even if the focus was perfect, amount of noise was low, and the equipment was top of the line, you will still find you need to sharpen your images occasionally for them to display perfectly and stand out from the thousands of images online. This tutorial will be your guide to sharpening images in Lightroom.

There are two distinct steps in sharpening an image. The first step is a creative one, it is a selective sharpening you will apply to your image to reveal the detail you want to stand out, for instance, sharpen a model’s eyes or the texture of a fabric. The second step is a technical side of sharpening required when sharpening images for a specific output, i.e., print or web.

Sharpening Settings

To begin, open the image you want sharpened in Lightroom and go the Develop module – a quick way to access the Develop module is to use the keyboard shortcut ‘D’. Inside the Develop module, scroll down through the options until you find the ‘Detail’ section of the module; to jump to this section use the keyboard shortcut ‘Cmd + 5’ (Ctrl + 5 for Windows).

lr develop

You will notice that the ‘Detail’ section displays a part of your image zoomed into 100%. It is crucial when sharpening your image to always check how the image looks zoomed into 100%, you can quickly zoom in and out of the actual image using the keyboard shortcut ‘Cmd + ‘plus’’ (Ctrl + ‘plus’ for Windows). Sharpening strongly affects image noise – it is important that you check the noise levels in the image. Be sure to check the shadow areas compared to neutral areas. Checking for noise will give you an idea how much sharpening you can apply to the image, or if perhaps you need to first reduce noise or only use selective sharpening.

lightroom detail

The Detail section of the develop module has four settings you can change to affect sharpness. Amount – controls the level of sharpening applied to the image. Radius – affects the size of the area surrounding the lines and edges in the image; increasing the contrast ratio of those edges is what creates a sharpening effect. Detail – affects the tolerance to which edges will be sharpened; the higher the slider the more individual edges in the image will be selected for sharpening. Masking – controls the area of the image around the subject that is sharpened. This feature can work extremely well by sharpening only subject and not the background if the two are well separated from each other.

sharpening settings

A quick tip that can help you check what effect these sliders are having on your image is to hold the ‘Option’ key (Alt for Windows) while holding the slider. Lightroom will gray out, black out or desaturate the image depending on which adjustment you are changing and reveal the sections of the image being affected.

altoptkey

When sharpening, there are a few things to look out for. First, you want to avoid seeing jagged lines in the image. It becomes most visible with straight lines. Often, this is caused by the radius being set too high. Second, check the level of noise in the image, you are expected to get some increase in noise. Third, when sharpening, beware of areas that are out of focus, you want to avoid adding sharpening to the edges that are supposed to be blurred. Often times the ‘Masking’ slider can help minimize this issue.

Selective Sharpening

To add selective sharpening to your image you will have to use either the Graduated Filter tool, accessed by keyboard shortcut ‘M’, or the Radial Filter tool, accessed using the keyboard shortcut ‘Shift + M’. When it comes to selective sharpening, the best bet is to use the Radial Filter tool, simply because it allows for more precise area selection for sharpening. If you wish to use the Graduated Filter tool, have a look at our tutorial on how to use it; however, as an example for this tutorial, a Radial Filter will be used.

Select the Radial Filter tool, and drag it around the areas you wish to sharpen. In the case of the example image, those are the eyes of the model. Once you highlight the areas, go to the settings of the Radial Filter tool, find the Sharpening slider and adjust it to increase sharpness in that specific area.

selective sharpening

Output Sharpening

If you are happy with how your image looks you are almost ready to export it; however, if you export the image as it is while lowering the resolution, you will notice that with the lower resolution the sharpness has decreased as well. That is because pixels contain detail – deleting them erases some of the fine detail of the image resulting in a softer appearance. You will need to sharpen the image to compensate for the down-scaling. In Lightroom, this step has been made extremely simple.

When you are ready to export your image, go the Export panel found through the Lightroom toolbar. A new dialog box will open where you will be able to set a number of parameters for the exported image. Find the ‘Image Sizing’ section and set the dimensions of the image. Afterward, right underneath you will find the ‘Output Sharpening’ section – it might have only a few options, but it does a fairly good job at calculating just how much sharpening you need depending on how much down-scaling has occurred. Usually the ‘Standard’ amount of sharpening will do the trick; however, if you find any of the over-sharpening signs mentioned earlier, go back and export your image again, using a lower setting.

outputsharpening


A Guide to Color Management in Lightroom

It is not always creativity and an eye for detail that photo retouching requires. Being a photographer or working in photo retouching requires you to know quite a number of technical details, and Lightroom color management is one of them. At first, color spaces, gamut and color profiles might sound off-putting and complicated, but in reality, they are not difficult to understand, and in practice, you will find that you mostly need to know just a few simple rules. This tutorial will be your guide to Lightroom color management. Click here to find out how to install Lightroom Presets.

Lightroom Color Profiles

Lightroom Color Profiles, in a nutshell, are a set of guidelines you provide your computer or software to help it display the image; it will include the information on the range of colors, depth of white and black tones and the color distribution between tones of the image. It sets boundaries as to how much color information in the image there is. Click here for more infos.

There are three important color profiles to consider. First one being ProPhoto RGB, Adobe RGB, and sRGB. Considering you are working with a RAW image, when you import it into Lightroom, the software will automatically assign it the ProPhoto RGB profile, the reason being, it can hold most of the information a camera sensor can capture, therefore, working in this color space will preserve most of the information in the image. Adobe RGB covers slightly less color space than ProPhoto RGB, but it still retains most of the color that an industrial CMYK printer will be able to print, meaning that if you plan to have your photos printed professionally, a magazine or a poster, it is usually the profile to go with. Last, the sRGB color profile, probably the one you will be converting your photos to the most – it limits the color space to that of the most monitors. Although more new monitors are trying to reach the Adobe RGB color space, still, the color profile used online is sRGB, and therefore, the most common one you will find. Underneath is a graph that shows how the three color spaces relate to each other in addition to a 2200 matt paper.

Colorspace

Converting Color Profiles

It is key to consider that converting the image’s color profile is irreversible. If you convert the profile from ProPhoto RGB to Adobe sRGB, you will not be able to regain the information lost through conversion, because a color profile that uses a narrower color gamut than the original compresses the image. Sometimes you might be asked to deliver the photos to a client in Adobe RGB profile, despite you only having the sRGB file. That is not a problem, you can still convert your sRGB file to Adobe RGB profile; however, you will not be regaining the extra color that Adobe RGB offers.

Before you convert your image to the required profile, make note that it is best practice to work on the image without applying a color profile for as long as you can – make it the last step in the editing process. Luckily, in Lightroom, your choice to select a color profile comes when you export the image. Last note, is that this primarily concerns RAW images, certainly, most files downloaded online will be in sRGB profile already. If the image is imported into Lightroom that does not have a color profile assigned, Lightroom will automatically treat it as an sRGB image.

To choose a color profile in Lightroom, go to ‘File’ and select ‘Export’. A new window will open asking you to set the Export settings for the image. Here you can set the output folder, size, sharpening, watermark and the color profile settings. Find the ‘File Settings’ section and open the ‘Color Space’ options, from the drop-down menu that appears, then select the color profile you need. Select the image format, and bit depth if applicable. Bit depth will be irrelevant if you are saving in the JPEG format as it uses 8 bits as standard. Bit memory will be more important if you are editing an image that will use the Adobe RGB color space. To fully utilize the extra color gamut available in Adobe RGB, the 16-bit image will open more available colors to be used – 65,536 shades of each color, Red, Green and Blue, as opposed to the 256 shades of  8-bit images.

lightroom export

lightroom export

If you are unsure what color profile you need to be using, your best bet is that it is the sRGB profile in 8-bit mode. It might sound like it is the most compromising option of all; however, it is the most compact and most commonly used. Unless you know you need to be using a different color profile, there is little need to convert to a profile other than sRGB, and if you always save the copy of the original file, you will be able to return to it if a different color profile is needed, without compromising image quality.  Now that you know about color management, it might interest you to visit our post about tool overlay in Lightroom.

How to Use the Graduated Filter Tool in Lightroom

Perhaps one of the greatest challenges of landscape photography is finding the perfect exposure, that will give you a well-lit landscape and a beautiful looking sky in one mesmerizing photo. Before digital went mainstream, the common tool was to use the graduated filter that would go in front of your lens, it is still widely used with digital technology as well. You also have the option to shoot with two exposures and stitch them together, but even if you ended up shooting only one image, you can still achieve a similar effect using the Graduated Filter tool in Lightroom.

In the example image, we see a landscape scene, showing green rolling hills and a mist covering an early morning valley. The image has potential, but the sky, unfortunately, looks overexposed and dull. The foreground could use some minor tweaking as well, to bring out the dark tones.  These are the two problems we will want to fix with the Graduated Filter tool.

What Lightroom Develop Module Tells Us

Begin by opening the image you want to be corrected in Lightroom and find the Develop module. In the develop module you will find the Graduated Filter tool – the fourth adjustment tool in the module. Alternatively, use the Keyboard shortcut “H” to access the tool.

lr develop

Once the tool is selected, hold the mouse and drag it down from the top of the image, towards the lower half. You want it to go comfortably over the land areas in your image for a more realistic final look. Naturally light scatters, it does not get cut off unless an object interferes with its path – we want the changes we make to the sky areas of the image to reflect that; therefore, we allow the adjustments to transition just a tiny bit into the foreground as well.

graduated filter

Fixing Common Mistakes

If the graduated filter you applied does not align with the horizon, rotate it by moving the mouse cursor towards the center of the filter. Once you are close enough, the mouse icon will change indicating you are able to rotate it. To prevent the graduated filter from misalignment in the first place, hold down the ‘Shift’ key when dragging it.

Once you have the graduated filter you will notice that it allows you to change a number of settings. They include: exposure, brightness, contrast, saturation, clarity, sharpness and add color. The changes you make to these settings will only affect the area covered by the Graduated filter.

filter settings

What do we Use the Graduated Filter Tool for?

Since we aim to darken the sky, we begin by lowering the exposure levels. Lowering the exposure will also lower the highlights for that area, if you have clouds in your image, you will want to regain some of their whiteness by raising the contrast ratio. Making these changes to the image will usually increase the saturation of the image – adjust it accordingly.

filter settings2

Further, if you aim to have a dramatic looking image, you can increase clarity of the Graduated Filter – it will increase the edge contrast ratio. Beware that increasing the clarity of the sky can reveal uneven color graduation, going from dark to light, if you are seeing that reduce the clarity. If you aim to have a smoother sky then decrease the clarity to achieve a softer look.

While you are applying changes to the Graduated Filter beware of the land areas of the image. Often, parts of those areas will become underexposed when lowering the filter setting. You will likely need to bring the shadows back slightly or move the graduated filter higher so that those areas are not affected.

Lightroom’s Graduated Filter tool is not only limited to for use on skies, feel free to experiment by adding it to any part of the image. For instance, the Graduated Filter can be further used in the example image to deepen the black tones in the foreground area.

graduated filter2

The same process as the one used on the sky applies. We drag the Graduated Filter across the areas we want to be corrected, once it is applied we change the settings for the filter. In the case of the example image, we increase the clarity, add sharpness for a crisp look,  lower the highlight by lowering the brightness, compensate for saturation and add warmth by adding just a little bit of a color cast to the gradient.

lightroom graduated filter