Tag: Wedding photography

Local Correction Tools – Lightroom

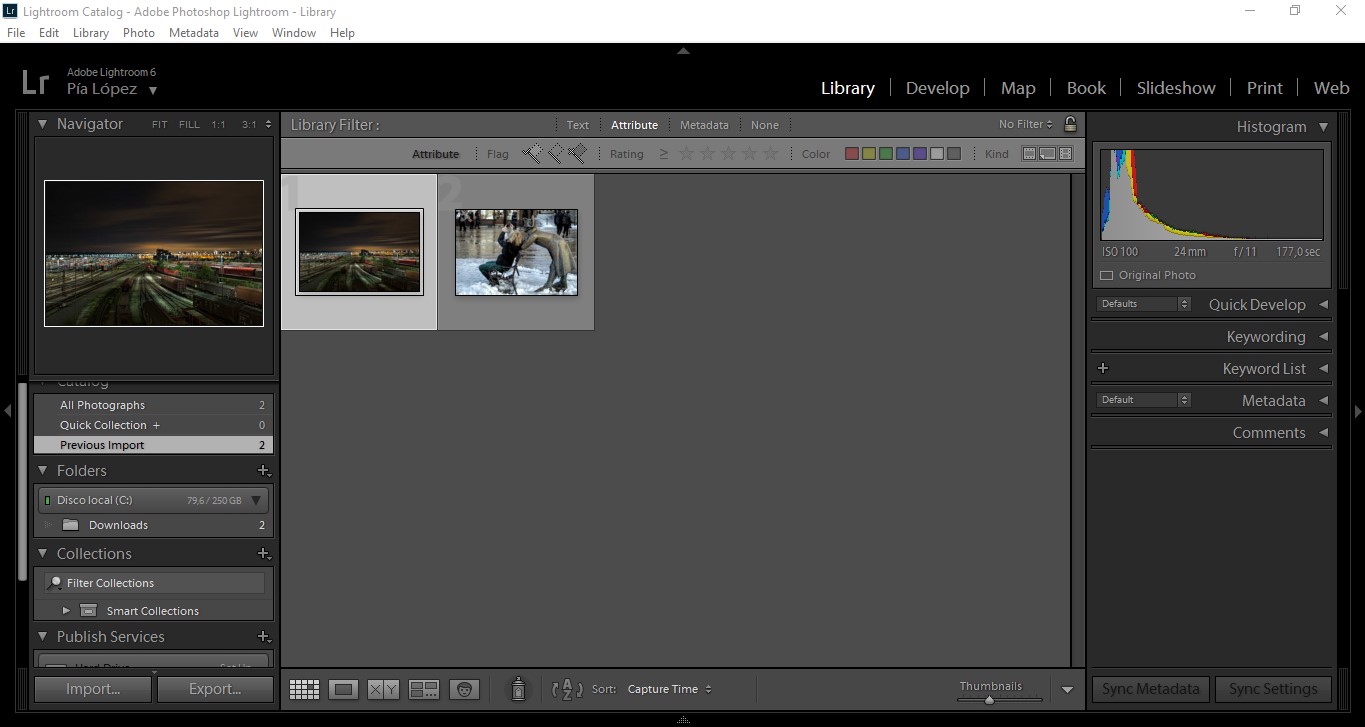
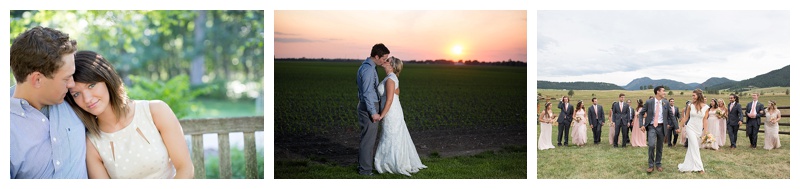
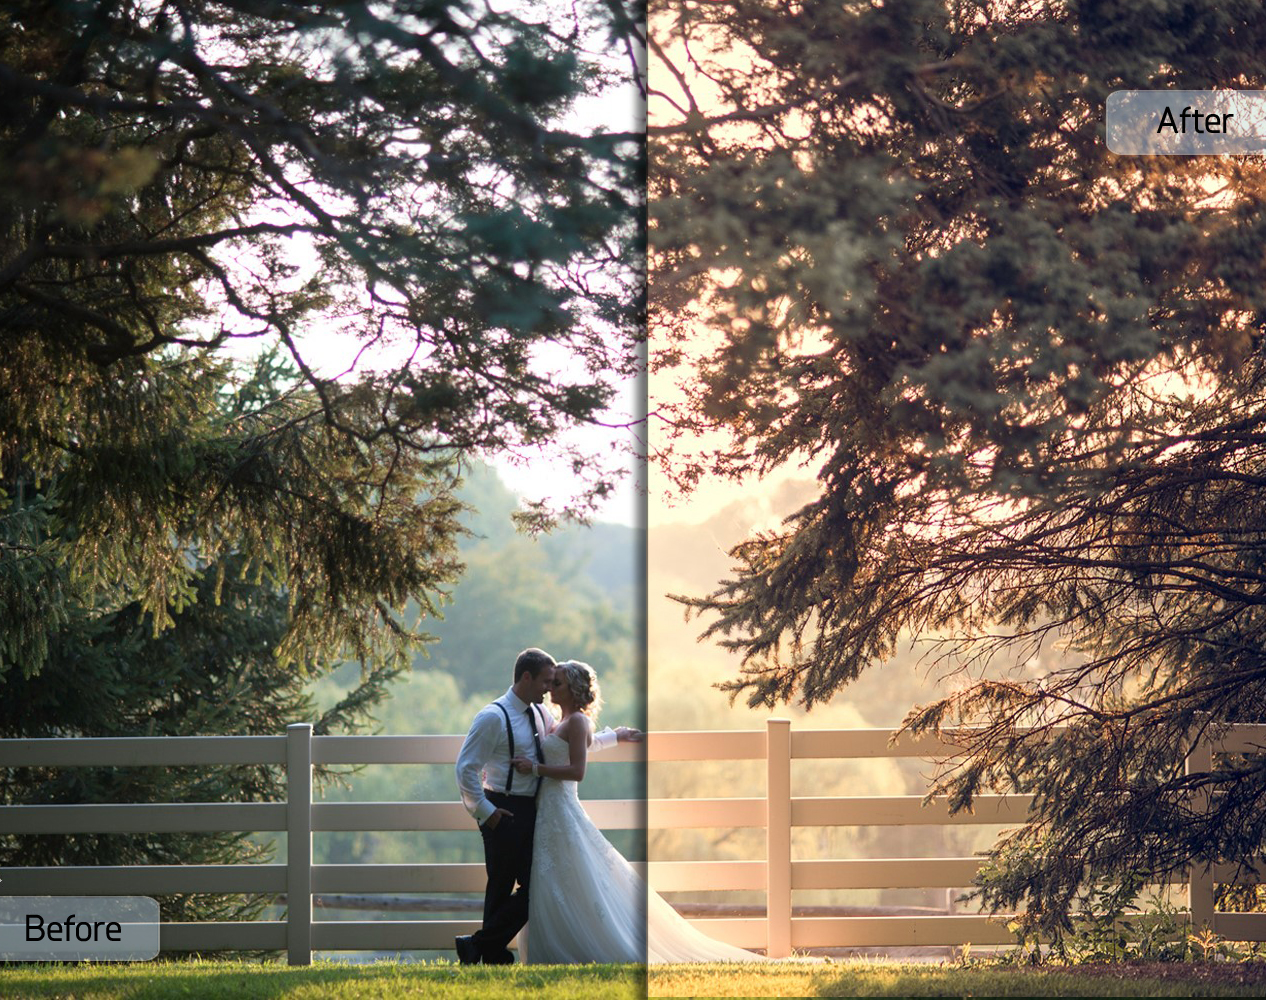
Color correction is an art form that relies on your perception, experience, and interpretation of the image. We can do this correction if we have an installed Lightroom presets. The fundamental difference between Global & Local correction tools is simple:Global edits are the enhancements we make to the whole photograph.Global correction does apply the changes across all the pixels in the frame. Global editing shouldn’t be used to correct one part of an image, to the detriment of the remainder.Too often I’ve seen people adjust the white balance of an entire photo to try to achieve “perfect” skin tones. Not only is this quite difficult, it frequently makes the rest of the photo look strange. Good global edits are essential, but they don’t negate the need for local editing. Well-executed local edits are the difference between a nice photo and a great one.Whereas local correction tools apply the changes only based on the areas we choose to apply. Some of the Basic Lightroom tools and Photoshop’s Shadow/Highlight act locally and do not treat all pixels with the same brightness values as identical. Some of the Local correction tools in Lightroom  Presets are:
Crop tool(R)
Spot removal tool(Q)
Red eye removal tool
Graduated filter(M)
Radial filter(Shift+M)
Adjustment brush(K)

Local Correction Tools - Toolbar
Local Correction Tools – Toolbar

These tools are available only in develop module and are placed right below the histogram on the right side.

  • Crop tool ( R)
    Crop tool helps us to recompose the photograph that we have taken, to make it aesthetically better or to simply make it more pleasing to the eye. The kind of cropping we do, without a doubt, will vary from one photograph to another. Some might require minor corrections on the horizon while some others might require vertical alignments. Regardless, the crop tool provides the photographer with an opportunity to play around with the proportions, perspective, and the way a photograph looks ultimately. This tool plays a vital role in the post-processing of a photograph.

    Click the Develop tab at the top of your workspace. Locate and select the Crop & Straighten tool icon in the toolbar, which opens the options for the tool. Alternatively, press “R” on your keyboard to open the Crop & Straighten tool options. 

    The Crop & Straighten tools are often the first step many photographers use when editing photos in Lightroom. Use these options to crop a photo for Instagram, straighten crooked photos, or prepare photos for printing.
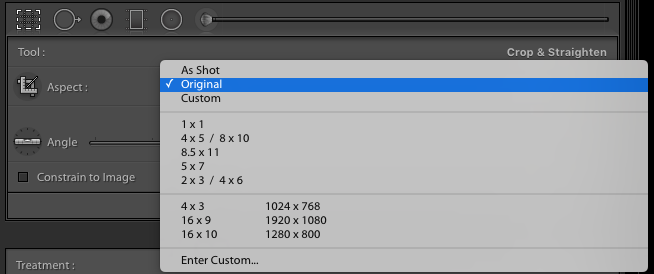
    Crop Tool features
    Crop Tool features
  • Spot Removal (Q)
    In the Develop module, select the Spot Removal tool from the tool strip, or press Q.

    The Spot Removal tool in Lightroom lets you repair a selected area of an image by sampling from a different area of the same image. It helps us remove dust speckles, insignificant or unnecessary elements from the photograph, remove skin blemishes, etc. On an advanced level, the spot removal might also help to us to remove certain elements from the photograph, like a person, overhead electrical wiring, etc. 
    The two spot removal techniques are Clone and Heal.

    Heal matches the texture, lighting, and shading of the sampled area to the selected area.
    Clone duplicates the sampled area of the image to the selected area.
  • Spot removal tool - features.
    Spot removal tool – features.
  • Red eye removal tool
    Red Eye will remove the red discoloration of a person or a pet’s eyes that can result from a camera flash going off. Unfortunately, there aren’t any shortcuts available for this particular Lightroom feature, but this is yet another vital tool when it comes to post-processing photographs. To remove a red eye from an eye on a photograph, you can use this tool to remove the red eye and to enhance the eye.
  • Spot removal tool.
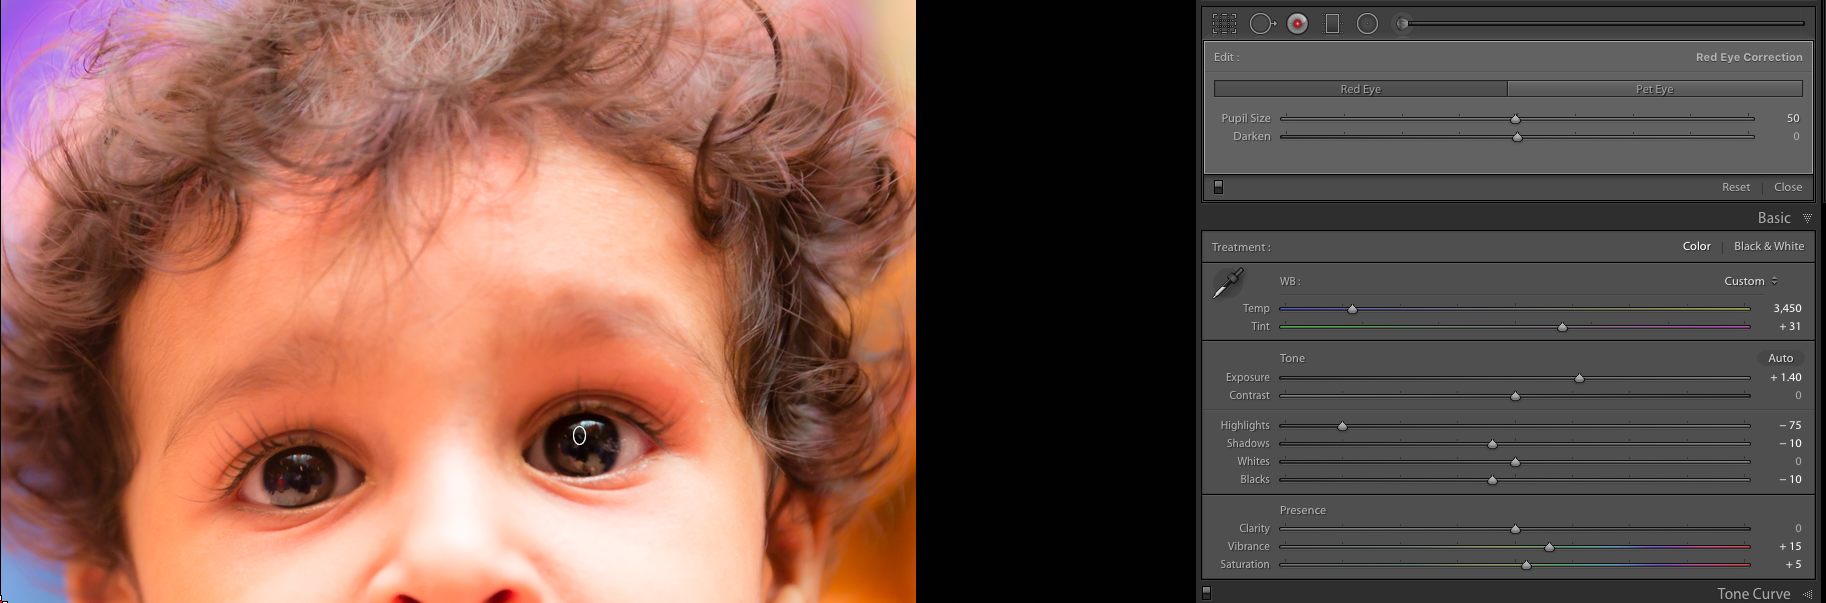
    Red-Eye Removal Tool.
  • Graduated Filter Tool
    Graduated Filter Tool
  • Graduated filter (M)
    In the Develop module, select the Graduated Filter tool from the tool strip, or press M.
    The Lightroom Graduated Filter is a versatile tool for making local adjustments to your photos.This tool is a huge help for landscape photo retouch as it can be used to enhance the details from the foreground and the skies.
  • Radial Filter (Shift + M)
    The background or elements surrounding the primary object of your photograph can distract the viewer. To draw attention to the subject, you can create a vignette effect. The Radial Filter tool enables you to create multiple, off-center, vignetted areas to highlight specific portions of a photograph.

    In the Develop module, select the Radial Filter tool from the tool strip, or press “Shift + M”.
  • Radial Filter Tool
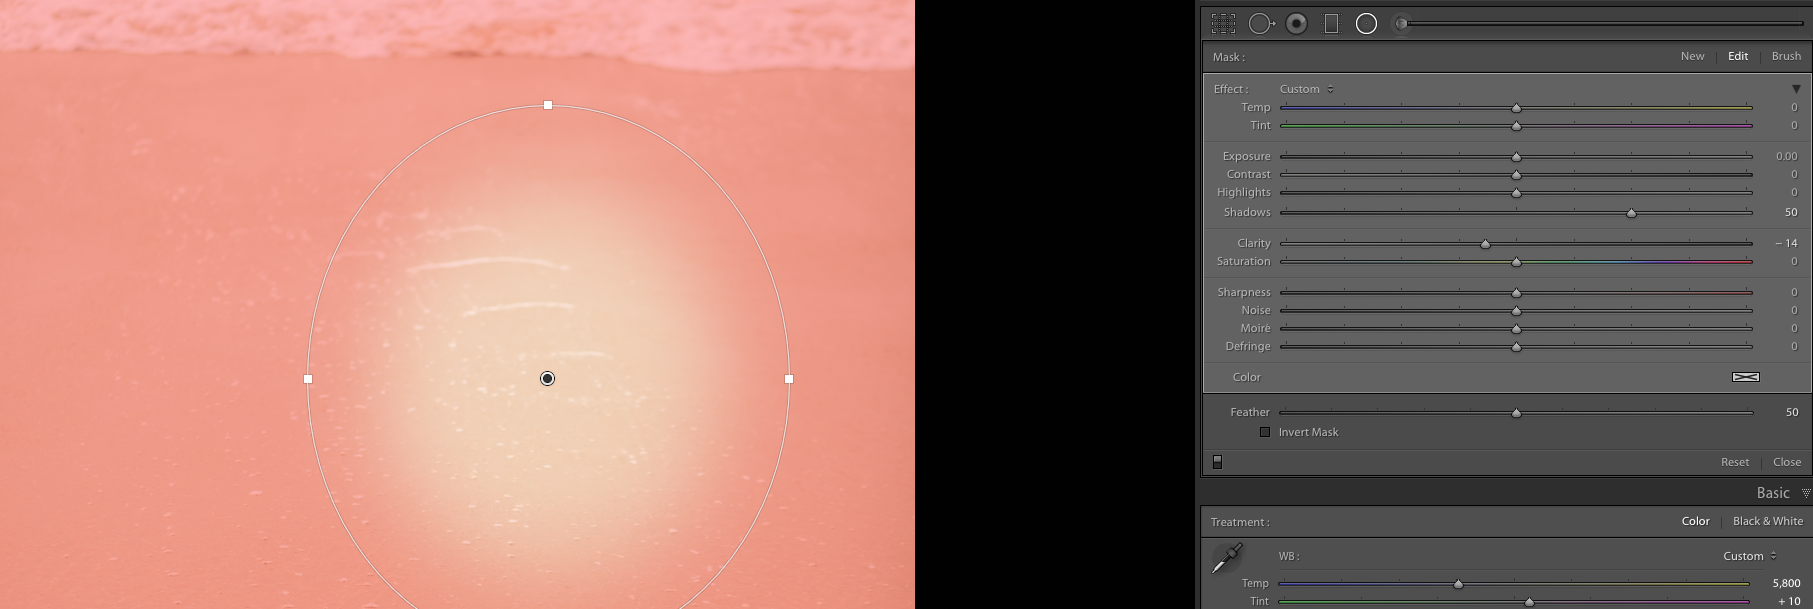
    Radial Filter Tool

    Adjustment Brush (K)

    The Adjustment Brush tool, literally, works like a brush. The changes or corrections get applied to those regions that you select or brush over. This is one the major advantages of this particular tool – make changes to specific areas or regions of the photograph. The Adjustment Brush tool lets you selectively apply Exposure, Clarity, Brightness, and other adjustments to photos by “painting” them onto the photo.

    In the Develop module, select the Adjustment Brush tool from the tool strip, or press K.

Adjustment Brush Tool

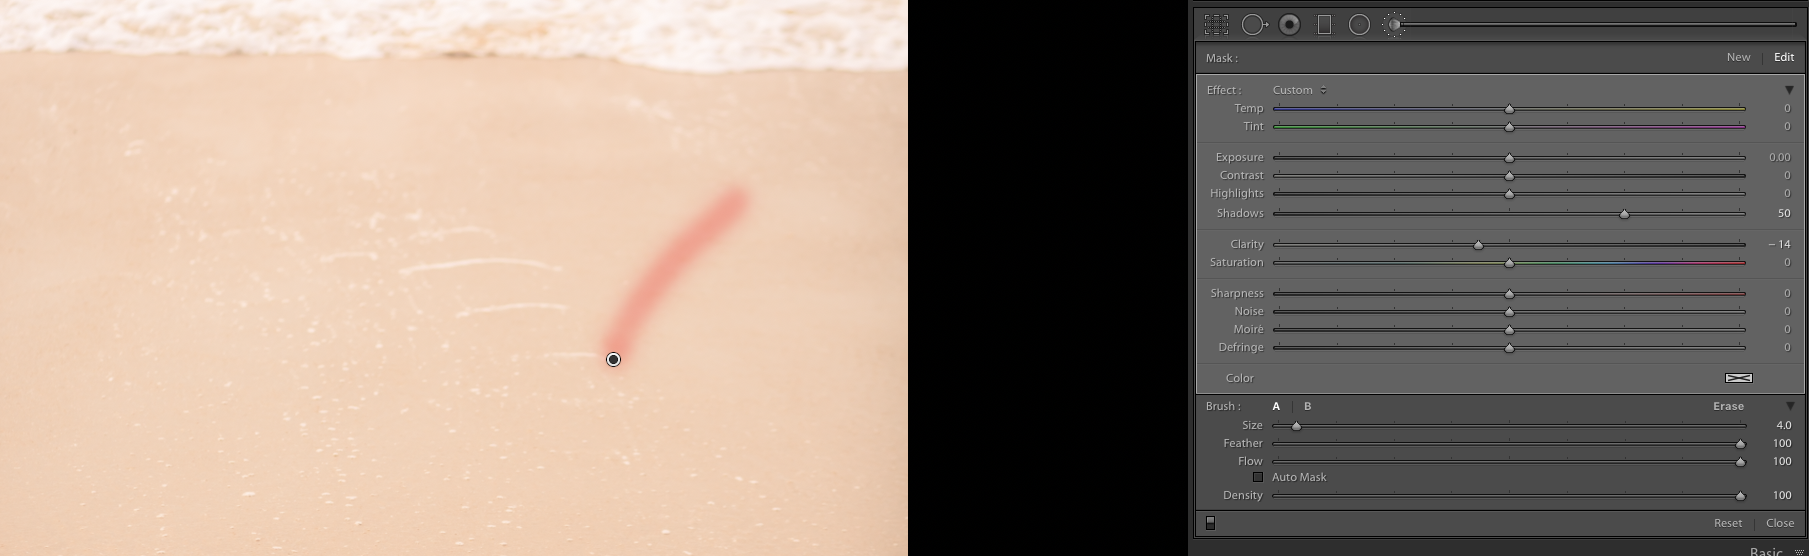
The adjustment brush tool combined with the graduated filter tool are a deadly combination. These two tools together have the power to create/produce magical outputs even out of the most simple photographs.

Lightroom is great for processing your photos and understanding how its tools work will help you use it more effectively. Use these features, play around with the tools and tell us about your experience in the comments below. 🙂 

Adobe Lightroom’s Rating System Guide for Beginners

When you have hundreds, maybe even thousands of images you need a way to sort through them that’s both quick in practice and set-up. Lightroom gives the photographer several methods of tagging / attributing images ready to be put into collections and you may find you have a preferred method or actually find them all useful. Whatever the outcome, this Lightroom’s Rating System tutorial will talk you through the various tagging methods as well as give you tips on why rating your images is important.Lightroom offers three different rating systems – star ratings, flags and colors. Star ratings are usually used to record the quality or value of the photo, with 1-star photos being poor, and 5-star photos being the best you’ve ever taken. Grading the photos gives you more information to help you find the best photos again later. The downside is if you’re indecisive, you could spend ages trying to figure out whether a photo deserves 2 stars or 3, and as your photography improves, your older 3-star photos might only count as 2-star photos now. But, you can always change the rating on a photograph, so you don’t have to worry about it much, now. Flags are much simpler, having just 3 states – flagged, unflagged or rejected. It’s quicker to decide whether you like the photo or not, so if you find yourself dithering between 2 and 3 stars, flags might be the ideal system for you.Colors are kind of open to interpretation. This gives you a lot of flexibility, but it also means that in order to get the most out of color labels you will need to develop your own system. For example, when you are finished with a photo and it is ready to export you could mark it as green. When there is a photo that you know you want to print you could mark it as red. Photos that need more work could be set to yellow. The colors can mean whatever you want them to mean, you just need to decide on the system that will work for you.These three options are collectively referred to as “Image Attributes”.

Why would you need this feature?

The answer to this question is simple. You need to use these features too:

  1. Keep your workspace organised.
  2. Easily sort through your library.
  3. Save a lot of time.
  4. Make your work a lot more friendly, neat and easy.
  5. Easily separate and tell the difference between specific shots in various ways.

How do you effectively use this feature?

First you have to install the Lightroom preset.  When you are in the library module of Lightroom presets, if you look near the bottom of the screen you should see the controls for flags, stars, and colors.Screenshot_2

Star Rating in Lightroom

Like I said before, an image can be given a star rating ranging from 0-5, with 0 being the worst and 5 being the best. It’s best to apply the theory that the more stars an image have the better you believe it is. This will speed up your work-flow and stop things becoming confusing when you’re looking back through your images. Rating stars can be set or displayed in any view of the Library module (Grid view, Loupe view or Survey view). There are multiple ways to provide star rating to your image(s):

  1. Select the photo that you want to rate, then choose Photo > Set rating and select a number from the drop-down list.  
  2. Alternatively, select the image you wish to rate and press a number from 1 – 5 on your keyboard to rate the picture.
  3. Hover your mouse cursor over a thumbnail and to the bottom left you will see 5 dots appear. Clicking on these allows you to apply a number of stars to the image. But please note that this method works only in the Grid View.

Tip 1: You can select photos and press ] to increase the rating or press [ to decrease the rating.Tip 2: You may find the Compare View useful when applying stars as this will allow you to compare two similar shots side-by-side so you can decide which one deserves the higher score.

How to Flag Photos in Lightroom

The main purpose of flagging photos is to help you know which ones to keep and which ones to reject. When it comes to flags each photo will be in one of three states: it can be marked to keep, marked to reject, or unmarked.

  1. The quickest way to pick or reject an image is to use the keyboard shortcuts:
    P – to pick an image.
    X – to reject an image.
    U – to mark an image as unflagged.
  2. Alternatively, you can select an image in Grid view or Loupe view, and mark it as any of the three ( Flagged, Rejected or Unflagged). Choose Photo > Set Flag > Choose any of the options from the drop-down list. This method works in any of the views (Grid, Loupe or Survey)

Note: Marking a photo as “Reject” will not remove it from the Library. They will simply be grouped as rejected photographs.

A flagged image.


A rejected image would have a flag icon with a cross over it. (top left of the cell)

Colour Labelling

Labeling photos with a certain color is a flexible way to quickly mark a large number of photos. Like I mentioned before, colours are open to interpretation. They can mean whatever you want them to mean, and you just have to identify a system that works best for you. Like the other two attributes, the colour rating can be done in a number of methods:

  1. Select the photograph that you want to rate, choose Photo > Set colour rating and choose a colour from the drop-down menu.
  2. Alternatively, you can also use the keys 6-9 to select a particular colour.
    the “6” key for red
    the “7” key for yellow
    the “8” key for green
    the “9” key for blue

Unfortunately, the colour purple does not have a keyboard shortcut. Press the same number key again to remove the colour rating. Once applied, the colours will be visible around the images.

An example of what a colour-rated cell would look like.

That covers three of Lightroom’s most powerful features for keeping your photos organized. The key is to decide on your own system and then actually use it by tagging your photos.

We hope this article is helpful in guiding you to maintain a clean and organized workspace. Leave a comment below and let us know about your experience. And if you’re interested about lightroom’s features, check our post about Lightroom Masterclass in Clarity.


Get on the other side of the lens

It wasn’t until someone forced me to take photographs with my boyfriend John that I realized how nerve wracking it really is. As a wedding and engagement photographer, I am constantly telling couples to kiss, put your foreheads together, stare into each other’s eyes, etc.  For me, it has become the norm and prior to my experience on the other side of the camera, I had no idea what my clients were going through.  A couple of summers ago, I photographed a wedding in the Dominican Republic.  The bride was a photography major in college and loved taking photos.  When in the Dominican, she decided it was an absolute must to get my boyfriend and me in front of her camera. From this experience I gained so much insight from my clients perspective and as a result became a much more relatable photographer.

Insight #1 – It is AWKWARD!

I was so excited to get cute pics until I actually got there and she started directing me. You want me to do what?! You want us to kiss and hold the pose there while you rearrange your lighting? But it’s hot outside… this is so uncomfortable… I feel my nose sweating…

Those were just some of the thoughts going through my head in the first five minutes of our session.  John and I felt so uncomfortable and couldn’t help but nervously giggle. As the session went on, we gradually got more comfortable and settled into ourselves and really had a great time.

couple kissing

Ebby L Photography

Above, John and I had been holding that kiss for what felt like hours. The entire time, we tried not to laugh holding the pose and I am so glad we kept it together.  I mean, look at that wave behind us!

The important takeaway from the awkward insight – make sure your clients know it’s okay to be nervous in the beginning.  Make silly jokes or share your own experiences on the other side of the camera.  Tell them about other clients getting a beer before the session or staring in the mirror way too long to figure out their good side.

Insight #2 – Photos of yourself are important!

Being a photographer, I am constantly sharing photos of clients I take pictures of.  In the first 3-4 years of business, my Facebook profile and business page were cluttered with images of others.  It wasn’t until I saw another photographer post portfolio pictures of herself that I realized how important it was.  Your clients want to know who you are!  By showing them pretty pictures of yourself, not just iPhone selfies, you’re helping them identify you with your high-quality work. For an added bonus, hold a camera in your pictures to give them an even bigger reminder. For other social media branding tips, check out the article Official Portfolio vs. Instagram

The photo on the left is a step in the right direction but a poor quality image. You want the photos of yourself to be a representation of the images you will give your clients. For more insight on how to take better “selfies”, check out Bill’s article and learn to take super selfies.

portrait

Ebby L Photography

Insight #3 – Confidence booster

Yes… you read that right… after my nerve-wracking, giggly experience taking photos with John.. I actually felt more confident! I gained assurance in myself after seeing that even though we felt like the definition of awkward, we still got great pictures! I also became more certain in my ability to take pictures. After learning how my clients could be feeling, it made me realize that them getting back their beautiful images I took is even more exciting than I thought.  Now when I hear clients say, “I hope we weren’t too awkward!” or “ah does my hair look okay?” I feel confident showing them a sneak peek on my camera screen to reassure them that yes you guys look THIS GOOD and that you have nothing to worry about. 

couple hugging

Ebby L Photography Wedding Photography Ebby L Photography

So overall, get on the other side of the lens! Ask a photog buddy to take an afternoon and exchange headshots with you. Make a day of it with your significant other and teach them to use the camera while also getting pictures of yourself.  Learn how you feel in front of the camera.  Show off the photos of yourself and use them to represent your brand/business. If you’re just starting out as a photographer, make sure to read 8 Things I wish Somebody Told Me When I Was A Beginner Photographer.  

Shooting Wedding Details: A Comprehensive Guide

Effectively capturing details is essential to communicating the atmosphere and emotions of your clients’ wedding day. Formal shots and group photos are essential, but often times it’s the little things that really bring back memories.

First, let’s clarify exactly what is meant by the word “detail.” In this case, “detail” refers to two things: smaller articles that are particularly valuable to the couple (wedding rings, especially), and things that do not necessarily carry any sentimentality, but aid in expressing the spirit of the celebration. Adequately documenting these particular elements requires that the photographer adheres to a few simple guidelines.

The Basics

Regardless of what you are shooting, it’s important to pay attention to angles and composition. When I’m working on details, I always shoot directly above or directly in front of my subject. Usually, any other angle detracts from the image and makes the photograph appear unbalanced.

bouquet-of-roses-1246490_1280

If you’re shooting small details, using a macro lens is imperative. It’s impossible to photograph a multifaceted diamond without one. Again, I’m emphasizing wedding rings, but this applies to any tiny object that would otherwise lose detail without a lens that lacks the ability to focus closely.

Furthermore, lighting plays an extremely important role in sufficiently enhancing smaller features. Position your subjects next to a window or another source of natural light. Artificial light typically comes from above and casts harsh shadows (just as if you were shooting outdoors at high noon).

Photographing Sentimental and Essential Details

Valuable objects directly related to the wedding must be captured clearly and thoughtfully. Jewelry, clothing, decorations, the cake, etc. are the unique accessories that showcase the couple’s personalities and will thus be some of their most treasured photos. The goal here is to highlight each item without complicating the image and detracting from the subject. I like to add outside elements that complement the subject. This is really a great way to augment shots of jewelry or other accessories that are very small. If you have the opportunity to work outdoors, you can use sticks, leaves, rocks, and so forth to give the image a rustic, nature-inspired vibe.

20151004-175926-2_mini

If you can’t go outside, simply find ways to add eye-catching textures or patterns to the shot, or incorporate something else that is special to your clients to add interest.

20150711-142947-478_mini

The bride’s dress is equally important. The same rules apply, but it can sometimes be difficult to get a creative shot of the gown. Again, incorporate textures and patterns when you can.

20150711-135407_mini

Creating a unique dress shot requires a little artistry and sometimes, improvisation. At one of the weddings I worked last summer, we had been having a tough time finding a nice place to photograph the dress. The hotel was beautiful, but the circumstances just weren’t quite right. We ended up taking the dress down to the lobby and asked the concierge if we could hang it from their chandelier. Surprisingly, they agreed, and it looked perfect. Then, as I stepped back through the automatic doors to get a wider shot, I ended up with this:

dress_mini

The point is, you can always find creative ways to work around seemingly impractical or unappealing situations. Keep in mind, too, that when you’re shooting wedding dresses, it is important to get wide shots of the entire dress as well as close-ups of the fabric and details.

dress2

Photographing Non-essentials

After you’ve covered the necessities, you can really get creative with the more obscure details. These are particularly important, though, because they really help convey the feel of the entire day. Not to mention, this is really a lot of fun during the reception or whenever you have some downtime. I also take a lot of pride in images like these because they sincerely express my unique photography style.

painting_mini

I try to choose things that will evoke strong feelings in the couple long after the wedding. They may forget little things like what they were eating while getting ready, details in the room where the bride prepared, and so forth. When they look back at these photos in years to come, all of the emotions of the day will come flooding back, and that is really the fundamental goal of quality wedding photography.

makeup_mini

chandelier_mini

To further enhance your wedding day details, Sleeklens offers a wide array of Lightroom presets and Photoshop actions.

Wedding photography Etiquette: Dress Code

Figuring out what to wear to a wedding is a timeless question. However, in the wedding service community, there are certain degrees of professionalism which are required. We look for our service providers to be polished and put together when we seek them out and so will your client. From your first meeting with them to the day of the wedding, your presentation is key. A strict set of rules won’t work as different events call for different dress codes, but a few basic guidelines to follow when dressing yourselves will go a long way.IMG_4028

Ladies: My first rule is do not ever wear heels when you’re shooting a wedding. The amount of time you spend on your feet will surely leave you limping by the end night. Find something with sole support and aesthetic like a nice pair of Oxfords or some lovely boots- professional and comfortable.

That being said, always go with the pants. Not jeans or leggings, pants. You never know when a wedding may call you to get creative by getting low or laying in the grass, in which case a skirt or dress just won’t do. Find yourself a nice pair of pants whether they be skinny or straight, just make sure they’re fitted, durable and flexible.

Do not worry yourselves with too many accessories. A necklace will surely get caught up in your camera straps and a hat will surely get bumped or blown off. Keep it simple with some nice earrings or loose bracelets.

women_jewels

Lastly, whether you’re shooting in the winter or summertime, I always recommend short or adjustable sleeves. Even in the winter, those venues can get steamy as guests pack in so I always recommend button ups. They always look classy but allow you the option of unbuttoning or rolling up your sleeves for comfort. T shirts, hoodies and zip ups are too casual and inappropriate for the occasion.


Now, why is this so important? You’re not only giving out an impression to your client, but also for their guests and other service providers in this wedding. The image of how put together, you looked during the wedding speaks volumes when your client thinks to recommend you to a friend later, or if the catering company remembers you and suggests you to one of their clients.  We have proven to be a very visual society and because of that, it is undeniably important to look the part of the professional photographer.


Men: 

I’m sure you think you have it easy. Just throw on a suit and tie, right? You’re going to regret wearing all those layers and will have surely lost your jacket by the end of the night if you do that. It will also be pretty hard to distinguish yourself between wedding guests.

Keep it simple. A nice pair of shoes like Oxfords will do the job, no need for those shiny black shoes.

I suggest a nice dark pant made out of something that doesn’t wrinkle like these.

e4ae3bbe1646c9a0f9b809a0790213d6

Fitted and stylish, you’ll definitely look the part of the photographer. However, they allow you the flexibility and freedom to move as needed without the risk of wrinkles. That being said, a casual button down pairs very nicely with this. Again, nothing heavy or made of wrinkly material. While your appearance is important so is comfort to so find clothing that breathes and moves with you!

However, every event is different. Some clients may request you to dress a certain way to fit the theme of their wedding, whether that be fancy or casual. You might even be working certain venues that request the wedding service providers to dress within a certain code. Gauge those as they come, but keep these guidelines in mind for the weddings that you won’t be asked. Most clients won’t even think about it, but showing up to work looking put together assures the client that you are taking your job seriously.

man_camera

Dressing well is also important when working as a second shooter! Make sure your customer service skills and professional demeanor match your appearance as I assure you, other photographers look.

Hope this helps and happy shooting, y’all!

Wedding Photography: A Look Inside Your Gear Bag

Wedding photography has become its own breed. It calls for efficiency, preparedness, and flexibility. All of this starts in your camera bag.

Bag: A good day’s work starts with your bag. There are many different options out there from backpacks, rolling bags, shoulder bags, etc. I personally have a big shoulder bag, as it allows me quick access and a secure place to store everything I need. While size is certainly a factor with a bag, I recommend looking for something with Velcro adjustable compartments that allow you to create a space big or small to house everything you need.

Your bag should also be weatherproof. You never know when you might get caught in a storm or have a couple that requests shooting in the rain or snow, so you want to have something that you know will survive and keep your gear dry. Promaster is a great company. Their bags are durable, well padded and super versatile for all needs and budgets.

01_wedding_bag

Camera: If you’re going to shoot weddings you need a full frame DSLR. Being a Canon shooter I recommend starting with the Canon EOS 6D. It is a full frame with all the manual capabilities you’ll need to successfully shoot a wedding. Canon has many full frame cameras, but the 6D is its entry into that realm of DSLR’s.

02_wedding_bag

Lenses: A timeless debate. Every photographer has their own style that calls for different lenses. Below are my staples, which also make for a good foundation. I believe you should have a good, prime lens on hand. They allow you to capture all the special details like flowers and shoes with a focused crispness, but also make for great portraits, which your bride will surely want.

My pick is the EF 50mm f/1.2L USM. Its huge aperture allows for a very narrow depth of field which creates that blurred background everyone loves. Additionally, in your arsenal, you’re going to want something with a range.

You don’t want to be too intrusive during the ceremony or intimate parts of the reception, so it’s good to have something with strong telephoto capabilities. My personal favorite is the EF 70-200mm f/2.8L IS II USM. As long as you’re moving around, this lens can be used for anything.

I have taken some nice group shots on super sunny days with it, using the lens hood. It’s a very versatile lens and definitely worth the investment. And lastly, I recommend owning the EF 24-70mm f/2.8L II USM. It is a standard zoom lens but with its wide angle range and close focusing distance, it makes a great lens to have during the reception. With its quick focus, it’s ideal for dancing, action and fast paced environments.

03_wedding_bag

Lighting: To start with, you must be equipped with and familiar with an attached camera flash. You will be using your flash throughout the entire day – to fill in shadows, illuminate dark environments or simply give your subject more dimension.

I recommend investing in a good flash for the lower budget weddings that might not allow you to hire a second shooter or an assistant, which will cause you to fall back on your own flash capabilities. Have no fear, the Canon Speedlite 600EX-RT is perfect for the job. It has an expanded zoom range as well as many more customization options over its predecessor.

Its wireless capabilities make it a fantastic option for off camera flashes and can additionally be used with up to five other flashes at once. While it does have good recycling time, the batteries will not be able to last you through four or five-hour reception without having to change them, so investing in a good external battery is equally as essential.

The Canon Compact Battery Pack CP-E4 is a great option. It slips right onto your belt and doubles the battery life of your flash allowing for super speedy recycling time.

04_wedding_bag

Essentials to keep in your bag: It’s always good to have extra cleaning clothes for lenses on hand as well as business cards to hand out to guests who are interested in your work.

Extra memory cards are also super important. I like to keep some on me and in my bag just in case. I usually bring six 16GB SD cards for a full wedding day.

It is always good to be prepared. On that note, I recommend having a little bag of goodies just for you! It’s important to stay hydrated and energetic throughout the day, so I like to keep a small camera bag with water bottles and snacks on hand too. In there I also have bobby pins, oil blotting sheets, tiny bottles of hairspray and tissues. You will be spending all day with the bride and it speaks volumes when you have something she or someone else in the bridal party may need.

Offer help when you can because as you shoot more and more weddings, you’re going to have a lot of experience that your brides don’t necessarily have, but could definitely use.

That is a good foundation for a wedding gear bag. I highly recommend digging around on KEH, B&H or Adorama for good deals on these items. If you’re unsure about buying without trying, renting equipment might be a great option for you!

Some final notes: With every aspect covered on what to carry on your next shooting session, you need to focus on improving the quality of your wedding photographs with a quality product – As you’re likely to experience a lot of situations where you need to be quick in order to capture the moment, sometimes we can end up feeling disappointed by the outcome of the photograph itself when issues such as underexposure, overexposure, flat tones, not enough details become the most noticeable element in our composition.

Because of that, we thought in an efficient way to solve such drama, with our newest bundle “Forever Thine Workflow“, for enhancing wedding photographs in an easy and effective way. Take a look at what a good quality edit can bring out from the work you have accomplished – and without even requiring you to be a professional Lightroom user.

Before-After 1

Hope this helps and happy shooting!