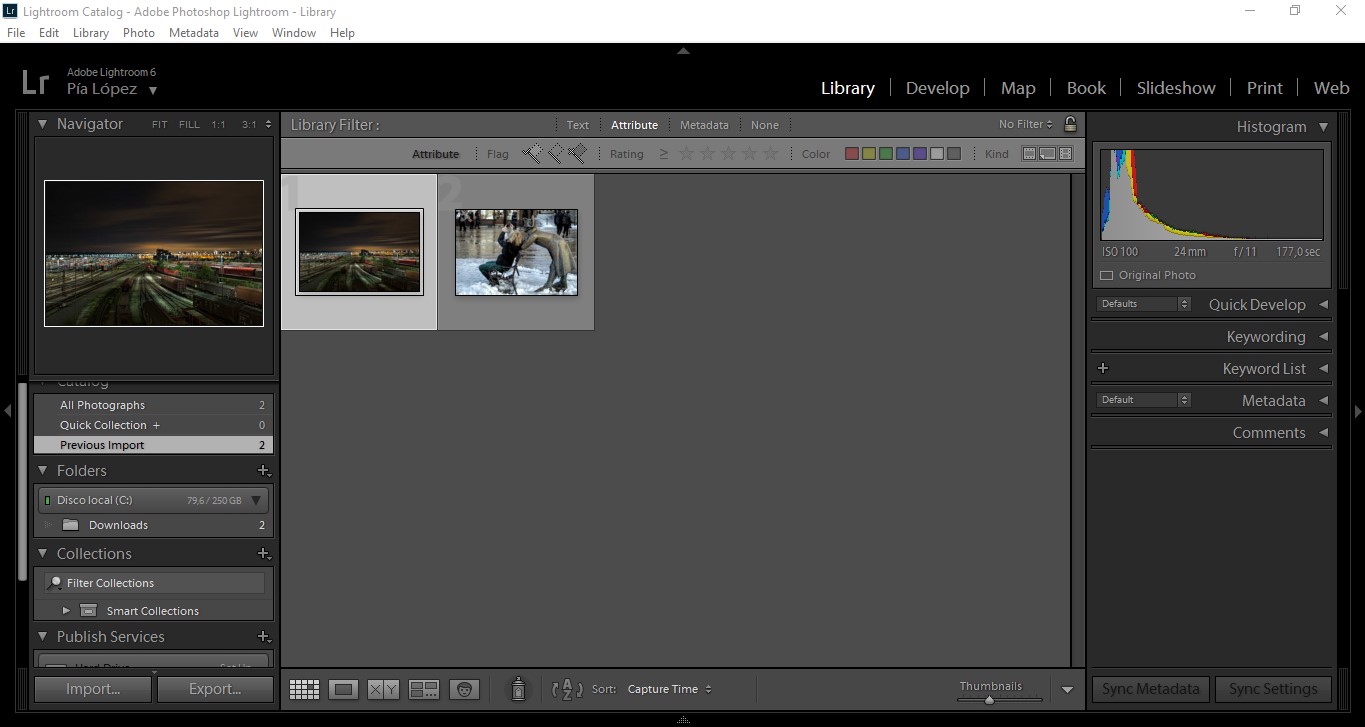
I was not the most organized person in the world. My mom was always kidding saying that I was able to find my head just because I have it attached to my neck. I was also a mess with my computer files, including my photos. When you are taking some photos here and there you might survive being a disorganized person. But when you get a bit serious into photography, either you develop a system to organize your photos or you won’t be able to find them between your tones of files. The day I discover the power of the Lightroom (LG) Library module for organizing photos was a turning point in my photography career. If you are like me and you struggle with making order on your images, keep reading! I will share with you some of the things I learnt along the way.
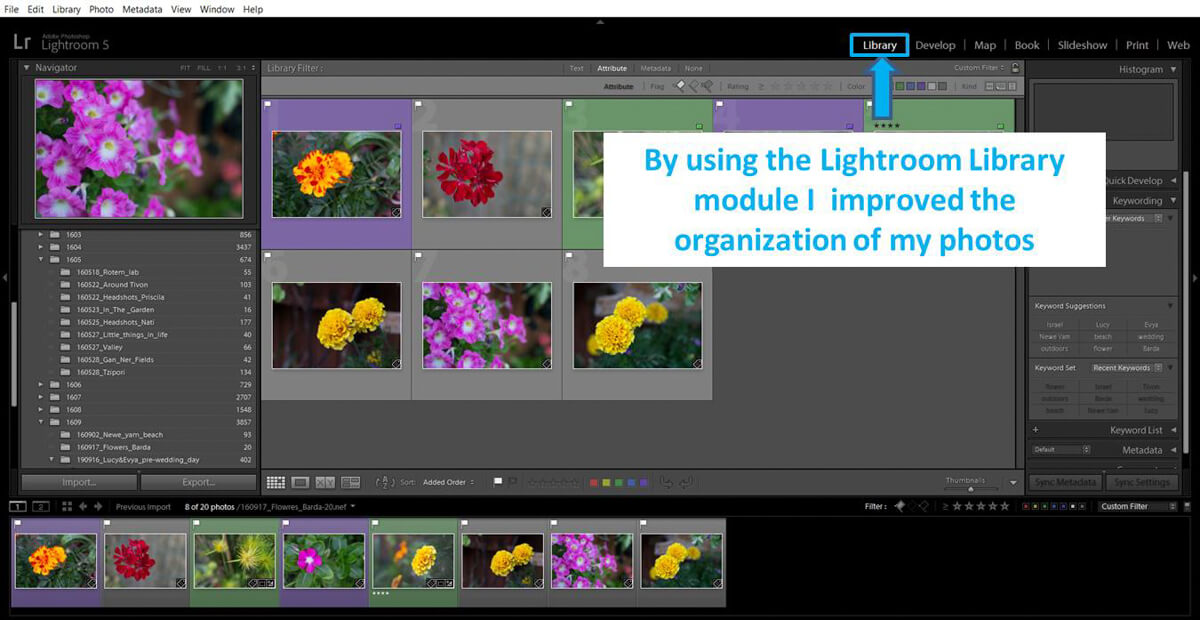
Include the organization of your photos an extremely important step on your post-processing workflow.
This might be obvious, but if you have a tendency to be disorganized, you need to keep reminding yourself that making order on your photos is crucial. I know… organizing is not the funniest thing to do. But when you are using the right tools, like the LG library, it is not so terrible. Think that investing a bit of time now on keeping your photos in place can save you a lot of time when you need to find your images. Organizing your photos is the first step in the post-processing workflow. Don’t jump ahead!
Decide on a system to name your files (and keep it along time)
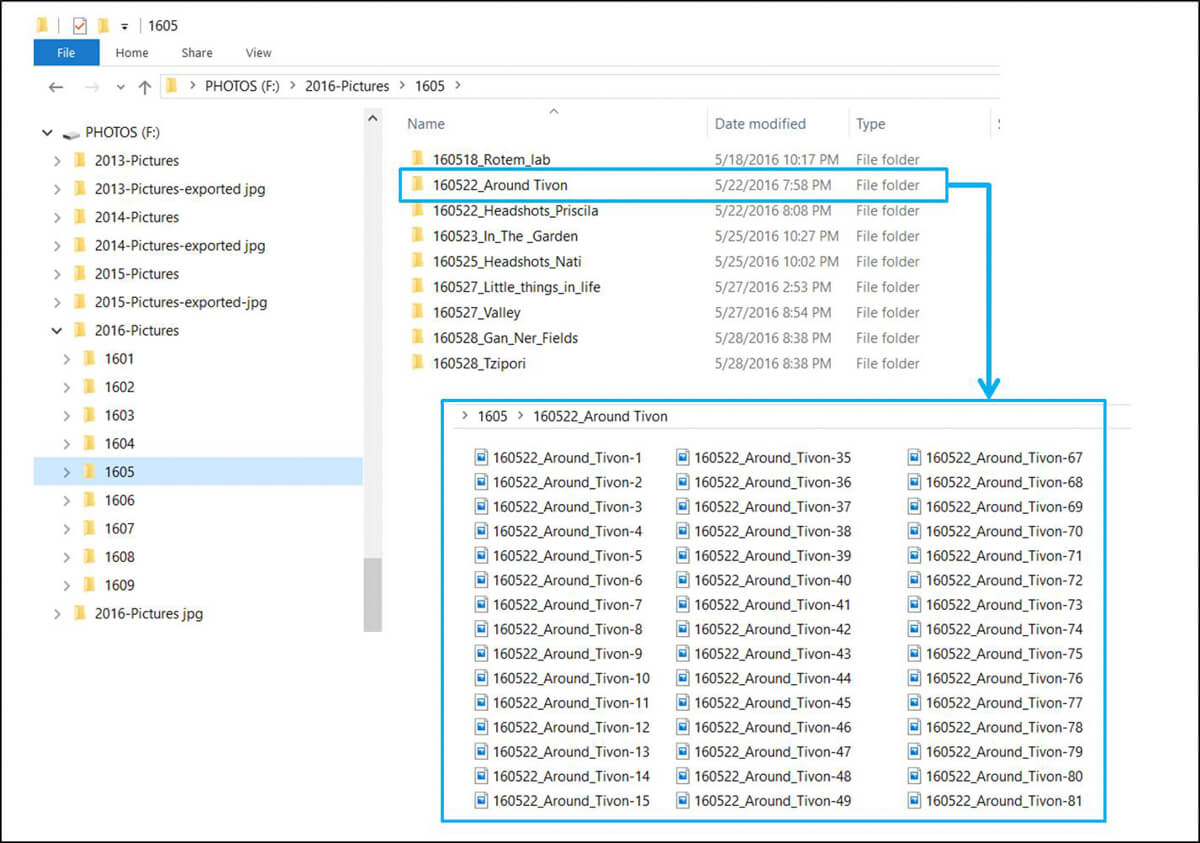
There is not a unique system to name your files. You can organize them by date or by subjects for example. Which one is the right way to do it? I guess that it depends on your personality. Choose the one that talks more to you and keep it along time. Don’t change from one system to another because then you will be in a mess again. I can show you my system. I work well on dates. I have my folders named by year (20016. 2015, 2014…) and month (for example: 1605 for May 20016). Inside the month folder I have the daily folders, in which I include both the date and the name of the photo-session (example: 160522_Around_Tivon for walk that I did around the place I live (Tivon, Israel) on the 22nd May 2016). Some people think that working on dates is not practical because when you need to look for some photos, you need to remember when you shot them. For me it is not a problem because I also use a system of keywords (I will explain a bit later, don’t worry).You might prefer to have the folders by subjects: travel, portrait, landscape… Just pick a system that makes sense to you. This is the most important thing.
Name and work with your folders and files from inside LG
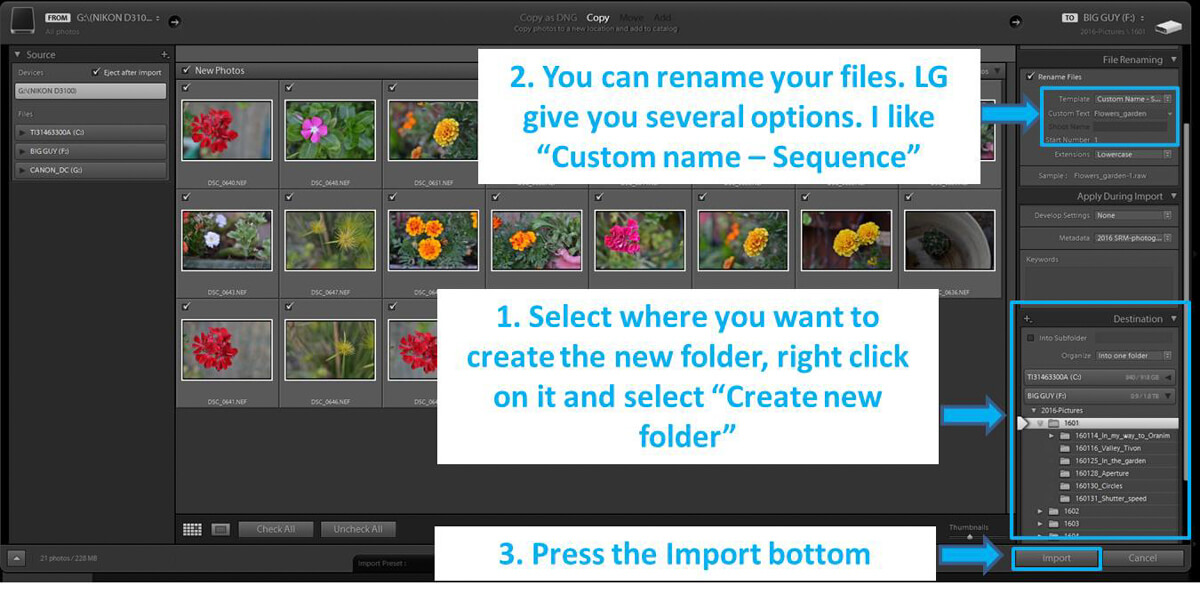
You can imagine LG like your control freak friend: if you create a folder, rename a file or change the location of something without telling, it won’t like it AT ALL. For that reason you have to make all the changes from inside LG. The good thing is that it is really easy to do it (LG is a control freak, but it is not so mean). I just got use to do everything from LG. I start by importing the photos from my SD card using LG. You can create the folder and place it wherever directly from LG.
At this point, I also like to rename the photos using a custom name. This is pretty easy to do and quite useful for finding files in the future. I use the Custom+sequence option. As custom name I put the photo session name or date+photo session name.
Once imported, you can navigate into your folders using the left bottom panel in the Library module.
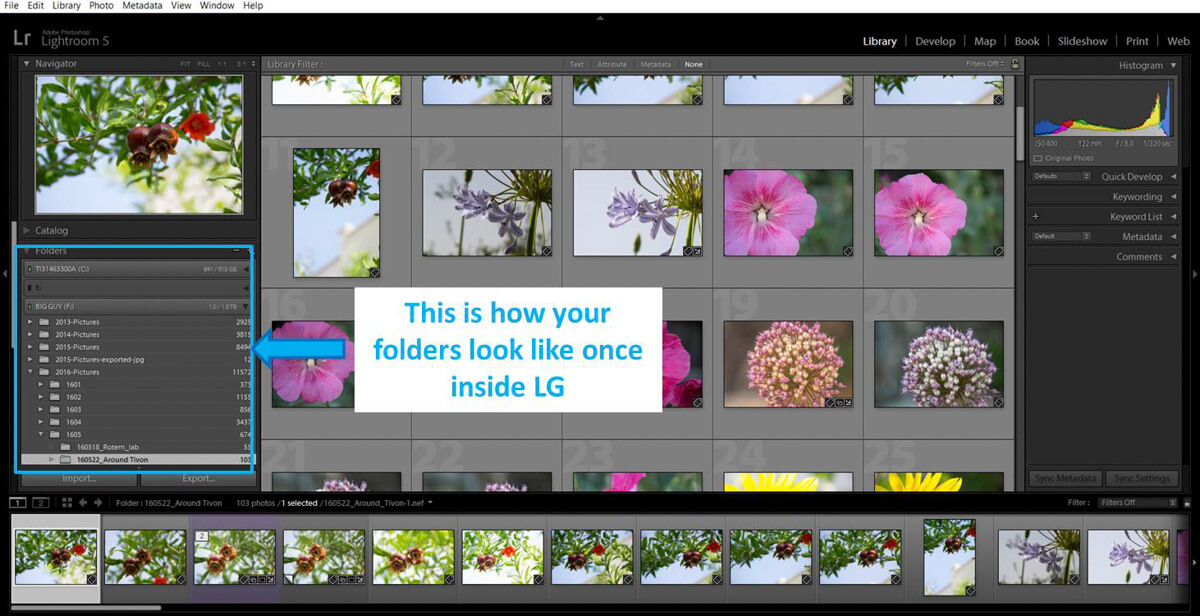
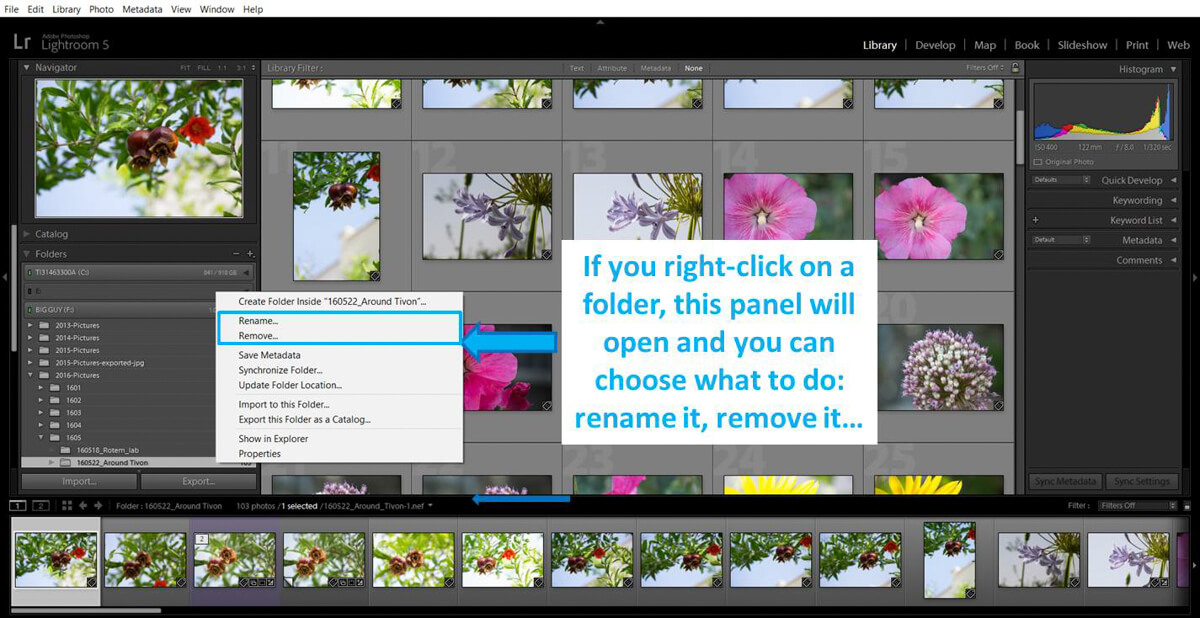
Do you need to rename a folder or to delete it? You have to do it from inside LG (if not LG will lose track of the changes you made and and won’t be able to find your files). You do it from the Folders panel on the library module. To move a folder into another you just need to select it and drag it into the new destination folder.
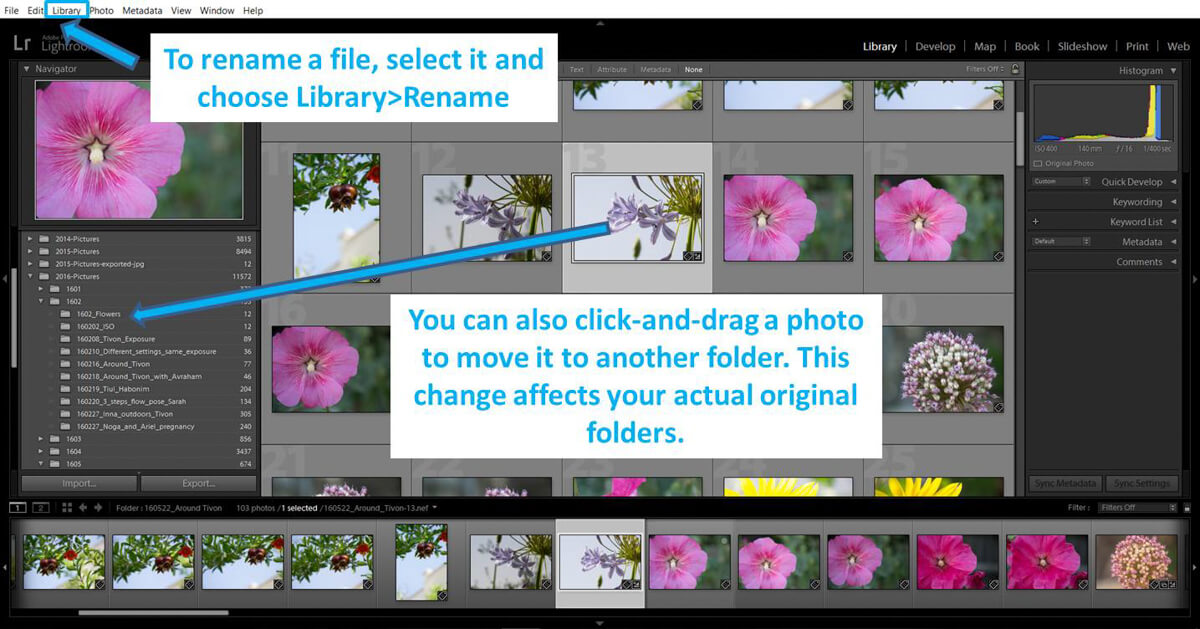
To rename one or more files, you just need to select them and choose Library>Rename photo(s). To move it to another folder, you select it and drag it.
Delete the really bad photos
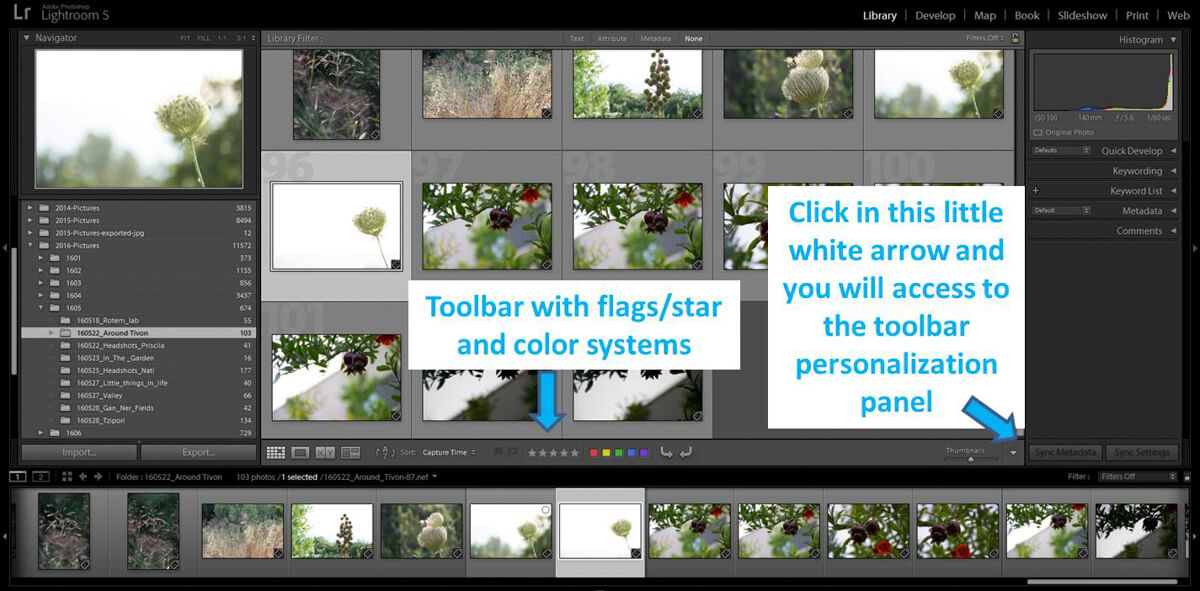
Once I have the photos in LG, the first thing I do is selecting the really bad photos. With really bad I mean the photos I am sure I won’t ever use because they are way too dark, extremely burnt or completely out of focus. First, I mark them by flagging the photos with a Black flag, that is the one that means: “Set as rejected”. This step can be done really fast. With the photo selected, you just click in the “set as rejected” flag icon (check the photos below to see where you can find the flag) or you press the letter X in your keyword. To remove the flag, you either press again the flag icon in the toolbar or you press the letter U.
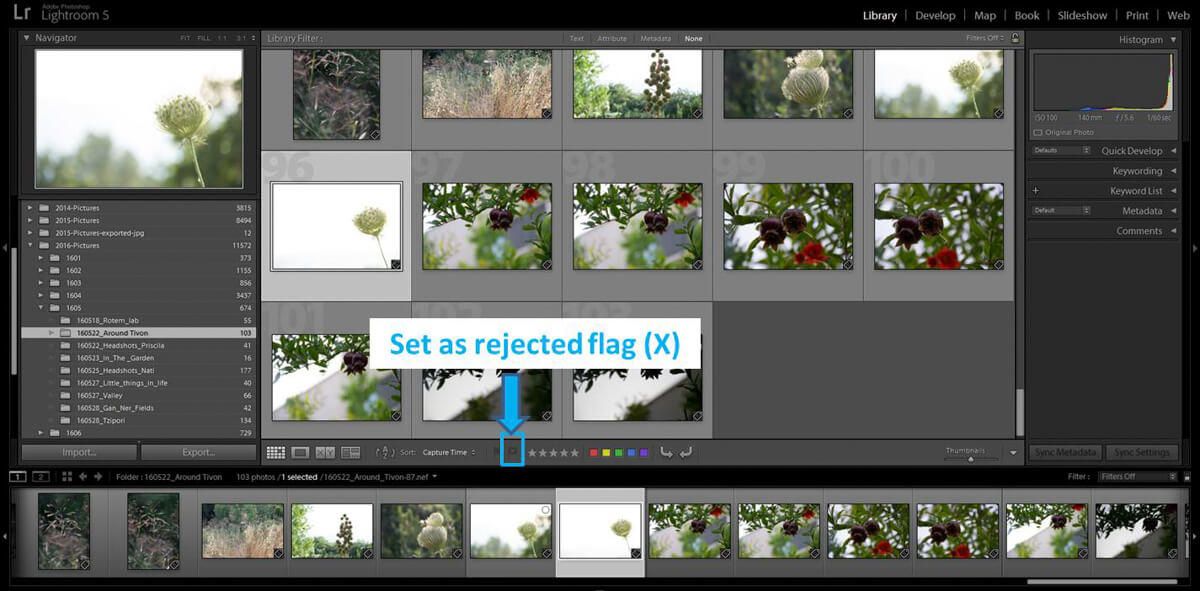
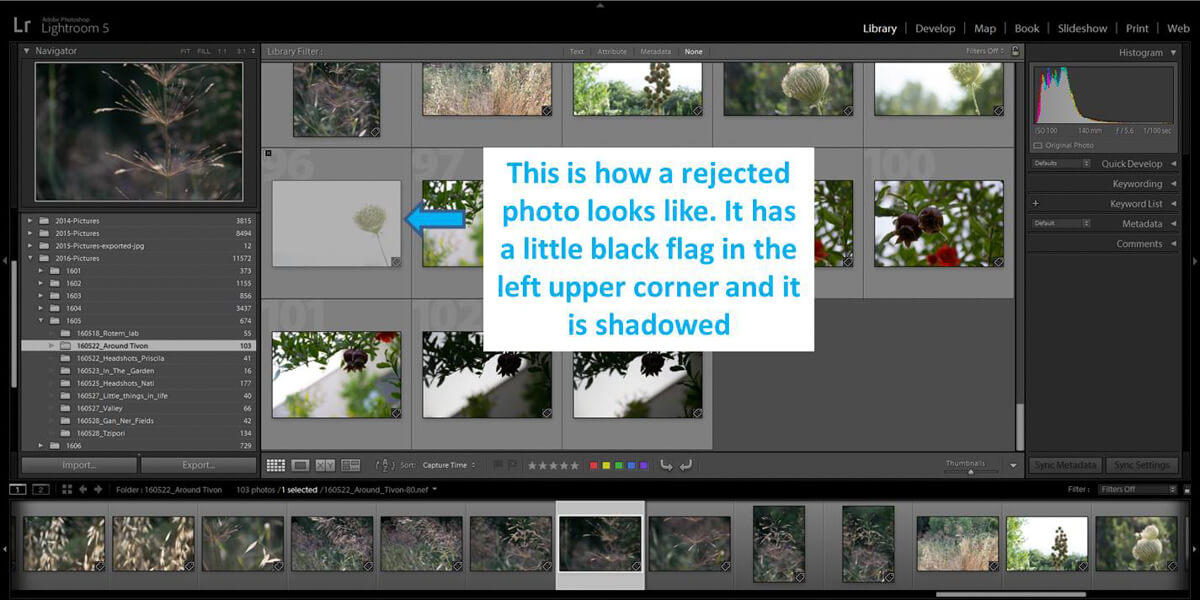
Once you have flagged all the photos you want to delete, you can get rid of them pretty fast by filtering them first. Right on top of the filmstrip you have a black toolbar and in the right you can see that it says “Filter”. If you click on this word, several filter options will appear: flags, stars and colors. If you click in the icon of the “set as rejected” flag, just the black flagged photos will be shown. At that point, you can select them all and press “delete” in your keyword. You have the option to remove the photo from LG or delete it from your disk. To clear the filter you can either press again in the same flag icon or select “Filters off” (see photo below)
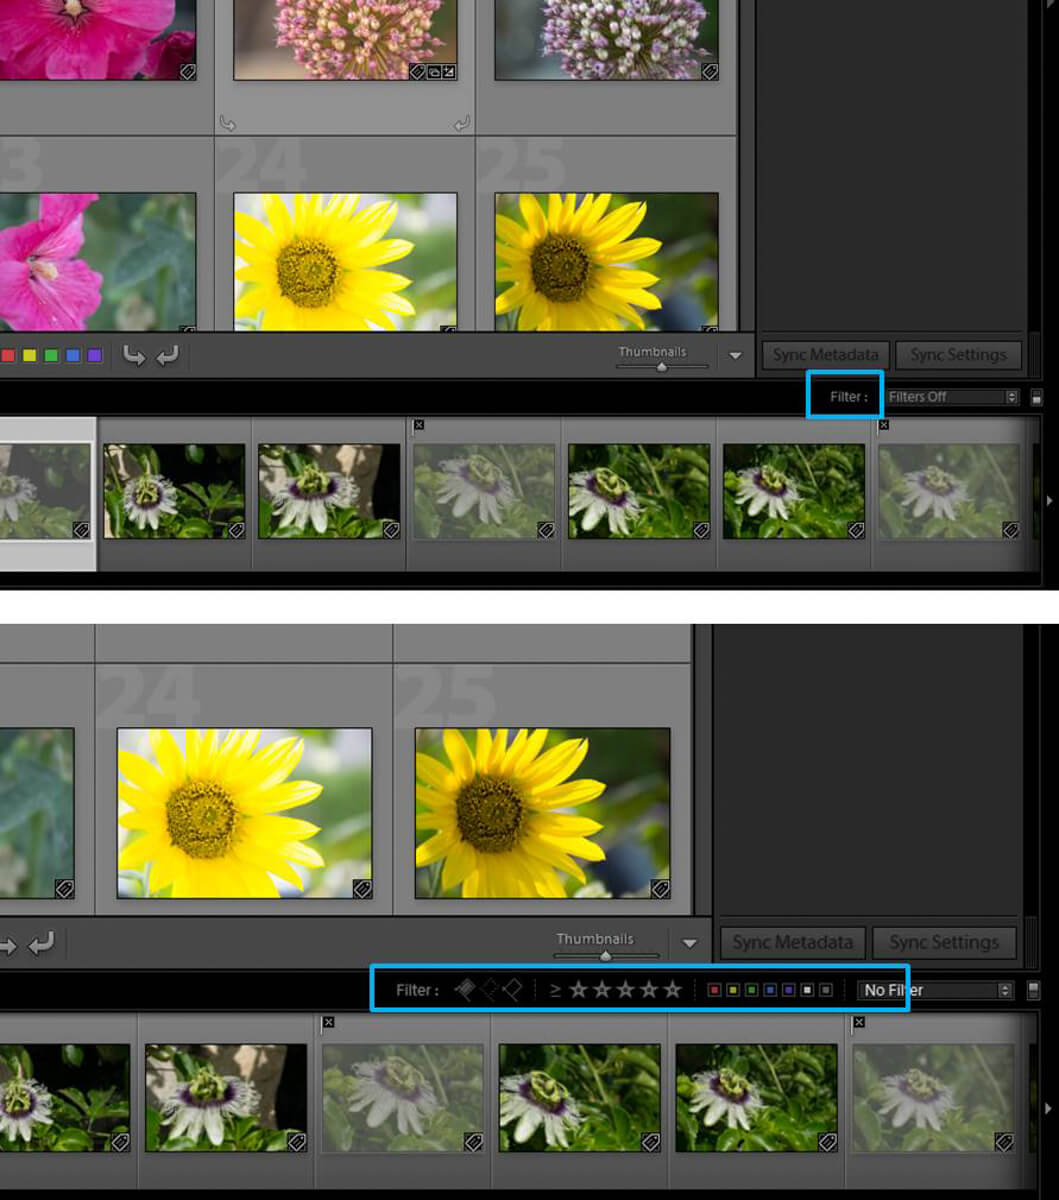
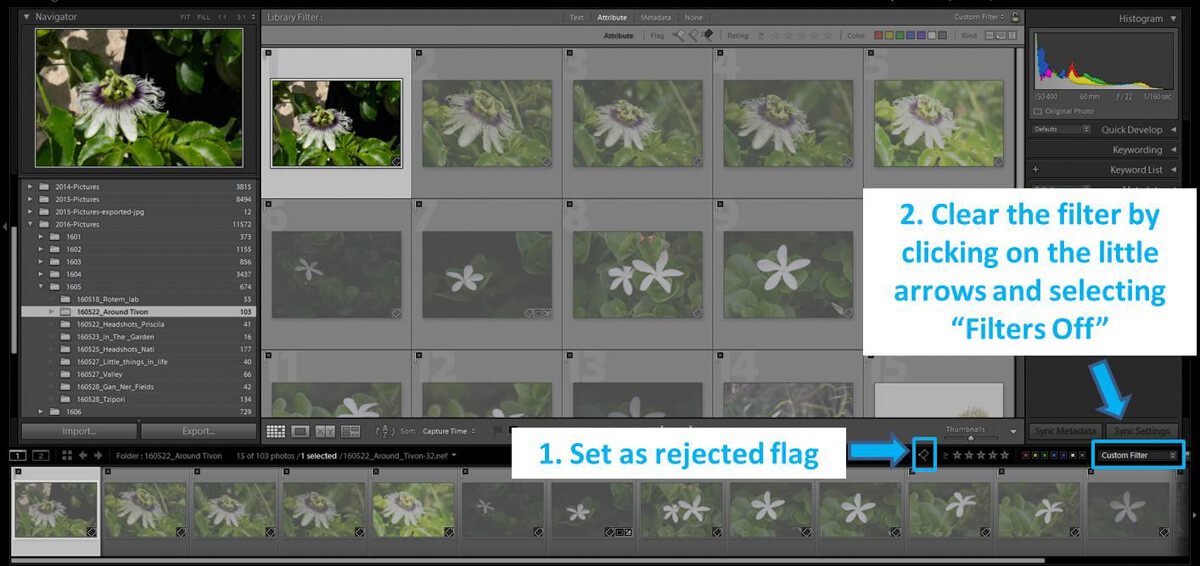
Use flags, stars and colors
Now you have all the good photos in your computer organized nicely in folders. This is a great starting point! But LG can help you even more in the organization of your photos. You can mark your images using flags, stars and colors. To learn how to do it, have a look to the great post by my Sleeklens colleague Navanee Viswa in which he explains Lightroom rating system in detail. I just want to tell you that there are as many rating/organizing systems as photographers. Each one of us has his own way of working. You need to find a system that talks to you and allow you to organize your photos in a consistent way. I will explain to you my system just a matter of example:
First I go over the photos fast and I flag as rejected the really bad ones. I delete them from the disk. I do a second round flagging with the white flag the photos I want to keep. You can make these 2 rounds in one by flagging with either rejected or Pick. I filter just the flagged “Pick” photos (or I make a collection. More about LG collections in next blogs). Once I have in front of me just the flagged photos, I start my color rounds.
Purple: I will work with this photo
Green: I finished editing this photo
Yellow: this photo is part of an HDR
Red: This photo is part of a panoramic
Then I filter by just the green photos (in the same way that we filtered the “set as rejected” photos before). Then I go over the images and I rate them by stars: 4 stars are the ones I want to share in my social media and 5 stars are the ones that are so good that will be part of my portfolio. Maybe you won’t see all the rating icons in the thumbnail cell of the grid view (for example you might not see the stars). You can change the display of the cells in the LG Library going to View>View Options> Grid View>Cell Icons and in the Top or Lower label you select “Rating and Label”. For more details and options, you can have a look to the article Customising cells in Lightroom’s Library module.
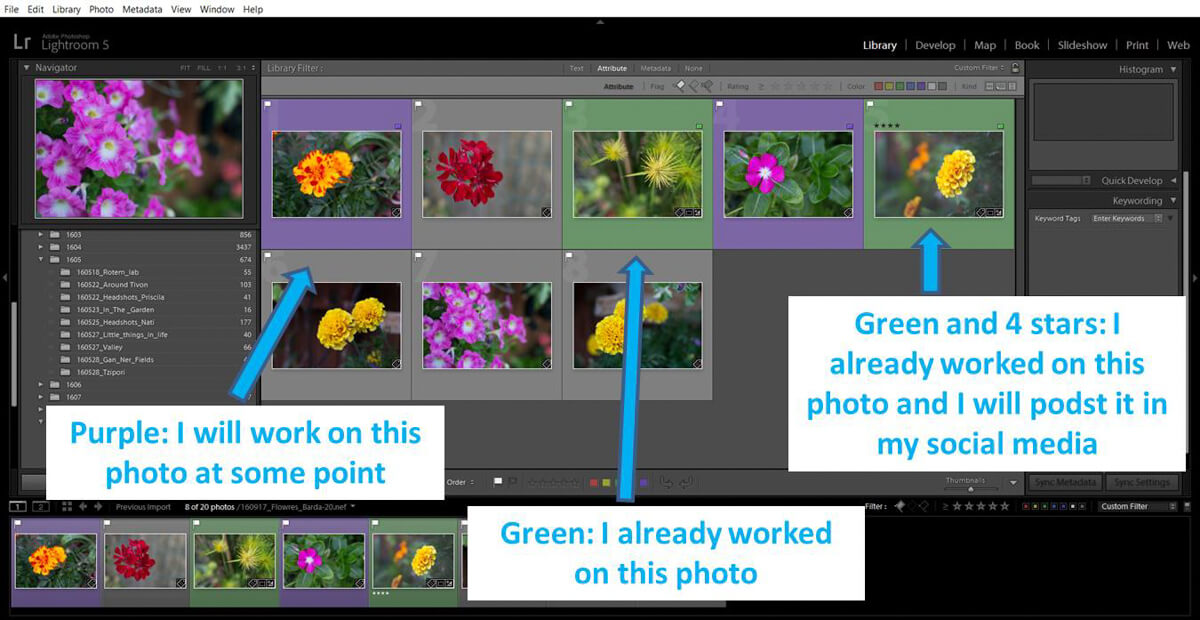
My system might not be good for you. There is nothing wrong with that. I know there are photographers that start by rating their photos with stars and they never use colors. Any combination of flag, stars and colors that make sense to you and that help you in your workflow will be great. It takes some thinking though. But it is worth it.
Keywords can help you to describe your images and make them more searchable. Have you ever spend hours looking for a particular photo? You can avoid this situation organizing photos using keywords!! How cool this would be? I am using this feature since long time ago. However, I recently discovered that I am not doing it in the most efficient way. But this is going to change! I have a plan that will allow me to take much more advantages out of keywording. Check out what I learnt!
What are LG keywords and where can you find them?
Your photo files, besides containing the actual image, they also contain extra data, also known as metadata. Some metadata is added by the camera: lens aperture, shutter speed, ISO… Other metadata, as keywords, can be added later. Keywords are a way to describe your image. As part of the photo metadata, keywords show up in internet searches. For that reason they have a role in the exposure of your photos once you publish them. If somebody is doing a search for one of your keywords, your photo might appear in their results. In LG, keywords are found in the library module.
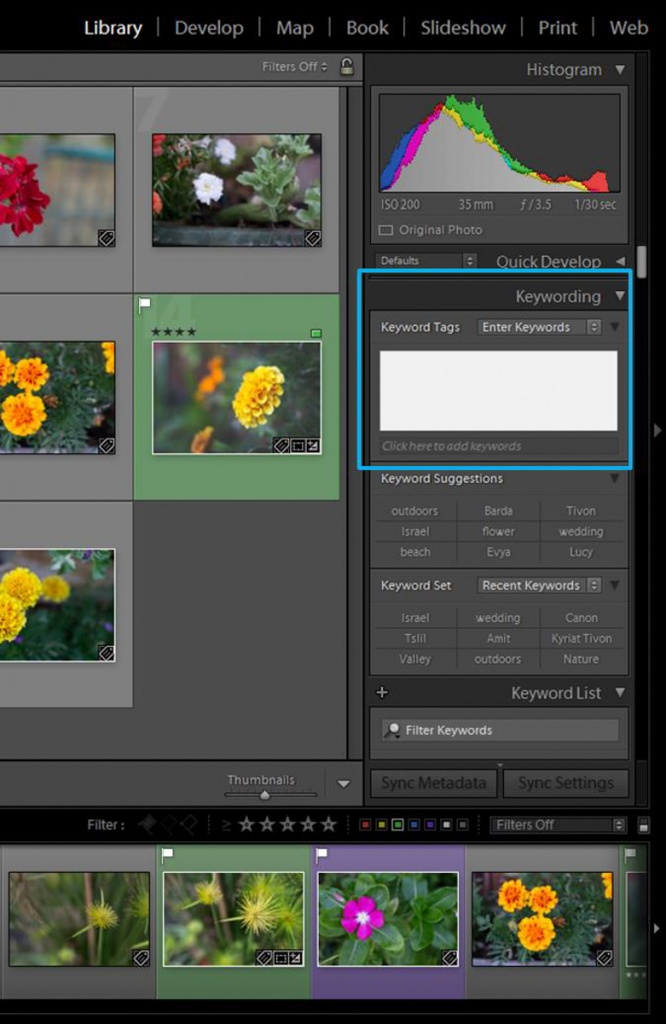
Try the keyword hierarchy structure
Until now I have been keywording my images following what it is called “Flat word” technique. This means that I was just adding keywords to my photos and all of them are on the same level of importance. For example, if I was adding keywords to a flower’s photo that I took next to my place I was using: flower, Tivon (my town), Israel, outdoors, summer….. As you can see this system is quite easy and fast. You can always see your keywords in the Keyword list option in the Library LG module. Great! However I ended up with an extremely long list of keywords. It didn’t have any structure and it was quite difficult to handle. Finding something using my keywords became insane. To find similar terms I needed to scroll down in the list and this became quite annoying when the list growth big. My keywords were complicating my life instead of simplifying it!
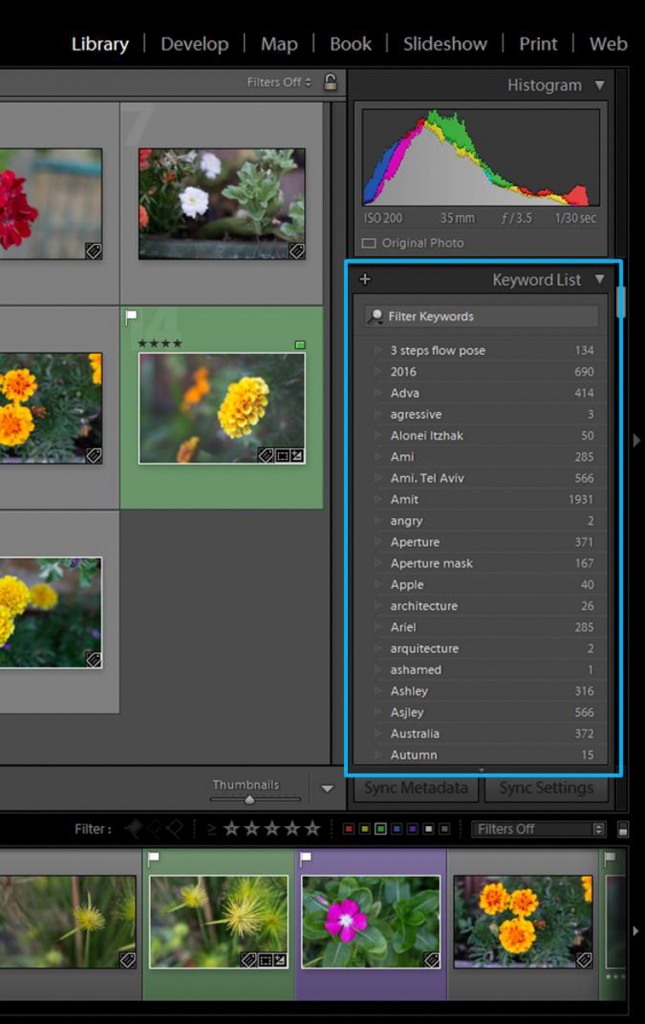
But there is another way to organize your keywords: Hierarchy system. This system will allow you to have a structured list of keywords nested inside categories. Searching for things is much easier than in a non-structured long list because relevant terms are grouped together. For example: I can find all my nature or landscape photos easily because I have a category for each one of them. Setting this system takes more time. However it is an investment because you will save this time (and more) in the searches.
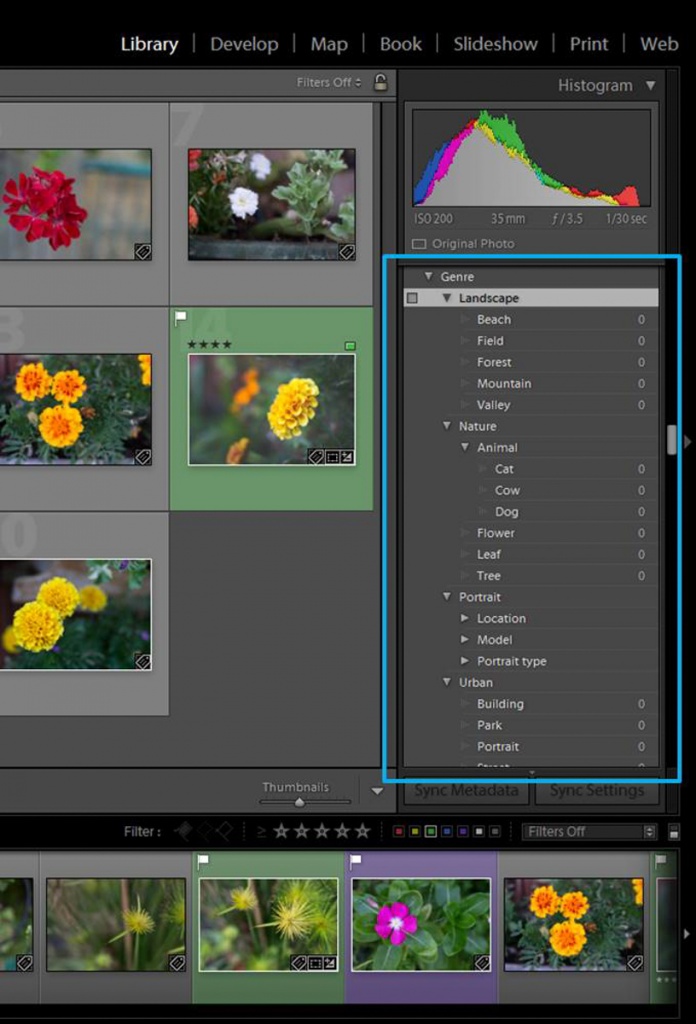
Plan your keywords
It is worth to spend some time thinking about how you want to organize your keywords. You can start with a 2 or 3 level keyword system. You can add the keywords in LG:
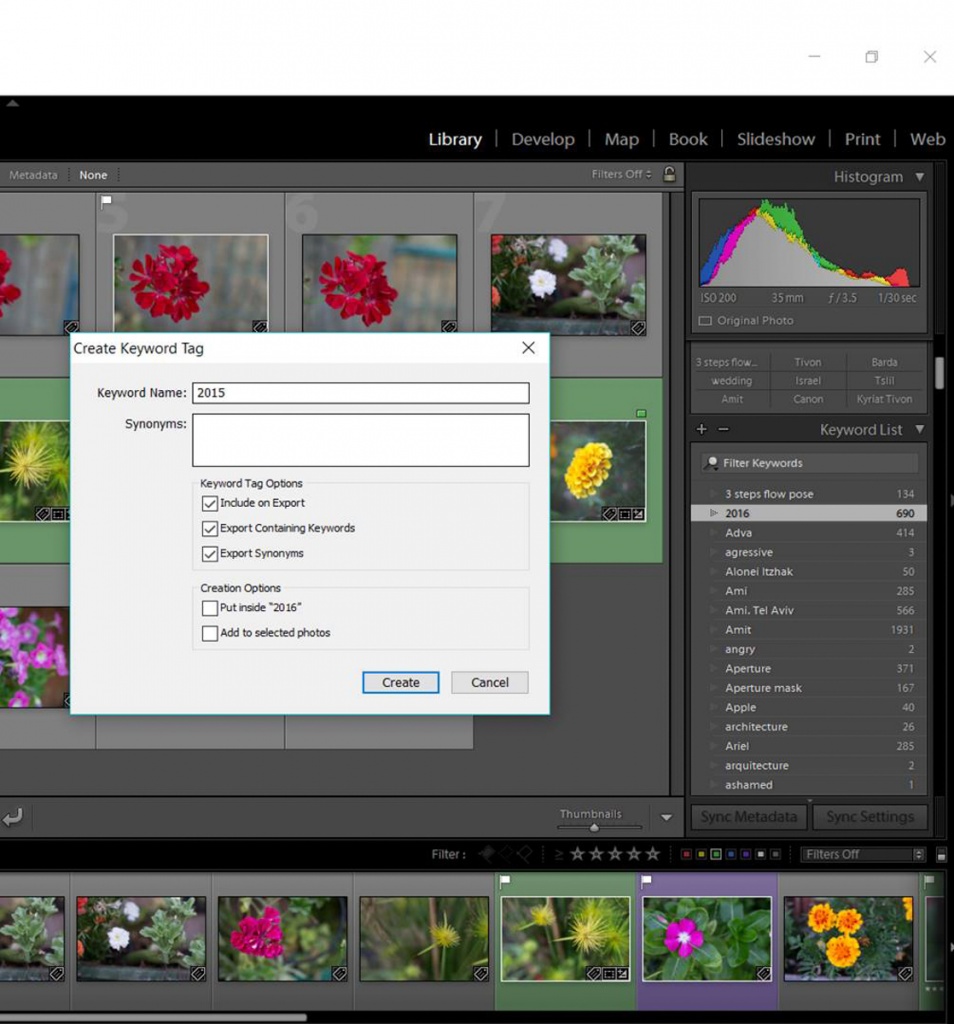
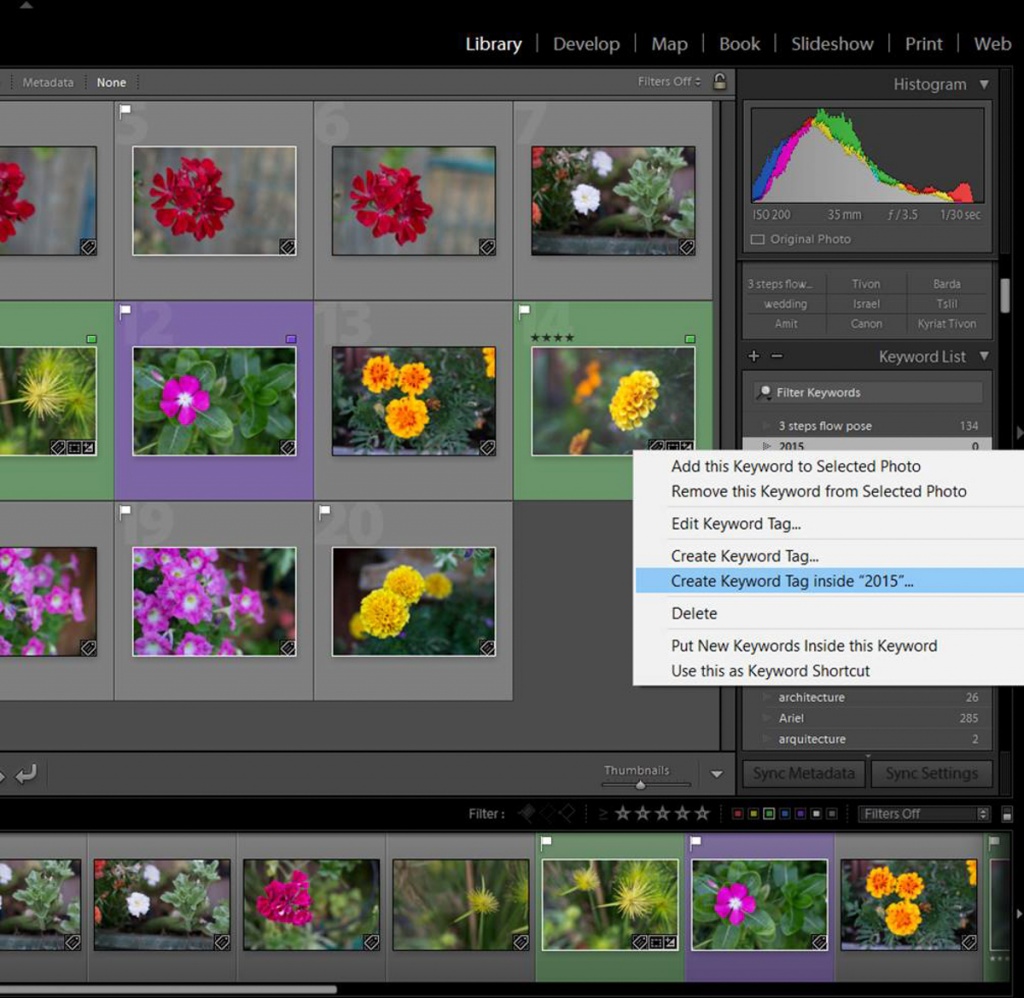
An easier option is to create first your structured list outside LG and then import it. You can use any program you like, such as word or excel. However, keep in mind that you will need to save your planning lists into text format to be able to export them to LG later on.
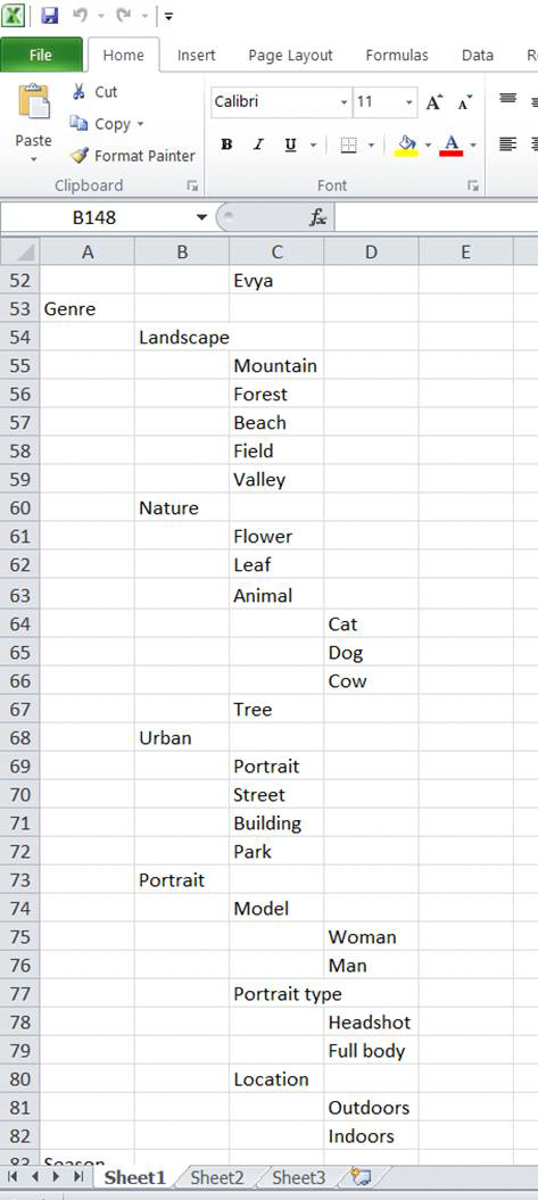
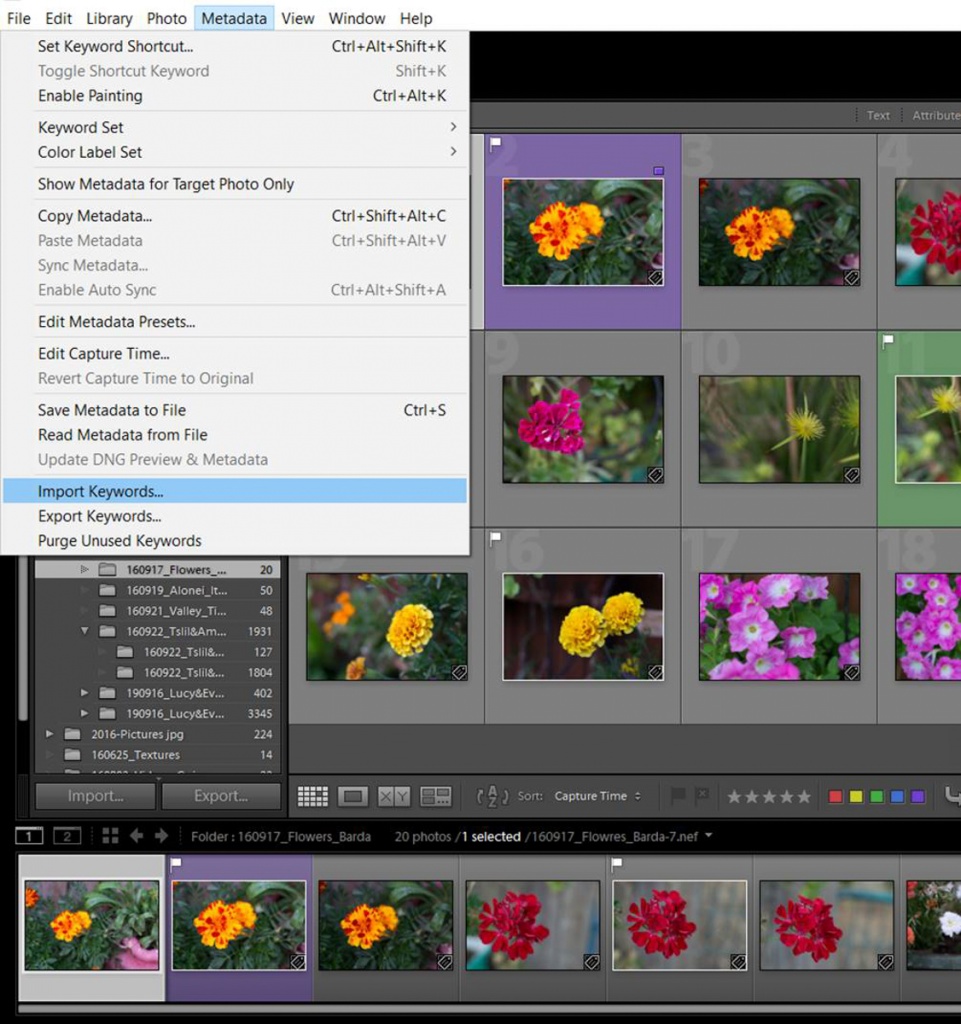
Keep the keywords inside a reasonable number and keep controlled vocabulary
Keywords can get very complicated if you have a lot of levels in your lists or if you don’t keep a controlled vocabulary. My recommendation is that you start with just a 3-level keywording system and add levels just when you get used to work with keywords. Use all the time the same keywords. It can be useful to have your keyword list next to you (printed or in a pdf version) when you are working. If you start changing the keywords along the way you will lose the whole organization of the system.
Use synonyms
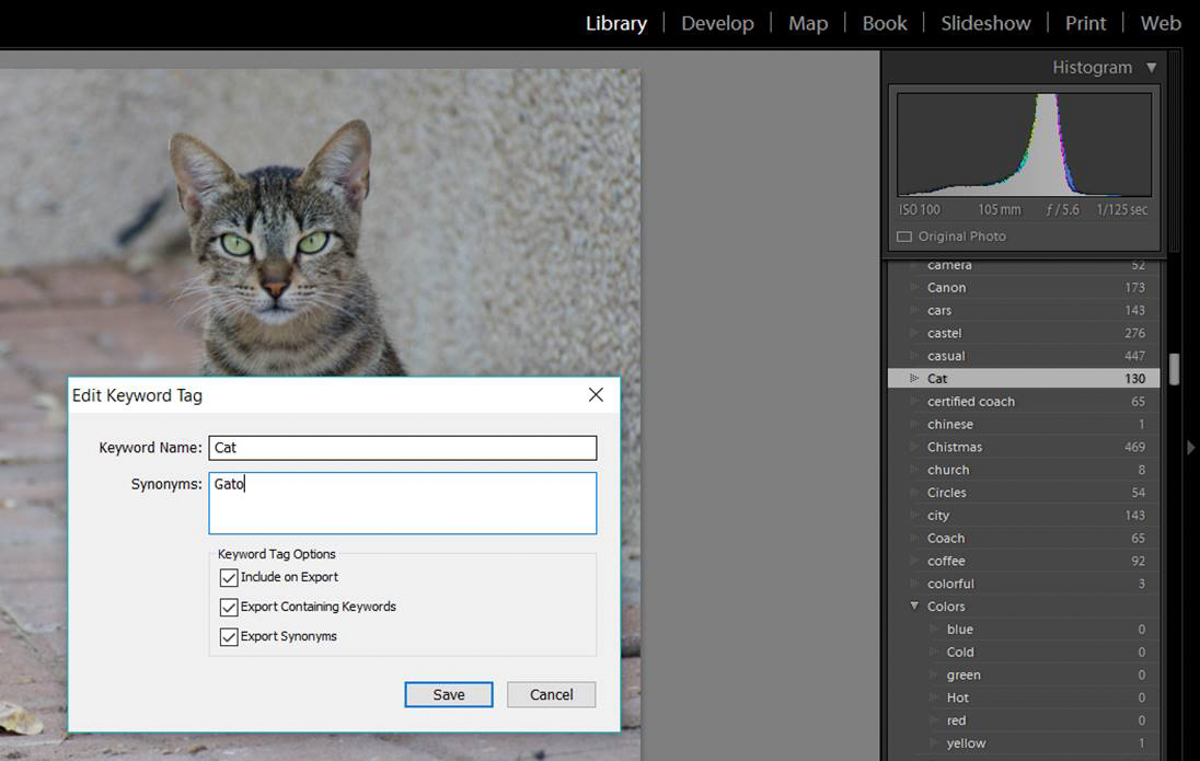
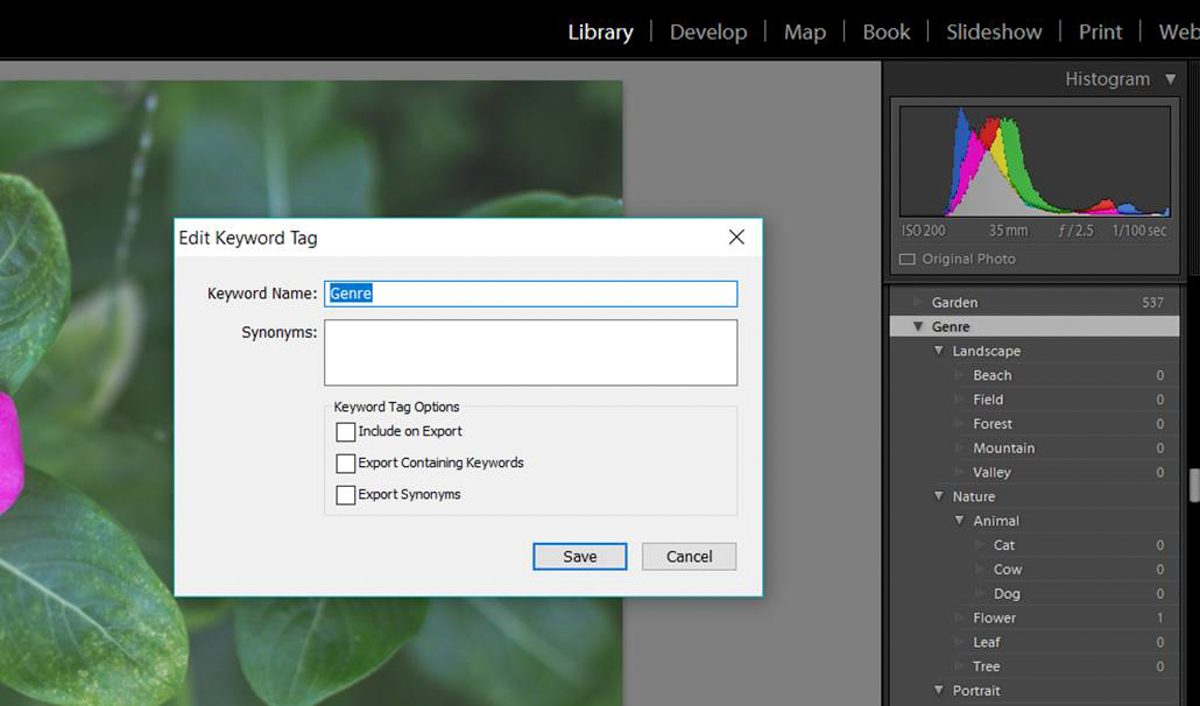
There are times that your keyword might have synonyms. It can be good to add them to your image because then your photo will have more probabilities to be found both inside your catalog and in internet search. You don’t know which of the keyword synonyms people will look for, so have them all on the metadata is a good strategy to increase the chances that your photo will be found. However, adding all the synonyms to the keyword list might make things complicated. No worries! LG have a solution. You can add synonyms to your keyword by double-click on the keyword in the Library module. When a dialog box appears, you just need to add your synonyms in the box labelled as so. Click “Edit” to save change and exit the box.
Do keyword maintenance from time to time
From time to time check that your keyword system is still OK. Do all your keywords match with your planned keyword list? Are any new keywords organized in your hierarchic list? Do you have any unused keyword that you can delete? Reviewing your keyword system will keep it tidy and nice to use.
Ways to add keywords to a photo
You can add keywords to your photos in different ways:
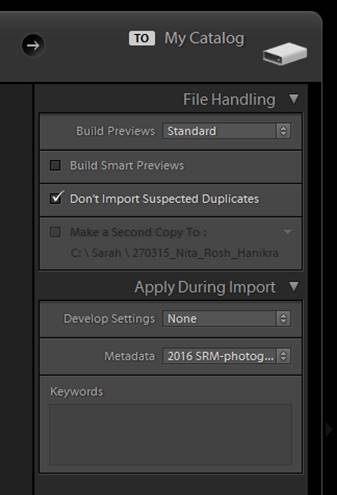
- When you import the photos: On the import dialog you will find a section called “Apply during import”. There you will find a panel where you can type the keywords. Keep in mind that these keywords will be added to all the photos you are importing at that moment, so the keywords should be appropriate to all of them. They are usually general keywords.
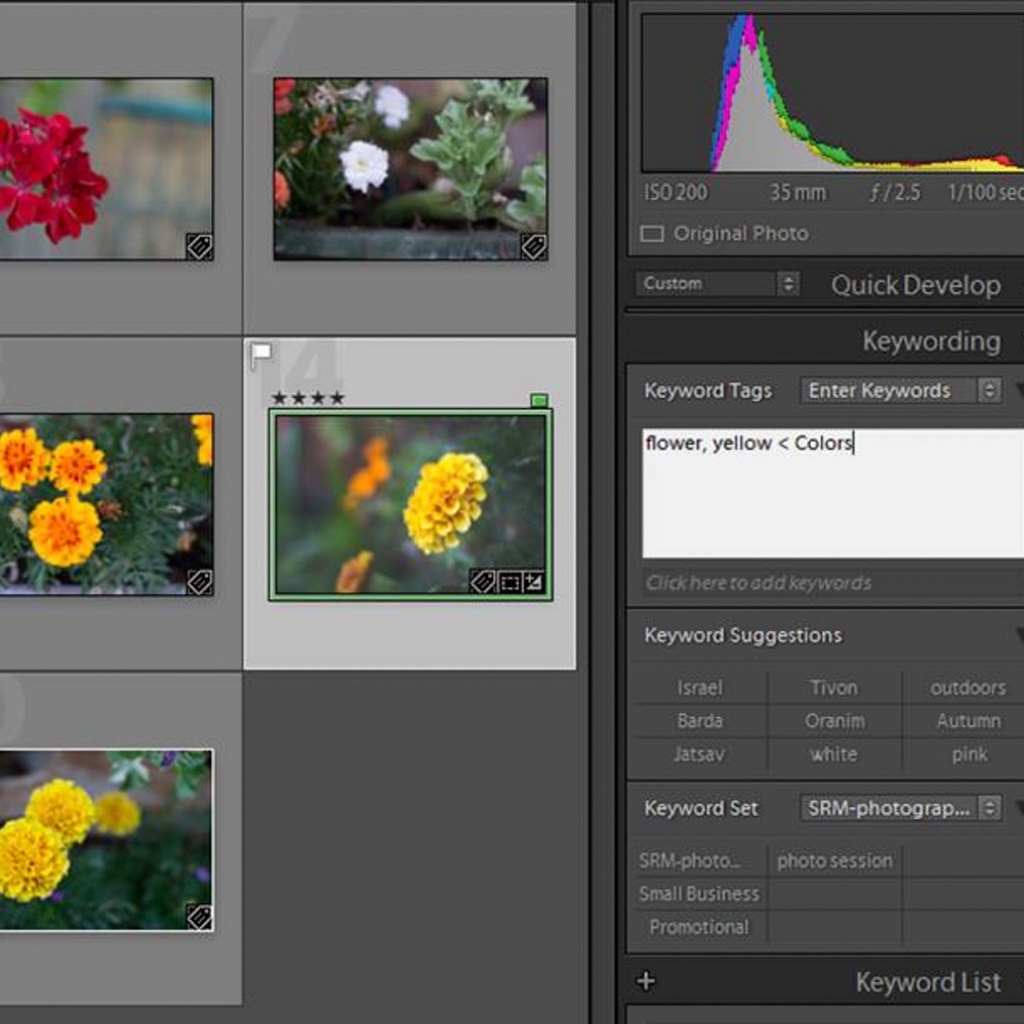
- Manually: You can find the Keyword panel in the right side of the in the library LG module. You can add keyboards by type them in the panel or by checking them in your keyword list. You can add more than one keyword by separating them by commas. You can select just one picture to add its keyword or you can select multiple photos (in the Grid view) and add the same keyword to all of them at once.
- Using the painter tool
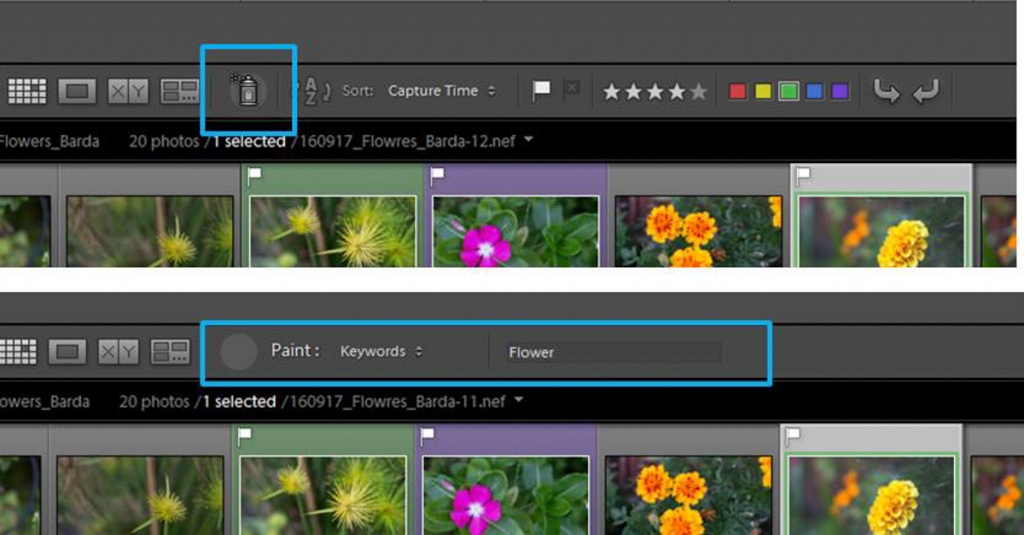
Have you ever seen the painting spray icon in the toolbar of your Library LG (In the Grid View!! Press T in your keyboard if you don’t see the toolbar)? You can use it to keyword your photos is a quick way. Select “Keyword” in the list right next to the spray icon. Write the keywords you want to add in the box next to the right and then click in the thumbnails of all the photos in which you want to add them. Easy!
In the Keyboard panel, you can select the way you want the keywords to be displayed. There are 3 options: enter keywords, keywords&containing keywords and Will export

Find your photos by keywords
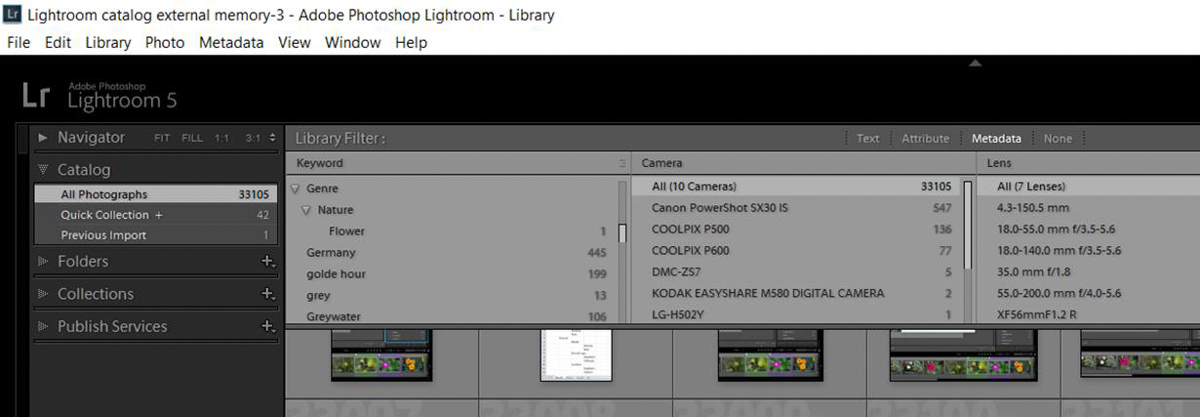
One easy way to find the photos containing a keyword is using the Filter Bar of the Library module (press \ in your keyboard if you can’t see the Filter Bar). In the “Metadata” label, you can find a section with all your keywords. Select the one that interest you and LG will show you all the photos that were labelled with it. If in the left panel of the Library you have selected “All photographs”, LG will look for the keyword in the whole catalog. If you want to look for the keyword in a particular folder, just select it before starting the search.
I hope you find all these information about keywords useful. If you are starting your LG catalog now, it is a good time to establish your keyword system. If you have already a pretty big catalog (like I do), take it easy. Don’t try to keyword all your images at once because it is a gigantic task. Better divide it in several working blocks. I saw that for me it is good to work on the keywords for half an hour or so and rest. Depending on the day, I do one or more working blocks. I am not in a hurry, so I don’t push myself. However, I think it is really useful to have a good system of keyboards, so I work on it whenever I have the chance.
What a LR collection is?
A collection is a way to group photos in one place. Collections allow organizing photos for easy viewing, improving your workflow or for performing other tasks. You can find the collections in the Collections panel of for example the Library module.
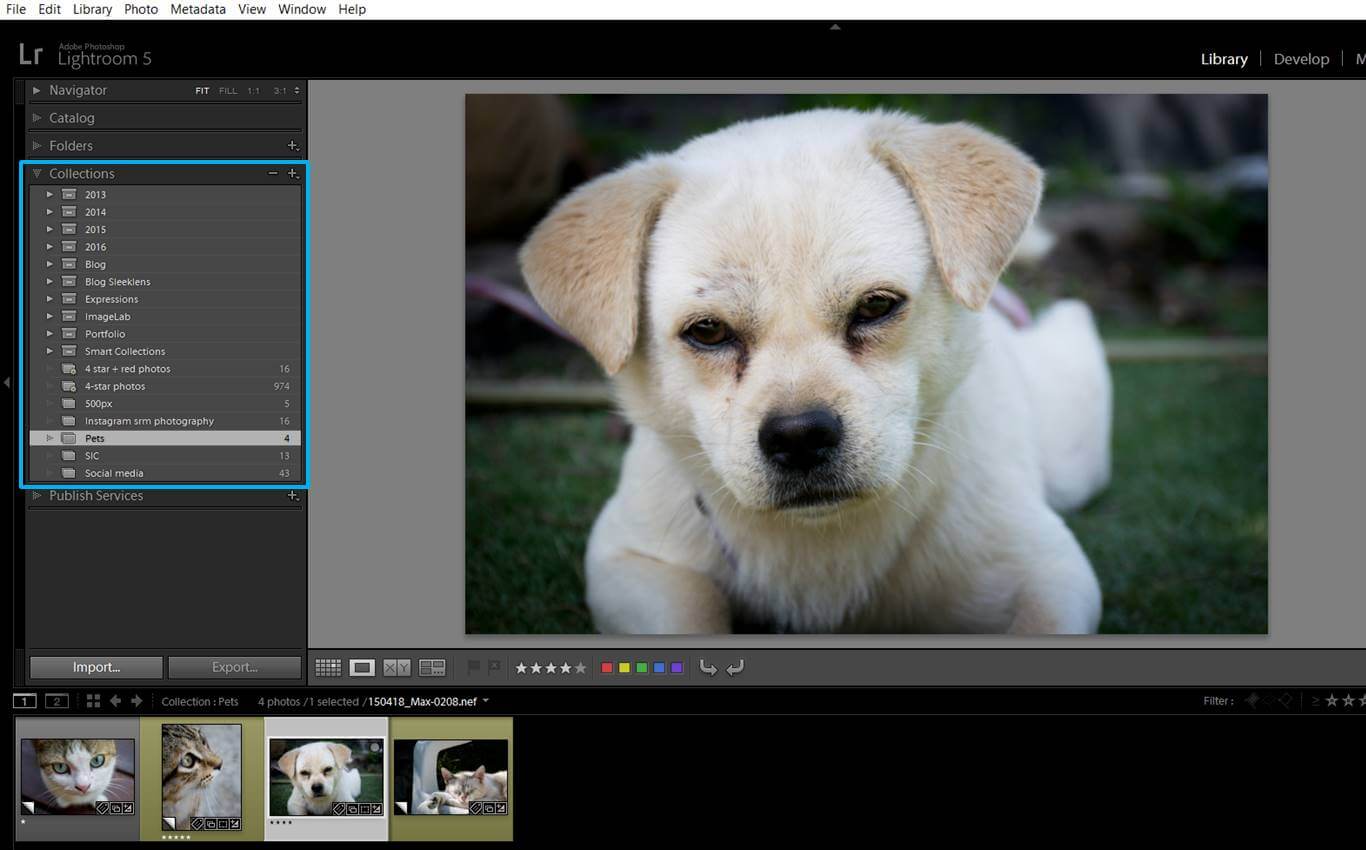
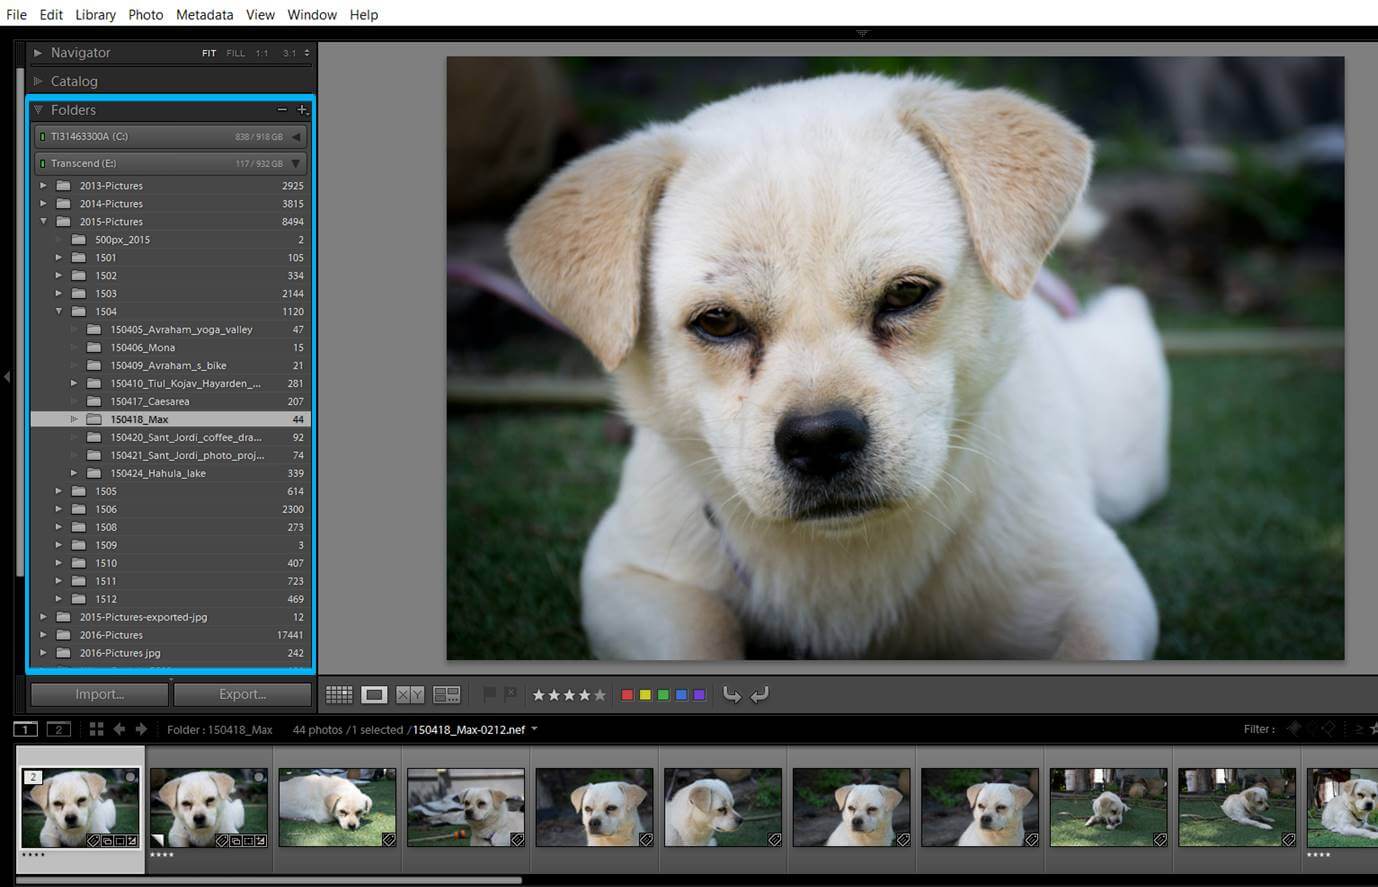
At first Collections might seem pretty similar to folders, but in fact, they are much more flexible. Collections can include just a selection of photos from a folder or a combination of photos coming from different folders. One photo belongs to just one folder, but it can be in different collections. For example, I can have a picture of a dog in its folder (I usually name the folders with the date+relevant name. This dog photo is in a folder called “150418_Max because I took it the 18th April 2015 and the dog is called Max”). The photo belongs to just ONE folder unless I copy paste it to several (but if I do so, things starts getting complicated here).
However, this dog can be in several collections. This image is in both my “Pets Collection” and my “4 star Collection”.
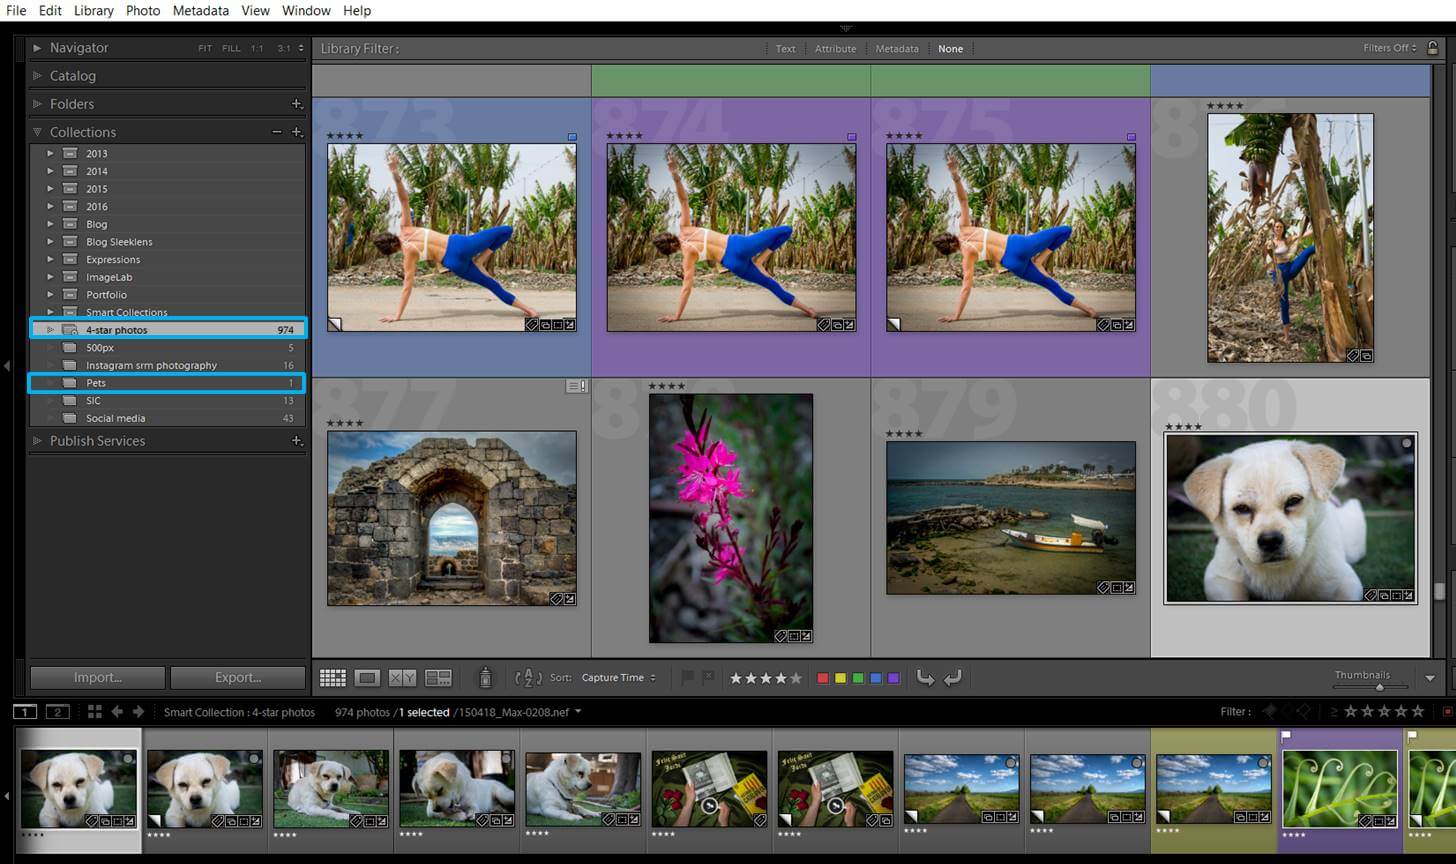
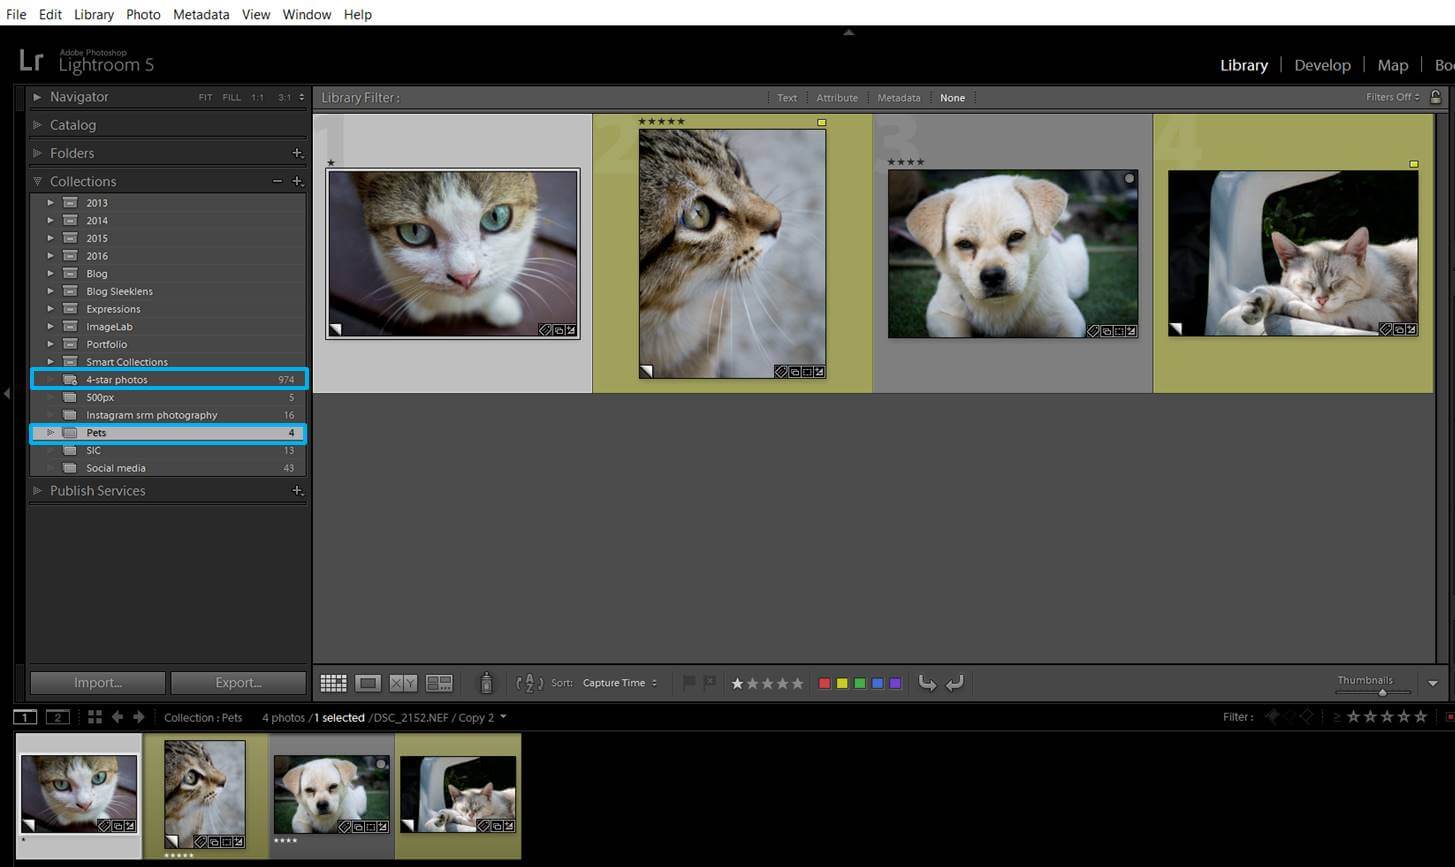
Here you can see Max inside my “Pets” collection.
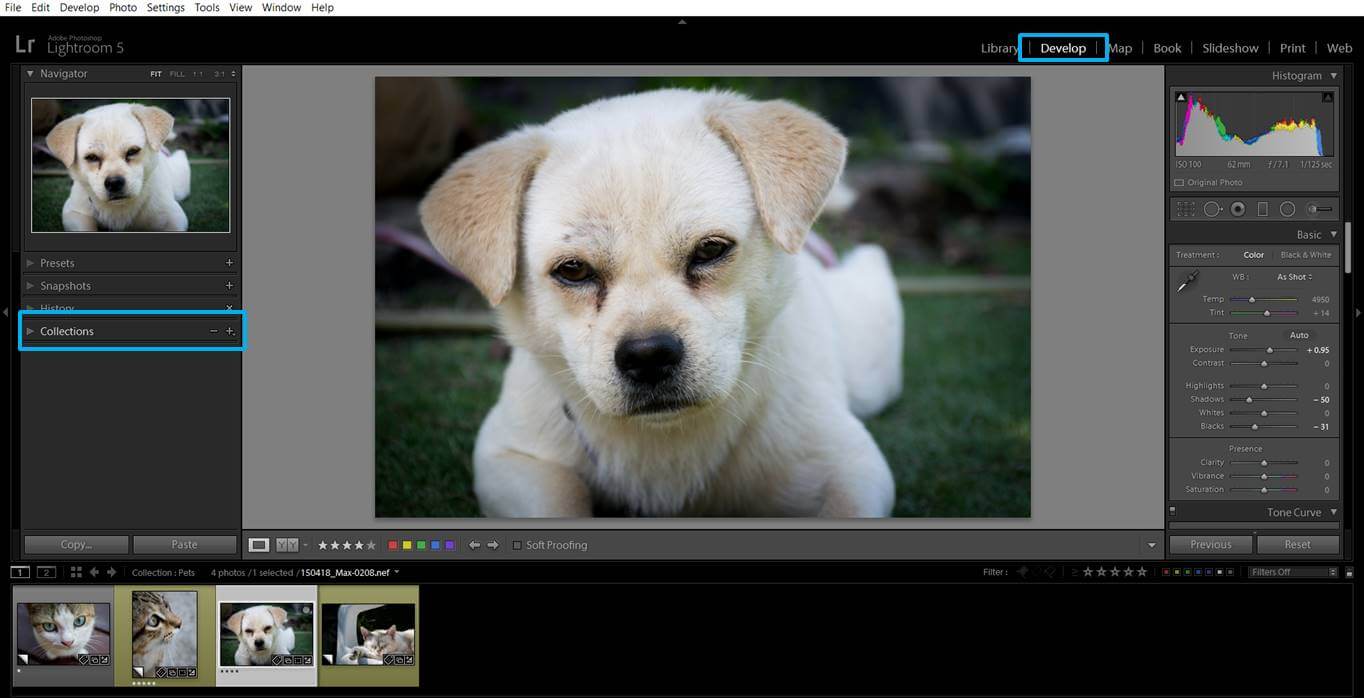
Collections also have another advantage over Folders. You can access to the latter just from the Library module. However, you can access to the Collection panel from any of the LG modules, including the Develop one. This is handy because you won’t need to leave the develop mode in order to move from one collection to the other.
LR collection types
The 2 types of collections that I use the most are Smart and Regular collections. Here I will explain to you the difference between them. In the next section of this article I will tell you how to create them.
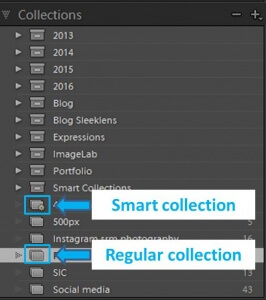
A smart collection is that one that uses a filter in order to group your photos. One smart collection can include for example all the photos that you have tagged with 4 stars. Smart collections are dynamic. If you change the definition of the filter, the photos inside the collection will change accordingly. If you change the description of the photo, it might appear or disappear from a smart collection. For example, if I change the stars of one photo from 4 to 5, this image will disappear from my “4-star Smart collection”.
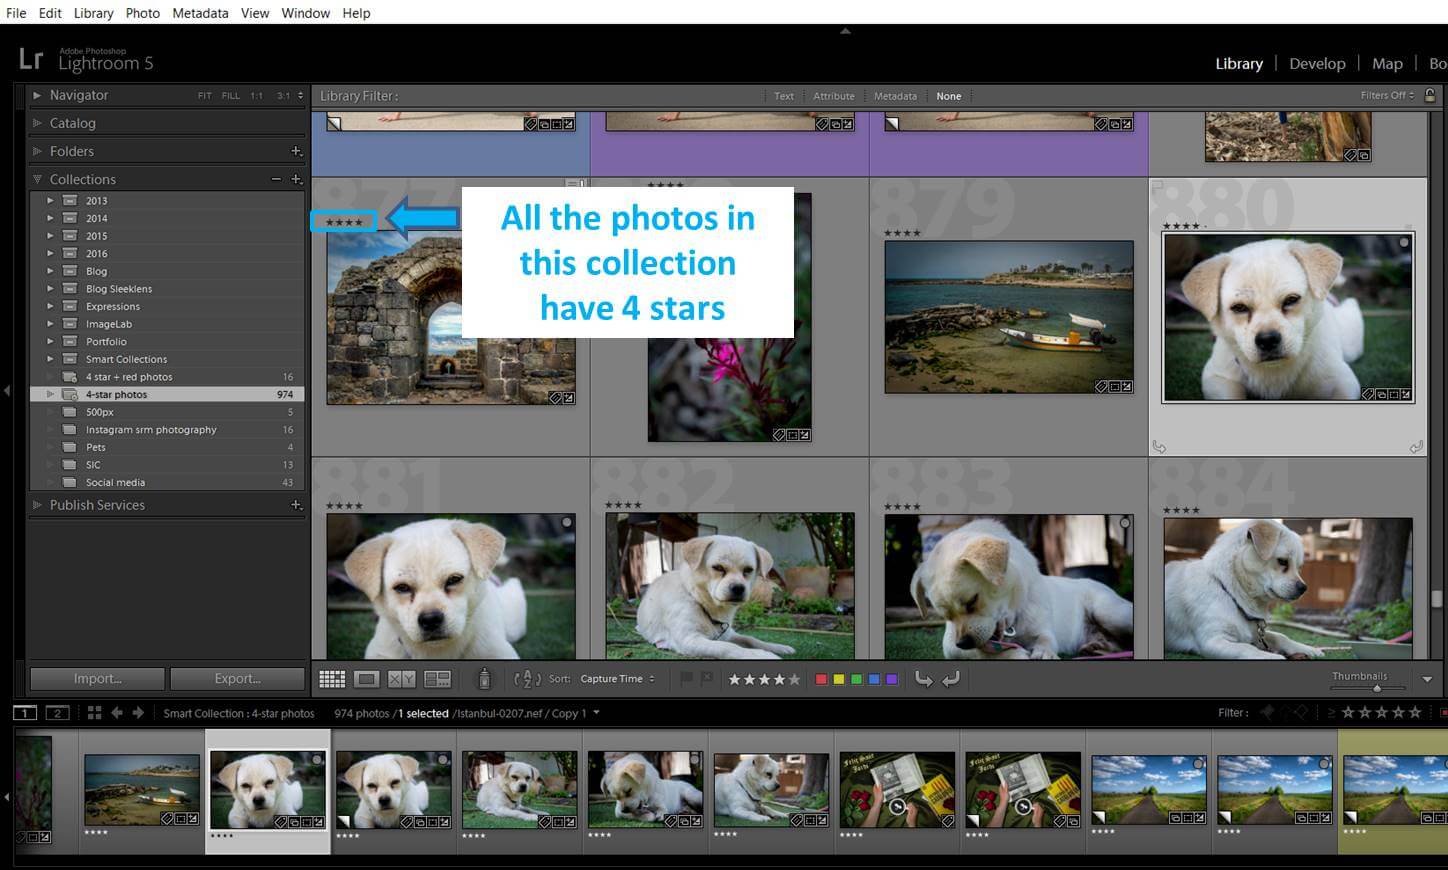
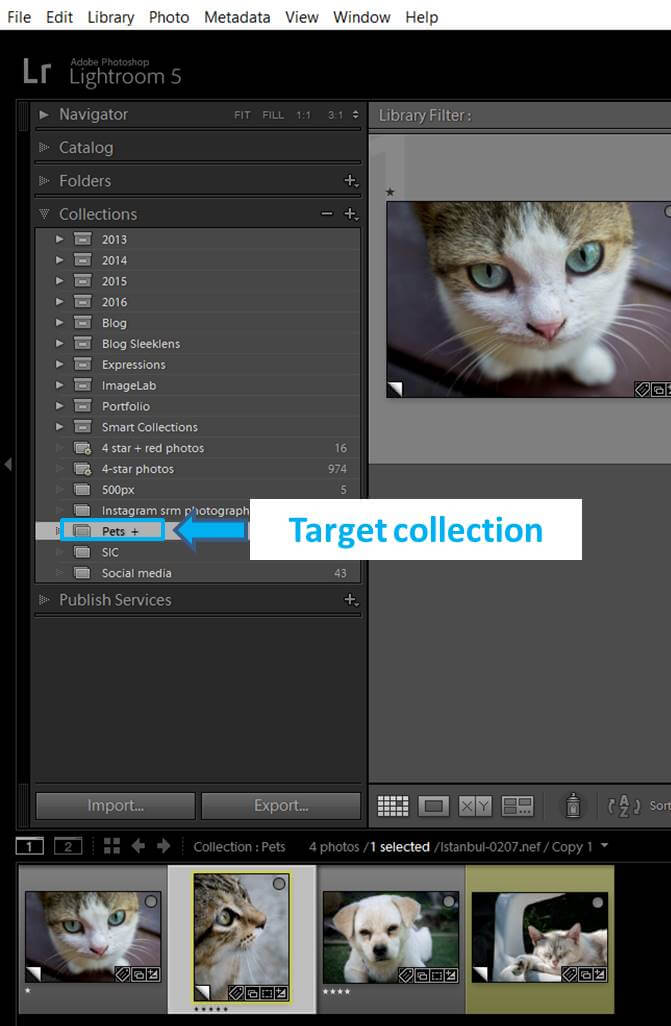
A regular collection includes the photos you personally select, meaning that it requires more effort to build and maintain. However, regular collections have some advantages too. They allow you to reorder your photos by selecting them in the Grid view and drag them to the new position (you can’t do it in Smart collections). You can also choose one of your regular collection and make it the Target Collection. You can have just one target collection at a time. Then, when you select a photo and press “B” in your keyword, this image will be added to this collection.
How to create a LR collection
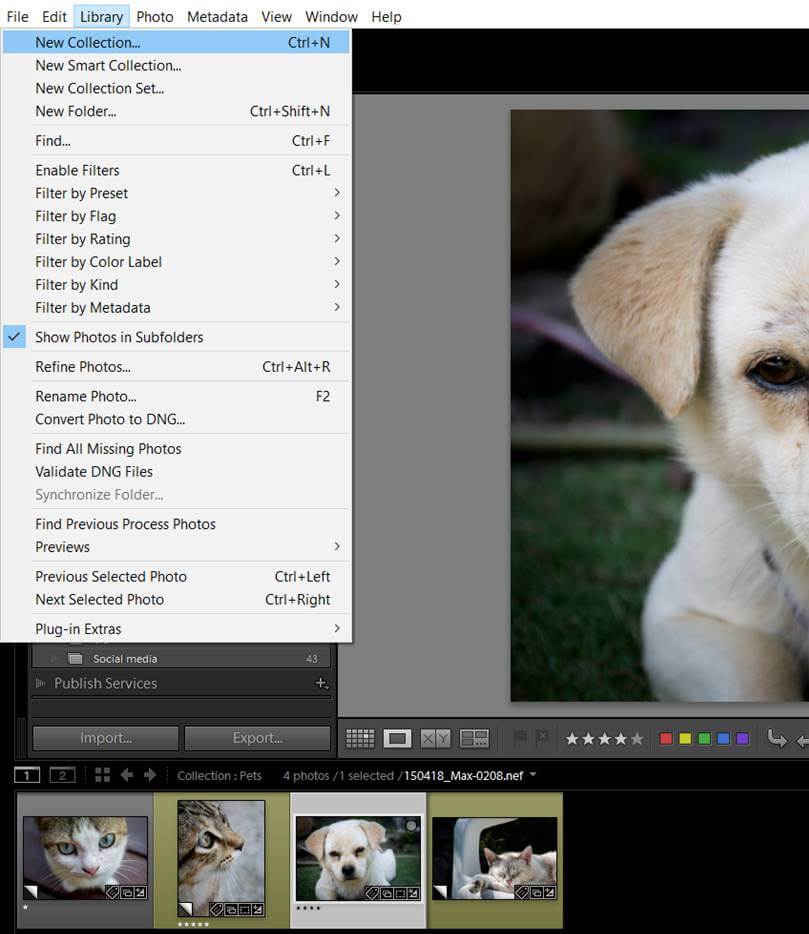
Now that you know what a collection is, you might be wondering how to create one. You can do it in 2 ways. In the Library module, you can select Library>New Collection for creating a regular collection or Library>New Smart Collection for the smart ones.
Another way is to click in the Plus icon in the Collection panel. You can access to this icon from any LG module.
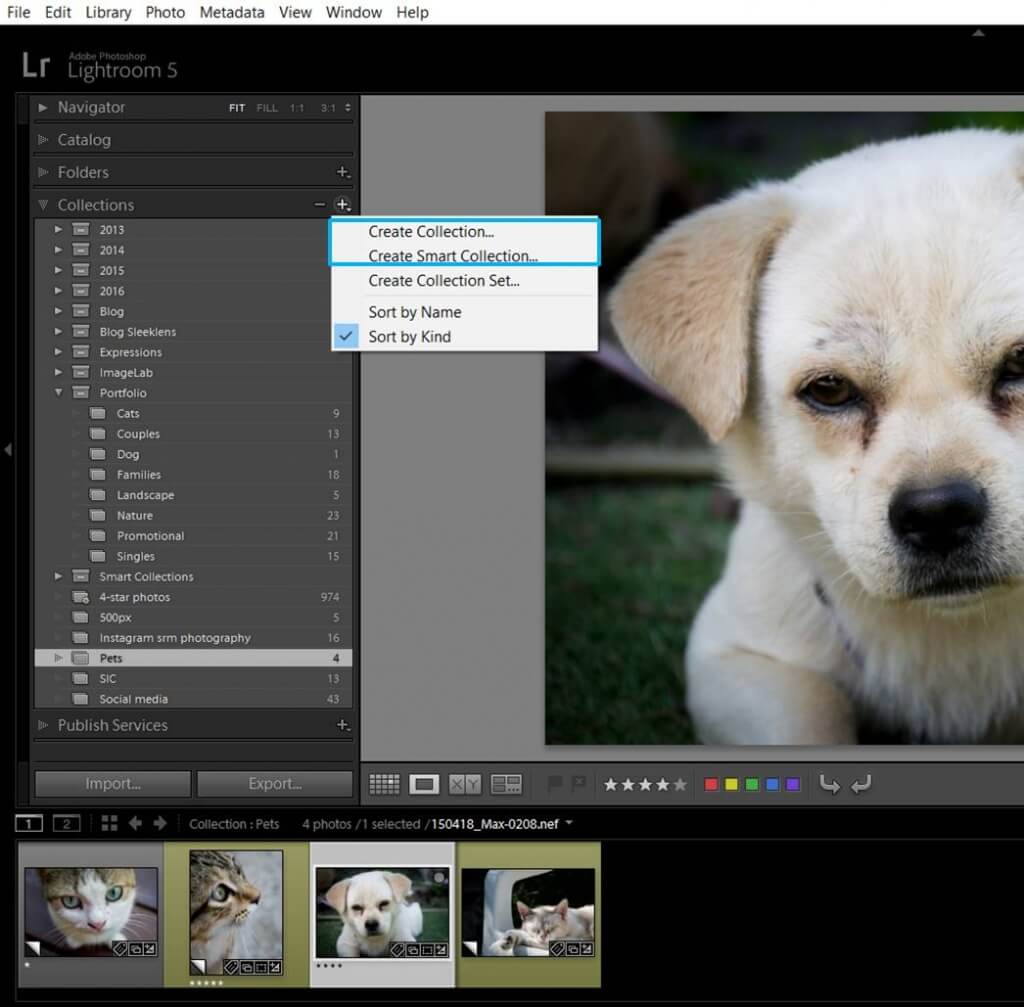
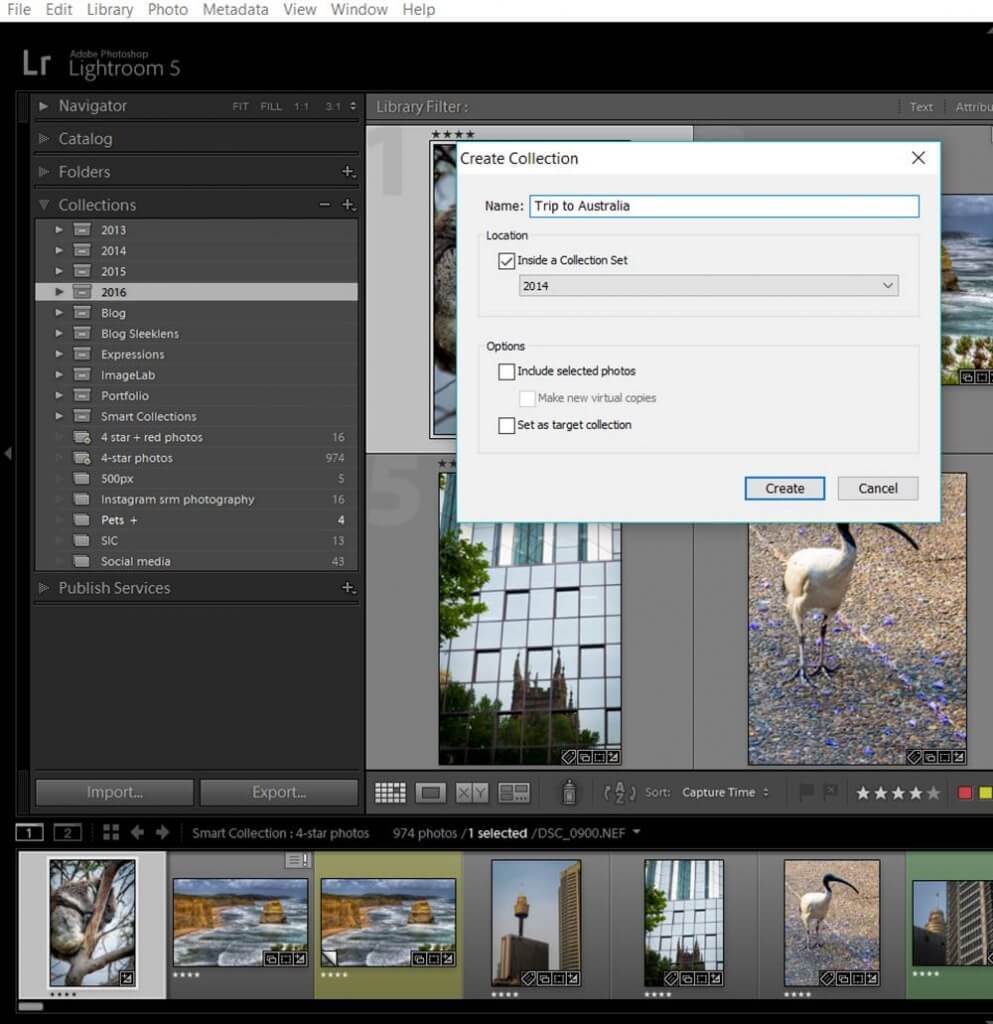
In case of the regular collection, a dialog box will open and you will be able to name your collection.
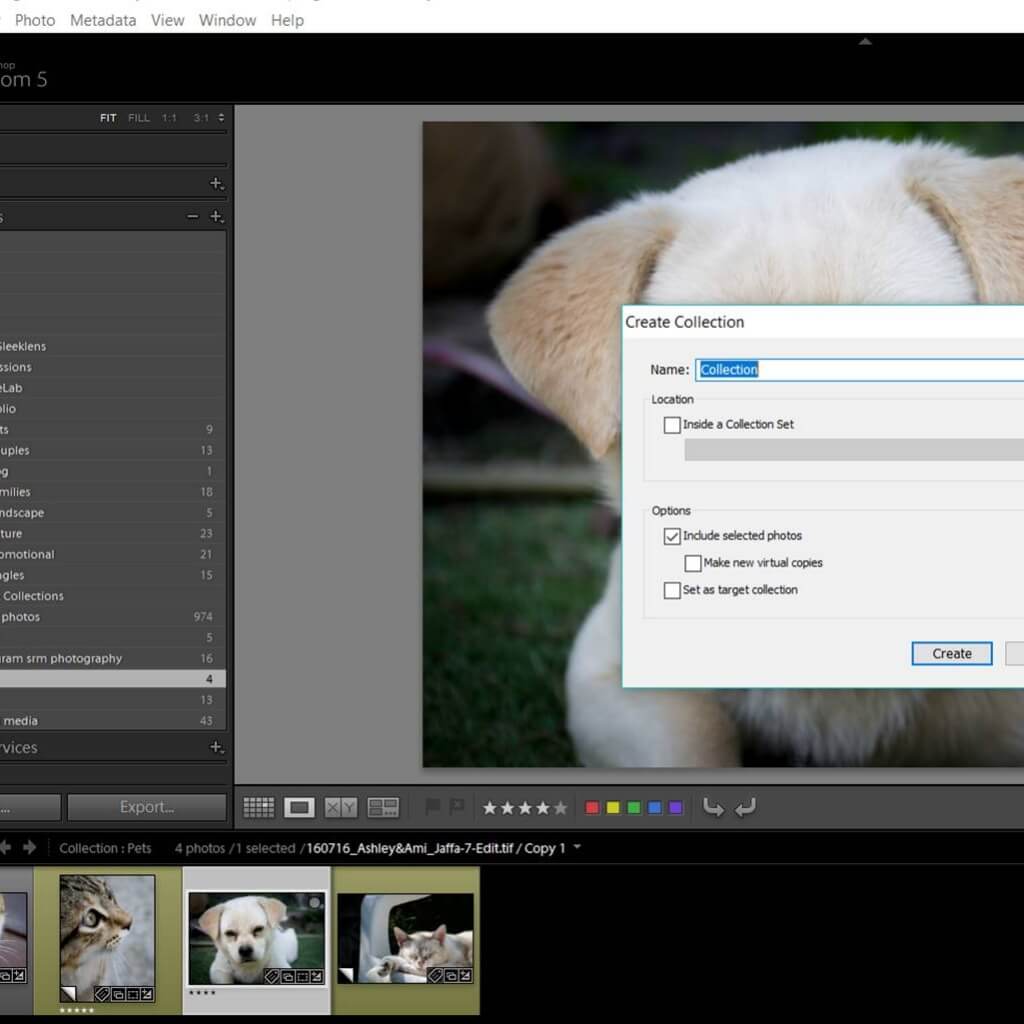
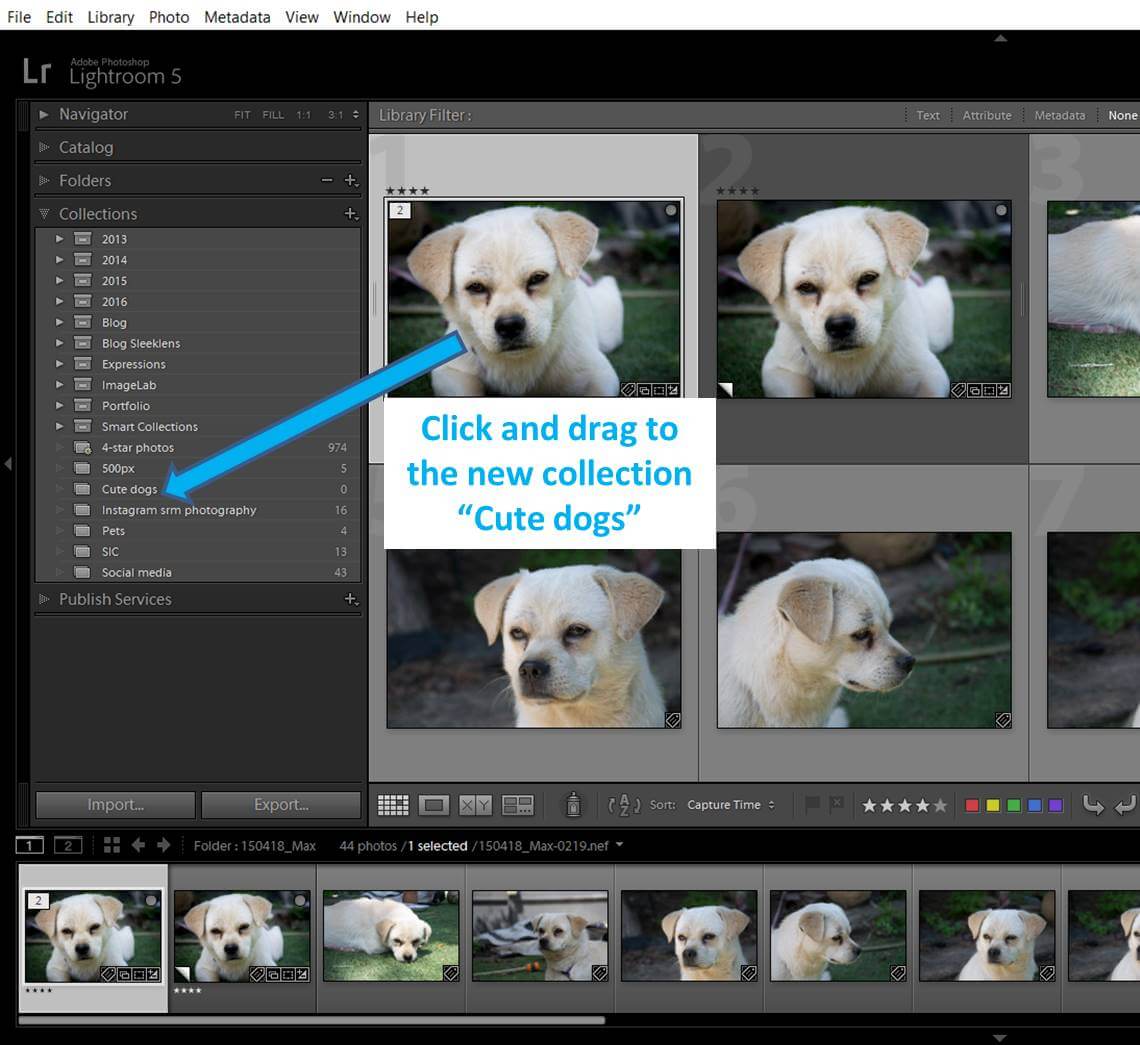
You can create an empty collection and then drag your photos from the Grid View in the Library mode.
You can previously select the photos you want to include in the collection and when you get to the dialog box check the option of “Include selected photos” creating it including the already selected photos.
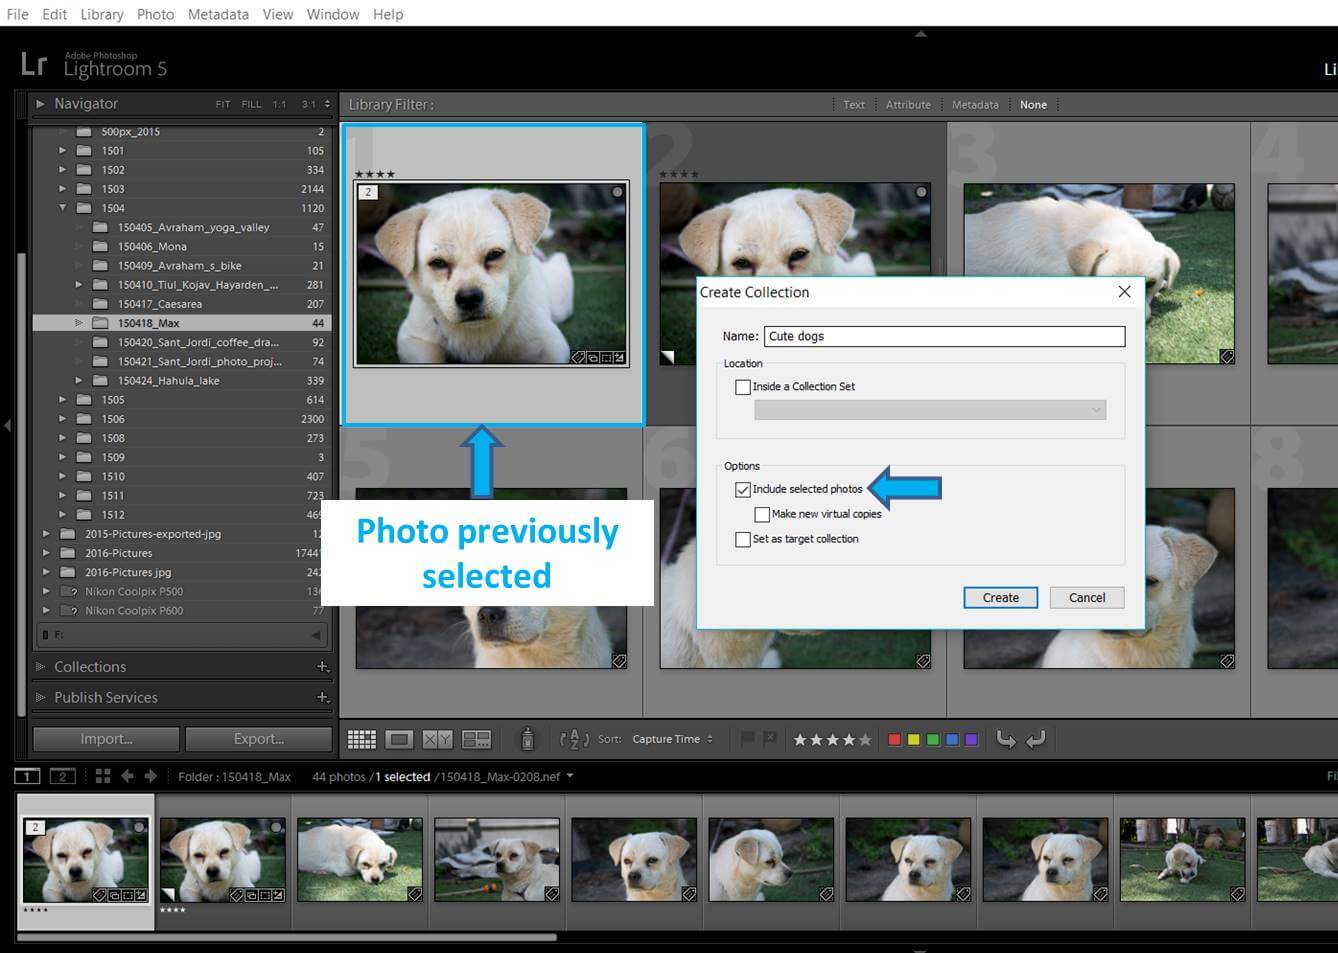
In the dialog box you can make the regular collection your target one by checking the box “Set as target collection”.
The dialog box for creating a smart collection is different.
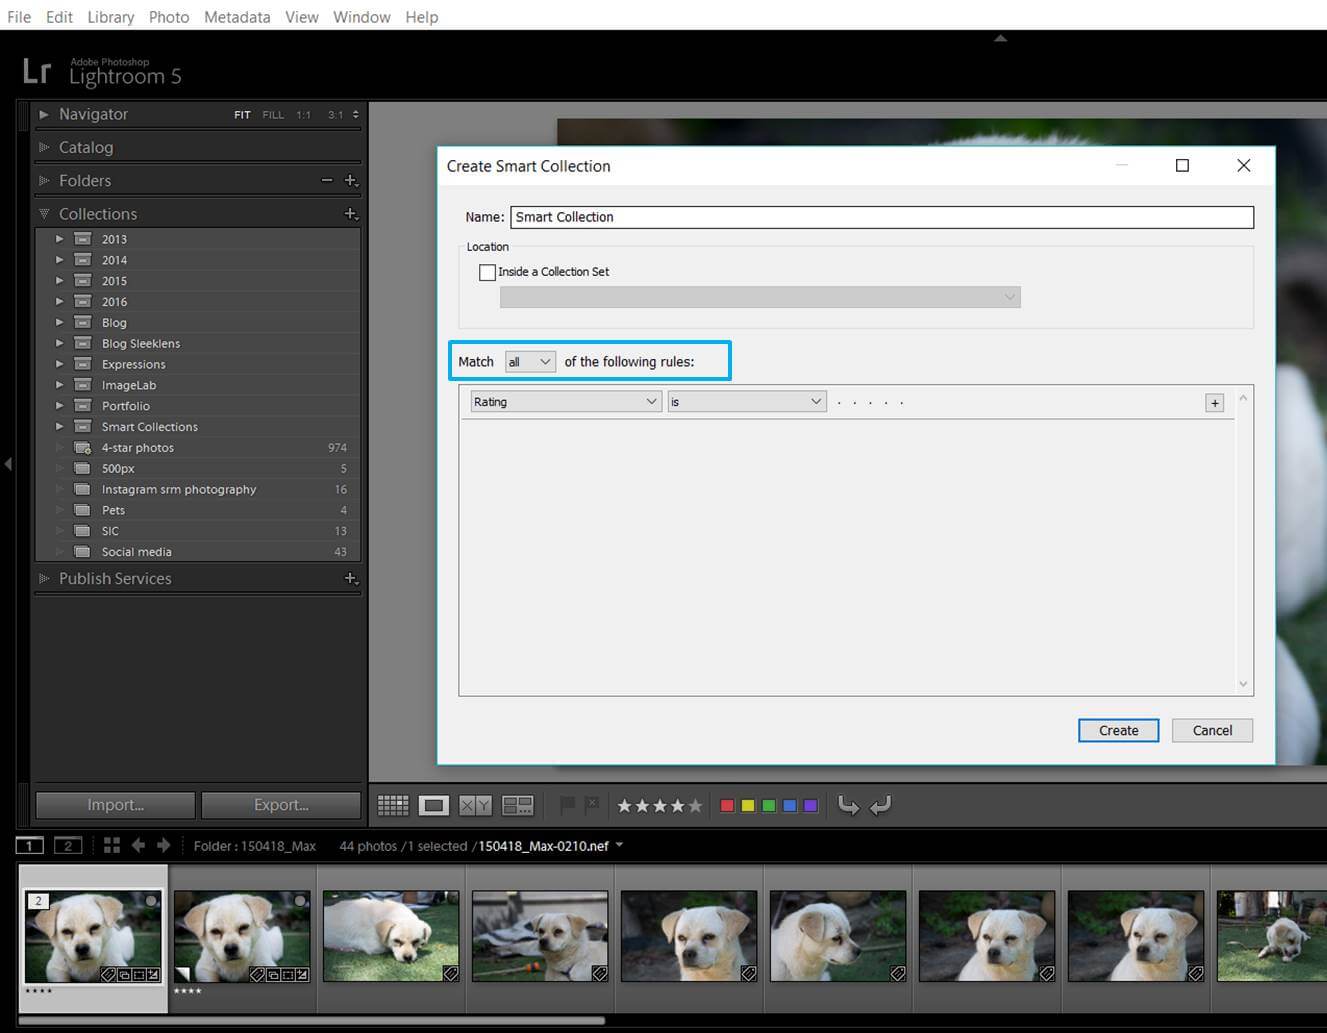
You can name the collection and determine the rules of the collection. You can also say if all the rules need to be matched, just any of the rules or none of the rules. You can add rules regarding rating (stars), flags, label color, label text (keywords) and more!
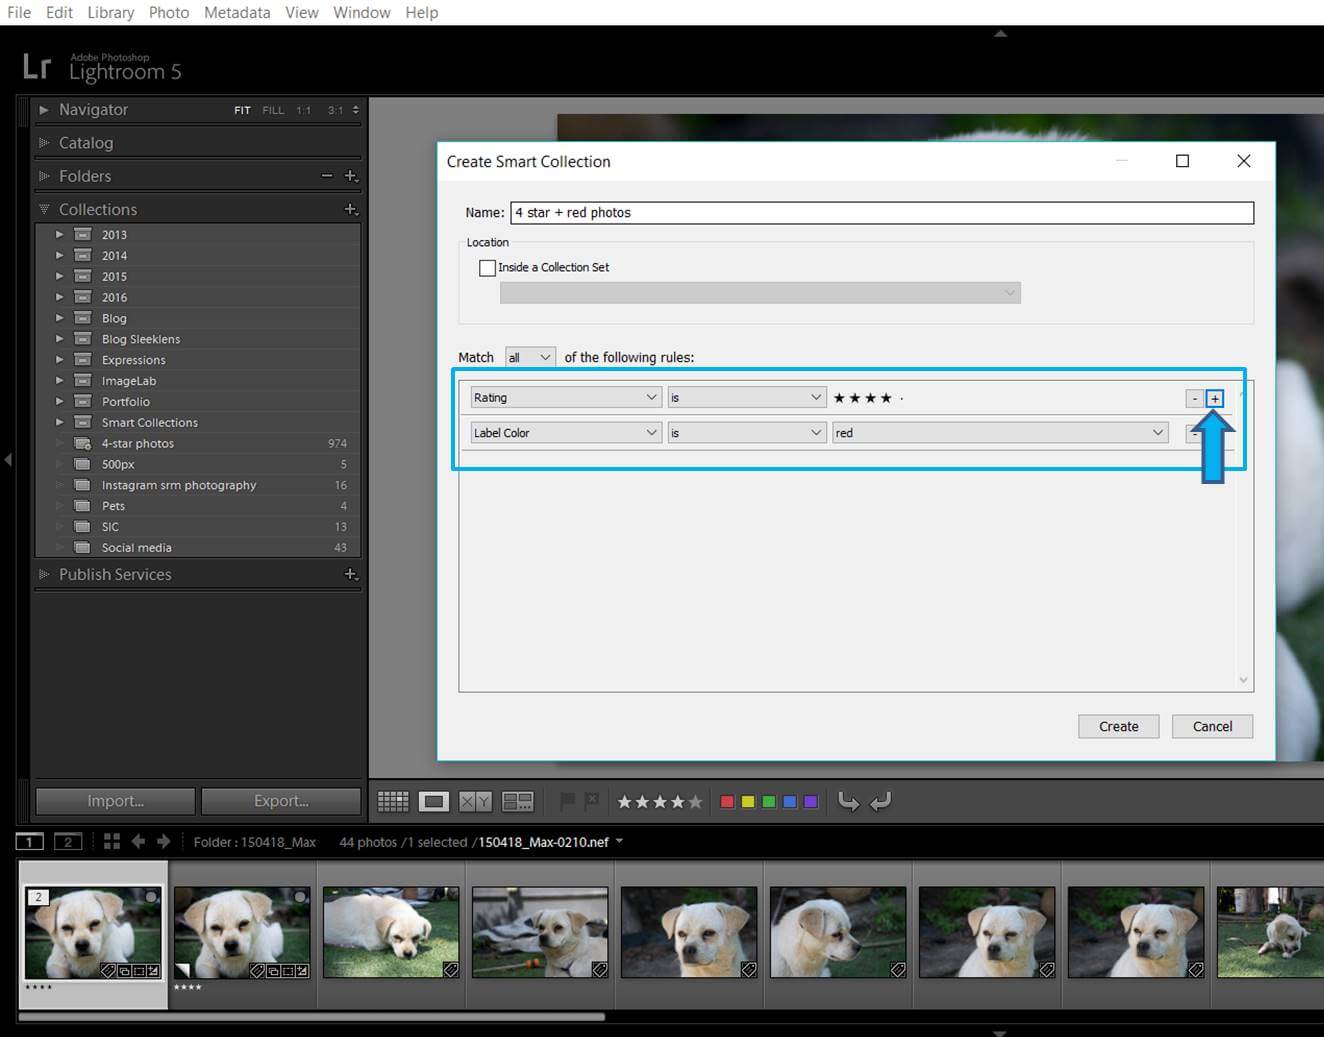
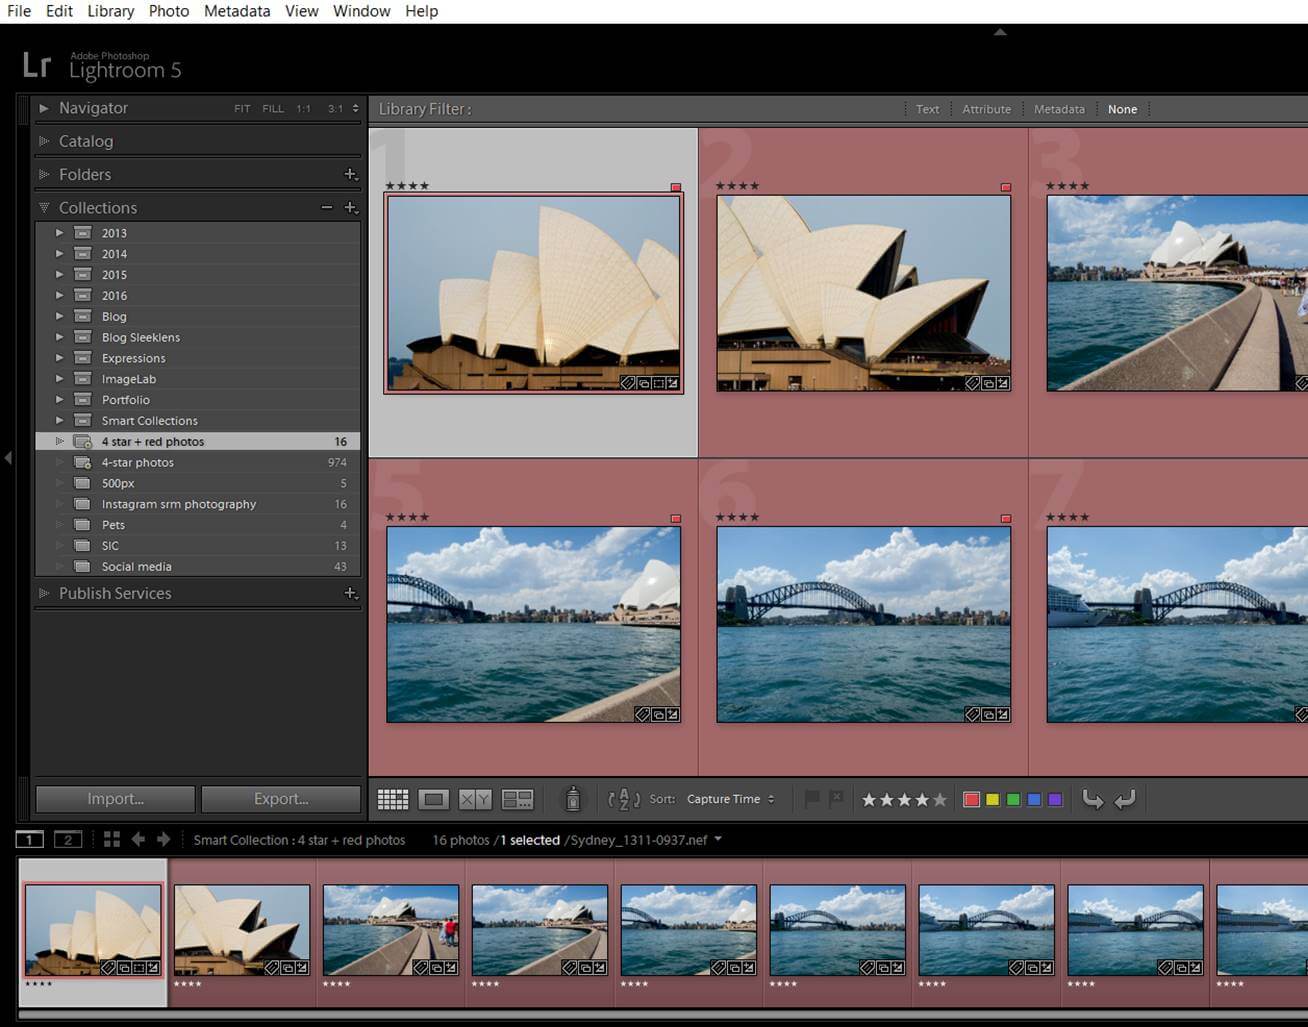
Once you create the collection the photos from your catalog that matches the criteria will automatically appear in the collection.
Other things you should know about collections
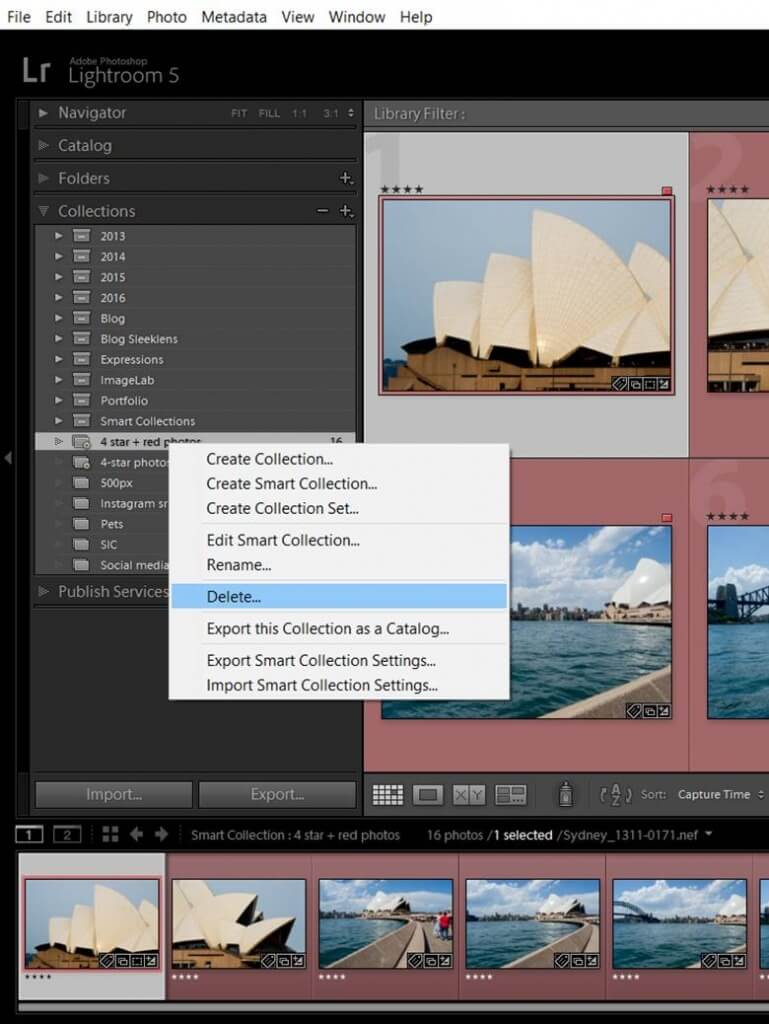
You can delete a collection by just right-clicking on its name and selecting “Delete”.
You can delete a photo from a regular collection just by selecting it and clicking “DEL” in your keyword. The photo will disappear from that collection, but it will stay in its folder and in any other collections that it belongs to. You can’t delete photos from a smart collection. In that case, you will need to change the metadata of the photo in a way that it won’t match the criteria of the smart collection any more. Then it will disappear from the collection automatically.
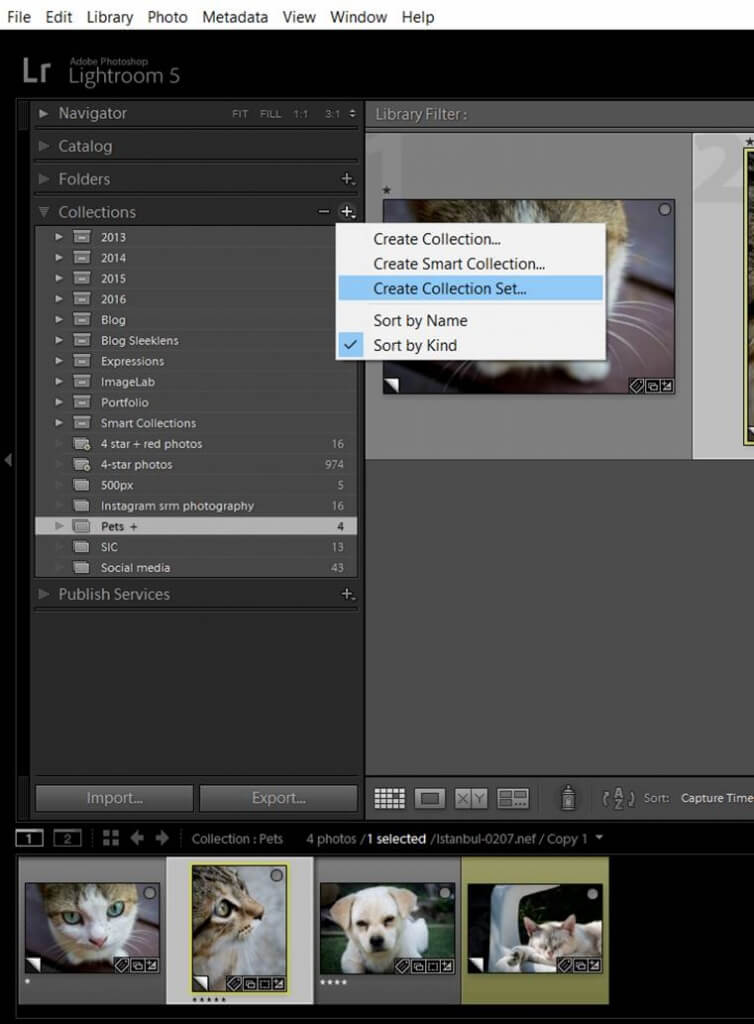
You can organize your collections by sets. To create a set you can do it in the same way than to create a collection, but this time you select “New Collection set”. A dialog box will open and then you can name your set. Under a set you can have several collections.

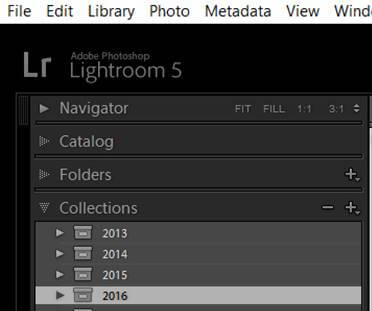
You can both select a collection and drag it to the set you want or you can assign a set to the collection when you are creating it.
Have a look at the smart collections that LR has already created for you
LG has already a set of smart collections that can actually be handy. LG called the set “Smart collections” and it includes 6 collections: Colored red, Five stars, Past Month, Recently modified, Video files and Without keywords.
In the colored red collection you will find all your images labeled this way. In my case, I use red to label the photos that I use to build panoramas. If I am looking for them I just need to go to this smart collection instead of looking through all my folders. You can use the red color to label other kind of photos: your family photos, the HDR raw images, your nature photos…
The Five stars collection works in the same way as the colored red collection. Any photo that you will label with five stars will automatically appear in this collection. If you are like me, you will give 5 stars only to your best photos. In that case, this collection is a pool of your best images and can be used to build your portfolio. Instead of looking through several folders to select your best images, you will find them all in this smart collection. Pretty handy, isn’t it?
The Recently modified folder includes photos that you modified in the last 2 days. It is good for finding the photos you have been working on lately. You have also one folder for the photos you transferred to LG in the last month and one for the videos. Finally, you have a Without keywords collections. If you have a keywording system, it is good to localize all the photos that don’t have keywords in order to add them. This folder exists for that reason.
As you can see, I have 5369 photos without any keyword. These are photos that I added to the catalog before I set my keywording system. This Without keyword” folder allows me to have them localized and I can go easily over them and add the keyword that they need.Post- processing Collections system
I found this system genius. I read about it on Scott Kelby’s blog and I want to share it with you. This system uses collections to narrow down all the images you take in a photo session to the ones you want to edit. First of all you create a collection set with a relevant name for you and under this set you will create either three regular collections or three smart collections (Full shoot, Picks and Selects). I will explain to you the latter option in the following paragraphs.
First of all I added a unique keyword to all the photos of the folder I am working with. In the example I was working with a folder of photos I took on the 22nd of May, 2016, around Tivon (Tivon is the name of my town in Israel). I selected all the photos in the Grid mode and I just added in the keyword panel “Around_Tivon”.
Then I created a collection set with a relevant name for me. I used the date+relevant name format: “160522_Around_Tivon”. If you need a reminder of how to create a collection set have a look to the previous blog. After this I created inside the collection set a smart collection called “01-Full shoot_Around_Tivon” that includes all the photos with the unique keyword I just added to all the photos “Around_Tivon”. This collection will include all the photos I took that day.
From all the collection, I flagged the ones I wanted to work with. You can check how to flag a photo in the first blog of this series with Tips for organizing your photos with Lightroom. Next step was to create a new smart collection inside the same collection set called “02-Picks_Around_Tivon”. This collection includes the photos that have both the keyword “Around_Tivon” and the flag. Now you have in this collection just the selection of images you want to edit.
After editing, I rated the photos I like the most with 4 stars (these are the ones I will deliver to the client or publish in social media). I created a new smart collection called “03-Selects_Around_Tivon” that will include the photos that match the previous conditions and that are rated with 4 stars. Now you have a collection with the best photos of this session.
This system allows you to switch quickly between all the images you took, the ones you want to edit and to the best ones. It makes the post-processing workflow much easier because you avoid all the image searches and you don’t have to switch between collections or folders. You can add more folders to this system: Black & White photos, panoramas, HDR…
Build collections by Genre or subject
I also like to have collections by genre or subject. For example, I like to have a collection of landscapes, another of cats, and other with portraits and so on… You can create regular collections and add the photos manually or you can use smart collections that includes the photos that contain certain keywords (for example: landscape) or any other metadata that allows you to classify it.
Build a portfolio collection set
I have a portfolio collection set where I organize my best photos by subjects. I have been using regular collections and adding the photos myself but you can also create a smart collection that will collect automatically your best shots (5 star ones that include certain keyword for example)
Project collections
I build collections for each one of my photography projects. This allows me to have an easy access to them and to make the workflow much easier.
I am working in a project about Emotions. I created a collection set that includes one collection for each model that participated in the project. Organizing the images by collections, makes it really easy for me to find the photos and keep working on the project.Social media and blog collection
It can be useful to have collections with the photos you want to publish in your social media (Facebook, Instagram) or in any photography community (500px for example). Same as before, you can create a regular collection and add the photos manually or you can create a smart collection. I also have collection sets with the images I use in my blogs. If I am not sure whether I already published a certain photo or not, I can have a quick look to my blog collections and make sure.
I have a collection for each one of the blogs that I wrote for you. 🙂I hope you find this content useful and that I helped you to improve your photo organization and editing workflow. As always, feel free to tell me about your organization strategies or if you want me to talk about any other subject. I will be happy to hear from you! Have a happy LG organization!

