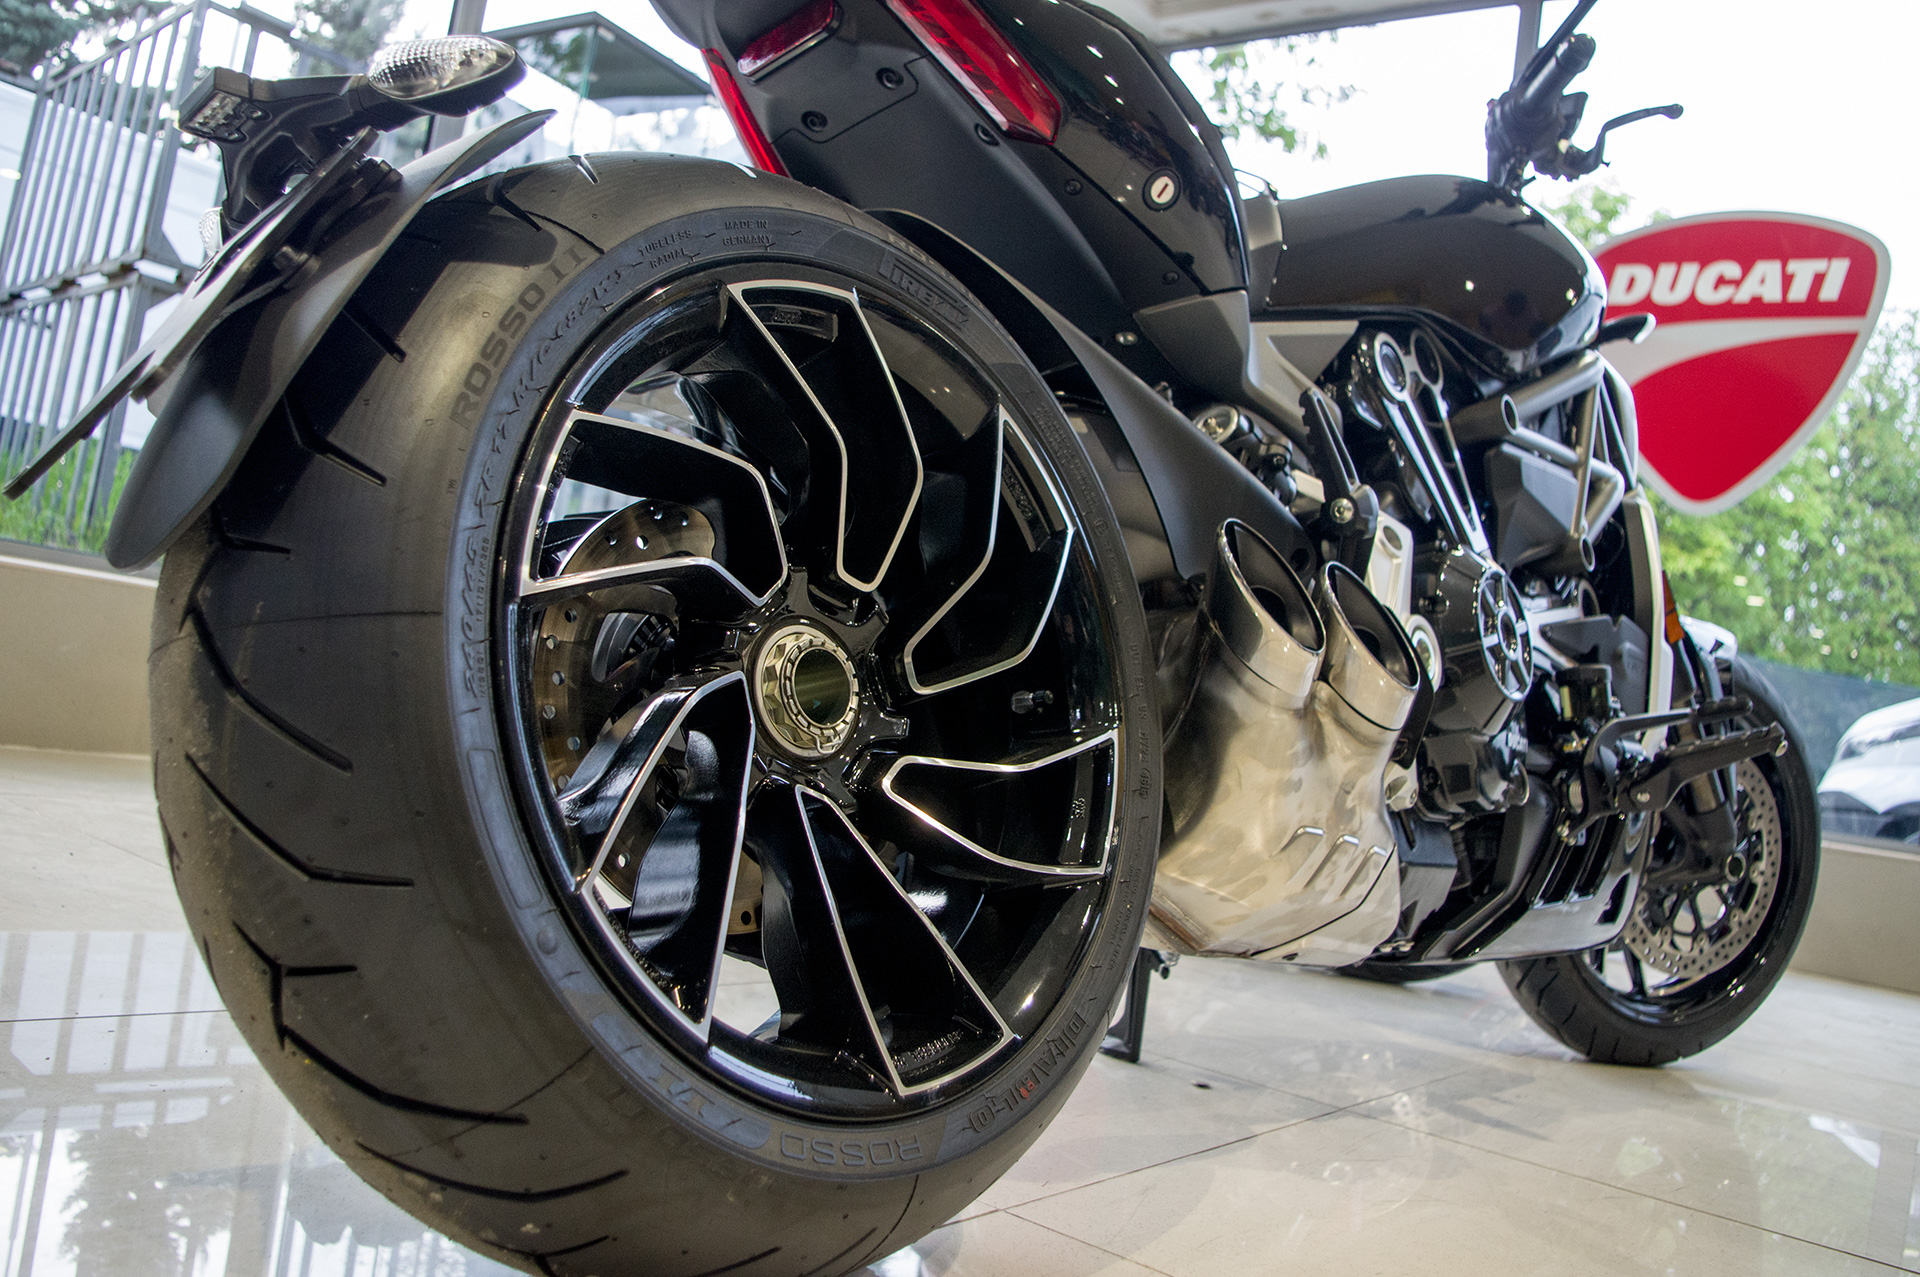
I love my work, I love to take photos of many things, portraits, nature, kids, events… but my favorite objects have wheels, two of them.
You can shoot bikes in more than one way. They can be moving objects riding or racing, or they can be models in the studio, on a stand on a show, or even outdoors in front of an interesting background, or even in nature. My photos of bikes are published on my website, and they are clean without of a lot of disturbing details.
So, we gonna go thru the process of getting quality photos of bikes without fancy equipment or use of a studio.
The camera, whatever is a cheap, used or old DSLR, or even the most expensive one on the market it’s all in the setting, and in the angle. Any 50 mm. or above will do the job. Just avoid shooting at a focal length of less than 50 mm. unless you want to achieve the wide angle effect.
There is more than one reason to shoot with lenses that are going above 50 mm. The longer focal length would mean the easier isolation of the bike from the background. Also, less focal length will make a nasty distortion on the proportions on the bike.
My usual setting is F4, this is fair enough for the image not to lose the details.
Also, you should mind the time of the day of your photo session. Midday is a very very bad timing because the sun is very harsh. If you don’t have other option than find a good shade. The best time is early in the morning or in the afternoon. At this time of the day, the sun is more even, and the light is smoother. Also, all of the shiny chrome parts of the motorcycles won’t destroy your image. The tendency of the gas tank is to throw a shadow on the machine so probably you should consider using a board to throw a light in those spots. This is the cheaper way, the more expensive solution is professional lighting equipment.
Always check the background for outside sessions, for every model not only for motorcycles. Try to find some background color with a contrast. This will help you to put an accent on the bike. If you ask me just shoot them on an empty field with a blue sky or in front of a brick wall. For me, personally, industrial background works best for Cafe Racers, Bobbers or Choppers, and a modern architecture for new sporty bikes as a background.
When you are shooting a model such as a bike, consider that you will have to take shots from every possible angle. Start from left, right, front and back. After that, you should go for the details. If you are a sick fan of bikes like me than you will know all the details, but if you are not that into this than you should shoot: the bars, the tank, the pipes, wheels, engine, headlight and all the shiny chrome parts. Now that you have covered the basics, use the rest of the time on exploring the bike. Find interesting details such as skulls and (or) all kinds of different markings. You can also talk to the owner of the bike, or the builder if it’s a custom bike, just in case if you are missing something out. Don’t be lazy and use all kinds of angles. Get down on your knees and get dirty. The lower angle is, the better your photo will be. Never take photos from a standing point, always shoot in the line of the tank or the headlight, this one trick makes any bike look much better. In one situation, I even requested a removal of the tank so that I can get a clear view of a big shiny V twin engine. 🙂
After the session probably you will have to post process your work. Photoshop or Lightroom will do just fine for editing images that you took. Firs look for dark places on your photos such as the seat, tires, engine etc. Newer crop the photos to tight around the bike and leave a space for text on them. Who knows, they might get to be published in a magazine or a web page. After all, it is a great success if your photos see the light of a magazine.
For this kind of photography, you shouldn’t have to have a problem in finding a model. Try the local dealer, a local custom bike builder, or even a proud owner of unique motorcycle (old timer or a rare model), and don’t be afraid to ask somebody to take photos of his bike. Trust me, the bikers like to show off with their precious toys.
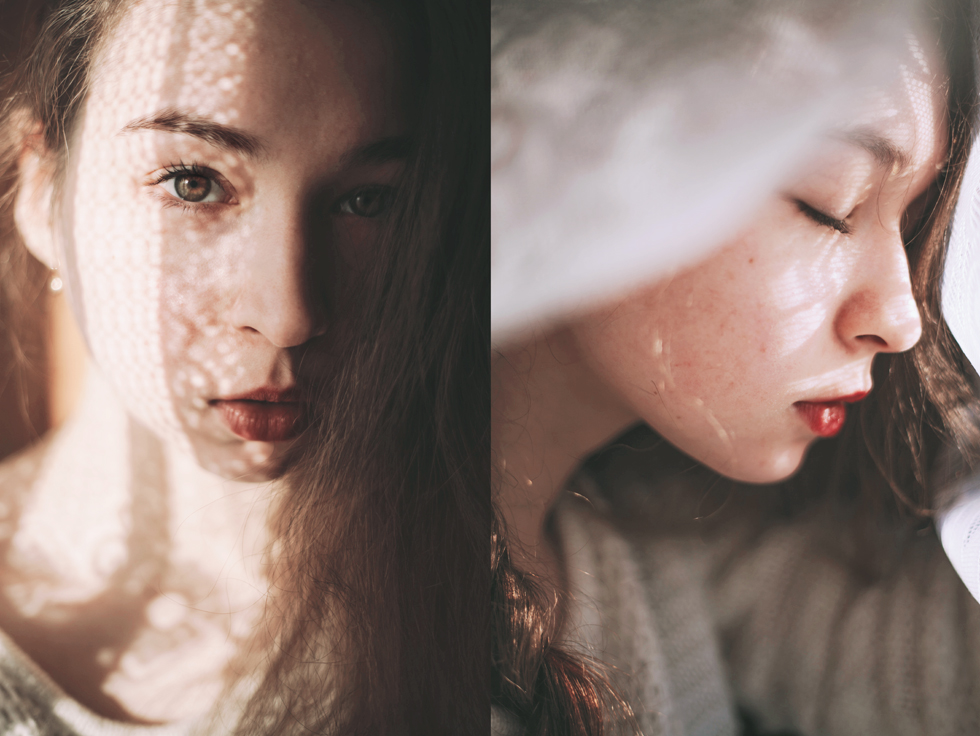
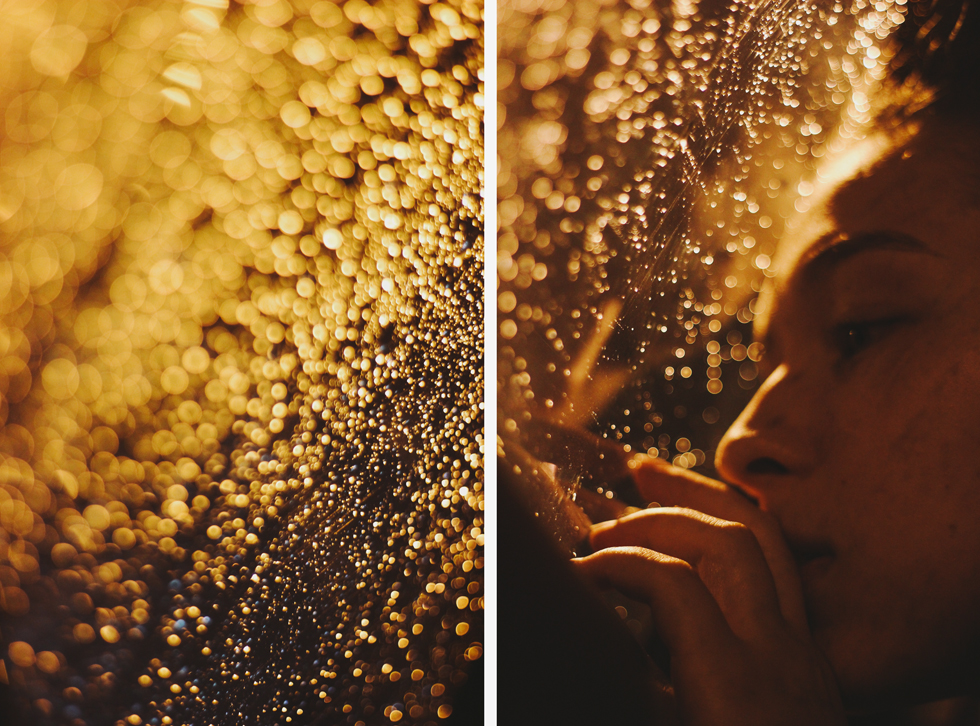
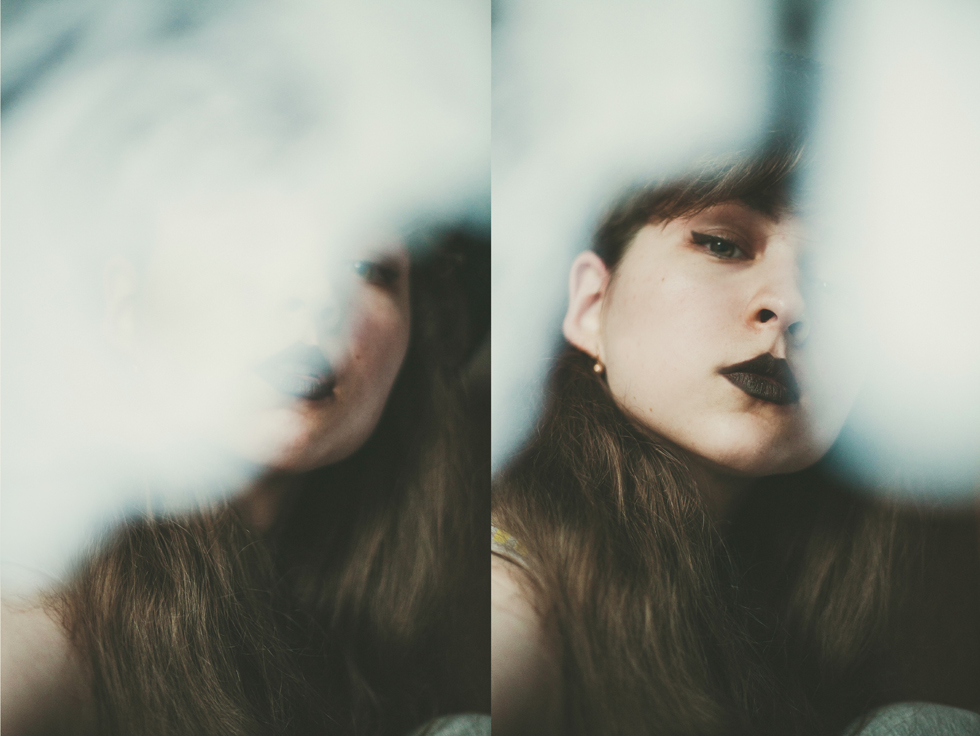
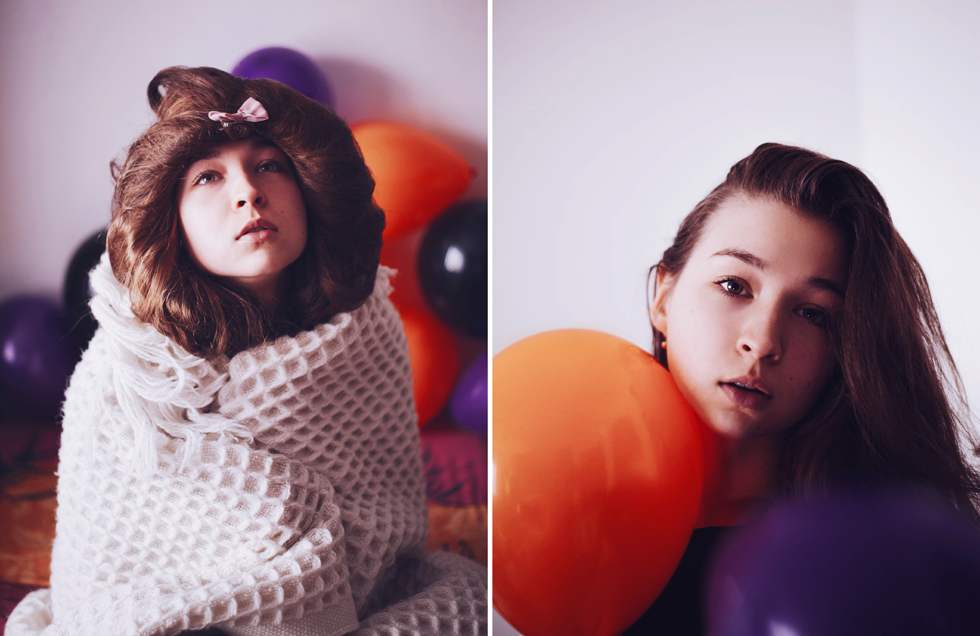
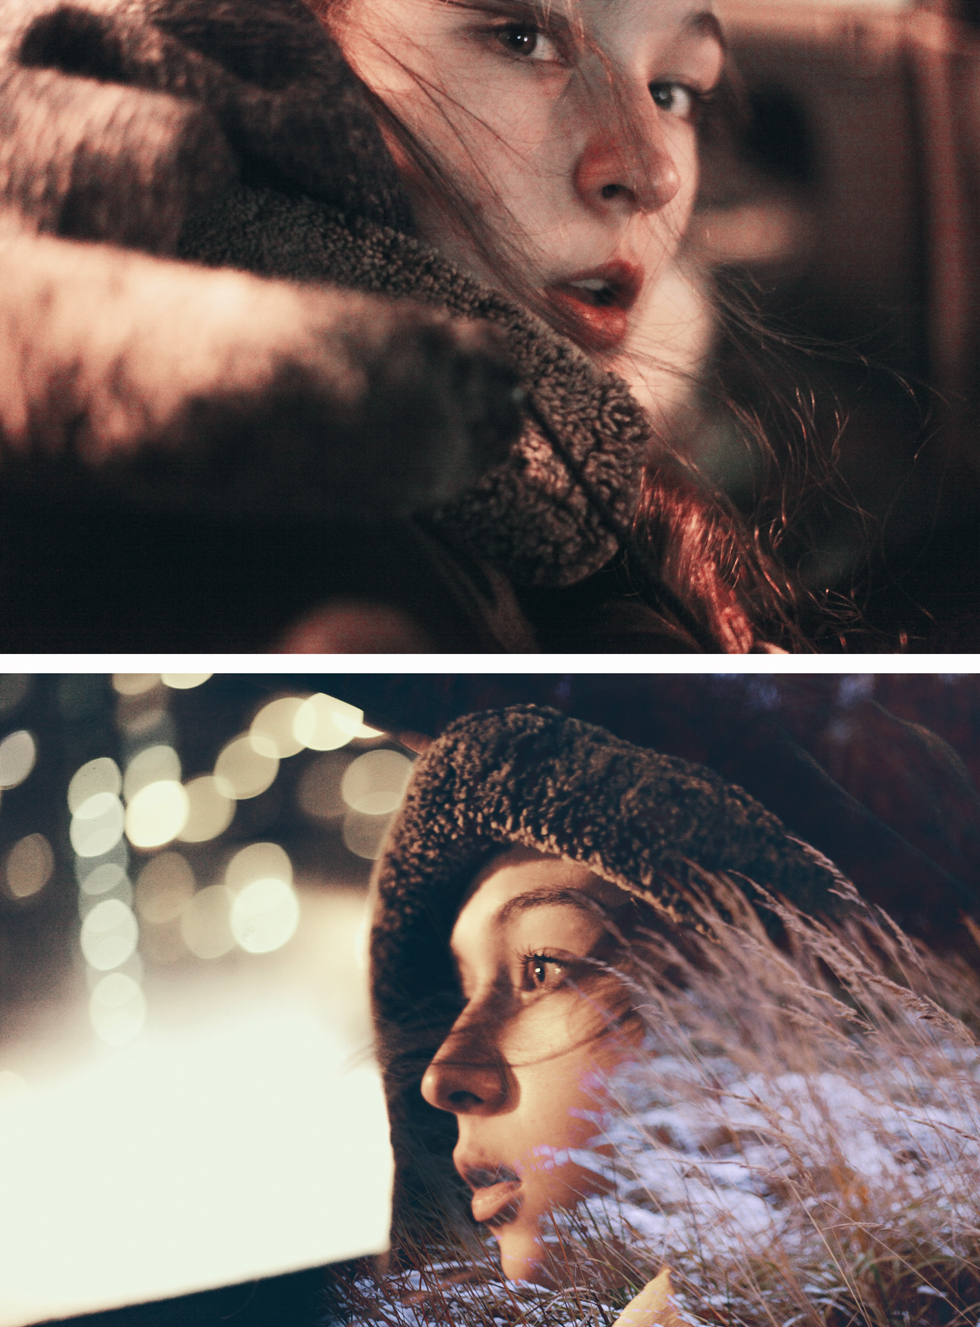
Sometimes, one photo isn’t enough. Sometimes, a single image feels void of meaning or value. Instead of considering yourself a failure for not being able to create more powerful photographs, experiment with diptychs. Chances are that this method will give you more opportunities to express yourself clearly, preventing you from abandoning the precious images you once considered useless.
Combining photographs is like placing one puzzle piece next to another for a perfect fit, for a perfectly eloquent story. The term used to describe these puzzle pieces is diptych; a diptych consists of two images which clearly reflect the photographer’s feelings about the subjects in the photos. These reflections can oppose each other dramatically or beautifully complement one another. No matter what the result is, it has the potential to provide viewers with a deeper look into the photographs’ meaning, something which enriches both the creator’s portfolio and the photographs themselves. Diptychs are a fantastic way to prove a point, highlight an often overlooked detail, or shine a light on one’s emotions by combining several elements.
Diptychs, when planned, result in fascinatingly intelligent compositions. Combining a photo of a wilting flower with a lonely, slightly bent silhouette is an example of a plan which could become an immensely touching work of art. The advantage of immersing yourself in this world is that there’s no rule when it comes to choosing photographs – if you wish to place a macro photo next to a wide-angle shot, nobody will stop you or render you eccentric. In fact, the results might fascinate you and push you to try out even more seemingly bizarre photo combinations. If you’d like diptychs to be a consistent part of your portfolio, or if you simply want to have an experimental phase, acquire a notebook for collecting diptych ideas. In addition to giving you ideas related to compositions, this working process will also provide you with general photo inspiration.
Spontaneous diptychs, albeit unpredictable, can end up becoming fun and creativity boosting challenges. If you can’t find any suitable photos to use from a recent shoot, look through your archives and find something that feels appropriate. Collect photographs which you deem fitting and experiment with them until you find the perfect match. If you’re interested in greatly broadening your artistic horizons, take photos of striking objects and people to include in future diptychs. Such resources could also come in handy when making double exposures. No matter what you use them for, these images will inevitably aid you in your future photography projects.
Now that you’re familiar with the advantages of planned and spontaneous diptychs, dare to experiment with both. Notice what feels right for you as an artist, take notes, and boldly play around. Eventually, you’ll be more aware of your preferences while still being familiar with other ways of photographing and creating. The more you keep your eyes and mind open, the more potential you’ll discover in unfamiliar types of art.
The power of a diptych heavily relies on storytelling. Since there are millions of unique stories you could tell, let this form of art fill you with freedom and curiosity. Having twice as many opportunities to share your emotions is similar to being given twice as much space to shoot in. Diptychs are like thick books filled with stories upon stories, ones which affect each viewer differently. Ask yourself, “What kind of story do I want to tell? What kind of artist do I want to be?” As you muse over this, the answers will quietly arrive, carrying with them an abundance of ideas to satisfy your creative thirst. Use these stories to give shape to your art.
As you photograph, be it for the sake of fashion, landscape, wildlife etc., keep diptychs in mind. While providing you with healthy challenges to help you grow creatively, they also give you a chance to open your mind to other forms of art; if you’re a portrait photographer, you might want to experiment more with landscape photography to create breathtaking portrait/nature diptychs. If you mainly focus on macro photography, take spontaneous portraits to mix with your closeups. The beauty of diptychs is that they embrace every type of artist out there. Most importantly, they give every photographer a chance to grow, improve and appreciate their work even more.
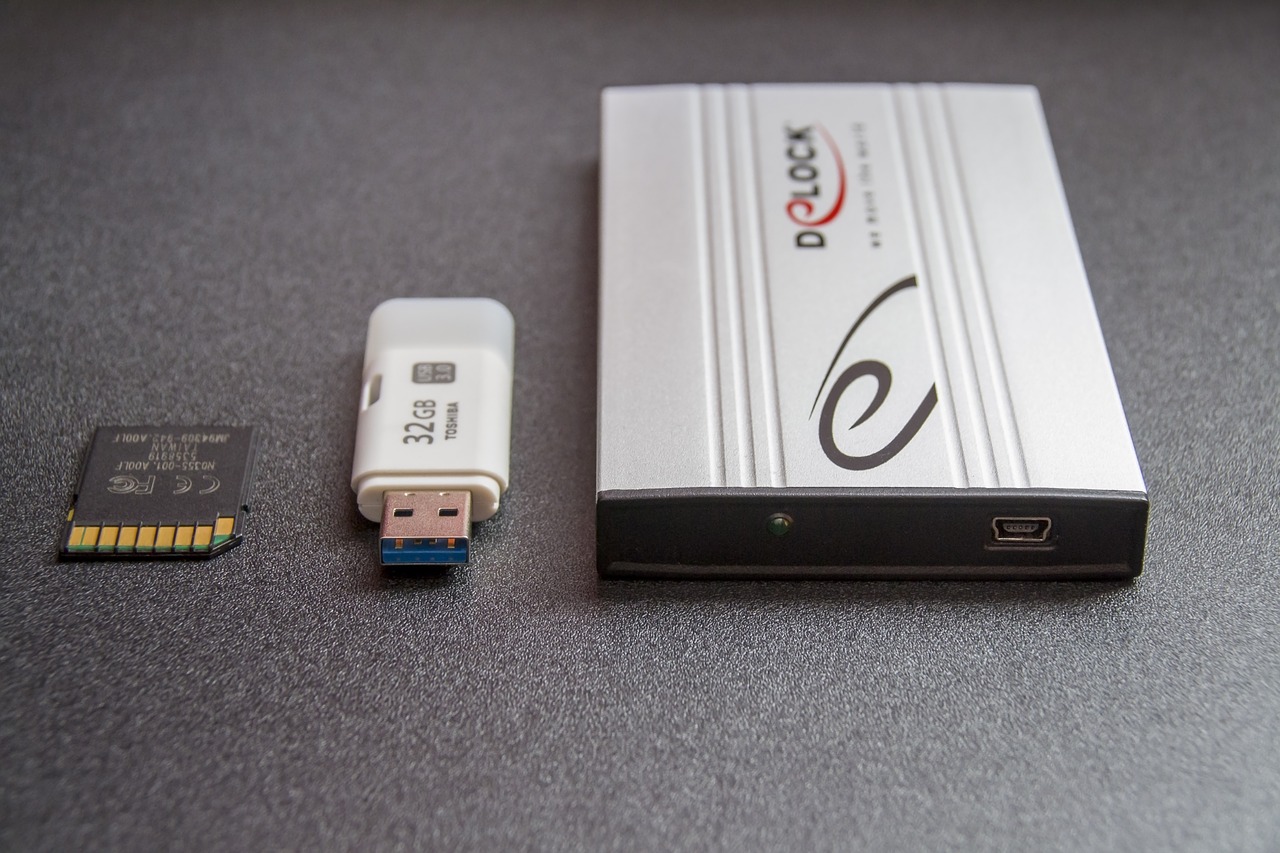
If you’re using a digital camera, you’re going to need a memory card to store all of your photos on. You can get these cards almost anywhere, and with modern technology and production lines, they don’t have to cost you all that much money. But when buying memory cards, is it better to use one big card that will stay on your camera and hold all of your pictures? Or use a couple of smaller ones that you need to switch out more often? It may seem like using a bigger memory card is better due to the convenience. However, using a smaller memory card in your camera comes with a lot of pros.
Protection
The best reason for using smaller memory cards in your photography is protection. Technology is pretty reliable these days, but things still break or go wrong. Memory cards can become corrupt or get lost. If you have all of your pictures on one device and something bad happens to it, you’re going to lose all of those pictures. But, if you have several smaller memory cards, you won’t lose everything if something does go wrong. So, if a card becomes corrupt, you still have other pictures on different devices.
Another key reason to use smaller memory cards is for on-the-go work. It’s one thing for your card to become corrupt when you stick it in your computer, it’s another to lose it or have it break while you’re out taking pictures. Not being able to use your camera can be a downer on any outing. If you have several smaller memory cards with you, instead of one big one, you can swap out the damaged card for a working one and continue on your adventure.
Organization
If you take a lot of pictures in a lot of different locations, or you’re doing a studio day with a bunch of different clients, keeping all of your images organized can be hard. If every picture you take is on one big memory card, you’ll probably find yourself spending a lot of post-picture time organizing all of the images on your computer. But if you use smaller memory cards, keeping track of everything becomes much easier.
You can designate small memory cards to each person or location. You can even fill up two or three of the smaller ones in case something does go wrong with one of your cards. Then, when you get home and start printing or editing your photos, you can easily find the pictures you’re looking for. Not only is finding them a breeze, but it’s easier to make different folders to dump the pictures into if you’re only working with one smaller memory card at a time.
Travel
It may not sound like it, but using smaller memory cards is better for travel than larger ones. Yes, having a bunch of smaller cards means keeping track of more items as you go, but in the long run, it’s so much better. If you’re going on a long trip, or even just a ride down to the park, you’re going to want those extra cards. Not just for organization and protection, but as a way to keep the fun going.
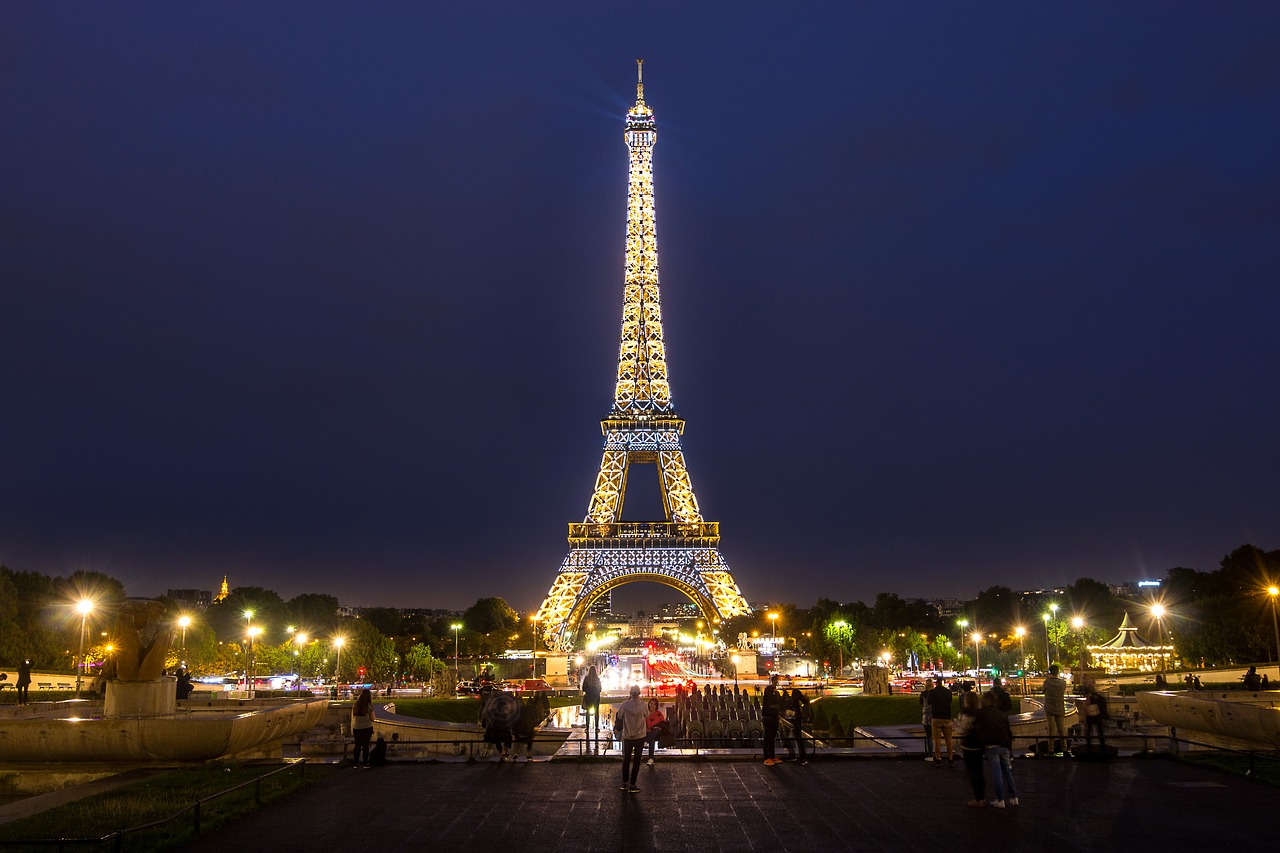
Imagine taking your best camera over to France to get pictures of the Eiffel Tower. On your trip, you bring your trusty, mega memory card. But when you get there, you discover that your card is lost, or got broken in transit. Now you’re stuck having to go to a store and buy one, which may put a big dent in your travel funds. Or you just don’t take any photos. But if you had smaller memory cards instead, you would be able to switch the cards out and take as many photos as you want. Smaller memory cards protect you from unforeseen circumstances and ensure that your Paris trip runs smoothly, and you have a lot of pictures to show for it.
The Cons
Using smaller memory cards may be the better option, but it’s also costly. It costs a lot more money to buy a whole bunch of smaller memory cards than it does to buy just one large one. Not only does it cost in terms of money, but also in time. Having to switch out cards all of the time can be annoying. Plus, if you don’t keep careful track of everything, there is a high risk of losing one.
However, having the ability to keep everything organized is a major plus. Also having back-ups in case something goes wrong with one card can mean the difference between a failed photo shoot and an excellent one. It’s much better to use a bunch of smaller memory cards than larger ones. For anything from studio photography to nature shots, having protection and organization on-the-go is a must.
In a previous article I gave you some tips about flower photography. Today I want to talk about the editing of this type of photos. I always recommend doing your best in the moment of capturing the photo. Invest some time looking for the right perspective, work on the composition of your image, avoid cluttered backgrounds, focus on the right spot and aim for a good exposure. However, there are some simple things you can do in post-processing that can make your flower photo even better.
I will show you some of my general post editing tips in Lightroom. They are general, not universal. These tips will give you a good basis to start with, but they might not work in all the situations you might encounter. You will need to experiment with your flowers a little (this is part of the fun in photography, isn’t it?). The basic idea behind all my editings is to make my main flower/s pop out. So let’s jump to Lightroom Develop module and see how these tips goes!
Do some global adjustments first
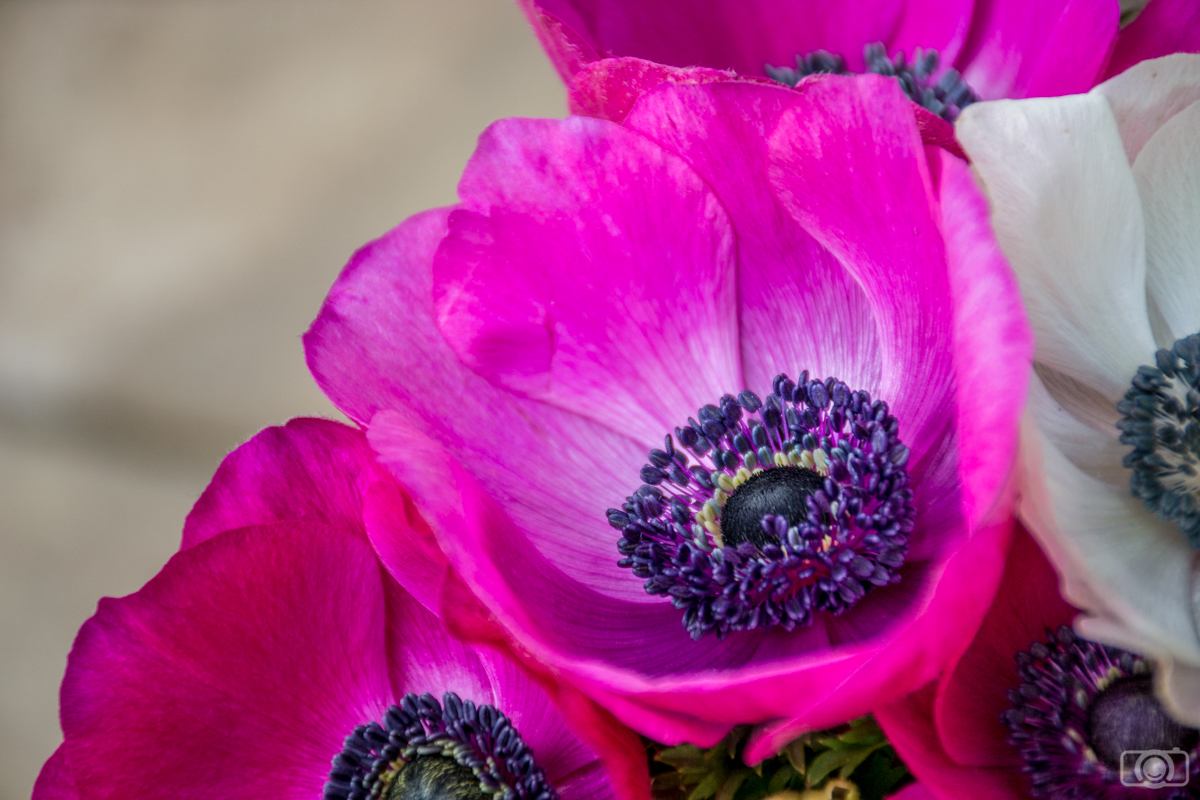
This is a good tip for any kind of photography. First of all do the global adjustments, meaning the ones that affect the whole photo. For this tutorial I am going to use this straight of the camera photo:
Straight of the camera photo
The slides I like to work with are:
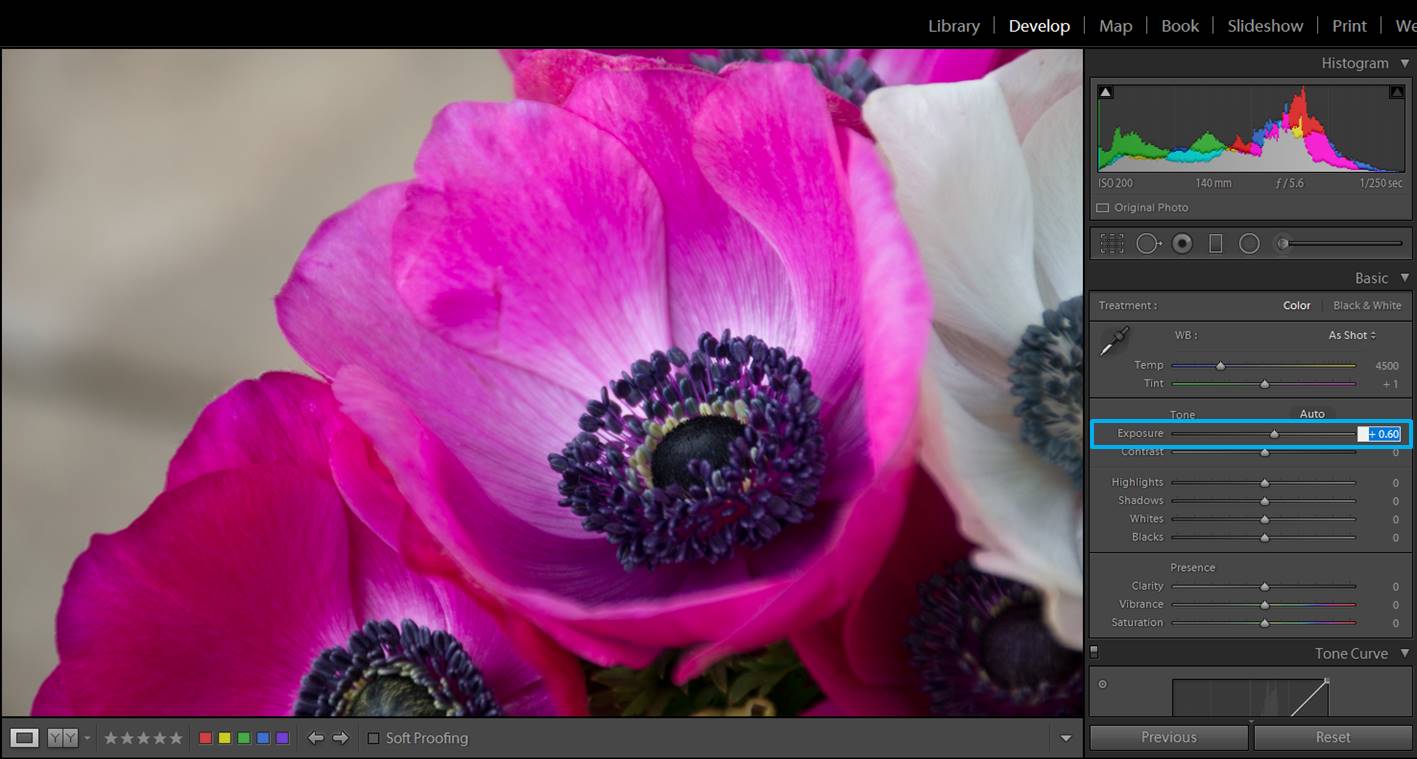
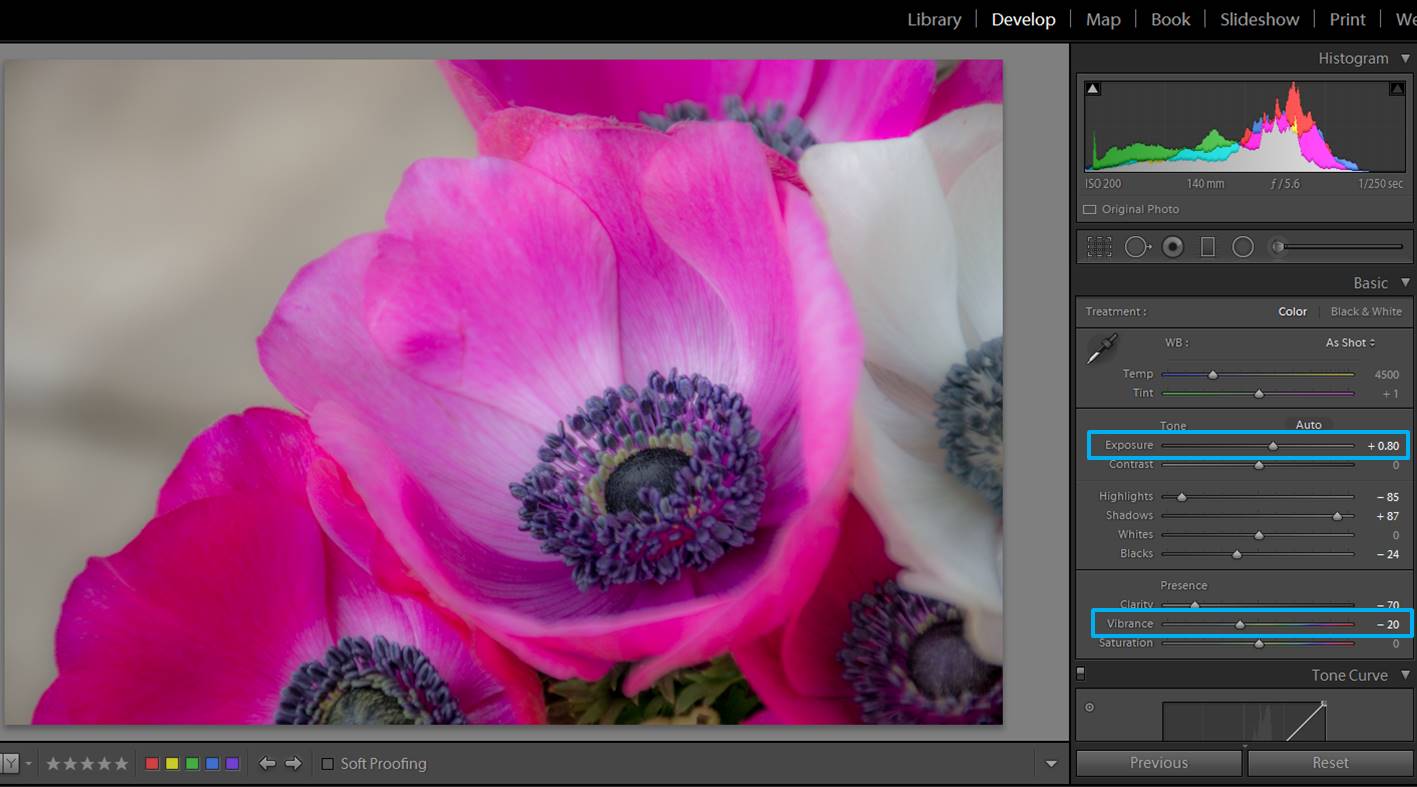
Exposure: You might need to adjust a bit the exposure (or a lot if you didn’t manage to adjust it at the moment of taking the photo). If your photo is overexposed, you need to move the slide to the right and if it is underexposed, to the left.
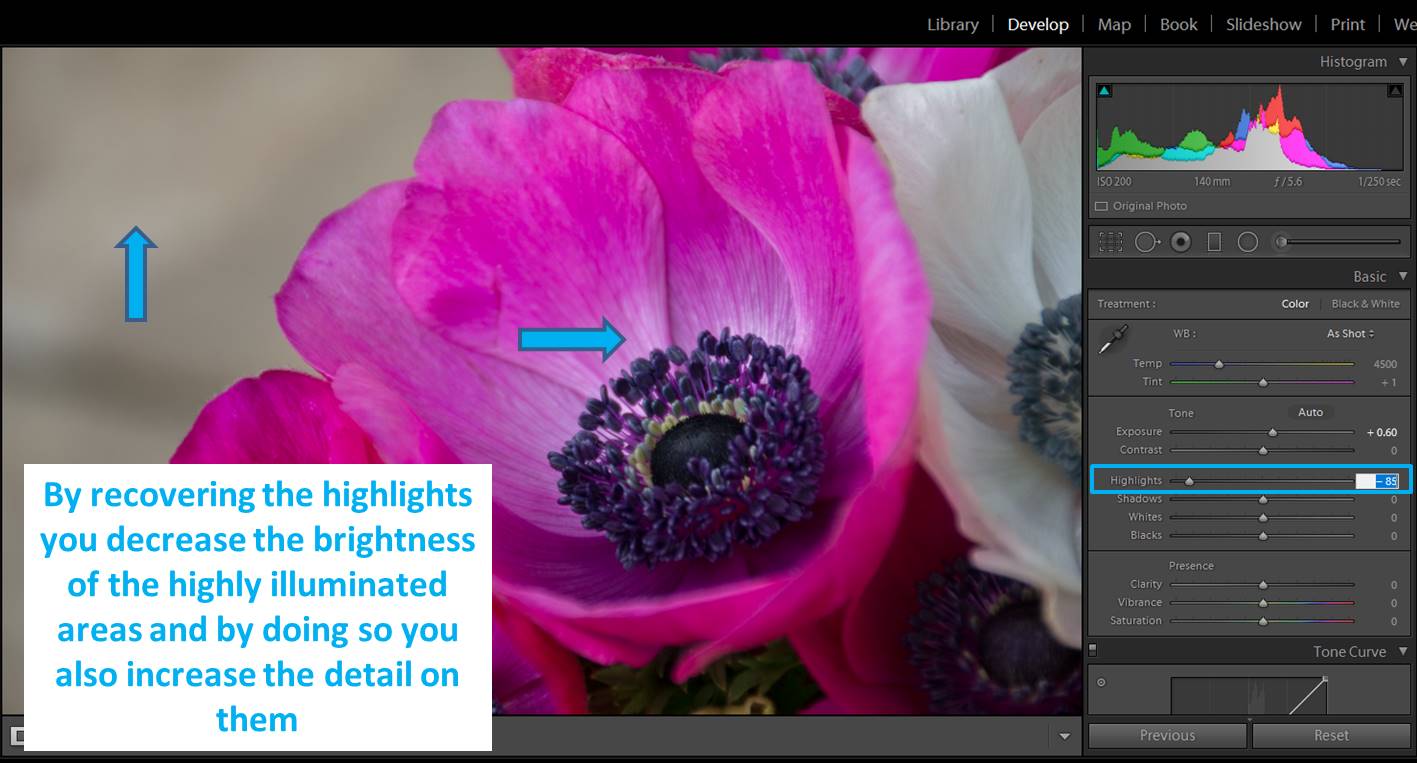
Highlights: I usually try to recover some highlights by moving the Highlight slide to the left. This is especially useful if you have to deal with a background which is too bright because it will bring a bit of detail to the photo. By default, our eyes are drawn to bright things so they tend to focus on the lighter areas of an image. If the background is too bright it will draw our eyes to it and make us ignore the flower, and this is exactly what we don’t what want!! So if you can make the background less bright, it will be better. This doesn’t mean that you always need a dark background. You can use white backgrounds too. What I mean is that they should not be extremely bright.
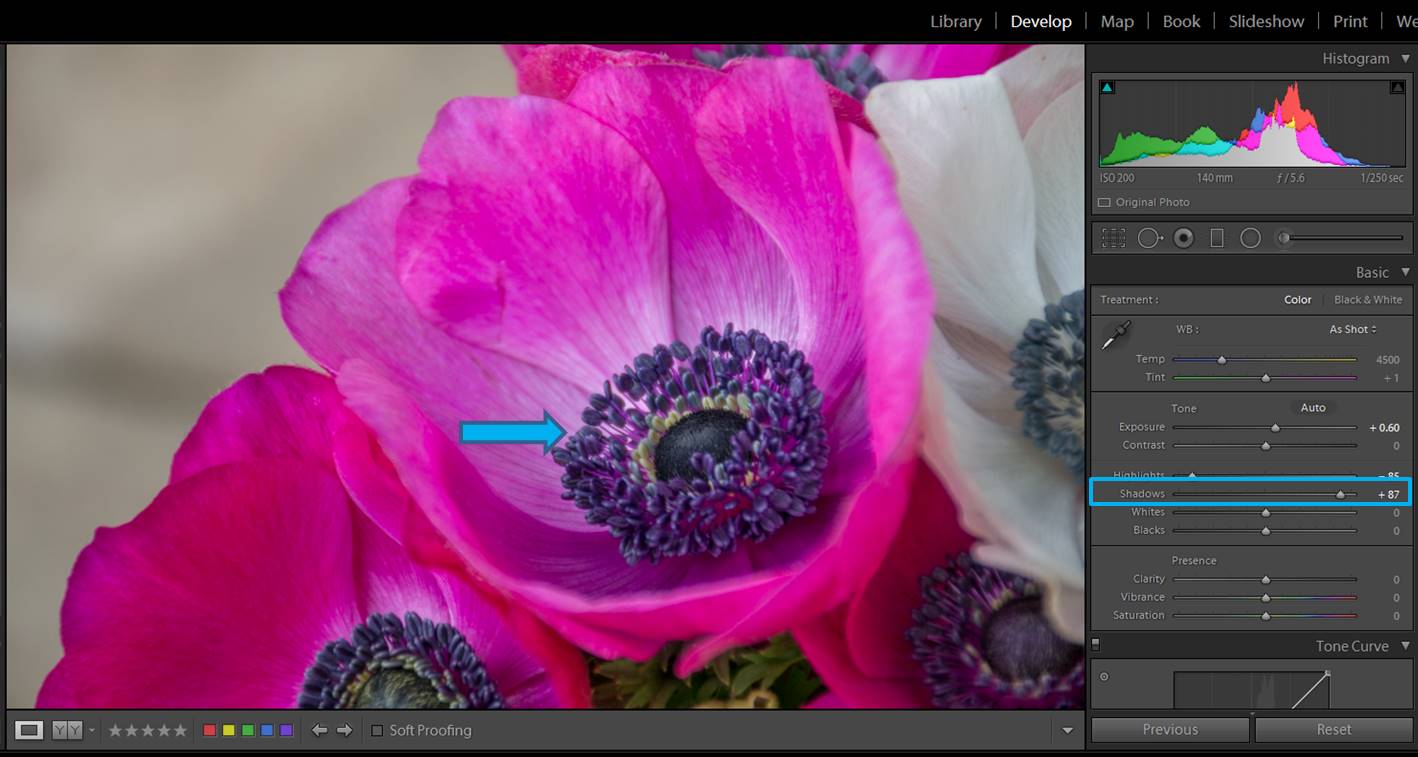
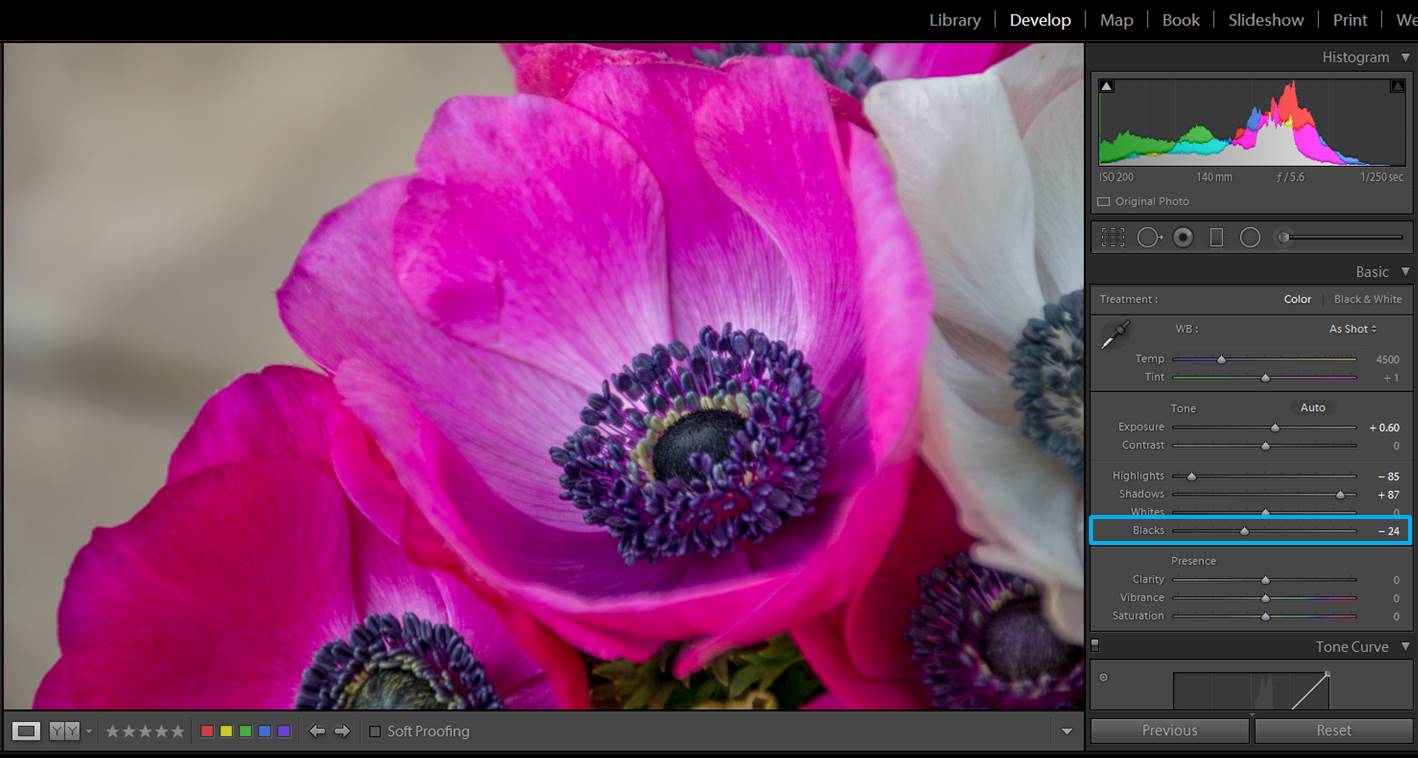
Shadows and blacks: If I see that my main subject has an interesting area too dark, I move the shadow slide to the right. You will see how details will appear in your image.
However, the contrast of the area can get a bit weak. Increase a bit the blacks (moving Blacks slide to the left) and your problem is solved! By decreasing shadows and increasing blacks you give a higher dynamic range to your image.
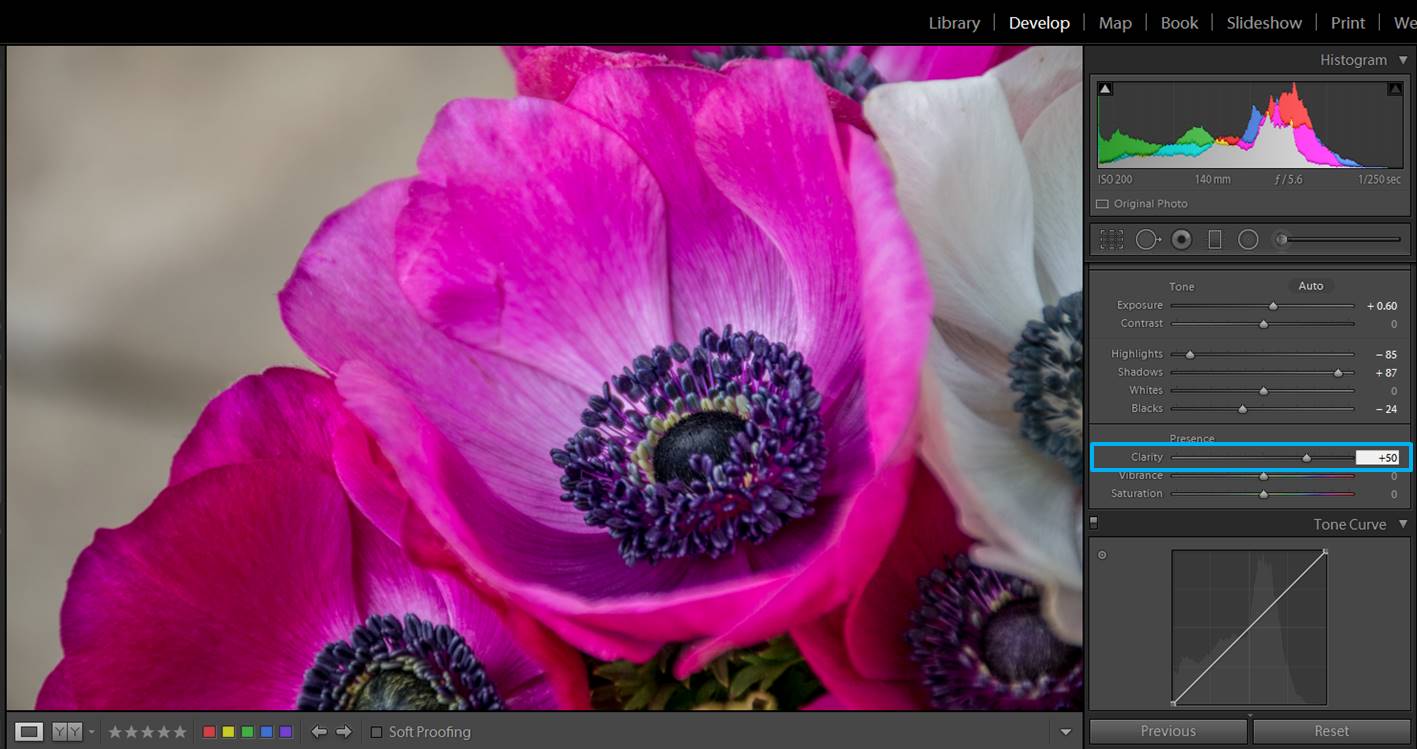
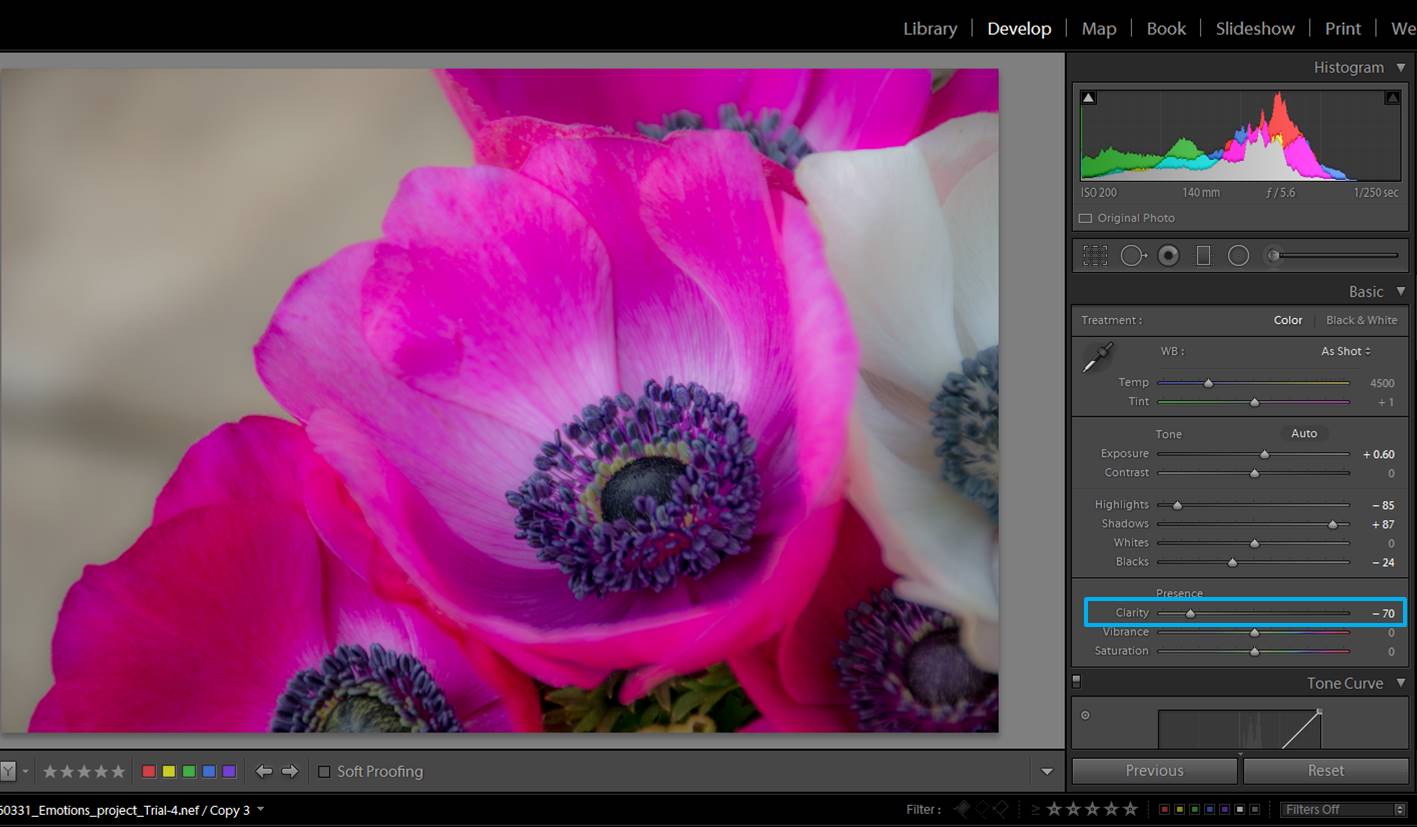
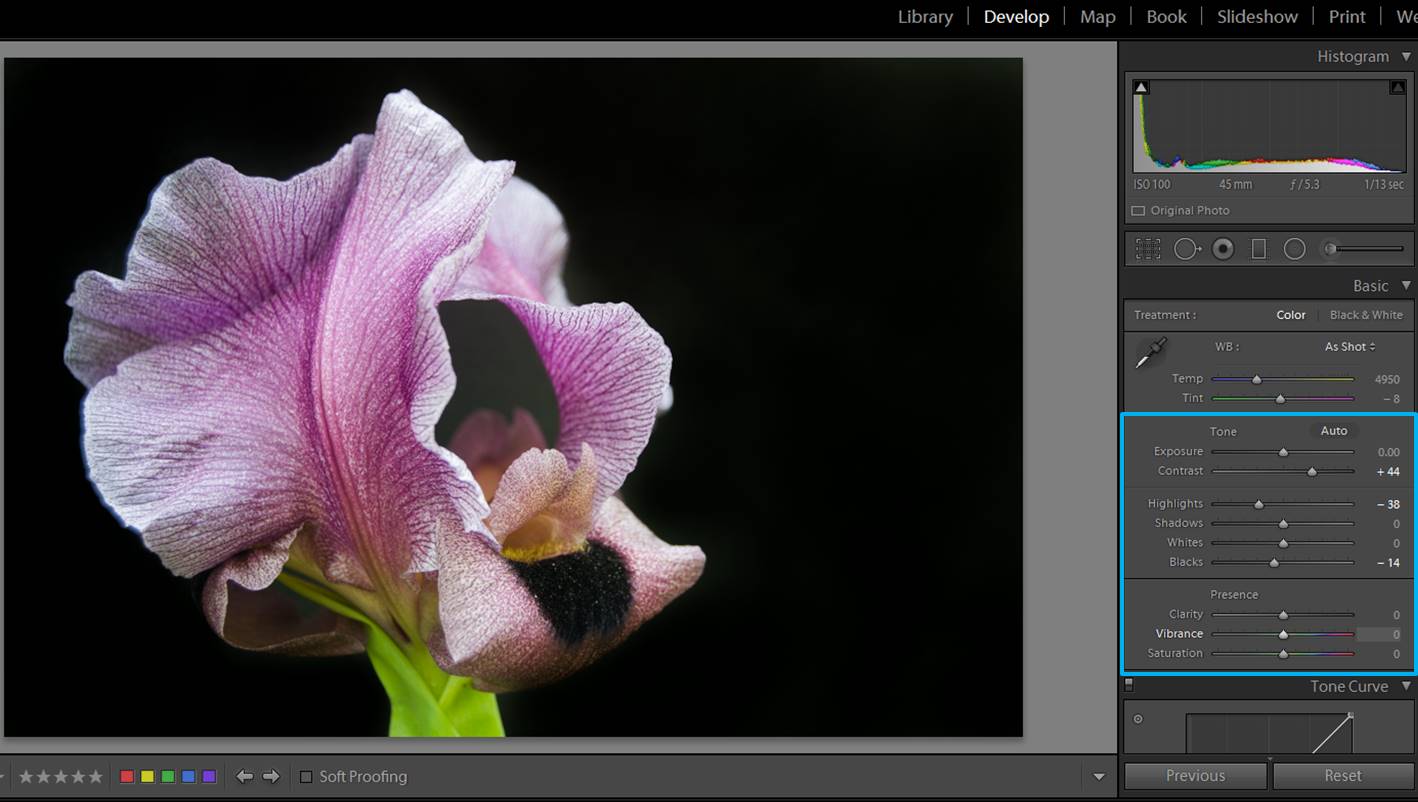
Add your personal touch with the clarity slide
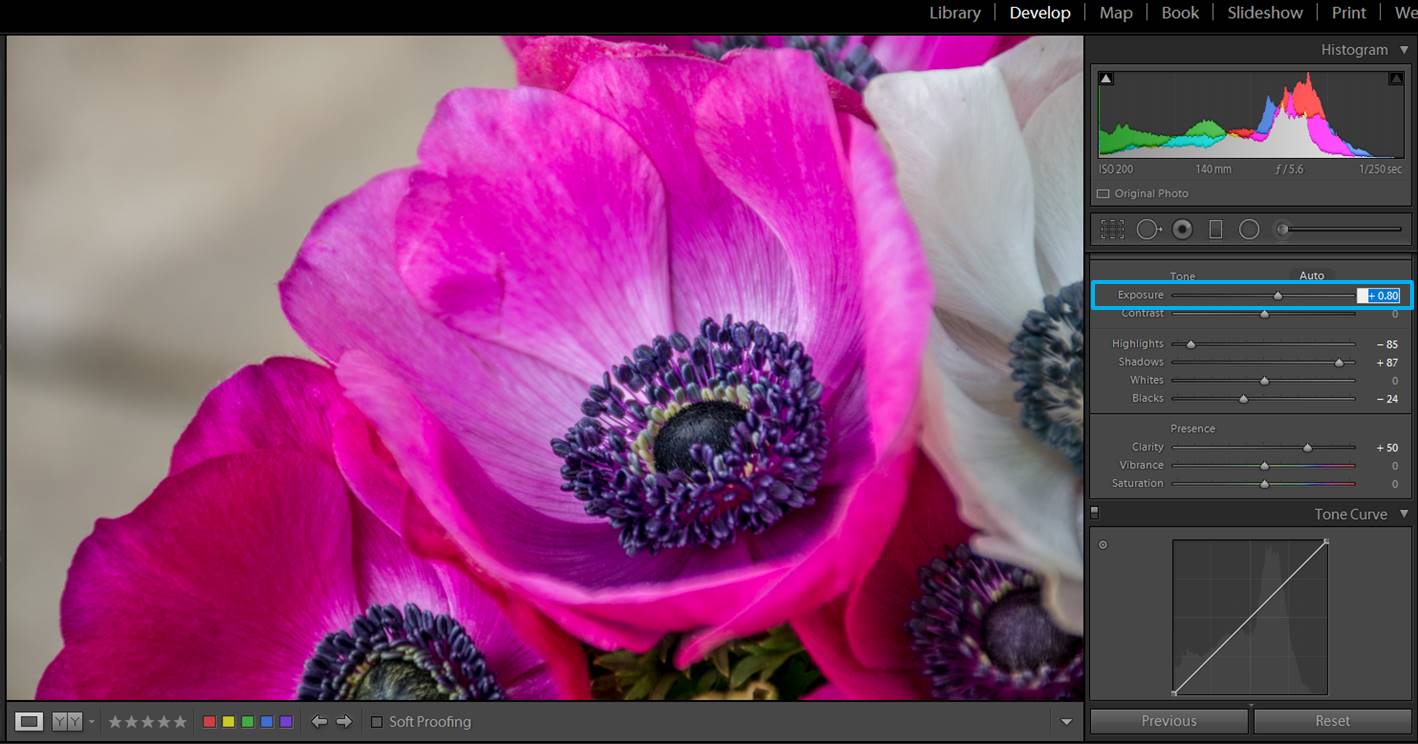
I love the clarity slide! This is the point in the editing when you really need to decide which kind of final look you want for your flowers. Do you want to show all the little details of your flower? Then you should move the clarity slide to the right. This might darken your photo a little, so you might need to adjust the exposure again.
If you prefer a softer look, move the clarity slide to the left.
In this case too, you might need to adjust the exposure. In the example, by changing the clarity I also causes the colors to stand out a bit too much, to counter this side effect, I moved the vibrance slide to the left in order to get a more natural look.
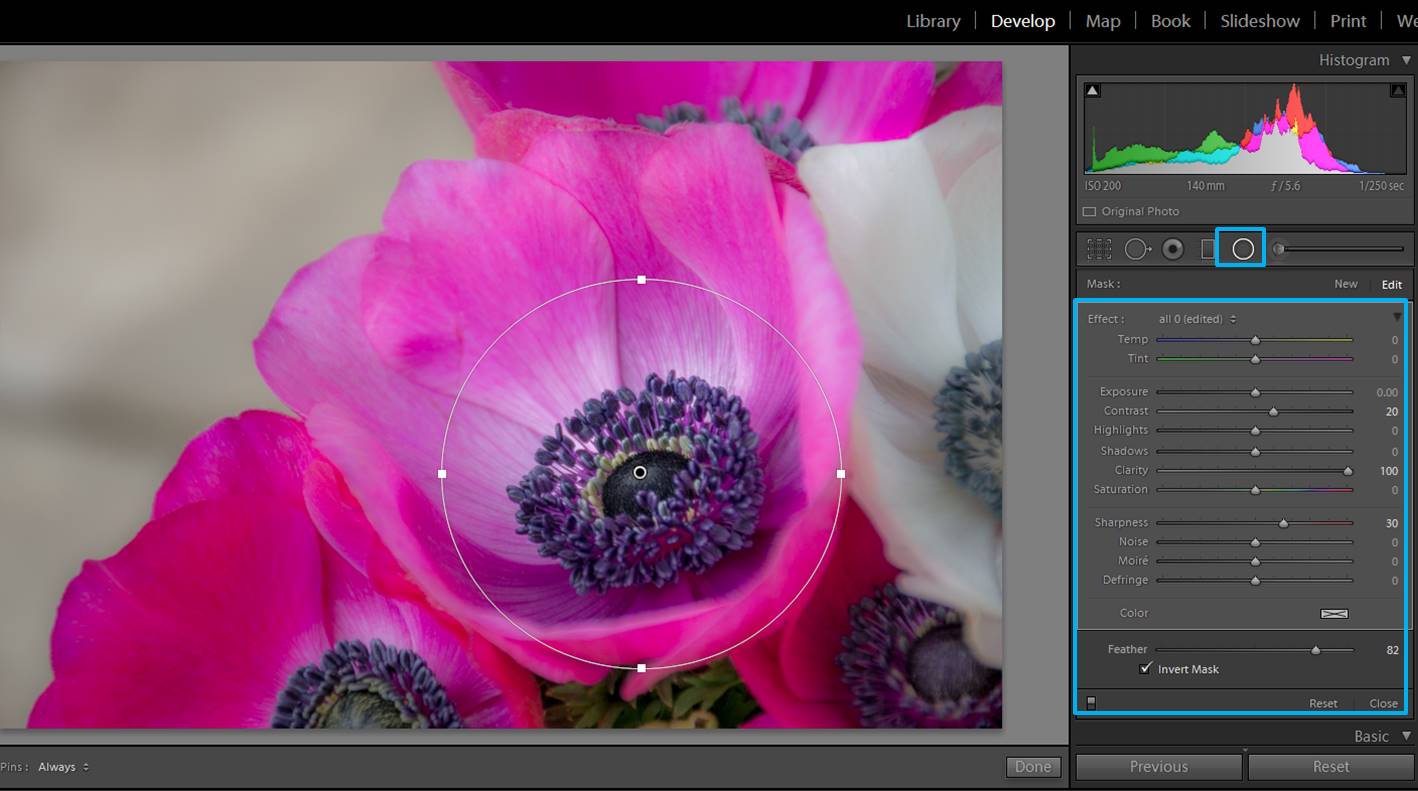
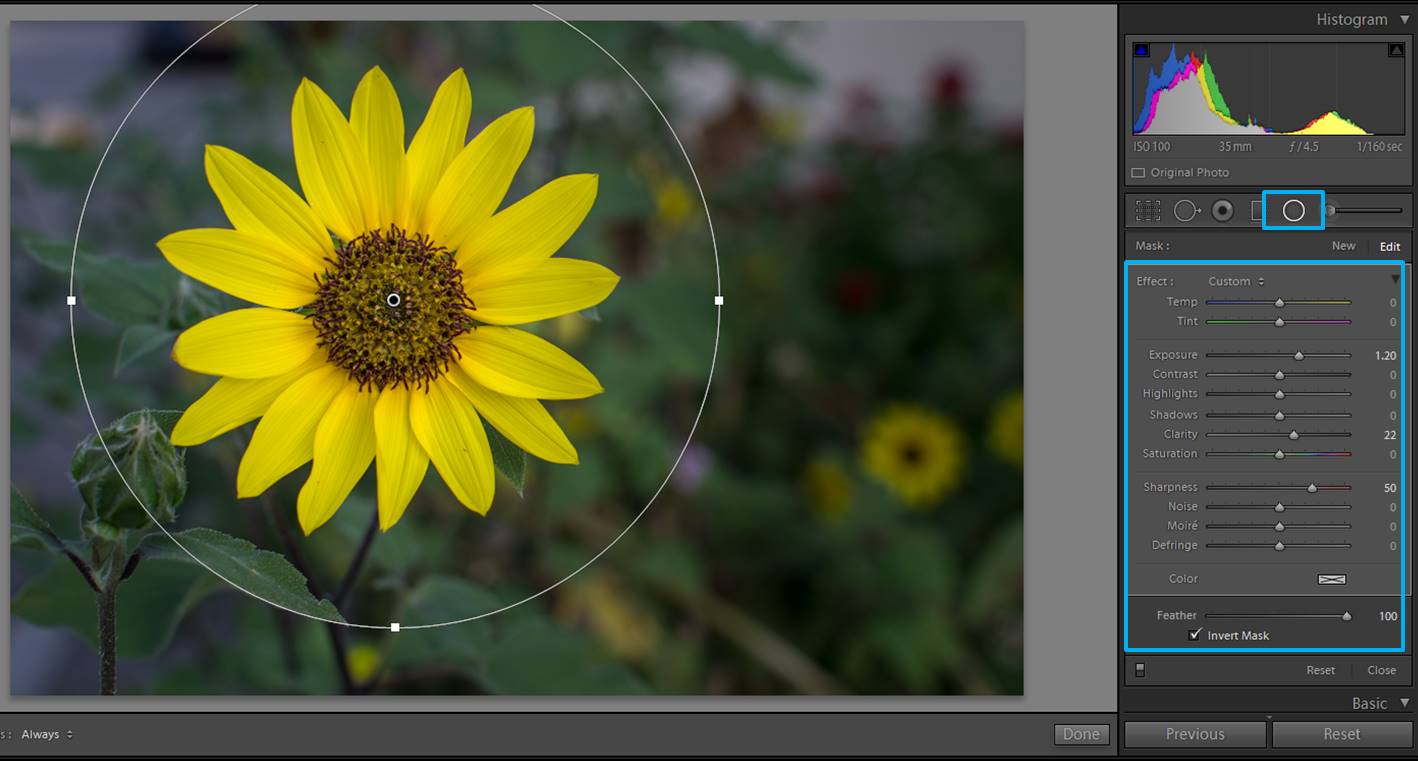
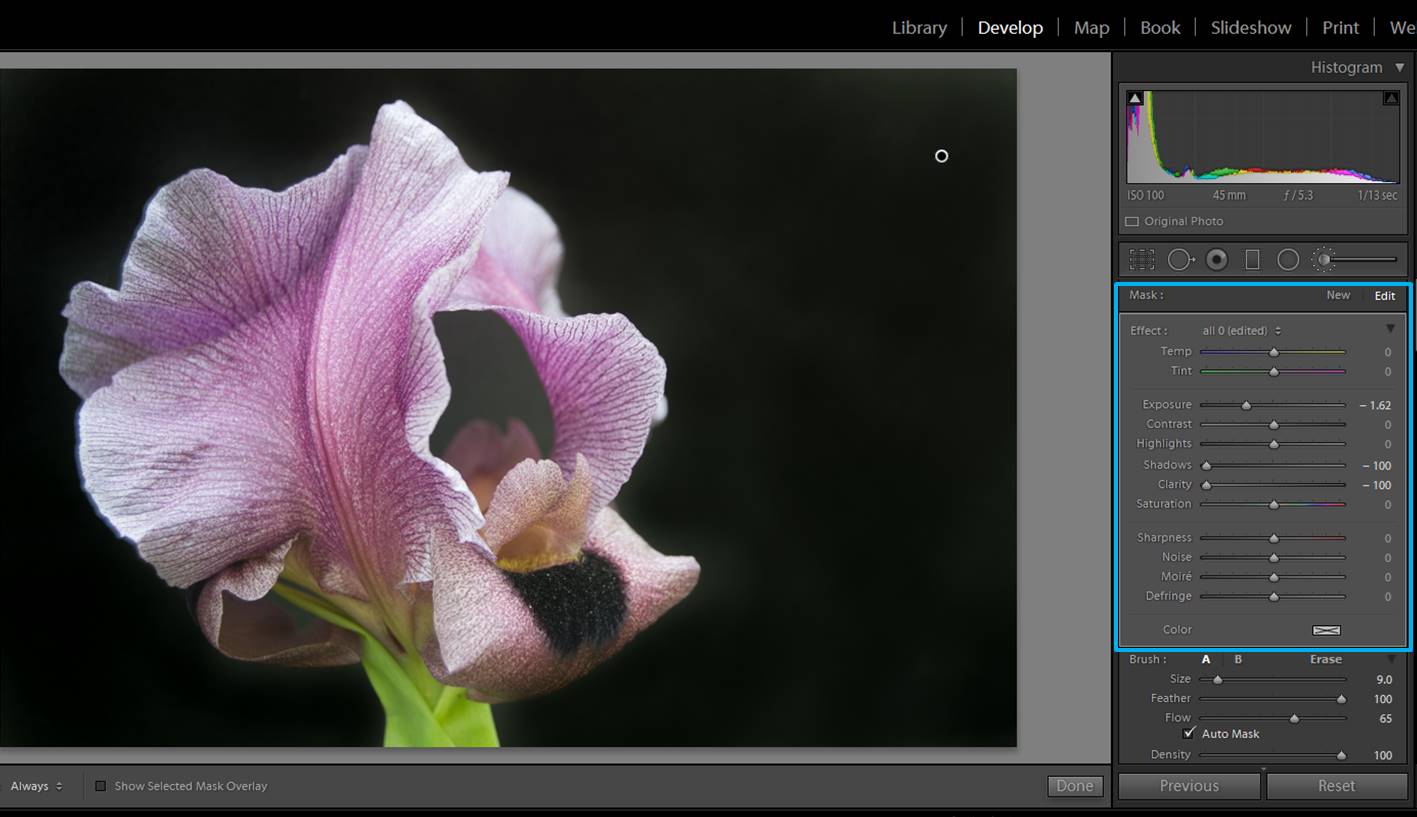
When you decrease the clarity of a photo you get this blurry dreamy effect. However, you might like to keep the details in specific parts of the photos. For this, you can use a circular filter like in the image below.
You can add a circular filter to do local adjustments in your photos. In this case I checked the “Invert Mask” because I wanted the adjustments to be made inside the circle. I wanted the center of the flower to be more defined, so I increased the clarity and the sharpness of the area inside the circle. Note that I feathered the circular filter quite a lot to make the adjustments gradual from the center of the circle to the outside.
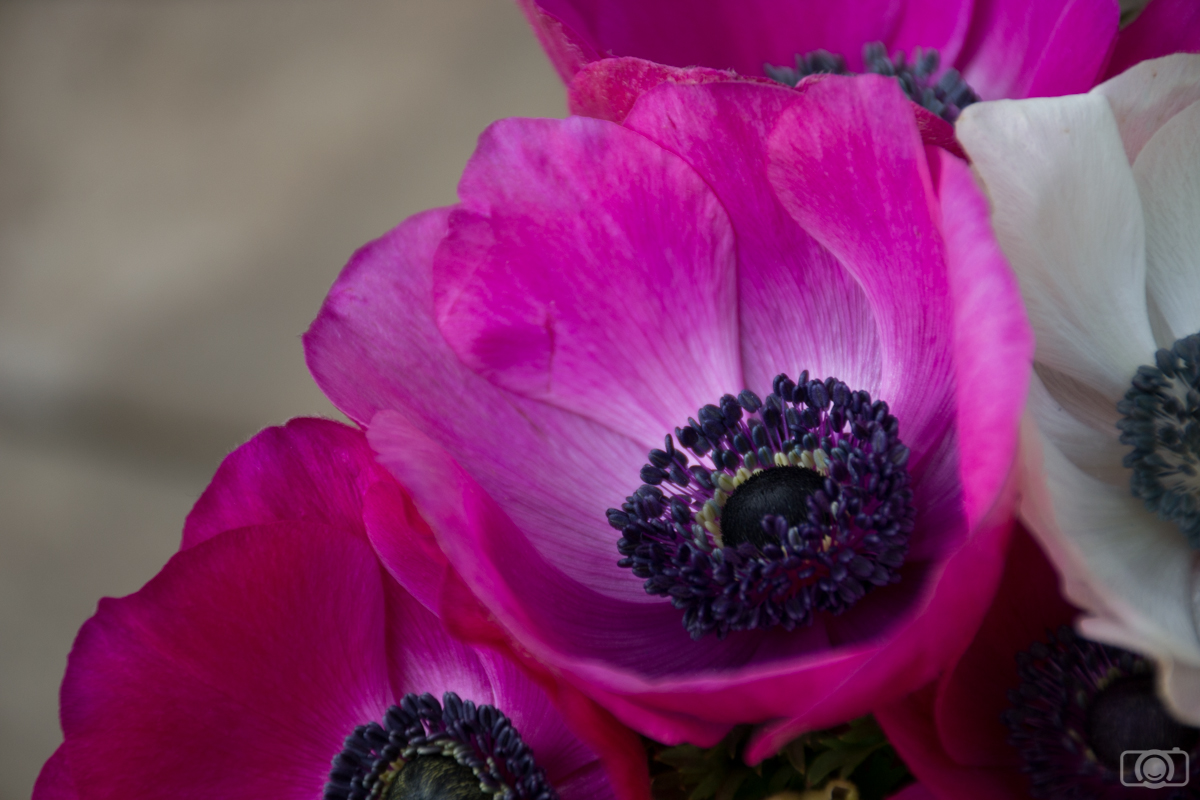
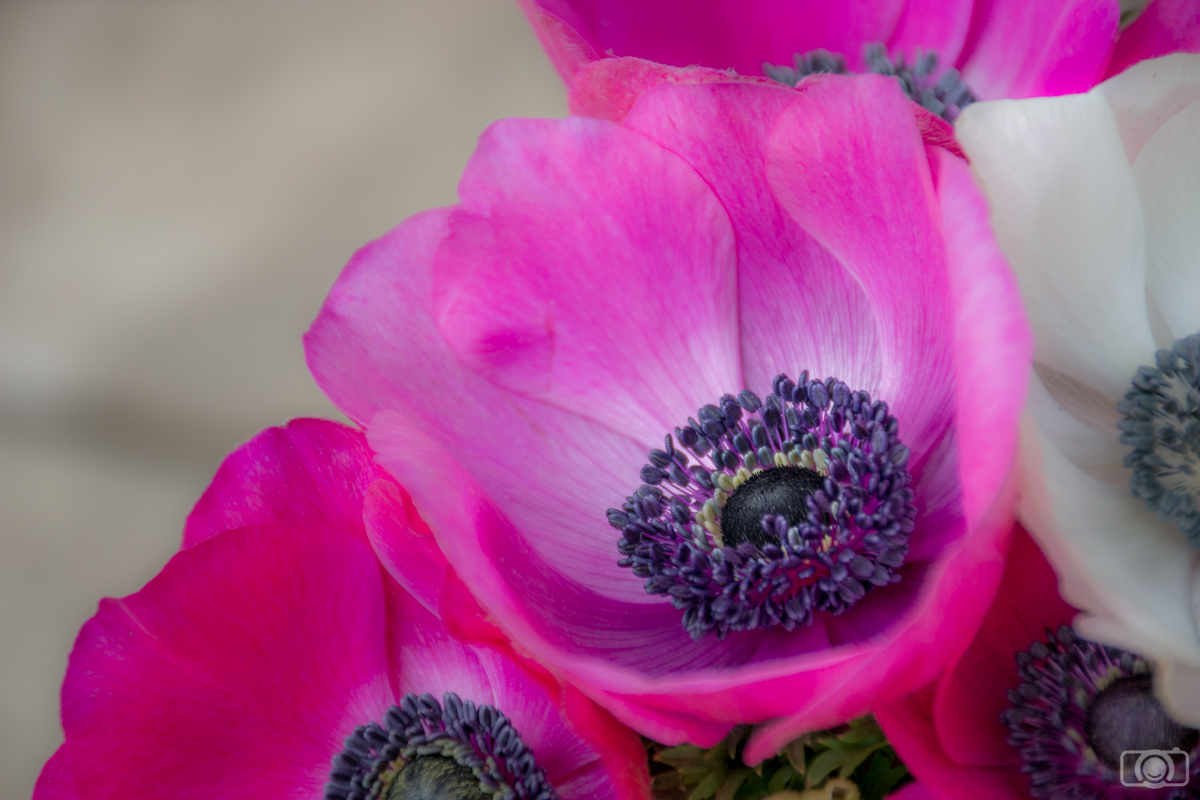
So here you have the 2 versions of the same photo.
This is the final sharper version of the imageThis is the final softer version of the image
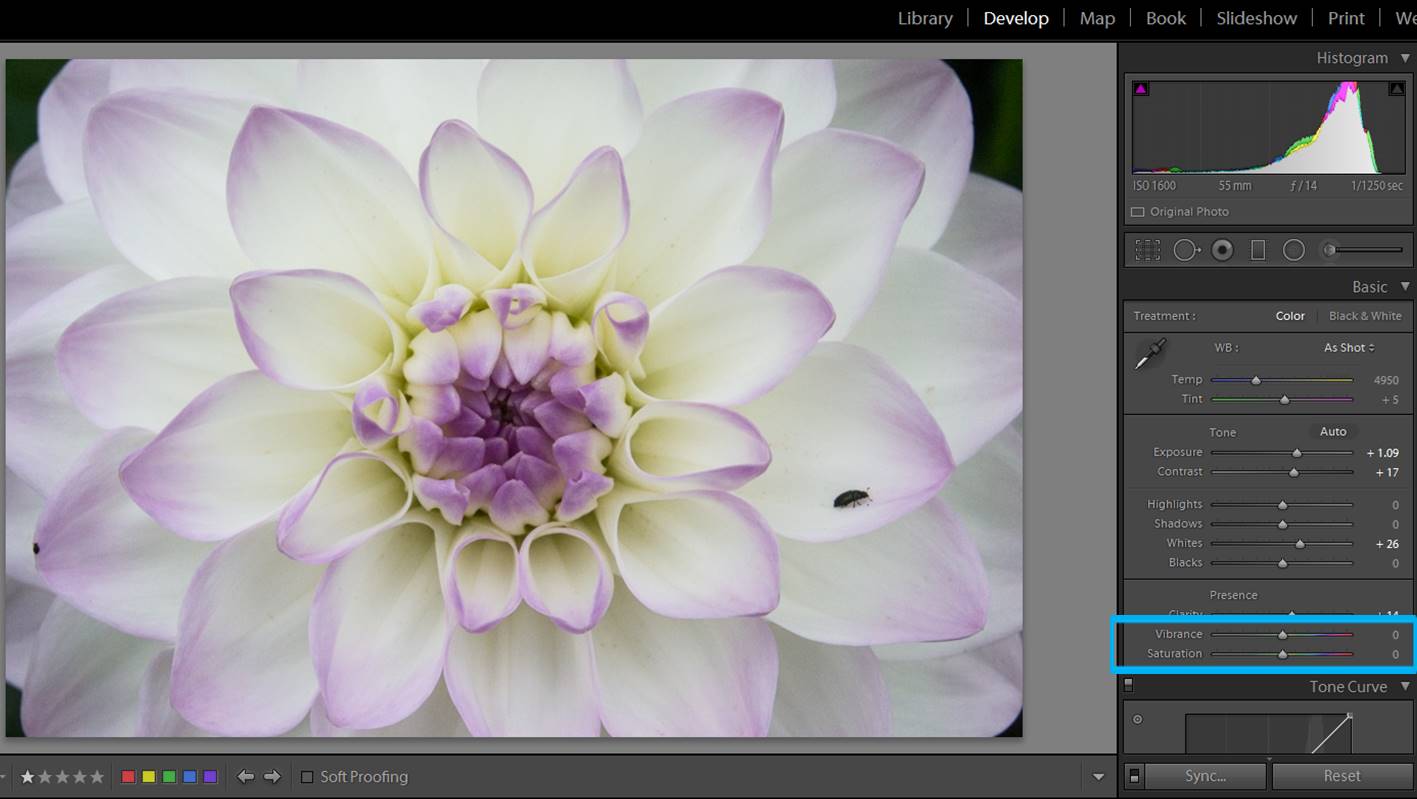
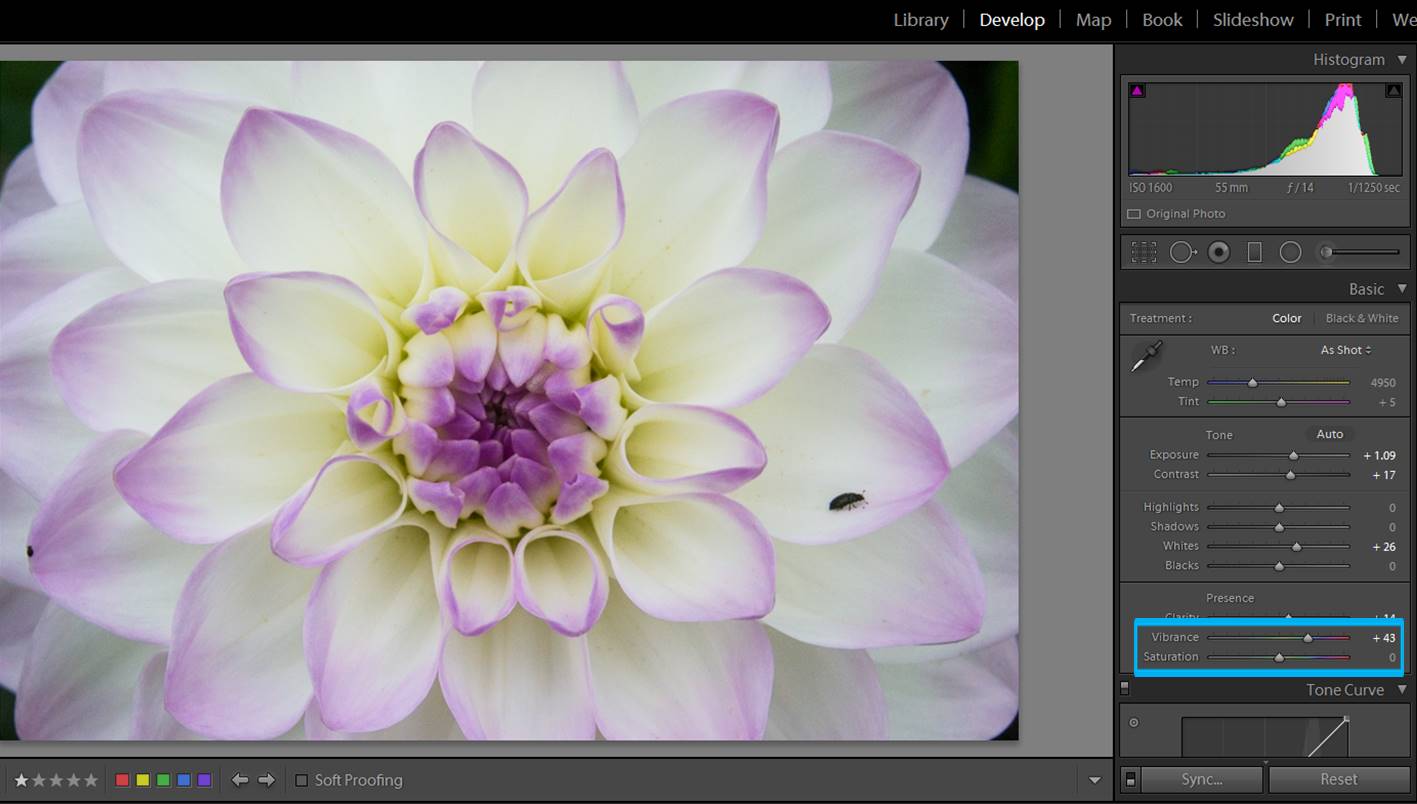
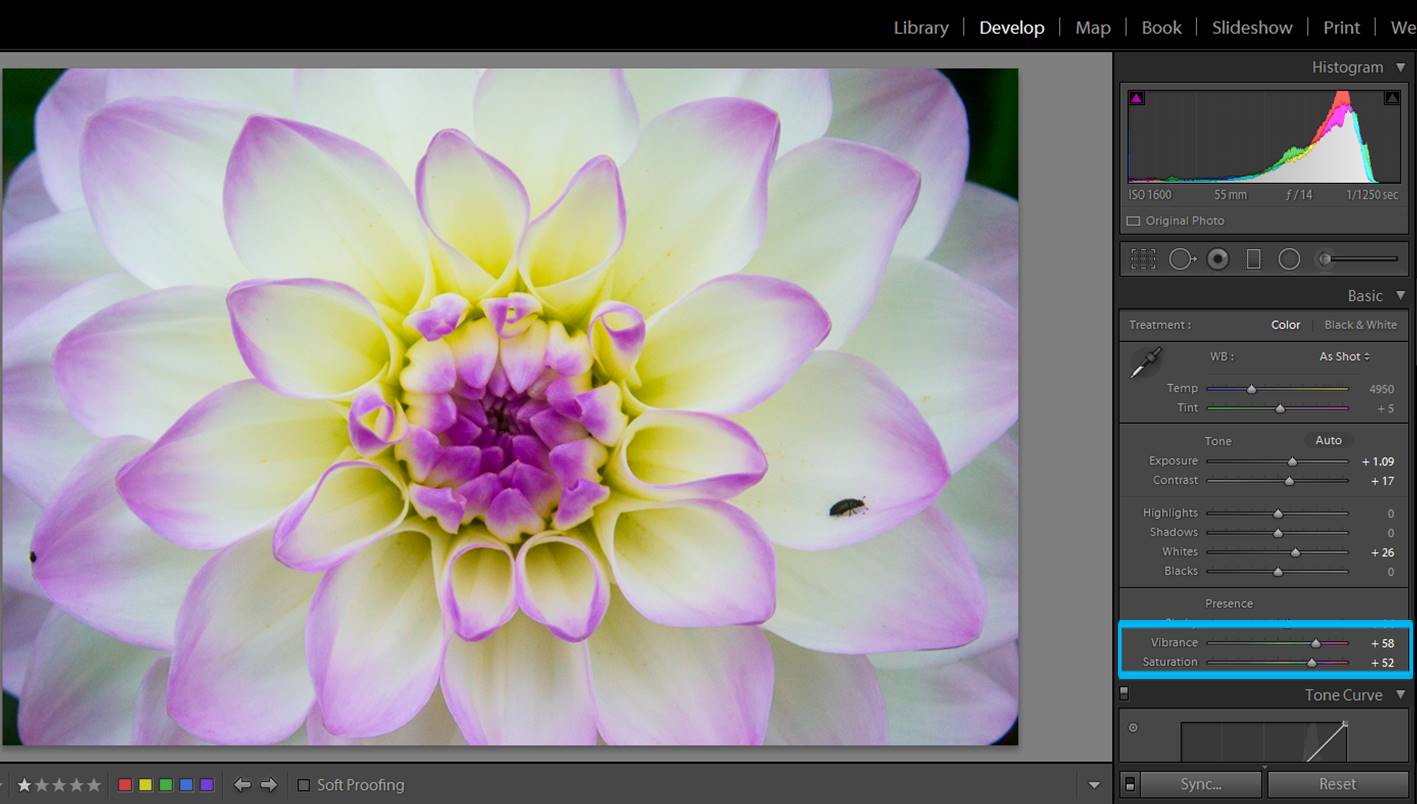
Increase (or not) vibrance/saturation
By increasing the vibrance and/or saturation you can make the colors of your flower pop out. However… if you increase them too much your flower’s color can get to a point it looks unreal. If you are doing some creative post-processing, this might be a good thing. But if you are trying to achieve a natural-looking flower image, too much vibrance and saturation will not be good.
I did some general adjustments to this image, but I didn’t touch the vibrance and saturation slides yet.
I usually increase the vibrance little by little until I reach to a point that I like. Sometimes you won’t need to touch vibrance/saturation at all because your original picture has already beautiful colors.
I usually increase the vibrance little by little so I could find a point where the colors stand out, but the flower still looks real
In this image I increased both the vibrance and the saturation too much the so that you can see their effect on the photograph. You should be careful with these slides because you can reach an unnatural look pretty easily.
Highlight your subject
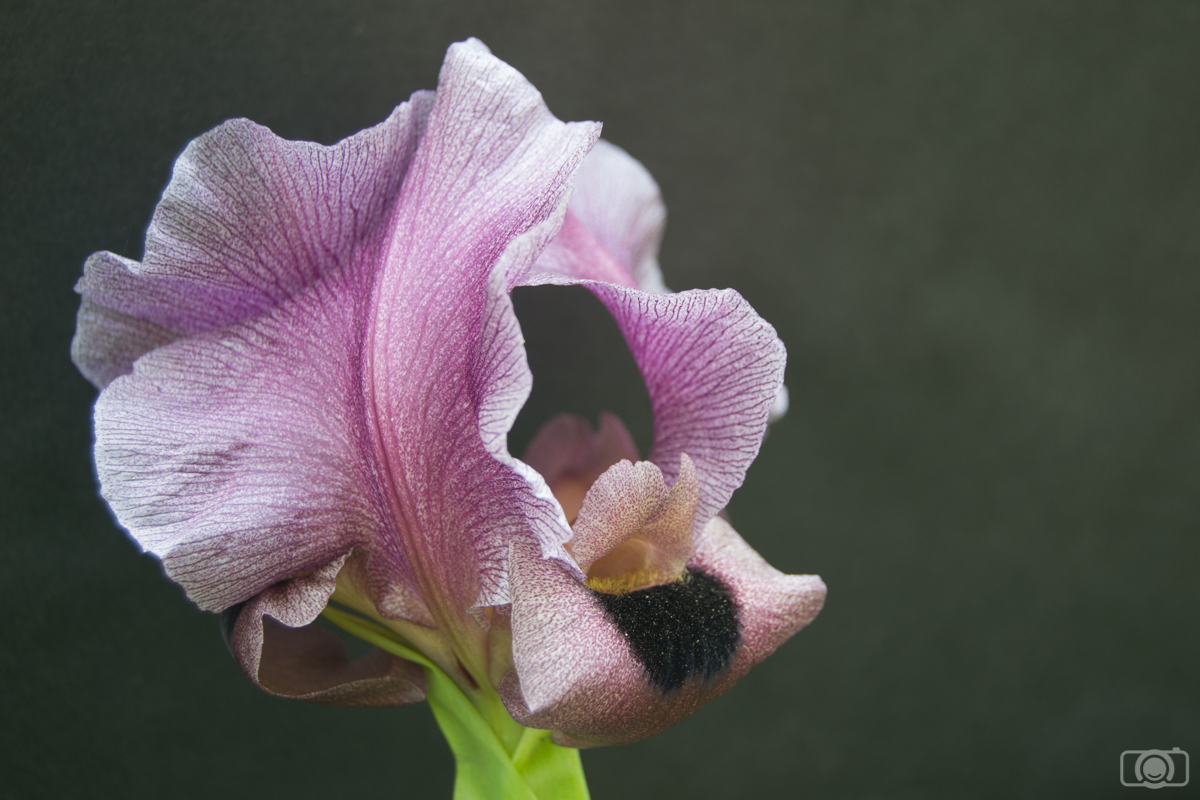
Imagine that you have a photo like the one below. The background is ok because it is quite dark, but your flower does not really stand out.
In this situation you can use a circular filter to highlight your flower and make it the focus of your image. I usually add the circle, then I check “Invert Mask” so that all the adjustments will affect the inner part of the circle and I feather it at 100 to make the adjustments look gradual. You might need to play a little with your adjustments, but usually you will need to increase the exposure. I also like to add a bit of sharpness and clarity, but this is up to you!
I use the circular filter to increase the exposure of my main subject/s and make them pop out from the darker background.
If you are using black backgrounds…make them really black!
If you are using black backgrounds for your flower photography, they might look a bit grey-ish in the original photo.
Straight out of the camera photo
Make them really black by using Lightroom brush tool. You just need to “paint” the background. I like to check the “Show Selected Mask overlay” because then I can see in red the places where I paint. Another tip: check “Auto Mask” and Lightroom will detect the edges and will help you to paint just the background (and not “stray” with the brush onto the flower).
When you have the “Show Selected Mask Overlay” checked, you can see in red the places where you “painted” with your brush. Check also “Auto Mask” to make Lightroom help with not painting outside of the borders.
Once you have painted the background, adjust the brush by decreasing the exposure, making the shadows darker (slide to the left) and make it smooth by moving the Clarity slide to the left too.
Last thing is doing general adjustments to the photo to make the flower really stand out!
Now it is your turn to practice with your own flower photos and Lightroom! Do you have a tip I have not included here? Tell me about how it goes with your editing! Have a happy post-processing!!
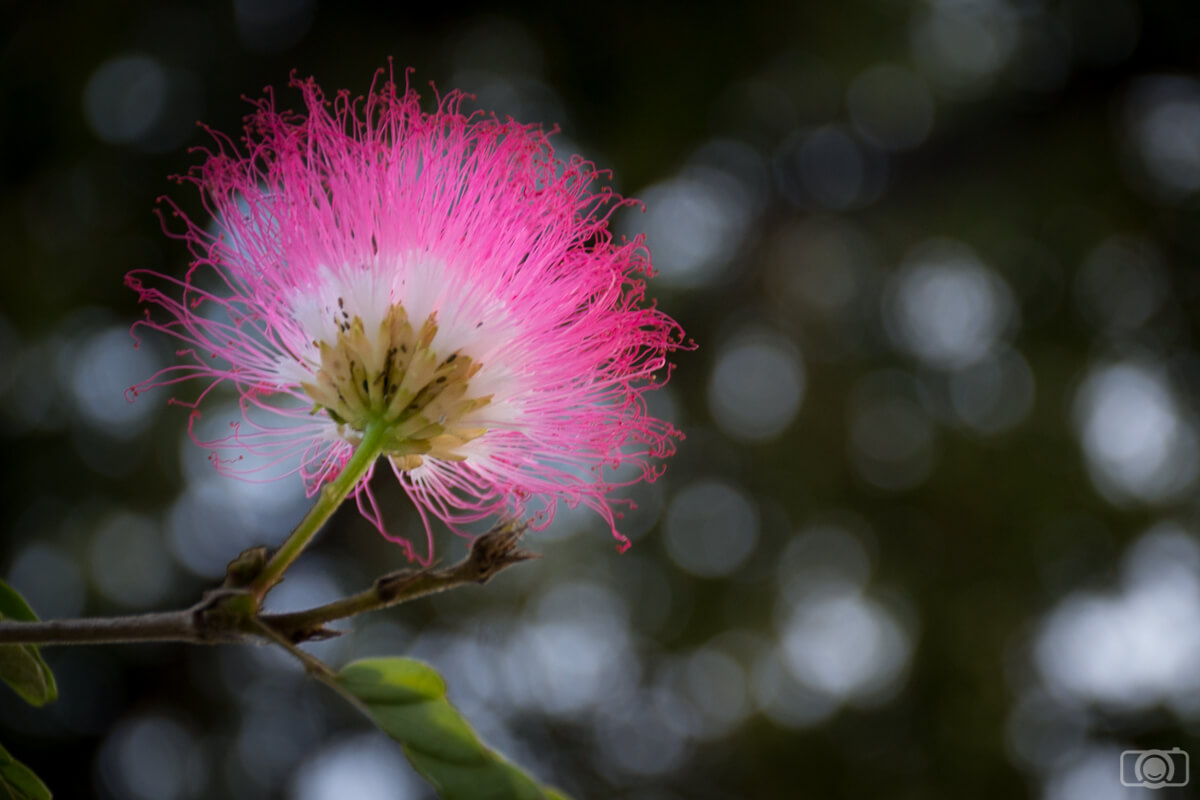
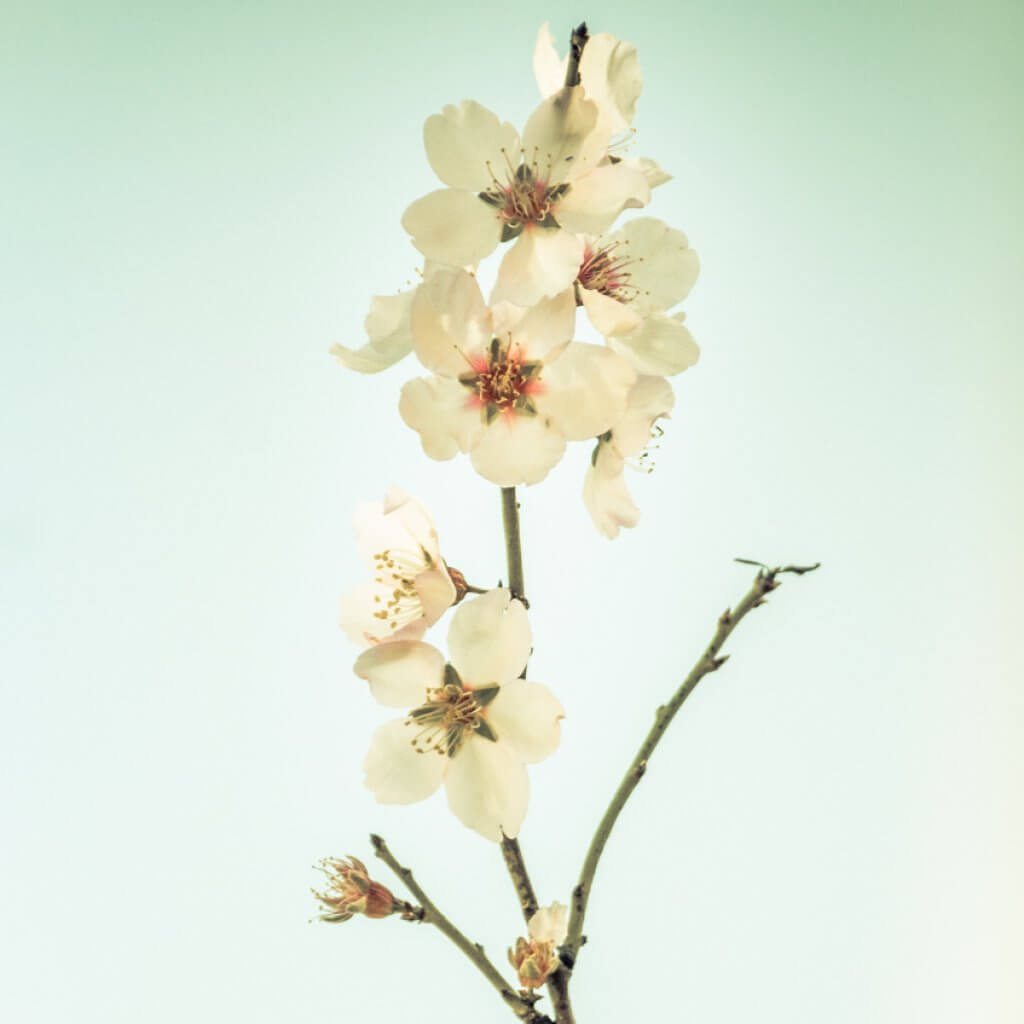
I think that flowers are one of the most photogenic subjects in nature. Do you agree? Their big diversity of colors, shapes, and sizes offers endless possibilities. In addition, there is something attracting about the ephemeral nature of flowers. I always think about the impermanence of things when I am taking photos of flowers. It’s as if they are telling me “Look at us, we are beautiful and we are not going to wait here for much longer, so bring your camera already”. As Frida Khalo said: “I paint flowers, so they will not die”. I am not good at painting, so I take photos of them instead! Today I am sharing with you some of the tips and tricks I learned along the way.
Keep it simple
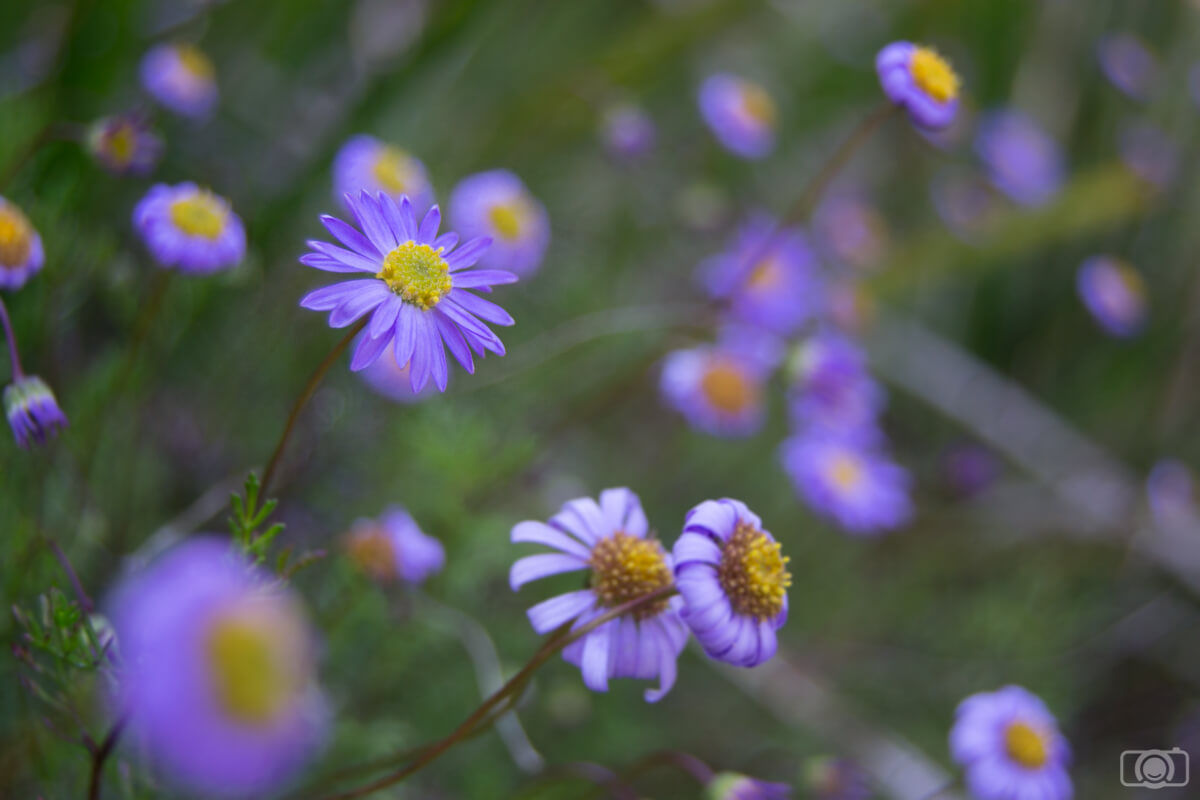
Flowers are beautiful, so they don’t need much more things in the frame beside themselves. I agree that this might be a matter of aesthetic preferences, but in general the most part of the flower photos that will make you go “Oooooh” have very few elements in the frame, if not just a single flower.
Flowers are beautiful subjects that don’t need much more in the frame in order to show their beauty.
Eliminate distractions
Your main objective in flower photography is to highlight the main flower/s in your photo. This means that you need to eliminate from the frame as many distracting elements as possible. These elements can be other flowers, branches, anything you can find around gardens and parks… there are a lot of them! You can try to crop out distractions by doing a close up of the flower. You can also move the flower so that the distracting elements disappear from the frame. Another option is to move and change the perspective in which you are taking the photo.
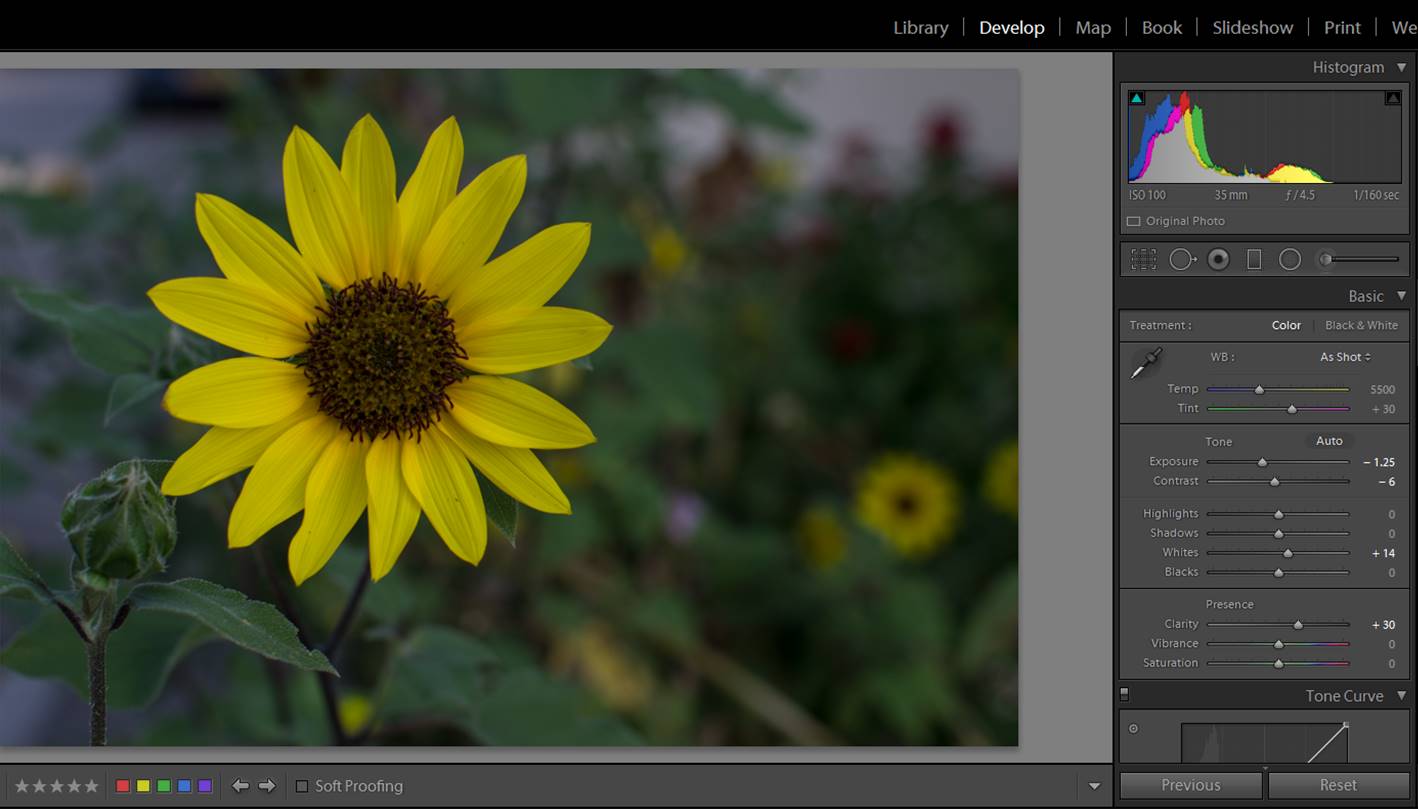
The sunflower field where I took this photo was a bit messy. To avoid distractions I change the perspective and instead of taking a photo with the other sunflowers I decided to use a single sunflower in my composition.
There is another way to make a background look less distracting: make it blurry. You can achieve this effect by using a wide aperture (low aperture number). f/5 or lower can work really well. It is also useful to keep in mind that a longer focal length will make the background blurrier. For example, if you shoot with a 150mm lens, the background will be blurrier than if you use 35mm. In conclusion, a good option (if possible) would be to combine a low aperture number with a long focal length.
I took this photo with an aperture f/5 and a 70mm focal length. You can see that in this particular situation I managed to blur out the background. You might need to check the aperture and focal length that will work better for your photos. Wide apertures and long focal lengths will give you a good starting point.
Make sure that you are focused on the right place
This is especially important if you are using wide apertures. You might be so focused on getting blurry backgrounds that you might lose a bit of the focus of your camera. Think always which part of the flower must be sharp in your photo. Then, after taking the photos, check that you achieved what you want. A lot of times I realized that I didn’t focus on the right spot only when I was back home uploading the photos to my computer! Oops!!!
Create your own backgrounds
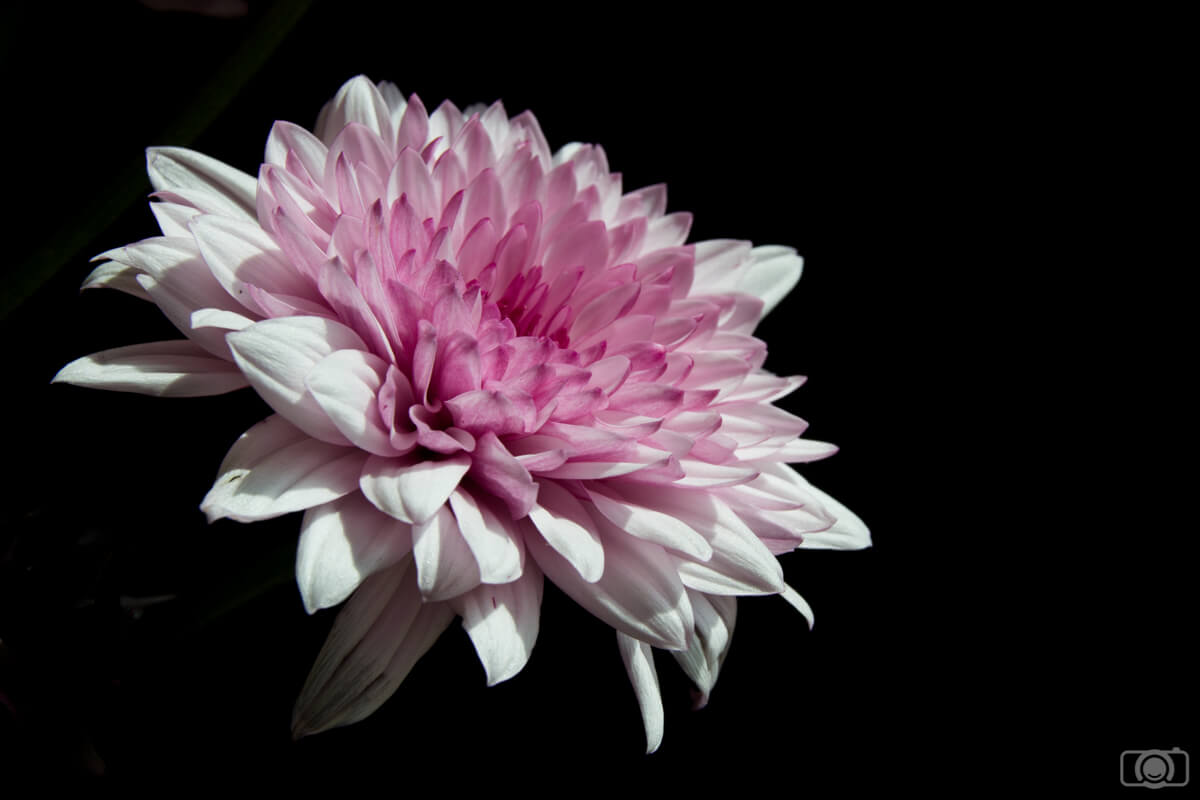
In some occasions, you can create your own distraction-free background. You can use a simple blackboard (or any other color you like) and just place it behind the flower. These photos lose the atmosphere that the surroundings provide them (because just by looking at the photo you can’t really tell where they were taken). But on the other side, by using a background you make sure to have at least some elegant images of your flower.
Black backgrounds make the colors of the flowers pop up.
Be aware of the wind
When you are shooting at low shutter speeds the slightest movement of the flower will make it appear blurry in the photo. Be aware of that! You can try to block the wind or wait patiently to have a moment of calm. You can also increase your ISO and/or use a wider aperture (meaning lower f-number) to be able to use a faster shutter speed. However, this blurry effect can be beautiful too. It can give a unique and creative look to your photo. If you like this blurry style… go for it!!
Try different perspectives
Don’t be shy trying perspectives. Take photos of flowers from the front, the back, from up, from down, just a part of the flower, the whole flower… You might be surprised by your results.
Changing the perspective I managed to get photos with a more abstract look
Allow yourself to be creative in the editing
Flowers are perfect for trying a more creative editing. You can use Photoshop filters to make them look like a painting, you can add a soft effect for a more romantic look… Have fun to experiment!! I will share with you some of my editing tips for flowers in my next article.
Flowers are a great photography subject if you like being creative in your editions
And now you just need to find some flowers and start practicing your flower photography! Do you have a tip I have not included here? Are you crazy about flowers as I do? Tell me about your experience! Have a happy shooting!!
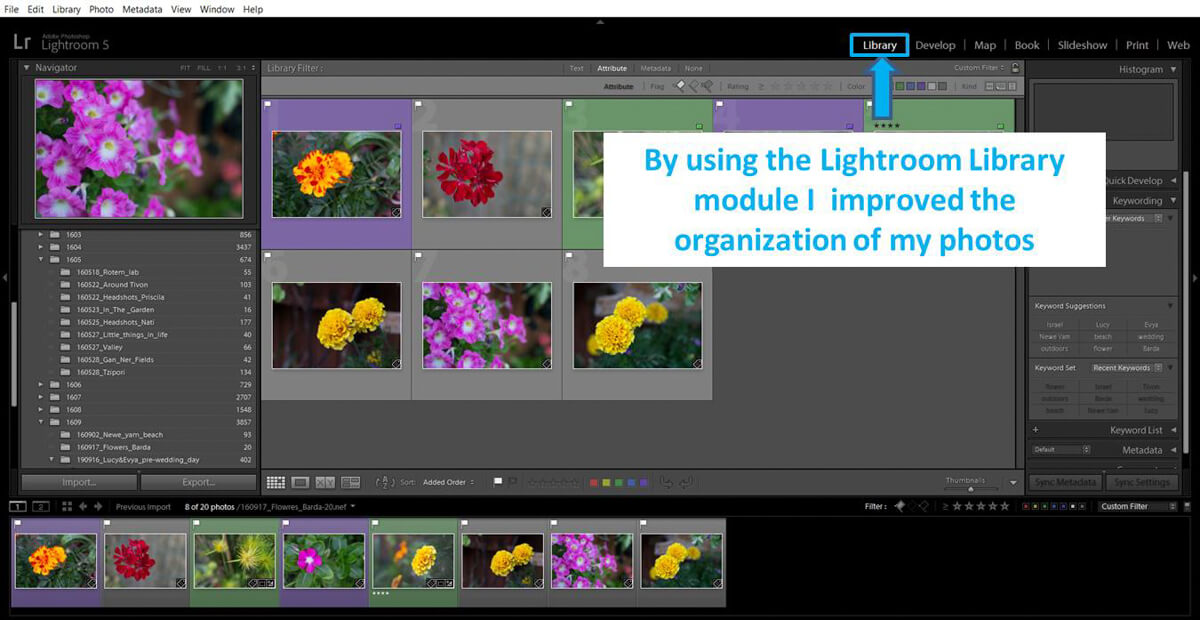
I was not the most organized person in the world. My mom was always kidding saying that I was able to find my head just because I have it attached to my neck. I was also a mess with my computer files, including my photos. When you are taking some photos here and there you might survive being a disorganized person. But when you get a bit serious into photography, either you develop a system to organize your photos or you won’t be able to find them between your tones of files. The day I discover the power of the Lightroom (LG) Library module for organizing photos was a turning point in my photography career. If you are like me and you struggle with making order on your images, keep reading! I will share with you some of the things I learnt along the way.
Include the organization of your photos an extremely important step on your post-processing workflow.
This might be obvious, but if you have a tendency to be disorganized, you need to keep reminding yourself that making order on your photos is crucial. I know… organizing is not the funniest thing to do. But when you are using the right tools, like the LG library, it is not so terrible. Think that investing a bit of time now on keeping your photos in place can save you a lot of time when you need to find your images. Organizing your photos is the first step in the post-processing workflow. Don’t jump ahead!
Decide on a system to name your files (and keep it along time)
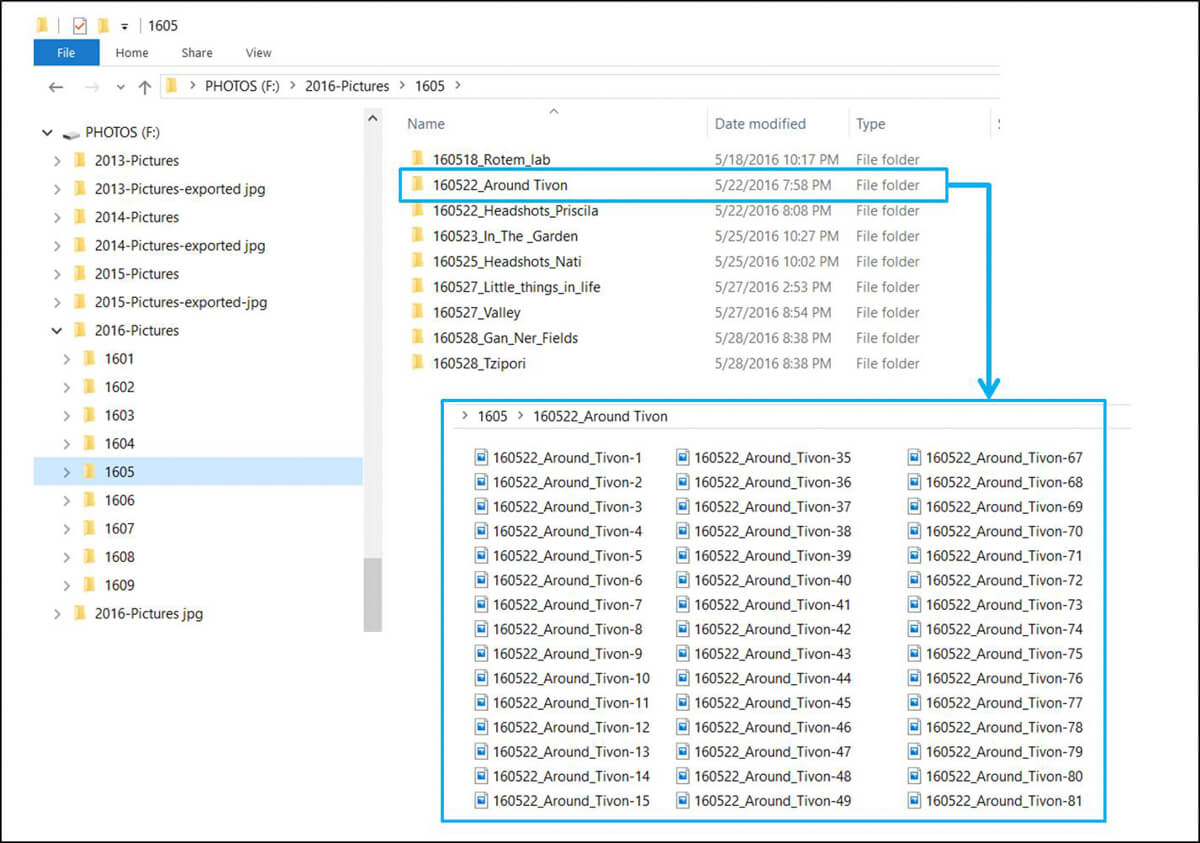
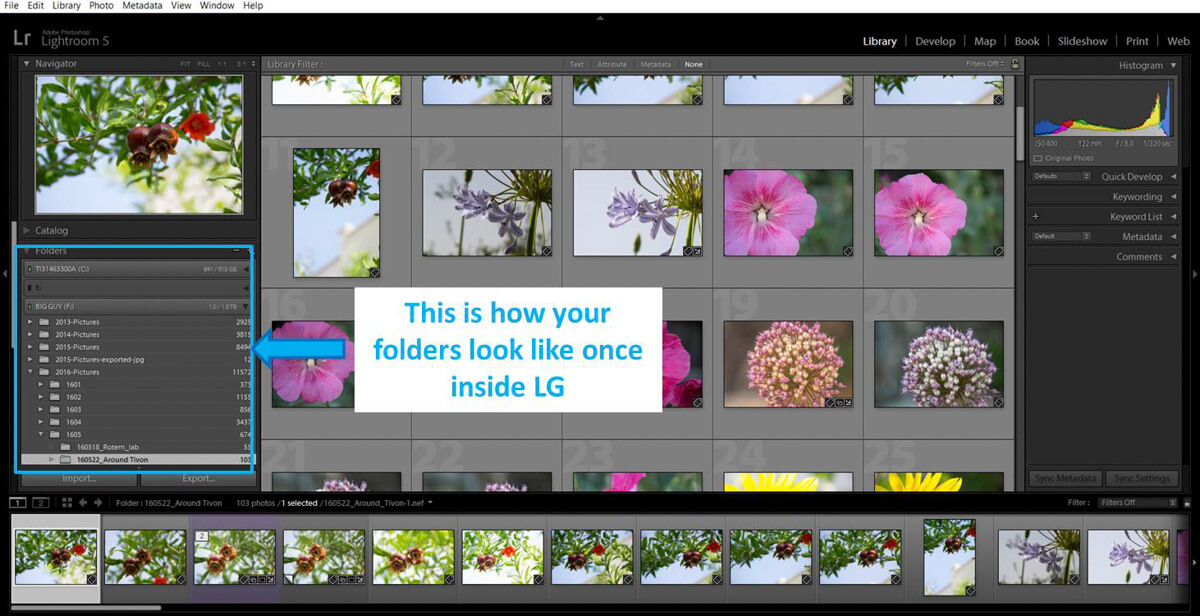
There is not a unique system to name your files. You can organize them by date or by subjects for example. Which one is the right way to do it? I guess that it depends on your personality. Choose the one that talks more to you and keep it along time. Don’t change from one system to another because then you will be in a mess again. I can show you my system. I work well on dates. I have my folders named by year (20016. 2015, 2014…) and month (for example: 1605 for May 20016). Inside the month folder I have the daily folders, in which I include both the date and the name of the photo-session (example: 160522_Around_Tivon for walk that I did around the place I live (Tivon, Israel) on the 22nd May 2016). Some people think that working on dates is not practical because when you need to look for some photos, you need to remember when you shot them. For me it is not a problem because I also use a system of keywords (I will explain a bit later, don’t worry).You might prefer to have the folders by subjects: travel, portrait, landscape… Just pick a system that makes sense to you. This is the most important thing.
Name and work with your folders and files from inside LG
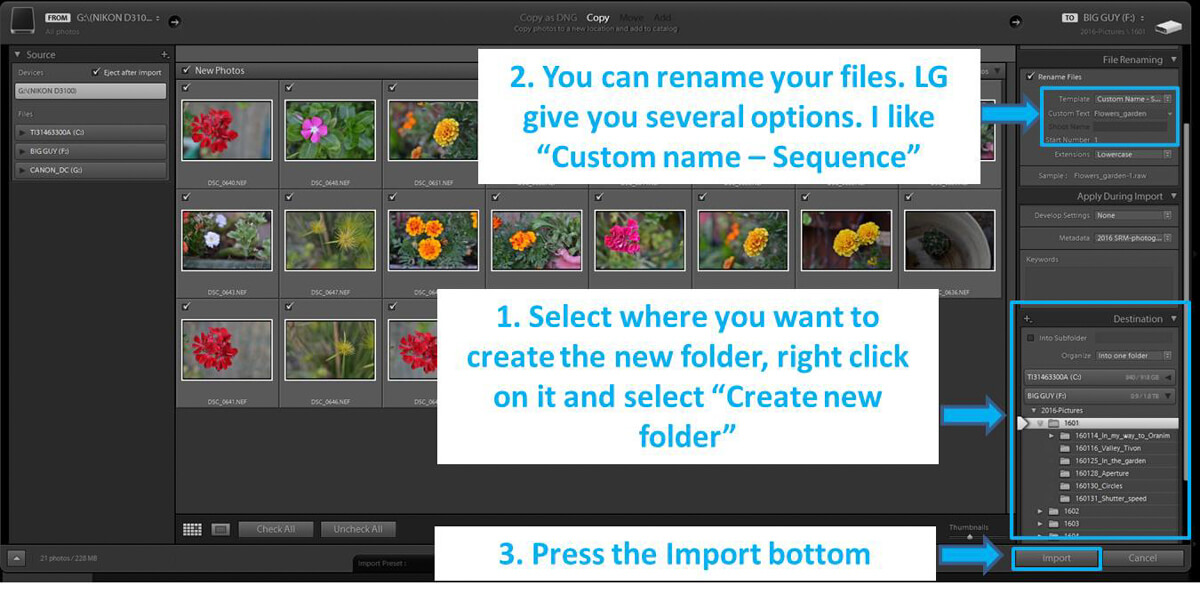
You can imagine LG like your control freak friend: if you create a folder, rename a file or change the location of something without telling, it won’t like it AT ALL. For that reason you have to make all the changes from inside LG. The good thing is that it is really easy to do it (LG is a control freak, but it is not so mean). I just got use to do everything from LG. I start by importing the photos from my SD card using LG. You can create the folder and place it wherever directly from LG.
At this point, I also like to rename the photos using a custom name. This is pretty easy to do and quite useful for finding files in the future. I use the Custom+sequence option. As custom name I put the photo session name or date+photo session name.
Once imported, you can navigate into your folders using the left bottom panel in the Library module.
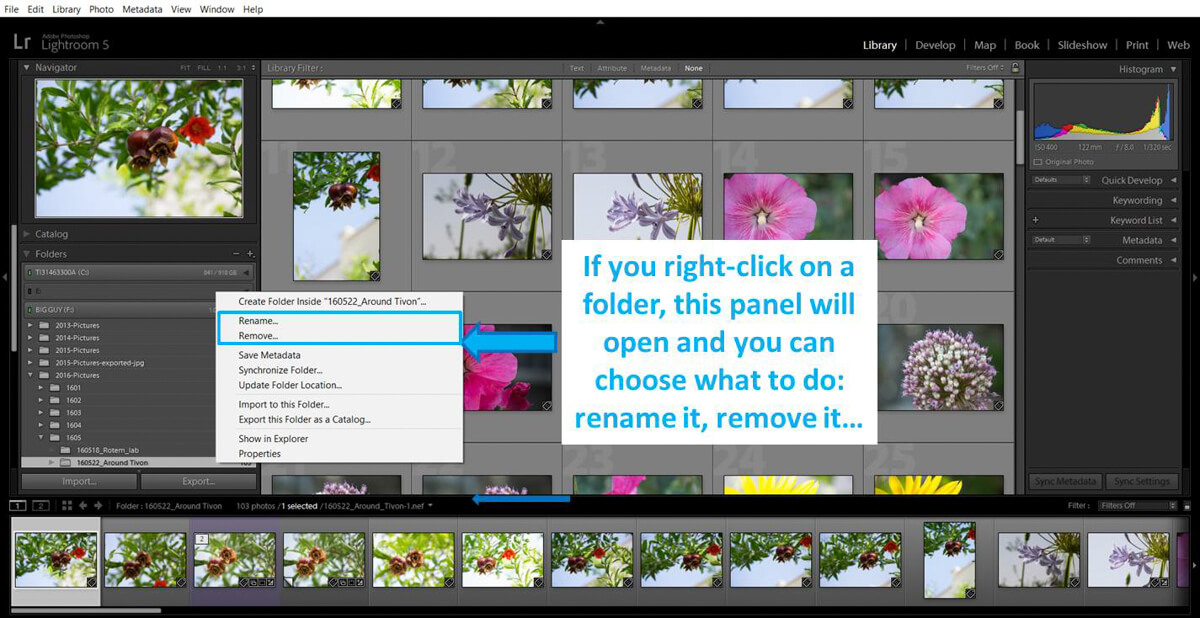
Do you need to rename a folder or to delete it? You have to do it from inside LG (if not LG will lose track of the changes you made and and won’t be able to find your files). You do it from the Folders panel on the library module. To move a folder into another you just need to select it and drag it into the new destination folder.
To rename one or more files, you just need to select them and choose Library>Rename photo(s). To move it to another folder, you select it and drag it.
Delete the really bad photos
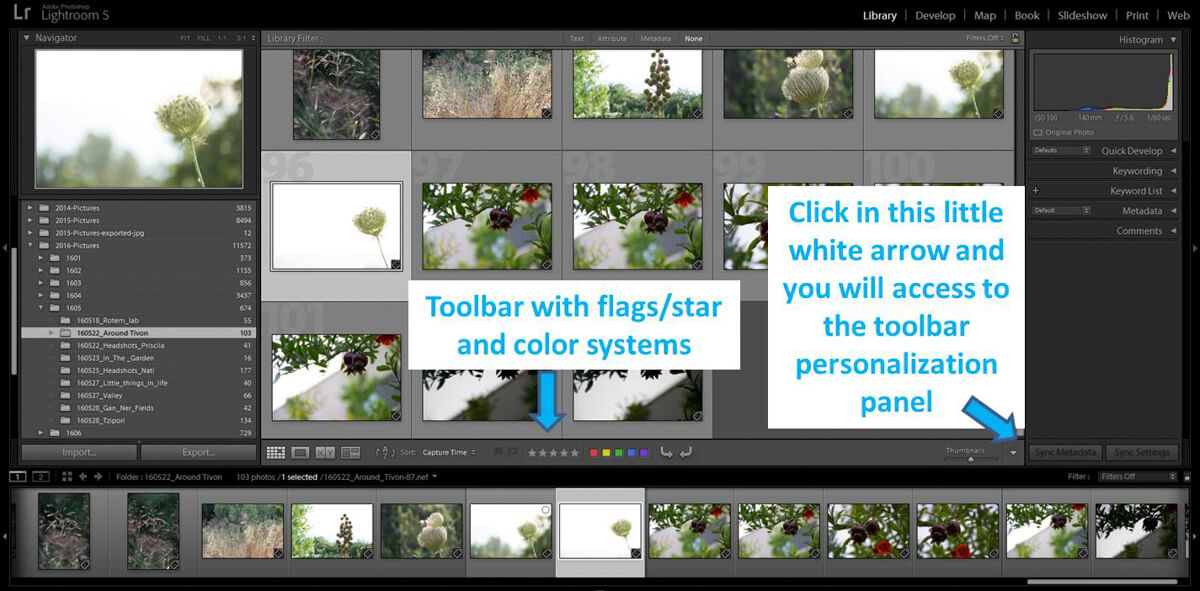
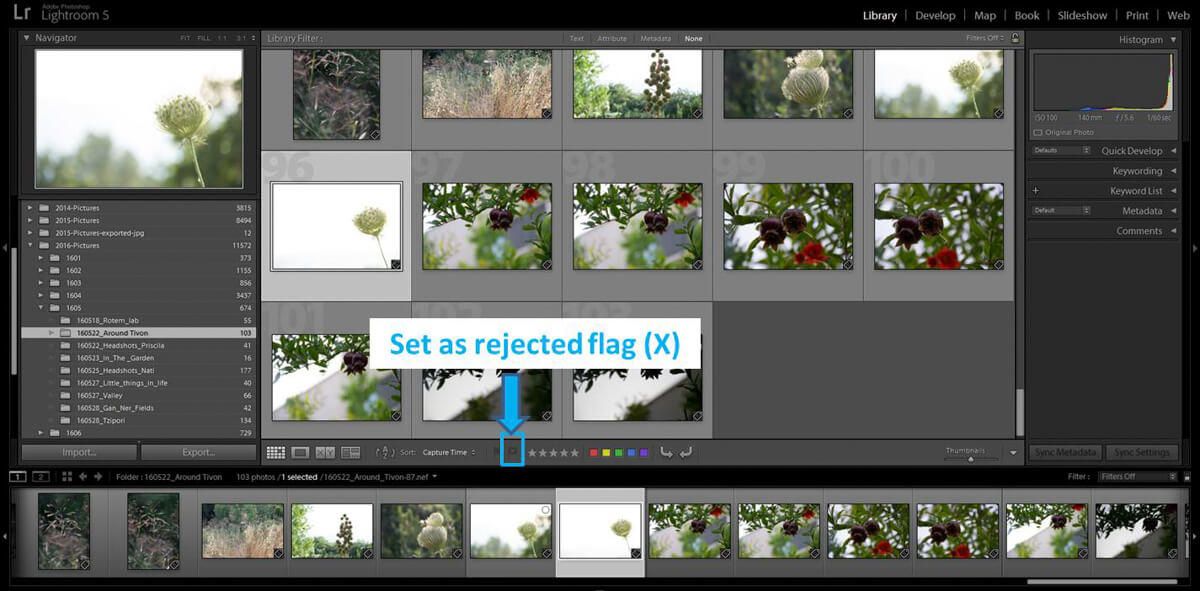
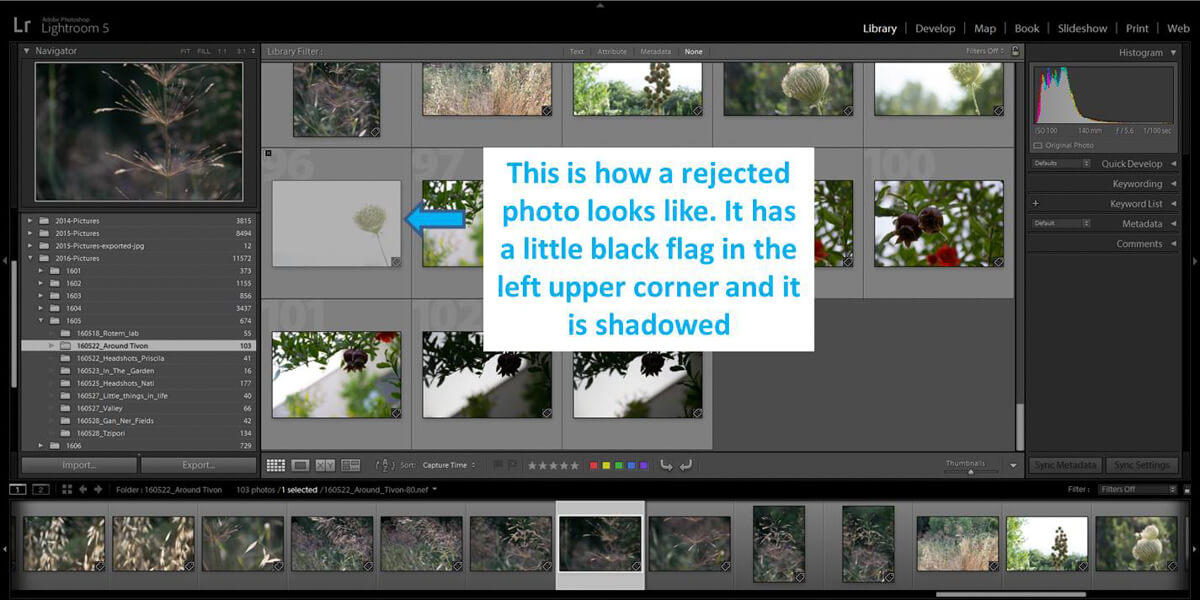
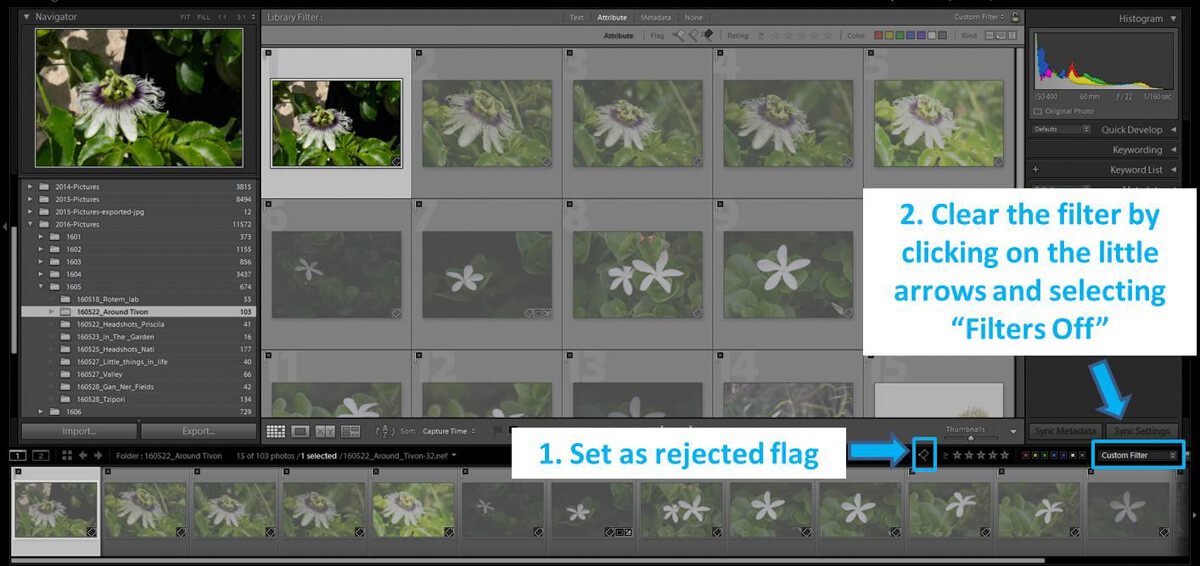
Once I have the photos in LG, the first thing I do is selecting the really bad photos. With really bad I mean the photos I am sure I won’t ever use because they are way too dark, extremely burnt or completely out of focus. First, I mark them by flagging the photos with a Black flag, that is the one that means: “Set as rejected”. This step can be done really fast. With the photo selected, you just click in the “set as rejected” flag icon (check the photos below to see where you can find the flag) or you press the letter X in your keyword. To remove the flag, you either press again the flag icon in the toolbar or you press the letter U.
If you don’t see the tool bar as I have it in this image, you can click in the little arrow in the right side of the toolbar and customize it to show the flags, colors, stars…
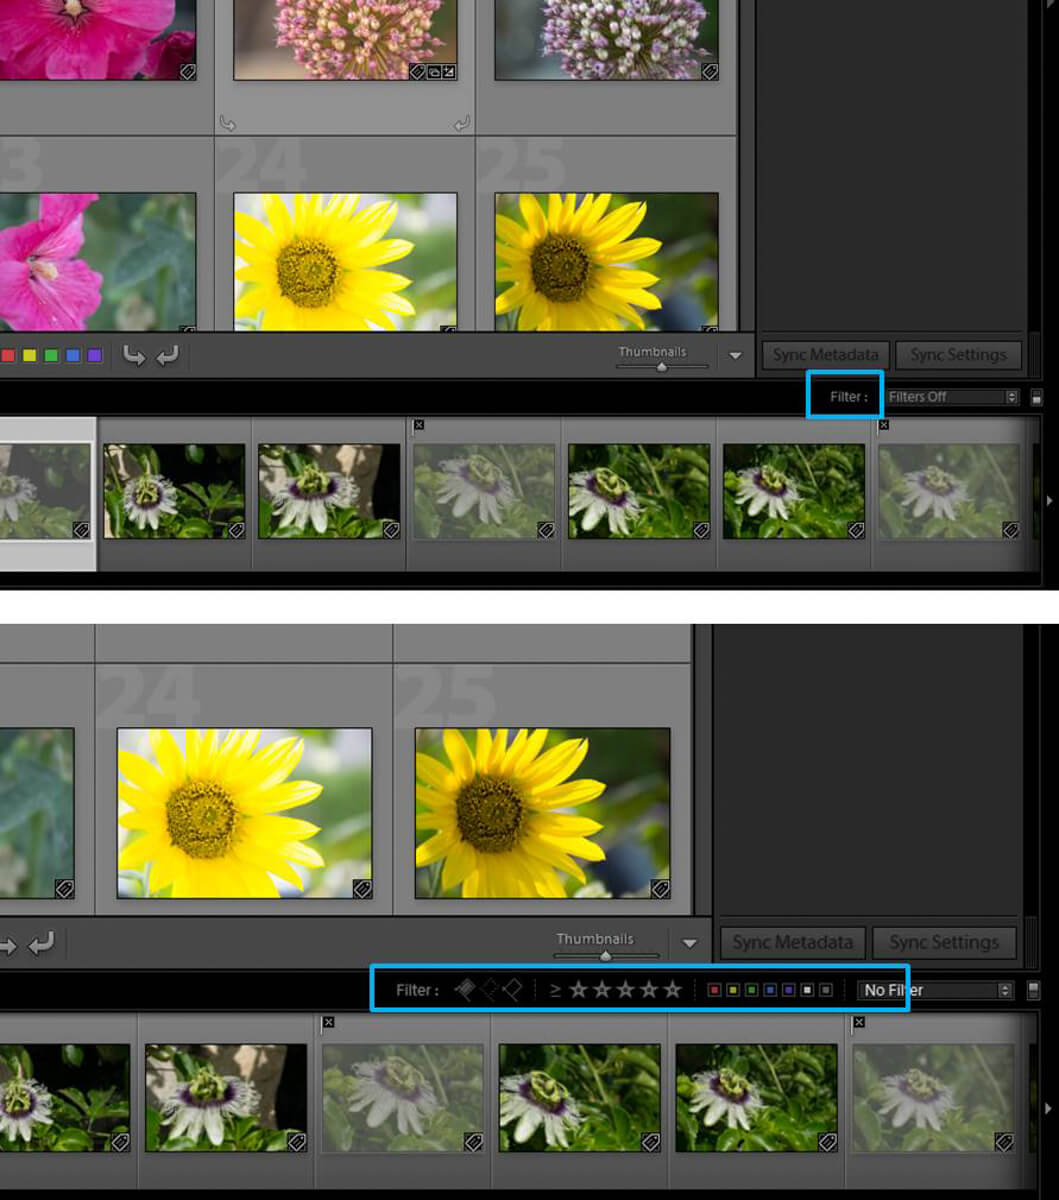
Once you have flagged all the photos you want to delete, you can get rid of them pretty fast by filtering them first. Right on top of the filmstrip you have a black toolbar and in the right you can see that it says “Filter”. If you click on this word, several filter options will appear: flags, stars and colors. If you click in the icon of the “set as rejected” flag, just the black flagged photos will be shown. At that point, you can select them all and press “delete” in your keyword. You have the option to remove the photo from LG or delete it from your disk. To clear the filter you can either press again in the same flag icon or select “Filters off” (see photo below)
You can see the filter options by clicking on the word “Filters”.
Use flags, stars and colors
Now you have all the good photos in your computer organized nicely in folders. This is a great starting point! But LG can help you even more in the organization of your photos. You can mark your images using flags, stars and colors. To learn how to do it, have a look to the great post by my Sleeklens colleague Navanee Viswa in which he explains Lightroom rating system in detail. I just want to tell you that there are as many rating/organizing systems as photographers. Each one of us has his own way of working. You need to find a system that talks to you and allow you to organize your photos in a consistent way. I will explain to you my system just a matter of example:
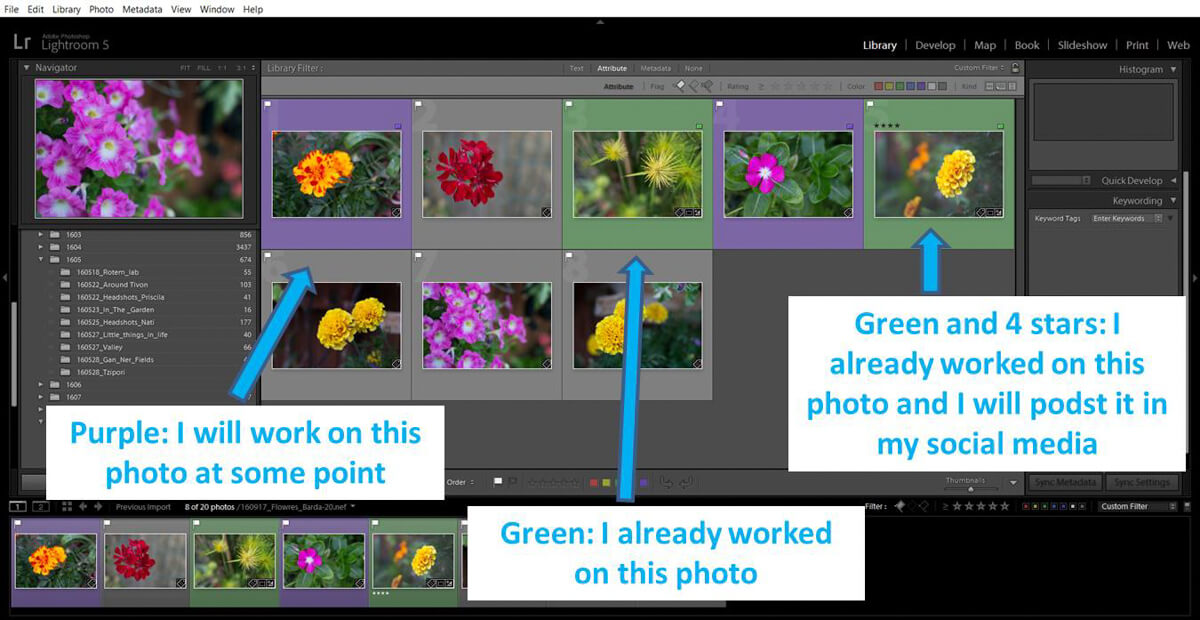
First I go over the photos fast and I flag as rejected the really bad ones. I delete them from the disk. I do a second round flagging with the white flag the photos I want to keep. You can make these 2 rounds in one by flagging with either rejected or Pick. I filter just the flagged “Pick” photos (or I make a collection. More about LG collections in next blogs). Once I have in front of me just the flagged photos, I start my color rounds.
Purple: I will work with this photo
Green: I finished editing this photo
Yellow: this photo is part of an HDR
Red: This photo is part of a panoramic
Then I filter by just the green photos (in the same way that we filtered the “set as rejected” photos before). Then I go over the images and I rate them by stars: 4 stars are the ones I want to share in my social media and 5 stars are the ones that are so good that will be part of my portfolio. Maybe you won’t see all the rating icons in the thumbnail cell of the grid view (for example you might not see the stars). You can change the display of the cells in the LG Library going to View>View Options> Grid View>Cell Icons and in the Top or Lower label you select “Rating and Label”. For more details and options, you can have a look to the article Customising cells in Lightroom’s Library module.
This is how my LG Library work space look like after using my flag, colors and stars system
My system might not be good for you. There is nothing wrong with that. I know there are photographers that start by rating their photos with stars and they never use colors. Any combination of flag, stars and colors that make sense to you and that help you in your workflow will be great. It takes some thinking though. But it is worth it.
Keywords can help you to describe your images and make them more searchable. Have you ever spend hours looking for a particular photo? You can avoid this situation organizing photos using keywords!! How cool this would be? I am using this feature since long time ago. However, I recently discovered that I am not doing it in the most efficient way. But this is going to change! I have a plan that will allow me to take much more advantages out of keywording. Check out what I learnt!
What are LG keywords and where can you find them?
Your photo files, besides containing the actual image, they also contain extra data, also known as metadata. Some metadata is added by the camera: lens aperture, shutter speed, ISO… Other metadata, as keywords, can be added later. Keywords are a way to describe your image. As part of the photo metadata, keywords show up in internet searches. For that reason they have a role in the exposure of your photos once you publish them. If somebody is doing a search for one of your keywords, your photo might appear in their results. In LG, keywords are found in the library module.
Try the keyword hierarchy structure
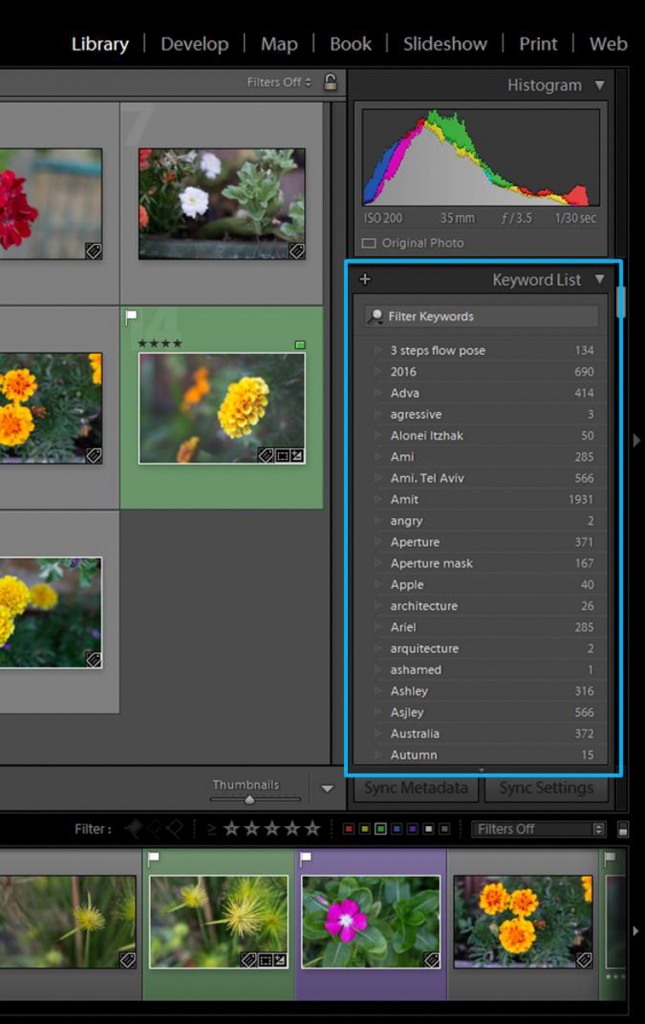
Until now I have been keywording my images following what it is called “Flat word” technique. This means that I was just adding keywords to my photos and all of them are on the same level of importance. For example, if I was adding keywords to a flower’s photo that I took next to my place I was using: flower, Tivon (my town), Israel, outdoors, summer….. As you can see this system is quite easy and fast. You can always see your keywords in the Keyword list option in the Library LG module. Great! However I ended up with an extremely long list of keywords. It didn’t have any structure and it was quite difficult to handle. Finding something using my keywords became insane. To find similar terms I needed to scroll down in the list and this became quite annoying when the list growth big. My keywords were complicating my life instead of simplifying it!
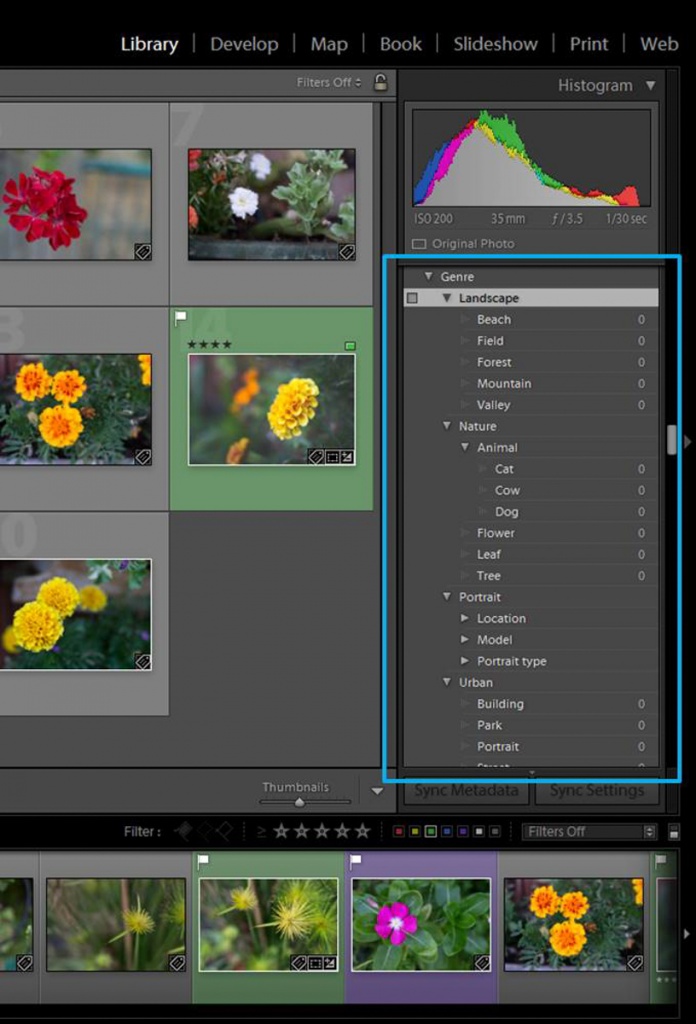
But there is another way to organize your keywords: Hierarchy system. This system will allow you to have a structured list of keywords nested inside categories. Searching for things is much easier than in a non-structured long list because relevant terms are grouped together. For example: I can find all my nature or landscape photos easily because I have a category for each one of them. Setting this system takes more time. However it is an investment because you will save this time (and more) in the searches.
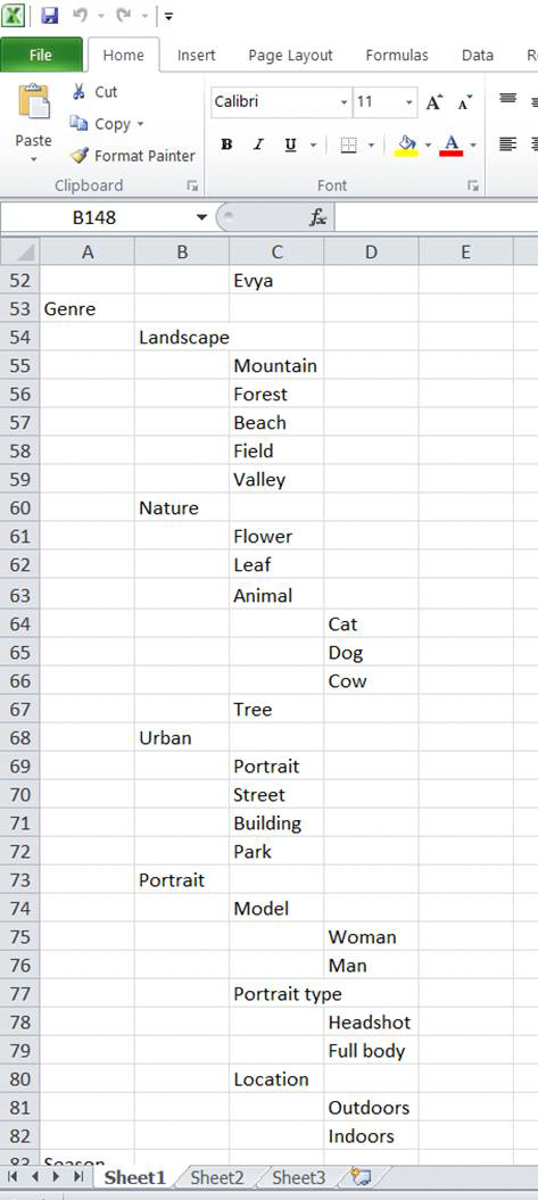
Under the “Gender” category I have all the types of photos I take: landscape, nature, portrait and urban. Inside each one of them I have subcategories that can describe my photos in a deeper level. For landscape for example, I have beach, field, forest…
Plan your keywords
It is worth to spend some time thinking about how you want to organize your keywords. You can start with a 2 or 3 level keyword system. You can add the keywords in LG:
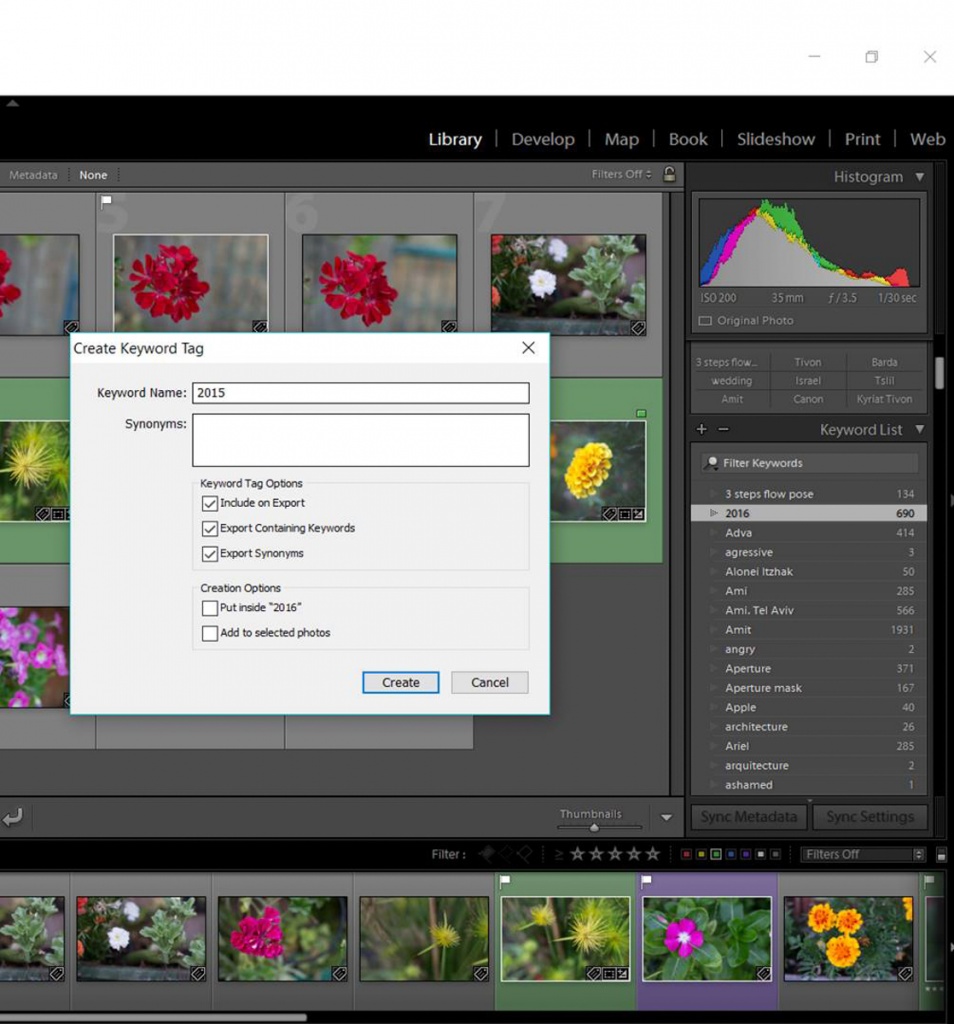
Click in the + icon in the left side of “Keyword list” and this dialog box will open. Here you can add one by one as many keywords as you need.
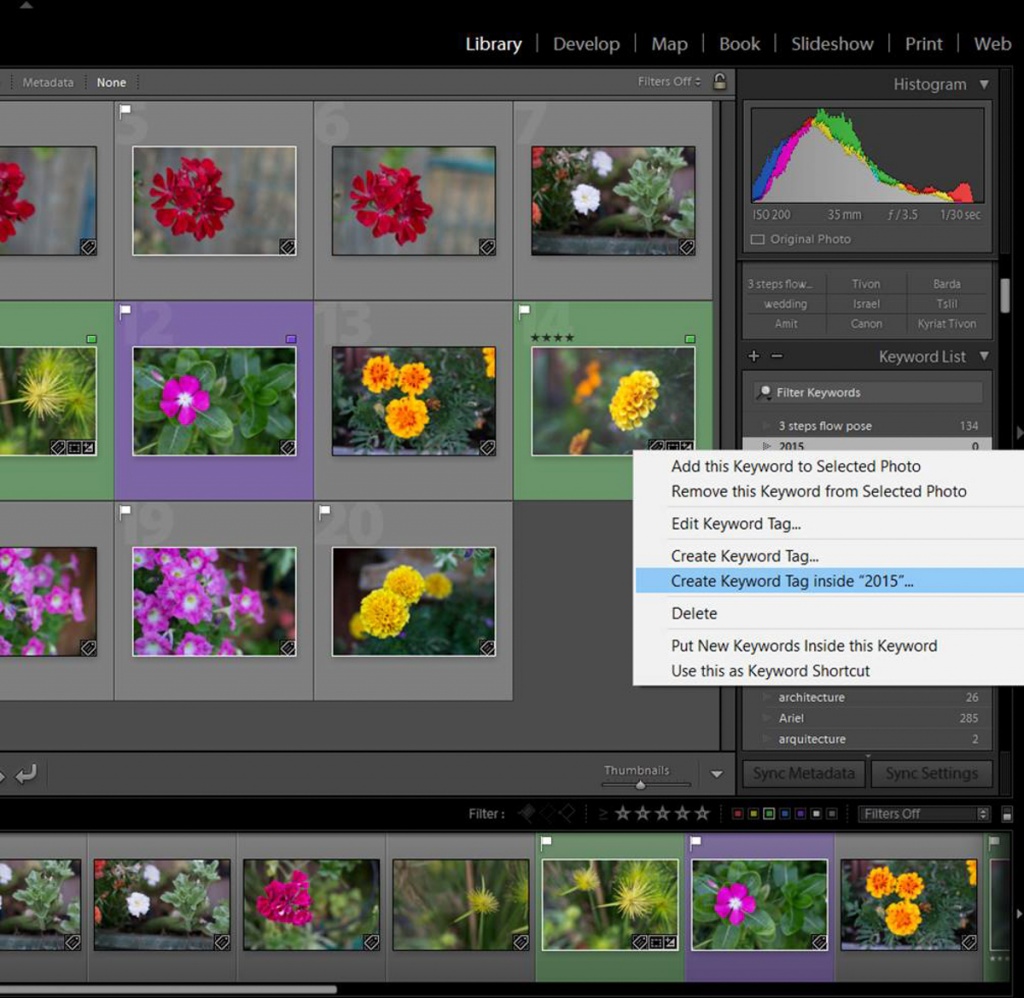
I wanted to create a subcategory inside the keyword “2015” (I wanted to add the months of the year). For this, I right-clicked in the keyword “2015” and selected “Create Keyword Tag inside 2015”. You can add as many keywords inside a previous one as you want. But in this way, you need to add them one by one. It can get a bit tedious.
An easier option is to create first your structured list outside LG and then import it. You can use any program you like, such as word or excel. However, keep in mind that you will need to save your planning lists into text format to be able to export them to LG later on.
To make things easier and faster, you can create your keyword list in an excel file. You need to keep the tabulations between the different categories of keywords (in the excel files this means that each category level is in a different column). Once you are done, save the file as text-tabulated to be able to import it to LG.
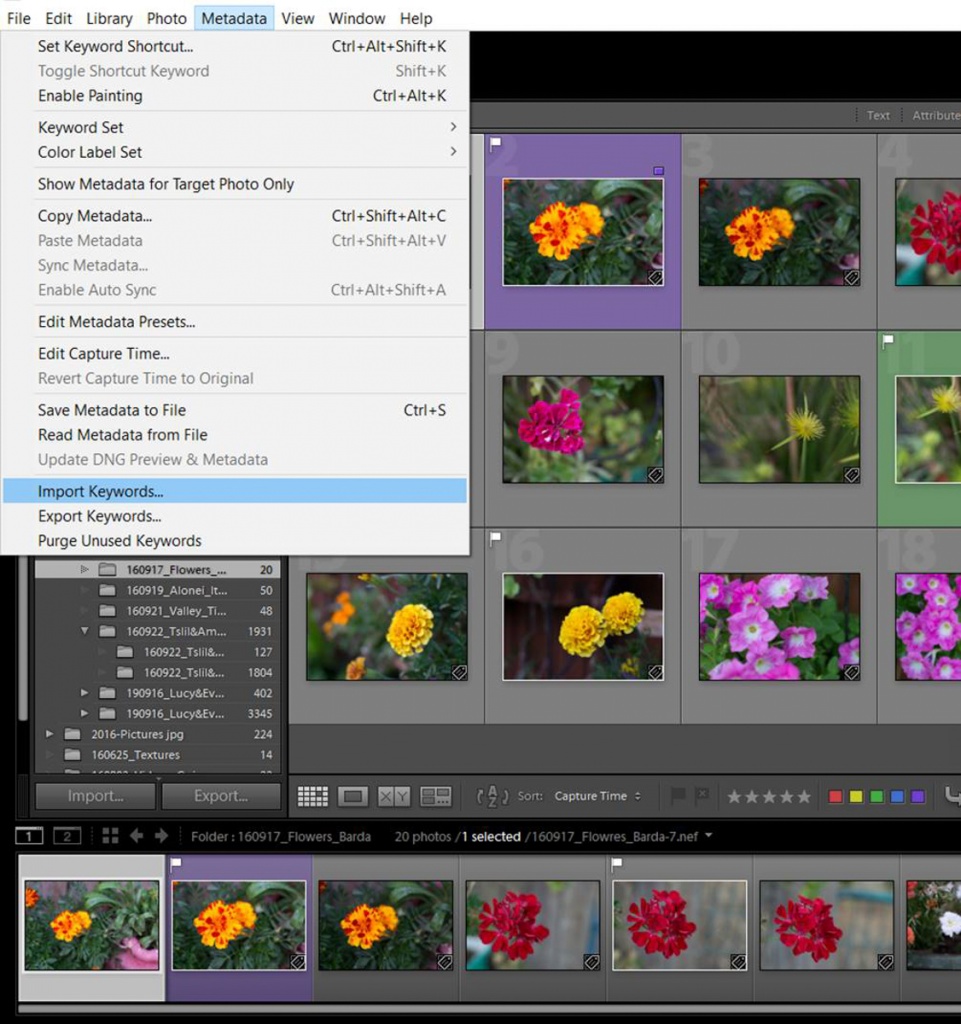
To import your keyword list, you need to go to select “Metadata”in the Library module and then Import keywords. You will see that your list appear in the Keyword list panel.
Keep the keywords inside a reasonable number and keep controlled vocabulary
Keywords can get very complicated if you have a lot of levels in your lists or if you don’t keep a controlled vocabulary. My recommendation is that you start with just a 3-level keywording system and add levels just when you get used to work with keywords. Use all the time the same keywords. It can be useful to have your keyword list next to you (printed or in a pdf version) when you are working. If you start changing the keywords along the way you will lose the whole organization of the system.
Use synonyms
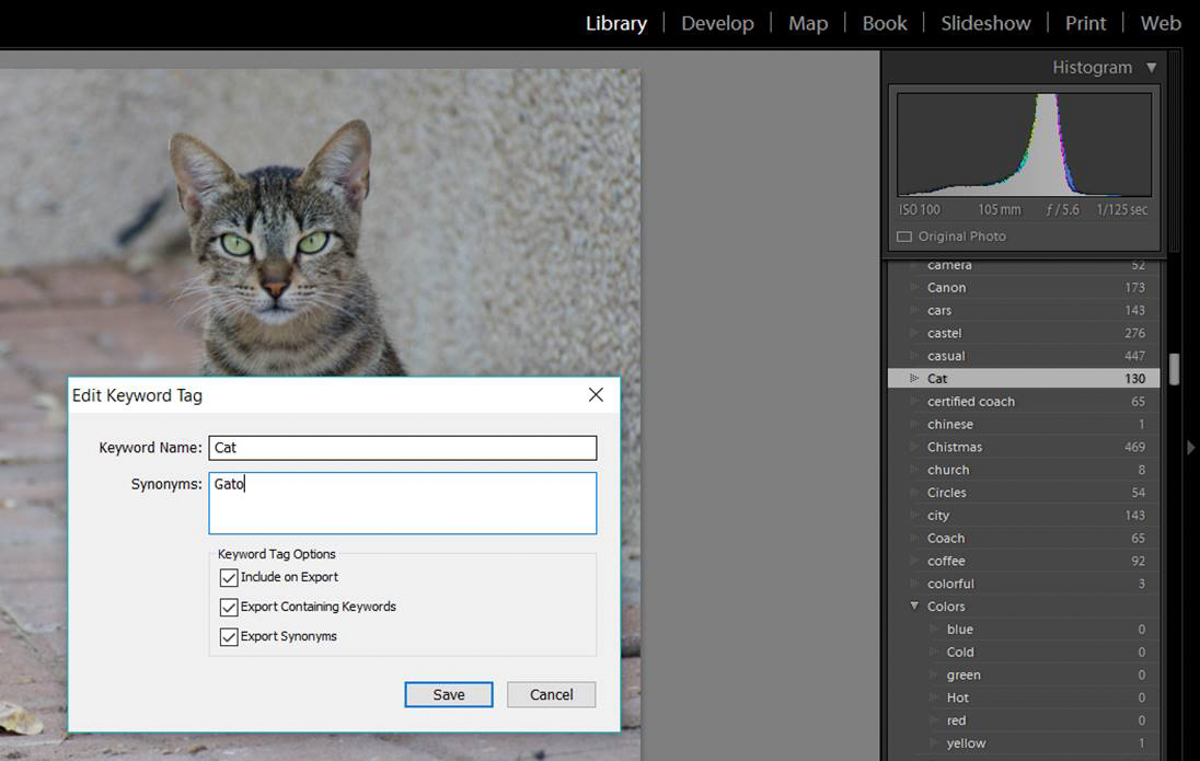
There are times that your keyword might have synonyms. It can be good to add them to your image because then your photo will have more probabilities to be found both inside your catalog and in internet search. You don’t know which of the keyword synonyms people will look for, so have them all on the metadata is a good strategy to increase the chances that your photo will be found. However, adding all the synonyms to the keyword list might make things complicated. No worries! LG have a solution. You can add synonyms to your keyword by double-click on the keyword in the Library module. When a dialog box appears, you just need to add your synonyms in the box labelled as so. Click “Edit” to save change and exit the box.
I use the synonyms to add the Spanish translation of the word. Part of my audience is Spanish speaker, so for me it is important to have the keywords in both English and Spanish. Using synonyms is an excellent way to add languages to your keyword list without getting too complicated.
Do keyword maintenance from time to time
From time to time check that your keyword system is still OK. Do all your keywords match with your planned keyword list? Are any new keywords organized in your hierarchic list? Do you have any unused keyword that you can delete? Reviewing your keyword system will keep it tidy and nice to use.
Ways to add keywords to a photo
You can add keywords to your photos in different ways:
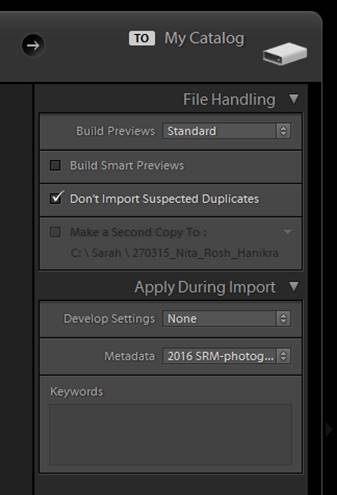
When you import the photos: On the import dialog you will find a section called “Apply during import”. There you will find a panel where you can type the keywords. Keep in mind that these keywords will be added to all the photos you are importing at that moment, so the keywords should be appropriate to all of them. They are usually general keywords.
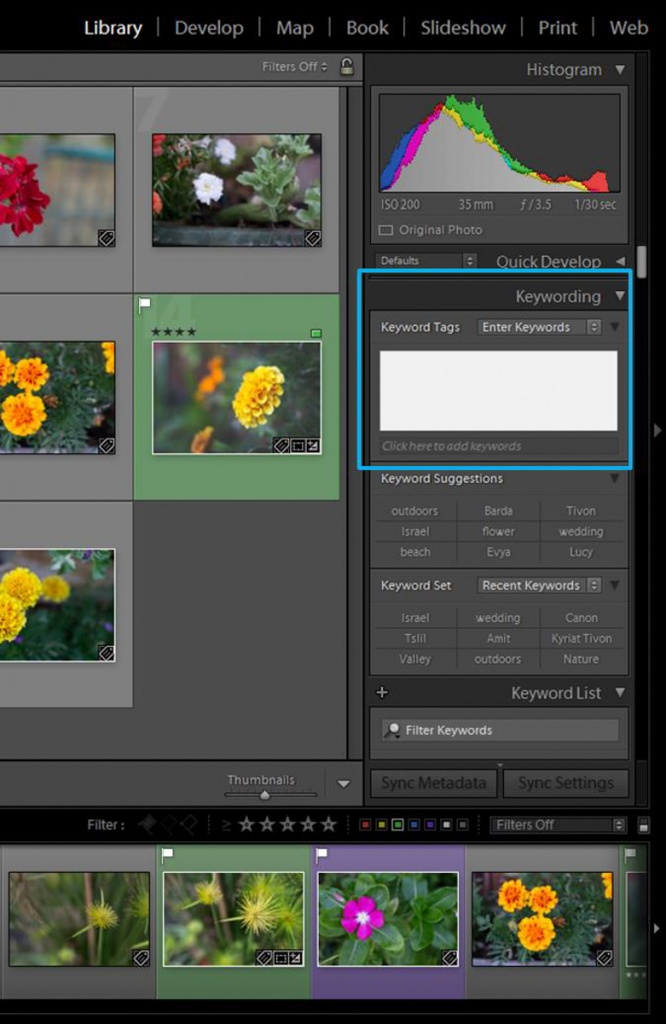
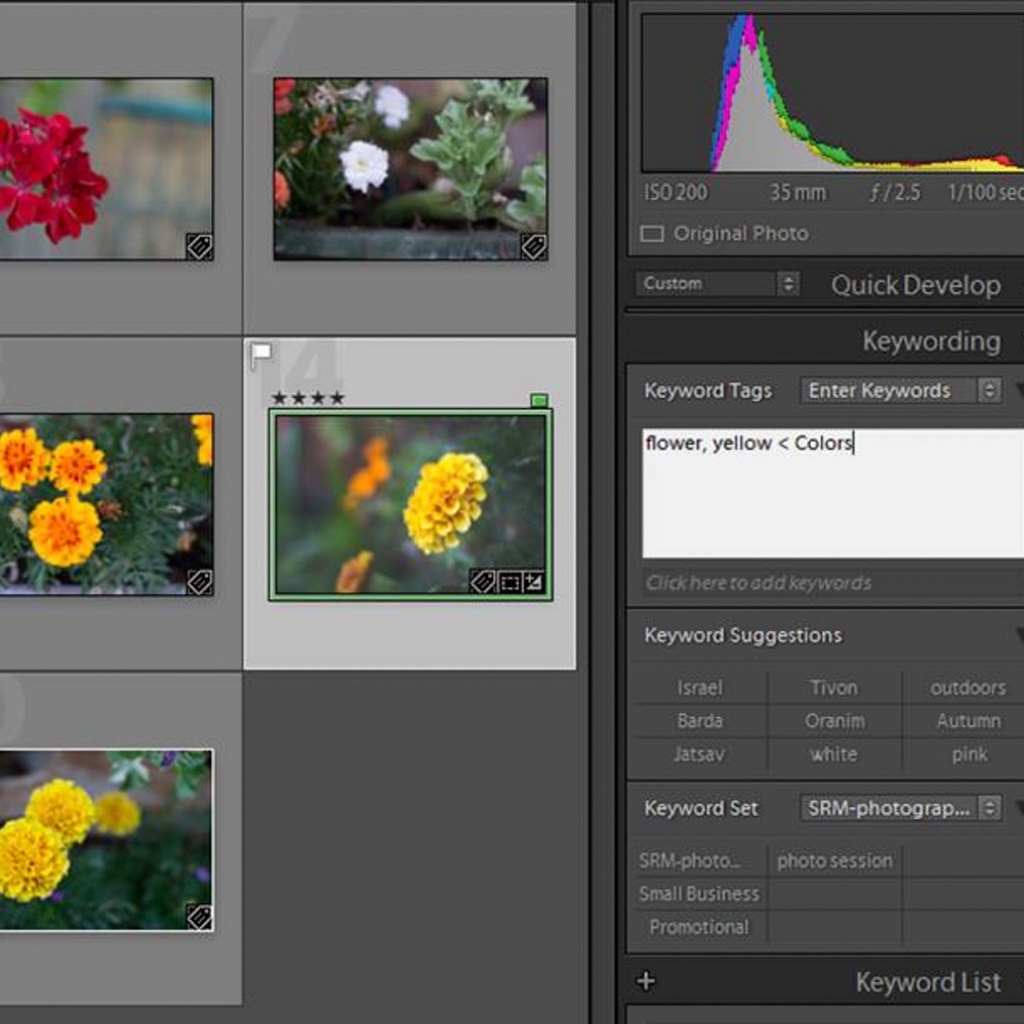
Manually: You can find the Keyword panel in the right side of the in the library LG module. You can add keyboards by type them in the panel or by checking them in your keyword list. You can add more than one keyword by separating them by commas. You can select just one picture to add its keyword or you can select multiple photos (in the Grid view) and add the same keyword to all of them at once.
You need to add the keywords separated by a comma. When you have a keyword with a < sign means that it belongs to that category (in this example, yellow belongs to the category colors)
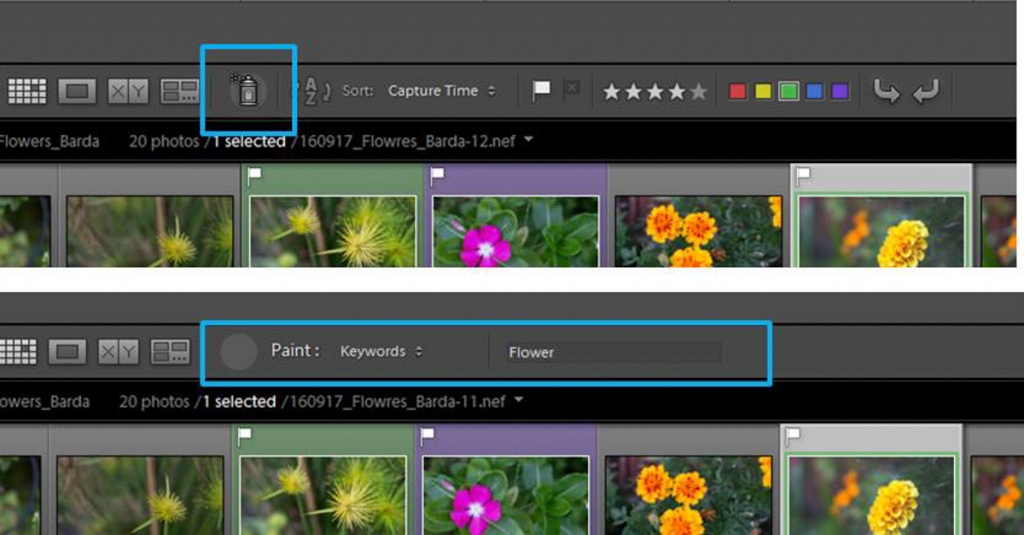
Using the painter tool
Have you ever seen the painting spray icon in the toolbar of your Library LG (In the Grid View!! Press T in your keyboard if you don’t see the toolbar)? You can use it to keyword your photos is a quick way. Select “Keyword” in the list right next to the spray icon. Write the keywords you want to add in the box next to the right and then click in the thumbnails of all the photos in which you want to add them. Easy!
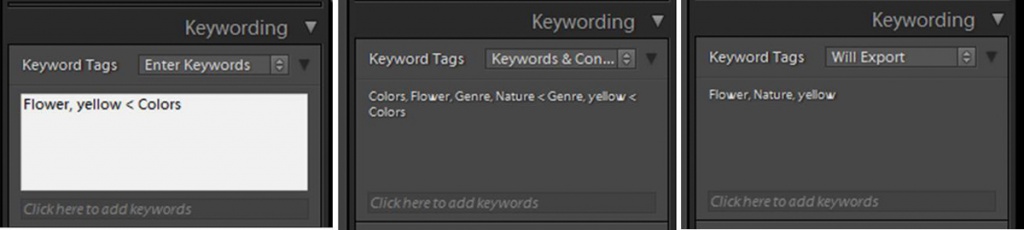
In the Keyboard panel, you can select the way you want the keywords to be displayed. There are 3 options: enter keywords, keywords&containing keywords and Will export
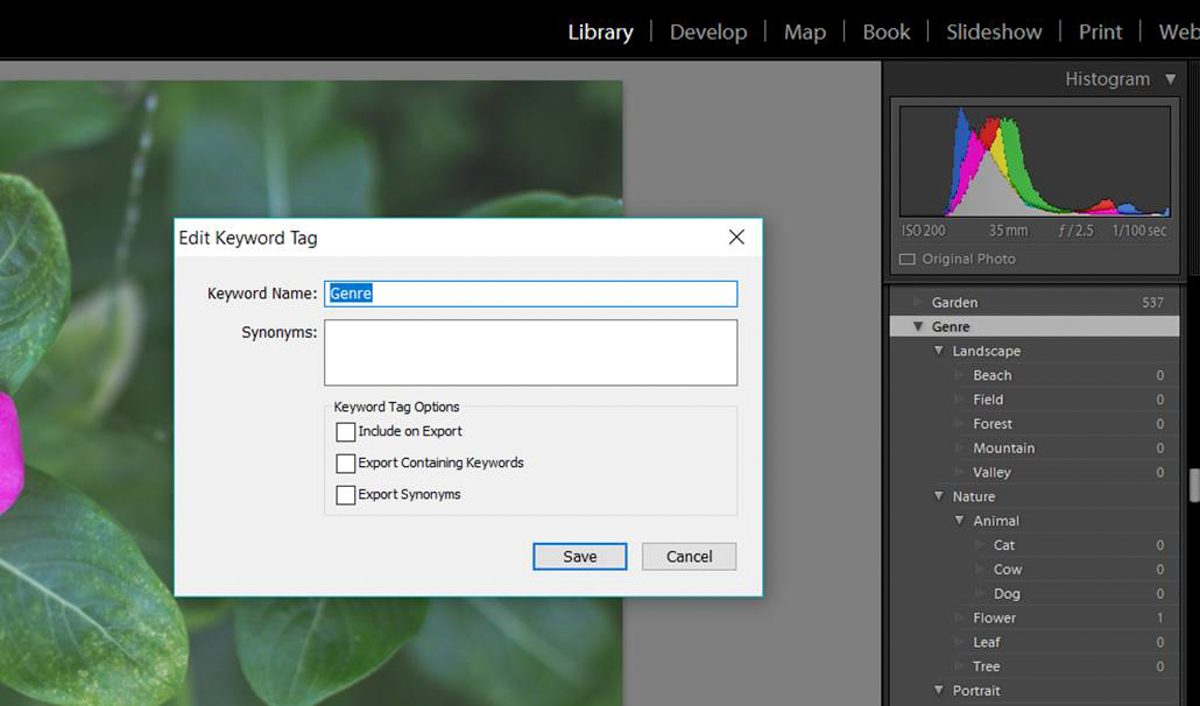
In “Enter Keywords” you can see the keywords that you added. In the “Keywords & Containing Keywords” option you can see all the keywords you added and all the keyword categories above them. In “Will Export” you can see the keywords that will be in the metadata of your photo when you export it. You can see that in my case, “Genre” and”Colors” are not exported. This is because I don’t think they are adding anything to the description of my images (although they help me a lot in the keyword organization), so I decided not included them in the exported image. You can see in the image below how to do it.
You double click in the keyword that you don’t want to include in the metadata of your photo and you uncheck the “Include on Export” option.
Find your photos by keywords
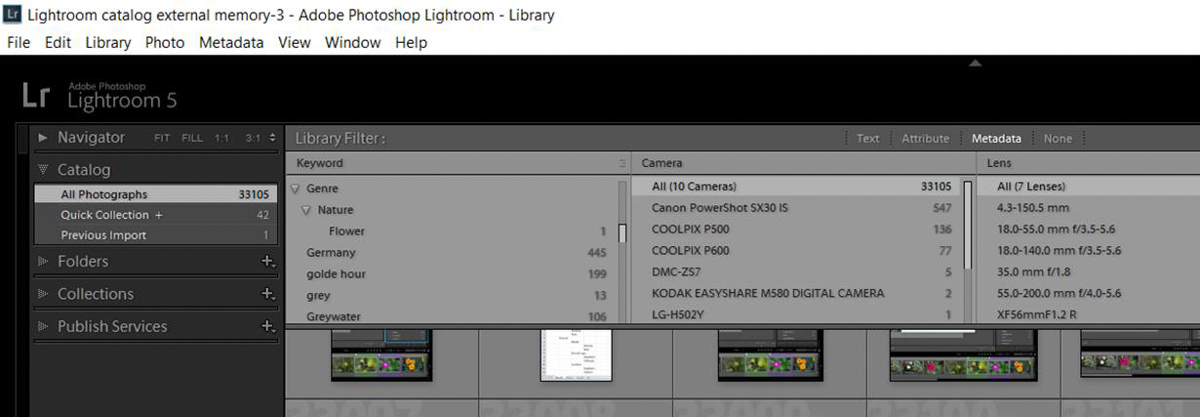
One easy way to find the photos containing a keyword is using the Filter Bar of the Library module (press \ in your keyboard if you can’t see the Filter Bar). In the “Metadata” label, you can find a section with all your keywords. Select the one that interest you and LG will show you all the photos that were labelled with it. If in the left panel of the Library you have selected “All photographs”, LG will look for the keyword in the whole catalog. If you want to look for the keyword in a particular folder, just select it before starting the search.
In the keyword Library Filter you can access to all the photos you labelled. You can see that I can select photos I took in Germany for example. You can also see here one of the mistakes I made with my keywording. I have 199 photos tagged with the word “golde hours” instead of “goldeN hour”. This is because I was not consistent with the vocabulary i my keyword list. I need to fix that!
I hope you find all these information about keywords useful. If you are starting your LG catalog now, it is a good time to establish your keyword system. If you have already a pretty big catalog (like I do), take it easy. Don’t try to keyword all your images at once because it is a gigantic task. Better divide it in several working blocks. I saw that for me it is good to work on the keywords for half an hour or so and rest. Depending on the day, I do one or more working blocks. I am not in a hurry, so I don’t push myself. However, I think it is really useful to have a good system of keyboards, so I work on it whenever I have the chance.
What a LR collection is?
A collection is a way to group photos in one place. Collections allow organizing photos for easy viewing, improving your workflow or for performing other tasks. You can find the collections in the Collections panel of for example the Library module.
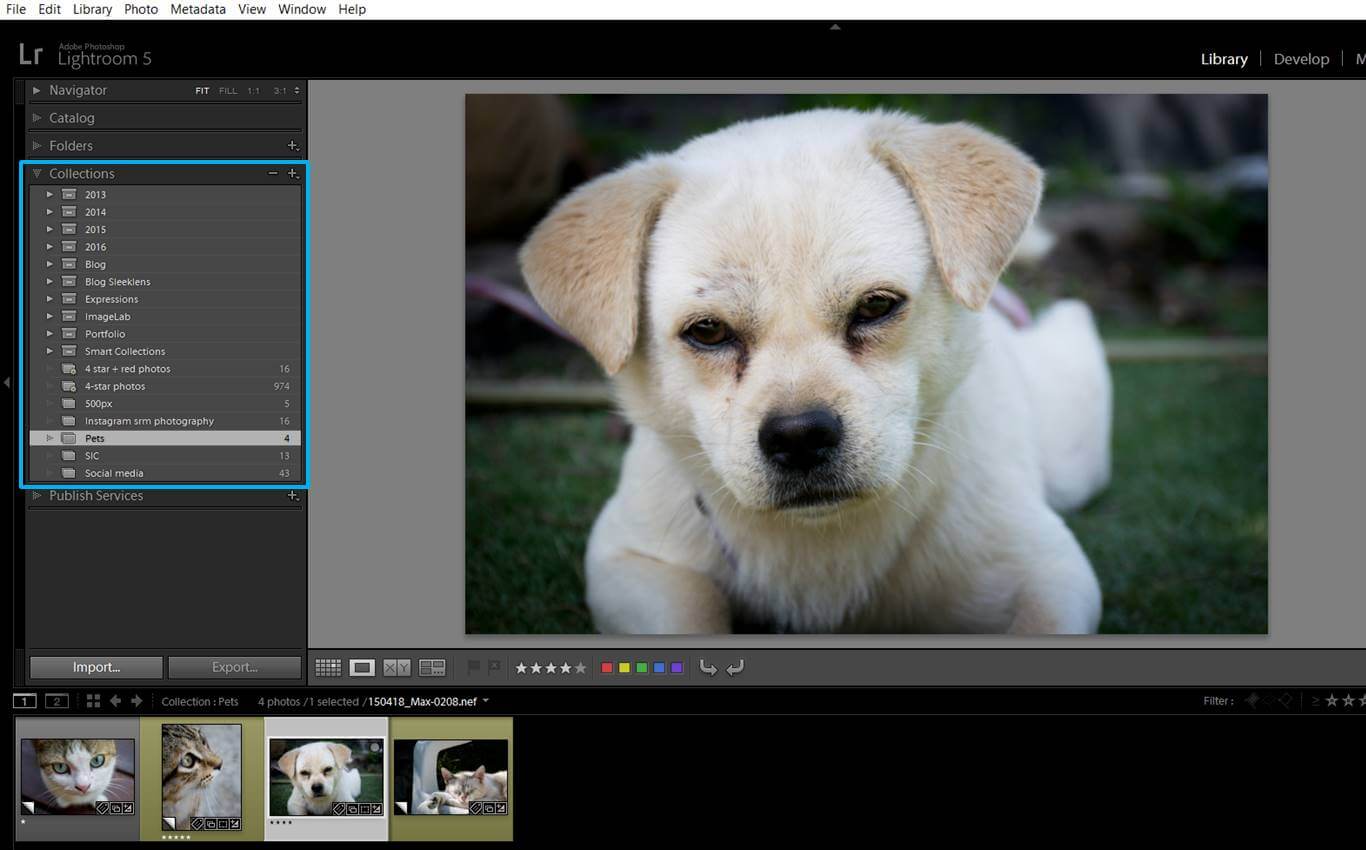
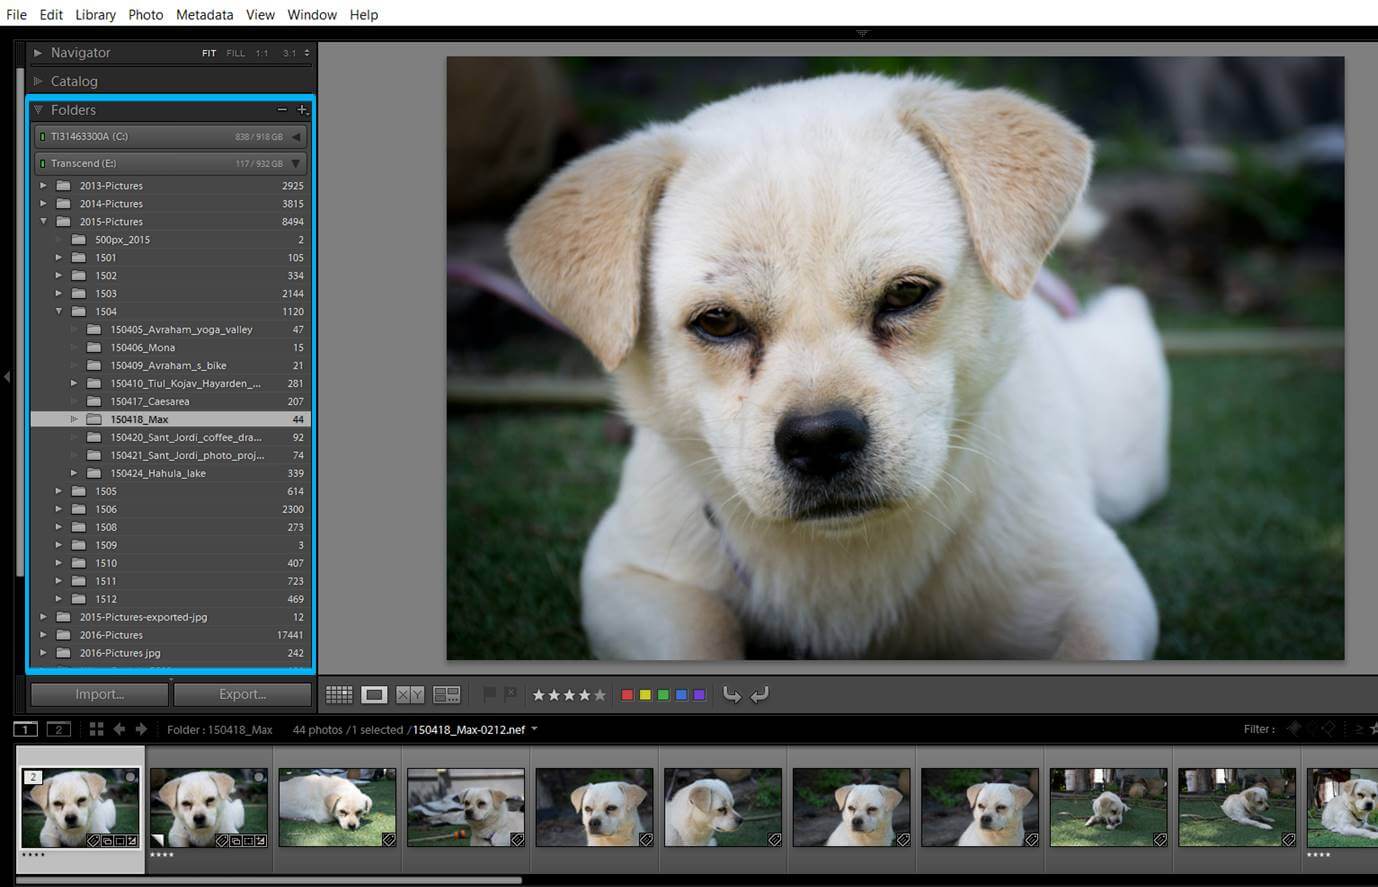
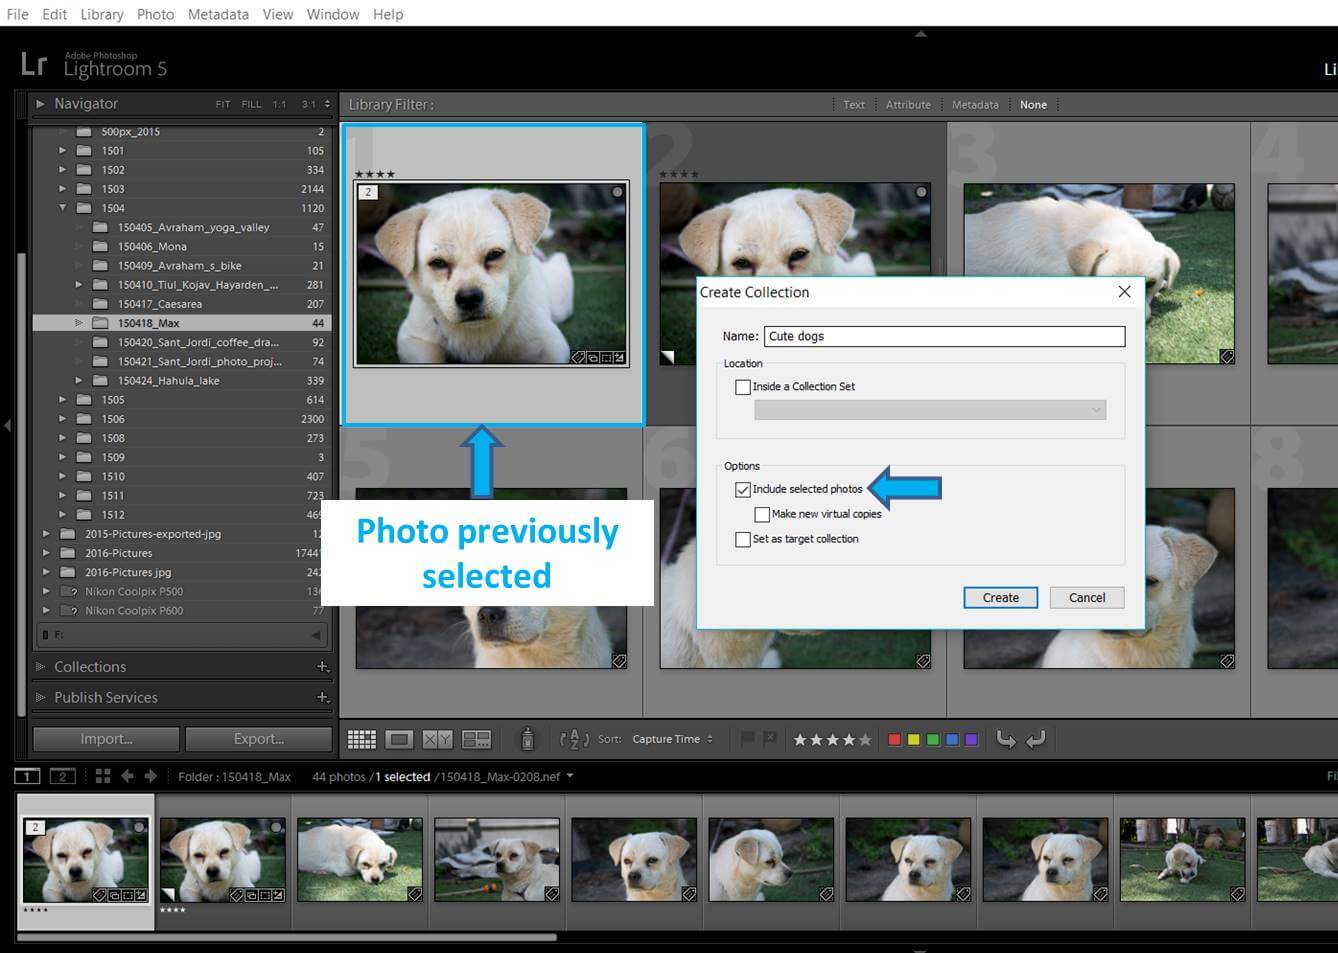
At first Collections might seem pretty similar to folders, but in fact, they are much more flexible. Collections can include just a selection of photos from a folder or a combination of photos coming from different folders. One photo belongs to just one folder, but it can be in different collections. For example, I can have a picture of a dog in its folder (I usually name the folders with the date+relevant name. This dog photo is in a folder called “150418_Max because I took it the 18th April 2015 and the dog is called Max”). The photo belongs to just ONE folder unless I copy paste it to several (but if I do so, things starts getting complicated here).
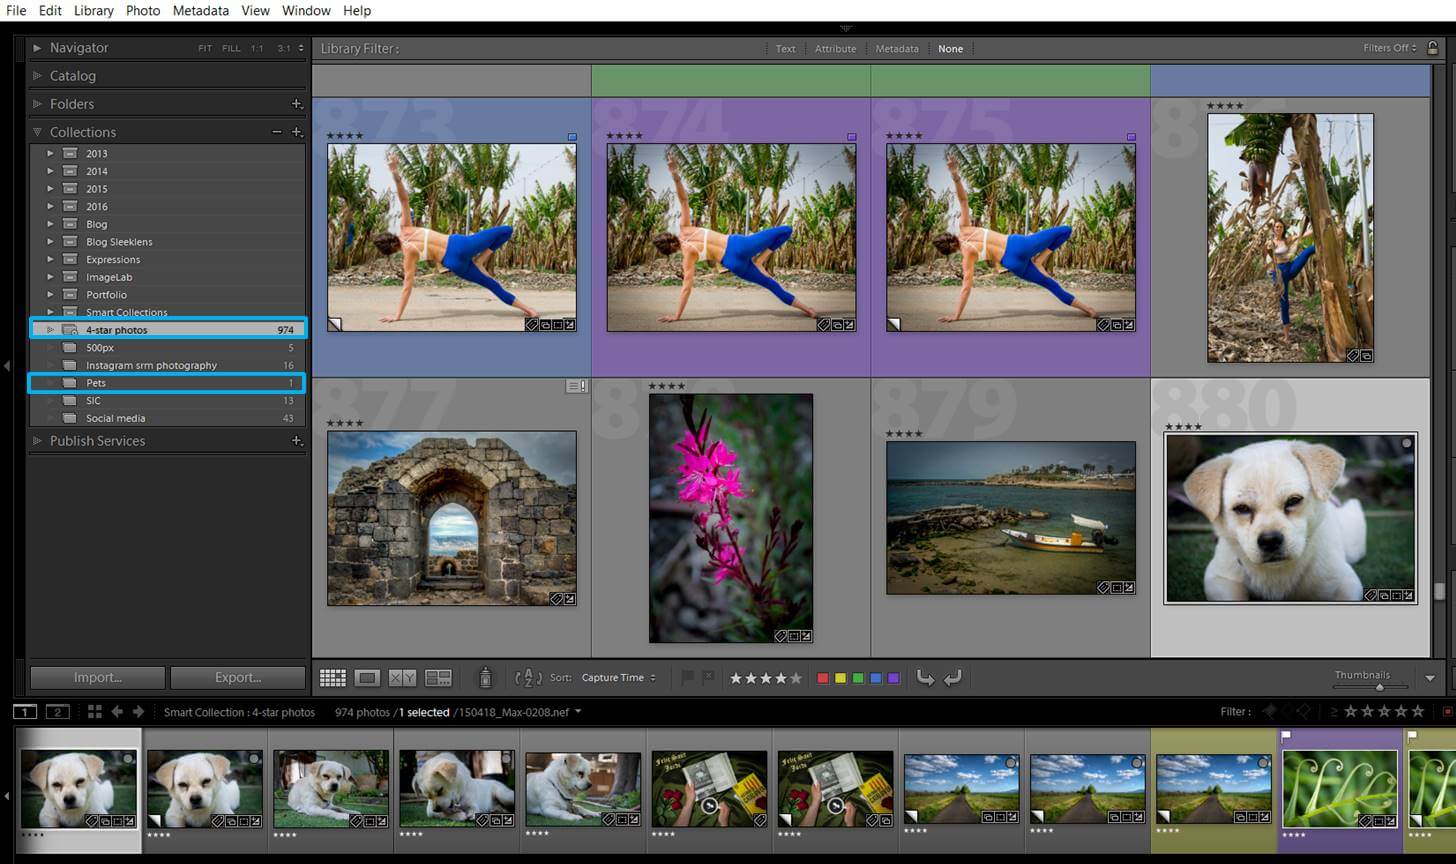
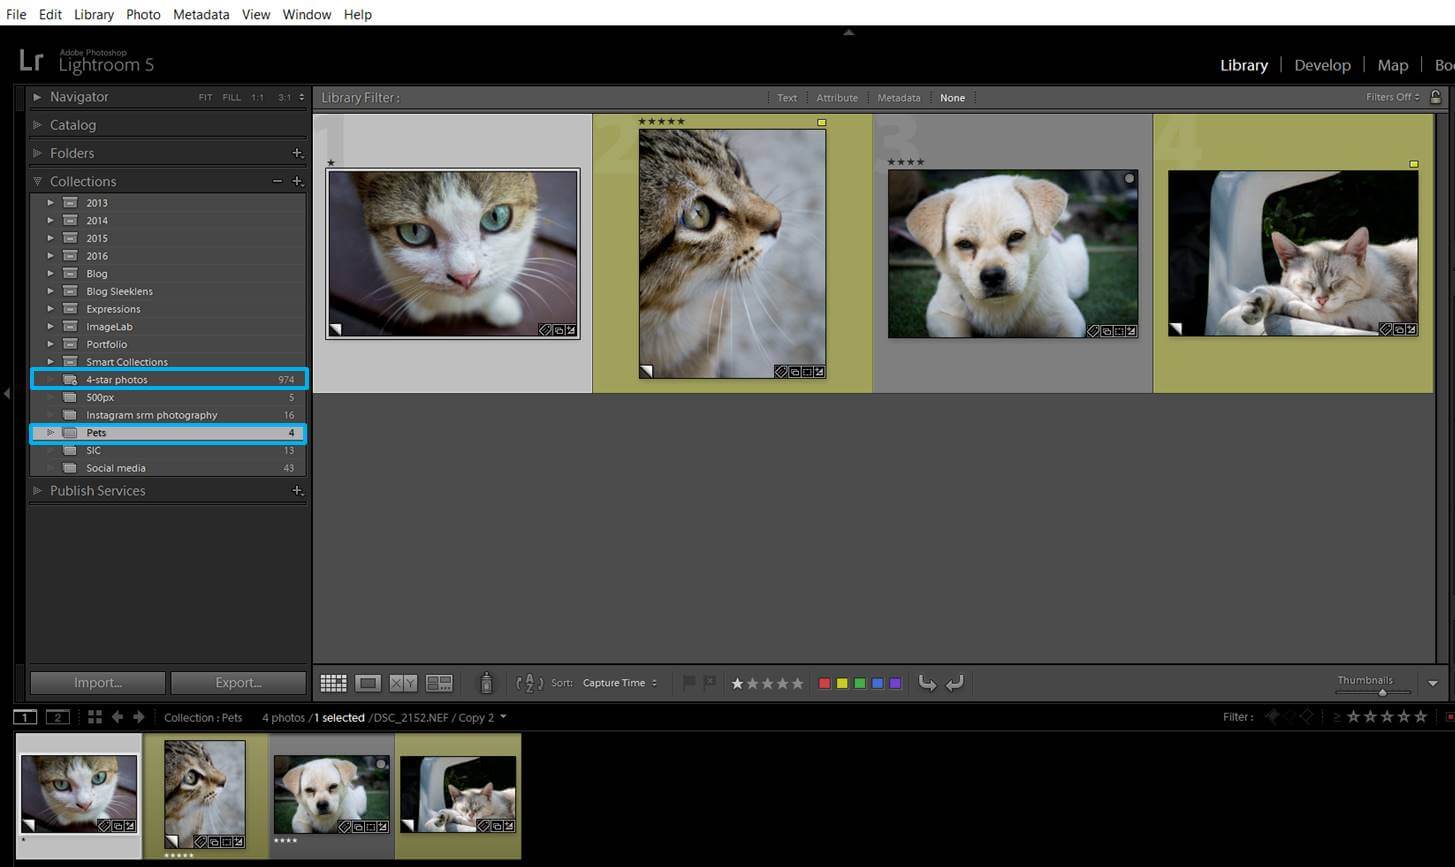
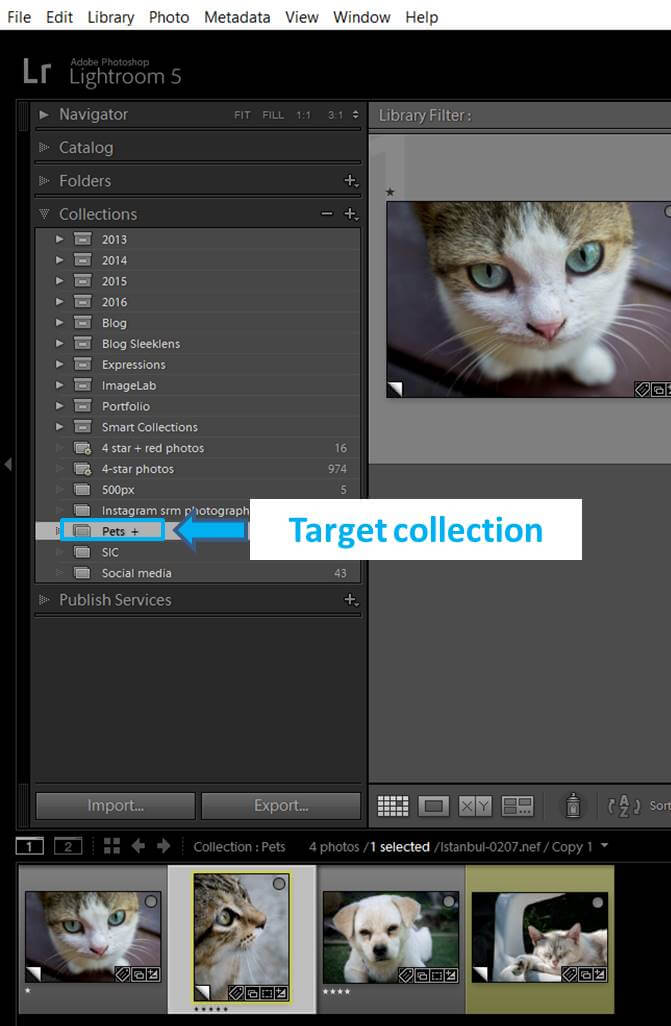
However, this dog can be in several collections. This image is in both my “Pets Collection” and my “4 star Collection”.
Here you can see Max inside my “4 star photos” collection. But you will see that Max is also in the “Pets” collections (marked in blue in the Collection panel).
Here you can see Max inside my “Pets” collection.
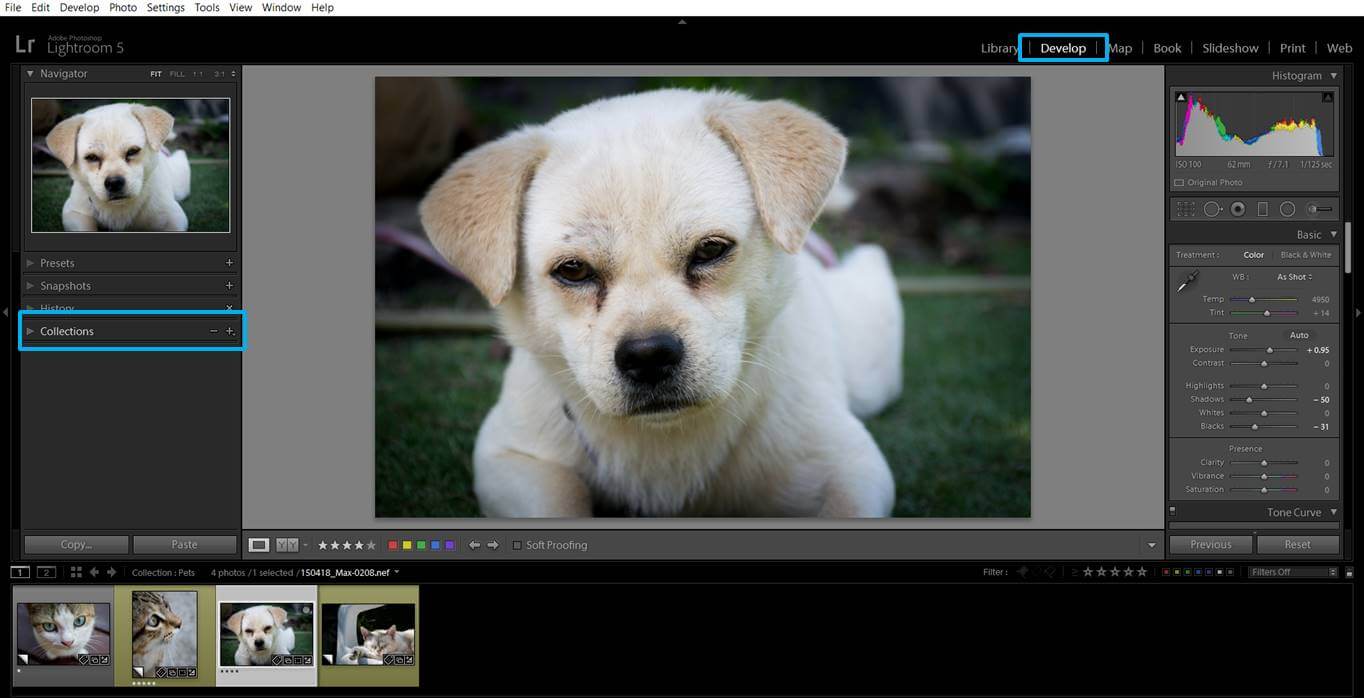
Collections also have another advantage over Folders. You can access to the latter just from the Library module. However, you can access to the Collection panel from any of the LG modules, including the Develop one. This is handy because you won’t need to leave the develop mode in order to move from one collection to the other.
LR collection types
The 2 types of collections that I use the most are Smart and Regular collections. Here I will explain to you the difference between them. In the next section of this article I will tell you how to create them.
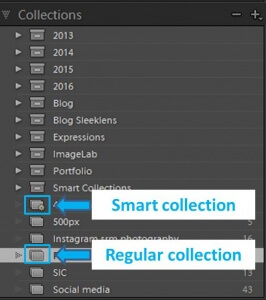
Icons are different for regular and smart collections.
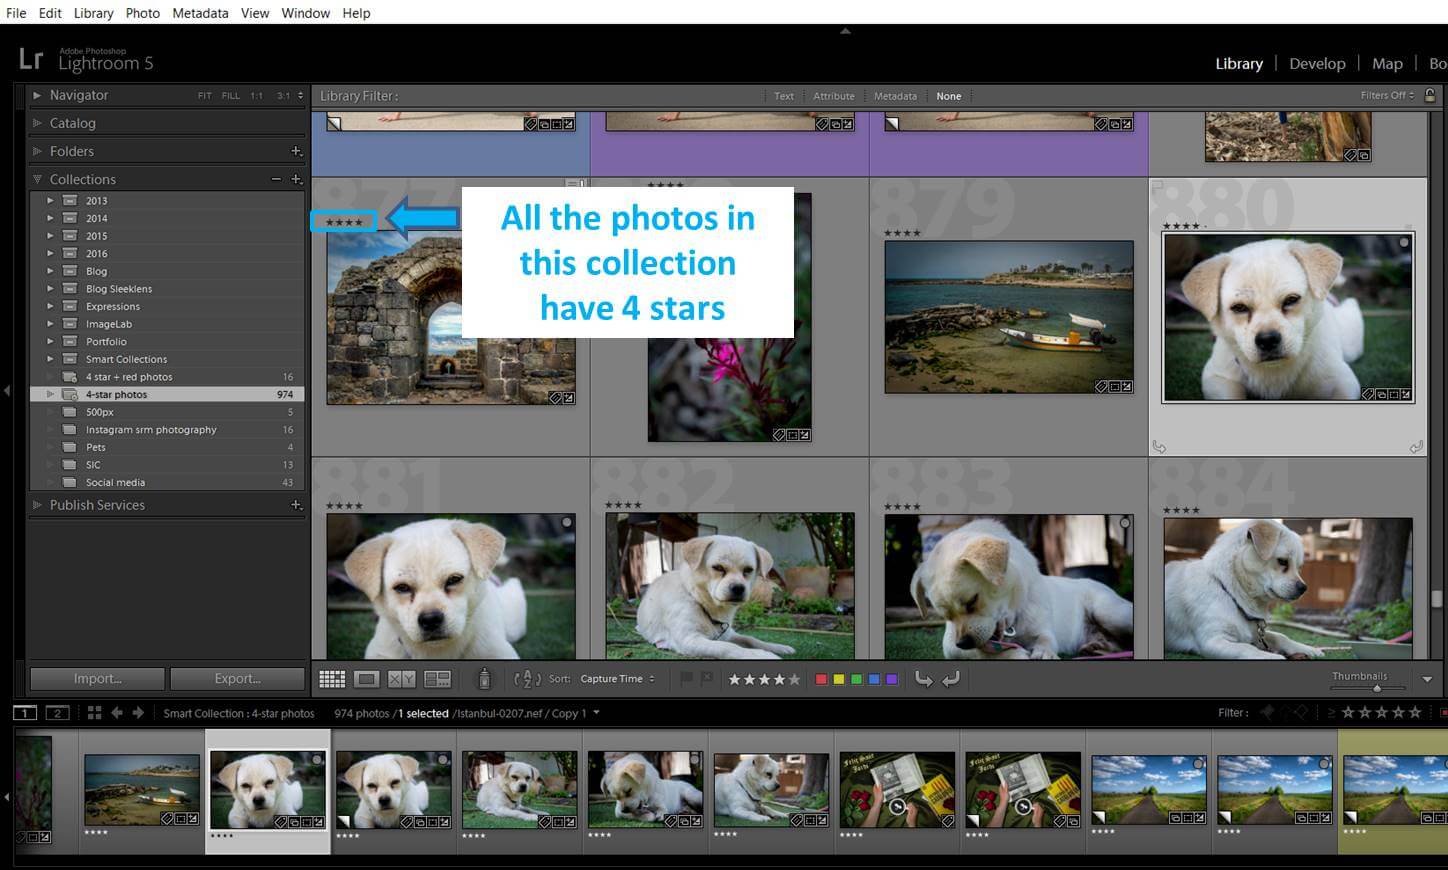
A smart collection is that one that uses a filter in order to group your photos. One smart collection can include for example all the photos that you have tagged with 4 stars. Smart collections are dynamic. If you change the definition of the filter, the photos inside the collection will change accordingly. If you change the description of the photo, it might appear or disappear from a smart collection. For example, if I change the stars of one photo from 4 to 5, this image will disappear from my “4-star Smart collection”.
A regular collection includes the photos you personally select, meaning that it requires more effort to build and maintain. However, regular collections have some advantages too. They allow you to reorder your photos by selecting them in the Grid view and drag them to the new position (you can’t do it in Smart collections). You can also choose one of your regular collection and make it the Target Collection. You can have just one target collection at a time. Then, when you select a photo and press “B” in your keyword, this image will be added to this collection.
How to create a LR collection
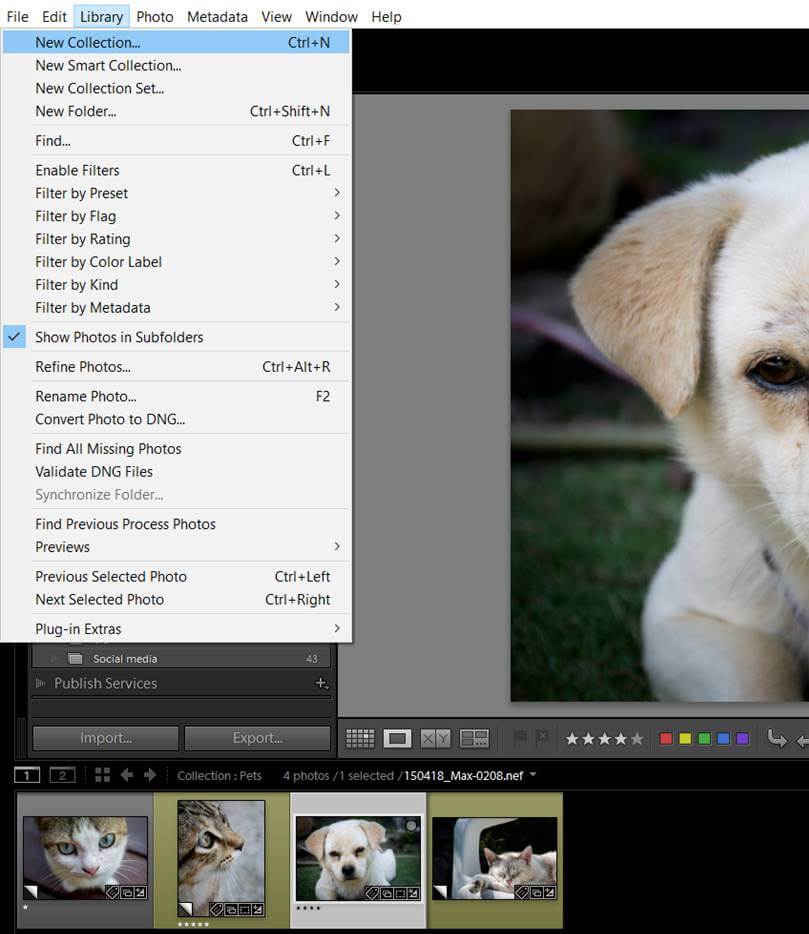
Now that you know what a collection is, you might be wondering how to create one. You can do it in 2 ways. In the Library module, you can select Library>New Collection for creating a regular collection or Library>New Smart Collection for the smart ones.
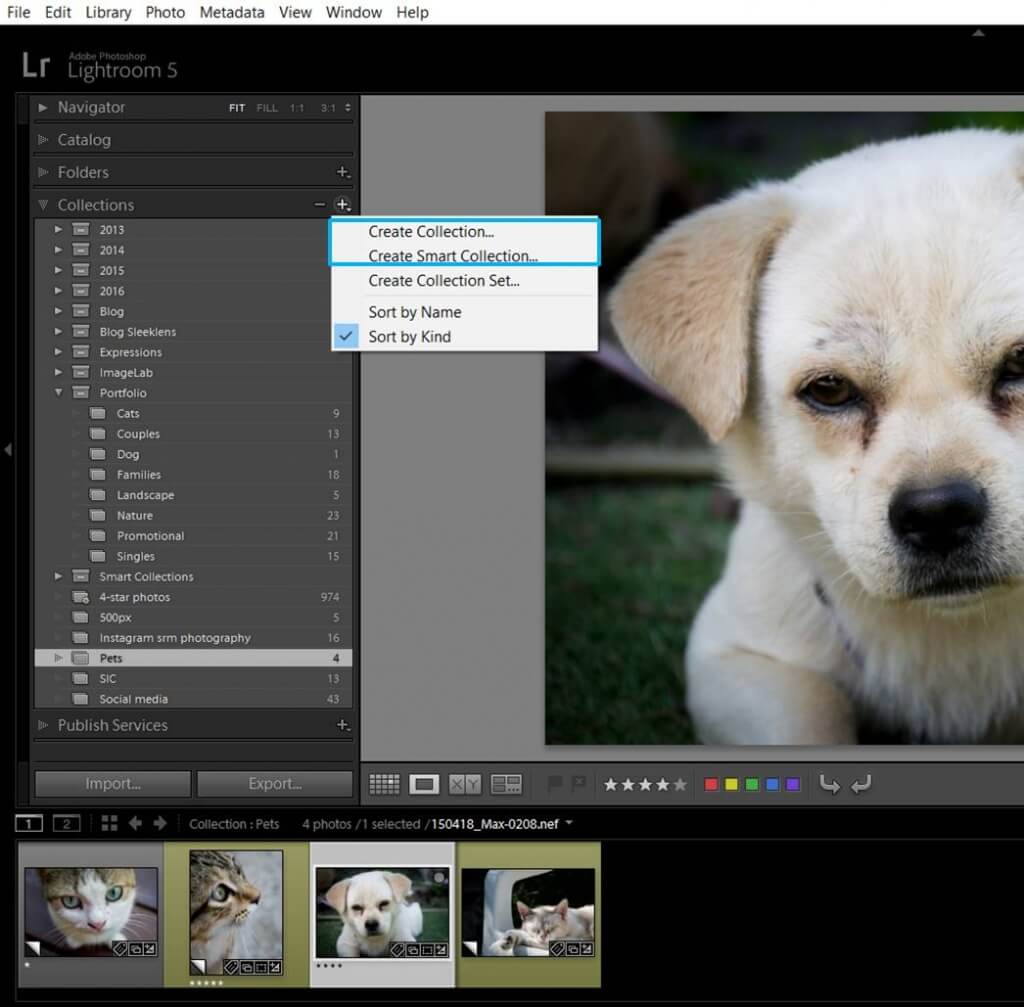
Another way is to click in the Plus icon in the Collection panel. You can access to this icon from any LG module.
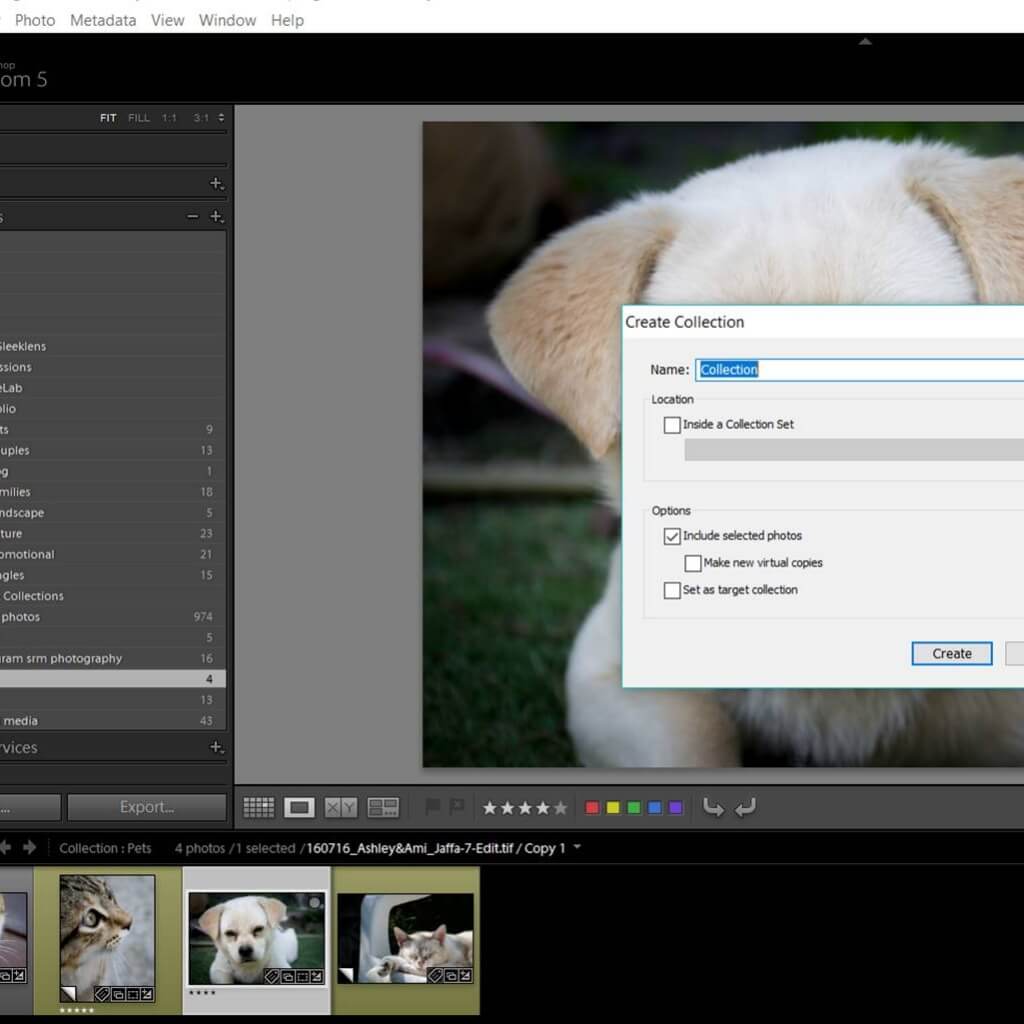
In case of the regular collection, a dialog box will open and you will be able to name your collection.
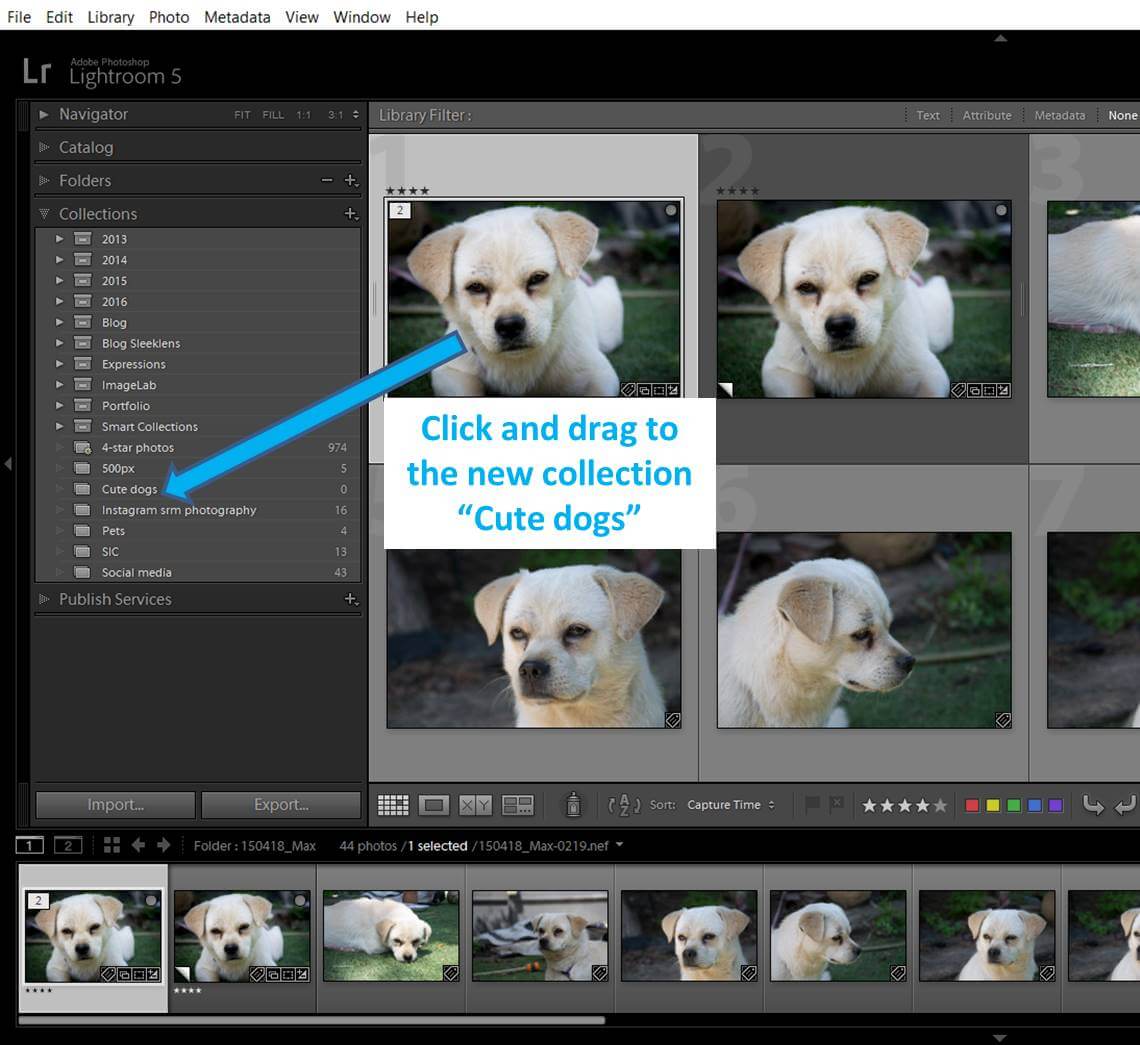
You can create an empty collection and then drag your photos from the Grid View in the Library mode.
Here I created a new collection called “Cute dogs”. You can see it is empty because next to its name there is a 0 (number of photos inside the collection). To add our doggy Max to the collection we just need to drag the image into it.
You can previously select the photos you want to include in the collection and when you get to the dialog box check the option of “Include selected photos” creating it including the already selected photos.
In the dialog box you can make the regular collection your target one by checking the box “Set as target collection”.
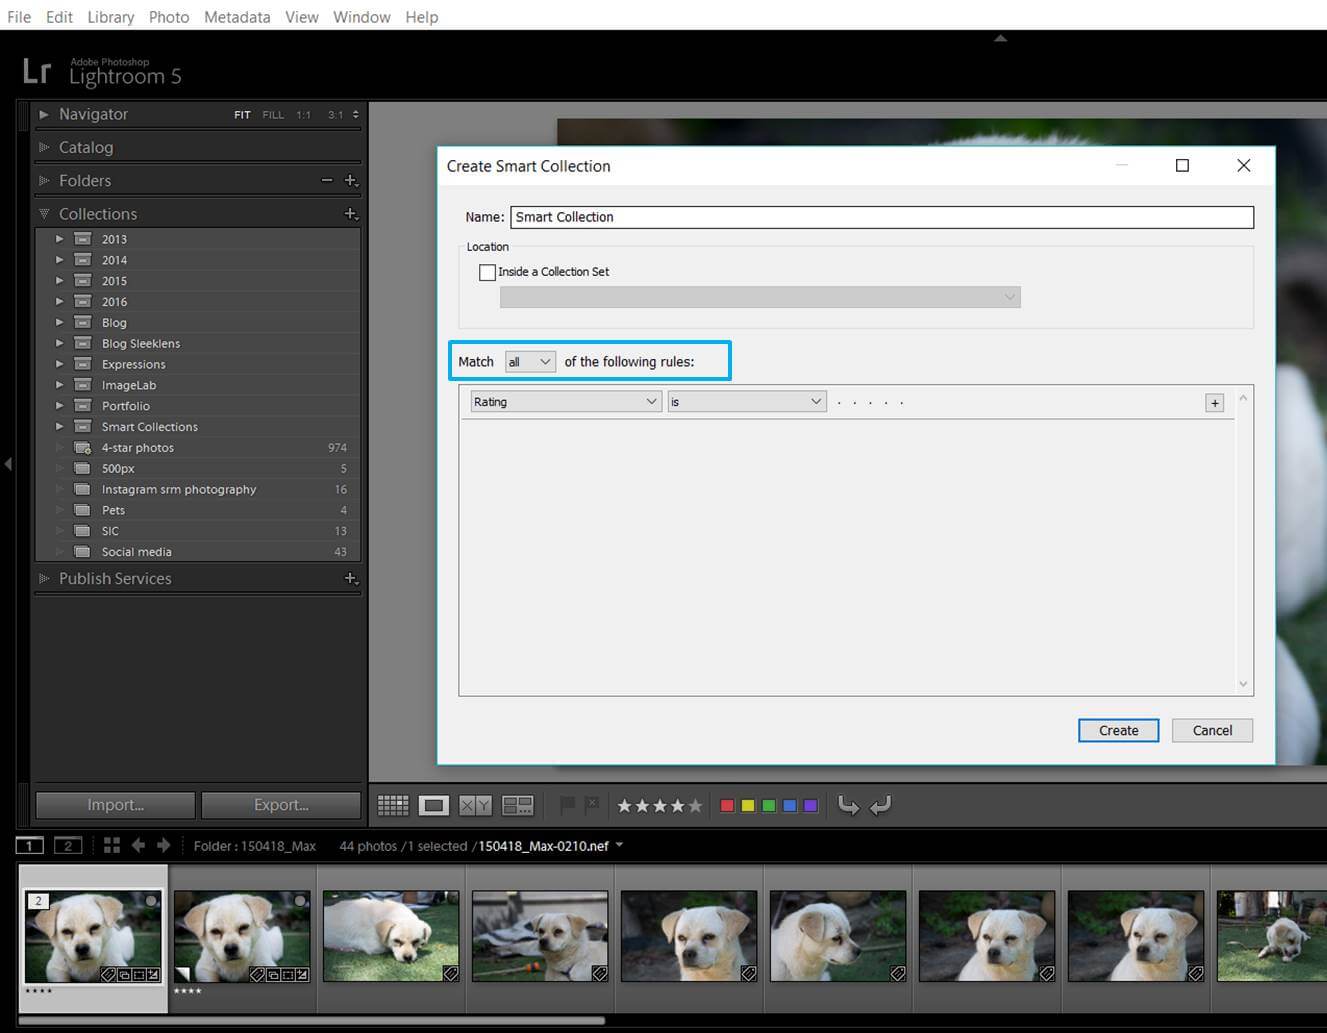
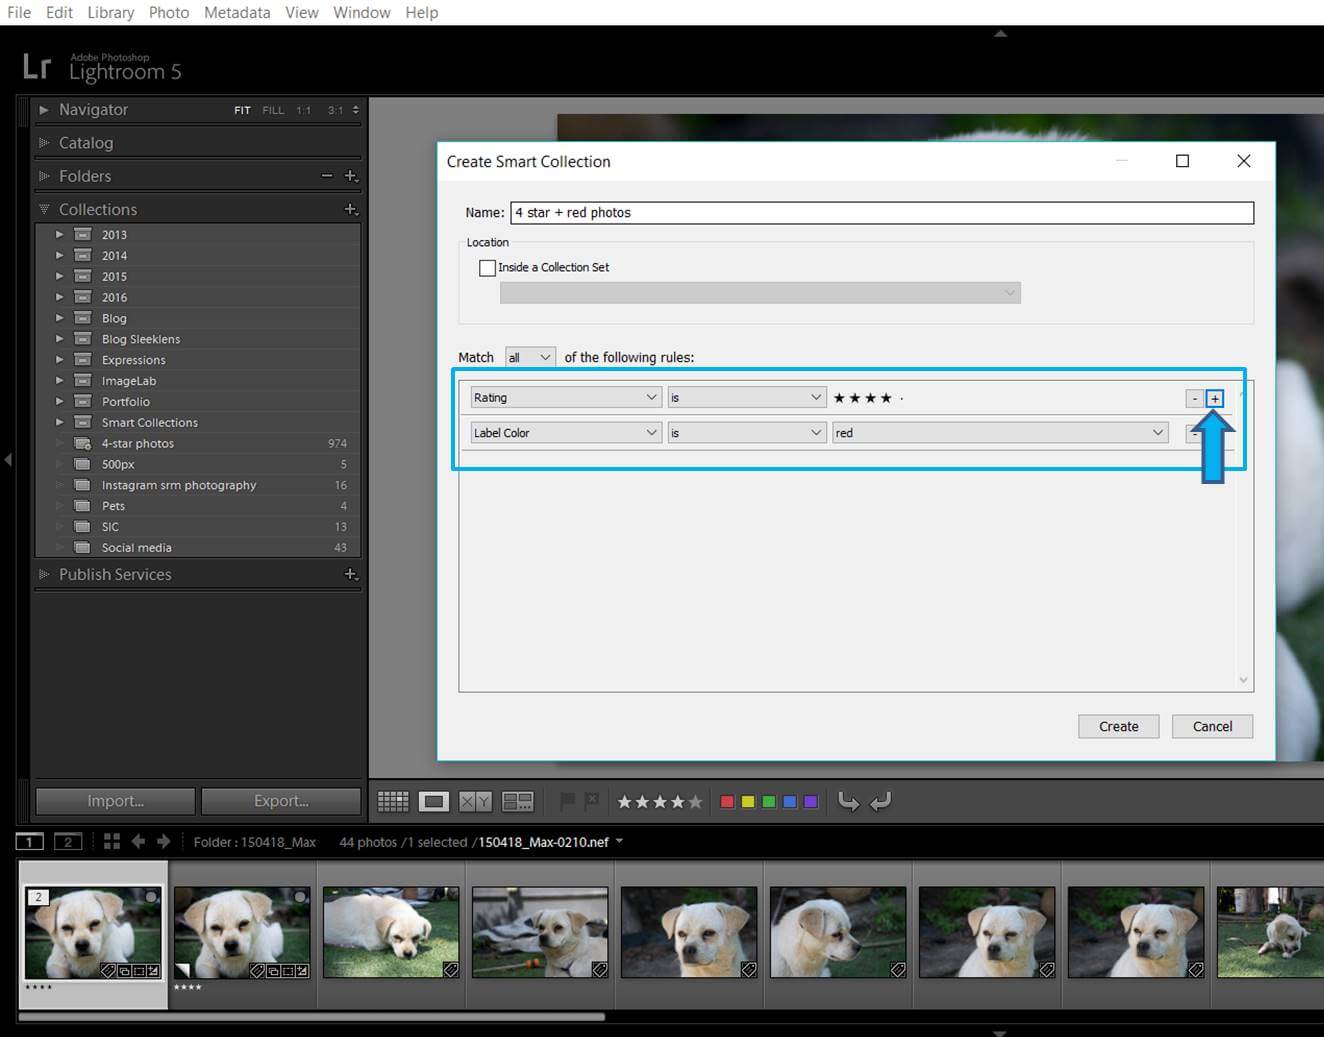
The dialog box for creating a smart collection is different.
You can name the collection and determine the rules of the collection. You can also say if all the rules need to be matched, just any of the rules or none of the rules. You can add rules regarding rating (stars), flags, label color, label text (keywords) and more!
Clicking in the “+” icon you can add more criteria to your smart collection.
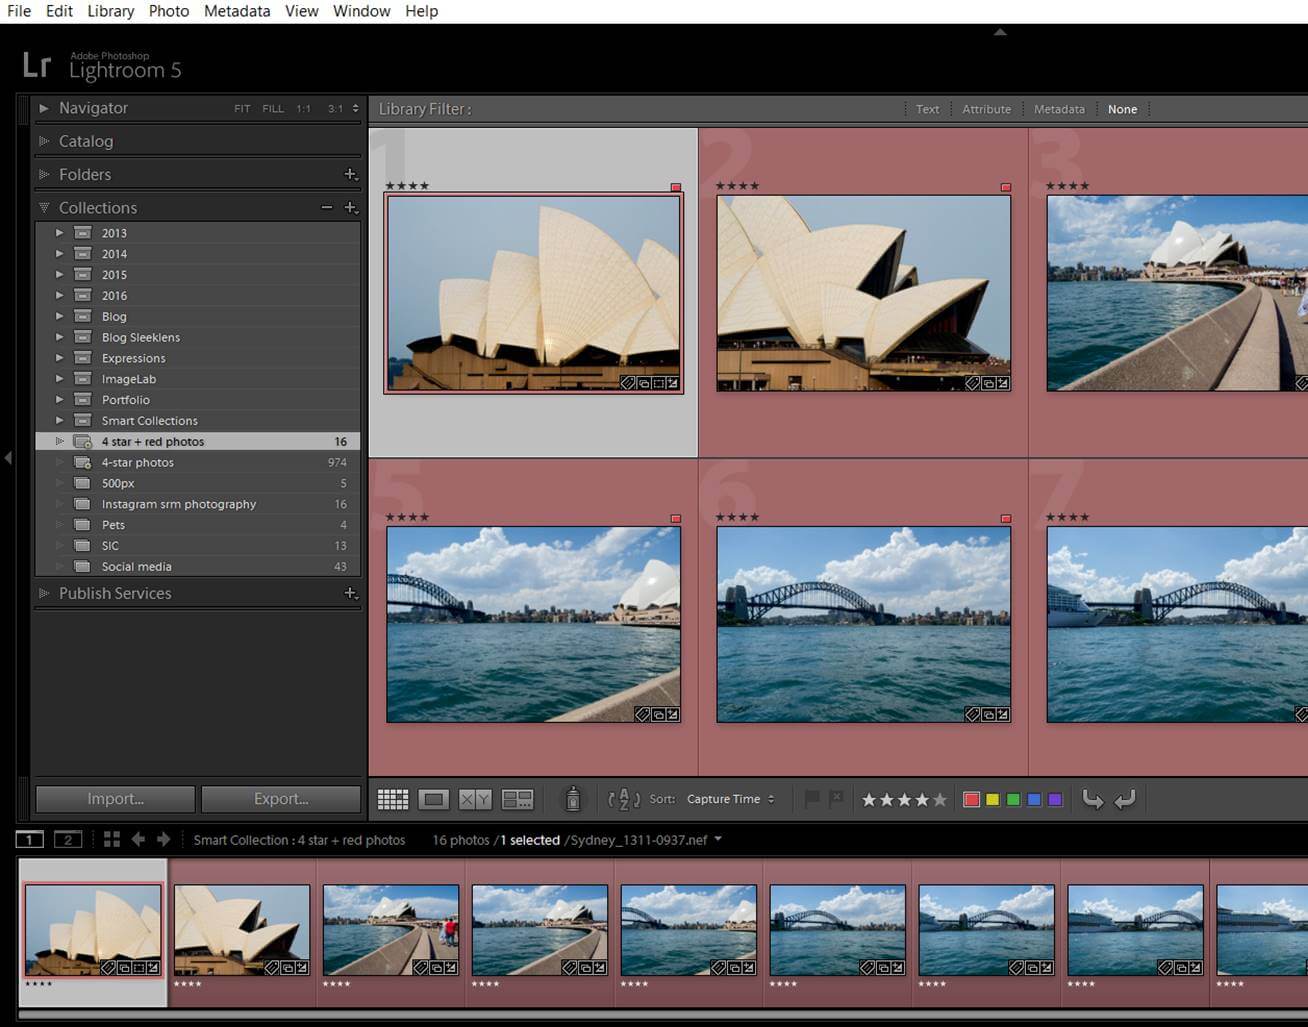
Once you create the collection the photos from your catalog that matches the criteria will automatically appear in the collection.
16 photos filled automatically my collection because all of them match the criteria of being labelled in red and having 4 stars. No other photos in my catalog matches both criteria.
Other things you should know about collections
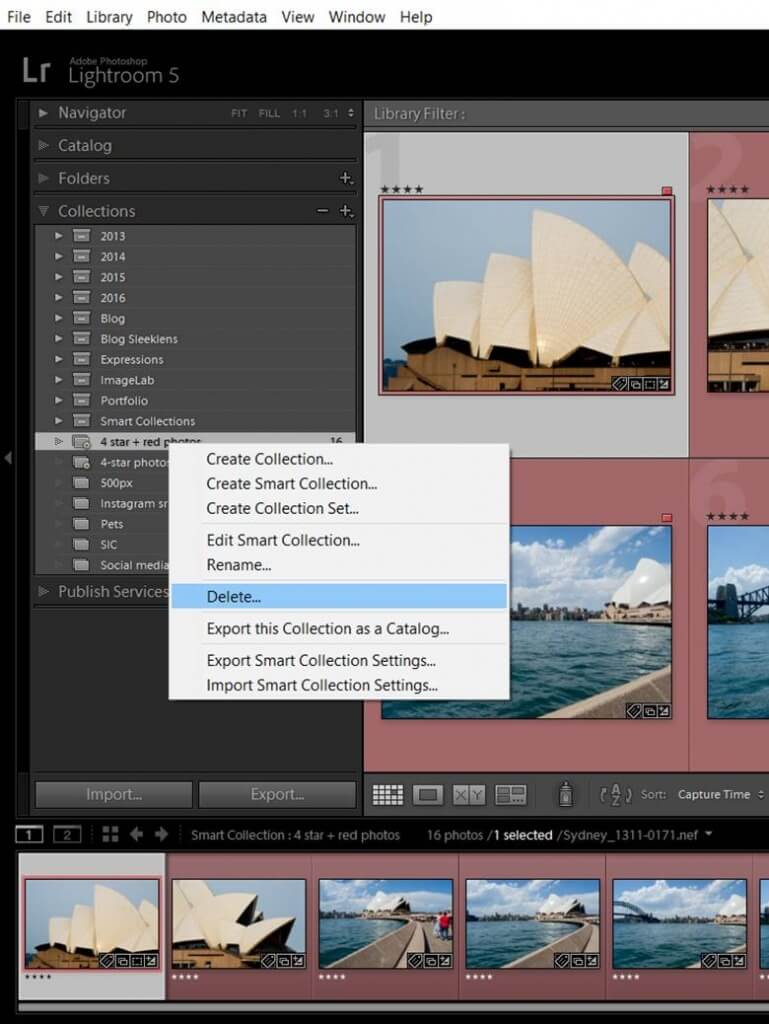
You can delete a collection by just right-clicking on its name and selecting “Delete”.
You can delete a photo from a regular collection just by selecting it and clicking “DEL” in your keyword. The photo will disappear from that collection, but it will stay in its folder and in any other collections that it belongs to. You can’t delete photos from a smart collection. In that case, you will need to change the metadata of the photo in a way that it won’t match the criteria of the smart collection any more. Then it will disappear from the collection automatically.
You can organize your collections by sets. To create a set you can do it in the same way than to create a collection, but this time you select “New Collection set”. A dialog box will open and then you can name your set. Under a set you can have several collections.
Collection sets have their own icon: a box
You can both select a collection and drag it to the set you want or you can assign a set to the collection when you are creating it.
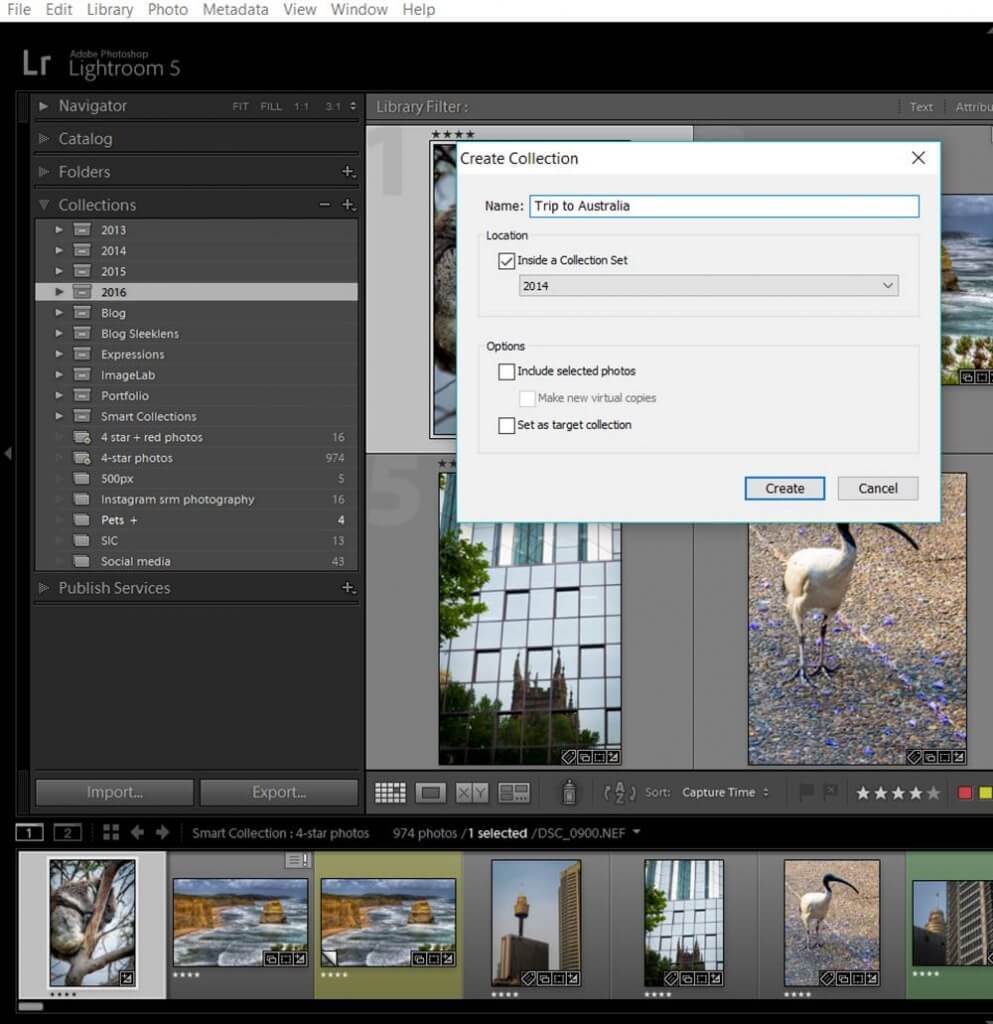
Here I am creating a collection called “Trip to Australia” and I am assigning it already to the Collection set “2014”.
Have a look at the smart collections that LR has already created for you
LG has already a set of smart collections that can actually be handy. LG called the set “Smart collections” and it includes 6 collections: Colored red, Five stars, Past Month, Recently modified, Video files and Without keywords.
In the colored red collection you will find all your images labeled this way. In my case, I use red to label the photos that I use to build panoramas. If I am looking for them I just need to go to this smart collection instead of looking through all my folders. You can use the red color to label other kind of photos: your family photos, the HDR raw images, your nature photos…
The Five stars collection works in the same way as the colored red collection. Any photo that you will label with five stars will automatically appear in this collection. If you are like me, you will give 5 stars only to your best photos. In that case, this collection is a pool of your best images and can be used to build your portfolio. Instead of looking through several folders to select your best images, you will find them all in this smart collection. Pretty handy, isn’t it?
The Recently modified folder includes photos that you modified in the last 2 days. It is good for finding the photos you have been working on lately. You have also one folder for the photos you transferred to LG in the last month and one for the videos. Finally, you have a Without keywords collections. If you have a keywording system, it is good to localize all the photos that don’t have keywords in order to add them. This folder exists for that reason.
As you can see, I have 5369 photos without any keyword. These are photos that I added to the catalog before I set my keywording system. This Without keyword” folder allows me to have them localized and I can go easily over them and add the keyword that they need.
Post- processing Collections system
I found this system genius. I read about it on Scott Kelby’s blog and I want to share it with you. This system uses collections to narrow down all the images you take in a photo session to the ones you want to edit. First of all you create a collection set with a relevant name for you and under this set you will create either three regular collections or three smart collections (Full shoot, Picks and Selects). I will explain to you the latter option in the following paragraphs.
First of all I added a unique keyword to all the photos of the folder I am working with. In the example I was working with a folder of photos I took on the 22nd of May, 2016, around Tivon (Tivon is the name of my town in Israel). I selected all the photos in the Grid mode and I just added in the keyword panel “Around_Tivon”.
Then I created a collection set with a relevant name for me. I used the date+relevant name format: “160522_Around_Tivon”. If you need a reminder of how to create a collection set have a look to the previous blog. After this I created inside the collection set a smart collection called “01-Full shoot_Around_Tivon” that includes all the photos with the unique keyword I just added to all the photos “Around_Tivon”. This collection will include all the photos I took that day.
From all the collection, I flagged the ones I wanted to work with. You can check how to flag a photo in the first blog of this series with Tips for organizing your photos with Lightroom. Next step was to create a new smart collection inside the same collection set called “02-Picks_Around_Tivon”. This collection includes the photos that have both the keyword “Around_Tivon” and the flag. Now you have in this collection just the selection of images you want to edit.
After editing, I rated the photos I like the most with 4 stars (these are the ones I will deliver to the client or publish in social media). I created a new smart collection called “03-Selects_Around_Tivon” that will include the photos that match the previous conditions and that are rated with 4 stars. Now you have a collection with the best photos of this session.
This system allows you to switch quickly between all the images you took, the ones you want to edit and to the best ones. It makes the post-processing workflow much easier because you avoid all the image searches and you don’t have to switch between collections or folders. You can add more folders to this system: Black & White photos, panoramas, HDR…
Build collections by Genre or subject
I also like to have collections by genre or subject. For example, I like to have a collection of landscapes, another of cats, and other with portraits and so on… You can create regular collections and add the photos manually or you can use smart collections that includes the photos that contain certain keywords (for example: landscape) or any other metadata that allows you to classify it.
Build a portfolio collection set
I have a portfolio collection set where I organize my best photos by subjects. I have been using regular collections and adding the photos myself but you can also create a smart collection that will collect automatically your best shots (5 star ones that include certain keyword for example)
Project collections
I build collections for each one of my photography projects. This allows me to have an easy access to them and to make the workflow much easier.
I am working in a project about Emotions. I created a collection set that includes one collection for each model that participated in the project. Organizing the images by collections, makes it really easy for me to find the photos and keep working on the project.
Social media and blog collection
It can be useful to have collections with the photos you want to publish in your social media (Facebook, Instagram) or in any photography community (500px for example). Same as before, you can create a regular collection and add the photos manually or you can create a smart collection. I also have collection sets with the images I use in my blogs. If I am not sure whether I already published a certain photo or not, I can have a quick look to my blog collections and make sure.
I have a collection for each one of the blogs that I wrote for you. 🙂
I hope you find this content useful and that I helped you to improve your photo organization and editing workflow. As always, feel free to tell me about your organization strategies or if you want me to talk about any other subject. I will be happy to hear from you! Have a happy LG organization!


 Facebook
 Google +