Tag: improve

Tips for editing your flower photographs in Lightroom

In a previous article I gave you some tips about flower photography. Today I want to talk about the editing of this type of photos. I always recommend doing your best in the moment of capturing the photo. Invest some time looking for the right perspective, work on the composition of your image, avoid cluttered backgrounds, focus on the right spot and aim for a good exposure.  However, there are some simple things you can do in post-processing that can make your flower photo even better.
sleeklens-29-final-sharp-1

I will show you some of my general post editing tips in Lightroom.  They are general, not universal. These tips will give you a good basis to start with, but they might not work in all the situations you might encounter. You will need to experiment with your flowers a little (this is part of the fun in photography, isn’t it?). The basic idea behind all my editings is to make my main flower/s pop out. So let’s jump to Lightroom Develop module and see how these tips goes!

Do some global adjustments first

This is a good tip for any kind of photography. First of all do the global adjustments, meaning the ones that affect the whole photo. For this tutorial I am going to use this straight of the camera photo:
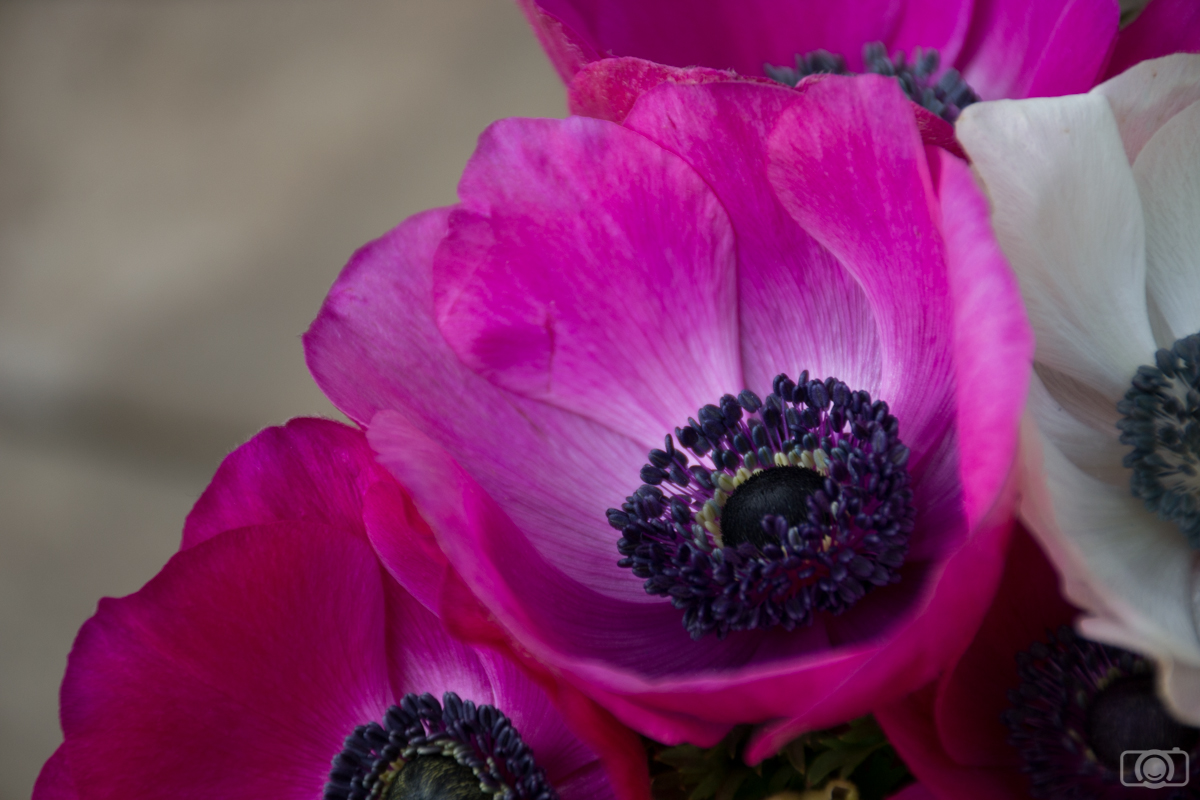
Straight of the camera photo

The slides I like to work with are:

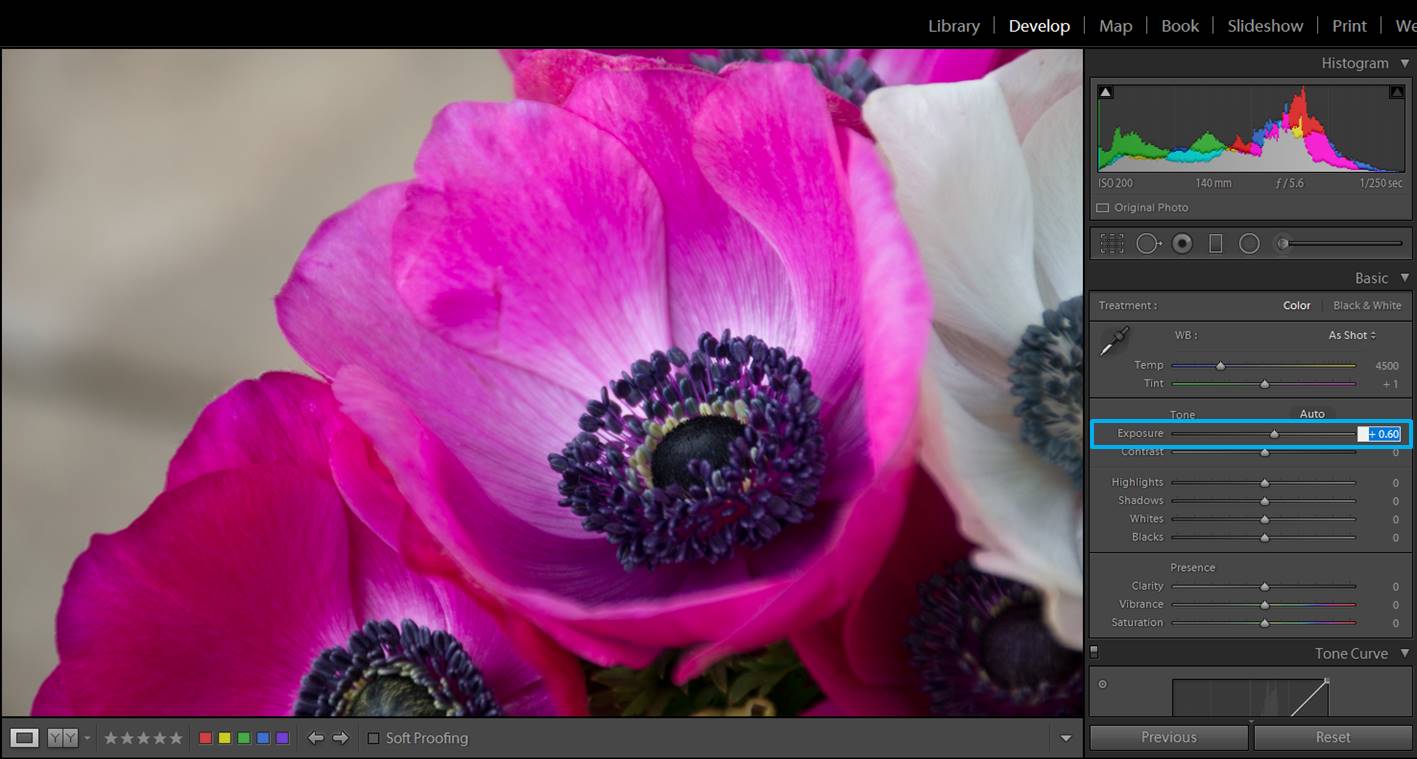
  • Exposure: You might need to adjust a bit the exposure (or a lot if you didn’t manage to adjust it at the moment of taking the photo). If your photo is overexposed, you need to move the slide to the right and if it is underexposed, to the left.
screenshot-2

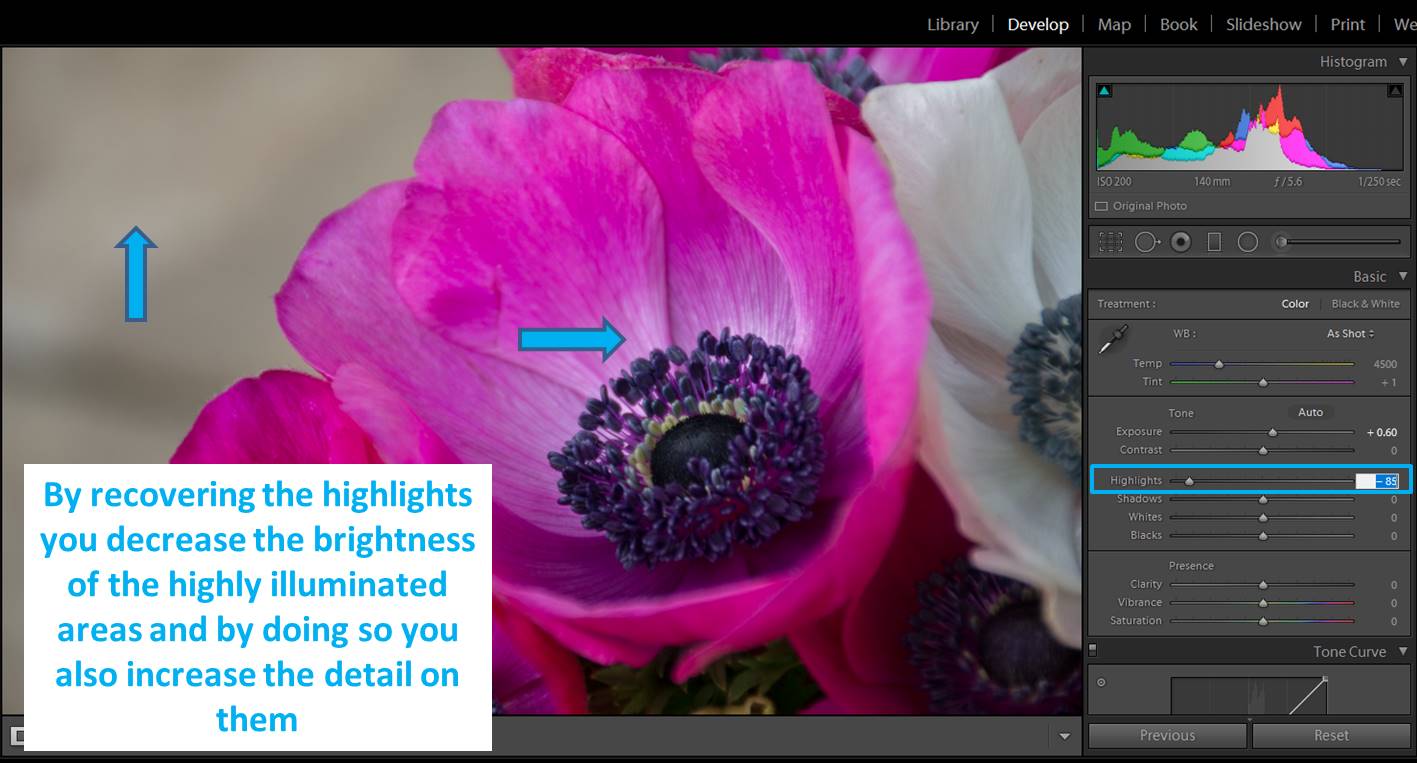
  • Highlights: I usually try to recover some highlights by moving the Highlight slide to the left. This is especially useful if you have to deal with a background which is too bright because it will bring a bit of detail to the photo. By default, our eyes are drawn to bright things so they tend to focus on the lighter areas of an image. If the background is too bright it will draw our eyes to it and make us ignore the flower, and this is exactly what we don’t what want!! So if you can make the background less bright, it will be better. This doesn’t mean that you always need a dark background. You can use white backgrounds too. What I mean is that they should not be extremely bright.
screenshot-3

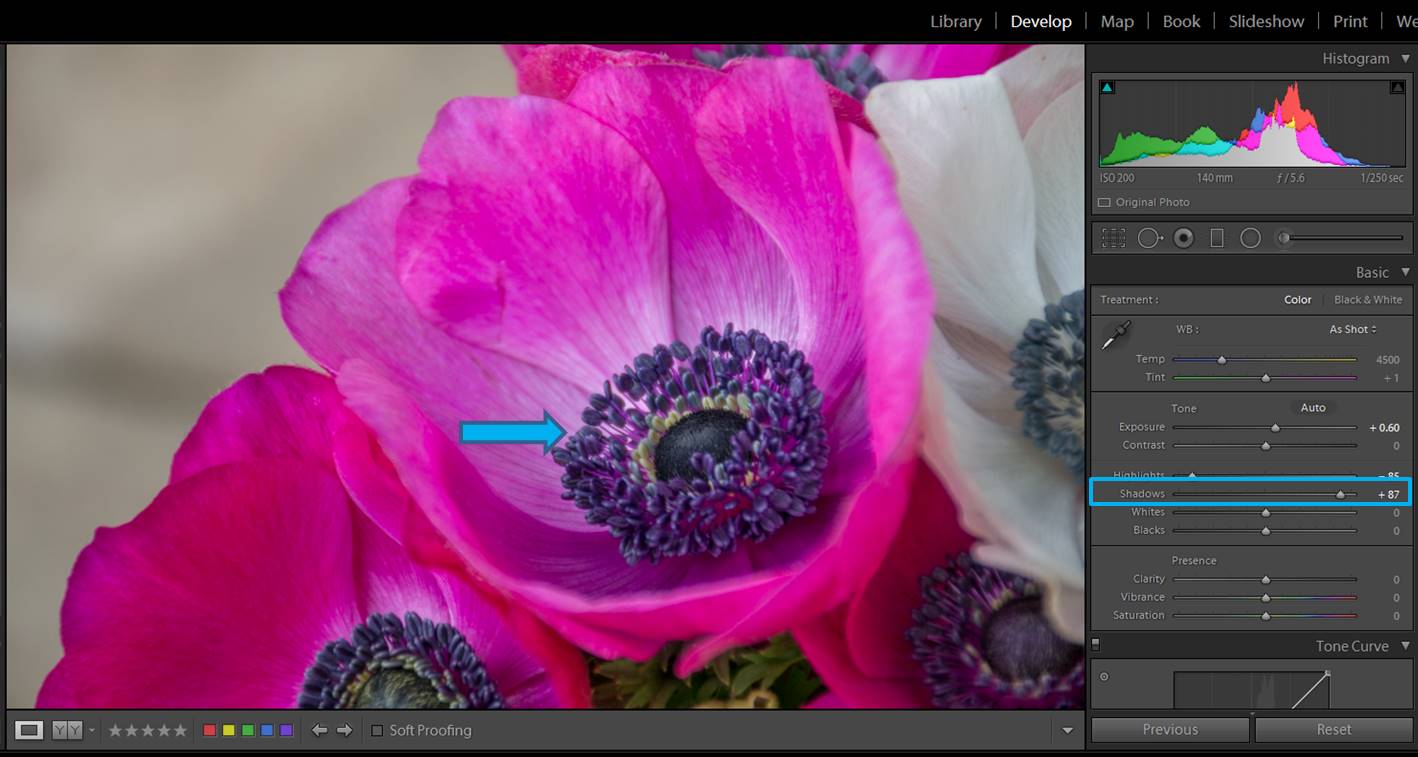
  • Shadows and blacks: If I see that my main subject has an interesting area too dark, I move the shadow slide to the right. You will see how details will appear in your image.
screenshot-4

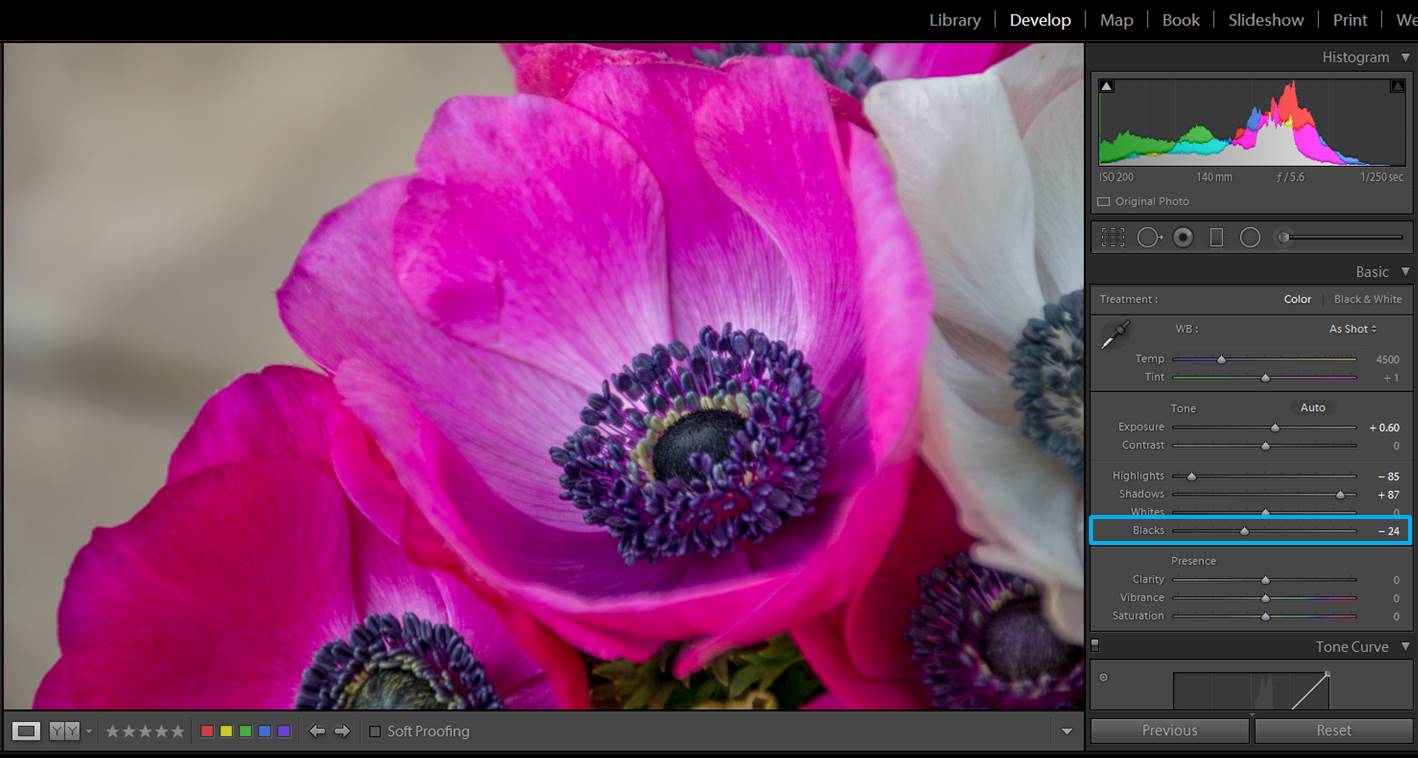
However, the contrast of the area can get a bit weak. Increase a bit the blacks (moving Blacks slide to the left) and your problem is solved! By decreasing shadows and increasing blacks you give a higher dynamic range to your image.
screenshot-5

Add your personal touch with the clarity slide

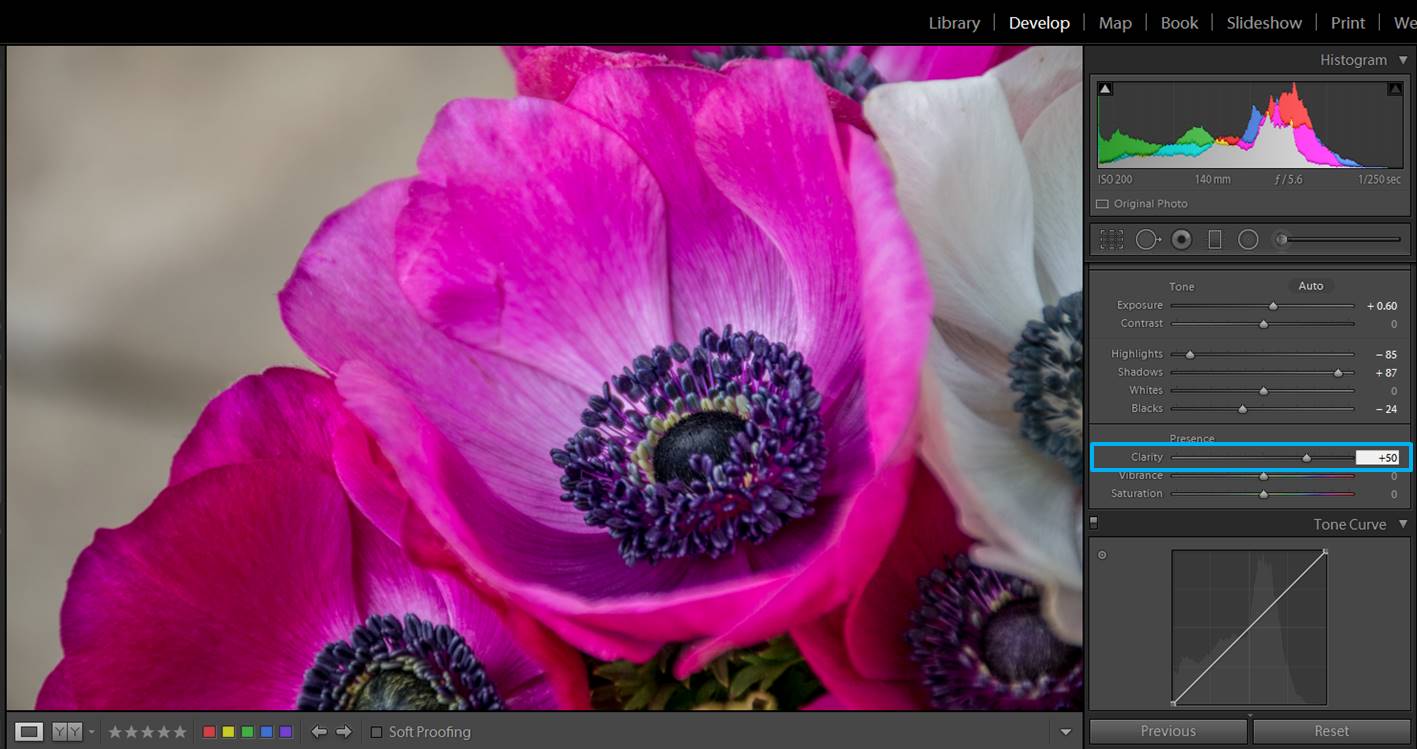
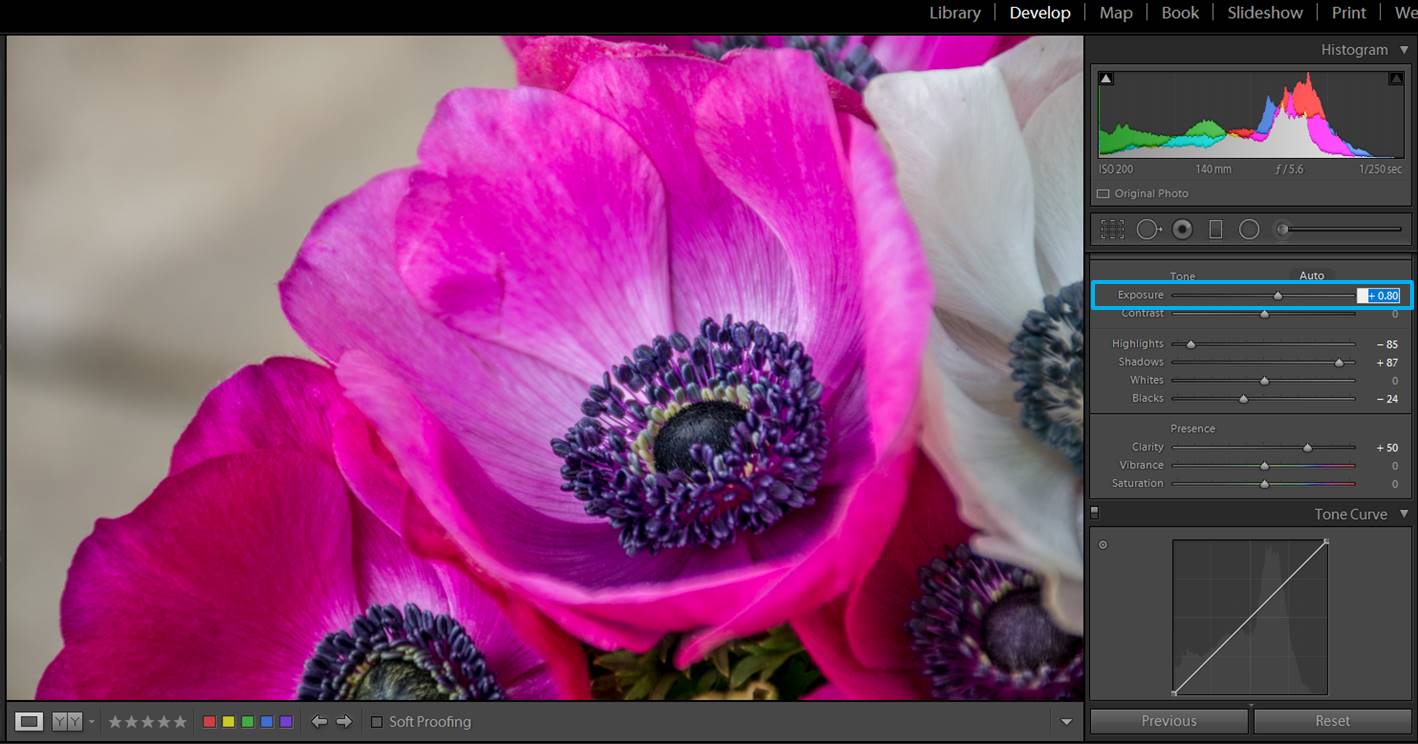
I love the clarity slide! This is the point in the editing when you really need to decide which kind of final look you want for your flowers. Do you want to show all the little details of your flower? Then you should move the clarity slide to the right. This might darken your photo a little, so you might need to adjust the exposure again.
screenshot-6

screenshot-7

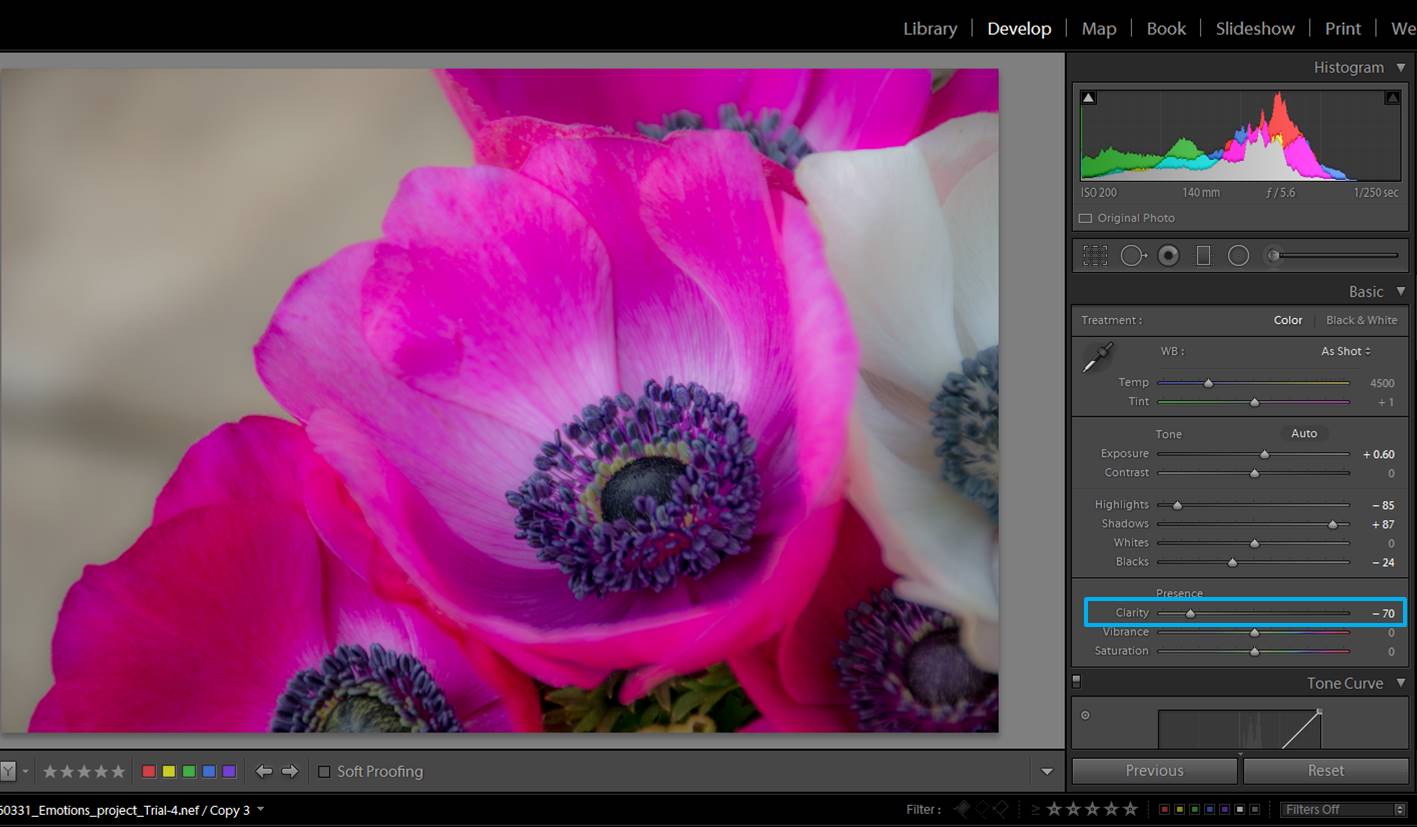
If you prefer a softer look, move the clarity slide to the left.
screenshot-8

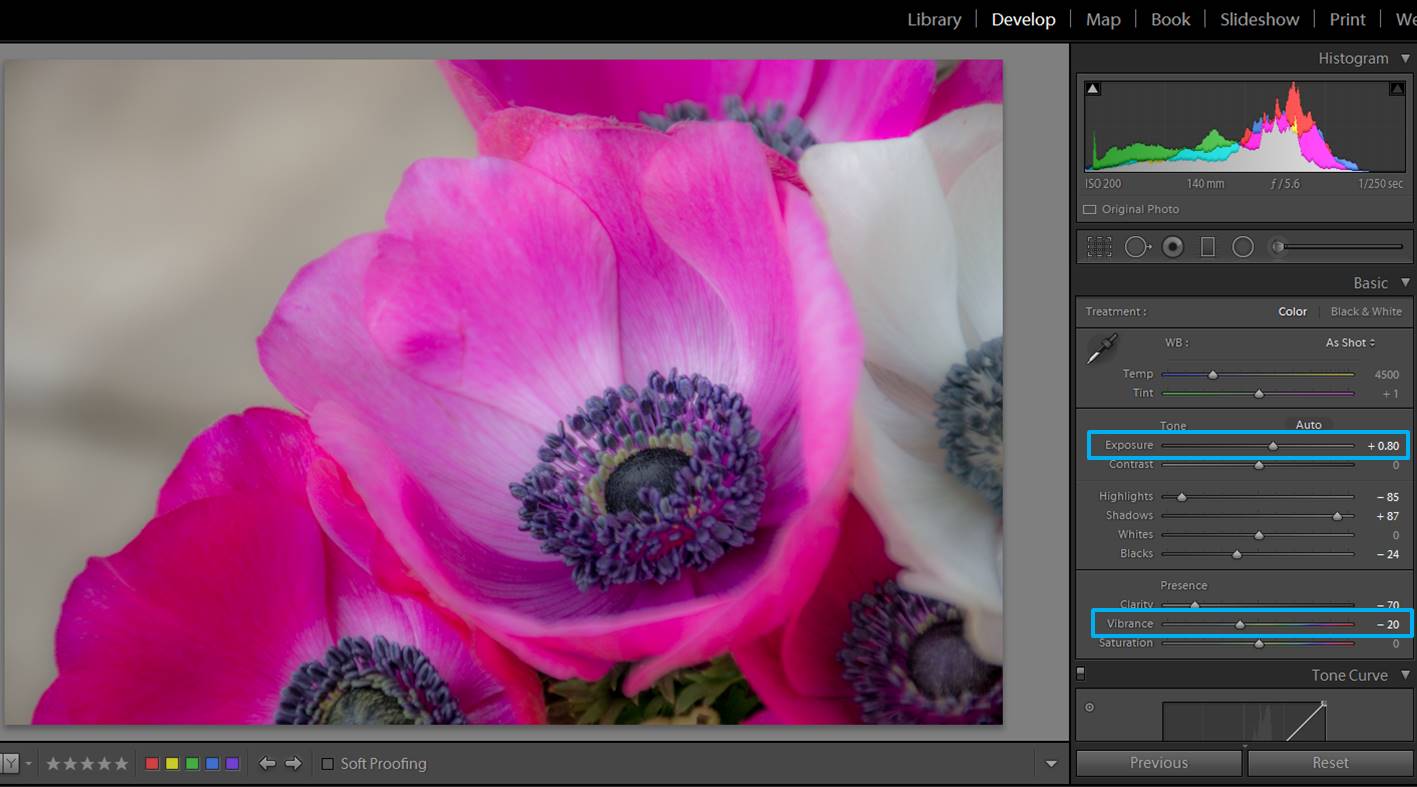
In this case too, you might need to adjust the exposure. In the example, by changing the clarity I also causes the colors to stand out a bit too much, to counter this side effect, I moved the vibrance slide to the left in order to get a more natural look.
screenshot-9

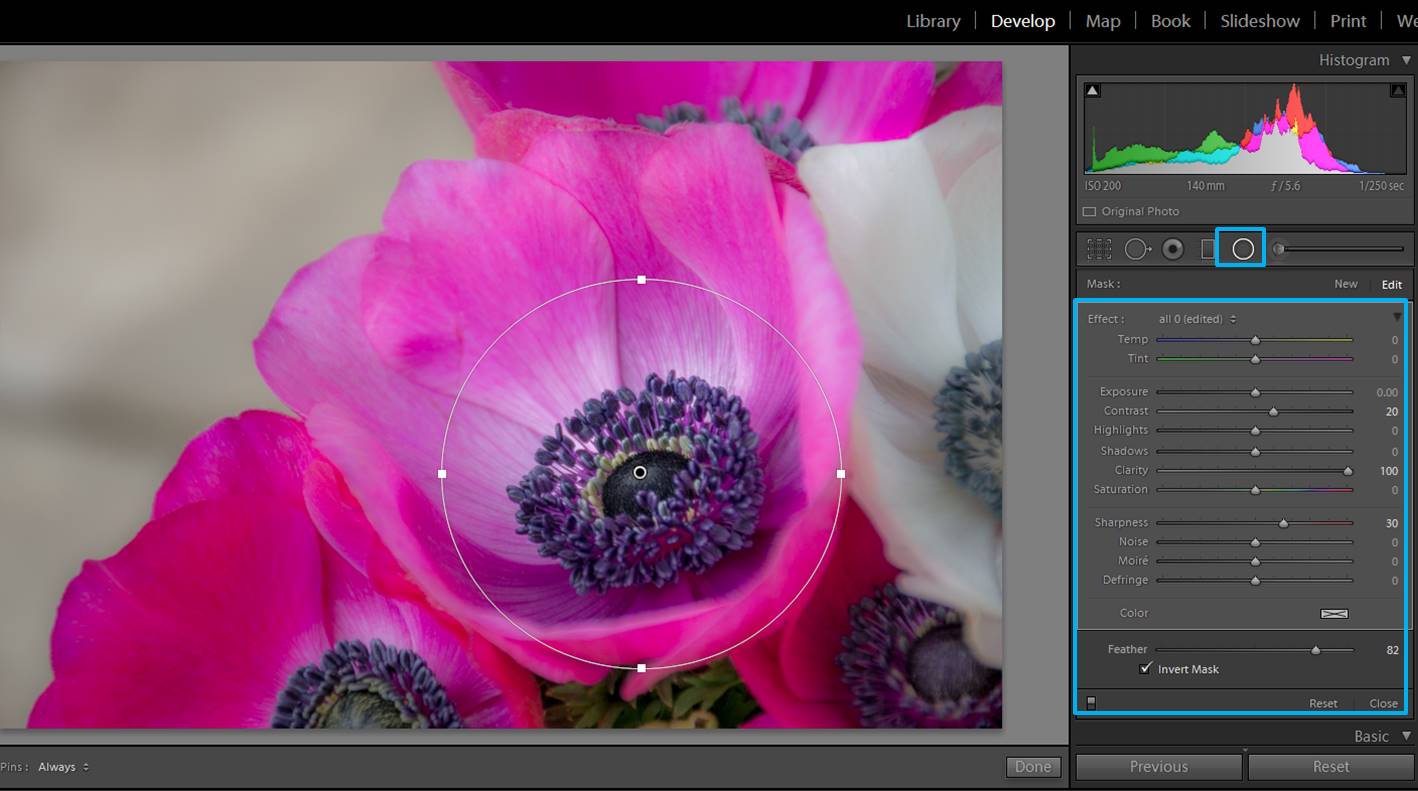
When you decrease the clarity of a photo you get this blurry dreamy effect. However, you might like to keep the details in specific parts of the photos. For this, you can use a circular filter like in the image below.
screenshot-10
You can add a circular filter to do local adjustments in your photos. In this case I checked the “Invert Mask” because I wanted the adjustments to be made inside the circle. I wanted the center of the flower to be more defined, so I increased the clarity and the sharpness of the area inside the circle. Note that I feathered the circular filter quite a lot to make the adjustments gradual from the center of the circle to the outside.

So here you have the 2 versions of the same photo.

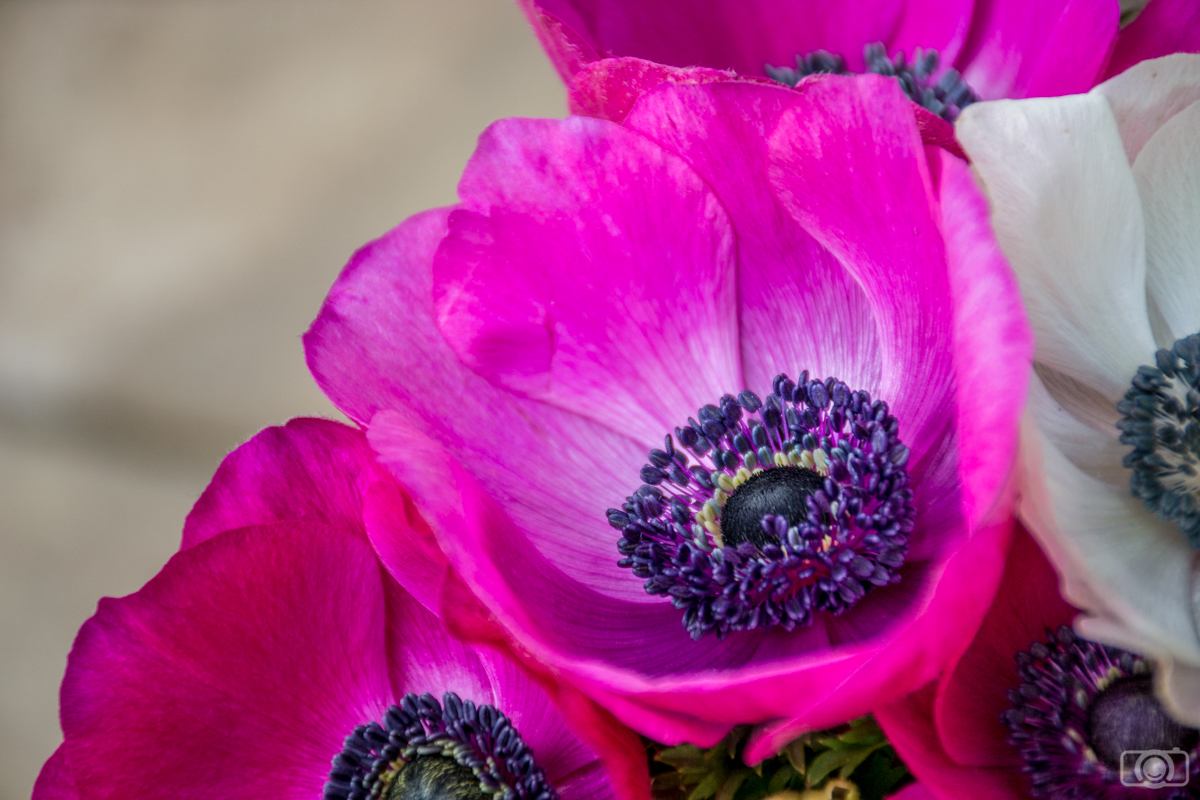
This is the final shraper version of the image
This is the final sharper version of the image
This is the final softer version of the image

Increase (or not) vibrance/saturation 

By increasing the vibrance and/or saturation you can make the colors of your flower pop out. However… if you increase them too much your flower’s color can get to a point it looks unreal. If you are doing some creative post-processing, this might be a good thing. But if you are trying to achieve a natural-looking flower image, too much vibrance and saturation will not be good.
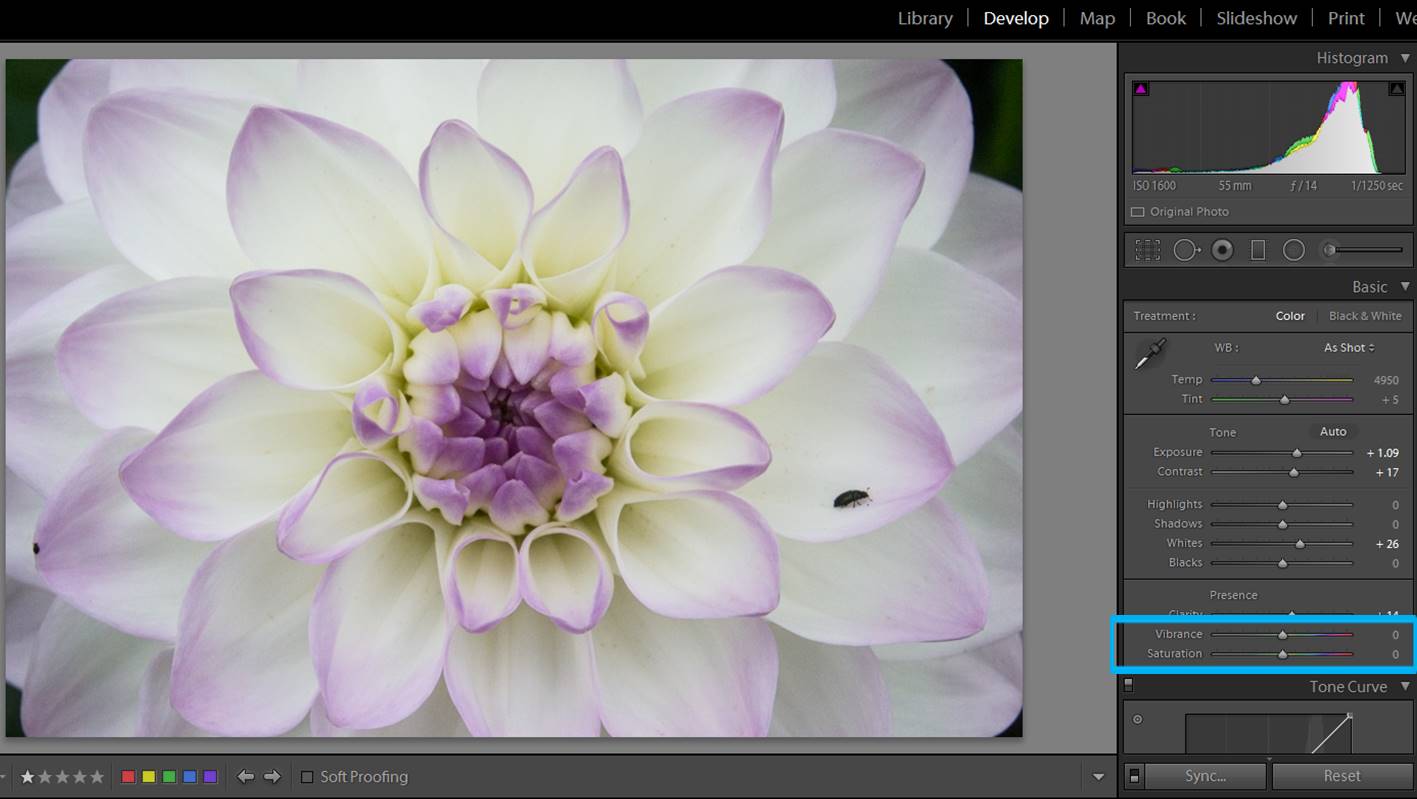
screenshot-12
I did some general adjustments to this image, but I didn’t touch the vibrance and saturation slides yet.

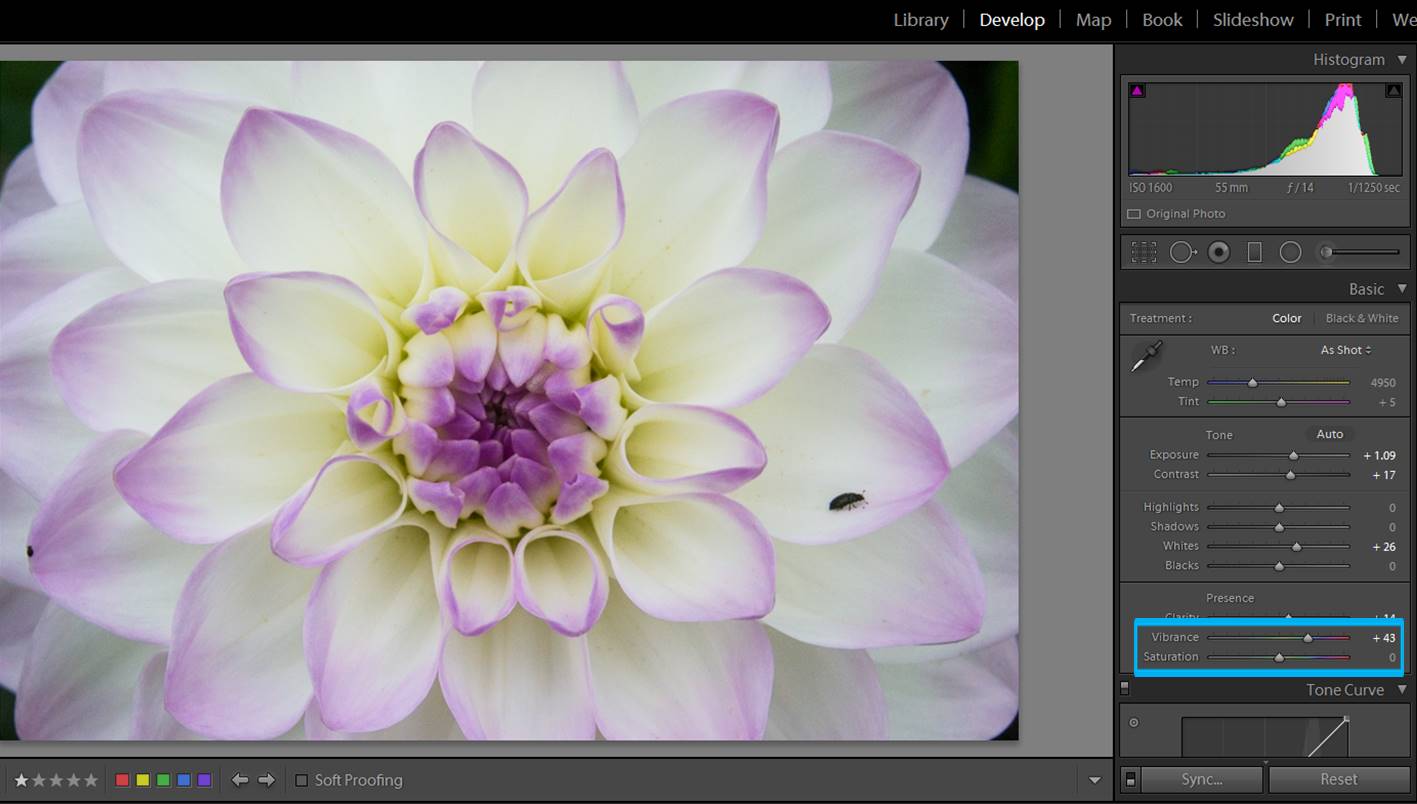
I usually increase the vibrance little by little until I reach to a point that I like. Sometimes you won’t need to touch vibrance/saturation at all because your original picture has already beautiful colors.
screenshot-13
I usually increase the vibrance little by little so I could find a point where the colors stand out, but the flower still looks real

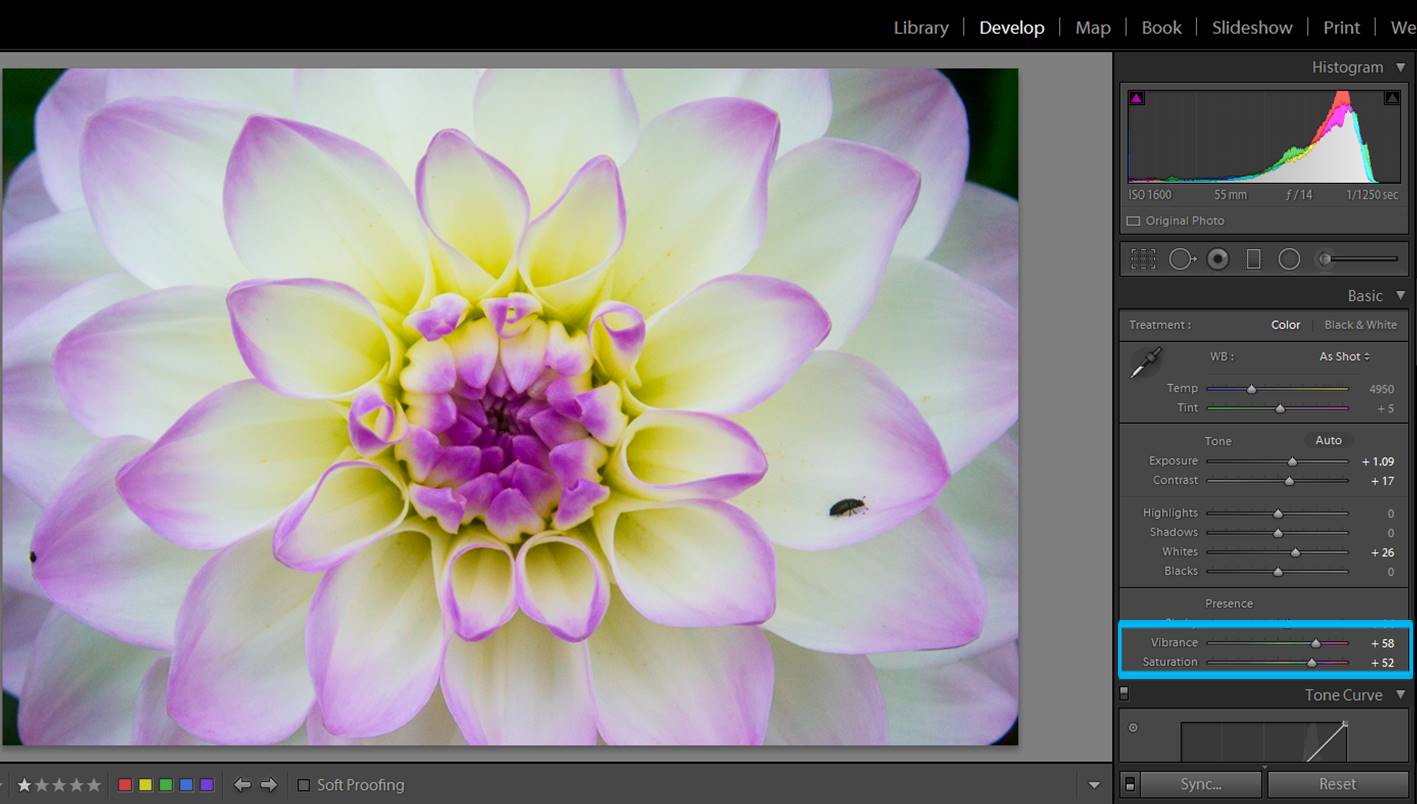
screenshot-14

In this image I increased both the vibrance and the saturation too much the so that you can see their effect on the photograph. You should be careful with these slides because you can reach an unnatural look pretty easily.

Highlight your subject

Imagine that you have a photo like the one below. The background is ok because it is quite dark, but your flower does not really stand out.
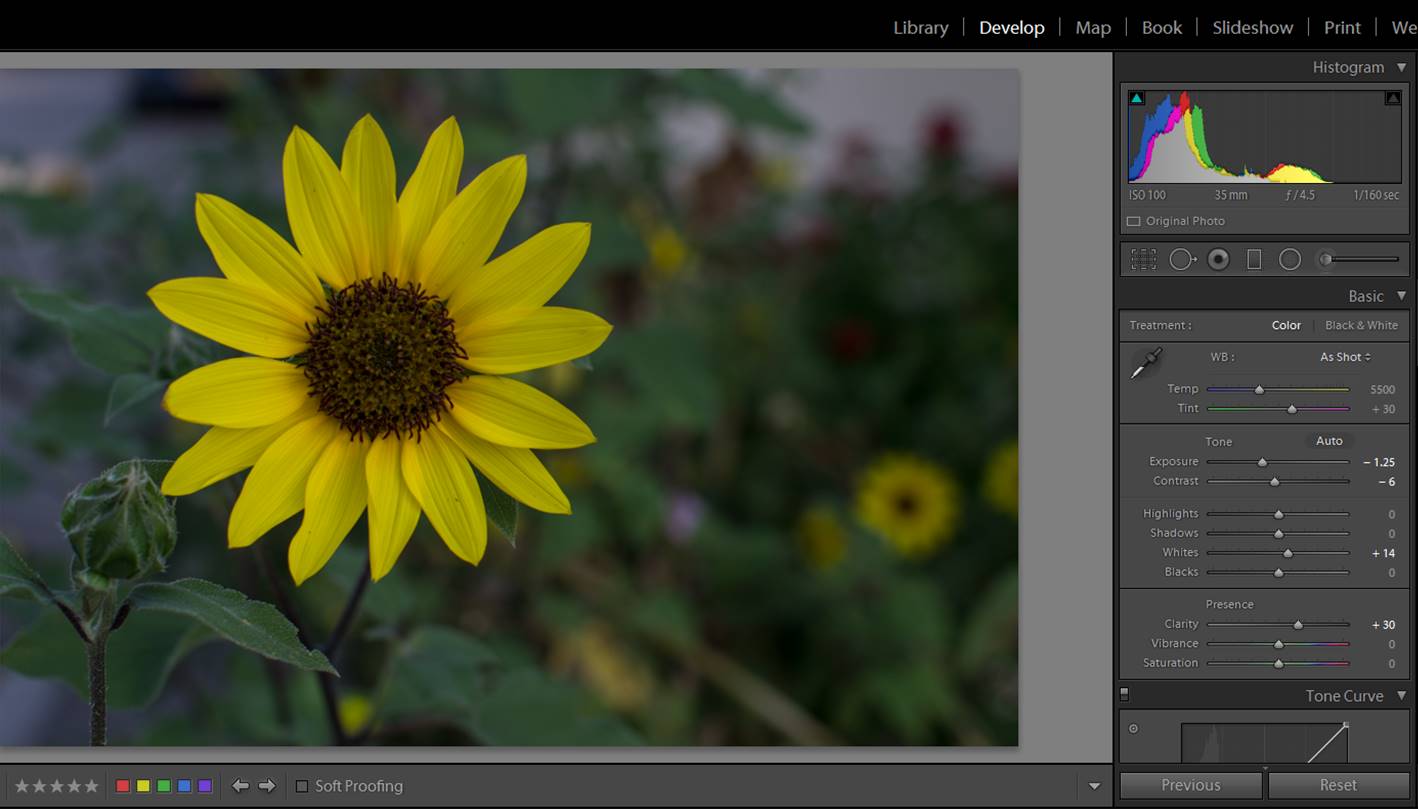
screenshot-15

In this situation you can use a circular filter to highlight your flower and make it the focus of your image. I usually add the circle, then I check “Invert Mask” so that all the adjustments will affect the inner part of the circle and I feather it at 100 to make the adjustments look gradual. You might need to play a little with your adjustments, but usually you will need to increase the exposure. I also like to add a bit of sharpness and clarity, but this is up to you!
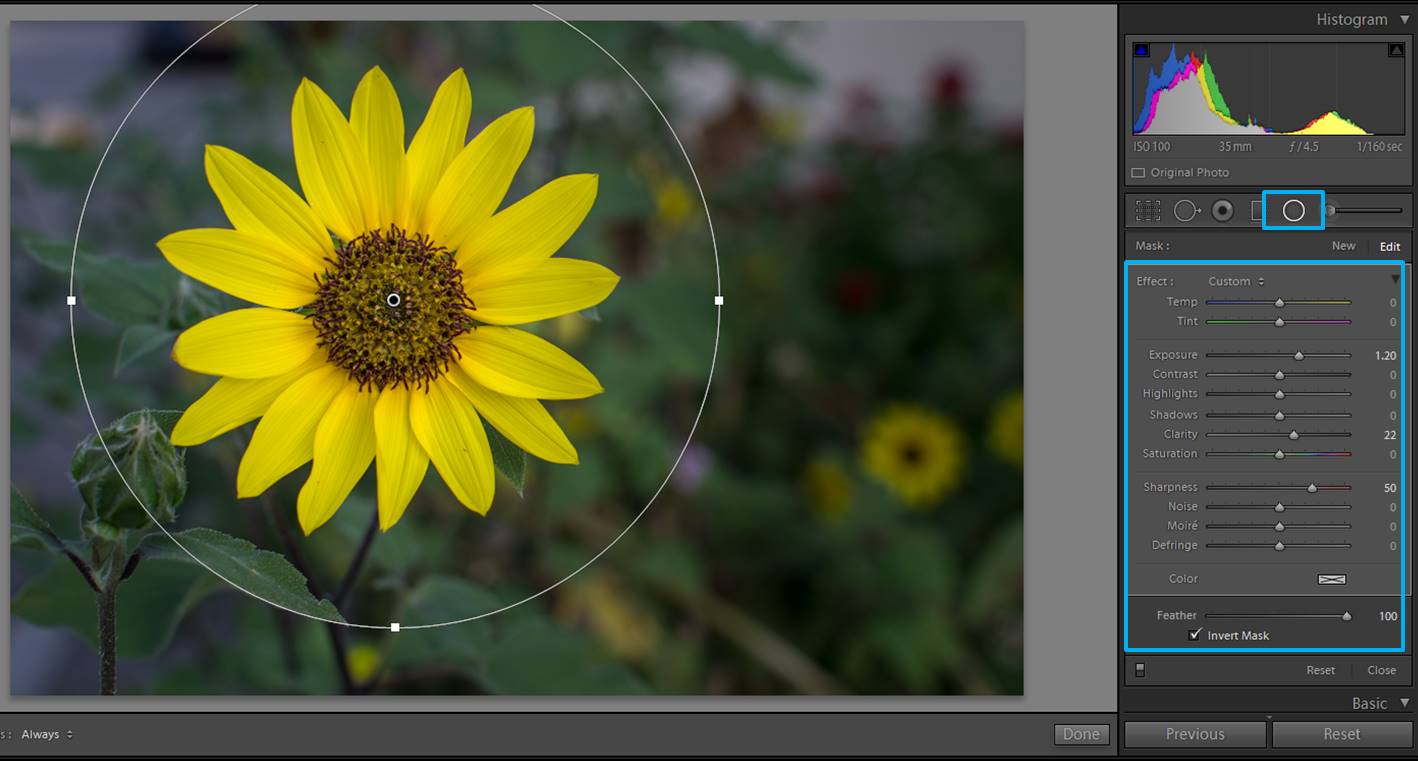
screenshot-16
I use the circular filter to increase the exposure of my main subject/s and make them pop out from the darker background.

If you are using black backgrounds…make them really black!

If you are using black backgrounds for your flower photography, they might look a bit grey-ish in the original photo.
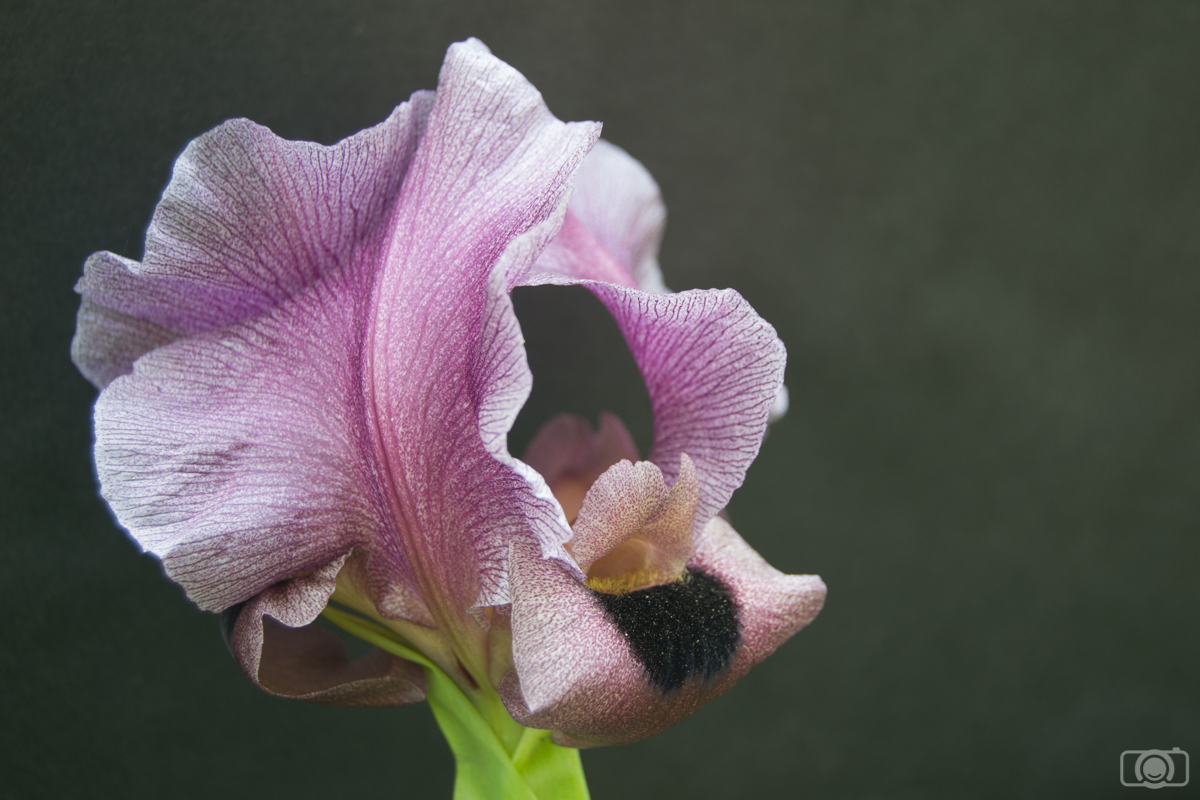
Straight of the camera photo
Straight out of the camera photo

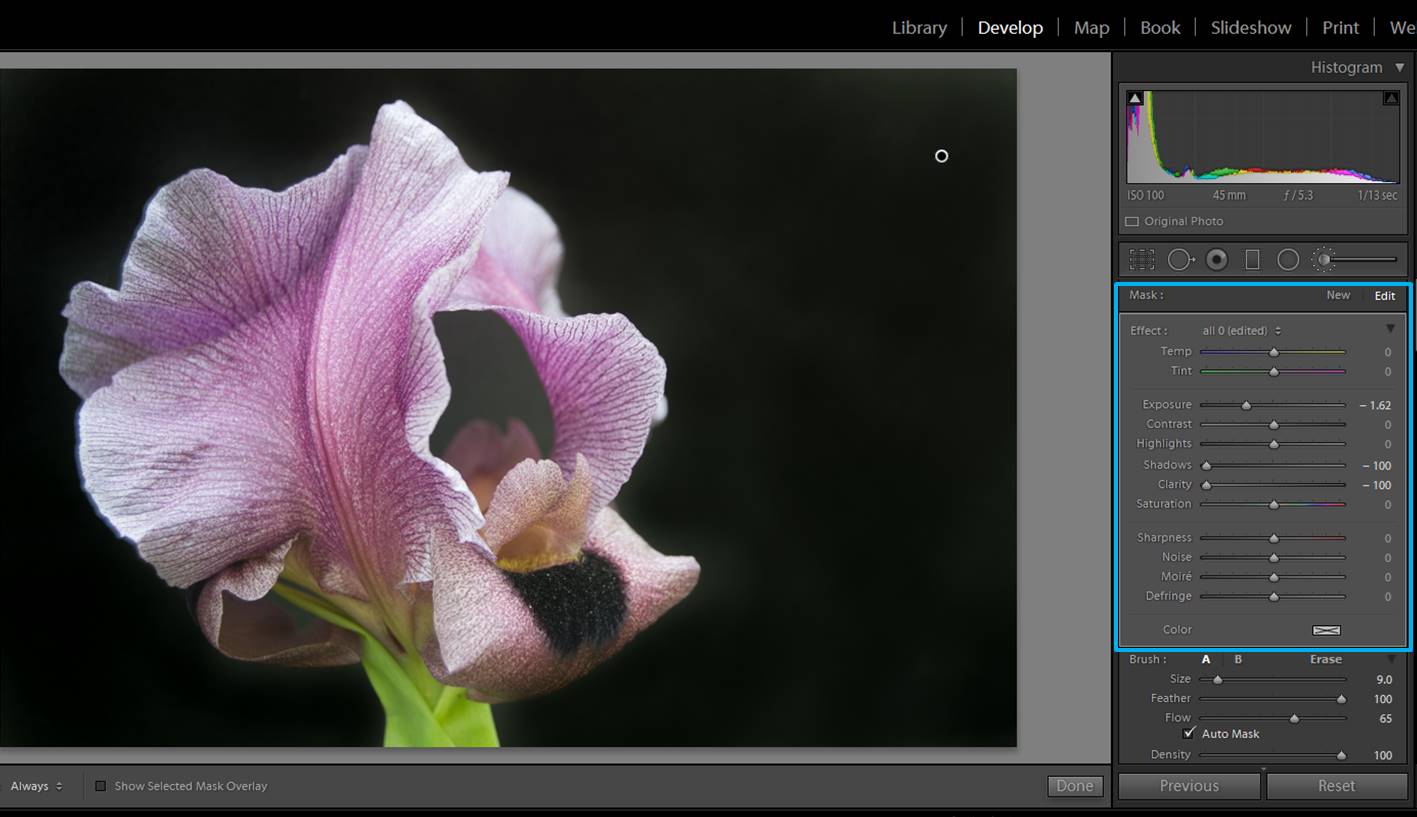
Make them really black by using Lightroom brush tool. You just need to “paint” the background. I like to check the “Show Selected Mask overlay” because then I can see in red the places where I paint. Another tip: check “Auto Mask” and Lightroom will detect the edges and will help you to paint just the background (and not “stray” with the brush onto the flower).
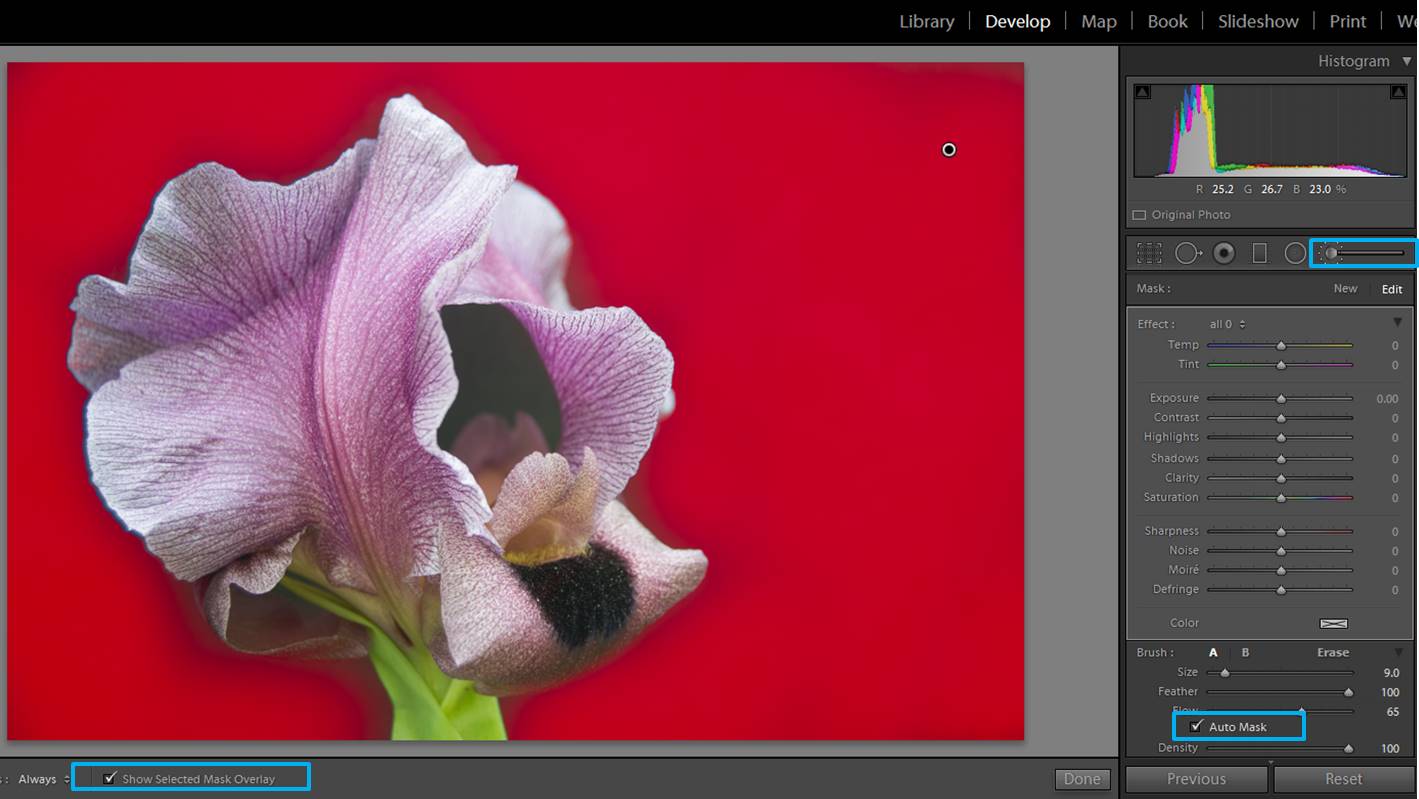
screenshot-17
When you have the “Show Selected Mask Overlay” checked, you can see in red the places where you “painted” with your brush. Check also “Auto Mask” to make Lightroom help with not painting outside of the borders.

Once you have painted the background, adjust the brush by decreasing the exposure, making the shadows darker (slide to the left) and make it smooth by moving the Clarity slide to the left too.
screenshot-18

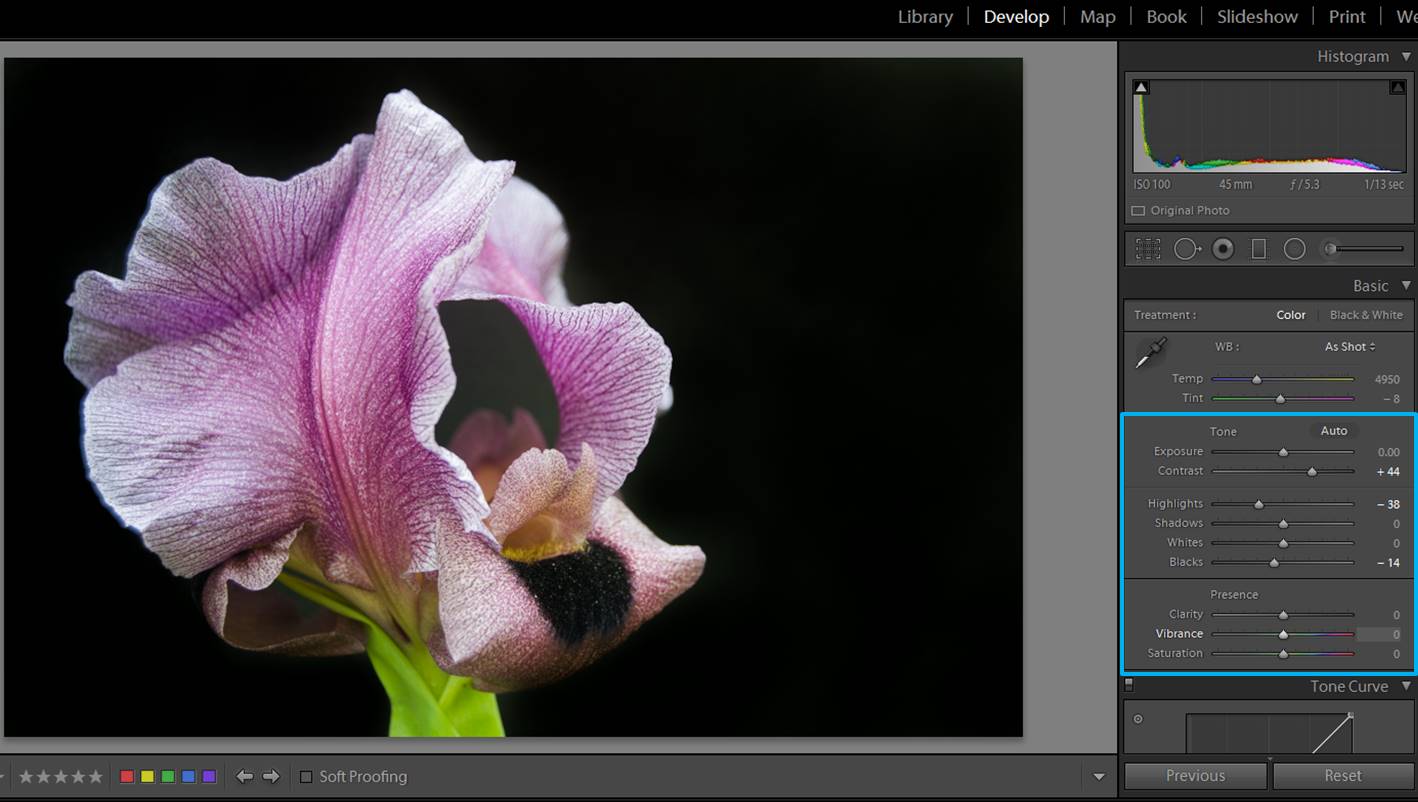
Last thing is doing general adjustments to the photo to make the flower really stand out!
screenshot-19

Now it is your turn to practice with your own flower photos and Lightroom! Do you have a tip I have not included here? Tell me about how it goes with your editing! Have a happy post-processing!!

Tips to improve your flower photography

I think that flowers are one of the most photogenic subjects in nature. Do you agree? Their big diversity of colors, shapes, and sizes offers endless possibilities. In addition, there is something attracting about the ephemeral nature of flowers.  I always think about the impermanence of things when I am taking photos of flowers. It’s as if they are telling me “Look at us, we are beautiful and we are not going to wait here for much longer, so bring your camera already”.  As Frida Khalo said: “I paint flowers, so they will not die”.  I am not good at painting, so I take photos of them instead! Today I am sharing with you some of the tips and tricks I learned along the way.

flower photogrpahy

Keep it simple

Flowers are beautiful, so they don’t need much more things in the frame beside themselves. I agree that this might be a matter of aesthetic preferences, but in general the most part of the flower photos that will make you go “Oooooh” have very few elements in the frame, if not just a single flower.

flower photogrpahy
Flowers are beautiful subjects that don’t need much more in the frame in order to show their beauty.

Eliminate distractions

Your main objective in flower photography is to highlight the main flower/s in your photo. This means that you need to eliminate from the frame as many distracting elements as possible. These elements can be other flowers, branches, anything you can find around gardens and parks… there are a lot of them! You can try to crop out distractions by doing a close up of the flower. You can also move the flower so that the distracting elements disappear from the frame. Another option is to move and change the perspective in which you are taking the photo.

flower photogrpahy
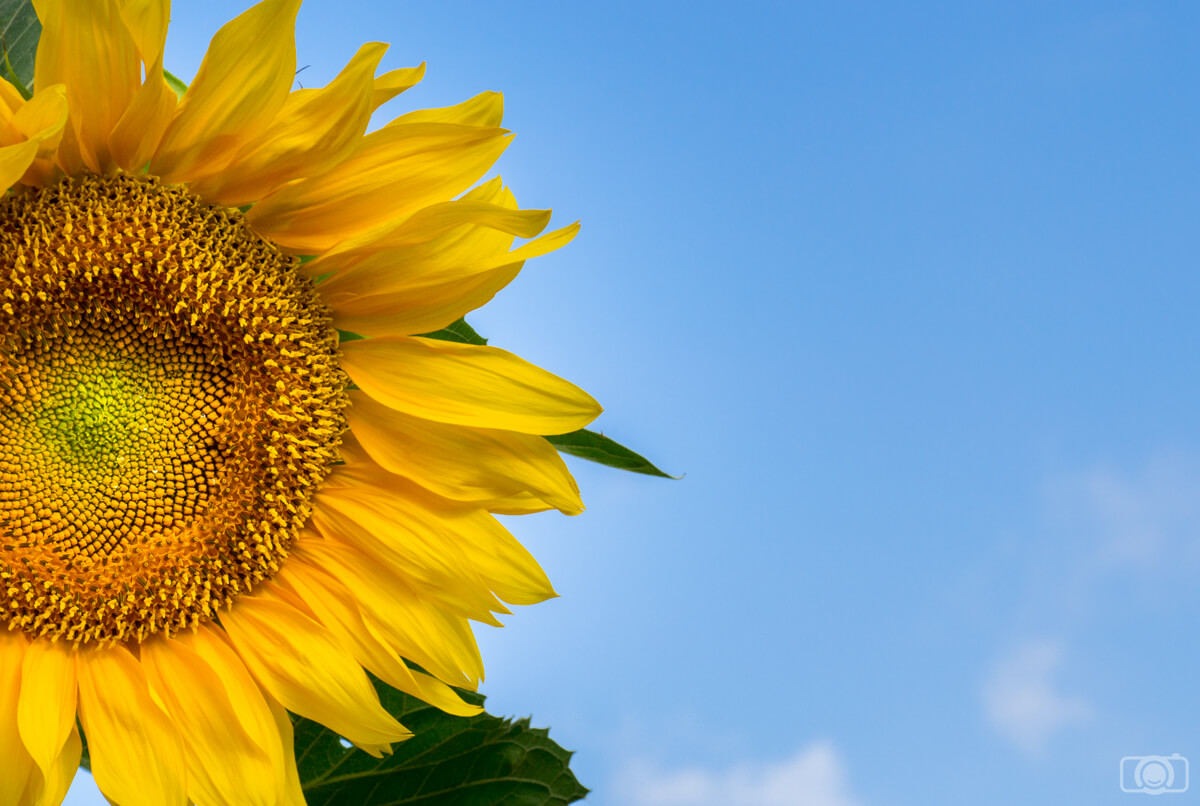
The sunflower field where I took this photo was a bit messy. To avoid distractions I change the perspective and instead of taking a photo with the other sunflowers I decided to use a single sunflower in my composition.

There is another way to make a background look less distracting: make it blurry. You can achieve this effect by using a wide aperture (low aperture number). f/5 or lower can work really well. It is also useful to keep in mind that a longer focal length will make the background blurrier. For example, if you shoot with a 150mm lens, the background will be blurrier than if you use 35mm. In conclusion, a good option (if possible) would be to combine a low aperture number with a long focal length.

flower photogrpahy
I took this photo with an aperture f/5 and a 70mm focal length. You can see that in this particular situation I managed to blur out the background. You might need to check the aperture and focal length that will work better for your photos. Wide apertures and long focal lengths will give you a good starting point.

Make sure that you are focused on the right place

This is especially important if you are using wide apertures. You might be so focused on getting blurry backgrounds that you might lose a bit of the focus of your camera. Think always which part of the flower must be sharp in your photo. Then, after taking the photos, check that you achieved what you want. A lot of times I realized that I didn’t focus on the right spot only when I was back home uploading the photos to my computer! Oops!!!

Create your own backgrounds

In some occasions, you can create your own distraction-free background. You can use a simple blackboard (or any other color you like) and just place it behind the flower. These photos lose the atmosphere that the surroundings provide them (because just by looking at the photo you can’t really tell where they were taken). But on the other side, by using a background you make sure to have at least some elegant images of your flower.

flower photogrpahy
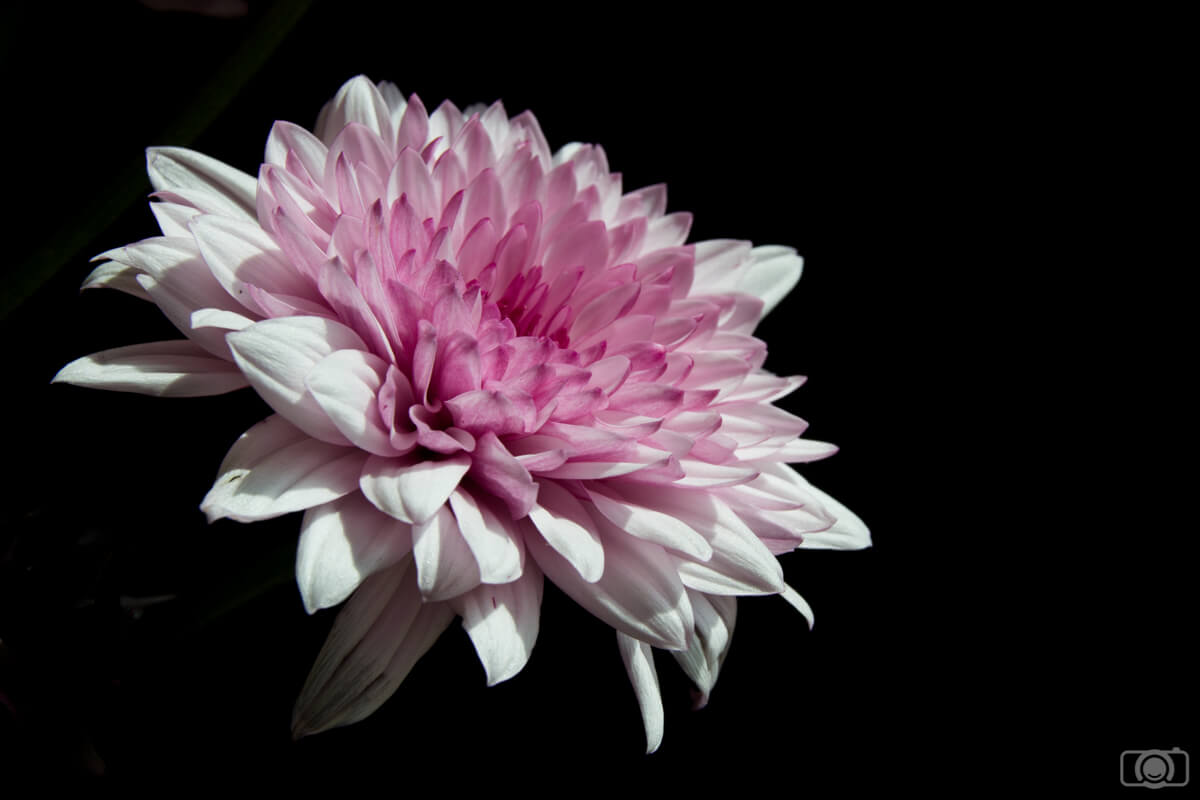
Black backgrounds make the colors of the flowers pop up.

Be aware of the wind

When you are shooting at low shutter speeds the slightest movement of the flower will make it appear blurry in the photo. Be aware of that! You can try to block the wind or wait patiently to have a moment of calm. You can also increase your ISO and/or use a wider aperture (meaning lower f-number) to be able to use a faster shutter speed. However, this blurry effect can be beautiful too. It can give a unique and creative look to your photo. If you like this blurry style… go for it!!

Try different perspectives

Don’t be shy trying perspectives. Take photos of flowers from the front, the back, from up, from down, just a part of the flower, the whole flower… You might be surprised by your results.

flower photogrpahy
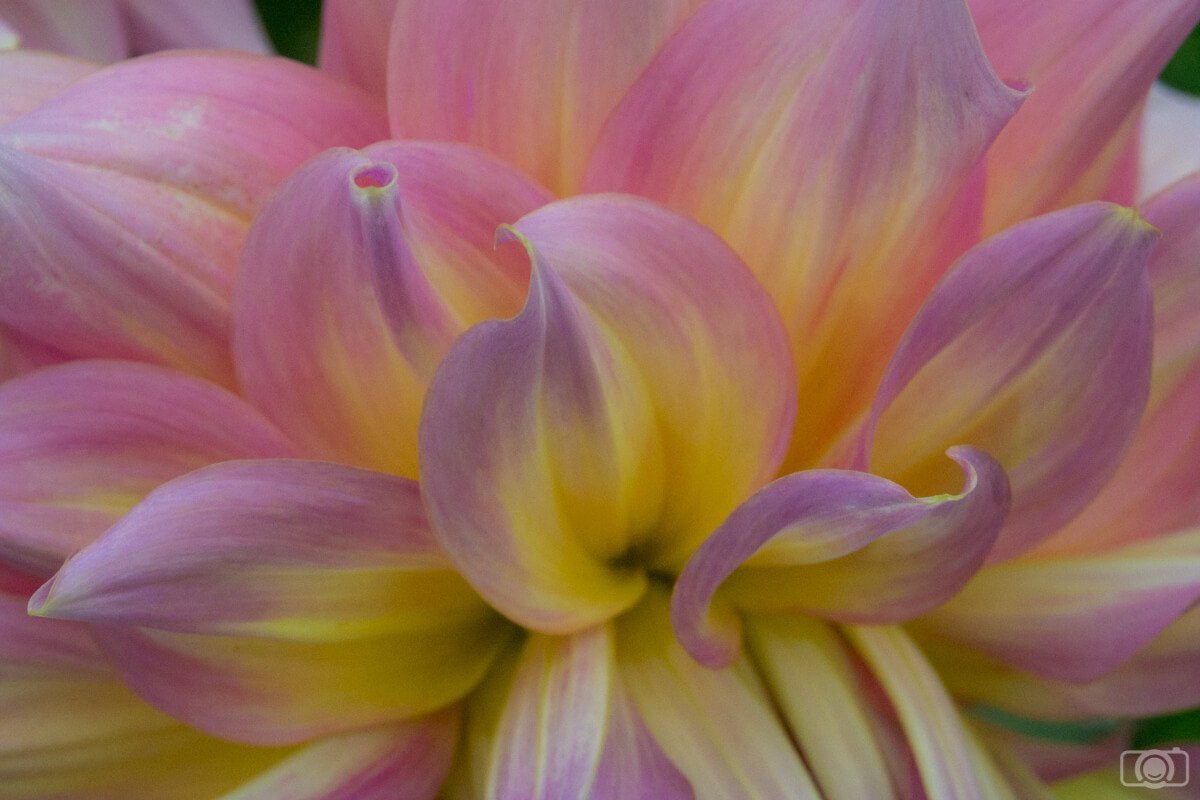
Changing the perspective I managed to get photos with a more abstract look

Allow yourself to be creative in the editing

Flowers are perfect for trying a more creative editing. You can use Photoshop filters to make them look like a painting, you can add a soft effect for a more romantic look… Have fun to experiment!! I will share with you some of my editing tips for flowers in my next article.

Flower photography
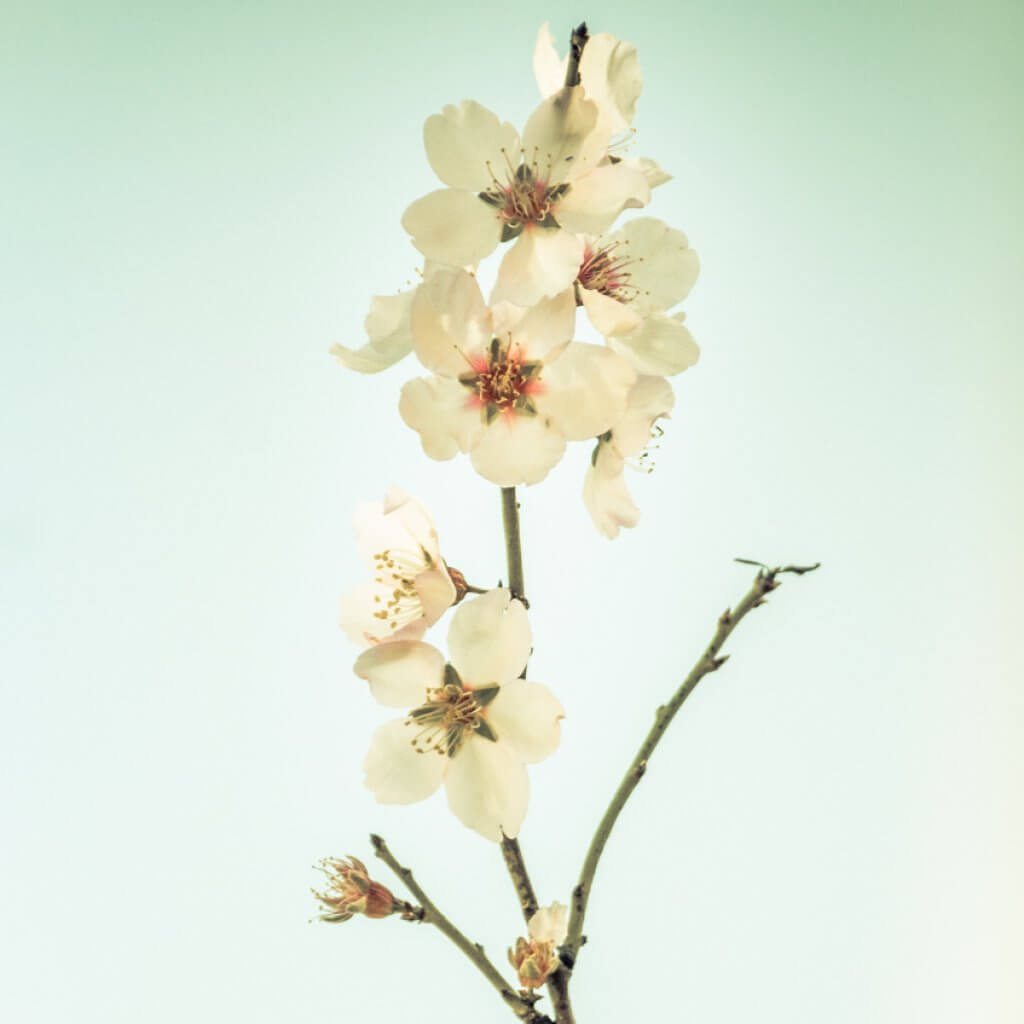
Flowers are a great photography subject if you like being creative in your editions

And now you just need to find some flowers and start practicing your flower photography! Do you have a tip I have not included here? Are you crazy about flowers as I do? Tell me about your experience! Have a happy shooting!!


Accepting Criticism to Improve Your Photography

Getting criticism can be hard to anybody. No one really likes to be told what to do, or that what they are doing is wrong. But learning to accept criticism and using it to improve your photography can help bring your photos to the next level. And trust me, there is always the next level. By learning to tell the difference between constructive criticism and non-constructive criticism, and by learning how to tell opinion apart from truth, you can learn to use your peers’ responses to your work to improve upon it.

Constructive Criticism

The first step in accepting criticism is learning what critics to listen to. Someone who tells you simply that your photo is terrible isn’t really there to help you. When someone is criticizing your work, keep an ear out for the specifics and any advice they offer on change. If someone says the background is too blurry and needs to be in focus for the picture to make sense, that’s constructive criticism. If someone says that the background is blurry and therefore the whole picture is worthless, that’s just someone trying to bring you down. Make a conscious note of who offers you constructive criticism and who doesn’t so that in the future, you can get straight to the right advice.

accepting-criticism-2


Constructive criticism always has a reasoning behind it. If someone doesn’t tell you why they think the model’s pose is horrendous, then ask them why. If they can’t tell you, then they’re probably just being nitpicky and a downer. If they can tell you, then they’re there to help you improve as a photographer. Always be sure to seek out the latter group of people when working on further projects.

Opinion vs. Fact

When reaching out and showing your work for criticism, it’s always important to get as many people to look it over as you can. When only one person says something about your photo, it can be hard to tell if what they say is a real problem or just a personal preference.

Let’s say that you take a studio portrait and ask 10 people to examine it. Three people say they don’t like the pose the woman has in it, while seven people say the pose is okay. At the same time, seven people say the background is too dark, while three say it’s just fine. Also, five of them say they like the prop used, and five say they don’t. What should you do?

accepting-criticism-1

In cases where you have a large body of people, the majority rules. It doesn’t really matter how much artistic experience each person has, the more people that have a problem with something, the more you should look into the problem. In this case, you should probably change the background to something lighter next time but shouldn’t feel too concerned about the pose. For the prop, you can either go for a larger audience, pull in more people to look at the photo or make a judgment call based on what you appreciate.

Turning Criticism into Better Work

Now that you know what isn’t working in your photo, what can you do to fix it? As stated above, the best answer is to simply ask your peers. What was it about the prop that wasn’t working for those five people, and how would they improve it? Trying out others’ suggestions can help make your photography better. At the same time, sometimes you get a whole bunch of different suggestions and have a few ideas of you own.

accepting-criticism-3

The next best thing to do after asking for their opinions is to go back to work and try out all the different ways. Open or close the aperture a bit, zoom in or out, change the colors, try a whole bunch of different combinations. Afterward, take all of your photos back to your audience and lay them out. Let everyone decide on which combinations work best. Just like before, go with whatever the majority chooses to ensure that you’re getting the best picture for everyone.

Don’t Let it Get to You

One of the reasons it’s best to only go to someone who can offer constructive criticism is that being told over and over that your work isn’t as good as it could be can drain a person. By ensuring that only critics with good intention are helping you, you can avoid a lot of the negative self-doubt that comes with the other kind of critics. Also, keep in mind that there’s always room for improvement. Every picture out there is going to need some work one way or another, even the greats of the art still work towards improvement. Whenever you get criticism, see it not as a negative towards your work, but as the chance to make it something even better than it already is.

Simple Tips for Amateur Photographers to Improve Your Photography

Everyone can call themselves a photographer, but there are photographers, and then there are photographers. As an amateur, you may think that you are not in the same league as someone who makes a professional living at it. This doesn’t need to be the case. You can be just as good as a professional photographer, and all it takes is knowing how to take advantage of your own skills and the environment around you.

In order to become a better photographer, there are several tips to get you to that next level and help you begin your career as a better photographer:

tips-amateur-photographers-1

Get Criticism

As an amateur, it can be very difficult to get the criticism of another. It can be soul crushing in some ways, but it doesn’t have to because criticism can make us better and can make us be more than we are. That is why you should get feedback from others. Feedback can be harsh, but it can be good, and no matter which way it takes, it will help you become better as a photographer.

Shoot Less

I don’t mean go out less; I mean get out there and shoot but really concentrate on what and how you’re photographing. It can be hard to shoot less when you want to get plenty of pictures, but this can be really good for you.

tips-amateur-photographers-2

In the past, a photographer had to be very selective with the pictures they took because there was often only so much film in their pocket. In the days of digital media, it is easy to take 1,000 pictures. If you take 1,000 or 10,000 pictures, you are going to have at least one to 10 that are simply stunning. Does this mean you are a better photographer, or is it just the law of averages getting good photos? This is why you should put more pressure on yourself to get the right pictures by being selective. It will sharpen your skills and make you a better photographer as a result.

Don’t Go Automatic

It can be easy to just use the automatic setting so that you don’t have to worry about shutter speed, aperture, light metering, etc., but this does not make you a better photographer. You need to get using M mode because that will force you to use aperture, shutter speed and ISO to make very unique photos but to also give you an understanding of how you can use the environment around you to create stunning photos.

Be Inspired By Others

As a photographer, there is nothing wrong with becoming inspired by someone else and using their own methods to make you a better photographer. A good artist will emulate another artist to start with. This may seem like copying but by doing this, you will begin to learn more and more about yourself as a photographer and in time your own style is going to develop as well.

tips-amateur-photographers-3

Take a look at other photographers online. What do you like? What do you dislike? Find the style that inspires you, a certain picture that you really like and try to capture the same thing.

Keep It Simple

It can be tempting to have a lot of camera equipment at your disposal but that can get you bogged down and make things very difficult when you are trying to get the right photo. Instead, just keep things simple and keep it down to basics. Just have one camera and one lens, and use the combination to its full potential. Think outside the box to get the photos you want with just a small amount of equipment.

Know The Rules

To be a better photographer, there are composition rules you can use to get the image you want. One of the best is the Rule of Thirds, which places points of interest on intersections on the camera screen. You can also use leading lines to lead a person’s eye to the picture. The use of diagonal lines will create the image of movement, and be sure to use framing as well. Framing can use doors and windows to create natural frames for the picture.

tips-amateur-photographers-4

Using patterns and repetition is very important, and symmetry is very pleasing to the human eye. Use those things to your advantage.

We all have the potential to be great photographers, and using these tips can help get you on the path to becoming the great photographer you always wanted to be. Just remember to keep it simple, keep it natural and don’t force yourself to be the type of photographer you are not.