As one of the leading industries in photo filters production, Haida always has new ideas to improve the quality of our shots.
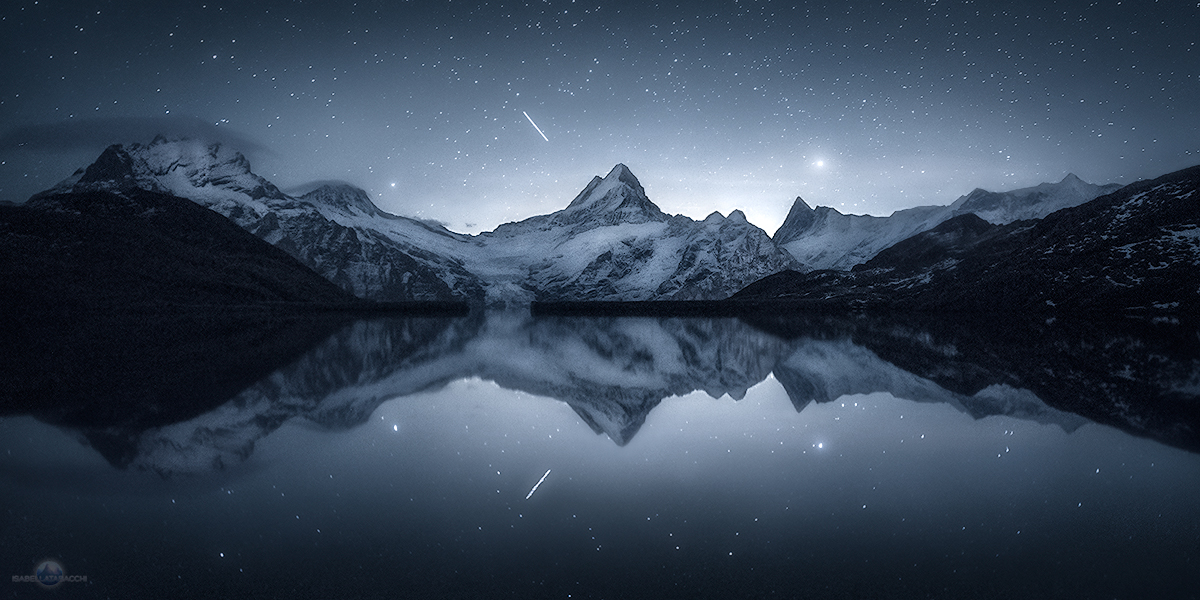
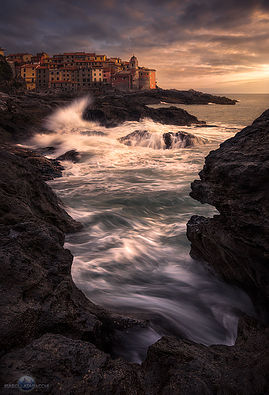
A good instance is the new nano Haida Clear Night filter. It was so useful to contrast the yellow light pollution in some places where I created some of my images!
This is, for example, the final result (post-processing included) of a shot taken with that filter in the Swiss Alps.
You’ll think that it’s very easy to have such uniform color of a nightscape with Adobe Photoshop and that the light pollution tint is removable also with some features in Adobe Camera Raw.
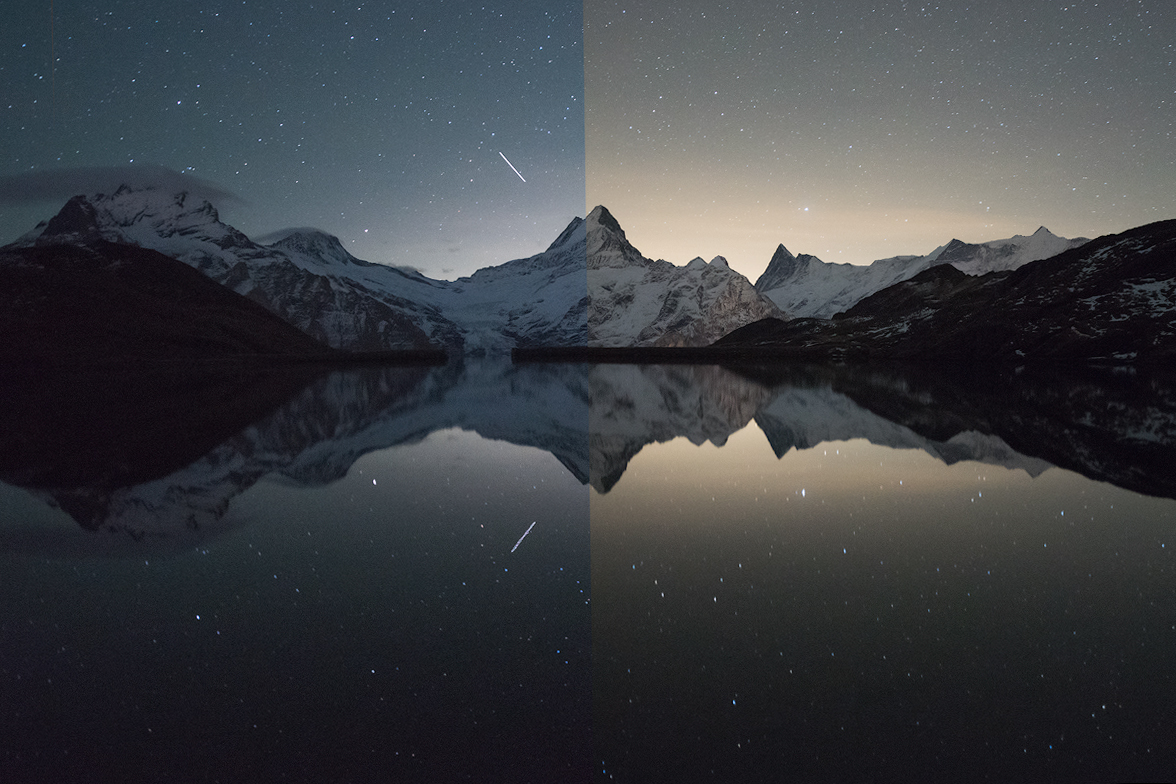
That could be true, but the following image shows as my editing work was very short thanks to the Haida Clear Night filter.
This image is composed of two not post-processed shots as Adobe Camera Raw shows them. I took the RAW files with the same white balance of 3700 K (Kelvin).
In the “WITHOUT” part, we can notice how the light on the horizon is strong, yellowish and has its impact on the rest of the sky, even in the mountains.
In the “WITH” half of this demonstrative picture, the light is not only white but even more restricted on the horizon area. Therefore, the stars are also more evident, outlined.
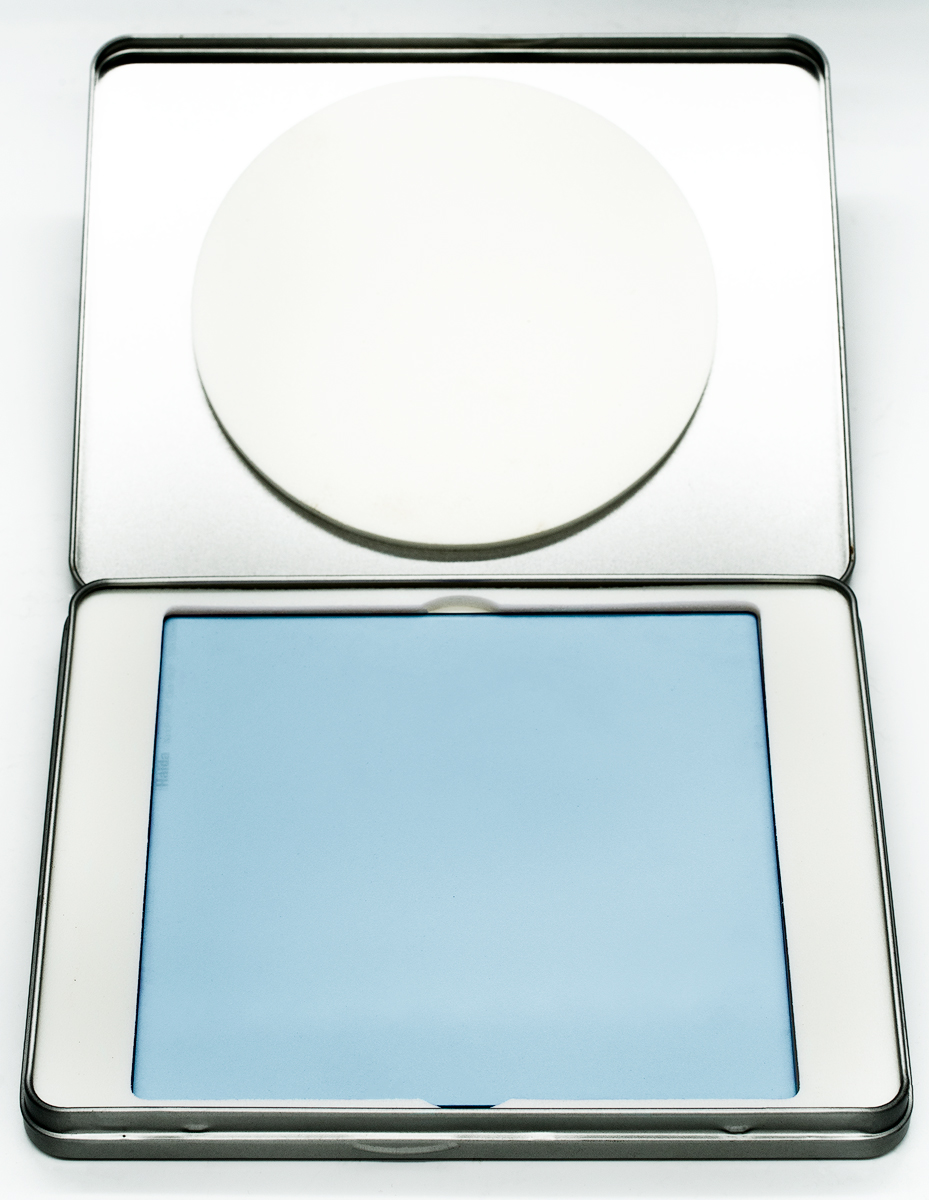
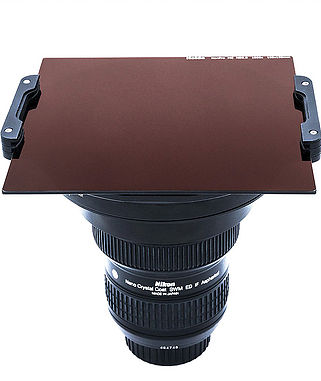
This is how the Clear Night filter looks in its original Haida Filter case.
You can notice the light blue color of the glass: this is why the yellowish pollution is contrasted!
The filter contains also a polarizing capability: it defuses light coming into the camera; so, the luminosity and brightness of the pollution will be confined at the horizon, the stars and astro magic like Milky Way will be more evident.
A parenthesis about the nano-coat meaning
The nano coat couldn’t miss in this product.
But, what does “Nano Pro” mean? Well, it’s the extremely thin, nano, a coat which covers the glass surface of the filter.
This is the great innovation of this new product line that makes the difference in comparison to the previous series. It gives resistance to dirt, reflections, and scratches.
Thanks to this coat, my filters fantastically survived sandy, earthy, rocky, icy places.
Furthermore, as a landscaper, I often take shots to waterfalls and rocky beaches where the waves move on the reefs and splash some water on the filter. Thanks to this coat I have just to clean lightly with a towel cause the drops come away very easily.
Another comparison: when the light pollution is very strong
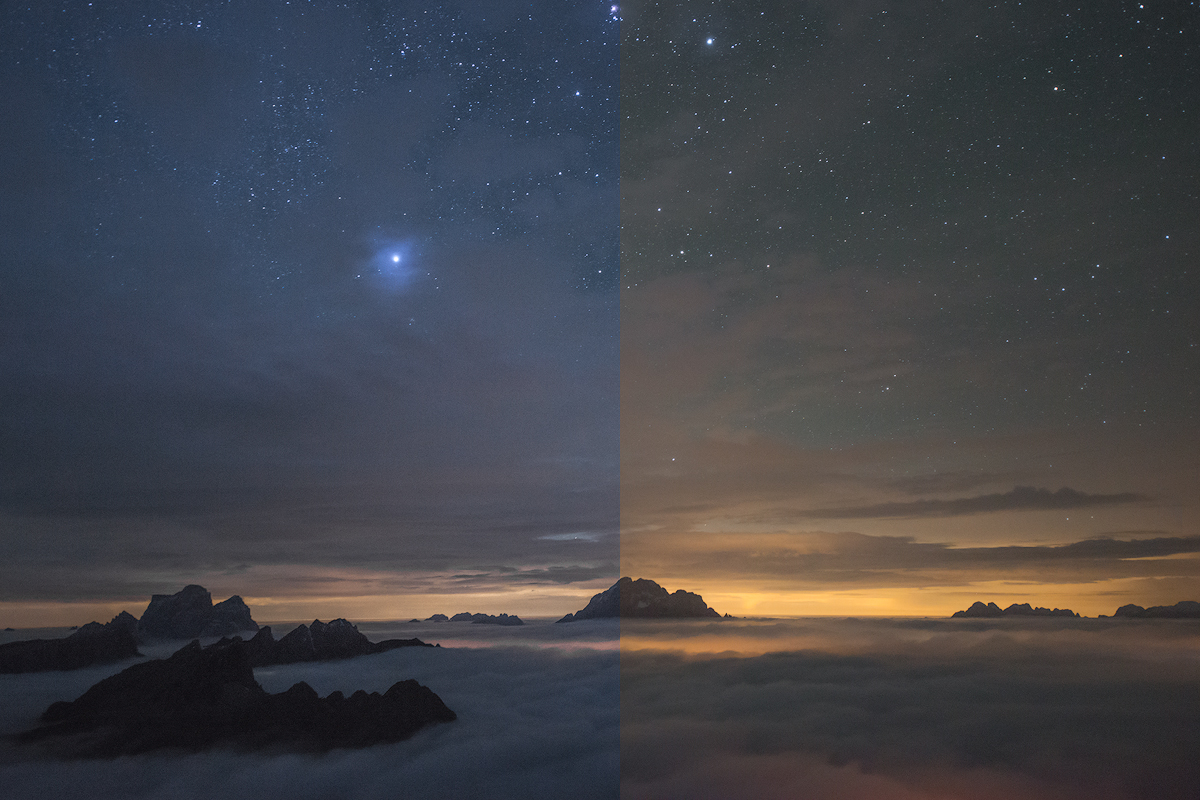
This is another “WITH-WITHOUT” image composed of two shots I took during my workshop at Lagazuoi hut, in the Italian Dolomites.
My students and I had the opportunity to immortalize this view of the highest peaks in the Dolomites of Ampezzo coming out from a “sea” of clouds.
Unfortunately, the light pollution of the valleys was reflected in the clouds and at the horizon; but the shot with the Haida Clear Night filter, with the same white balance, is completely different.
All these features help so much the post-processing phase cause we need to do fewer actions in order to delete the light pollution and that yellowish cast.
Where can you buy it?
You can purchase Haida Clear Night filter at Amazon.com.
But are also available on fotichaestli.ch , the Swiss distributor website.
They are available in every size:
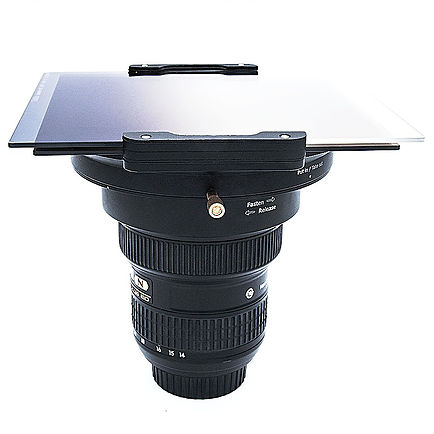
Square Glass Insert filter systems. 75×75, 100×100 and the 150 super wide angle systems (you need the holder to mount the filters on the lens).
You have to put the filters in the grooves of the holder to use them. I own the 150 series holder for my Nikon 14-24mm f/2.8G ED wide-angle lens.
The support system is steel and very steady and resistant. It consists of the universal holder that supports the filters, the front adapter ring and the rear adapter ring that sustain and connect the holder to the lens.
A little gold nut enables to remove or rotate the holder on the rings to position better the filter, especially if it’s a GND.
There are also two rubber plates (superior and inferior) on the holder surface, near the grooves; they prevent the light to come into the space between the lens and the holder, so the nuisance reflections don’t appear on our shots. You can find also some replacement rubber plates in the holder pack.
I also took many very long exposure shots with ND, GND and both filters; I never saw that horrible reflection (similar to crowns) that appear every time the light goes through the filter.
And of course there are not this kind of problems about the Clear Night filter; in the night the light is very weak, especially when the moon is not visible (except cityscapes).
Conclusion
Haida Clear Night filter is a great choice for a nightscape.
I like the color cast on the glass, cause it eliminates yellowish and orange pollution, even if I know that is a matter of taste (I love cold nightscapes).
The quality is great and the price also. I have to tell you that this idea met my expectations.
Based in Ningbo, Haida is a company established in 2007, specializing in researching particularly the filters used on the photographic lens, and also other camera accessories.
Haida filters are among the best on the market and one of their best features is the great price-quality evaluation.
And as I’ve tried the new nano-coated products for months, and they survived many travels and extreme environments (like iced rocky beaches, deserts, salted water) I’ve been even more satisfied with the new stuff of the industry from Ningbo.
Here is some image I took with the new Haida filters.
Now to the main characteristics of the products I tested: Nano Pro MC ND 3.0 (1000x) 150×150 and Nano Pro MC Soft GND 0.9 150×170 filters.
The Nano coat
What does “Nano Pro” mean? Well, it’s the extremely thin, nano, a coat which covers the glass surface of the filter.
This is the great innovation of this new product line that makes the difference in comparison to the previous series. It gives resistance to dirt, reflections, and scratches.
Thanks to this coat, my filters fantastically survived sandy, earthy, rocky, icy places.
Furthermore, as a landscaper, I often take shots to waterfalls and rocky beaches where the waves move on the reefs and splash some water on the filter. Thanks to this coat I have just to clean lightly with a towel cause the drops come away very easily.
The holder
You have to put the filters in the grooves of the holder to use them. I own the 150 series holder for my Nikon 14-24mm f/2.8G ED wide-angle lens.
The support system is steel and very steady and resistant. It consists of the universal holder that supports the filters, the front adapter ring and the rear adapter ring that sustain and connect the holder to the lens.
A little gold nut enables to remove or rotate the holder on the rings to position better the filter, especially if it’s a GND.
There are also two rubber plates (superior and inferior) on the holder surface, near the grooves; they prevent the light to come into the space between the lens and the holder, so the nuisance reflections don’t appear on our shots. You can find also some replacement rubber plates in the holder pack.
I also took many very long exposure shots with ND, GND and both filters and I never saw that horrible reflection (similar to crowns) that appear every time the light goes under the filter; so I’m really satisfied with this holder.
The filters
The glass filters are stacked in the grooves of the holder that I described previously.
The sharpness of these filters is excellent and also by the absence of color dominant even if they appear colored at the first sight.
Also, the management of phenomenon like flares and vignetting is great, also because my wide angle already creates some of those.
I also tried to take pictures with GND and ND both mounted and the results are great. But remember to insert the ND always on the first groove nearer the lens to avoid strange light reflections.
Comparisons
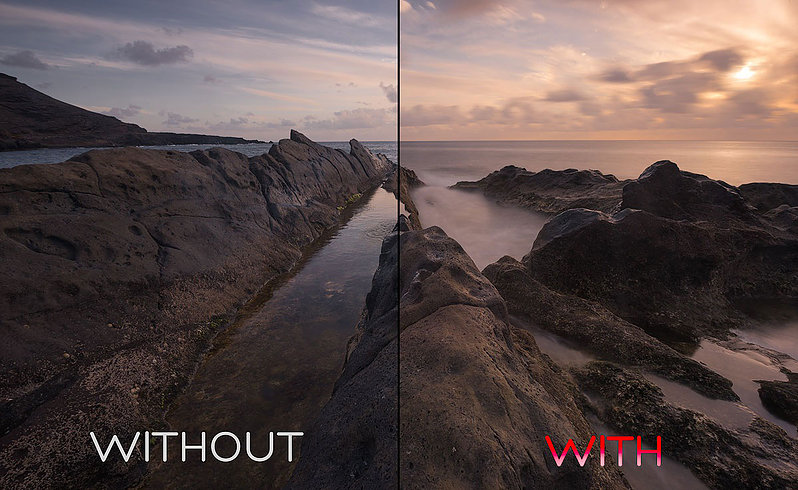
Here are following two “with-without” images that consist of not post-processed shots.
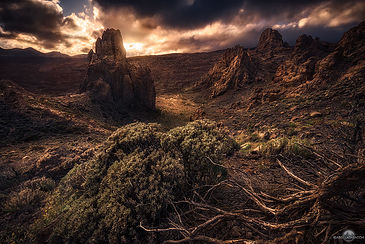
In the first, taken in Lanzarote, I used the Nano Pro ND 3.0 (1000x) filter.
You will notice how, in the “WITH” half, the sea water looks like a thick fog and seems velvety. Besides, the clouds are blurred.
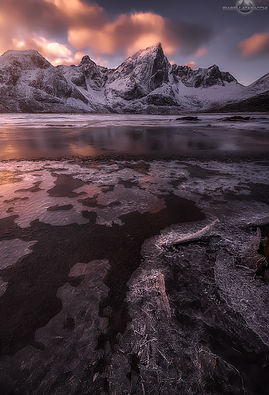
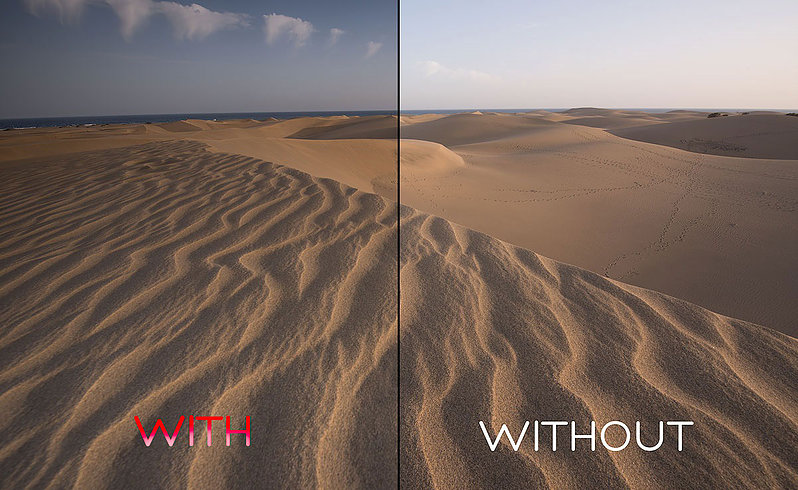
In the second, taken in Gran Canaria, I used the Nano Pro Soft GND 0.9 filter.
You will notice how the sky and the upper part of the image are darker, even if the foreground has almost the same brightness and contrast in both the halves. This allows a better managing in postprocessing.
Where can you buy them?
The new Nano Pro filters will be soon buyable in Amazon distributed from Pro-photoshop.
If you live in U.S.A you can visit the HaidaUSA online store.
If you are a Swiss customer, you can also visit the official distributor in Switzerland Fotichaestli.com.
In conclusion…
The quality of the Haida Nano Pro filters is excellent. The strength and the stability of the holder impressed and helped me during my adventures. Even if I often explore extreme and wild locations, my filters are already intact and not damaged.
For instance, I went, as you read, in the desert; there is a lot of sand there; if the glass would be of poor quality, would have a lot of scratches now.
But thanks also to nano coat on it, I was able to clean it without stress.
Many photographers could have some hassles taking shots, for example, to waterfalls. Indeed the water goes frequently splash on the ND filter used on these kinds of shots. But the nano coat permits to clean the glass very easily.
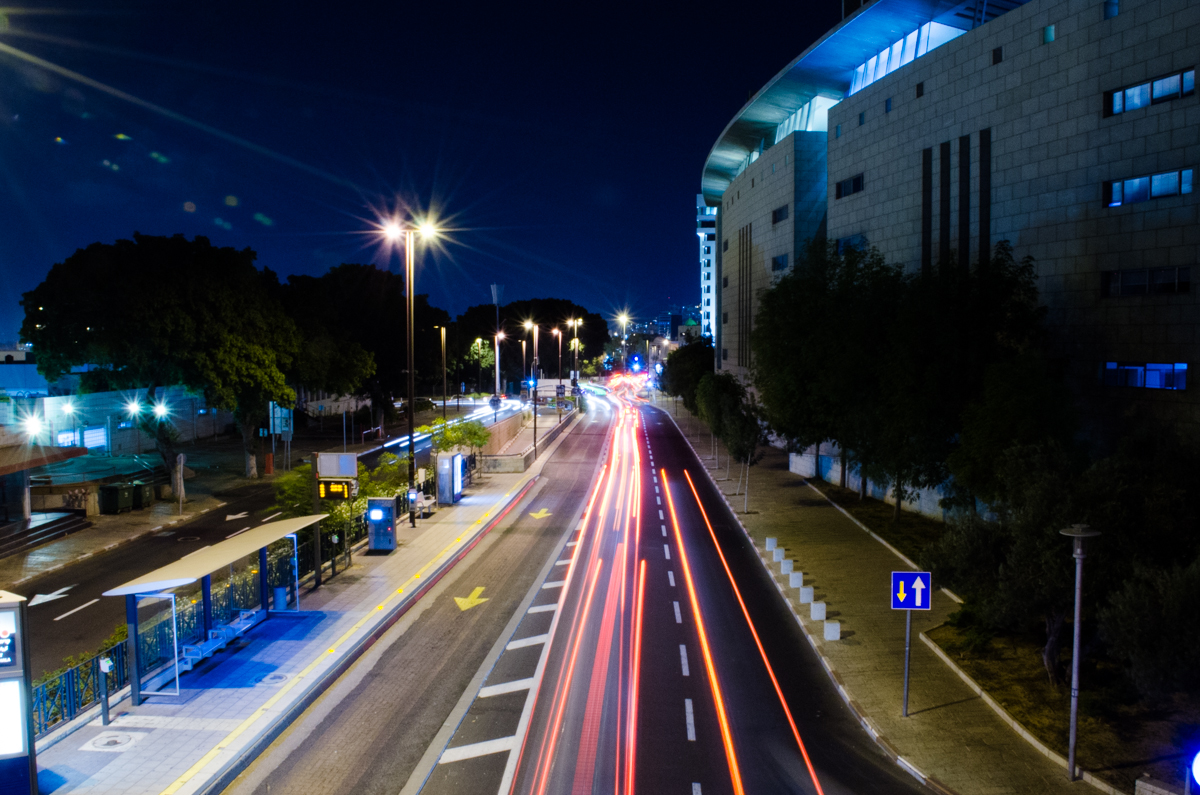
is a technique that makes slow-moving elements (such as waves or the light trail of cars) appear in the photo mist like, blurry or elongated, while still, objects remain sharp and defined. The key factors for achieving this effect are low shutter speed and having the camera extremely stable. Using long exposure photography you can give a totally new dimension to your nature photos. I think you will love this technique and the photos you will achieve by using it. In today’s article, we will show you how.
This photo was taken at night using long exposure. The moving cars were too fast to be captured by the camera, but their bright lights were captured as light trails, giving a nice effect to the image.
#1. Use long exposure photography when you have moving elements in the frame
The effects achieved by long exposure are created because the moving object is captured by the camera many times during the time the shutter is open. We can achieve different effects depending on the amount of light the object is giving and its manner of movement, For example, a passing car at night is giving off light from its headlights and is moving relatively fast in a specific direction, so the effect we get is that we see the headlights as streaks of light outlining the path of the car the car drove through. On the other hand, waves, which do not give off the light, move back and forth on the shore and so they would make the water at the beach look like mist or a thick fog.
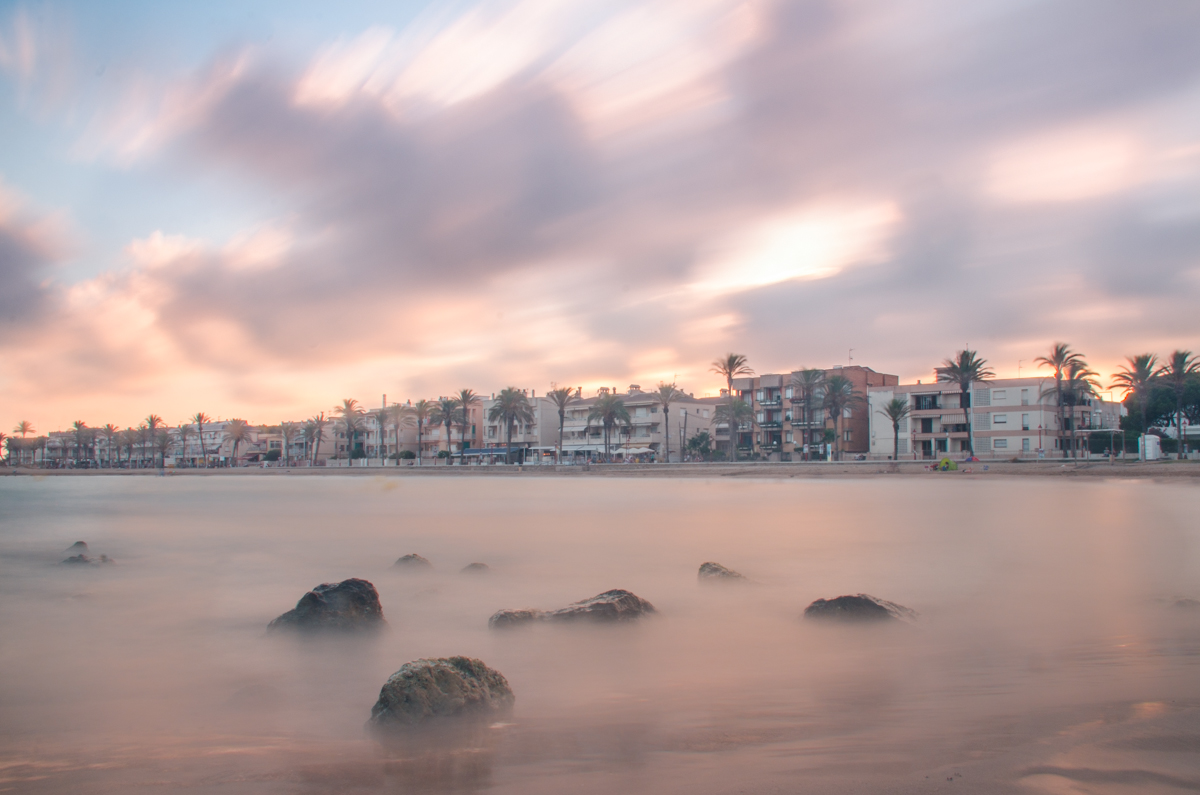
In this photo, both the water and the sky were moving, but the buildings were static.
#2. To get a well-balanced image, add static elements in your composition
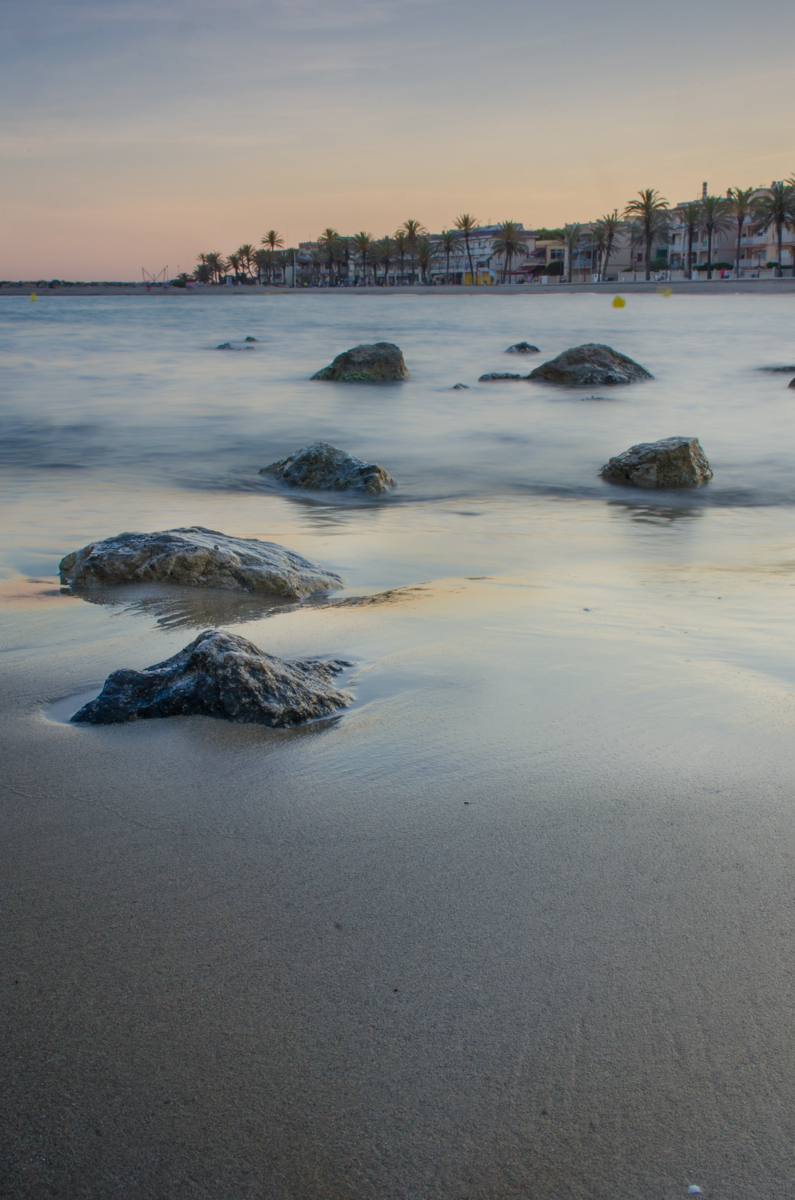
If everything in the frame is moving, you can end up producing photos with a dizzying effect. Unless you want this effect for creative purposes, I recommend you to include in the composition of the image at least one static element that will provide the viewers a point to rest their eyes. The contrast can also enhance the effect and make the image more balanced. A static object can be a rock, a tree, a house, a path… anything that does not move when you are pressing the shutter.
The combination of the static rocks and the buildings and the movement of the waves create a balance in this photo.
#3. You will need a tripod to avoid camera shake
As you will be shooting with low shutter speed, you will need to stabilize your camera somehow. One of the best option is to use a tripod. There are a lot of tripod models in the market. I recommend you to get a stable one which will fit your budget.
The tripod by itself won´t give you 100% stability. If you have a lens with image stabilization (also known as vibration reduction), it will be better than you turn it off when you have the camera on the tripod. I know this last tip might seem contradictory, but these stabilization systems are meant for hand-holding situations and if you are using a tripod, they might cause shaking instead. Another tip is to avoid touching the camera or tripod while you take the photo. I recommend using the timer delay options of your camera to avoid the shaking due to the pressing of the shutter release. You can also use a remote control and avoid touching the camera altogether.
#4. Use filters to avoid overexposure
Nature photography many times takes place during daylight. If you want to take a long exposure photo, the first problem you will face is the overexposure. Sometimes even with the aperture closed as much as it can be and the ISO set to the lowest value, you might still have burnt photos. How to solve this problem? By using filters to reduce the light that gets into your camera.
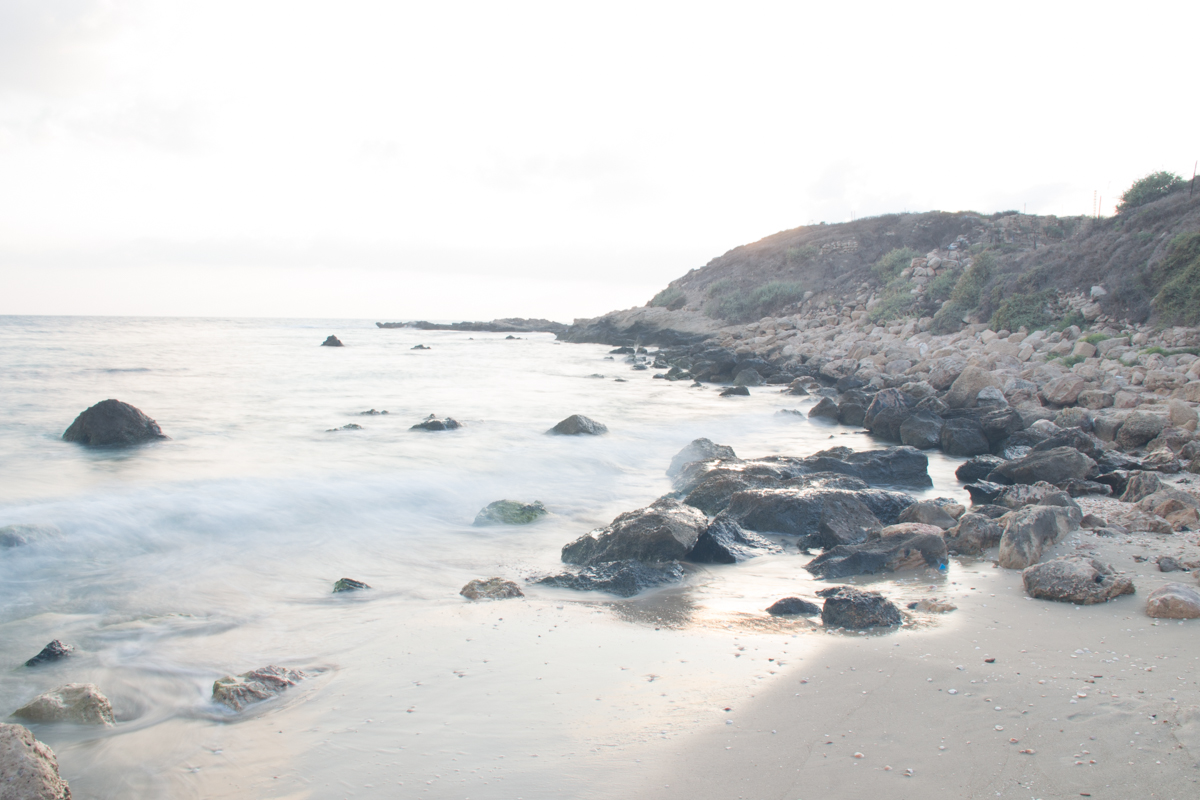
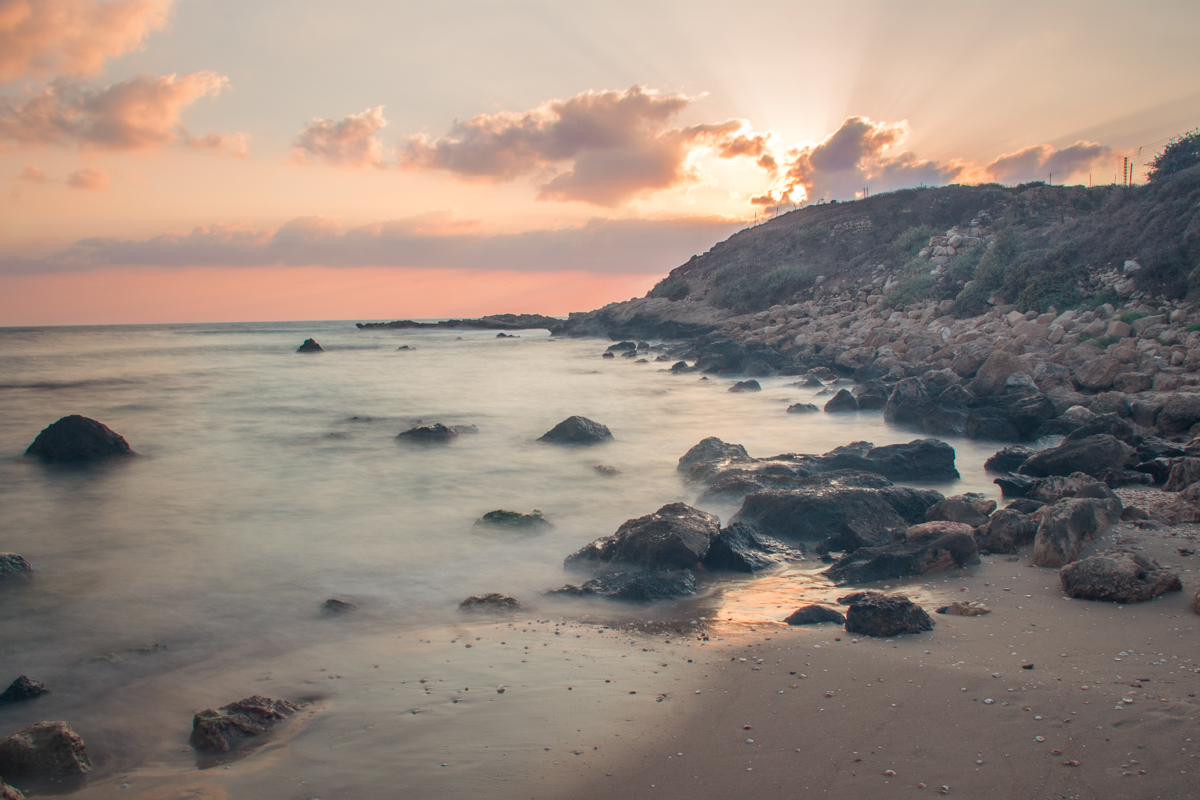
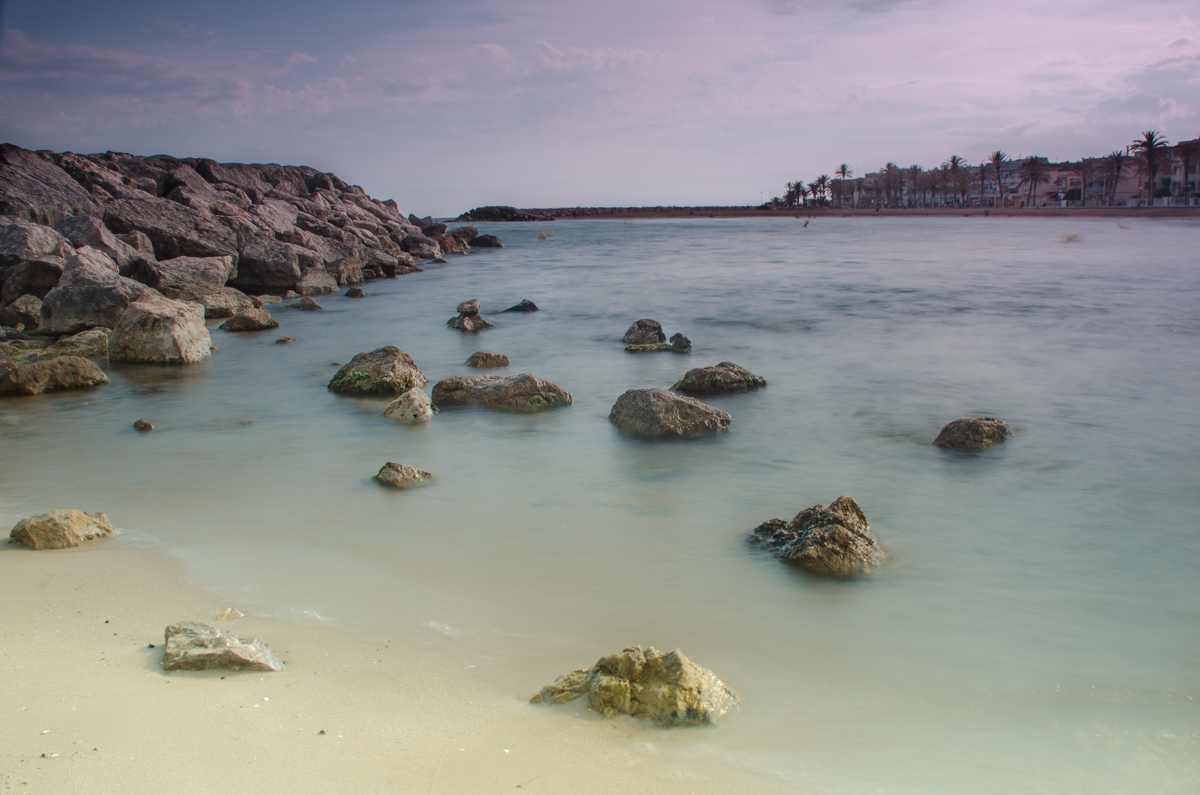
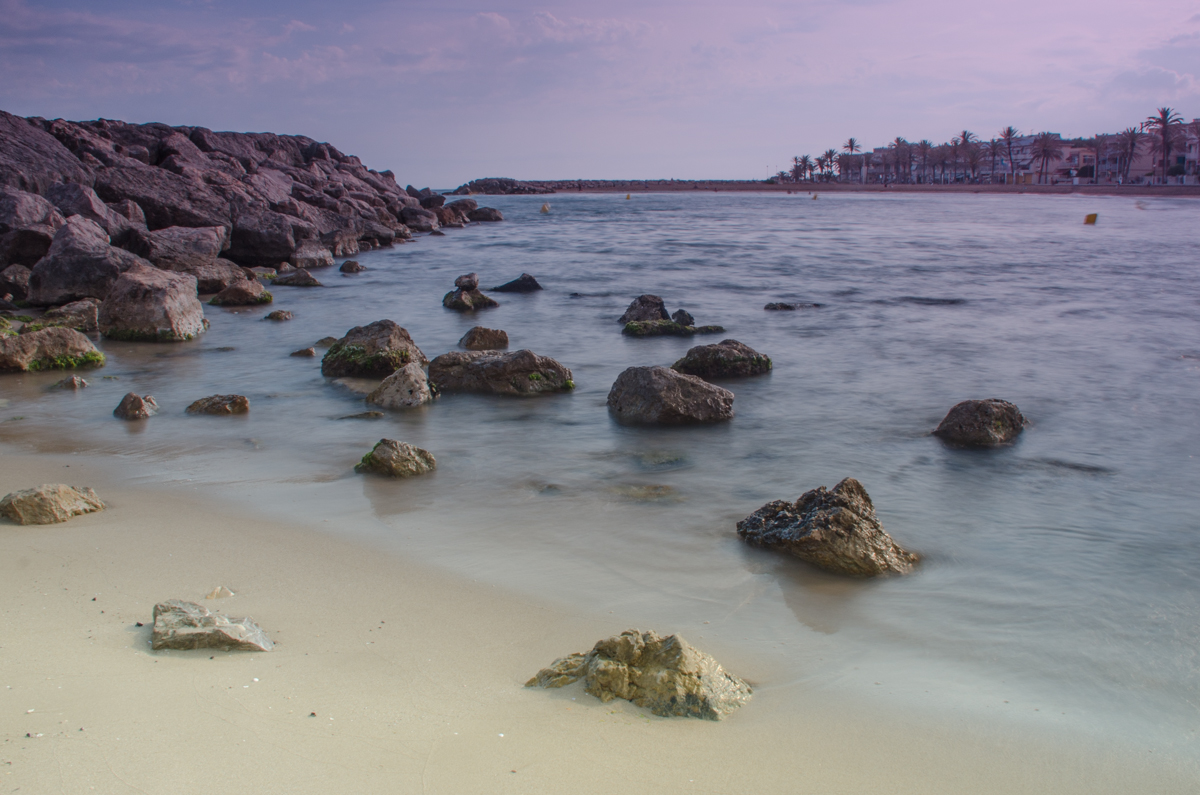
The upper long exposure photo was taken without using any filter. As the sun was bright at that moment and the shutter speed was low, the image ended up being overexposed (burnt). The photo below was taken using an ND filter. As it stops light from coming into the sensor of the camera, the resulting photo is better exposed.
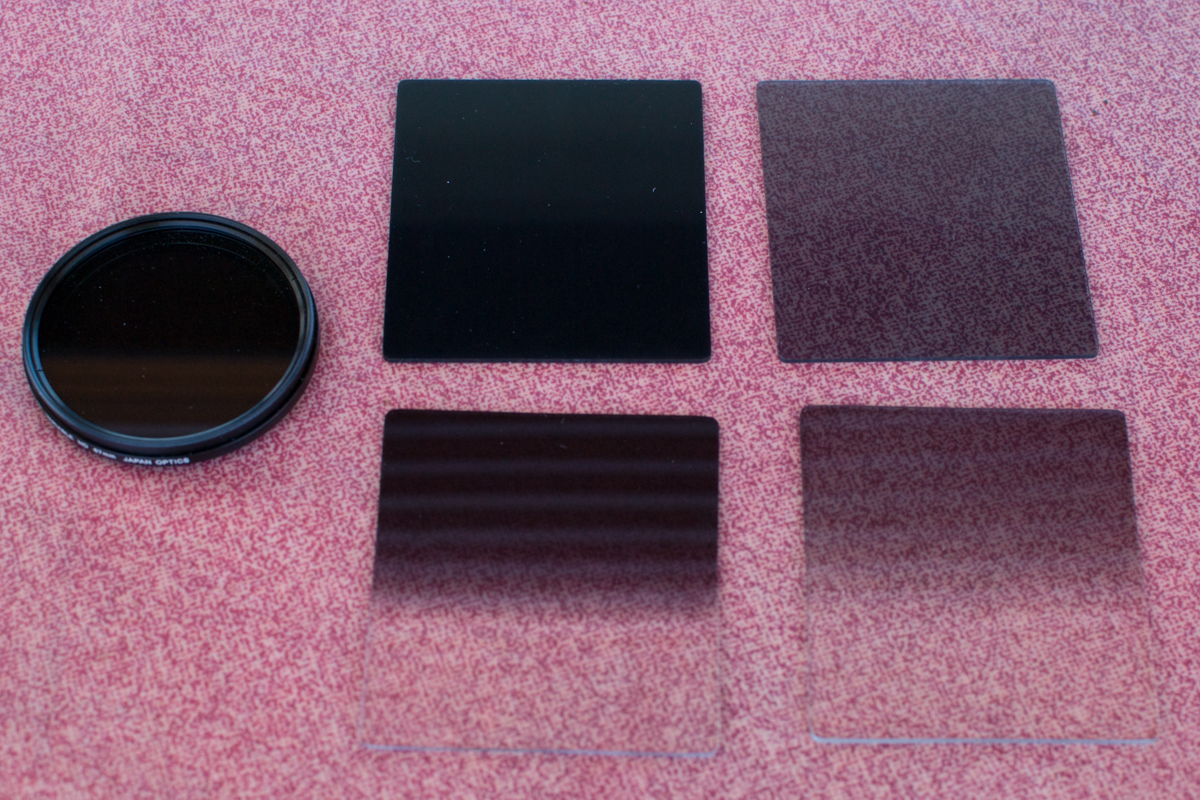
There are many different filters, but two types are especially interesting for long exposure photography: Neutral density (ND) and graduated filters. The first one is basically a uniform dark filter. There are different dark intensities. The more intense is the light in your frame, the darker your filter should be. The darkness of a filter is measured by the stops of light that they don´t get into your camera. The highest its stop number, the darker the filter is. Graduated filters are a variation of the ND filters. Their darkness is not uniform but increases progressively in a gradient.
Filters can come in various shapes and types. Here you can see the left a circular ND filter, To the right at the top are 2 ND filters with 2 different stops (degree of light they can block) and in the bottom 2 graduated ND filters also with different stops.
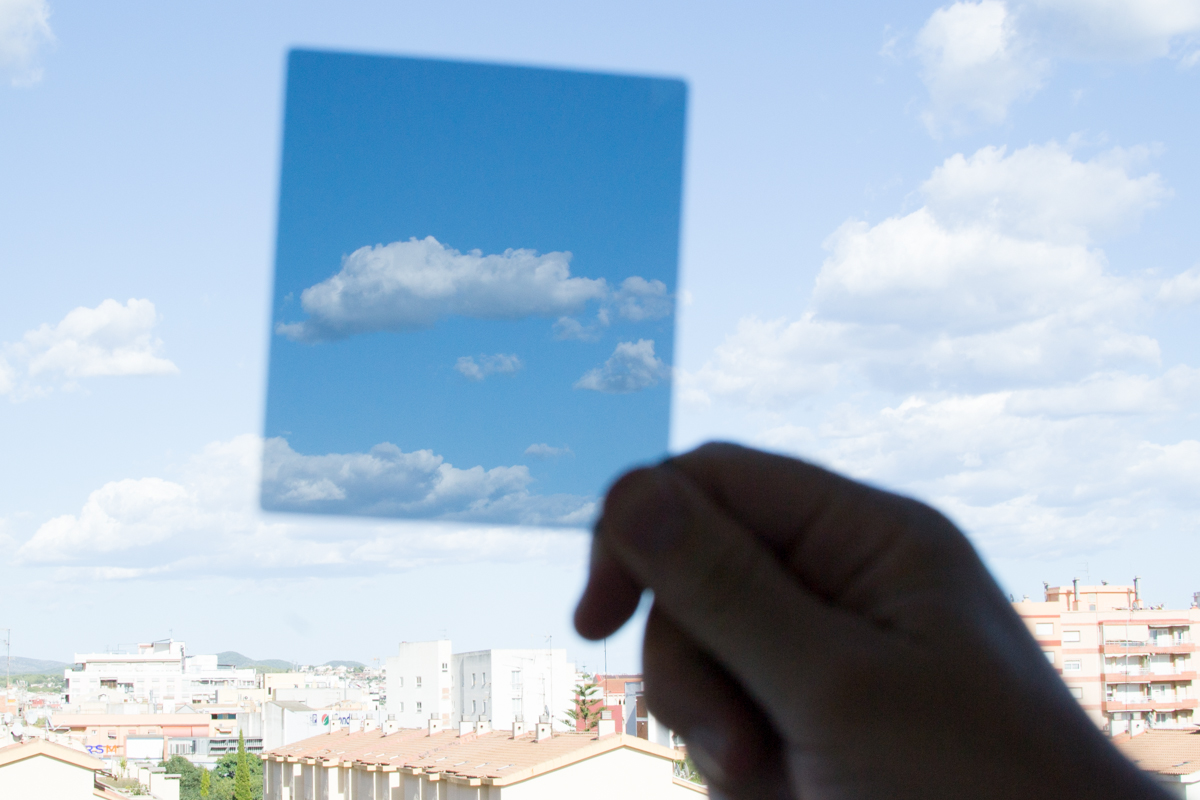
The effect of ND filters is blocking light. As you can see in this overexposed photo., the area covered by the filter was corrected by it.
You can use one filter or stack several ones on top of the other. For example, you can use several rectangular filters in the filter holder or you can use one round filter on your lens and then add one or more rectangular filters using a filter holder.
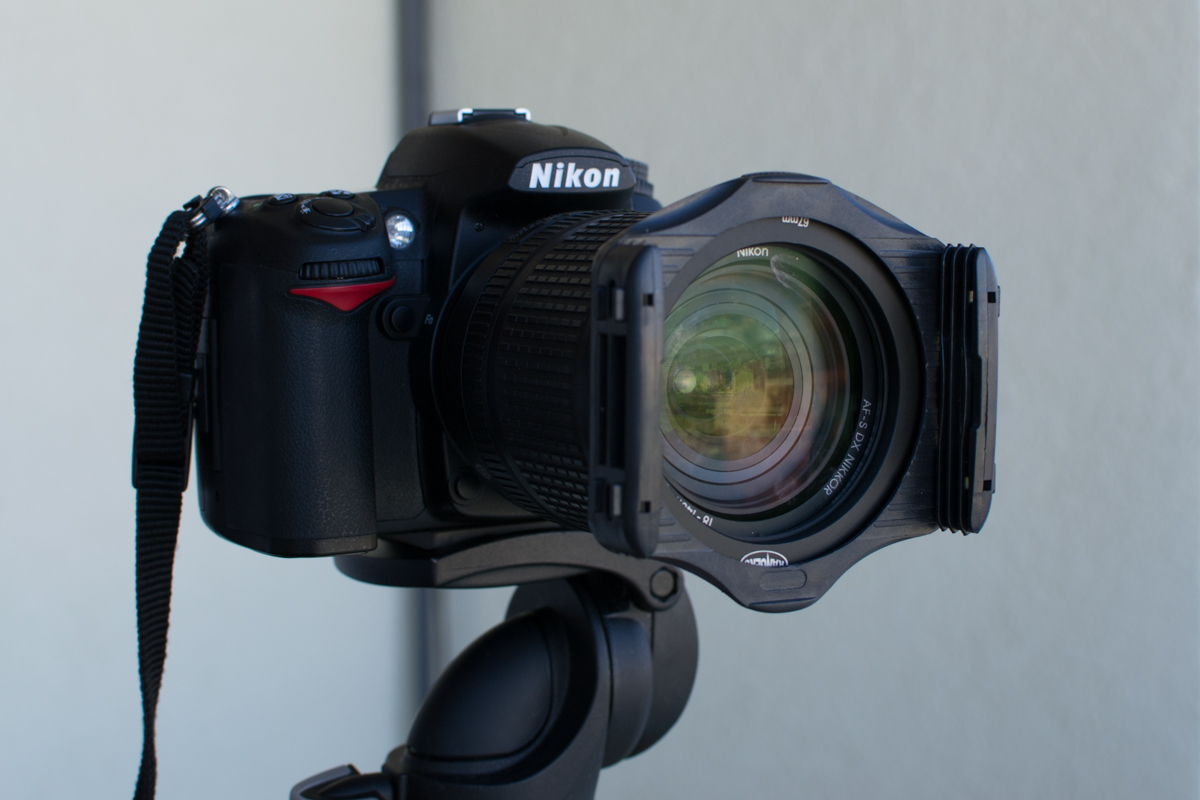
Rectangular filters are usually placed in a filter holder mounted on the lens.The filter holders have slots into which the filters can be fitted easily.
Once in the field, I set the camera to the shutter speed I want in order to get the desired effect. Then I set the ISO to 100 and the Aperture that will give me the Depth of Field I want. I usually go with Apertures 8.0 or higher. To decide the filter or filters I need, I have to admit I do it by trial and error. I believe there is a formula, but when I am in the field, trying filters comes to me much more naturally. I start with the least dark filters and I progressively move to darker ones.
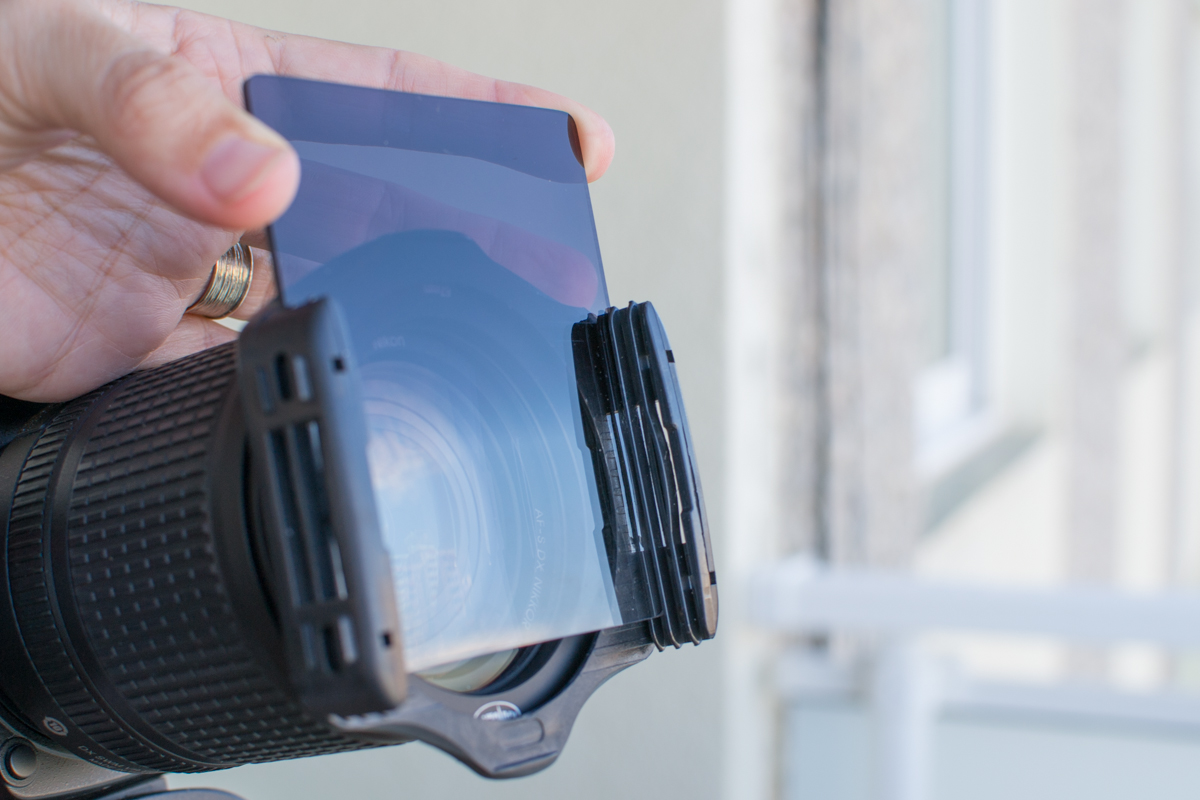
Filter holders have two or three slots that enable you to stack several filters on it.
#5. You might need to crop your image a little in order to delete the filters borders
When you use filters, and especially when you use several filters stacked, black halos or shadows it might appear in the corners of the photo. This is more evident if you are using a wide-angle lens or low numbers of mm. This can be solved easily. Just plan ahead and take a photo knowing that you will need to crop it afterward. I recommend you to how a look to Navanee Viswa´s tutorial to learn how to crop a photo using Lightroom.
In the upper image, you can see black areas that are in fact the filter holder. The lower photo is the same one, after cropping it a little using Lightroom.
#6. You might need to deal with some color cast correction
Depending on the quality of your filters, they might add a color cast to your photo.
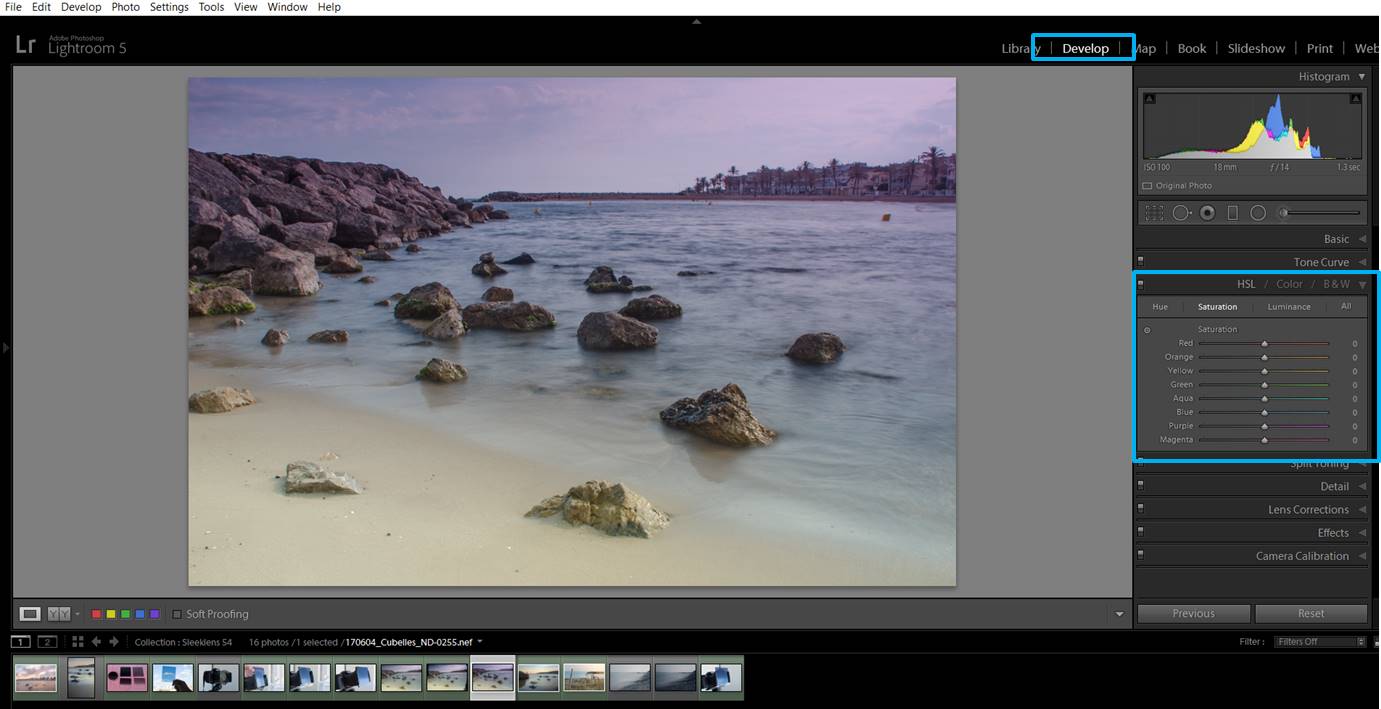
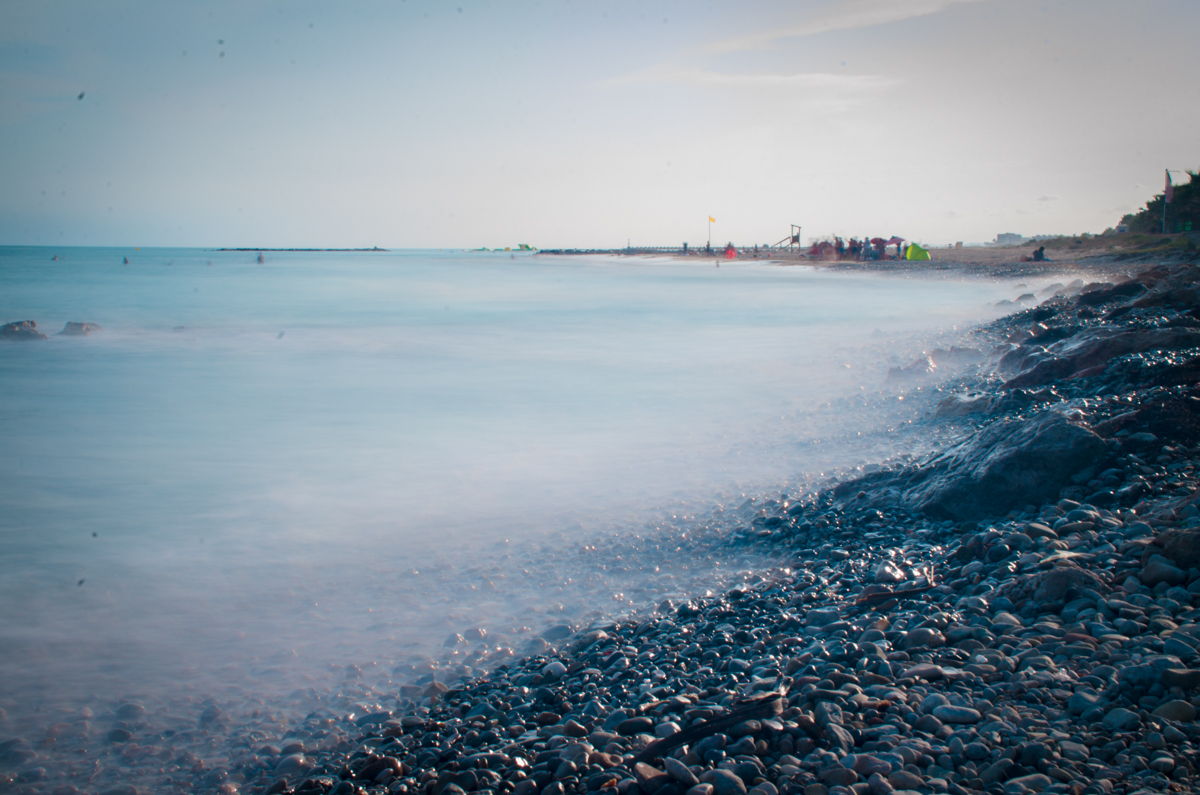
This image has a purple tint due to the filter I used to take it. You can find better quality filters that don’t produce any color cast, but they are usually more expensive.
I am quite new to long exposure photography. When I decided to give it a try, I was not sure about spending a lot of money on my first filters. I got a filter kit that included a wide variety of filters in a really good price. Of course, they are not of the highest quality, but they still allowed me to experiment and discover that I do like this type of photography. As I use them quite a lot, I can think about investing in better ones in the future. For now, however, I stay with my cheap filters and I solve the color cast issue using Lightroom.
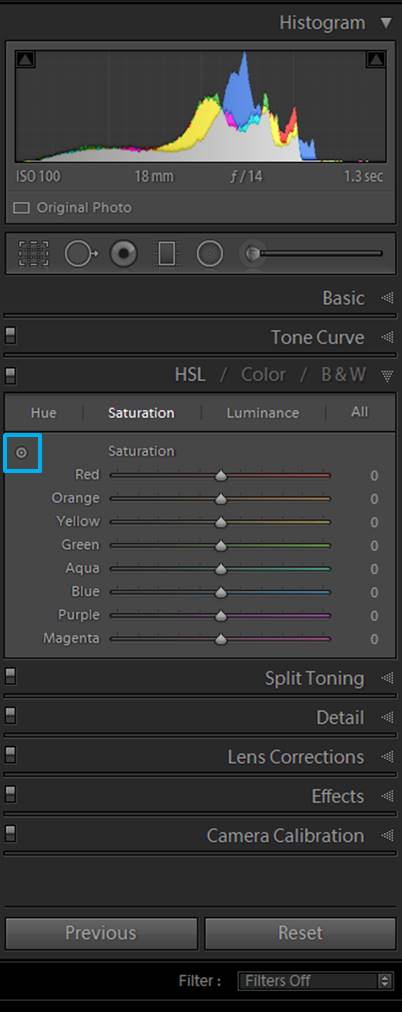
In the Develop module, look for the HSL/Color/B&W section and select Saturation.
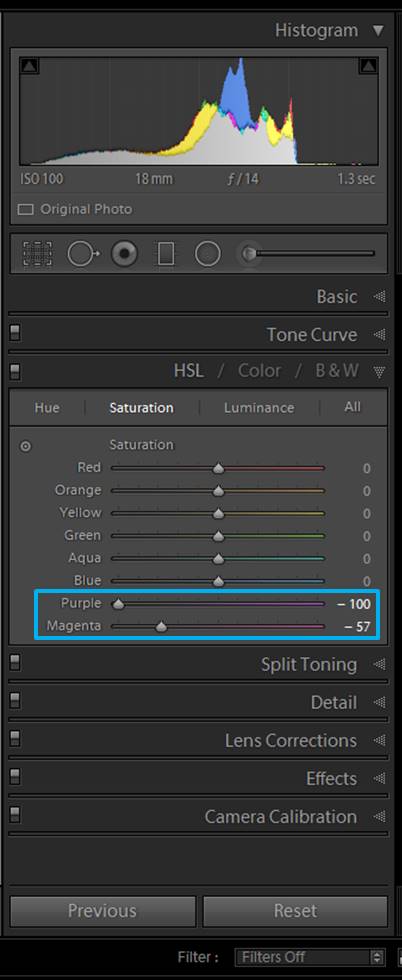
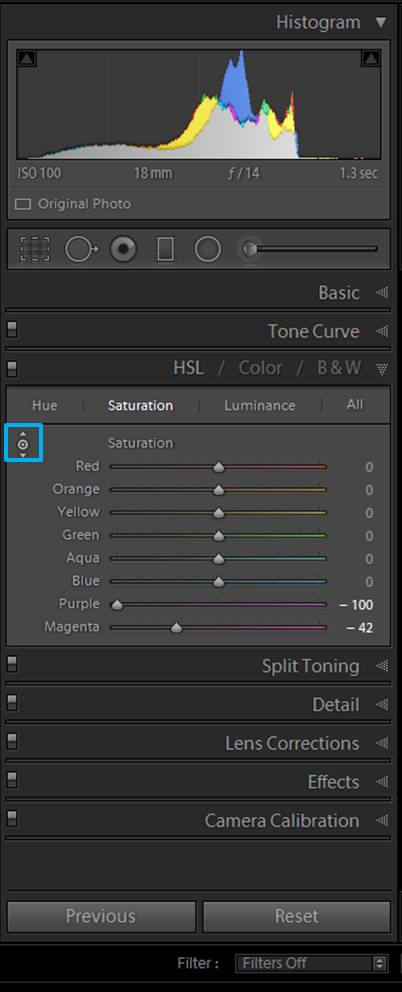
Play around with the sliders of the colors that are giving you the color cast. In my case, I put down the purple and the magenta.
If you don’t like playing around with the sliders, there is another way you can correct the color cast. Press in the little icon marked with a blue rectangle.
This icon changed shape. This shape is also in your cursor.
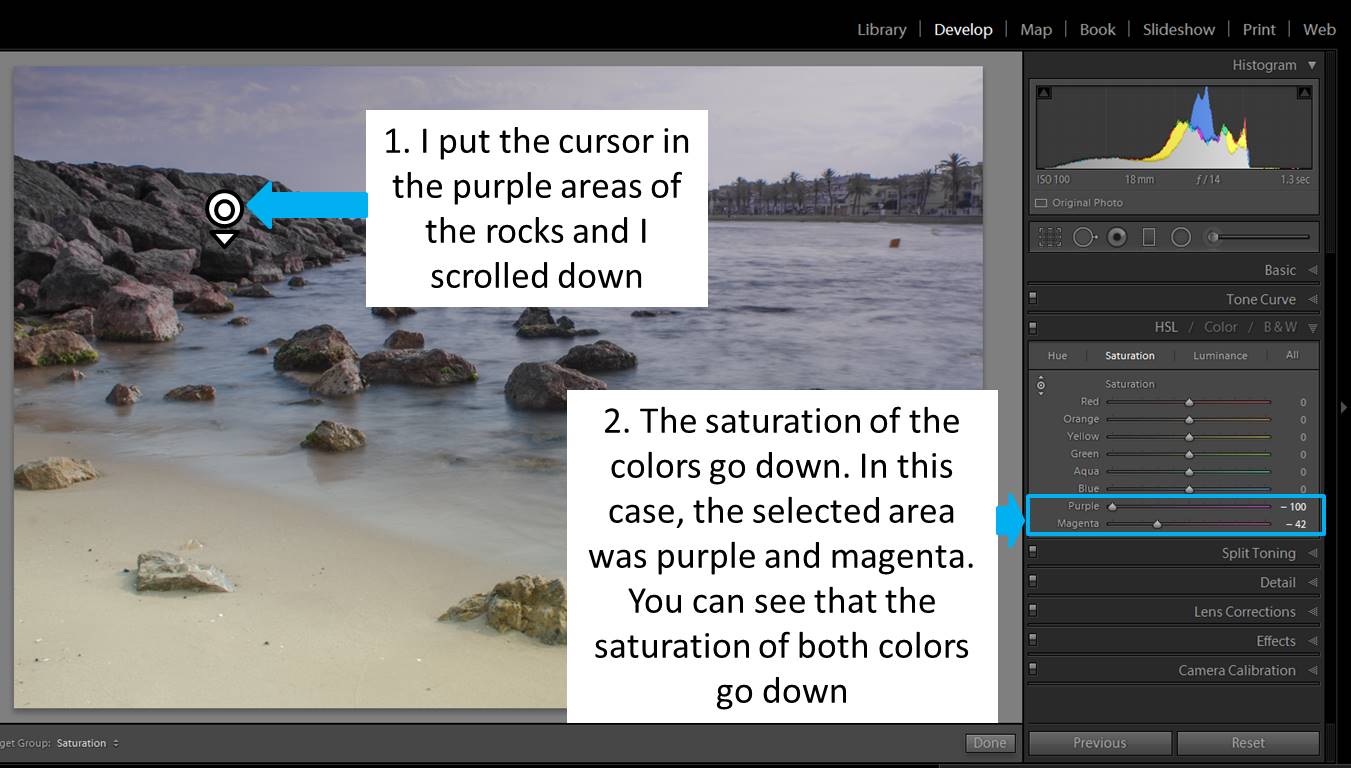
Click in the area of the photo you want to correct and scroll down (because you want to decrease the color saturation. To increase it, you need to scroll up).
Here you have the final corrected image!
If you prefer Photoshop, you can also use it to remove the color cast. Julian H explains how to do it in his article “How to remove color cast using Photoshop”.
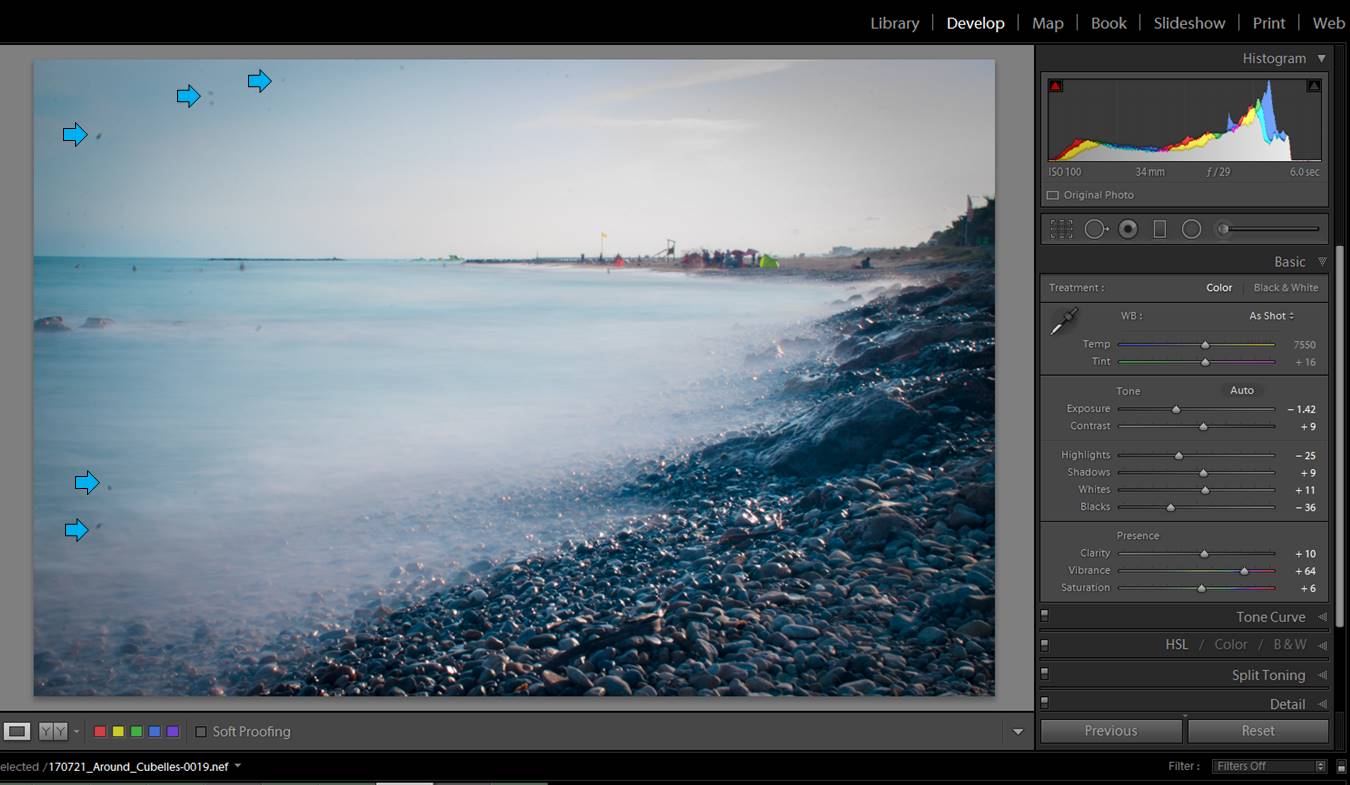
#7. Keep your filters clean if you don’t want to spend a lot of time removing spots
Your filters might seem clean,but when you see the photo on your computer you might discover it is full of spots of dust or drops…
That day I didn’t clean the filters and I ended up with a lot of ugly spots in my photos.
I remove them with Lightroom using the spot removal tool.
There are few dust spots that are quite visible in this photo.
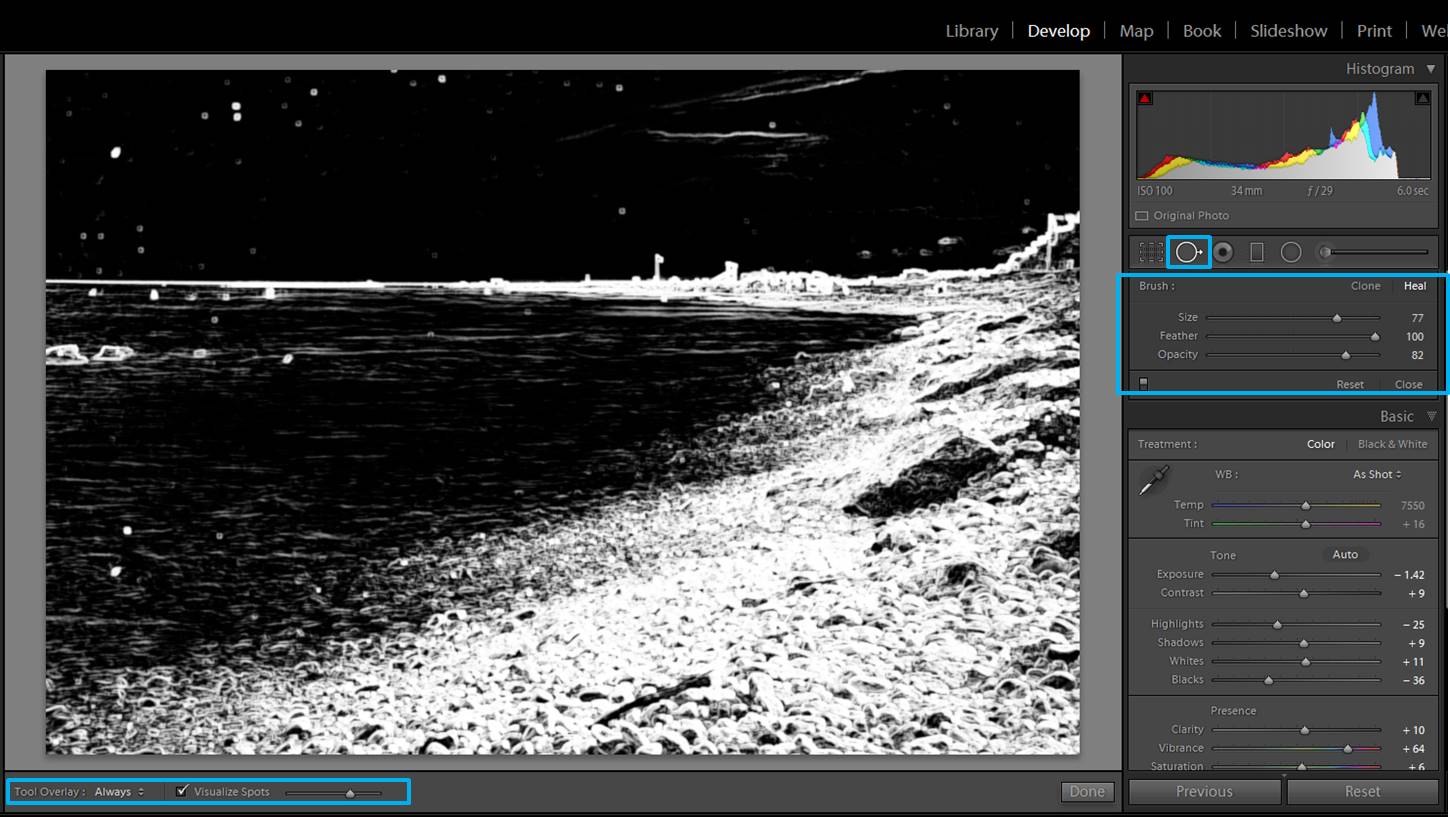
But there is a way to see the dust spots even better! Select the Spot removal tool (blue square), click on “Heal” and in the lower part of the screen click on “Visualize Spots”. You will see your photo in black with white contours. The dust spots are the little round white spots. There are a lot in this photo!
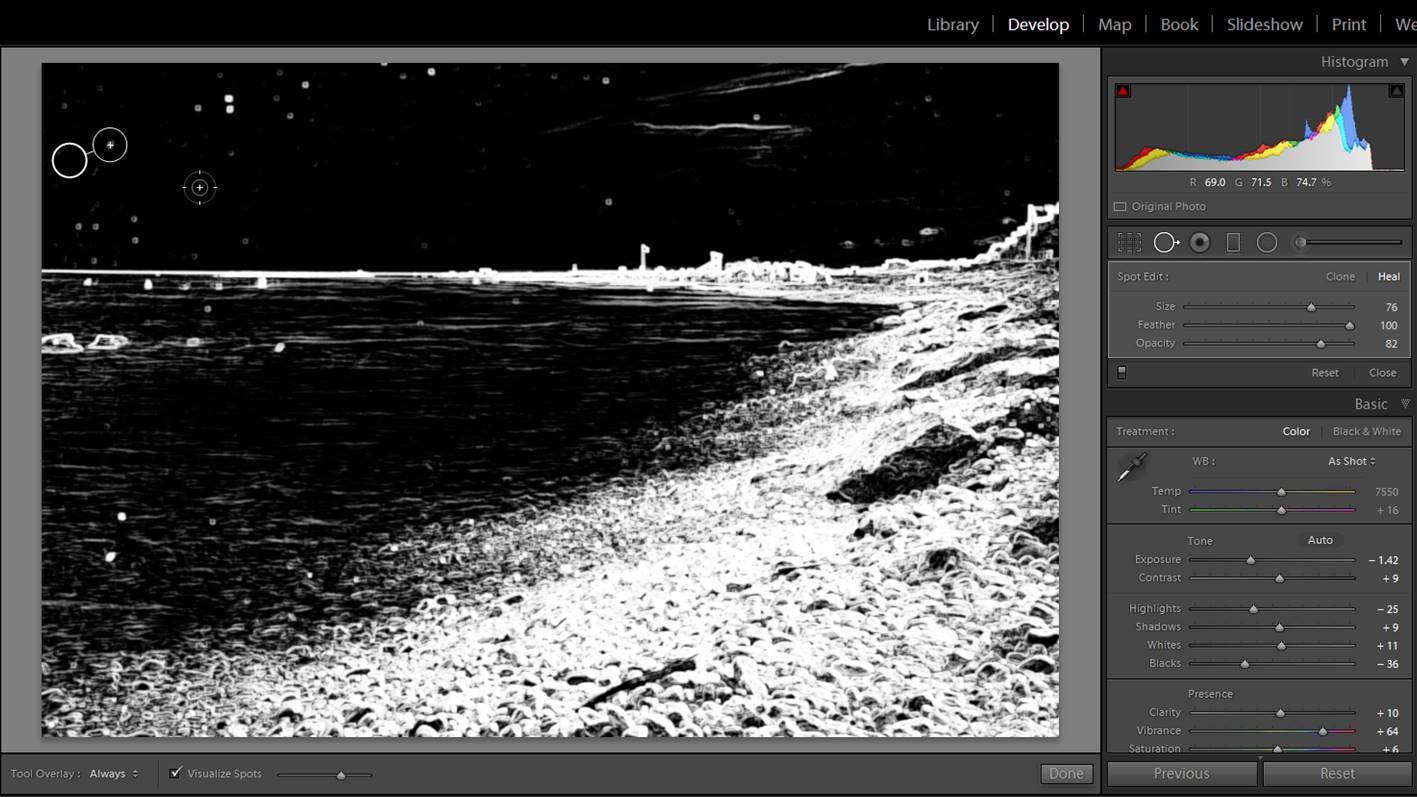
With the Spot Removal Tool, select one dust spot. You will see that Lightroom selects an area from which it is copying the content. Repeat for each dust spot.
Believe me, if you have a lot of them, it can get really tedious. Look how crazy it can get!:
I have learn that it is better to keep a cleaning cloth with your filters and spend some time cleaning them before using (even when they seem quite clean). A minute of cleaning in the field could save you hours later (depending on how many photos you have) in front of the computer.
Here the dust-free version of the photo.
#8.Take your time and enjoy nature
Long exposure photography is not fast photography. You need to set your tripod, choose filters (clean them), experiment different settings… I recommend you to take it as an opportunity to relax and enjoy nature. Sit down, bring something nice to eat and/or drink and have fun!
I hope you liked this article, please write me any questions or comments and have a happy shooting!
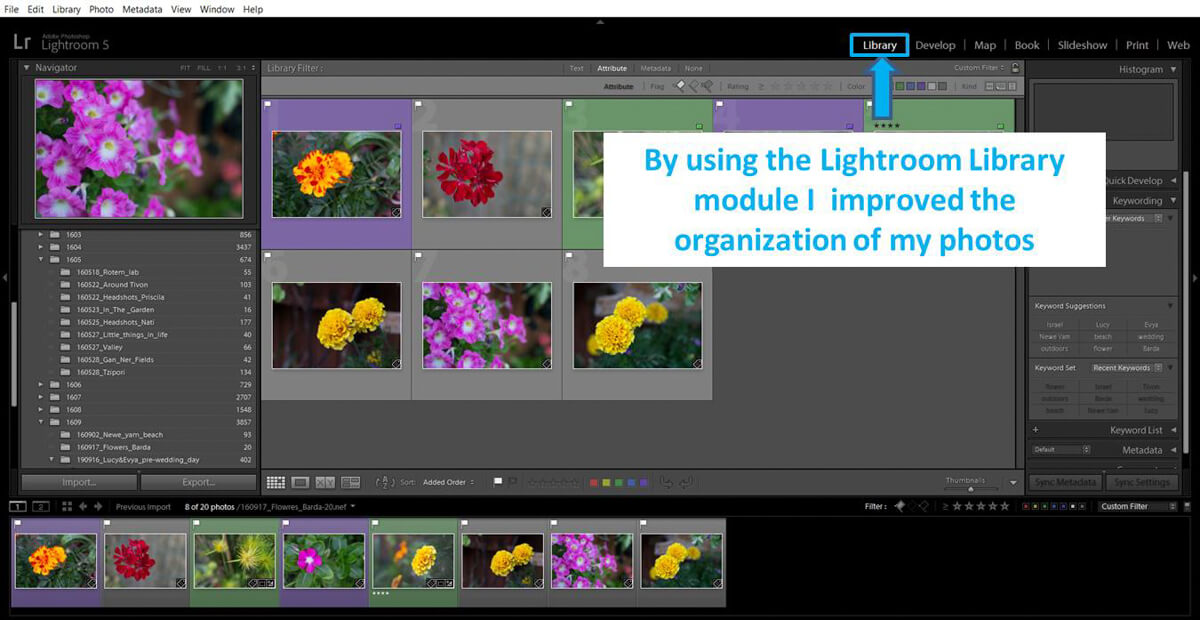
I was not the most organized person in the world. My mom was always kidding saying that I was able to find my head just because I have it attached to my neck. I was also a mess with my computer files, including my photos. When you are taking some photos here and there you might survive being a disorganized person. But when you get a bit serious into photography, either you develop a system to organize your photos or you won’t be able to find them between your tones of files. The day I discover the power of the Lightroom (LG) Library module for organizing photos was a turning point in my photography career. If you are like me and you struggle with making order on your images, keep reading! I will share with you some of the things I learnt along the way.
Include the organization of your photos an extremely important step on your post-processing workflow.
This might be obvious, but if you have a tendency to be disorganized, you need to keep reminding yourself that making order on your photos is crucial. I know… organizing is not the funniest thing to do. But when you are using the right tools, like the LG library, it is not so terrible. Think that investing a bit of time now on keeping your photos in place can save you a lot of time when you need to find your images. Organizing your photos is the first step in the post-processing workflow. Don’t jump ahead!
Decide on a system to name your files (and keep it along time)
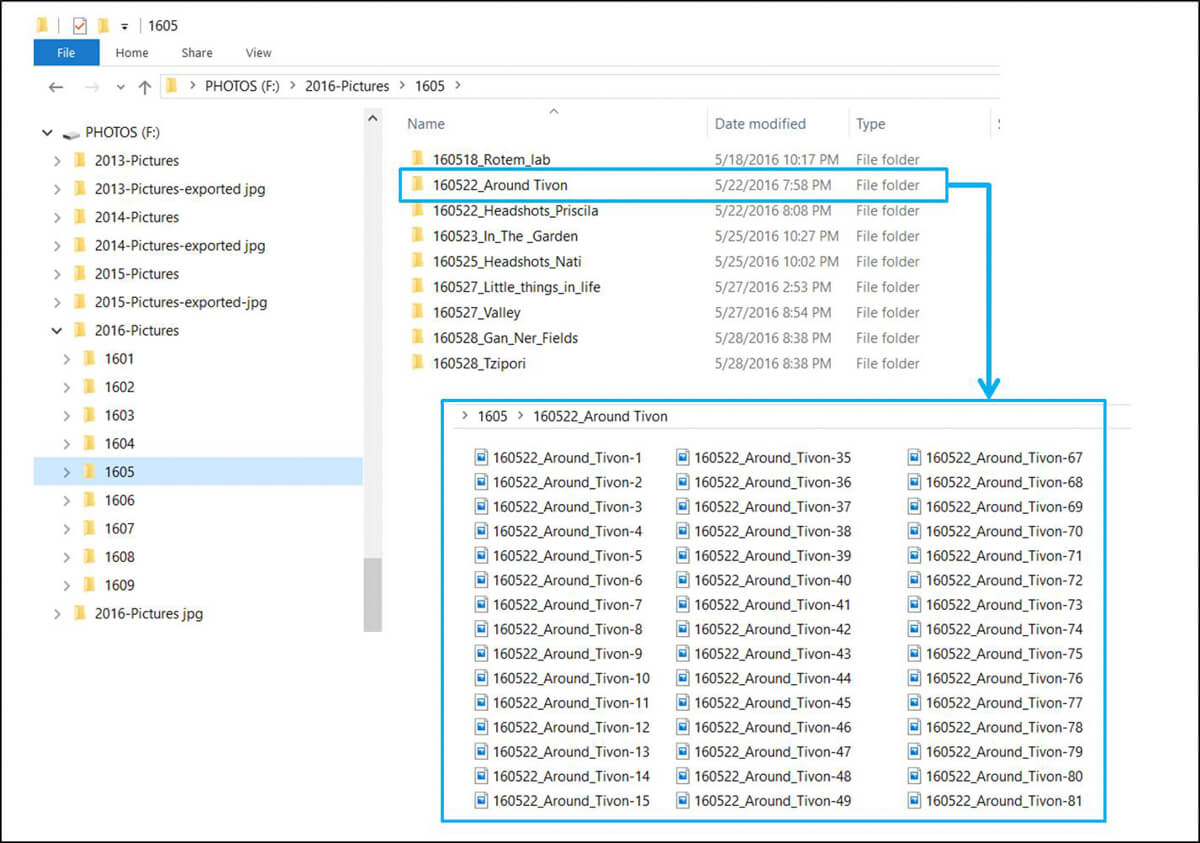
There is not a unique system to name your files. You can organize them by date or by subjects for example. Which one is the right way to do it? I guess that it depends on your personality. Choose the one that talks more to you and keep it along time. Don’t change from one system to another because then you will be in a mess again. I can show you my system. I work well on dates. I have my folders named by year (20016. 2015, 2014…) and month (for example: 1605 for May 20016). Inside the month folder I have the daily folders, in which I include both the date and the name of the photo-session (example: 160522_Around_Tivon for walk that I did around the place I live (Tivon, Israel) on the 22nd May 2016). Some people think that working on dates is not practical because when you need to look for some photos, you need to remember when you shot them. For me it is not a problem because I also use a system of keywords (I will explain a bit later, don’t worry).You might prefer to have the folders by subjects: travel, portrait, landscape… Just pick a system that makes sense to you. This is the most important thing.
Name and work with your folders and files from inside LG
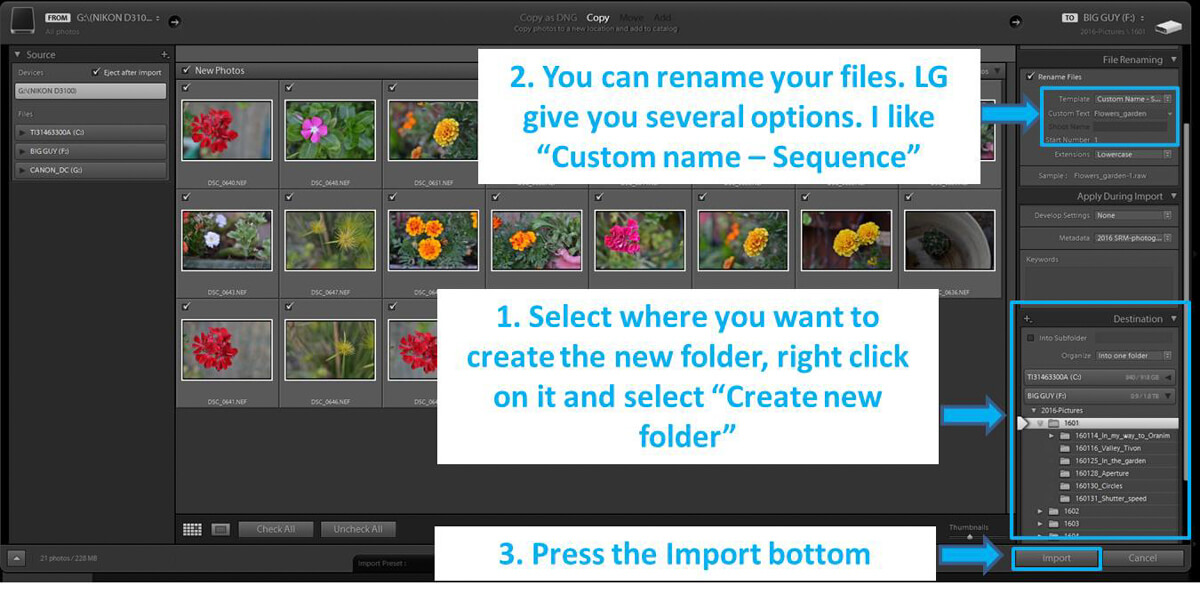
You can imagine LG like your control freak friend: if you create a folder, rename a file or change the location of something without telling, it won’t like it AT ALL. For that reason you have to make all the changes from inside LG. The good thing is that it is really easy to do it (LG is a control freak, but it is not so mean). I just got use to do everything from LG. I start by importing the photos from my SD card using LG. You can create the folder and place it wherever directly from LG.
At this point, I also like to rename the photos using a custom name. This is pretty easy to do and quite useful for finding files in the future. I use the Custom+sequence option. As custom name I put the photo session name or date+photo session name.
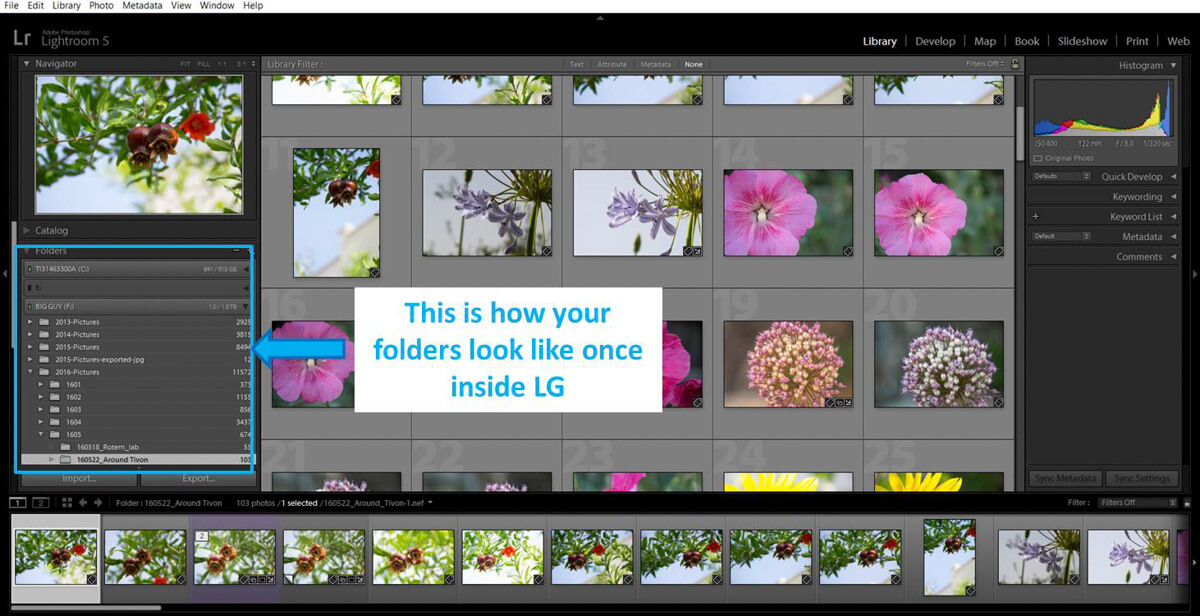
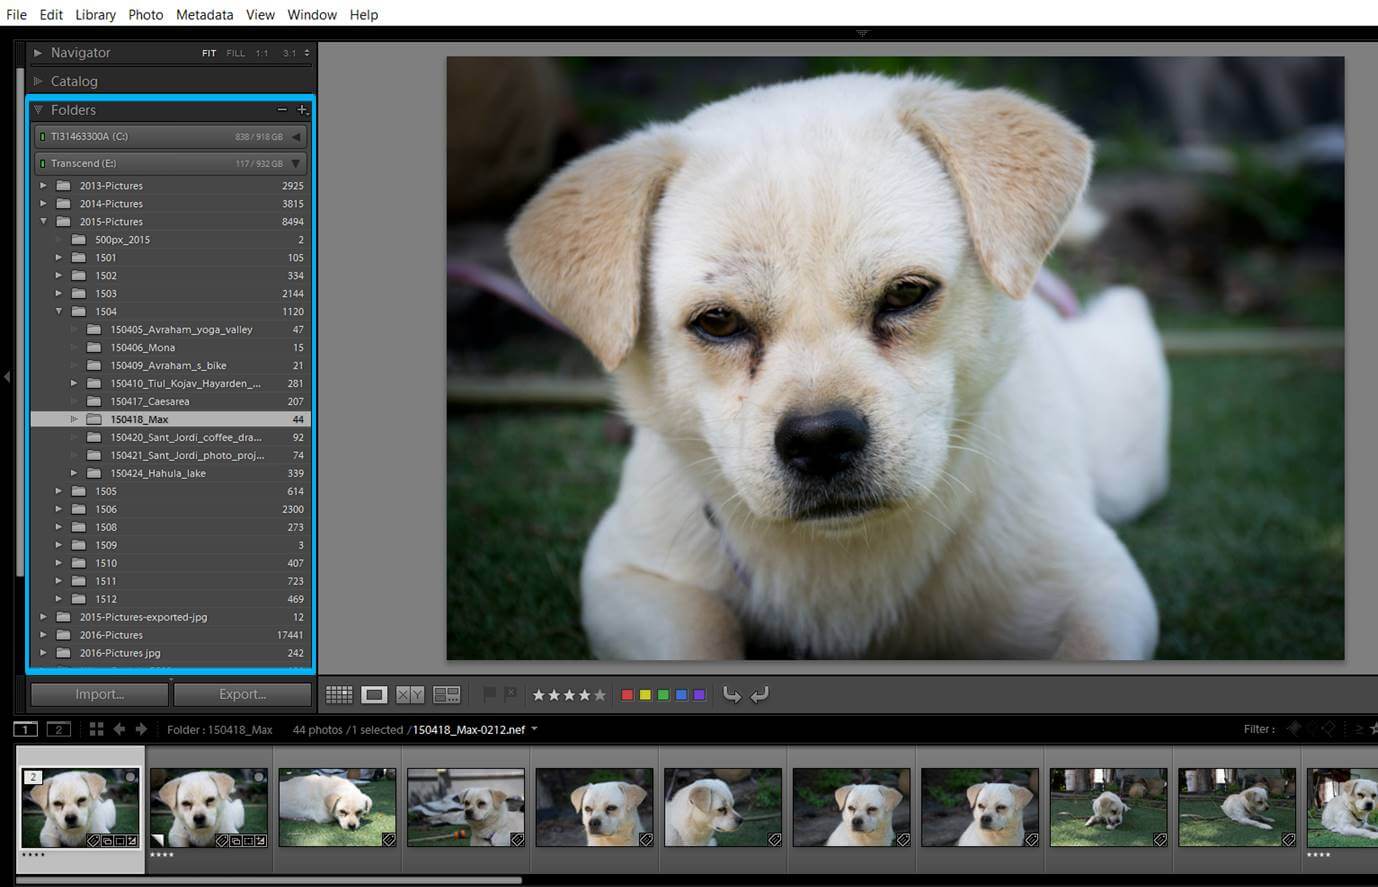
Once imported, you can navigate into your folders using the left bottom panel in the Library module.
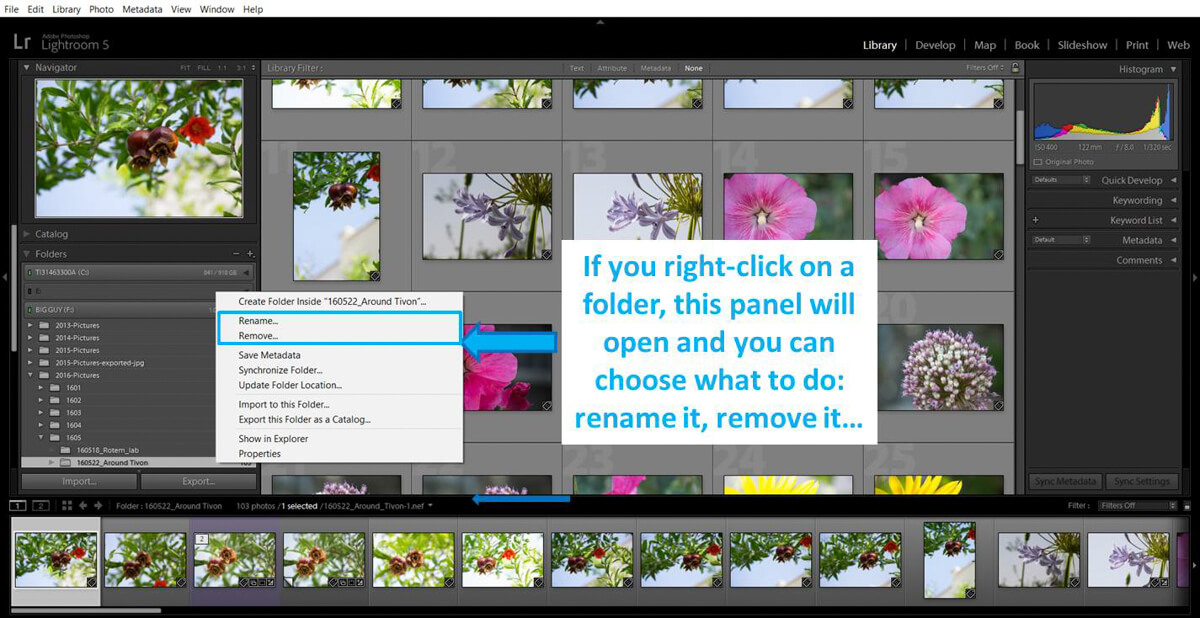
Do you need to rename a folder or to delete it? You have to do it from inside LG (if not LG will lose track of the changes you made and and won’t be able to find your files). You do it from the Folders panel on the library module. To move a folder into another you just need to select it and drag it into the new destination folder.
To rename one or more files, you just need to select them and choose Library>Rename photo(s). To move it to another folder, you select it and drag it.
Delete the really bad photos
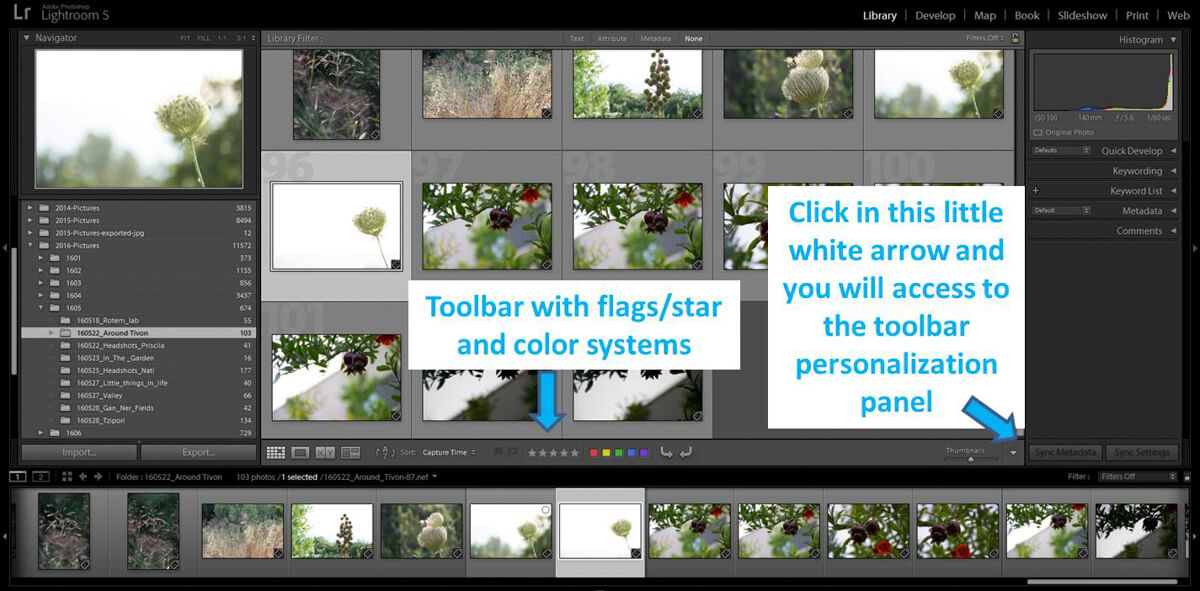
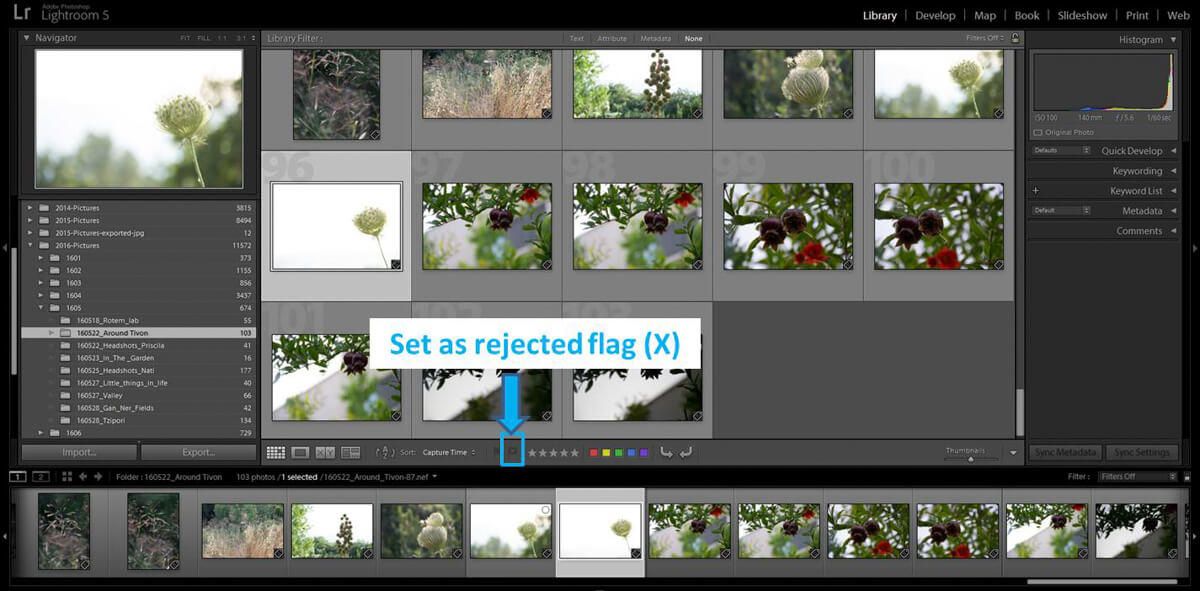
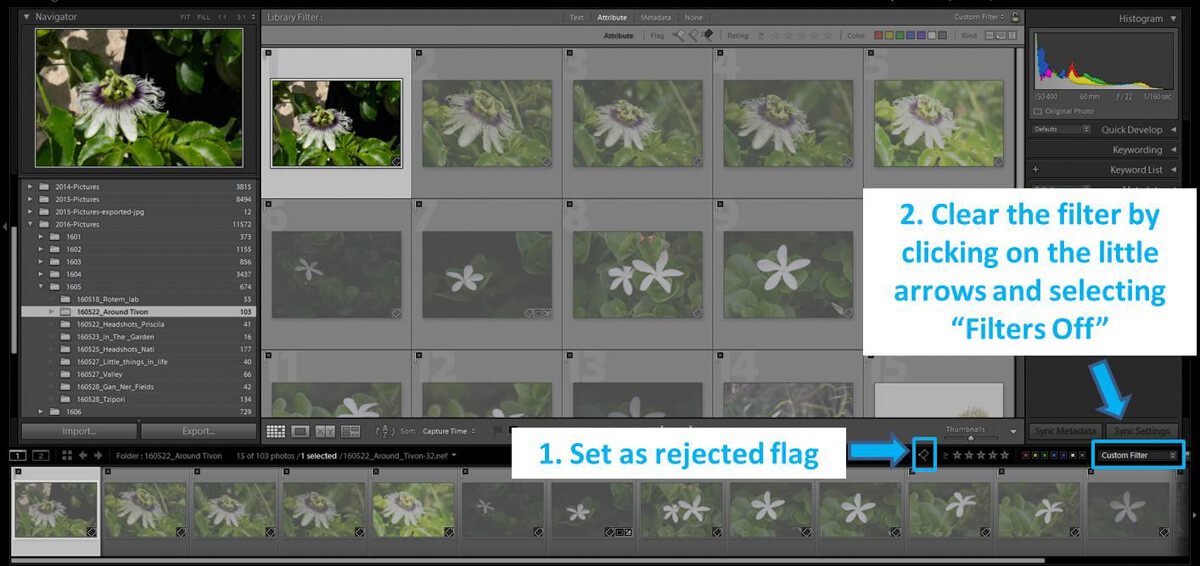
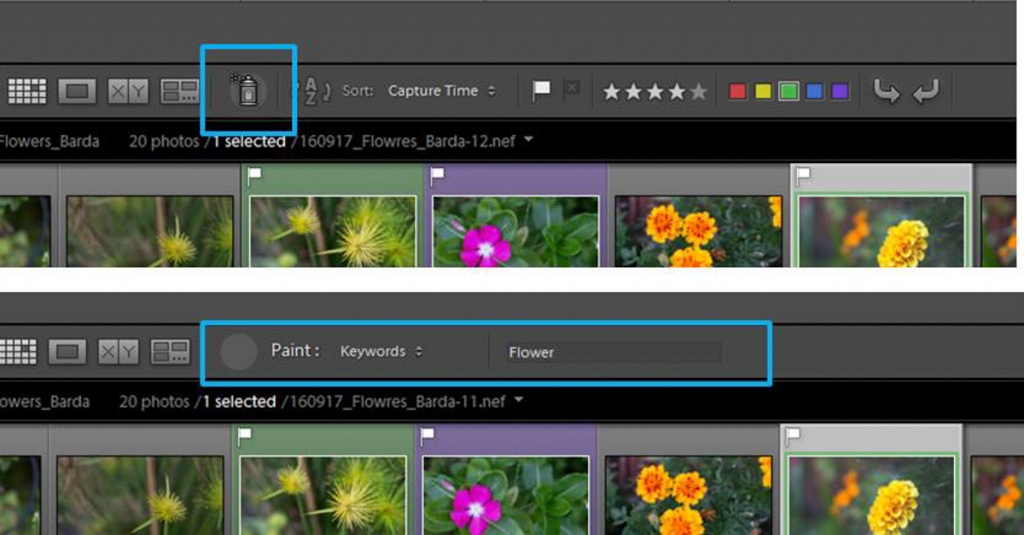
Once I have the photos in LG, the first thing I do is selecting the really bad photos. With really bad I mean the photos I am sure I won’t ever use because they are way too dark, extremely burnt or completely out of focus. First, I mark them by flagging the photos with a Black flag, that is the one that means: “Set as rejected”. This step can be done really fast. With the photo selected, you just click in the “set as rejected” flag icon (check the photos below to see where you can find the flag) or you press the letter X in your keyword. To remove the flag, you either press again the flag icon in the toolbar or you press the letter U.
If you don’t see the tool bar as I have it in this image, you can click in the little arrow in the right side of the toolbar and customize it to show the flags, colors, stars…
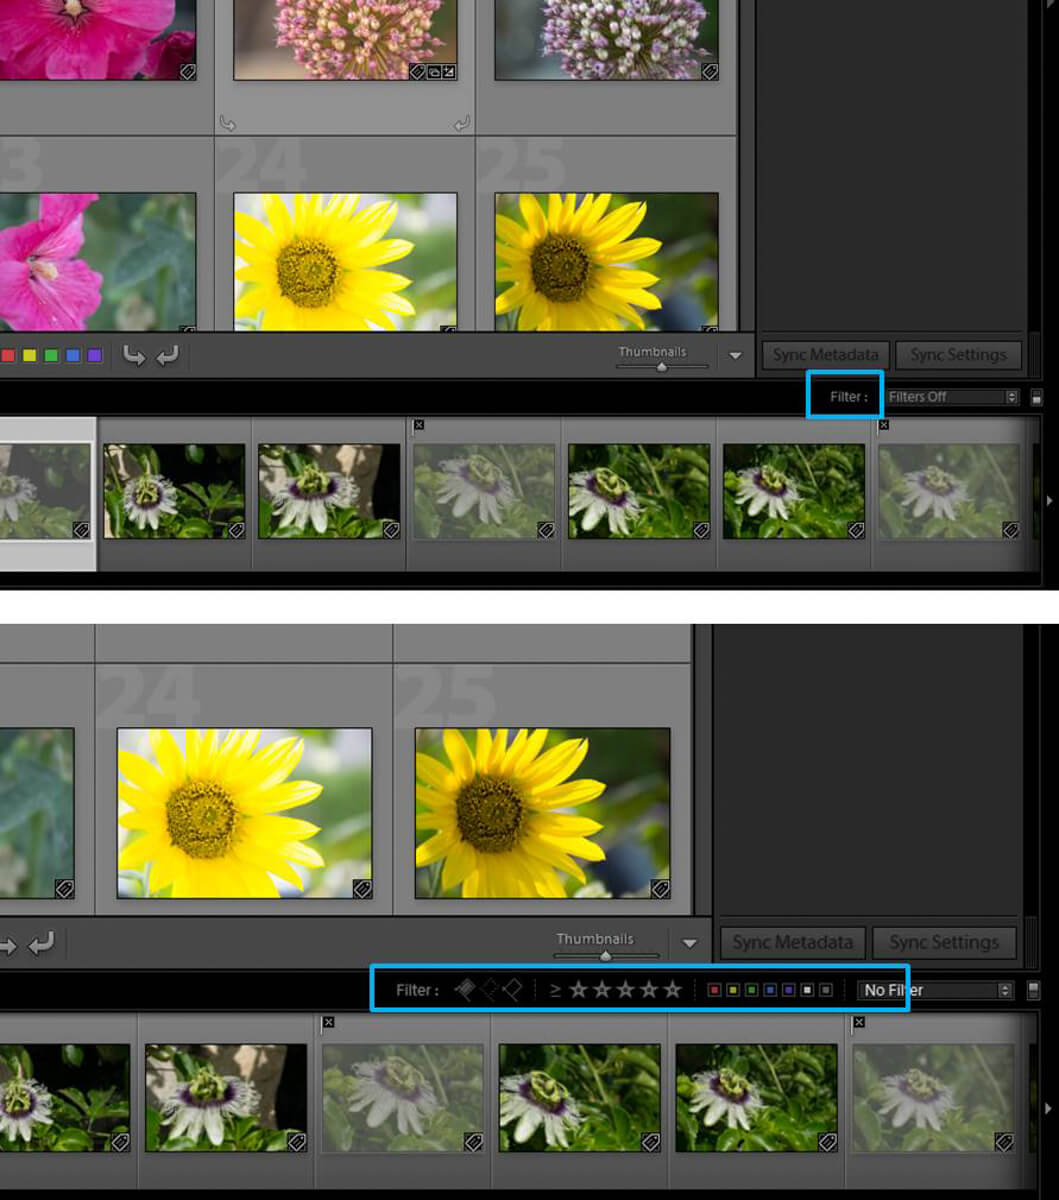
Once you have flagged all the photos you want to delete, you can get rid of them pretty fast by filtering them first. Right on top of the filmstrip you have a black toolbar and in the right you can see that it says “Filter”. If you click on this word, several filter options will appear: flags, stars and colors. If you click in the icon of the “set as rejected” flag, just the black flagged photos will be shown. At that point, you can select them all and press “delete” in your keyword. You have the option to remove the photo from LG or delete it from your disk. To clear the filter you can either press again in the same flag icon or select “Filters off” (see photo below)
You can see the filter options by clicking on the word “Filters”.
Use flags, stars and colors
Now you have all the good photos in your computer organized nicely in folders. This is a great starting point! But LG can help you even more in the organization of your photos. You can mark your images using flags, stars and colors. To learn how to do it, have a look to the great post by my Sleeklens colleague Navanee Viswa in which he explains Lightroom rating system in detail. I just want to tell you that there are as many rating/organizing systems as photographers. Each one of us has his own way of working. You need to find a system that talks to you and allow you to organize your photos in a consistent way. I will explain to you my system just a matter of example:
First I go over the photos fast and I flag as rejected the really bad ones. I delete them from the disk. I do a second round flagging with the white flag the photos I want to keep. You can make these 2 rounds in one by flagging with either rejected or Pick. I filter just the flagged “Pick” photos (or I make a collection. More about LG collections in next blogs). Once I have in front of me just the flagged photos, I start my color rounds.
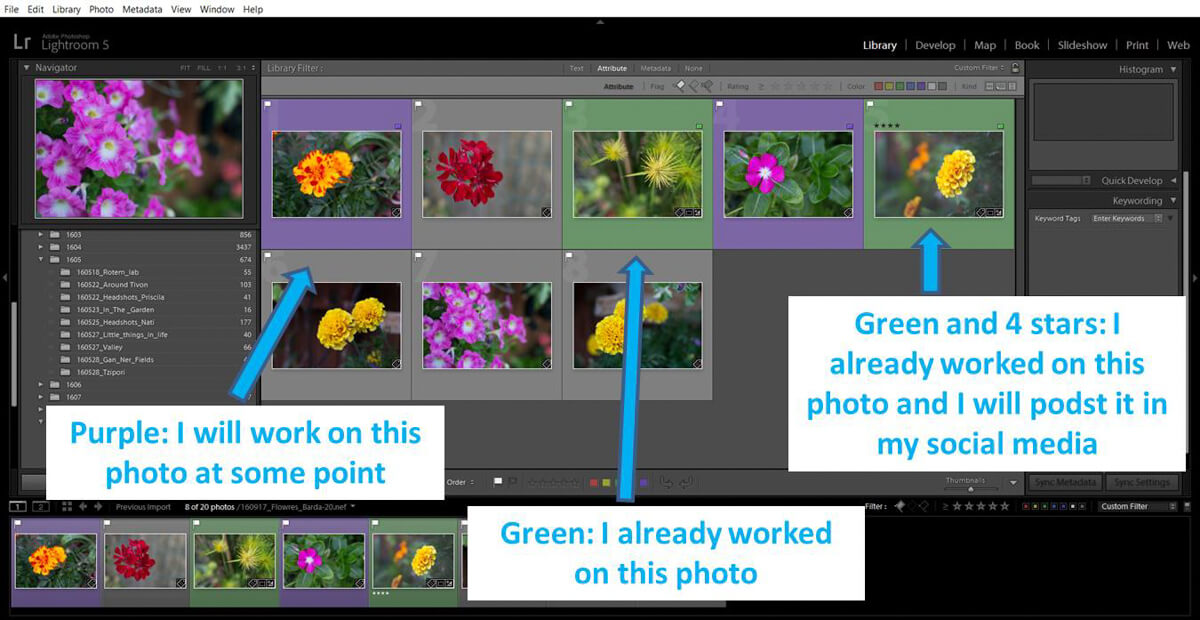
Purple: I will work with this photo
Green: I finished editing this photo
Yellow: this photo is part of an HDR
Red: This photo is part of a panoramic
Then I filter by just the green photos (in the same way that we filtered the “set as rejected” photos before). Then I go over the images and I rate them by stars: 4 stars are the ones I want to share in my social media and 5 stars are the ones that are so good that will be part of my portfolio. Maybe you won’t see all the rating icons in the thumbnail cell of the grid view (for example you might not see the stars). You can change the display of the cells in the LG Library going to View>View Options> Grid View>Cell Icons and in the Top or Lower label you select “Rating and Label”. For more details and options, you can have a look to the article Customising cells in Lightroom’s Library module.
This is how my LG Library work space look like after using my flag, colors and stars system
My system might not be good for you. There is nothing wrong with that. I know there are photographers that start by rating their photos with stars and they never use colors. Any combination of flag, stars and colors that make sense to you and that help you in your workflow will be great. It takes some thinking though. But it is worth it.
Keywords can help you to describe your images and make them more searchable. Have you ever spend hours looking for a particular photo? You can avoid this situation organizing photos using keywords!! How cool this would be? I am using this feature since long time ago. However, I recently discovered that I am not doing it in the most efficient way. But this is going to change! I have a plan that will allow me to take much more advantages out of keywording. Check out what I learnt!
What are LG keywords and where can you find them?
Your photo files, besides containing the actual image, they also contain extra data, also known as metadata. Some metadata is added by the camera: lens aperture, shutter speed, ISO… Other metadata, as keywords, can be added later. Keywords are a way to describe your image. As part of the photo metadata, keywords show up in internet searches. For that reason they have a role in the exposure of your photos once you publish them. If somebody is doing a search for one of your keywords, your photo might appear in their results. In LG, keywords are found in the library module.
Try the keyword hierarchy structure
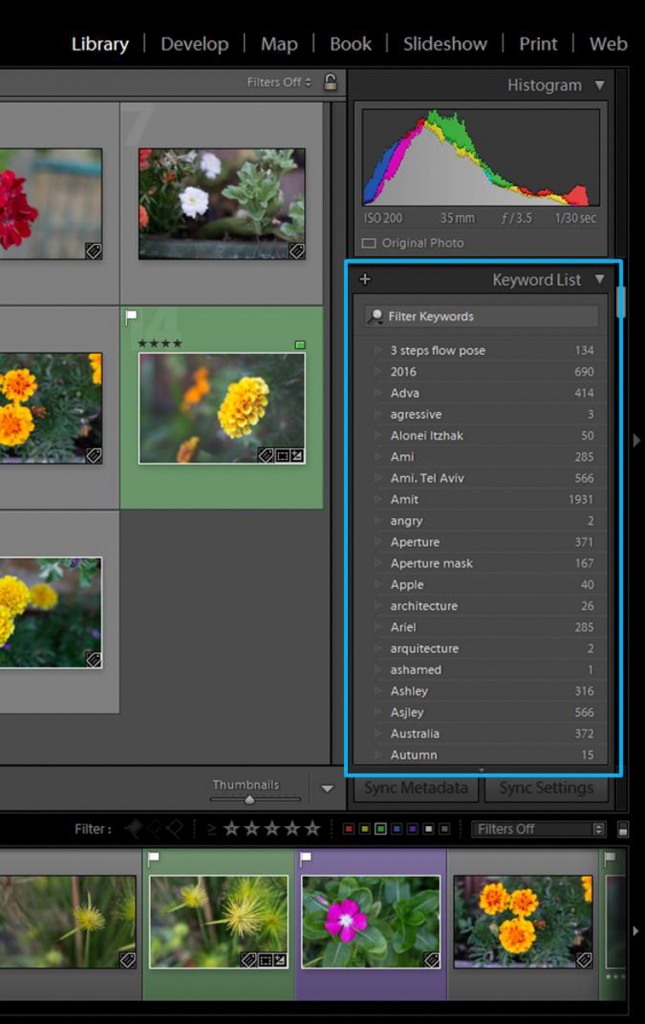
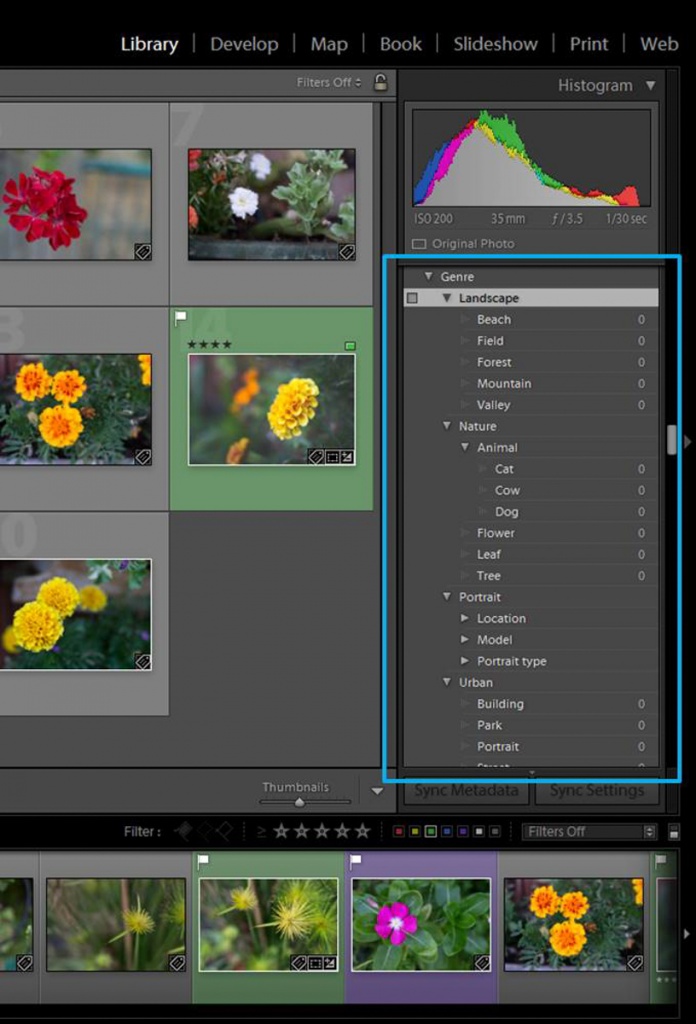
Until now I have been keywording my images following what it is called “Flat word” technique. This means that I was just adding keywords to my photos and all of them are on the same level of importance. For example, if I was adding keywords to a flower’s photo that I took next to my place I was using: flower, Tivon (my town), Israel, outdoors, summer….. As you can see this system is quite easy and fast. You can always see your keywords in the Keyword list option in the Library LG module. Great! However I ended up with an extremely long list of keywords. It didn’t have any structure and it was quite difficult to handle. Finding something using my keywords became insane. To find similar terms I needed to scroll down in the list and this became quite annoying when the list growth big. My keywords were complicating my life instead of simplifying it!
But there is another way to organize your keywords: Hierarchy system. This system will allow you to have a structured list of keywords nested inside categories. Searching for things is much easier than in a non-structured long list because relevant terms are grouped together. For example: I can find all my nature or landscape photos easily because I have a category for each one of them. Setting this system takes more time. However it is an investment because you will save this time (and more) in the searches.
Under the “Gender” category I have all the types of photos I take: landscape, nature, portrait and urban. Inside each one of them I have subcategories that can describe my photos in a deeper level. For landscape for example, I have beach, field, forest…
Plan your keywords
It is worth to spend some time thinking about how you want to organize your keywords. You can start with a 2 or 3 level keyword system. You can add the keywords in LG:
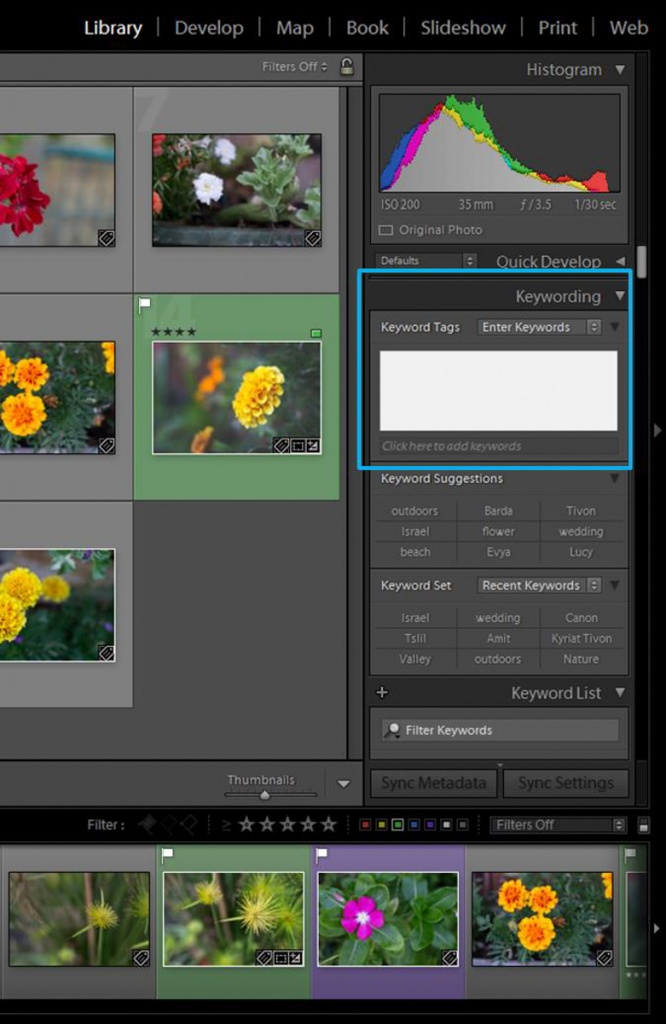
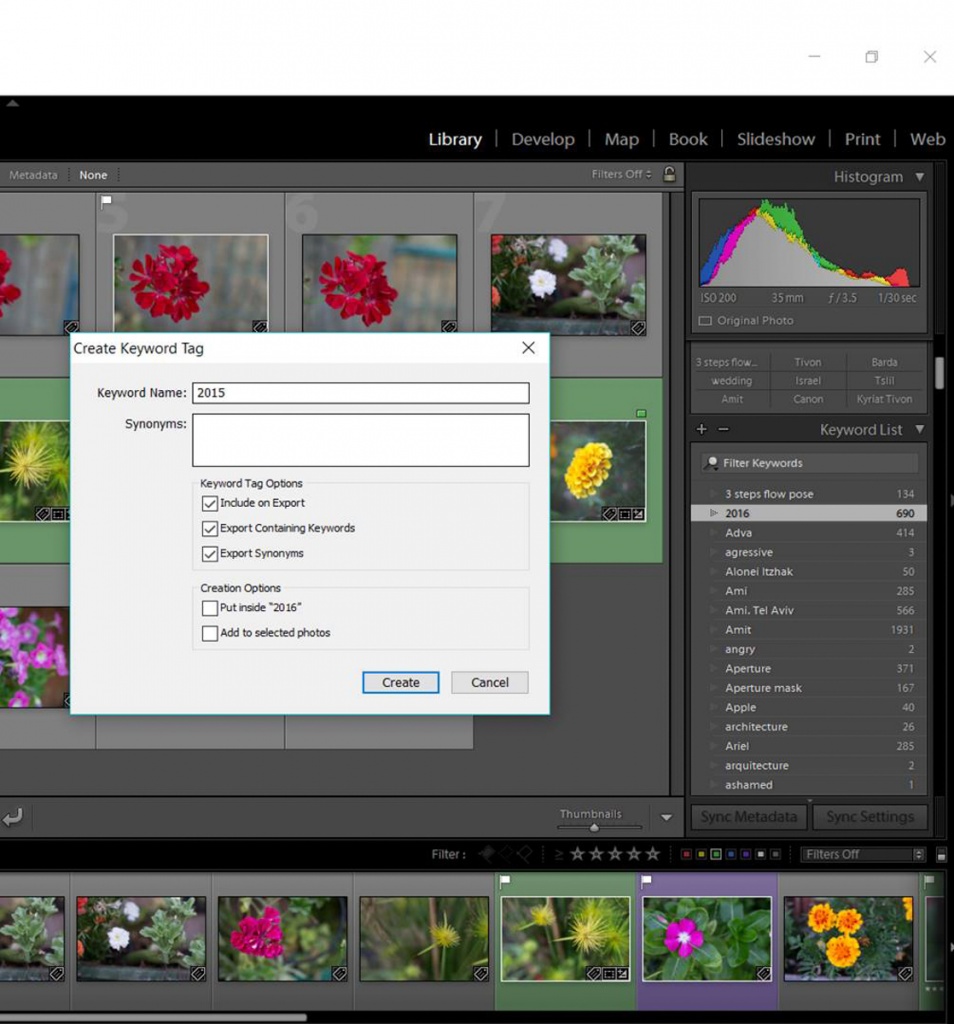
Click in the + icon in the left side of “Keyword list” and this dialog box will open. Here you can add one by one as many keywords as you need.
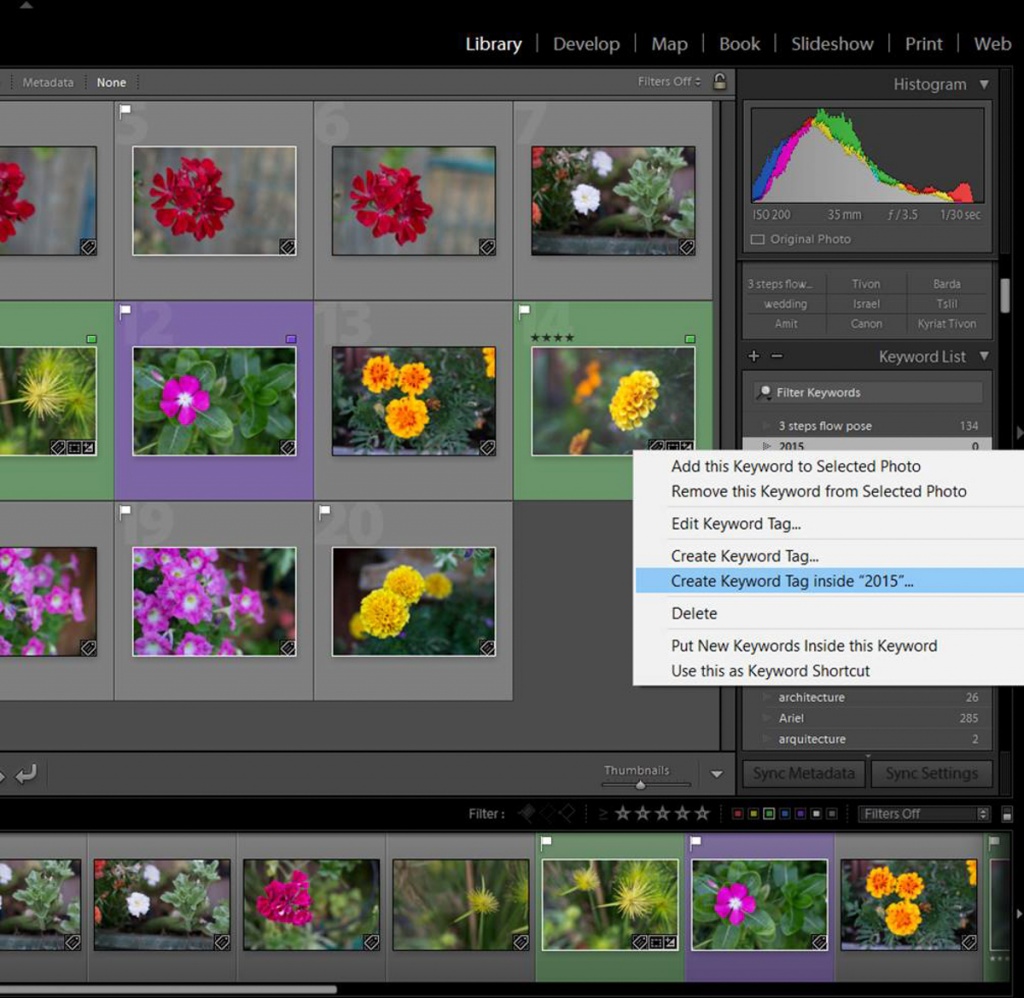
I wanted to create a subcategory inside the keyword “2015” (I wanted to add the months of the year). For this, I right-clicked in the keyword “2015” and selected “Create Keyword Tag inside 2015”. You can add as many keywords inside a previous one as you want. But in this way, you need to add them one by one. It can get a bit tedious.
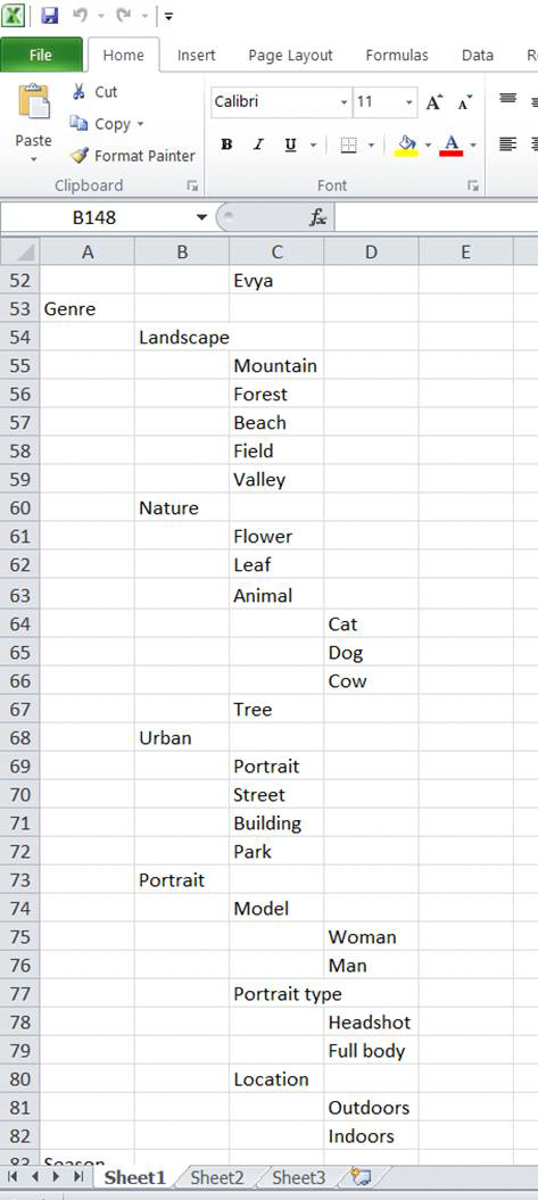
An easier option is to create first your structured list outside LG and then import it. You can use any program you like, such as word or excel. However, keep in mind that you will need to save your planning lists into text format to be able to export them to LG later on.
To make things easier and faster, you can create your keyword list in an excel file. You need to keep the tabulations between the different categories of keywords (in the excel files this means that each category level is in a different column). Once you are done, save the file as text-tabulated to be able to import it to LG.
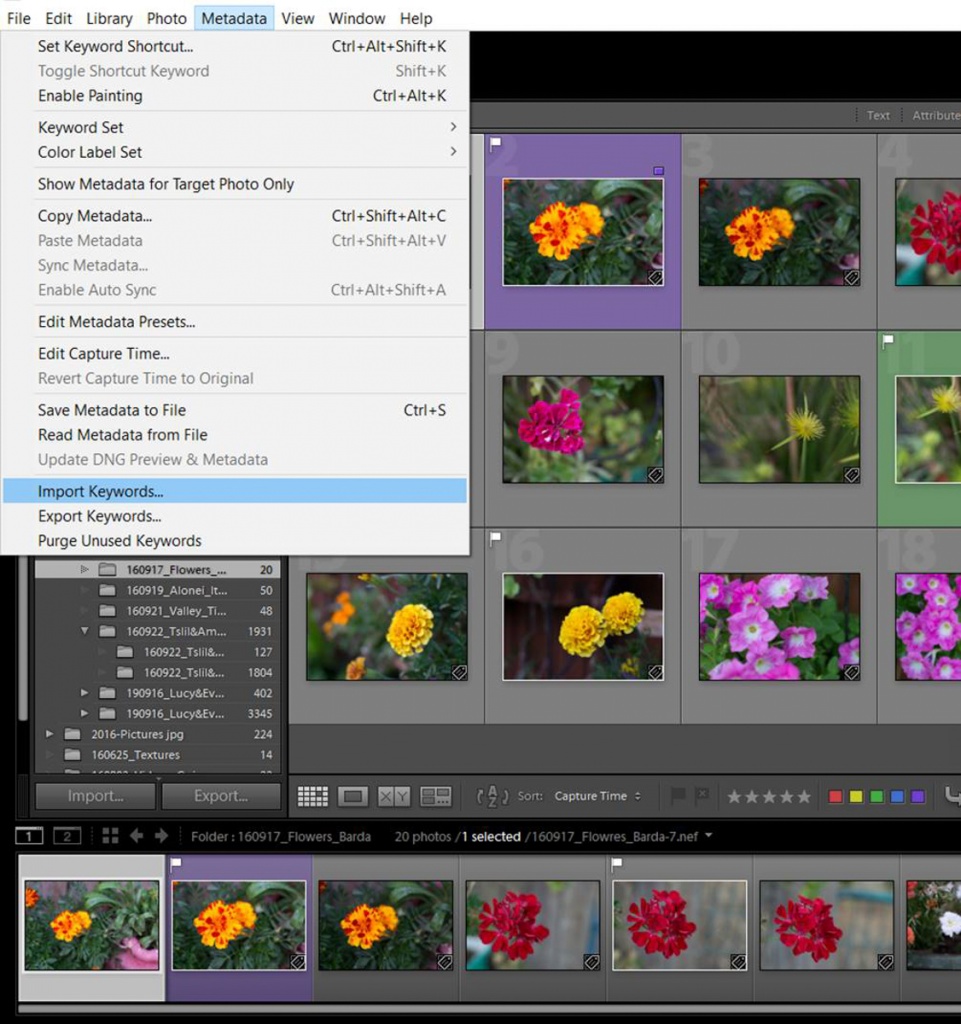
To import your keyword list, you need to go to select “Metadata”in the Library module and then Import keywords. You will see that your list appear in the Keyword list panel.
Keep the keywords inside a reasonable number and keep controlled vocabulary
Keywords can get very complicated if you have a lot of levels in your lists or if you don’t keep a controlled vocabulary. My recommendation is that you start with just a 3-level keywording system and add levels just when you get used to work with keywords. Use all the time the same keywords. It can be useful to have your keyword list next to you (printed or in a pdf version) when you are working. If you start changing the keywords along the way you will lose the whole organization of the system.
Use synonyms
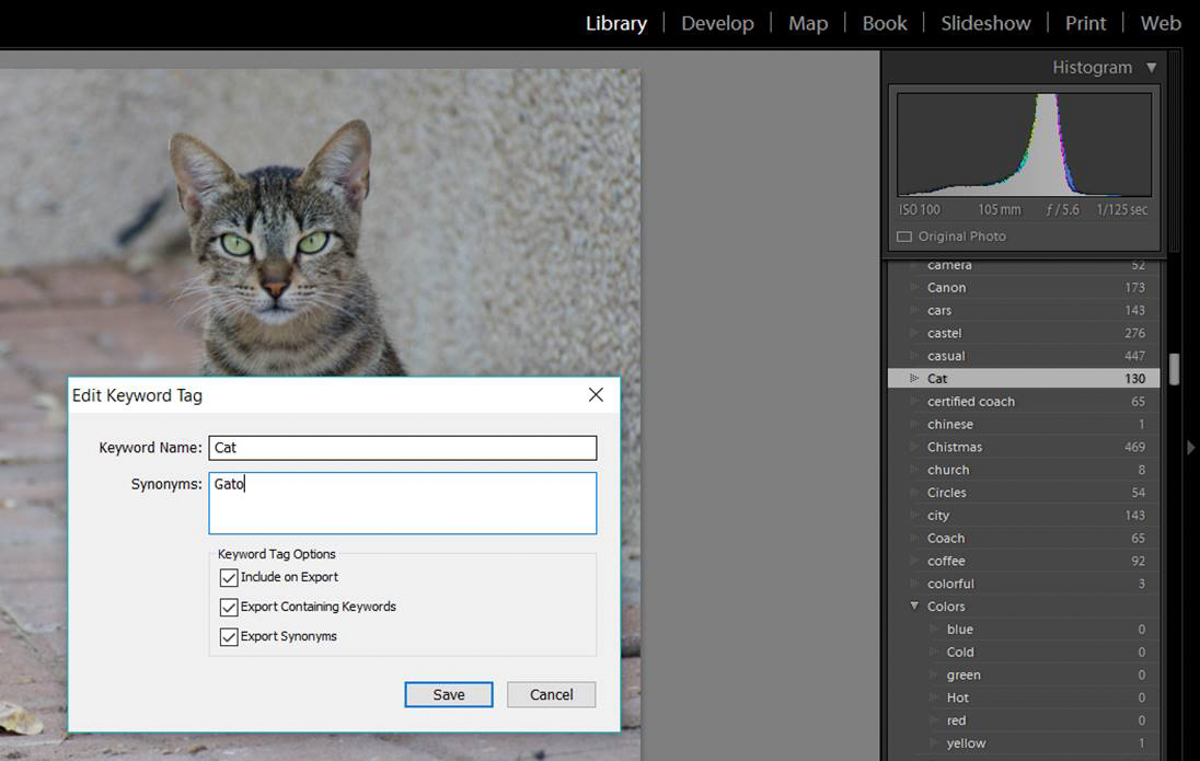
There are times that your keyword might have synonyms. It can be good to add them to your image because then your photo will have more probabilities to be found both inside your catalog and in internet search. You don’t know which of the keyword synonyms people will look for, so have them all on the metadata is a good strategy to increase the chances that your photo will be found. However, adding all the synonyms to the keyword list might make things complicated. No worries! LG have a solution. You can add synonyms to your keyword by double-click on the keyword in the Library module. When a dialog box appears, you just need to add your synonyms in the box labelled as so. Click “Edit” to save change and exit the box.
I use the synonyms to add the Spanish translation of the word. Part of my audience is Spanish speaker, so for me it is important to have the keywords in both English and Spanish. Using synonyms is an excellent way to add languages to your keyword list without getting too complicated.
Do keyword maintenance from time to time
From time to time check that your keyword system is still OK. Do all your keywords match with your planned keyword list? Are any new keywords organized in your hierarchic list? Do you have any unused keyword that you can delete? Reviewing your keyword system will keep it tidy and nice to use.
Ways to add keywords to a photo
You can add keywords to your photos in different ways:
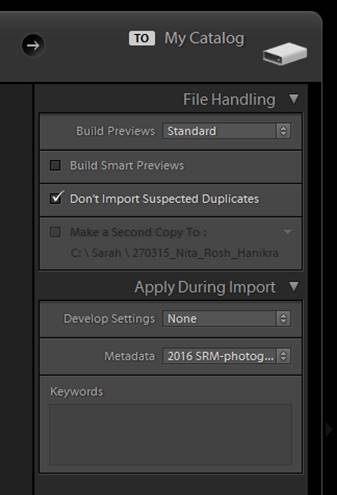
When you import the photos: On the import dialog you will find a section called “Apply during import”. There you will find a panel where you can type the keywords. Keep in mind that these keywords will be added to all the photos you are importing at that moment, so the keywords should be appropriate to all of them. They are usually general keywords.
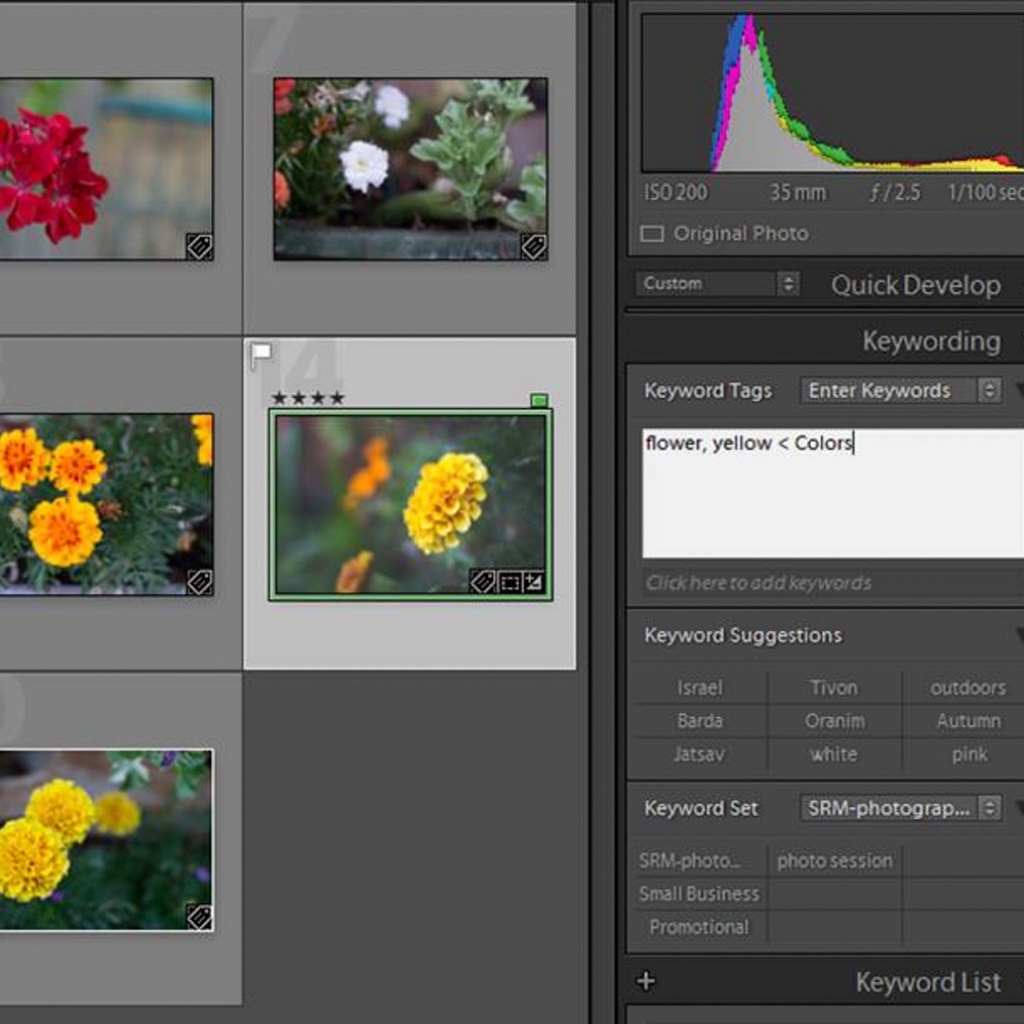
Manually: You can find the Keyword panel in the right side of the in the library LG module. You can add keyboards by type them in the panel or by checking them in your keyword list. You can add more than one keyword by separating them by commas. You can select just one picture to add its keyword or you can select multiple photos (in the Grid view) and add the same keyword to all of them at once.
You need to add the keywords separated by a comma. When you have a keyword with a < sign means that it belongs to that category (in this example, yellow belongs to the category colors)
Using the painter tool
Have you ever seen the painting spray icon in the toolbar of your Library LG (In the Grid View!! Press T in your keyboard if you don’t see the toolbar)? You can use it to keyword your photos is a quick way. Select “Keyword” in the list right next to the spray icon. Write the keywords you want to add in the box next to the right and then click in the thumbnails of all the photos in which you want to add them. Easy!
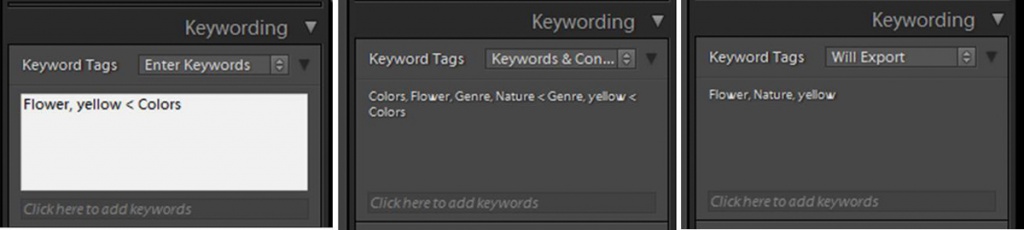
In the Keyboard panel, you can select the way you want the keywords to be displayed. There are 3 options: enter keywords, keywords&containing keywords and Will export
In “Enter Keywords” you can see the keywords that you added. In the “Keywords & Containing Keywords” option you can see all the keywords you added and all the keyword categories above them. In “Will Export” you can see the keywords that will be in the metadata of your photo when you export it. You can see that in my case, “Genre” and”Colors” are not exported. This is because I don’t think they are adding anything to the description of my images (although they help me a lot in the keyword organization), so I decided not included them in the exported image. You can see in the image below how to do it.
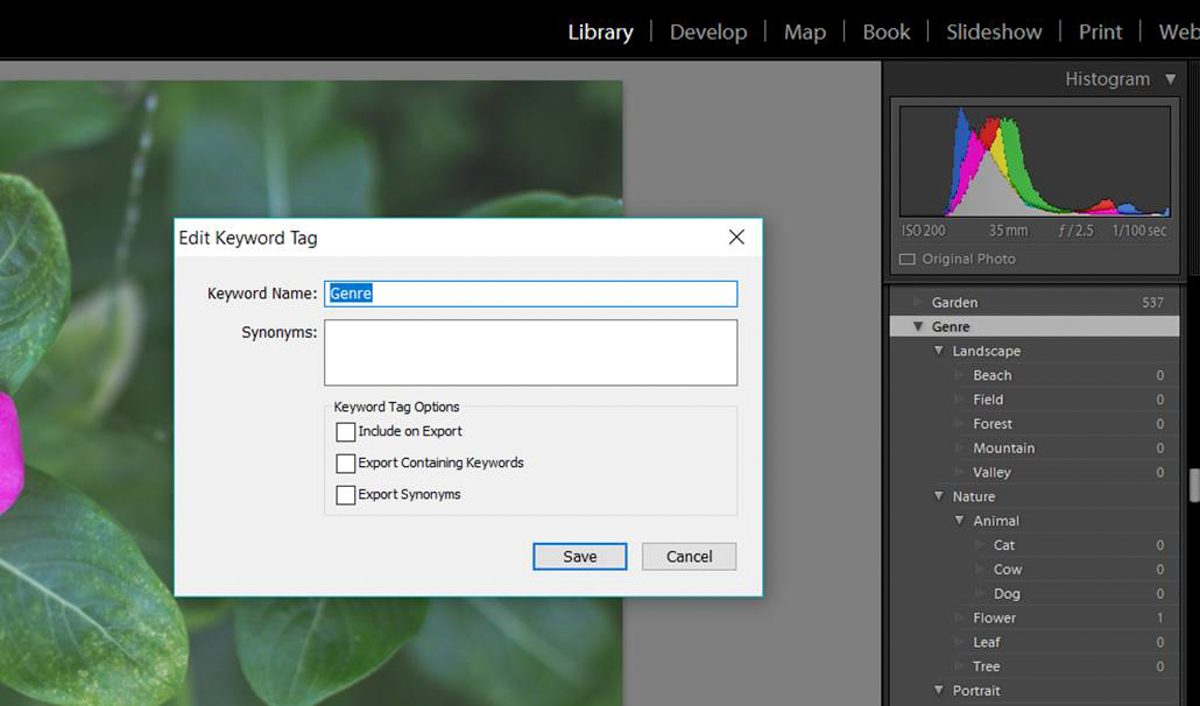
You double click in the keyword that you don’t want to include in the metadata of your photo and you uncheck the “Include on Export” option.
Find your photos by keywords
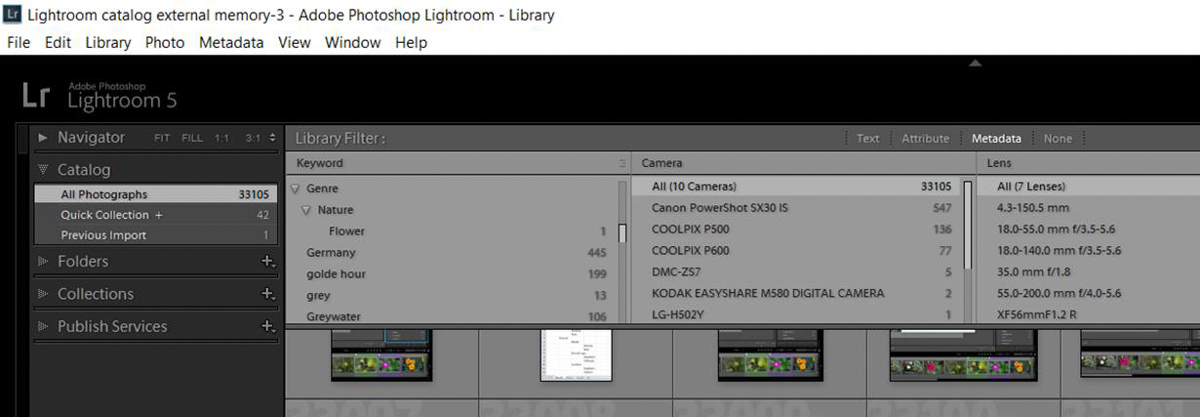
One easy way to find the photos containing a keyword is using the Filter Bar of the Library module (press \ in your keyboard if you can’t see the Filter Bar). In the “Metadata” label, you can find a section with all your keywords. Select the one that interest you and LG will show you all the photos that were labelled with it. If in the left panel of the Library you have selected “All photographs”, LG will look for the keyword in the whole catalog. If you want to look for the keyword in a particular folder, just select it before starting the search.
In the keyword Library Filter you can access to all the photos you labelled. You can see that I can select photos I took in Germany for example. You can also see here one of the mistakes I made with my keywording. I have 199 photos tagged with the word “golde hours” instead of “goldeN hour”. This is because I was not consistent with the vocabulary i my keyword list. I need to fix that!
I hope you find all these information about keywords useful. If you are starting your LG catalog now, it is a good time to establish your keyword system. If you have already a pretty big catalog (like I do), take it easy. Don’t try to keyword all your images at once because it is a gigantic task. Better divide it in several working blocks. I saw that for me it is good to work on the keywords for half an hour or so and rest. Depending on the day, I do one or more working blocks. I am not in a hurry, so I don’t push myself. However, I think it is really useful to have a good system of keyboards, so I work on it whenever I have the chance.
What a LR collection is?
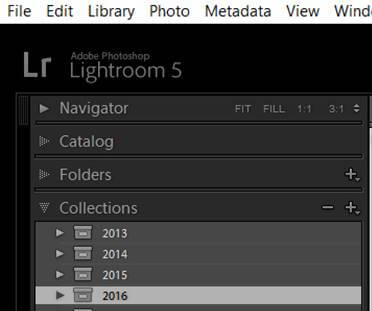
A collection is a way to group photos in one place. Collections allow organizing photos for easy viewing, improving your workflow or for performing other tasks. You can find the collections in the Collections panel of for example the Library module.
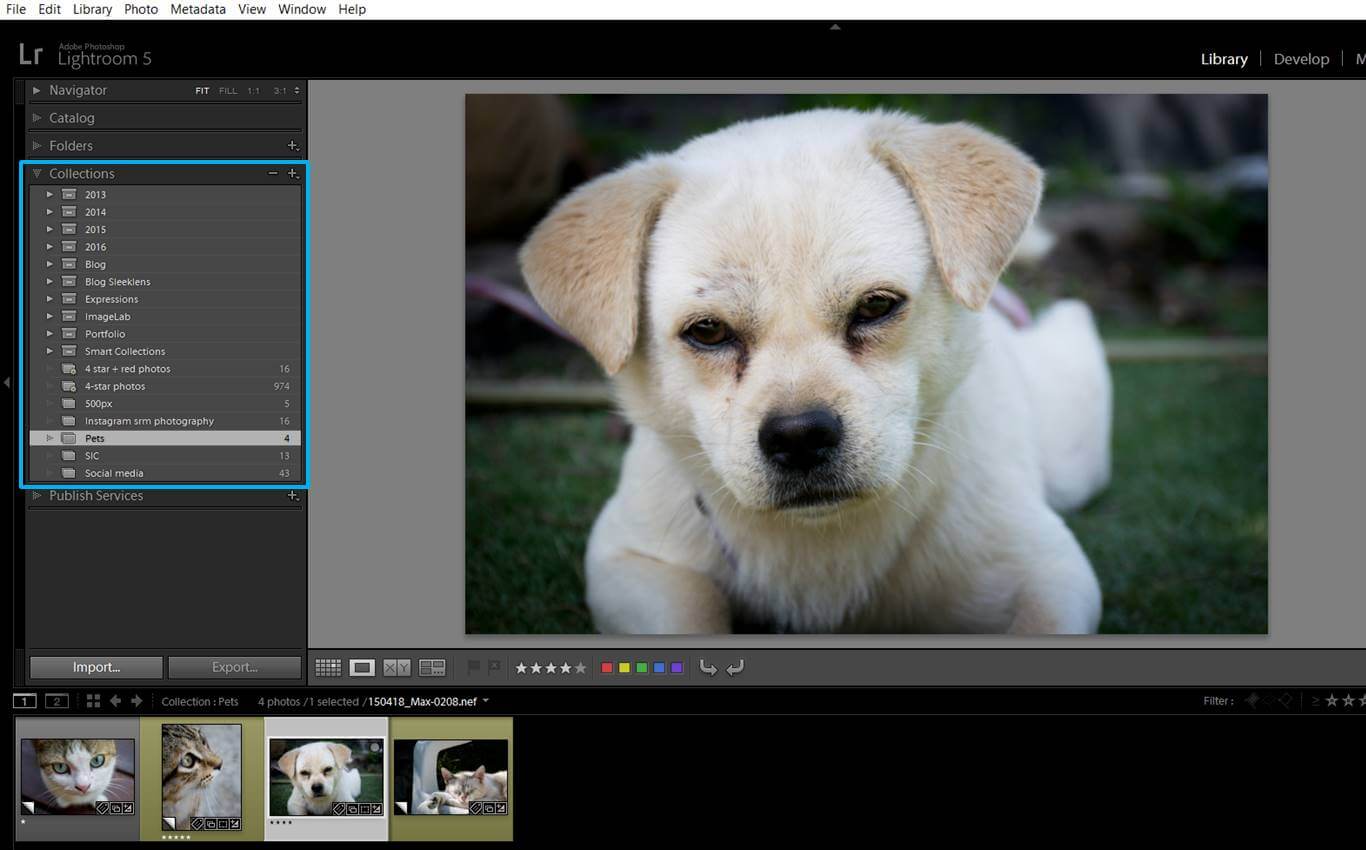
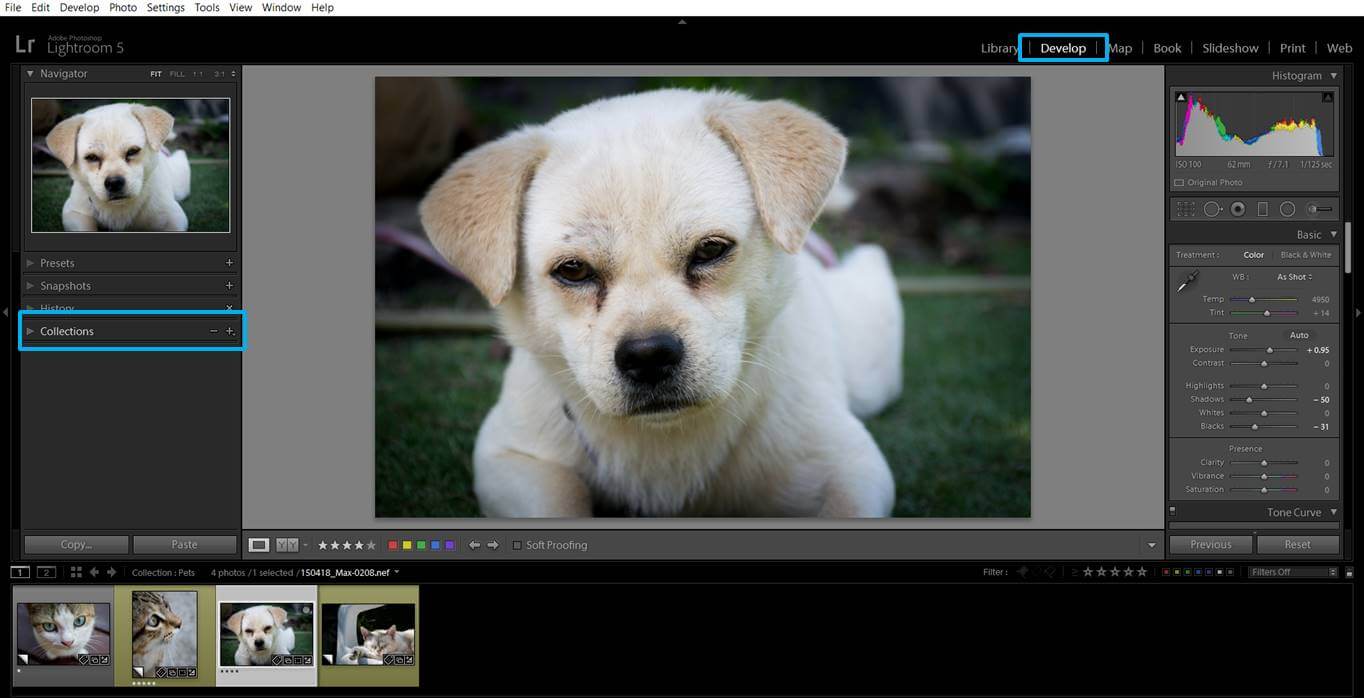
At first Collections might seem pretty similar to folders, but in fact, they are much more flexible. Collections can include just a selection of photos from a folder or a combination of photos coming from different folders. One photo belongs to just one folder, but it can be in different collections. For example, I can have a picture of a dog in its folder (I usually name the folders with the date+relevant name. This dog photo is in a folder called “150418_Max because I took it the 18th April 2015 and the dog is called Max”). The photo belongs to just ONE folder unless I copy paste it to several (but if I do so, things starts getting complicated here).
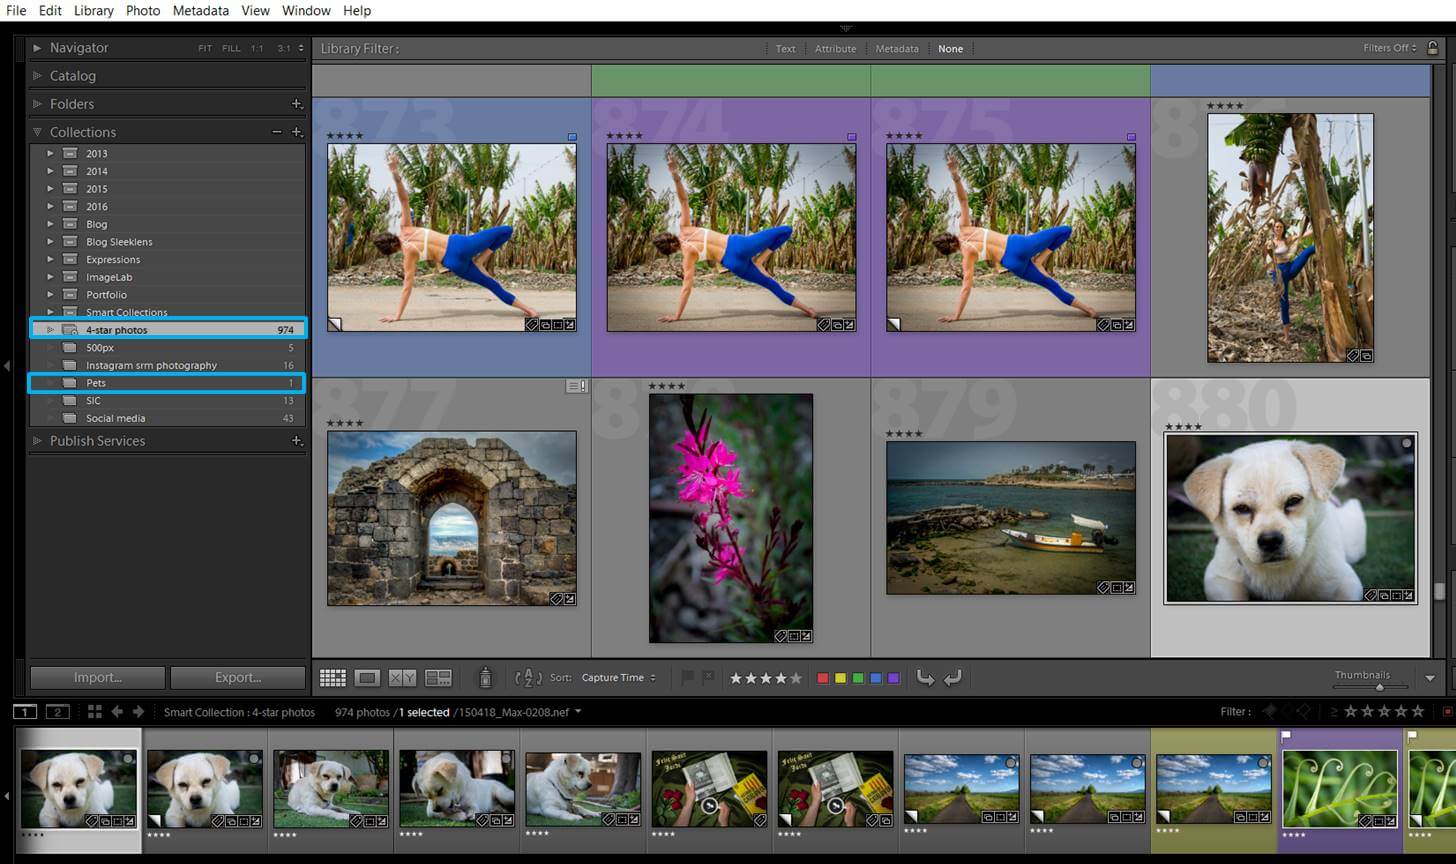
However, this dog can be in several collections. This image is in both my “Pets Collection” and my “4 star Collection”.
Here you can see Max inside my “4 star photos” collection. But you will see that Max is also in the “Pets” collections (marked in blue in the Collection panel).
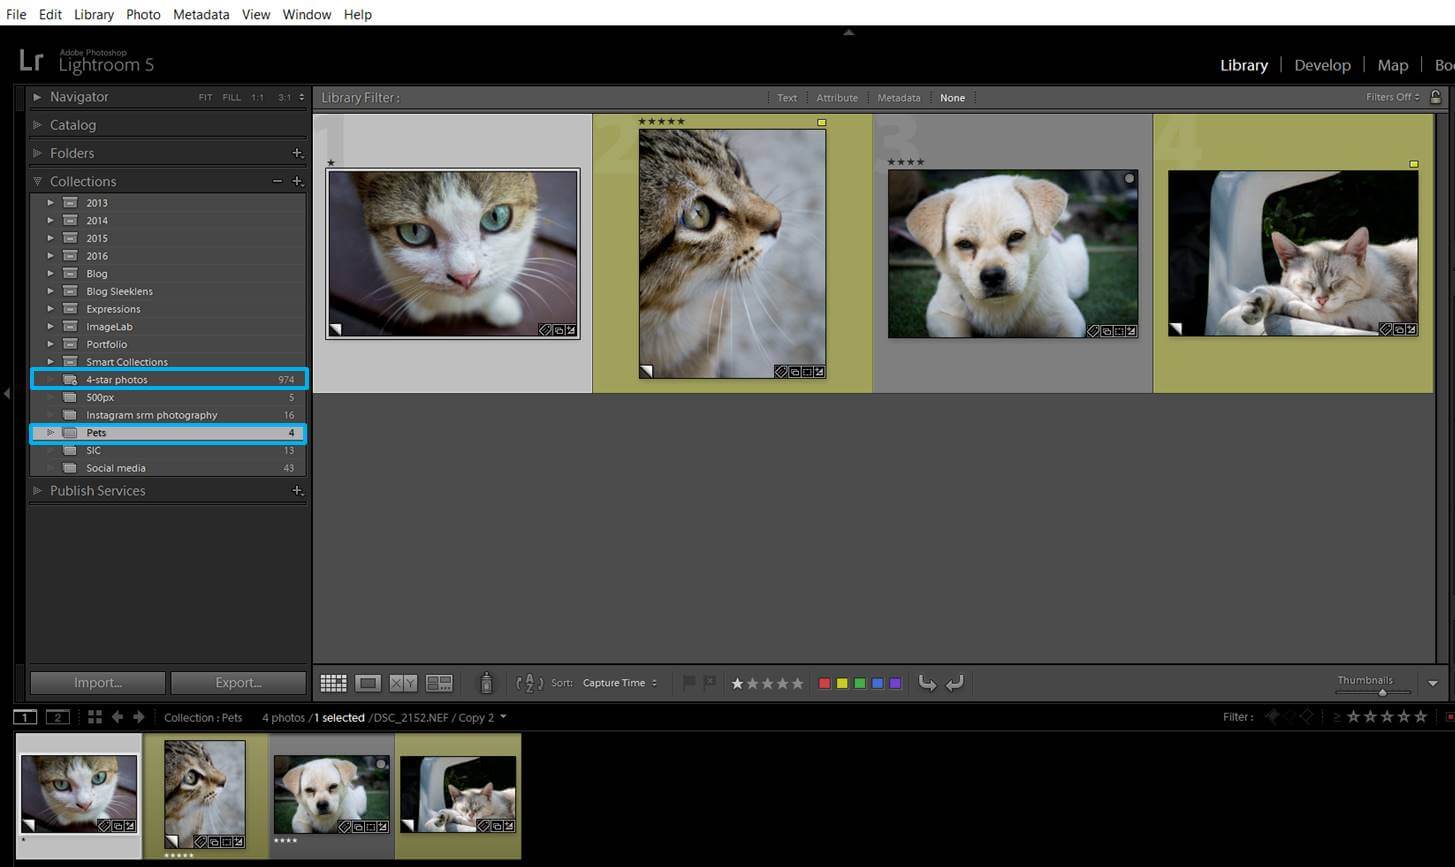
Here you can see Max inside my “Pets” collection.
Collections also have another advantage over Folders. You can access to the latter just from the Library module. However, you can access to the Collection panel from any of the LG modules, including the Develop one. This is handy because you won’t need to leave the develop mode in order to move from one collection to the other.
LR collection types
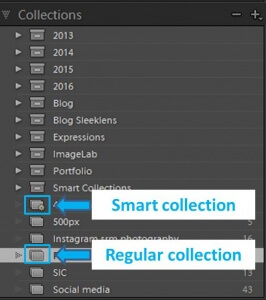
The 2 types of collections that I use the most are Smart and Regular collections. Here I will explain to you the difference between them. In the next section of this article I will tell you how to create them.
Icons are different for regular and smart collections.
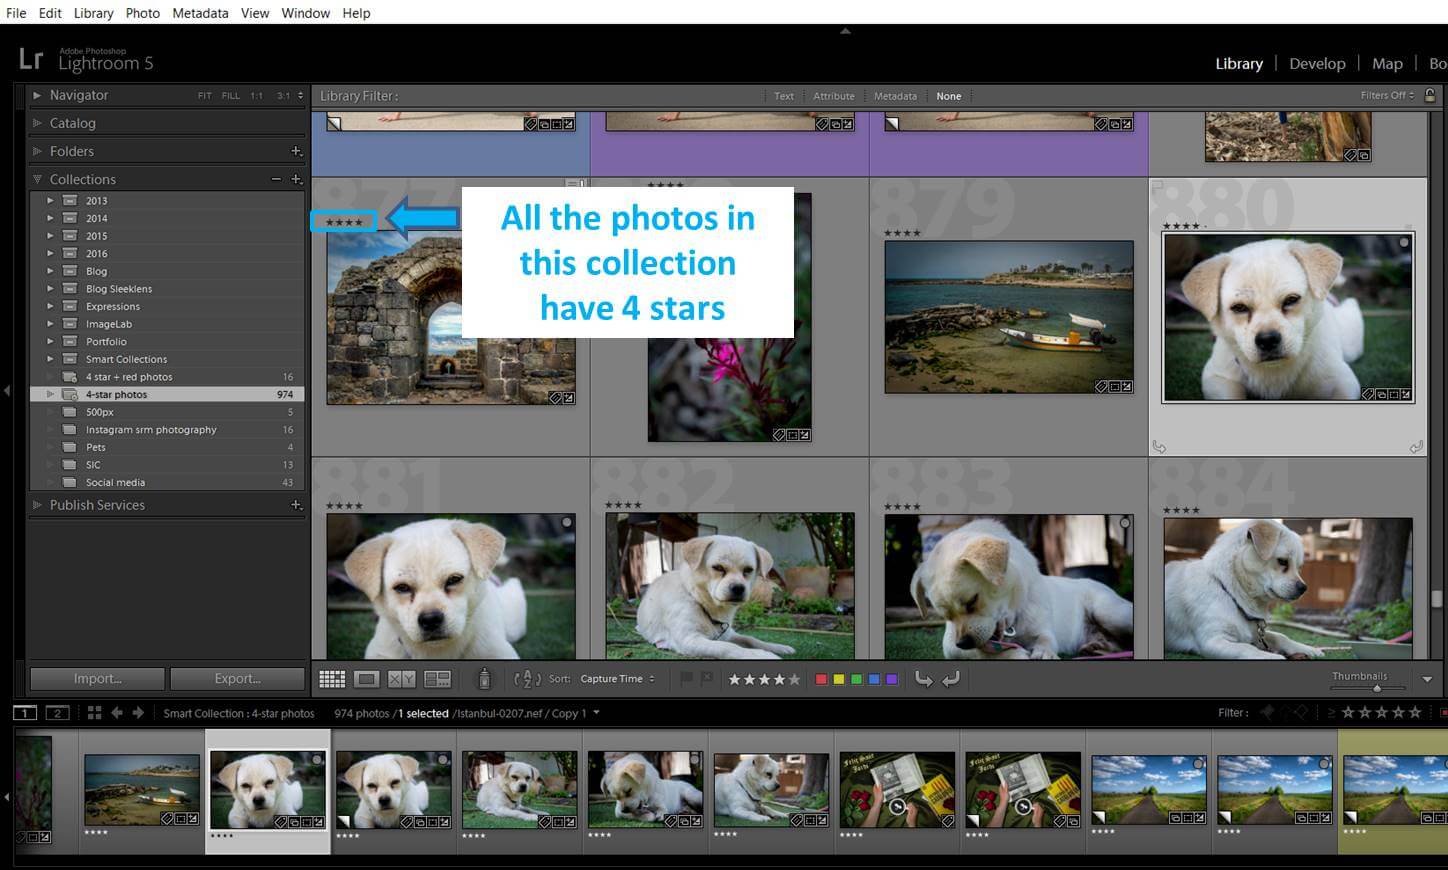
A smart collection is that one that uses a filter in order to group your photos. One smart collection can include for example all the photos that you have tagged with 4 stars. Smart collections are dynamic. If you change the definition of the filter, the photos inside the collection will change accordingly. If you change the description of the photo, it might appear or disappear from a smart collection. For example, if I change the stars of one photo from 4 to 5, this image will disappear from my “4-star Smart collection”.
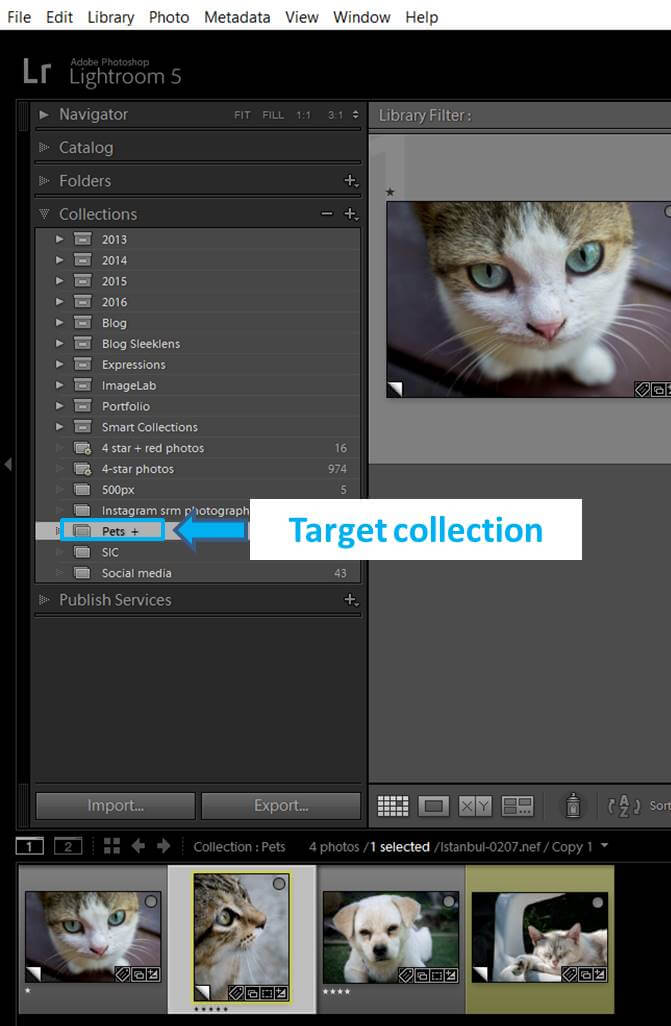
A regular collection includes the photos you personally select, meaning that it requires more effort to build and maintain. However, regular collections have some advantages too. They allow you to reorder your photos by selecting them in the Grid view and drag them to the new position (you can’t do it in Smart collections). You can also choose one of your regular collection and make it the Target Collection. You can have just one target collection at a time. Then, when you select a photo and press “B” in your keyword, this image will be added to this collection.
How to create a LR collection
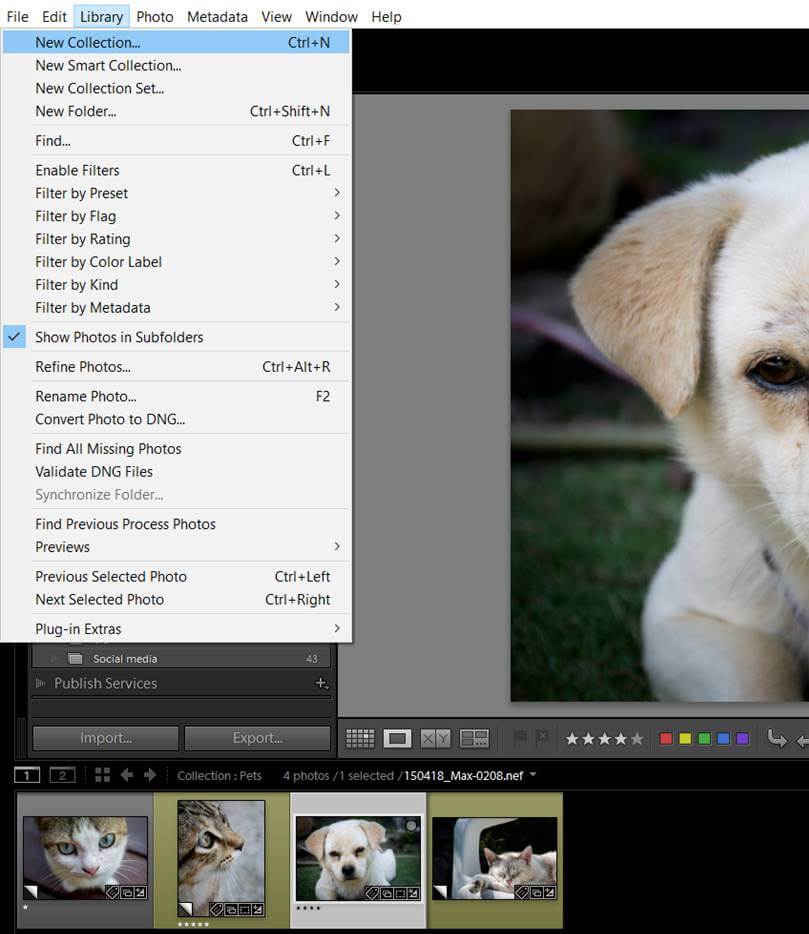
Now that you know what a collection is, you might be wondering how to create one. You can do it in 2 ways. In the Library module, you can select Library>New Collection for creating a regular collection or Library>New Smart Collection for the smart ones.
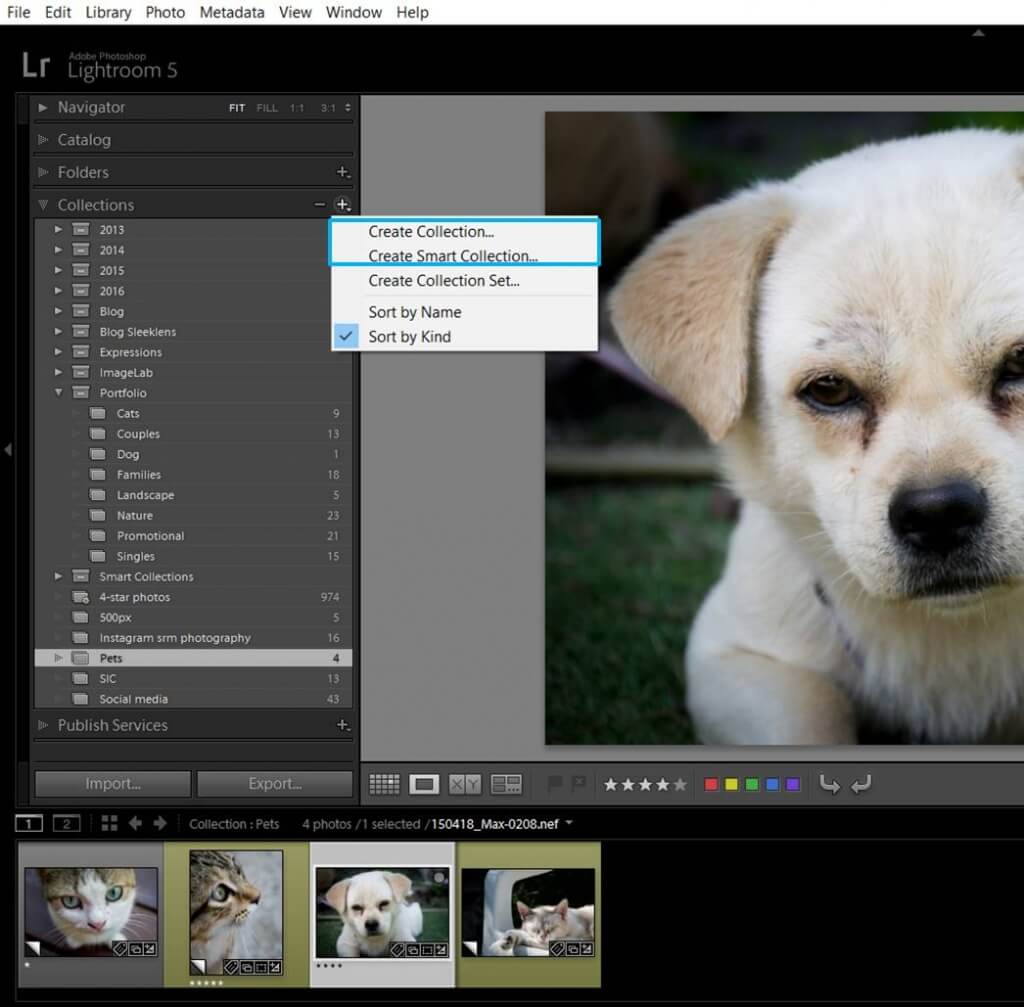
Another way is to click in the Plus icon in the Collection panel. You can access to this icon from any LG module.
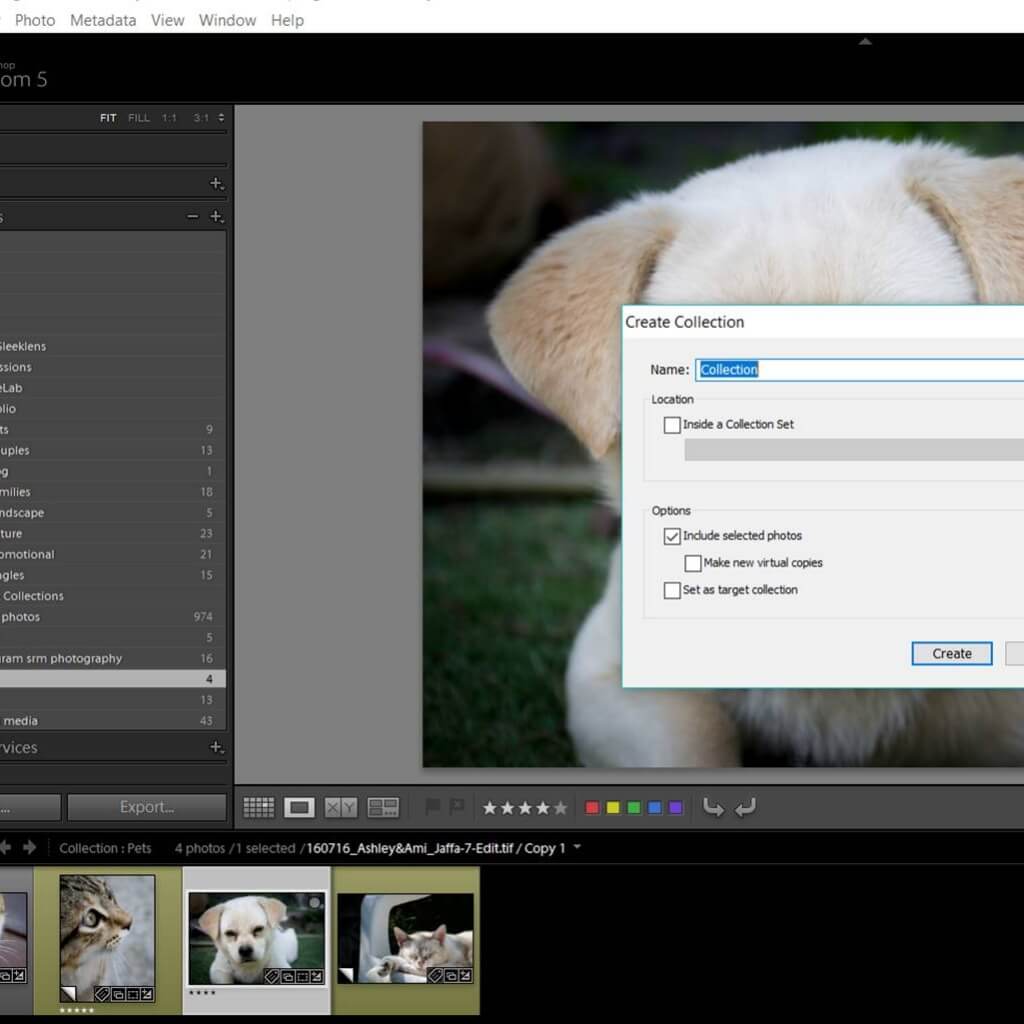
In case of the regular collection, a dialog box will open and you will be able to name your collection.
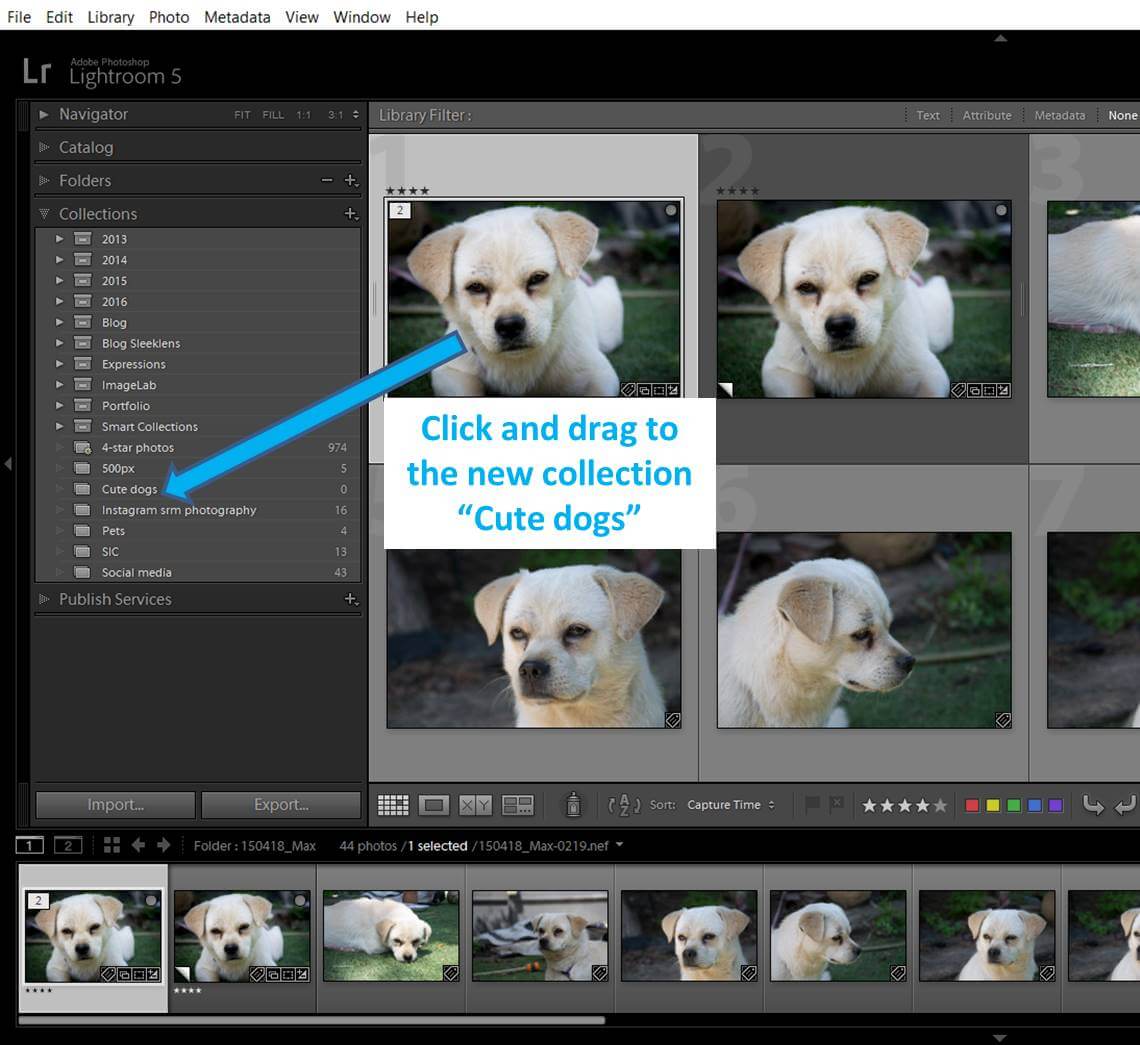
You can create an empty collection and then drag your photos from the Grid View in the Library mode.
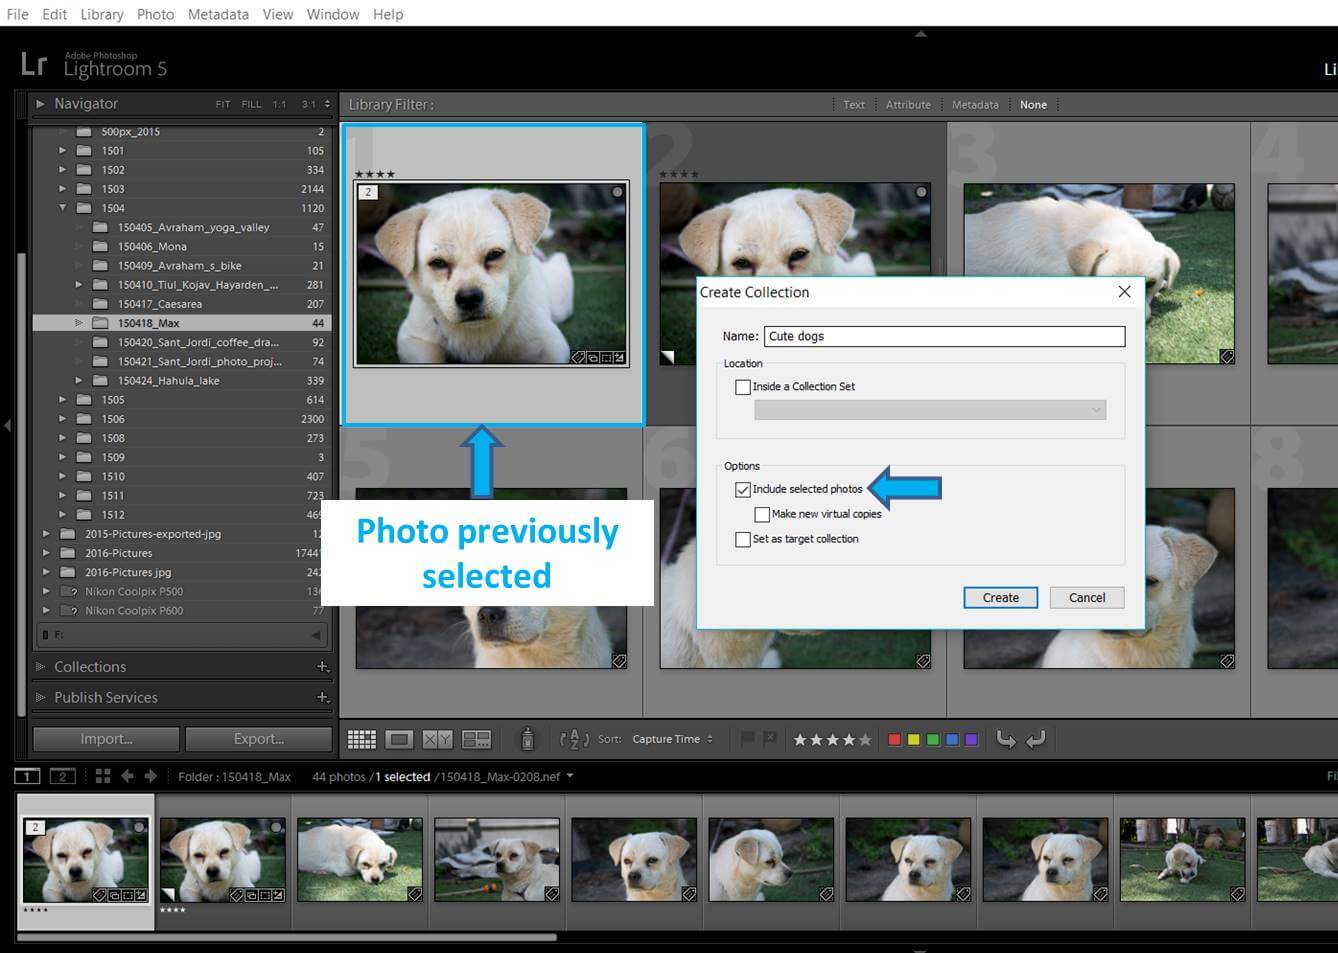
Here I created a new collection called “Cute dogs”. You can see it is empty because next to its name there is a 0 (number of photos inside the collection). To add our doggy Max to the collection we just need to drag the image into it.
You can previously select the photos you want to include in the collection and when you get to the dialog box check the option of “Include selected photos” creating it including the already selected photos.
In the dialog box you can make the regular collection your target one by checking the box “Set as target collection”.
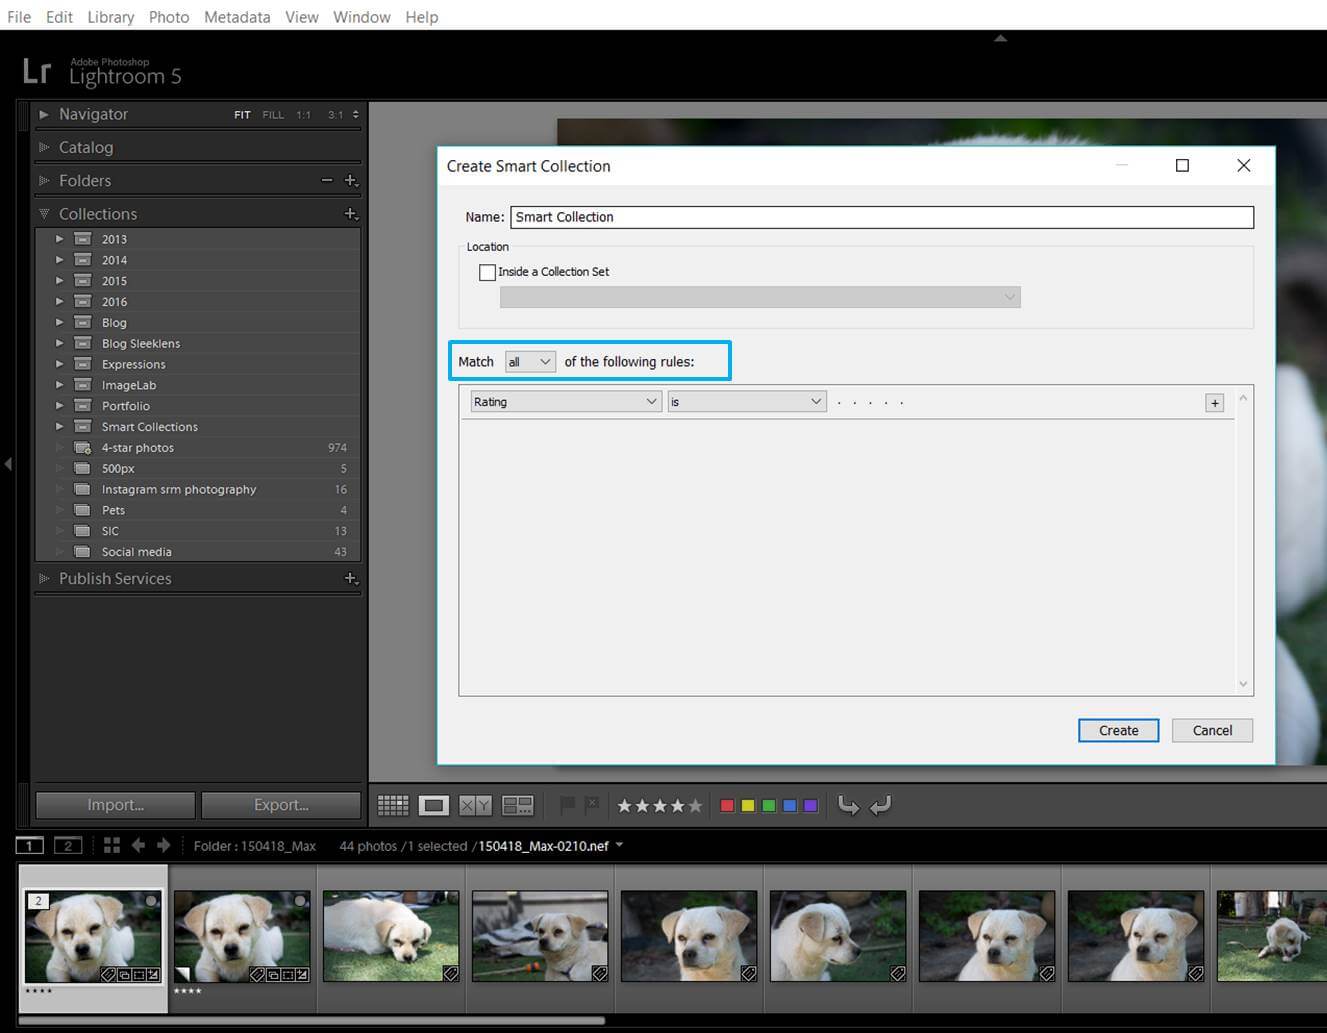
The dialog box for creating a smart collection is different.
You can name the collection and determine the rules of the collection. You can also say if all the rules need to be matched, just any of the rules or none of the rules. You can add rules regarding rating (stars), flags, label color, label text (keywords) and more!
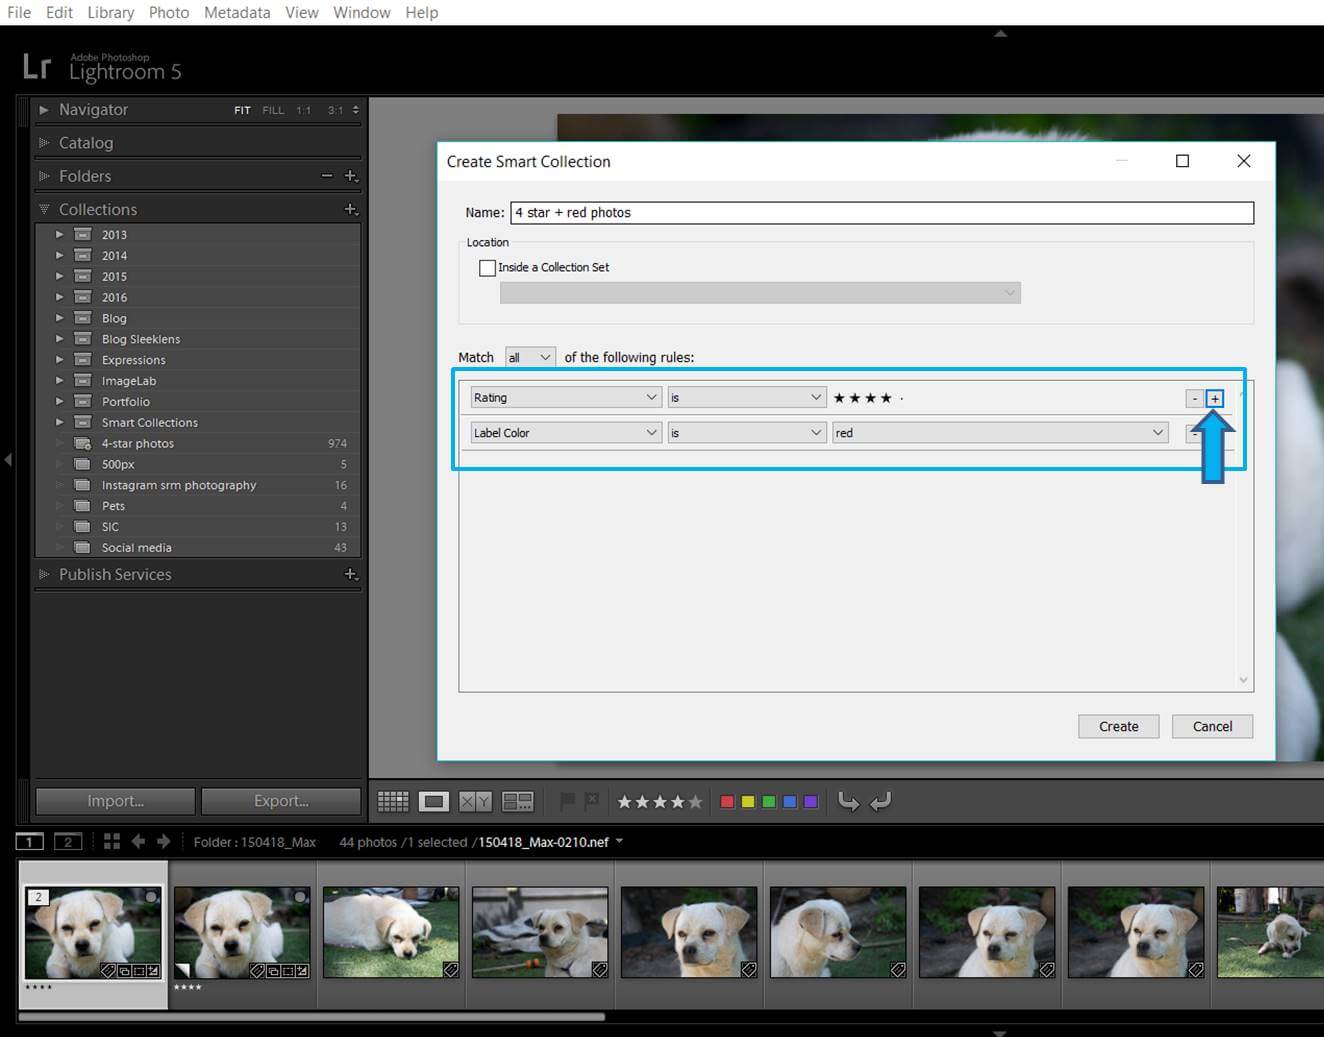
Clicking in the “+” icon you can add more criteria to your smart collection.
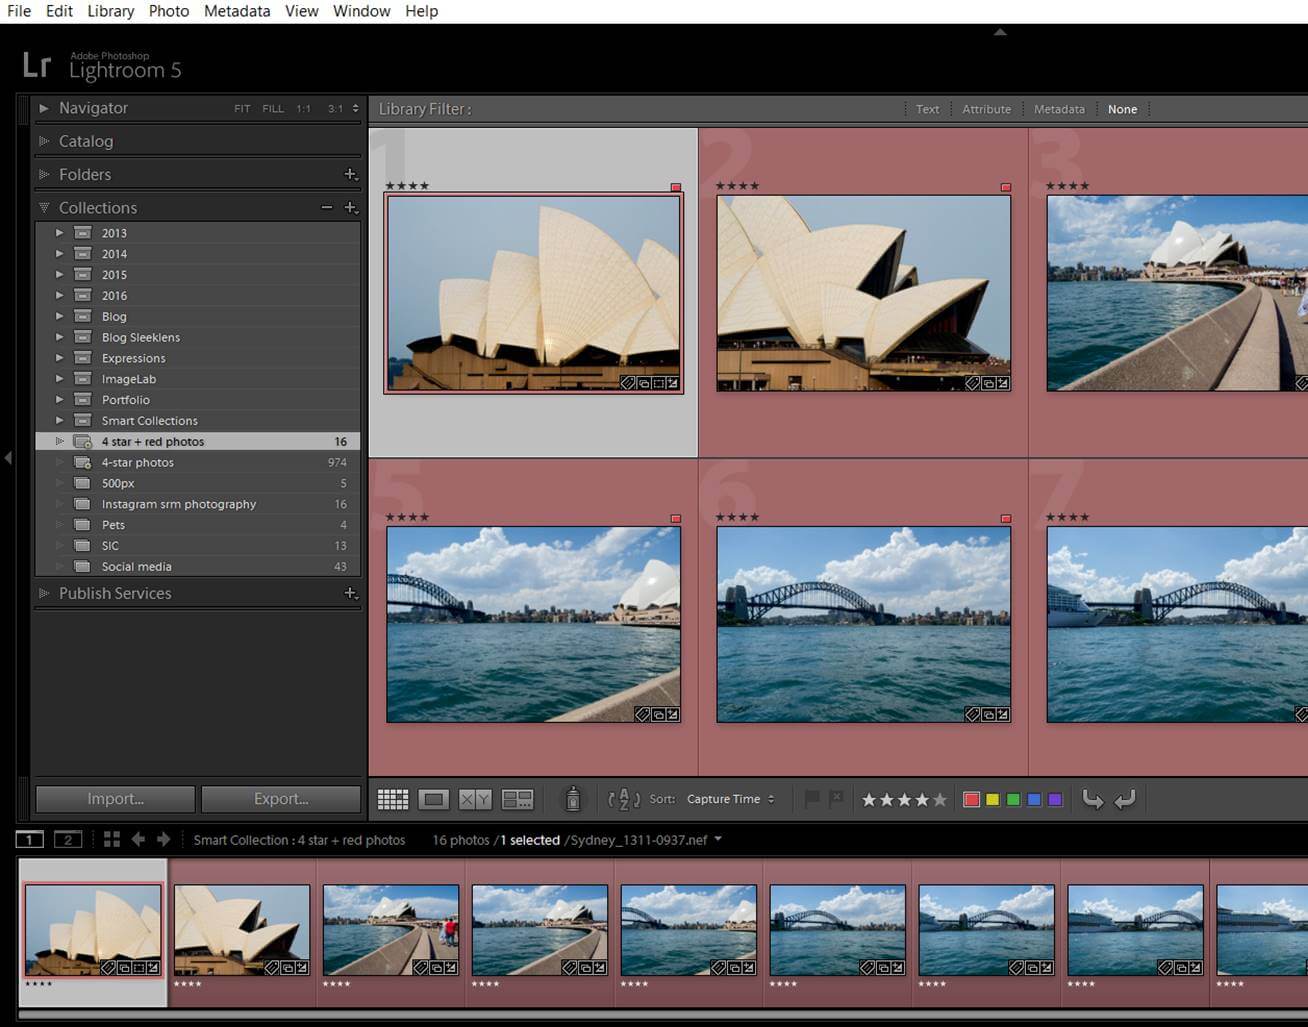
Once you create the collection the photos from your catalog that matches the criteria will automatically appear in the collection.
16 photos filled automatically my collection because all of them match the criteria of being labelled in red and having 4 stars. No other photos in my catalog matches both criteria.
Other things you should know about collections
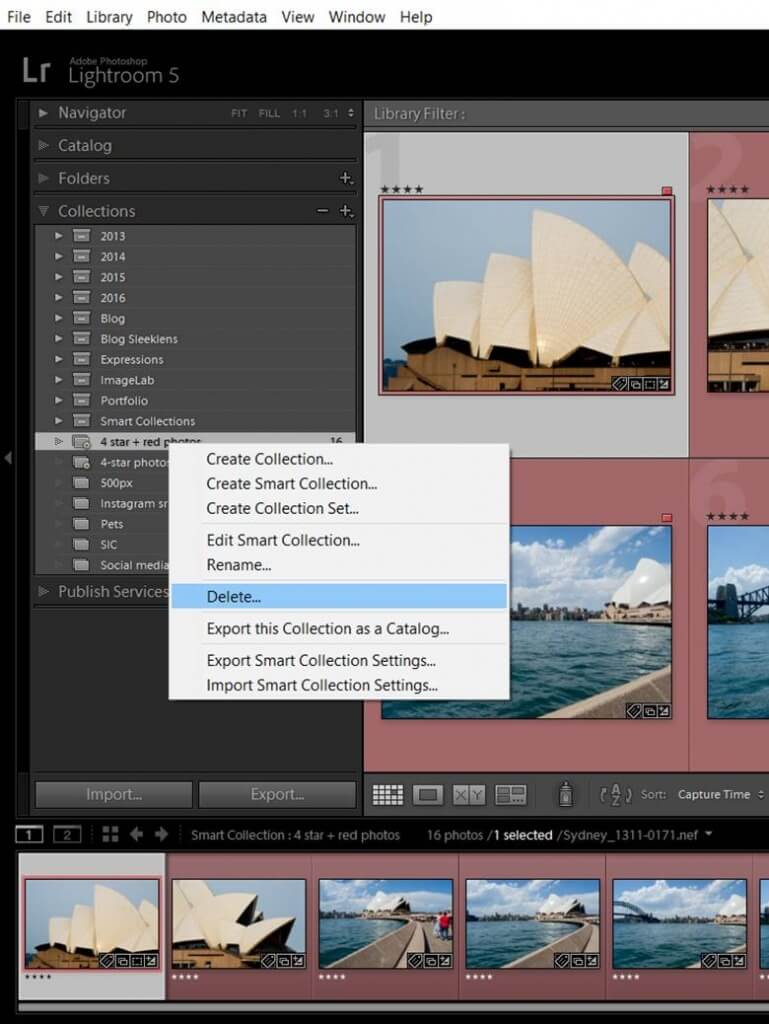
You can delete a collection by just right-clicking on its name and selecting “Delete”.
You can delete a photo from a regular collection just by selecting it and clicking “DEL” in your keyword. The photo will disappear from that collection, but it will stay in its folder and in any other collections that it belongs to. You can’t delete photos from a smart collection. In that case, you will need to change the metadata of the photo in a way that it won’t match the criteria of the smart collection any more. Then it will disappear from the collection automatically.
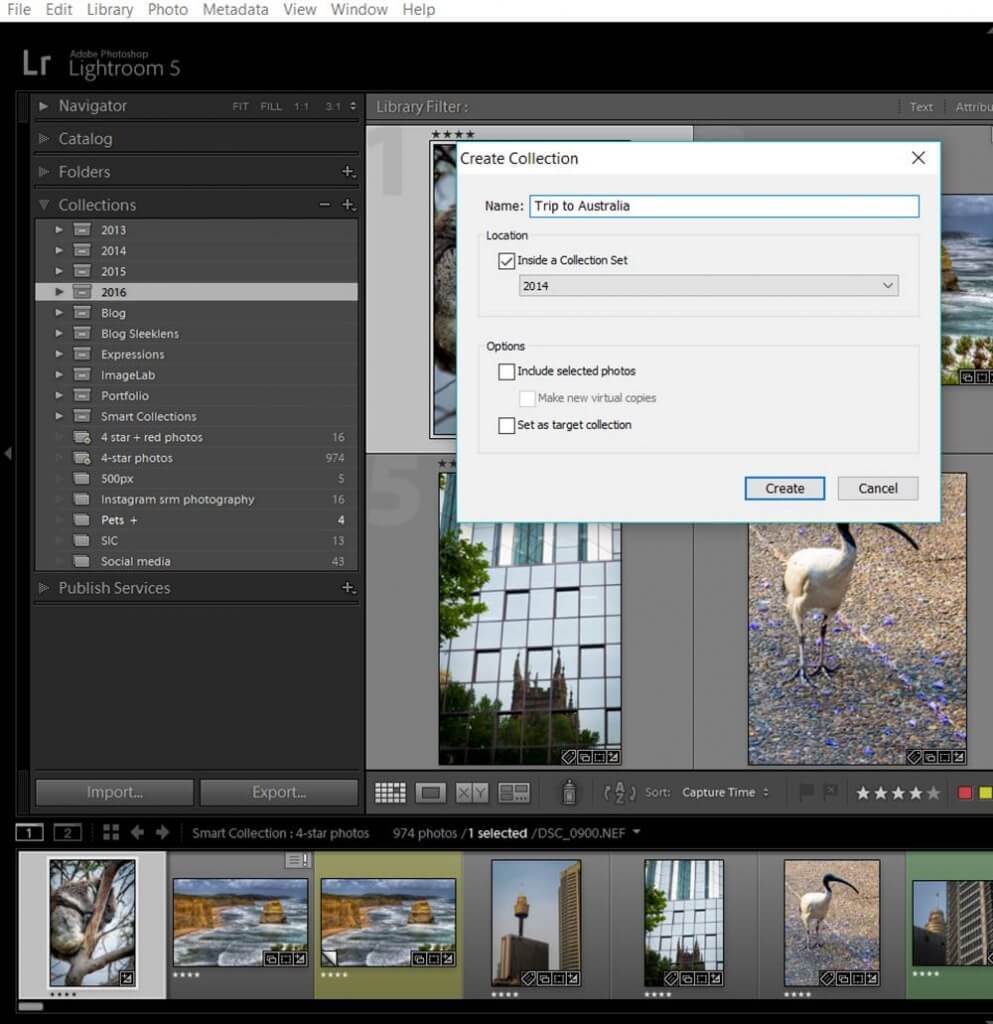
You can organize your collections by sets. To create a set you can do it in the same way than to create a collection, but this time you select “New Collection set”. A dialog box will open and then you can name your set. Under a set you can have several collections.
Collection sets have their own icon: a box
You can both select a collection and drag it to the set you want or you can assign a set to the collection when you are creating it.
Here I am creating a collection called “Trip to Australia” and I am assigning it already to the Collection set “2014”.
Have a look at the smart collections that LR has already created for you
LG has already a set of smart collections that can actually be handy. LG called the set “Smart collections” and it includes 6 collections: Colored red, Five stars, Past Month, Recently modified, Video files and Without keywords.
In the colored red collection you will find all your images labeled this way. In my case, I use red to label the photos that I use to build panoramas. If I am looking for them I just need to go to this smart collection instead of looking through all my folders. You can use the red color to label other kind of photos: your family photos, the HDR raw images, your nature photos…
The Five stars collection works in the same way as the colored red collection. Any photo that you will label with five stars will automatically appear in this collection. If you are like me, you will give 5 stars only to your best photos. In that case, this collection is a pool of your best images and can be used to build your portfolio. Instead of looking through several folders to select your best images, you will find them all in this smart collection. Pretty handy, isn’t it?
The Recently modified folder includes photos that you modified in the last 2 days. It is good for finding the photos you have been working on lately. You have also one folder for the photos you transferred to LG in the last month and one for the videos. Finally, you have a Without keywords collections. If you have a keywording system, it is good to localize all the photos that don’t have keywords in order to add them. This folder exists for that reason.
As you can see, I have 5369 photos without any keyword. These are photos that I added to the catalog before I set my keywording system. This Without keyword” folder allows me to have them localized and I can go easily over them and add the keyword that they need.
Post- processing Collections system
I found this system genius. I read about it on Scott Kelby’s blog and I want to share it with you. This system uses collections to narrow down all the images you take in a photo session to the ones you want to edit. First of all you create a collection set with a relevant name for you and under this set you will create either three regular collections or three smart collections (Full shoot, Picks and Selects). I will explain to you the latter option in the following paragraphs.
First of all I added a unique keyword to all the photos of the folder I am working with. In the example I was working with a folder of photos I took on the 22nd of May, 2016, around Tivon (Tivon is the name of my town in Israel). I selected all the photos in the Grid mode and I just added in the keyword panel “Around_Tivon”.
Then I created a collection set with a relevant name for me. I used the date+relevant name format: “160522_Around_Tivon”. If you need a reminder of how to create a collection set have a look to the previous blog. After this I created inside the collection set a smart collection called “01-Full shoot_Around_Tivon” that includes all the photos with the unique keyword I just added to all the photos “Around_Tivon”. This collection will include all the photos I took that day.
From all the collection, I flagged the ones I wanted to work with. You can check how to flag a photo in the first blog of this series with Tips for organizing your photos with Lightroom. Next step was to create a new smart collection inside the same collection set called “02-Picks_Around_Tivon”. This collection includes the photos that have both the keyword “Around_Tivon” and the flag. Now you have in this collection just the selection of images you want to edit.
After editing, I rated the photos I like the most with 4 stars (these are the ones I will deliver to the client or publish in social media). I created a new smart collection called “03-Selects_Around_Tivon” that will include the photos that match the previous conditions and that are rated with 4 stars. Now you have a collection with the best photos of this session.
This system allows you to switch quickly between all the images you took, the ones you want to edit and to the best ones. It makes the post-processing workflow much easier because you avoid all the image searches and you don’t have to switch between collections or folders. You can add more folders to this system: Black & White photos, panoramas, HDR…
Build collections by Genre or subject
I also like to have collections by genre or subject. For example, I like to have a collection of landscapes, another of cats, and other with portraits and so on… You can create regular collections and add the photos manually or you can use smart collections that includes the photos that contain certain keywords (for example: landscape) or any other metadata that allows you to classify it.
Build a portfolio collection set
I have a portfolio collection set where I organize my best photos by subjects. I have been using regular collections and adding the photos myself but you can also create a smart collection that will collect automatically your best shots (5 star ones that include certain keyword for example)
Project collections
I build collections for each one of my photography projects. This allows me to have an easy access to them and to make the workflow much easier.
I am working in a project about Emotions. I created a collection set that includes one collection for each model that participated in the project. Organizing the images by collections, makes it really easy for me to find the photos and keep working on the project.
Social media and blog collection
It can be useful to have collections with the photos you want to publish in your social media (Facebook, Instagram) or in any photography community (500px for example). Same as before, you can create a regular collection and add the photos manually or you can create a smart collection. I also have collection sets with the images I use in my blogs. If I am not sure whether I already published a certain photo or not, I can have a quick look to my blog collections and make sure.
I have a collection for each one of the blogs that I wrote for you. 🙂
I hope you find this content useful and that I helped you to improve your photo organization and editing workflow. As always, feel free to tell me about your organization strategies or if you want me to talk about any other subject. I will be happy to hear from you! Have a happy LG organization!
Even though nowadays a large majority of the images produced daily are taken with a digital camera and even though the post-processing has become something familiar to every photography enthusiast, many of the techniques we use to enhance our images actually come from the era of film photography.
On this entry, I want to talk about a special filter that is quite commonly used in portrait photography and that has become popular in landscape photography as well: the Orton effect.
Introduced in the 1980s by photographer Michael Orton, the result obtained from applying it to an image is what can be described as a ‘dreamy effect’. If you have ever used some kind of plug-in software for Photoshop such as Color Effex, you might know this as ‘Glamour Glow’ and, when carefully used, it can produce very interesting final results.
Orton effect in Photoshop
You don’t actually need any plugin to obtain the same effect in Photoshop, though. The Orton effect is just a combination of two images, each of them with specific characteristics. The two images are of the same subject with the main difference being the focus. While the base image needs to be perfectly in focus, the overlaid one is out of focus. The opacity of this top image will affect the strength of the effect on the final image.
Luckily, with the tools available with Photoshop, you don’t even need to shoot different images with different focus. You can simply use a blurring filter in order to get an out-of-focus version of the image you want to process. What you need, though, is a sharply focused image on the first place.
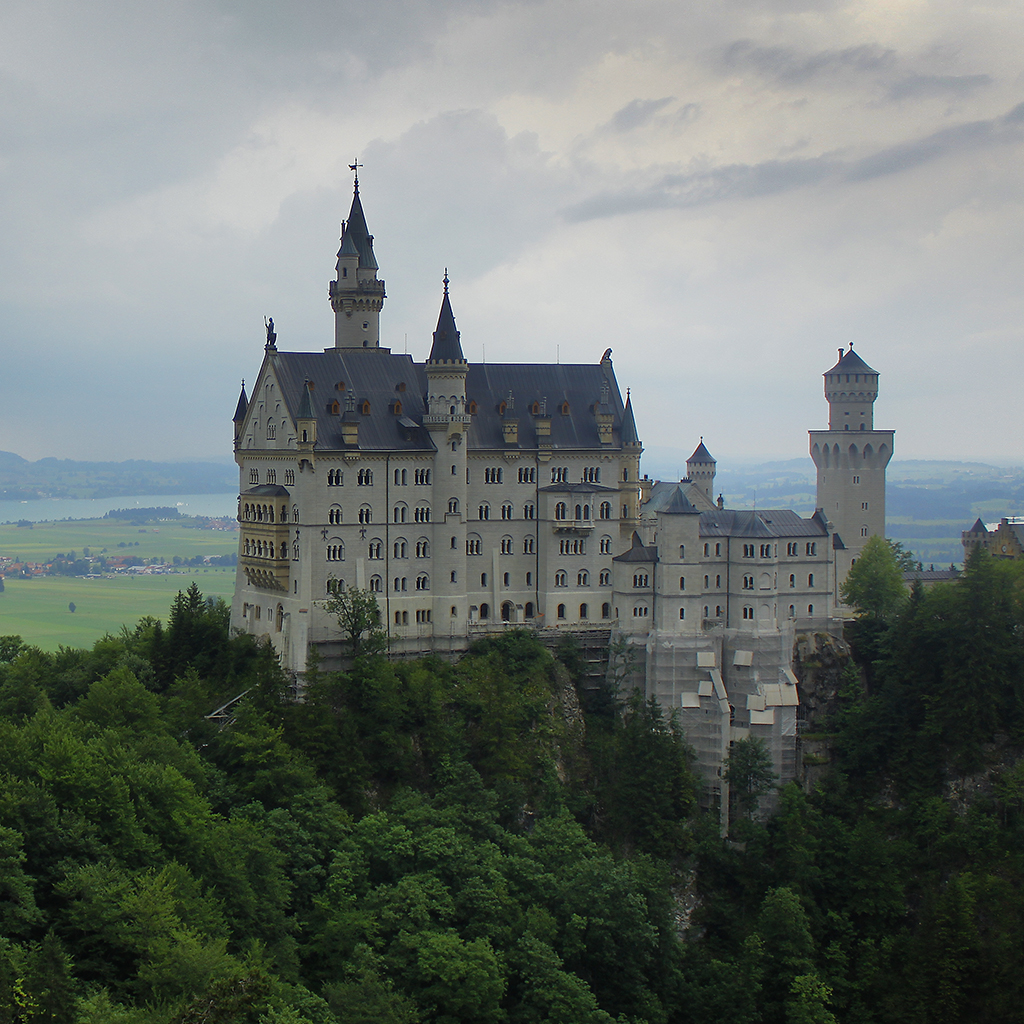
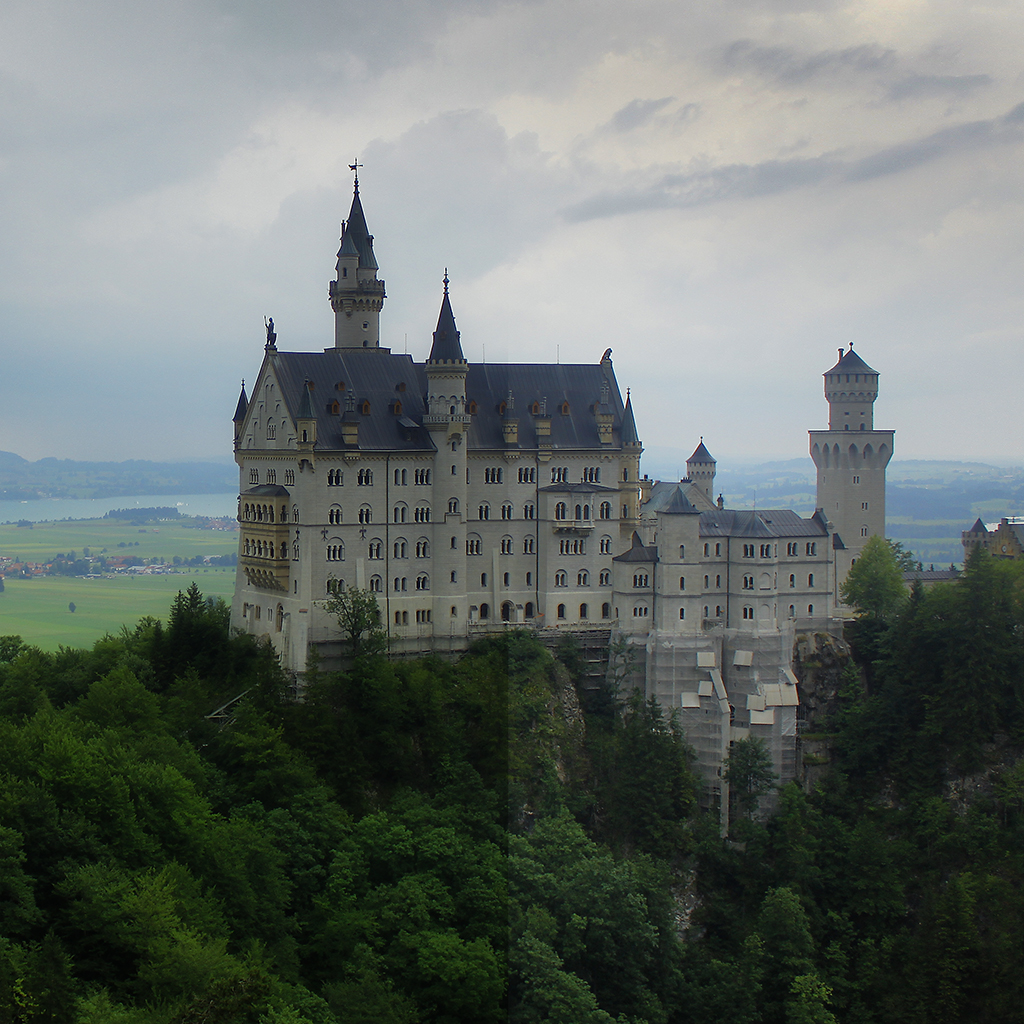
Take, for instance, this image of the Neuschwanstein castle in Bavaria, Germany.
This is a classic capture of this amazing structure, built by the King Ludwig II of Bavaria and that has served as inspiration for the famous Cinderella castle, located in two of Disney’s theme parks.
Given the nature of the subject, even when the original capture can already show the magnificence of the structure itself and the location, the image can still benefit from some post-processing and it serves as a good example for the dreamy look that the Orton effect can provide.
The first step is to duplicate the original layer in Photoshop. Even though the basic idea of the filter is the combination of two (or more) images with different focus, simply stacking a blurred layer on top of the original one will give an exaggerated effect. The following image was produced by applying a Gaussian blur to the top layer (radius of 40 px) and reducing the opacity in order to combine both layers.
You can see that the ‘dreamy’ effect is far too strong, making the image look more like foggy. The reason for this is how the blending of Photoshop works. For the image above, the blending mode was left in ‘Normal’, meaning that the layer is simply placed on top of the background layer and the opacity will just make a linear combination of both images.
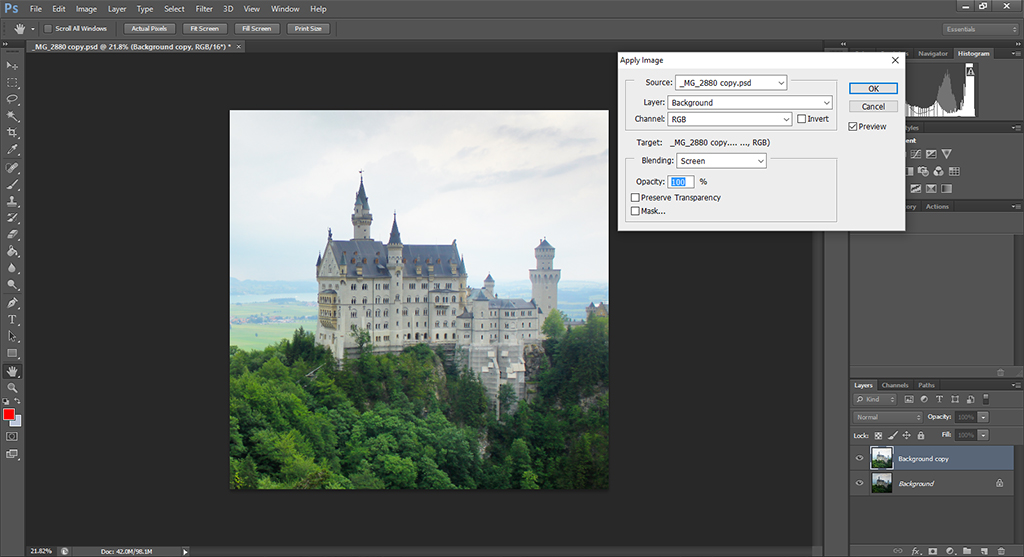
Another problem with using the ‘Normal’ blending mode is that the final result of the Orton effect tends to darken the original image so a blending mode that increases the brightness of the dark areas is desired. An ideal one for this purpose is the ‘Screen’ mode. So what you need to do is, with the top layer selected, go to Image -> Apply Image… and select your background layer (here simply called ‘Background’) and ‘Screen’ on the Blending drop-down menu.
This will give an overexposed version of your original image, but still retaining some details on the brightest regions. The next step is to duplicate the top layer. Once you have three layers, apply a Gaussian blur to the top one (Filters -> Gaussian blur…). The amount of blur to apply is not so important right now, since its effect on the final result can be controlled with the opacity of the layer, as we will see in the next step. The image below is a blurred version of the original image with a radius of 30.
Next, merge the two top layers into one by selecting both layers at the same time and then right click -> Merge Layers so that you end up with only two layers. Finally, by changing the blending mode to ‘Multiply’, you get the final image with the Orton effect applied.
At first, the image will look too dark and the effect might be also too strong, so you can adjust the opacity of the layer until you are happy with the results. The image below was produced with an opacity of 70%. Additionally, I masked the effect with a layer mask around the trees and increased the overall brightness to counteract the effect of the Orton effect. In order to highlight the difference with the original image, I masked out the effect on the right side.
And that’s it. As you can see, to achieve the effect requires only a couple of easy steps and, if used carefully, you can significantly enhance some of your images, so go ahead and try it and, if you have any question, just write me an email.
Landscape photography is a complex subject with many variables that need to be taken into account when composing your image while having too little to no control at all in terms of the elements and illumination sources (except for fill flash, but that’s a completely different subject). The whole capture process starts before leaving home when you are planning your photos and finishes when you are back at home while you post-process your images.
In order to make the post-processing stage as simple as possible, it is important that the image you get out of your camera is as close as possible to the final result you want to achieve.
When capturing landscapes, the sky usually plays an important role in the composition and, apart from that, it is also one of the trickiest parts of the image when it comes to processing, mainly because any change in local contrast leads to an increase in appreciable noise.
In this post, we will look at a simple way of getting good structure and local contrast in the sky while capturing your image. It basically involves the use of circular polarizer filters.
Circular polarizer filters
Light is everywhere. All our lives are affected by it and, in face, life would not be possible without it. However, it still is one of the most complex elements in nature. Light is the visual part of the so-called electromagnetic spectrum that goes from the low frequency radio waves to high frequency gamma rays.
One of the strangest things about light is that it behaves both as particles (photons) and as waves and it is this latter characteristic that allows polarizer filters to work. Light can be seen as electromagnetic waves being propagated in space and as such, the magnetic field and the electric field can travel at different angles and this affects how light gets into the sensor of your camera.
Now, without complicating things further, let’s take that last sentence for granted and focus on what matters from the point of view of photography. Circular polarizer filters basically achieve a specific polarization that has the main effects of enhancing local contrast, especially on the sky, eliminate reflections on windows and the light scattering on water surfaces.
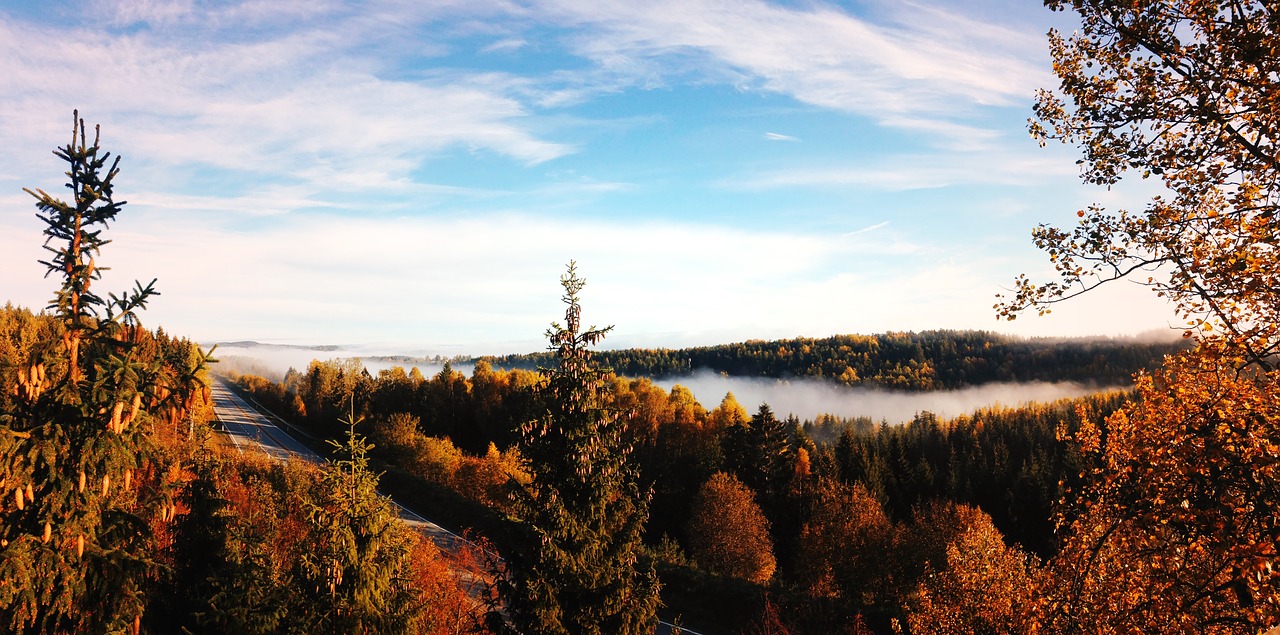
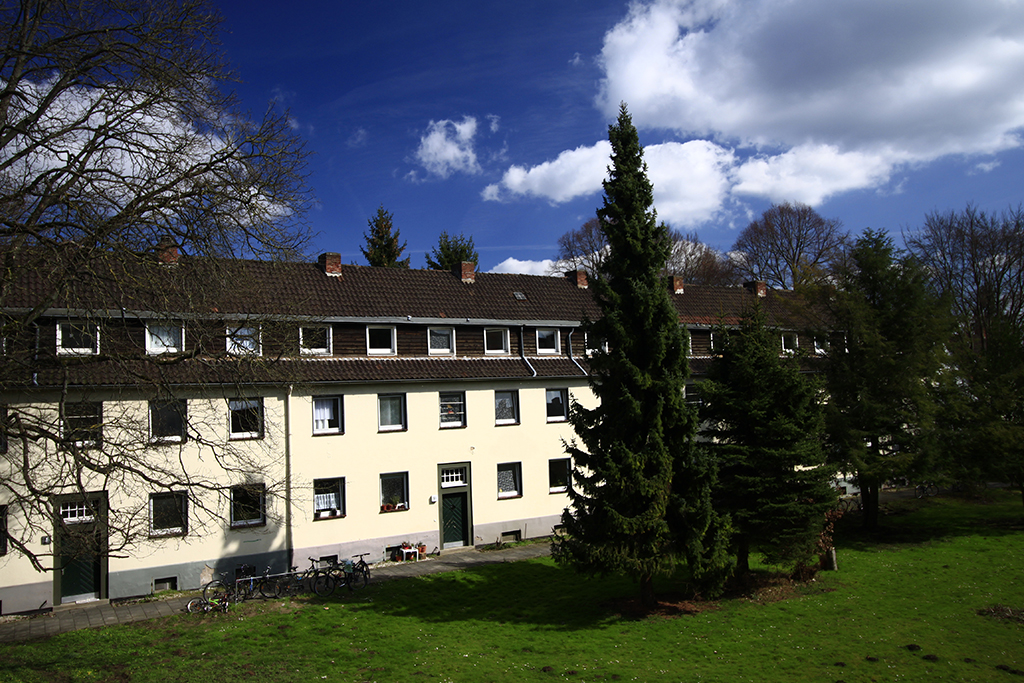
The following image was taken on a sunny day with the Sun relatively high on the sky, without any filter.
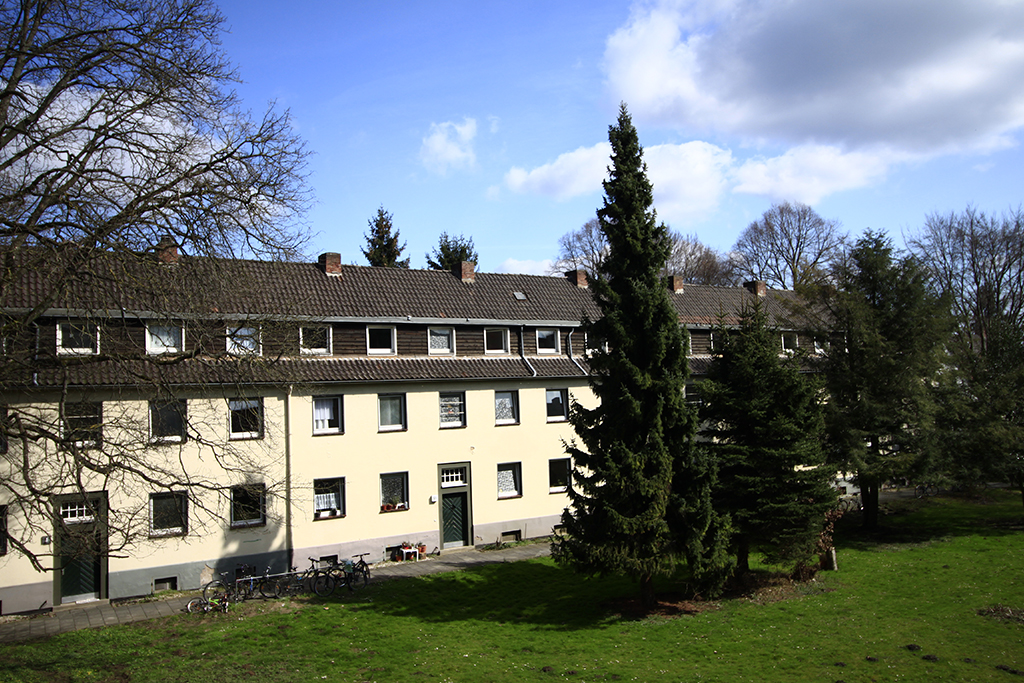
Notice how, even though the sky has some clouds, the contrast between the blue sky and the white clouds is quite low. Now, by only adding a polarizer filter, a dramatic improvement is achieved as shown in the next image (no post-processing has been applied to any of the photos).
Even though both pictures were taken within a few seconds of each other, the improvement in the sky is remarkable. There is also a change in the colors, like for instance the green of the grass and the trees, which seems to be a bit darker and more saturated on the second image. Also, since the polarizer is blocking part of the light spectrum, the second image is darker in general. To demonstrate the effect of the filter, I did not change the exposure time from one image to the other, but when using polarizer filters, it is often necessary to make small adjustments in the exposure time or aperture in order to compensate for the reduced light reaching the sensor.
The two images above were taken with the two extreme positions of the filter, but it is of course possible to apply a subtler effect by rotating the filter a smaller angle.
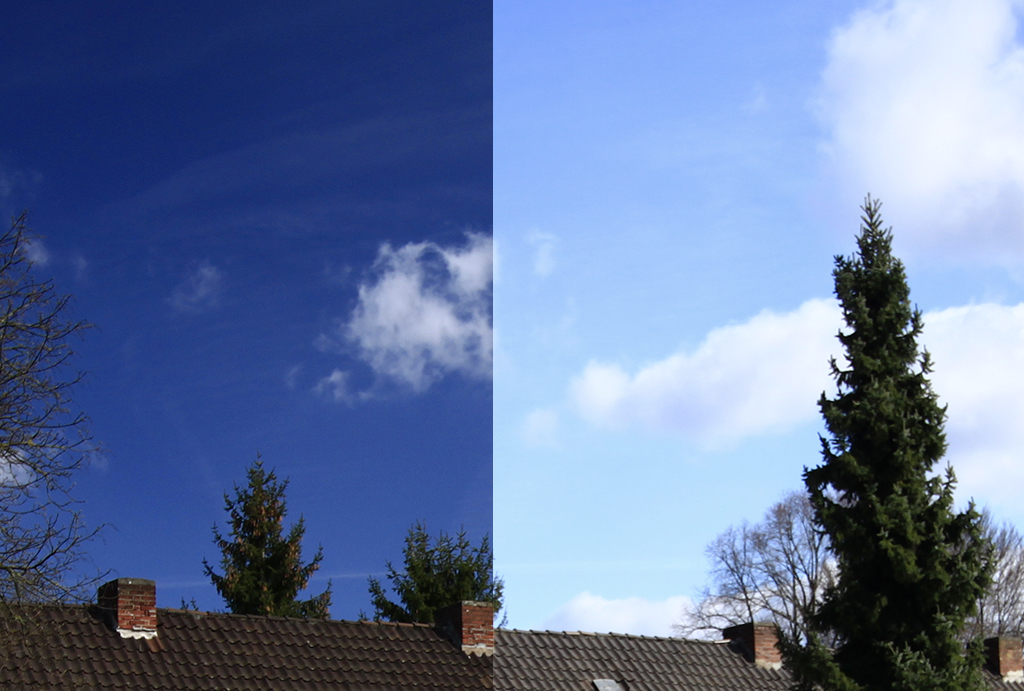
A great advantage of getting the right structure on the sky before post-processing is the reduced amount of noise that can be achieved. The next image shows a side-by-side comparison of the sky before (right) and after (left) applying the filter.
Even though the increase in contrast and structure was very pronounced, there is no noticeable increase in the noise. This is expected, since the way the sensor is capturing the incoming light did not change. If the image was captured without the filter and then post-processed to get a similar effect to that of applying the filter, the final result would contain a significant amount of noise, making the post-processing way more complicated.
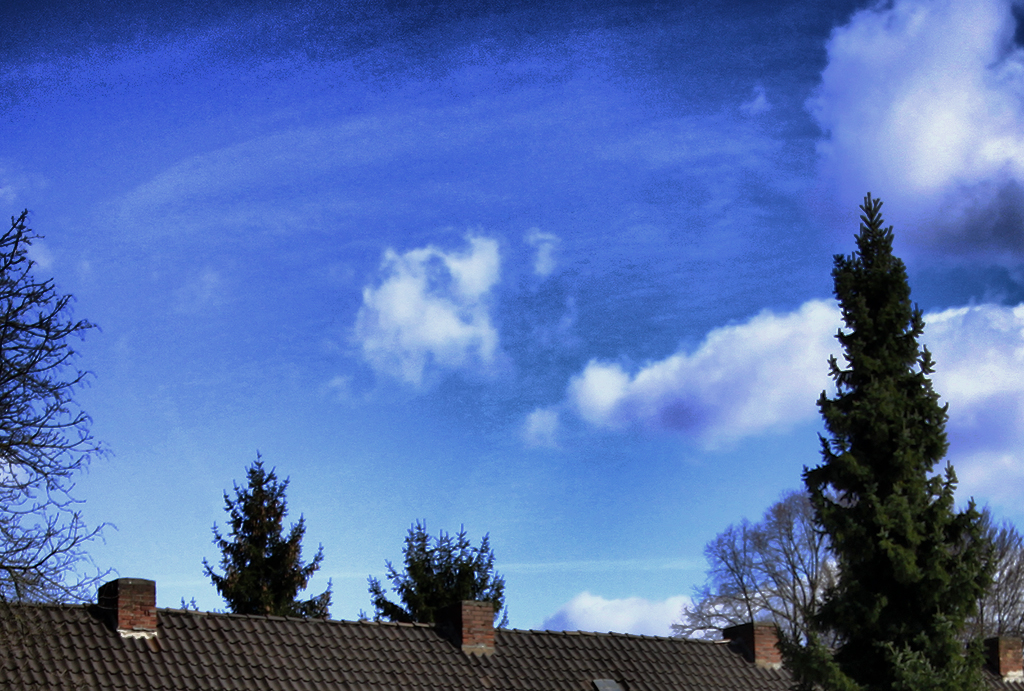
The following image is a poorly post-processed version of the original capture without the filter, in an attempt to achieve similar contrast to the one obtained using the polarizer. Further processing steps can of course be taken to reduce the noise, but the point I want to make is precisely to show the effort that can be saved by simply using a filter.
So my final suggestion is, if you enjoy landscape photography and still don’t own a polarizer filter, go out and get one. Depending on what you want to achieve and your budget, you will find many options in the market but even having a cheap one will make an instant difference in your final images, so don’t hesitate too much and go for it. And as usual, if you have any questions, just write me an email!


 Facebook
 Google +