Tag: night

Haida Clear Night filter. A solution to the light pollution

As one of the leading industries in photo filters production, Haida always has new ideas to improve the quality of our shots.

A good instance is the new nano Haida Clear Night filter. It was so useful to contrast the yellow light pollution in some places where I created some of my images!

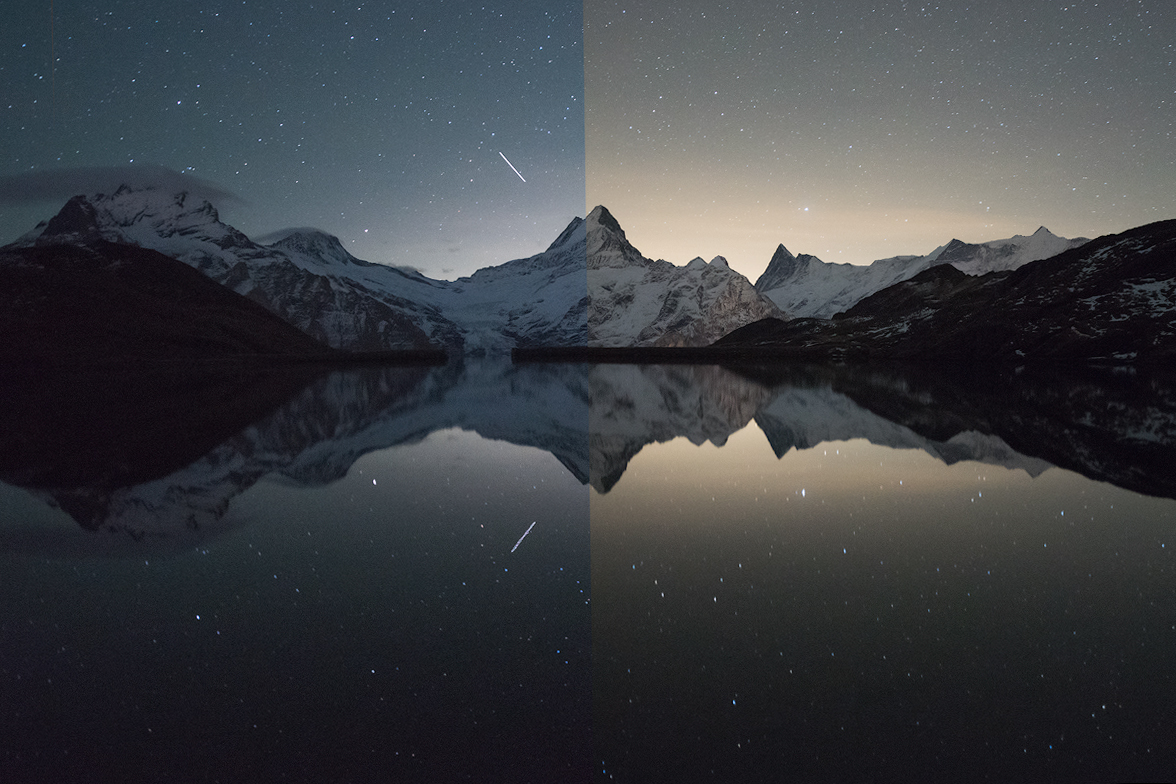
This is, for example, the final result (post-processing included) of a shot taken with that filter in the Swiss Alps.

see filter isabella tabacchi

You’ll think that it’s very easy to have such uniform color of a nightscape with Adobe Photoshop and that the light pollution tint is removable also with some features in Adobe Camera Raw.

That could be true, but the following image shows as my editing work was very short thanks to the Haida Clear Night filter.

clear night with without

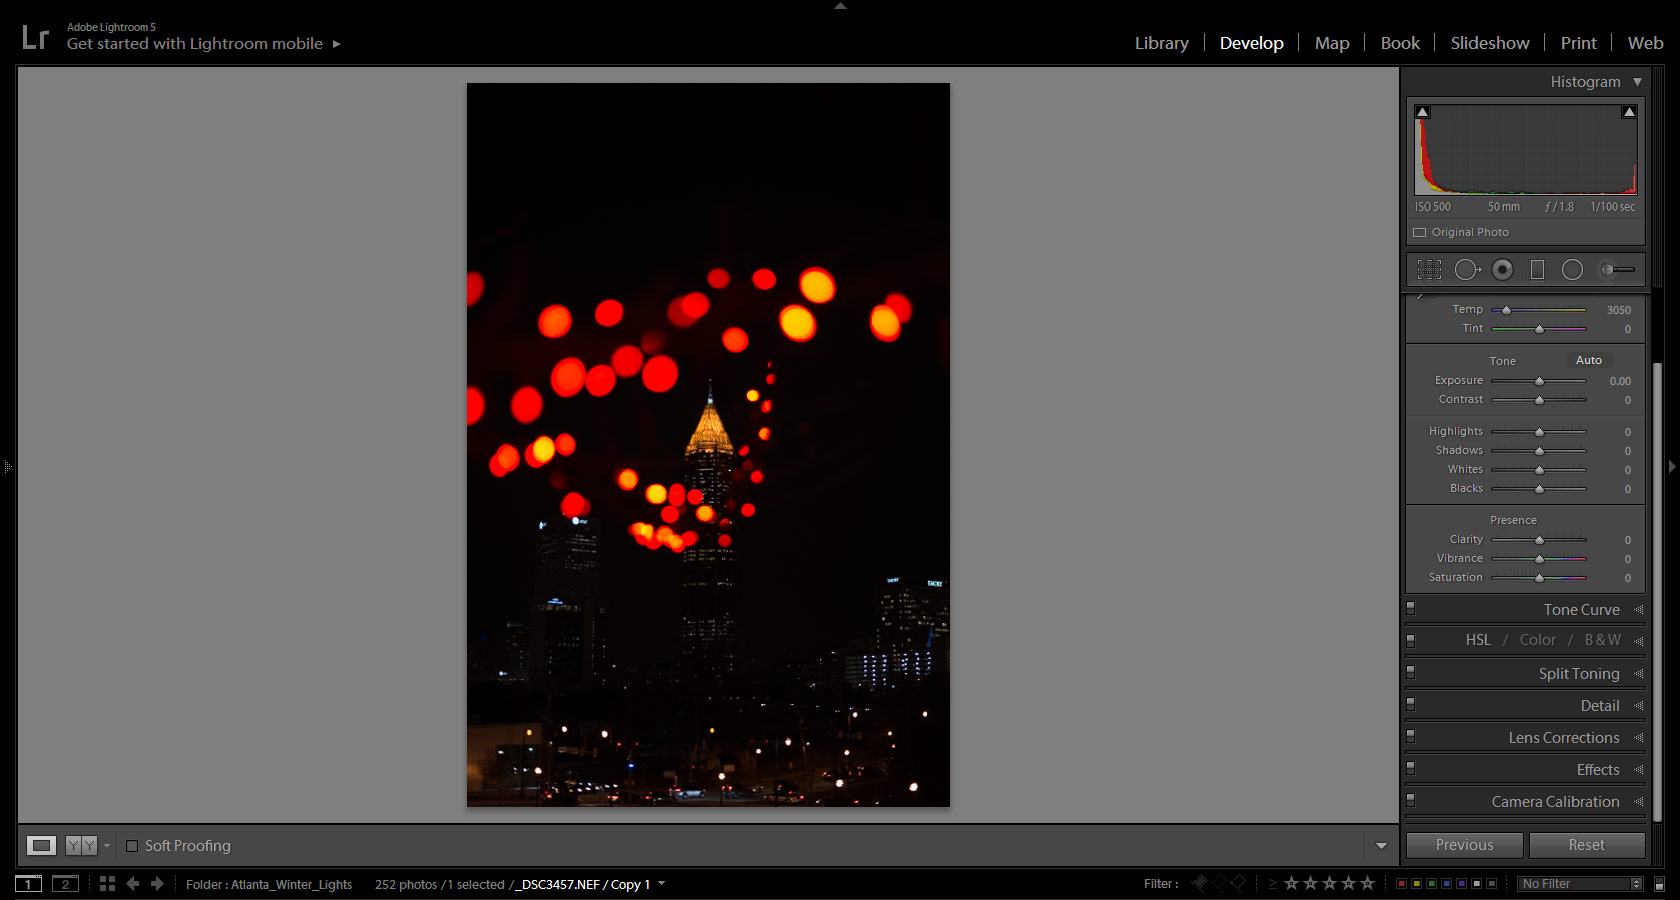
This image is composed of two not post-processed shots as Adobe Camera Raw shows them. I took the RAW files with the same white balance of 3700 K (Kelvin).

In the “WITHOUT” part, we can notice how the light on the horizon is strong, yellowish and has its impact on the rest of the sky, even in the mountains.

In the “WITH” half of this demonstrative picture, the light is not only white but even more restricted on the horizon area. Therefore, the stars are also more evident, outlined.

clear night filter haida

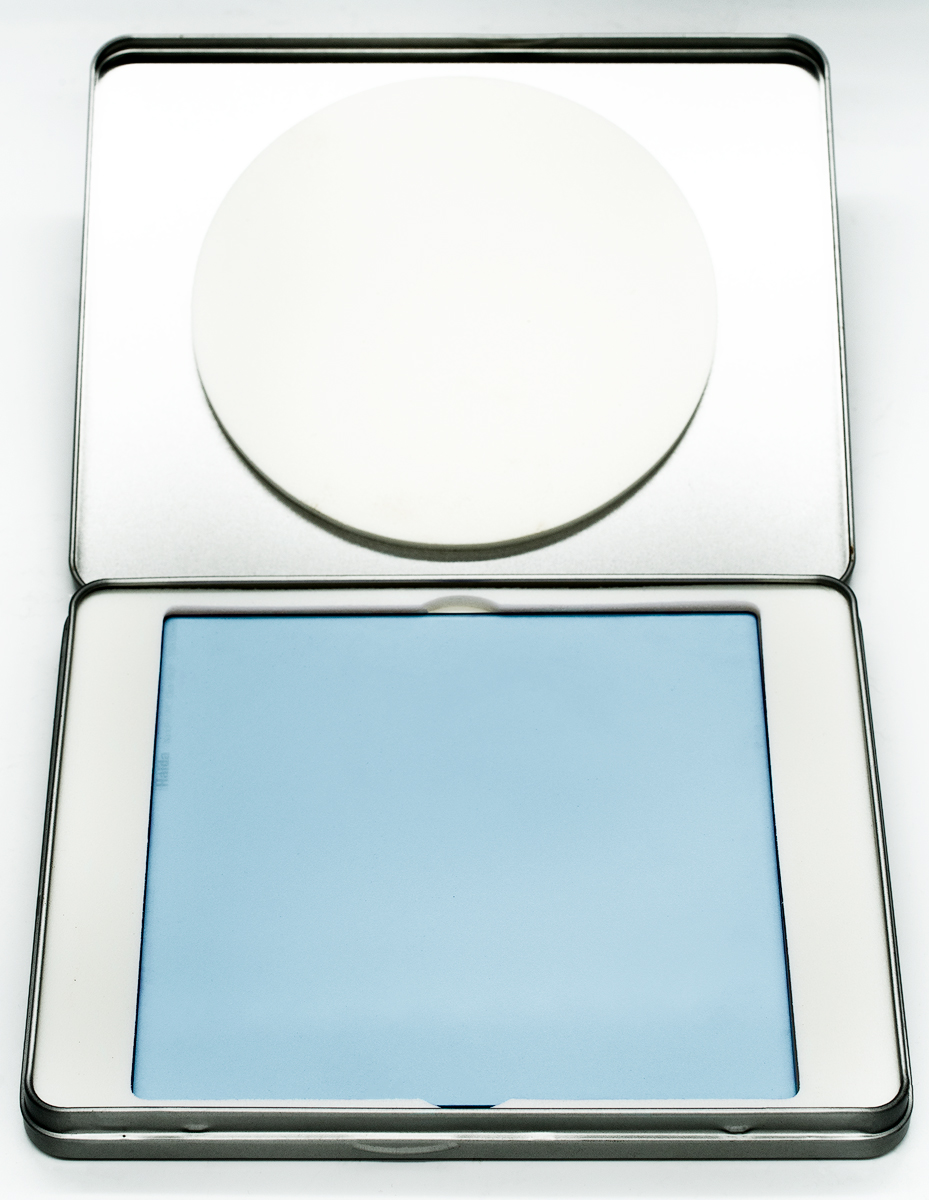
This is how the Clear Night filter looks in its original Haida Filter case.

You can notice the light blue color of the glass: this is why the yellowish pollution is contrasted!

The filter contains also a polarizing capability: it defuses light coming into the camera; so, the luminosity and brightness of the pollution will be confined at the horizon, the stars and astro magic like Milky Way will be more evident.

A parenthesis about the nano-coat meaning

The nano coat couldn’t miss in this product.

But, what does “Nano Pro” mean? Well, it’s the extremely thin, nano, a coat which covers the glass surface of the filter.

This is the great innovation of this new product line that makes the difference in comparison to the previous series. It gives resistance to dirt, reflections, and scratches.

Thanks to this coat, my filters fantastically survived sandy, earthy, rocky, icy places.

Furthermore, as a landscaper, I often take shots to waterfalls and rocky beaches where the waves move on the reefs and splash some water on the filter. Thanks to this coat I have just to clean lightly with a towel cause the drops come away very easily.

Another comparison: when the light pollution is very strong

CLEAR NIGHT

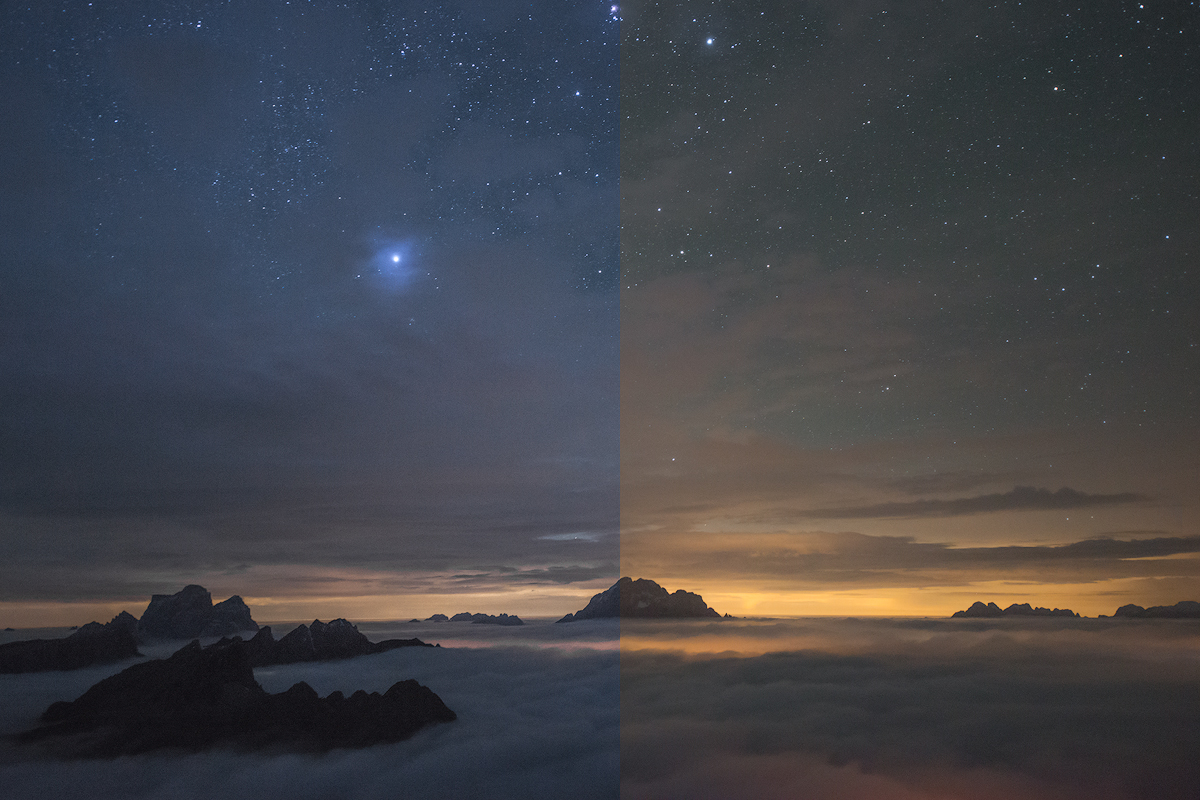
This is another “WITH-WITHOUT” image composed of two shots I took during my workshop at Lagazuoi hut, in the Italian Dolomites.

My students and I had the opportunity to immortalize this view of the highest peaks in the Dolomites of Ampezzo coming out from a “sea” of clouds.

Unfortunately, the light pollution of the valleys was reflected in the clouds and at the horizon; but the shot with the Haida Clear Night filter, with the same white balance, is completely different.

All these features help so much the post-processing phase cause we need to do fewer actions in order to delete the light pollution and that yellowish cast.

Where can you buy it?

You can purchase Haida Clear Night filter at Amazon.com.

But are also available on fotichaestli.ch , the Swiss distributor website.

They are available in every size:

  1. Square Glass Insert filter systems. 75×75, 100×100 and the 150 super wide angle systems (you need the holder to mount the filters on the lens).


Round filter sizes: 52, 55, 58, 62, 67, 72, 77, 82 m

A little parenthesis about the Haida holder

You have to put the filters in the grooves of the holder to use them. I own the 150 series holder for my Nikon 14-24mm f/2.8G ED wide-angle lens.

The support system is steel and very steady and resistant. It consists of the universal holder that supports the filters, the front adapter ring and the rear adapter ring that sustain and connect the holder to the lens.
A little gold nut enables to remove or rotate the holder on the rings to position better the filter, especially if it’s a GND.

There are also two rubber plates (superior and inferior) on the holder surface, near the grooves; they prevent the light to come into the space between the lens and the holder, so the nuisance reflections don’t appear on our shots. You can find also some replacement rubber plates in the holder pack.
I also took many very long exposure shots with ND, GND and both filters; I never saw that horrible reflection (similar to crowns) that appear every time the light goes through the filter.

And of course there are not this kind of problems about the Clear Night filter; in the night the light is very weak, especially when the moon is not visible (except cityscapes).

Conclusion

Haida Clear Night filter is a great choice for a nightscape.

I like the color cast on the glass, cause it eliminates yellowish and orange pollution, even if I know that is a matter of taste (I love cold nightscapes).

The quality is great and the price also. I have to tell you that this idea met my expectations.

SaveSave

Night Sports Photography Tips

Being a sports photographer requires some patience and practice, no matter what time of day or lighting conditions you’re dealing with. But, photographing sports at night demands even more. If you’re interested in shooting sports like baseball and football, it’s likely that you’ll have to capture images under the lights, after the sun goes down. While this can be challenging, there are some tricks to ensure you get awesome action shots, even your first time out.

There are several reasons nighttime sports photography is so difficult. You’re dealing with limited lighting conditions and a subject that is usually quite far away, moving at a fairly fast pace. As with most other types of photography, the key to mastering sports photography at night is to experiment as much as possible.

However, there are some things you can do to guarantee a better result. These tips will help you prepare for the challenge of night sports photography. We’ll talk more about the kinds of settings and techniques you can use to approach it.

football night game photo

Use the Right Equipment

Shooting a fast-moving subject in low light will be especially difficult with an entry level camera, particularly if you’re hoping for a high-quality result. You’ll want a camera with a digital sensor capable of shooting usable images with an ISO of at least 1600.

A kit lens also won’t yield the results you’re looking for. For this kind of photography, you’ll want a fast lens. This means a lens with a wider aperture – a smaller f-number, like 1.8 or 1.4 – that will let in more light with each exposure. You’ll be able to use faster shutter speeds at a lower ISO, which will give you much cleaner images. If you have one, use a lens with an aperture of at least f/2.8.

soccer night game photo

Artificial lighting can create all kinds of color temperature issues. Before you start shooting, you should take the time to read up on setting your camera’s manual white balance. Set the white balance so that your camera knows what white should look like. This will save you time correcting white balance in post after the game is over.

Use the Right Techniques

Besides knowing how to use the light, there are some things you can do to get great action shots.

1. Stay Low

Find a good angle and stay as close to the ground as you can, either sitting on kneeling on the sidelines or at the end zone. This offers a better perspective on the action. It also lets you fill more of the frame with the action happening on the field. Your resulting images will be a lot more dynamic than if you had been shooting upright. Plus, it’s a lot more comfortable than standing for several hours while you photograph the game.

low perspective sports photography

2. Learn to Predict the Action

If you don’t understand how the sport is played, you’ll have a much more difficult time capturing interesting shots of the action. You want to figure out which direction your team or players will be moving, and what their ultimate goals are so that you will be ready with your camera when the action happens.

action sports photography

Get to know the players and the way they play to have a better idea of where the ball will go. Keep your eye on the ones who score the most goals or get the most penalties. The best thing about shooting digital is that you can take as many photos as your storage card will allow. So, if you keep at it, you’ll end up with at least one great action shot.

3. Enjoy the Atmosphere

Things like parents watching their kids on the field, cheerleaders or excited fans celebrating on the sidelines, and coaches and trainers calling out plays are an interesting part of the game. These moments can make for some great, unique sports pictures. Don’t be afraid to look around the crowd and see what else you can shoot.

stadium fans photo

Also, try to keep from looking through the images on your LCD screen. Not only does this risk you getting hurt if you’re not paying attention, you might miss out on the perfect shot. Use the LCD to ensure you’ve got the exposure and white balance set correctly, and then leave it alone while you shoot.

Add Finishing Touches in Post-Production

Whenever you can shoot in RAW to capture as much detail as possible. This will allow you to correct things like exposure, contrast, and color without losing image quality. Note that using the sliders will likely increase noise in your images, though, so be careful that you don’t over-do it.

You’ll probably have tons of images to go through, so choose the best ones to spend time on in post-production. Most of them will probably need a crop to focus in on the action and create a pleasing composition, but try to maintain the original aspect ratio to make printing easier in the future.

Bokeh Photography for Beginners

Holidays are a good chance to get great color and lights in your shots. Winter, in general, is a great time to go out and experiment with ways of shooting scenes that are not always at your disposal. With all of those lights and colors for the holidays, also comes the opportunity to create some awesome bokeh. Essentially, bokeh is the way the lens renders out of focus light. It is circles of light like in the above image or the creamy background in portraits if taken with the right settings. Aside from having a nice out of focus bokeh in portraits, there are tons of objects you can use to create some great bokeh by holding objects in front of your lens. Incorporating out of focus elements can enhance your images and give it a mood you otherwise would not have.

1 – Starting Point

So what do you need to know before taking photos, and how to achieve bokeh in your images? Well, the biggest things that go into creating bokeh are the lens choice and the aperture you shoot at. The shape of the bokeh, a lot of times, is determined by the aperture blade amount. Generally, the better the lens the more blades (around 9), while the lower end lenses have about 5. The higher amount of blades creates more of a circle which creates the bokeh, more creamy and soft, where the lower blade count will create something like a hexagon. I tend to prefer the more round bokeh, but that is not to say that the less circular ones are not good and should not be done. Everyone has a preference but it is good to know the difference of why the bokeh might look different from lens to lens.

2 – Prep

If we look at one of the images I started with, we can gain a lot of information by looking at the histogram below. I mentioned above that aperture also plays a role in creating bokeh. One of the things to keep in mind if you are trying to get nice bokeh, is shooting around f 2.0 or wider. Having the lens open wider allows for a smaller depth of focus, thus giving you the out of focus bokeh in your images. What you generally see in portraits is that the subject is in focus and the whole background is out of focus. In the images I shot, I used the foreground as a framing device and made that the out of focus part. So in my image, I made the foreground out of focus and used that as a nice way to introduce some interest in my image. Going, either way, works (either creating the foreground/background out of focus), just as long as there is enough difference in the field of focus to get one of the elements to go blurry. As an artist, that is up to you to decide on how you want to incorporate things being out of focus into your images.

Arnel Hasanovic Bokeh Tutorial

3 – Shooting Bokeh

So, once you have in your head what you want the subject to be and how you want to incorporate bokeh into your shot, you then experiment! When shooting out of focus especially with the object almost touching your lens, it is often unpredictable and fun to see what slight movements will do with the light. In my case I kept adjusting, moving from angle to angle, making minute changes, to get something that looks like the image below. One thing to remember is that the color of the object out of focus can play a big role in helping you get a nice clean image. Before getting this shot I was using some more green light that did not look good against the color of the building, so I moved over to the more red holiday lights and that made all of the difference.

Arnel Hasanovic Bokeh Tutorial

4 – Experiment! Experiment! Experiment!

Did I mention experiment?! Trying out new things and making slight changes with your camera will yield two great and unexpected results that you can learn from. Shooting at night is not something I do a lot of, so when I get a chance to do something I do not normally do, I play around, knowing that there is no consequence for failing. Below is a small sample of the different angles and changes I made along the way to getting the image above. If you notice, a lot of the images look the same in a row, but one move up or down changed it. When working with light bouncing around your lens and it is so close that it almost touched the lens, the smallest change can get you to a winning shot.

Arnel Hasanovic Bokeh Tutorial

5 – Conclusion

Shooting bokeh can be a lot of fun and there are a lot of different ways to incorporate it into an image. Sometimes used just for fun, and other times to hide distracting objects. Whatever the case may be, it’s fun to take a time to try new things and play around.  Below are some other images and uses of bokeh during the night.

Arnel Hasanovic Bokeh Tutorial