Tag: Tools

PS Tools Used to Make Portraits Stand Out

Simple portraits are beautiful and worthy of being shared online, but sometimes, they can look a bit boring.

However, that doesn’t mean you need to delete every portrait that looks too dull. Knowing how to enhance simple photos will:

  • Make you a better retoucher
  • Inspire you to find beauty even in the most insignificant places
  • Encourage you to get better at mastering simple themes and compositions

Before you’re even tempted to delete that rich collection of simple portraits, try to enhance them using these incredible Photoshop tools.

Patch Tool

photoshop patch tools
If you look closely, you’ll notice that a few of the model’s blemishes and neck wrinkles are gone. Even though the patch tool might seem like an insignificant part of Photoshop, it will make your editing workflow easier.

This handy tool will patch up any blemishes on your model’s face. You can also use it to get rid of wrinkles, stray hairs, and facial hair. Simply draw over the area you’d like to fix and drag it to a clean patch of skin. I recommend dragging your selection horizontally, as this will create a more natural look.

I don’t recommend using this tool to fix large areas on your model’s skin. Dragging a very large selection away from its source will result in blurred, unflattering-looking skin like this:

photoshop patch tools

Gradient Map

If your portraits are lacking in contrast, you don’t necessarily have to use Curves or Levels. Gradient Map, a tool that’s often overlooked, will make your portraits stand out within seconds.

ps tools gradiant map

Before you create a new layer, press D on your keyboard. This will set your colors to black and white.


photoshop tools set colors
You can also find Gradient Map in Image > Adjustments.

When you select Gradient Map, a small window will pop up. Make sure Dither and Reverse are unticked and click Okay. Then, change your layer mode to Soft Light and lower your layer’s opacity until the results don’t look too dramatic. Even though Gradient Map can look images look intense, you can use it to add a bit of contrast to your images without wasting a lot of time.

If you want to give your photos a more nostalgic feel, change your colors to something other than black and white.

PS tools dither and reverse
You can either manually change your colors or choose from a few styles in the Gradient Map window. For this photo, I used a variety of tones to add both contrast and warmth to the image.

Screen Mode

Screen mode is a layer mode that’s often used to create double exposures. It can also be used to add reflections and textures to photos of all kinds.

ps tools double exposure
The extra image, combined with the aforementioned Gradient Map tool, resulted in a portrait with lots of textures and vibrant colors.

For this to work, you need to have a variety of stock photos. You can either take them yourself or download them from a website like Pixabay or Unsplash. Use photos that have a lot of light and space, but also remain open to using photos with unusual compositions.

Place your stock photo over your portrait and change your stock photo’s layer mode to Screen. This will immediately brighten your entire image. If the effect is too dramatic, use the Curves or Levels tools to edit the stock photo only.

If you’re not satisfied with the results, use another image or add multiple photos to your portrait. There’s no limit to how much you can do when it comes to these “double exposures.”

ps tools

Using these simple Photoshop tools, you’ll be able to enhance even the simplest of portraits. And the next time you’re tempted to delete that precious photo, open it in Photoshop and give it a chance to show its true potential.


Take advantage of selection tools in Photoshop

From all the native functionalities of any image processing software including Photoshop, the selection tools are definitely among the most important ones. For instance, when talking about brightness, the only reason to make global adjustments is a wrongly exposed image from the camera. Most of the times, we will be interested in making local adjustments, for instance in contrast, brightness or color saturation.

While the main functionality when performing these adjustments in Photoshop are the adjustment layers, a clever use of the selection tools will facilitate the whole process.

The problem is that selecting exactly what we want is not always a straightforward or easy process. The different smart selection tools that Photoshop provides take advantage of sharp changes in image properties such as color or brightness.

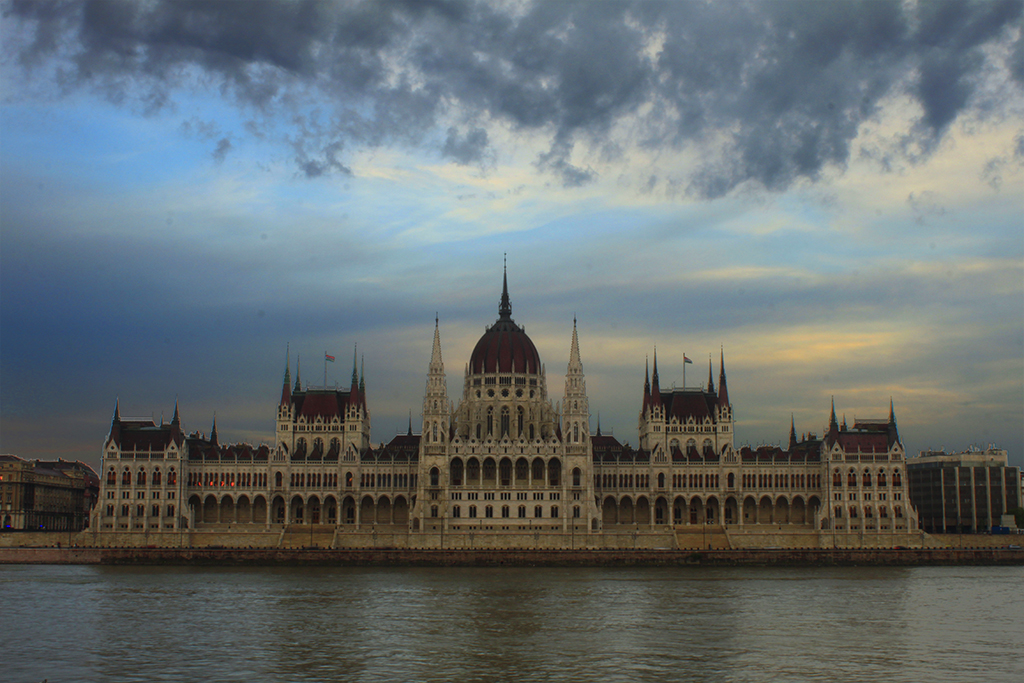
However, the images we are dealing with and, more specifically, the regions within those images where we want to apply those local adjustments not always have the gradients necessary to make the selection process a clean and simple one. Take, for instance, this image of the Parliament in Budapest, Hungary.

select01

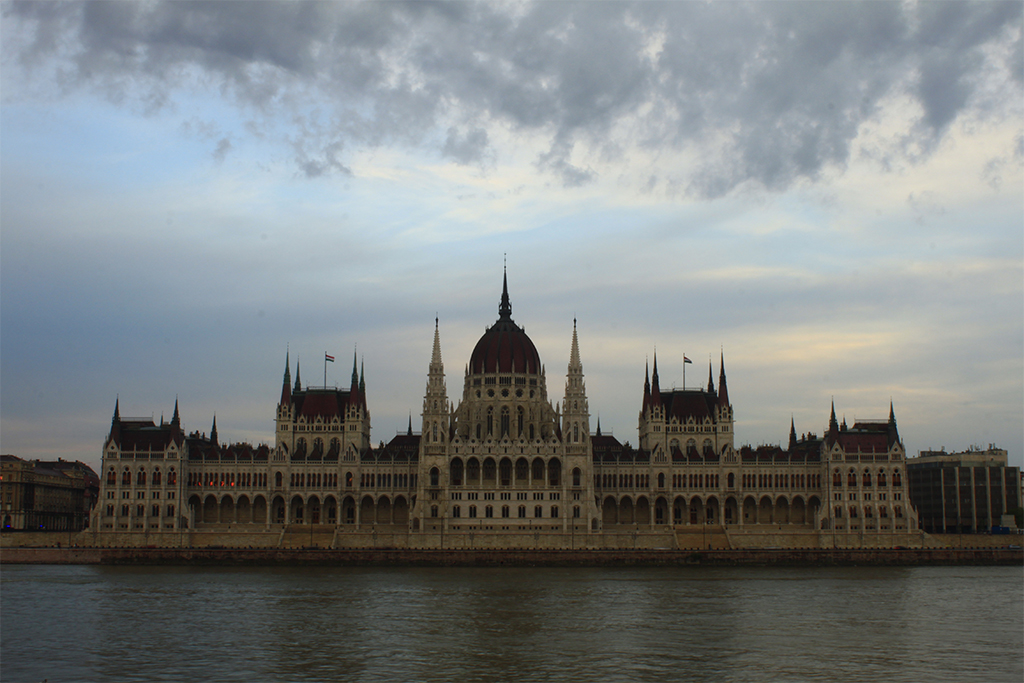
While the photo is relatively well exposed, the sky is a bit overexposed while the foreground is a bit dark. This leads to a loss of details and color contrast. The fact that the sky is not completely overexposed means that detail can still be extracted without the need to combine the photo with a darker one by means of a blending or HDR process. This is usually something desirable, since while blending two images can help achieve a great result, using a single one can significantly simplify the whole process.

As I just mentioned, having structure on the sky means that we can use one of the many selection tools available in Photoshop to select the sky, reduce the brightness and increase the contrast in order to better balance the whole image. However, the same structure that will help us achieve the desired result will make the selection process a non trivial one. As an example, the following image shows the result of applying the ‘Magic Wand Tool’ with a tolerance of 50, which is a rather high value.

select02

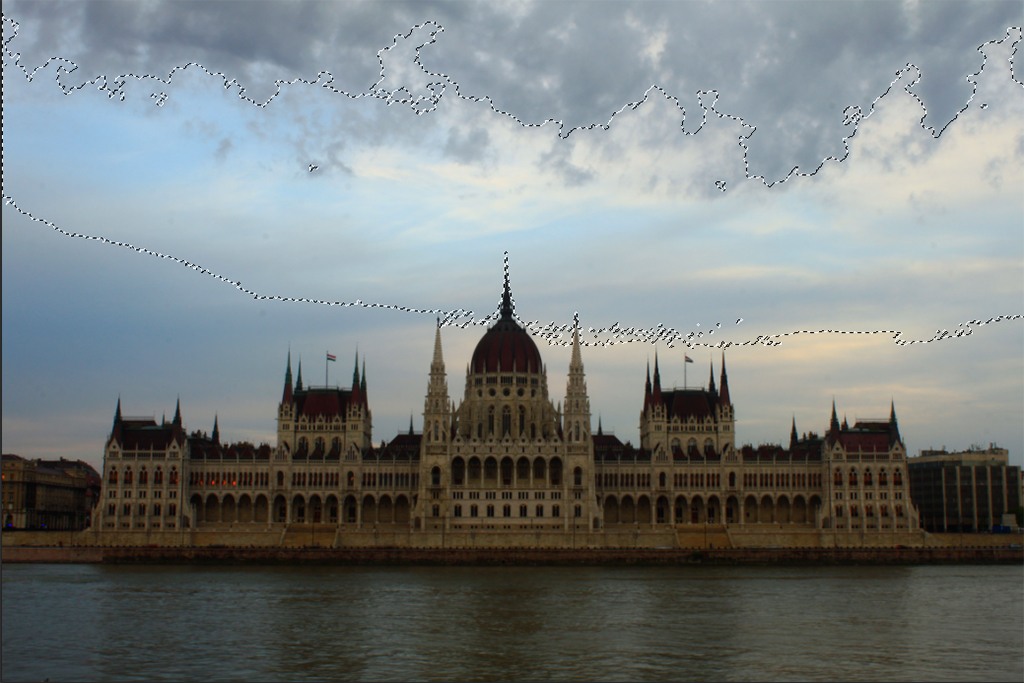
In order to select the whole sky, it is necessary to recursively apply the tool to capture the different sections of the sky, something that can be problematic, specially when coming close to the skyline (where the sky meets the buildings).

Since the selection tools rely on rapid changes in contrast, we can take advantage of this by artificially increasing or decreasing the contrast between the different regions of the image, depending on what we want to achieve. The first step in this process is to duplicate our base layer twice and convert the top layer to black and white.

select03

The reason for doing this is that black and white images have larger contrast than color images by definition. From the three layers, the base one is there to preserve the original image, the middle one will become our contrast-corrected color image and the top one is going to serve as a mask to make the selection process an easier one.

The next step is then to increase the contrast of our top layer until the sky is almost completely white and the foreground is almost completely dark. To increase the contrast you can go to ‘Image -> Adjustments -> Brightness/Contrast…’ and simply move the ‘Contrast’ slider to the right. Since you want to dramatically increase the contrast, you will most probably need to repeat this step several times taking the slider to its maximum value.

Pro Tip – Use photoshop vintage effect to create retro-style photos

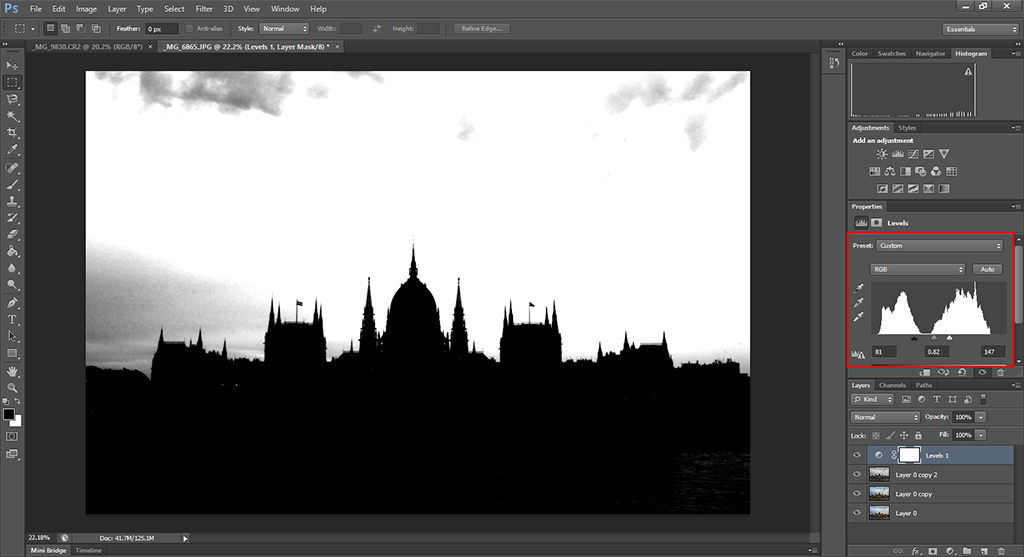
Another option that will allow you to avoid repeating the same step several times is to create a ‘Levels’ layer over the top layer. Then you need to move the left slider to the right until the foreground becomes almost completely black and the right slider to the left until the sky becomes almost completely white. The most important part of the image is the skyline, so don’t worry too much if not all the sky turns white or the foreground black.

select04

By looking at the image above, it is already evident that the selection process will be much simpler than before. In fact, we can now use the selection by color, given that the difference in color between the top and the bottom parts is remarkable. For this, go to ‘Select -> Color Range…’. Depending on your image, you can adjust the ‘Fuzziness’ to allow the tool to select a wider or narrower range of colors. For our image of the Parliament, since the foreground is noticeably darker than the sky, we can increase the Fuzziness to its maximum value and then select the sky. The following image shows the result of the selection process.

select05

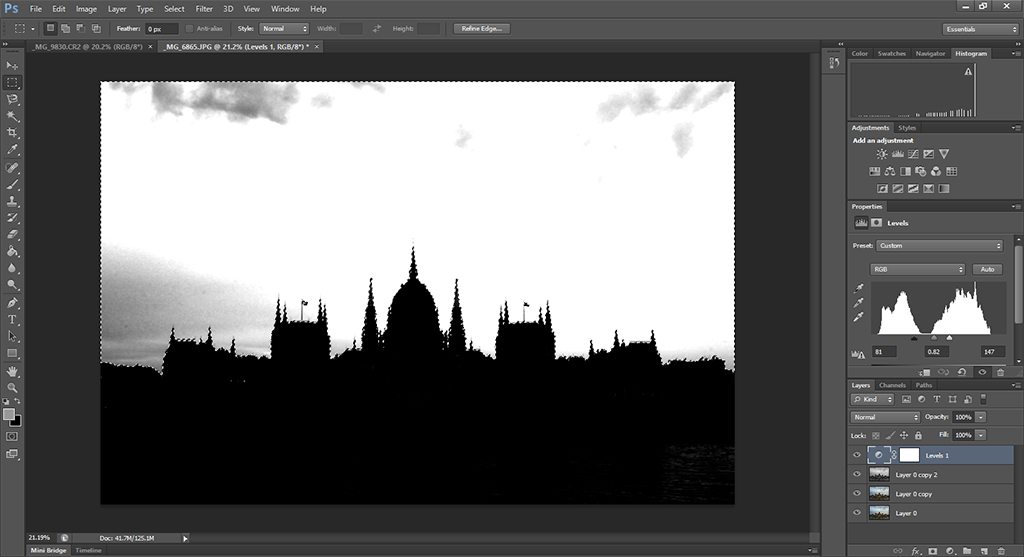
Now the selection cleanly follows the skyline. If there are some spots that were selected in the dark region, you can remove them from the selection using the rectangular selection tool while pressing the ‘Alt’ key.

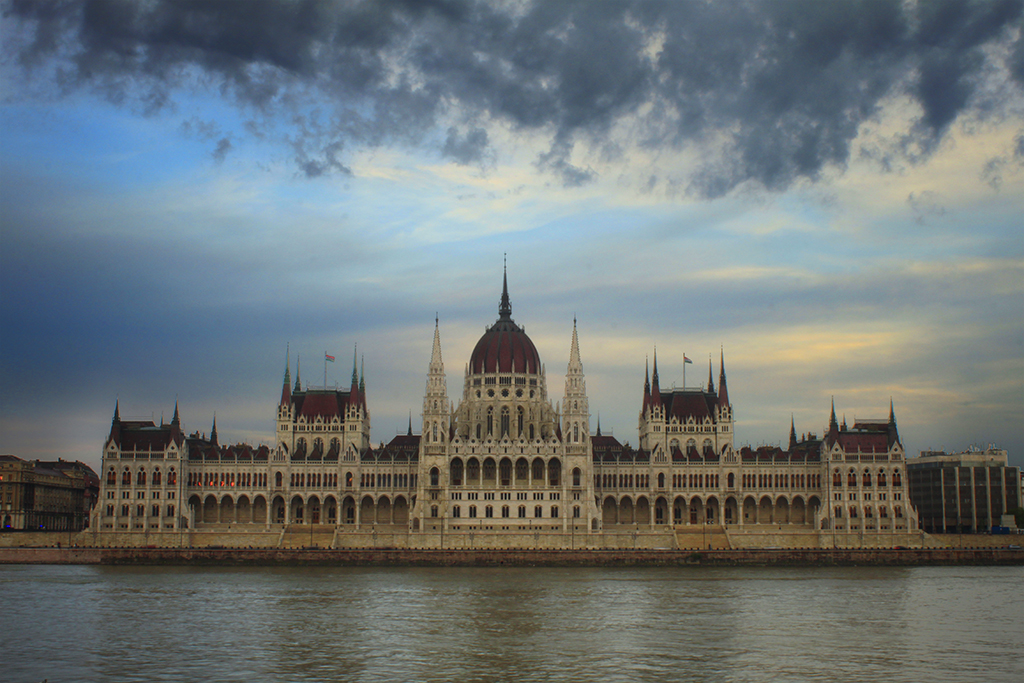
With this selection, hide the two top layers and select the second layer while keeping the selection (you can save the selection if you want in case you loose it by mistake). Next you can make the adjustments you want and they will only be applied to the sky. Also, by inverting the selection, you can apply changes to the foreground. For the next image, I increased the contrast and decreased the brightness on the sky and increased the brightness on the foreground.

select06

The image looks much more balanced now, but if you look closely, some parts of the skyline look strange, specially the top left corner of the Parliament building. This is because the selection in that region was not perfect because the sky  is a bit darker than on the rest of the image. The easiest way to correct this is to apply a layer mask and mask the top layer in those regions with a low opacity (around 25%).

select07

For the final image, I applied a vignette to help the building stand out. As you have seen, the selection process can be simplified by just adjusting the contrast of a layer that is used only for the selection process. While this process might not be suitable for every image (specially when the contrast between the two regions that want to be adjusted is too low from the beginning), for some images it can produce smooth results and will certainly speed up the whole process.

If you have any questions regarding the contents of this post, just write me an email and I will be happy to help you.

Local Correction Tools – Lightroom

Color correction is an art form that relies on your perception, experience, and interpretation of the image. We can do this correction if we have an installed Lightroom presets. The fundamental difference between Global & Local correction tools is simple:Global edits are the enhancements we make to the whole photograph.Global correction does apply the changes across all the pixels in the frame. Global editing shouldn’t be used to correct one part of an image, to the detriment of the remainder.Too often I’ve seen people adjust the white balance of an entire photo to try to achieve “perfect” skin tones. Not only is this quite difficult, it frequently makes the rest of the photo look strange. Good global edits are essential, but they don’t negate the need for local editing. Well-executed local edits are the difference between a nice photo and a great one.Whereas local correction tools apply the changes only based on the areas we choose to apply. Some of the Basic Lightroom tools and Photoshop’s Shadow/Highlight act locally and do not treat all pixels with the same brightness values as identical. Some of the Local correction tools in Lightroom  Presets are:
Crop tool(R)
Spot removal tool(Q)
Red eye removal tool
Graduated filter(M)
Radial filter(Shift+M)
Adjustment brush(K)

Local Correction Tools - Toolbar
Local Correction Tools – Toolbar

These tools are available only in develop module and are placed right below the histogram on the right side.

  • Crop tool ( R)
    Crop tool helps us to recompose the photograph that we have taken, to make it aesthetically better or to simply make it more pleasing to the eye. The kind of cropping we do, without a doubt, will vary from one photograph to another. Some might require minor corrections on the horizon while some others might require vertical alignments. Regardless, the crop tool provides the photographer with an opportunity to play around with the proportions, perspective, and the way a photograph looks ultimately. This tool plays a vital role in the post-processing of a photograph.

    Click the Develop tab at the top of your workspace. Locate and select the Crop & Straighten tool icon in the toolbar, which opens the options for the tool. Alternatively, press “R” on your keyboard to open the Crop & Straighten tool options. 

    The Crop & Straighten tools are often the first step many photographers use when editing photos in Lightroom. Use these options to crop a photo for Instagram, straighten crooked photos, or prepare photos for printing.

    Crop Tool features
    Crop Tool features
  • Spot Removal (Q)
    In the Develop module, select the Spot Removal tool from the tool strip, or press Q.

    The Spot Removal tool in Lightroom lets you repair a selected area of an image by sampling from a different area of the same image. It helps us remove dust speckles, insignificant or unnecessary elements from the photograph, remove skin blemishes, etc. On an advanced level, the spot removal might also help to us to remove certain elements from the photograph, like a person, overhead electrical wiring, etc. 
    The two spot removal techniques are Clone and Heal.

    Heal matches the texture, lighting, and shading of the sampled area to the selected area.
    Clone duplicates the sampled area of the image to the selected area.
  • Spot removal tool - features.
    Spot removal tool – features.
  • Red eye removal tool
    Red Eye will remove the red discoloration of a person or a pet’s eyes that can result from a camera flash going off. Unfortunately, there aren’t any shortcuts available for this particular Lightroom feature, but this is yet another vital tool when it comes to post-processing photographs. To remove a red eye from an eye on a photograph, you can use this tool to remove the red eye and to enhance the eye.
  • Spot removal tool.
    Red-Eye Removal Tool.
  • Graduated Filter Tool
    Graduated Filter Tool
  • Graduated filter (M)
    In the Develop module, select the Graduated Filter tool from the tool strip, or press M.
    The Lightroom Graduated Filter is a versatile tool for making local adjustments to your photos.This tool is a huge help for landscape photo retouch as it can be used to enhance the details from the foreground and the skies.
  • Radial Filter (Shift + M)
    The background or elements surrounding the primary object of your photograph can distract the viewer. To draw attention to the subject, you can create a vignette effect. The Radial Filter tool enables you to create multiple, off-center, vignetted areas to highlight specific portions of a photograph.

    In the Develop module, select the Radial Filter tool from the tool strip, or press “Shift + M”.
  • Radial Filter Tool
    Radial Filter Tool

    Adjustment Brush (K)

    The Adjustment Brush tool, literally, works like a brush. The changes or corrections get applied to those regions that you select or brush over. This is one the major advantages of this particular tool – make changes to specific areas or regions of the photograph. The Adjustment Brush tool lets you selectively apply Exposure, Clarity, Brightness, and other adjustments to photos by “painting” them onto the photo.

    In the Develop module, select the Adjustment Brush tool from the tool strip, or press K.

Adjustment Brush Tool

The adjustment brush tool combined with the graduated filter tool are a deadly combination. These two tools together have the power to create/produce magical outputs even out of the most simple photographs.

Lightroom is great for processing your photos and understanding how its tools work will help you use it more effectively. Use these features, play around with the tools and tell us about your experience in the comments below. 🙂