Tag: details

The Power of Seeing Monochrome: Tones of Black and White

Colors have a way to give you a bright and cheerful feeling. There is just something about a photo that speaks colors. It brings out that energy and brightens up your day with it. Did you know that even photos in Black and White/Monochrome can intrigue you?

people

Black and White definitely gives you a retro feeling of the olden days, when photographers like Andre Kertesz, Henri Cartier-Bresson, Fan Ho created wonderful artistic memories. At the same time, in current times you will find many photographers including myself, trying to experiment shooting or even editing in Black and White to create a different moment with a touch of the past.

How do we find the right photo to edit in Black and White? Or maybe capture a moment in Black and White?

In a recent assignment titled “Cities in Black and White” on National Geographic by Matt Adams, I tried to experiment and submit to the assignment. We were allowed to edit photos into black and white. In the assignment, Matt gave us a guide as to what to see or how to find the right photo to edit. It was not easy to choose the colored photos to transform them in Black and White yet, it was a fun learning experience. It has also continued to help and guide me to keep improving and trying out various edits to get the right tones of Black and White.

chair

Seeing through black and white can be a challenge but it can be simple. We have been quite accustomed to having the option of shooting in color that when looking at black and white it feels too plain. It is in that simplicity that many great moments have been created in the past and even today.

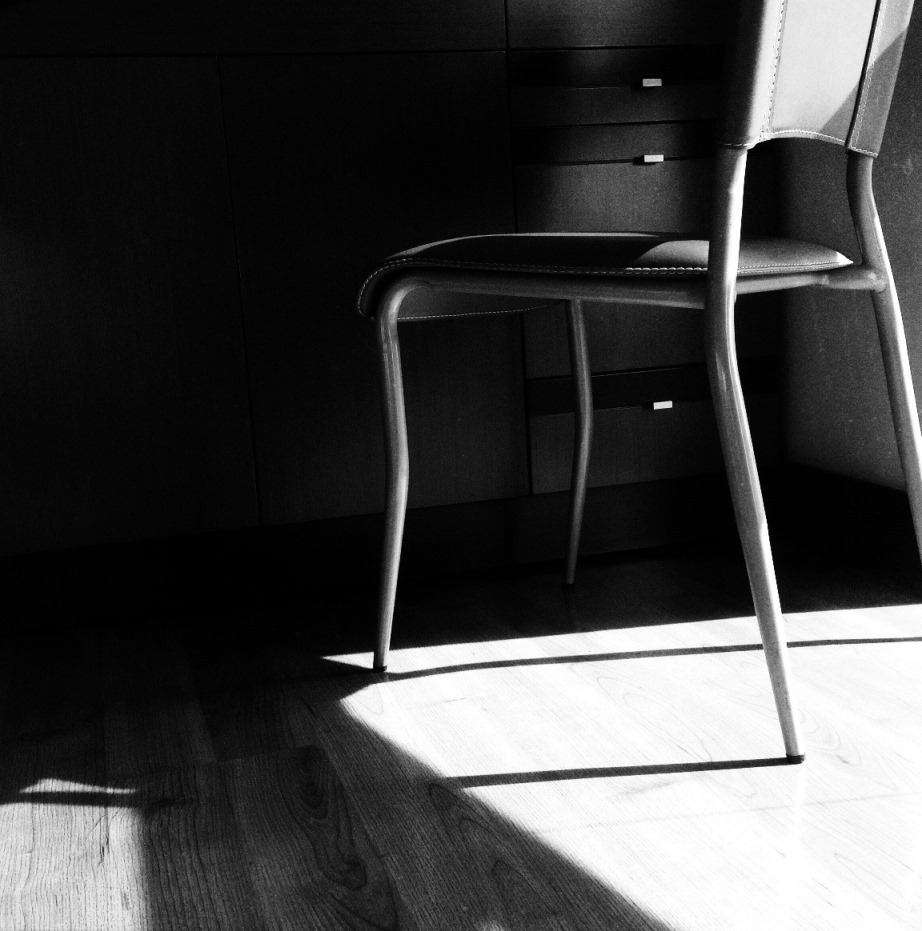
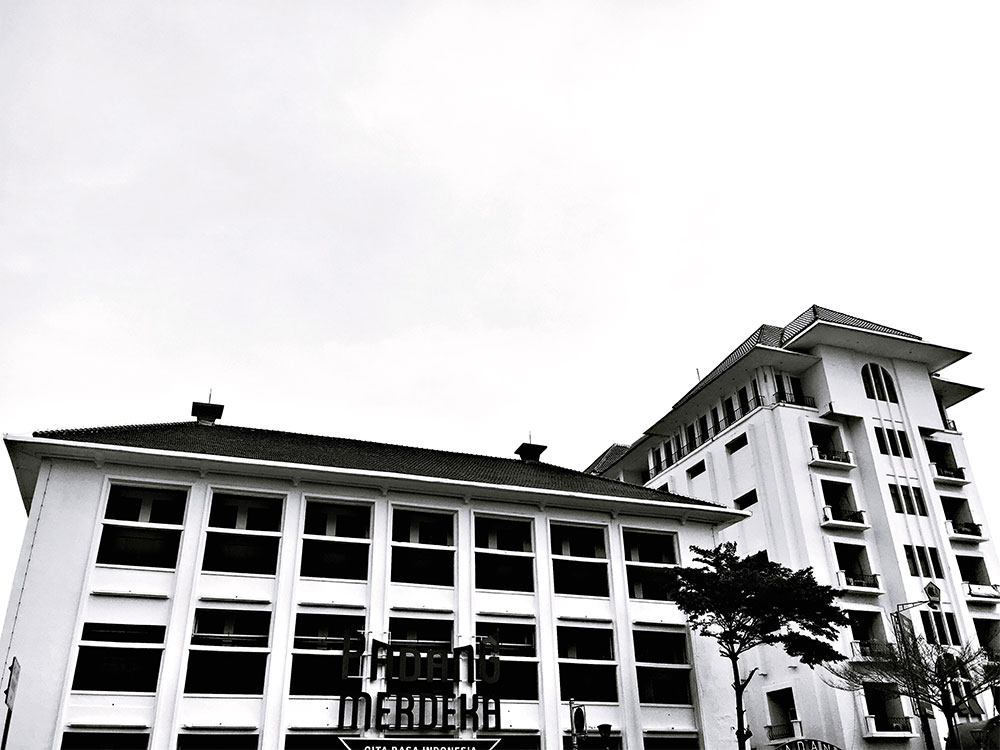
The photo above has been shot in pure black and white. There was the “Weekend Hashtag Project WHP” on Instagram at the time titled “Shadows and Light” if I recall correctly. This project helped me to experiment capturing in black and white. I saw the chair and the sunlight during the day was pretty good to create a shadow effect. From a particular angle, I captured the shot, to portray the serenity of the moment using the chair as my object.

We now turn to comparing between color and monochrome photos to see how editing and conversion can also bring out a good black and white tone to photos.

art

art

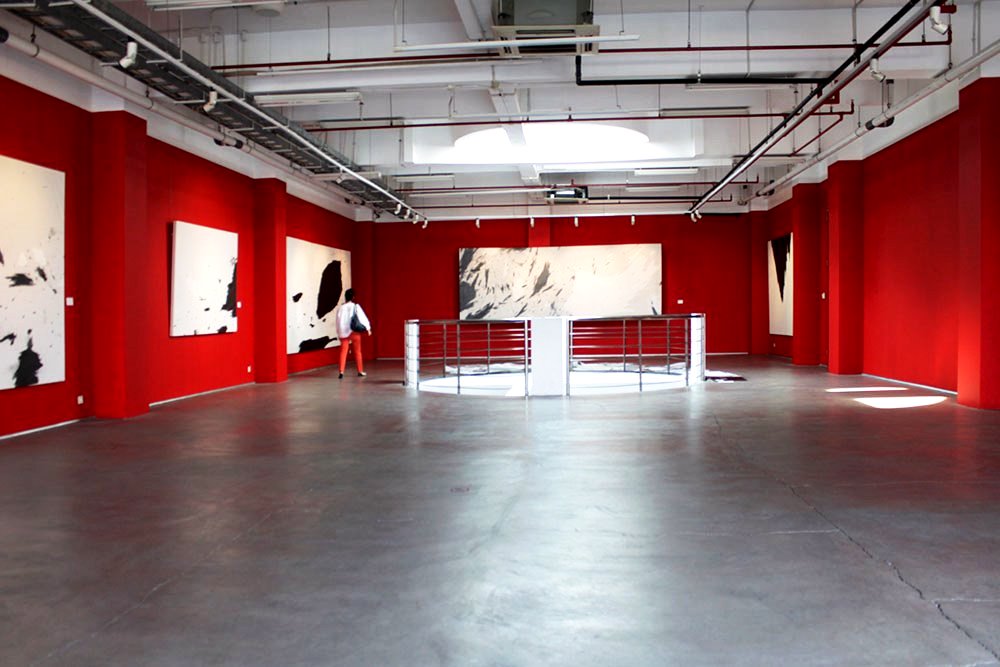
This prominent red colored photo of an art gallery brings the moment to life with the red, the artwork and the structures. I chose this photo to transform it into black and white. As you will see once transformed, there is a completely new sense of the moment. Everything is the same the artwork, structure, and perspective. We can’t say that color is missing as the essence is the same. It is now just a matter of personal preference.

drops

drops

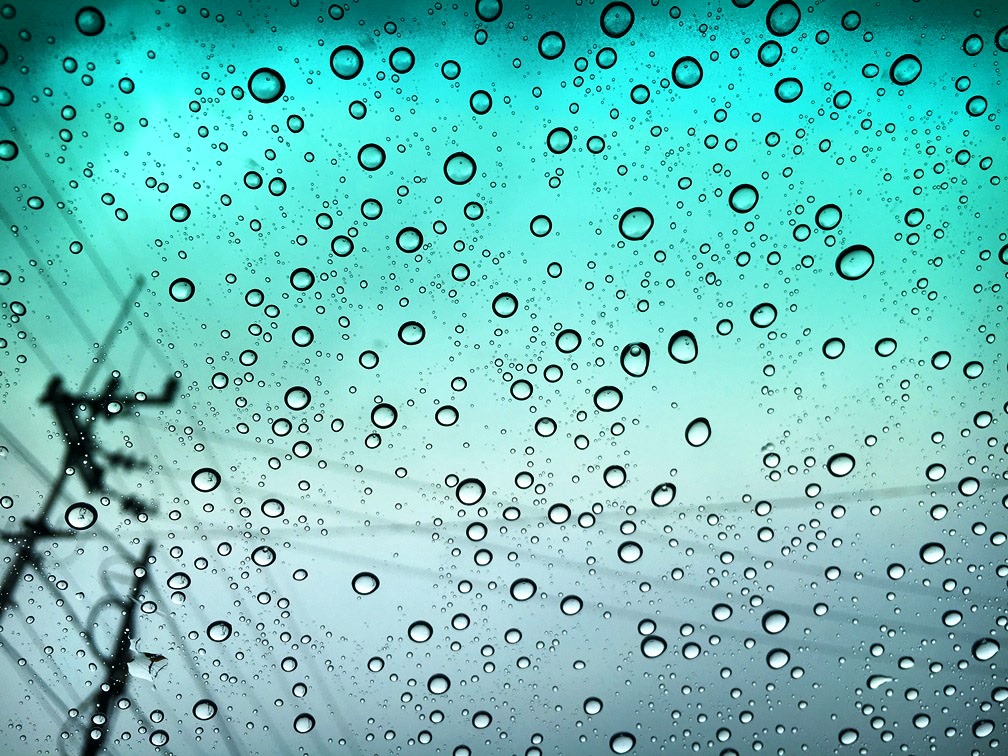
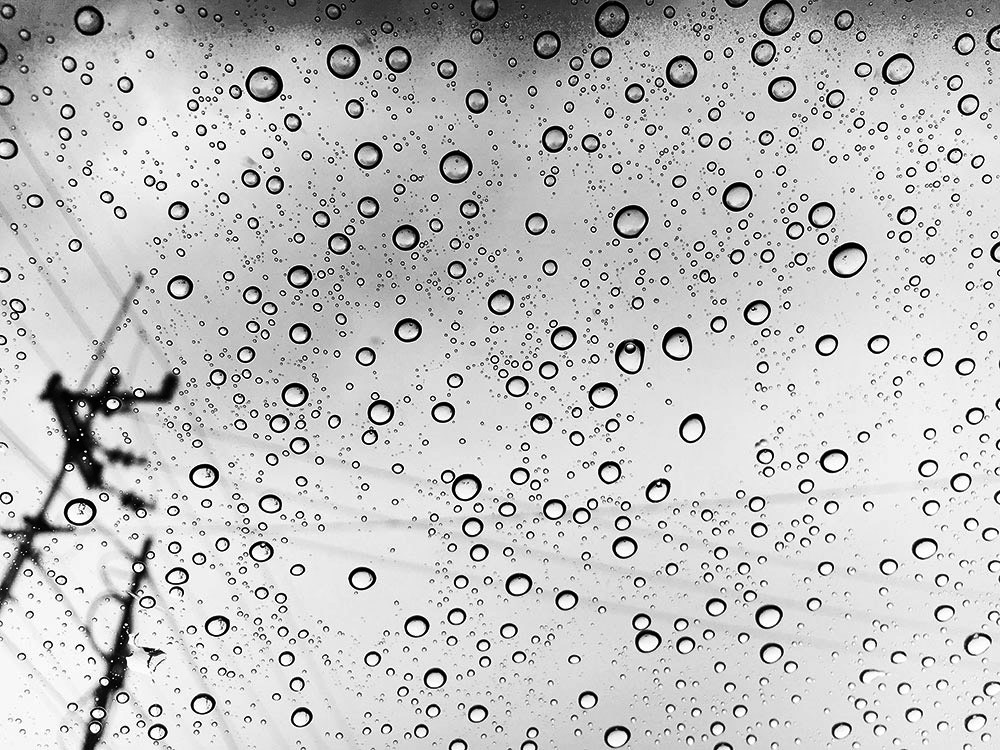
In this photo, the raindrops with the bluish green background bring the raindrops to life with every detail of it. After we convert it to black and white we can see not just the raindrops are alive but every single aspect of the photo is visible. There is complete clarity. The black and white is my personal preference as it defines what I wanted to capture the moment.

people

people

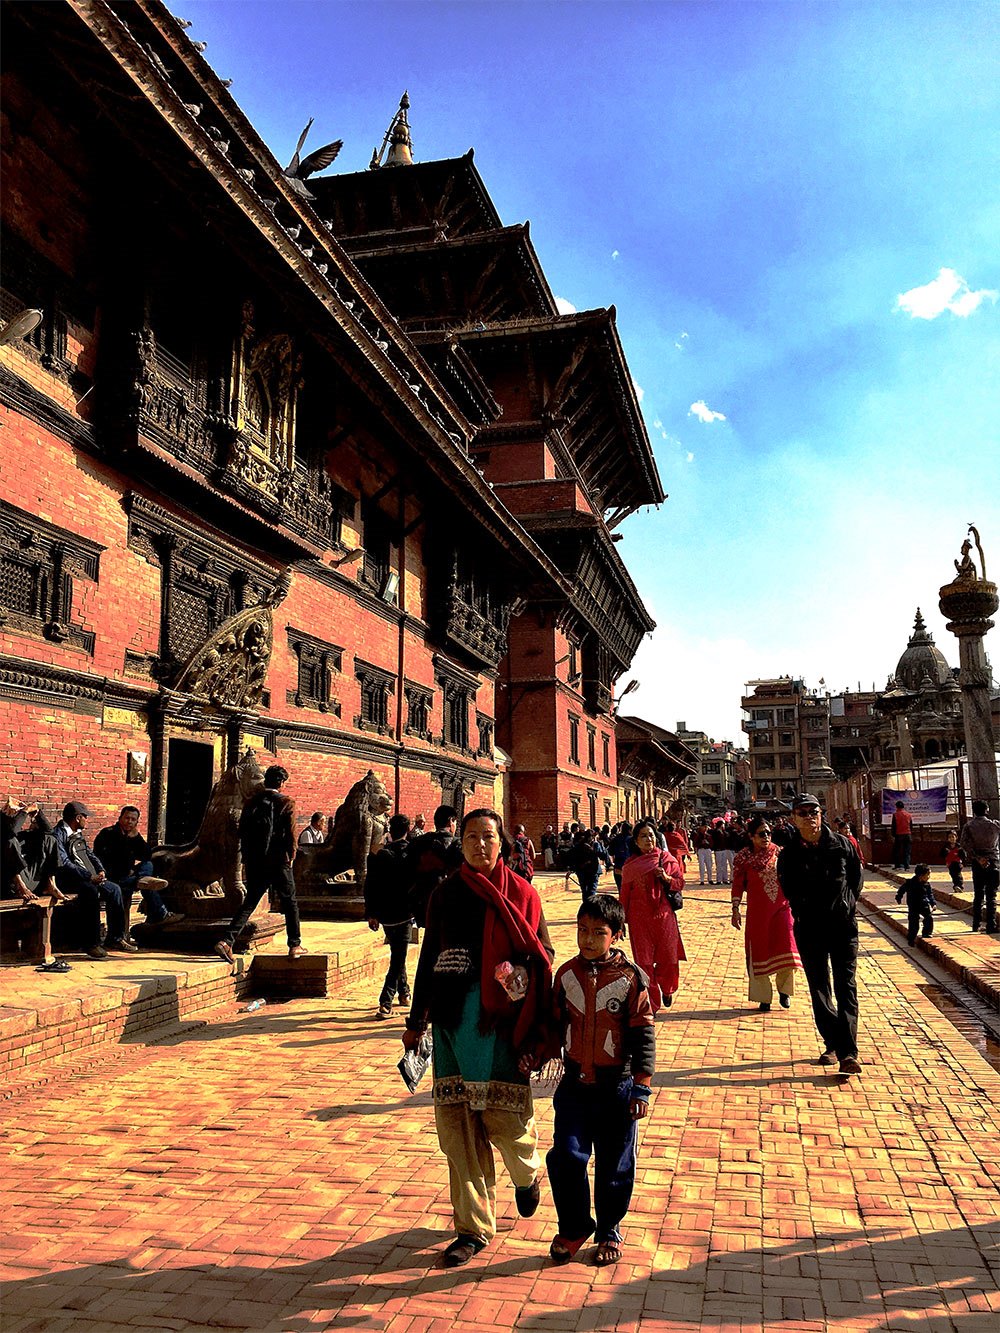
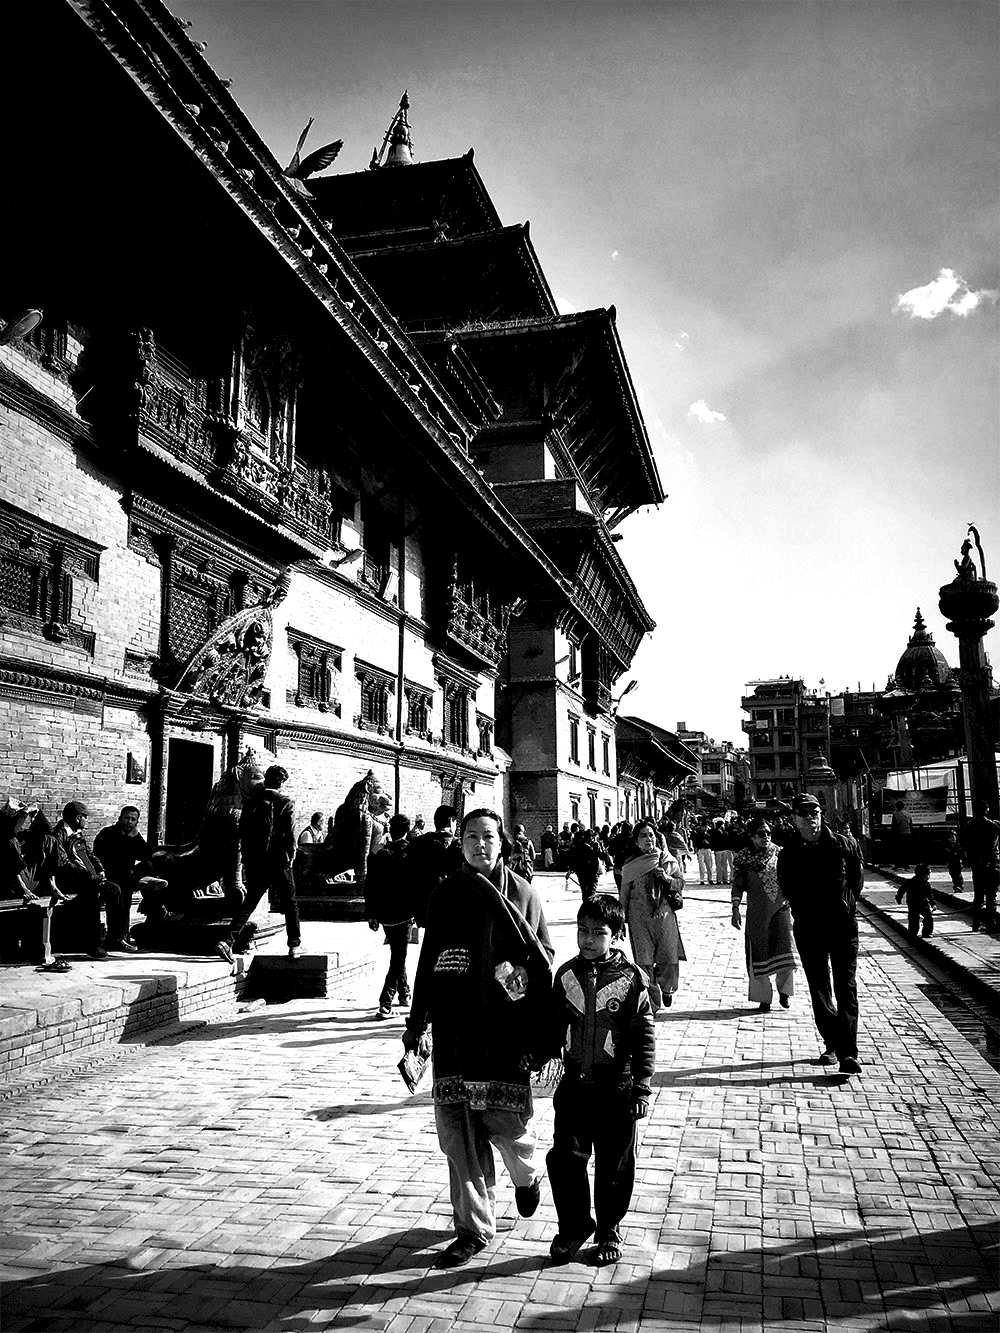
Walking around Patan Durbar Square, Nepal this scene was quite pleasant. The details of the wonderful palace building with the sunlight blue skies and people walking around created a lovely moment. Capturing this in color and after a while transforming it to black and white, made the moment feel more captivating. The details of every aspect pop out more through monochromatic tones.

inside

inside

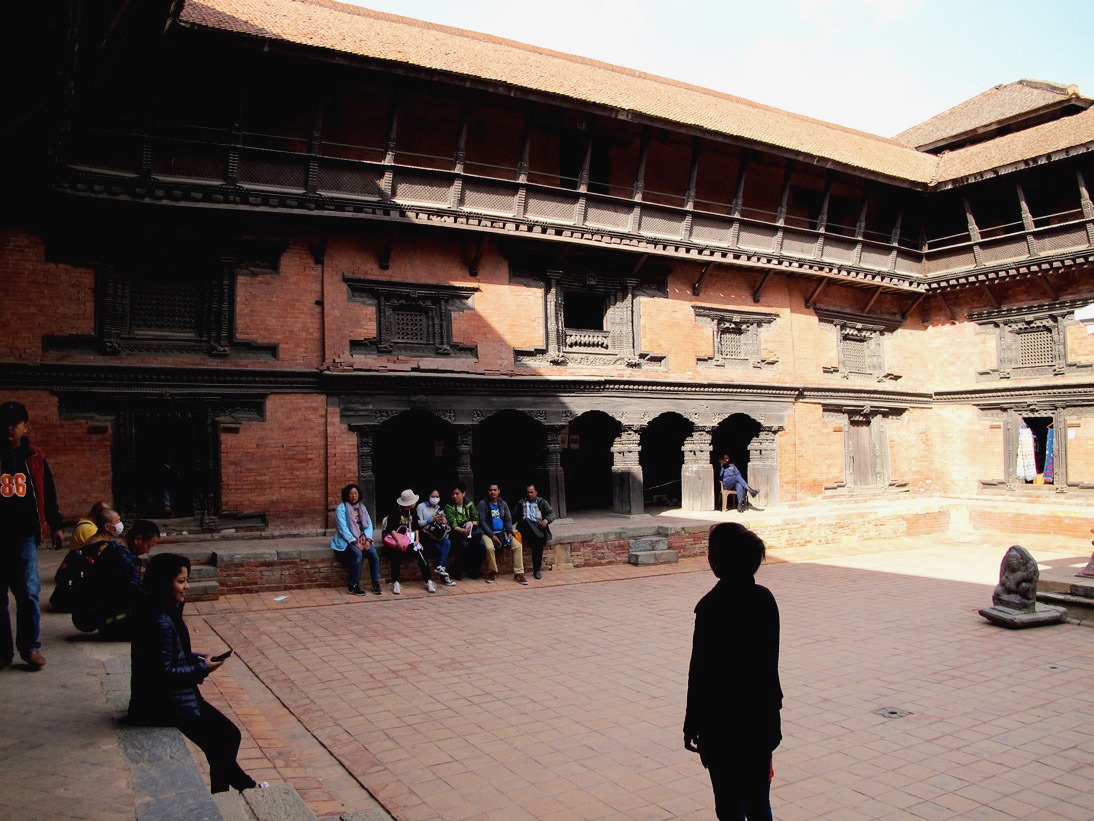
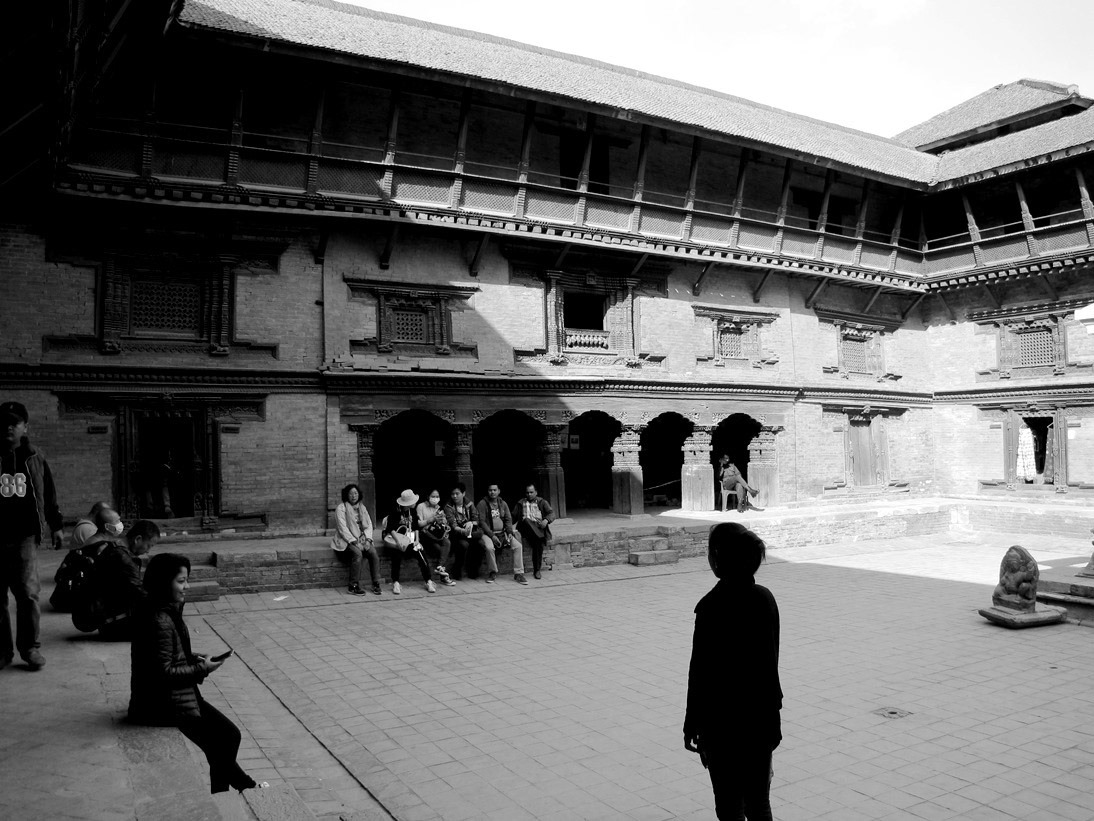
The insides of Patan Museum, Nepal was a feast for the eyes. The architecture and intricacy kept me fascinated looking for various aspects to capture this royal beauty. As we entered, without thinking I just clicked this scene of the girl standing and people sitting around. After completing the National Geographic assignment, I tried experimenting by converting this image to black and white and turns out the transformed version is much better. It focuses completely on the girl standing thus, creating a complete moment around it.

church

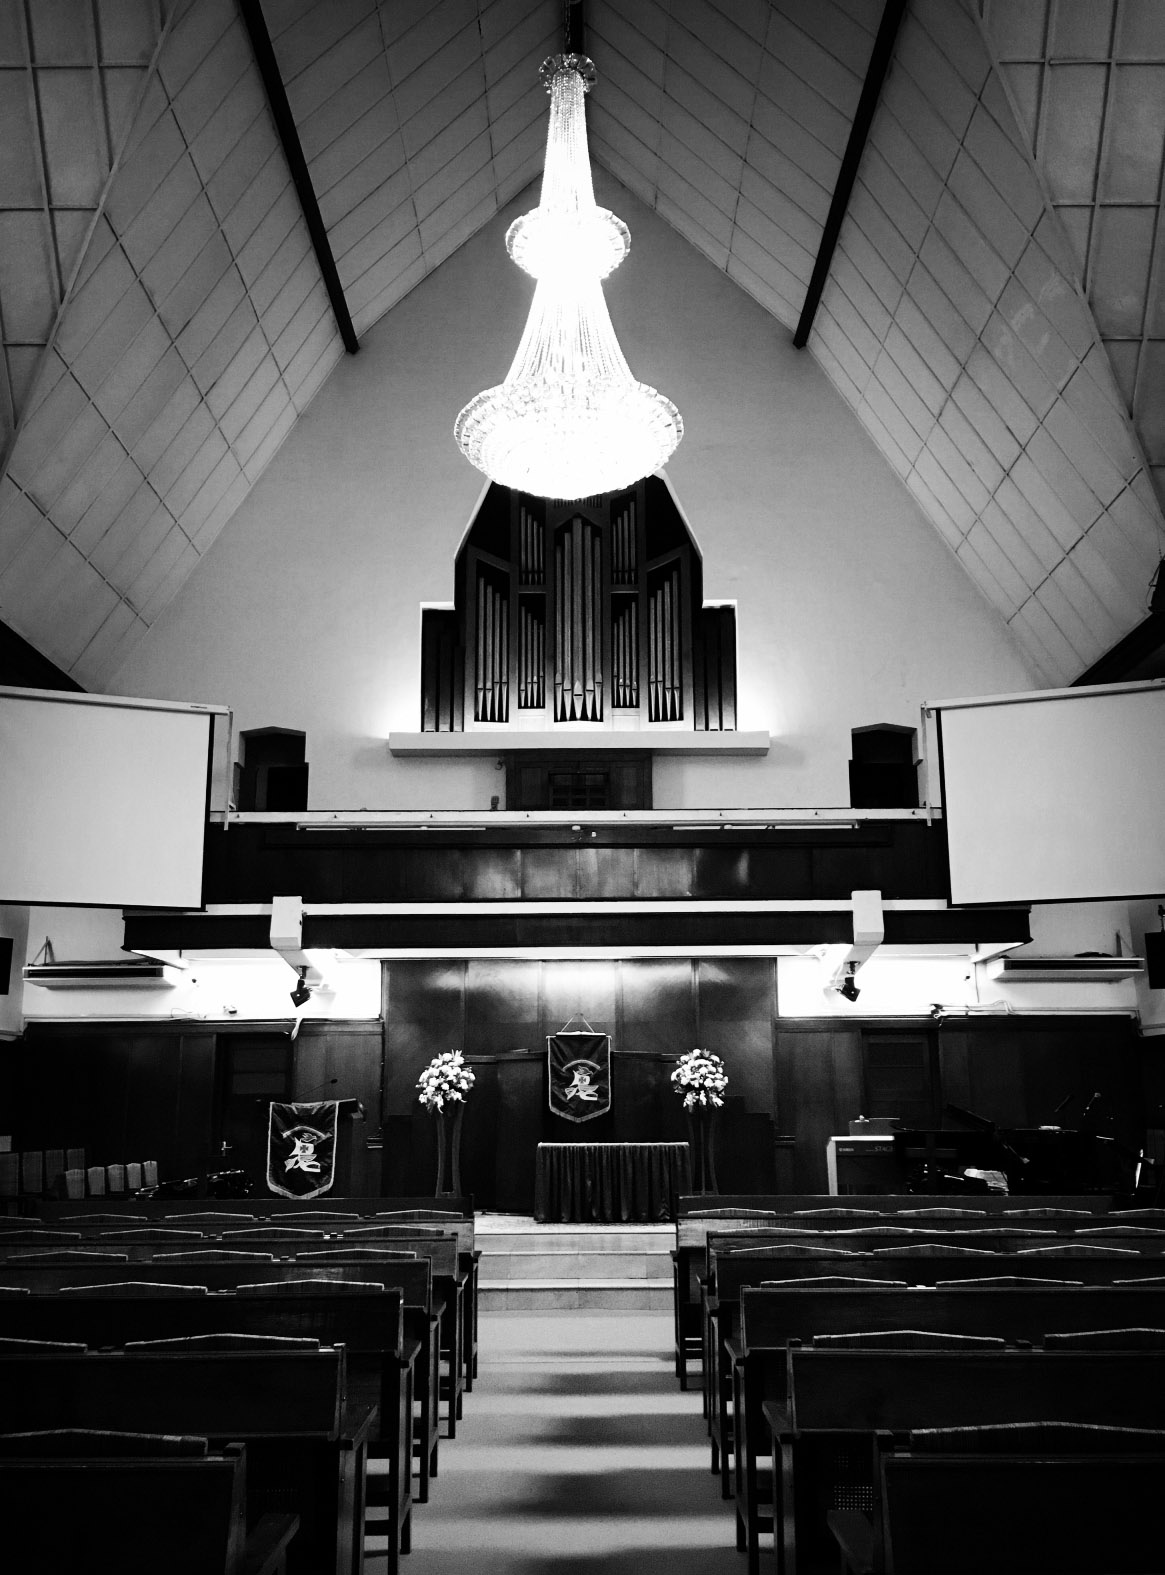
This moment was another pure black and white capture inside a Cathedral. The lighting inside was perfect to bring out the details and the black and white tones defined this moment entirely.

grounds

grounds

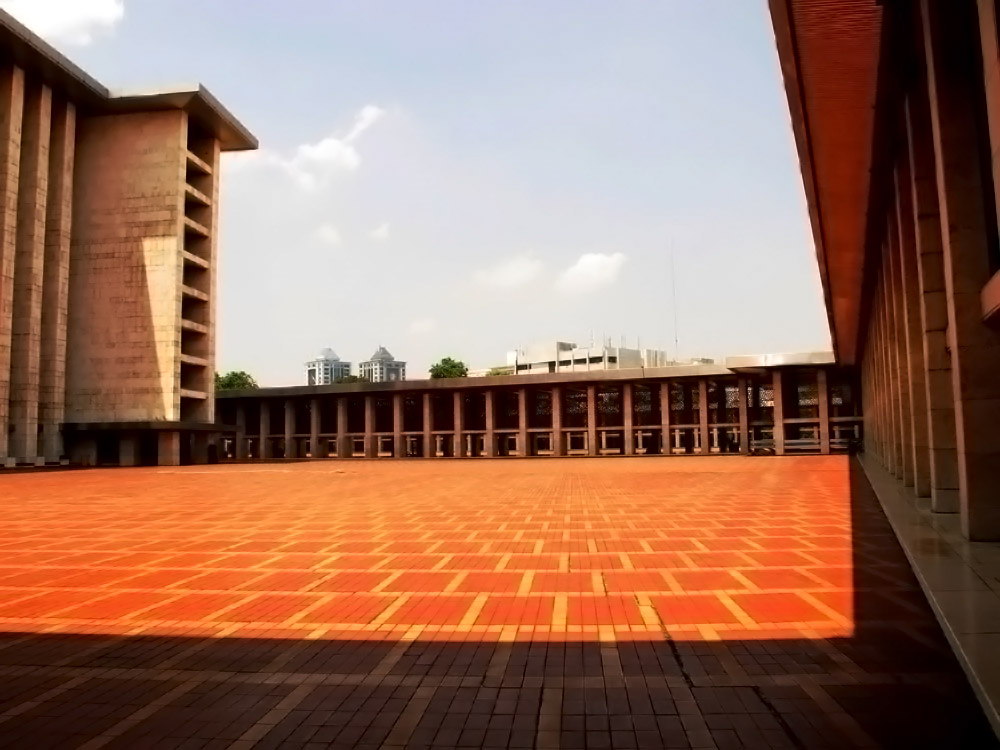
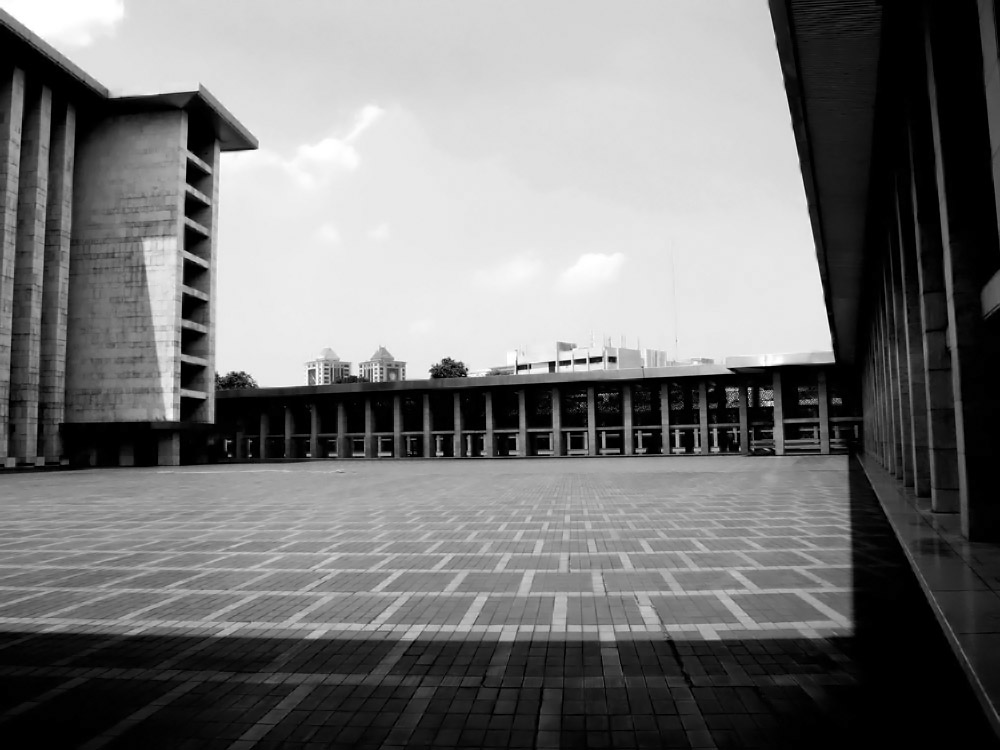
Lastly, through this patterned inside ground of Istiqlal Mosque, we can see how the colors combined with the skies form symmetry. Patterns can help to define black and white tones in moments more. Changing the image to black and white gives it a refined touch where all the lines and structure come in harmony together.

There is no perfect combination or formula to doing it right, just simply practicing. Fan Ho said, “it was always his goal to wait for the lighting and composition to fall into place when photographing.” That could be our benchmark when capturing in monochrome. As for editing, there could be many things we can take into consideration like patterns, structure, architecture or even people. It really all depends on finding the right balance and tones to convert it. Requires a lot of trial and error to get what you are looking for in the photo.

structure

Monochrome will continue to be something we experiment on as we do not have the limit of films and that is what makes it a challenge. The questions of how did they do it in the past? How did they learn the balance of composition? The simplicity and limit enhanced their creativity to get it right. They were able to capture the essence of what composition is not quickly, but smoothly. With color, it can feel like we have more distractions when focusing on an object or moment. Both has its positives, eventually, the choice is ours to make and create photos to share and inspire.

A day in the life of a photogenic kitten

I own a sassy little Scottish Fold called Mimi whose rambunctious personality gives me unique photo-taking opportunities every day. Though I mostly focus on portraiture, taking photos of animals gives me a chance to broaden my creative horizons and familiarize myself with mind-opening, genre-specific techniques. With this in mind, I decided to focus on an average day with my cat and find interesting creative doors as the day progressed. Here are the results.

//

//

While some cats are nocturnal animals, others enjoy sleeping at the same time as their owners. Mimi is a combination of both, switching from a peaceful nighttime cat to a wild creature lurking in the dark. The former is preferred by everyone not just because it gives the family an undisturbed night of sleep, but also because it makes Mimi fairly sleepy in the mornings – the ideal time to take cozy pet photos. A kitten experiencing the light of a new morning is exceedingly charming. This time of day is particularly useful for those who own wild kittens; photographing them early in the morning will help you avoid taking unsuccessful and blurry shots. Keeping the curtains drawn on a bright morning will also provide you with the best light: a mild yet clear environment for the best indoor pictures.

//

//

Mimi turns into a hyper creature as soon as she devours her breakfast. While this part of the day is a challenging one to capture, it’s worth diving into thanks to the often funny creative opportunities that arise. The light during this time is still mild, so worrying about lighting conditions isn’t a necessity. Taking into consideration the importance of capturing movement, the good lighting conditions are a huge plus. If the light isn’t favorable when your cat is in a playful mood, consider increasing your camera’s ISO number for less blurred results.

To make playtime more entertaining for both you and your cat, consider using distractions such as toys and snacks. These will catch your pet’s attention and serve as visually appealing foregrounds. Other objects which have the potential of becoming striking foregrounds are hair, blankets, and plants. Remember to reward your cat every few minutes so it feels encouraged and loved. Grumpy pets don’t make the best models, no matter how sweet they may look.

//

//

Exploring the apartment is something Mimi thoroughly enjoys, no matter how well she knows every room. Washing machines, doors, tables, and windows all fascinate her beyond measure. For unique and endearing images, follow your cat around and notice what interests them. Photograph them while they’re in their own bubble of curiosity. Exploration is the perfect time for spontaneity, and spontaneity is perfect for eye-catching and impressive shots.

//

//

Take advantage of your cat’s favorite hobby: napping. Mimi can sleep for hours on end, occasionally getting up and freezing mid-stretch. Since cats are so flexible, their sleeping and resting positions are often quite amusing. Mimi, for example, loves sleeping with her paws lined up neatly in front of her, just like The Sphinx of Giza. Photographing your cat’s unique quirks will give your photos more personality, so use your pet’s naptimes as an excuse to take awesome photos.

//

It really is all in the details. Focusing on parts of your cat – its paws, ears, eyes, and so on – will allow you to think more creatively due to the fact that it takes careful observation to find outstanding details. Instead of photographing your cat from a distance, find graceful parts that stand out to you. Making a collage out of those parts could be the start of an interesting project, for instance.

In just a day, you could acquire a plethora of sweet cat photographs. Imagine how wonderful your results would be if you photographed your pet more often if you started a project tracking its development and growth. Such projects, tough as they may sometimes be, are fantastic methods of improvement. Whatever you decide to do after reading this article, remember to reward your cat, be present while shooting (even if you’re focused), avoid stress, and most importantly, enjoy this wonderfully pleasant time together. The experience will leave you feeling warm and the photos will be the beginning of something wonderful.
Good luck!

//

Shooting Wedding Details: A Comprehensive Guide

Effectively capturing details is essential to communicating the atmosphere and emotions of your clients’ wedding day. Formal shots and group photos are essential, but often times it’s the little things that really bring back memories.

First, let’s clarify exactly what is meant by the word “detail.” In this case, “detail” refers to two things: smaller articles that are particularly valuable to the couple (wedding rings, especially), and things that do not necessarily carry any sentimentality, but aid in expressing the spirit of the celebration. Adequately documenting these particular elements requires that the photographer adheres to a few simple guidelines.

The Basics

Regardless of what you are shooting, it’s important to pay attention to angles and composition. When I’m working on details, I always shoot directly above or directly in front of my subject. Usually, any other angle detracts from the image and makes the photograph appear unbalanced.

bouquet-of-roses-1246490_1280

If you’re shooting small details, using a macro lens is imperative. It’s impossible to photograph a multifaceted diamond without one. Again, I’m emphasizing wedding rings, but this applies to any tiny object that would otherwise lose detail without a lens that lacks the ability to focus closely.

Furthermore, lighting plays an extremely important role in sufficiently enhancing smaller features. Position your subjects next to a window or another source of natural light. Artificial light typically comes from above and casts harsh shadows (just as if you were shooting outdoors at high noon).

Photographing Sentimental and Essential Details

Valuable objects directly related to the wedding must be captured clearly and thoughtfully. Jewelry, clothing, decorations, the cake, etc. are the unique accessories that showcase the couple’s personalities and will thus be some of their most treasured photos. The goal here is to highlight each item without complicating the image and detracting from the subject. I like to add outside elements that complement the subject. This is really a great way to augment shots of jewelry or other accessories that are very small. If you have the opportunity to work outdoors, you can use sticks, leaves, rocks, and so forth to give the image a rustic, nature-inspired vibe.

20151004-175926-2_mini

If you can’t go outside, simply find ways to add eye-catching textures or patterns to the shot, or incorporate something else that is special to your clients to add interest.

20150711-142947-478_mini

The bride’s dress is equally important. The same rules apply, but it can sometimes be difficult to get a creative shot of the gown. Again, incorporate textures and patterns when you can.

20150711-135407_mini

Creating a unique dress shot requires a little artistry and sometimes, improvisation. At one of the weddings I worked last summer, we had been having a tough time finding a nice place to photograph the dress. The hotel was beautiful, but the circumstances just weren’t quite right. We ended up taking the dress down to the lobby and asked the concierge if we could hang it from their chandelier. Surprisingly, they agreed, and it looked perfect. Then, as I stepped back through the automatic doors to get a wider shot, I ended up with this:

dress_mini

The point is, you can always find creative ways to work around seemingly impractical or unappealing situations. Keep in mind, too, that when you’re shooting wedding dresses, it is important to get wide shots of the entire dress as well as close-ups of the fabric and details.

dress2

Photographing Non-essentials

After you’ve covered the necessities, you can really get creative with the more obscure details. These are particularly important, though, because they really help convey the feel of the entire day. Not to mention, this is really a lot of fun during the reception or whenever you have some downtime. I also take a lot of pride in images like these because they sincerely express my unique photography style.

painting_mini

I try to choose things that will evoke strong feelings in the couple long after the wedding. They may forget little things like what they were eating while getting ready, details in the room where the bride prepared, and so forth. When they look back at these photos in years to come, all of the emotions of the day will come flooding back, and that is really the fundamental goal of quality wedding photography.

makeup_mini

chandelier_mini

To further enhance your wedding day details, Sleeklens offers a wide array of Lightroom presets and Photoshop actions.

How to make Extreme Macro Photos

Today we want to explain to you how extreme macros are made.

Macro photography is one of the most interesting fields in photography, not only because it’s giving you an insight of the small things we can’t see, also because you will develop a knowledge of how important camera settings are when you are working with low light conditions or moving subjects such as insects, in which the details can’t be seen with the naked eye.

Especially insects offer spectacular colors and structures and many insects actually can be found easily everywhere. The best time to photograph insects is in the morning when the temperatures are low and the insects are still asleep and less active, so they will not move and you can make the best possible photo of that insect. After a cold night in the summer, you will find thousands of dew-drops on the insects, this will add a nice extra to your macro shot. Furthermore, the light in the morning is probably the best light you can have during the whole day.

Fliege Tautropfen 3

If you want to achieve some great results, there are some essential things you will need for sure:

  • Tripod
  • DSLR (with Image Stabilizer)
  • A Macro Lens (different types of lenses for extreme macros are described down under)
  • Remote Shutter Release (to avoid camera shake caused by the exposure)
  • Focus Rack/Slider (slider allows you to slide forward/back to take a lot of pictures at different focus points, which will be stacked afterward in Photoshop)

Optional

:

  • Angle Finder (makes a low-position shooting easier)
  • Diffusor (to get the best light and the most out of your macro shot)
  • Flash (use a macro ring flash or a standard flash combined with a small softbox)

am-laufsteg-bf42861e-ef95-42dc-b218-f2b12b07c2fe

For increasing magnification to get extreme macro shots, there are some options:

Canon Mp-E

If you are using a Canon camera, the best lens for extreme macros is the Canon “Mp-E” Lens. It is extremely sharp and its maximum aperture is f/2.8, so it’s perfect for low light conditions and to receive a smooth & clear background. The only disadvantage is that this lens is pretty expensive, as it costs around $1,000, but quality has its price as we know.
More info about this special lens

Macro Snap-On Lens Adapter

Snap-On Lenses are used as an adapter which can be mounted on your actual macro lens. Using a Snap-On Lens such as the “Raynox DCR-250” will be the right choice if you prefer low budget macro photography. It will for sure produce rich and razor sharp macro images. Furthermore, it has a low weight, small enough to fit in any photo bag and works perfectly with any macro lens.
More info about the Raynox DCR-250

Extension Tubes

Extension Tubes goes in between macro lens and camera. The more tubes you use your camera and lens, the closer you will get to your object. A disadvantage of using extension tubes is, that you will not be able to focus automatically, but focusing automatically isn’t advisable anyway if you want to get a macro photo.

Reversed Lens

This is probably the easiest and most inexpensive way to get an extreme macro shot. The reversed lens technique is what the name says: You just mount your lens backward on your camera. All you need is to get an adapter to mount your lens on your camera body.
A 50mm standard lens will become a great macro lens and will let you explore all the details you want to photograph.
If you want to learn more about the reverse lens technique check out following Youtube Link.

Kleinlibelle Frontal

One important note when doing macro photos is, that I would not recommend using autofocus, this will not work if you want to get an extreme macro, making extreme macros is all about manual focus. Especially live-view will help you to get the right focus point. If you want to photograph insects, one thing that has to be in focus must be the eyes.
So, make sure you get the right equipment before you start shooting small things and if you decide to photograph insects, bring along much patience, as successful shots sometimes depend on a great deal of patience.


We hope you enjoyed this article!