Tag: radial filter

How to Make Your Picture Standout using Lightroom

Vignetting

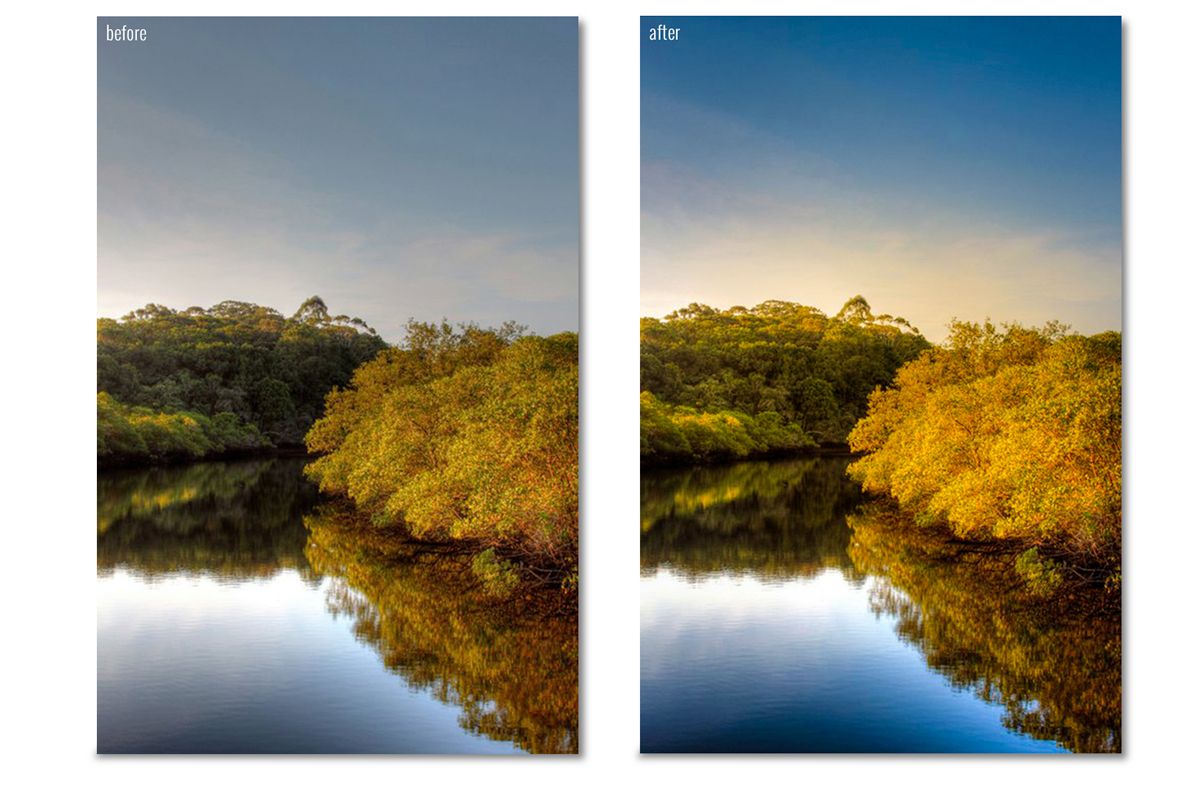
a picture is often used to enhance the subject of a composition, and Lightroom has an automatic feature to create vignetting in the effects panel. However, this software’s native effect only darkens the edges of the picture, making it look very artificial for my taste. So in this tutorial, you’ll learn an alternative way to make the same effect using specific adjustments in Lightroom, improving your picture and making it stand out just like the before and after below. Let´s go!

How to make your pictures standout using Lightroom

Step 1) Open Lightroom and Import and/or Open the selected image you want to tweak. Then, go to develop mode and select the graduated filter tool on the right tools panel, that way you’ll create a new mask in your image:

Create a graduated filter maskStep 2)

When you select this tool, you’ll notice the cursor will become a cross, click at the top edge of your image and drag to the middle of the image, maintaining a straight line. This way, you’ll create a mask on your image, and can tweak with the adjustments from the right panel, just as a usual image, but it will only apply to the area highlighted by the mask. You can tweak with the values according to your style of editing, but these are the values I’ve used for this example:

Create the first mask

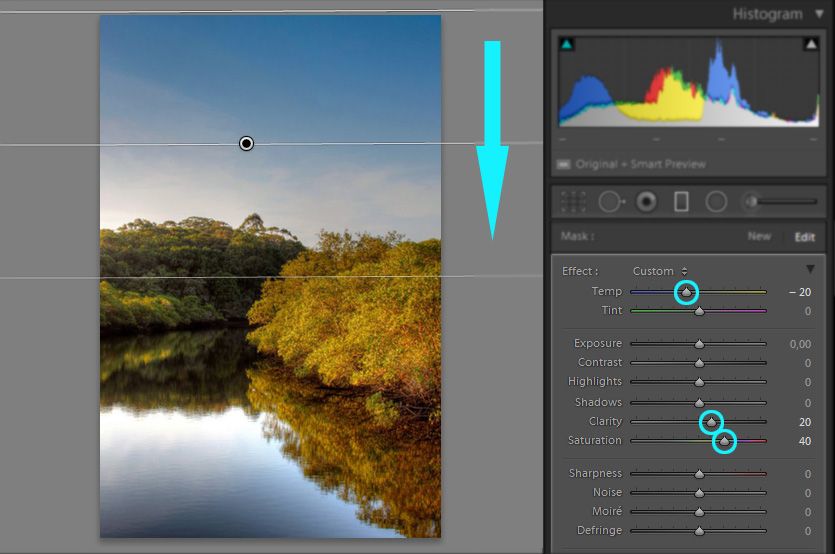
Lowering the temperature of the image and increasing the saturation, I could enhance the colors of the sky, and by tweaking the clarity values, I was able to increase the edge’s contrast, enhancing the details of the sky.
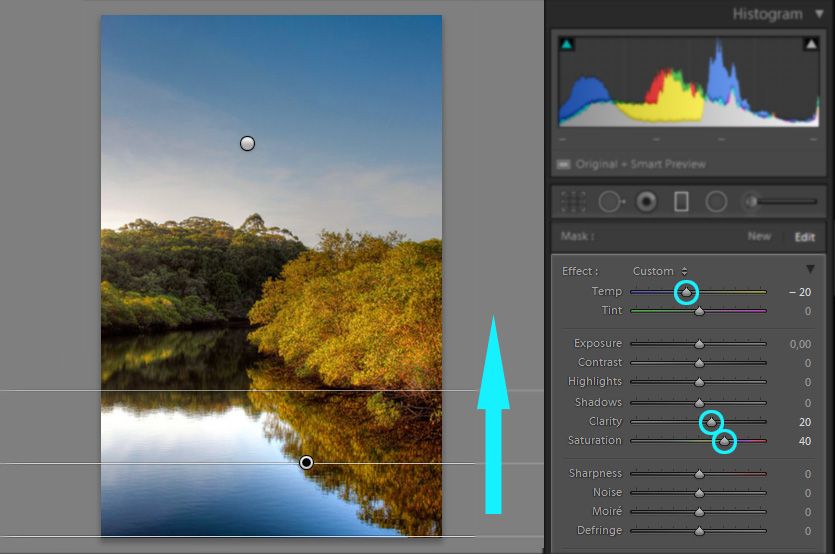
Step 3)

Now you’re gonna do the same thing as the previous step, but this time clicking and dragging from the bottom edge to the middle of the image. You can make the adjustments in the right panel, but for this example, I’ve used the same values from the first mask.

Create the second mask

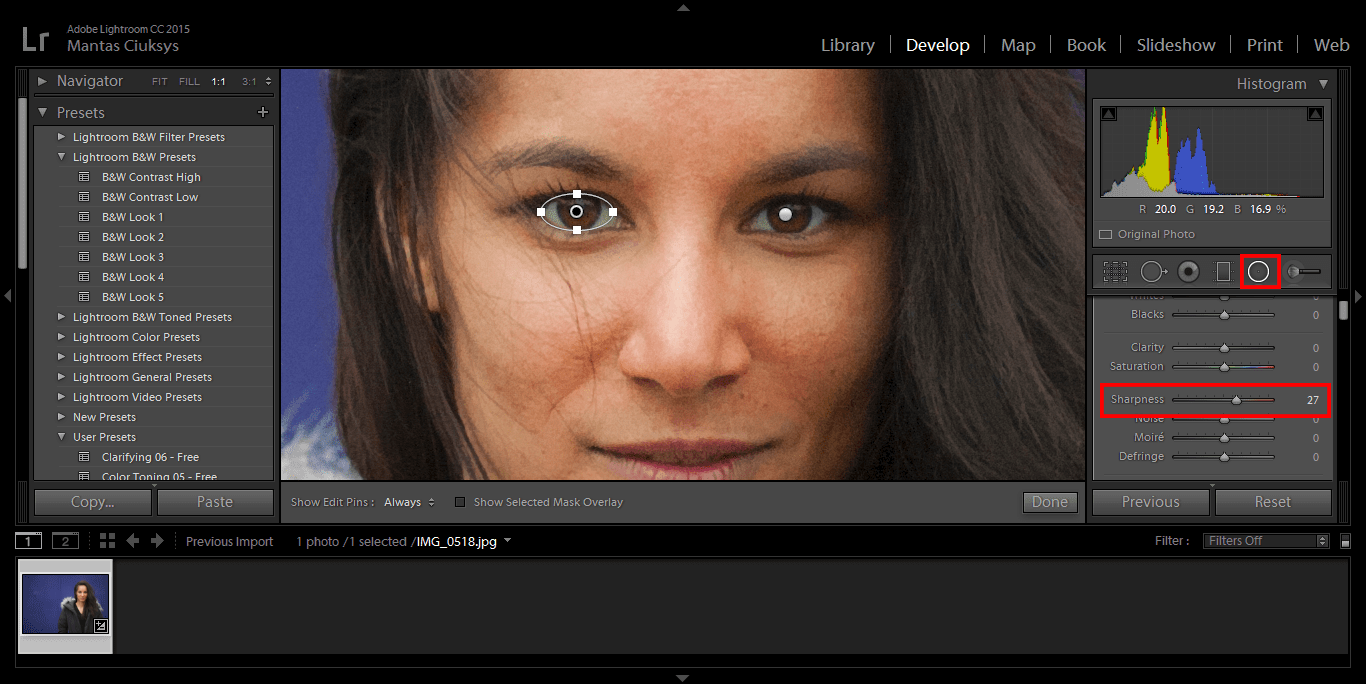
Step 4) In this next step you’re gonna make the edges of the picture darker than the middle, just like the default vignette effect, but better! Create a radial filter by clicking the tool on the right panel, you’ll notice the cursor will become a cross also (just like the graduated filter). To create this new mask, click at the center of the image and drag all the way to one of the edges, but this time it has a rounded shape. The values I’ve used are in the images below but, again, it will depend on the image you use and the style of editing you have.

Create a radial filter mask

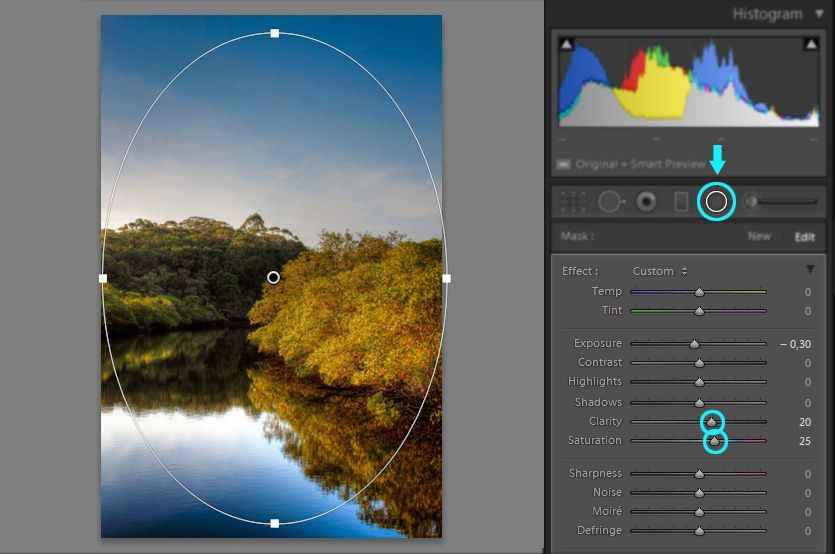
In my case, I like to bring colors to the picture by increasing the saturation and tweak a little bit in the clarity dial to enhance the details of the shadows. To darken the edges of the image, like the default vignette, I´ve lowered the exposure dial a bit.

Step 5)

To finalize the effect, you’ll create another radial filter just like the previous one. Click on the center of the image and drag to the edges, but this time you’re going to invert the mask by checking the box “invert mask” at the bottom of the right panel:

Create a inverted mask

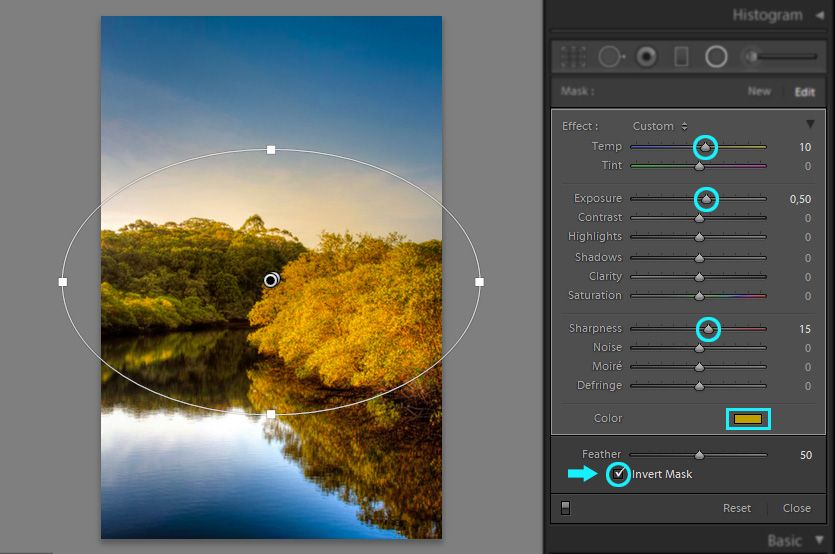
To emphasize the tone at the center of the image, I´ve increased the temperature just a little bit and added a warmer color to the mask, by clicking on the color box at the bottom of the panel and selecting a color similar to the ones at the center of the image. I´ve also adjusted the exposure and sharpness to enhance the details at the center of the image.

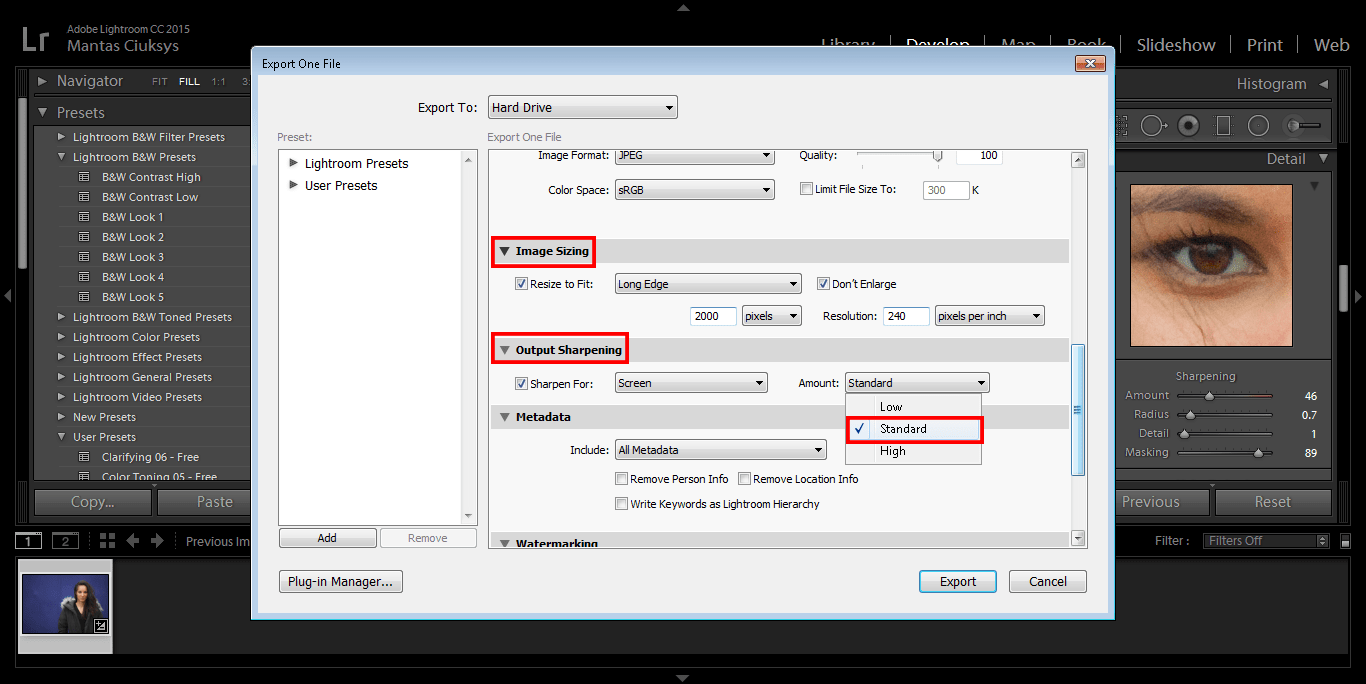
By now you should have ended with a totally different picture from the one you had at the beginning of this tutorial. Click “Done” and you can export the picture the way you do usually.

Final Result

In this tutorial, we learned how we could make our pictures stand out using two great tools from Lightroom, the graduated and radial filters. The final result was an image with enhanced colors and a smooth vignette effect with no dark edges. If you have any suggestions or doubts you can write a comment below or contact me directly. See you next time!

A Guide to Sharpening in Lightroom

Getting a sharp image is key in photography. If your image will be sharp, naturally, will have a lot to do with how the image was shot; however, even if the focus was perfect, amount of noise was low, and the equipment was top of the line, you will still find you need to sharpen your images occasionally for them to display perfectly and stand out from the thousands of images online. This tutorial will be your guide to sharpening images in Lightroom.

There are two distinct steps in sharpening an image. The first step is a creative one, it is a selective sharpening you will apply to your image to reveal the detail you want to stand out, for instance, sharpen a model’s eyes or the texture of a fabric. The second step is a technical side of sharpening required when sharpening images for a specific output, i.e., print or web.

Sharpening Settings

To begin, open the image you want sharpened in Lightroom and go the Develop module – a quick way to access the Develop module is to use the keyboard shortcut ‘D’. Inside the Develop module, scroll down through the options until you find the ‘Detail’ section of the module; to jump to this section use the keyboard shortcut ‘Cmd + 5’ (Ctrl + 5 for Windows).

lr develop

You will notice that the ‘Detail’ section displays a part of your image zoomed into 100%. It is crucial when sharpening your image to always check how the image looks zoomed into 100%, you can quickly zoom in and out of the actual image using the keyboard shortcut ‘Cmd + ‘plus’’ (Ctrl + ‘plus’ for Windows). Sharpening strongly affects image noise – it is important that you check the noise levels in the image. Be sure to check the shadow areas compared to neutral areas. Checking for noise will give you an idea how much sharpening you can apply to the image, or if perhaps you need to first reduce noise or only use selective sharpening.

lightroom detail

The Detail section of the develop module has four settings you can change to affect sharpness. Amount – controls the level of sharpening applied to the image. Radius – affects the size of the area surrounding the lines and edges in the image; increasing the contrast ratio of those edges is what creates a sharpening effect. Detail – affects the tolerance to which edges will be sharpened; the higher the slider the more individual edges in the image will be selected for sharpening. Masking – controls the area of the image around the subject that is sharpened. This feature can work extremely well by sharpening only subject and not the background if the two are well separated from each other.

sharpening settings

A quick tip that can help you check what effect these sliders are having on your image is to hold the ‘Option’ key (Alt for Windows) while holding the slider. Lightroom will gray out, black out or desaturate the image depending on which adjustment you are changing and reveal the sections of the image being affected.

altoptkey

When sharpening, there are a few things to look out for. First, you want to avoid seeing jagged lines in the image. It becomes most visible with straight lines. Often, this is caused by the radius being set too high. Second, check the level of noise in the image, you are expected to get some increase in noise. Third, when sharpening, beware of areas that are out of focus, you want to avoid adding sharpening to the edges that are supposed to be blurred. Often times the ‘Masking’ slider can help minimize this issue.

Selective Sharpening

To add selective sharpening to your image you will have to use either the Graduated Filter tool, accessed by keyboard shortcut ‘M’, or the Radial Filter tool, accessed using the keyboard shortcut ‘Shift + M’. When it comes to selective sharpening, the best bet is to use the Radial Filter tool, simply because it allows for more precise area selection for sharpening. If you wish to use the Graduated Filter tool, have a look at our tutorial on how to use it; however, as an example for this tutorial, a Radial Filter will be used.

Select the Radial Filter tool, and drag it around the areas you wish to sharpen. In the case of the example image, those are the eyes of the model. Once you highlight the areas, go to the settings of the Radial Filter tool, find the Sharpening slider and adjust it to increase sharpness in that specific area.

selective sharpening

Output Sharpening

If you are happy with how your image looks you are almost ready to export it; however, if you export the image as it is while lowering the resolution, you will notice that with the lower resolution the sharpness has decreased as well. That is because pixels contain detail – deleting them erases some of the fine detail of the image resulting in a softer appearance. You will need to sharpen the image to compensate for the down-scaling. In Lightroom, this step has been made extremely simple.

When you are ready to export your image, go the Export panel found through the Lightroom toolbar. A new dialog box will open where you will be able to set a number of parameters for the exported image. Find the ‘Image Sizing’ section and set the dimensions of the image. Afterward, right underneath you will find the ‘Output Sharpening’ section – it might have only a few options, but it does a fairly good job at calculating just how much sharpening you need depending on how much down-scaling has occurred. Usually the ‘Standard’ amount of sharpening will do the trick; however, if you find any of the over-sharpening signs mentioned earlier, go back and export your image again, using a lower setting.

outputsharpening