Tag: vignette

The Edge of Darkness – Using Vignettes to Improve Your Images

To my mind, there are three kinds of vignettes: First, there’s the optical flaw in many lenses where the corners of an image are darker. There are all sorts of software out there that easily fixes it. For example, with your photos in Lightroom, you can go to the Develop module and then the “Lens Corrections” tab where you’ll find a checkbox for “Enable Lens Corrections.” Click on that and I’ve found that pretty much deals with it. If you want to be really efficient, create an import preset so that all your files are corrected at once when you bring them from the camera card into Lightroom.

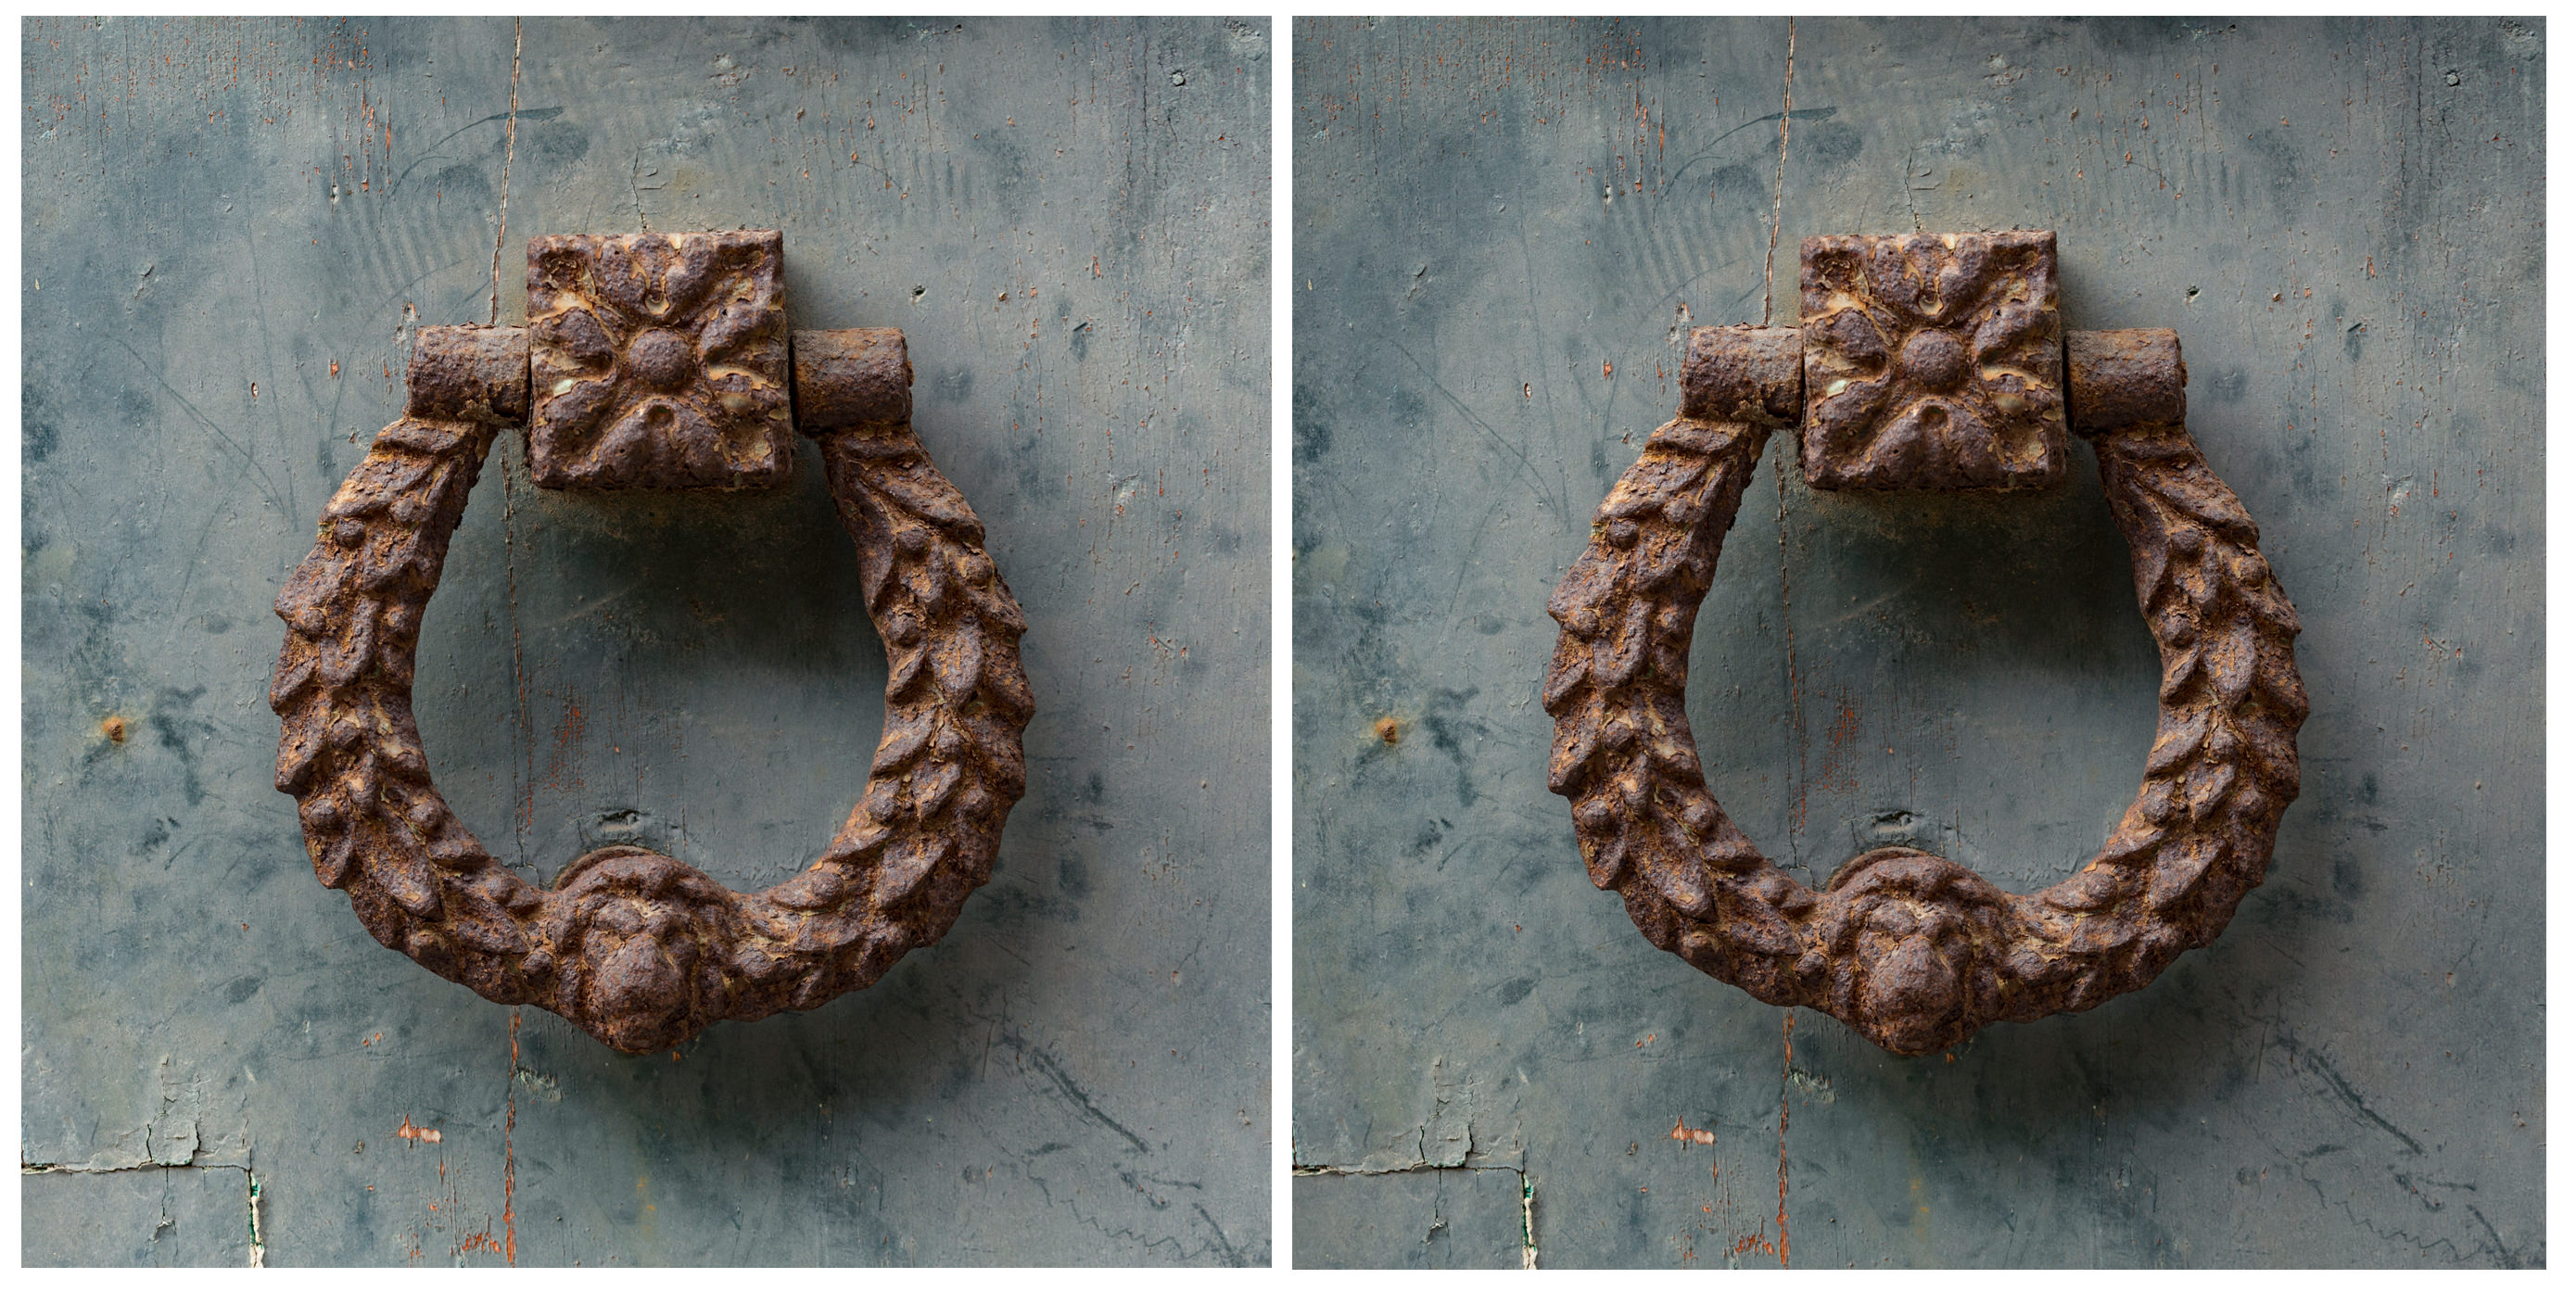
Secondly, there’s the kind of boorish, overweight vignette that’s applied to an image and screams, “I’m so insecure about my picture I’m going to pump up the drama to 11.” You’ve no doubt seen this vignette version. A heavy, dark cloud envelopes the image’s subject to such an overwhelming extent, it’s all you notice at first.

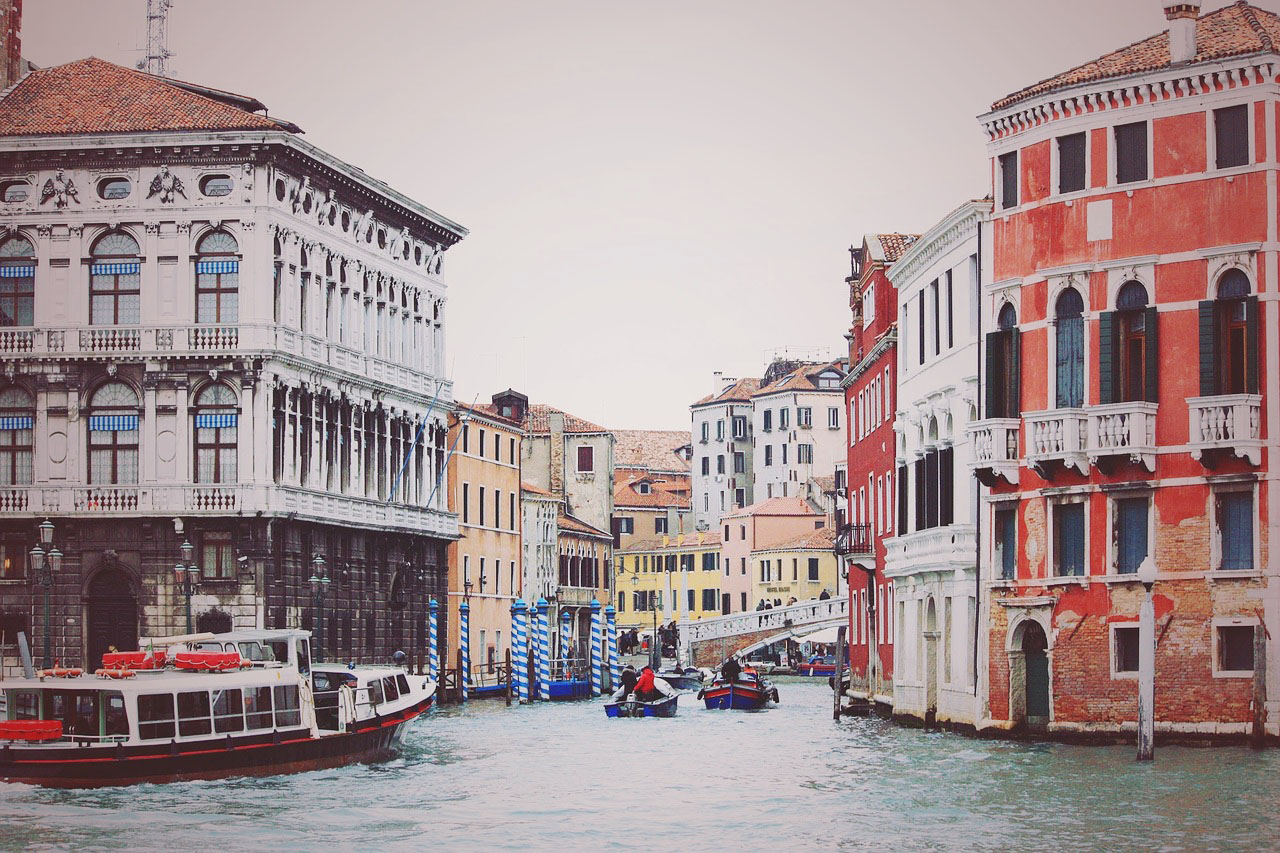
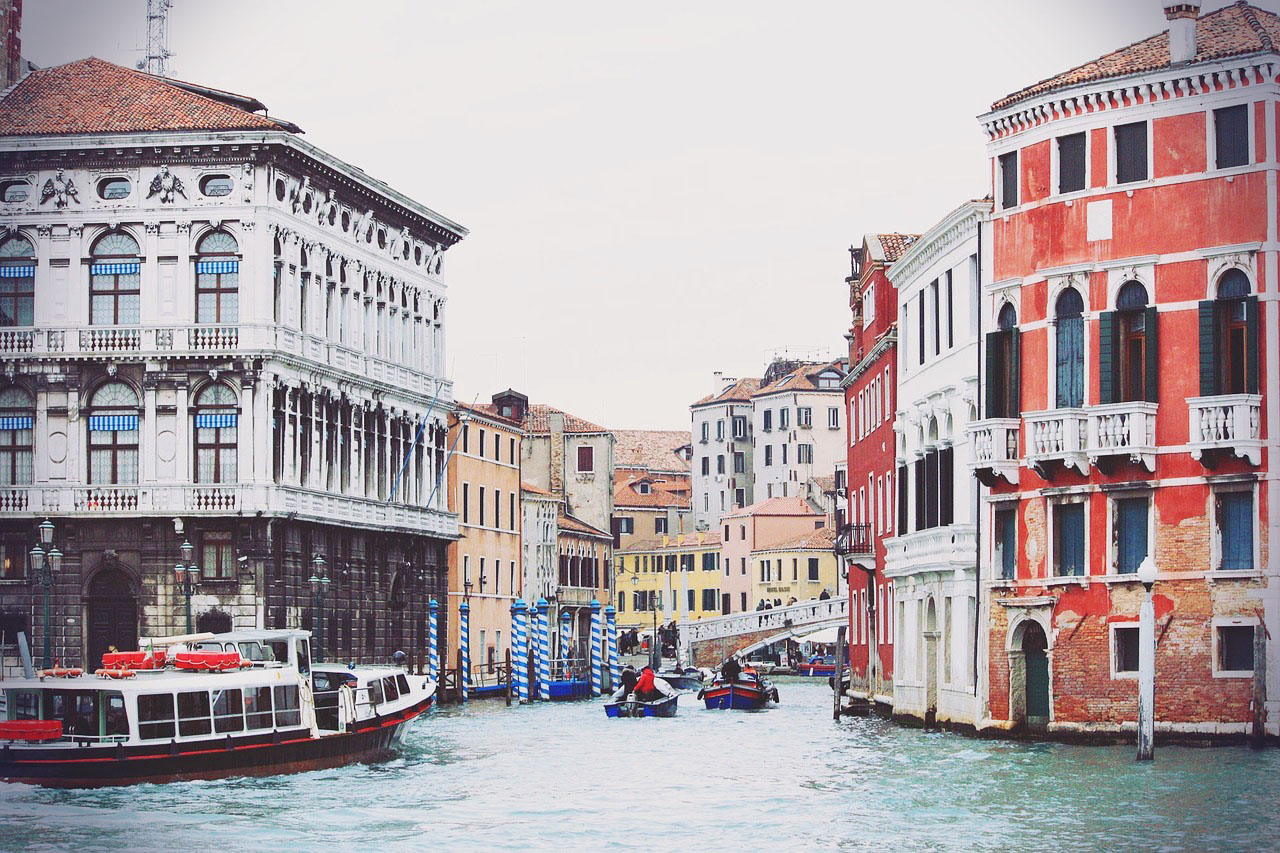
The vignette I prefer is much more subtle. I employ it to almost invisibly drawing the viewer’s eye inward so that whatever darkening around the edges I use complements the composition instead of competes with it. The principle is simple: when we look at an image, we almost always immediately zoom in to whatever is brightest in the frame. By toning down the edges, you’re essentially putting up a visual fence that corrals the viewer’s attention to the center of the image so it won’t stray to the less relevant corners. Done right, the vignette is never noticeable to the viewer.

The Post-Crop Vignette

post process vignette_mini
True confession: I’m a sucker for ornate door knockers. I found this one in Riomaggiore, Italy. I applied a modest vignette to it with the Post-Crop Vignetting slider, just enough to darken the corners and keep the viewer’s attention on the knocker.

The simplest way to add a vignette is with “Post-Crop Vignetting” under the “Effects” tab in Lightroom’s Develop module. Trust me, I know the temptations this humble slider presents. Crank up the vignette—that is, slide the Amount to the left, way to the left—and at first it appears you’ve transformed the picture into something moody and almost gothic. Ah, but look again. If the first thing you see is the vignette, then you’ve pushed it too far. When I use this method, I restrict myself to somewhere in the 10-15 range. Never more. I just want to darken the corners a little bit so one’s eyes don’t get adventurous.
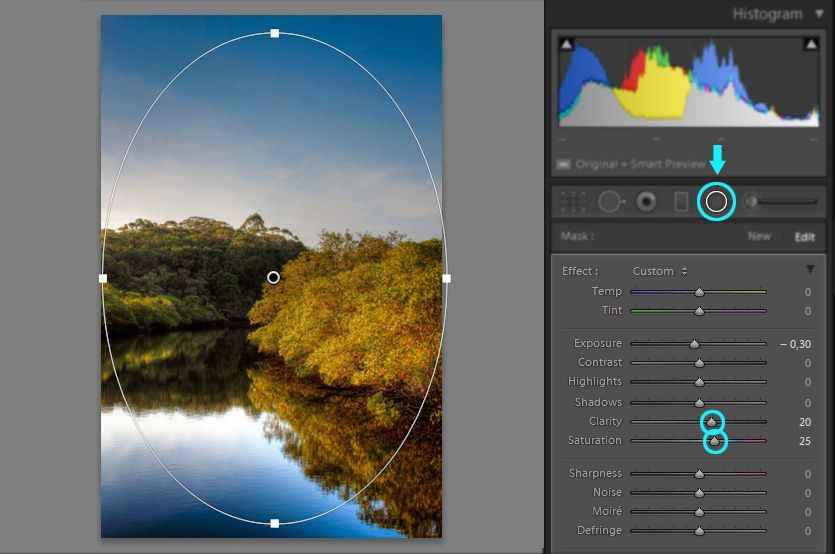
The Radial Filter

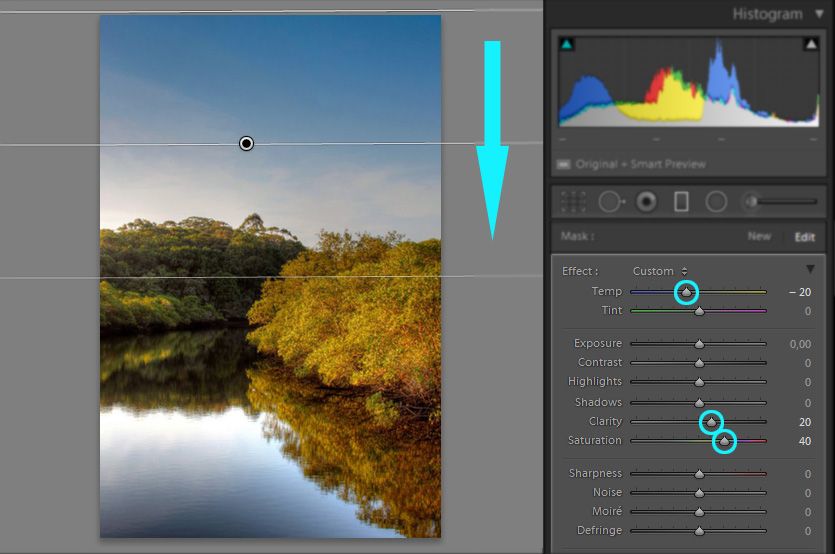
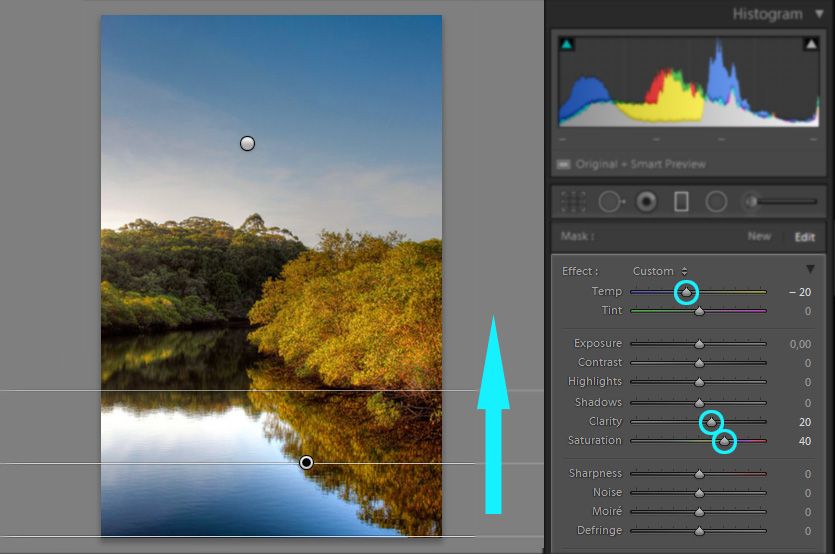
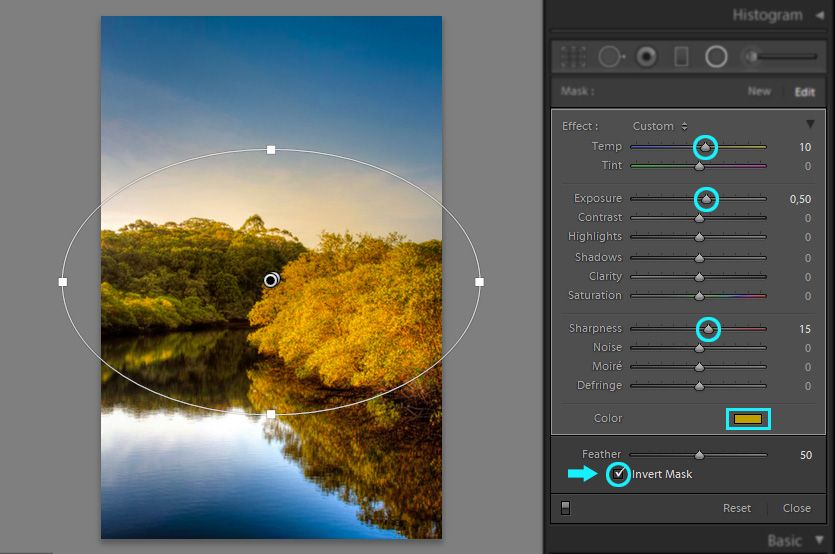
A little more involved, but not by much, is the more flexible Radial Filter. You can find this in the Develop module below the Histogram and above the tabs. It’s the circle icon second from the right not to be confused with the Spot Removal circle second from the left. Click on this or tap Shift-M. You’ll be presented with a long list of corrections you can make, but for a vignette, the Exposure slider is all you’ll usually need. First, double-click on the word Effect near the top which will zero out all the sliders. The next thing I usually do is lower the Exposure to 1.00. That’s usually too much, but I can judge the initial effect more clearly that way.

with radial filter_mini
This was taken on an 112-mile kayaking trip down the Green River in Utah. In the morning, I would help my wife launch her loaded-down boat. After the shot had been processed in Lightroom, I applied the radial filter lightly so that the eye is drawn to the two of us first rather than, say, the canyon walls in the background. Notice how the oval has been stretched to only cover the kayak and a bit of the surrounding river.

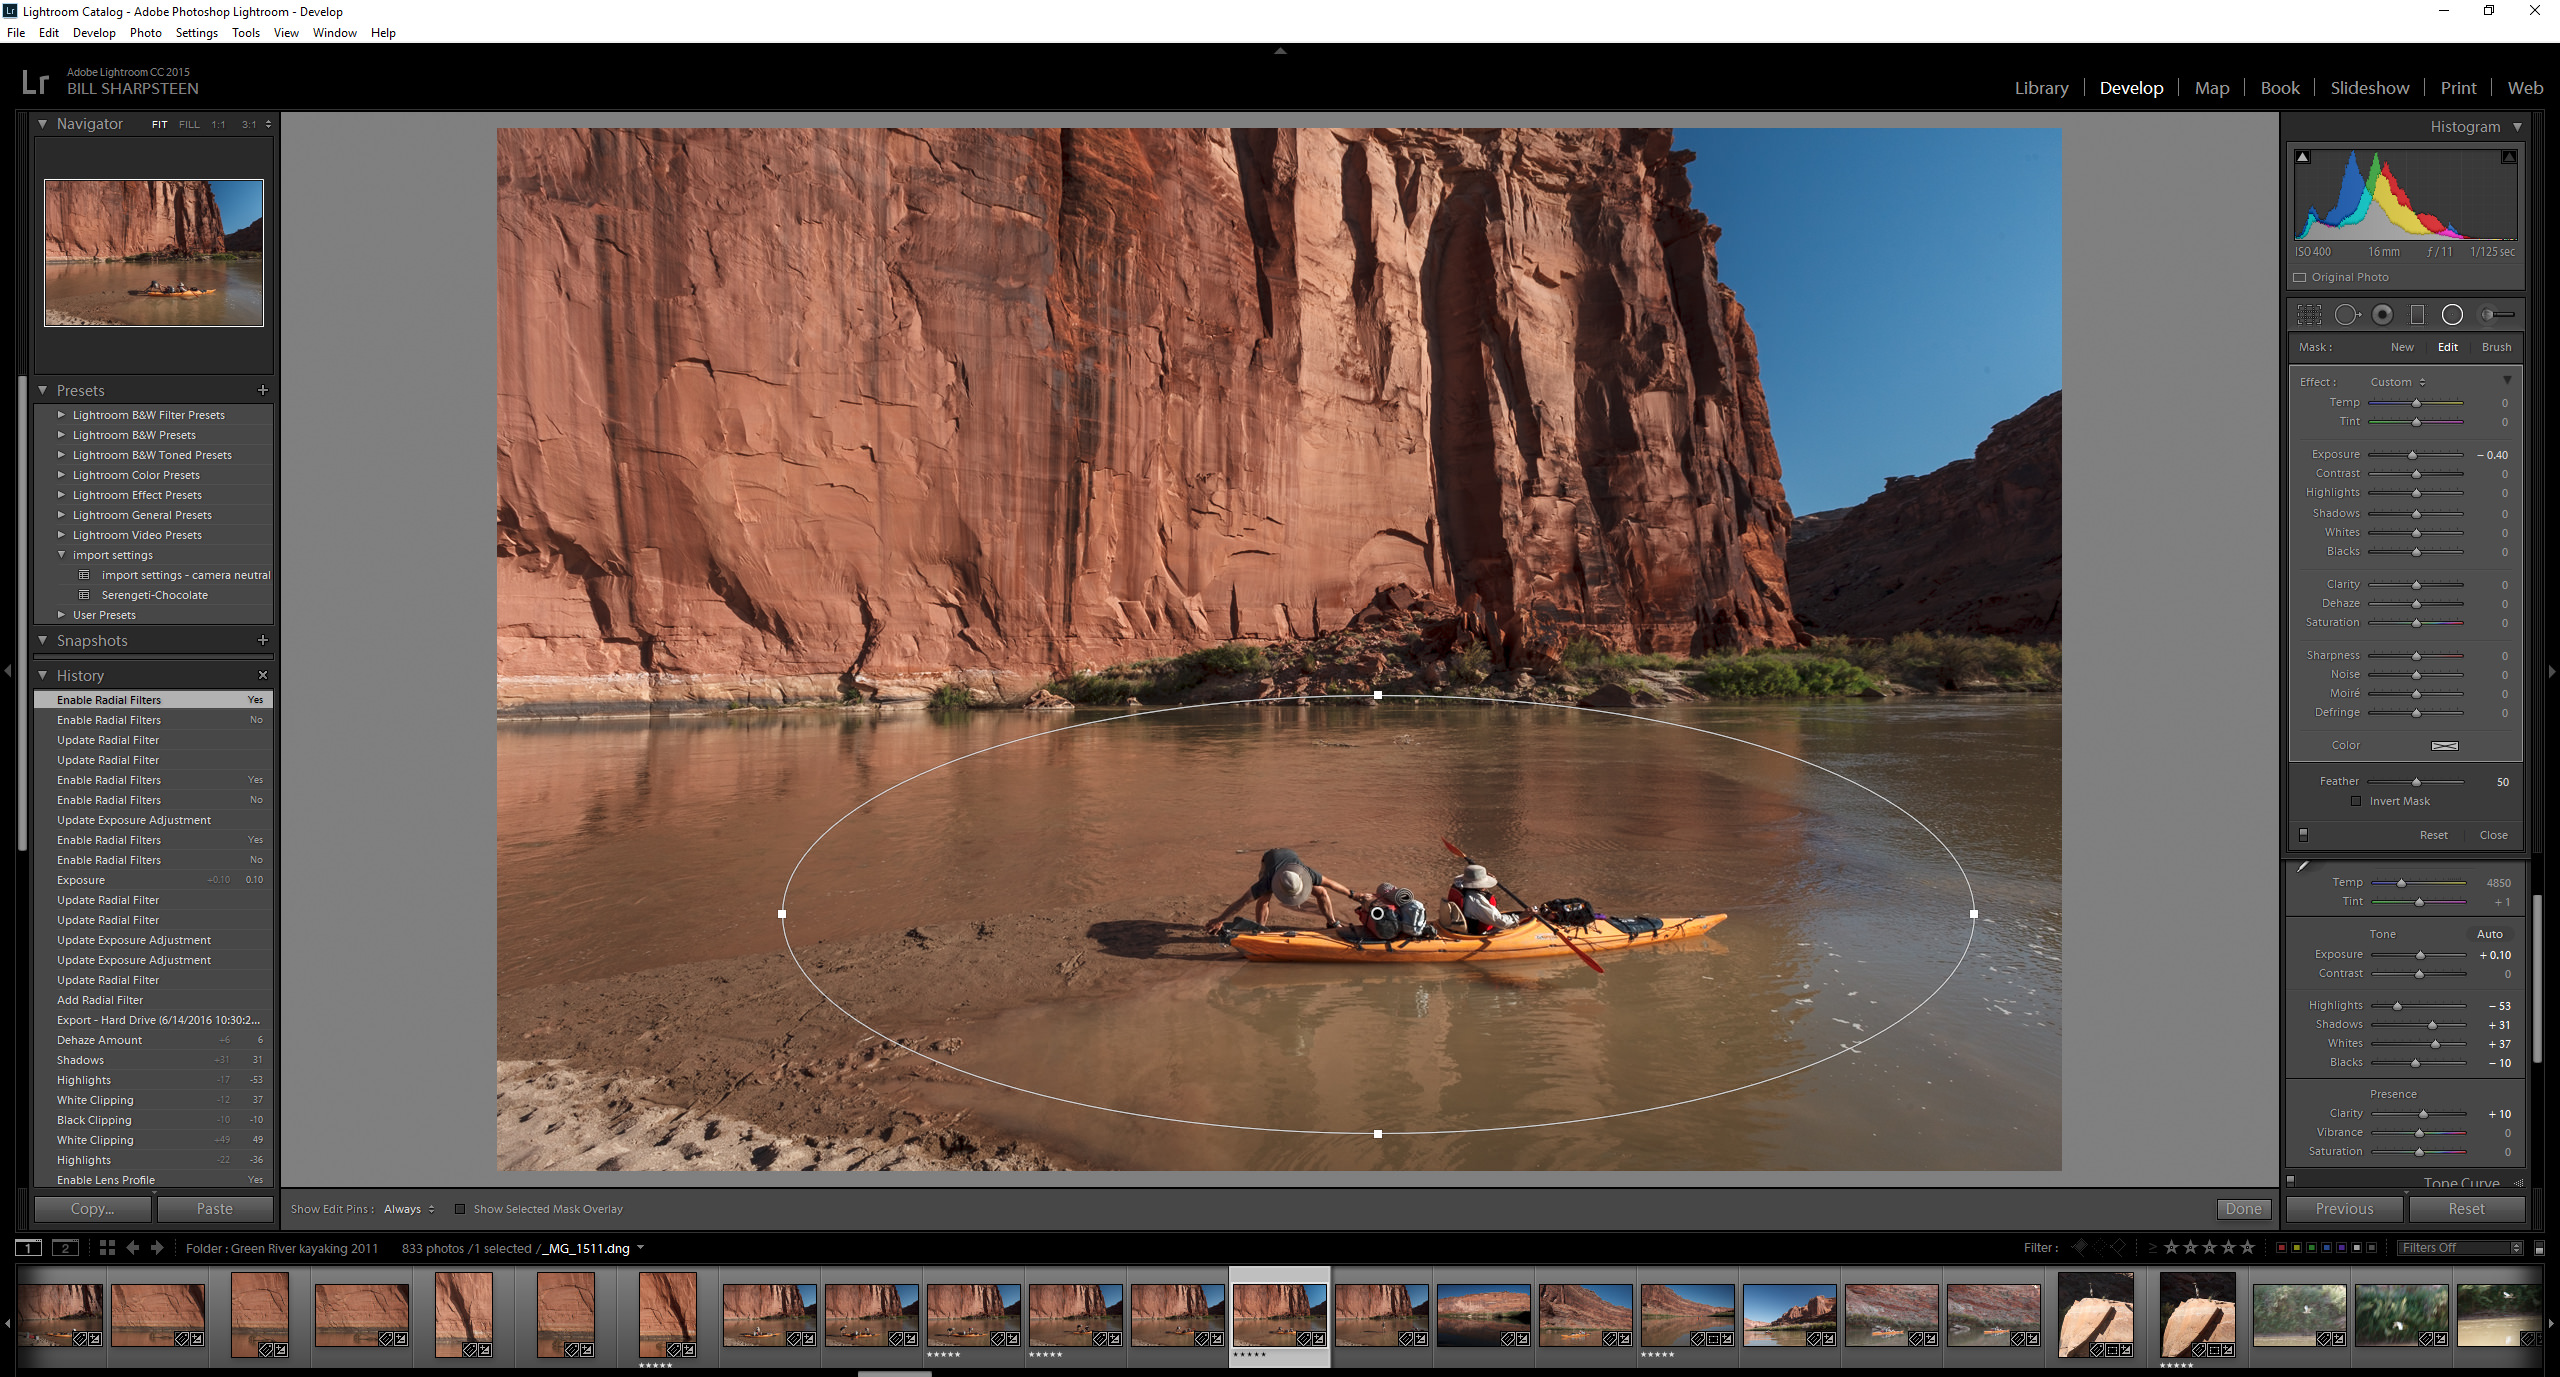
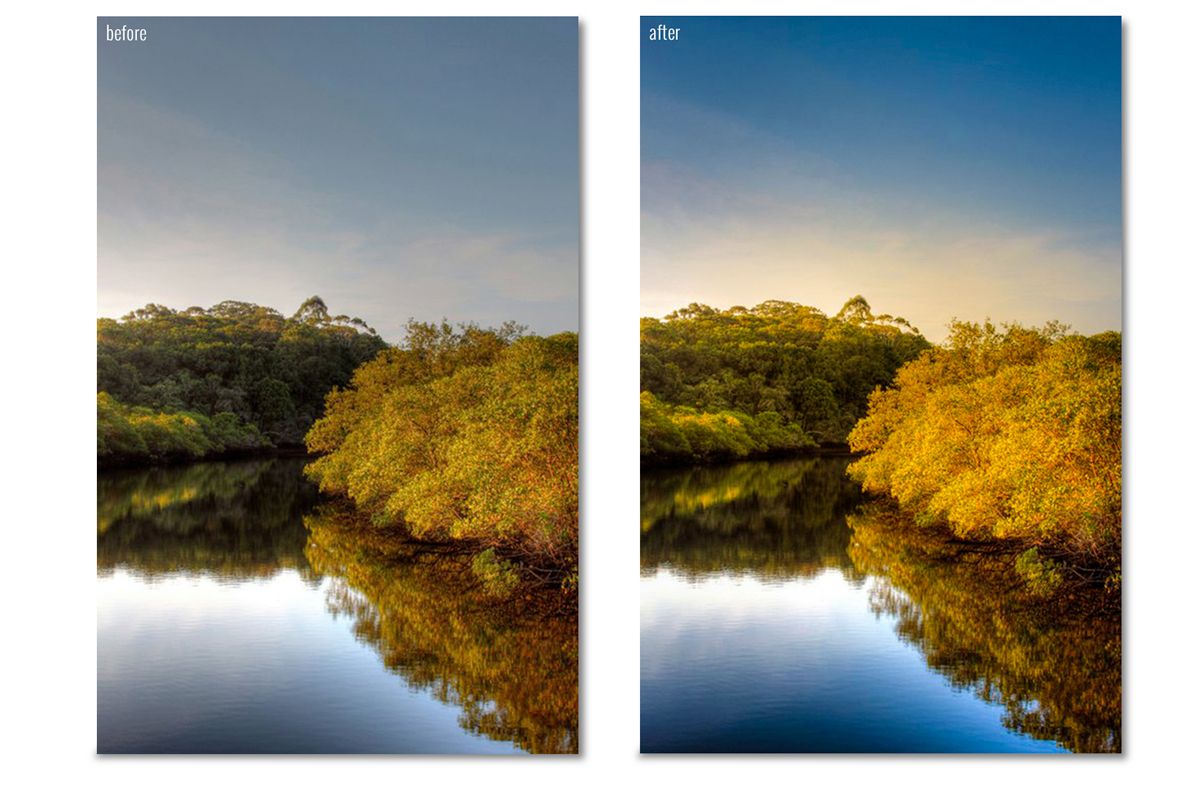
Then move the cursor to the image and drag out to create an oval around the part of the picture you want the viewer to see first. In the case of my example, I wanted to darken the image around my wife and me as I help her launch into the Green River. Everything but what’s in the oval gets a bit darker. No need to get fussy with how exact you are with this first step because the oval is infinitely adjustable. You can move the oval by placing the cursor inside it—it turns into a hand—and then drag the oval to where you need it. Put the cursor outside the oval and you can rotate it. Hover the cursor over one of the four handles and you can stretch or shrink the oval. The Radial Filter gives you far more options in turns of molding the vignette’s shape to conform to your needs.

At this point, resist the urge to over-darken but instead lighten the effect until it’s more subtle, often around -.50 to -.75. How do you tell? Look at the image and ask yourself if you can even see the vignette you’ve created. If you can’t, then go to the little button at the bottom left of the Radial Filter tab which turns off the effect. Toggle the effect on and off. If you can see a difference between where you started and where you ended, then the effect is working but won’t be obvious to the viewer.

Custom Vignettes

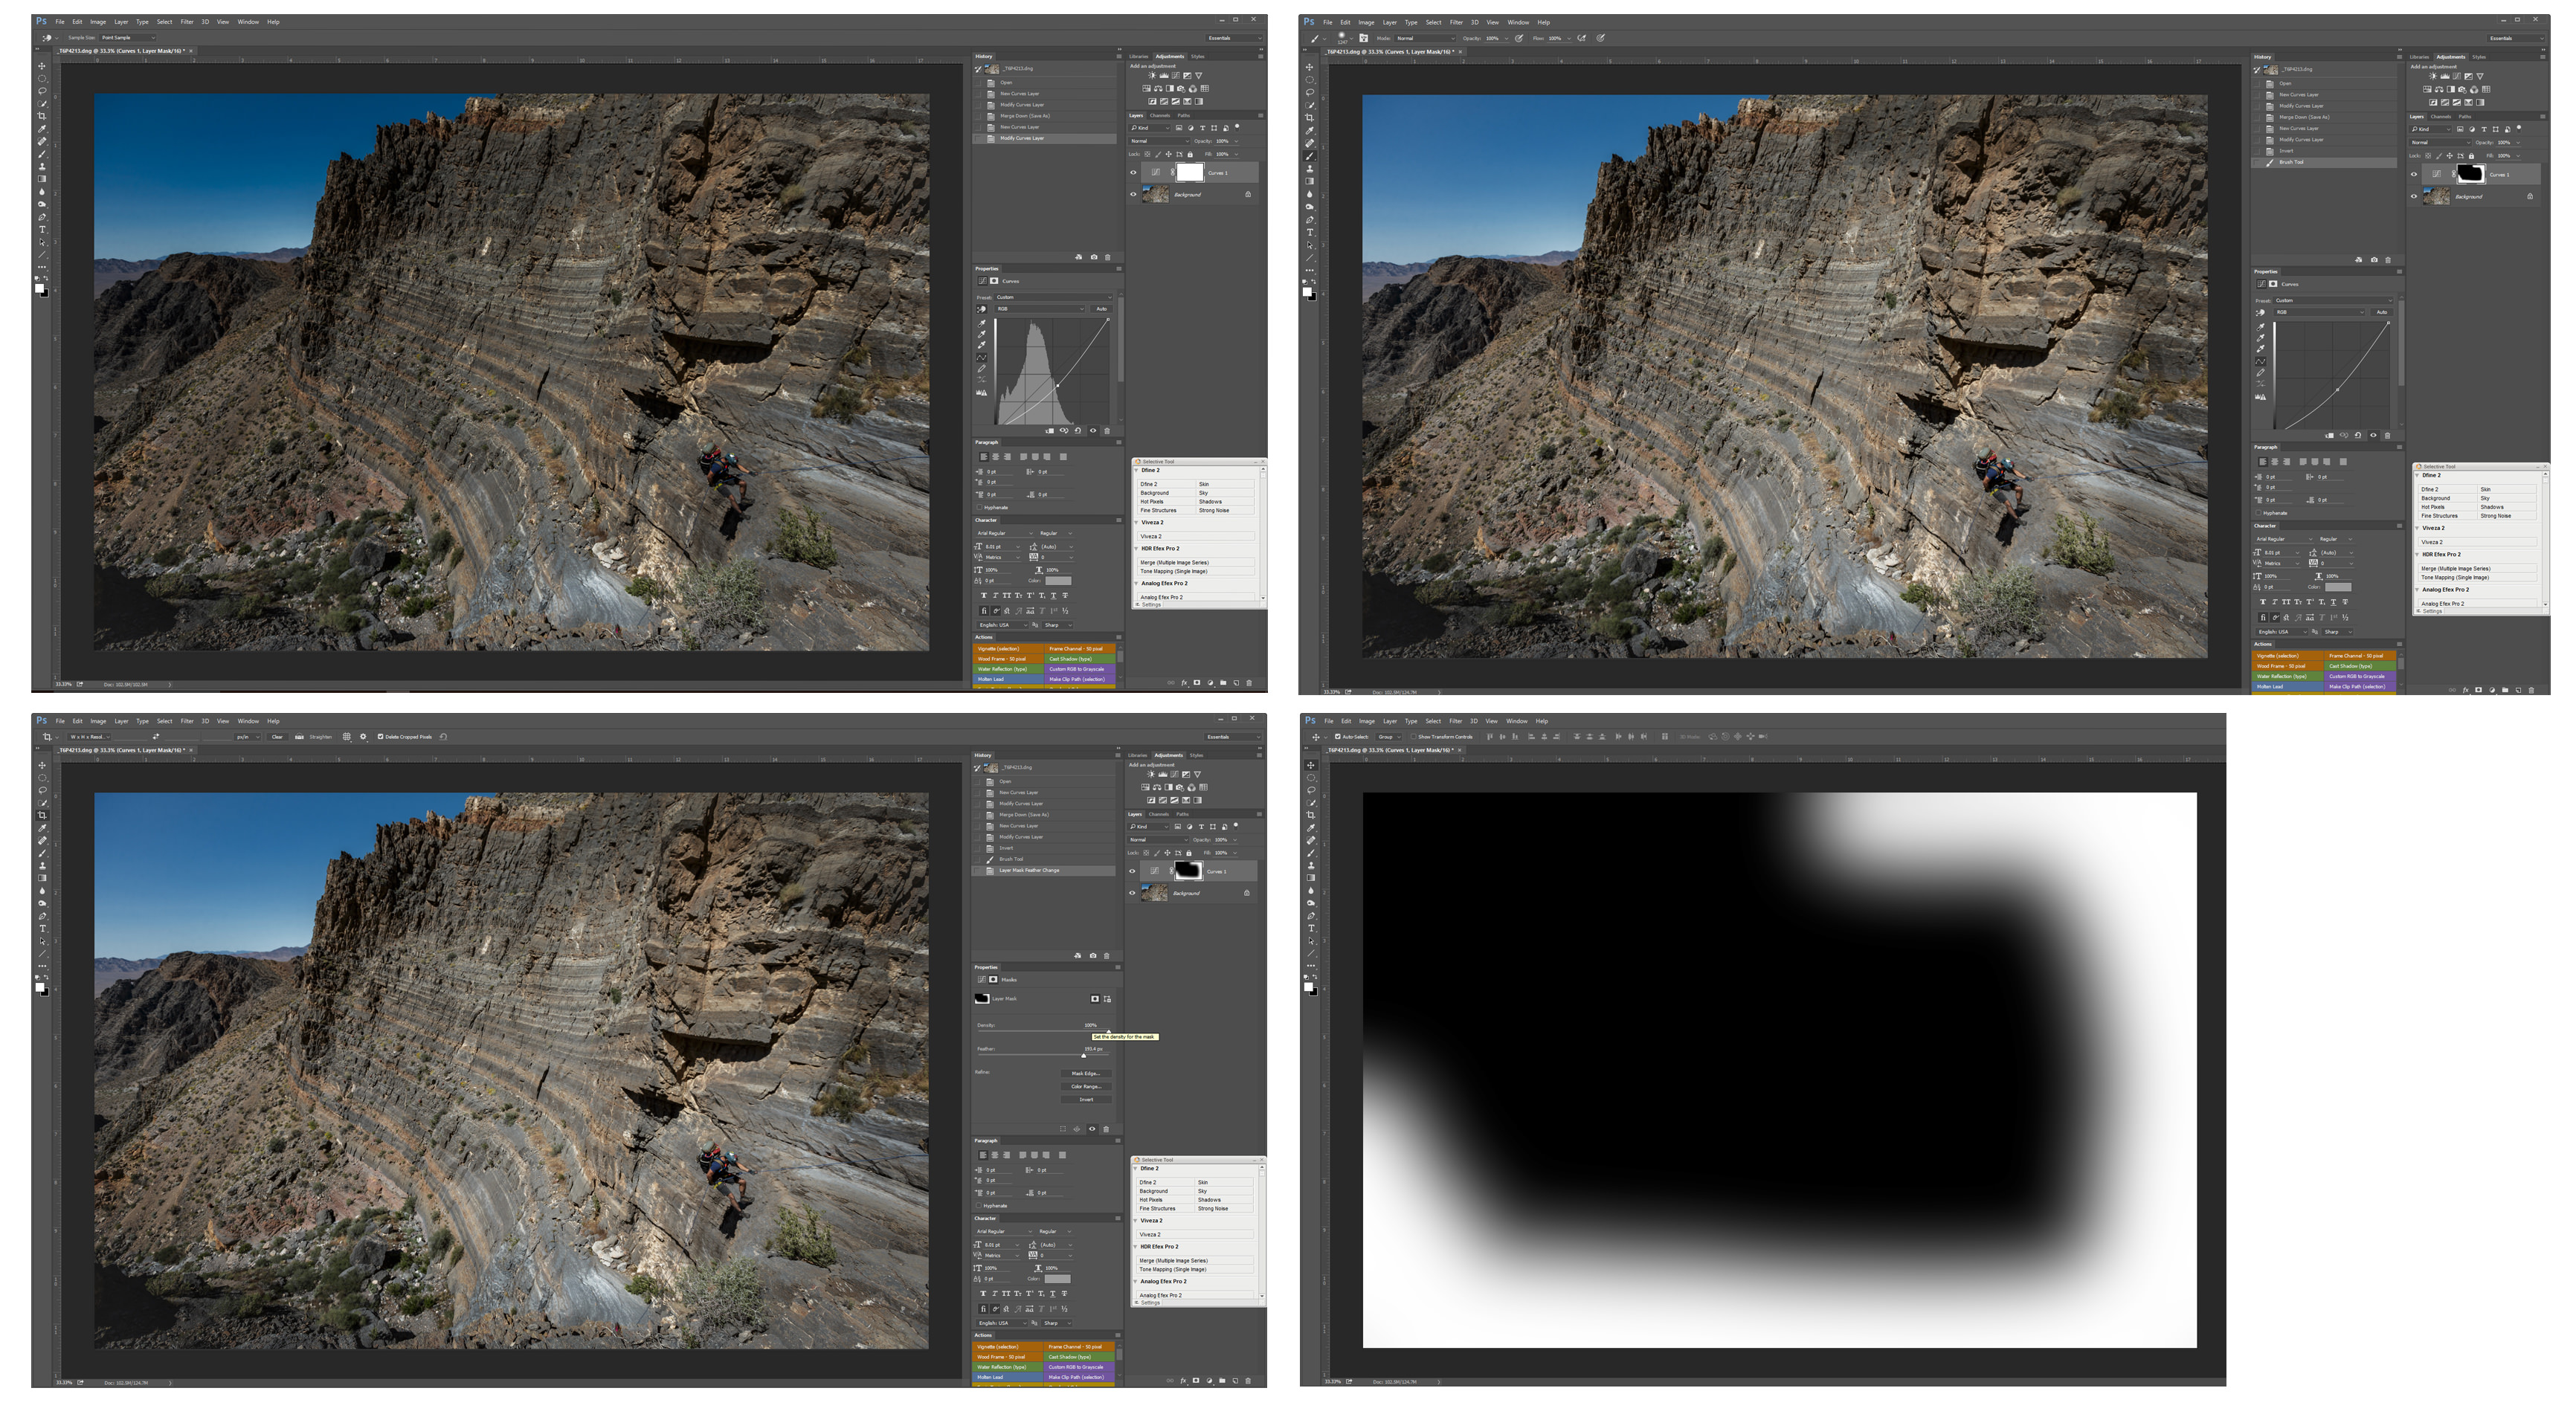
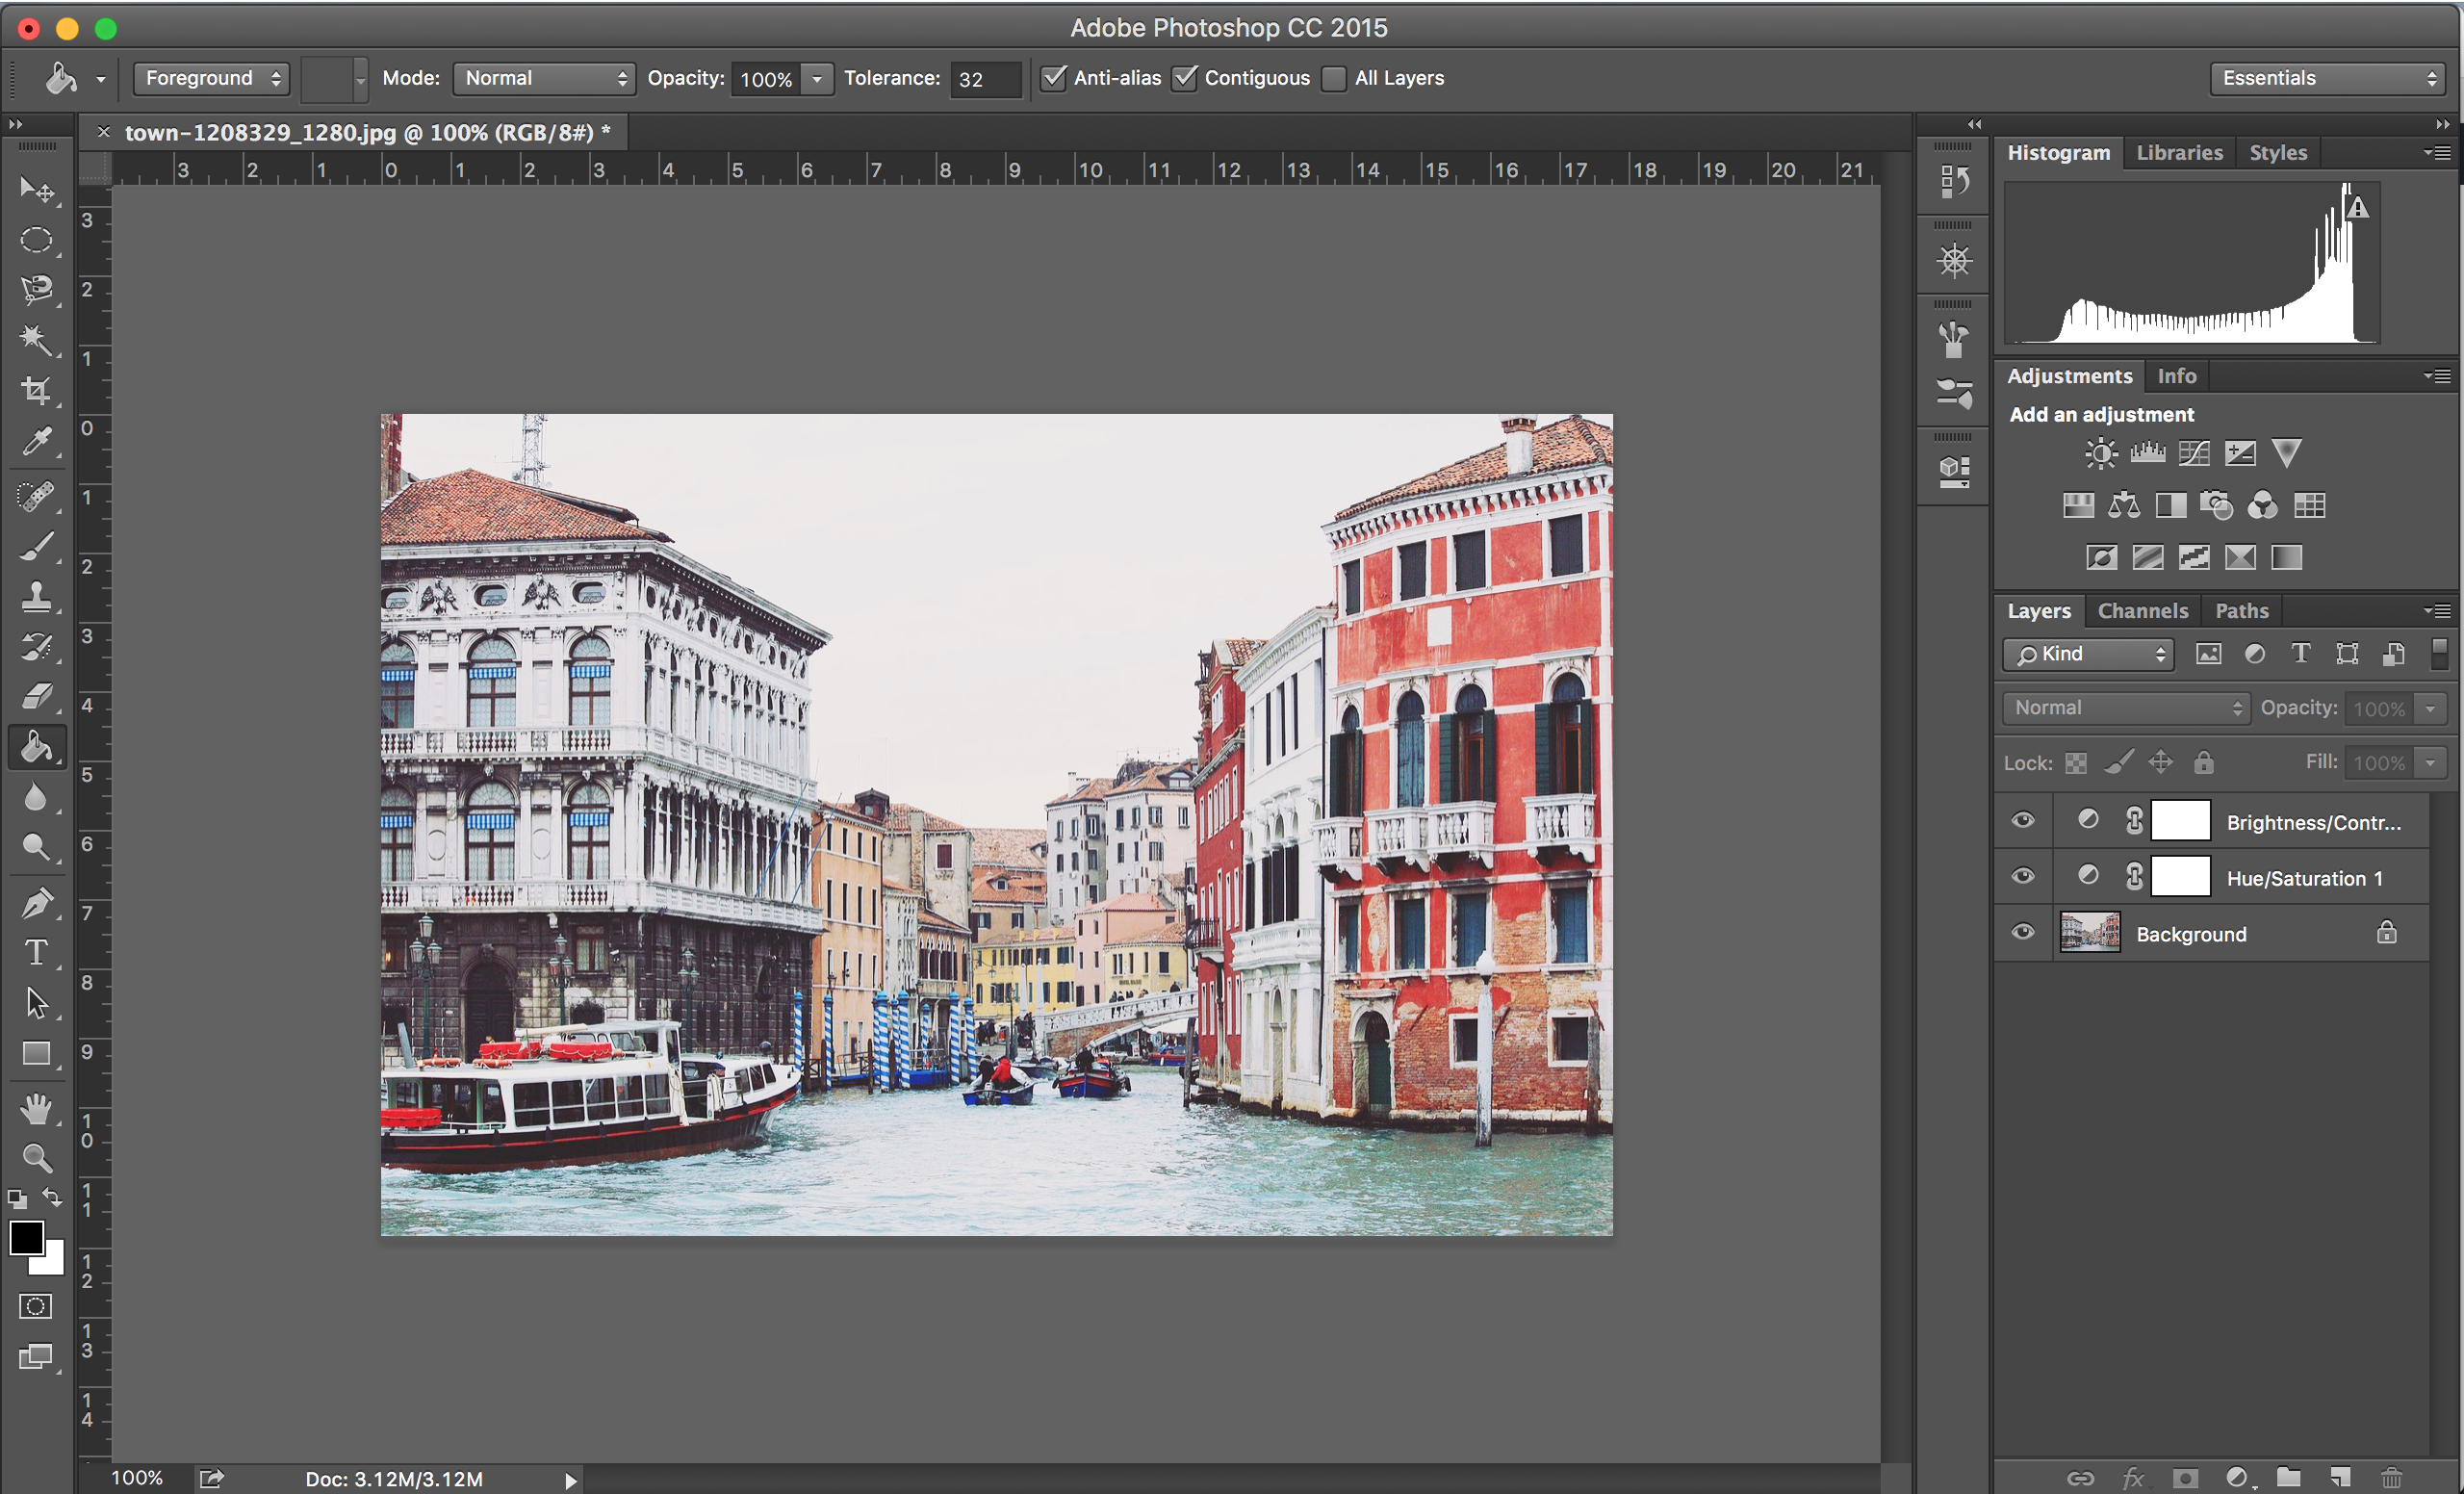
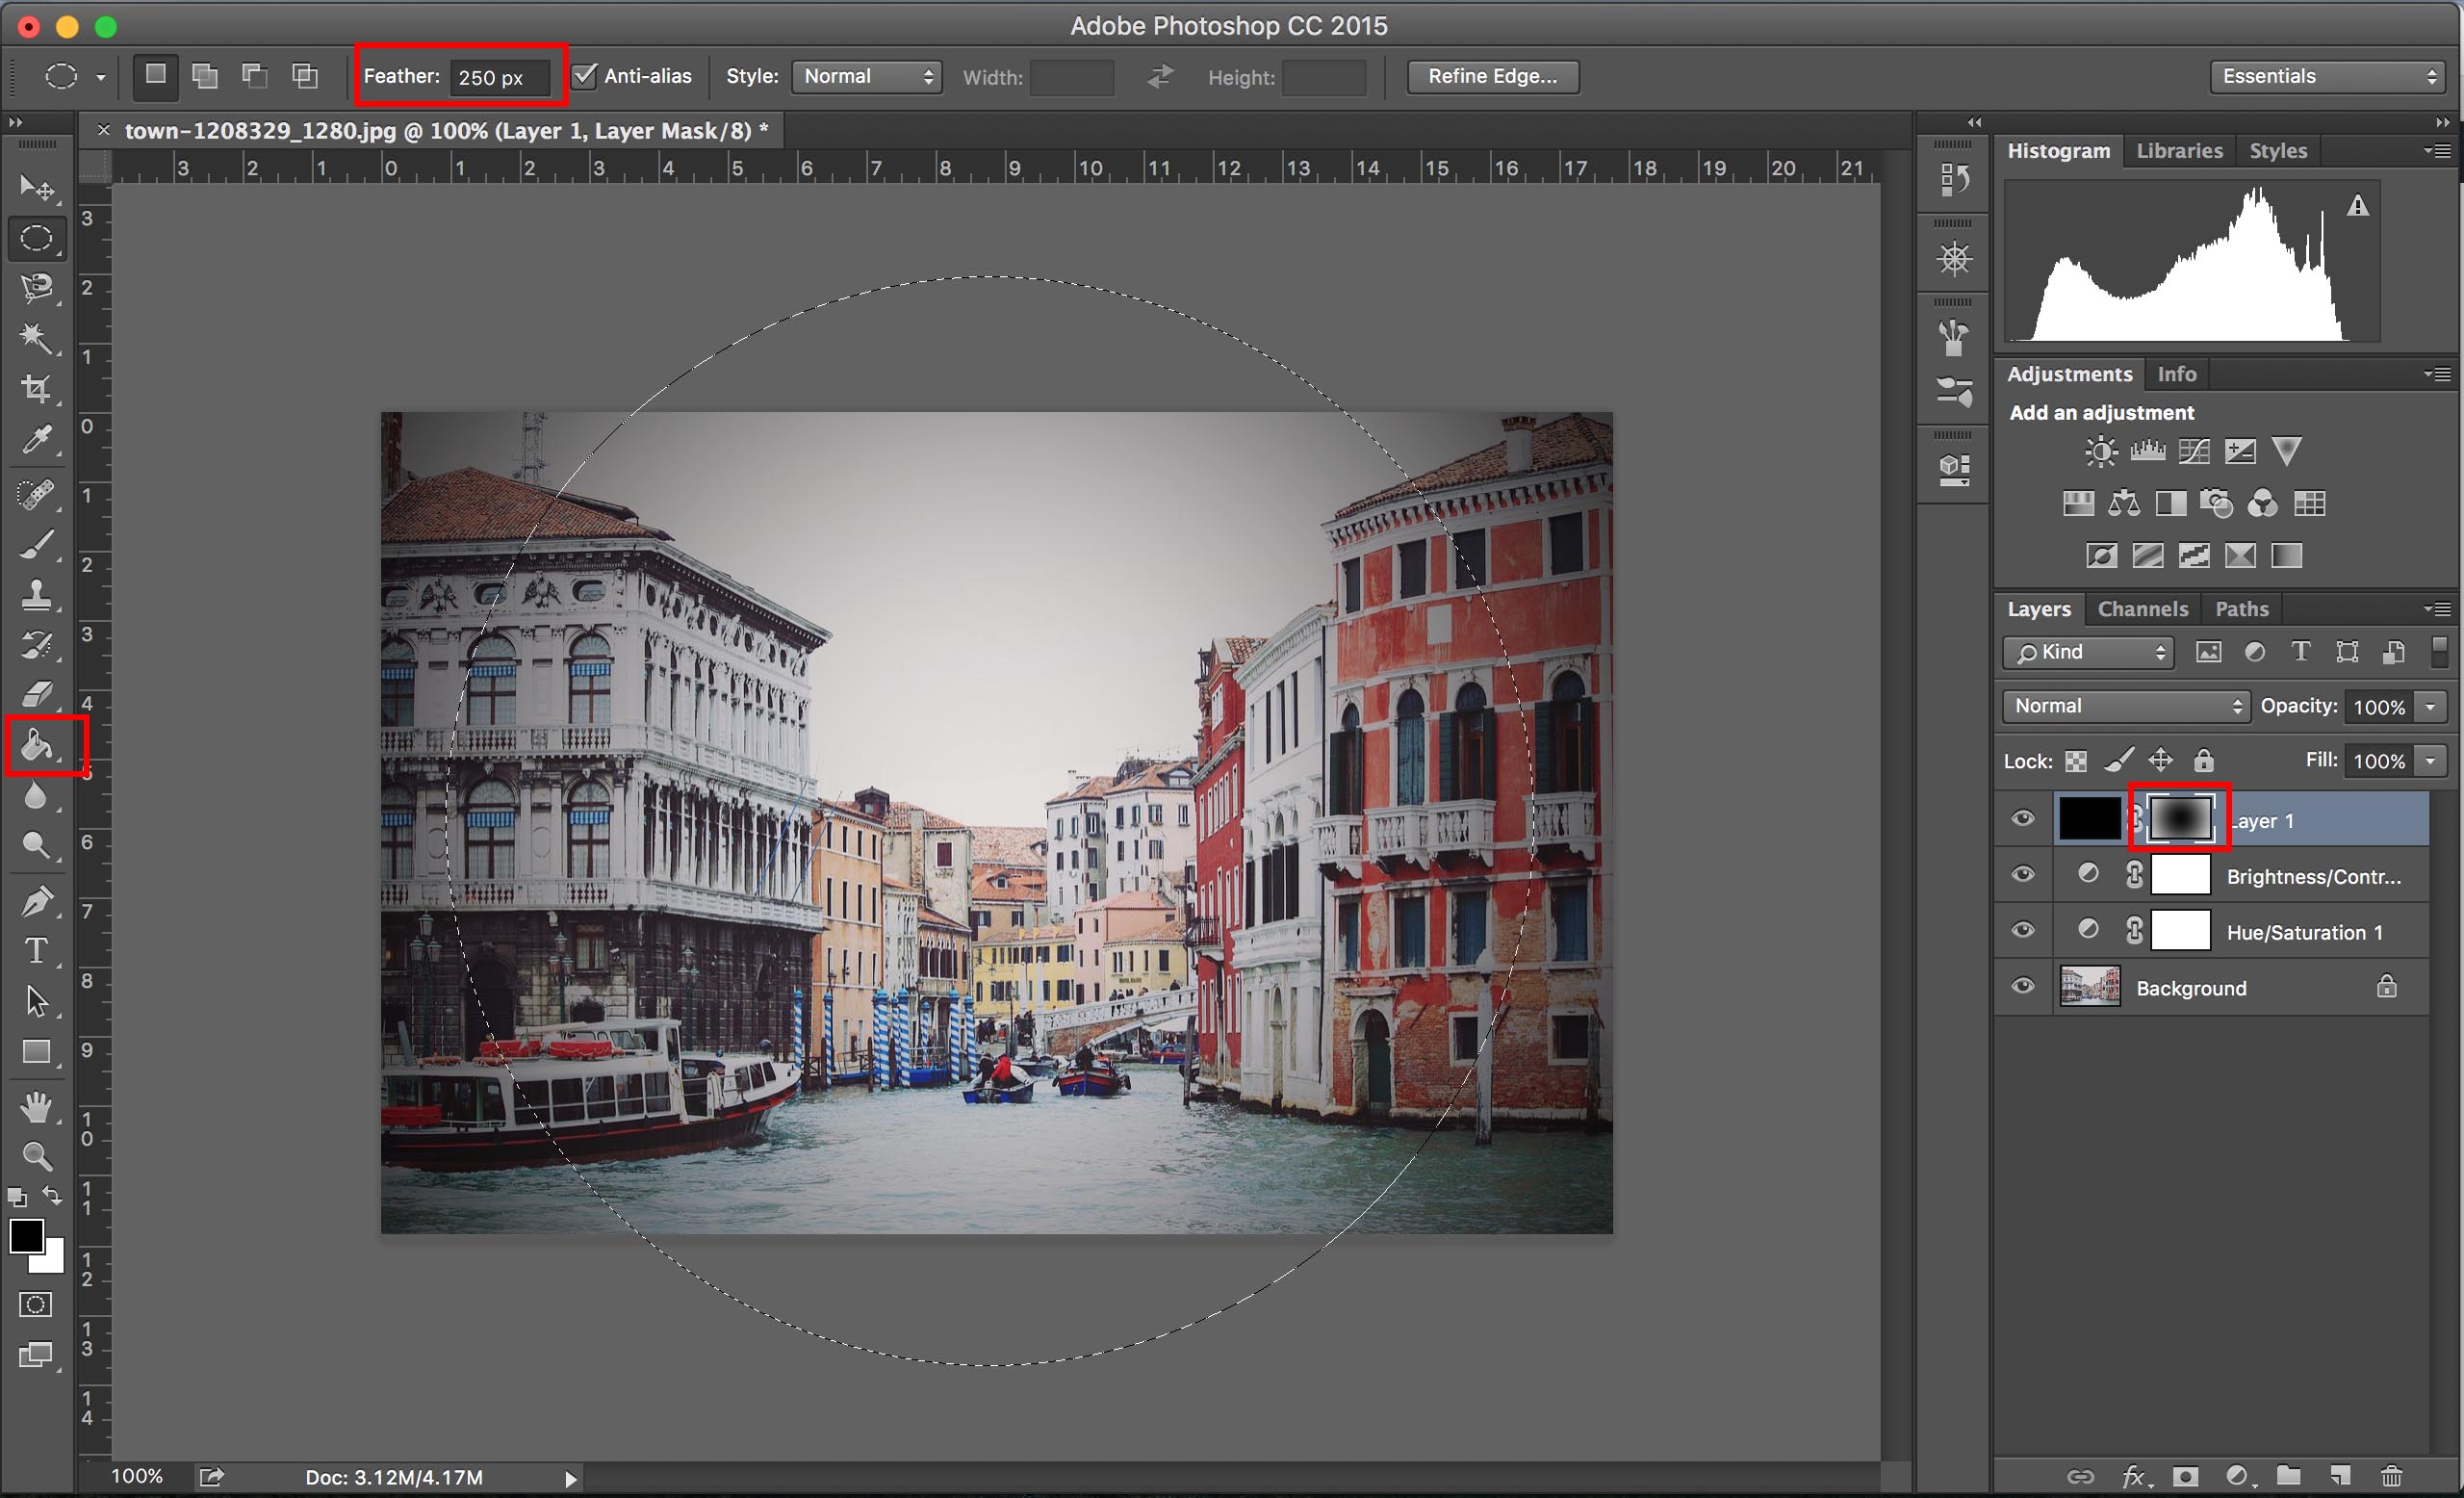
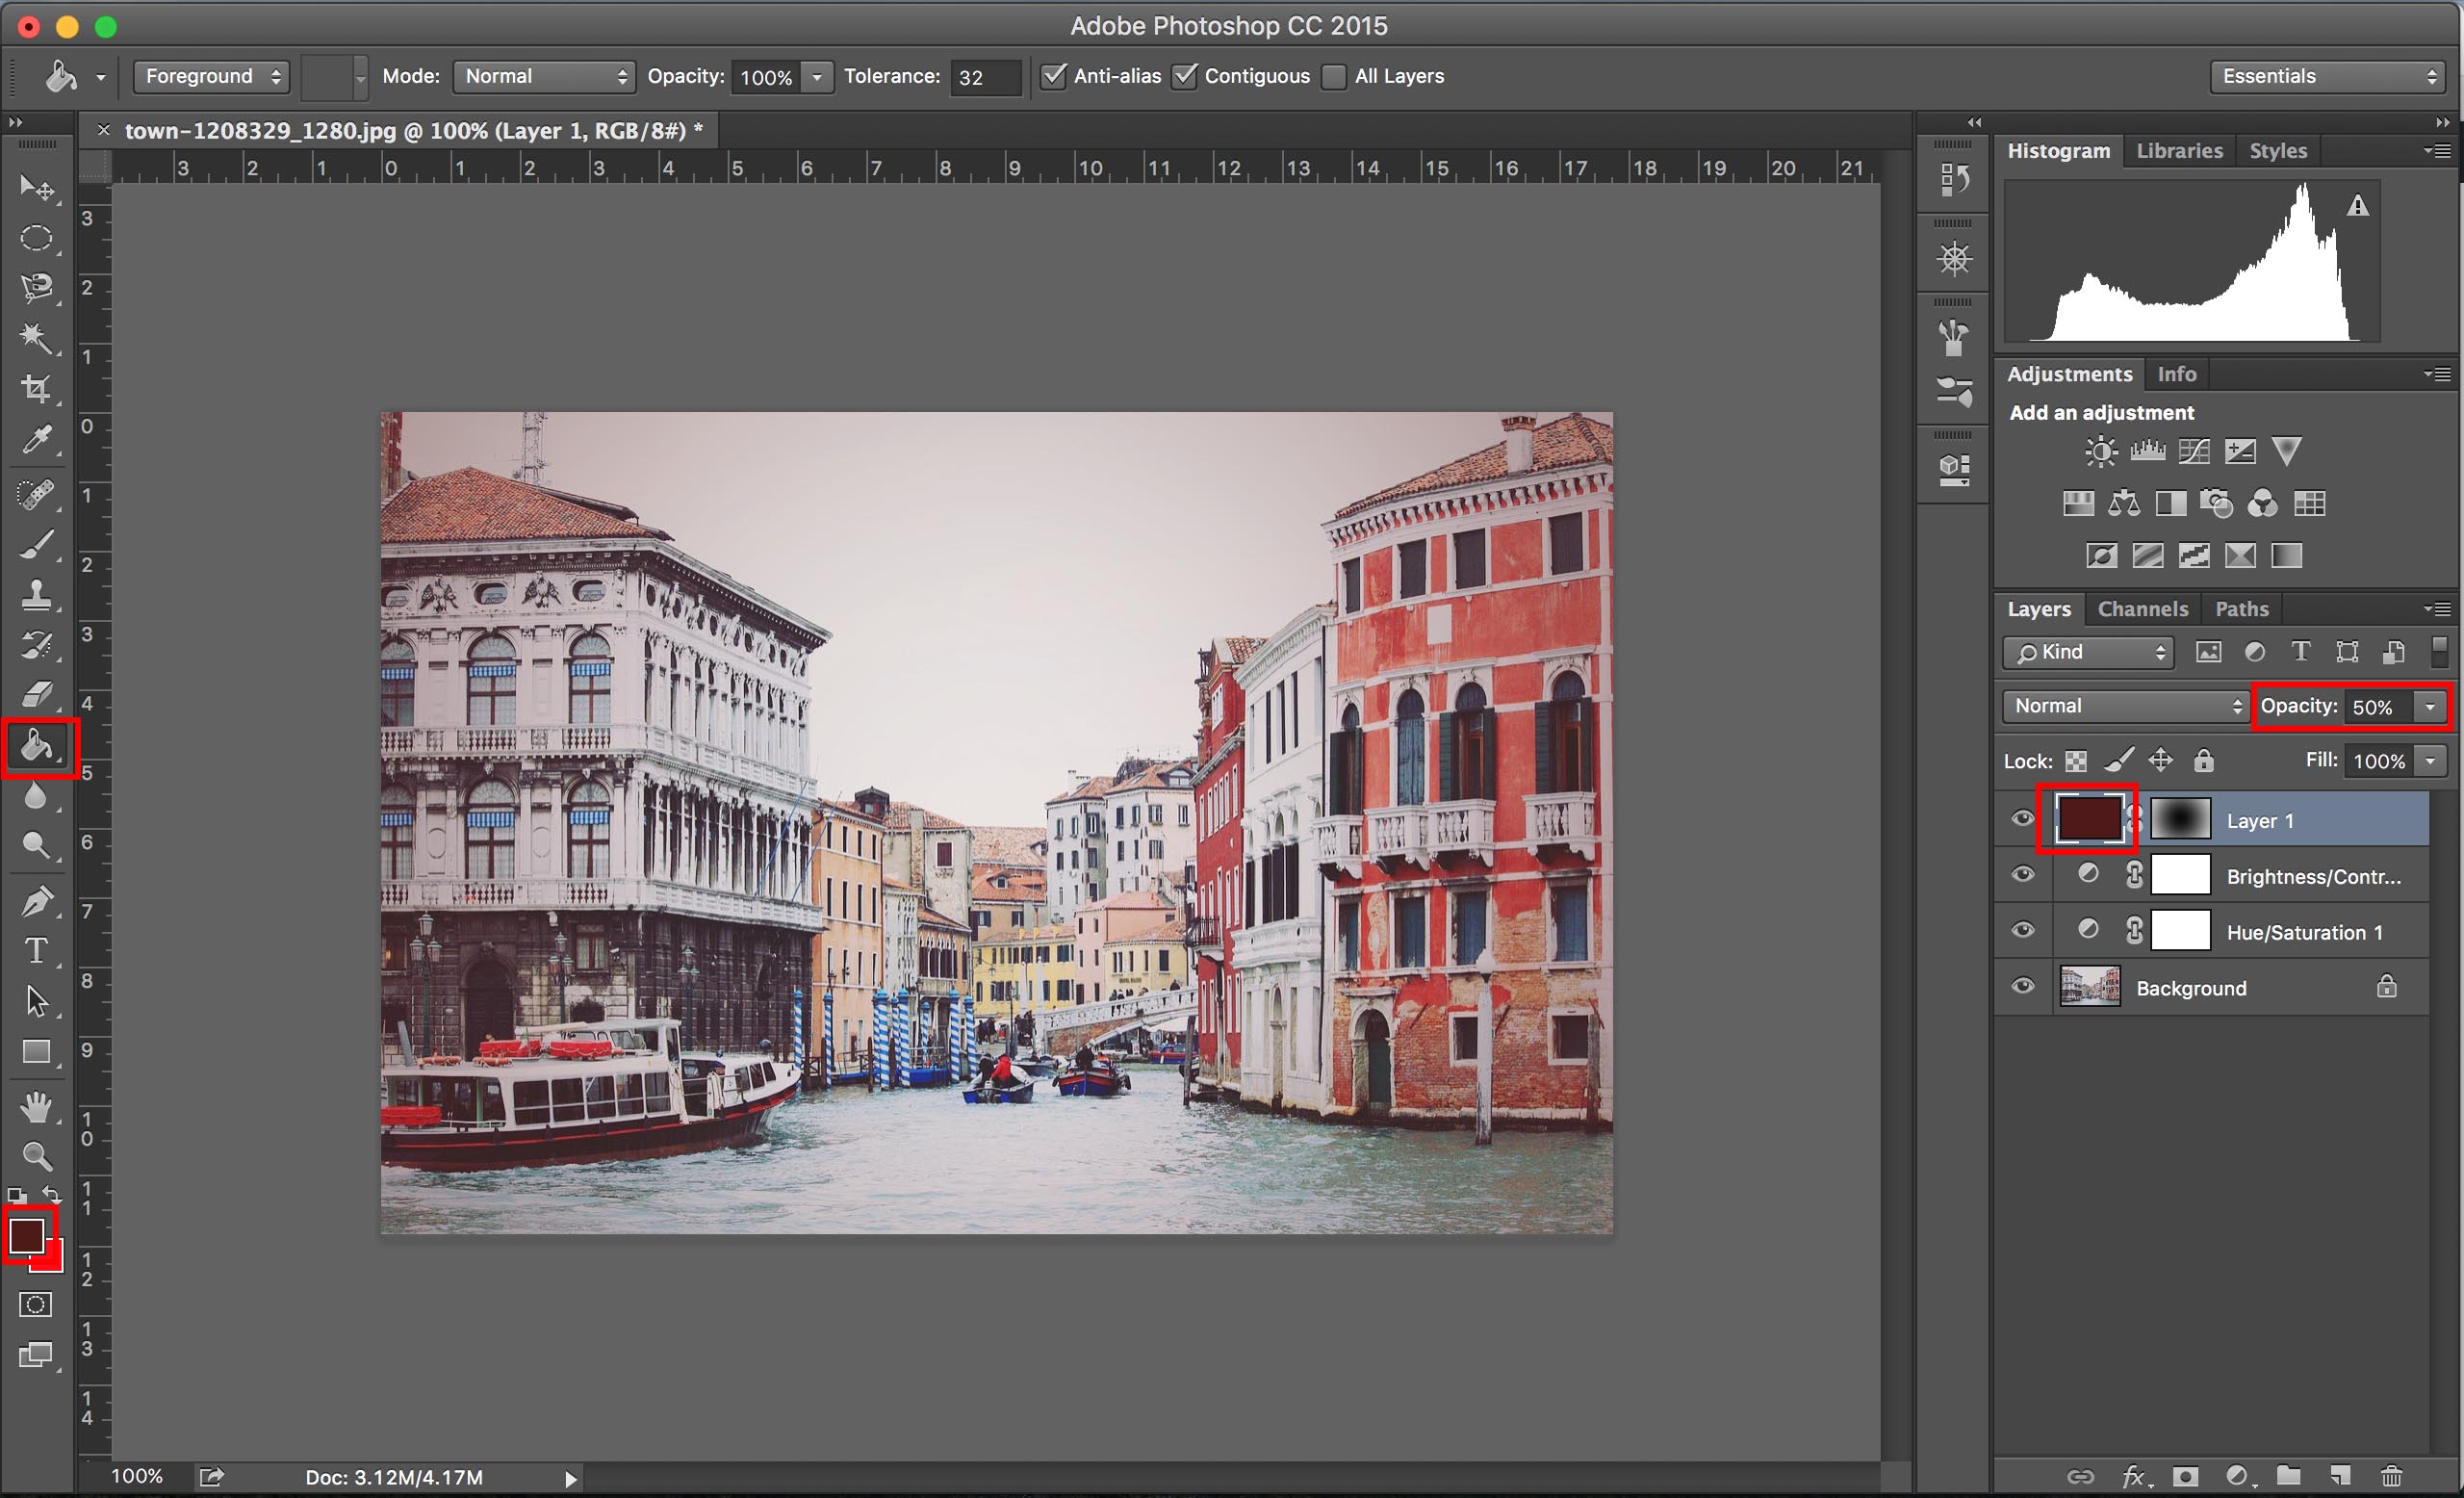
My last method, which I use most often even though it takes a little more time, is sending the file to Photoshop for some quality time with layers. I’m especially persnickety when it comes to any image that has sky in it because there’s something ugly and distracting to me about dark corners on a sky. Just doesn’t look right. And the only way to avoid that is with a truly custom vignette. Just the same, this isn’t complicated.

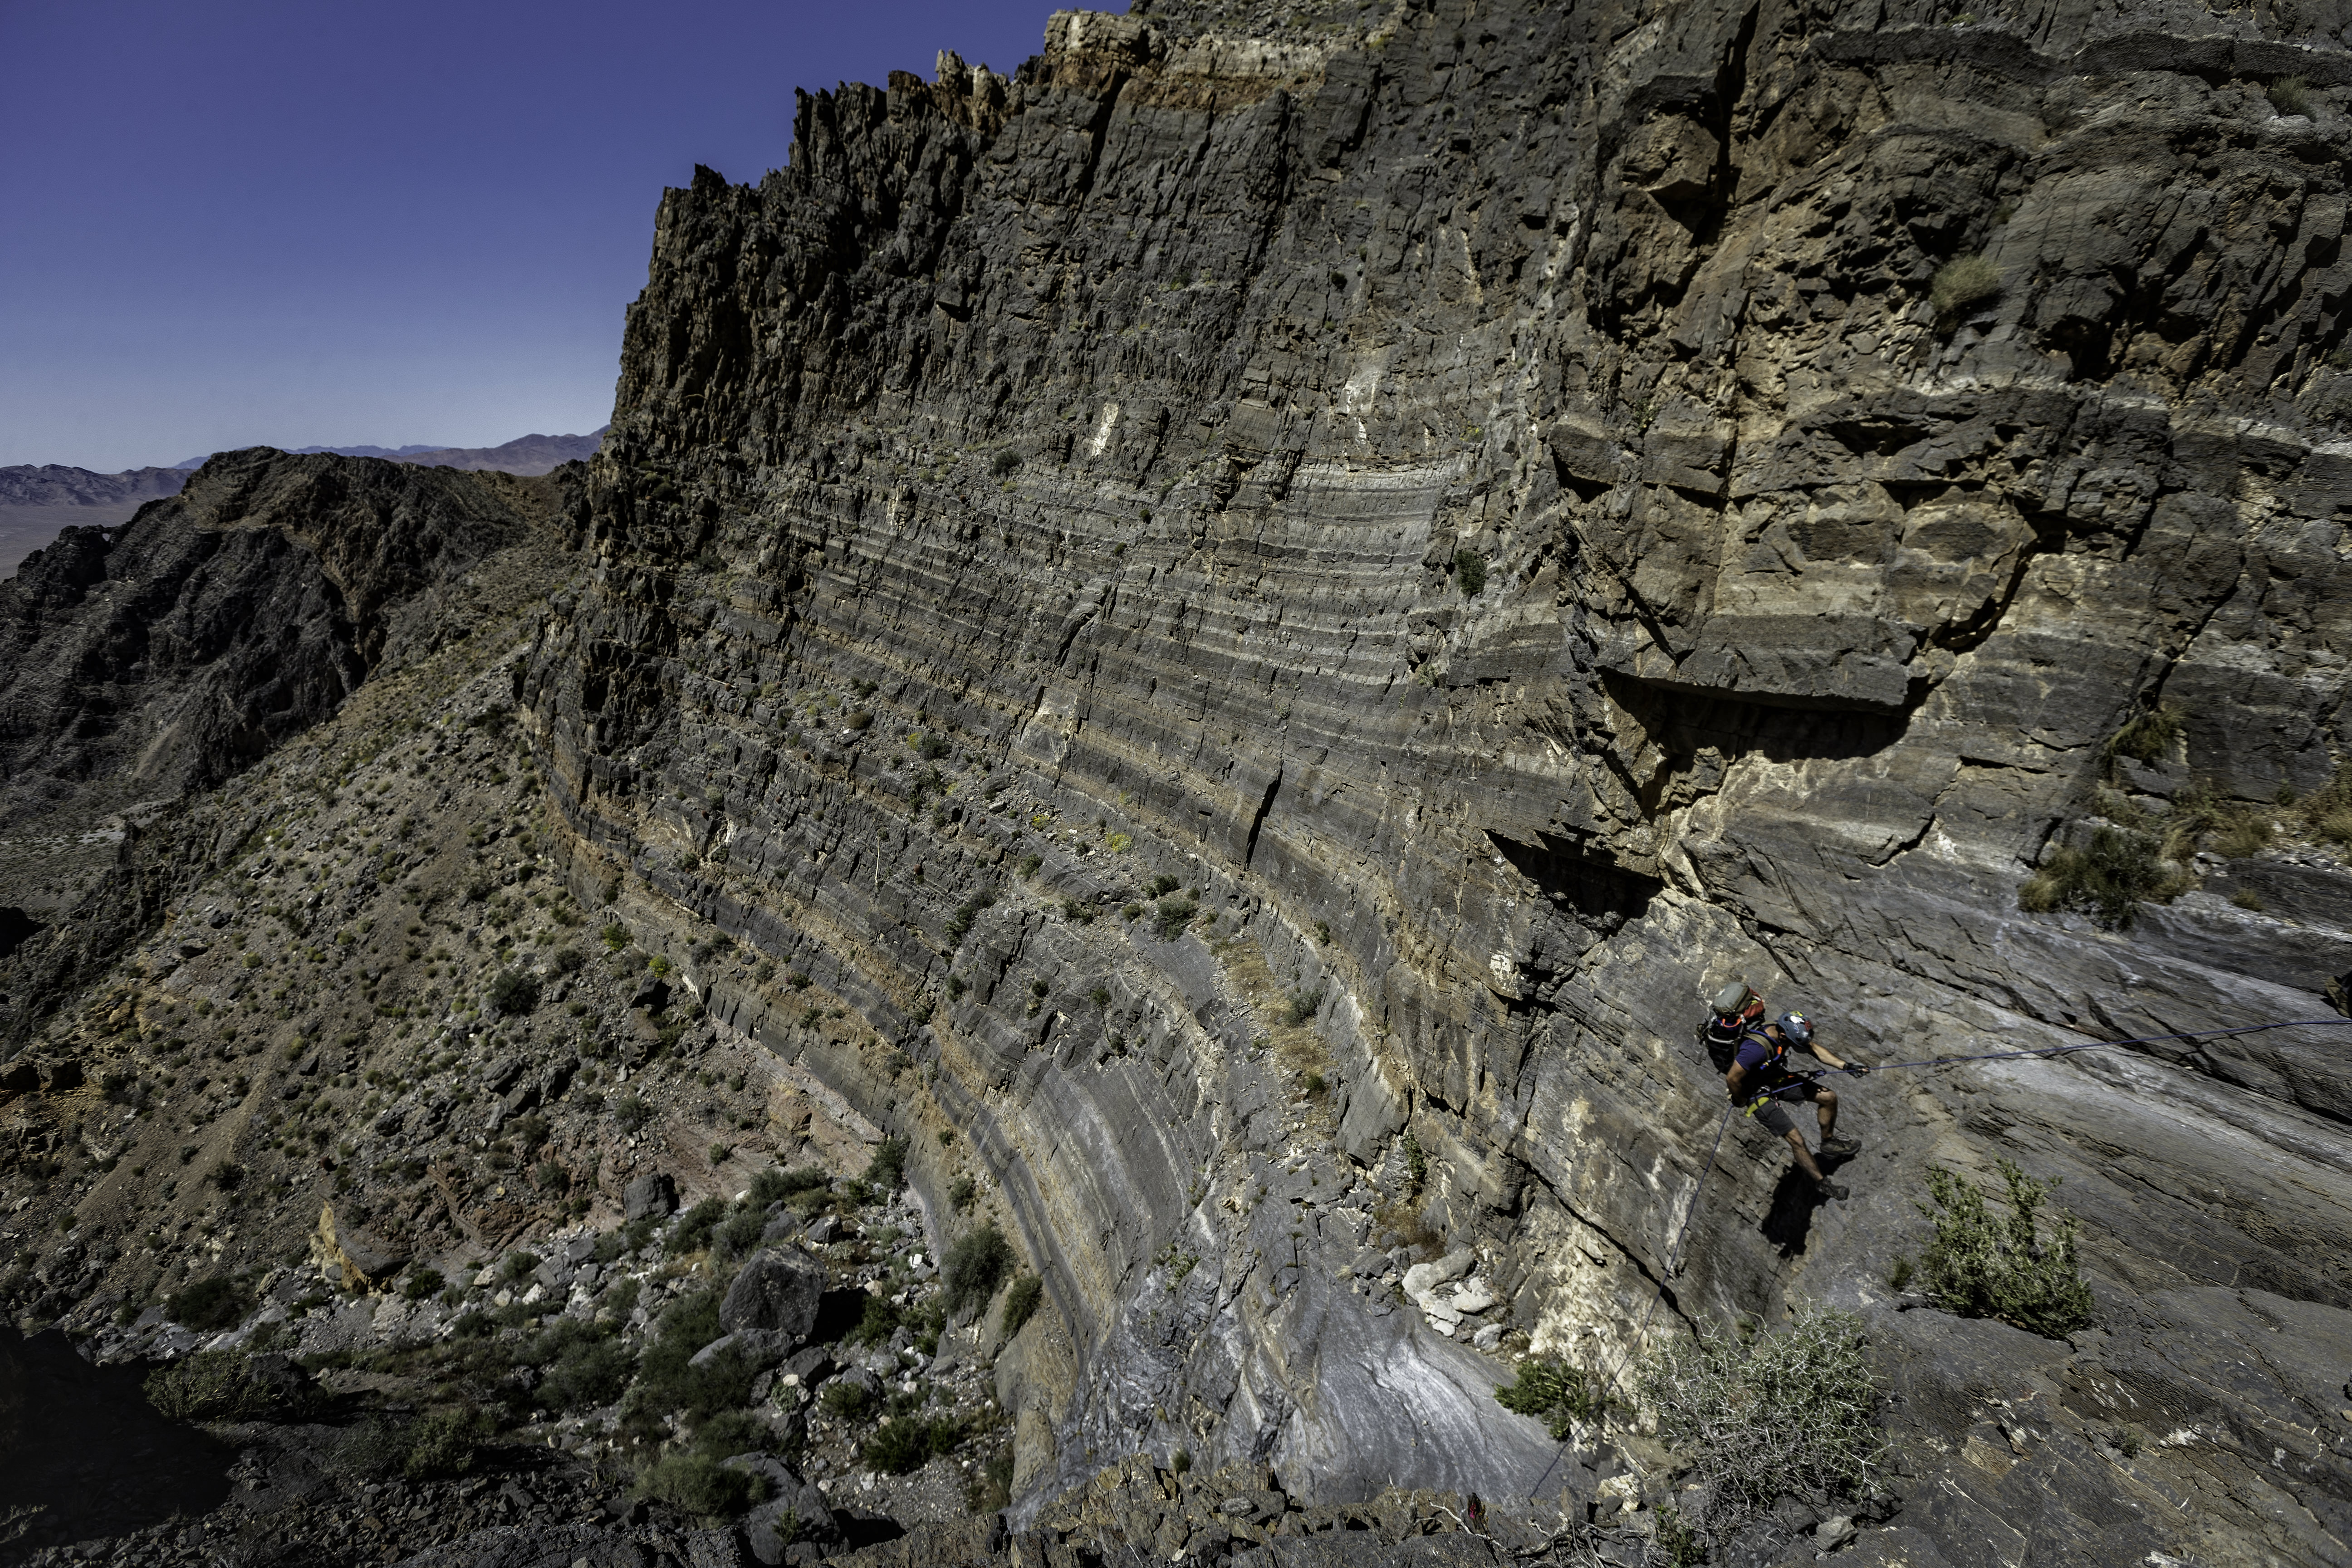
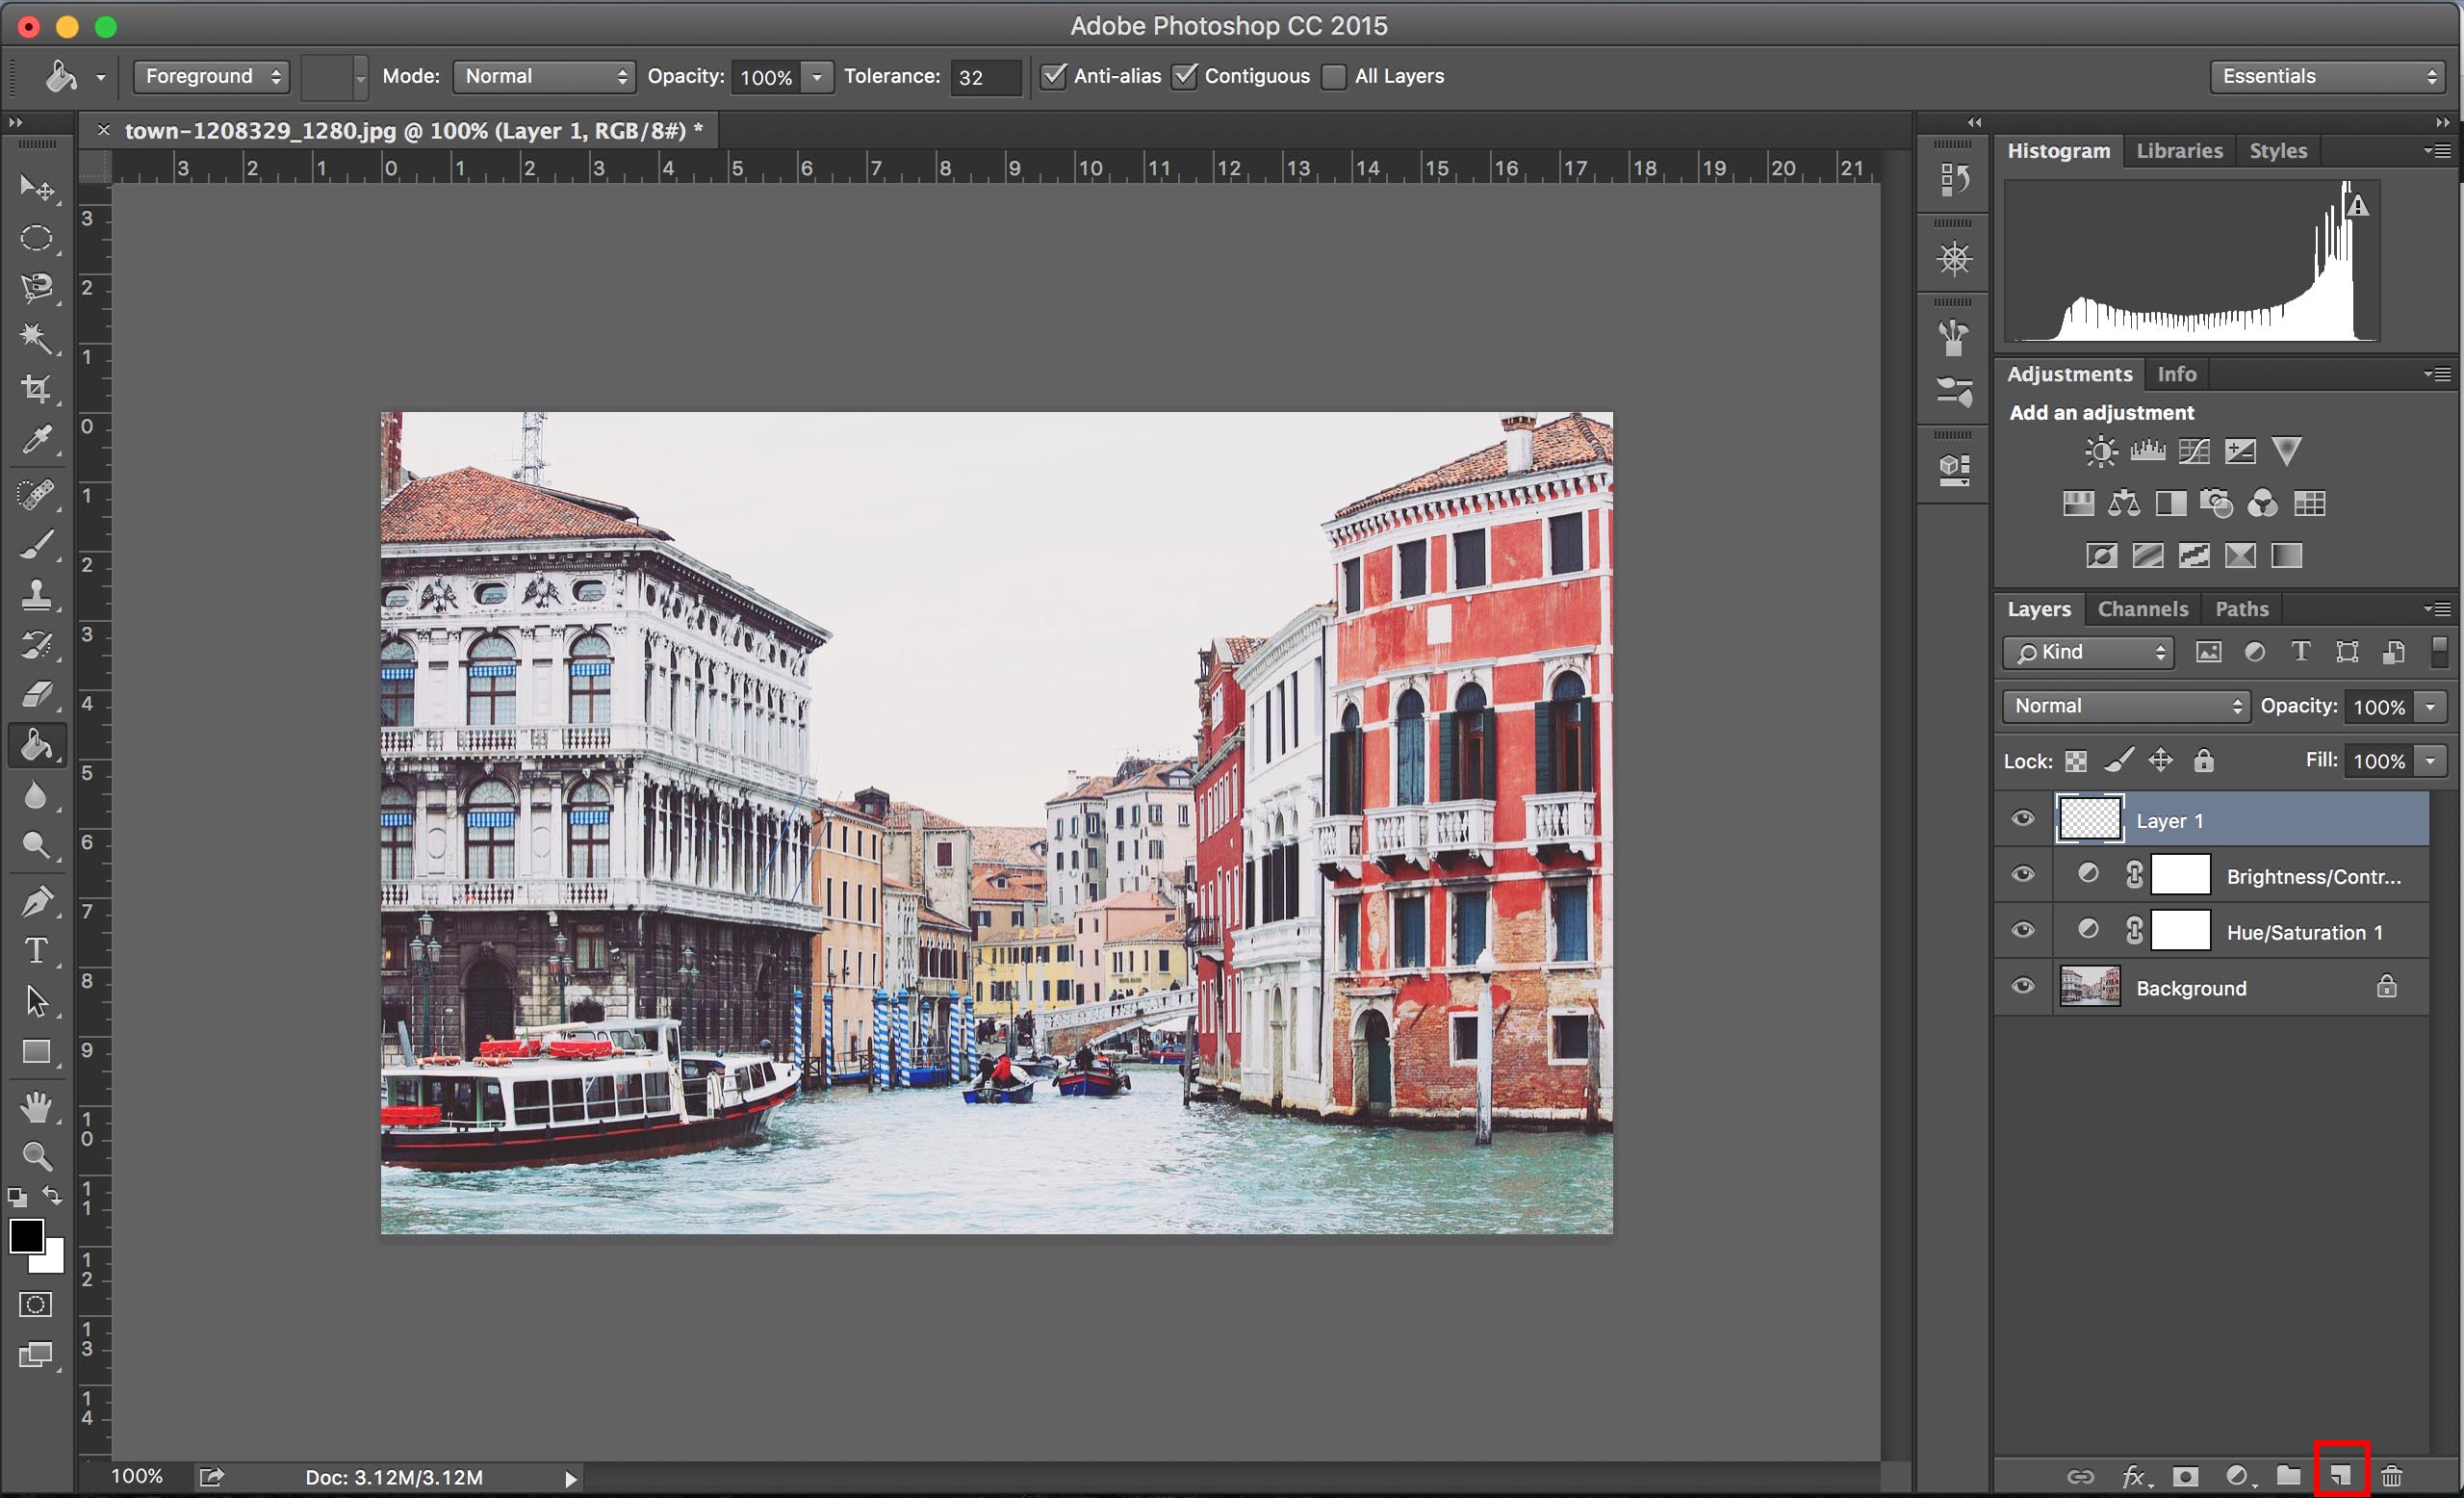
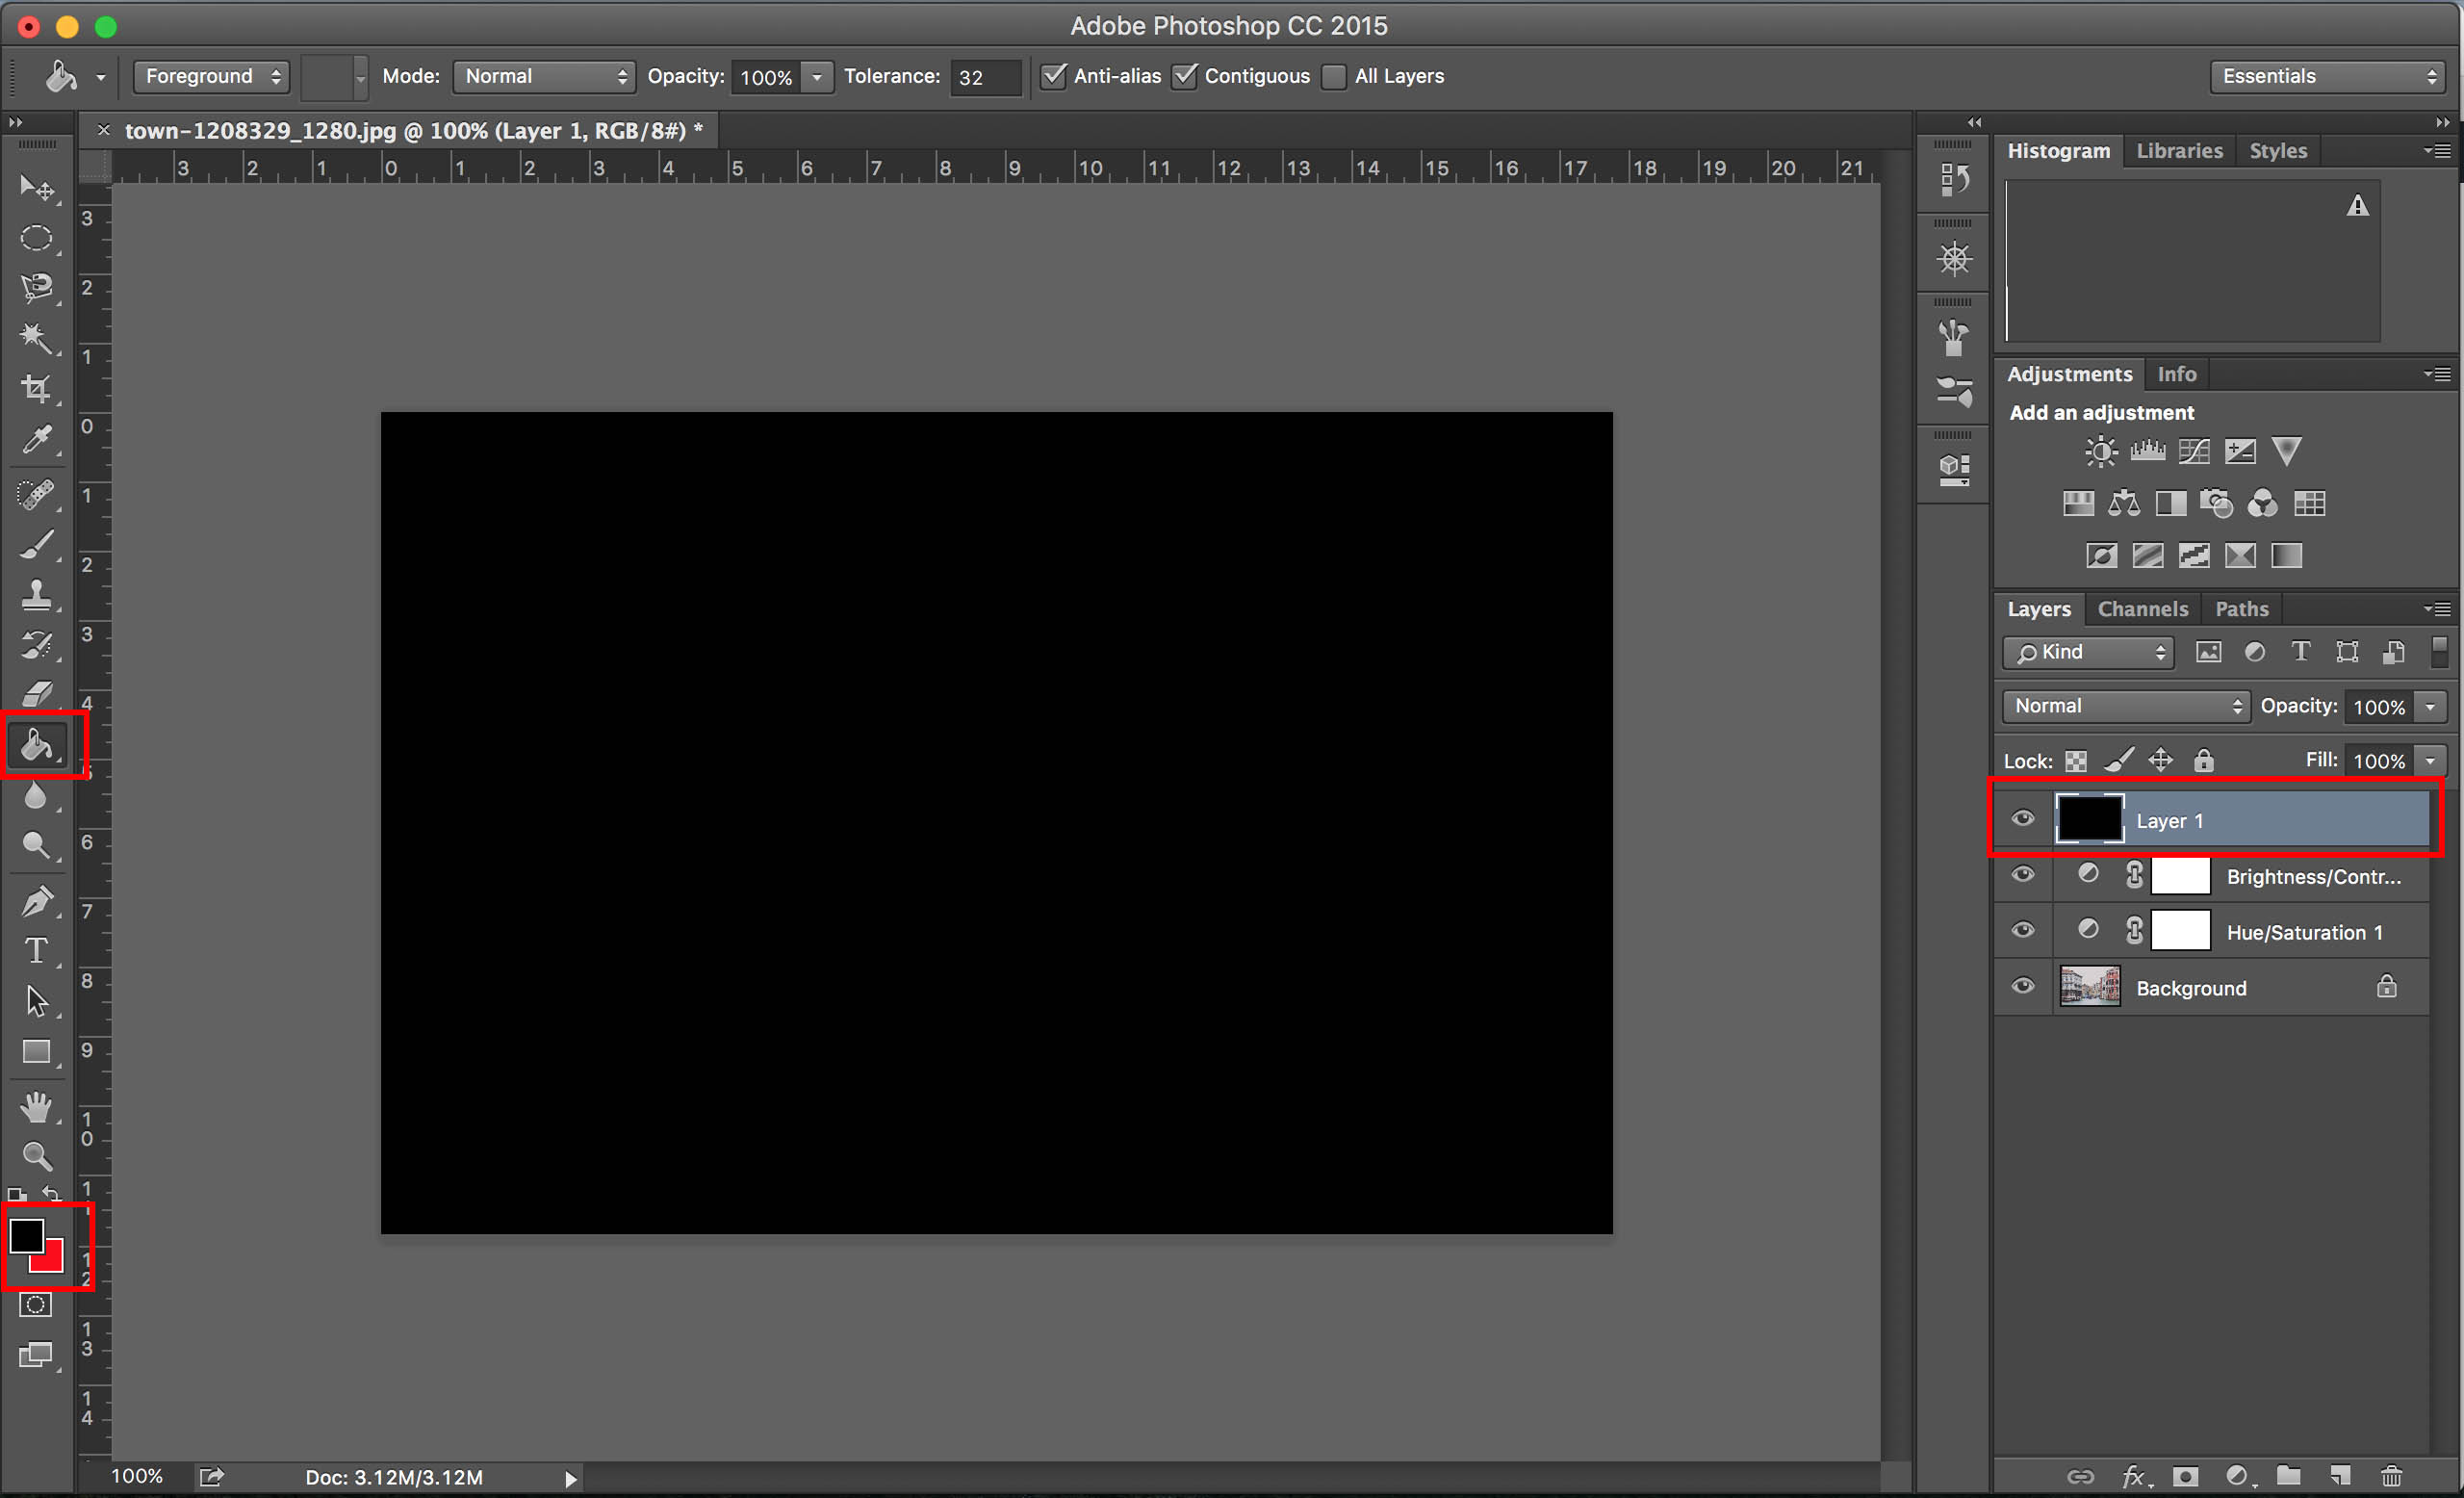
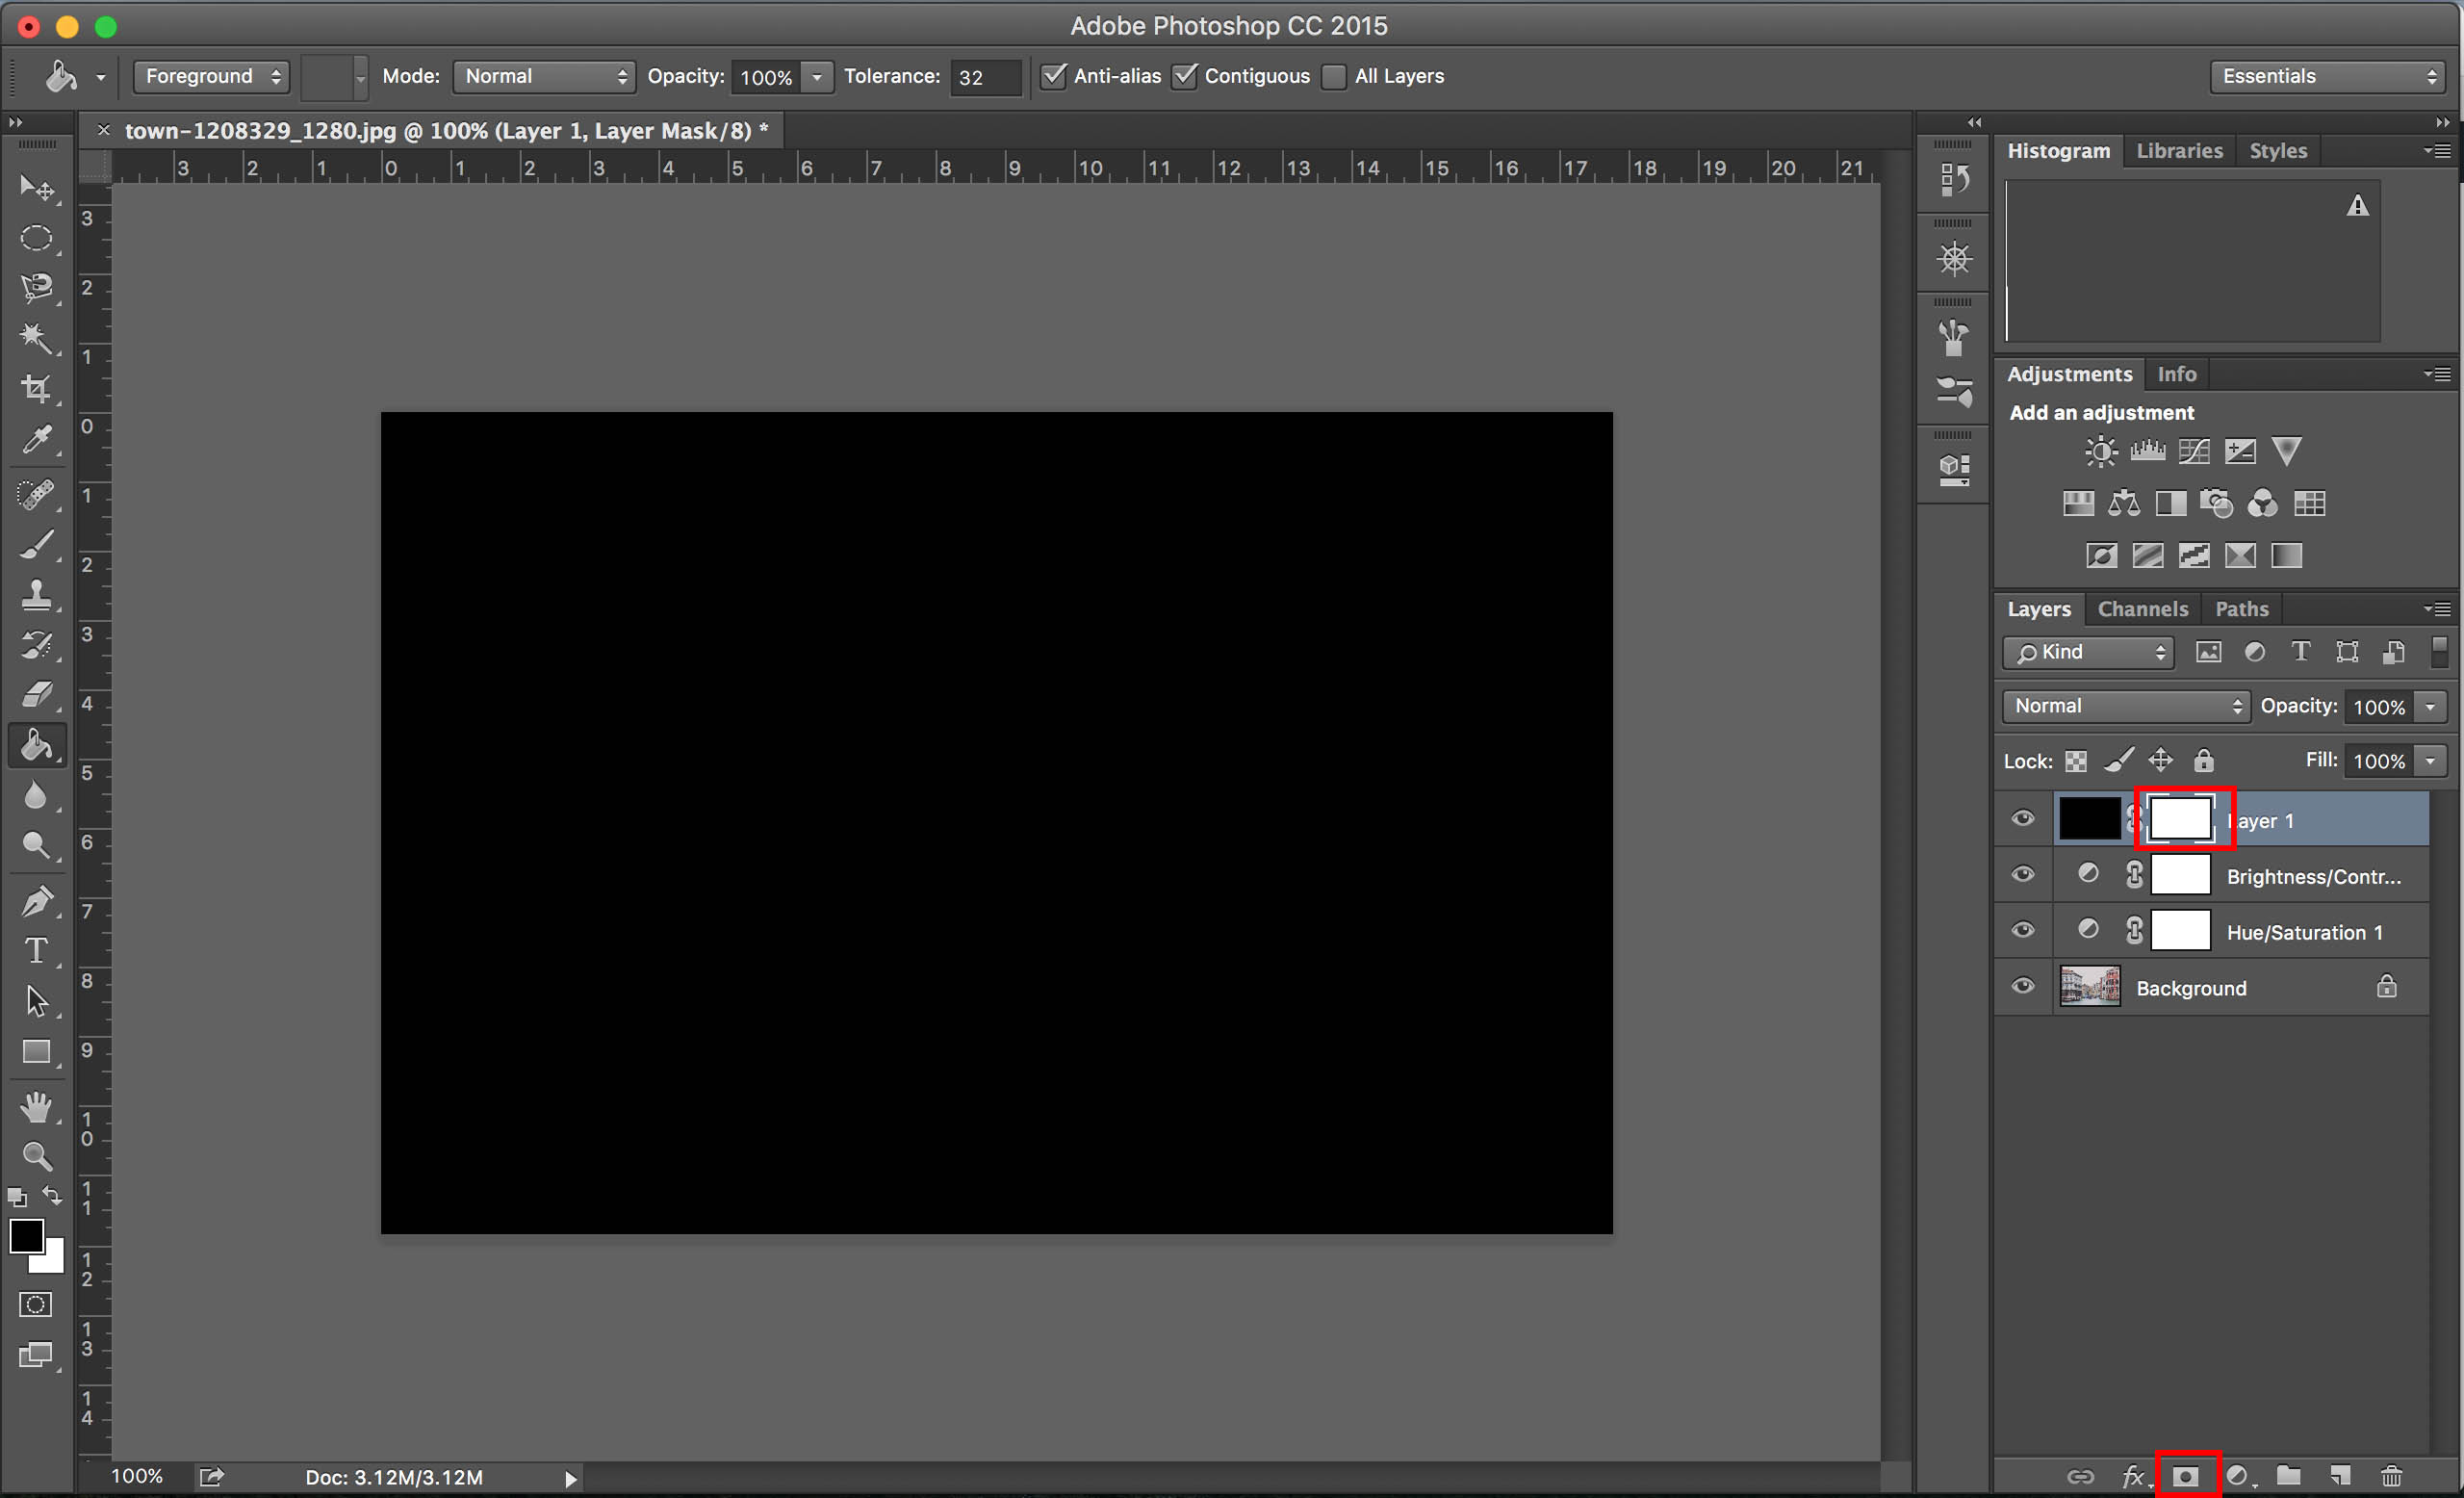
The first thing I do is click on the curves adjustment, place the cursor in the middle of the line and drag down and to the right until the entire image is darker, maybe even darker than I’ll want for the final image. Then I tap Control/Command-I which inverts the curves mask to white and hides what I just did. Next, I grab the Paintbrush, make sure it’s set big and as soft as the slider permits, and after confirming I’m painting with black, I slap the Paintbrush around the edges of the image. But I do this with a plan. If, say, there’s a person in the picture, I avoid painting over her. I almost never paint anywhere in the sky. I conform the vignette to what the image gives me instead of forcing it on the picture. The mask, as you see in the example, is often irregular and nothing like what that simple Post-Crop Vignette function does.

If I go too far, I’ll switch the paint to white and erase whatever masking bothers me. Next, in the Curves adjustment properties box, you’ll notice two little icons at the upper left. One showing the curves graph and another with a big circle. Click on the circle which will bring up two adjustment sliders for the layer mask. Using the second slider labeled “Feather” crank it to the right until you hit somewhere in the 200 pixels range. This will soften the mask so that it’s nearly invisible, but, magically, the effect is still there. You can tell by turning the layer off and on by clicking on the eyeball to the left of the layer named “Curves 1”. If the custom vignette looks a little dark, you can lower the opacity a little.

custom vignette 7_mini
This was the final rappel in a previously unexplored canyon near Death Valley. In the upper left, the curves adjustment has been used to darken the entire image. Upper right: the mask has been inverted and white has been painted over the portions I want to darken for the vignette. Lower left: I’ve feathered the mask to nearly 200 pixels. Lower right: The mask itself showing how irregular the vignette is and customized to avoid darkening the sky and the canyoneering.

Flatten the layers if you so desire (I always do but there are people who like to save the layers in case they need to return), and save the file.

custom vignette 6_mini
Atlas Canyon, Nopah Range. The final image with a bit of contrast added.

As you can tell, I don’t like obvious vignettes. It’s part of my processing toolkit that stays out of sight to the viewer but nevertheless greatly improves the image. So, go lightly with the darkness and it will serve you well.

How to Add a Vignette of Any Color to Any Photo in Photoshop

Ah, the vignette. A tried and true stylistic staple of photography since its inception. Even though a vignette is, strictly speaking, a result of low-quality optical design, it has been adopted by many as a technique to add instant nostalgia and depth to almost any image. The reason this look gives images a vintage feel is because every photograph used to have some level of vignetting. This is actually still true today, but with modern advancements in the lens and camera design (and in-camera software that eliminates any vignetting), we don’t often experience the extreme vignetting like we used to. But this doesn’t mean it has to disappear from our aesthetic vocabularies. In fact, it’s now pretty easy to add a vignette of any color whatsoever, not just black, opening up new possibilities to the modern day photo. Here, we’ll show you one simple technique that will allow you to change the color of you vignette to create just the right feeling in any image.

1. First, you’ll see that our sample image is opened in photoshop and we’ve already made some minor adjustments to it. It’s best to make all other adjustments and edits first so that you don’t balance your image with the vignette in mind, as this can look unnatural in the end.

Screen Shot 2016-03-25 at 12.42.37 PM

2. The next thing we want to do is add a new layer on top of all the others. Do this by clicking the “New Layer” button in the bottom right corner.

Screen Shot 2016-03-25 at 12.44.51 PM

3. Using the “Paint Bucket Tool” on the left side of the screen, fill in the entire new layer with black, which can be selected at the bottom left where the two color swatches are (make sure the black is on top to use that color).

Screen Shot 2016-03-25 at 12.51.28 PM

4. Then you’ll need to add a mask to the same layer you just filled in with black. Do this by clicking the “Add Vector Mask” button on the bottom right corner.

Screen Shot 2016-03-25 at 1.01.24 PM

5. With the mask selected, use the “Elliptical Marquee Tool” on the top left to select a large circle in the center of your image. Even though your image is probably a rectangle, it’s important to make the selection a circle because that’s the shape of a vignette a real life lens would make, which means your final product will look more realistic. To ensure you get a perfect circle, hold down the shift key as you make your selection. Once you’ve made a circle that fits your needs and preferences (the size I have below is a little on the small side), use the arrow keys to nudge the circle to the center of the image.

Do you know how to turn Autumn into Summer in Lightroom and use Photoshop to Create Light Effects?

Screen Shot 2016-03-25 at 1.05.59 PM

6. Check to make sure you “Feather” setting is set to somewhere between 25px and 500px depending on the size of your photo and your personal preferences. Then, making sure your mask is highlighted and not the black layer itself, use the same “Paint Bucket Tool” as before to fill in the selected circle with black. This will actually hide that section of this layer since you are painting the mask with black which hides the layer. This will reveal your original image with a new vignette on top. The last couple of steps may need to be tried a few times for each image to gauge how large of a circle selection is needed and how much feathering is best.

Screen Shot 2016-03-25 at 1.19.04 PM

7. Finally, we can adjust the color and intensity of our vignette freely. To adjust the intensity, just lower the opacity of the layer using the “Opacity” slider on the “Layers Panel.” If you want to change the color, deselect the circle marquee by using the “Marquee Tool” to click on the circle, select the black layer itself (not the mask), and use the “Paint Bucket Tool” to fill the whole layer with a different color.  Below, I adjusted the opacity to 50% and used a reddish color similar to that of the building on the right side of the photo. It’s important to keep your vignette color very dark, otherwise, it won’t look like a real vignette at all.

Screen Shot 2016-03-25 at 1.33.18 PM

Red vignette one

Personally, I was a little underwhelmed by my first attempt shown above, so I went back and experimented a bit, which is key to any good photoshop edit. In a matter of minutes, I was able to retry this technique from the beginning and got a much more satisfying result. I used a larger circle that went all the way to the left and right edges of the image, changed my “Feather” value to 50px, kept the opacity to 40%, and used a color that was closer to the water, giving the whole image a cooler tone. You can see the final result below.

Blue vignette one

And here is the original image for comparison.

Original vignette free

The key to this technique is experimentation. Because you can change the vignette size, feathering, color, and opacity pretty easily, there’s a lot to mess around with. Make sure not to go overboard with the colors, instead of keeping them close to black with a slight lean towards the color you want. Different colors, particularly warm vs cool colors, can drastically change the emotional effect of your image. Sleeklens offers some awesome plugins to adjust the coloring in Lightroom if you don’t want to use this technique. There are also plenty of other ways to give your photos that retro feels, but adding a slightly colored vignette can be a very effective way of altering the mood.

How to Make Your Picture Standout using Lightroom

Vignetting

a picture is often used to enhance the subject of a composition, and Lightroom has an automatic feature to create vignetting in the effects panel. However, this software’s native effect only darkens the edges of the picture, making it look very artificial for my taste. So in this tutorial, you’ll learn an alternative way to make the same effect using specific adjustments in Lightroom, improving your picture and making it stand out just like the before and after below. Let´s go!

How to make your pictures standout using Lightroom

Step 1) Open Lightroom and Import and/or Open the selected image you want to tweak. Then, go to develop mode and select the graduated filter tool on the right tools panel, that way you’ll create a new mask in your image:

Create a graduated filter maskStep 2)

When you select this tool, you’ll notice the cursor will become a cross, click at the top edge of your image and drag to the middle of the image, maintaining a straight line. This way, you’ll create a mask on your image, and can tweak with the adjustments from the right panel, just as a usual image, but it will only apply to the area highlighted by the mask. You can tweak with the values according to your style of editing, but these are the values I’ve used for this example:

Create the first mask

Lowering the temperature of the image and increasing the saturation, I could enhance the colors of the sky, and by tweaking the clarity values, I was able to increase the edge’s contrast, enhancing the details of the sky.

Step 3)

Now you’re gonna do the same thing as the previous step, but this time clicking and dragging from the bottom edge to the middle of the image. You can make the adjustments in the right panel, but for this example, I’ve used the same values from the first mask.

Create the second mask

Step 4) In this next step you’re gonna make the edges of the picture darker than the middle, just like the default vignette effect, but better! Create a radial filter by clicking the tool on the right panel, you’ll notice the cursor will become a cross also (just like the graduated filter). To create this new mask, click at the center of the image and drag all the way to one of the edges, but this time it has a rounded shape. The values I’ve used are in the images below but, again, it will depend on the image you use and the style of editing you have.

Create a radial filter mask

In my case, I like to bring colors to the picture by increasing the saturation and tweak a little bit in the clarity dial to enhance the details of the shadows. To darken the edges of the image, like the default vignette, I´ve lowered the exposure dial a bit.

Step 5)

To finalize the effect, you’ll create another radial filter just like the previous one. Click on the center of the image and drag to the edges, but this time you’re going to invert the mask by checking the box “invert mask” at the bottom of the right panel:

Create a inverted mask

To emphasize the tone at the center of the image, I´ve increased the temperature just a little bit and added a warmer color to the mask, by clicking on the color box at the bottom of the panel and selecting a color similar to the ones at the center of the image. I´ve also adjusted the exposure and sharpness to enhance the details at the center of the image.

By now you should have ended with a totally different picture from the one you had at the beginning of this tutorial. Click “Done” and you can export the picture the way you do usually.

Final Result

In this tutorial, we learned how we could make our pictures stand out using two great tools from Lightroom, the graduated and radial filters. The final result was an image with enhanced colors and a smooth vignette effect with no dark edges. If you have any suggestions or doubts you can write a comment below or contact me directly. See you next time!