Tag: Retro

Using Photoshop Vintage Effect to Create Retro Style Photos

Retro is always something that comes back because we all want to think back to the times when we were younger. It is all about nostalgia, and that nostalgia is what gets people trying to create retro looks not only to movies, but to photography as well. That is essentially the entire concept of Instagram.

In the past, it was very difficult to get those retro photograph feelings without using film photography, but with new trends in digital photography and editing software, it is much easier. There are many things you can do in Photoshop and Lightroom to get the vintage look, but today we’re going to focus on the Photoshop side of it.

Making Adjustments

There are many ways that you can use Photoshop to get that retro feel. You can use helpful tools like Sleeklens presets but there is also a series of steps you can go through to make those adjustments to create the retro feel. The choice is yours if you want to do it quickly, or to do it yourself through the following steps.

retro-photography-1

Make It Soft

The first thing to do with the picture is to lower the clarity to -30, which will create a dreamy softness to the image. From this point, you are going to want to adjust the highlights and brightness of the picture. You can increase the exposure by about half a stop, and brighten up the highlights and the whites to get a bit of that burned out Photoshop vintage effect that is crucial to the retro feel.

You should also use the shadow slider to soften the shadows slightly, especially if you had only one light in the studio with you. Once you have done that, you continue to create the warm and soft tone by increasing the temperature of the photo, while also enhancing everything by decreasing the vibrancy.

retro-photography-2

Fix the Lighting

Chances are you are going to have to fix the lighting of the photo in order to get that retro look. When you are using a photo that only had one light source in it, this is very important to fix that lighting look.

The first thing you have to do is to increase the exposure with the adjustment brush that you have in Photoshop.

Once you have done that, you need to bring up the shadows to open everything up, and then you pull down the saturation.

retro-photography-3

Once that has been completed, you will turn on the Auto Mask and that will allow you to make some more unique changes. Take the Auto Mask and brush it on the outside of the subject. This will be important because it won’t ruin the image, but it will fix some of the lighting and shadow problems. Once you have done that, you turn off Auto Mask and then use a small hard brush to erase the images around the subject where the shadow is very strong, and that will bring it back to what it should be in the original retro look.

Great Tip – 4 cool photoshop tools that improve your editing workflow

Using Presets

One of the big advantages of using presets is that all the work is essentially done for you. All you do is load presets into Photoshop and that will allow you to select what you need to create the retro look. This is a good idea if you are planning on creating a lot of pictures that have a retro look. Presets like the “Nostalgic Vintage Collection” can do this for you, eliminating a lot of the tasks you would have to do yourself. Doing that for one picture is fine, doing it for 10 or more will get very tedious and it will take you a long time to get it done properly.

retro-photography-4

Filters

Some cameras will come with software built into the camera that you can use to create that retro look before you take it to Photoshop. This again can help to eliminate some steps for you, with you just needing to fix things like shadows in the program itself. You can also buy filters that create a retro look but again post-production work in Photoshop is usually required.

The retro look is big right now, and creating that retro look will help set you apart from other photographers. When you can create photos that look like they are from decades past, you are helping to create the nostalgic memories that many have for the past, and the pictures of their past.

Why Film Camera Photography is Making a Comeback

We may have all thought that film was dead with the advent of digital photography. Millions of people switched over to digital and many film companies went out of business. However, like vinyl records, there are those who still use film, and they swear by it. Now, more and more people are going back to analog because it has a unique style to it that they want. Call it a hipster trend if you want, but the truth is that film isn’t going anywhere.

Why Film?

Digital photography is a product of our instant oatmeal society. We take a picture and we delete it, put it in a folder and forget about it, or put it on Facebook. There is no reason to keep anything. You can take 1,000 pictures and choose one great one. The laws of averages dictate that is going to be the case. With analog, you have to be choosier. You have to really want that image because you only have so much film. There are no duck-faced selfies here, just planned out photos that are a step above the rest.

In addition, film just happens to feel better. Like a vinyl record, with the scratches serving as part of the experience, film is slow, it feels different, the cameras sound different and the lighting is captured differently. Like vinyl, there’s a real retro feel – not just in the image, but in the process. Sure, you can edit digital images now to create a retro look in post production, but there’s a romanticism with film.

It forces you to think of things in a whole new way. To shoot analog, you have to throw out everything you know about digital, and learn a new skillset that could make you a better photographer all around.

film-comeback-2

The Advantages of Film

There are many advantages that film has over digital cameras. For one thing, with digital, the sensor determines your resolution. The better the sensor, the better the image itself. With film, you don’t have pixels and you don’t have resolution. You have pure images captured in beautiful, crisp reality. Yes, the type of film and the camera will dictate the image quality, but overall what you capture is what you get. No pixels getting in the way. Depending on the film, you are going to get between four and 16 million pixels. One study found that medium format film – the kind most people use because it is middle-of-the-road – has 400 MP resolution. That is by far more than any digital camera on the market today.

Another advantage is that your analog image is going to be unique because of the film grain, which is the chemical particles that did not receive enough light. Unlike digital noise that looks awful, film grain can really add to the image and give it something unique, like a fingerprint.

The dynamic range of the film camera is another advantage over a digital camera, although less so now. Most film cameras have 13 stops of dynamic range, while most digital cameras are slightly below that.

film-comeback-3

Lastly, when you are shooting in low light conditions with a digital camera, you may get a great deal of digital noise. This can make the picture look simply awful. It is something that must be avoided, but it can be hard to if you don’t have a top of the line camera.

Old school, analog cameras tend to have better sensors for this type of scenario without sacrificing any of the movement speed you may need.

Should You Switch?

The short answer is that no, you should not. Digital cameras have many advantages and are really great machines to have at your disposal. When you need a lot of pictures and don’t want to waste a lot of time on them, go with digital. That being said, there is nothing wrong with having a film camera at your disposal. This can help you begin to appreciate how pictures were taken in the past, but it can also get you to think about new ways to get images. You will learn how to develop images, how to position things for the perfect setting. In many ways, film cameras are a great way to learn how to take pictures because everything needs to be right so you don’t end up wasting any film. In that regard, they are a training tool for the new photographer.

film-comeback-4

No, film is not going to overtake digital cameras. With every cell phone now having a camera inside, there is no chance of that happening. That being said, film is still holding on and it is not going to disappear completely. There are far too many people who want to use these retro-style cameras to capture unique images that will stand out and really make your images snap. Embrace the future of photography, but also don’t forget about the past. Take a turn with a film camera and you will be happy you did, because they are something truly unique and truly special to use.

How to Add a Vignette of Any Color to Any Photo in Photoshop

Ah, the vignette. A tried and true stylistic staple of photography since its inception. Even though a vignette is, strictly speaking, a result of low-quality optical design, it has been adopted by many as a technique to add instant nostalgia and depth to almost any image. The reason this look gives images a vintage feel is because every photograph used to have some level of vignetting. This is actually still true today, but with modern advancements in the lens and camera design (and in-camera software that eliminates any vignetting), we don’t often experience the extreme vignetting like we used to. But this doesn’t mean it has to disappear from our aesthetic vocabularies. In fact, it’s now pretty easy to add a vignette of any color whatsoever, not just black, opening up new possibilities to the modern day photo. Here, we’ll show you one simple technique that will allow you to change the color of you vignette to create just the right feeling in any image.

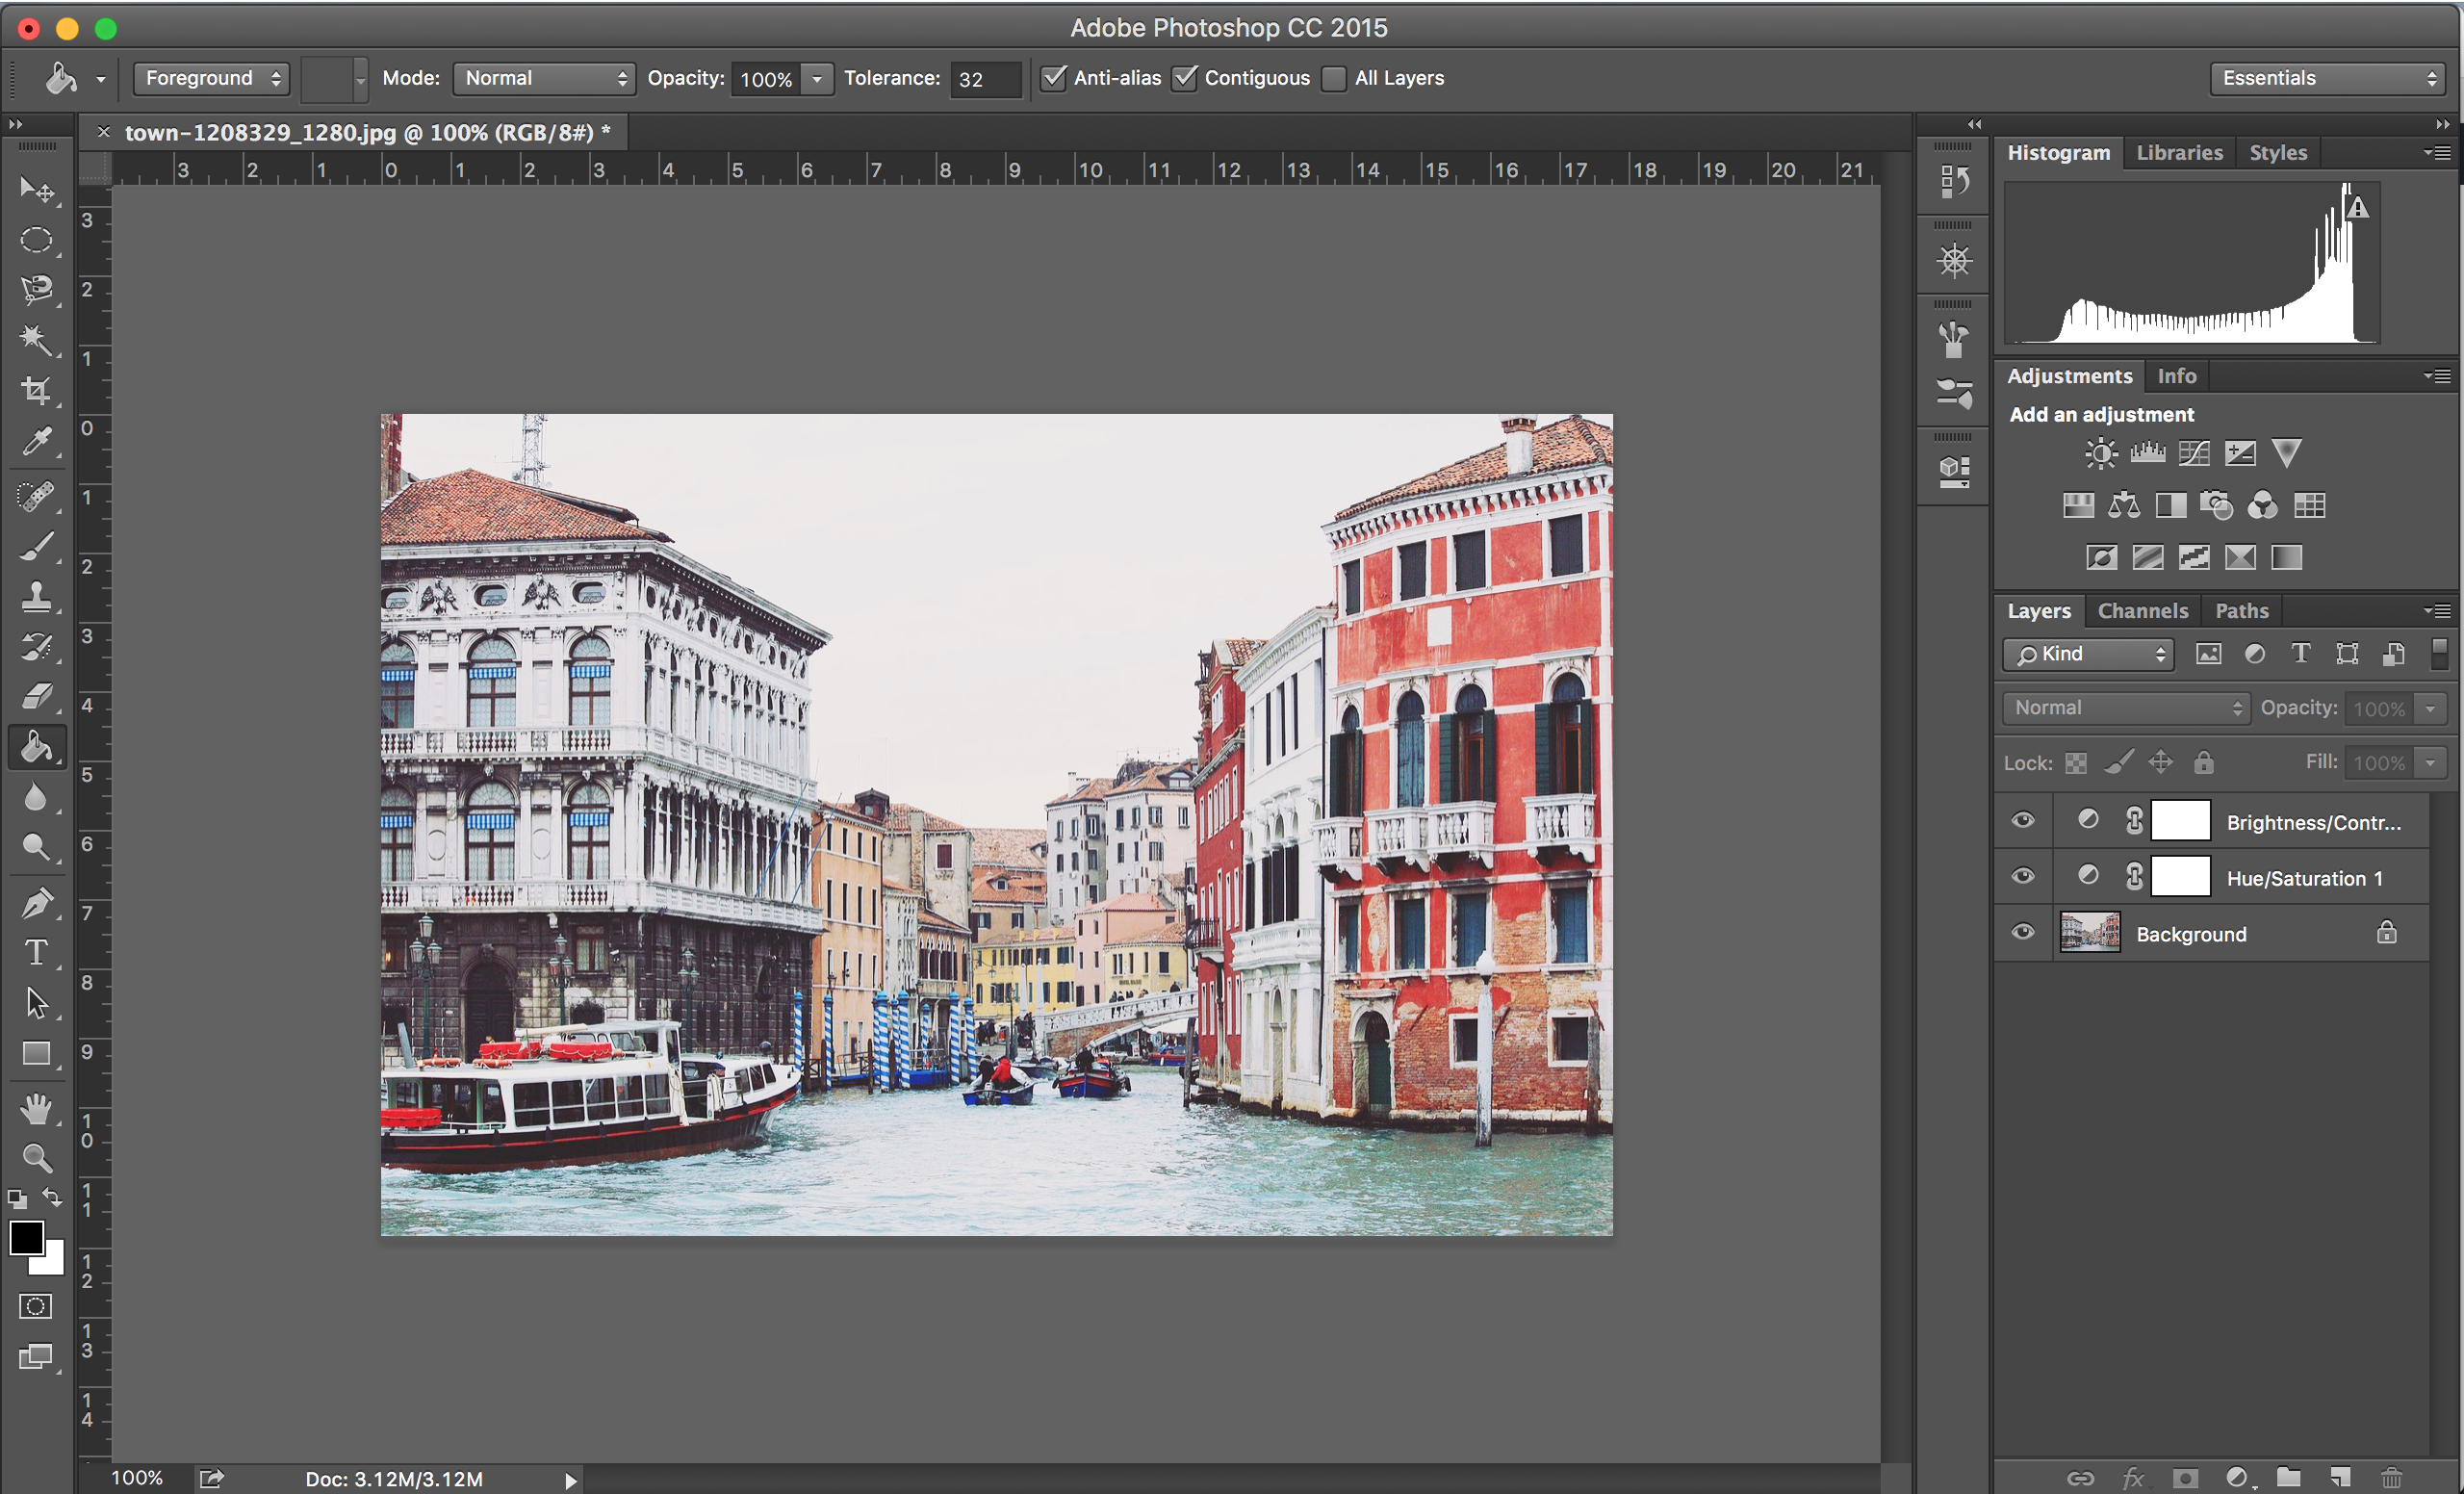
1. First, you’ll see that our sample image is opened in photoshop and we’ve already made some minor adjustments to it. It’s best to make all other adjustments and edits first so that you don’t balance your image with the vignette in mind, as this can look unnatural in the end.

Screen Shot 2016-03-25 at 12.42.37 PM

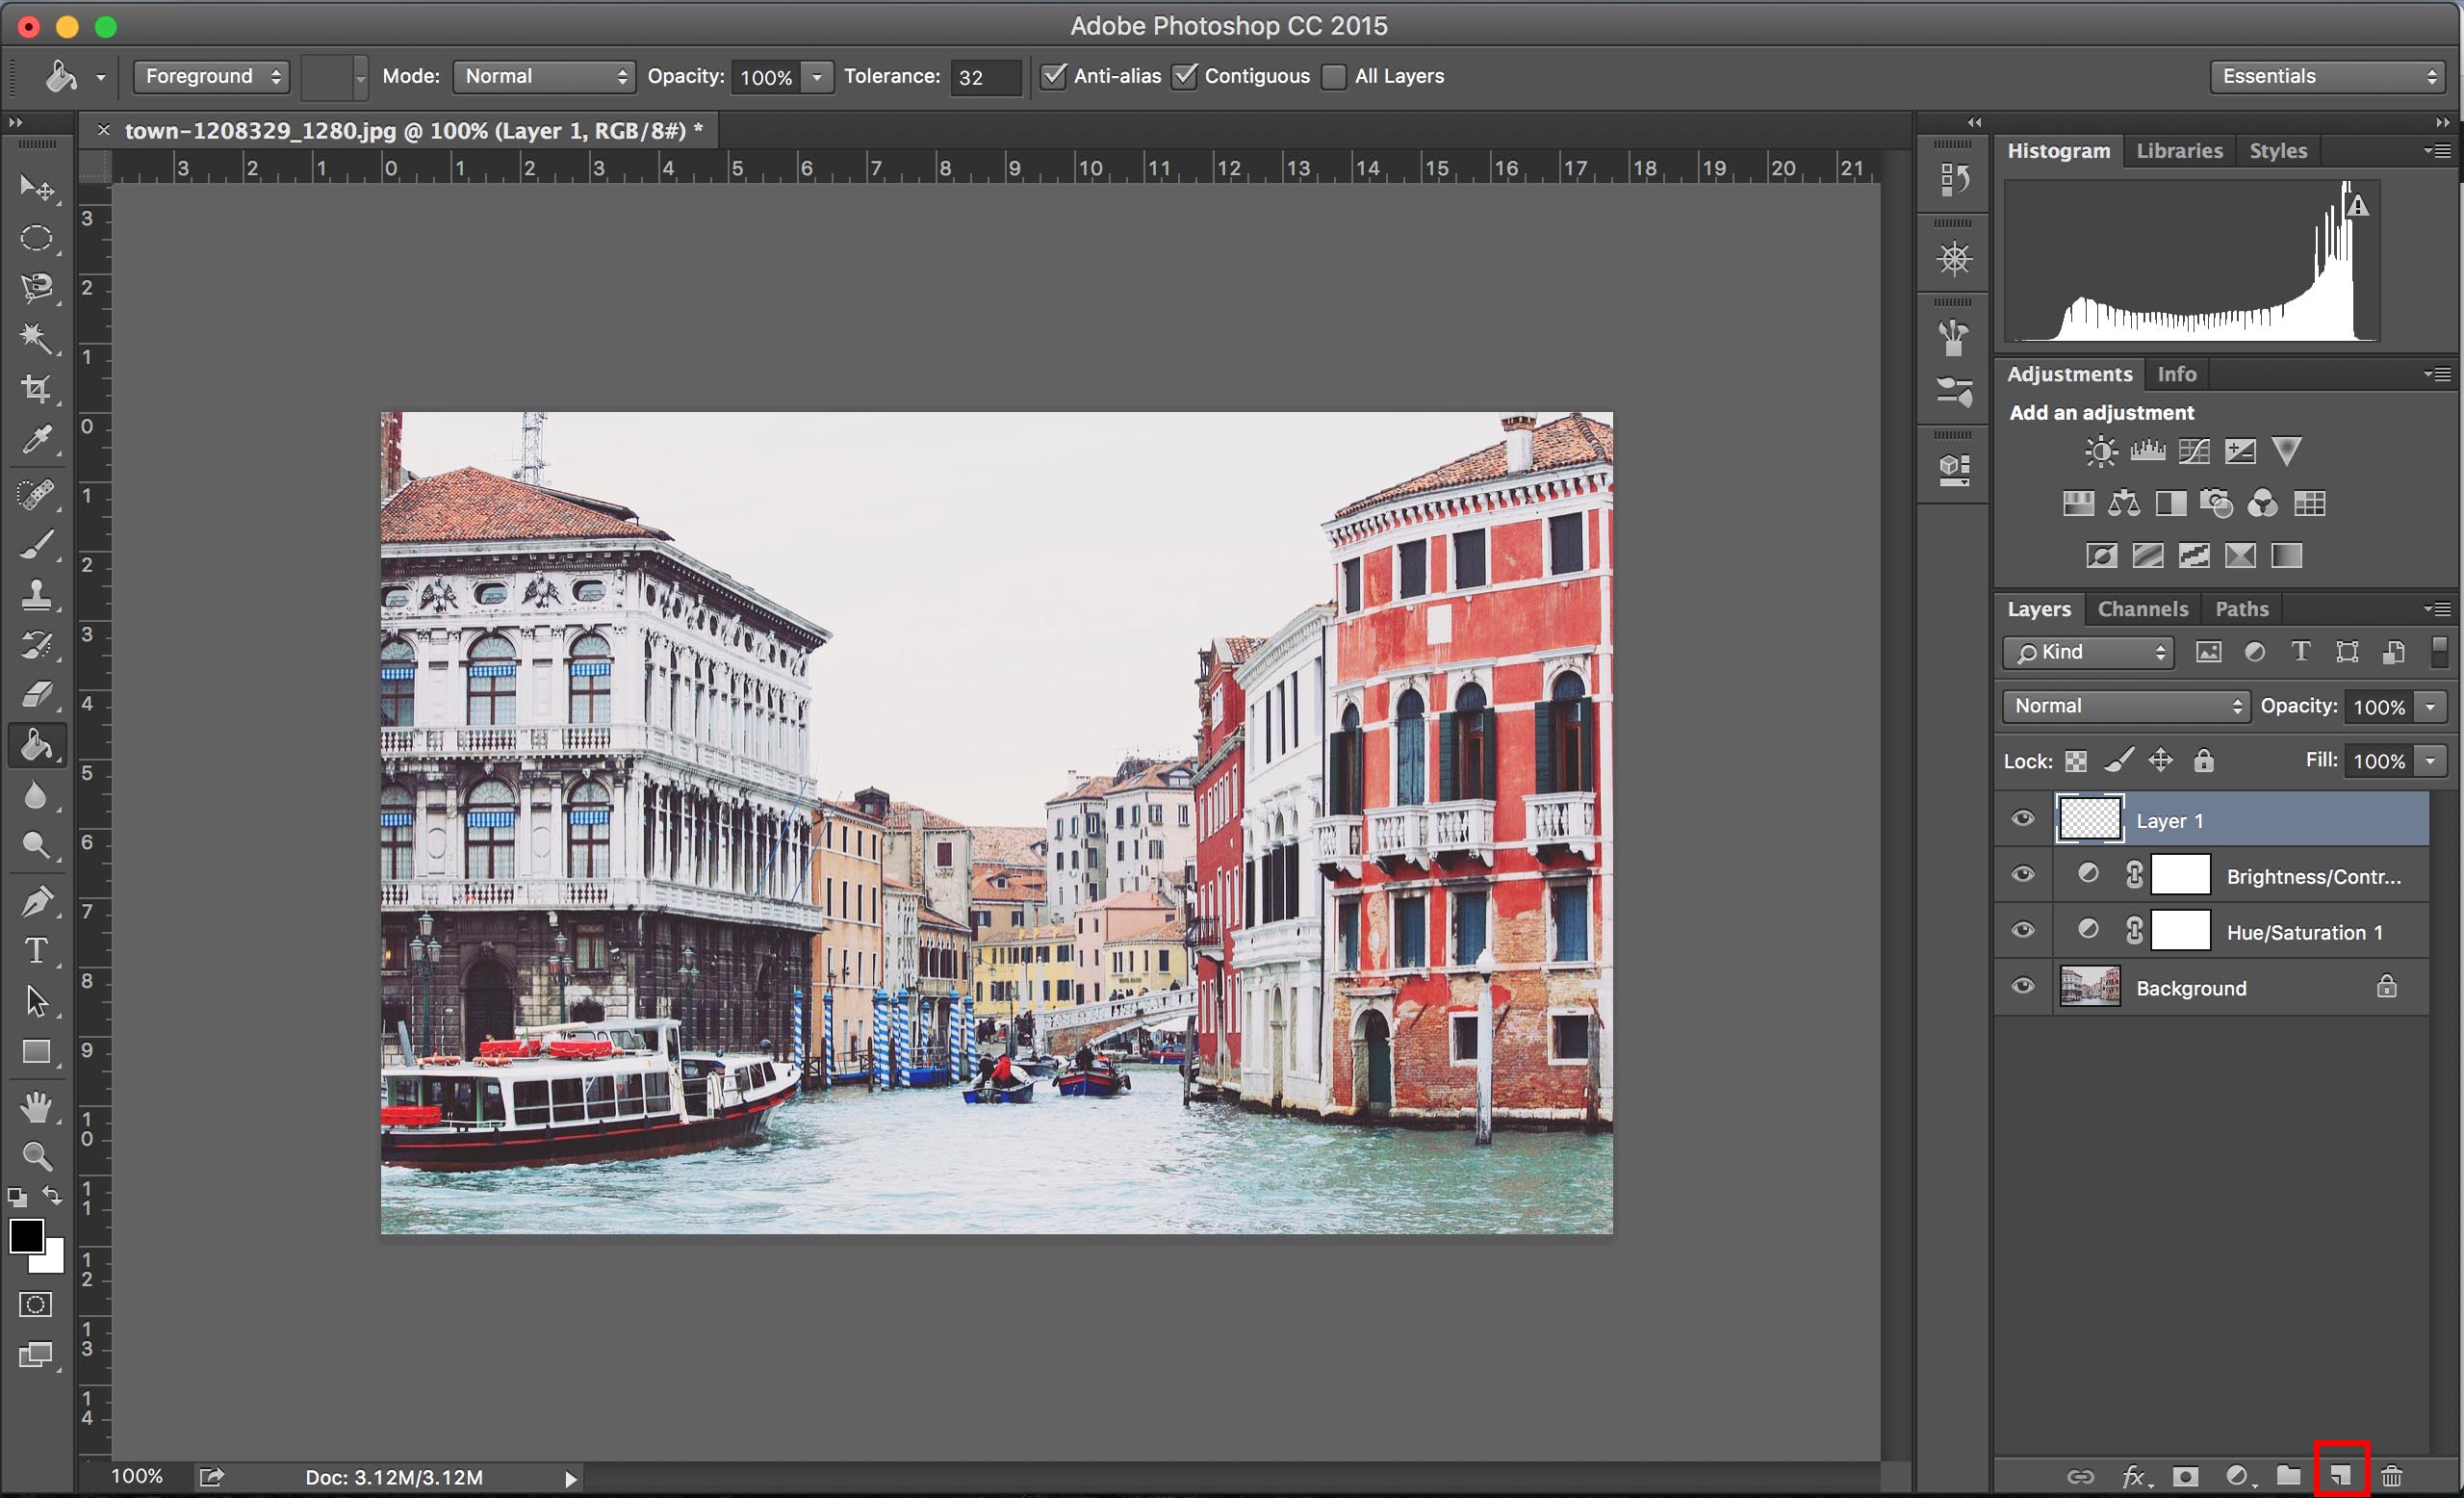
2. The next thing we want to do is add a new layer on top of all the others. Do this by clicking the “New Layer” button in the bottom right corner.

Screen Shot 2016-03-25 at 12.44.51 PM

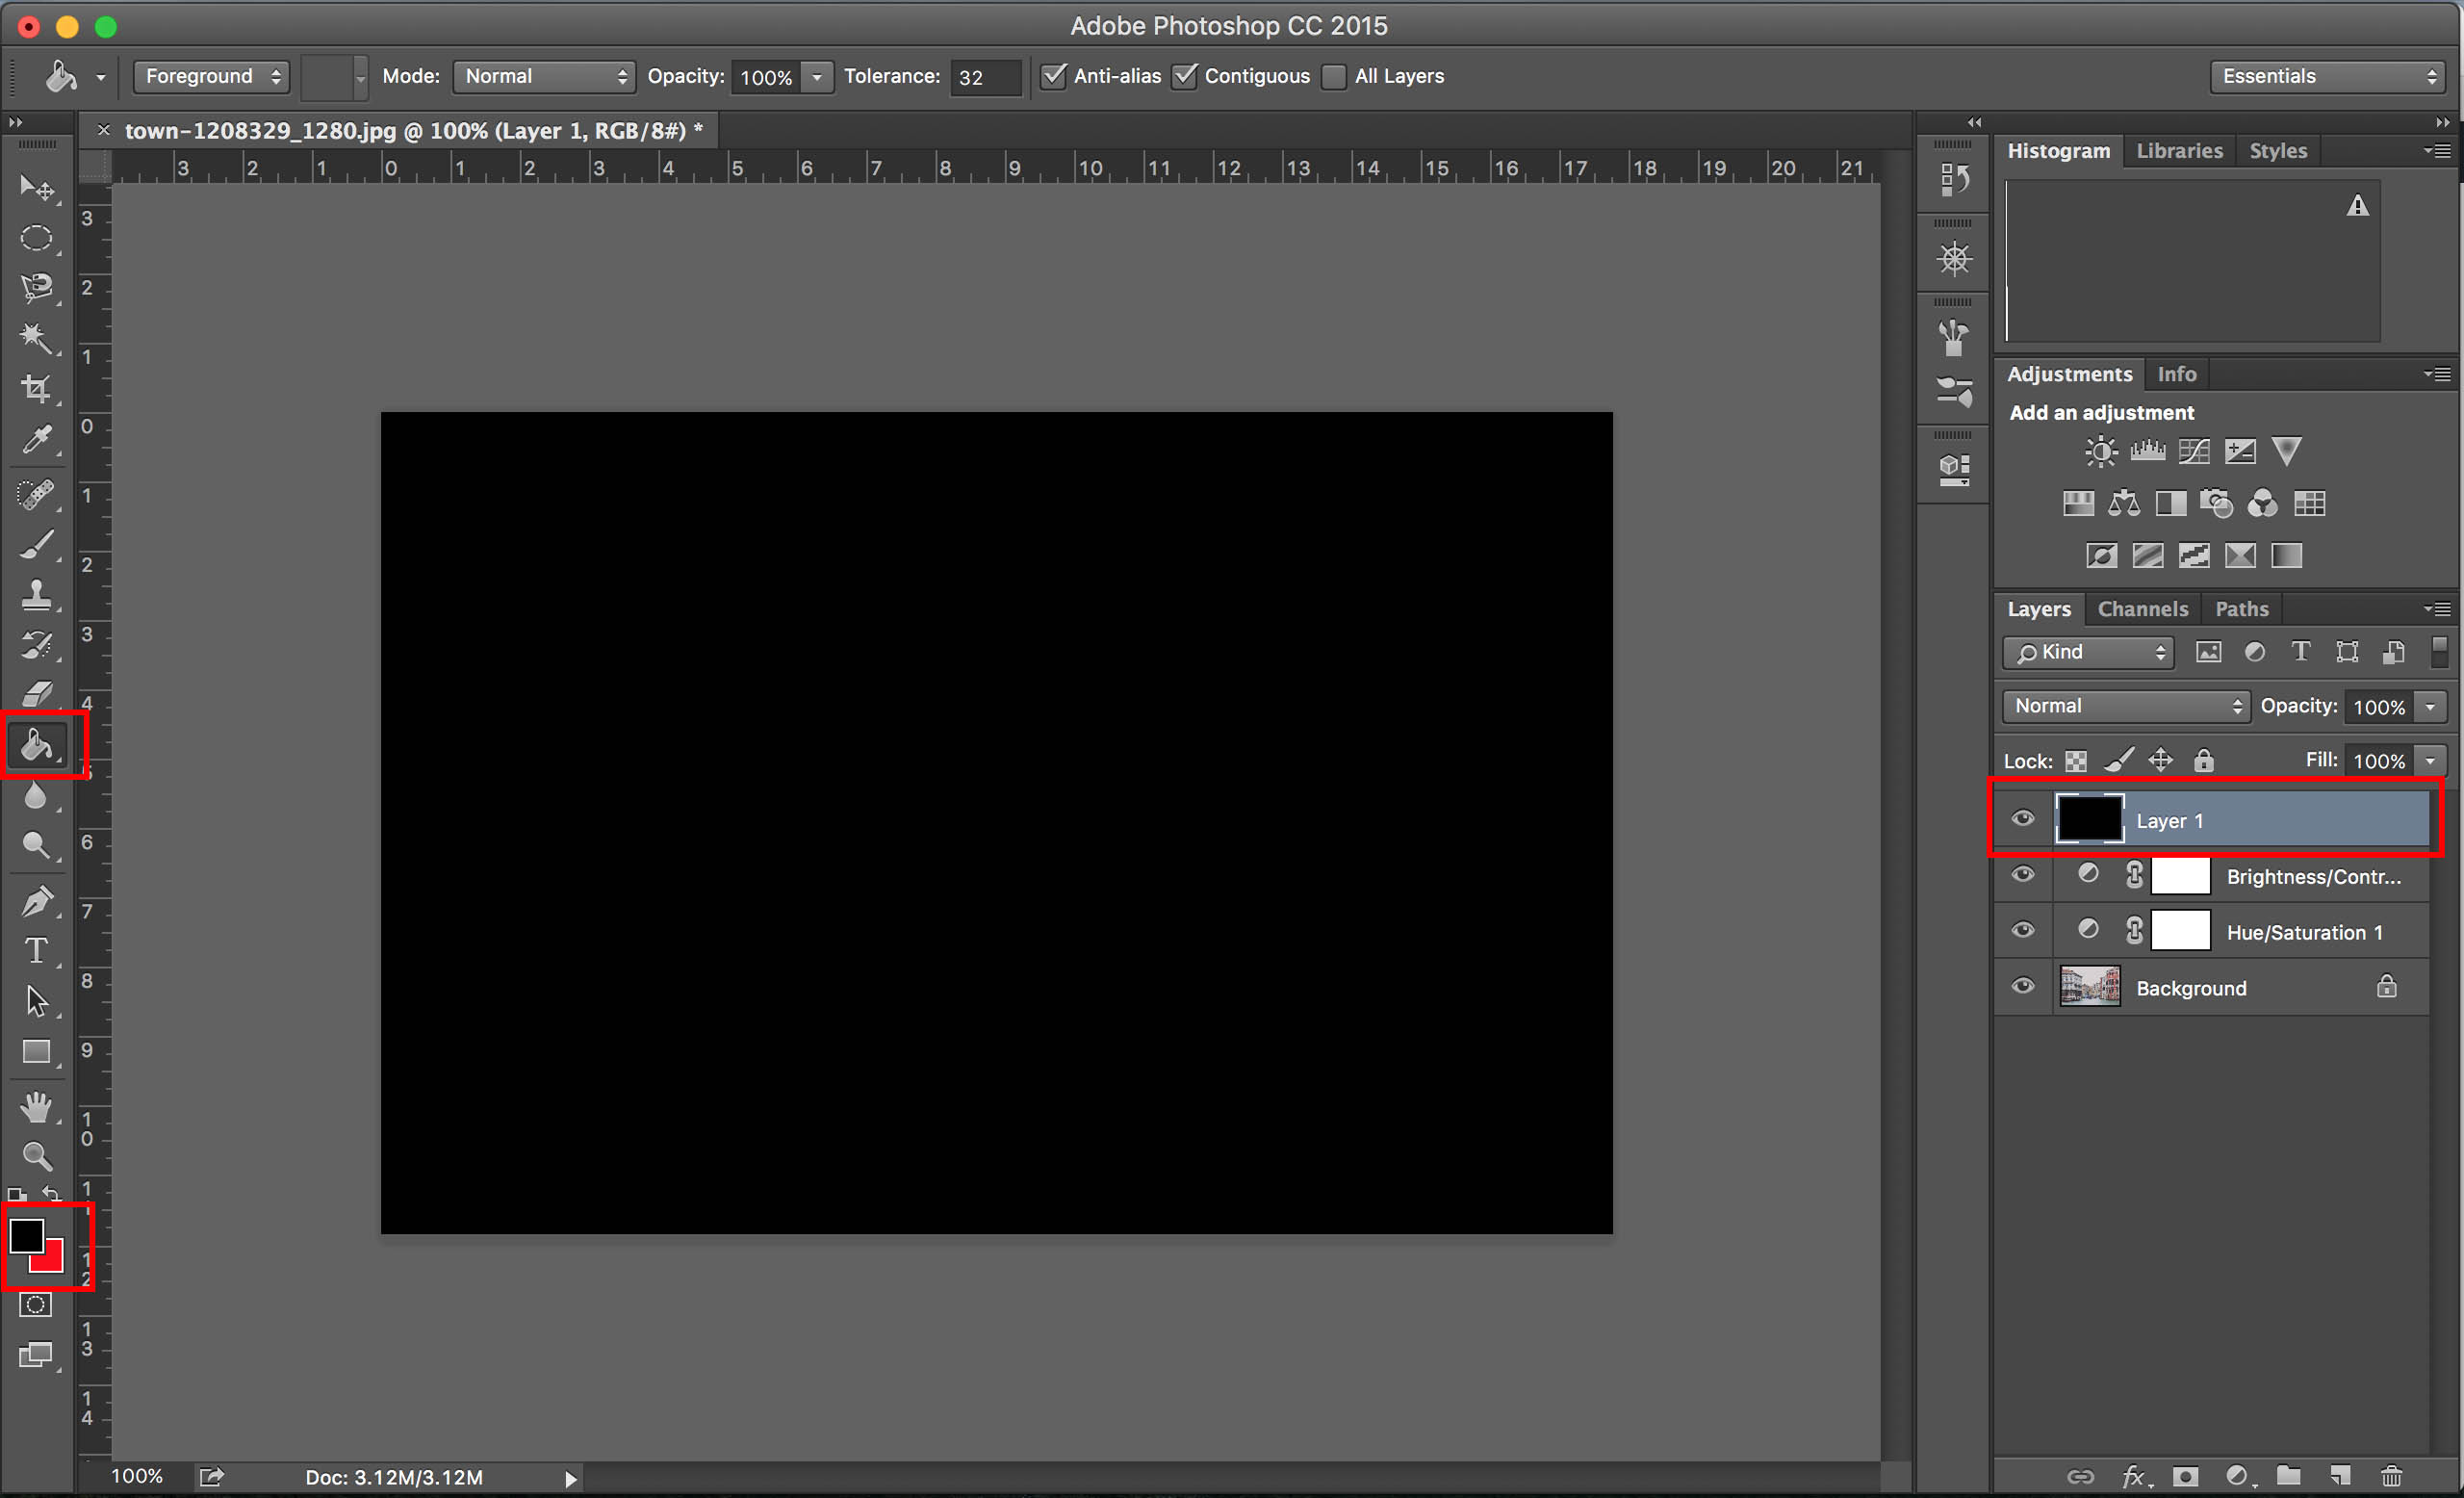
3. Using the “Paint Bucket Tool” on the left side of the screen, fill in the entire new layer with black, which can be selected at the bottom left where the two color swatches are (make sure the black is on top to use that color).

Screen Shot 2016-03-25 at 12.51.28 PM

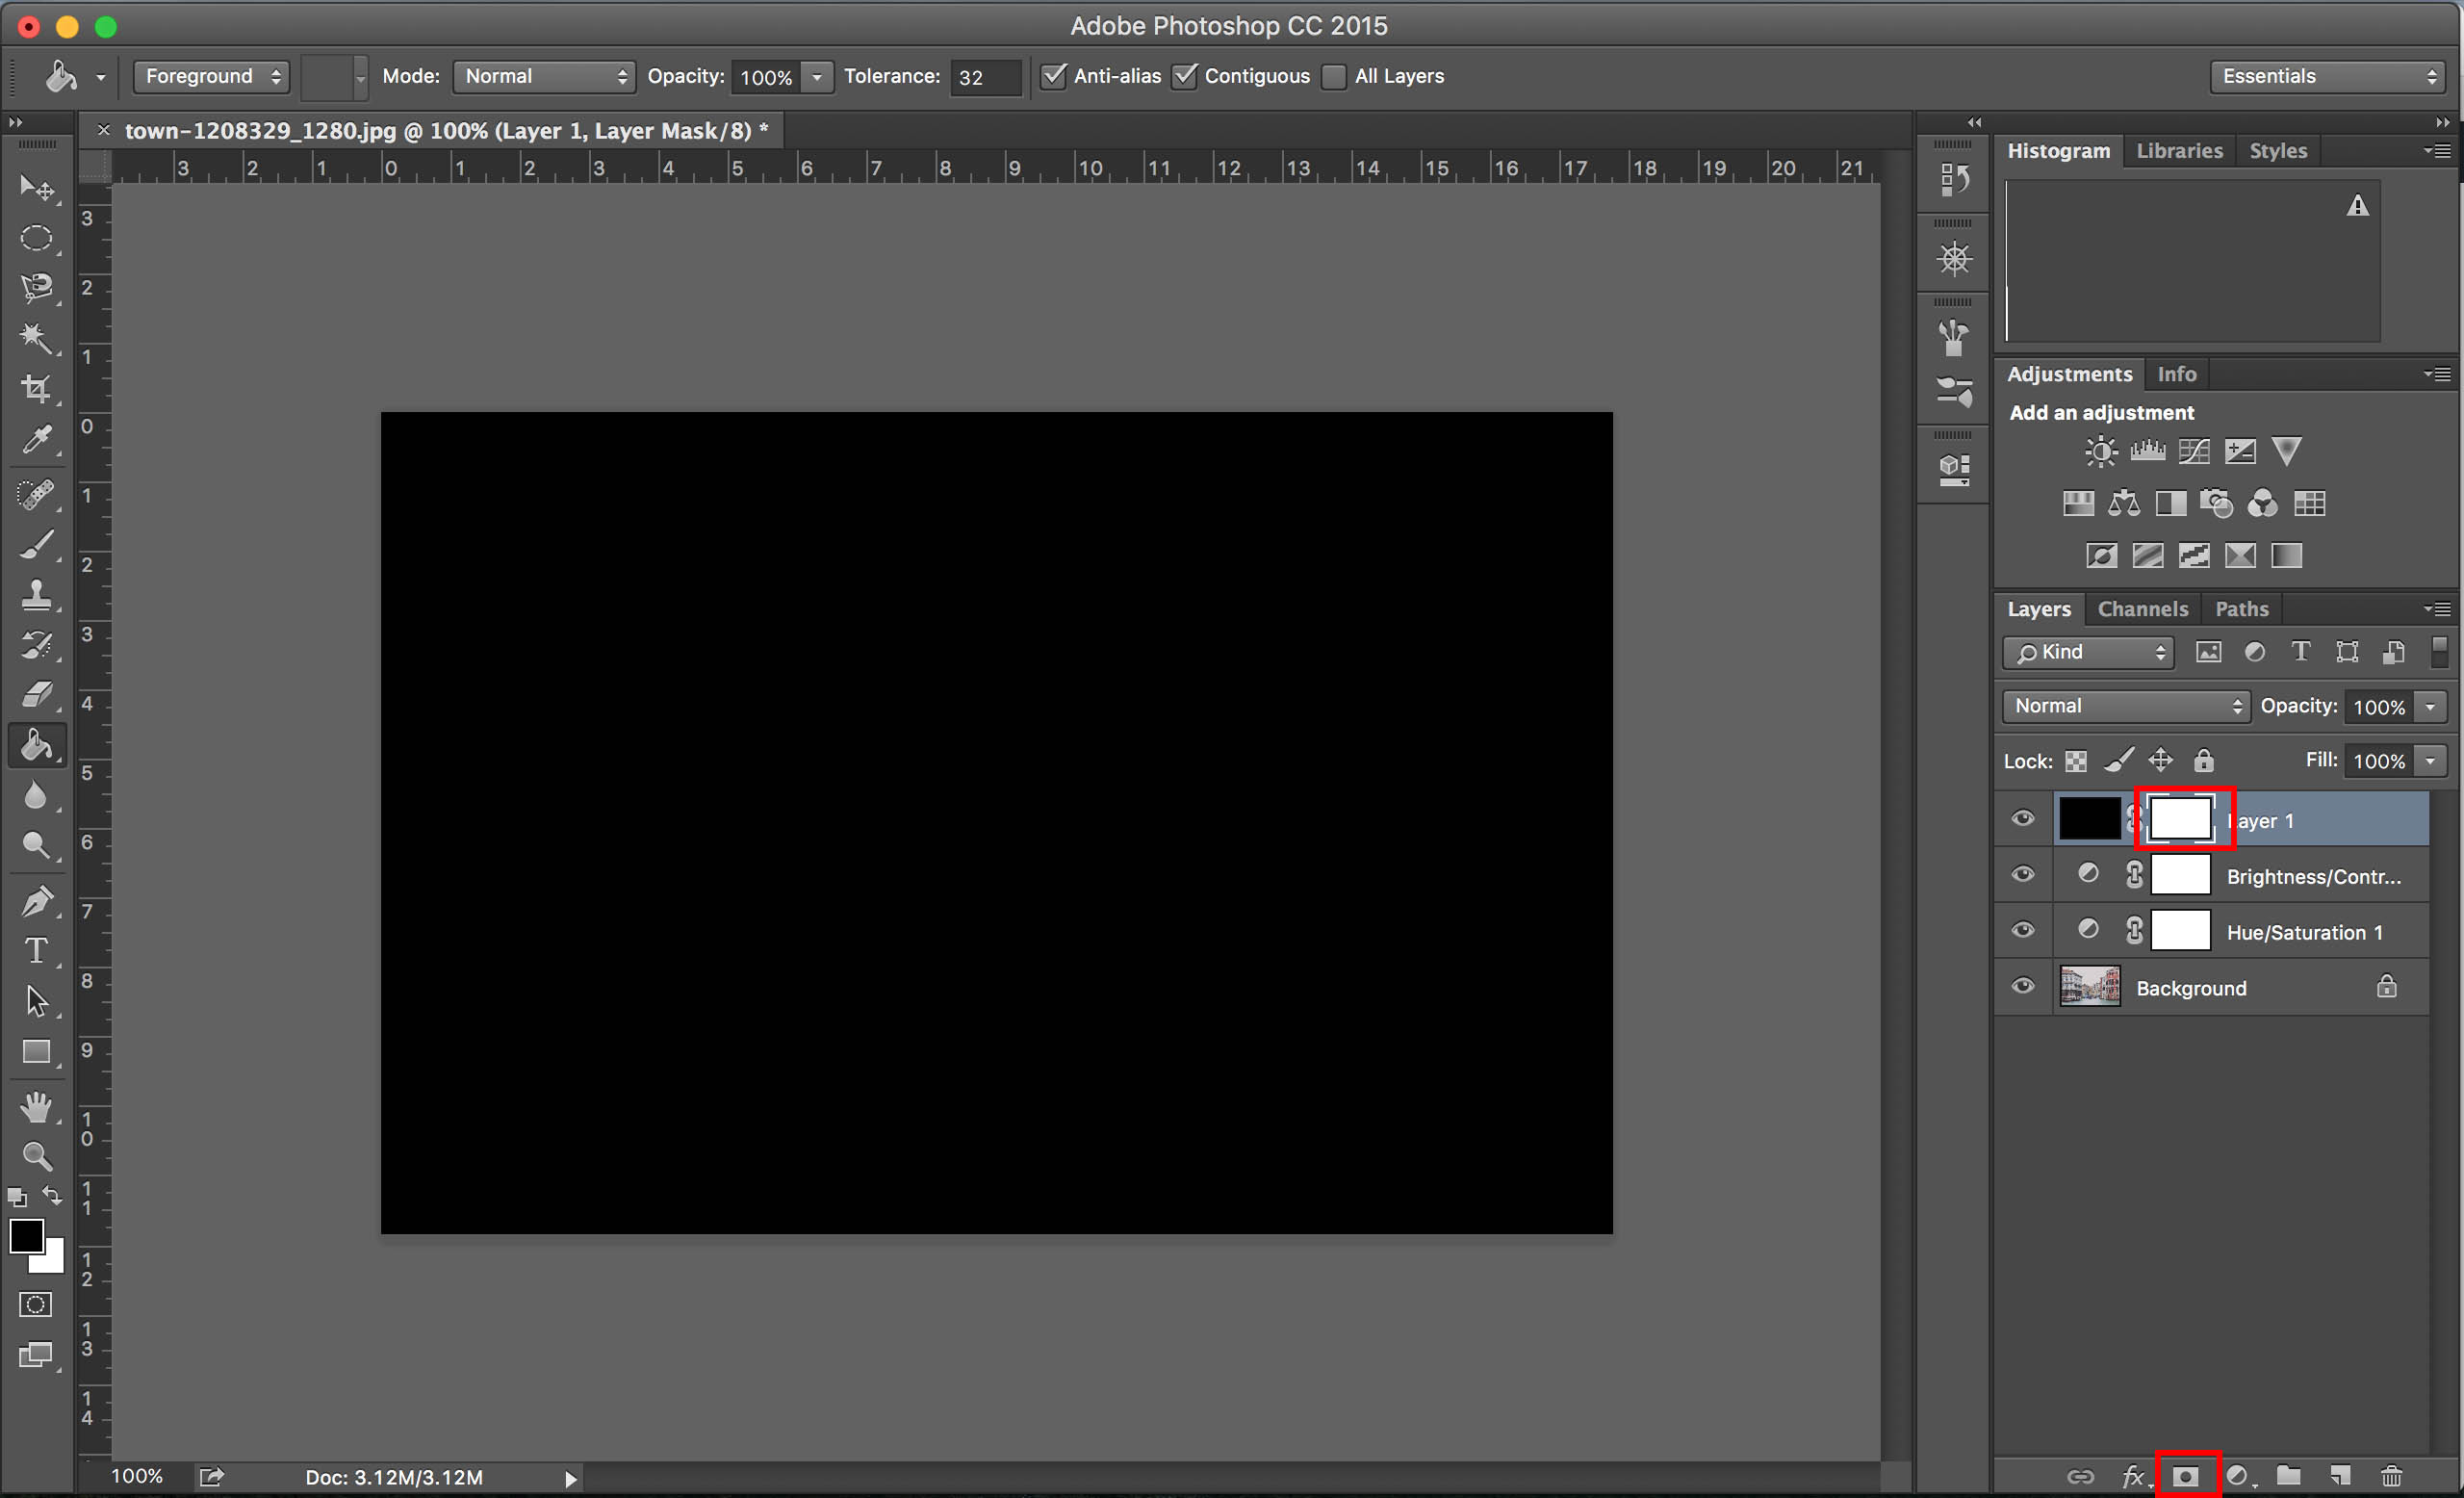
4. Then you’ll need to add a mask to the same layer you just filled in with black. Do this by clicking the “Add Vector Mask” button on the bottom right corner.

Screen Shot 2016-03-25 at 1.01.24 PM

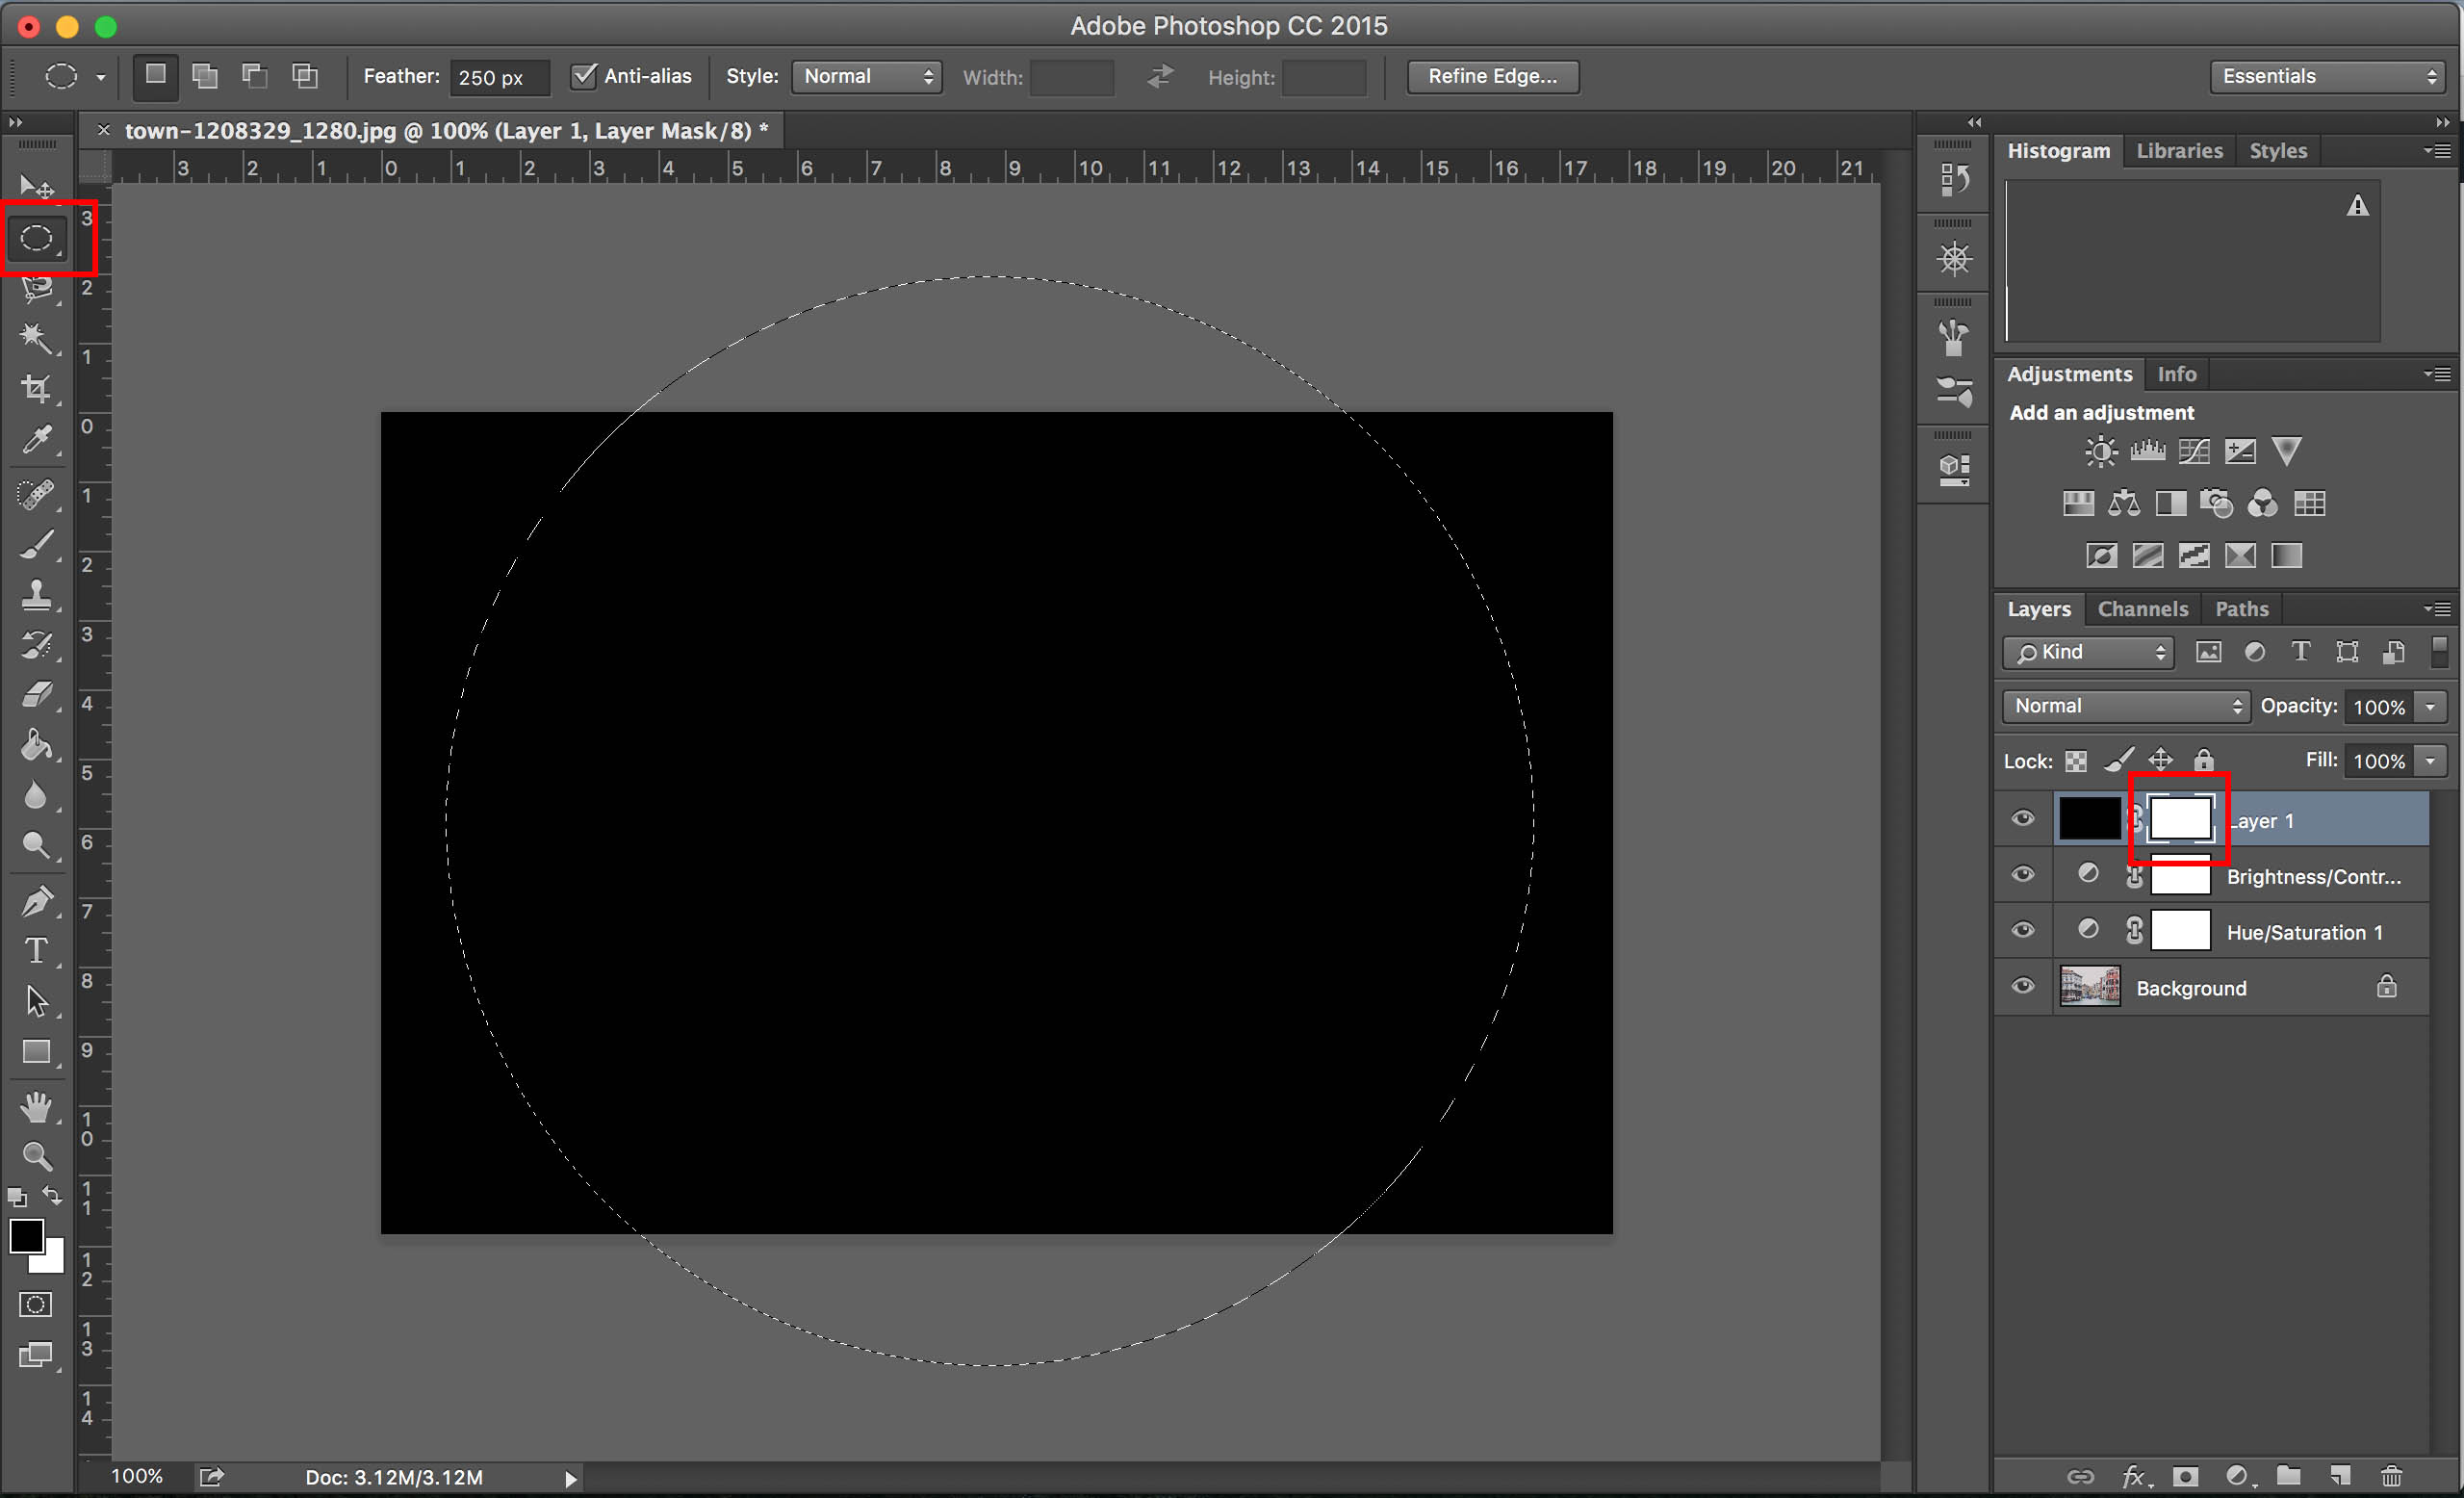
5. With the mask selected, use the “Elliptical Marquee Tool” on the top left to select a large circle in the center of your image. Even though your image is probably a rectangle, it’s important to make the selection a circle because that’s the shape of a vignette a real life lens would make, which means your final product will look more realistic. To ensure you get a perfect circle, hold down the shift key as you make your selection. Once you’ve made a circle that fits your needs and preferences (the size I have below is a little on the small side), use the arrow keys to nudge the circle to the center of the image.

Do you know how to turn Autumn into Summer in Lightroom and use Photoshop to Create Light Effects?

Screen Shot 2016-03-25 at 1.05.59 PM

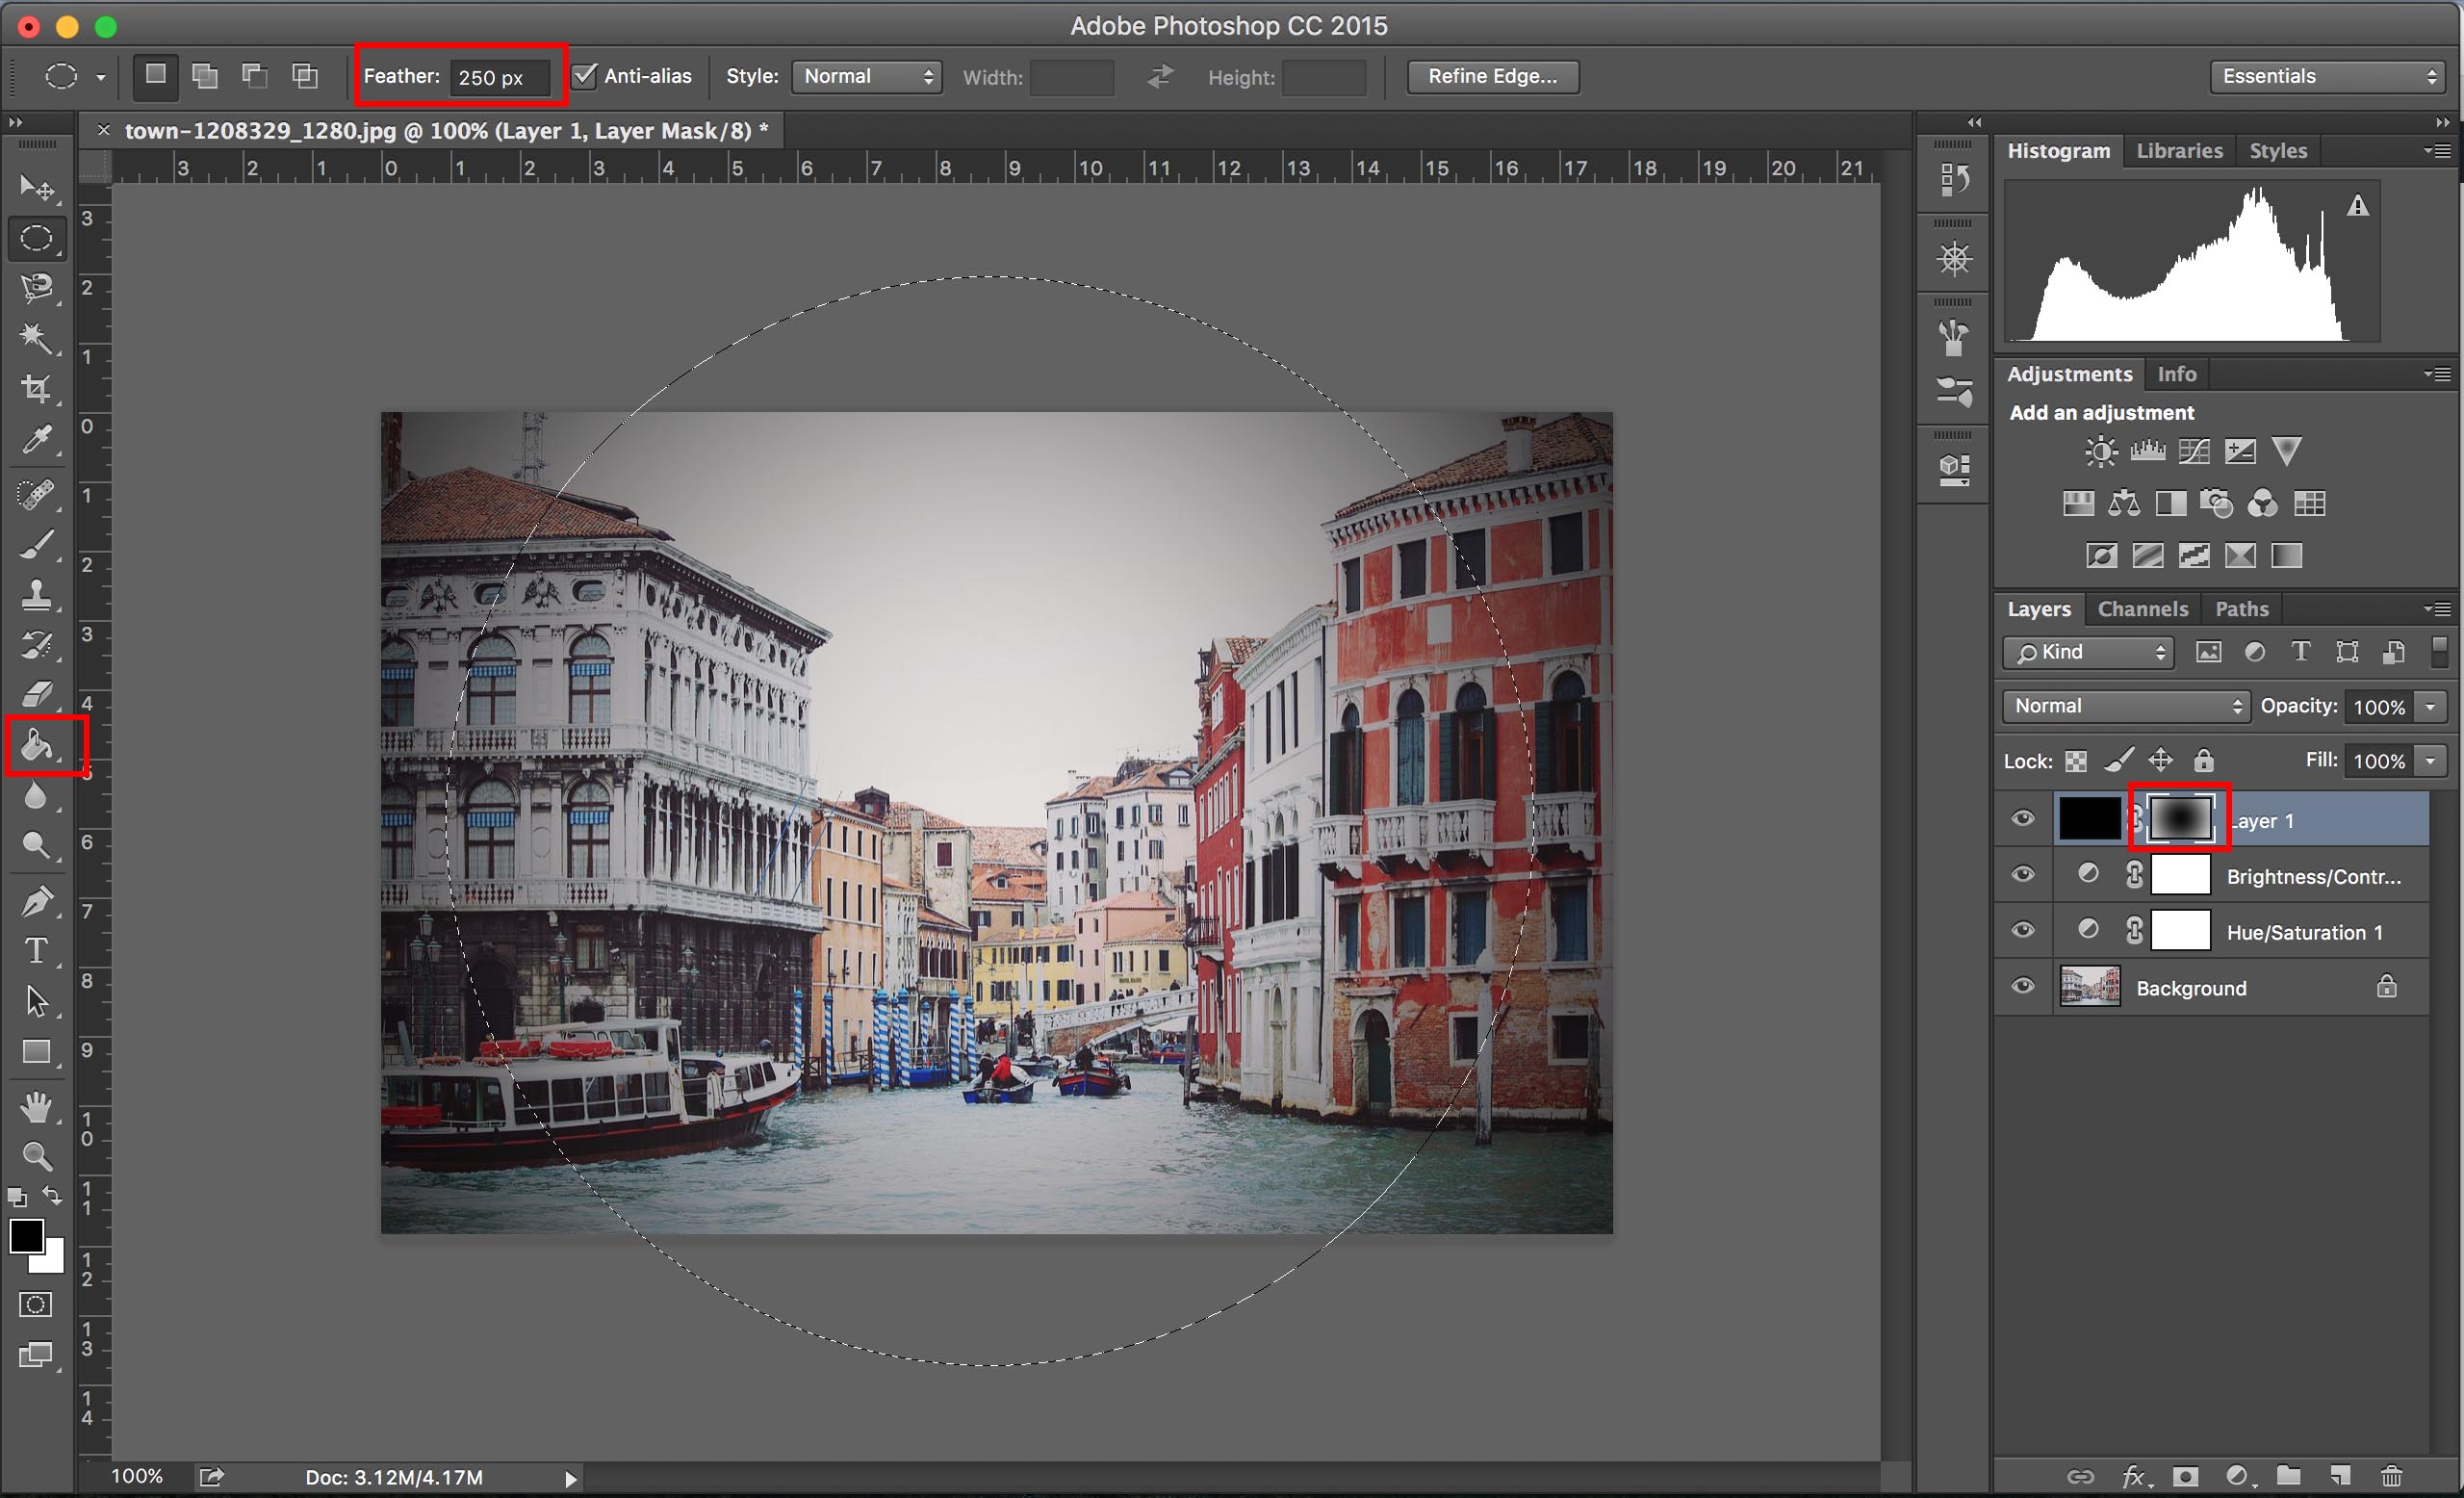
6. Check to make sure you “Feather” setting is set to somewhere between 25px and 500px depending on the size of your photo and your personal preferences. Then, making sure your mask is highlighted and not the black layer itself, use the same “Paint Bucket Tool” as before to fill in the selected circle with black. This will actually hide that section of this layer since you are painting the mask with black which hides the layer. This will reveal your original image with a new vignette on top. The last couple of steps may need to be tried a few times for each image to gauge how large of a circle selection is needed and how much feathering is best.

Screen Shot 2016-03-25 at 1.19.04 PM

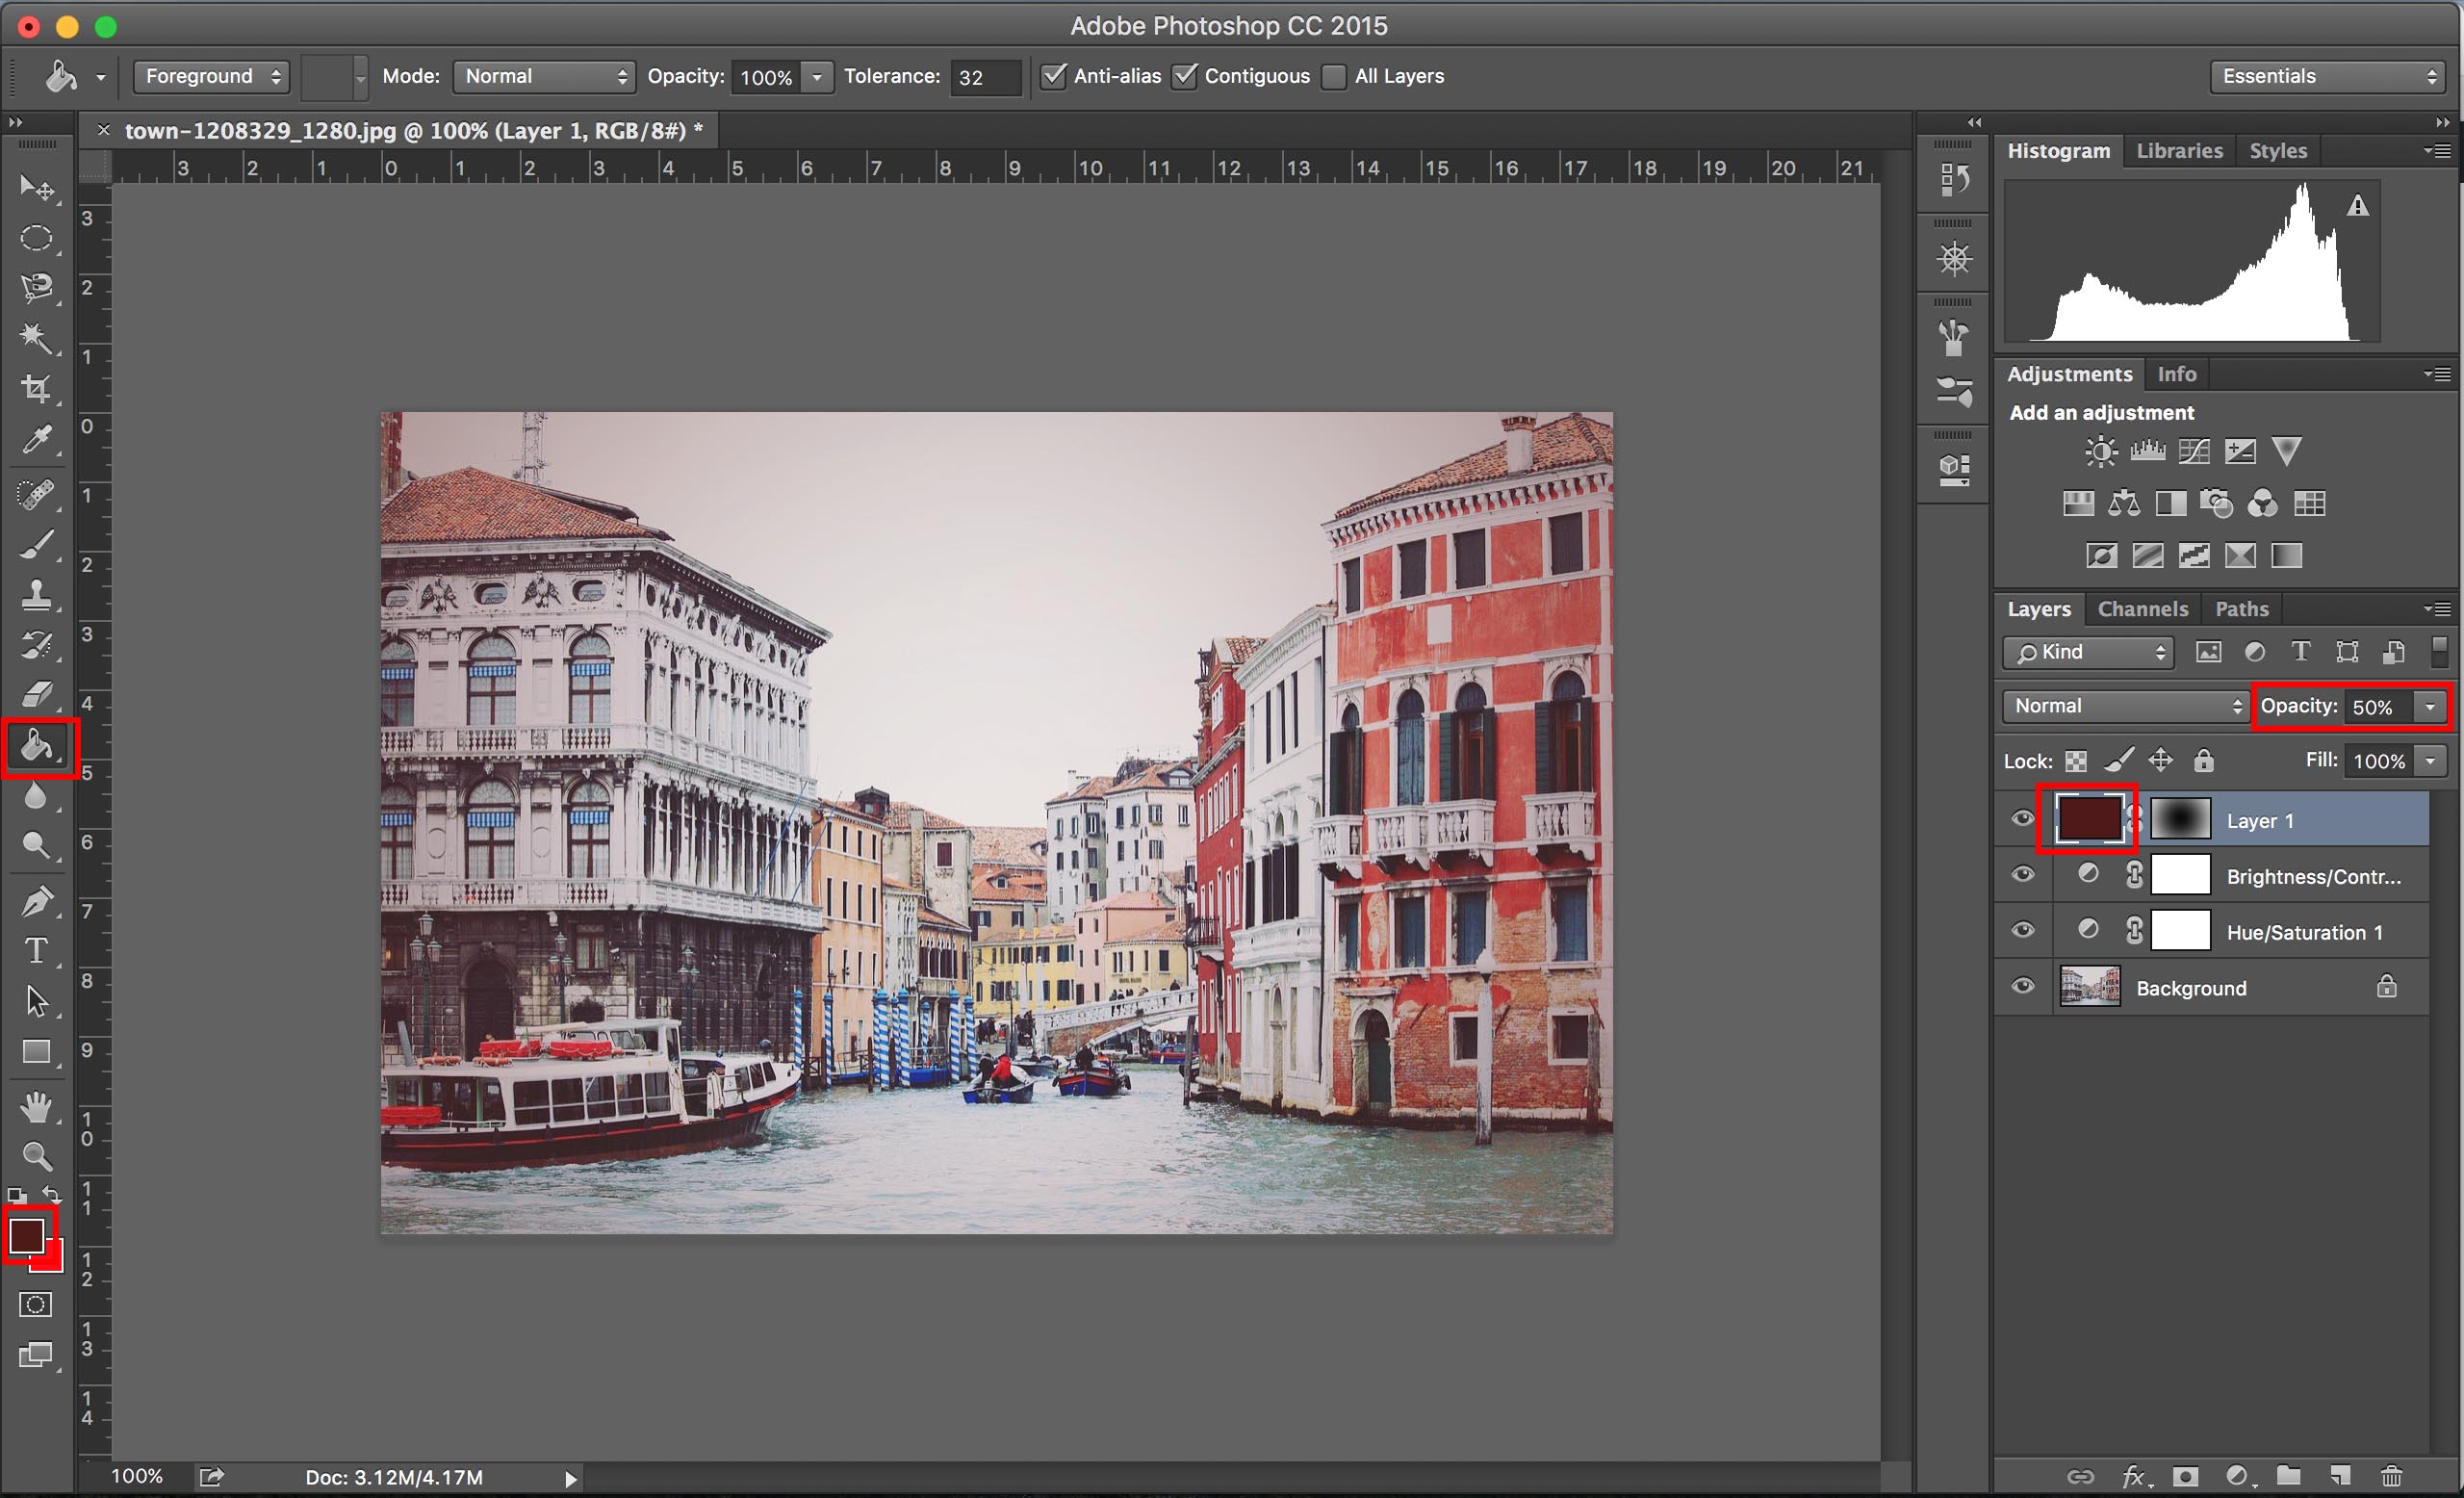
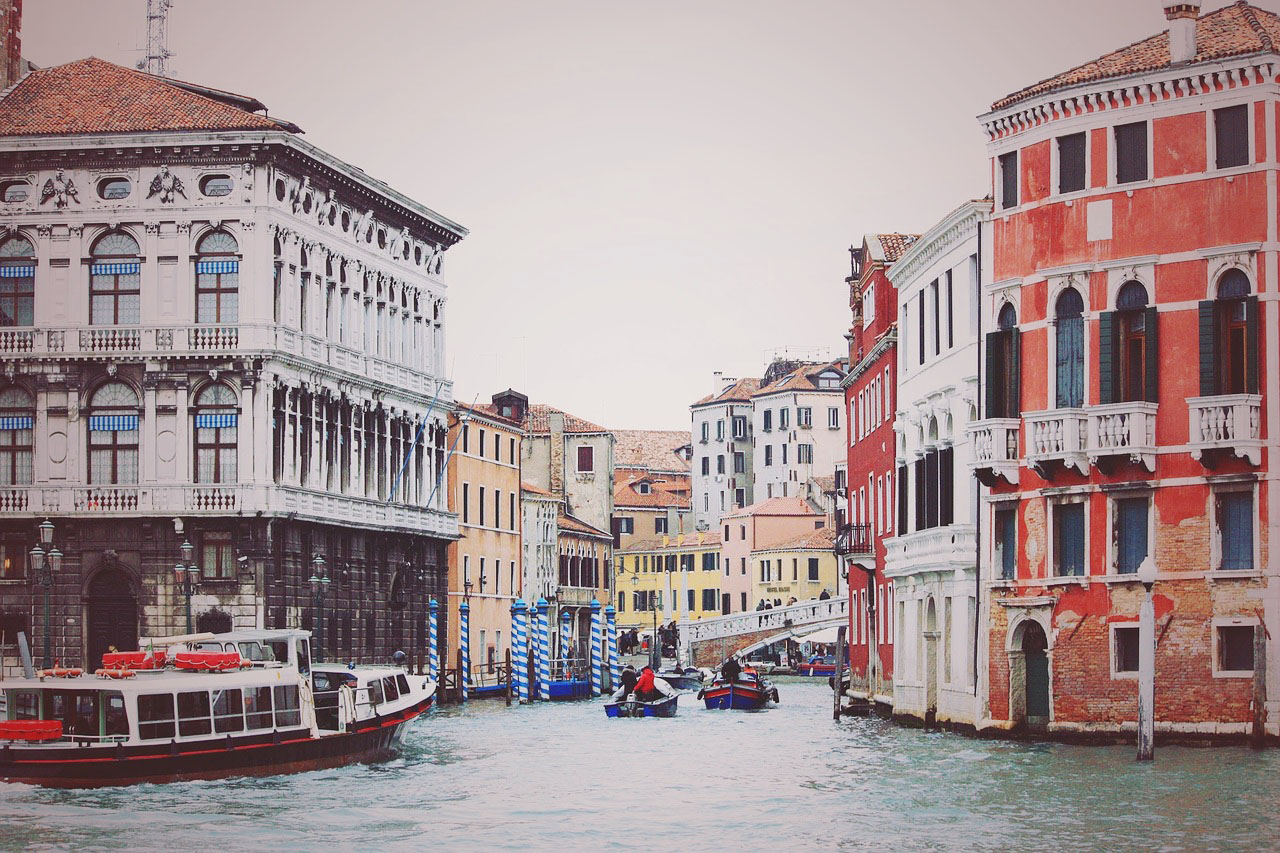
7. Finally, we can adjust the color and intensity of our vignette freely. To adjust the intensity, just lower the opacity of the layer using the “Opacity” slider on the “Layers Panel.” If you want to change the color, deselect the circle marquee by using the “Marquee Tool” to click on the circle, select the black layer itself (not the mask), and use the “Paint Bucket Tool” to fill the whole layer with a different color.  Below, I adjusted the opacity to 50% and used a reddish color similar to that of the building on the right side of the photo. It’s important to keep your vignette color very dark, otherwise, it won’t look like a real vignette at all.

Screen Shot 2016-03-25 at 1.33.18 PM

Red vignette one

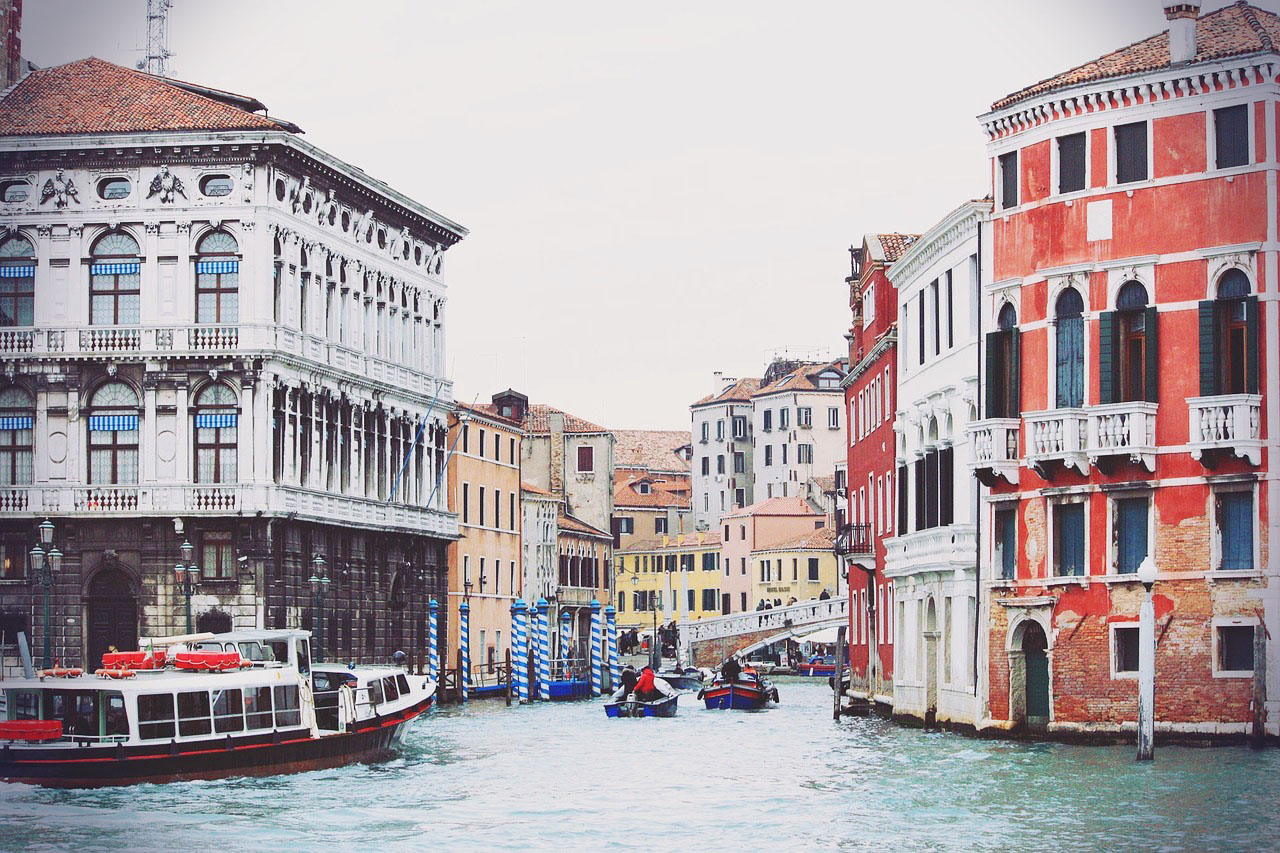
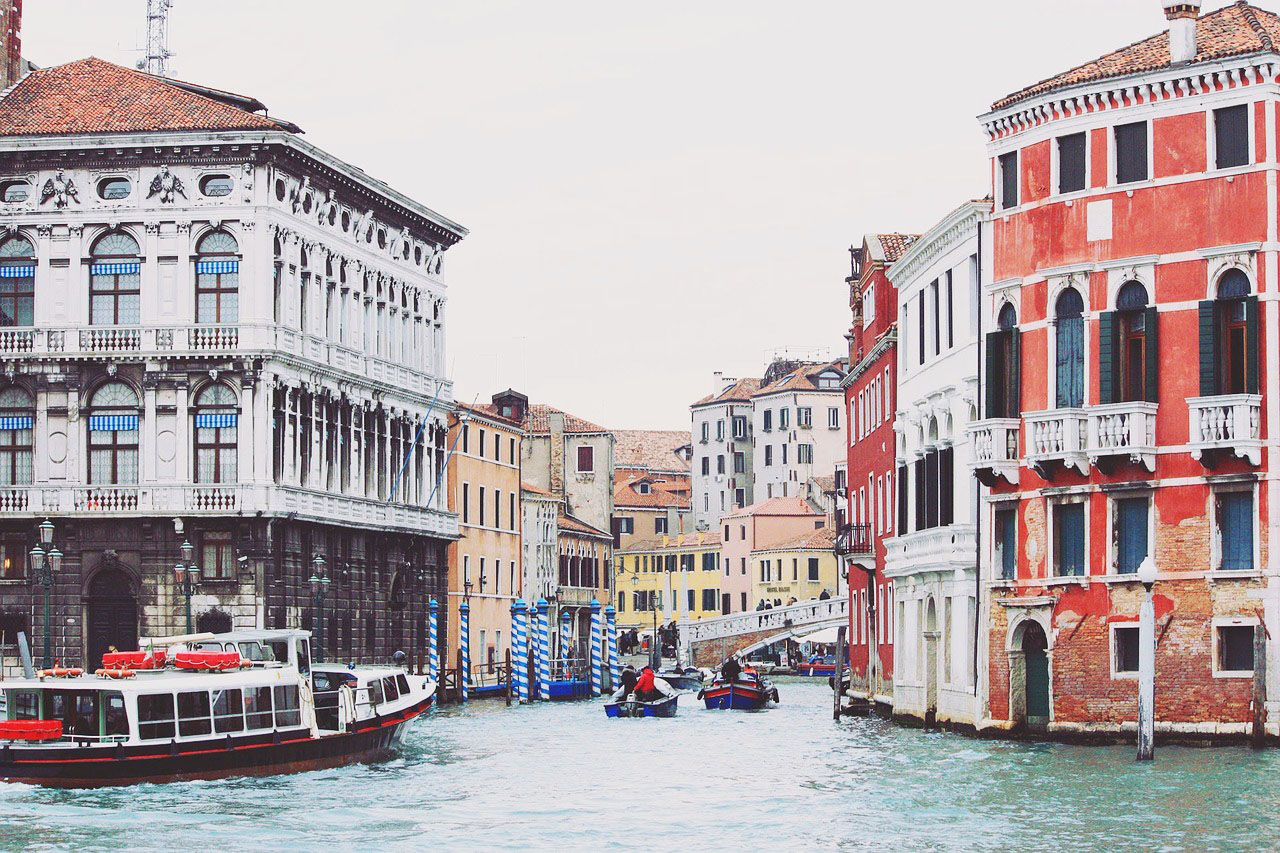
Personally, I was a little underwhelmed by my first attempt shown above, so I went back and experimented a bit, which is key to any good photoshop edit. In a matter of minutes, I was able to retry this technique from the beginning and got a much more satisfying result. I used a larger circle that went all the way to the left and right edges of the image, changed my “Feather” value to 50px, kept the opacity to 40%, and used a color that was closer to the water, giving the whole image a cooler tone. You can see the final result below.

Blue vignette one

And here is the original image for comparison.

Original vignette free

The key to this technique is experimentation. Because you can change the vignette size, feathering, color, and opacity pretty easily, there’s a lot to mess around with. Make sure not to go overboard with the colors, instead of keeping them close to black with a slight lean towards the color you want. Different colors, particularly warm vs cool colors, can drastically change the emotional effect of your image. Sleeklens offers some awesome plugins to adjust the coloring in Lightroom if you don’t want to use this technique. There are also plenty of other ways to give your photos that retro feels, but adding a slightly colored vignette can be a very effective way of altering the mood.