4 Cool Photoshop Tools That May Dramatically Improve Your Editing Workflowwww.sleeklens.com
Photoshop is filled with exciting features that you can’t learn immediately. Some of us discover them with time, while others invest hours into learning every single trick.
When I first got into editing, I had no idea these tools existed. Because of this, I missed out on many creative opportunities and lessons. Now, I can rely on them to inspire me, enhance my portraits, and make my editing process easier. Here they are.
Table of Contents
Sharpen Specific Parts of Your Photo Using High Pass
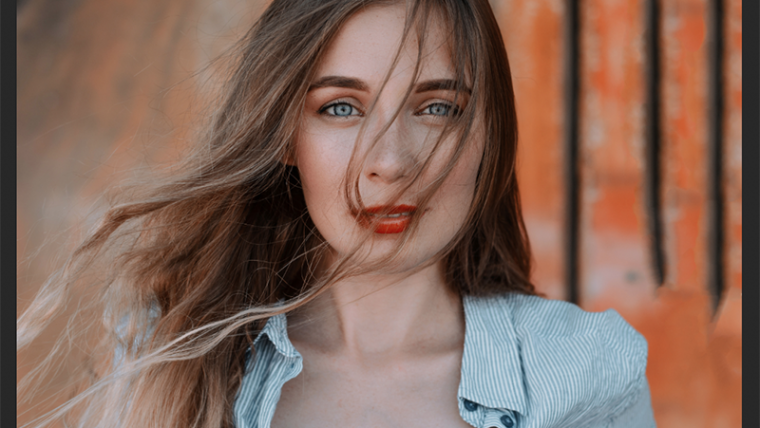
The High Pass Filter is ideal for photographers who like highlighting specific parts of their images. If you’d like to add clarity to your subject’s eyes, make a small detail stand out, or simply make your photos more visually appealing, you’ll enjoy using this filter.
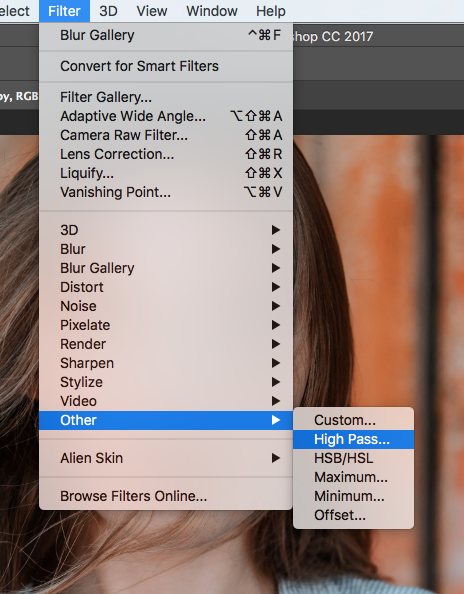
Duplicate your background (right-click, duplicate layer), Go to Filter > Other > High Pass and select a small number. The preview will give you an idea of how sharp your photos will look.
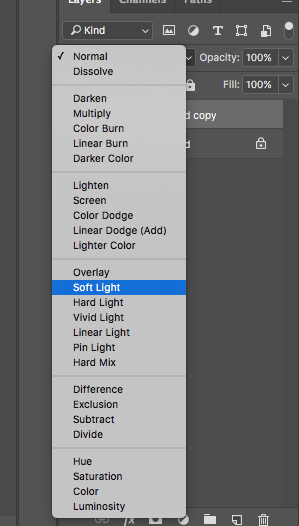
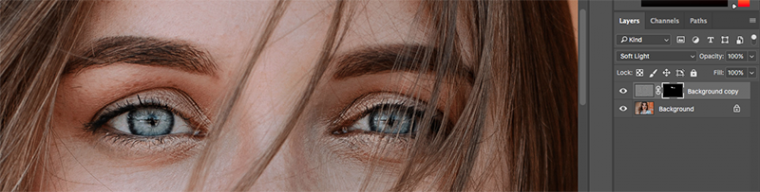
Once you’re happy with the result, change your layer mode to Soft Light. Your photo should go back to normal and look sharper than before.Hold the Option key and click the layer mask icon at the bottom of your layer box. A black box should appear next to your duplicated layer. This will get rid of the effect and allow you to manually select the parts you’d like to highlight. Using your brush tool (make sure the colour is set to white), gently paint over any areas you want to emphasise. If your results are too strong, lower the layer opacity (located right above your duplicated layer).
Effortlessly Recreate the Tilt-Shift Effect
The tilt-shift effect became popular when tilt-shift lenses entered the photography world. This effect gracefully blurs parts of your image to create dreamy atmospheres and gorgeous bokeh. If your budget is tight, you’re in for a treat! A while ago, Photoshop decided to create a special tilt-shift tool for those who can’t invest over $1,000 into a lens. The catch? You need to have Photoshop CC or above.
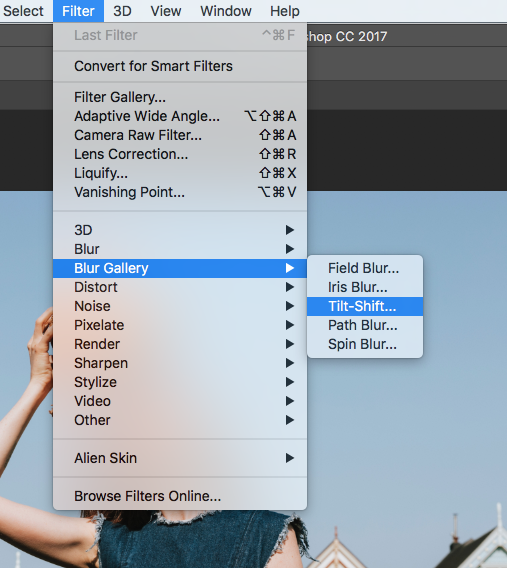
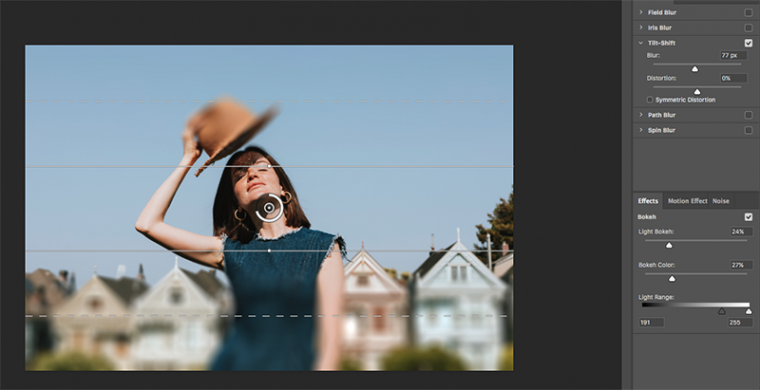
Go to Filter > Blur Gallery > Tilt-Shift. This will open a new window.
In this section, you can control how blurry and distorted your photo gets. (Note: the farther apart the horizontal lines are, the more natural the blur will look.)
Quickly Change Your Brush Opacity by Pressing These Keys
If you often use the brush tool (or anything with an opacity option) you don’t have to change its opacity manually. You can save an abundance of time by simply pressing 1-0 on your keyboard, 1 representing 10% and 0 representing 100%. If you need a more specific number, such as 45, type it quickly and the opacity will automatically change. This has saved me a lot of time!
Fill Empty Spaces Using Content Aware
Content aware can be used in a variety of ways. If there’s a detail in your photo that you don’t like, content aware will replace it for you.
Content aware can also be used to fill in empty spaces. This is ideal for stitched photos, which are sometimes filled with mistakes and empty spaces.
Unlike the patch tool, which relies on manual selections, this tool has a mind of its own. It will smartly fill in the area you select. The smaller the region, the nicer your results will look.
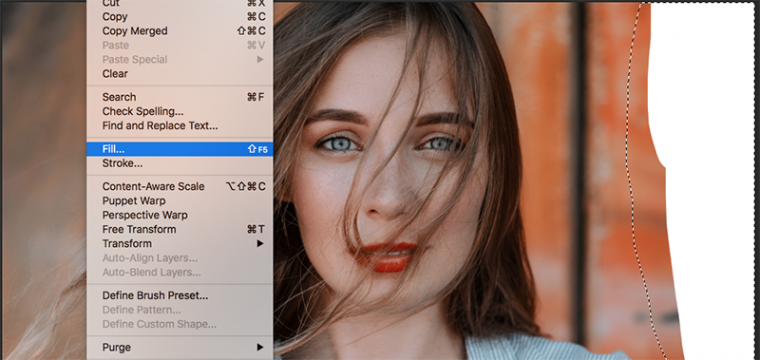
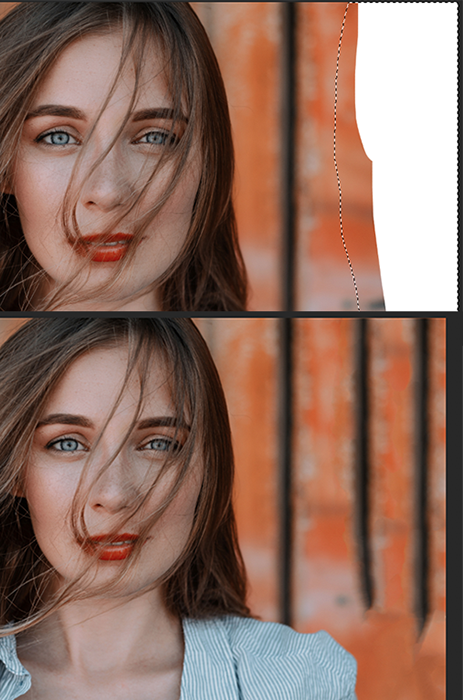
Select the part of your photo that you’d like to fill in. Then, go to Edit > Fill, select Content Aware, and click Ok. Depending on the size of your selection, it might take some time before you see any results.Content aware cleverly filled in the empty space by adding horizontal lines of different lengths.
I hope these tools teach you something new. If not, I hope they encourage you to embrace new knowledge and become an even more experienced Photoshop user. We have also made the Bokeh PhotoShop effect simpler to understand.
I'm an admirer of nature, a photographer, and a curious reader. Writing about photography and helping others improve is a growing passion of mine. My constant wish is to inspire others to be creatively fearless and endlessly curious.
"Always dream bigger is my advice to you, because you can have whatever your heart desires"
- Ashley Graham


 Facebook
 Google +
Comments (0)
There are no comments yet.