Tag: photography tips

Epic Polar Lights: How to Photograph Aurora Borealis

I’ll dedicate this topic to one of the most loved phenomenon in landscape photography: Aurora.

Aurora is a natural dancing light in the Earth sky, visible in the night at high latitudes. This is why it can be called borealis or australis.

When I observed aurora borealis for the first time, I was almost crying.

It’s a great emotion and, as a photographer, I would like to give you some advice on how to capture it forever.

What is Aurora exactly?

Before taking shots to a phenomenon like this, you should learn about what it consists and how it works.

It’s very curious to know that the interaction between the terrestrial magnetosphere and the solar winds produces the dancing lights.
You’ll see colored bands or vortices in the night sky (when the lights are visible and bright).

Aurora can be diffuse or discrete. The first seems like a big colored glow; the second consists of spirals, curls or bands and is the strongest.
Its unit of measurement is Kp scale and goes from 1 to 10 (in order of strength).

The colors of the lights: not always green!

The composition and density of the atmosphere and the altitude determine the color of the aurora light.

An excited atom that returns to the ground state sends out a photon with a specific energy. This energy depends on the type of atom and on the level of excitement. We’ll perceive this energy of the photon as a color.

At very high altitudes, in addition to normal air, there is atomic oxygen. Molecular nitrogen and molecular oxygen compose it.
Aurora is made energetic electrons that are strong enough to split the molecules of the air into nitrogen and oxygen atoms. The photons that come out of Aurora have therefore the signature colors of nitrogen and oxygen molecules and atoms. Oxygen emits green and red photons.

lofoten isabella tabacchi aurora

Usually, the green is the main color of the polar lights color mixture.
When Aurora is very strong, you can observe a purple-red band on the highest part of the photon emission.

At the highest strength of the polar lights, nitrogen molecules get a mixture of blue and red emission and create a purple edge at the bottom of the aurora.

So, the polar lights can be not only green. Indeed, the strongest auroras appear in lower latitudes as enormous red glows: the rare “blood auroras”.
Images from the International Space Station show the rings of aurora near the poles: when the polar lights are very strong, the rings expand and the red emission on the top of the green lights comes down to the lower latitudes.

Popular culture believes red lights as a portent of disgrace.

“Blood auroras” are said to have foretold the death of Julius Caesar (44 BCE) and they presaged the American Civil War (1860), the second World War.
A rare red aurora appeared also in November 2003, in the sky of the Dolomites, when I was a child.

Nothing bad happened and you can take a vision of that phenomenon at this link: http://www.cortinastelle.it/aurora20112003.htm .

Where and when?

Aurora occurs usually in the “auroral zone”, above 60° north or south of the equator. Australis are the lights appear in the Southern hemisphere, Borealis in the Northern.

As written in the previous paragraph, it’s very rare in the lower latitudes.

We can mainly observe aurora, for instance, in the north of Norway, Iceland or Alaska in the north of the planet, or in New Zealand, Tasmania in the south. We have always to be in the “auroral ring” around the poles.

But when? Well, usually not in the Summer, when the sky is too bright in that latitudes (the daytime is almost 24h long during that season); the best time frame is from September to April and the highest solar activity is usually during the Equinox time.

During my travel in Lofoten Islands, I’ve found very useful some apps about aurora forecast; you can find them in the App Store (IOS or Android). You’ll get a vague idea about the activity in the evening you’ll plan your shooting.

How to take a great aurora shot

Is not difficult to immortalize a polar aurora (if you are in the best place in the best moment).
The best aperture and ISO sensibility are the same of a classic night sky shot but the shutter speed has not to be too long.

I usually keep it under three seconds, or I wouldn’t capture the shape of the lights movement.
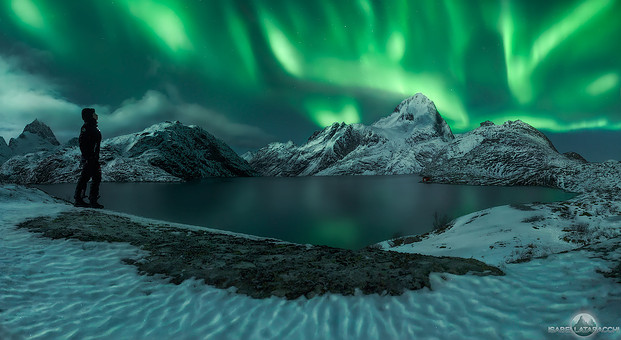
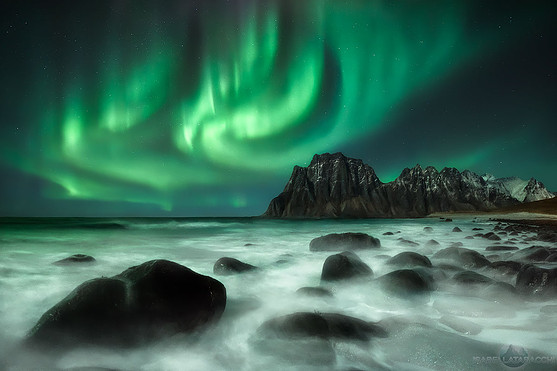
For example, I took this shot in Uttakleiv beach, in Lofoten Islands.

lofoten isabella tabacchi

How to edit an aurora shot in Adobe Camera Raw (Photoshop)

The tastes of the people are various. I can see every day thousand kinds of aurora images post-processed in different ways. I’m going to explain my own method.

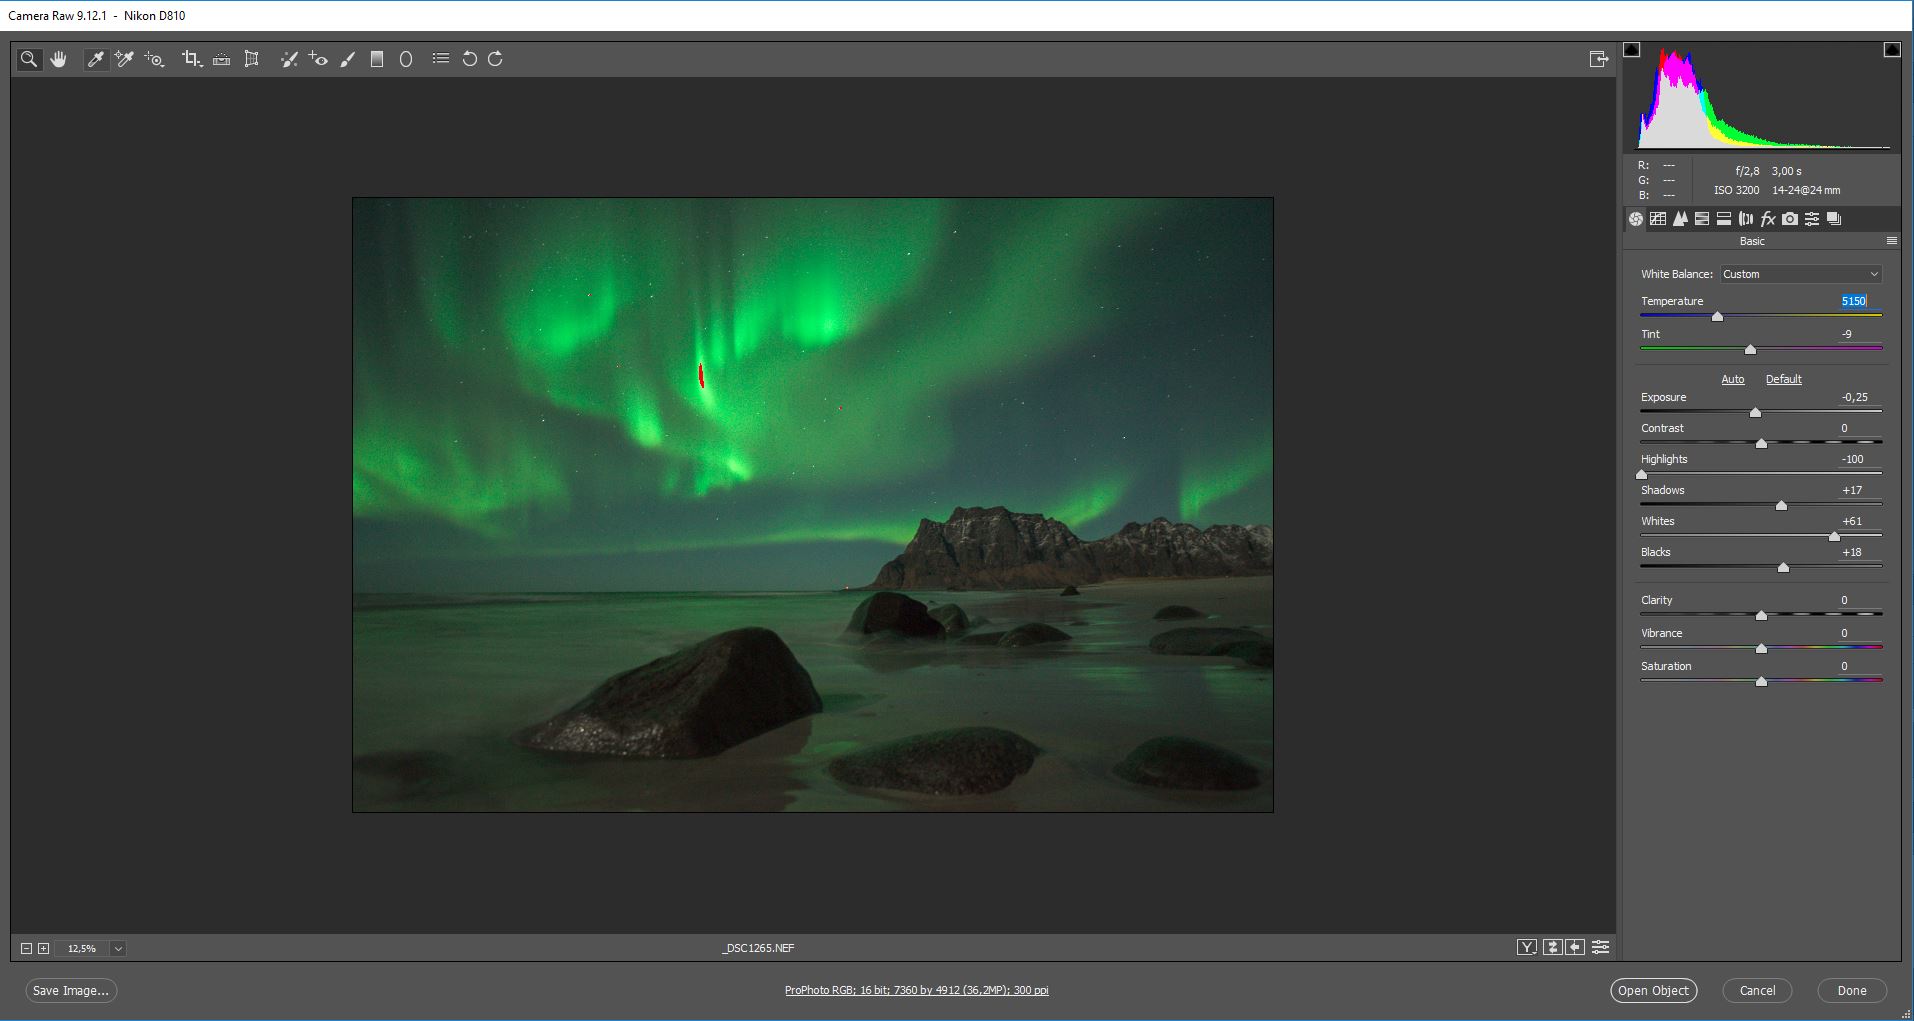
Here you can see a RAW file opened in Adobe Camera Raw. This is a discrete aurora I saw in Uttakleiv, in Lofoten Islands. The lights are very bright and the shape is almost great as I observed it that evening, but I’d like to improve the luminosity of the aurora and the contrasts.

aurora processing 1

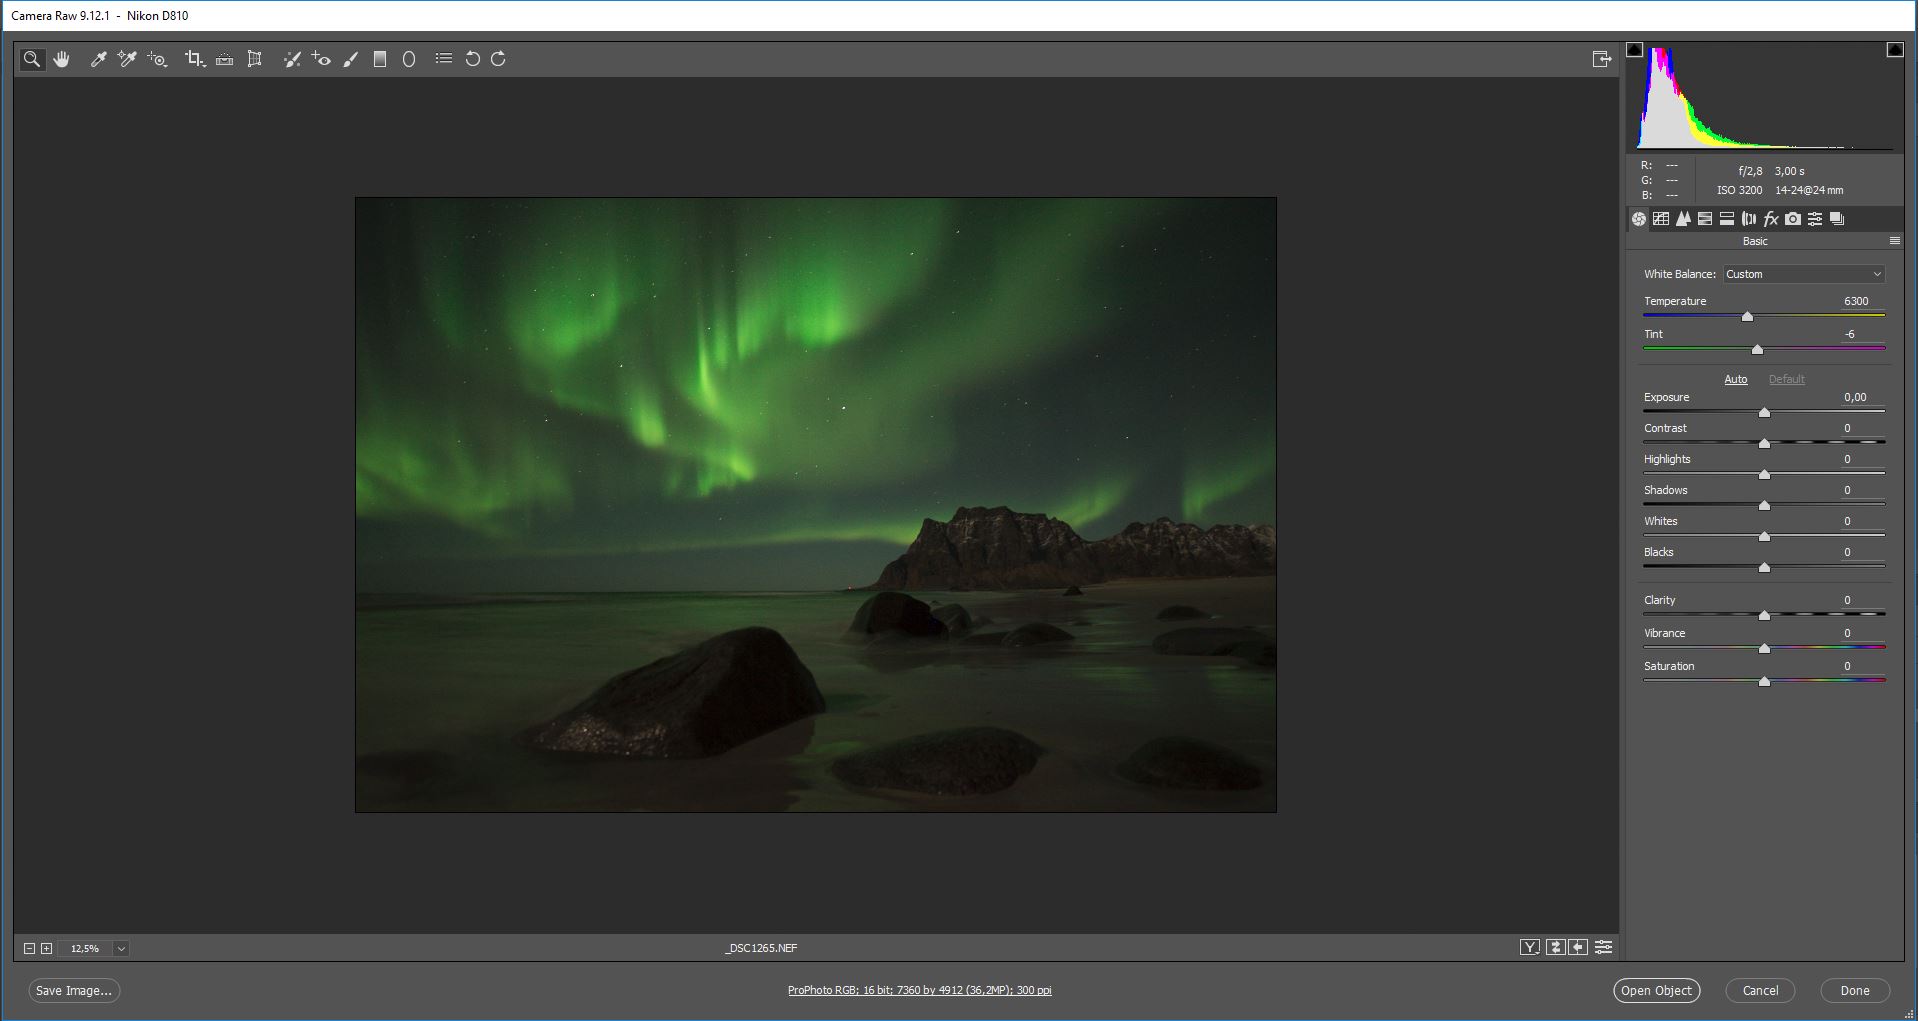
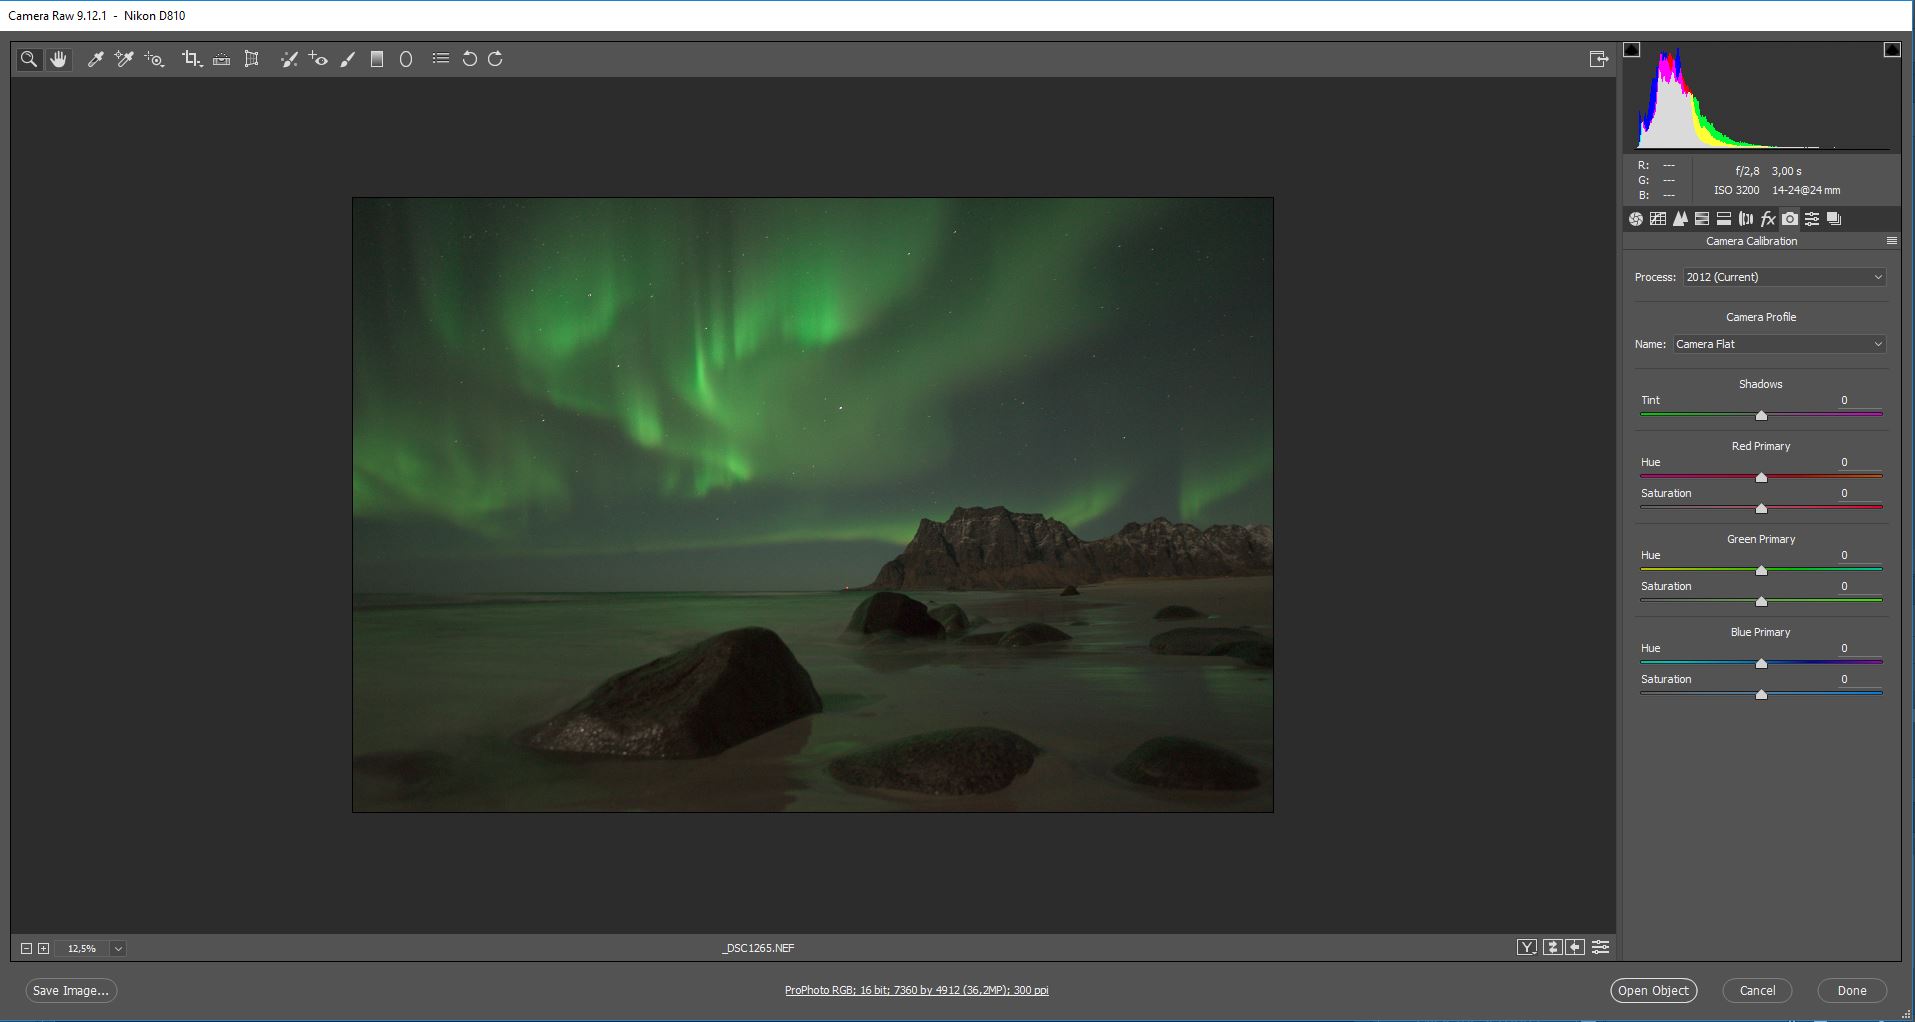
The first thing I do when I begin to edit an aurora shot, is to go in Camera Calibration section.

I change the Camera profile Adobe Standard with Camera Flat. The lights become less bright and the shadows more open; this allows me to manage the lights, the shadows, and the contrasts better.

aurora processing 2

The following image shows the adjustments I usually set on an image like this.

I usually prefer to give a colder white balance that goes well with the green color.

aurora processing 3

aurora processing 4

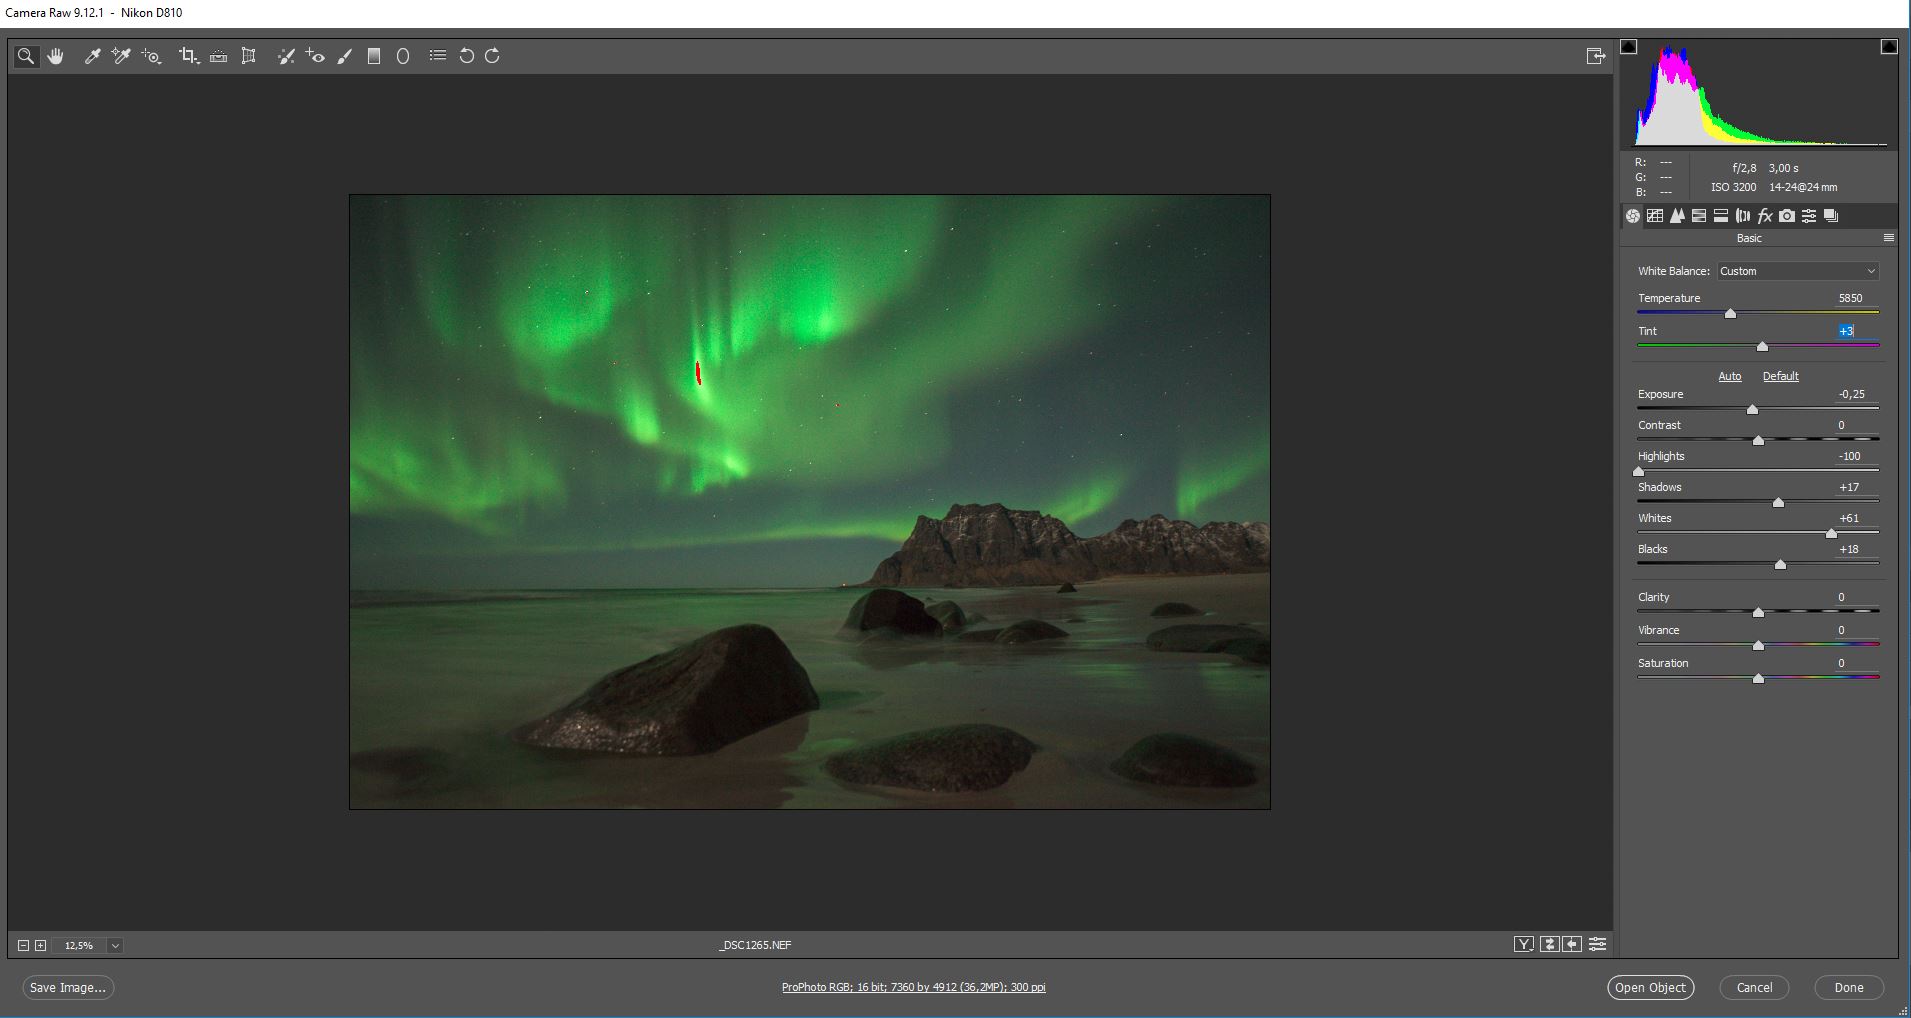
But you can also prefer a white balance that shows well the colors of Aurora, like the brown-purple in the top of the green.

I usually decrease the highlights to increase much more the whites. I’ll have a much more contrasted, well shaped and brighter aurora.

I also open the shadows and the blacks a little bit and decrease the exposure to balance everything.

As you’ve just read Aurora it’s not difficult to capture and needs a very soft post-processing. So, plan your travel and reach the highest latitudes; you’ll live amazing emotions.


SaveSave

How to Capture Great Photos of Flamingos

Flamingo photography is challenging. Flamingos may make tacky lawn ornaments, but they inspire tremendous photography. These vivid pink flocks are rebounding in pop culture, and natural developments have made them more accessible for photographers who can’t travel to other parts of the world. Getting pictures of these delicate beauties isn’t always the easiest task, though. Here, we’ll go over the basics every photographer needs in order to prepare for a flamingo shoot and nail perfect flamingo photography. We’ll discuss location, how patience helps you find the right shot, and offer up a few technical suggestions to help you get some great photos.

Flamingo Photography Guide

Location, Location, Location

While you could always go to your local zoo and take photos of a few flamingos standing in a shallow pool, most photographers prefer to chase more exciting images. If a zoo is your only option, though, there’s certainly nothing wrong with that. At the very least, it gives a wonderful opportunity to practice timing and the technical aspects of photographing flamingos, which we’ll discuss later.

free range flamingos photo

If you have the chance, at least try to catch flamingos in a free range environment. Many states have large, open enclosures, or limited free range environments for their animals. With permission, a photographer could set up in the enclosure itself to take a wider range of photos than a typical flamingo exhibit at a zoo would allow.

Ultimately, however, the best place to shoot flamingos is in their natural habitat. In the United States, that means heading to Florida. A hundred years ago, flamingos were much more common, but due to a series of factors, both known and unknown, they became a rarity. In the past few years, however, they’ve returned, and while wildlife photography is never exactly an easy exercise, it’s much less challenging now.

flamingos flying photo

Flamingos are migratory, and unlike birds such as Canada geese, they don’t always return to the same locations. If you’re planning a road trip, check ahead of time with local newspapers, birdwatchers, and even other photographers to see where the flamingos are actually staying. Usually the Everglades National Park is a safe bet. Still, it pays to do your research. That research can also tell you where in the massive park you are mostly likely to meet some fine pink fellows.

Being Patient and Keeping the Birds at Ease

Flamingo photography can be tricky as flamingos may not be as active as many smaller kinds of birds, but they’re still wild animals, and it takes patience to get even one good shot. Go out early, and expect to stay relatively late. Birds will become more comfortable with your presence the longer you’re there without incident. A zoom lens is a magical thing, but you still need to get fairly close for the best shots.

closeup flamingo in water

Flamingos are social birds, and many of the most dazzling flamingo photographs are of their largest migratory flocks. Working with a group of animals is many times more frustrating than working with one or two, of course, so be ready for the challenge. You will take a lot of shots, but only a few will turn out the way you want them to. Wait for the right moment. You don’t have to press the shutter even once in five minutes, 15 minutes, or even an hour.

The best way to shoot with a large number of animals is almost always to isolate a single individual within the mass. That doesn’t mean you crop out the other birds, but your image needs a focal point, and shooting a group of animals like they’re a landscape rarely produces quality photos. Look for active areas. Don’t be tempted to just snag photos of flamingos at rest. Find an individual or group that is doing something and let your photo develop a story.

Flamingo Photography Tips

When you’re photographing any kind of bird, you should focus on the head and eye. The eye will often reflect or gain highlights from a flash, which makes for a more dynamic image. Keeping your camera at or around the bird’s eye level also enhances the angle of your shot. Think of it as portrait photography.

wildlife portraiture

Whenever you’re photographing animals, you need to make sure your shutter speed and aperture settings are prepped for moving targets. You can use slow-moving or even still animals for practice shots, too. You may get a good image from your warm ups, and it’s always rewarding when your first pictures of the day don’t all come out with blurry motion smears.

Flamingos are simultaneously elegant and comical. Their long legs and necks evoke swans and cranes, but their wild coloring, awkward walk, and crooked beak add a distinctly more laughable characteristic. They offer photographers a goldmine of opportunities. Now that they’re closer and more common than ever, it’s possible for more photographers to try taking pictures of flamingos in the wild. Whether you have a chance to meet them in the wild, or have the limited access afforded by zoos, use patience, look the birds in the eye, and have fun.

How to Conquer the Creative Photography Slump Effectively

We all face it. One day you’re producing great work with ease. The next, completely gone. Poof! Now, just picking up your camera is a dreaded task. And the idea of shooting seems so daunting! What happened? Where did the excitement go? We can’t determine when this will happen or what triggers the descent. But we all have been here, more times than we’d like to admit. But it’s normal, and happens to everyone. Though there is no cure, you can prepare and set in place the proper treatment plan. Below I’ve outlined a few tips I’ve found have helped me when I feel a slump coming on.

DSCF4039

Study the Greats

I often find when I’m in a slump, I need to walk away from the camera. But, I still need to spark that desire to pick the camera back up. For this reason, my go-to spark generator is to watch videos on photography. Whether this is a documentary on a specific photographer or a general video on a type of photography. There are some great documentaries on Netflix. And endless inspiring videos on YouTube. I love the site CreativeLive. They offer live video classes ranging from basic settings to advanced post-processing.

This is also why I keep photography books in my creative space. If I’m having a slump moment, I’ll grab a book and just flip through it. After a quick flip through The Americans, I’m running for my camera.

Kim_Suarez_01

Change 1 Thing

Whether you plan for it or not, we all get into habits with our photography. It could be shooting the same locations or falling back to your go-to settings. Or even specific post-processing behaviors. An easy fix for a creative slump is to pinpoint one area to switch up. This may mean driving to another location to walk around with your camera. It could also mean adjusting a setting you usually set and forget. For example, if you shoot in Aperture Priority Mode, switch to Shutter Priority. Focus the afternoon on freezing or blurring your subjects. Or better yet, practice your Manual Mode skills and spend some time learning about manual ISO. I find a simple change, like shooting all day in f4, will result in some images I wouldn’t have otherwise taken.

DSCF2323-2

Get Involved in Your Local Community

Photography is everywhere. So chances are you live in a photography community. Even small towns seem to have photography groups or local classes available. Search sites like Craigslist or Meetup for these opportunities. It may surprise you how many there are around you. Take a class at your local community college. Or find a local store and check out their calendar dates. When I lived in San Francisco, I took a class on film photography and print-making at Rayko Photo Center. It got me in the darkroom every Wednesday night making prints with other photographers. I met so many great people and learned so much.

DSC00961-2

Explore Another Art Form

All forms of art share the same basic skeletal structure. We follow a similar series of events to arrive at the end destination, be it a photograph, painting, etc. What I’ve found to work for me is to explore other forms of art to get over a photographic slump. This may mean practicing or just observing. I may focus on writing for a few hours or do some sketching. I’ve found that going to a museum or gallery produces the best spark. Looking at paintings and sculpture, particularly Surrealist and Pop Art, are so inspiring. If you have a nearby museum, spend time there. Maybe even volunteer there to get free admission and behind the scenes access.

DSCF2130

Get Critiqued

I find this the best practice for beating a creative slump, and in general. Getting your work critiqued by a photographer you respect, can be so beneficial to your work. Even if you’re not in a creative slump, you should be doing this as often as possible. A good critique will be able to provide feedback, whether good or bad, you wouldn’t gather on your own. To be clear, a critique is not a “Nice Photo!” on Flickr or Facebook. Find a fellow photographer who can speak to structure and aesthetics of the photograph. You’re looking for the information you can act on to better your work.

DSCF2793

Start a Project

If you haven’t already, read through my previous post on starting a photography project. A project can be a great way to spark some motivation. Start small if you need to. Plan the logistics so you know the timeline as well as the desired outcome of the story you want to tell. A project will give you purpose when you go out shooting and will get you thinking long term.

DSCF1310

Travel

Travel does not have to mean hopping on a plane bound for Paris. Though how nice does that sound? Travel can mean driving a few hours away or even just exploring an unfamiliar part of town. When out walking, switch up your route. Drive 2 hours and see where you end up. Make a day of it with your family and turn it into a mini photo project. I did a mini photo project on an afternoon spent at a flea market I had never been to, it was great. As long as you’re in a new area, that creative spark will activate. I am fortunate to be able to travel for my day job around the world. So, I make sure to take few extra days to wander around with my camera. It’s great for my portfolio and is of little cost to me. If you are able to travel for work, take advantage. Spend as much free time as you can out with your camera.

DSCF3005-2

DON’T Buy Gear

We all know GAS (Gear Aquisition Syndrome) by many various naming conventions. As photographers, we love gear and gadgets. That sort of comes with the territory. But, it’s when we think that only more gear will make us better, that we need to be careful. When in a creative slump, it’s easy to say “Well, all I need is a new lens and that creativity will come racing back”. Or “If only I had the newer model, then I would be a better photographer”. Don’t fall for it! You’ll only realize once the excitement fades that you are right where you started. And poorer. So make sure to follow the above steps first. As long as you have a camera that can take a picture, you have all you need to get out of a creative slump.