Tag: mistakes

What to Do When Things Go Wrong During a Portrait Photo Shoot

Failure can’t always be avoided

. Crying children, uncomfortable models, and technical issues can all stop you from having a creatively fulfilling photoshoot. Even though people and situations are unpredictable, you can have control over what happens. There are things you can do to:

  • Fix any problem that occurs, no matter how impossible it may seem
  • Increase your model’s confidence because of your calmness during the incident
  • Attract more clients thanks to your problem-solving abilities

Below are five scenarios featuring different people and obstacles. Each scenario comes with a few solutions that will keep you grounded and make your subjects feel at home. With these tips in mind, you won’t have to panic the next time you bump into an intimidating problem. Just take a deep breath, remember what you learned, and act like the skilled photographer that you really are.

child hiding behind hands

Take a Break When the Kids Start to Cry

It’s easy for children to lose their patience, especially in the presence of a stranger. If your little model starts to cry or run around, don’t get frustrated. Most importantly, don’t show your frustration. Patience will clear your mind, allow you to find a solution quickly, and show your clients that you’re a tolerant photographer.

If your model is restless, let the entire family take a break. Even if this adds an extra hour to your session, it will be significantly better than continuing and getting highly unflattering results. Once everyone has relaxed (talking and eating always help!) you can safely continue your shoot. If you want to be very hospitable, have a few goodies ready for when your models get tired. They’ll appreciate your thoughtfulness.

two girls covered in blankets laughing outside

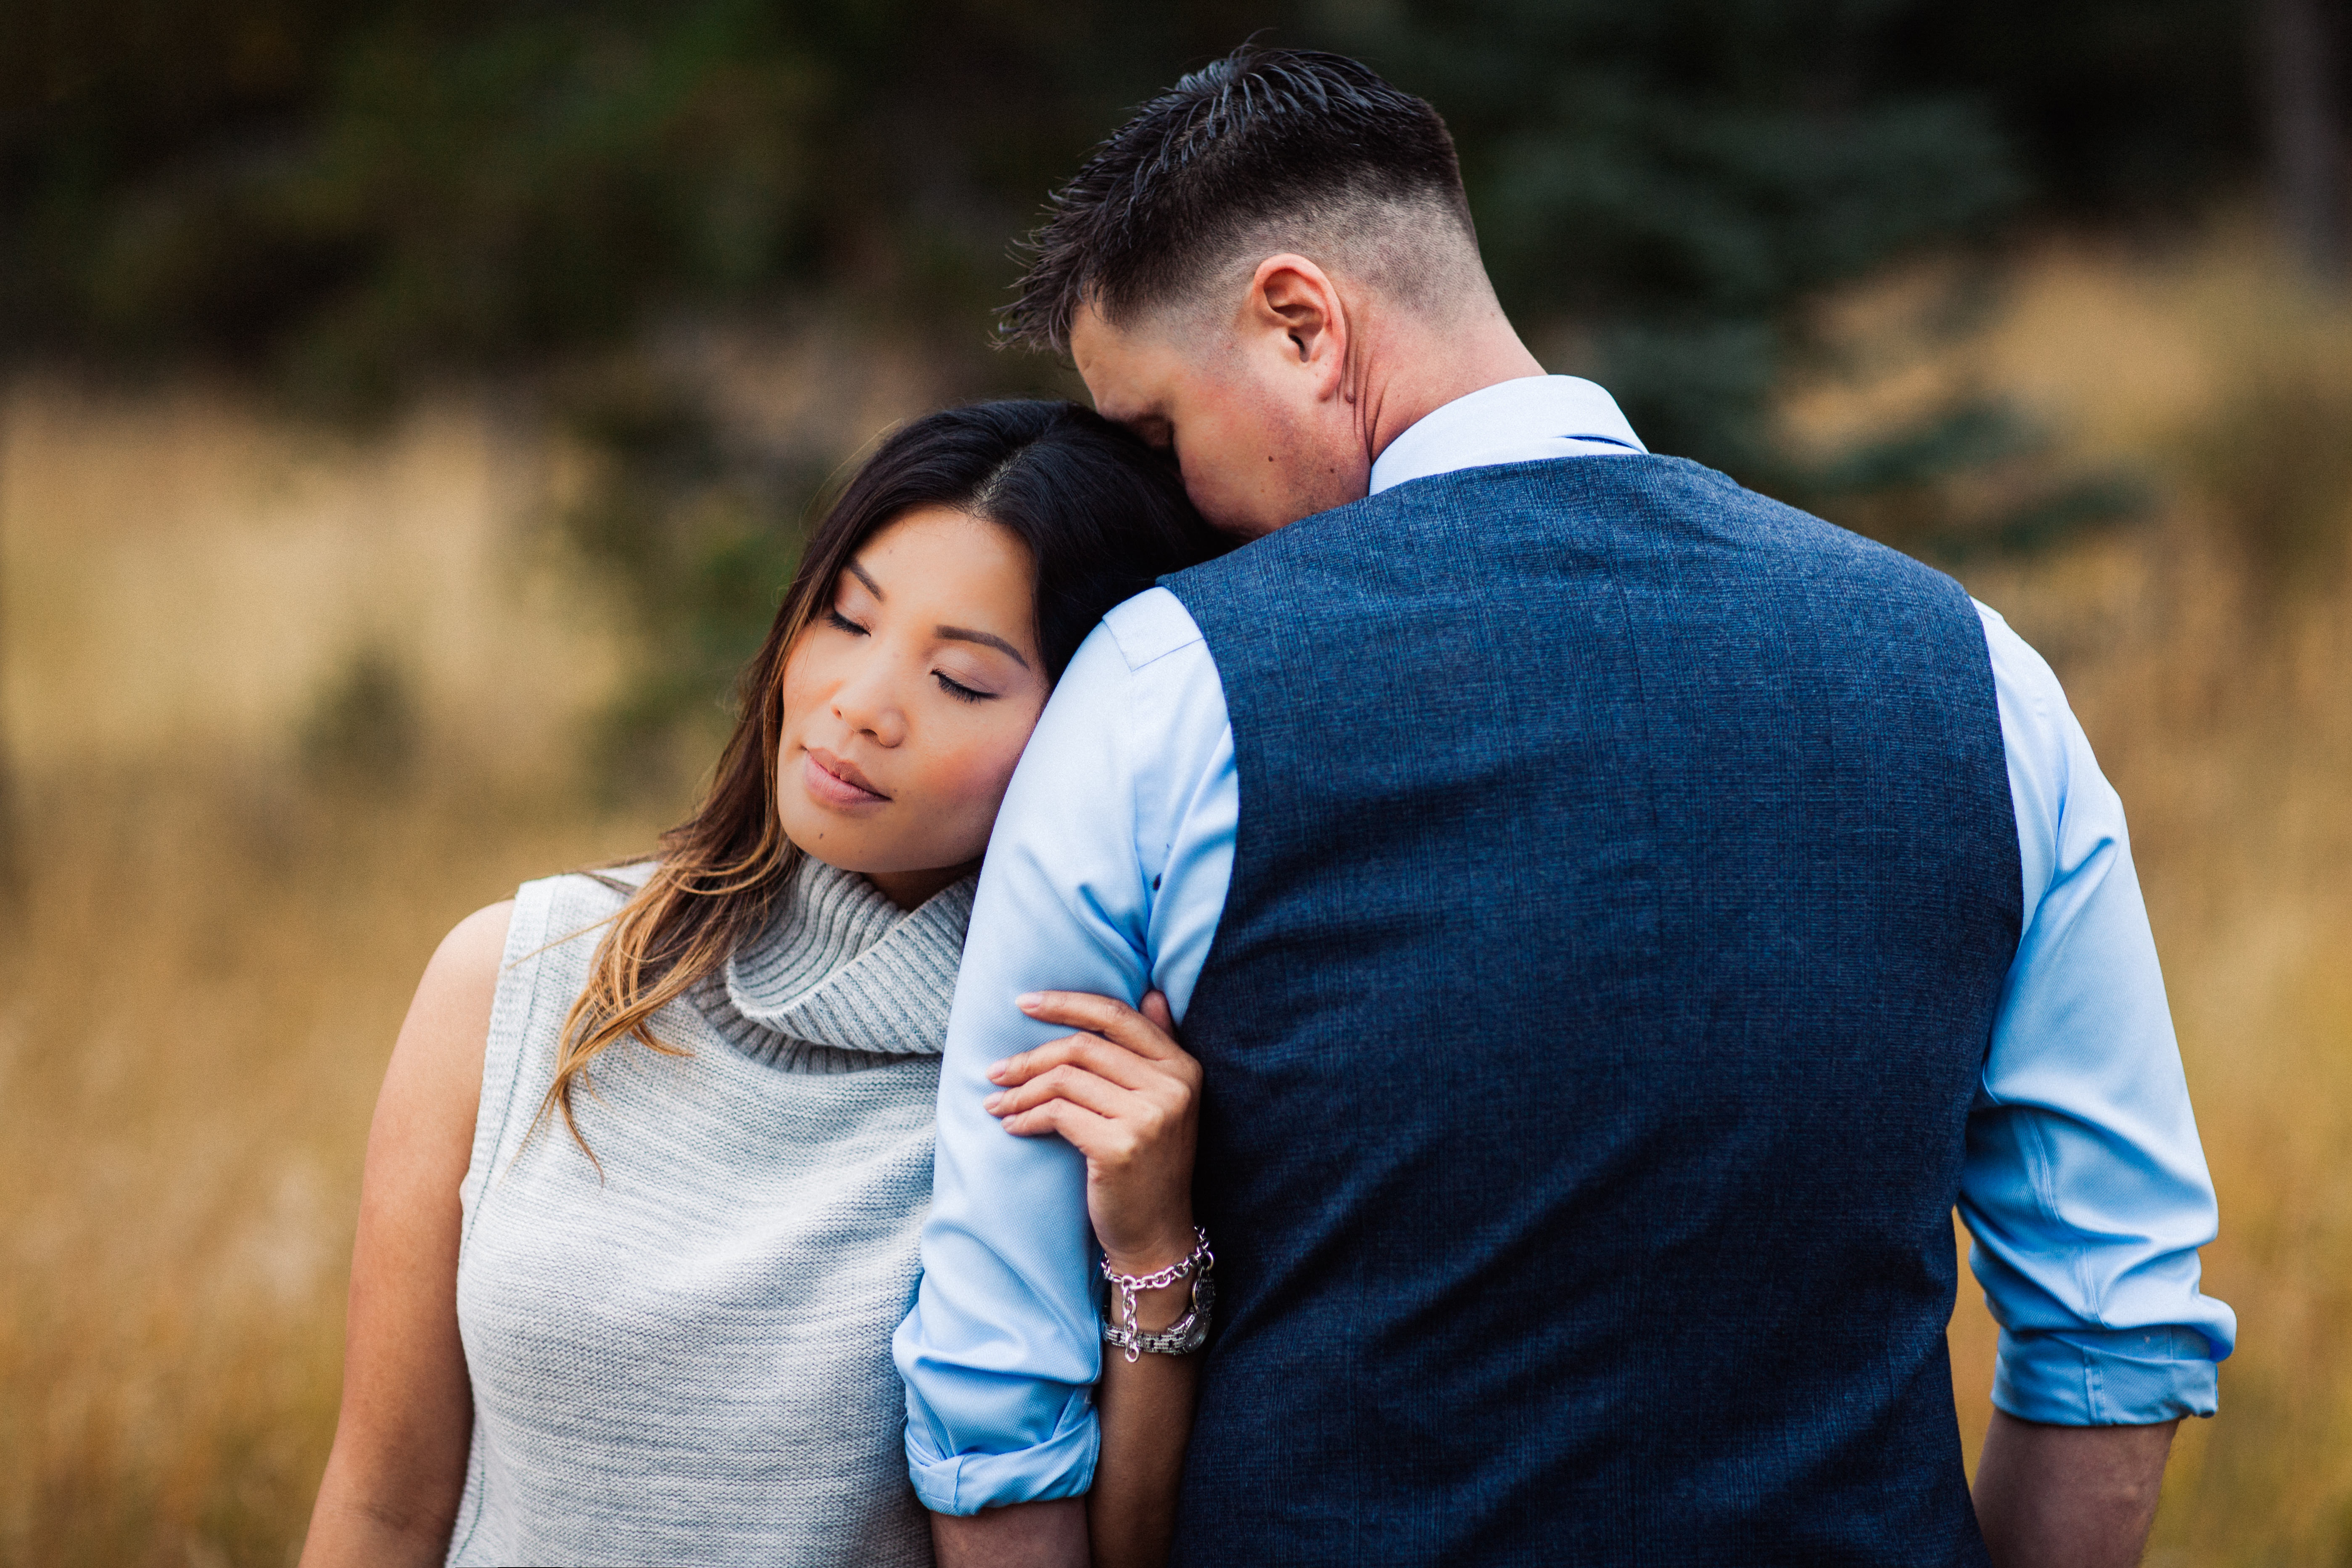
When Your Model Looks Uncomfortable, Be Supportive

Feeling left out and incompetent can immediately ruin anyone’s self-confidence. To solve this problem, be open about your past experiences. Make sure your subject feels like a normal individual worthy of being photographed. Don’t let your models bring themselves down. Don’t make it seem like perfection is attainable. What you want is for them to feel their best. Once they do, everything else will fall into place.

Be kind, share funny experiences from the past, try to make them smile, and let them know that making mistakes is okay! If they get the idea that you won’t lose your temper every time they strike the wrong pose, you’ll gain their trust and boost their confidence.

photography equipment flatlay

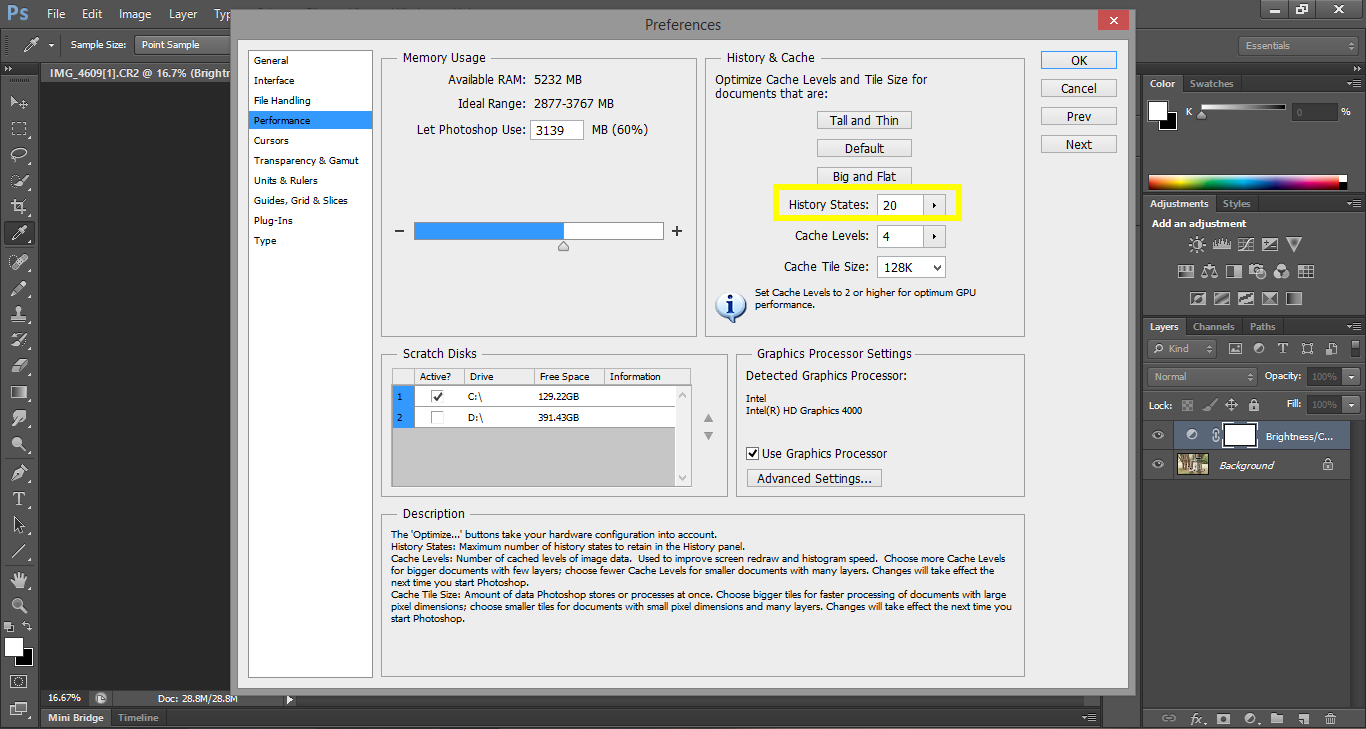
When There’s a Technical Issue, Make Sure You Have Backup Gear

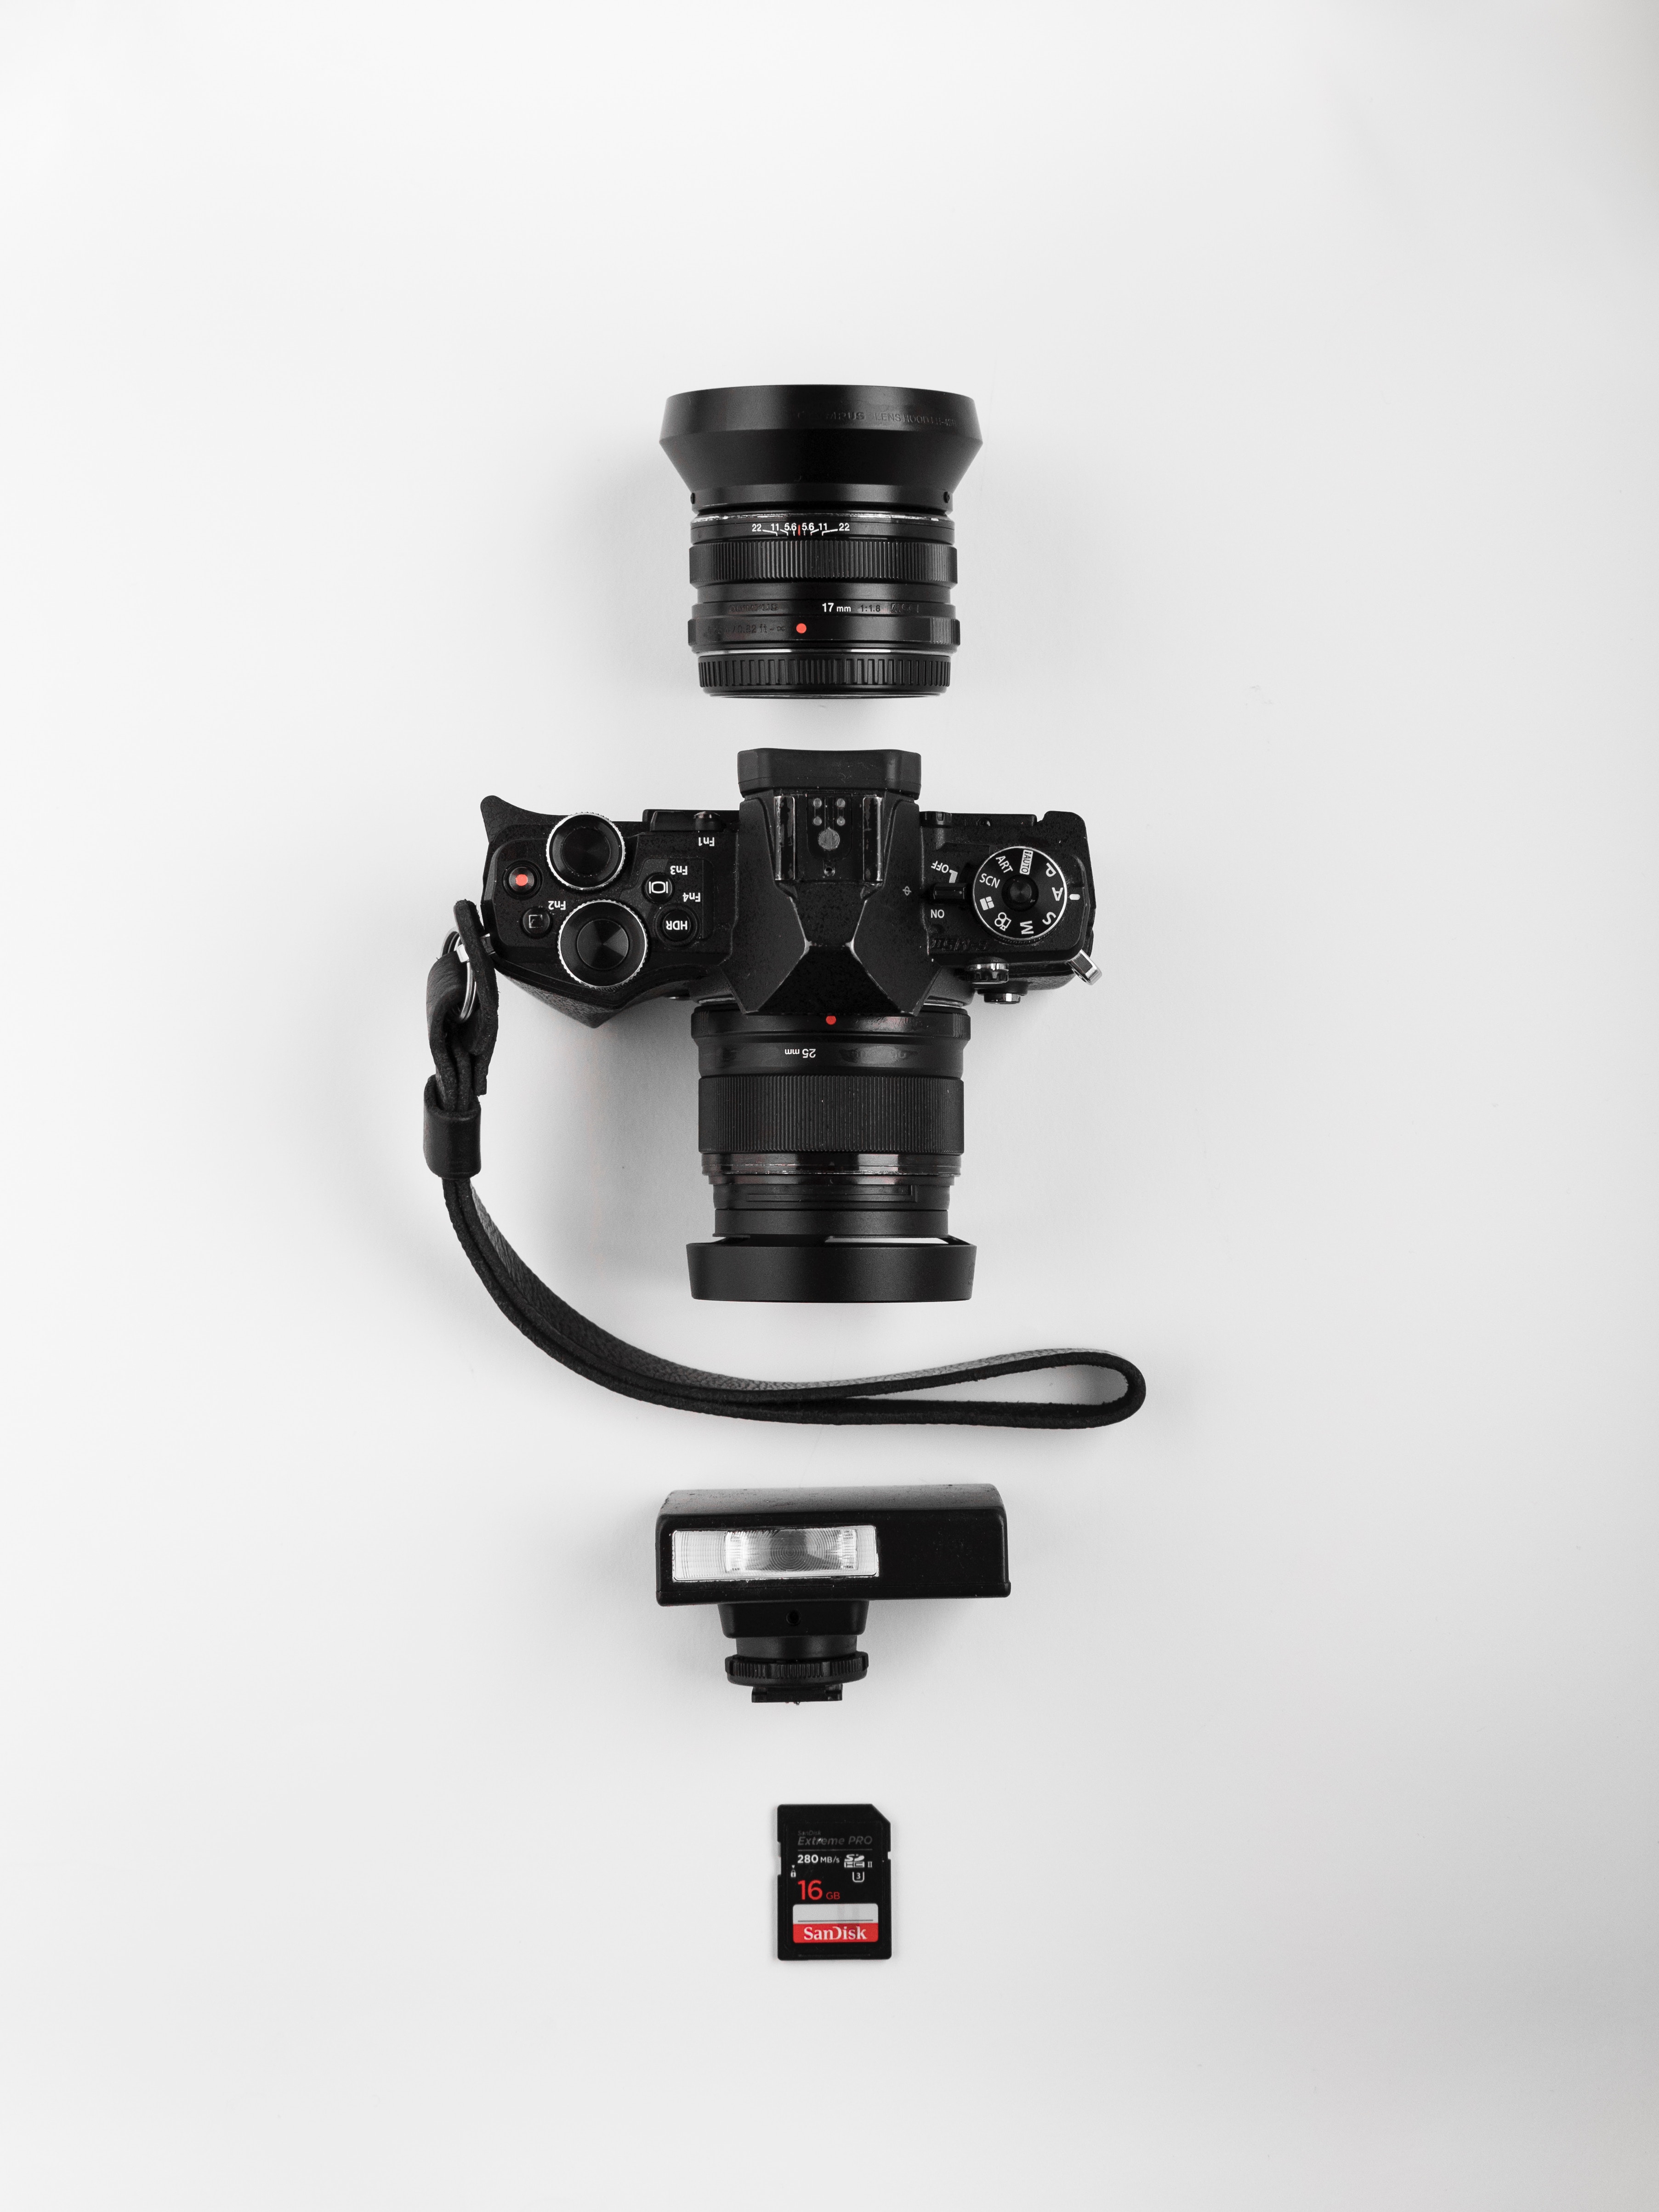
Many wedding photographers stick to this rule like their lives depend on it. Without backup gear, a full-day shoot can turn into a photographer’s worst nightmare. Here are a few things you should have (in addition to your main equipment) in case something breaks:

    • Camera body
    • Batteries
    • Lenses
    • Lens filters
    • Memory cards

If you’d like to find out more about backup gear, check out this article.

girl holding an umbrella

Prepare Lighting Equipment in Case the Weather Gets Bad

Make sure you check the weather forecast before you plan a shoot. If the weather isn’t promising and you can’t afford to postpone your shoot, bring an umbrella and a reflector to the location. An umbrella will keep you, your equipment, and your clients dry during an unexpected storm; a reflector will enhance your subjects’ faces on an overcast day.

In addition to bringing helpful equipment, make sure there’s a building nearby where you could stay during a storm. The last thing you want is to make your clients feel unsafe. Knowing what to do and where to go will save you from a lot of unnecessary misunderstandings in the future.

silhouette of girl against nightsky

Photography, like any other job, has the potential to throw you into a pit of annoying mistakes. Don’t let this trouble you. Knowing how to deal with problems will help you focus on what matters most: taking incredible photographs of incredible people. Being prepared may not completely eliminate failure, but it will definitely keep you happy, sane, and positive. That, dear reader, is how you deserve to feel.


What to Avoid When Posing Models: A Reference Guide

If you’re active on social media, you’re probably familiar with the perfect photo: a body-flattering pose, a breathtaking expression, and a look that speaks of pure confidence. It may seem like the models in such photos are naturally perfect and that nobody else can even dream of modeling the same way. The truth is that these individuals simply have a strong knowledge of posing which greatly contributes to their modeling success.

Certain angles can make even the most stunning models look unappealing. Every person has a variety of expressions and poses that can make or break an image. It’s up to you to help your subjects find these strengths. To do this, you can show them what not to do. The reason this approach works is that mistakes, unlike ideal poses, are universal; anyone can learn from them. Once your subjects know what to avoid, they’ll discover confidence-boosting poses that will not only make them look incredible in your photos but give you a chance to take your work to the next level. Let’s begin!

model posing out in nature

Don’t Make Them Uncomfortable

Awkwardness and posing don’t work too well together. An overload of compliments, criticism, or silence will make any model feel out of place. If you don’t want to try too hard and give the wrong impression, get to know your subject’s personality first. This will help you understand the kind of treatment they’d be happy with. Even a short conversation will reveal their personality and, in turn, allow you to reveal yours.

Don’t forget to talk about yourself, too. Opening up to people will make you appear relatable, charismatic, and friendly. You and your model may find mutual interests or acquaintances that will help you bond during the photoshoot. And even if you don’t perfectly click with someone, there will always be an opportunity to make them feel good in your presence.

man standing in front of wall

Don’t Ask Them to Pose Immediately

Many photographers treat posing like acting. Instead of telling their models to strike a pose, they ask them to move around, interact with their surroundings, and visualize something specific. This may not appeal to every person you work with, but there’s something important you can learn from it: giving your models room for imagination will help them pose naturally. Spontaneity, in addition to a lack of strictness, will open up many creative doors for you.

model posing outdoors

Avoid These Poses

Once your model feels comfortable in front of your camera, it’s time to let him or her know what to avoid:

  • Slouching: this is something many people do unintentionally. To avoid this, your models should straighten their backs, take a few deep breaths, and slightly turn away from the camera. This will instantly make them look relaxed and comfortable.
  • Entire body facing the camera: this will make your models look awkward and wide. Instead of facing the camera, your subjects can slightly turn their shoulders or put their hands on their hips.
  • Pressing arm against the body: this will flatten your subjects’ arms and make them look much bigger than they actually are.

model laughing in a field

Don’t Forget the Hands

Awkward-looking hand poses can make a generally beautiful image look unnatural. Make sure your models’ hands are relaxed; their fingers should be slightly spread out and placed on their shoulders, under their chins, or wherever they decide. Give them freedom when it comes to their hands, but always make sure to correct them when they start to look too tense. A proper hand pose will give your photographs an air of grace. When your models see how elegant they look in your photos, they’ll feel even more confident in your presence.

closeup of a model holding her face

Posing isn’t always a walk in the park. Even professionals need clear instructions when working with new photographers. If someone with years of experience needs direction, imagine what a struggle it is for non-models to feel comfortable in front of the camera! A small amount of patience and posing knowledge are all you need to create a healthy photographer-model relationship.

SaveSave

5 Portrait Photography Mistakes You Should Avoid

It’s true, creativity has no limits. What may look like an unforgivable mistake to one artist may be a relieving source of inspiration for another. Regardless of this fact, certain mistakes are simply worth avoiding. Photography genres have unique rules that deserve to be kept in mind during photo shoots. Landscape photography, for instance, demands a type of lighting that may not appeal to portrait photographers.

In portrait photography, unflattering lighting, uncomfortable poses, and tension all contribute to inauthentic photographs. It’s important to know how to deal with models, what not to do during the editing process, and how to approach different lighting situations. In addition to doing all of these things yourself, you can learn from the mistakes of others to boost your learning process.

In this article, you’ll not only familiarize yourself with 5 common portrait photography mistakes but learn from them. Each mistake is accompanied by a helpful solution so that the next time you bump into a creative problem, you’ll know exactly what to do.

Avoiding Conversations with Your Model

Taking photos of someone you barely know can be a tense activity, especially if you’re introverted. It’s easy to forget that the model is probably as uncomfortable as you are. Avoiding proper discussions will not only result in unnecessary awkwardness but give you a massive creative block.

Solution: If possible, have a short meeting with your client before a shoot. Once they get to know both your love for photography and the creative ideas you have in mind, they’ll feel more comfortable in your presence. In turn, you’ll get to know them. Don’t be afraid of asking questions, requesting feedback, and giving them creative space. They may have an idea that will come in handy during your shoot, so remember to stay open-minded.

conversations with coffee

Solely Depending on Poses

Posing guides are undeniably helpful, but they can get in the way. Not every individual will feel comfortable with certain poses. Your client may even end up feeling bad about poses you really like.

Solution: Don’t ditch your posing guide. Instead, give your model lots of room to be spontaneous from time to time. If they enjoy talking, have conversations with them as you take photos. Give them compliments and proper feedback. This will help you catch authentic moments. The photo below is a great example of this.

girl smiling

Beating Yourself up in Front of Your Client

…or in any other situation. Of course, self-deprecation is sometimes humorous and pleasant. When it comes to photo shoots, however, bringing yourself down will bring your others down, too. You’ll end the shoot feeling exhausted and unenthusiastic. If you don’t believe in your creative skills, no one will.

Solution: Embrace the inevitability of mistakes. If something goes wrong, don’t immediately blame yourself. Instead of discouraging both yourself and your client, find a solution. Once your client notices the confidence you have in your problem-solving abilities, they’ll feel safe in your presence.

girl taking a picture

Not Focusing on the Eyes

Experimentation is cool. It proves that you don’t limit your creative mind. Many clients, however, want a combination of simple and creative photos of themselves. Images that focus on their clothes, hair, or surroundings won’t satisfy them completely.

Solution: Manually focus on the eyes when you take simple portraits. This may take some practice, especially if you’re used to autofocus, but keep trying and you’ll get the perfect results in no time.

portrait

Shooting in Locations with Abnormal Lighting

Light is a photographer’s best friend

, but too much of it can lead to the creation of unappealing portraits. Harsh, flat, or distracting light is something portrait photographers don’t use on a daily basis. Unique lighting situations require unique approaches. If used incorrectly, they’ll highlight the wrong features and overshadow flattering elements.

Solution: Before a shoot, find the best locations where lighting won’t be a problem. For instance, a park filled with shaded areas will give you lots of room to take well-lit photos on sunny days. An open field will give you lots of lighting opportunities on gloomy days. Unless you want to create experimental portraits or experiment with portrait actions, avoid locations with lots of different lights.

girl looking through records

It’s true, creativity has no limits. It’s also true that learning from other photographers’ mistakes will benefit you greatly. Absorb this knowledge, learn from your own mistakes, and keep taking wonderful photographs of others.

SaveSave

Five Most Common Photographers’ Mistakes to Avoid

Although we tried to avoid it, we all do mistakes. But mistakes don’t have to be necessarily something terrible. In fact, mistakes are a great tool to learn and move forward. I learnt a lot from my photography mistakes. Some of them are quite personal, but others are pretty common in the photography community. I wanted to share with you five of my photographers’ mistakes because you might relate to them. But this is not a post about being ashamed of ourselves. Not at all!! Let’s take our mistakes and give them a positive twist analyzing what we can learn out from them.

Mistake number 1: Thinking that everybody in the world likes photography as much as you do

It is great to have such a passion for photography that I wanted to share it with everybody. I talked about photography with all my friends, family and clients. I explained to them the last things I learnt and my last photo sessions. I was also telling them about gear, post processing… It was way too much for them. They were not telling me to stop because they were polite, but I know they suffered from extreme boredom. Poor guys!

Photographers' mistake: not adjust your talk to your audience
If you want to see people yawning, share your passion for photography in a way that reaches to them. Adapt your stories to your audience. They will thank you.

What I learnt: think about your audience. Is the person in front of you a photography lover? If so, go for it and share your passion. But if your audience doesn’t even have a camera, try to control yourself. Of course you can share with them things because after all photography is a big part of your life. You don’t have to keep it as a secret. I just recommend you to adjust the things you explain to them. Imagine that your lawyer friend is coming to tell you everything about his last case. I mean EVERYTHING, including minor details and everything he needed to learn to face that case. I don’t know about you, but I probably wouldn’t understand a word of what he is saying. The same thing happens to them when we talk about photography in such a deep level. Share your passion, but make it interesting for your audience. Tell them a story but don’t go so much into technical details. They will understand how much you love photography without suffering for being your friends.

Mistake number 2: Getting all the new pieces of gear you find    

Gear is vital for us. Without gear we can’t do our art. But do we need everything that we see? I want to highlight here the word NEED. Because one thing is WANTING new gear. But do we NEED it? I have got new gear that I have used once and now it is sitting in a corner of a closet collecting dust. For what I saw around internet, I am not the only one that does it. Are you doing it too?

Photographers's mistake: get unnecessary gear
I wanted to get a set of ND filters when I saw them online. I kept myself of pressing the tempting “Buy” button and I thought for one month. During this time I realized that I had a lot of chances to use the filters. I finally got them. It was a good purchase because I really do use them for long exposure photography. However, it is not always like this. Sometimes, during this thinking one-month period I realized that I don’t need the gear. I saved a lot of money just by waiting some time and analyzing the usage I would give to the potential new gear.

What I learnt:  we don’t really need all the new gear that appears on internet.  I also learnt that although the lesson is easy to learn, it is not so easy to apply. Because we do need some gear. We are photographers, we need staff. We should aim for balance. We need to get enough gear to keep growing as artists without spending money in unnecessary things. Something that works for me is waiting to buy the gear for one month. When I see something I would like to buy, I hold myself (This part is the difficult one.  You need to be strong at this point). I say to myself that I will buy it in one month if I decide that I really need it. Along this month, I count how many times I would have used the gear. If the number is low, I don’t  buy it and I safe the money. If I see myself finding a lot of chances to use the gear, I go and get it.

Mistake number 3: spend too much time learning and few time practicing

There are so many interesting things to learn! And it is so easy to access them. Articles, video tutorials, online courses, books… we can spend the whole day learning new things. Sometimes I spent more time reading and watching videos than taking photos. And this is the problem: learning too much theory without practicing is not how you improve your photography. You can get inspiration from somebody’s else experiences, but until you don’t experience the things by yourself, you won’t really understand the craft.

Photographers' mistake: not non practicing enough
I read a lot about composition and the importance of highlighting your subject. One of the ways of doing it is by simplifying the background. I read that with flowers, you can add a simple black background. I wanted to try it, but I was spending so much time reading about composition, looking for inspiring photos, checking about subject isolation techniques and so on that it took me more than one month to grab my camera and take this photo.

What I learnt: it is important to keep a good balance between theory and practice. There is nothing wrong about reading and following tutorials. But always combine them with practicing sessions. You can learn in small time blocks (one chapter at a time, or one video) and instead of jumping to the next lesson, go and take your camera.

Mistake number 4: lose awareness of the surroundings

I am from Barcelona. There are a lot of interesting spots in the city where photographers accumulate. You have several buildings from the architect Gaudi, including the Sagrada Familia (the only cathedral that is still under construction in Europe), the old city, the Ramblas (one of the most famous streets in Barcelona). Is in that places where I see a lot of photographers forgetting about their surroundings. Some of them are trying to focus to the tall towers of the Sagrada Familia cathedral and they are walking back step by step, trying to fit everything in the frame. Some of them are so concentrated in their photography that they walk into the traffic line, without looking if there are cars coming. I myself almost run over some photographers with the car. Scary staff. In addition, there are some people taking advantage of this lack of awareness: the thieves. If they see you too concentrated in your camera they will come to still your wallet.

Photographers's mistake: lose awareness of where you are
It is easy to lose the awareness of where you are when you are taking photos. However it is important to find a way to avoid it. Close to this beautiful Gaudi’s cathedral (Sagrada Familia) I almost run over some photographers that didn’t realize that they have walked into the traffic line.

What I learnt: if you are taking pictures in a city or at any place where you are not alone, try not losing your awareness of the surroundings. If you see that you have a tendency to do it, look for strategies to avoid bad consequences. Put your wallet and important things in a place that can’t be access by thieves. You can also tell somebody to put an eye on you to tell you when you are getting into danger.

Mistake number 5:  follow the last fashion without thinking if you need it or not

There is always a last photography trend. Some of them are really cool and keep updated about the last techniques is always good. The problem is when you are carried out by these trends. Do you really need to use these techniques? Is it adding something to your style or does it go against it? This happened to me. I became an HDR fanatic. Internet was full of these hyper realistic looking photos. HDR all over the place. It was hard to ignore it. HDR is useful when you can’t capture all the dynamic range of a scene. There are situations in which your camera can’t handle the difference between the shadows and the highlights. It is just too much (too much contrast between light and shadows). In those situations, if you capture well the shadows, the highlights get burnt. Or when you capture well the highlight, you lose detail in the shadows because they are too black. What can you do then? HDR at rescue!! You can take photos at different exposures and merge them in post processing. Your problem is solved. You have both nice shadows and highlights in the scene. I loved it. But I loved it may be a bit too much because I found myself doing HDR even when I was able to capture all the dynamic range of the scene in a single shot. Such a waste of time in front of the computer post processing unnecessarily!

Photographers' mistake: following trends too much
I still love HDR. I like the dramatic effect you can get. However, I learnt to first check if I really need to take several shots at different exposures and merge then in post processing or if I just need one single shot.

What I learnt: Trends are great opportunity to learn new things. However, before jumping into the trend, learn about it. Check if you need to follow this trend or not. If it will add something to your photography or it will be a waste of time. That everybody is doing something at a certain periods doesn’t mean that it is the more convenient thing for you. Analyze first and then decide by yourself.

Are you making some of these mistakes?  I will be happy to know about your experiences. Feel free to share with me any comments or any other mistake I should include in this list! Have a happy shooting!!

Using Photoshop’s History Panel To Fix Editing Mistakes

We all make mistakes. It’s going to happen. After all, mistakes are something that happen and that’s why pencils have erasers. When you are working on photo editing in post production, mistakes used to cost you the photo and often hours of work. That is not the case anymore with new digital software and digital photos. Now, fixing a mistake in a program like Photoshop can be resolved quickly and easily. All it takes is understanding how the history panel works in Photoshop CC.

history-panel-1

How the History Panel Works

When you are using Photoshop, every little thing that you do is recorded by the program. Every mouse click and every keystroke is logged. This is not done to spy on you, or figure out what you are doing, but to provide you with a means to reverse a change that you made. This change could have been made a minute ago, or hours ago. You could spend an hour on a picture, realize you don’t like how it is turning out, and you can revert back to how it looked an hour ago with the click of a mouse and a press of the button. It really is that easy.

Think of it this way, every change you make in a picture is a step in the process. The history panel shows those steps, and all you have to do is step back once, twice, or two dozen times, to get back to where you want to be. Hansel and Gretel left bread crumbs but Photoshop leaves you the history panel to find your way back.

If you’re using Essentials, you’ll find the History icon in the top right corner of your image. If you can’t see that, go to the Window tab and select History.

history-panel-2

The Commands

So, how do you fix mistakes, or redo something that you accidentally undid? Well, as it turns out it is very easy to do.

If you want to step backward once, twice or more, then do the following:

Mac: cmd + opt + z

PC: ctrl + alt + z

That’s it. Keep clicking those and you will move backwards in the history of the picture. The more you use those commands, the farther back you are going to go in steps.

history-panel-3

What if you go back too far and you need to step forward? Don’t worry, Photoshop has you covered there as well:

Mac: cmd + shift + z

PC: ctrl + shift + z

That is once again, all there is to it. Just substitute in Shift and you are able to move forward with ease to fix any undo mistakes you made.

History Preferences

It should be noted that currently, you can only move back 20 steps in the default settings of Photoshop in your history panel. If your mistake was 21 steps ago, well you are out of luck unless you change your history preferences.

Once again, this is made very easy to do by Photoshop. On a Mac, just go to the Photoshop tab on the top of the page, while in Windows you go to Edit. While there, you click Preferences and then choose Performance. There you will find History States.

history-panel-4

history-panel-5

Now, you need to be aware that you can set this to 1000 if you want, but the more steps you save, the larger the memory used is going to be. When you are editing a large file, and you are keeping hundreds of edits in memory, you are going to use a lot of your system memory and you are going to use a lot of your system space. This in turn can cause performance issues on your computer. If you have an extremely fast and powerful computer, then you have nothing to worry about, but older computers will be hard pressed to handle the extra load.

Go Back to the Start

If you are editing and you are not happy with anything you did and you just want to go back to the very start of the entire process, you can do that. There are actually several options to choose from in this regard.

First, you can just close the file and not save it. If you have created something original, that may not be the option that you want.

Second, you can choose File and select Revert, which will take things back to the very beginning of the entire process for you.

history-panel-6

Third, you can click on Snapshot at the top of the history panel.

Making mistakes will happen, especially when you are looking at really large files and complex designs. Being able to move back in time to fix things makes everything easier, and you will be very happy that you can move one, 10, 100 or 1000 steps back if need be. Just remember to change the steps setting so that you don’t lose out if you need to go back 21 steps. You can also start learning about Photoshop actions to keep mistakes to a minimum.

How to add an interesting reflection in photoshop?

Five Editing Mistakes Beginning Photographers Make

When you’re first starting out in photography, it’s easy to fall victim to a few common mistakes. When I look back at my work from seven years ago, it’s apparent to me (and probably any other photographer) that I fell into many of the same traps as a lot of other beginners. Things that draw attention to your subject don’t necessarily improve the photo–they can simply be distracting.

In this list below we’re going to get in touch with the five most common mistakes beginners tend to make during their journey towards becoming professional photographers:

Heavy Vignetting

2_vinette-1

Exaggerated vignettes are a tell-tale sign of an amateur photographer. Beginners like them because they draw attention to the center of the frame where they are most likely to compose their focus. What they’re effectively doing, though, is underexposing the sides of the image and detracting from their talent. A good photographer ought to use the whole shot, utilizing natural elements to frame the subject. Amateur photographers also like to use vignettes in an attempt to add some drama to the photo. Luckily, there are natural ways to do this–mastering the sun flare technique can really enhance an otherwise lifeless image.

Overusing Presets

3_Going over the top with presets-1

It’s easy to go overboard with presets. Overuse can make a photo look unnatural and unflattering. If you suspect you’ve done too much, you’re probably right. Keep it simple. Instead of over-editing the entire photo, use local adjustments to accentuate specific areas.

Histogram tool can be your best friend under situations like this, as you’re constantly checking over clipped values (mostly at highlights or shadows), but also Lightroom’s before/after mode can be extremely handy for checking where things went wrong.

Overdoing Black and White

4_Only editing in black and white-1

This is the mistake I’m most guilty of in my early work. Converting an image to black and white does not generally make it more artistic. Of course, there are ways to use black and white to effectively enhance a photo, but many new photographers end up using this style as a crutch. The number of variables that color adds to the editing process can be intimidating. Be sure to learn about complementary colors and incorporate them into your photos. However, do try to avoid photographing bright and heavily saturated colors because camera sensors don’t tend to register these colors well. If you’re unsure which way to go, this post can help you decide whether to edit your photo in color or black and white, but also keep in mind that not only black and white effects count as the only range of monochromatic effects – sepia or cyanotype effects also looks appealing for most clients.

Heavily Retouching Skin

5_Over Retouching-1

Most photographers fear that their clients won’t like their photos because of the way they themselves look (by no fault of the photographer). It’s tempting to heavily retouch skin in an attempt to flatter your client, however, it’s best to edit only what is necessary. A good rule of thumb is to touch up or remove only imperfections that are impermanent, such as acne or bruises – try, also, to find flattering angles and accentuate those.

Overdoing such adjustments will end up in unnatural results, mostly if you don’t happen to ace post production tools such as Lightroom Presets & Brushes or Photoshop Actions. In the end, you’re prone to ruin all your hard work by just trying to make it look better.

HDR Processing

6_Going crazy with the clairity slider-1-1

Every photographer wants to learn new techniques; more often than not, though, HDR processing looks a bit over the top. While it can be tempting to bracket exposures, it’s best to avoid it until you’ve mastered basic photography skills first. Instead, if you don’t have enough dynamic range in a shot, bracket the exposure and brush locally in the post.

A quality image ought to appear natural, polished, and simple:

1_original-1

Now that you’re familiar with these common mistakes, you can easily avoid them by mastering photography techniques that surely will take your photographs to the next level! Don’t feel disappointed by making mistakes during your first attempts – everybody had a starting point and a goal to reach, therefore it’s your right to learn from bad experiences and add all that knowledge to your future work.

Hope this guide was useful and keep shooting!