Tag: flash

Ring Light Photography: How To Make Your Own Ring Flash for Less Than $20

Ring light photography is a wildly popular, professional technique that creates perfectly lit, breathtaking pictures. A ring light can really boost the quality of your photographs if you know how to use it right.

How to Use a Ring Light

  1. Determine Ring Light Size Needs
  2. Set Up Ring Light
  3. Position the Ring Light
  4. Pick a Lighting Color
  5. Decide Whether to Use a Diffuser
  6. Adjust Camera Settings
  7. Take Test Shots

As a photographer, you know that lighting is key to a good shot. There are many different ways to manipulate lighting, and using a ring light is one of the most effective methods for photographers to achieve their desired result.
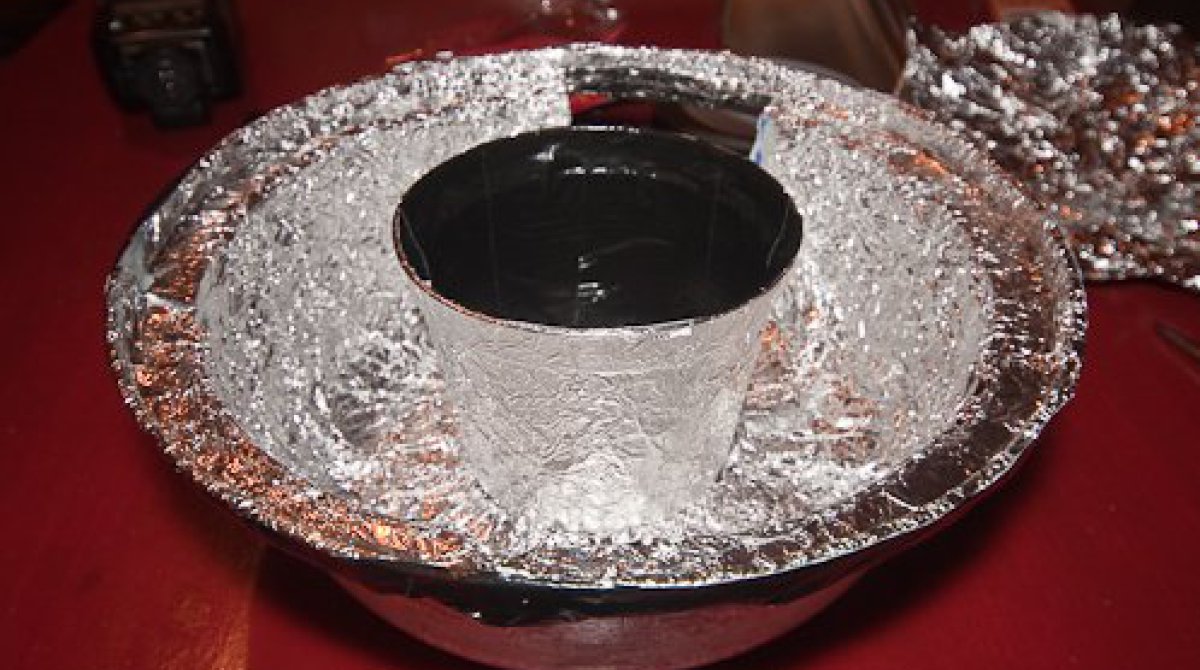
make your own flash ring for less then 20$

What Is a Ring Light?

As its name implies, a ring light is a photography prop that is essentially a circular light ring made up of LED lights. An led ring light is donut-shaped, with a hollow middle circle for a camera (or smartphone) to fit through.

So, what is a ring light used for and what does a ring light do?

Ring lights are used by photographers and videographers in both a studio and outdoor setting to control lighting.

A ring light adds soft, flattering light to any subject without causing glare. Ring lights are commonly used for product and Food Photography because they cast an even, flat light and eliminate unwanted shadows.

Ring lights are also used for portrait and Self Portrait Photography. They help minimize blemishes and get rid of harsh shadows. If you’ve ever wondered how a model’s eyes look so vibrant in a photograph, that’s probably thanks to a ring light.

The brightness of a ring light constricts pupils, bringing out more of the color from the irises. It also creates stunning, characteristic catchlights in the eyes. For this reason, a ring light is a great way to get started with Portrait Photography at Home.

Many content creators and social media influencers also use a phone ring light to enhance the light quality of their selfies, YouTube videos, or even for streaming a live stream. With the rise of remote work, many people use a ring light for video call purposes, too.

Using a ring light is not complicated, but if you want to take your photos to the next level, then you should follow these steps on how to use a ring light most effectively.

make your own flash ring for less then 20$

How to Use a Ring Light

1. Determine Ring Light Size Needs

Even though they are used for a wide variety of photographs now, ring lights were originally created by a dentist for taking pictures of teeth. So, the first ring lights were very small in size.

Today, there are still small ring lights available for macro photography and extreme close up purposes, but there are also bigger sizes.

Before you purchase a ring light, you need to ask yourself how big of a ring light you need for what you’re photographing. What size ring light is best for your purposes?

While you can find sizes varying from 8 to 24 inches on the market, the most common ring lights today are between 10 and 18 inches in diameter.

A 10 inch ring light is categorized as a selfie ring light because it is ideal for close-ups and headshots. If you are going to be using your ring light primarily for selfies or focused product shots, then this may be a good size for you. Smaller ring lights are also helpful for makeup artists, makeup application, makeup tutorials, or even video calls since they mimic natural lighting when the real thing isn’t available.

There are also 8 inch ring lights, which are designed for content creators who just want a ring light to enhance their phone photos and videos. Hence, this size is considered to be a phone ring light. A phone light ring is the cheapest option. A ring light for a phone can usually be clipped right on your smartphone or set up around a phone holder.

An 18 inch ring light is used in professional settings to get the lighting in a room just right. This size can illuminate an entire room, so it is a good overall option for less focused photographs.

As a general rule of thumb, an led ring light with a bigger diameter casts a wider, more even light whereas an led ring light with a smaller diameter has a more concentrated beam. So, if you want a smooth, evenly lit image, you will want to go with a larger ring light size. However, if you want your subject to stand out more, a smaller size will be the best ring light for you.

2. Set Up Ring Light

Now that you know which size ring light best suits your needs, you may be wondering how to set up a ring light.

How you set up a ring light depends on the type of ring light. There are two kinds of ring lights: those that mount directly on the camera and those that attach to a tripod or light stand.

On-camera ring lights are most often used for macro photography or scientific photographs (for example, crime scene documentation.) Setting up an on-camera ring light is easy. You just have to attach it to your camera so that the camera lens fits through the ring light’s center hole.

Because they are mounted to the camera, on-camera ring lights are easier to carry around, which is helpful, for instance, if you need to move around in nature to capture snapshots of insects. Also known as a ring flash, a ring light that is attached right to your camera lens emits a focused, powerful ray of light, which is very useful in dark settings.

Off-camera ring lights are used more often in a studio setting. They emit a wide ray of light, which is more suited for bigger subjects, like people. Since off-camera ring lights are mounted to a light stand, they can be moved around to create different lighting effects.

For an off-camera ring light, simply pop out your tripod or light stand and mount the led ring light on top. If the ring light does not run off battery power, then plug it in. Then, either hold or use another tripod to position your camera lens through the hollow center of the light ring.

3. Position the Ring Light

After you get your ring light mounted, you will need to position the prop. Different ring light positions can create a variety of unique effects.

The simplest, most common method of positioning a ring light is directly in front of your subject. However, it can be fun to experiment with different lighting positions.

Have fun and experiment with positioning your ring light to create unique effects. For instance, for product or food photography, try angling the ring light above your subject. This turns the led ring light into a sort of faux softbox.

For portrait photography, place a ring light at a 45 degree angle to illuminate the side of your model’s face. You can also position the ring light behind the subject to use as a frame for farther away shots, or if you zoom in so the ring light itself doesn’t show in the photo, this position will add a gorgeous halo lighting effect.

If you’re wondering how far away should a ring light be, this depends on how concentrated you want the lighting to be. The closer the ring light is to your subject, the more focused and harsh the lighting will be. The farther away, the more diffused the lighting will get.

4. Pick a Lighting Color

Light emits different temperatures. This color temperature is measured in Kelvins.

Most ring lights have a color temperature level somewhere between 3,000 and 6,000 Kelvins. Lower color temperature levels give off a yellowish, warm light whereas higher color temperature levels create bluish, cool white lighting.

While some ring lights only offer one temperature, many can be adjusted with a color filter or dial to give you a range of color temperature options.

So, what is the best ring light color for your photography needs?

To decide which ring light color to use, you should take into account the subject you are photographing and the effects you want the ring light to add. For example, with portrait photography, you may want to consider your model’s skin tone and whether you want your lighting to look more like the sun’s warm, natural lighting, or something cooler.

5. Decide Whether to Use a Diffuser

While you can diffuse lighting by positioning a ring light farther away from your subject, there may be some instances where you want to use an additional diffuser.

Diffusers soften your lighting and aid in eliminating unwanted shadows. For this reason, they especially come in handy if you’re photographing products or food. A diffuser can also help to fill in blemishes and shadows on a portrait model’s face.

However, if you want the subject to jump out a bit more, you may want to skip the diffuser. It really depends on the effect and type of photograph you want to capture.

6. Adjust Camera Settings

The next step you will want to take is to adjust the settings on your camera. You will need to adjust your camera’s exposure (f/5.6 at 1/160s is a good place to start) and brightness levels. You may also want to consider manually setting your camera’s aperture, ISO, and shutter speed.

7. Take Test Shots

Finally, snap a few test photos. See how they turn out and if you’re happy with the result. If not, don’t be afraid to go back to a previous step and make adjustments to your ring light position, color filter, or camera settings. Have fun and play with it a little until you get the perfect shot.

Are Ring Lights Worth It?

Ring lights are an effective, relatively easy-to-use photography prop. You can find a ring light as part of just about every professional photographer’s light kit. But, is a ring light worth it?

In short, the answer is yes!

Ring lights make a big impact on photographs, and they’re very lightweight, making them one of the most portable photography props. But, just how much is a ring light going to cost you?

You’ll be happy to hear that not only are ring lights one of the most useful light kit pieces out there, but they’re really affordable, too. In the past, ring lights were more expensive, but today you can find ring lights or even a ring light with a stand for as little as $20.

Cheaper options exist for those who just need the very basic function of a ring light, but not all ring lights are equal, so make sure you do your due diligence before purchasing a ring light. You want to make sure your ring light is a good size for what you’re using it for.

Since a ring light is made of LED lights, you also want to make sure that the ring light has a high color rendering index (CRI) value. The color rendering index measures on a scale of 1-100 how accurately an artificial LED light source can reproduce colors. A color rendering index value of 90 or more is considered to be excellent, while anything under 80 is poor.

Ring lights are one of the most popular photography devices, for good reason. They are used by everyone from content creators and makeup artists to professional product and food photographers.

Whether you’re searching for a good lighting prop for creating high quality YouTube videos or for your professional portrait photography studio, if you don’t have a ring light already, you should definitely get one soon.

Because ring lights are so commonly used in portrait photography, you should also check out Sleeklens Studio Portraits Lightroom Presets to give your photos that extra oomph.

How To Get Into Concert Photography

Whether you are hired by the performer or event organizers, tackling concert photography is not an easy job. But if photography was an easy job, everybody would be a professional photographer.

Most concerts have a few things in common, including low light, lots of motion, little to no access, and a quick timeframe. So how does one manage all of that?

13 Concert Photography Tips

Do Your Homework

In order to get access, you’ll need to do your homework. Find out whether the performers allow concert photographers inside in the first place. What are their policies? Can the music photographer shoot the whole concert or just the first few songs? Do the performers allow photographers to shoot backstage? Do they require photographers to have a photo pass? How do they move on stage? Do they have some prominent habits on stage that would look cool in a photo? Will there be guest performers? These all are questions that you’ll need to be answered before you enter the venue.

Саф и Легијата [24.04.2015] Photo by Dzvonko Petrovski.

Get Access

There are two types of access needed to photograph a concert successfully. Mainly, you need to be able to get into the concert as a press photographer or get a photo pass. In other words, you need access to be able to get backstage, in between the stage, and into the photo pit.

Secondly, you’ll need access in terms of angles. If the stage is too high, and you are just in front of it, you won’t see a thing. Therefore you’ll need access to the areas from which can actually shoot the performers properly.

Manage The Light

Since 99% of the time you’ll have a strong light hitting your camera directly (since the stage lights will actually be in the background), make sure that you aren’t using a lens that is prone to flaring, since you’ll end up with a bunch of images with lens flares. Those stage lights will create atmospheric light and rim light on your subjects (the performers in this case), so your job is to provide the fill light in order to avoid silhouettes. I usually use the on camera flash modified with a 20x30cm softbox.

Саф и Легијата [24.04.2015] Photo by Dzvonko Petrovski

Focusing

Direct light could pose problems for the focusing system on some cameras, and the best way to manage that is to set the camera to center point focusing. Then block the lights with your hand, focus, and recompose. Do all that without releasing the focus button—using a back button focus for this might be easier.

ISO

Саф и Легијата [24.04.2015]

Photo by Dzvonko Petrovski.

Usually, the first thing people do in scenarios like this is bump up the ISO camera settings in order to gain more detail in the shadows of the image. In most scenarios, that would be the smartest thing to do. However, in this case, you are using flash, and have very bright stage lights. You don’t need a high ISO because you can let the flash take care of the fill light while the stage lights take care of the highlights. This way you end up with cleaner shots.

For the purpose of proving this, all of the shots that you see in this article have been taken with a Canon 1000D (a camera that has a maximum of 1600 ISO, and most of them are shot on 800), with 18-35mm f/1.8 Sigma Art lens.

Don’t Forget To Move

I see many photographers anchoring themselves to one spot and staying there for the whole concert. That is a  huge mistake to make. Performers move around, they dance, they jump, they do stuff. Standing in one place will result in you missing most of the shots.

One rule of thumb that I have when shooting concerts, especially rockers and rappers (since they hug the microphone in a specific manner), is that I move to the opposite direction of the microphone. That way the microphone and the hand holding it isn’t covering the whole face of the performer, and it provides a good photographic element, in addition to the portrait and light.

Have Your Equipment Ready

Concerts are demanding on your equipment, especially in regards to battery life and storage. Be prepared for around 2,000 shots, sometimes more. That means that you’ll need to provide enough juice to the flash batteries (since they are the first ones to die) to get around 2,500 shots, then enough storage space in cards for that amount as well.

Keep in mind that while at the concert there is usually no way to charge batteries, dump SD/CF card content on a laptop or other things that you would be able to do in other types of settings. You’ll need to be prepared to shoot continuously for the whole concert. So, if you don’t already have them, get yourself some spare batteries and memory cards—you’ll definitely need them.

Isolate the Subject

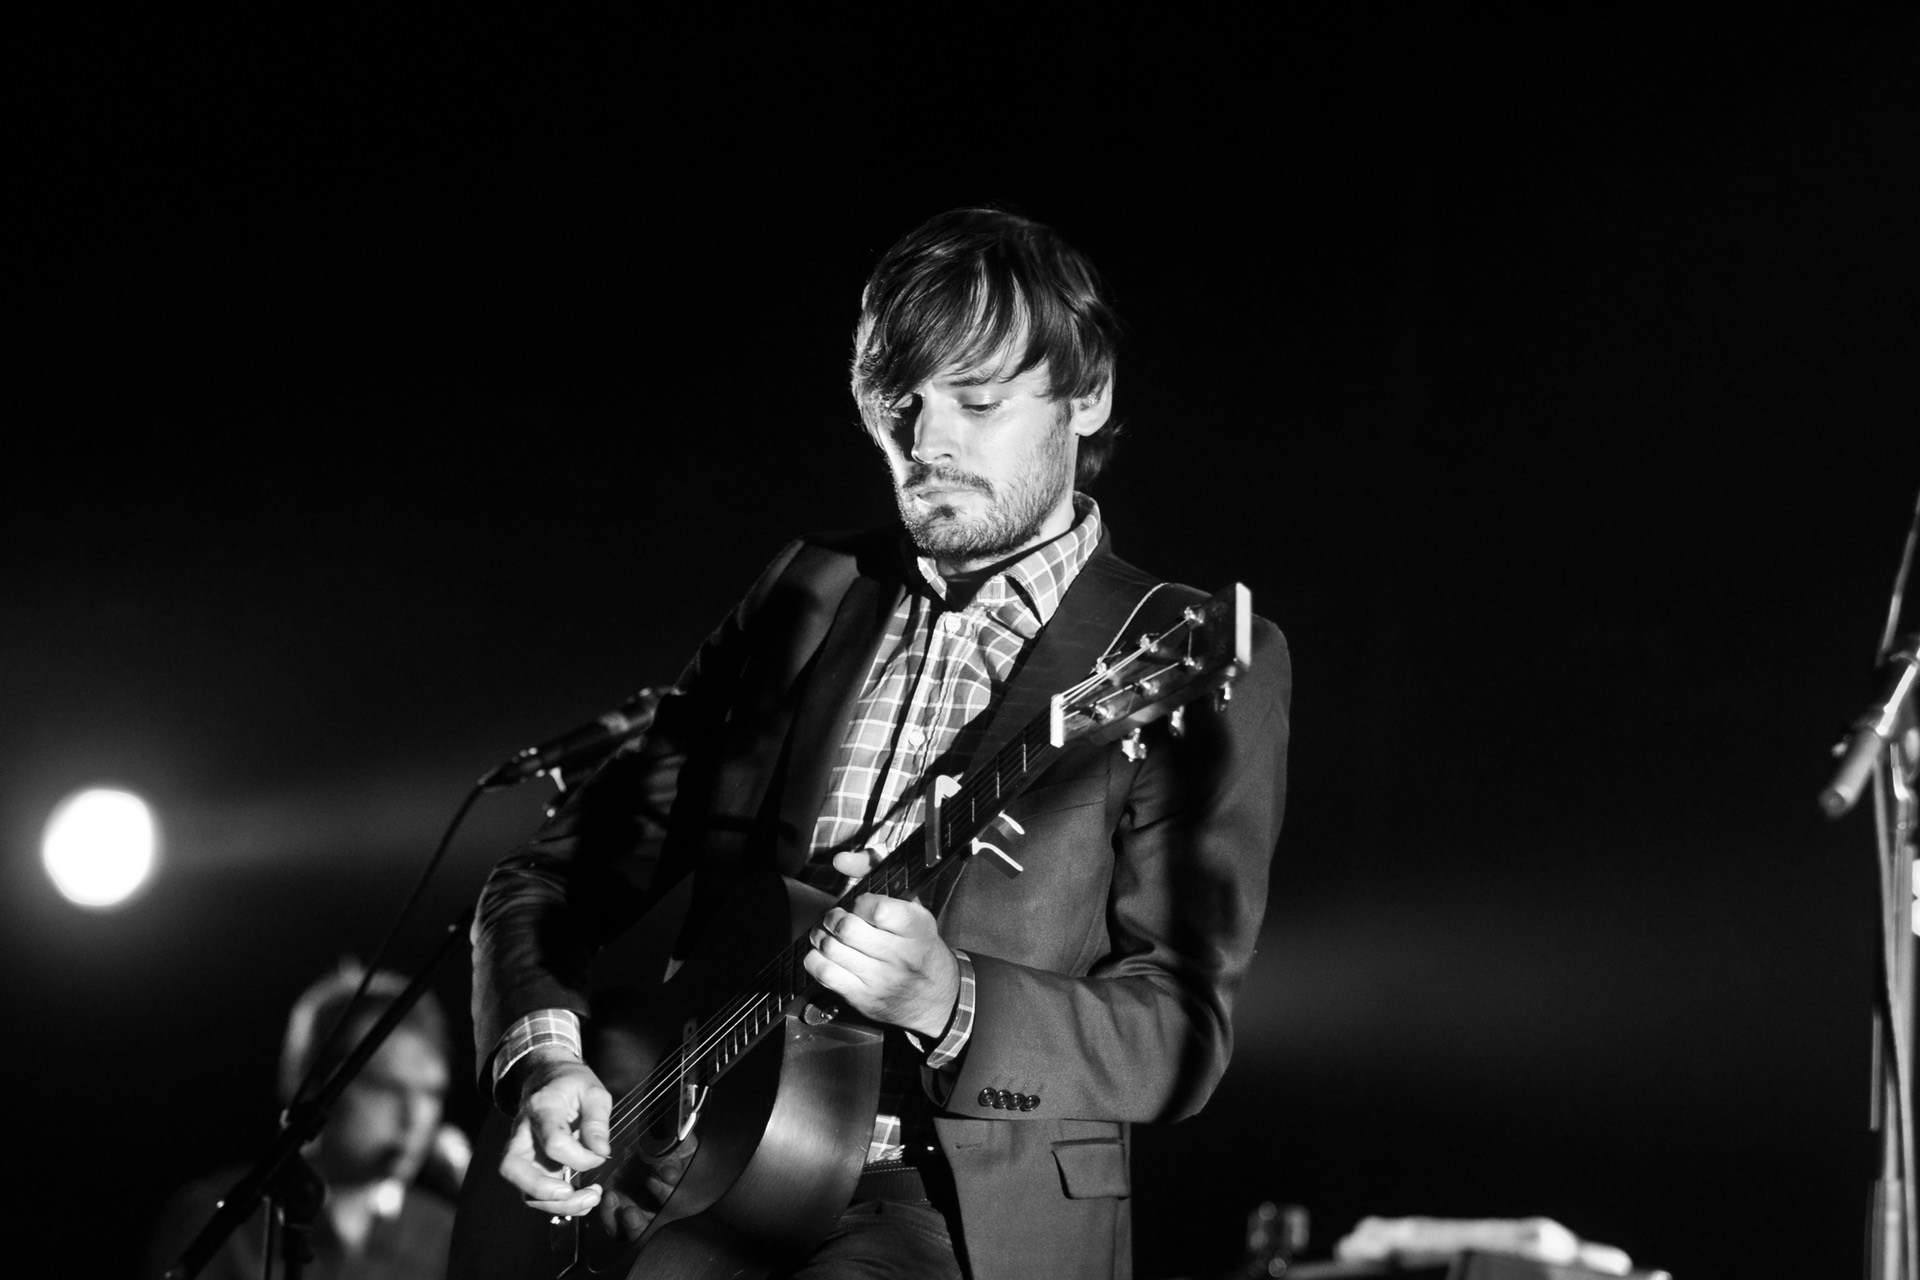
black and white

One of the best reason to get into live music photography is to see your favorite bands and artists in person! Needless to say, many of us are in love with artists like Taylor Swift, Bruno Mars, Justin Timberlake, Elton John, etc. Being a concert photographer means you’ll be coming home with amazing photos of these musical artists!

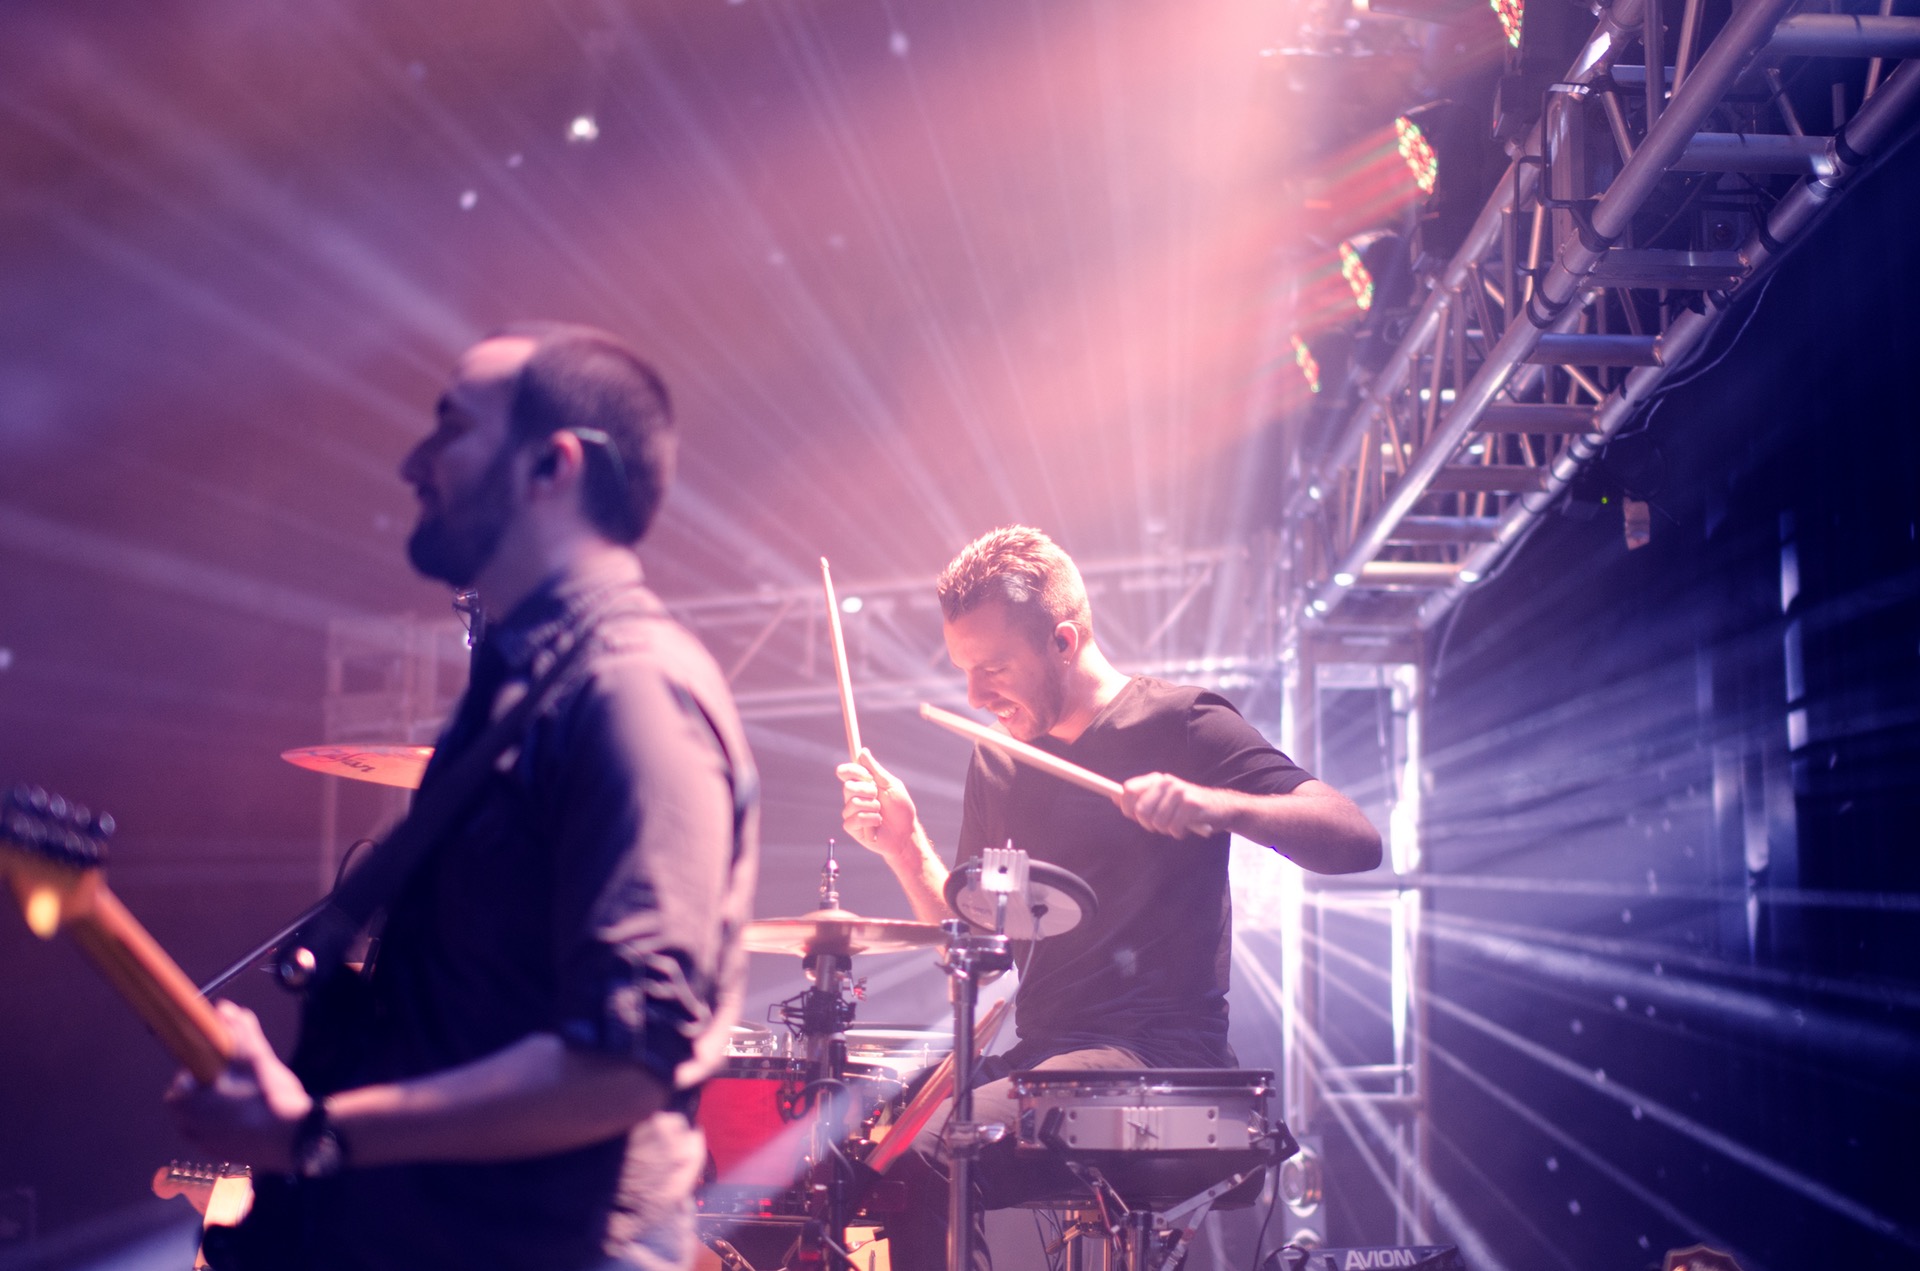
As seen in the photo above, one great composition in concert photography is using a long telephoto lens or zoom lens to isolate the band member. This separates the subject from all other surrounding elements and highlights the artist along with their instrument.

Pro Tip: if you generally buy general admission tickets, ARRIVE EARLY in order to get as close as possible to the subject. The limiting factor in concert photography is oftentimes not being close enough to the subject to isolate them when framing your photo.

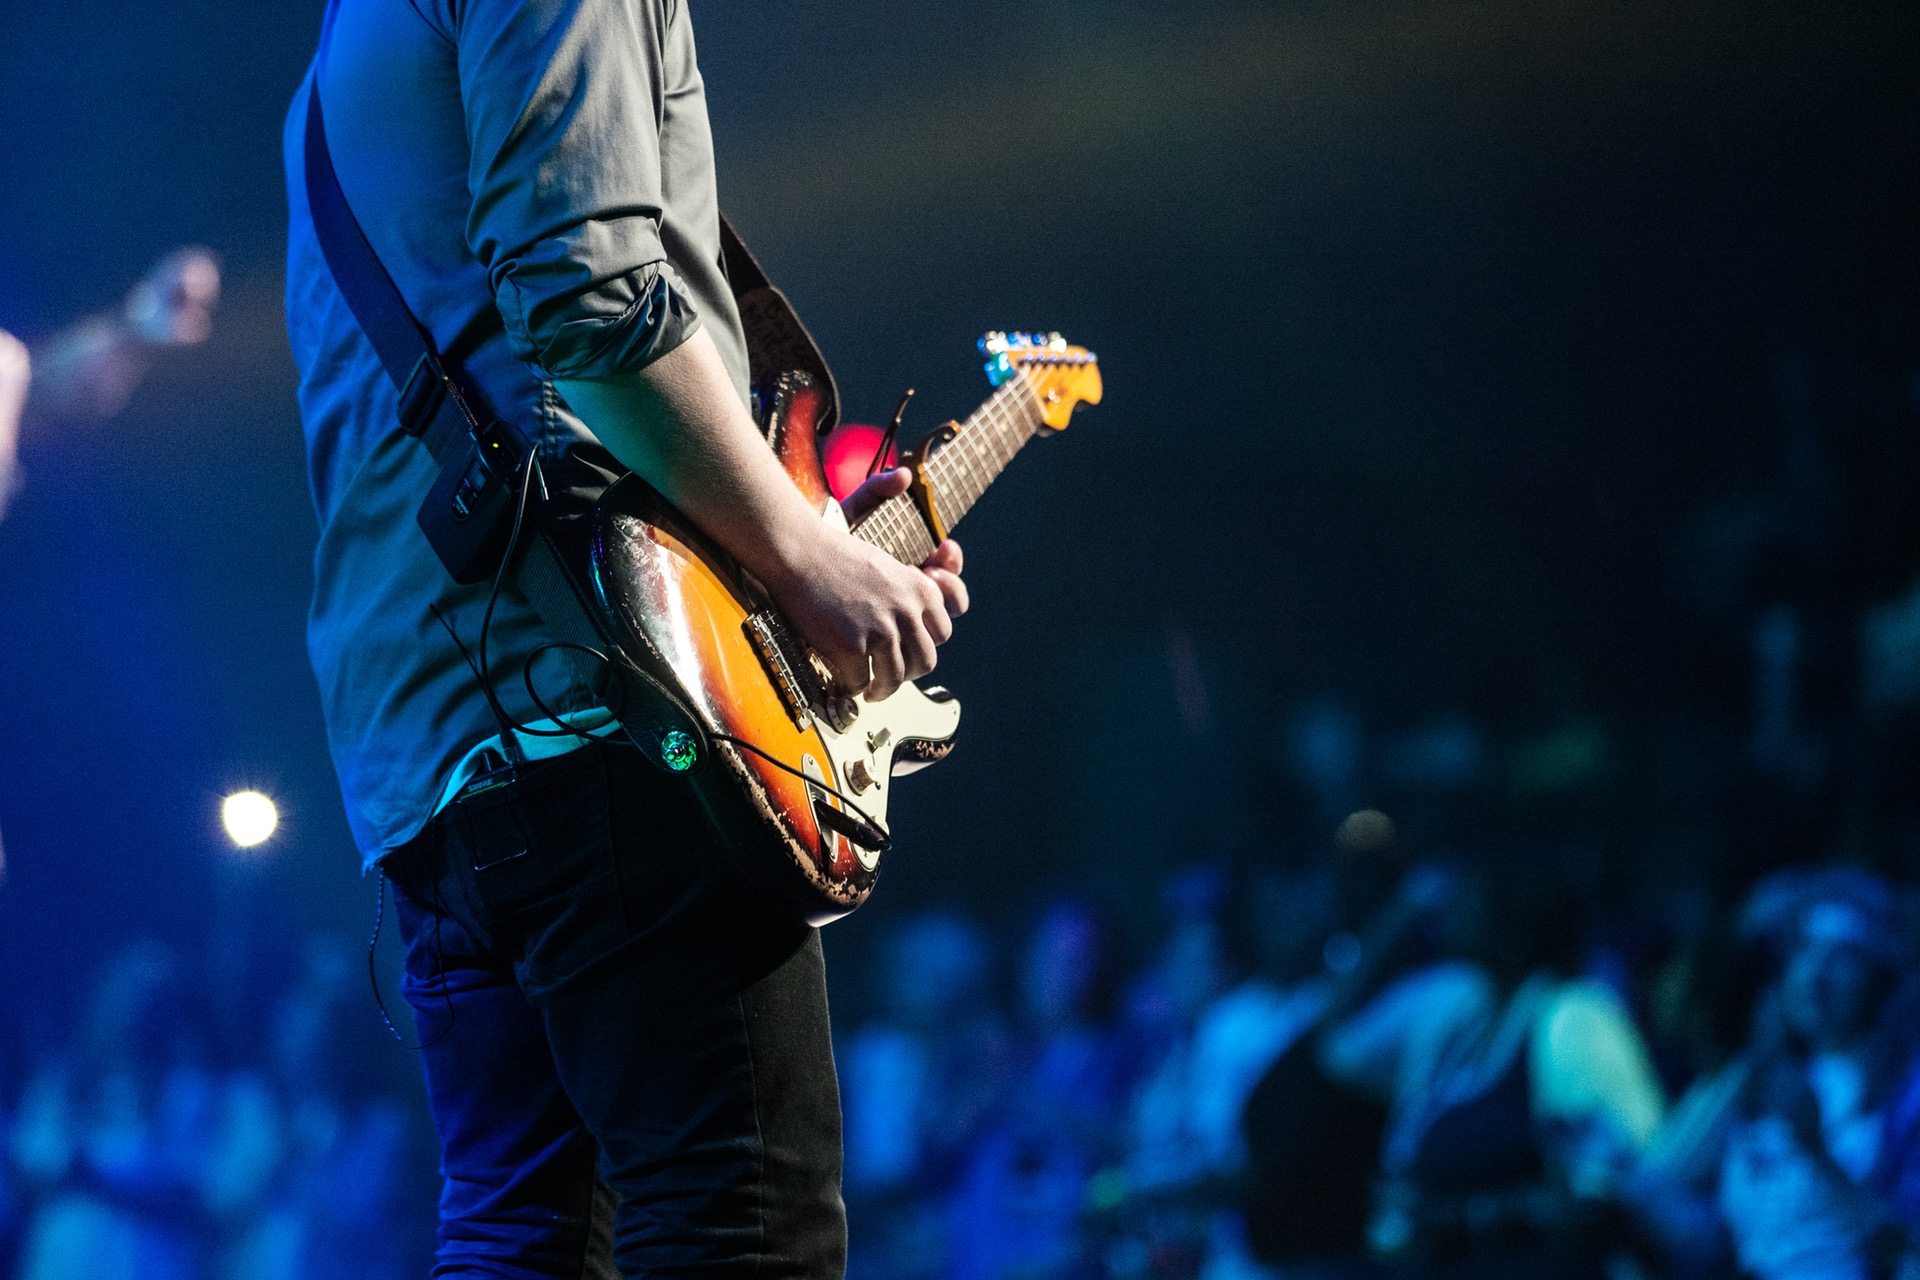
guitarist

Another option when isolating the subject is to choose an instrument to be the subject. An artist’s instrument is an extension of themselves. It’s how they to express themselves. Bonus points if you can include some background context in the photo—either the audience or other important elements of the stage.

Include Background Context

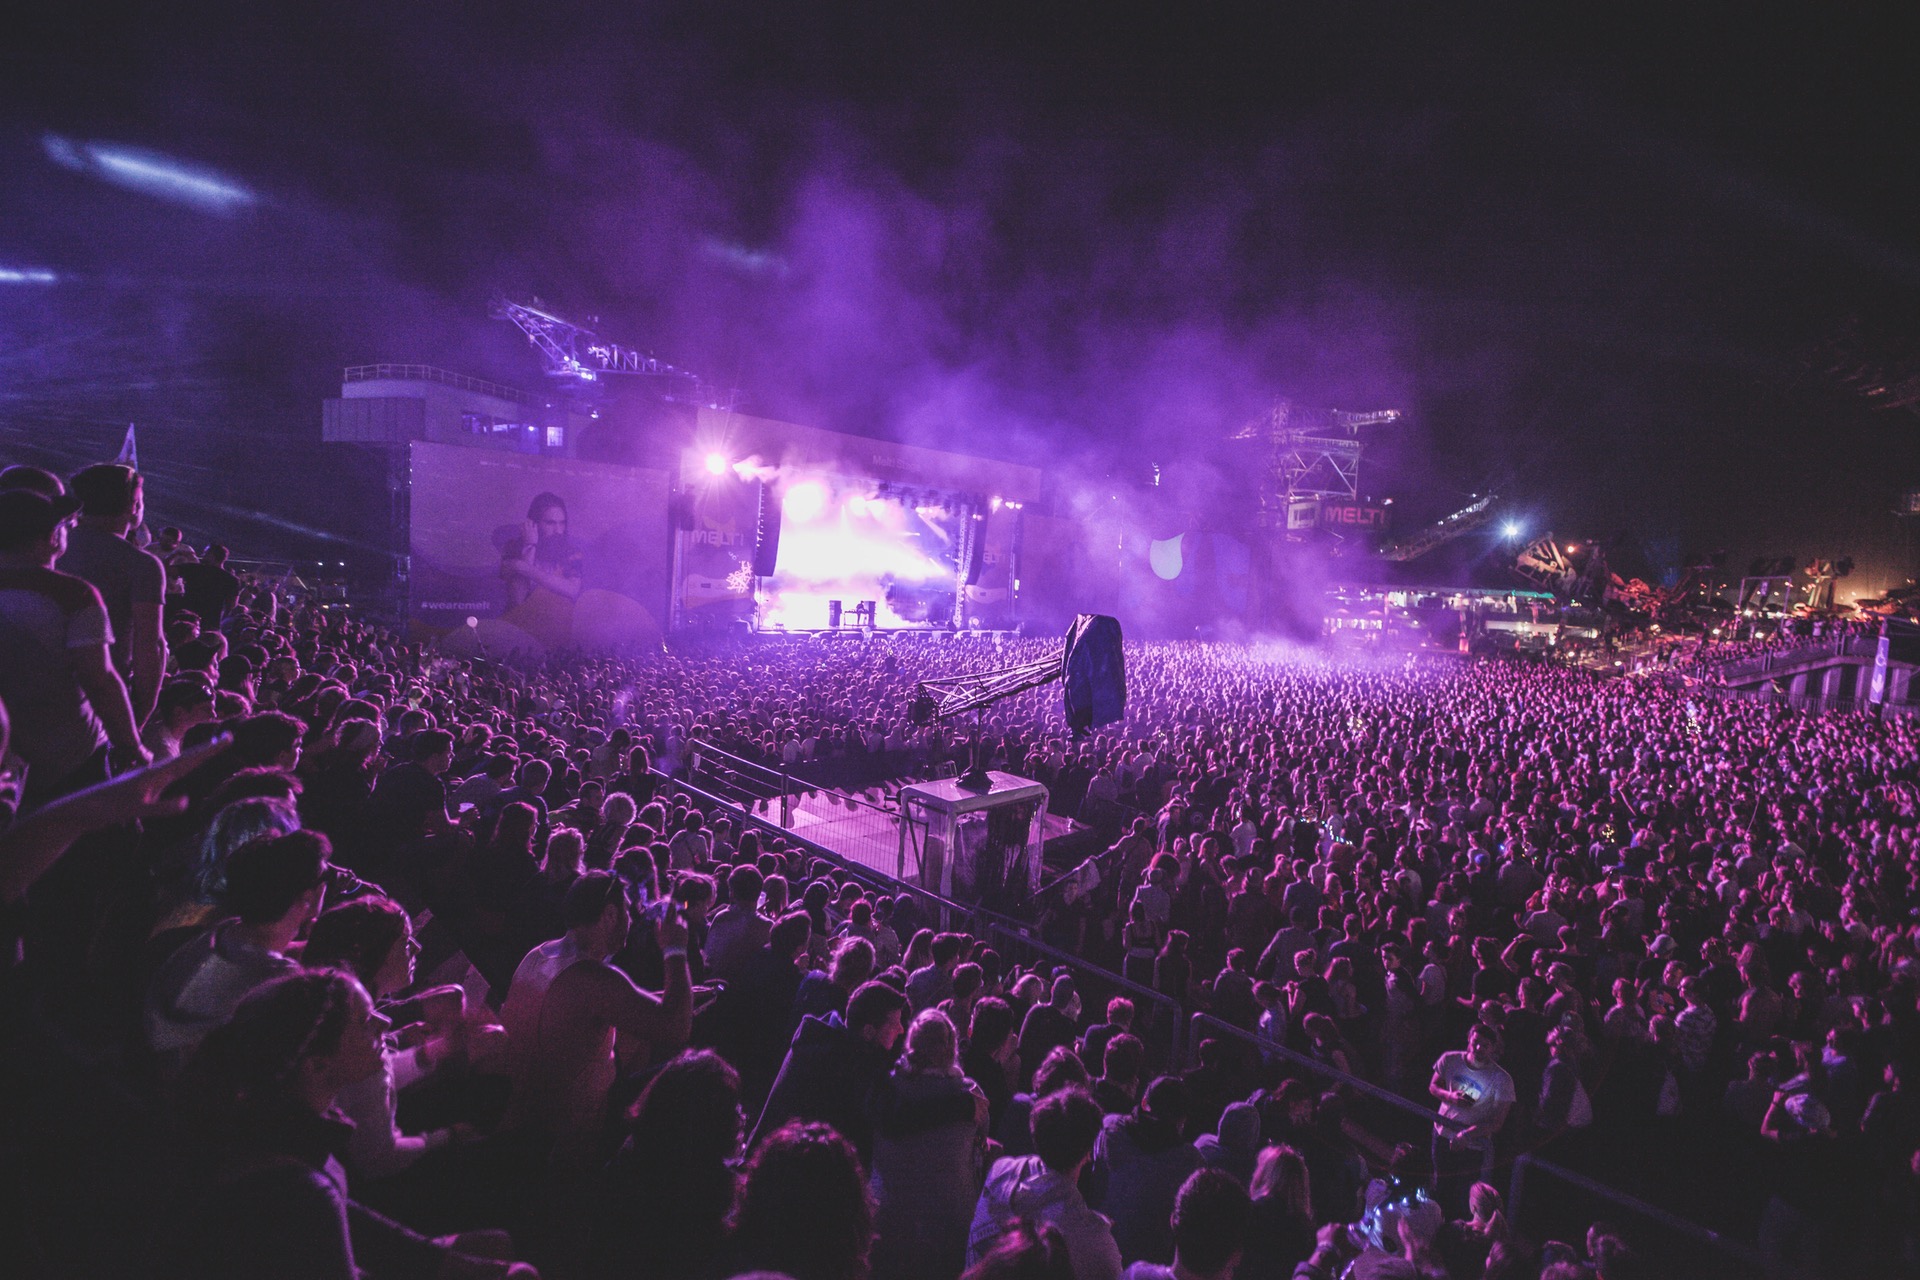
purple

On the other side of the spectrum, bringing a wide-angle lens in order to capture the audience along with the stage can also result in an awe-inspiring photo. By providing background context to the photo, the photographer helps the viewer understand how large the audience is and get a feel for the atmosphere.

Not to be overlooked is the significance of the lights, smoke, and other decorations that are part of the visual elements at a large concert.

Isolate the Subject & Include Background Context

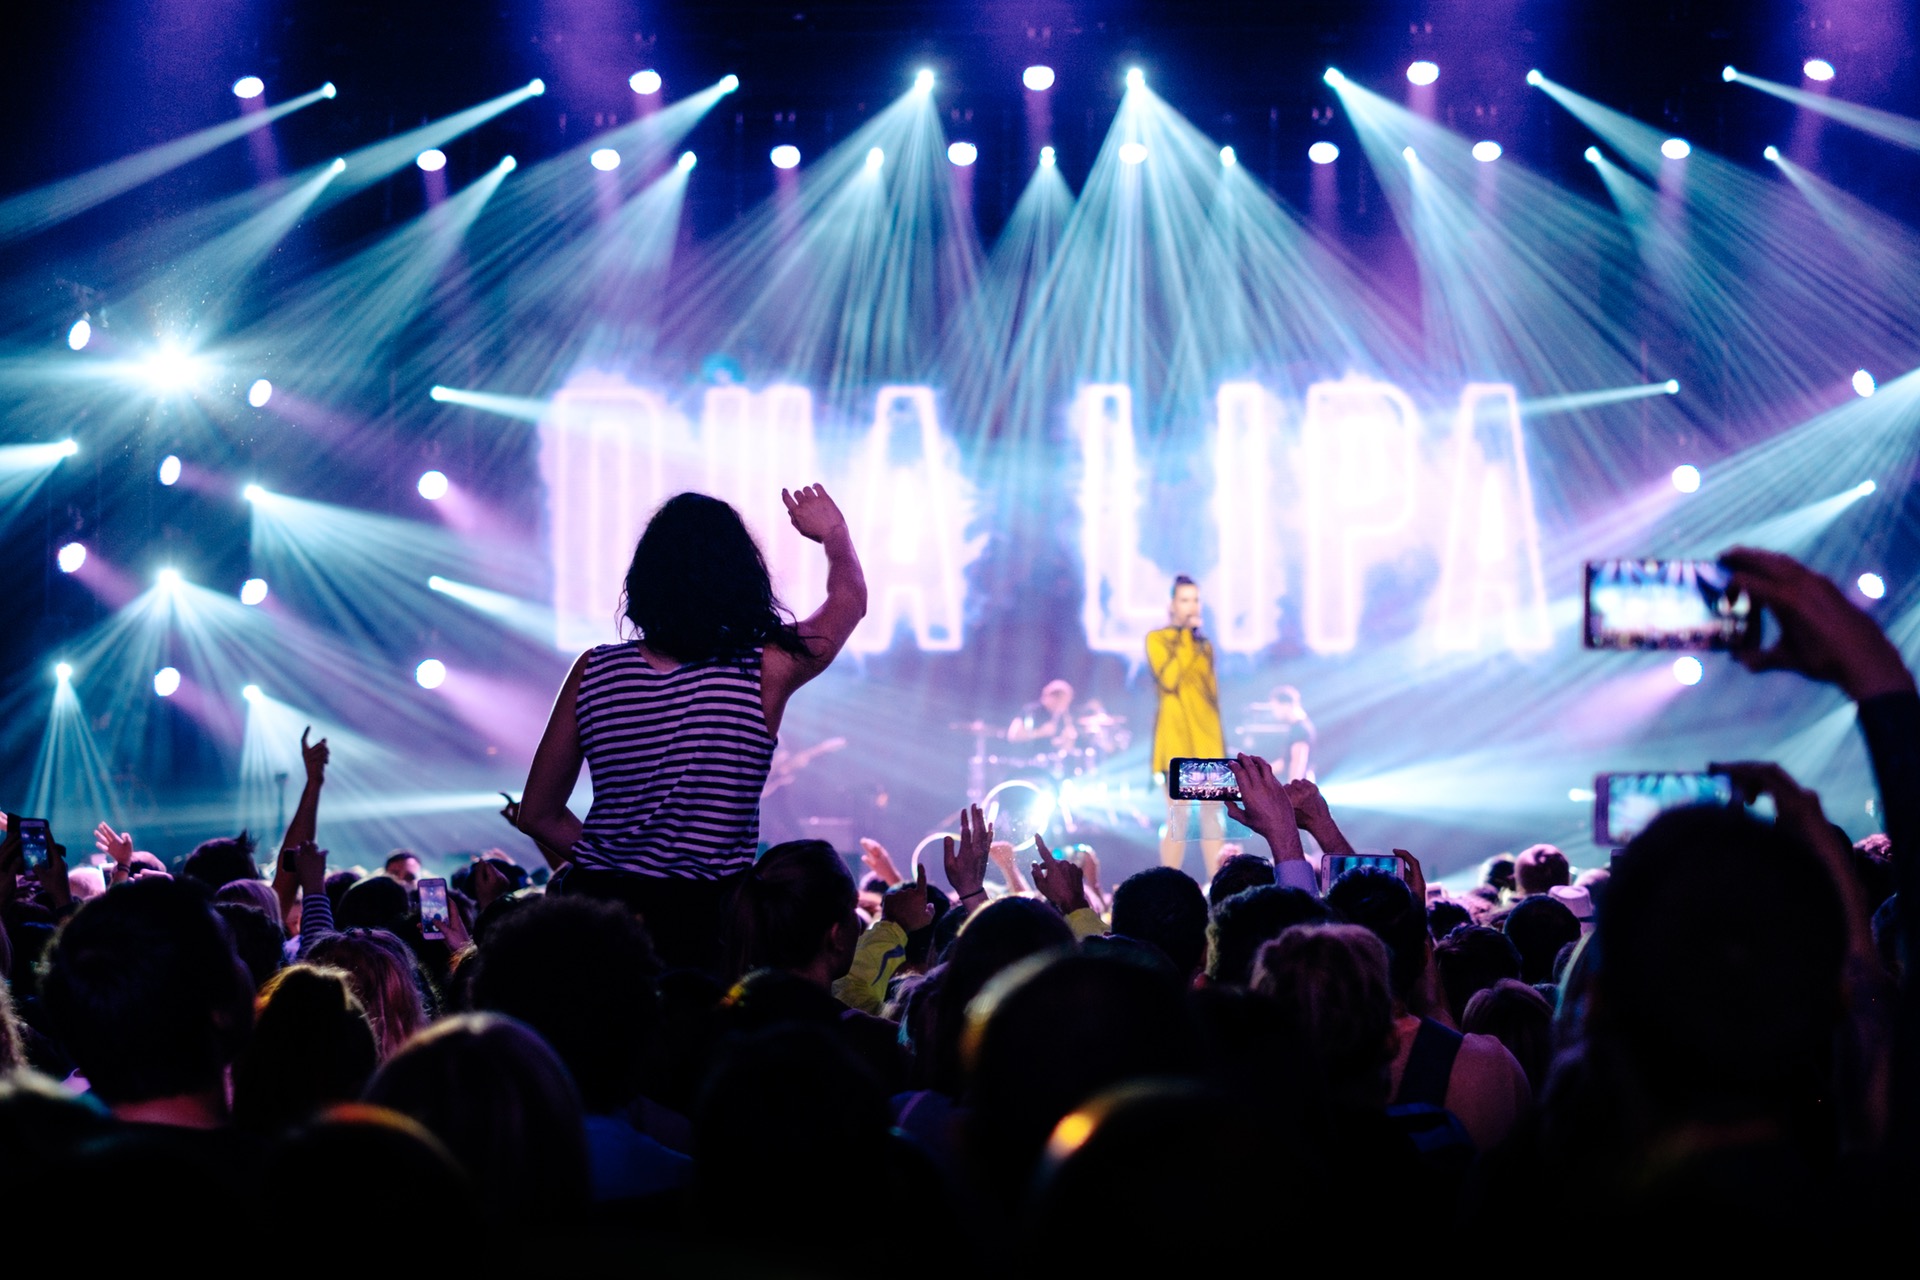
stage lights

A mixture of the two compositional techniques above, this photo has two main subjects. The crowd-surfing girl on the left, along with the musical artist on the right. By including the crowd-surfer, this helps guide the viewer to look between her and the main musical artist on stage. The viewer’s eyes do not have to roam to through the audience because there is someone that already stands out from the rest.

Take a Picture of the Captivated Audience

crowd

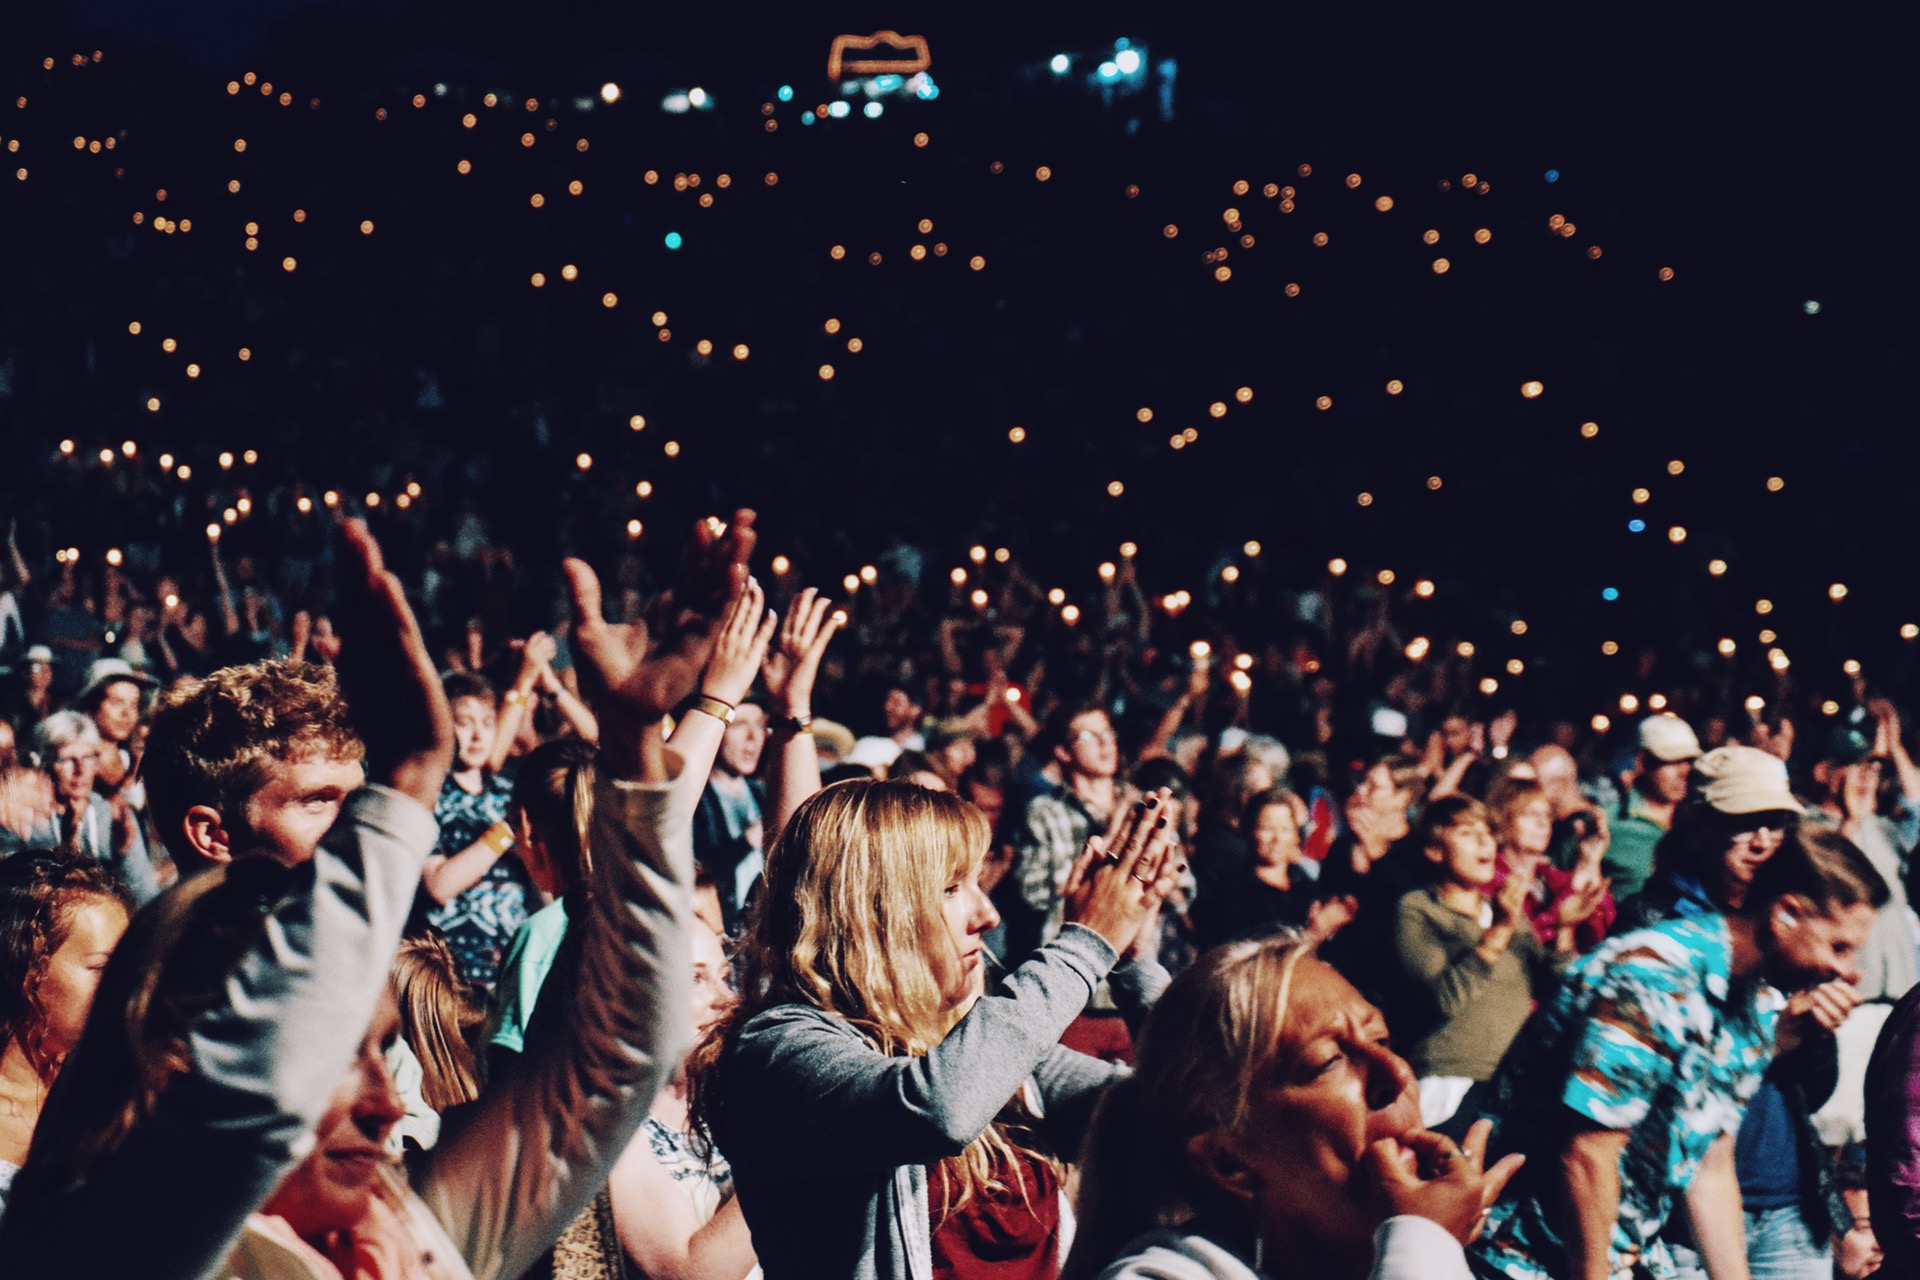
Being at a concert is a magical feeling. This is especially true when it is close to the climax of the event, as the musical artists ramp up toward their biggest hits and popular songs. During this special period, it’s a good idea to turn around and take a picture of the audience behind you.

A great signal that you should turn around is when the artist(s) ask the audience to clap along with them, or when the audience is waving their phones in harmony with the live music.

Take Lots of Pictures

musician

Snap, snap, and snap away! Concert photography has a tough learning curve, especially for beginner photographers. Understanding the low light condition, moving subjects, a limited time to take pictures, and constantly changing stage lighting are all very tough for any photographer to deal with. The result is that the number of “keepers” from any music photography session will likely be lower than what you are used to.

But don’t give up! The “keepers” that you do end up with are one-of-a-kind, and usually very unique. Timing plays a big role in whether you capture an image. This means that the more photos you take, the more “keepers” you’ll end up with.

cell phone

Don’t Be Afraid to Use Your Phone

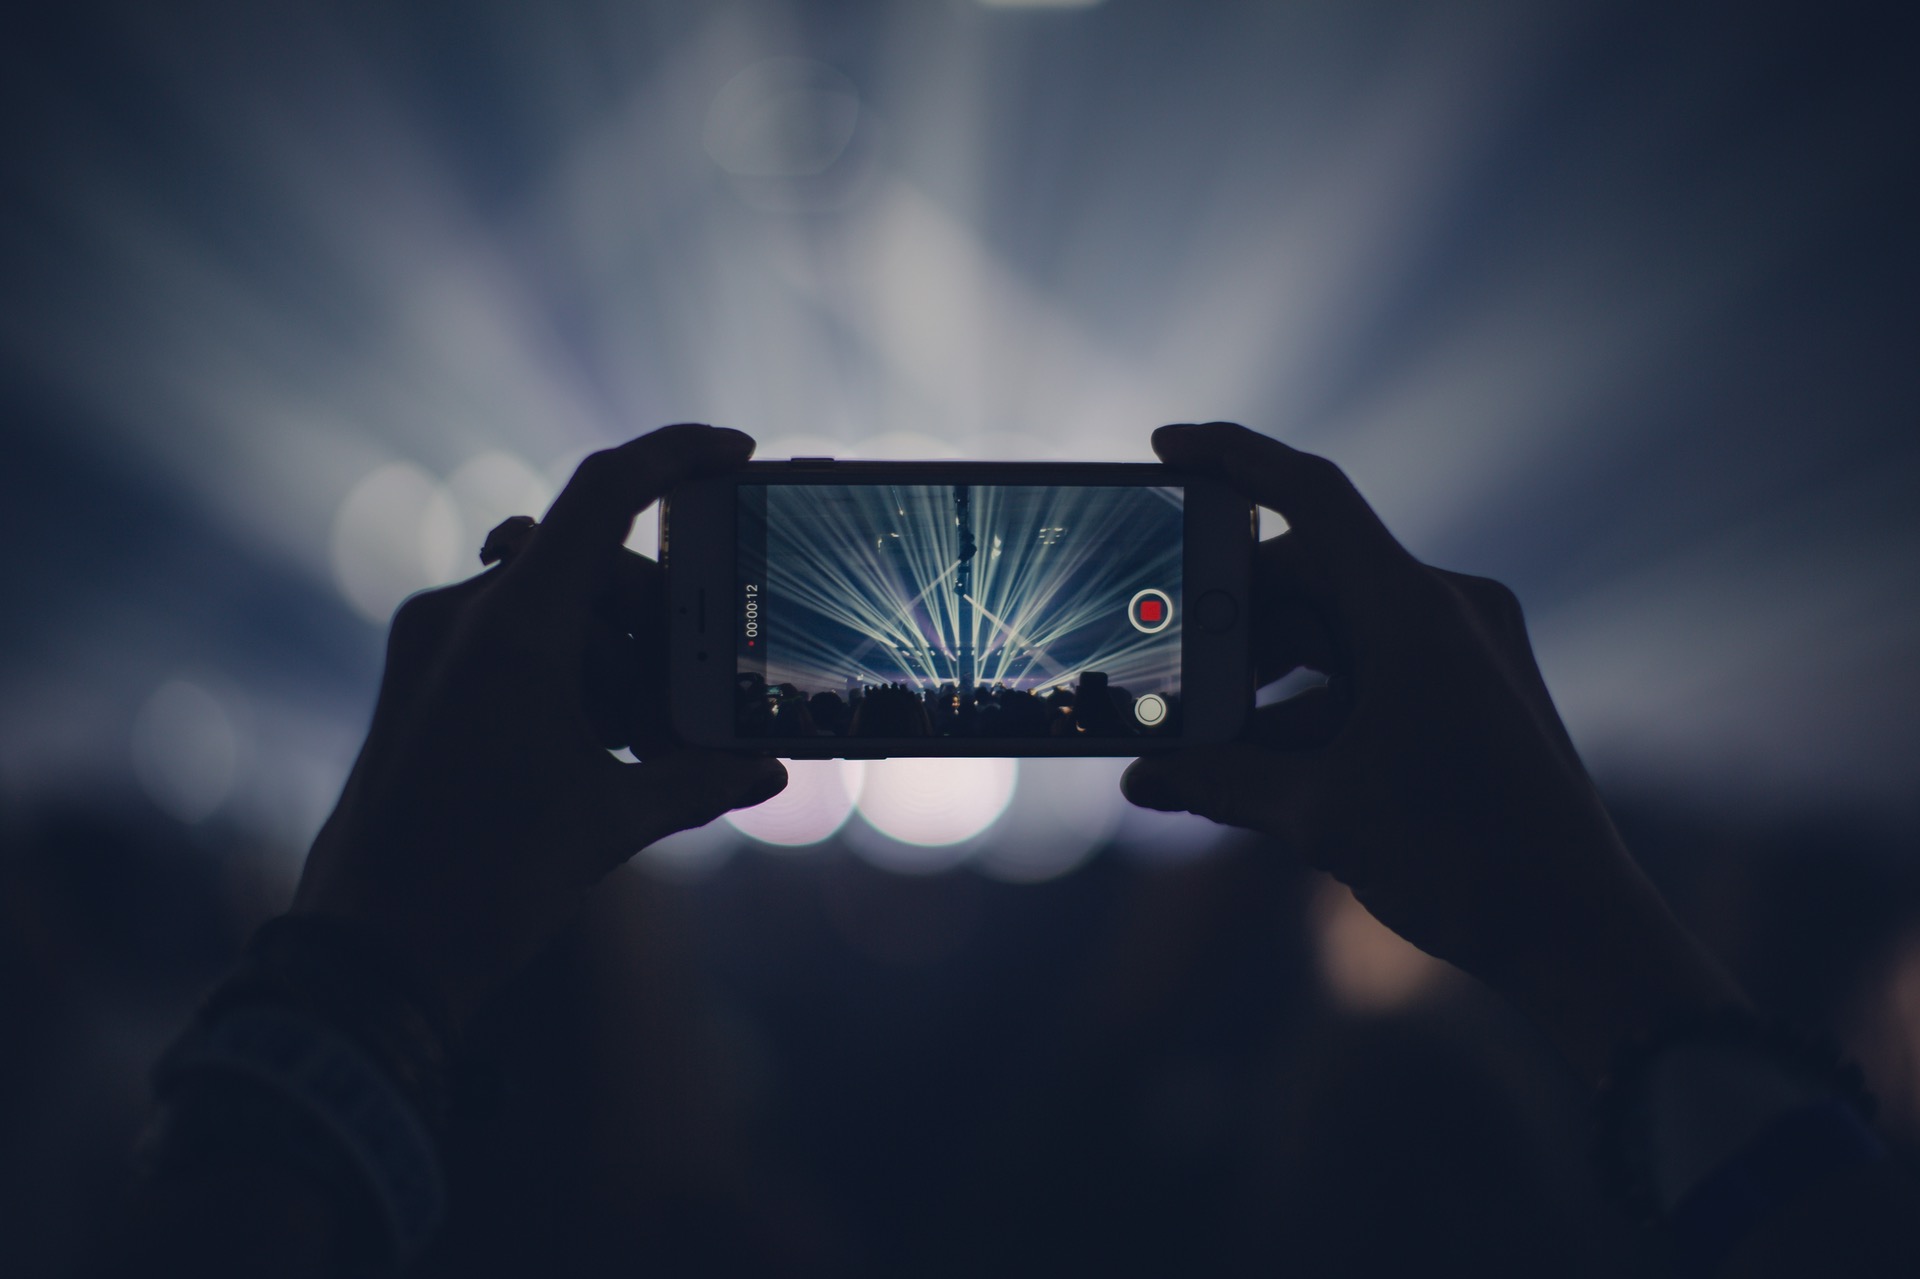
Remember that you do not have to have an SLR in order to take pictures! If you have a decent camera lens on your phone, that can also be a great way to document your experience at a concert. The concert venue may request that you do not bring professional cameras, but they will usually allow cell phones!

How to Edit Concert Photography in Adobe Lightroom

We all know the challenges of concert photography: the low light, the fast movement, the crowd, your distance from the stage—and so much more. Just getting the camera settings right to get a properly exposed, focused image is challenging enough, but once you have that, what do you do? Is your image washed in blue light? Or worse, the dreaded red light?

Getting the image is only the first part of nailing killer concert photography. Now you need to edit the image and balance the colors to your liking.

Below are some great steps for editing concert photographs in Adobe Lightroom. A couple requirements: the image must be in the RAW format, and the color wash needs to be somewhat minimal. In essence, if the red wash is too extreme, you can’t do much. The white balance dropper just won’t be able to find the appropriate blues and greens.

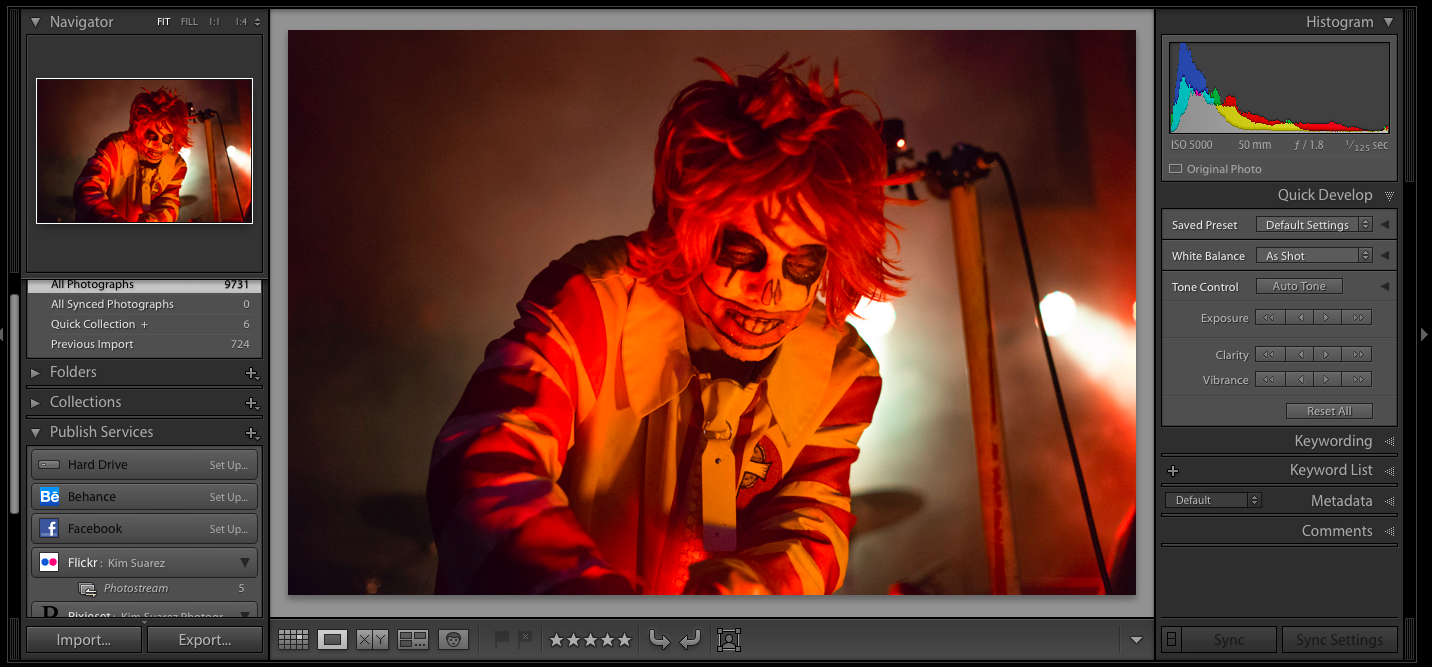
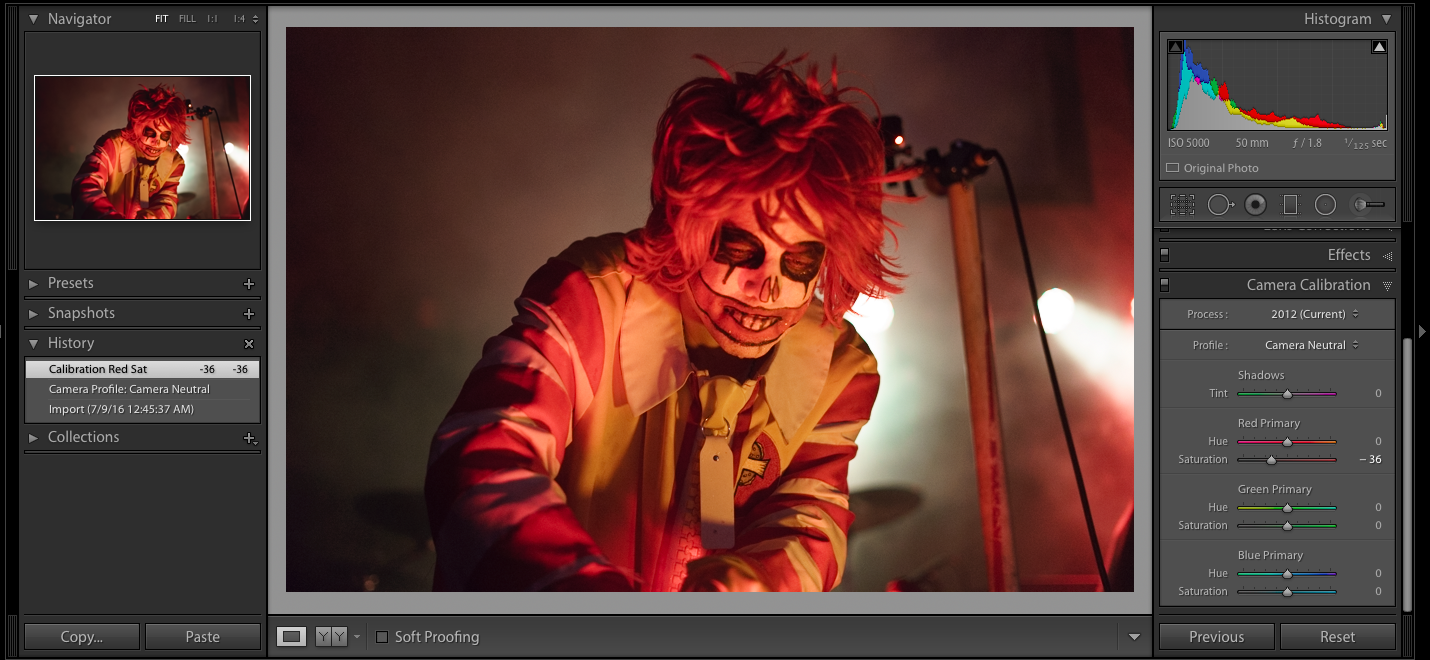
For this tutorial, we’ll be using this concert photo as our starting image:

Screen Shot 2016-07-21 at 10.18.46 PM

Camera Calibration

When you bring your RAW image into Adobe Lightroom, you’ll want to first adjust the camera calibration. Play around with settings, because it will depend on the image. From experience, I’ve found camera neutral works best for me. Play with the sliders once you’ve found an option that works.

You may also want to adjust lens corrections here as well. Go to the lens corrections tabs and check the first two boxes in the basic subgroup. These are enable profile corrections and remove chromatic aberration. This will fix any lens distortion you may experience. I recommend always checking them because it can be surprising how much of a difference this makes.

Screen Shot 2016-07-21 at 10.19.11 PM

White Balance

Next, head to the basics panel and find the white balance dropper tool. Click onto an area of the photo that should be white. This can be the eyes, teeth, clothing, etc. Here is where you’ll likely be able to tell if this option will work for your image. Sometimes it just won’t. But if it does, it is amazing how much the tones will balance out. You can also play with temp and tint, but I usually leave them as is.

Screen Shot 2016-07-21 at 10.19.25 PM

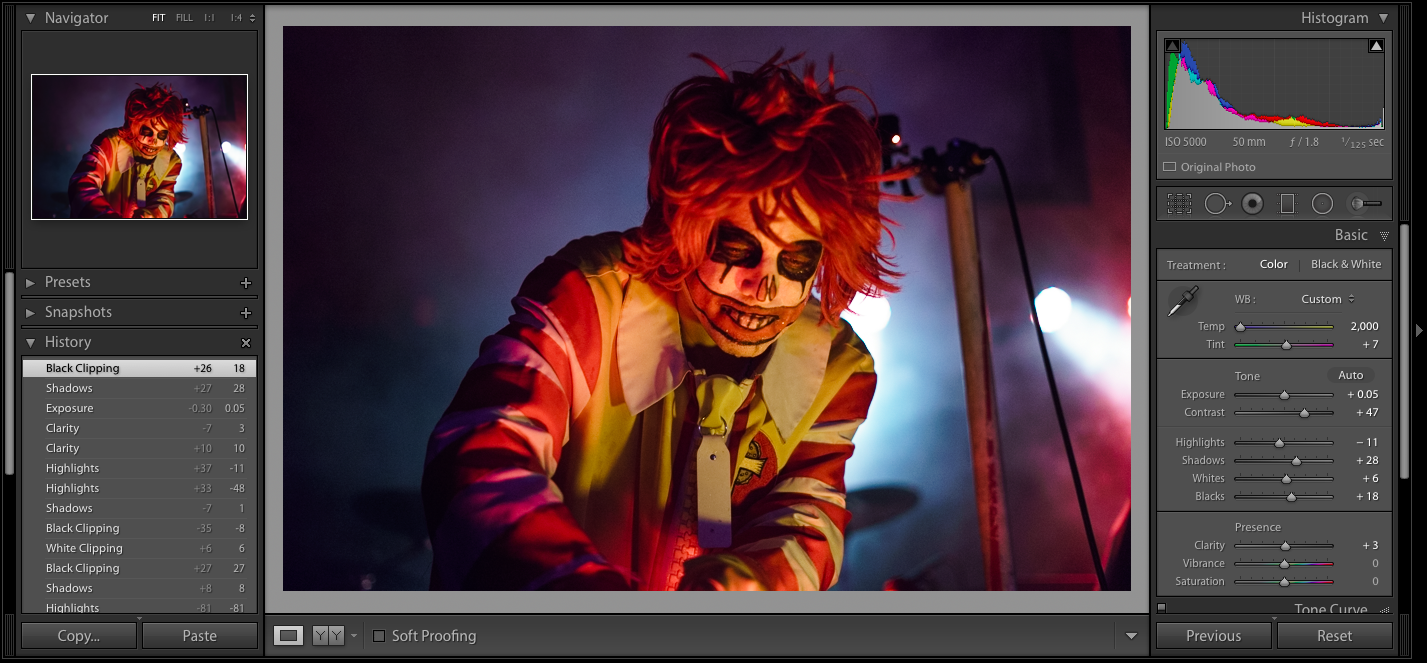
Basic Settings

Here is where I’ll do my basic setting adjustments. This would be exposure, contrast, whites and blacks. I usually find my images tend to be on the darker, more contrasted side, so I’ll adjust to that style.

In this image, I wanted to convey a dark, moody feeling because that is the band’s image. The band being the McDonald’s-themed Black Sabbath cover band, Mac Sabbath. If you haven’t heard of them (as I hadn’t until this night), check them out or go to a show. They are amazing performers, and you can’t get a bad photo of them.

Back to settings. Play around and see what works for the image and your style. It’s important to maintain a style when editing photographs. You want people to immediately recognize that they are your photos, if possible.

Screen Shot 2016-07-21 at 10.21.20 PM

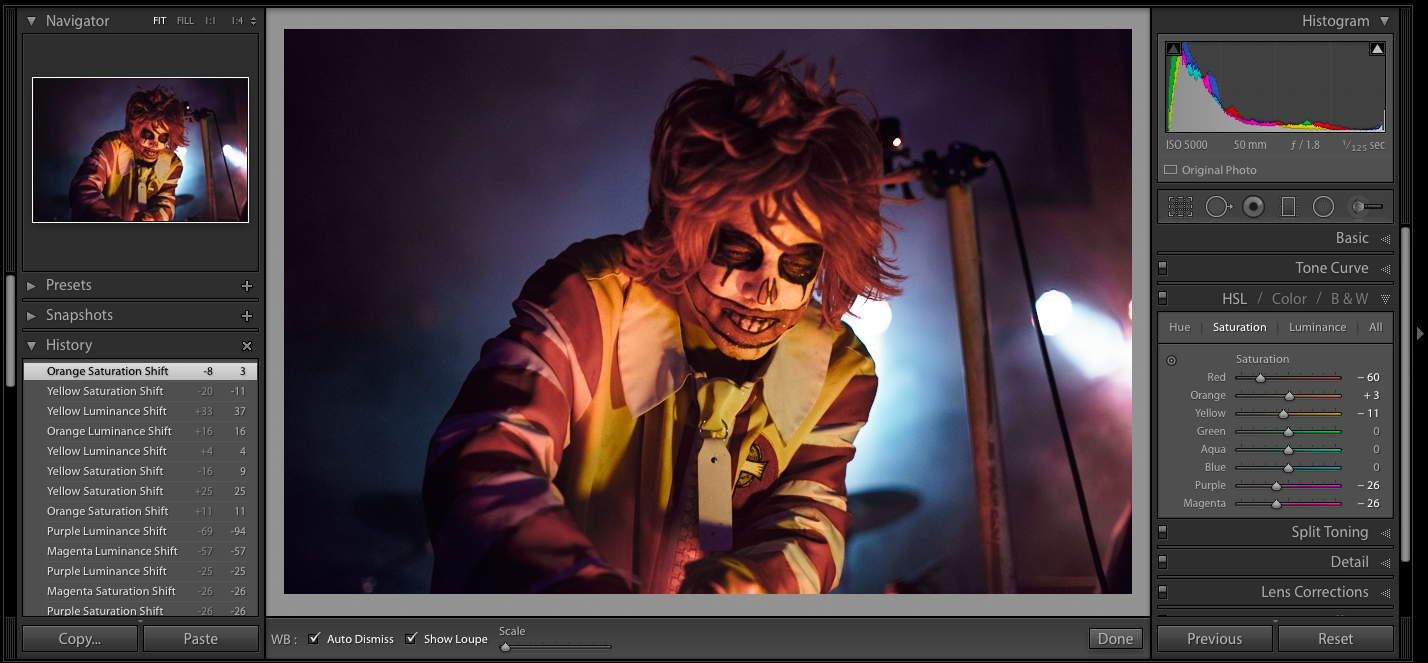
Color Saturation

If you still find lingering color tones you don’t like, go to the HSL tab. You’ll want to desaturate any colors you don’t want and then adjust luminance. See what I’ve done below and played around with the sliders. There is a chance you may not need this step, but experiment and see how your image can change.

Screen Shot 2016-07-21 at 10.28.51 PM

If you want to salvage less-than-ideal concert photographs, you may need to convert to black and white. Some might consider this a cop out method, but if the image is strong and well captured, it is worth the edit. Experiment with your settings and see what works for your image. To me, converting to black and white is a no-brainer, but there is no formula here for perfect editing. Each image is different, and should be representative of your style—not someone else’s opinion (unless it is a respected music photographer offering valid advice).

A final word on editing concert photography—just go with the flow. If there is an extreme red or blue wash, but otherwise the photo is strong, leave it as is. Adjust what you can, but this type of lighting is somewhat expected. Also, most venues are good about flowing through different stage lighting during shows. So, you’ll likely see red, blue, neutral, and other types of lighting. Because you are using burst mode when shooting concerts, you’ll have tons of options at the end of the night. You may not even need any of those images shot during the red lighting.

Concert Photography is a Worthwhile Endeavor for Any Live Music Lover

Concerts are challenging, since they are a type of scenario where you don’t have any control over the scene, you have limited  angles, and you’ll need to shoot more than a thousand photos, just to have 10-20 keepers. It is an utterly dynamic scenario where there is no “one setting does it all” solution. You’ll have to continuously adapt to the changing lights and formations.

However, concerts are the perfect place to practice photography too. They put every photographer to the test, pushing them to their absolute limits. We hope this tutorial gave you a few ideas on how to improve your concert photography skills, and we can’t wait to see what pictures you capture!

How to Use Flash Photography

For new photographers, using flash can be something that is relied upon far too heavily. Many amateur photographers will use it when they shouldn’t, and that can lead to pictures that don’t reach their full potential. Don’t get me wrong, there is always a time for a fill flash, but you also have to know when not to use it. Knowing when and how to use flash is important for becoming a better photographer.

Flash photography has the potential to create beautiful light and alter the color of the image on the camera screen, but it also has the potential to wash people out, focus on the wrong thing, and ruin what could have been a wonderful image.

flash-photography-1

What is Flash Photography

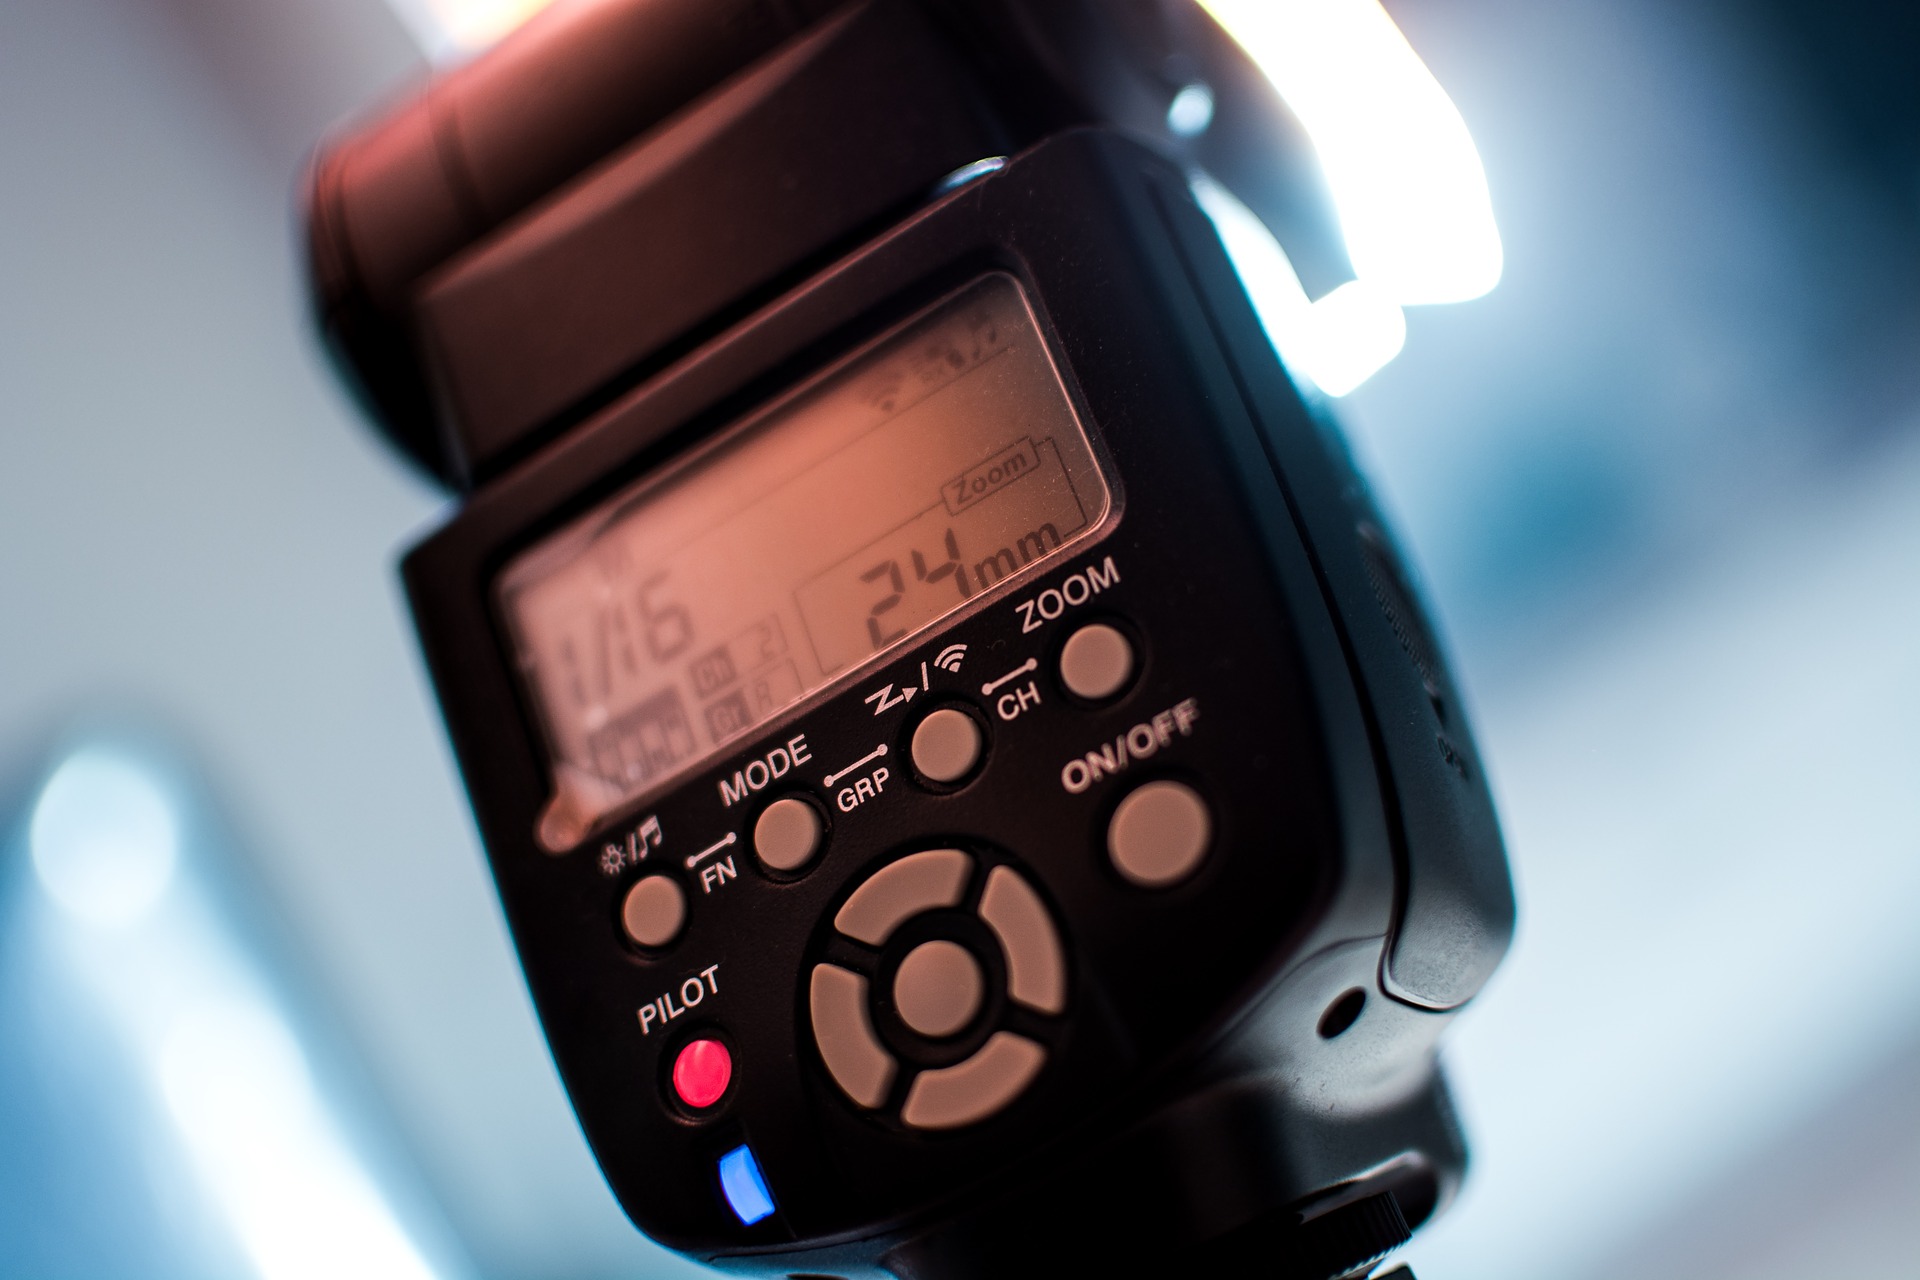
Flash photography refers to a technique where the photographer uses an external flash to improve the lighting of the photograph. Many cameras come with an internal flash light that can be turned on in the camera settings, but you can also buy an external flash, also known as flashguns, that connect to the hot shoe of the camera. Flashguns can also be used when they are disconnected from the camera to for more flash control.

Flash photography is helpful for low light situations or when harsh shadows are present. It’s also useful for achieving the right exposure, so that there is less to fix during post processing.

When to Use Flash Photography

In order to learn how to use flash photography, you need to learn which situations are most appropriate for using it. Here are five times when you’ll want to use a fill flash when taking photos:

To Add Light

Use a camera flash when you need to control the lighting in a low light situation. You want to get that extra flash control to ensure that the picture is not too dark and that the subject can be clearly seen.

To Bring in the Right Amount of Light

When you are taking a picture, you need to control the amount of light you have. You will want to fill the existing light, or enhance the existing light to add a little ambient light. You may also need to expose only the subject in a dark scene to provide extra contrast, or you may want to overpower other light sources—whether it is a lamp or the sun itself.

flash-photography-2

To Control the Direction

When you have your subject exposed to the light, that light may not be enough or it may not be flattering to your subject. When that is the case, you will want to control the direction of the light. Poor light direction can lead to not enough light on your subject and a flash with a reflector can add that extra bit of light to give a more natural light to the image. In addition, if the light direction does not flatter your subject, you can add flat light direction by changing the light direction with the camera flash.

flash-photography-3

Improve Light Quality

The available light is not always quality light. There are times when the natural light that is in a scene is just not working with the person or subject you are photographing. With a flash, you can do a great deal to create really wonderful photos, including:

– Creating a hard flash for portraits and other effects

– Creating ambient light for amazing effects and style

– Creating diffused light to improve the natural light that is already in the scene

– Creating soft light and reducing harsh shadows for better portraits

These are just some of the things that an external flash can do for you when you want to improve the light quality of the scene.

flash-photography-4

Controlling the Light Color

With getting those perfect images, sometimes you have to actually play with the color of the light itself. A little ambient illumination can take a scene and make it dreamlike, but it can also take a scene and give it a soft and earthy glow. There is so much you can do with colors and flash—the sky truly is the limit.

Every light source is going to provide a different color, from fluorescent lighting to lamps to the sun itself. Every light source produces its own color, and that color can impact your picture in ways you may not want.

flash-photography-5

A good flash will help you modify the color temperature of the light. This will create very creative and stylized photographs. You can actually fix the color of the photos with the flash as well.

When you are using a flash, it can be your best friend, but also your worst enemy. The trick is knowing when and why you should use the flash. By having this firm understanding, you can ensure that the image you capture is going to look great, and it is going to show that you are a professional who knows how to use the flash properly.

How to Learn Flash Photography

There are always different aspects of photography that some of us shy away from, especially if it seems a bit difficult. This is common among all photographers, as there is always at least one aspect of photography that we don’t  feel completely confident doing.

Flash photography is one of the most difficult aspects of photography to master. If I’m being completely honest, I was once scared of flash photography as well. It seems so complex and technical, and I was just getting comfortable with my camera as a beginner.

However, I had a project coming up that would require me to use a flash unit, and boy, I was panicking. But after doing a few trial and errors photoshoots, I became more familiar with how the flash head works, and how it can be used to enhance my photographs.

Learn at Your Own Pace

Learning flash photography as a beginner is not very difficult, but I would recommend taking your time and doing some research on the tools and settings that will help improve your flash photography. One can describe flash photography almost like riding a bike, if that’s not to cliche. You can’t always get flash photography right on the first try, but once you master it, it will become an important tool in your

Light travels in a straight direction and as a result, can be manipulated in many ways. You learn about the different ways as you get more familiar with the flash you have. There’s no rush unless you’re trying to meet a deadline to complete a project but apart from that take your time. I promise you won’t get a headache but will be more amazed as to what you can do with a flash light.

Get the Tools You Need

Once you’ve learned the foundation of flash photography, you can begin to research and expand your knowledge on the topic. Flash photography will become more intricate and interesting as you grow to understand the techniques and more. These tricks come with the help of some very special tools that can be used in the field or in a studio.

studio

Studio photography, in regards to flash, is a much more controlled and predictable environment than being in the field. For example, during a studio portrait photography session, you can position your lights and direct them in such a way that the result is always the same and there is no external force or natural elements to disturb it. In the field, you often have to shoot and adjust depending on the natural light around you. You might not always end up with the same result for all your images, but depending on the consistency of the natural light, you will get a majority looking the same. These tools will help you improve your flash photography game.

Sometimes it can be hard to gauge the flash output, especially while working in situations with varying light. Investing in a TTL flash (also known as a through the lens flash) can help in these situations, as a TTL flash uses the camera’s light meter to automatically determine the correct flash exposure needed for the situation. Once you start to master the TTL flash, you can start experimenting with manual flash settings to hone in on the exact flash intensity, flash power, and flash duration that you need.

Get Confident

Now that you’ve learned the foundation of flash photography,  along with finding the tools you need, it’s time for you to play around and try some new things. You now know how flash works and how the tools surrounding flash photography can help enhance your images, so what are you waiting for?

I would always tell my friends and fellow photographers that nothing tried, nothing done. So, don’t scared now to pack up some equipment and hit the road to create something that will blow your next viewer or client away. Photography is an art that can be seen as fragile and personal for many reasons. It is a channel through which as a photographer we can express themselves. If you lack confidence in your work, this can present itself on your images. Be confident in what you’re doing, and never be scared to fail. It is through failure that we realize how great we actually are.

photographer

I hope this article has helped you to overcome your fear of flash photography in ways more than one. We never really know everything so learning something new or looking to make improvements is never a bad thing. With that said, I hope you guys create some magic with flash photography and thank you for stopping by!

Tips for low light photography without flash

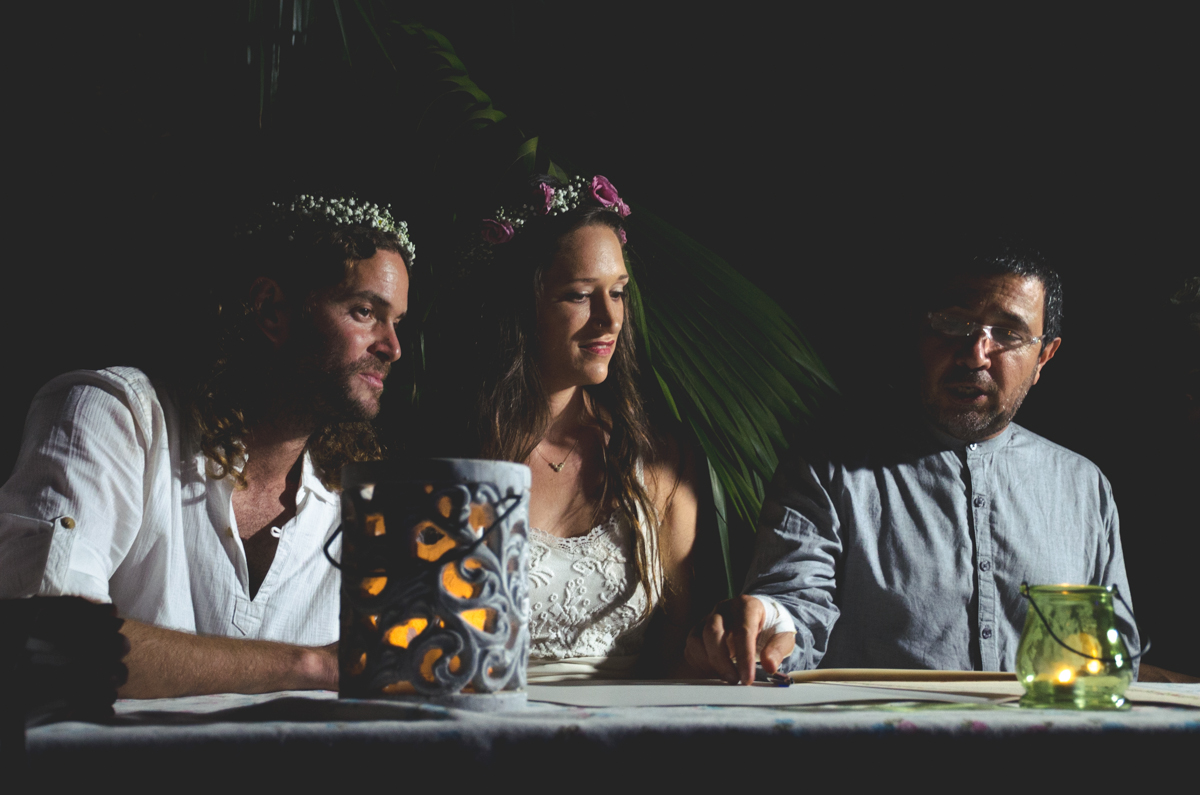
Have you ever found yourself in a situation where you had to shoot low light photography without flash? It happened to me in some events, one of them was a night wedding in the countryside.

Wedding in low light
Weddings at night are beautiful…but they are difficult to shoot!

These challenging situations of having to shoot low light photography without flash usually happen at events when the flash is annoying some of the participants and guests or when babies are involved. On those occasions, I feel as if someone tied my arm behind my back (only one of them, the other is holding the camera). With these limitations, I have to change the way I shoot photos. I am happy to share with you a few things you can do if you find yourself in situations of this kind.

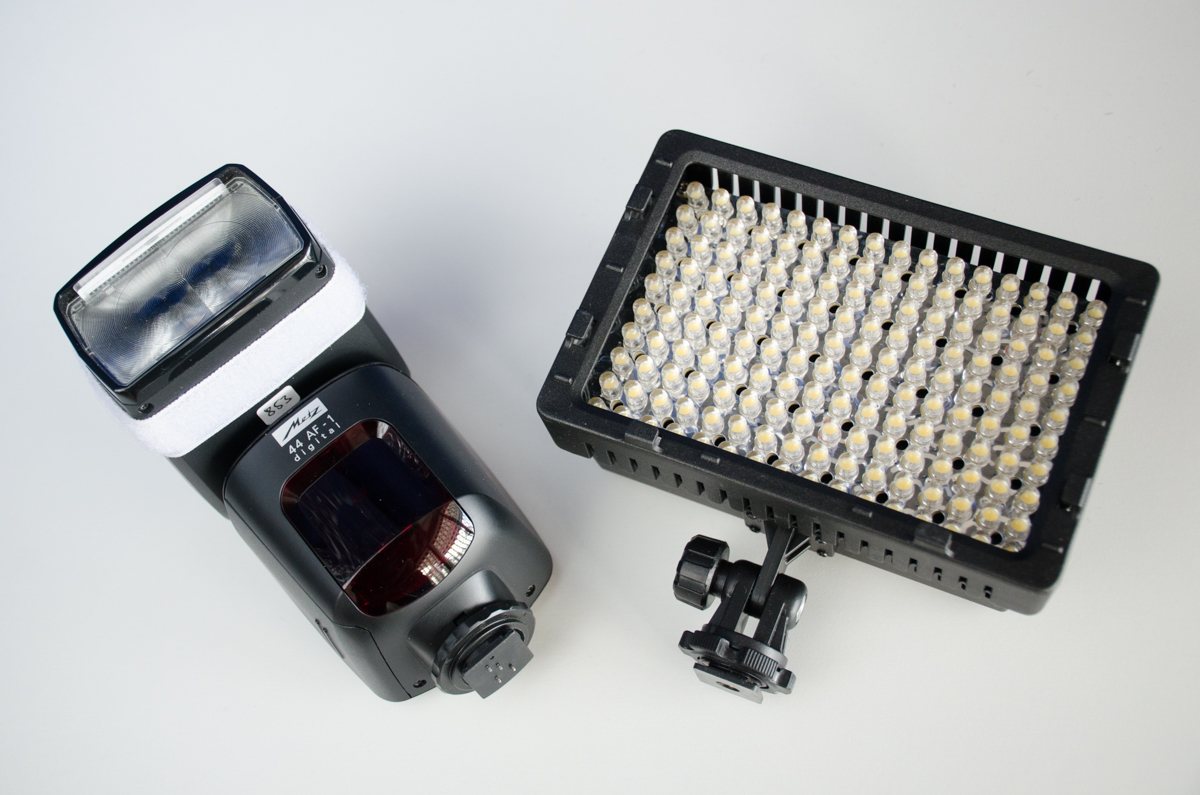
External lights
It can be frustrating not being able to use external flashes (on the left) or LED lighting devices (on the right). Take these situations as challenges that will make you grow as a photographer (yes, optimism is a good approach here).

Use a wide aperture

The first thing you can try to nail that low light photography without flash is to open your aperture wide. If you know about your predicament in advance, you should choose a lens with a wide aperture that you are comfortable to work with (keep in mind that not all wide aperture lenses will be good for you, there is a tradeoff and you need to compromise over things). When you work with this low f stops (wide apertures), you should keep in mind that they are usually making the background blurry. This is great for isolating your subject and making it pop in the photo, however, if you forget about this, you might lose important parts of the image that you wanted sharp. Just try to remember and take care.

Shallow depth of field
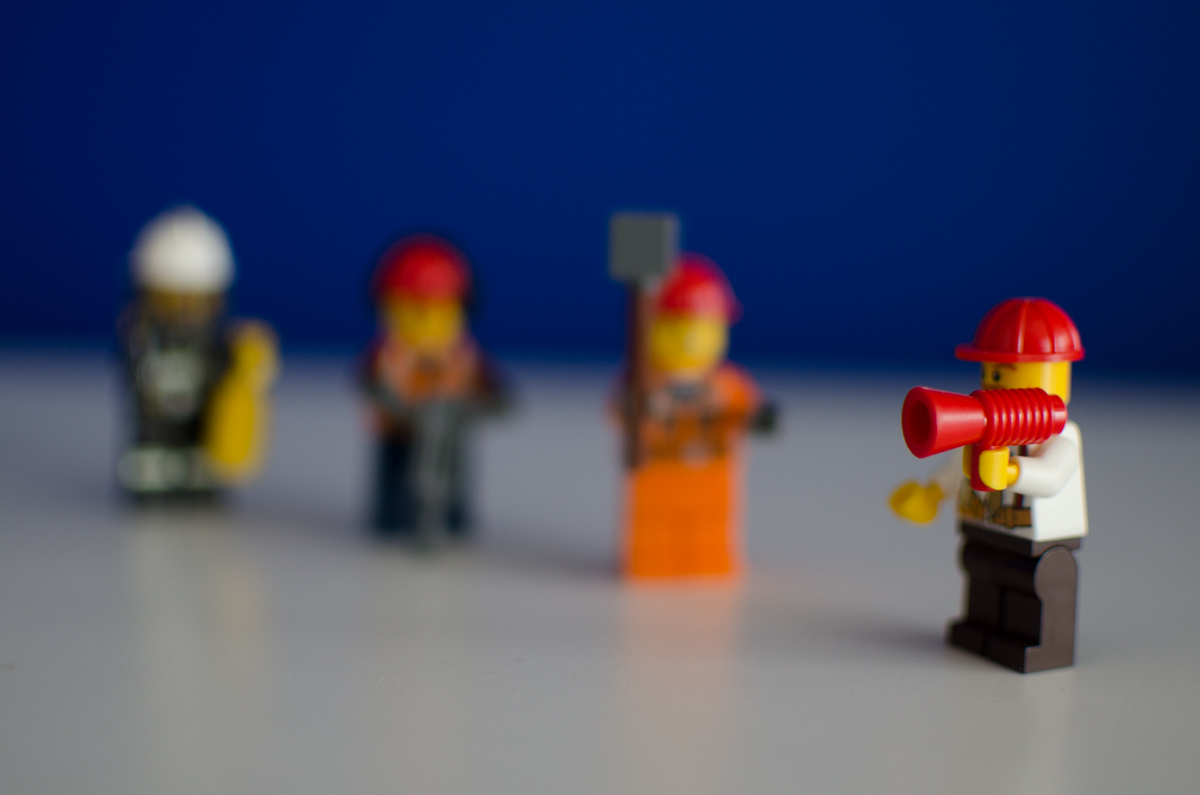
This photo was taken with an aperture of f1.8. As you can see, the depth of field was so narrow that the only thing in focus is the megaphone of the little guy on the right.

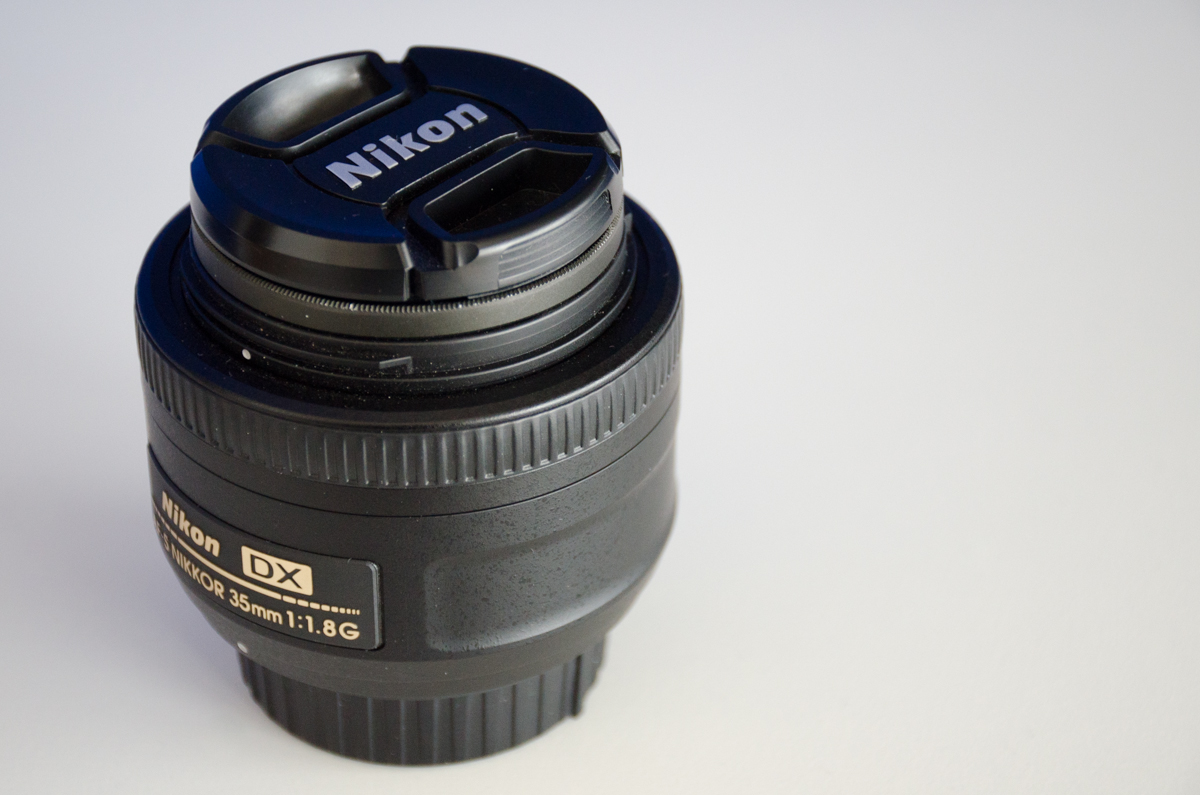
Although fast lenses (the ones that can get really wide apertures) are great for low light photography without flash, they are also quite expensive. I have just one of them, a 35mm. This is a great lens and it is affordable. It is pretty good for newborn photography, when you get close to your subject and you usually have time to react or even set a little the scene. However, for situations where you have to react fast I think using a zoom lens can be more useful. The problem is that those are much more expensive! I have never been able to get one. If you are in my situation, keep reading because I developed strategies which solve low light situations without getting expensive equipment.

good lens for low light
This is my only lens that can get to f 1.8. It is a 35mm and I love it!!

Increase the ISO…and fix it later in post processing (Lightroom)

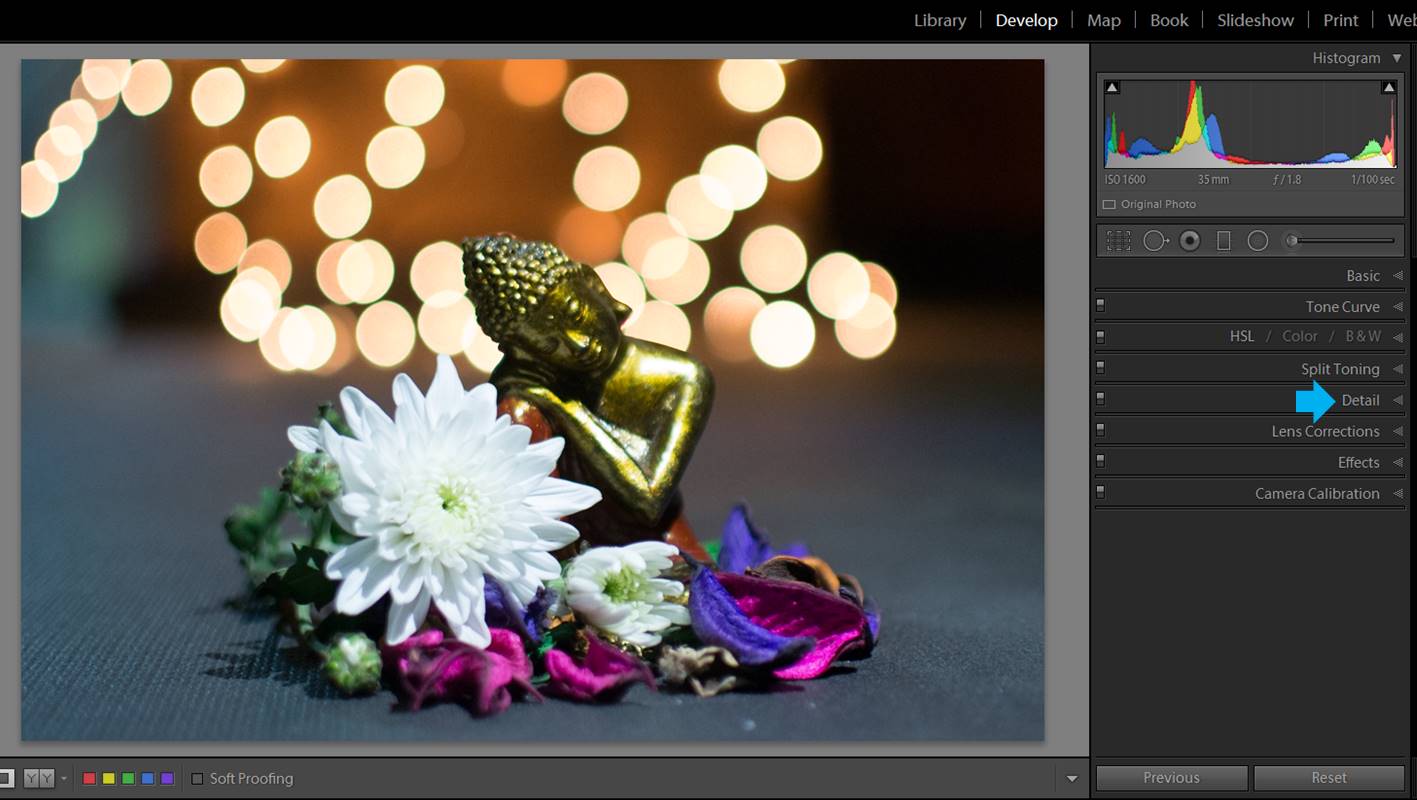
I am not the biggest fan of using high ISO values because the images get noisy. But extreme situations like low light photography without flash call for extreme measures! A high ISO value of 800 or higher will be helpful in this case. It is always good to know that you can reduce the noise in post-processing. And good news: using Lightroom for dealing with noise is easy. In the Develop module, under the Detail section, you will find several interesting slides dedicated to Noise reduction: Luminance and Color Noise slides.

low light photography

low light photography


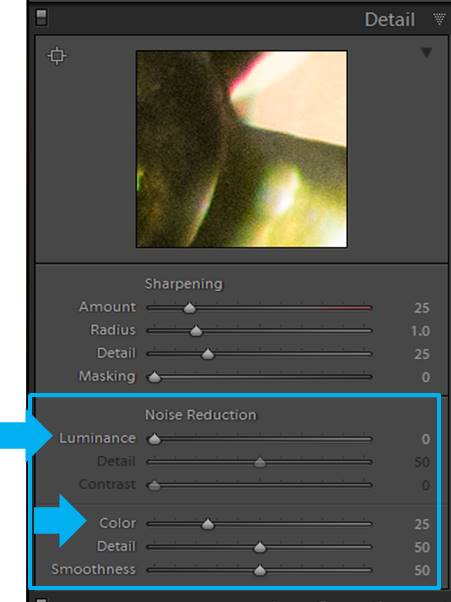
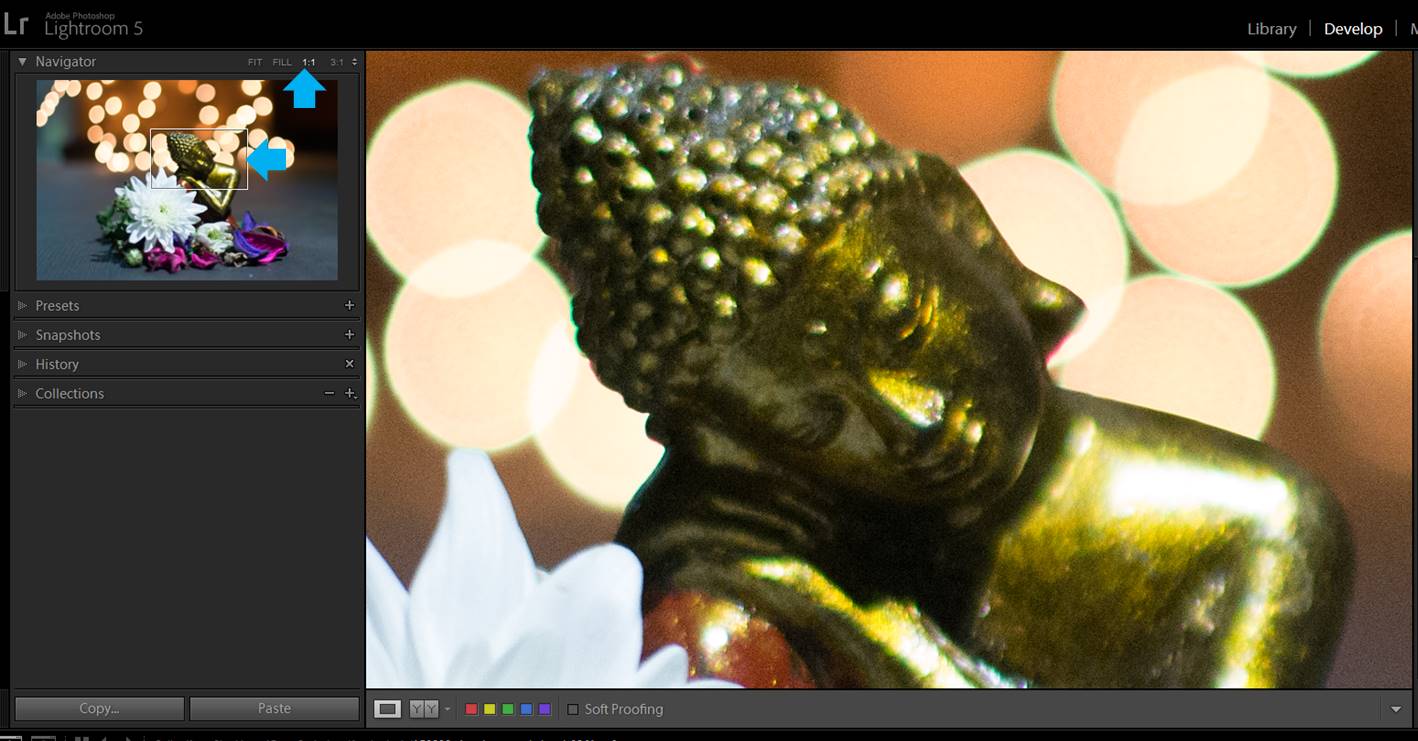
The Luminance Noise is the general noise caused by the brightness of the image, Color Noise is the color dots you see when you zoom in on an image that you shoot at high ISO. You can see them easier in the shadows of an image. Before starting to work on reducing the noise it is better to zoom in on the image by clicking the 1:1 in the Navigator and selecting on it the area you want to focus in.

low light photography

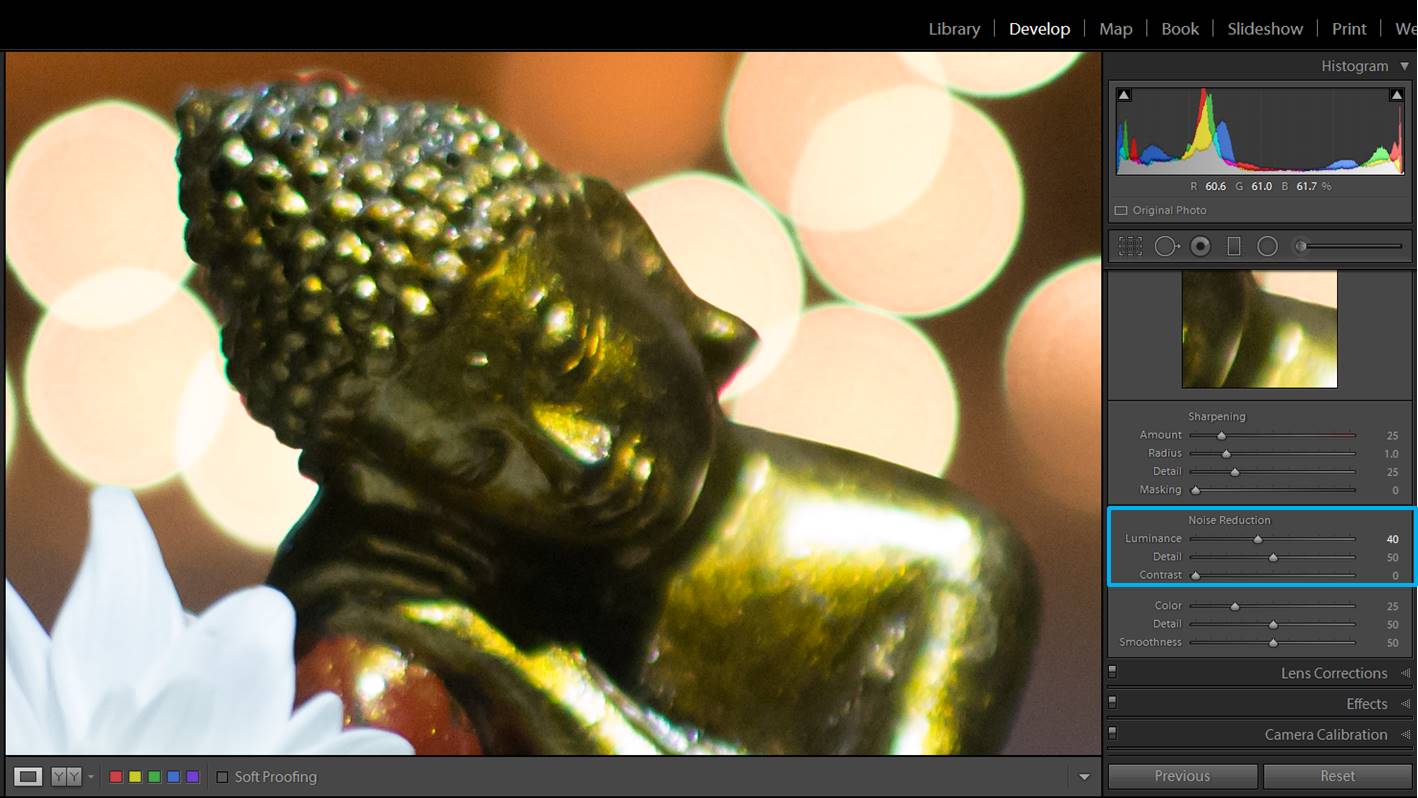
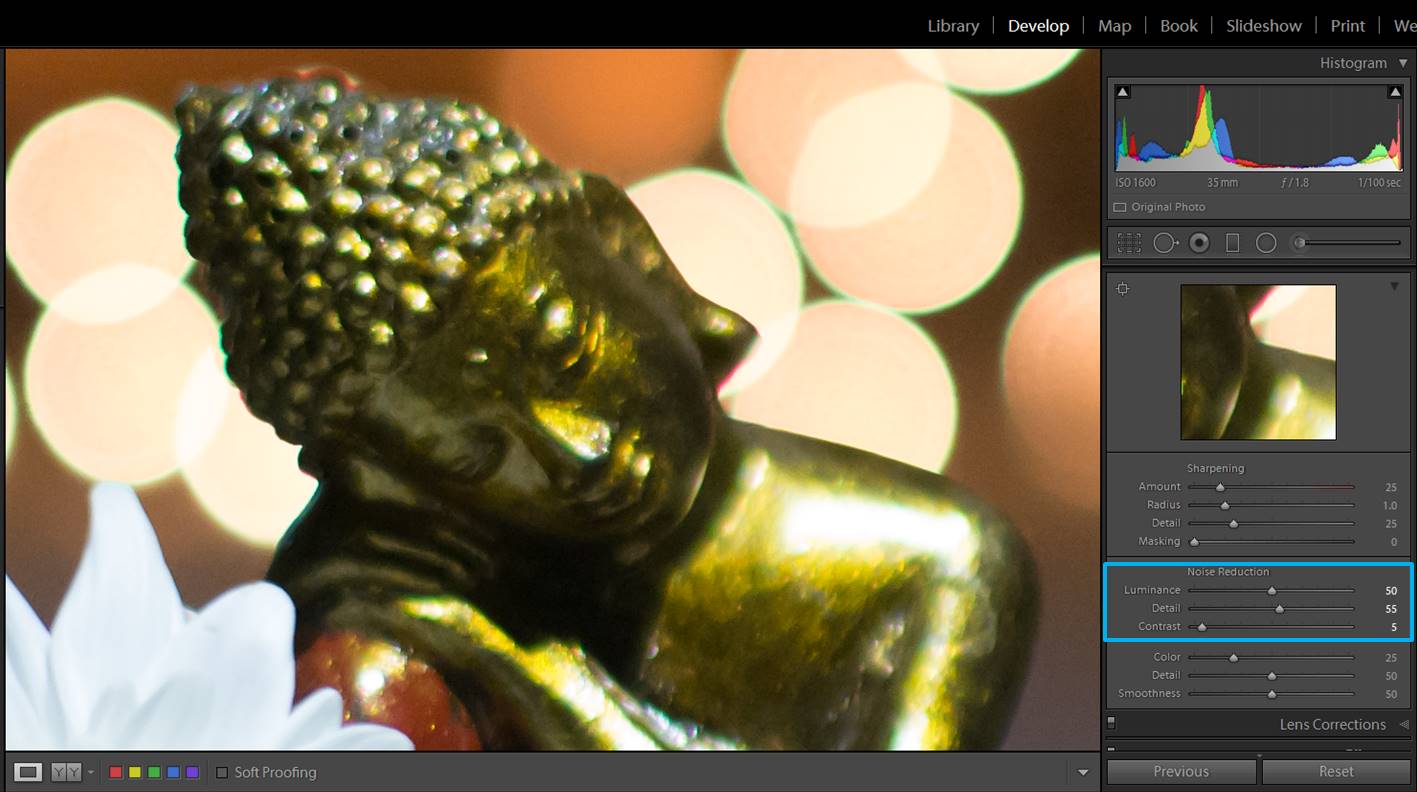
First thing to do is to reduce the Luminance Noise. A good value will be 30-40.

low light photography
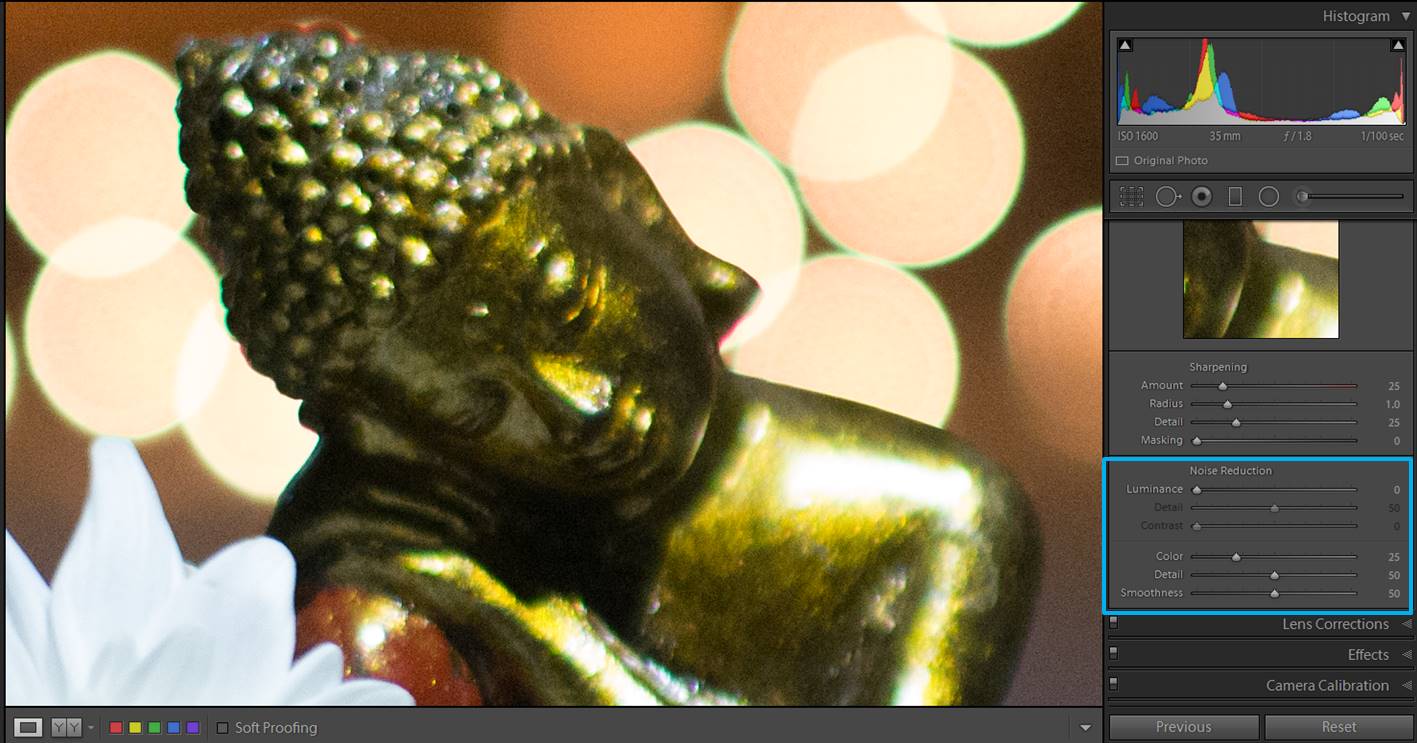
These are the original image settings.
low light photography
By setting the Luminance Noise Reduction slider to a value of 40, we managed to reduce the noise a lot while keeping details in the image.

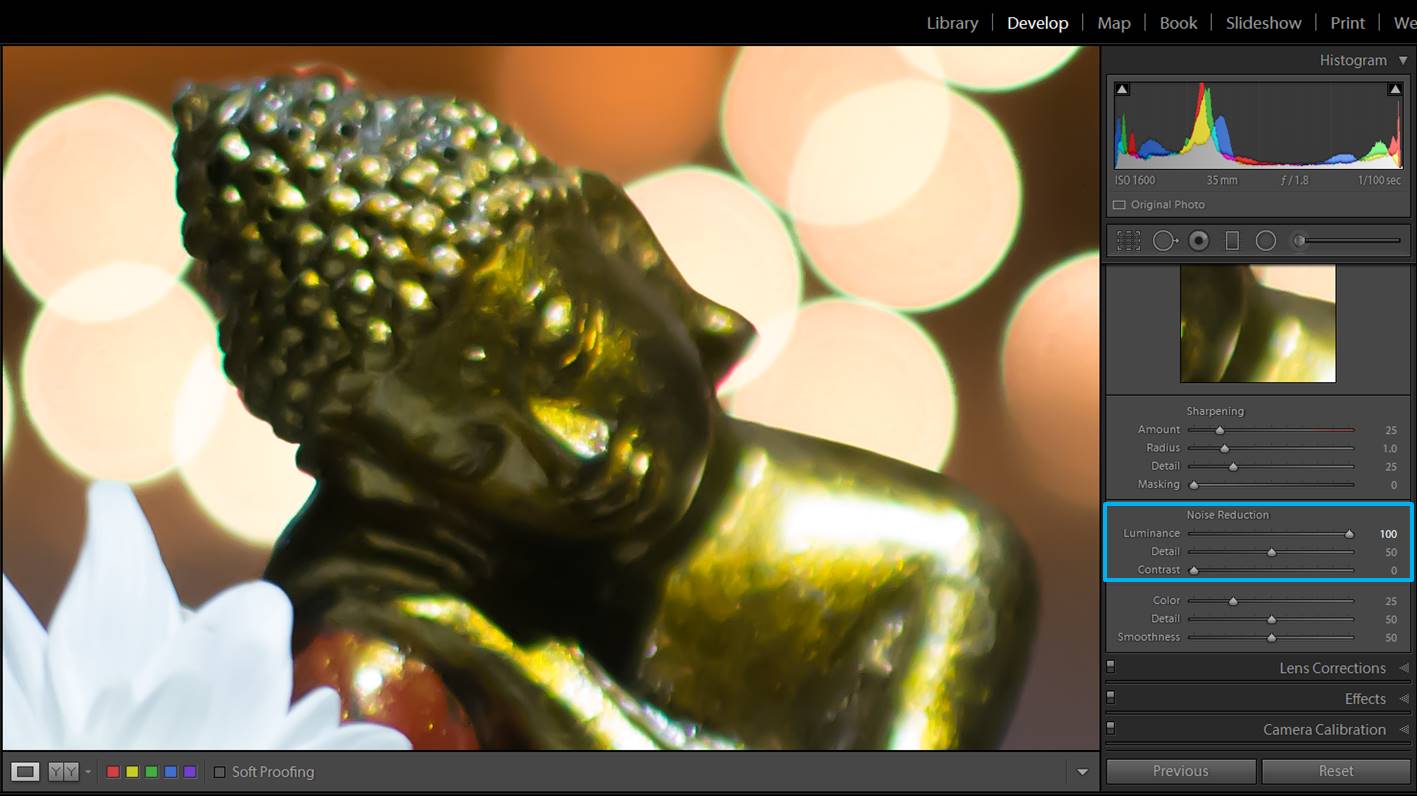
Keep in mind that when you decrease noises, you also lose definition. Everything has a price! Photos can get a painted look, so you aim to find the sweet spot where you reduce enough noise but still keep enough detail.

low light photography
This paint look produced by a too high Luminance Noise Reduction makes the Buddha figure look unnatural.

Once you are done with the Luminance Noise Reduction slider, you can adjust a little bringing some detail with the Detail Slide. Increasing the detail brings noise back though. You can also increase the contrast a little, but this one also brings noise back. In summary, The Luminance Noise slider is the one that you have to use to do the first Noise reduction and then you can tune it finer with the Detail and Contrast sliders.  It might be tricky at the beginning, but it gets better with some practice.

low light photography

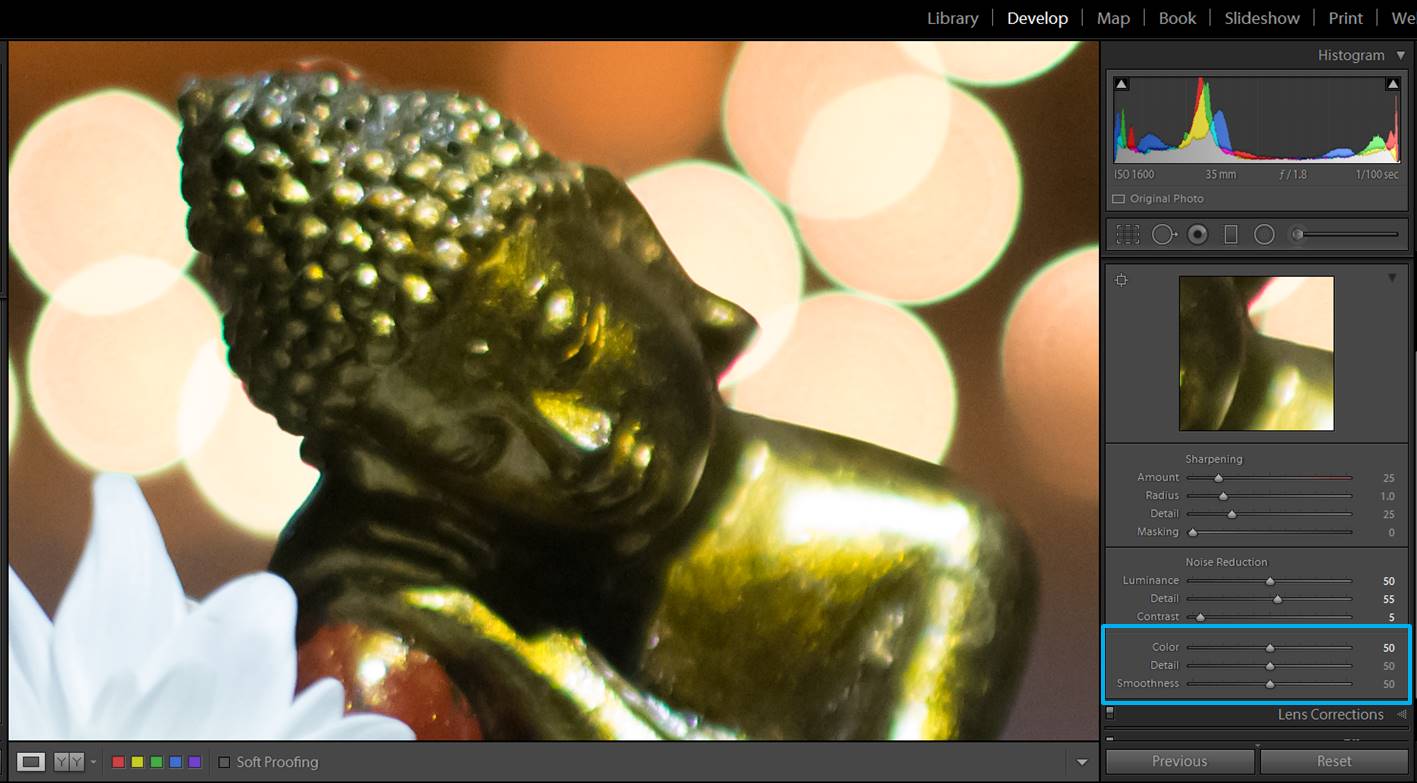
Now you need to do the same with the Color Noise Reduction Slide. The default value is 25. If you don´t have a lot of noise, this value might be good, but if your image has a really high ISO value, you will need to increase it quite a lot. Try 50 and adjust accordingly. Then you can fine-tune it by increasing the detail, but remember that this will bring back the noise. You can also play a little with the Smoothness slide. I usually leave Detail and Smoothness on their default values.

low light photography

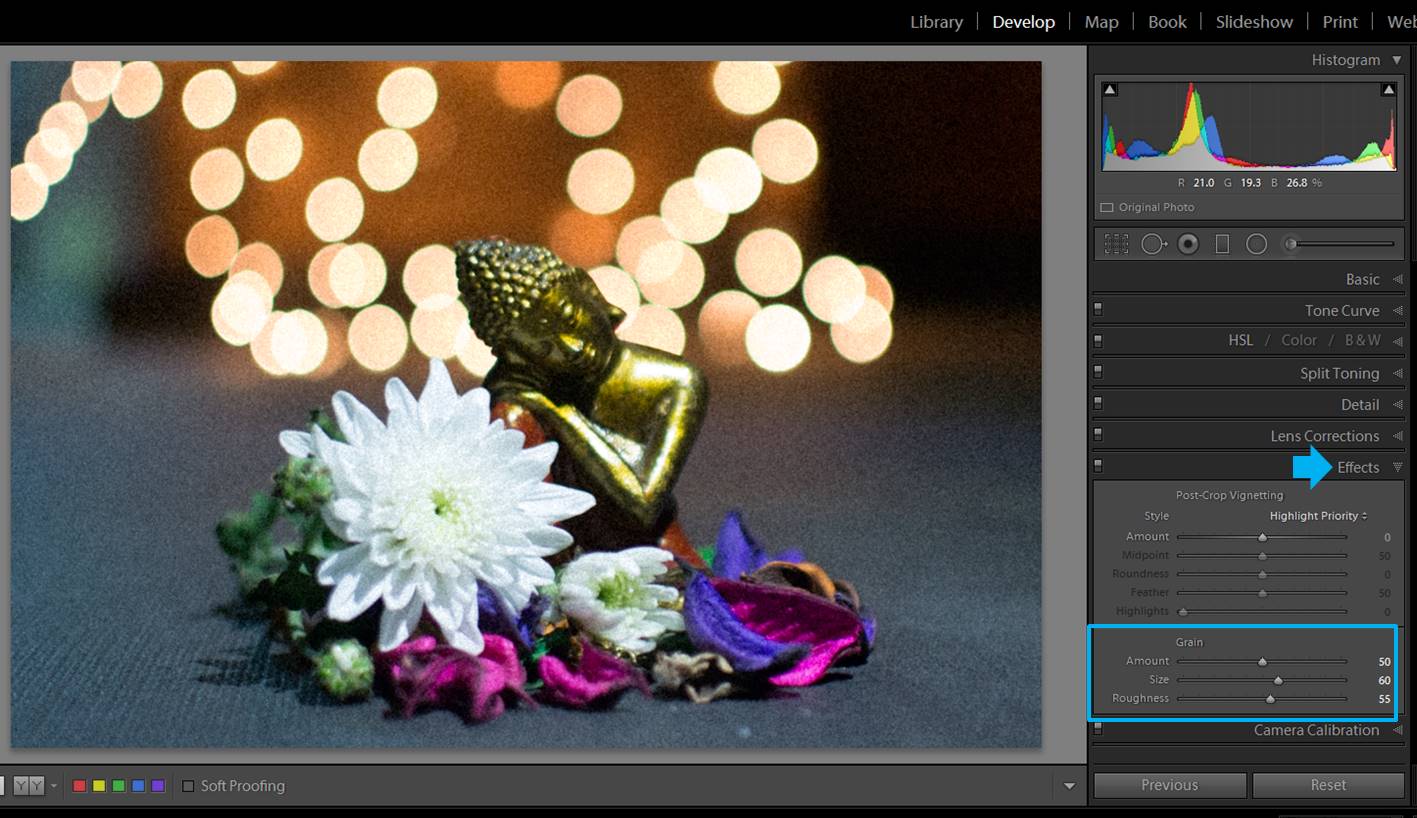
And finally, if you can’t beat the enemy, join him. Add a grainy effect. It might seem like you were looking for it! The trick here is to make the photo look clearly grainy, to let the viewers see that this effect is intentional.

low light photography
You can add a grain effect by increasing the amount of grain and its size in the “Effects” section (Develop mode).

Use a tripod or alternative stabilization methods

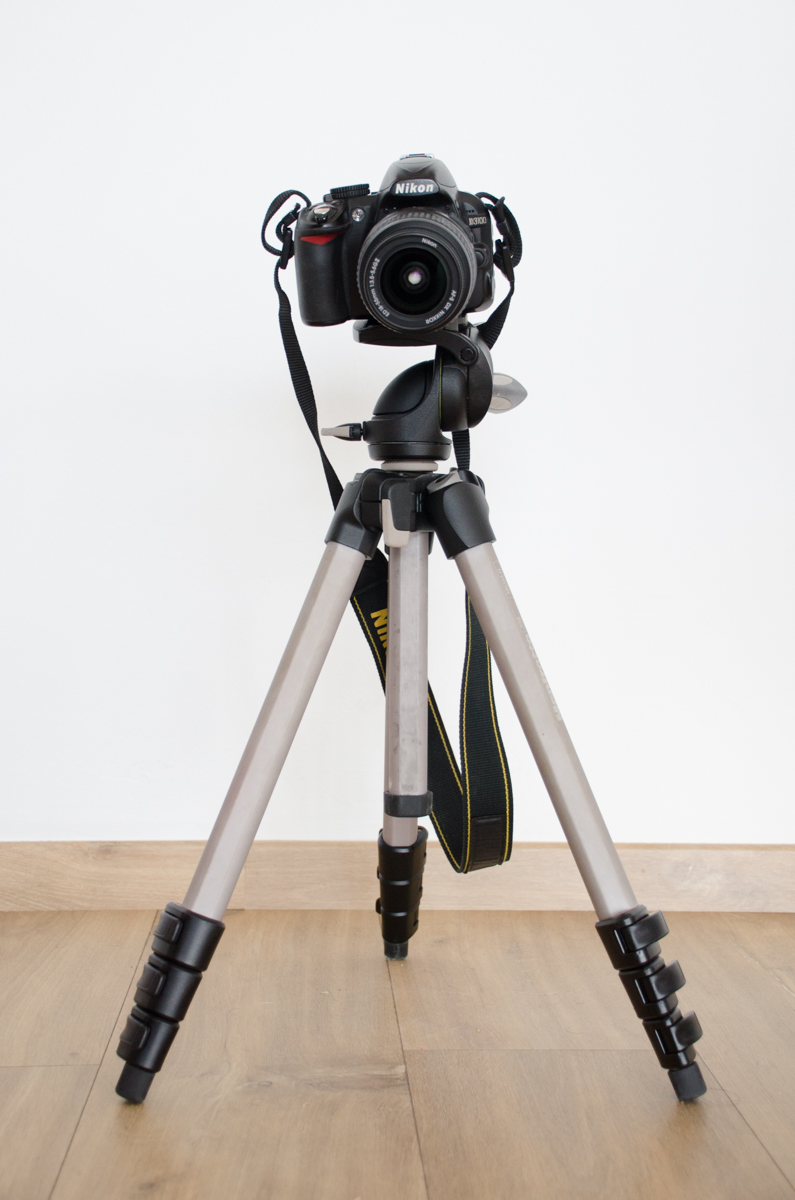
To increase the amount of light going into your sensor, you can also decrease the shutter speed. There is a limit where the speed is so low that the slight movements of your hands cause the photo to be smudged and blurry. This limit depends on the lens you use (more zoom, more evident is the shaking) as well as your personal abilities. Usually, the limit is around 1/80 sec. You can avoid it by simply using a tripod.
Tripod, great tool for low light situations

I find tripods really useful in low-light situation when you can stick to a spot and take photos of objects or places. However, if you need to be mobile, or you are in a busy event, the tripod can be uncomfortable and sometimes even impossible to use. In that case, you can use alternative stabilization methods, that might not be so efficient, but they can solve your situation. If you have money to spare, you can buy equipment such as monopods, or wearable chassis. Alternatively, you can use any surface you find to stabilize your camera (like tables, closets, chairs…anything can work). You can lean on a wall and shoot with the elbows tight to your sides to avoid shaking. You can also sit or lean forward with your elbows on your knees while shooting.

If you still get people blurry because they move all the time, you can try to ask them to freeze their movement for longer than usual (“excuse me, could you just not move for three seconds”). Try to make it sound fun and people will usually be fine with it.

I hope these tricks will help you in low light situations. Do you have any other strategies to handle it? Please, share it with us. We are always happy to learn new things. Have a happy shooting!

Shooting a portrait in 15 minutes – Gear Overview

A new beginning

The wonderful people at Sleeklens have invited me to share my thoughts and experiences as a freelance photographer working in London. I will endeavor to do this several times a month, and for my first correspondence, I thought I would introduce myself so you will hopefully get an idea of what I love about photography and how my life as a working photographer unfolds.

My name is Matt Writtle and I’ve been working professionally for over twenty years. I have been seen quite a lot of changes, from bulk loading Ilford HP5 film and shooting with an old Nikon FM2, to shooting most of my work now on a Leica M (240) digital. I prefer digital now, controversial I know, but I have never been the most patient of people and the majority of my work is to shoot portraits and features for newspapers such as the Daily Telegraph and London Evening Standard.
To describe my work succinctly: I have to produce a studio quality portrait on location, in a venue I have never been to before, in less than thirty minutes.

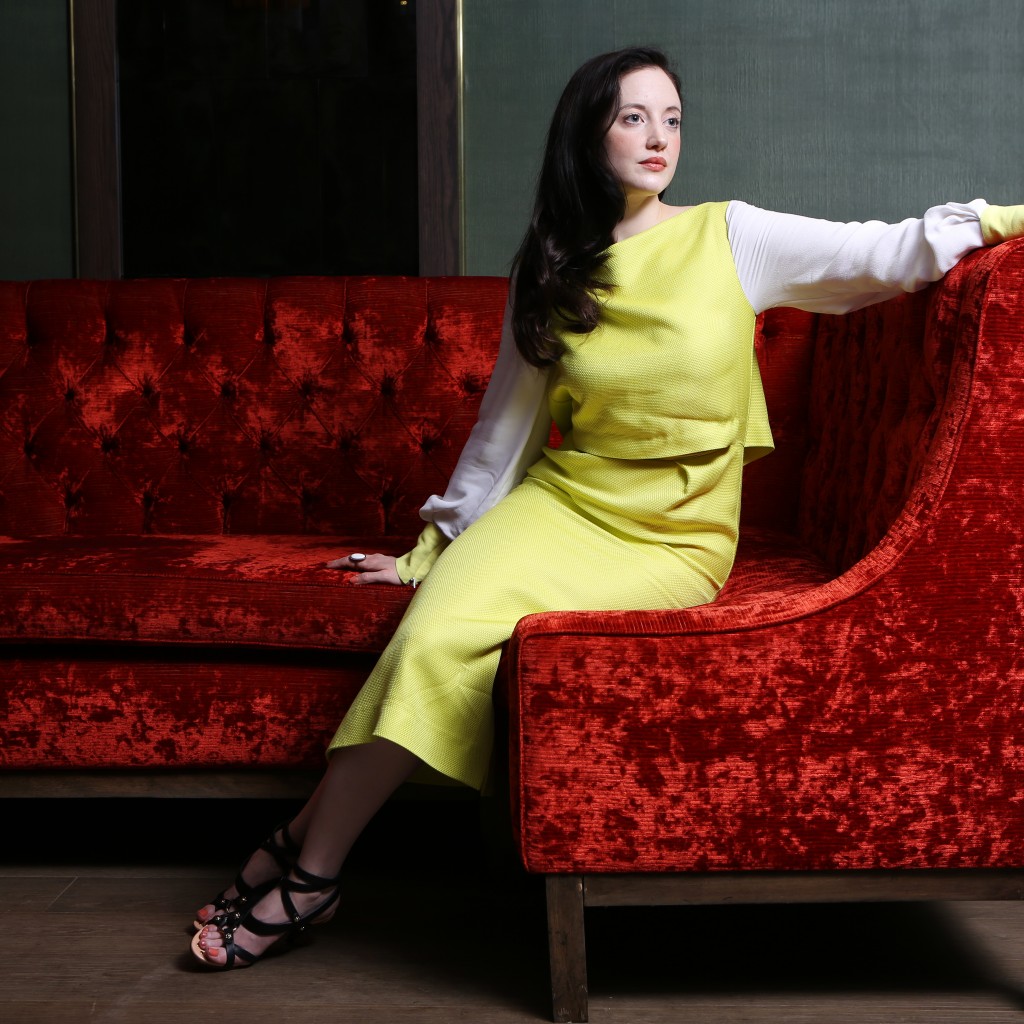
Portrait of actress Andrea Risborough at the Mayfair Hotel, Piccadilly, London. PHOTO MATT WRITTLE Picture commissioned exclusively for the London Evening Standard. Use in another publication will require a fee.

Ninja Turtle

Nearly all portrait shots are time allocated and controlled by the public relations officer or “PR” for the subject. Consequently, time is tight and closely monitored. I normally get fifteen minutes, thirty if I’m lucky, so preparation is key. The best way to prepare is to correspond with the PR in advance of the shoot, and then arrive early. Thirty to forty-five minutes before the shoot is a good amount of time to recce the venue, mostly hotel rooms, lobbies or a theater, and ascertain how much available light there is and what set up to use.

Budgets are tight, photographic assistants on newspaper shoots are rare, and as technology has advanced so has the demise of manpower, so, I have to travel alone with all my equipment on my back. I wheel it all around in Think Tank Airport Security V2.0 and additionally, I now carry a 22inch beauty dish in an extra large drum cymbals case on my back, very useful case and vastly cheaper than photographic equivalents. I look like a Teenage Mutant Ninja Turtle going on holiday!

My two main light attachments are the dish and a Photek Softlighter II 46 inch. Presently, I use the dish as my key light, and should I need any shadow fill I use the Softlighter II (brolly box). I have to be mindful not to have too much darkness and contrast in the image as newsprint doesn’t reproduce blacks very well. I also have to consider house style: newspapers don’t want their images to be too moody and gloomy.

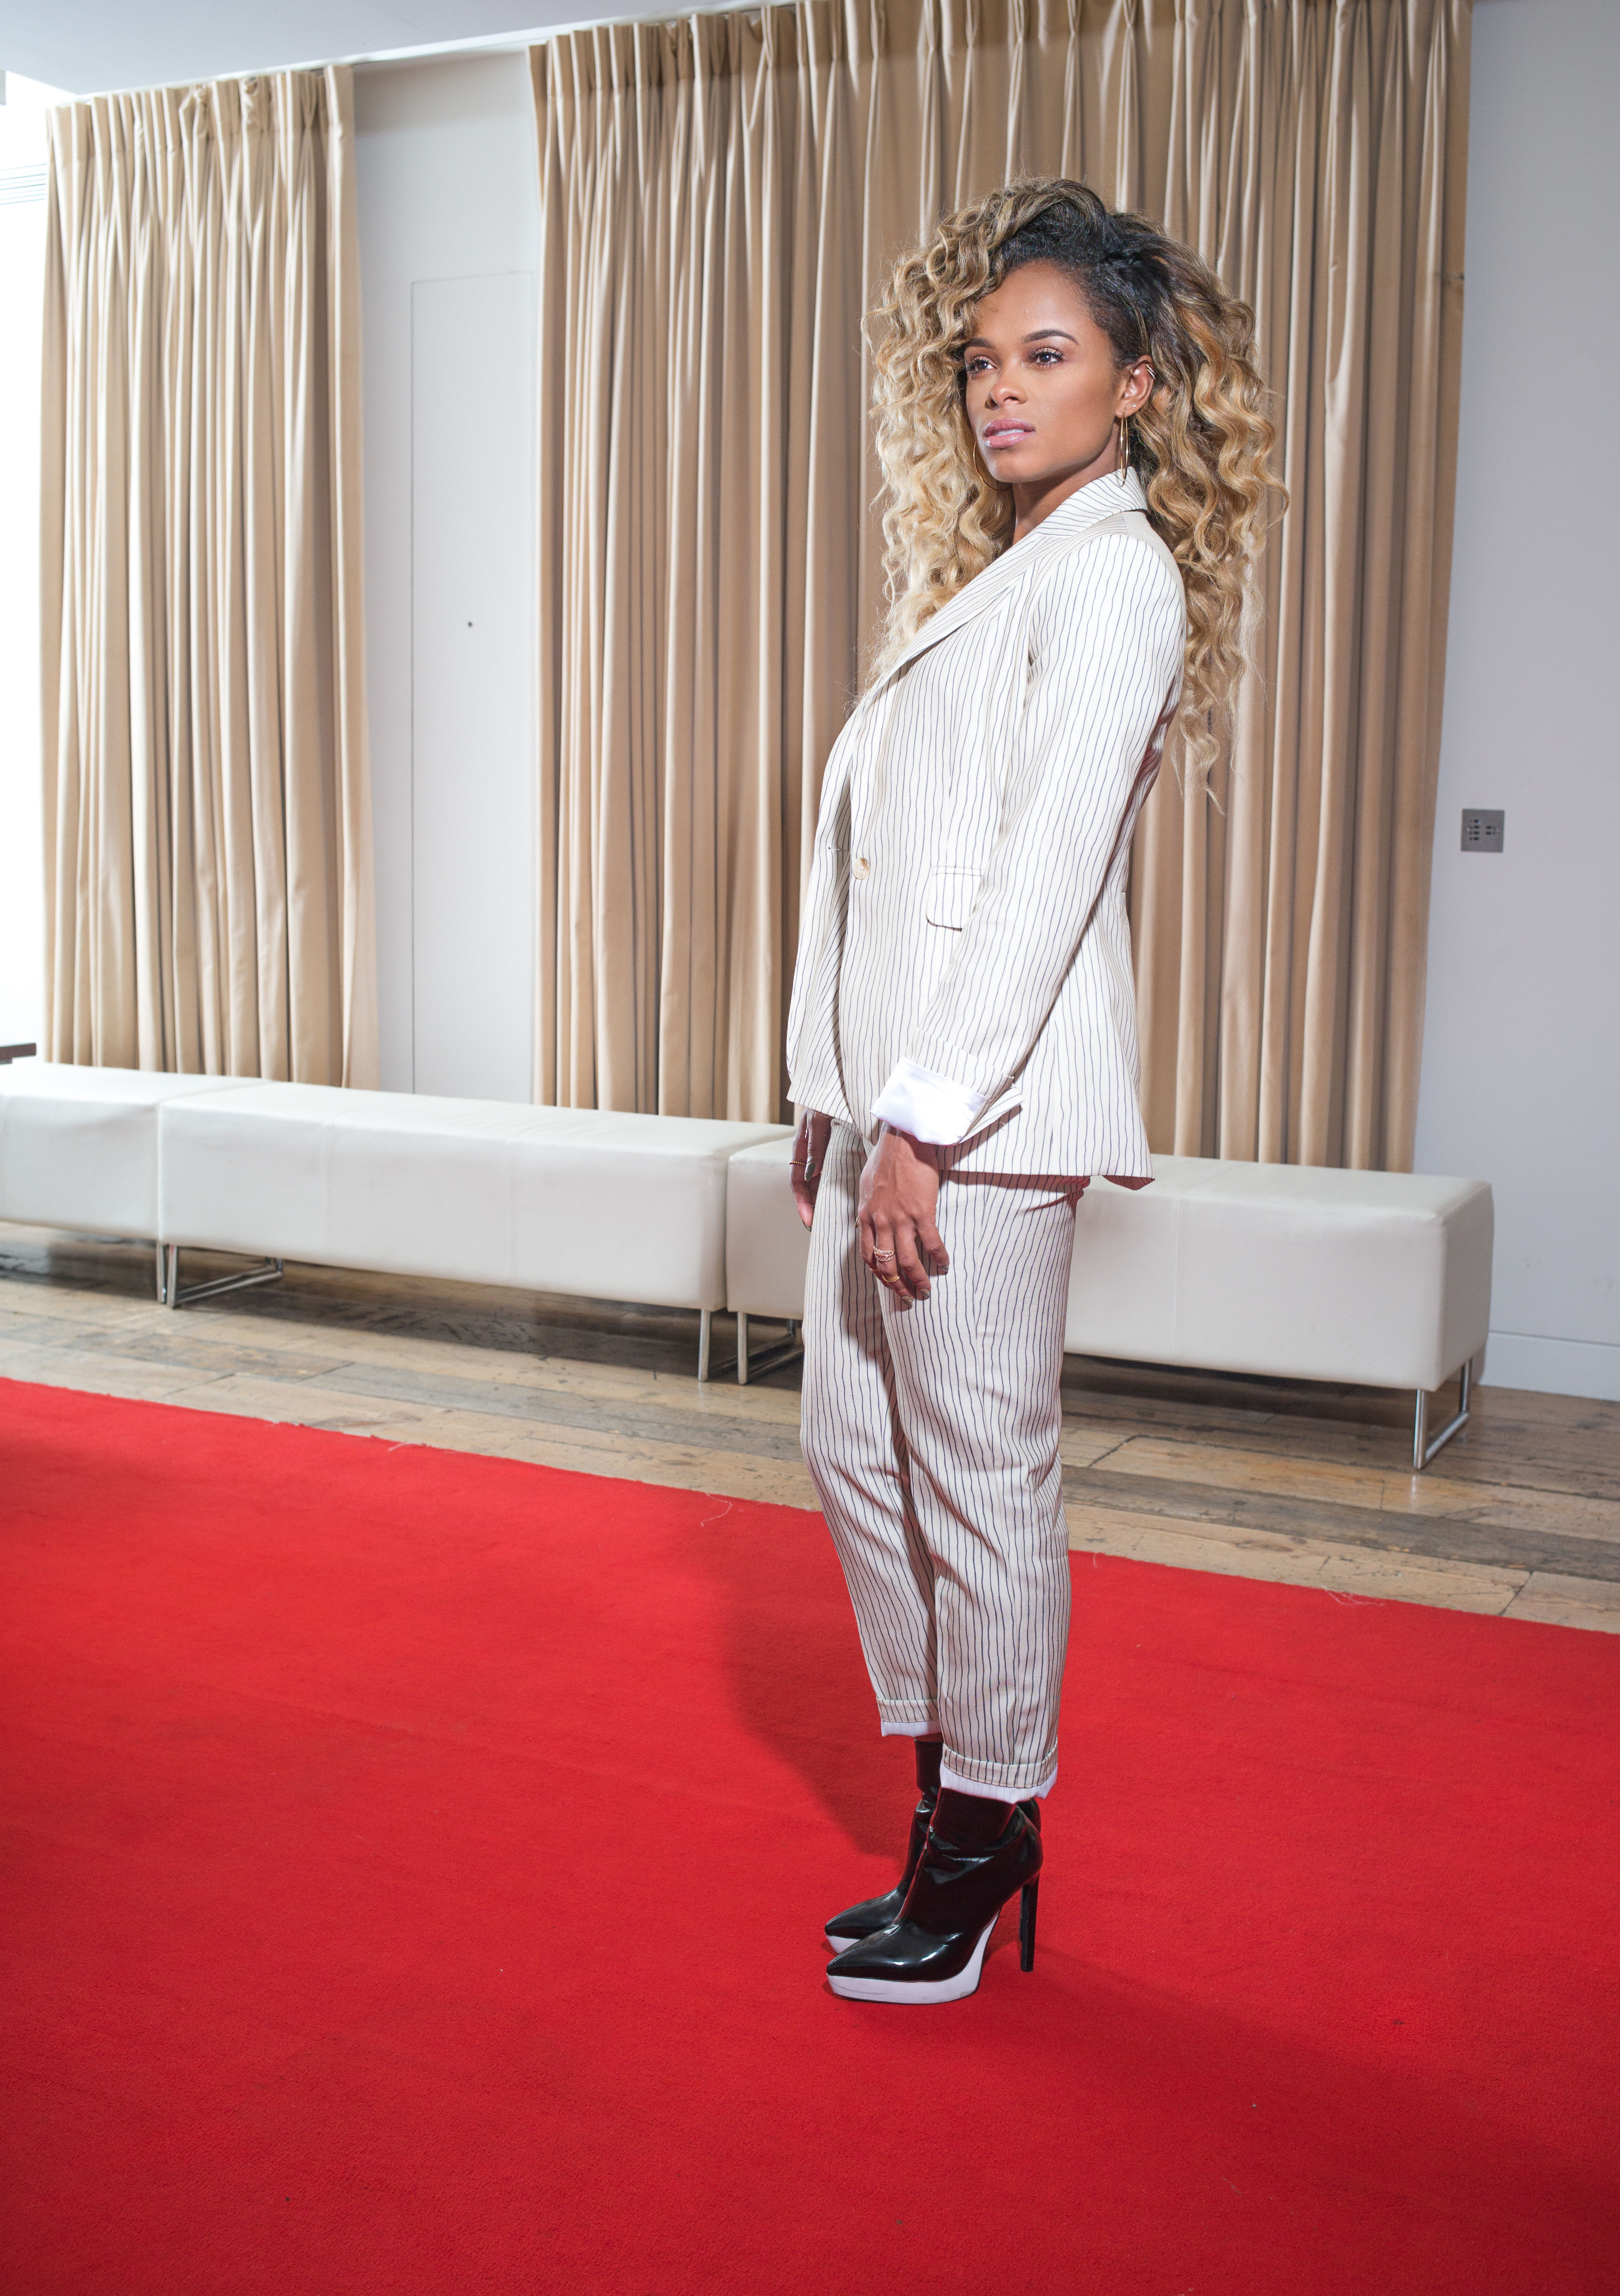
Commission May0066291 Assigned Portrait of former X-Factor contestant and pop star Fleur East at Sony BMG, High Street Kensington, west London. MUST CREDIT PHOTO MATT WRITTLE © copyright Matt Writtle 2015. Picture commissioned exclusively by the Telegraph Media Group. Use in another publication will require a fee.

War and Peace

On most shoots, I walk around the location and try to imagine how the subject will look in a scenario befitting of the angle of the interview. I tend to ask the PR to stand in for a light test. Exposure and mood created, I wait. Many people don’t consider how different each individual will look in the same light, and often, I have to modify the light to accommodate the star.

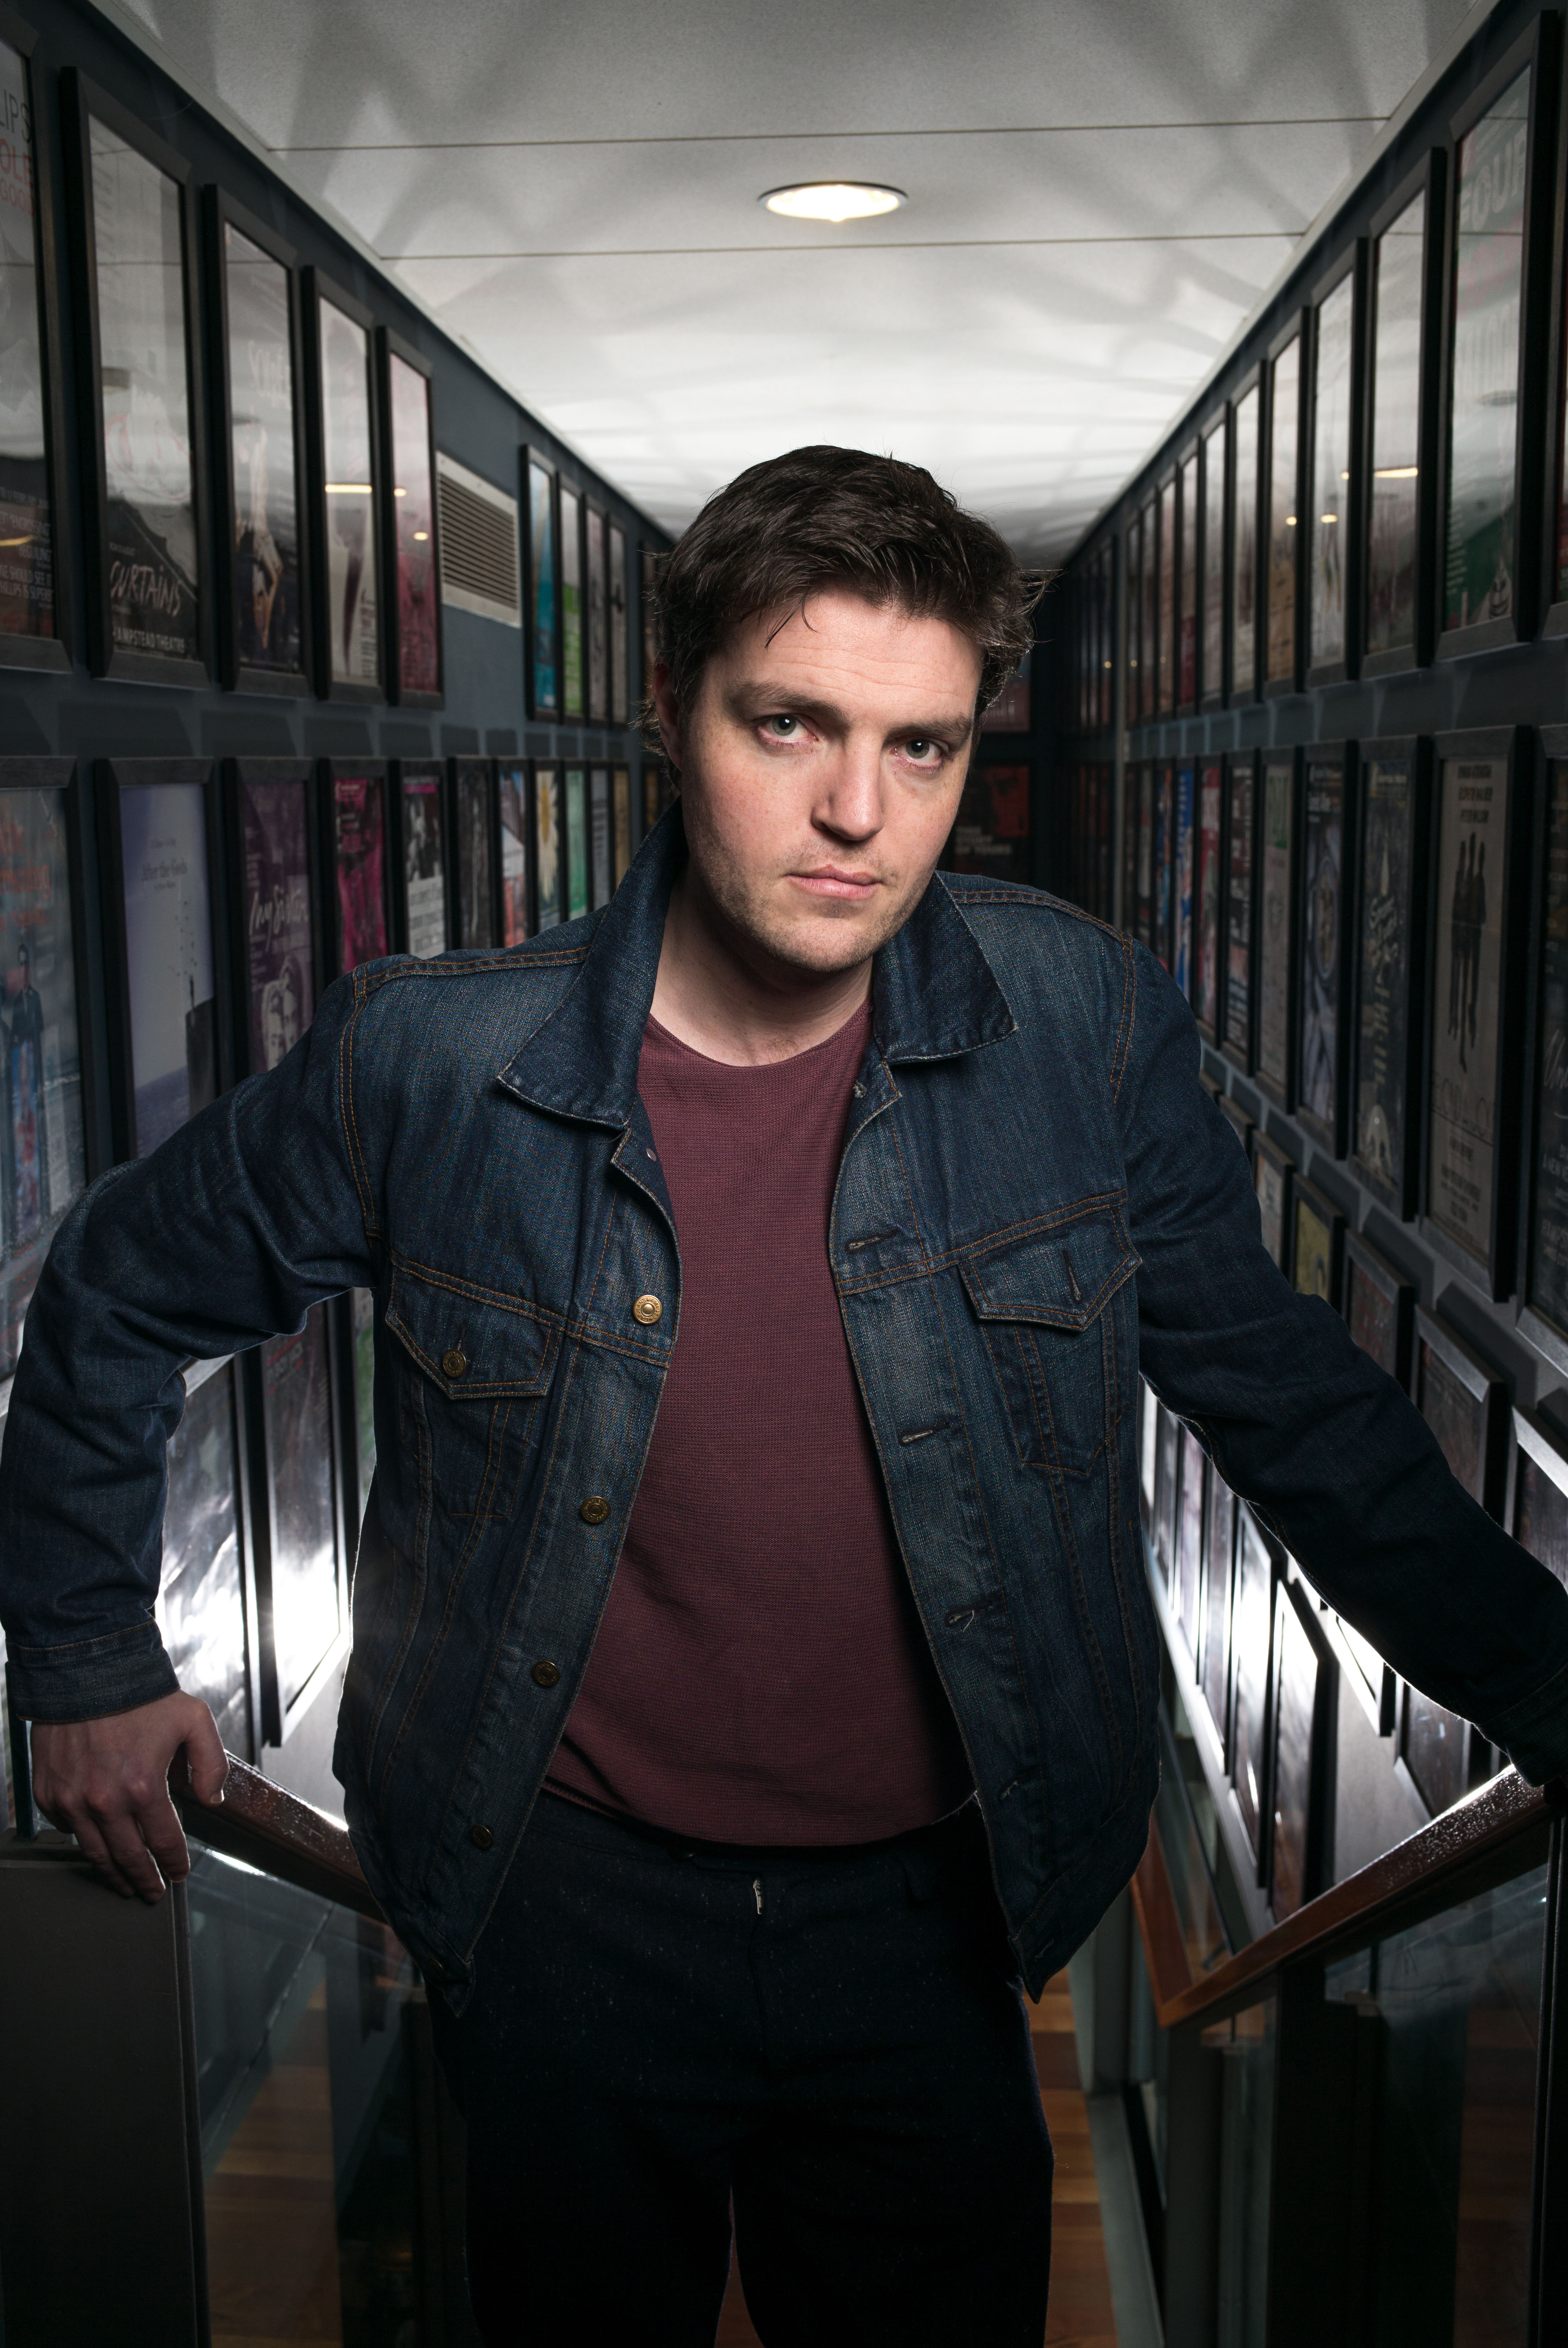
This was the case when I photographed actor Tom Burke (BBC’s War and Peace) recently for the Daily Telegraph. The shoot was at London’s Hampstead Theatre he was performing in, so, stairwell and lift lobbies were my backdrops. Ten minutes recce and he appeared. I keep things simple. The more complicated you try to make things, the more time you waste.

Set up one was at the top of some stairs with framed posters of previous actors who’ve starred at the theatre. I was thinking hall of fame and he was being inducted. Beauty dish key light, with a basic backlight to add mood and light the framed pictures.

Commission May0068723 Assigned Portrait of Actor Tom Burke who is appearing in Reasons To Be Happy at Hampstead Theatre, Swiss Cottage, north London. MUST CREDIT PHOTO MATT WRITTLE © copyright Matt Writtle 2016. Picture commissioned exclusively by the Telegraph Media Group. Use in another publication will require a fee.

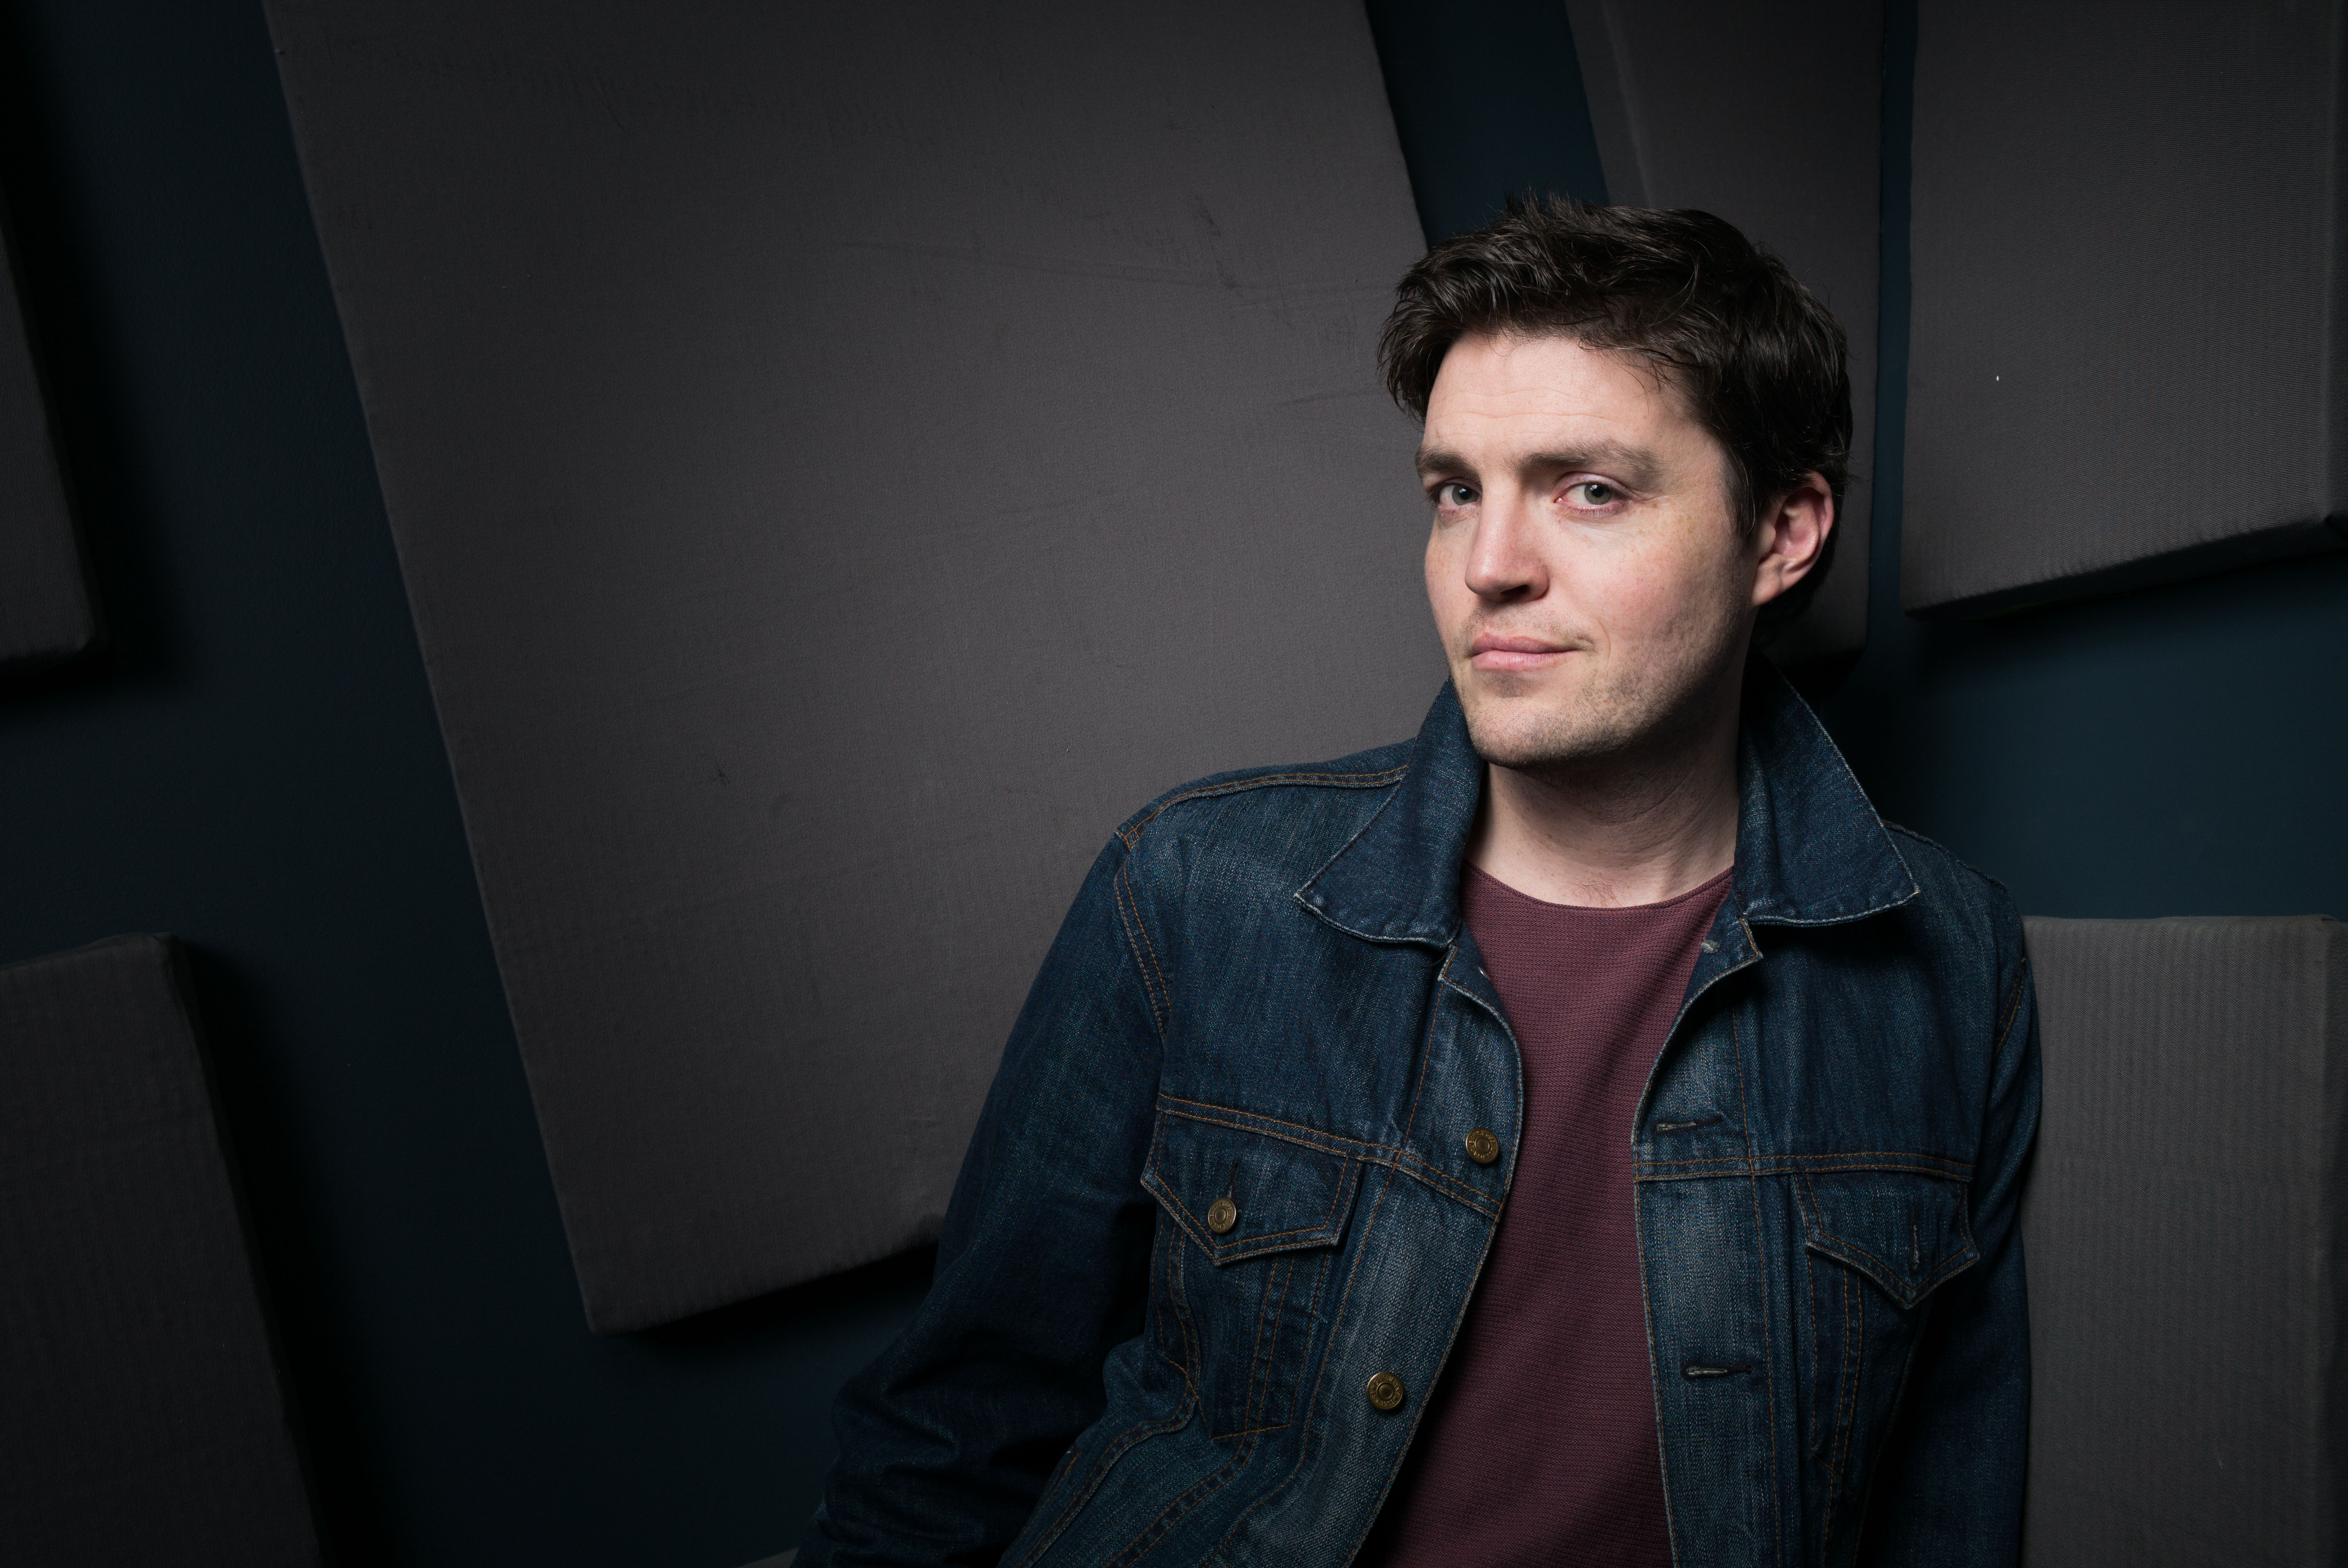
Set up two was in a darkened lift lobby, but as Tom Burke is known for his brooding characters, I thought this quite fitting. Again, beauty dish key light, with a gentle amount of fill for shadows with the brolley box, all of which shot on my Leica M (240) with a 35mm f1.4 and 50mm f1.4 aspherical.

Commission May0068723 Assigned Portrait of Actor Tom Burke who is appearing in Reasons To Be Happy at Hampstead Theatre, Swiss Cottage, north London. MUST CREDIT PHOTO MATT WRITTLE © copyright Matt Writtle 2016. Picture commissioned exclusively by the Telegraph Media Group. Use in another publication will require a fee.

‘Goodnight Mommy’

In addition to the technical, you have to get a famous or notorious person inside to produce the image you want. I would say it’s a challenging and tense situation. For those fifteen minutes, I channel my adrenaline, whilst being friendly and keeping the subject happy. At the same time, I make sure the image is focused, composed, exposed and the lighting suits the mood of the character, all while a PR is standing behind you counting down how much time you have left.

It can be frustrating, but only because you have unique access and often not enough time to do it justice. But when there is a connection, the shoot sparks into life and that’s when the magic happens.

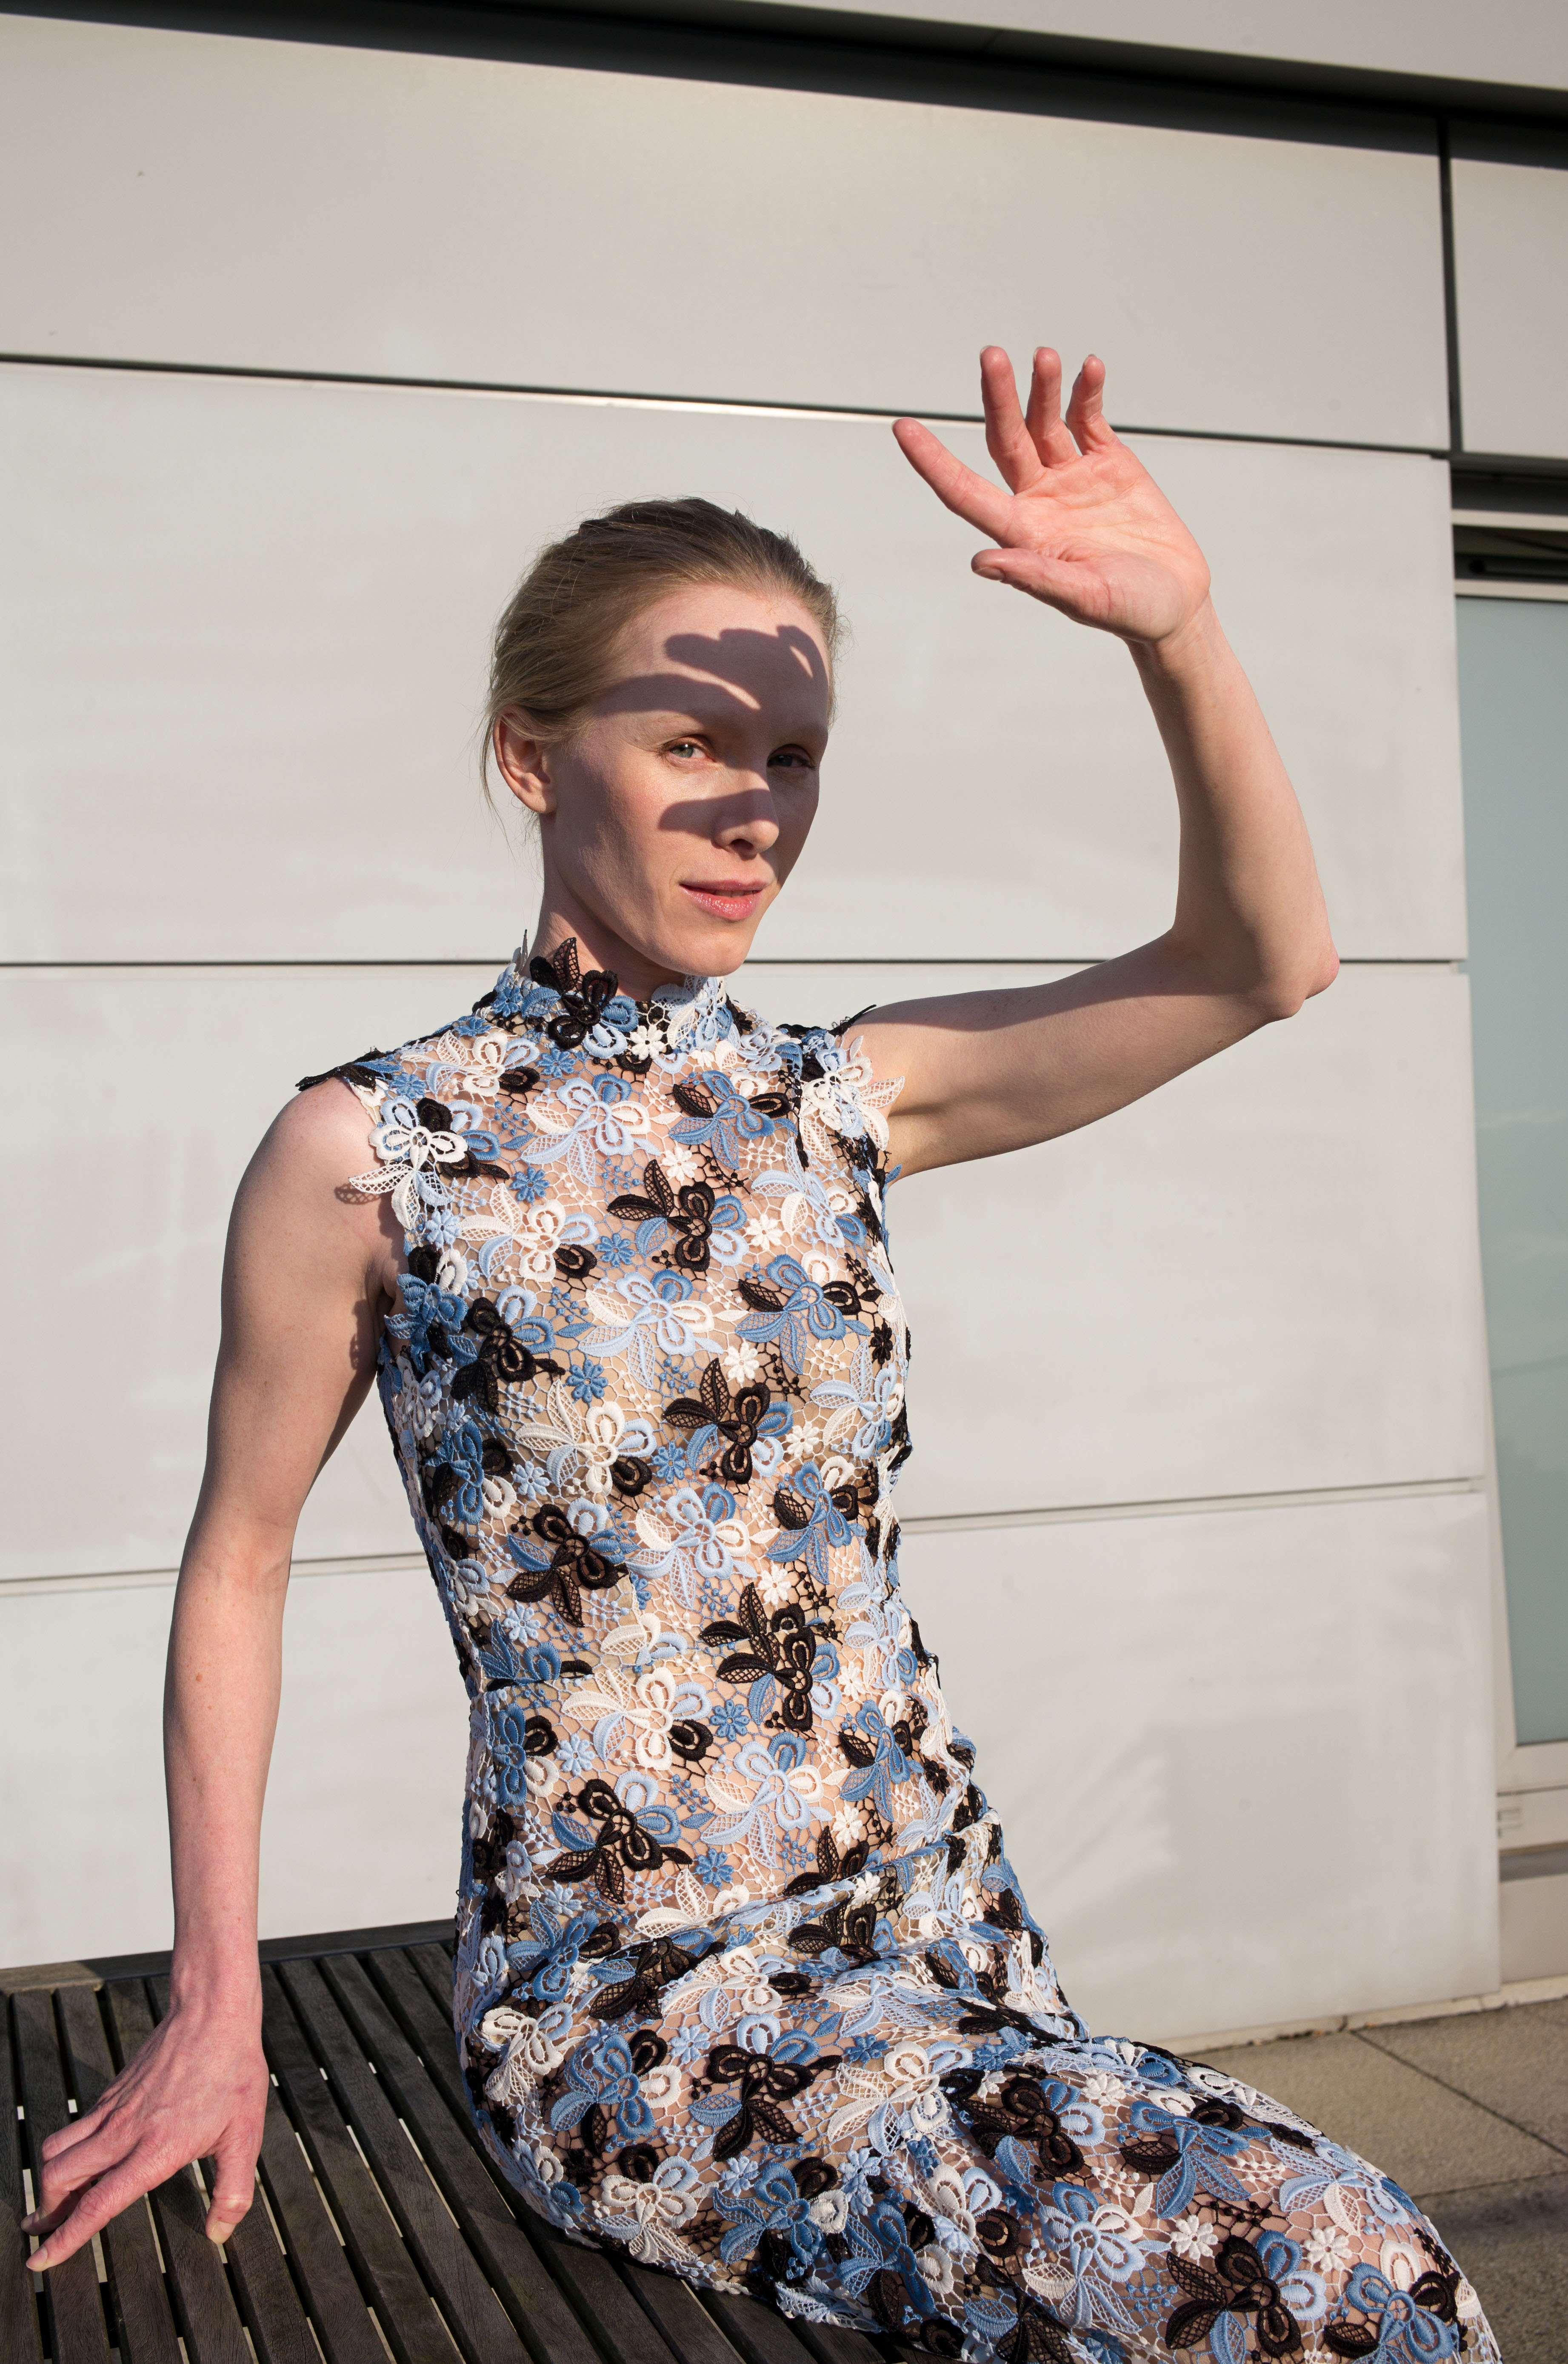
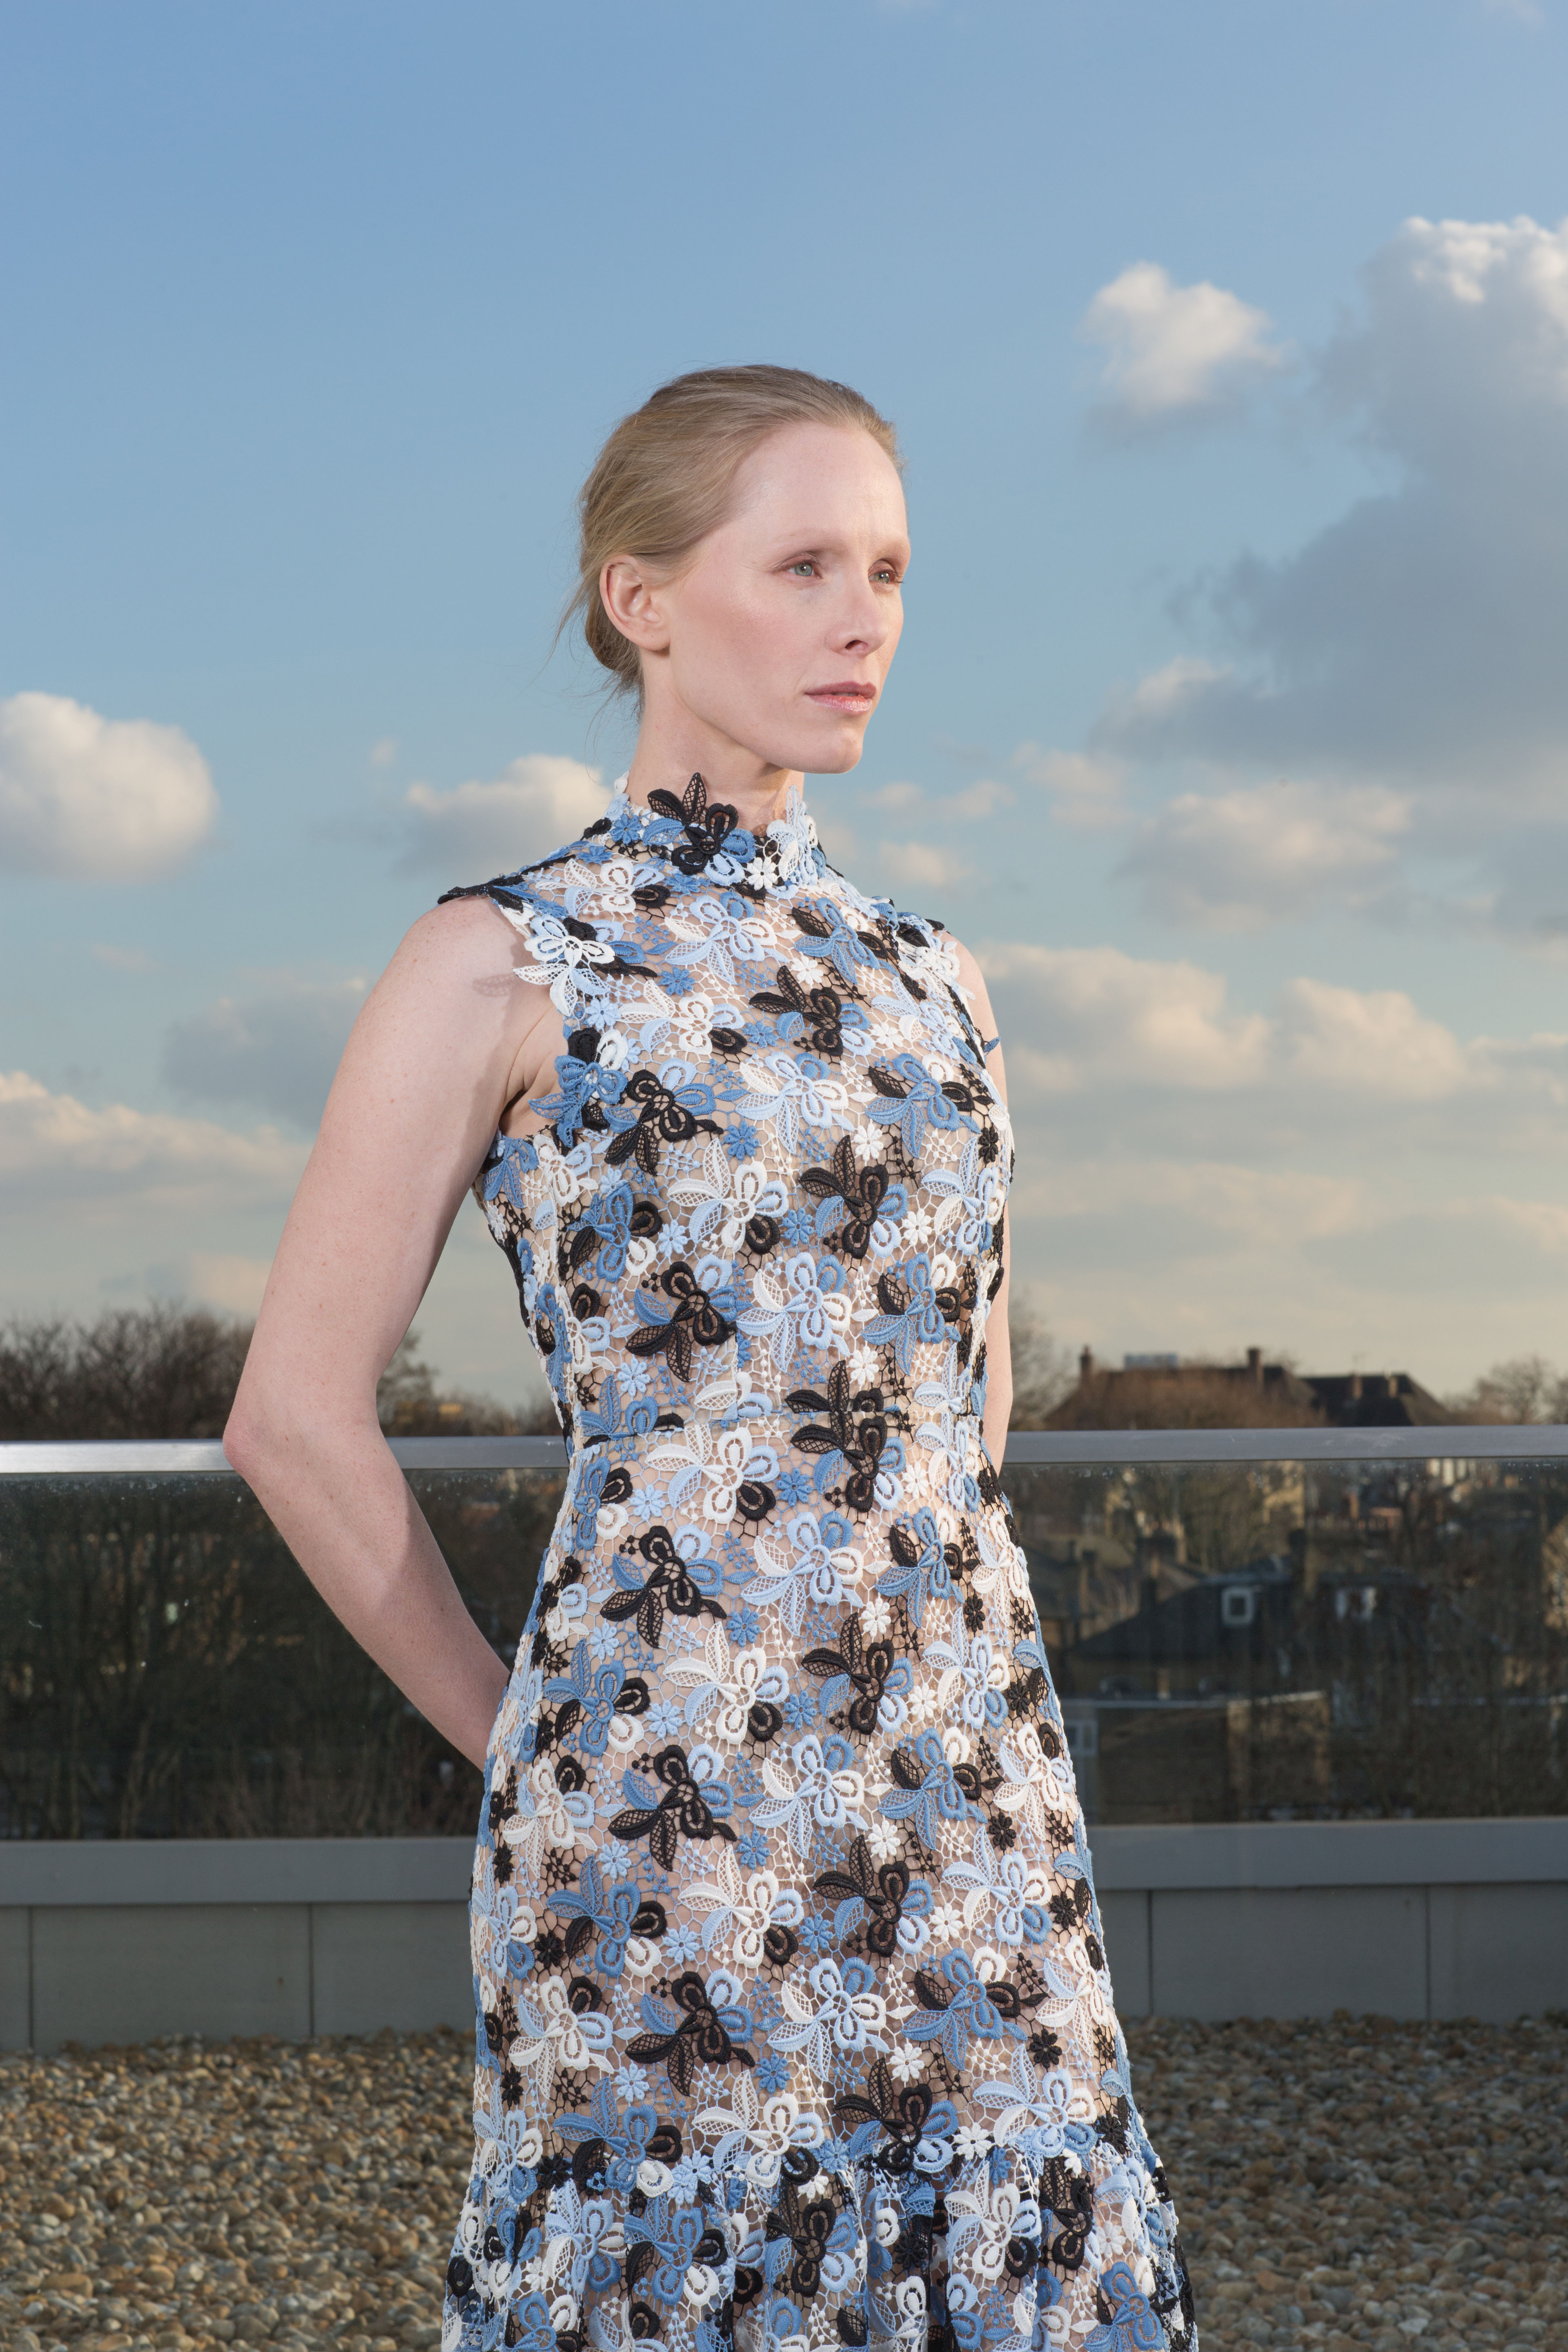
This was apparent when I photographed the Austrian actress Susanne Wuest who starred in a horror film “Goodnight Mommy’ which has received critical acclaim. We met at her penthouse apartment at the old Arsenal FC football stadium, now flats. Having modelled before, I was optimistic the shoot would be successful. She was as enthusiastic as I and we connected on what we both wanted to achieve, which took place on her terrace against a beautiful blue early spring sky.

Set up one was just natural light shot on my Leica with a 35mm.

Portrait of Austrian actor Susanne Wuest at her apartment in Highbury, north London. MUST CREDIT PHOTO MATT WRITTLE © copyright Matt Writtle 2016. Picture commissioned exclusively by the London Evening Standard and ESL. Use in another publication will require a fee.

Set up two was on my Canon 5d mark III with a 24mm-70mm zoom. I metered for the natural light and then placed two Elinchrom Quadra heads, one with the beauty dish, one naked, at 45° angles to her and boom! I got my favourite shot.

Portrait of Austrian actor Susanne Wuest at her apartment in Highbury, north London. MUST CREDIT PHOTO MATT WRITTLE © copyright Matt Writtle 2016. Picture commissioned exclusively by the London Evening Standard and ESL. Use in another publication will require a fee.

Hope this guide has been useful for you as a brief panorama of how do we photographers suit our gear to match the different scenarios we may come across during our daily job. See you next time!