Ring light photography is a wildly popular, professional technique that creates perfectly lit, breathtaking pictures. A ring light can really boost the quality of your photographs if you know how to use it right.
Table of Contents
As a photographer, you know that lighting is key to a good shot. There are many different ways to manipulate lighting, and using a ring light is one of the most effective methods for photographers to achieve their desired result.
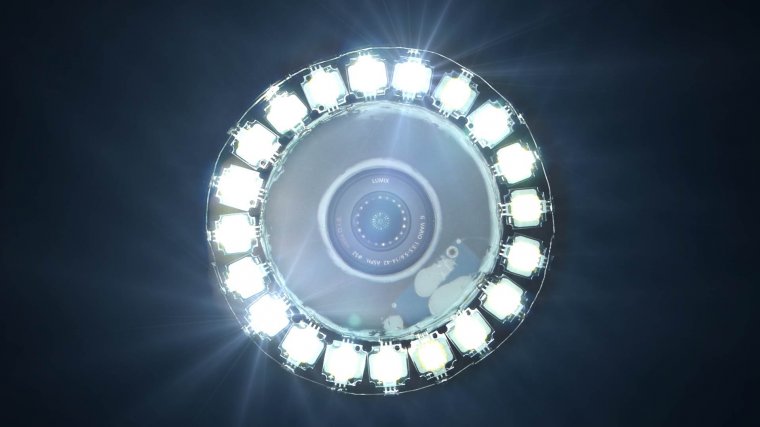
As its name implies, a ring light is a photography prop that is essentially a circular light ring made up of LED lights. An led ring light is donut-shaped, with a hollow middle circle for a camera (or smartphone) to fit through.
So, what is a ring light used for and what does a ring light do?
Ring lights are used by photographers and videographers in both a studio and outdoor setting to control lighting.
A ring light adds soft, flattering light to any subject without causing glare. Ring lights are commonly used for product and Food Photography because they cast an even, flat light and eliminate unwanted shadows.
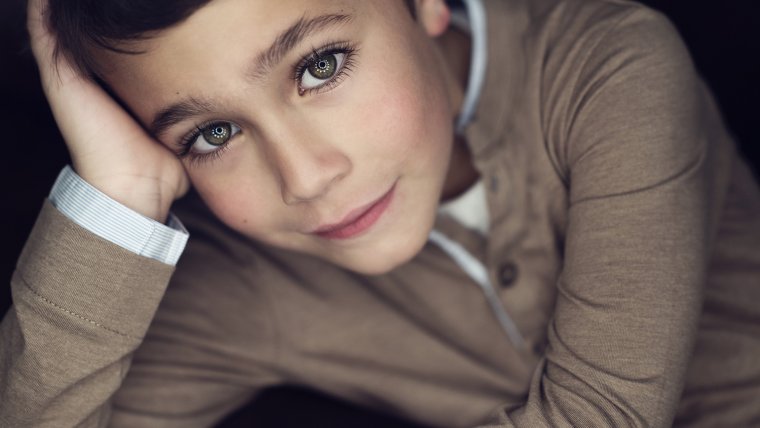
Ring lights are also used for portrait and Self Portrait Photography. They help minimize blemishes and get rid of harsh shadows. If you’ve ever wondered how a model’s eyes look so vibrant in a photograph, that’s probably thanks to a ring light.
The brightness of a ring light constricts pupils, bringing out more of the color from the irises. It also creates stunning, characteristic catchlights in the eyes. For this reason, a ring light is a great way to get started with Portrait Photography at Home.
Many content creators and social media influencers also use a phone ring light to enhance the light quality of their selfies, YouTube videos, or even for streaming a live stream. With the rise of remote work, many people use a ring light for video call purposes, too.
Using a ring light is not complicated, but if you want to take your photos to the next level, then you should follow these steps on how to use a ring light most effectively.
Even though they are used for a wide variety of photographs now, ring lights were originally created by a dentist for taking pictures of teeth. So, the first ring lights were very small in size.
Today, there are still small ring lights available for macro photography and extreme close up purposes, but there are also bigger sizes.
Before you purchase a ring light, you need to ask yourself how big of a ring light you need for what you’re photographing. What size ring light is best for your purposes?
While you can find sizes varying from 8 to 24 inches on the market, the most common ring lights today are between 10 and 18 inches in diameter.
A 10 inch ring light is categorized as a selfie ring light because it is ideal for close-ups and headshots. If you are going to be using your ring light primarily for selfies or focused product shots, then this may be a good size for you. Smaller ring lights are also helpful for makeup artists, makeup application, makeup tutorials, or even video calls since they mimic natural lighting when the real thing isn’t available.
There are also 8 inch ring lights, which are designed for content creators who just want a ring light to enhance their phone photos and videos. Hence, this size is considered to be a phone ring light. A phone light ring is the cheapest option. A ring light for a phone can usually be clipped right on your smartphone or set up around a phone holder.
An 18 inch ring light is used in professional settings to get the lighting in a room just right. This size can illuminate an entire room, so it is a good overall option for less focused photographs.
As a general rule of thumb, an led ring light with a bigger diameter casts a wider, more even light whereas an led ring light with a smaller diameter has a more concentrated beam. So, if you want a smooth, evenly lit image, you will want to go with a larger ring light size. However, if you want your subject to stand out more, a smaller size will be the best ring light for you.
Now that you know which size ring light best suits your needs, you may be wondering how to set up a ring light.
How you set up a ring light depends on the type of ring light. There are two kinds of ring lights: those that mount directly on the camera and those that attach to a tripod or light stand.
On-camera ring lights are most often used for macro photography or scientific photographs (for example, crime scene documentation.) Setting up an on-camera ring light is easy. You just have to attach it to your camera so that the camera lens fits through the ring light’s center hole.
Because they are mounted to the camera, on-camera ring lights are easier to carry around, which is helpful, for instance, if you need to move around in nature to capture snapshots of insects. Also known as a ring flash, a ring light that is attached right to your camera lens emits a focused, powerful ray of light, which is very useful in dark settings.
Off-camera ring lights are used more often in a studio setting. They emit a wide ray of light, which is more suited for bigger subjects, like people. Since off-camera ring lights are mounted to a light stand, they can be moved around to create different lighting effects.
For an off-camera ring light, simply pop out your tripod or light stand and mount the led ring light on top. If the ring light does not run off battery power, then plug it in. Then, either hold or use another tripod to position your camera lens through the hollow center of the light ring.
After you get your ring light mounted, you will need to position the prop. Different ring light positions can create a variety of unique effects.
The simplest, most common method of positioning a ring light is directly in front of your subject. However, it can be fun to experiment with different lighting positions.
Have fun and experiment with positioning your ring light to create unique effects. For instance, for product or food photography, try angling the ring light above your subject. This turns the led ring light into a sort of faux softbox.
For portrait photography, place a ring light at a 45 degree angle to illuminate the side of your model’s face. You can also position the ring light behind the subject to use as a frame for farther away shots, or if you zoom in so the ring light itself doesn’t show in the photo, this position will add a gorgeous halo lighting effect.
If you’re wondering how far away should a ring light be, this depends on how concentrated you want the lighting to be. The closer the ring light is to your subject, the more focused and harsh the lighting will be. The farther away, the more diffused the lighting will get.
Light emits different temperatures. This color temperature is measured in Kelvins.
Most ring lights have a color temperature level somewhere between 3,000 and 6,000 Kelvins. Lower color temperature levels give off a yellowish, warm light whereas higher color temperature levels create bluish, cool white lighting.
While some ring lights only offer one temperature, many can be adjusted with a color filter or dial to give you a range of color temperature options.
So, what is the best ring light color for your photography needs?
To decide which ring light color to use, you should take into account the subject you are photographing and the effects you want the ring light to add. For example, with portrait photography, you may want to consider your model’s skin tone and whether you want your lighting to look more like the sun’s warm, natural lighting, or something cooler.
While you can diffuse lighting by positioning a ring light farther away from your subject, there may be some instances where you want to use an additional diffuser.
Diffusers soften your lighting and aid in eliminating unwanted shadows. For this reason, they especially come in handy if you’re photographing products or food. A diffuser can also help to fill in blemishes and shadows on a portrait model’s face.
However, if you want the subject to jump out a bit more, you may want to skip the diffuser. It really depends on the effect and type of photograph you want to capture.
The next step you will want to take is to adjust the settings on your camera. You will need to adjust your camera’s exposure (f/5.6 at 1/160s is a good place to start) and brightness levels. You may also want to consider manually setting your camera’s aperture, ISO, and shutter speed.
Finally, snap a few test photos. See how they turn out and if you’re happy with the result. If not, don’t be afraid to go back to a previous step and make adjustments to your ring light position, color filter, or camera settings. Have fun and play with it a little until you get the perfect shot.
Ring lights are an effective, relatively easy-to-use photography prop. You can find a ring light as part of just about every professional photographer’s light kit. But, is a ring light worth it?
In short, the answer is yes!
Ring lights make a big impact on photographs, and they’re very lightweight, making them one of the most portable photography props. But, just how much is a ring light going to cost you?
You’ll be happy to hear that not only are ring lights one of the most useful light kit pieces out there, but they’re really affordable, too. In the past, ring lights were more expensive, but today you can find ring lights or even a ring light with a stand for as little as $20.
Cheaper options exist for those who just need the very basic function of a ring light, but not all ring lights are equal, so make sure you do your due diligence before purchasing a ring light. You want to make sure your ring light is a good size for what you’re using it for.
Since a ring light is made of LED lights, you also want to make sure that the ring light has a high color rendering index (CRI) value. The color rendering index measures on a scale of 1-100 how accurately an artificial LED light source can reproduce colors. A color rendering index value of 90 or more is considered to be excellent, while anything under 80 is poor.
Ring lights are one of the most popular photography devices, for good reason. They are used by everyone from content creators and makeup artists to professional product and food photographers.
Whether you’re searching for a good lighting prop for creating high quality YouTube videos or for your professional portrait photography studio, if you don’t have a ring light already, you should definitely get one soon.
Because ring lights are so commonly used in portrait photography, you should also check out Sleeklens Studio Portraits Lightroom Presets to give your photos that extra oomph.


Please verify your software version before proceeding.
 I’ve verified my software version


 Facebook
 Google +
Comments (0)
There are no comments yet.