Hey 🙂
Hope you’re having a great day and with you here let’s make it better by learning a few things with our guides to Lightroom.
In this Tutorial I am going to be taking you through step by step, how easy it is to Import Presets.
You will most likely receive your Presets in Zip File format, open those as normal to which ever folder you use.
For this Tutorial I have mine saved onto my Desktop.
In Lightroom you will see the tab Develop, as shown in the picture below
Click on that and on the bottom left you can see the Presets section, this is what we are going to be working with today.
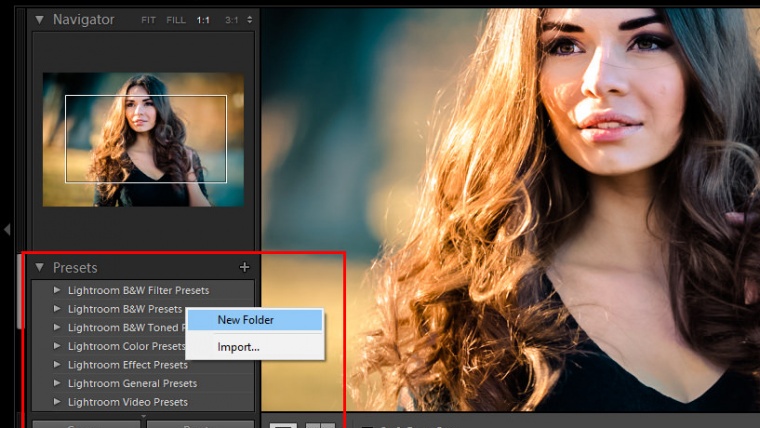
Once there, Right Click on one of your Presets as shown below.
We’re going to add some Presets that we want to work with.
Then, you will be given an option to click on New Folder.
I then name the Folder after the Preset that I am planning on adding, in this case Chasing Light Workflow will be my first.
Click Create.
Ok, so now Right Click on the Folder that you just created and Click on Import.
To find my file I had to Click on Desktop on the left hand side of the pop up, then I clicked on the Folder containing my Presets. I opened that Folder, then had to highlight all the files and click Import.
Easy enough…
Give it a couple of seconds to load and you will have all your new Presets loaded and ready to use, I have 5 more in total to add.
So I just repeat the process and add, this took me less than 2 minutes to do.
Now I have a few hundred Presets ready for use. How cool is that? 🙂
All of these Presets can be purchased from our store
In my honest and humble opinion, Presets can be used by just about anyone, from the very basic rank beginner, right up to a professional level.
I myself have a great understanding of Adobe Lightroom and can fly through the settings to get my pictures looking exactly the way I want them to look, but I have to admit that I really enjoy using Presets.
One major advantage is due to the Speed of which I can produce quality work, now I’m fast, very fast at editing but I can’t beat the speed of clicking through Presets.
More advantages that I like quite a bit… in fact this would probably be the main reason that I use presets.
And that being….
That I love scanning through Presets and finding the ones that I may never have thought of using on my image.
The styles are all there for you to use just by clicking through them in the Presets panel, so no real thought or energy is required.
You can get a really good fresh perspective on things, it’s really great I must say.
Some Great Advantages for beginners of using presets are that, some of you guys may not have a clue how to reach a certain look that you are going after in your head. I know that when I first started playing around with editing I would get some good results, come back at a later date on a new image wanting to achieve the same look and would have completely forgotten the settings that I had found through trial and error.
When using Presets you may stumble upon that exact result you want and then save it in your notes for future use.
Presetting eradicates this inconsistent trial and error way of working, to which I used to be somewhat of a victim.
For now I’m going to leave it there, I want you to take a few minutes and go over what you learned in this Tutorial
So enjoy using Presets while discovering all the great options that it offers.
See you next time!
Comments (0)
There are no comments yet.