How to Create Chromatic Aberration in Photoshopwww.sleeklens.com
Ok and we’re back! so in a previous Tutorial for Lightroom I did we looked at How to Remove Chromatic Aberration in Lightroom. Link
How to Remove Chromatic Aberration in Photoshop Link
Well this time we are going to look at how to actually create it, goodness knows why but I thought that for many of you, you may not have an image that had any so I thought it would be a good idea to show you exactly how it can be created in Photoshop, then I’ll do another Photoshop tutorial on How to Remove Chromatic Aberration in Photoshop and you can use the image that we make here today for that tutorial or if you want to learn to do it or both the links will all be included in this very tutorial.
Also, maybe you just like the effect that it creates and want to use this for some sort of photo composite, well if that’s the case then get out! lol joking, you are very much welcome to join along too, and at the very least perhaps we’ll just learn a few things about Photoshop that we’ve never seen before or areas we didn’t even know existed which is great too.
So with all that being said let’s get to it.
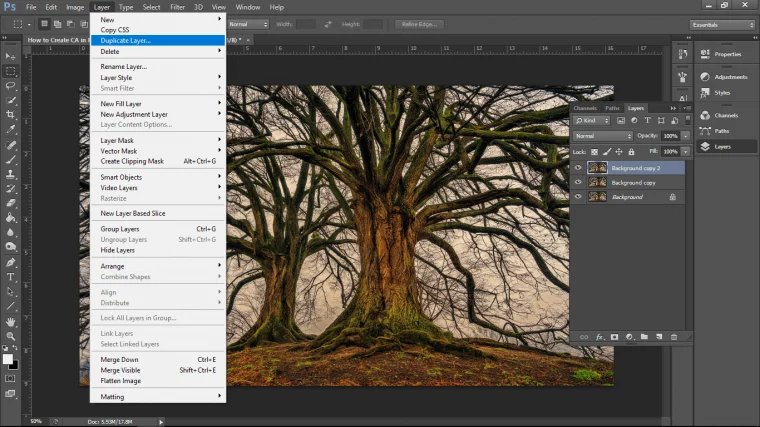
Ok open up your image and the first thing that I want you to do is to create two duplicates of that image.
There a couple of different ways you can do this, the easiest being if you click on the layer, you will see it in my image below, it has a padlock on it and it is called ‘Background’
well if you click that and drag it down to the icon that is one before the last at the bottom of that panel and releases it will create a new layer that is a copy of your background layer.
Then you just simply repeat and you will then copy another version.
So just in case you are confused as to which icon it is, you will see it on the right-hand side of the screen at the bottom of the panel that contains your layer ‘Background’
The icon itself is right beside that recycling bin there and it looks like a square with a fold at the bottom left.
The reason I’m doing this and not just indicating it to you on the image is because I want YOU to look and try to find it yourself.
That way it will sink in far better through actions than just mindlessly copying.
I’m all for live participation and active searching when possible as opposed to the very forgetful “here it is right here approach”
Another slightly slower way is to go to ‘Layer’ – Duplicate Layer
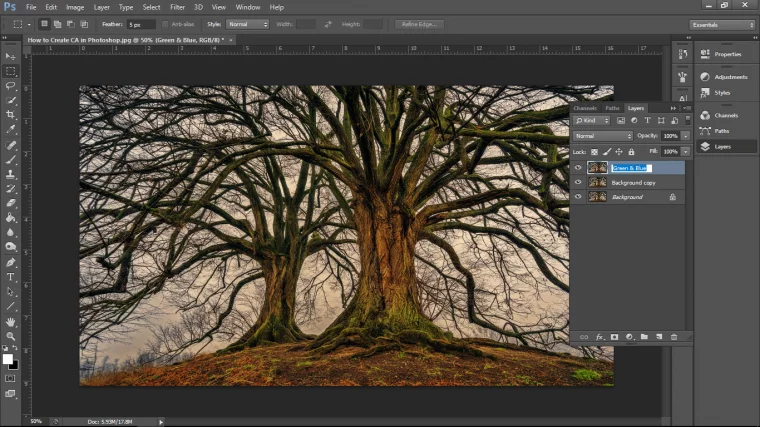
Next label the two new layers, doesn’t matter in which order.
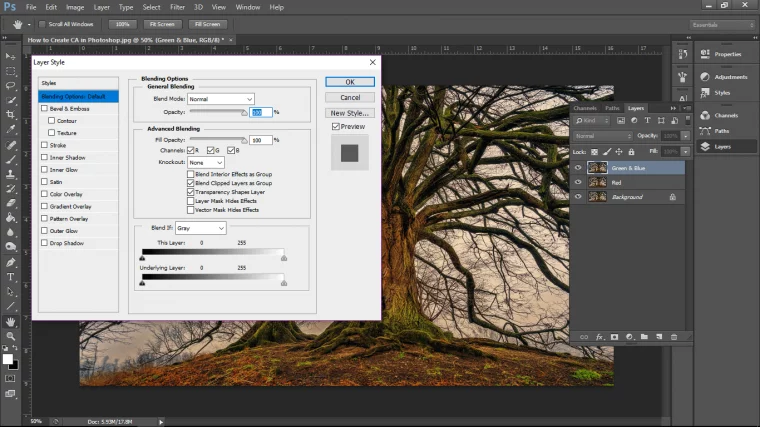
The easiest and fastest way to do this that I know is just to double-click on one of the layers.
The panel should appear now.
In there you’ll see a whole bunch of options, ok we have to learn all of them for today… haha just kidding.
Don’t worry if it looks a bit daunting at the minute, the only thing we have to concern ourselves with is the middle section called Advanced Blending.
You’ll see there that there is 3 little boxes that will be ticked and labeled R G B, they’re beside the word ‘Channels’ because that’s what they are.
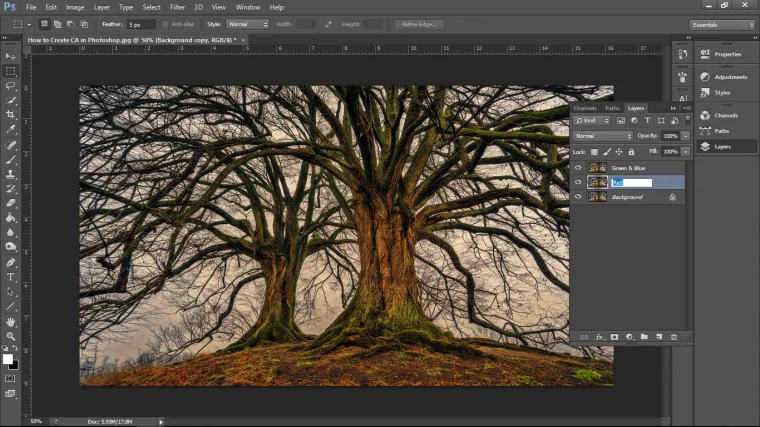
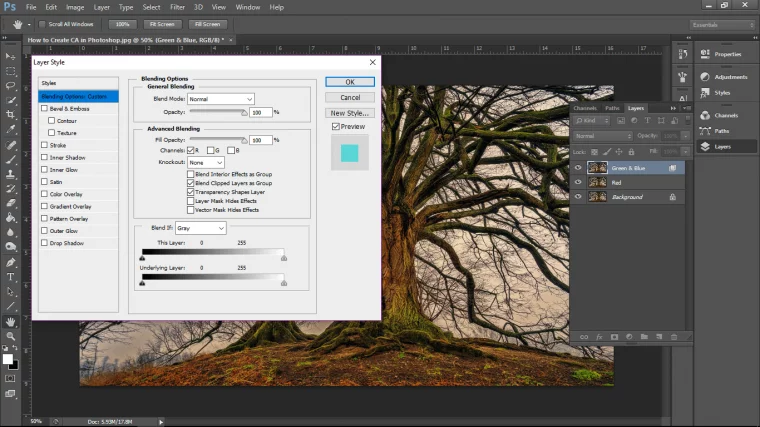
Ok so say you are in the Green and Blue layer, what you do here is then click on the G and B boxes to untick them, this will remove those colors from your image.
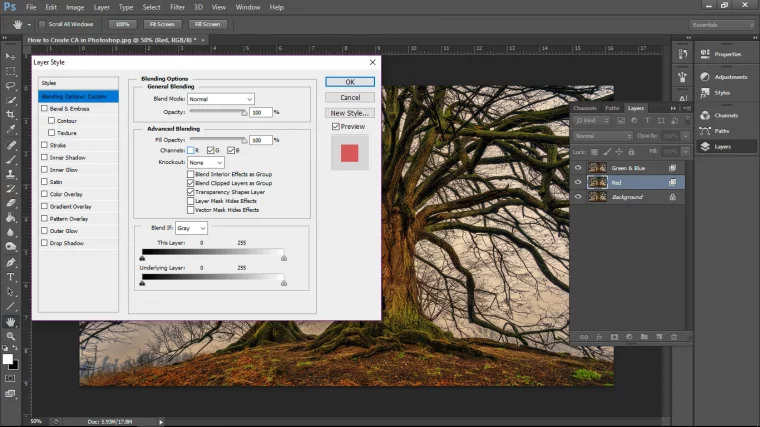
Next, go to the layer labeled Red and repeat the exact same process except for one major difference, instead of clicking on Green and Blue, untick the box ‘R’ and press OK.
This will remover the Red from that layer now.
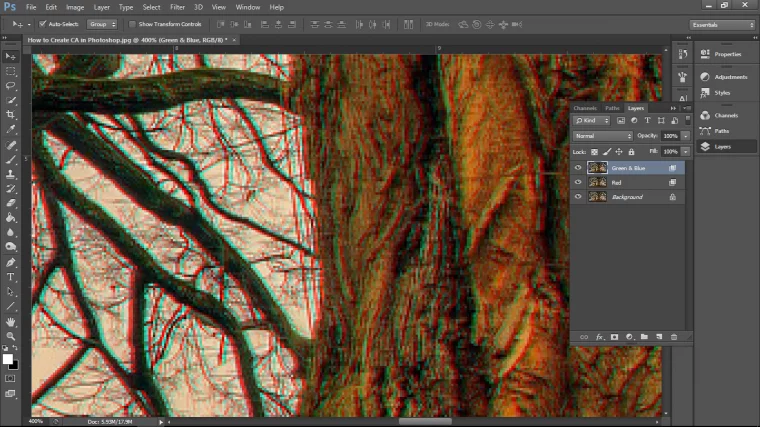
Last but not least, zoom in [you can use your plus and minus keys on your keyboard for this while holding Ctrl]
Take each layer, in turn, click on the layer and give it a nudge or two to the side and up [or down]
The Green and Blue layer will go to the right and the Red layer will be nudged to the left.
When developing an understanding of chromatic aberration, Photoshop users need to get familiar with the concept of fringing. Fringing is a term used to describe an unfocused haze of color that appears around an object in a photo. Most often, this type of chromatic aberration appears when dark edges are adjacent to bright areas caused by daylight or certain types of lighting.
Color fringing occurs when lenses cannot bring all the different wavelengths of a particular color into the same focal plane. It results from different colors of light passing through a lens at different speeds. It's common to see purple fringing (also known as PF), which appears as magenta or purple, but blue, red, green, and yellow can also occur.
There's no perfect lens that focuses all wavelengths into a single focus point, but photographers can take precautions to minimize color fringe during shooting. For example, photographers can avoid using wide-open lenses when shooting high-contrast scenes and prevent overexposure of highlights. Also, some higher-end lenses have coatings to help prevent color fringing.
To tackle fringing and chromatic aberration, Photoshop users have several options. The most straightforward solution is to use the Lens Correction Filter to remove chromatic aberration automatically. It's also possible to make manual corrections if desired. If you want to add a chromatic aberration effect to give your photo a unique look, you can accomplish that in Adobe Photoshop as well.
Focal length is another essential concept that photographers need to know. First, it's important to understand that focal length has nothing to do with the size of the lens itself. Instead, the focal length of a lens is the distance between the camera's sensor and the lens's optical center.
That brings up another question: What's an optical center? A lens isn't a single piece of glass but is constructed with several elements and groups of elements that help focus the light and reduce distortions. The place where all light rays come together to form a sharp image is called the optical center of the lens.
Another important fact: Lenses get their names from their focal length. So, for example, a 50mm lens has a 50mm focal length, and a 24mm lens has a 24mm focal length. Keep that in mind when shopping for new lenses to add to your collection.
If you need more insight on focal length and other critical concepts, you can take online photography courses developed by experts.
Longitudinal chromatic aberration is one of the two main types of aberration, with the other being lateral chromatic aberration. Also called LoCA, longitudinal chromatic aberration happens when different wavelengths of a single color don't converge together at a specific point after traveling through a lens. You may see LoCA throughout objects, even in the center.
Certain fast aperture prime lenses are far more susceptible to LoCA than slower lenses, and even expensive lenses are not immune to LoCA. In some scenarios, It may be possible to prevent or minimize LoCA by decreasing the aperture and reducing the light coming into a lens.
If you take an amazing photo that displays longitudinal chromatic aberration, don't despair. To fix this chromatic aberration, Photoshop users can create a copy of the original image, add a layer mask, and use the gaussian blur feature. You'll need to adjust the gaussian blur radius until it appears that the aberration is gone and change the blending mode from normal to color. Then you can use a small brush to remove the LoCA manually.
This process requires some skill and practice, but you can often get good results by using Adobe Lightroom for simple cases of chromatic aberration. Go into the Develop module, navigate to the basic tab, and look for the Remove Chromatic Aberration option. If you need to get up to speed on using this popular photo editing tool, Lightroom tutorials can be your best bet.
Are you familiar with the photography concept of focal plan? Basically, it means the distance between your camera lens and the point where your image is in the sharpest focus. You can imagine the focal plane as stretching horizontally across your image. Anything along that line will be in clear focus. Your focal plan is connected to aperture or the part of the camera that manages light entry and depth of field.
So what's depth of field? It's the area around the focal plan which still appears in focus. You can adjust the depth of field to be more shallow so that less appears in focus or make it deeper to make more of the photo appear to be in focus.
The other chromatic aberration variant to know is lateral chromatic aberration or LCA, also known as transverse chromatic aberration. This aberration occurs when light traveling at an angle focus at different positions on a focal plane. LCA is only visible on the edges of images, but never in the center.
Unfortunately, decreasing aperture doesn't have an impact on LCA. The only way to address this issue is in post-production. To remove this type of chromatic aberration, Photoshop users can follow the steps outlined in the LoCA section above. Need help getting started? Photoshop tutorials can help you learn the key skills you need to improve your photo editing techniques.
Graduated from college in 2002 with a degree in Art & Design, I started exploring my way in Graphic Design and Professional Post Production. Full-time freelancer since 2011.


 Facebook
 Google +
Comments (0)
There are no comments yet.