
Hi all,
So for today I want to take a look at and walk you through a Photoshop tutorial on how to use the clipping mask tool to create some amazingly awesome effects using Photoshop CC, though the same steps will apply to Photoshop Elements as well.
I have just previously done a Photoshop tutorial that was on layer masking, if you haven’t seen that yet then check it out and learn all about Masking in Photoshop today because there isn’t much to it—it’s actually very easy once you understand the basics.
A clipping mask is a Photoshop tool that allows you to use an image as a mask for another image, allowing only the masked portion of the second image to show through. Clipping masks are often used to create photo collages or to add textured backgrounds to photos.
Now, let’s get to it and get the learning going.
So the Photoshop clipping mask and the layer mask are very very close in terms of what they are able to do, but with the clipping mask you are able to do a little bit more and on your own terms which is great.
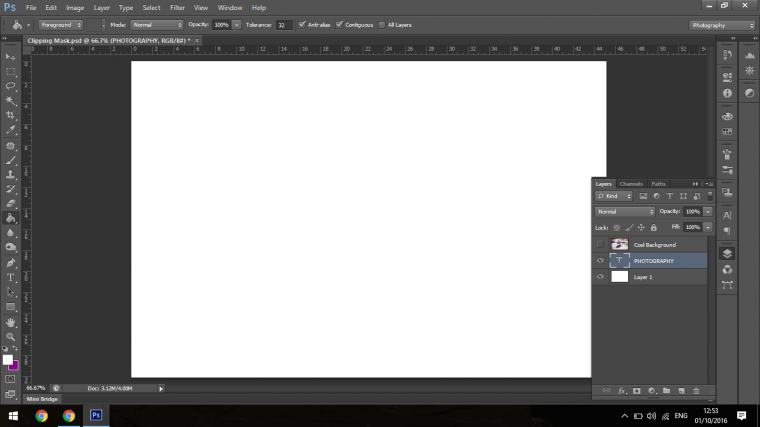
Now to start off with we will want to create multiple layers in the Adobe Photoshop layers panel. I want to make the base layer white, then a new layer above that, which will be my text layer that says “photography.”
Then for the upper layer, I will have the image layer that will create the actual effect that we are looking for.
Those are the three layers that we will be working with today (well just the top two to be honest).
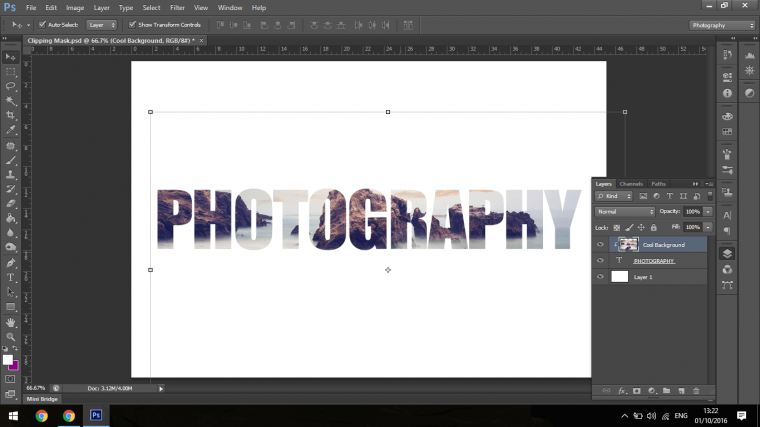
In the image below, you will see all those layers to the right, in the layer menu, with the top one named Cool Background and the text layer, PHOTOGRAPHY, highlighted as the selected layer.
Now that I have explained the basic background for you to properly get started you, must have the layers stacked exactly as seen in the layer panel above. The layer that you want to create the clipping mask with must be underneath the image layer that will create the effect.
Don’t worry if that sounds a bit complicated—the layer stacking that is, it won’t be once the Photoshop clipping mask magic is revealed.
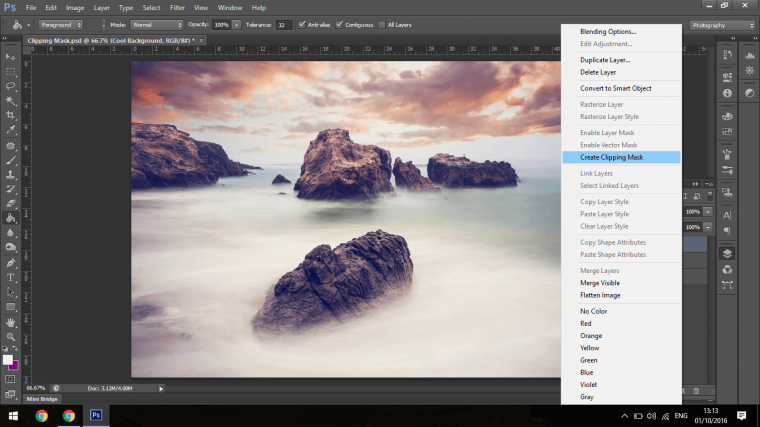
Now that you know what the stacking order should be, our next step will be to actually create the clipping mask itself. This is done very easily.
You simply do this by right clicking on your mouse on the upper layer in the stacking order, which would be the image layer with the photograph.
Now that you have right clicked on the top image, a large menu bar will suddenly appear filled with lots of options, scan your way down through the layer menu bar and you will come to the create clipping mask option, which is what we are looking for. I have it highlighted it in the layer menu below, just in case you can’t see it and are stuck.
Now once you click that layer menu option, you will then see an awesome transformation occur on your screen.

You should now see the text layer that was underneath the image now become the actual image, so to speak. Of course this is not really the actual case, but the clipping mask layer gives the illusion of that happening, I think that is probably the easiest way to explain it as it can seem some what confusing.
The cool thing about this is now you can click on the upper layer and drag your mouse around, moving the photo layer around the shaper layer. This will change the image contained within the clipped layer.
In other wards you are moving the photo layer within the text layer.

The main difference with the clipping mask compared to the layer mask is that when you make the layer mask, the masked image is permanent, as opposed to something that has had the clipping mask tool used on it, where you can move the image around the adjustment layer, which allows for many more options at your disposal when it comes to changing the pattern or image within the Photoshop mask.

Clipping masks are a great way to add simple effects to your images and videos. By following the steps in this tutorial, you can create your own clipping mask in no time. Have fun experimenting with different shapes and colors to see what unique looks you can create.


Please verify your software version before proceeding.
 I’ve verified my software version


 Facebook
 Google +
Comments (0)
There are no comments yet.