How to Work with Strike a Pose Lightroom Portrait Workflowwww.sleeklens.com
When it comes to taking portraits, there are a variety of post-editing tweaks and adjustments you have to make in order to make the photo pop. Thankfully, the SleekLens Strike a Pose Lightroom Preset Workflow makes this process easier. It’s as simple as:
Table of Contents
How to Use Strike a Pose Lightroom Portrait Presets
Adjust Skin Tone
Enhance Eyes
Fix Hair
Enhance Fashion Accessories
If you’re a portrait photographer, then you know how important it is to optimize your editing workflow. It not only helps you edit faster, but it also helps you create a consistent, cohesive look. Thankfully, with the use of a portrait preset, you can accomplish both–giving your photos a polished look clients will love.
How to Use Strike a Pose Lightroom Portrait Presets
As you start to edit portrait photographs, there are a few components you need to take into special consideration when making adjustments, including:
1. Adjust Skin Tone
Two of the most common problems that you will find with photos, is that sometimes the subjects appear to have a red or a green skin tone. Let’s start with a photo where the subject appears to have a red skin tone.
The photograph that I will start with is about a little girl that appears to have a reddish tint to her skin tone. There are two ways to go about fixing this with the “Strike a Pose workflow”, the first being a preset that can be applied to the entire photograph.
Start by scrolling through the Adobe Lightroom presets and select the preset named Color Correct – Fix Red Skin. Once applied, you will see that it takes a bunch of the red out of the picture. Basically, when you use Color Correct – Fix Red Skin, you are applying a preset that has a green undertone. Because green and red are on opposite sides of the color wheel, they tend to cancel each other out.
Now go back, I will show you a second way to do this. Let’s say that your entire photograph isn’t red, but a specific area is, maybe on your subjects cheeks or forehead. For that, we would use brushes.
So, we will now go into our brushes and scroll down to the “Strike a Pose” brushes. In the Strike a Pose COLOR brushes we will select the one called Fix Red Skin. Once I have that highlighted, you can look at the colors and see that it will show a light mint green color, which will cancel out that reddish tone. So, as you can see, if you had a photo where you wanted to keep the reddish tone in the background, but get rid of it on your subject, the brush comes in really handy for that.
Once I have highlighted the areas that I want to affect with my brush, I will adjust it just a little by turning up the exposure and saturation. If you don’t feel that you have pulled out enough of the red, you can click NewNew, and go over the areas again with the same steps, using the panel to make adjustments to exposure, contrast, saturation, etc. As you go along. Just keep in mind, that you don’t want to go too far with the brushes, making the skin turn green.
So, in the before and after of the image that I am using you can see That we have taken some of the red tone out and added a little bit of light to our subject’s skin, but kept the red tint in the background.
Now, I will show two ways to correct green skin tones. In the photo that I am using for this one, you can see that it really does have a green tint to it.
The first way, just like before, is to go to the presets and this time select Color Correct – Fix Green Skin. Again, this preset will apply the color correction to the entire photo, this time with a red tint, canceling out the green. If after using this preset, you don’t feel like you’ve taken enough of the green out, you can go into the colors tab and adjust the preset by lowering the green a bit under saturation. You could go into hue and change the hue of the green.
The second way to fix the green tone in the photograph is by using the brush.
When you go into your brushes, select the Strike a Pose – Color – Fix Green Skin brush. With this brush, we are going to do the same thing that we did before, when we fixed the red tones, by running the brush over the areas of skin that you want to be affected. With the image that I am working with, I’m going to run the brush through some of her hair as well. Even though it isn’t the subject’s skin, it has that weird green look to it. Now when it comes to fixing skin, the brushes aren’t as strong as the presets are, but then again, you don’t want to use the preset, if you’re just trying to affect a specific area like the face.
While making your corrections, don’t forget that you can make adjustments in the panel, to get the color, brightness and other parts just right. Like in the photo that I’m working on, I will move the color up just a bit so it’s a little darker. I will also turn up the saturation and exposure a little to brighten.
Now I am going to zoom into her face to show the before and after. It has made quite a difference, as we have neutralized that green skin that she had before. If you want to adjust even after using the brush, you can use your navigator to change the saturation of the colors some, maybe turning the green and yellow down a little more and adjust the hues a bit. The effect of my image now looks much more balanced.
So, now that we have gone over how to fix red skin, the next thing that I will do is show you how to remove blemishes.
For this example, I am using an image where my subject has some blemishes on her face. The way we will fix this is by using the Spot Removal Tool.
To get started, click on the Spot Removal Tool and apply it to a nearby area that doesn’t have a blemish, it will use a sample of that area to apply to the blemish. Next, apply the tool to the blemish areas, adjusting the brush size, opacity, feathering, etc. As needed with the sliders in the panel. A lot of time you may find that a subject that has acne or blemishes is that they sometimes have an uneven skin tone, so we have a brush that as well, called Even Skin Tone.
Now, go into your brushes and scroll down. Once you get down to the “Strike a Pose” brushes, we are going to go with the brush named FACE – Even Skin Tone. Once that is selected, simply run your brush gently over the face, making adjustments to the exposure and whatever else you may need as you go. Once I have gone over, I will click on New and repeat the same process one more time to be thorough. The after effect of my image shows that we have evened out the skin tone and have gotten rid of the blemishes.
2. Enhance Eyes
They say that the eyes are a window into the soul, and that’s just as true when it comes to portrait photography. By brightening and enhancing the subject’s eyes, you’ll create a photo that’s brilliant and captivating
To start out with, we have a photograph open of a little girl, which has already had some “Strike a Pose” presets applied to it. Now, we will work with the brushes to really enhance her eyes.
Let’s zoom into the eyes a bit and get started. There are several brushes that are included with our “Strike a Pose” workflow, that are meant specifically for the eyes. To begin, let’s go into the “Strike a Pose” brushes and select the FACE – Enhance Brown Eyes brush since our subject has brown eyes.
Basically, this brush is used around the iris of the eyes to enhance the color and clarity. Remember that while you apply the brushes, you can also make adjustments to your applied area with the sliders on the panel to the right.
Let’s turn up the exposure a little bit, to add some more light to her eyes.
Now, we will use this brush again, by clicking New. We are still going to use the same FACE – Enhance Brown Eyes brush, but this time we are going to add color to it.
Go for the colors and for now, I’m going to go into the orangey zone.
Then, I’ll turn the Exposure down a lot.
We will apply the brush right into the iris of her eyes, to add some more brown color.
Next, I will click New to start a fresh brush, this time we’ll go with the “Strike a Pose” FACE – Whiten Eyes brush. With this brush, You’ll just apply to the whites of your subject’s eyes.
Sometimes, you’ll notice that if a preset is applied to your photograph that may have a yellow or orange tone to it, that color will be reflected in the white of the eyes. If that is the case, you can use this brush to change it to the white color that it should be. With this photo, I am also going to use the Exposure Slider to help brighten the whites of the eyes as well. To get into the smaller areas in the eyes, you can also reduce the size of your brush.
Some other brushes that come with this workflow, which is really great for almost everything, not just for working with the eyes, include the Light – Darken and Light – Brighten brushes. Right now, we’ll click New, start a fresh brush and go to the Light – Brighten brush.
We’re going to take this brush, make it a little bigger and go over the iris. This will really help make the color pop.
Now, we’ll go to the Light – Darken brush
For this, we will make the brush really small and run it around the edge of the iris, this will make it stand out more from the white of the eye. You could also run this brush along the eyelash, to help darken the lashes and give some more separation if needed.
So, when you look at the before and after of this photo, what we have done is added some color, light and a little more contrast to her eyes.
Now moving on to the next photograph, which already has some matte presets attached to it.
We will start out by doing some things similar to what we did with the previous photo, first selecting Whiten Eyes in the “Strike a Pose” brushes.
Apply this brush just like we did before with the previous photograph, for this one I will turn the Exposure up a little bit.
As mentioned before, when we used the Enhance – Brown Eyes brush, there is also a brush for enhancing green eyes. As our subject has green eyes, we will go ahead and click on Enhance – Green Eyes brush.
We’re going to run that in the iris of her eyes, adding a little bit of light. If you decide that you wanted more green, to stand out more, we can go into the colors and adjust. We’ll go up into the yellow/green range, then turn the Exposure down a little, so we don’t end up with a bright lime green color.
Another brush that comes with this workflow is a brush for use under the eyes, called FACE – Fix Under Eye Circles.
Run this brush under the subject’s eyes, to help lighten the dark circles under the eyes.
As shown in the before and after photos, We have whitened the whites of her eyes, added a little more of a green color and softened underneath her eyes some.
Alright, now we’ll move on to a third photograph.
The first thing that we are going to do, is using the Whiten Eyes brush again. Like before, we are going to apply this brush to the whites of the eyes, in order to bring back some of that white tone. In this photo, we’ll turn up the Exposure.
It looks like the girl in this photograph has a mix between a green and bluish color of her eyes, depending on the way the light hits them. So, for that, we will go with the Enhance Blue Eyes 2 brush.
As you can see it sets a kind of blue color.
For this, I will move the color up a little.
And, I will go ahead and use that in the iris of each of her eyes, turning the Exposure up a bit.
Then the next thing that we will do, is starting a new brush by clicking on New and choosing the “Strike a Pose” Light – Brighten brush.
With this brush, we will just make an overall sweeping motion across the eyes, to add a little more light all over.
Then click New select the Light – Darken brush, this time making the brush really small. We will use this run this brush right around the edge of each iris, to add some definition.
You can see in the before and after of this Strike a Pose photo, we’re not making drastic changes to the eyes, but it does make a difference in the photograph, making them pop out and really bringing them to life.
3. Fix Hair
One aspect of portrait photography that is often overlooked is applying adjustments to the subject’s hair. This is a huge mistake, as adding contrast and clarity to the subject’s hair will help them pop against the background.
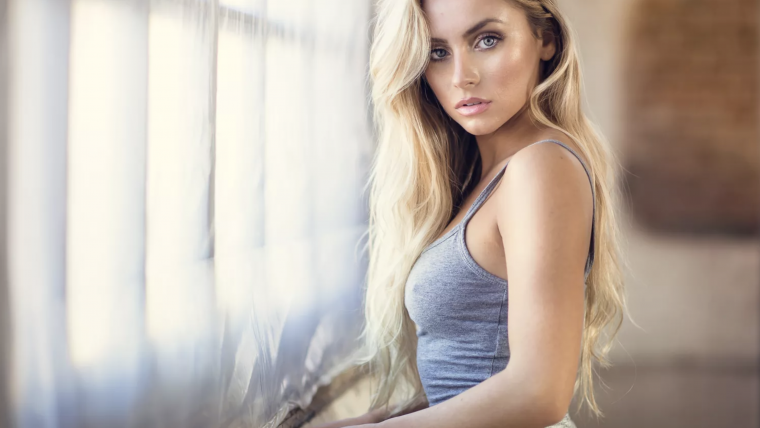
The first I am going to do is go to my brushes, click New to start a new brush, then scroll down to the Strike a Pose brushes. The first brush that we’re going to use will be Define Blonde Hair in the Strike a Pose HAIR brushes, since our subject has blonde hair
Once that brush is opened, you’ll see that the settings will be adjusted for you. Also, if you open the colors, it will be in the blonde color range. This will help add color and definition to the hair.
Now, we will run this brush all around her hair. Keep in mind, that as you apply this brush to the hair, you can adjust the brush size to suit your needs.
Once you have run the brush through her hair, we can go over to the panel and use the sliders to change the setting a little bit. For this brush the Contrast was set all the way down, but for my photo, I’m going to turn it up some. I will also pull the Exposure up a little, because I want to lighten her hair as well.
I will also move the Clarity up, but just a bit.
Now that we have applied changes with the Define Blonde Hair brush, you’ll notice that we just basically add color and light to her hair, but It has really changed the overall look.
So now, I will move on to another brush and delete the one that we just used. Go ahead and click New, to start a fresh brush.
Now we will go back into the “Strike a Pose” HAIR brushes, this time we’ll go with the Add Shine brush. You could use this if the subject in your portrait had dull or flat hair. You’ll see that with this brush, the highlights and clarity are turned up a bit, pulling out the shine and the light reflecting off the hair, really enhancing the look.
After you have applied this brush to the areas that you want to affect, You can move the hand cursor over to highlight and see where you’ve run the brush.
The before and after shows a lot more light has been added, and those shiny highlights have really been brought out.
Now, we will move on to another brush. Go ahead and delete the changes just made, then start a fresh brush by clicking New.
For the next brush, we’re going to go back into our “Strike a Pose” brushes and select the Define Hair brush. The effects of this brush will really up the clarity and adds just a little bit of color, giving more overall definition to the hair. Even though it is a yellowish color, you could use it on a subject with darker hair. This is a brush that you may want to use if the hair on your subject is slightly out of focus or simply need a bit more definition and texture to add to the photograph.
The changes that I’m applying to my photo are very subtle, but if you wanted to add more definition you could push the Clarity Slider up some.
As I said, it is a subtle change, but it really does make a difference in the photograph.
We have gone over the Define Blonde Hair, Add Shine and the general Define Hair brushes, so now I’ll change to a different photograph, this one time where the subject has dark hair.
Let’s go back to our brushes and this time, we’ll choose the “Strike a Pose” Define Dark Hair brush. Unlike the Define Blonde Hair selection, there isno color attached to this brush, but instead the contrast has been turned down, which will help bring out the darker tones.
If while applying this brush, you decide that you want the hair to be even darker, you can go over to the right panel and turn the Exposure and the Highlights down.
Now that we have applied that brush, we can see that we have really darkened the hair, especially closer to her head.
You may notice that it has taken some of the definition and contrast, making it a little bit of a flat black color. To fix that we can go into our “Strike a Pose” brushes and use the Add Shine brush. We’ll run this brush through the flat areas to bring back some of the contrast and highlights that I lost before, making adjustments in the panel to Exposure, etc. Along the way.
In the after effect you can see that the subject’s hair has been darkened and a little more defined than before.
After deleting those previous effects, let’s go to another brush. This time we are going to use the Add Punch, again in “Strike a Pose”. Add Punch helps to add shine, contrast and clarity all at once, giving your subject’s hair an overall boost. It won’t make a huge difference, but it is going to add something to your portrait. When photographing people, hair can be a defining trait that you’ll find your photos.
Go ahead and run this brush throughout the hair.
You’ll see that the changes made are very subtle, but what it has done is brought contrast and clarity and added a lot of definition.
There is one last thing that I want to show you, using the “Strike a Pose” workflow. For this we’ll go back to the first Portrait that we were working with and go into the “Strike a Pose’ COLOR brushes.
With these I want to show you how to slightly change the color of the hair, so in the “Strike a Pose” COLOR brushes, we’ll choose the Warmer brush to give the hair a warm tone.
The girl in my photo has blonde hair, but I would like to change it to a more brown color, with the Warmer brush we can do that.
Once we select this brush, we will then go into the colors and move it up into the darker orange range, then start applying the brush to her hair.
I am going to go over to the panel and turn down the Exposure, to give that darker orange more of a brown tone. When running the brush through the areas of the hair that you want to affect, you can also play with the colors to find the effect that works best for you.
For my photo I’ll move it back to the more reddish orange range, then turn the Exposure and Shadows down. To get less of an orange color, I will also turn down the Saturation to make it more of a natural color.
Now that we have changed the hair color from blonde to more of a brunette color, I will then go into the “Strike a Pose” LIGHT brushes.
I will show you how we can use the LIGHT – Brighten and LIGHT- Darken to add highlights and lowlights.
We will make the brush really small and start with LIGHT – Brighten, to add highlights. Since my subject already has some natural highlights, we will just go ahead and apply the brush along with those. We can even move up the Exposure Slider to make them a little lighter.
Now we will use the LIGHT – Darken brush, to add lowlights to her hair. With this brush we can use it to go over the natural lowlights in the hair. It also helps when we want to darken the hairline as well. Darkening the hair around the face is especially helpful when you want to make the face really pop out in the photograph.
So, there you have it. The before and after of this photo shows that we have started with blonde hair and given our subject a slightly darker brunette color that still looks natural. We have also added more highlights and lowlights. And that’s how you can use the Hair brushes in the “Strike a Pose workflow” to add color, contrast, shine and overall definition to hair in your photographs.
Shooting street fashion can be fun. However, often pictures don’t turn out quite the way you imagined. By using the Sleeklens Strike a Pose Lightroom bundle you can make amazing pictures that really emphasize the fashion accessories of a great outfit.
The best strategy to getting impactful shots of fashion accessories is setting up the frame. When shooting, try to frame your shot around the object you want to highlight. Then, in post-production, it’s easier to showcase the accessories. The following guide will help you edit common fashion accessories in Adobe Lightroom to make them pop.
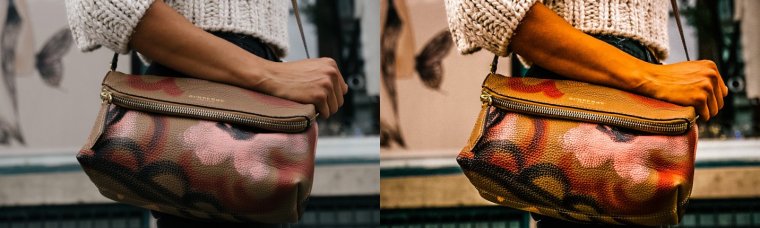
1. Purses
Purses are a great starting point for shooting accessories. Almost every woman carries one around. Also, readers and editors are looking for great shots of high-fashion purses. Because of their size, they are easy to get great pictures of, even at a distance. When using the Strike a Pose Lightroom bundle to edit purses, you’ll want to focus on their color. Not only will the color catch a viewer’s eye, but it’s the best thing you can portray through an image. A picture can’t tell show someone the fabric or strength of a purse, but the color can sway the mind of a would-be buyer.
We made the purse in the above example pop using the Sleeklens Strike a Pose bundle. For the Base category, we used the Cool Portrait to help lighten up the photo. We then used the Dark Shadow setting in the Exposure category. This setting helped lighten the edges and curves of the bag to make the colors more visible. When it came to the Color Correct category, we reduced the greens to make the reds of the circles pop. Next, we used the Bronze Tone in the Tone/Tint category to bring out the yellow of the purse’s background. Finally, you’ll always want to use Color Pop in the Polish category when editing purse photos to help bring out your previous work.
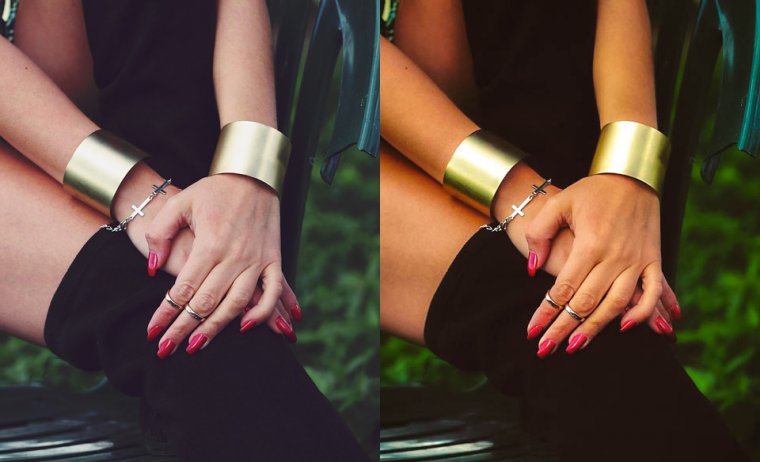
2. Bracelets and Necklaces
Bracelets and Necklaces are hard to photograph. Not everyone wears them, and good ones can be hard to spot while on the street. Most jewelry will be in a silver or gray color. Some can have color to them. However, when editing photos with the Sleeklens Strike a Pose Lightroom bundle, you want to focus on the shine. Making a bracelet or necklace glisten in a photo will catch the viewer’s eye and draw their attention to your work.
Here, we used the Strike a Pose bundle to help make the bracelets in this picture pop. For the base, we used the Cinematic Portrait preset to bring a general light, gold tone to the picture. We then reduced the reds in the Color Correction section to tone down the skin and the fingernails. This helped draw attention away from the other colors and help create focus on the gold. We further brought out the gold in the bracelets by using the Golden Glow preset in the Tone/Tint category. Finally, we polished the image up with the soften preset. This preset lowered the contrast of the image, softening the edges of the bracelet and giving them a gentle glow.
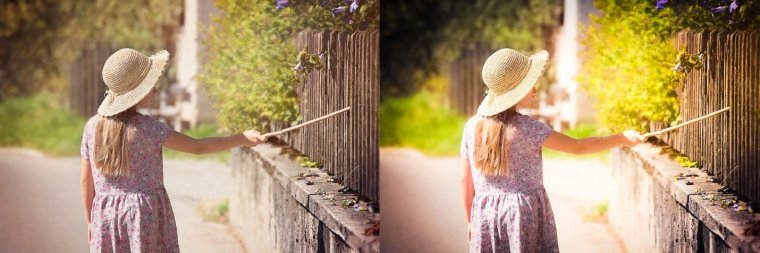
3. Hats
Hats are fun to shoot because there are so many different styles. Big floppy hats make for fun photos and short stylish hats are great for more formal photos. Editing hats using Strike a Pose works well when you focus on the shape of the hats. Defining the lines of a hat and their relationship to a person’s head can help make your image better. People are more likely to look at hats when they are highlighted. This is especially true for smaller hats that may get drowned out by the rest of the outfit.
When it came to editing the picture for the hat, the main focus was creating lines. Lines in an image draw attention to where you want the focus to be. The different presets in the Sleeklens Strike a Pose bundle helped focus on the hat. For the Base section, we used Hide-and-Seek. This created a highlight in a diagonal line in the background and pulled the attention to the center of the image, near the hat. Next, we reduced both the blues and reds in the image. This toned down the pattern on the girl’s outfit and helped pull the focus from the dress to the hat. We polished the image up with the Sharp Contrast preset to help outline the hat’s shape. Finally, we added the Black Dreamy vignette. This move toned down the background and helped pull the attention towards the girl and her hat.
As long as you can get a good framing for an accessory, you can get a great image. Even if the image you take doesn’t turn out well, you can use the Sleeklens Strike a Pose preset pack to make it perfect. By popping color and focusing on the shape of accessories, your street fashion photos can look amazing with only a little bit of time spent editing.
Strike a Pose with SleekLens Lightroom Photo Presets
We hope you found these Lightroom tutorials helpful for optimizing your photo editing workflow and improving the aesthetic of your portrait photos. By making just a few small adjustments to the skin tone, eyes, hair, and accessories with a portrait Lightroom preset, you can transform the subjects of your portrait photo, giving your friends, family, and clients pictures they will cherish for years to come.


 Facebook
 Google +