Sometime in the previous century, I was finishing up a 270-mile backpacking trip along a section of the Pacific Crest Trail in California. I was dirty, a little skinny and definitely ready for my close-up. Just as I was traversing along a mountain slope with the morning light in the perfect position to highlight what a greasy mess 15 days on the trail will do to one, I met some day hikers. I asked them to take a picture of me and though they seemed to not understand why I would want such a thing, they obliged.
Given this was the semi-crude days of film, I didn’t see the portrait in grime until the roll had been processed. The person who took the photo had placed my head dead center in the shot. There was nothing but sky behind me instead of the mountain scene. My grungy jeans were cropped off as was the trail itself. A potentially wonderful, story-telling moment—at least to me—was lost.
From then on, I decided I would be responsible for my own self-portraits as they were known back then. Or, so as not to take myself too seriously, I now call them selfies like everyone else.
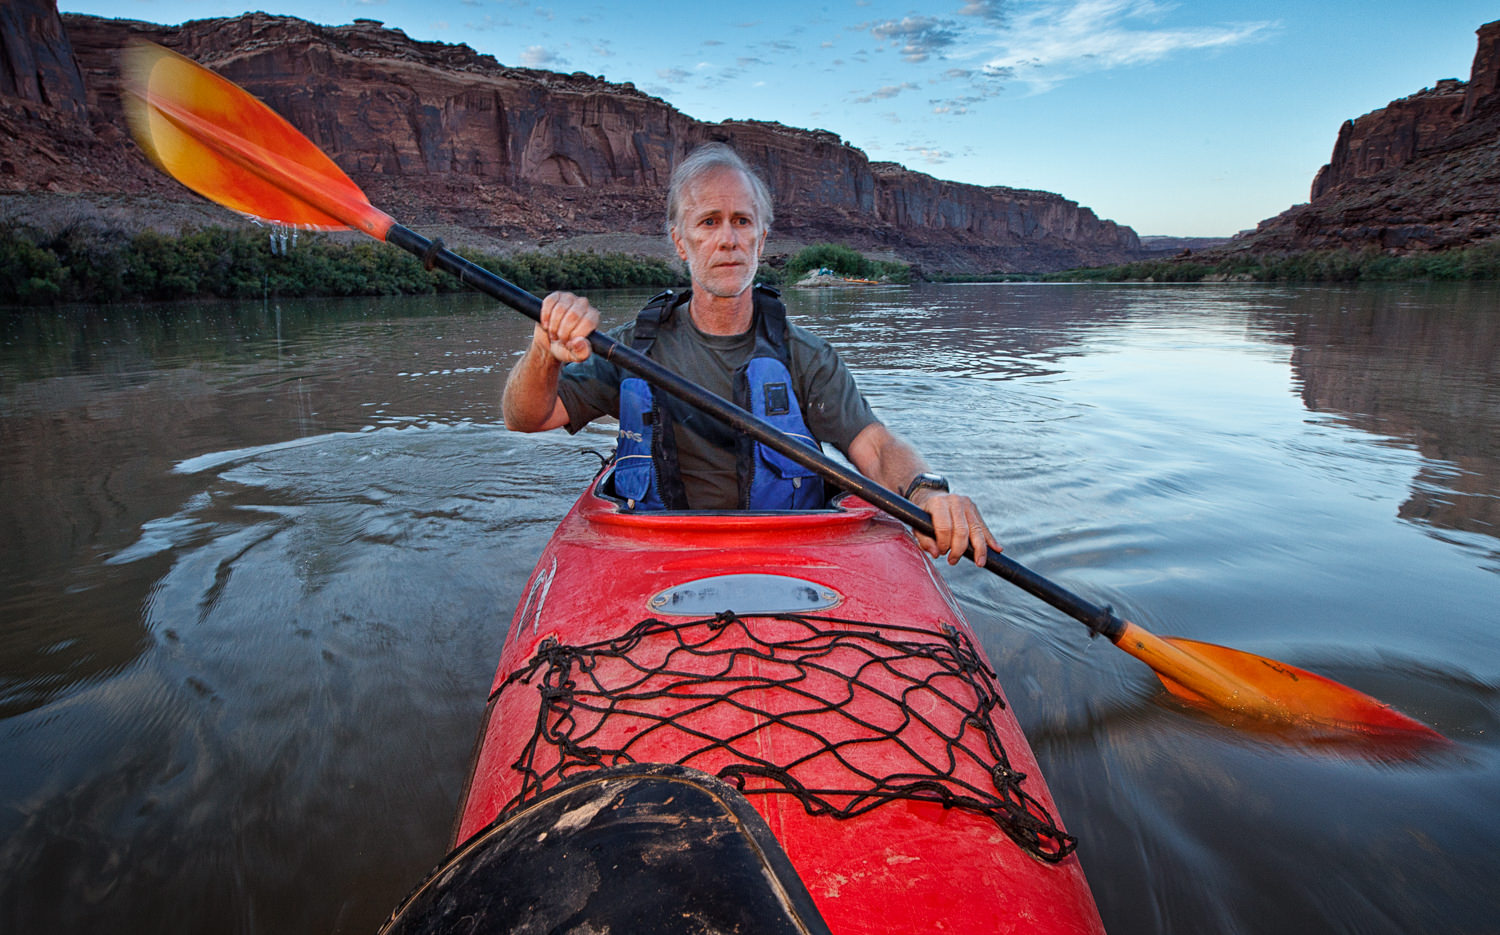
I clamped a Canon 5DMII with a flash and warming filter to the front of my kayak and then went paddling on the Green River in Colorado at sunset. I purposely used a slower shutter speed to get a little blur in the paddles.
However, my idea of a selfie isn’t mugging the camera with a maniacal grin. We can do better than that.
For me, a selfie is a sometimes artful record of somewhere I’ve been or something I’ve done. It includes some context or maybe even shows a little action. I might be alone in the shot or with someone, often my wife. My kind of selfie has a candid quality to it that doesn’t even look in most cases like I took it myself. Very often, it only takes a few minutes to do.
Solo Selfies
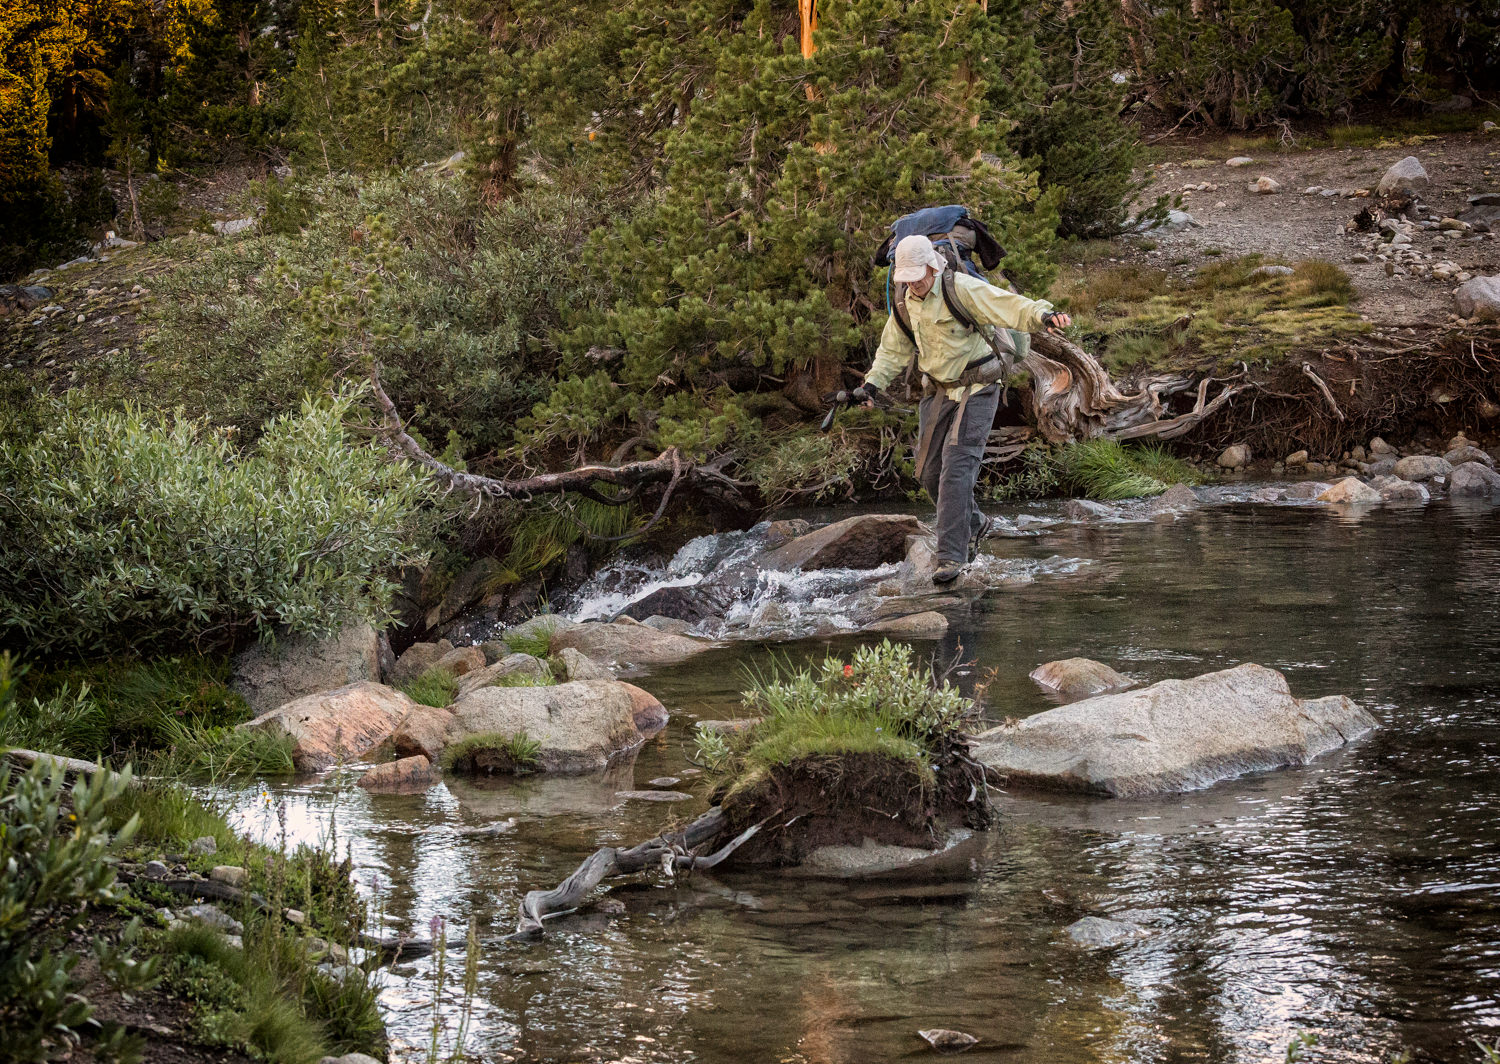
Yosemite National Park. This hiking shot took a little time. I first crossed the creek without my pack and set up the camera. Then I went back, put on my backpack and crossed. I set the wireless remote to take 10 pictures, one second apart so I would have enough different variations to choose from.
So let’s start with a common situation for me. I’m hiking alone in the mountains and come across a beautiful view from atop a ridge. This shot has potential, but it’s missing something, a storytelling element. It needs a model and I happen to have one: me! So I shrug off my pack and pull out a tripod. A small one, mind you. Just hefty enough to hold my camera.
I know, I know. A lot of people hate tripods, especially if they have to carry them any distance. But having those legs are absolutely necessary to precisely compose the shot. After all, have you ever tried to balance a camera on, say, a rock or fence? Too often, you’re composing based on the shape of whatever you’re using for support instead of getting the picture you really want.
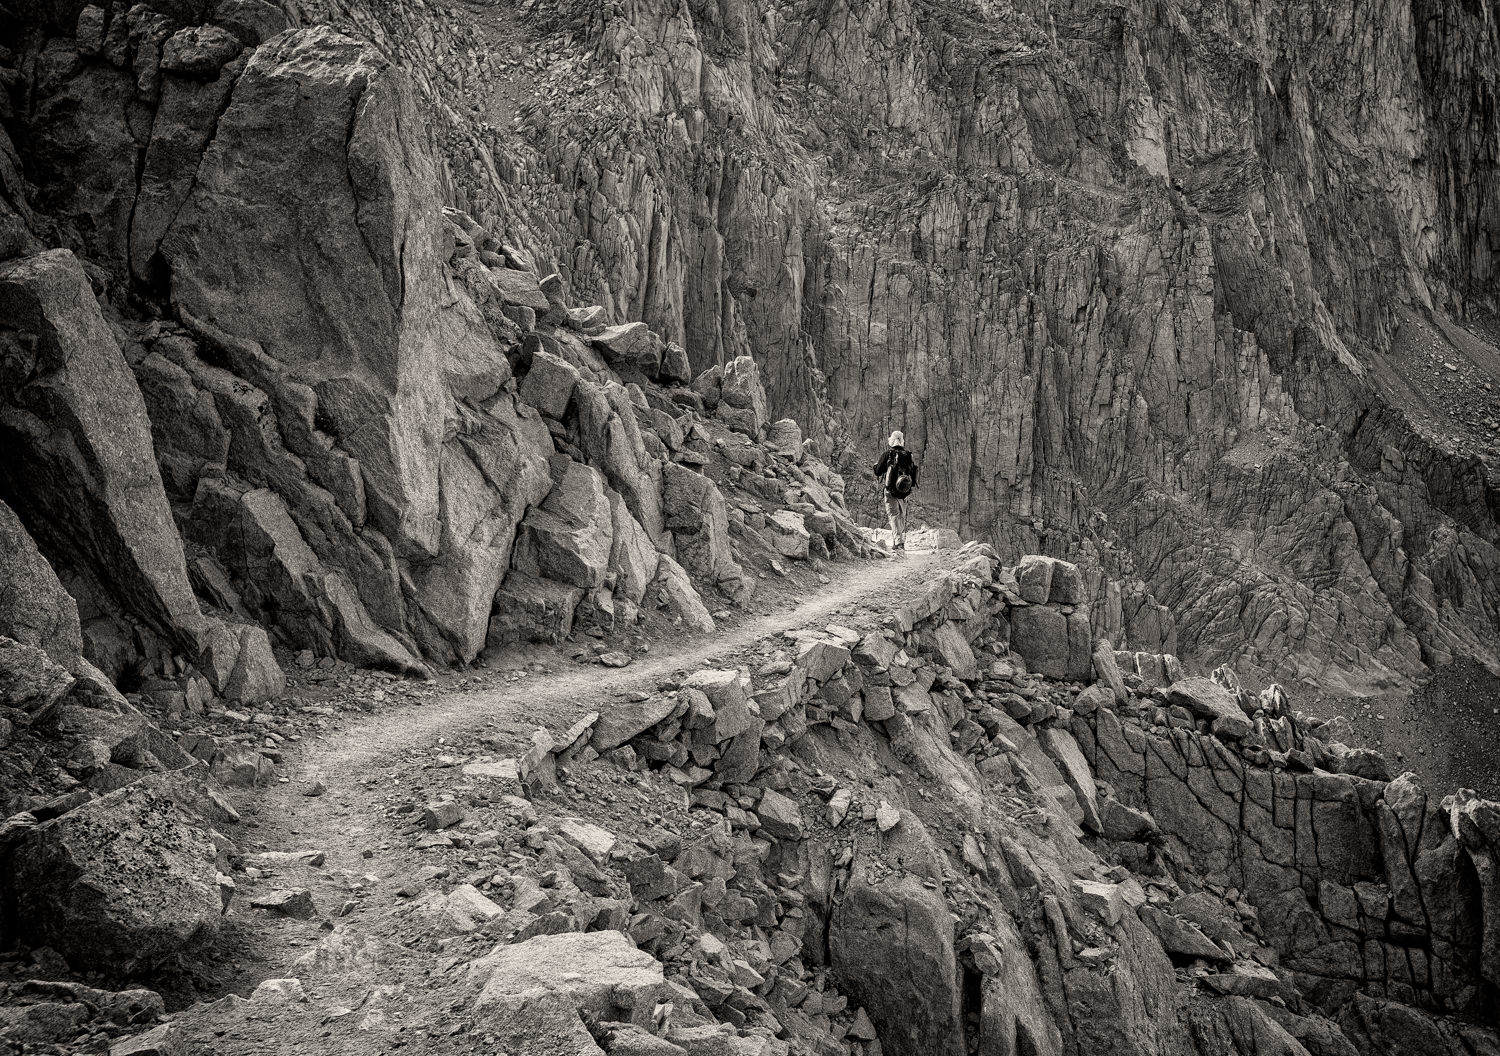
This was more about adding a human element to the scene (Mt. Whitney trail) than showing my face.
So after I whine to myself about having to take the time to extend the tripod legs and attach the camera—true confession: I hate carrying tripods, too—I connect to the camera the second most important selfie tool, a wireless remote. True, just about all cameras include a self-timer but I really detest having to set it and then rush to get into position before the time is up. So I use the Vello ShutterBoss II. It has a claimed range of 250’—I’ve gone as far as about a 100 feet and it worked like a champ—and allows me to take multiple pictures at whatever interval suits me.
It comes in two pieces. There’s the receiver that attaches to the camera’s hotshoe with a cord for my Canon three-pin connection (it’s also compatible with several other brands). The other half is a transmitter I take with me to activate the camera. (Some cameras allow you to remotely take pictures with an app and smart camera, so check your options.)
In this particular scenario, I compose the picture to highlight the story I want to tell. I try to keep it simple. In this case, I just want to be hiking through the foreground with the wilderness scene behind me. Other times, my role as the model might be more static where I just supply a human element for the scene. However, I find just standing there often makes for a boring shot so I prefer to be doing something.
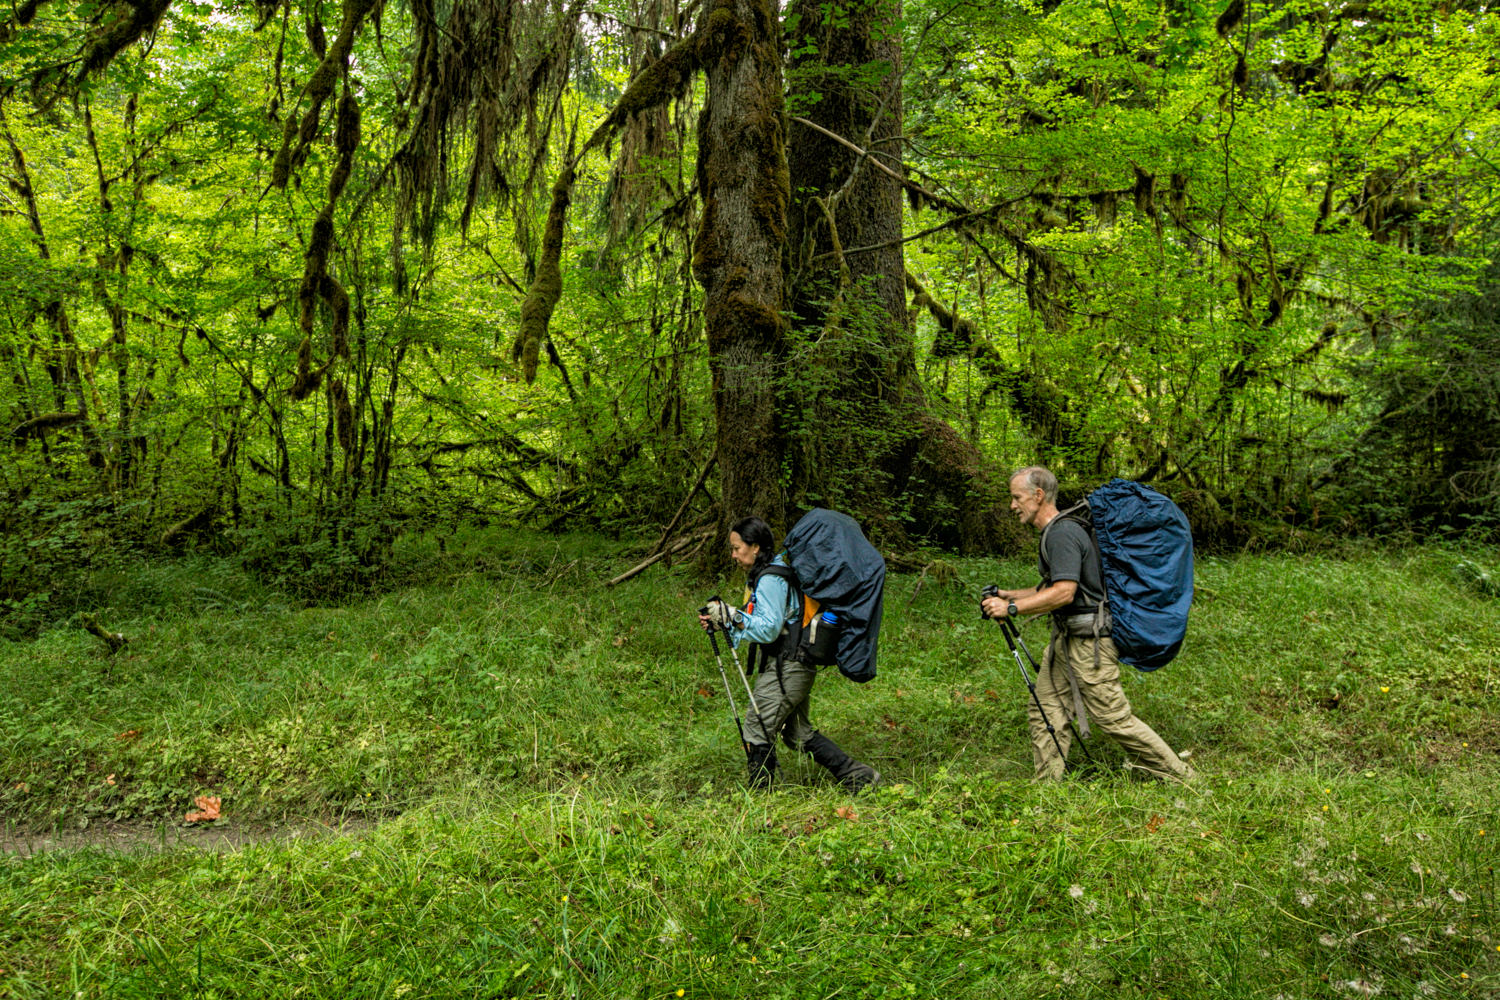
My wife, Gloria, and I hiking the Hoh River rain forest trail in Olympic National Park. This shot served the usual selfie purpose of simply showing us on our backpacking trip, but it also lent a human element to the scene.
There are many issues to consider as I go about this. Here they are:
Where do you want to be in the frame? I usually fall back on the law of thirds to keep it easy and put myself in a lower corner with the scene behind me. If I’m walking, I want to be entering the scene. If I’m standing still, I want to be facing the main part of the scene from the side of the frame.
What’s in the background? You don’t want to block an important element. Also, look for such pitfalls as trees or poles that potentially could spring out of the top of your head.
What’s the direction of the light? Generally speaking, you want the light source on your face. Make sure you’re not standing in a shadow when the rest of the scene is brightly lit.
What are you going to do in the shot? Moving? Standing still? Fiddling with something? Or just smiling at the camera? Plan ahead so you don’t come away with an indecisive look on your face. Know the story you want to tell, no matter how simple it might be.
Know where you want to be in the actual scene. That sounds obvious, right? But everything looks a little different from where the camera is opposed to when you place yourself in the scene. Look for some object in the viewfinder that’s close to the position you want to be in. Maybe it’s a distinctive rock, lamppost or crack on the pavement.
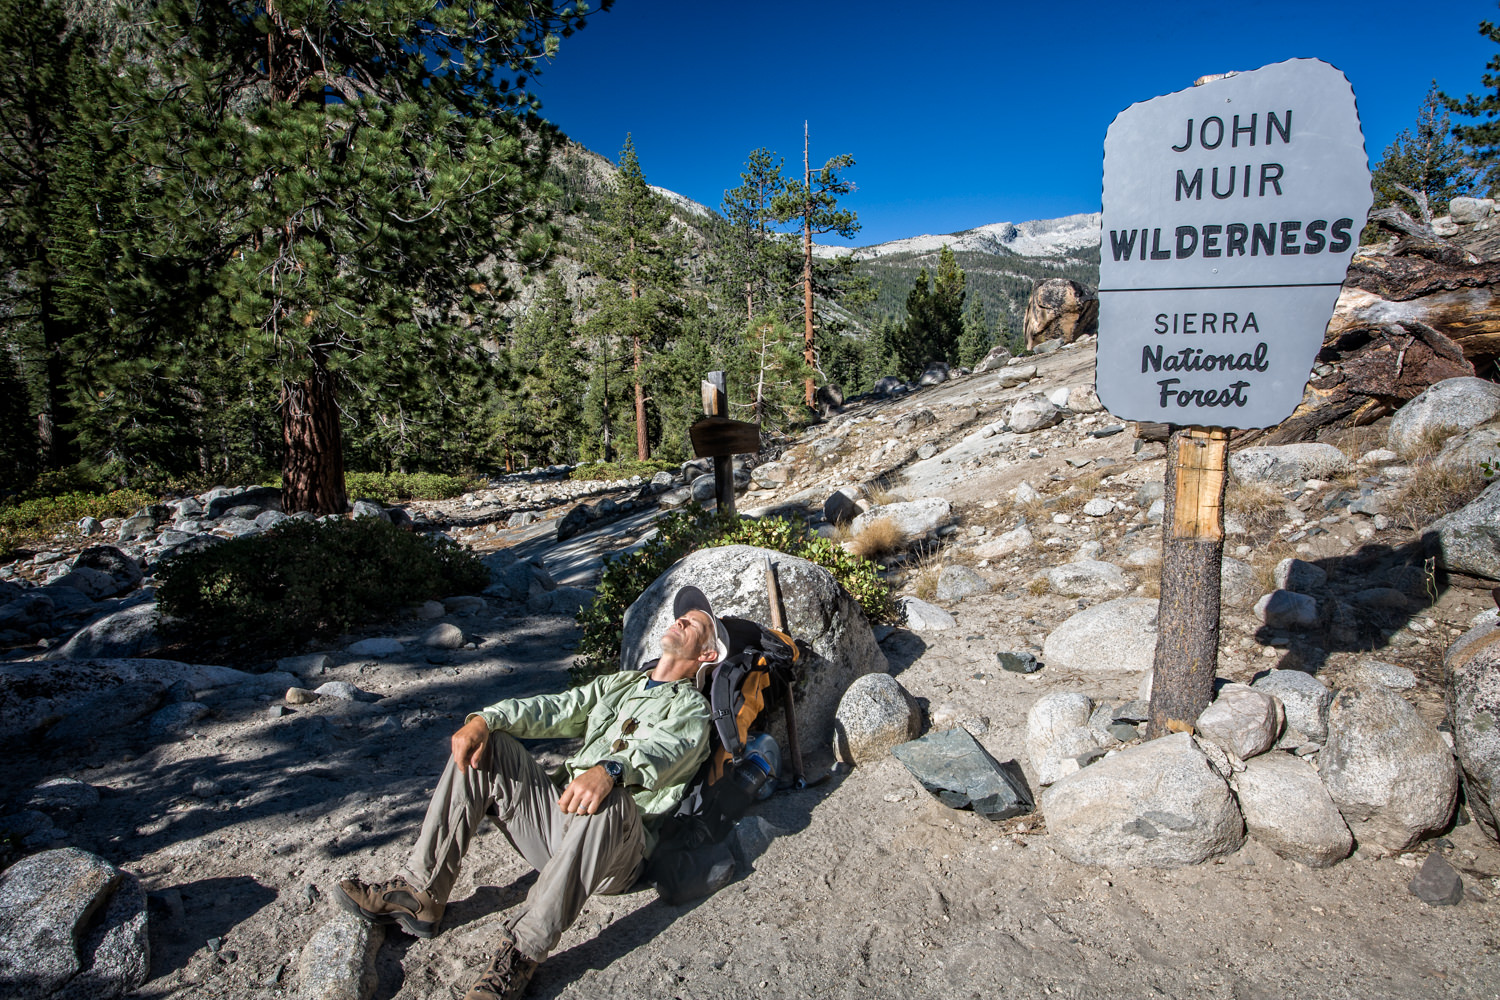
This is really the simplest of all super selfies, but it does tell a brief story about my solo trip on the Pacific Crest Trail through the High Sierras.
Take a moment to visualize yourself in the picture and how your presence contributes to the overall composition. Be prepared to reshoot if your imagination isn’t accurate.
I like to set the remote so it shoots after a three or four-second delay. That gives me time to stash away the transmitter in a pocket so I’m not pointing it at the camera when it starts taking pictures. This also adds to the impression of the shot being totally candid or unposed.
How many shots do you want to take? Sounds odd, but say you’re walking through the scene. Set the remote to pop off 10 frames at one-second interval. You’ll have a lot more variations to choose from. Even if it’s a more static shot, take several pictures at a time, varying your pose slightly for each frame.
Pre-focus and then set the lens to manual focus. This prevents the camera from re-focusing on the wrong thing when you hit the remote. Choose something as near as possible to where you’ll be standing and focus on that. If you’re a little unsure, set a smaller aperture for greater depth of field so you’re more likely to be in focus.
Manually set the exposure. Again, this prevents the camera from making decisions you might not agree with once you’ve walked away from it. For added insurance, take a shot while you’re still at the camera and examine the LCD version for proper exposure and focus.
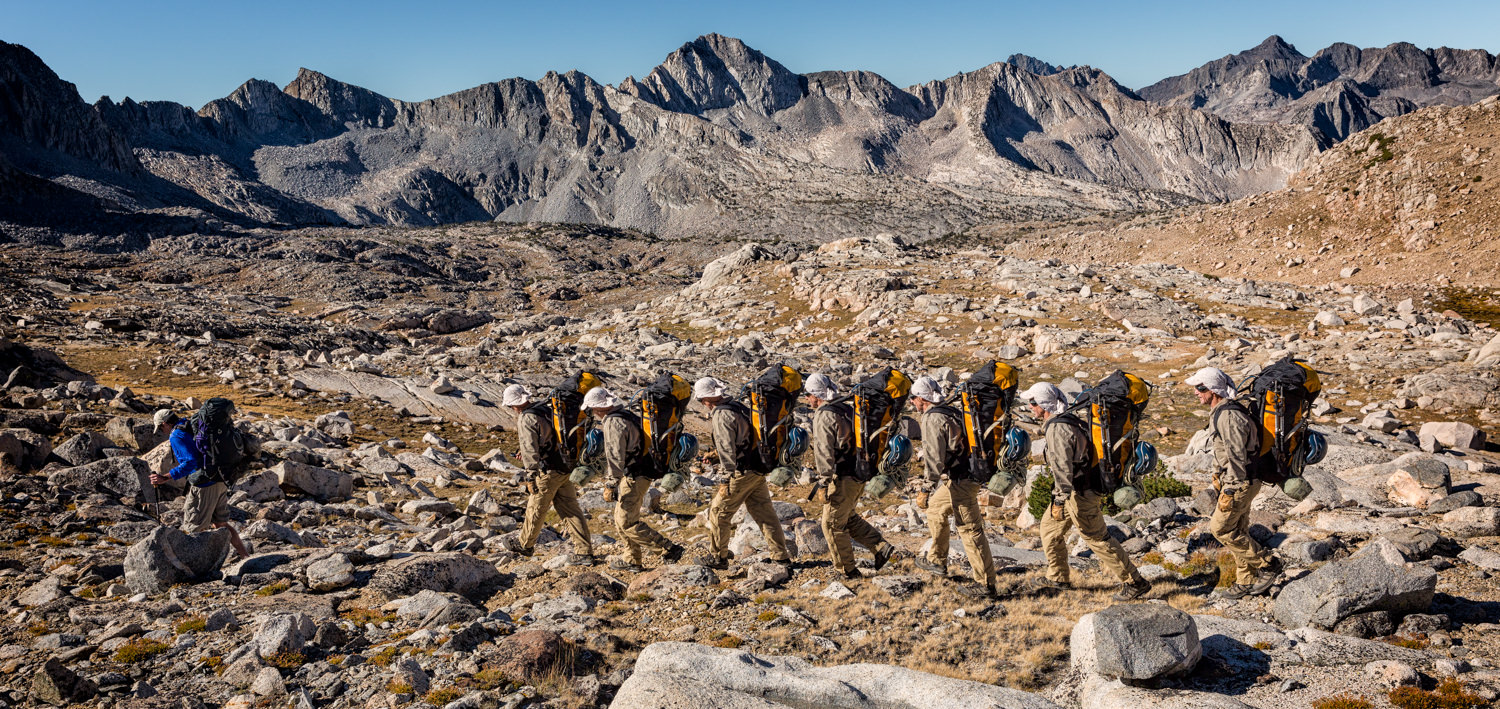
As my friend and I were cross-country hiking to Thunderbolt Pass in the Sierra Mountains, the high altitude, and rugged terrain made feel like I was carrying a pack for a whole group. So I set up the wireless remote to pop off 10 pictures and then I combined the seven best ones in Photoshop using layers and masks.
Consider your shutter speed. If it’s too slow, you might be blurred. Of course, you might want that to suggest movement, but if you’re just standing there you’ll usually want to be sharp. Increase the ISO for a faster shutter setting if necessary. For walking shots, aim for at least 1/250, for more static poses, at least 1/30.
Be careful where you place the tripod. It should be on solid ground. Trust me, you don’t want to helplessly watch your camera topple over when it’s 20 feet away. If it’s windy, hang a weighted bag from the tripod hook on the center post, or lower the legs so the entire assembly is a bit more stable. Also, when you walk away from the camera on your way to pose, be careful not to knock into it. (I’ve done that, too.)
If you’re doing this where there are people passing by, be sure no one can trip over the tripod.
Always check the pictures you’ve taken to make sure they are what you intended. Reshoot if necessary. If you have time, try different compositions.
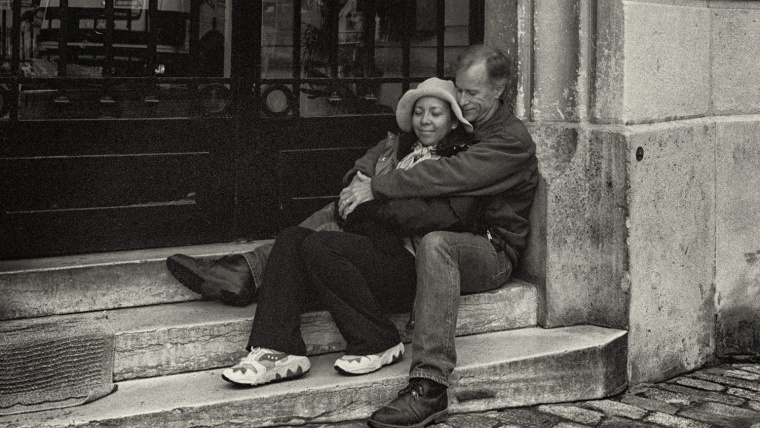
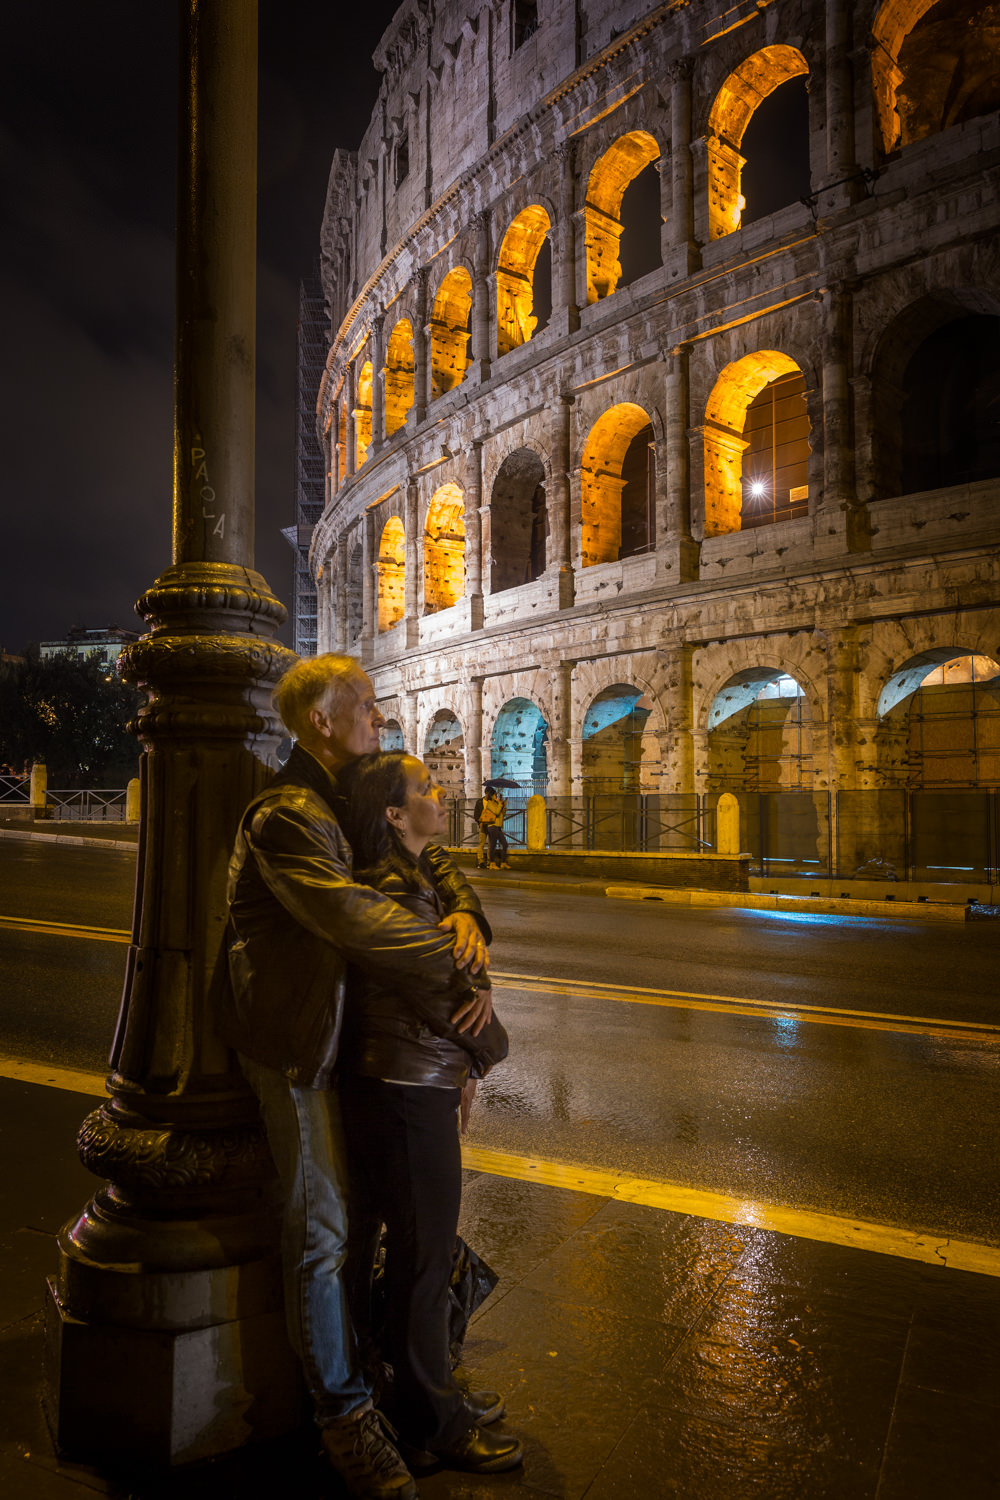
Canoodling at the Roman Coliseum. We got lucky because it was a rainy night which shined up the road. And then the headlights from a bus down the street illuminated our faces.
Canoodling Selfies
More often than not, I’m traveling with my wife and we like to do what we call canoodling pictures. We’re not mugging the camera. We’re interacting with each other one way or another, seemingly oblivious to the fact we’re being photographed. For my money, they make for far better travel pictures because, again, they tell a story about our trip. Also, instead of only getting a limited shot of the surrounding scene, dependent on how long my arm is for holding the camera, I can compose so there’s greater context. That shot of us in front of the Eiffel Tower actually has the entire icon in the picture.
And, oh, one more thing: our faces aren’t distorted like you see in a typical selfie. If the composition requires it, I can use a long lens with us off in the distance.
Half Dome, Yosemite National Park. Shot with the camera’s built-in self-timer
Here are a few things to think about when doing a self-portrait with one or more others:
Pose the other person first. Set the focus on them.
Imagine yourself in the shot and determine if you’ll be in the same plane of focus as they are. If necessary, stop down the aperture for greater depth of field so you’ll both be in focus.
Beg, if necessary, for your selfie partner to ignore the camera and “act naturally.” Find something for them to do or have them interact with you. The nice thing about a wireless remote is you can always pop off pictures without getting up to reset the camera, which is distracting to the other person.
Make sure neither of you will be casting a shadow on the other’s face.
Always check the picture after it’s taken to be sure it worked as you envisioned it. My attitude is, we’ve traveled all this way, we might as well get great shots of ourselves, so take the extra time to do it right.
I was about to descend into LeConte Canyon on the Pacific Crest Trail when I realized I needed a really wide shot to get it all in. So I shot the first several segments of this pano, going left to right. I then shot several in a row of me hiking through the shot, and then one last picture for the end. The picture was stitched using Photoshop.
Pano Selfies
One variation of all of the above is do the selfie as a panoramic. This involves setting the camera in a vertical orientation on the tripod and taking all the pictures as you would normally do for a pano, overlapping each one by about a third, using manual exposure, focus and color temperature settings. Leave the last frame for you to be in the scene. Later, stitch the shots together with whatever software you prefer, choosing the best of the frames with you in it.
I have to admit that doing “super selfies” is a bit more challenging than simply extending a smartphone camera at arm’s length and firing away, but I’m convinced my selfies do more to record a special moment or scene.
Hope you guys liked this tutorial and before you ask, the header image happens to be a quick set up “super selfie” of my wife and me in a doorway on Avenue Junot in Paris during an early morning walk. I used a mechanical timer attached to a Bronica SQ-A medium format camera. See you next time!
Bill Sharpsteen has seen photography evolve from the primitive days of film (his first camera was a cheap metal box with plastic lens and a hundred light leaks) to digital sophistication (he now works with a Canon EOS-1D X). Not once has he ever uttered the words, “Real photographers only use film.” He's a freelance photographer and writer; his first book project, Dirty Water: One Man’s Fight to Clean Up One of the World’s Most Polluted Bays, was released in 2010, and his next book, The Docks, about the Port of Los Angeles was published in 2011, both by University of California Press. His latest book, self-published in 2015, is a collection of essays and photographs about the sport of canyoneering called Canyon Deep: Descents Into Hidden Landscapes.
His photographs have appeared in Washington Post, Entrepreneur, Emmy, Westways, Washington Journey, Outdoor Photographer and Photo Techniques. He has published more than 60 articles for such publications as Los Angeles Times Magazine, Los Angeles Magazine, Washington Post, TV Guide, Entrepreneur, Photo Techniques, Outdoor Photographer and Alaska Airlines Magazine. The topics covered a wide range of interests including business, television, the environment, personalities, travel and entertainment.
Sharpsteen also worked during the early 1980s as an award-winning documentary director covering Alaska Natives and the social issues facing them. Those shows garnered such awards as a silver medal in the 1983 International Film & TV Festival of New York, the Lincoln Unity Award and Alaska Press Club awards for best documentary and best video photography.
He lives in the Los Angeles area.


 I’ve verified my software version


 Facebook
 Google +
Comments (0)
There are no comments yet.