
The pandemic has opened the gates to many different, non-conventional career paths, and that’s only going to keep increasing. Say you want to put your photography hobbyist skills to a path of professional expertise, even monetising your craft? Then why not put some thought into how to become a better photographer? What’s are the essentials to master? Are there any key tips that can speed up this process?
In this guide, we’re going to cover in detail every part of this journey, from knowledge to tools. Let’s get started!
Table of Contents
Developing a constant improvement mindset is crucial since photography is by no means a static industry. Gear changes, we get new software releases, and also creativity unbinds us from traditional approaches to the discipline.
Overall, amateur photographers have a proclivity to assume that just by owning the most expensive gear they can afford (and even sometimes, getting loans to just go higher) they instantly improve. Such affirmation is nothing more than empty promises.
Instead of investing money, invest time into your passion. An experienced photographer once told me not to buy a better DSLR camera until I go over the limits of what that gear can offer. In a few words: consider changing your camera body just when you completely understand every single aspect of it, not because a flashy new piece of gear is released.

Photo by Tima Miroshnichenko from Pexels
By restricting your practice to the current gear, you own, you’re also challenging your abilities to their limits. Perhaps your camera isn’t weather-sealed. Then you need to explore methods to overcome that limitation regardless of the weather condition. Maybe it’s a low count of focus points or a restricted ISO range. Older DSLR models don’t offer AE bracketing, count with a lower dynamic range, and a diverse range of limitations, but that doesn’t imply they are useless.
If we say invest time to become a better photographer, the first thing that pops into mind is courses, online or dedicated photography academies that can show you a path for improvement. But what if you cannot afford paid education at this time?
Take a look at our recommended YouTube channels to broaden your photography education, from techniques to post-processing:
For those who are willing to invest money aside from time to level up faster, here are our recommendations in what comes to online photography courses:
And in case you want a more recurrent, day-to-day exposure to the photography learning material around the internet, here’s a curated list of the best photography blogs you can find. All articles were reviewed by leading experts in both photography and the tech industry.
The short answer to that question is yes. Many professional photographers have seen the potential of social media networks to outreach potential customers and grow a follower base, which in turn gives them the benefits of credibility in an ever-competitive market.
Recently, we released some recommendations about which TikTok Photographers to follow, but also please check these Best Instagram Photographers. A word of advice: social media photos in platforms such as Instagram are often heavily post-produced. Not just by the input the photographer did, but also since Instagram tends to apply its own rendering parameters depending on if you used an iPhone or Android device to post. As a general rule, iPhone-uploaded photos are usually more saturated.
Don’t assume all social media photos are straight-out-of-camera images; generally, they are the end result of long editing sessions and photography expertise.
Studying the rules of photography composition is the first step in the path of becoming an accomplished photographer. Even if you pay hundreds of thousands of dollars to get the best gear, the best post-production resources, and more, the image won’t hold on its own without a proper composition.
It’s natural this happens since composition rules are aimed to get a pleasing effect out of images by applying visual balance to deliver a story and imply an understanding of the scene.
This article by SLR Lounge visually describes the importance of composition rules in photography, however, photography composition rules are only mastered by a combination of knowledge and practice.
It is, in my view, the best approach to first get familiarised with these teachings by reading quality books on the subject, and/or through online photography courses. Then, enrol on a 30-day, 100-day or 365-day photography challenge that shall put all that knowledge into practice. One cool resource to inspire yourself in a photography challenge is this 31-Day Photography Challenge for Everyone by B&H Photo.
On which books should you read about photography composition, please check this list:
And you can check other suggestions for must-read photography books by following this link.
Let’s assume that now you can move past to the point where post-production should make a difference in the final image. In this section, I’ll discuss which tools can help you to improve your performance, expand the dynamic range of your images, compensate for minor mistakes we all make, and much more.
Even if the technique, gear and intent make a great combo for high-end results, the truth is that post-production makes the difference between professional and amateurs. Beginners in this industry tend to overdo this phase, achieving unnatural results or as users commonly label, “photoshopped images”. This is a by-product of overly applying saturation, overdoing sharpening, and – obviously a classic – intense vignetting effects. Let’s not discuss Photoshop manipulation as I shall discuss that point later on.
Lightroom Presets instead work with pre-saved adjustments made by professional photographers, which can be instantly applied to your images, and those adjustments won’t fall under those premises said above, that if you buy quality products of course.
A professional Lightroom presets package can take your image and convert it to a professional-level equivalent. Yet, we need to keep in mind that this is no magic: no Lightroom tool can overcome poor skills, neither they can compensate for the sensor size of the camera you used. By this, I’m referring that you cannot expect an image to be comparable to a professional DSLR photo taken at a studio if you work with a simple smartphone. There are multiple elements involved in the overall result of the image.
Definitely yes! Lightroom presets can work both ways: to speed up your editing performance, and to boost your creativity by opening the gates to editing effects you never even considered before. That’s the reason why is crucial to research the story behind a brand and not fall for the first cheap preset package in the market.
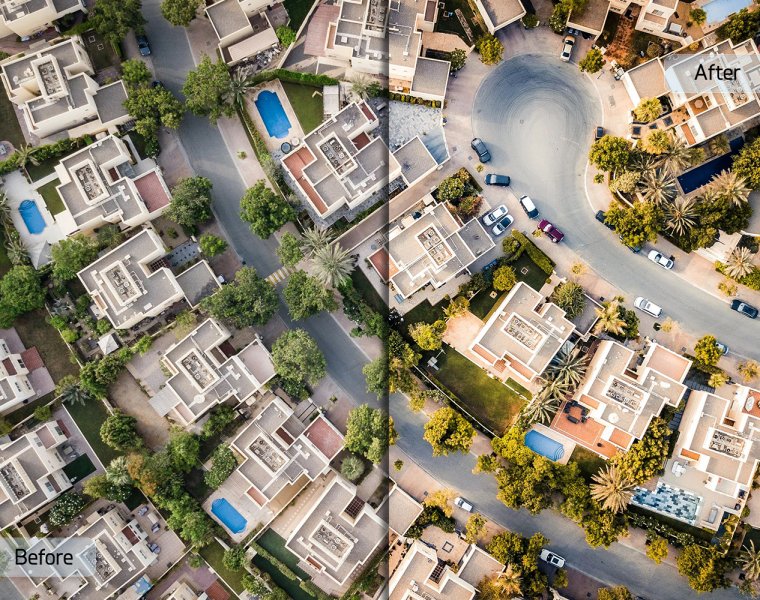
Photo edited with the Structure and Style Lightroom Presets Collection
Almost 100% of the quality presets vendors in the market are backed up by quality websites, with not just presets but also teaching insights in the shape of blog posts, social media posting, YouTube channels (some even with TikTok channels to reach a younger audience). And all of them offer as well user reviews that explain in detail the experience of using said products/services, the good and the bad (let’s be honest really…)
It may seem pricey at first, but you cannot go wrong with these tools as they are an investment for a lifetime.
Let’s assume it takes you between 5-10 minutes to process an average image out of your camera. Not heavy-edits such as Photoshop image manipulation but the extent of work that can be managed in Lightroom.
That’s 10-20 hrs of processing time for a session of 120 photos – something not so uncommon for a portrait, wedding or fashion photographer. What if I tell you that you can chop that editing time to just minutes by syncing edits in Lightroom? Yes, Lightroom presets allow such benefits as you can apply them to bulk edit items in your Library Module. After that, just a recommended check-up round should follow, spot any inconsistency or even come up with a second round of culling images.
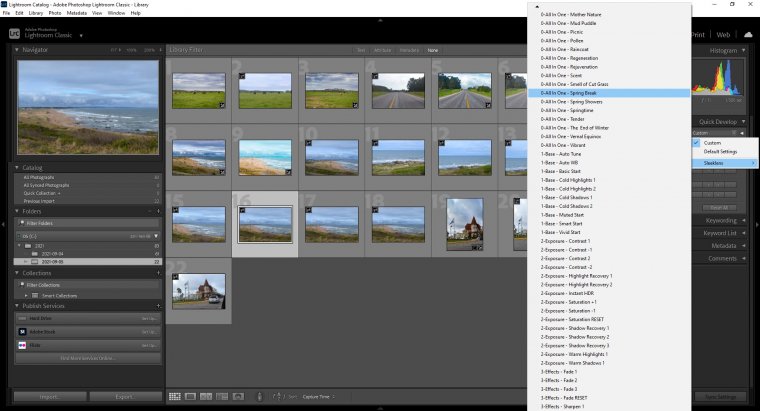
Bulk-editing photos in Lightroom Library Module using Lightroom Presets
You’re saving over 9 hrs of editing work, something that not just your agenda will thank but also your eyesight, your electricity bills, and your income, as you can take more work in that extra saved time.
Certainly. That’s one of the biggest advantages since you can process images regardless of their origin. You must take into consideration that the end result depends a lot on the original image quality as Lightroom presets are tools. If your image is too badly underexposed, there’s no way a preset can compensate for data loss given extremely low light values captured by the sensor.
The presets will work for multiple image formats such as JPG, PNG, DNG, RAW, NEF, CR3, ARW, and more. And the best part? They work for both PC and Mac (Linux is currently not supported, you can find great alternatives for editing software in Gimp, RawTherapee, and Darktable).
It’s not just tools for professionals – to which they are crucial thanks to its time-saving capabilities – they can help A LOT those beginner users that want to broaden their knowledge in photography. How can that be possible? Simple: presets also teach you which adjustments work best and which ones doesn’t. Presets use all the tools available in Lightroom, hence you’re also learning the proper methodology for complex tools such as HSL, Curves, Color Grading, Graduated Filter, etc.
By combining these tools with third-party plugins such as The Fader, presets can be as versatile as Photoshop layers, giving an opacity value to those presets effects applied.
This is one common misunderstanding with a common culprit: Adobe. Adobe has three versions of Lightroom with tech support at this moment: Lightroom CC, Lightroom Classic CC and Lightroom Mobile.
Lightroom Classic CC is the direct familiar to legacy Lightroom versions, inheriting tools, workflows, and even presets formats since it supports the LRTEMPLATE extension used by both presets and brushes in legacy Lightroom versions. It currently works with XMP format – since the release of Lightroom Classic CC 8.0. When you import an LRTEMPLATE file inside Lightroom Classic CC, it does an automatic conversion of the format to XMP. LRTEMPLATE remains the main format, with no known alternative to date, for Lightroom Brushes.
Lightroom CC is the new cloud-based version of Lightroom, which was released in 2017. The idea was to build a lightweight version (let’s assume it’s lighter…), with multiple options for instant sharing of your files through social media, and a more friendly approach for the original tools. Adobe did this in the sacrifice of brushes, which are NOT compatible with Lightroom CC, and this has been a huge headache for third-party vendors as users commonly mistake between both desktop versions of Adobe. There’s no support for brushes in Lightroom CC, and there won’t be any as far as Adobe tells us.
Lightroom Mobile inherits the performance of the original Lightroom app but introducing the possibility of using Lightroom Presets. But, watch it! Lightroom Mobile presets work under the DNG format, which is non less than the universal RAW file extension. In short, Lightroom Mobile Presets are installed as images you download into your mobile device, then you sync the editing applied to those images inside your Lightroom app, and save those adjustments as presets. Yes, it’s not a straightforward process; we would have wished Adobe made things easier for users, but that doesn’t seem to be the case. We put together here a detailed guide, step-by-step on how to install your presets inside Lightroom Mobile.
These are the most recent introduction to the Lightroom family. Lightroom Profiles take the lead of old film rolls, which had certain effects depending on their brand and product line, to which they affected the final image.
Even when Lightroom Profiles started as a method to emulate film effects in photos, they are currently used as alternative/side tools to presets with only one limitation: they can only be used by RAW files (in their whole spectrum of formats), as the panel won’t even be available if you open any other image such as a JPG.
You can take a look at our collection of Lightroom Profile packages to get an idea of what these tools can bring to your work.
The leading software of the photo editing industry without any doubt. Adobe Photoshop is the parent software of Adobe Lightroom (and for those who aren’t aware of the fact, Lightroom’s full name is Adobe Photoshop Lightroom).
Instead of just offering sliders and some manual tools to work your way through your photos, Photoshop gives users the entire range of tools to create magic inside your photos. It has a steep learning curve depending on which are your goals. For common photo editing, it can be mastered in just some months, but for complex photo manipulation, as you commonly see on ads, it can take years to become knowledgeable, with countless hours of practice. You cannot fully master it: there’s always something new coming around the corner, a new tool being introduced, a new methodology to speed up your current techniques – you get the drill.
Photoshop not only serves the photo editing industry but also any graphics creative out there, from Graphic Designers, Videographers, CG Artists, Website Designers, etc.
Photoshop Actions are the most commonly known resource for working inside Adobe Photoshop. Actions are a record of steps made by a user, which can be applied later on to any photo that follows the same structure. i.e: The original layer of your image is named ‘Original’ instead of ‘Background’, hence only a layer renamed as ‘Original’ can make the action work – otherwise, you get an error message.
Another not so commonly seen drawback of Photoshop Actions is the fact that they are both language-dependant, and version-dependant in some cases. Language-dependant since they won’t work if they were crafted in the English version and you use the PS UI in another language – it has no way to spot which tool is which in the ‘new’ language being used. The version-dependant is less commonly seen these days as it refers to backwards compatibility. Some tools are not available in prior versions of Photoshop, so when you aim to use an action that works with the said tool, it will bring an error message as that tool is not available in the PS version you’re currently working on.
The best part of PS actions is that they can amazingly speed up your editing time, especially for heavily detailed situations such as sky replacements, where the mood of the photo can be altered in seconds to match the new sky condition.
The tools known as Photoshop Overlays have gained a lot of popularity in recent years thanks to one simple factor: they make the impossible a reality.
Let’s put this case: you work with a non-weather-sealed camera and you ought to include some storm photos with dramatic effects in your portfolio for a job posting. It wouldn’t be wise, not even advisable, to risk your gear by going to a heavy storm out there just in case action happens. Instead, you can emulate the feeling of a huge thunderstorm or pouring rain by applying thunder & rain overlays to your photos, plus some sky overlays if you feel the sky doesn’t have enough punch. You end up with a carefully made composition that only experts can spot as ‘baked’ if your skills aren’t refined enough.

Photo edited with Sleeklens products for HDR photography
Photoshop overlays come in many shapes: light, rain, snow, leaves, butterflies, balloons, birds, petals, fireworks, glitter, and so on. They are quite easy to apply since most of them work with the Screen layer blending mode (please check this useful guide by SLR Lounge on Photoshop Layer Blending Modes to understand more about this).
These versatile tools allow us to completely alter the mood of an image, and sometimes they become crucial allies to post-production as it’s known to be the case in the Architectural Visualization industry.
One cool course to check is the VisualofJulius Sky Replacement Bootcamp – it certainly helped me to develop my photo editing skills and I can’t stop recommending it.
My best recommendation for this is to opt for LUTs, which are the acronym for ‘Look Up Tables’. The main difference is that they remap colours/tones without altering the adjustment tools, meaning they can be used either before or after the presets to complement their work.
LUTs were commonly used in the film industry to apply colour grading effects but were recently hyped by users the moment Adobe made them available for both Photoshop and Lightroom.
They are amazingly popular on Instagram, where photographers can style their profiles to the same ambience thanks to their effects.
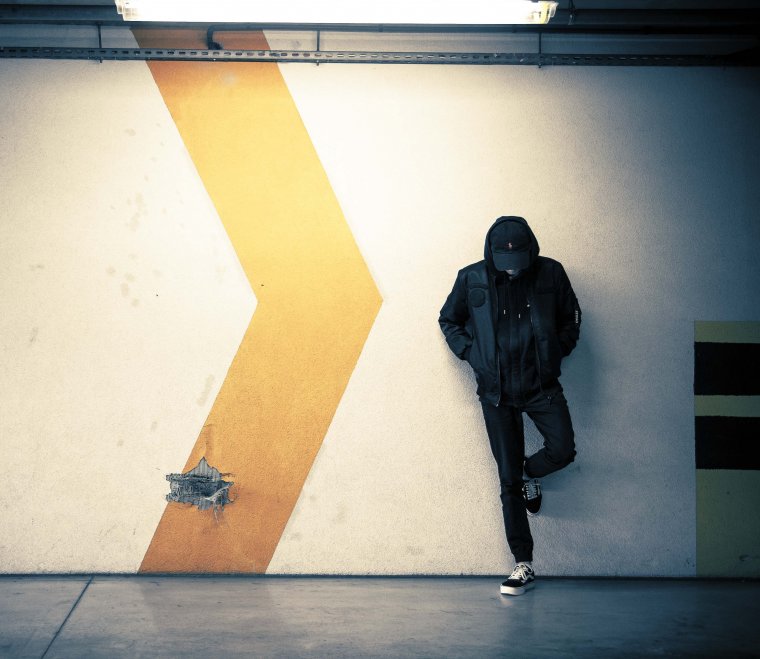
Photo edited with Sleeklens cinematic LUTs
I have mixed feelings about this software given its customer-retaining approach, but let’s take a tour of what Skylum has done so far.
Skylum was known for a powerful software called Aurora HDR, one of the best HDR tools available to date in the market. Then, they released software called Luminar 4, with the premise of using AI calculations to bring the best of your images, and they also allowed third-party tools as presets (called Luminar Looks) to the interface.
So far so good. Luminar 4 proved to be an alternative to Lightroom, especially since it’s a perpetual license in comparison to Adobe’s subscription system for all CC software. With amazingly powerful tools as Sky AI, AI Enhance the investment pays off. The Denoiser works even better than some Photoshop plugins, and the portrait editing tools are mind-blowing. Then, as not everything is a fairy tale, Skylum says it’s time to move on from Luminar 4 (after less than 2 years of releasing it), and they release Luminar AI with an immense hype about it.
Let’s just say I was sceptical about switching software without any good reason to do so (*enters old memories with Microsoft Windows releases*). Instead of buying it, I was waiting for some quality reviews before ditching my Adobe Lightroom subscription to afford it. And… the reviews came without stellar results. Then the intrigue came back to me: why follow that route as a company when Luminar 4 keeps gaining more and more followers?
Thankfully, a friend of mine bought Luminar AI and I was able to test it. What atrocious software to be honest! Not only it doesn’t bring extras to the table in comparison with Luminar 4, but it’s also extremely unreliable, crashing for no apparent reason (not even heavy RAM demands).
So then, let’s import the Luminar 4 looks I had to this new software. Hehe, good luck with that. It’s not an easy process, it has to be handled via the Skylum account and recently their website looks off. Then, the looks you had don’t show up the same way as before, since some tools are not entirely equivalent. Some of those presets will look off if you open the software side-by-side. Plus, the looks are now stored as ‘Templates’, and the access route is different.
Okay, let’s move to some crucial path for any photographer: you created a cool style for your photo and you want to save it as a preset. You create the preset, and then a colleague or a friend asks if you can share that preset with them as they love it. Oh, oh. Luminar AI doesn’t allow you to export the presets as common files. Instead, it gives you an abhorrent folder structure with countless numbers (a route location for the presets I should say), but that’s not commerciable or sharable to any extent. Skylum mentions the Luminar Template Packer tool but there’s no support whatsoever on their website, and you can see some critics in their forums.
In case you want to compare both versions, here you can check the side-by-side comparison of both Luminar versions.
And if all this wasn’t plenty enough, Skylum is now planning to release ANOTHER software: Luminar Neo, instead of fixing the mess up they did with Luminar AI.
My advice here: stick to Luminar 4. It works, it’s powerful. You can find plenty of tutorials out there to support your learning path, and by the end of the day, it gets the job done.
So, let’s say you want to move past the predictable post-production tools, what are the alternatives?
There are other options such as ACDSee Photo Studio Ultimate, CyberLink PhotoDirector, and others. It all depends on your budget, how serious you are about photography and the range of tools you desire to explore.
As a conclusion to this guide, I wouldn’t like to overlook the value that soft skills have to any industry. We often fall prey to ego instead of seeking a continuous improvement mindset, and for that very reason, I want to pinpoint a series of advice in this regard.
Cutting corners is not going to take you anywhere, despite what the friend of a friend may brag about in meetings. You cannot expect to become a professional photographer overnight. Only when you become fluent in the fundamentals is when you can get ready to move past conventionalism and discover your personal style.
The exposure triangle is a must, and so are the composition rules. Then you can explore tricky techniques that can put in jeopardy both you and your gear if that’s your calling. Otherwise, you’re slowly (or I should say quickly) building your path to failure. Plus, you look like a poser if you try to pose as the next best thing since sliced bread but someone asks you a basic question and… blank stare.
The only way to improve is to put ego aside and ask for honest, even brutal, reviews of your work. When you detach from ego you open yourself to be vulnerable, but also to learn from mistakes you could easily overlook.
Not all critique is valuable, as you’re not a failure, you’re a constant learner aiming to improve day by day. Define which critiques help your journey, and which ones just come from a place of envy and fear.
By stating that, I’m referring to get out of your comfort zone and explore the multiple ventures photography has to offer. Maybe you are an accomplished photographer in portraits, and one day you consider what could go wrong if you opt for a landscape photography project.
Take for granted that this approach is not just a helper to develop creativity, but also can surprise you as you cannot be fully conscious of the entire extent of your skills. Some of your vision just comes to you naturally, that’s the reason why you opt for one niche or another. Maybe you’re a natural in another niche you didn’t even value before – so be open to possibilities.
Some days are going to be first-rate, others as if taken out of a bizarre low-cost movie. Failure is always around the corner and it’s there to teach us not to be so overconfident that we miss the important things in life.
You made a mistake? Okay, now get back on your feet and move on. Accept the teachings your mistake gave you, and don’t mop for weeks and months about what you could have done differently.
Not just photographers inspire photographers. Many professionals in this industry give credit to traditional art, fashion, nature, industry workers and other incredible options. Inspiration comes to us naturally, so don’t close the gates to it because you blindly believe only photographers can teach you something.
Don’t put extra pressure by setting absurdly high expectations – and this advice comes from a professional worrier and perfectionist. When you aim for the ‘greatest thing ever made’ you just end up blocked because life happens, and your so carefully planned schedule can be as easily messed up by a traffic jam.
You entered this industry because you feel joy about being a photographer. You understand life behind a lens, and you desire to frame your vision to share it with the world.
Relax, breathe, and when you feel like giving up remember what brings you joy each day. That’s the best recipe for creative success. Good luck!


Please verify your software version before proceeding.
 I’ve verified my software version


 Facebook
 Google +
Comments (0)
There are no comments yet.