Five Ways To Enhance Your Night Sky Photoswww.sleeklens.com
A few years ago, when I first saw a night sky Milky Way photography piece, I was amazed. It is beautiful and yet something that is possible to be captured through our camera. Ever since then, I have developed my interest into Astro Photography and spent a lot of effort in how to photograph the beauty of the night sky, and most of the time I have to travel far from my place, just to find an ideal location for Astro Photography. From my experience, I would like to share with you all here in a few ways to enhance your night sky photos.
Table of Contents
1 – Not Just About Night Sky
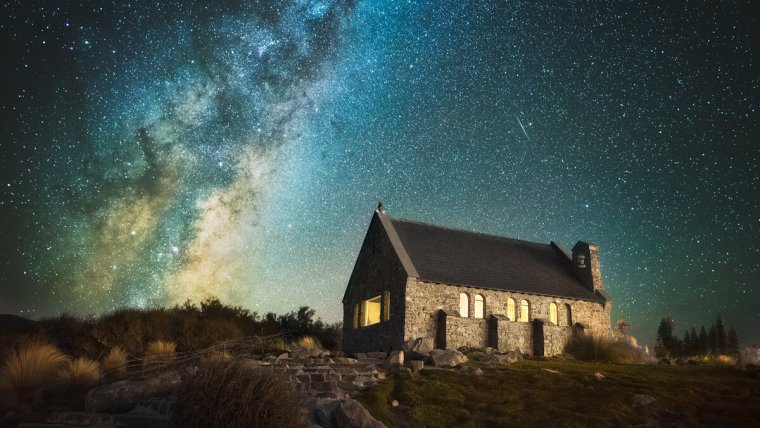
Although a photo of Milky Way itself is appealing it sometimes can be a bit too simple. In fact, it is the same Milky Way that photographed by every photographer around the world, the differences are only the angle and the position of the Milky Way appeared in the sky. By adding a good foreground in your frame, it helps to enhance the composition, adding a sense of depth to the photo, and create a contrast between the sky and the ground. Other than that, you can make use of leading line from your foreground (if there is one), which help to guide the viewer’s eye to the main subject in your photo.
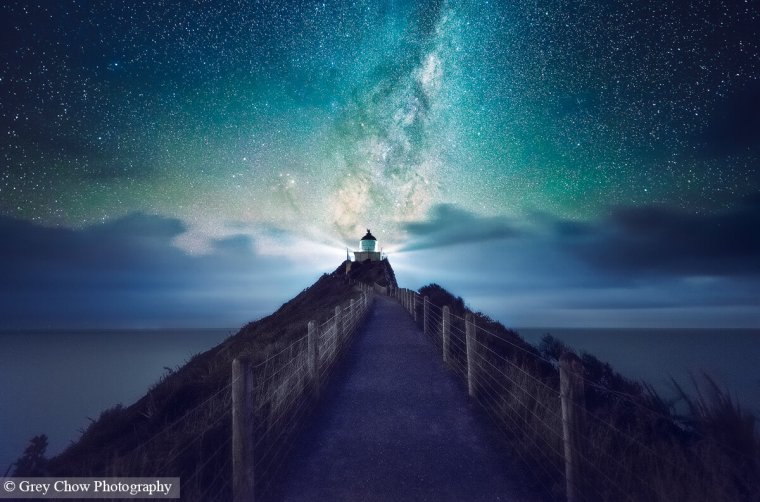
The leading line (the route) in the above photo leads the viewer’s eye into the main subject (the lighthouse).
2 – Adding Human Element
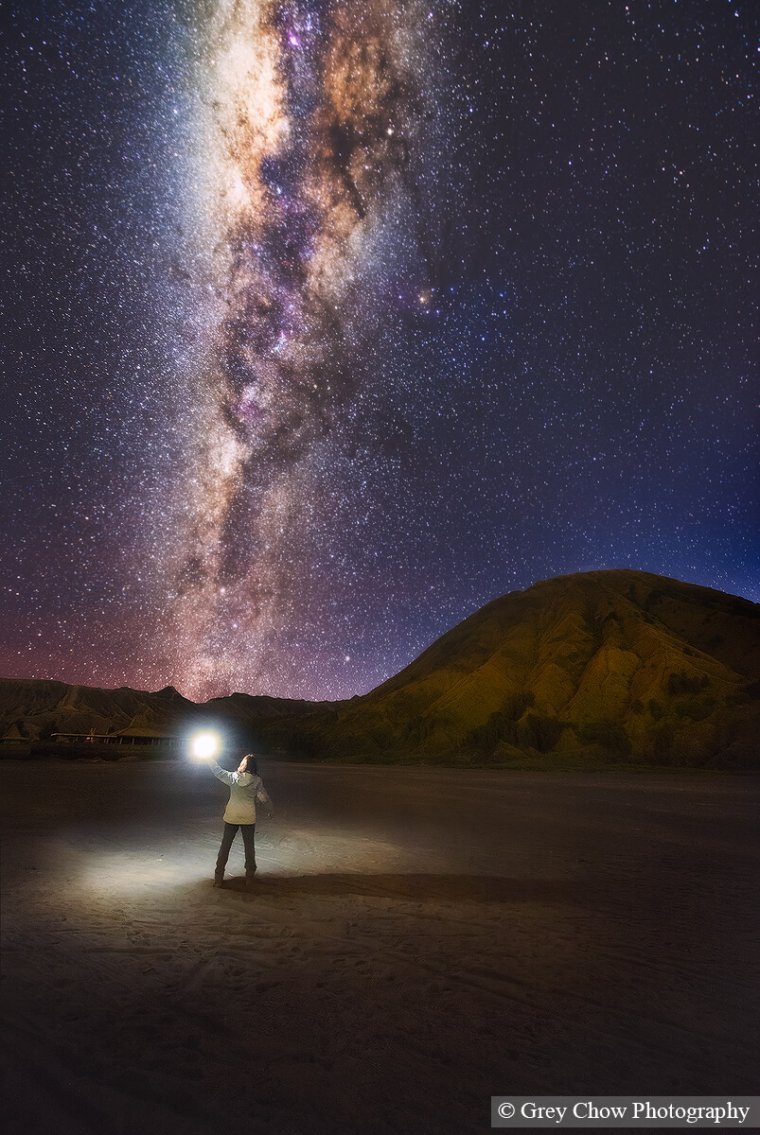
What if you can’t find any interesting foreground? In that case, try taking a photo of yourself or your friends. By incorporating a human element into your photo, it able to tell a story and giving the viewer a better imagination about the scene itself. You can ask one of your friends to help in pressing the shutter while you are posing, or using your camera self-timer if you are alone. With a bit of creativeness, you can use a Speedlight or any lighting equipment you can think of to light yourself up.
Having my friend holding a Speedlight as a foreground subject, giving an idea that she is on an adventure, exploring a new place under the night sky.
3 – Making Good Use Of Flash
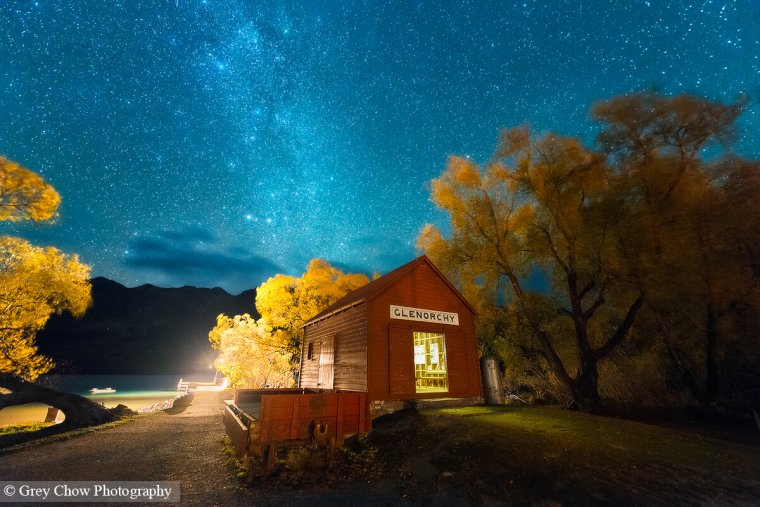
I have mentioned that using a Speedlight to light up a person, another way of using it is to illuminate the inside of a building. It can be a small hut, church or even an abandoned house that is used as your foreground subject. By doing so, it makes the foreground subject stand out in a photo, at the same time added the mood too.
Other than using Speedlight, you can use a flashlight to paint the light on your foreground subject, which commonly we called this a “Light Painting” technique. This is one of the frequently used methods to light up the foreground without the need to bump up the ISO and reserve a better image quality. To achieve a more natural result from the Light Painting, try using a yellow light instead of white light or you can add a Warming Gel/ Filter in front your flashlight.
The interior light was manual lighten up by myself using a Speedlight.
4 – Doing Panorama Shot
If you want to achieve a unique perspective from a scene, try doing a Panorama shot, which allows you to capture more areas of the scenery beyond your lens’ widest focal length. Other than that, the panorama photo also creating an arch shape look of the Milky Way. Taking a panorama shot is easy, what you need to do is make sure your tripod is level properly and take multiple frames of photos in a vertical position from one side to another side. After that, import all the photos into your computer and merge them into a single photo using Lightroom or Photoshop panorama function.
A panorama photo at the peak of Mount Kinabalu, Malaysia.
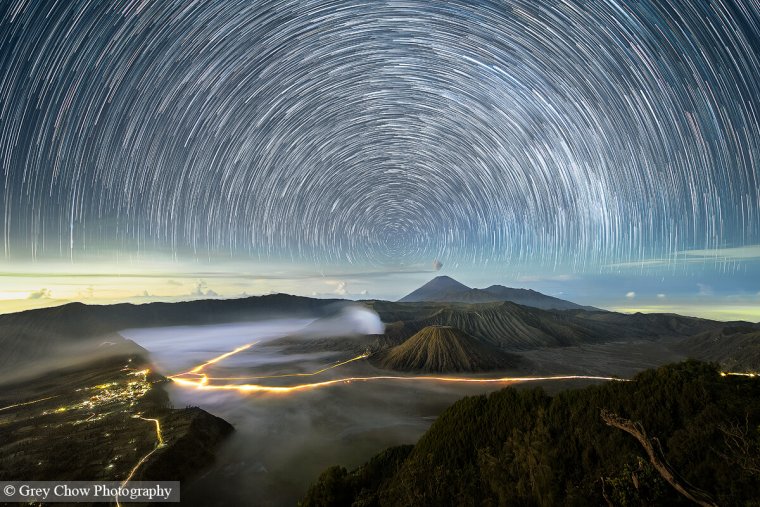
5 – Creating Star Trails Effect
Other than Milky Way, you can try something different by creating a star trail effect. Unlike Milky Way photo, we usually tend to avoid star movement with a shorter exposure time, but a star trail photo would normally require at least 30 ~ 50 minutes in order to generate an ideal trail effect. Don’t worry, I’m not asking you to take a single shot with more than 30 minutes exposure time. Instead of that, you should take multiple shots using a shutter release with interval timer configured. This allows you to take continuous shoot as long as you need until you stop the interval timer.
Afterward, you just need to import all the photos into a Star Trail application e.g. Startrail, StarStaX, and others, which will automatically create the Star Trail effect by merging all the photos into one. Alternatively, you can import all the photos into Photoshop as Layers and change the blend mode into Lighten.
Star trails effect above the Mount Bromo Volcano, Indonesia.
These 5 examples are what I usually applied in my Night Sky photography. Do you have any other suggestions for ways to improve your Night Sky Photo? Please let us know in the comments. I’m looking forward to seeing what ideas you come up with. 🙂
Grey Chow is an award-winning landscape photographer, having his work published in several media including the BBC News. Currently, he is also sharing his experience and expertise through articles and hosting several photography workshops and tours around the world.


 Facebook
 Google +
Comments (0)
There are no comments yet.