, I took you through the use of mobile apps to scout and plan for a sunrise shoot. Then I took you through my thought process behind taking multiple exposures to achieve the best sunstar, obtain sharp focus across the whole image, and balance out the bright luminosity of the sunlit sky versus the shaded parts of a scene. Here in part 2, I take you through the editing workflow I used for this image. This tutorial is pitched at users who have some familiarity with Photoshop but are still relative beginners wondering what tools to use and where to find them. I avoid using too many keyboard shortcuts, which you can lookup and learn later. I note that there are many ways to process an image. This is just one account that hopefully you can take something from and try with your own images.
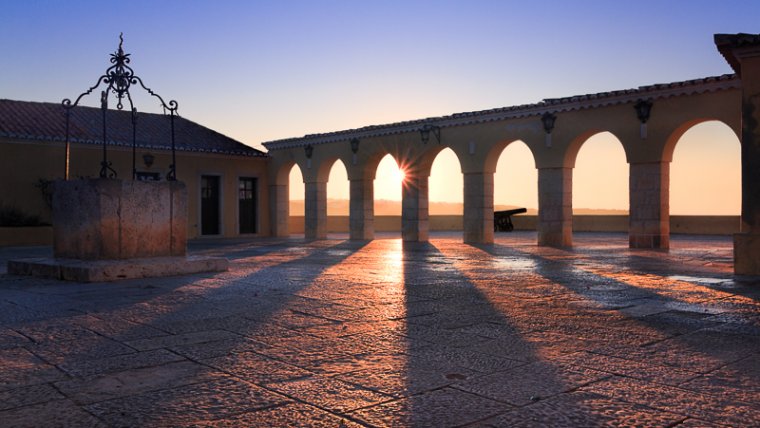
I stay with the same scenario, a sunrise at Fortaleza de Santa Catarina, a 17th-century fort overlooking the mouth of the River Arade, near Portimão in Portugal. I shot three sets of bracketed shots for i) the sunstar, ii) foreground focus and iii) background focus. I, therefore, have 15 RAW files to choose from for each composition. We actually only need 4 of these images, which we will blend together. The point of taking all these images was that I only needed to think about composition, focus and aperture in the moment. The sun moves quite quickly and you don’t want to miss your shot getting the right exposure. If there are some clouds, you may only have a few seconds to capture a sunstar where you want it.
Before going into editing, you should have a good idea of your intentions. The story of this image would be about the beautiful sunrise, the geometry of the paving and arches, and the long shadows cast by the columns. I need to make sure this strong geometry is not lost, that the sunstar is clear, but not overpowering, the warmth of the light is recovered from the flat RAW files and that the beautiful courtyard architecture and the well, in particular, does not disappear into the shadows.
Table of Contents
Processing overview
I use Adobe Lightroom and Photoshop CC. If you use other software, you should still be able to take something from the workflow below. These Adobe CC programmes recently switched to a subscription-only service. Given that I use both all the time and they are constantly updating the software, I find it to be reasonably priced. You can check out Affinity Photo as a fixed price alternative. Lightroom is user-friendly and a good default place to organise your images, perform the adjustments that affect a whole image and prepare your image for different outputs. Adjustments in Lightroom are virtual and non-destructive, so you can always go back to your original file and start again. You can blend different exposures in Lightroom in a limited whole image HDR way, but Photoshop gives you full control and you will need it for the best quality sunstar projects. I do not use HDR for exposure blending as it tends to create fringes and halos between objects of different luminosities like hillsides or tree branches against the sky. My workflow for this project takes about 30 minutes and involves:
Image review and picking in Lightroom
Basic image corrections and adjustments in Lightroom
Opening images as layers in one Photoshop project
Blending of exposures in Photoshop using Luminosity and Gradient Masks
Sharpening, colour and contrast adjustments
Clone stamping to remove unwanted items in a scene
Final adjustments to crop, colour and local brightness in Lightroom
Image review and picking in Lightroom
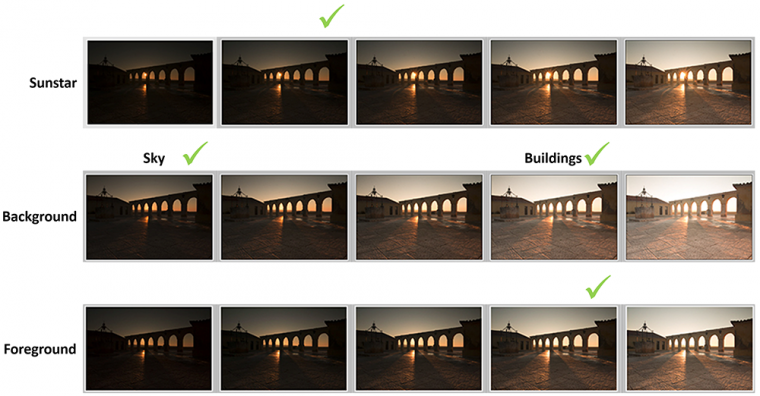
I start by reviewing my images in Lightroom and decide which are the most successful compositions and sunstars. I then pick which sunstar, foreground and background exposures I will use (press P to flag as a pick). I look for a sharp and not too flared sunstar, which may be an underexposed frame. The foreground image is correctly exposed. The two background images are correctly exposed for the buildings and the sky, the two of which will be blended later. Now is a good time to delete any unwanted exposures that take up disk space.
Selecting four exposures for blending in post-production
Basic image corrections and adjustments in Lightroom
I undertake very basic image adjustments of the foreground image in the Develop module of Lightroom:
Lens Corrections >Remove Chromatic Aberration and >Enable Profile Corrections. This corrects for any perspective and vignetting issues known for your lens, which should be automatically detected from the image file’s EXIF data.
Camera Calibration. This is important to get your colour balance right. You will have different colour profiles available to you, depending on your camera’s manufacturer. The profiles mimic those developed by each manufacturer for their different sensor technologies. In this case, I chose “Camera Landscape” for Canon as it handled the colour gradient in the sky most accurately. I also sometimes play with the primary saturation. Increasing blue saturation helped this image return to how I remembered it.
I often drop the highlights and increase the shadows, but this image didn’t need it as I had so many exposures to use. I play with the colour temp and tint to make sure the image resembles my recollection of the scene or the mood I am going for. Colour balance is very personal and you should go with your own taste.
Opening images as layers in one Photoshop project
I do not sharpen or perform any finer adjustments at this initial Lightroom stage. I also save cropping and framing until the very end as different future outputs may require different dimensions. Once the foreground exposure is ready, I press Ctrl/Cmd and select the other flagged exposures (Backgrounds and sunstar) then click Sync to copy the adjustments to each exposure. With all the exposures synchronised and selected, right click and select Edit In > Open as Layers in Photoshop.
Blending of exposures in Photoshop using Luminosity and Gradient Masks
You should now have one project open in Photoshop, with each exposure as a separate layer. It is best to label them as you go along (“foreground”, “background buildings”, “background sky” and “sunstar” in my case). I am to perform three exposure blends here:
Blending the background exposures of the shaded buildings and courtyard with that of the sky using luminosity masks
The exposure for the shaded buildings has a very bright sky. I could darken the sky with an adjustment brush in Lightroom, but it wouldn’t look so tidy as exposure blending and I may lose colour information or smooth gradient quality in the sky. Alternatively, I could use a frame exposed to the sky and lift up the shadows in Lightroom. However, I may get a lot of noise and will lose detail and colour information
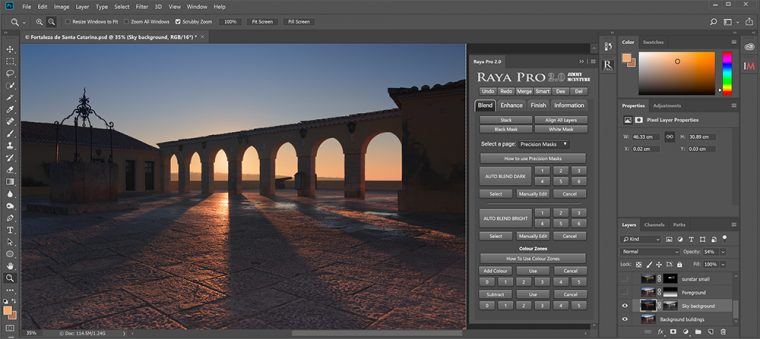
Luminosity masks sound complicated and scary, but they are easy, especially if you use a plugin to simplify the process. I place the “background building” exposure as the bottom layer and place the “background sky” exposure on top of it. I then use a Photoshop plugin called RayaPro (details below) to create a luminosity mask which identifies the brightest part of the sky exposure. The information from the correctly exposed sky then appears over the correctly exposed building layer. The end result retains all the information, detail and colour, for each part of the scene with no horrible fringing or halos. In fact, the image now resembles what you see with your eye after your brain has just done the same trick.
Using the Raya Pro plugin in Photoshop CC to easily create Luminosity Masks
The beauty of using a plugin like RayaPro is that you can quickly flick between different intensities of luminosity mask to quickly see which best suits your image. Here, I select the darker “background sky” exposure and click “Auto Blend Dark” and click through 1 to 6. I selected option 1. You can click on the mask while holding down the Alt/Option key to view what the mask has selected. The mask is black and white, where increasing white means that area of the layer is selected and black is excluded. You can see that the mask has accurately picked out the brighter sky and reflections off the paving. I thought that the sky was a little too dark in this blend, so I dropped the opacity of the darker sky exposure down to about 55% so the image appeared as I remembered it.
Visualising a Luminosity Mask
Blending in the sharp focus foreground using a gradient mask
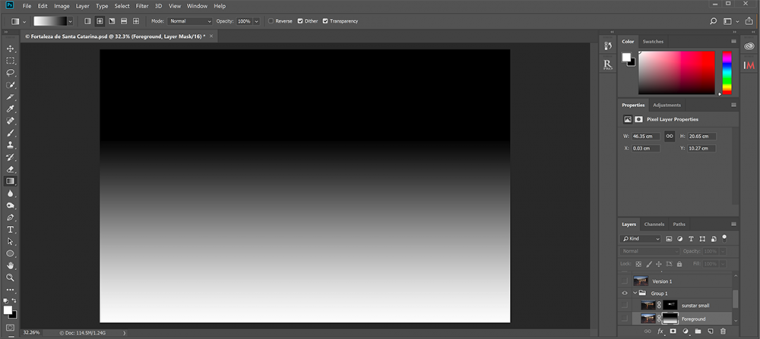
You can ask Photoshop to blend layers for you by selecting them and going to Edit>Auto-Blend Layers and clicking “Stack Images”. Photoshop will search for the best detail in each layer and use that in the merge. This is often referred to as focus stacking. In this case, I knew I just wanted the immediate foreground. So I simply select the foreground layer and add a new layer mask (circle in a rectangle icon, bottom right). I then click on the new layer mask and use the linear gradient tool (set from white to black) and draw upwards from the bottom of the image to the middle while holding the shift key. You end up with a nice gradient where the immediate foreground is selected white and middle ground selection fades into the background. Click back on the layer image and toggle the visibility of the layer by clicking the eye icon. You should see the effect of the foreground sharpness appearing in your scene.
Creating a Gradient Mask
Blending in the sunstar
I decided to image the sunstar and main scene a few moments apart, so now I need to add the sunstar back into the clean scene. Alternatively, you may have included the sunstar in your main exposure and now want to remove glare using an exposure when you used your finger or hand to block out the sun. In either case, select your new layer, “sunstar” in my case, and create a new layer mask for that layer. Then select the layer mask and click Ctrl/Cmd and I to make sure the mask is black (there are lots of Photoshop key command shortcuts you can learn later) and use the brush tool, set to white and about 40% opacity. With the layer mask still selected, I then carefully paint over where the sunstar is and it now begins to appear on my main scene. I toggle between painting with white and black to add or remove elements of the sunstar and flare that I like or dislike. That should be it. In the drop-down menu immediately above the layers, I selected the sunstar layer blend mode to be normal. You should try the other options and see what they do.
Sharpening, colour and contrast adjustments
Now we’re on the home straight and want to present the final image. I start by selecting all my blended layers, right click and select “Group from Layers”. I then create a copy of that group and merge the copied group into a single merged image for the next step. To do that, find the Create a new layer icon in the bottom right (looks like a folded paper). Drag the group and let go over that icon and a new copy will be made (this works for duplicating all layers, groups or multiple selections thereof). Right-click on the new copied group and select “Merge Group”. I rename this new blended image layer “Version 1” and make a copy of it. The reason for making copies as you go along is that Photoshop edits are destructive. Copies allow you go back or try a different edit, or fix an error later on.
Next, I perform sharpening. Sharpening is effective when the output is a digital screen, like on social media sites, but you do need to be careful. Too much is horrible. I have stopped using the sharpening tools in Lightroom and Photoshop and prefer to use a plugin called Detail from Topaz Labs, usually at the “light” defaults. It performs very well without creating noise or artefacts.
Then I perform any colour grading or contrast adjustments. This is to personal taste and style and can be quite elaborate. You could make use of 3D LUTs, Lightroom presets or Photoshop actions, such as those offered here at Sleeklens. I have used all of these at some point to help develop my skills and personal style. For this image, I used a plugin called Clarity from Topaz Labs to improve micro contrast and recover some warmth to the scene. The Google Nik Collection, now free, is another option. Again, I work on a copy of the previous layer (the sharpened layer in this case). The beauty of Photoshop is that you can control the opacity of each layer and thus soften any adjustment to keep the image looking natural.
Using Topaz Clarity for colour and contrast adjustments
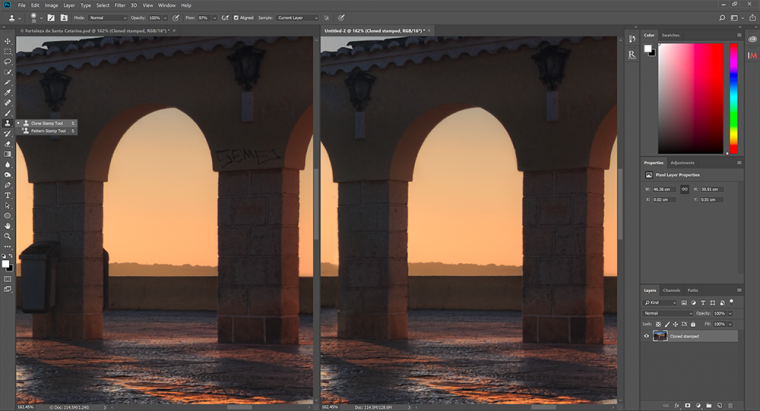
Clone stamping to remove unwanted items in a scene
Typically, that would be it for a landscape image. However, this being an urban site, there are a couple of issues, a graffiti tag and two trash bins on one of the columns. You need to decide if you are trying to create a true representation of a place (you don’t remove anything) or a moment to enjoy. I went for the latter. Operating on a new copied layer, I used the clone stamp tool to copy a piece of plain wall over the graffiti. I also copied from neighbouring column to remove the trash bins (why did they install them there?!). This level of editing is not to everyone’s taste, but it goes on all the time when images are published, trust me!
Removing unwanted items using clone stamping
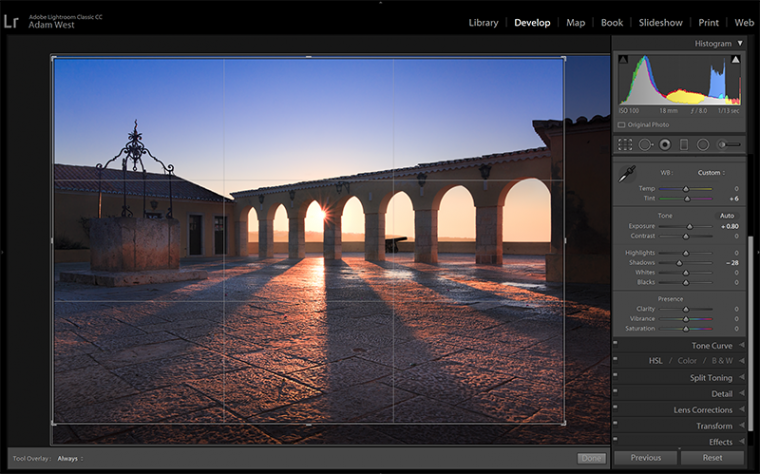
Final adjustments of crop, colour and local brightness
I tend to save Photoshop blending edits as a PSD file so I can return to them later. Close the file and return to Lightroom. The Photoshop edited image should be in the filmstrip.
Cropping
It is at this final stage I decide on the best crop. A 2×3 crop worked in this instance. I retained most of the scene and just lost some uninteresting wall on the right and a bit of foreground. I kept within the “rule of thirds” composition guide as the top third was mostly sky, the middle mostly architecture and the bottom mostly paving and light rays. This is not a strict rule, but compositions that follow this rule tend to be more balanced and pleasing to the eye. Carefully study the edges and corners of your cropped image to make sure nothing is creeping into the scene or is cut off awkwardly. In this scene, the centres of the light rays and shadows meet with the bottom corners of the image, which is pleasing.
Deciding on a final crop in Lightroom
Colour and local brightness adjustments
Even though I have already adjusted the overall colour using Topaz clarity, I still explore what further adjustments look like. I opted for +6 of magenta tint in Basic for a bit more warmth and +20 of blue saturation in Camera Calibration to give the image a bit more colour punch that works on social media. I’ll probably reduce this when printing.
I tend to add a thin density gradient in Basic to reduce the exposure of the immediate foreground by 1 stop. This gradient helps to “close” the image and draw the eye into the scene. I also added a density gradient on the sky and added a lot of magentas to shift to a more pleasing blue tone. Something like this is image specific, so play around and see what effect the adjustments make, what pleases you, what looks natural, what looks artificial.
Finally, after reviewing the image the next day, I added a radial filter over the well in the courtyard to make it stand out from the buildings a bit more. I added +0.8 exposure and a warm tint to match the sunlight streaming into the courtyard.
Summary
In summary, I have shown you some of the tools I use to plan a sunrise shoot, how you can go about taking multiple exposures and then combining them in post-production to create excellent results. The beauty of using Lightroom and saving the Photoshop file is that you can return later if you change your mind and want a different feel to the image. You have the main structure of the blended image and adjustments are quick and easy to make. Photoshop is extremely empowering. It is worth investing time in learning its capabilities. Make use of good quality plugins and actions to help you along.
Not many photography enthusiasts have a professional’s budget, so I have purposely used an enthusiast level APS-C DSLR camera for this work, the Canon 70D (now the 80D). It is a very practical and capable camera, but it does not have the dynamic range or low light performance of the leading full frame DSLR and mirrorless cameras from Nikon, Sony, Fuji and Canon. Bracketing and exposure blending, therefore, have a big impact on final image quality. I hope you find some of these tips useful and will try them out on your next shoot. Most of all, get out there and enjoy the light in the mornings!
Software
Adobe Lightroom Classic CC and Photoshop CC
Detail and Clarity from Topaz Labs
RayaPro from Jimmy McIntyre
Details of all of these tools and the equipment I use and recommend can be found on my website https://www.adamwest.co.uk/p/inmybag
Adam is a passionate landscape, nature and travel photographer based in Scotland.
All of the images in this blog are the copyright of Adam West.
Click on his name to see more of his work and get in touch.


 Facebook
 Google +
Comments (0)
There are no comments yet.