Create an Epic Photo Manipulation with just 2 Images: The Setupwww.sleeklens.com
Hello all, in this tutorial we are going to be creating a cool photo manipulation and for this, we are only going to be using two images.
So get your images however you can acquire them… so if you have some images that you took yourself on a shoot or a holiday then those would be perfect.
Use something with an epic background and perhaps the place you stayed or something interesting like a huge stone statue or a cool old building that you saw in the middle of nowhere, heck you could even use one of those old cars you may be found abandoned that you see in HDR images a lot.
For this, we’ll not be doing HDR but we will be adding some pretty cool lighting effects and using a few tools that you are maybe not too familiar with.
So to start off let’s take a look at where I get all my free images from…
For my free images, I go to Pixabay, this is pretty much the only site I use not to oversell it or anything but it was the first one I came across that I was recommended.
There’s a tonne more out there, in fact, I just got done creating a huge list for a client recently and there were some pretty interesting sites out there but my main concern was copyrighted images, some had some tricky little rules involved that I’m not too fused on having to do all the time, so I like to use Pixabay as I can just lift what I need and that’s that.
If you have any other sites you use similar to Pixabay then, by all means, I’d love to see them in the comments but make sure they are 100% free stock sites.
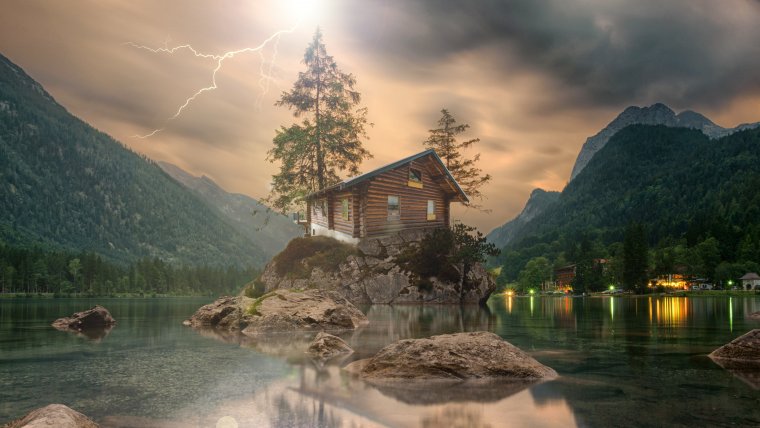
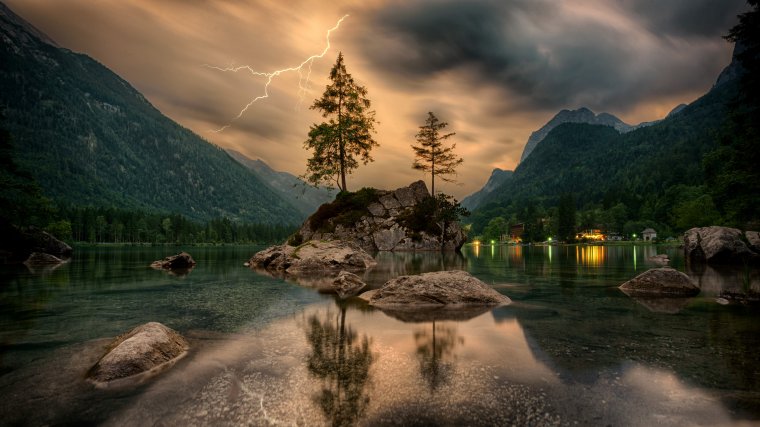
Ok with that being said let’s take a look at some images that we can use and see what we can come up with, the ones that I choose are as follows.
So let’s discuss the ideas that I have here for this upcoming piece.
The first thing I do when I go to take on something like this is to list the tasks that I have a head so when I get into the thick of it you don’t end up forgetting what needs to be done, which can easily happen especially when you are dealing with complicated edited that take time.
You can get a little brain fogged for sure, like when you create something and you take a break and go for a walk you come back and see a tonne of mistakes or things that you could have done.
Well, we are going to take care of this right now when fresh and be professional about it.
So the ideas that I had here at first was I wanted to add the building to the rock in the middle of the lake.
I can just imagine how cool that would look, especially if it was a real place you had visited.
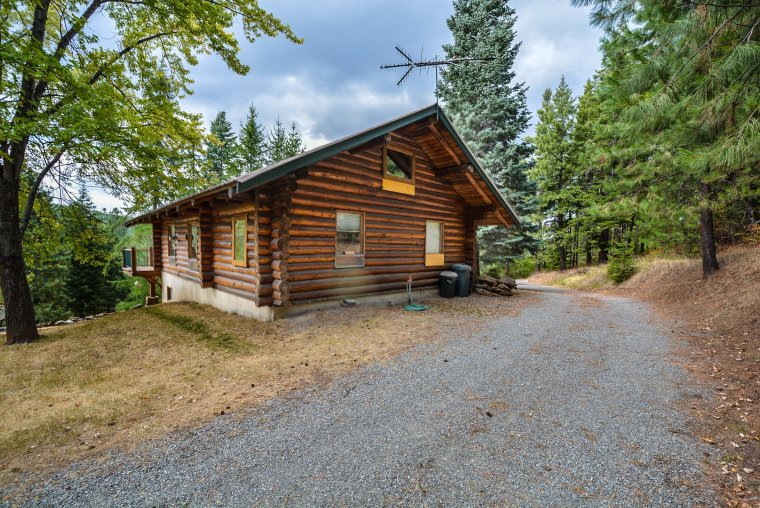
So the first thing I will have to do is to crop the house out.
For this, I’ll use the Pen Tool.
I’ll have to remove the aerial, the bins in front, the rocks to the right and the water tap will have to be cloned out as they will look unsightly.
I will probably be able to leave a little of the foreground in so I can blend it into the stone and particular attention will have to be paid to the side steps of the building with the gaps in the fencing.
For now, that’s a good starting point with the first image.
With the second image which will be the main base image, I will have to crop it down a little for the rocks become larger but I want to keep the image the same size, so I’ll have to convert it to a smart object
There will need to be reflections in the water.
I want to add some interesting lighting effects and perhaps a filter.
And lastly, I’m going to have to pay particular attention to the trees on the rock and see what way I will position the cabin.
Now that we have a game plan in part 2 we will begin to edit.
Graduated from college in 2002 with a degree in Art & Design, I started exploring my way in Graphic Design and Professional Post Production. Full-time freelancer since 2011.


 Facebook
 Google +
Comments (0)
There are no comments yet.