Adobe Lightroom Classic CC Gets a Faceliftwww.sleeklens.com
Lightroom Classic CC has been given a slight renovation and a facelift. Back in April of this year Adobe released and introduced users to version 7.3 of the much used and loved Adobe Lightroom Classic CC software. This Lightroom Classic CC update included bug fixes, support for new camera models and lenses as well as some new features and enhancements. In this article, I am going to review some of the changes that this latest update introduced to the Lightroom Classic CC user interface. Specifically, I am going to be focusing on the changes made to the Develop Module.
Table of Contents
Do You Have An Active Adobe Creative Cloud Subscription?
Before I dive into the user interface changes, I just want to point out that this update is only available for Creative Cloud members with an active account. Users with expired accounts or those using the older standalone Lightroom versions will not be entitled to avail of these new changes. Now would probably be a good time to renew your Creative Cloud account or even sign up for the first time.
As of writing this article, the latest version available is that of version 7.3.1. The latest minor release was made available also in April shortly after the initial 7.3 major release was published. Version 7.3.1 was issued to address a few bugs that were reported in the early days after the initial 7.3 release. The Creative Cloud application always pushes down the very latest release of the Adobe products so you need not worry about getting an older version while updating.
Adobe Lightroom Classic CC Gets A Facelift
Once you have downloaded and installed the latest Lightroom Classic CC update, which will require you to close your Lightroom Classic CC application before allowing the installation to complete, you will notice a few changes within the Basic Panel within the Develop Module. These are the changes that I am going to discussing throughout the rest of this article.
In summary, these changes are:
Camera Profiles Moved from Calibration Panel to Basic Panel
New Camera Profiles Added
Dehaze Slider Moved From Effects Panel to Basic Panel
The first three out of the four mentioned above will be obvious to you once you check out the new interface. I personally really liked what I saw when I first launched my Lightroom Classic CC application after updating to version 7.3. In my mind, I always wondered why they had the Camera Profiles hidden away down in the Calibration Panel. Choosing the correct Camera Profile to play a major part in the overall look and feel of your image while processing as the Camera Profile will adjust how the colors are displayed as well as adjusting the histogram. Anyway, let’s dive into each of the four updates that I outlined above in more detail.
Camera Profiles
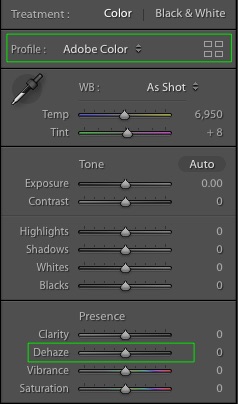
Moving the Camera Profiles from the Calibration Panel to the Basic Panel is a fantastic change and one that many of us welcomed in Lightroom Classic CC version 7.3. I am happy to see that Adobe has listened to its users as many of us have been wanting this for several releases now. It made absolutely no sense having the Camera Profiles hidden away in the Calibration Panel as it is the last panel listed in Develop Module. It never really surprised me when most of my Photography Workshop clients would inform me that they had no idea they could even change the Camera Profiles!
You can access all of these profiles by clicking on the icon (the one that looks like 4 boxes) on the right-hand side of where it says [Profile:].
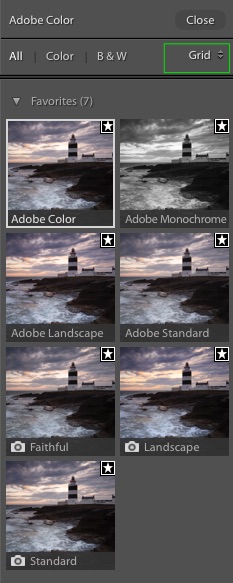
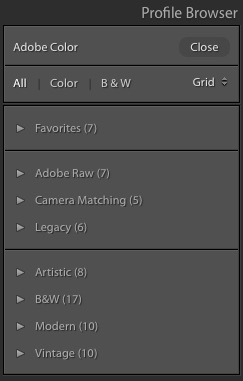
This will then load the Profile Browser. By default, this is set to display in a Grid style layout whereby you will see Thumbnails of your current selected image with respect to each of the different profiles available for selection. You can change the layout from Grid to either the Large or List layout options but I personally prefer the default Grid layout. The white box indicates the currently selected profile and the small star in the top right of each thumbnail indicates that the profile has been marked by you as a favorite.
You can add and remove the various profiles from favorites list when and as you see fit. To do this, simply click on the star icon.
Not only have Adobe moved the Camera Profiles to the Basic Panel but they have also introduced updated and brand new profiles as well. Thanks to Lightroom Classic CC version 7.3, we now have the option and ability to choose between the new Adobe RAW profiles, the updated Camera Matching profiles and also some older Legacy profiles. As well as this, you can select between various new Creative Profiles that are contained within the Artistic, B&W, Modern and Vintage groups respectively. Clicking on the drop-down arrow next to each of the Profile Groups will expand or collapse that particular group.
You can then simply scroll through the various Profiles until you come across one that you like. One of the features that I like here is that you can simply hover your mouse over the respective profile and it will render an example of the profile within both the Navigator image preview window to the top left of the Lightroom interface as well as in the main image preview window. The profile is actually only applied once you click on the profile.
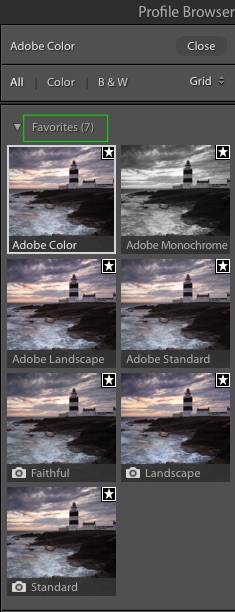
You will probably have noticed that I only had seven Profiles marked in my Favorites Group. My three favorite Camera Matching profiles and my 4 favorite Adobe RAW profiles. These are the profiles that best suit my needs and processing style. But of course, that is not to say that you cannot find something within new Creative Groups that will really suit your own style and help make your images pop!
Dehaze Slider Given A New Home
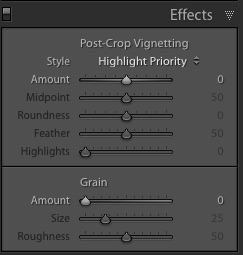
As you will see from the above screenshot of the Effects Panel the Dehaze slider has disappeared! Well, it hasn’t really. Adobe was again being nice and clever and moved it to the Basic Panel as well. It is now listed right under the Clarity slider and above the Vibrance and Saturation sliders. The new home for the Dehaze slider certainly makes sense, especially seeing as it is probably one of the basic adjustments that you might want to make while processing the image. I tend not to use the Dehaze sider a great deal myself but it is nice to have it available here in what is the main adjustments panels as opposed to being hidden away in another panel that I would otherwise never really go to.
The Larger Tone Curve
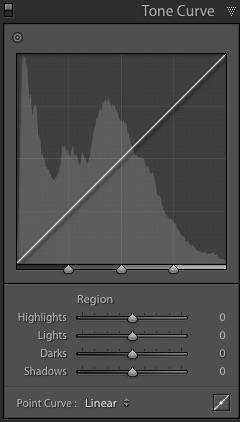
Along with the relocation and addition of new Camera Profiles as well as the relocation of the Dehaze slider, Lightroom Classic CC version 7.3 also introduced a larger Tone Curve. While the Tone Curve graph is definitely larger, I most certainly did not notice it straight away. But maybe that was just me? According to Adobe, “in this release of Lightroom Classic CC the Tone Curve has been expanded to optimize tone curve adjustments”. I never really had a problem with the old Tone Curve, so I will just have to take their word for it.
My Thoughts On Lightroom Classic CC 7.3
Overall I really like this release. The relocation of the Camera Profiles from the Basic panel to the Effects panel was a great move. The addition of brand new Camera Profiles was a nice added bonus which I am sure will be appreciated and used by many Lightroom users. And the relocation of the Dehaze slider is also very welcome in my eyes. These changes certainly help speed up my processing workflow a little anyway.
Have you updated yet? How do you find this Lightroom Classic CC version? Let us know in the comments as I would love to hear your thoughts and feedback.
Graham Daly is a self-taught freelance photographer based in County Cork, Ireland. He has won several photographic awards over the past several years since becoming enthralled and amazed with the world of photography.
In 2016 Graham went from being a super-obsessed hobbyist photographer to being a full time (and still obsessed!) professional photographer who has turned his passion into his career. When he is not out photographing amidst the beautiful
landscape and shorelines of Ireland, he is lending his photographic knowledge and tutoring other photographers, who like him, have a love for the outdoor world and want to further their own photographic skills and progress their own photography journey.
Graham provides photography Workshops & Training Courses all year round throughout the entire country of Ireland and caters for both groups as well as providing bespoke 1-2-1 sessions
Hello Graham! Thank you kindly for this post, today I downloaded Lightroom Classic CC and was watching a tutorial and felt completely lost because the two didn’t match, I was freaking out for a few minutes trying to find the damn dehaze option thinking I got a faulty Lightroom, but no thank you for reassuring and educating me otherwise, I found it thankfully and was able to move on happily!


 Facebook
 Google +
Comments (1)
Hello Graham! Thank you kindly for this post, today I downloaded Lightroom Classic CC and was watching a tutorial and felt completely lost because the two didn’t match, I was freaking out for a few minutes trying to find the damn dehaze option thinking I got a faulty Lightroom, but no thank you for reassuring and educating me otherwise, I found it thankfully and was able to move on happily!