How to Use the Hide and Seek Collection in Adobe Photoshopwww.sleeklens.com
We are back with another tutorial to accompany one of our videos, this time about how to work our “Hide and Seek Collection” for Adobe Photoshop. In this one, we are going to cover how to effectively use this collection of 78 Photoshop actions to give the best enhancements possible to your outdoor photographs.
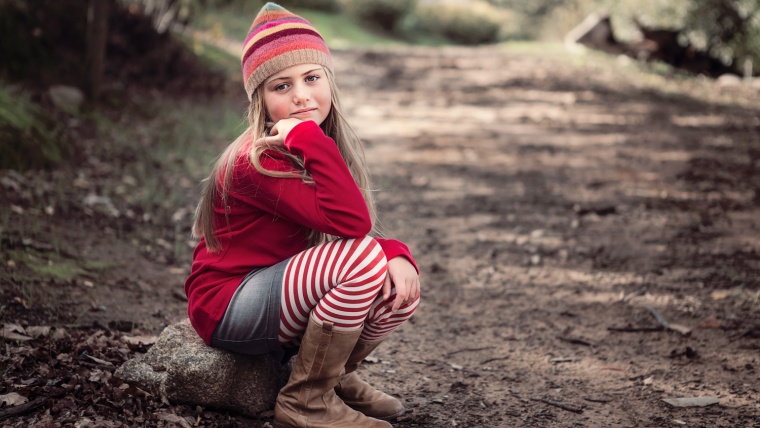
Let’s get started with our first photograph that we will be editing using the Hide and Seek for this demonstration. The first photo is an outdoor portrait of a young girl sitting beside a path, on a rock.
With our “Hide and Seek” photoshop actions open, we are going to start by applying a Base Pretouch Brush, specifically the Brighten Eyes Brush. Once your selection has been made, you’ll need to click the “play” button, which will then apply the action to your photograph.
Before moving on, for the actions in this Hide and Seek collection, you’ll want to go ahead and set your paint brush up for them. To do that, click on your paint brush tool, then at the top, set the brush to normal and keep the opacity fairly low. However, we will be adjusting it as we go along, as needed.
Now, with the 20% brush selected, we will zoom into the picture, make the brush a bit smaller and apply the brush over the subject’s eyes to brighten them up a little. Once that brush has been applied, I will right click on Background in the bottom right and select Flatten Image, which will just flatten out the brushes and anything else that we have applied so far to this photograph.
We are now going to move on to an All in One – Tone/Tint action, for this one we are going to go with Wild West. Click play to apply. Once this action has been applied it looks a little too dark, but we can easily fix that by turning down the opacity, just a little bit. Then, Like before, we will flatten the image again by right clicking and selecting Flatten Image.
Next I am going to use a color correct brush, because when I applied the Wild West action, it added a little too much color to my subject’s clothing. So, going into the Color Cast Correct brushes, we’ll select Slight Desaturate. Once you click play, a box will appear that actually give some instructions, for example in this case, The box will say something like “with the black layer mask selected, use a soft white, low opacity brush to slightly desaturate and color casts on your image”, which is how we have already set our brush in the beginning. We are going to raise the opacity and make sure that we have a brush setting with a bit of a feather to it, we don’t want to use a brush with a sharp edge for this. With our black layer mask selected, we will run our brush over the girl’s clothing to desaturate the colors which are a bit overwhelming in this photo. If you look down at the layer mask, you can see everywhere that the brush has been applied. Before moving on, we’ll flatten the image, just as we did before.
Now we are going to move on to the Portrait Retouch Tools. It is great that these are included in this collection, even though this one is primarily designed for outdoor photography, as you can see in this video that what we are working on is in fact and outdoor portrait. So scrolling down through the portrait retouch tools, we will select Basic Retouch (eyes, skin, teeth). With that selected, we’ll lower the opacity a bit and start out with Soft Skin Smoother. For this one you may need to zoom in on the photo a little more to be a bit more precise. Gently run the brush over the subject’s face to smooth out the skin a bit. I should be a very subtle effect.
Next, we will use Bright Sparkly Eyes and use it over the eyes, raising the opacity first. This will add some more light and help bring out the eyes a bit. Go ahead and Flatten the image again and we will move right along to the next step.
The last thing that we are going to do with this particular photo is apply a layer of Levels to add a little more light.
In our end result we have add more light, brightened up the subject’s eyes a bit and really added more color as well, enhancing the overall photograph.
Let’s move along to our next photograph which is of a little girl in a white dress standing on a dirt path. Let’s start this one out by applying an All in One Tone/Tint, we’ll select Mint Herb and click play to apply the action. Once we’ve applied this action, you’ll see that it has added quite a bit of a green tint. To counteract that we will go over and lower the opacity to about 18%, which will reduce that green effect. Then, like before, flatten the image before moving on.
The next thing that we will to this photo is to use Basic Retouch in the Portrait Retouch Tools, like with the previous picture. Zooming in on the eyes, we are going to use Bright Sparkly Eyes to brighten up the subject’s eyes and make them stand out a bit more. We’ll also use the Soft Skin Smoother on her face. Now we’re going to turn use Rosy Blush, but turn the opacity down so the application just adds a very subtle effect to her cheeks. Now, we will flatten the image before moving on to next step.
We are going to use the Portrait Retouch Tools once again, but this time we will use the Paint Effect, lowering the opacity to about 16%, so our effect will be very subtle.
We will also apply a vignette, let’s go with Ink Vignette for this one. After applying this vignette the photo now appears underexposed, but that can be fixed. This collection has actions that can correct these kind of exposure issues. So, let’s go up to our Exposure actions and select Underexposure Correction. For this action we have to adjust the opacity ourselves, so let’s change it to 56% to add more light.
The one last that I want to do to this is to add an All in One Base. We will select Punch Base and click the play button. This action adds a nice yellow effect to the photo.
In our end result, we have a photograph in which we have added a lot of light, brightened the subject’s eyes and enhanced the overall photo with a much warmer look.
Now let’s get started on our final photograph for this tutorial. This one is of a little girl sitting on a set of red steps, surrounded by ivy.
We will start this one with Slight Desaturate in the Color Cast Correction Brushes. Making the brush bigger, we will use this brush over the bright red steps to tone them down, just a bit. This brush will basically strip some of the color. And, before moving on, we’ll flatten the image.
Now let’s scroll through to the All in One Base actions. This time we’ll use Vivid Base and turn down the opacity, then click the play button.
Then we’re going to add the Sour Cherry action under All in One Tone/Tint. Once you click the play button, you’ll see that this action has added a pretty noticeable effect to this photograph. We are going to adjust it a bit by lowering the opacity from 50% down to about 9%, giving us a more subtle effect.
The last thing that we are going to do to this photo is to apply a Levels layer. We’ll use this brush over the little girl in the photo, just to brighten her up some. Remember to flatten the image.
Now we can look at our finished image. We made subtle changes that have enhanced the colors and brought some more light into this photograph, really bringing a bit more life to the image.
Thanks for following along, I hope this Hide and Seek tutorial was helpful. Remember to visit us often for more updated tutorials and articles from our blog.
Pia Lopez is a self-taught photographer, graphic designer and ArchViz artist. As Content Director of Sleeklens.com, her work is driven by her two biggest passions: technology and art.


 Facebook
 Google +
Comments (0)
There are no comments yet.