
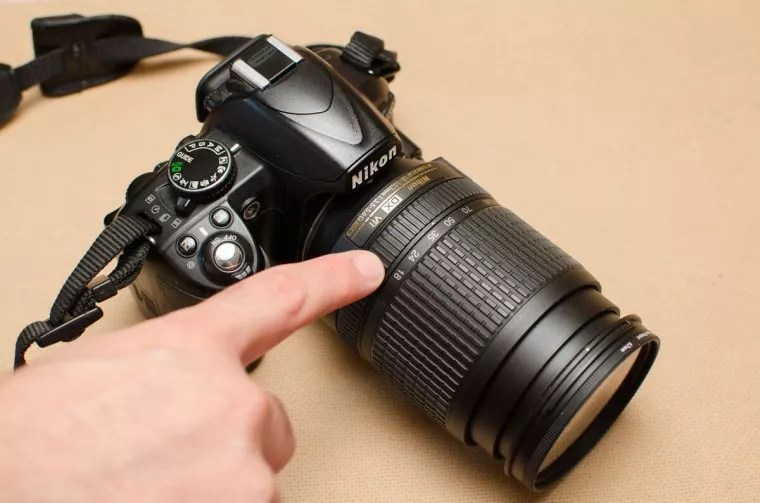
Focusing is one of the most basic (and important!) aspects of photography. If you manage to master it, your photos will reach a new level. Knowing how to set your focus correctly means you have the control over which part (or parts) of the photo is going to be sharp and which will be blurry. You can draw the attention of people to or away from particular details in your photo by what you decide to put into focus and what not; focusing is adding a new communicative aspect to the photo. First of all you need to decide if you want to use Manual or Auto Focus (AF) mode.


Table of Contents
Both manual and automatic focus modes are available in most of the cameras today. When you focus manually you have complete control over the focus, but it is a process that takes a lot of practice to master. When you use manual focus mode,you need to rely on your eye and your hand, simultaneously moving the focus ring on your lens and looking at how the image changes through the eyepiece of the camera.
Sometimes less than a millimeter is enough to influence the results. Even for an experienced photographer, it can take time to set the focus correctly. The greatest downside of this is that you might miss photos just because you did not focus in time.
Fortunately, cameras can help you focus using the AF (Auto Focus) mode. Basically, it means that the camera is moving the lens according to settings that you chose for it. This means the reaction time is much faster,
although you need to give up some of your control. In order to take the full advantage from your AF, you need to understand the different options you have.
Autofocus is, in essence, is your camera’s technology and intelligence doing the work. The camera adjusts the lens to obtain focus on a particular subject and how fast this works can determine if you get a sharp image or just missed an opportunity.
Manual focus is exactly what it sounds like—it means the photographer has to take control of the focus settings and manually hone in on their subject, adjusting the focus by hand. For the photographers out there that enjoy being in control of everything on their camera including focusing, I salute you. Manual focus may sound difficult, but with a little bit of practicing and getting used to the focal ring on your lens, it gradually starts to seem like a stroll in the park.
Personally I’m a fan autofocus and manipulating my focusing point, however, there are tight spots where manual focus became my saving grace. Therefore it’s safe to say that each plays their part even though manual focus takes more practice it’s worth it.
The sensors within your camera communicates with your lens to pick up contrast and light level but mainly contrast. Each sensor relatively does its job by measuring the change in contrast and sharpness, however, sharpness is not achieved until the camera has determined the correct contrast. Sounds like a lot right? But your camera does all of this in merely a fraction of a second.
There are two types of autofocus systems, categorized according to their working principle, namely active and passive. Active types are those that first measure the distance to the subject, normally by time-of-flight techniques, and afterwards adjust the focus according to that measured distance. The time-of-flight measurement can be achieved using light (normally infrared) or ultrasound. This method is not commonly used in commercial cameras, so let’s look into more detail at the other category, the passive methods.
Within the passive category, two competing approaches are commonly used. These are based in phase and contrast detection respectively. The phase detection works by synchronizing the image produced in an array of auxiliary sensors that cameras have apart from the main CCD or CMOS sensor. When the mirror of a DSLR camera is down (allowing you to see through the viewfinder), part of the light that reaches the mirror actually goes through (the mirror is slightly transparent) and reaches a secondary mirror that deflects the light to a set of small sensors that are placed in such a way that they are able to detect the light coming from opposite sides of the lens. The camera processor the compares the two images and, if they are not equal, instructs the motor of the lens to implement a correction that is proportional to how out-of-phase the two images are. In fact, what the camera compares is the intensity pattern of both images, and by doing so, it actually has the information necessary to know in which direction the focusing ring of the lens needs to be moved and how much.

The array of autofocus sensors changes from one camera model to another and the number of sensors depends on the number of autofocus points the camera has (at least two sensors for each point). As you can imagine by now, the quality of the autofocus of a camera using phase detection will then depend on a number of factors including not only the number of autofocus points but also the quality of the autofocus sensors.
The other method, contrast detection, is more commonly used in mirrorless cameras. The basic principle behind this approach is that the contrast between adjacent pixels is maximum when the image is correctly focused. The downside here is that a change in the contrast does not give information about the direction in which the adjustment needs to be made, so the camera has to scan a larger range before reaching focus.
There are sometimes, however, when the auto focus process may pose more of a challenge than usual, and you’ll notice it when you see your lens trying over and over and you’re getting a blurred or out of focus view from your subject. I usually call it “focus hunting,” but this doesn’t mean that obtaining focus is not possible for the desired subject. It just may be a bit more difficult than usual because of a few contributing factors.
The factors that may contribute to “focus hunting” are low contrast, high subject motion, and low light levels. Keep in mind the camera needs light along with contrast to determine its subject therefore when there is a lack of these when taking a shot you’ll realize where your lens struggles to focus or end up focusing on the wrong thing that attains high contrast and light levels.
If, however, you select a focal point within your shot that has these fundamental elements, then you may end up with a nice low light shot. The number, position, and type of focus points you have may vary in your camera model or manufacturer, but none the less, the concept is basically the same. These points will help you most importantly in shot accuracy and sharpness even if there is no focal point for your subject it’s still safe to auto focus and then recomposes your shot.
AF is based on focal points. The focal point is the area in the sensor that the camera will bring into focus. Depending on your camera, you might have more or less focal points to choose from. Nikon has from 1 to 51 focus points. The main idea is always the same: the camera will focus on the area of the frame that is the focal point you selected.
Next up are the autofocus modes photographers sometimes tend to bypass and not take full advantage of. Each mode can make AF shooting so much easier than it already seems to be. The name of the AF modes might vary between camera manufacturers. If you’re not sure what they are called for your camera, don’t worry—take your camera manual and have a look at the section about auto focus. You will find there all the information you need to recognize the AF modes.
In Nikon cameras, the auto focus modes are:
In Canon cameras, the auto focus modes are:
The first thing one notices when looking at the specification of high-end cameras is the large amount of autofocus points they have. In the specific case of the 5D Mark III, this number is 61! This not only improves the accuracy of the system, but it also allows, in combination with a predictive algorithm, to track fast-moving objects in order to provide continuous autofocus while taking many photos of dynamic situations (like wildlife or sports photography).
If you are taking a rather static scene (like a landscape), selecting a single focusing point will in fact outperform any of the other options. This is because you will be stopping the camera from deciding to change the focus point right before releasing the shutter, so you need to keep this in mind when you are planning your shots.

When selecting which points to use, the 5D also provides different modes to select from. For instance, if you want to use a single point, you can select between having a very narrow selection area (Single-point Spot AF) or a standard single point to select a larger subject (Single-point AF). The area covered by the AF system can be sequentially increased by selecting a central point together with four or eight surrounding points (AF point expansion), all the points in one of the nine available sub-zones (Zone AF) or the whole cloud of 61 points (automatic selection AF).
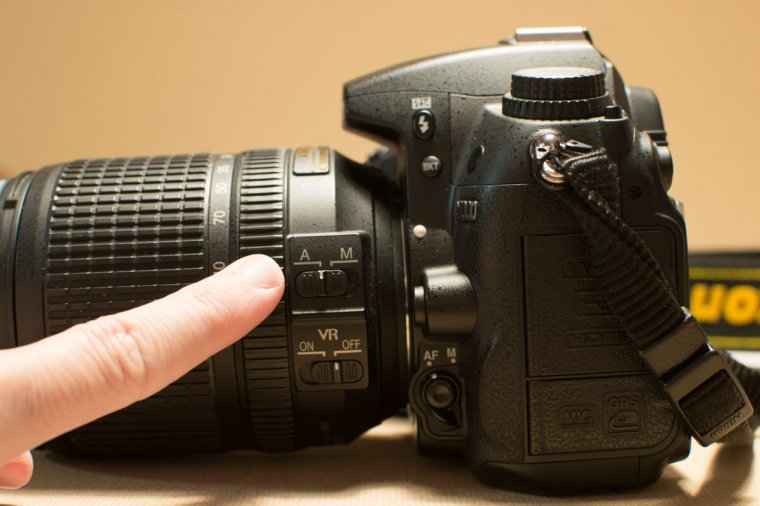
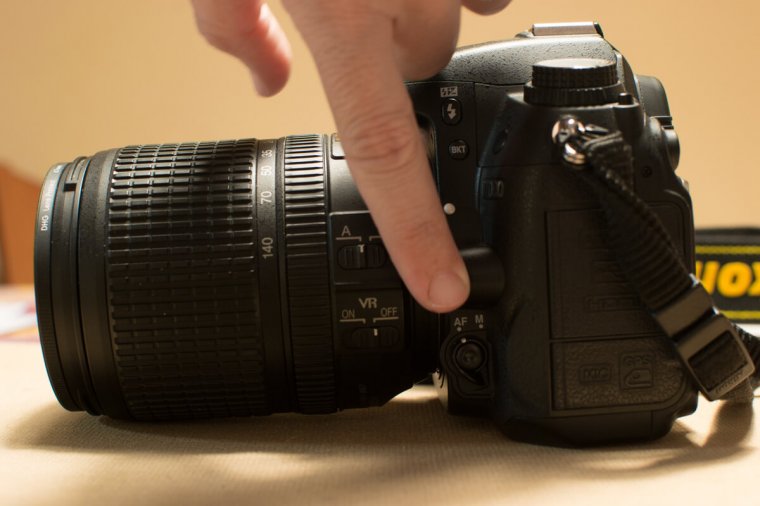
There are different ways to switch between AF modes, and again, it depends on your camera. You might have a switch or a dial to select the different focus modes or you might need to go to the menu screen and change it from there.
In general, I agree with the statement made by many photographers that nothing outperforms a carefully tuned manual focus, especially when it comes to still-life photography such as landscape or some macro subjects. However, many of the amazing photos that are made each day would hardly be possible if autofocus systems had not evolved the way they did. For this reason, if your main interest lies in dynamic subjects such as sports or wildlife photography, you should definitely put the autofocus performance near the top of your priorities when deciding which camera to buy.
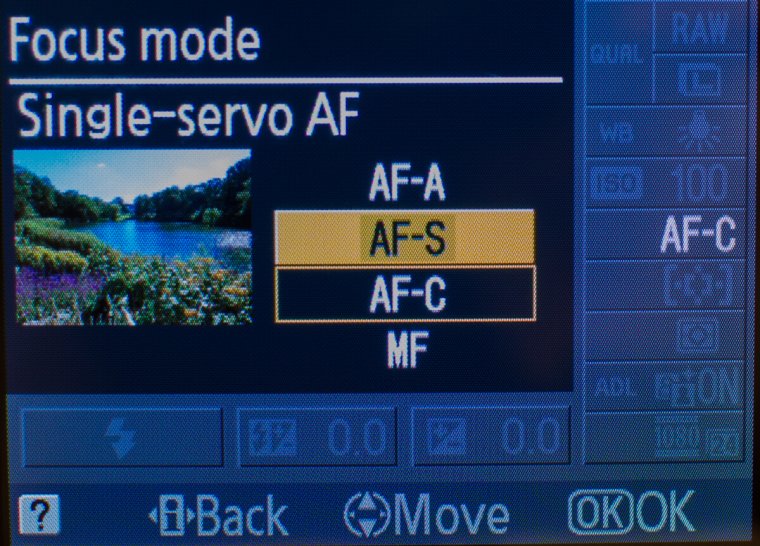
In Nikon the AF modes are called Single area focus mode (AF-S), Continuous focus mode (AF-C) and Single/Continuous Hybrid Mode (AF-A).
Single focus point is the simplest mode to use. This mode allows you to select just one focal point. It is useful when your subject is not moving (landscape) or if it moves just a little (some portraits). It allows you to lock the focus when you half-press the shutter release which is really useful if you want to reframe your photo and maintain the focus as it is.

If you are taking photos of people doing sports, cars, kids, animals or any other things that move… you will find the AF-C mode really useful. The camera is not blocking the focus point when you press the shutter release halfway. Instead, the camera adjusts the focus to the movement of your subject. This will allow you to keep your subject in focus all the time because you won’t need to refocus each time your subject moves. However, when you use this mode, you can’t reframe.

If you select this mode, your camera will decide if your subject is either static or moving and then it will select Single or Continuous mode respectively. This mode might be useful for beginners because then you just let the camera decide and you can pay attention to other things (exposure, white balance…). However, your camera might make the wrong decision. For example, if you want to take a photo of a static flower and in the frame, there is also an animal moving, your camera might think you want to take the photo of the animal, select Continuous mode and you can end up with an animal in focus and a blurry flower.
The focus area is related with how many focus points you are using and how they act. You have a selection of focus areas that you can use with each of the AF-modes. The most common ones are the Single-point AF-Area mode and the Dynamic AF-area mode. Let´s see what they are about!
In Single-Point AF-Area mode the camera uses just one focus point (the one you select in your viewfinder). It is a good option to take photos of stationary subjects such as landscapes, buildings or still life.
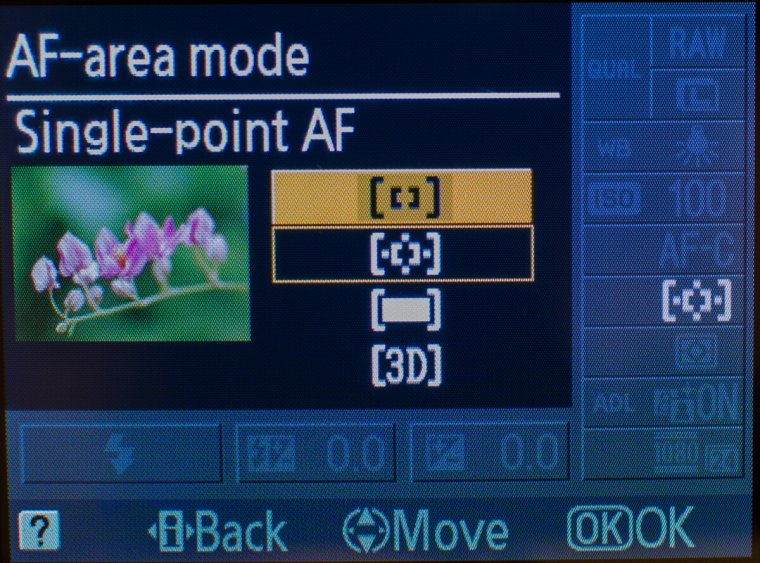
In Dynamic AF-area mode you also select just one focus point. But if the camera detects that the subject you are focusing on moves, it will use the surrounding focus points to track the movement. The fact that it will use just the surrounding ones means that you should keep your subject close to the initial focus point you selected (by following the movement of the subject with your camera). If the subject moves to the other side of the frame, the camera will probably lose track of it. Some cameras allow you to select the number of surrounding focus points: 9 focus points for a small area, 21 focus points or even 51 for the whole frame area.
There is a variation of the Dynamic AF-area mode called 3D-Tracking Mode. This mode is available in some Nikon cameras; it functions much like the Dynamic mode except that the camera keeps following the subject even if it goes out of the area covered by the focal points (9 or 21). The camera takes a bit longer to take the photo than the dynamic mode (if set on 9 or 21 focal points) but it gives a bit more room for error with estimating where the moving subject will be.
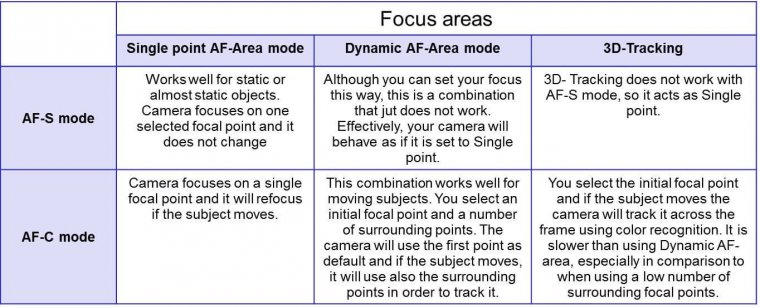
There are other area modes such as the Auto-Area AF Mode (the camera decides which one to use), group-area mode, face-priority AF… but the Single point and Dynamic AF-Area are the basic ones and can cover the most part of photo situations. If you are a beginner, I recommend you to start by using these two modes in order to keep it easier. You can always check the other modes once you master them. Here you have a table that combines the AF-modes with the Focus areas.
When I was younger, I associated manual focus on professionalism. Auto focus seemed like a feature made for beginners only. Shortly after, I realized that this wasn’t the case.
Both manual and autofocus can be used no matter how far you’ve come in your career. If you know which one to use at any given moment, you’ll feel less stressed during your photo shoots, take sharper photos, and be more confident in your photography skills.
Of course, the tips below aren’t rules set in stone. Some artists use manual focus only, while others rely on the accuracy of autofocus. This article will simply focus on the benefits of both.

If you get nervous during busy events like concerts, it’s likely that you’ll miss a lot of beautiful moments. Instead of wasting time, experiment with autofocus. Some photographers even shoot blindly for the sake of spontaneity. Their results are usually very unexpected but interesting.

Before I had a camera with autofocus features, I had to use manual focus to take photos of myself. Though this exercised my patience, it forced me to spend time on unnecessary procedures. Now that I have a better camera and a remote, I can pour all of my energy into my ideas instead.

If you’re surrounded by a group of people whose interactions you want to photograph quickly, for example, use autofocus. You simply won’t have enough time to manually focus on a subject that’s moving all the time. The same applies to pet, wedding, and street photography.

Still life photography is all about inanimate objects like buildings and vases filled with flowers. Since subjects like this don’t move, your camera will easily detect them with the help of autofocus.

If you’re going to be working with one subject, use manual focus to get the sharpest results. This will not only improve your knowledge of various camera settings but also help you create the best possible compositions.
Even though autofocus is useful, it won’t teach you how to handle your camera. By using manual focus, you’ll be more aware of compositions, colors, and depth of field. Spend quality time with your camera so that when you do have to use manual focus in a stressful situation, you won’t feel lost.

Modern autofocus features are smart, but they can be outwitted by foregrounds. If your subject is standing behind branches, window panes, or even tiny details like leaves, use manual focus. Pay extra attention to windows as your camera might accidentally focus on the dirt the windows instead of on your subject! (This happens to me often.)

When doing Macro Photography I pretty much instantly switch to manual focus due to the narrow depth of field meaning I’d have to be precise as to what I want to be in focus and not risk my camera going on its own agenda focusing on something else or end up in the state of “focus hunting.” Remember you’re in full control of your camera now so I’d suggest using a tripod when focusing manually for Macro Photography.
Autofocus isn’t the best at capturing details in the dark. It’s likely that you’ll see more than your camera does in low light, so make sure you switch to manual focus when you don’t have a lot of light sources to work with.
Now that we’ve explained what auto focus is, how it works, and the situations it works best for, it’s time to put your knowledge into action with a little training!
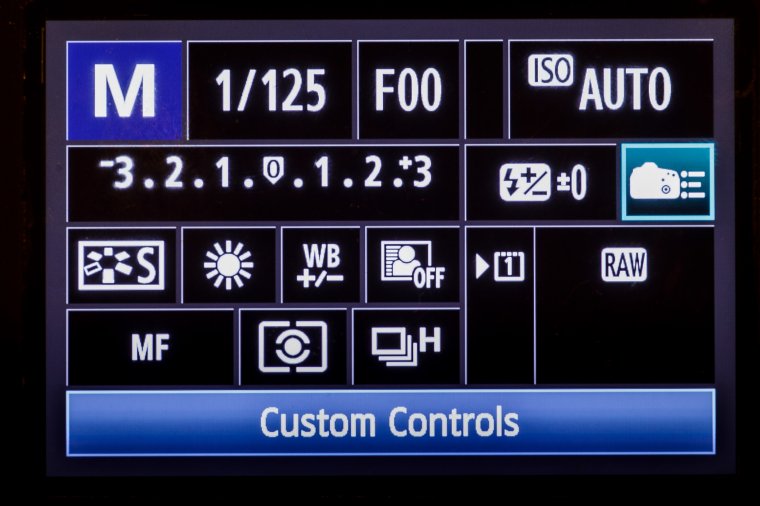
What this button does is focus the lens independently of the shutter button. That means you can focus on your subject with AF-ON while metering with your shutter button. There are several advantages to that which I’ll get to in a minute. But first, you need to configure your camera in order to use it.
With my Canon 1Dx and 5DMIII, this is hidden in plain sight on the Quick Menu. Your camera, if not a Canon, is no doubt different. But keep these two points in mind: designate the shutter button for metering only. That means you can meter off any place in the composition and then hold the button to lock in that exposure without it affecting the focus setting. That’s useful if you have a bright or dark area throwing off the exposure.
Say your camera meters primarily the center of the frame and you’re taking a picture of someone with a bright background. You can place the center metering spot on their face, lock in the exposure and recompose. Otherwise, the person’s face may end up under-exposed as the camera tries to properly expose for the background.
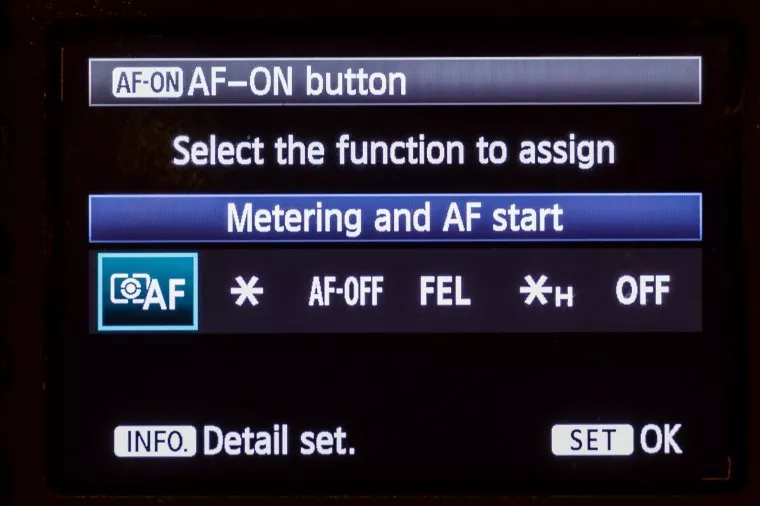
After setting the shutter button for exposure only, select the AF-ON button (or whatever it is called for your particular camera system) and configure it to focus the camera. Now when you press the back button focus, you can lock the focus without it affecting the metering which is now performed by the shutter button.
The next part is trickier. You have to train your thumb to seek out the back button focus while your eye is on the viewfinder and do it automatically so you don’t lose any pictures due to fumbling. Trust me, it will take a day or two, but ultimately, it will be second nature to focus with your thumb while your meter with your forefinger on the shutter.
As I said, the back button focus allows you to meter and focus separately, which can come in handy for all kinds of situations where you have contrasty lighting. First, focus on your subject with the AF-ON and then meter where you need to with the shutter button. Keep pressing that, recompose and then fire away.
You always have manual focus at the ready. That’s because the camera won’t go into autofocus unless you press the back button focus. Therefore, if you want to manually focus, just do so and when you press the shutter button, the camera won’t try to override where you’ve focused the lens.

You can select continuous focus or single shot by how you operate the back button focus. First, configure the AF Drive for continuous mode (“AI Servo” on the Canon). Then, if you want single shot, focus on your subject with the back button focus and let go. The focus is locked in and won’t change no matter where you place the focus points. That’s obviously handy when you want to quickly focus on the subject and then recompose. If you’re photographing a moving subject such as a runner or bird, then you hold down the back button focus and, depending on how good your focus system is, the camera should keep the subject continually in focus while it moves about the frame.
I suppose the only caveat here is not all cameras include a back button focus, so you have to check your camera manual to see if it’s an option.
Once again, this will take a little practice before you develop the appropriate muscle memory to work with the back button focus automatically, but once you do, I have a feeling you won’t want to go back to using the shutter button for focusing.
While there are certainly situations where a photographer needs to know how to manually focus a camera, many times the auto focus system is more that enough—provided you know which settings to use for which situations. All it takes is a little practice, and soon you’ll be come a master of your camera’s focusing system.
Happy Shooting!


Please verify your software version before proceeding.
 I’ve verified my software version


 Facebook
 Google +
Comments (0)
There are no comments yet.