
I don’t know how about you, but I always found it hard to understand every aspect related to image size. Image crop, pixel dimensions, aspect ratio, resolution… everything seemed difficult to me. I have even met a few people, including professional photographers who feel the same. However, I didn’t let myself get discouraged, and so my quest for knowledge began. I read a lot of articles, learned more about tools, including the crop tool and I watched quite a few tutorials on how to crop an image and took a few Lightroom Classic courses and presets, (click here). Today I want to share with you the useful things I’ve learned. Let’s start with some fundamental concepts of “how to crop photos” and then we would move on to more complicated things like how to crop or resize your landscape or portrait images from library module (present in the menu line) for both printing and web. And maybe next time, I could teach you how to achieve winter scenes with Lightroom. Let’s get started and know more about the best ways and the tips to crop!
Table of Contents
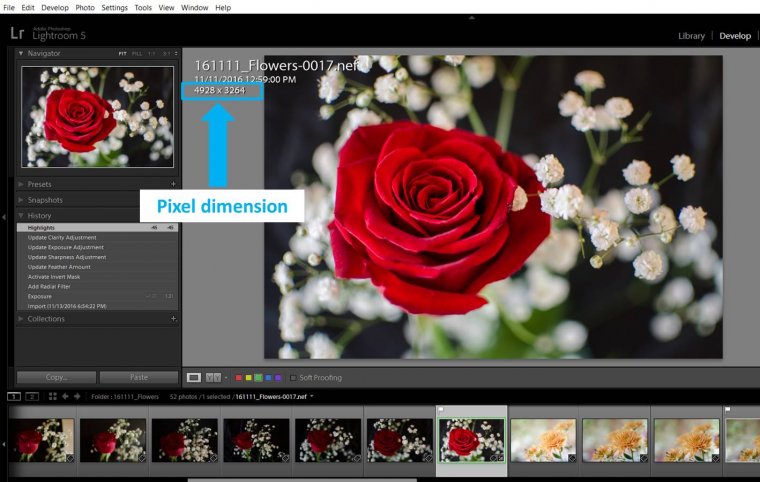
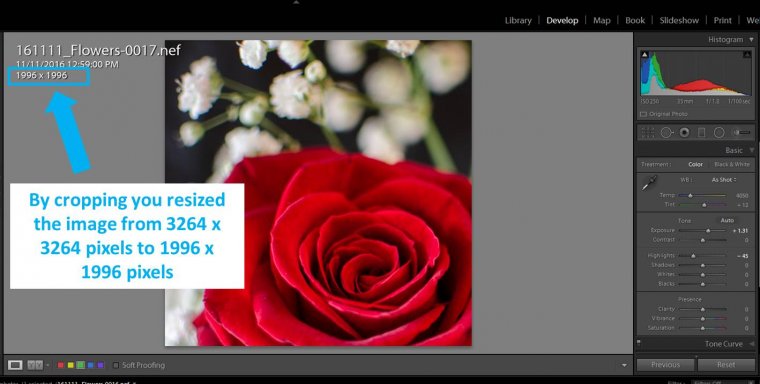
This is one of the most important concepts regarding photos. The pixel dimension of your photo is telling you how many pixels your photo has, like 1000, 2000 or 3000 pixels. With Lightroom classic, you can know the pixel dimensions of your image by clicking “I” on your keyboard (when you have your image in Loupe mode, see image below). Using a keyboard shortcut always helps as it allows you to access things easily. You will start a cycle of information overview in the photo. By clicking “I” once, you will be able to access the file name, the date and time you took the photo and the pixel dimensions. When you click ‘I” again, you will see the settings of your photo (aperture, shutter speed..) and if you click “I” one last time, all the information disappears automatically.
Don’t forget to show your love by sharing this article on social media.
My photos, when taken straight from the camera, have a ratio of 3:2, meaning that image is 1.5 times wider than higher. This ratio is determined by the sensor of my camera and is significant when it comes to composition. I have a Nikon D7000 and its sensor has a ratio 3:2, so my photos are 3:2 too. This ratio is common for sensors of both full-frame SLRs and crop sensor cameras.

Other types of cameras have an aspect ratio of 4:3.

The aspect ratio affects the composition of your photos because it determines the frame size that will contain the elements of the image. Different frames might need different placement of the elements results in a pleasant photo.
It is one of the Lightroom classic Crop Tool Options. The angle slider will allow you to rotate the photo as per your choice with the help of a slider. The crop handles on the portrait image can also be used. Once you move the cursor outside the crop handles, a curved arrow is what you get automatically that allows you to directly rotate the photo on the photo.
Straightening is easily done with the help of a straighten tool, you can do the following –
To rotate the image at the time of editing, all you need to do is place the pointer right outside the corner. Inside the crop box, you would be able to see a grid being displayed, meanwhile, the image rotating behind it.
Use the straighten tool from the toolbar for the straightening of the image.
The crop tool in Lightroom can be found after clicking on the Develop tab. The tab is located at the top section right next to the Library module tab available on the menu. There you can choose the Crop and Straighten tool as it easily crops photos and results in straightening.
QUICK TIP – To access the crop and straighten tool right, you can also use the keyboard shortcut, which is “R.”
Do you know any other way of straightening the image? Do tell us!
How can you Straighten an Image in Lightroom by using Straighten tool?
If you wish to straighten the image with the help of the Lightroom Crop Tool, all you have to do is click OUTSIDE the cropping frame as well as cropping handles. Once you do this, the tool to crop will turn into a “curved arrow,” thereby, allowing you to rotate the crop to straighten the image. It alters the image composition but that really doesn’t matter.
Did you like this quick tutorial and the tip?
When I first got the Lightroom, the one thing that I instantly noticed was the crop tool. Its working is very different than the crop tool I used in Photoshop. No, I never said that hated the tools in Lightroom, however, it took some editing and time for me to get used to it. I hope that every info that I share in this article helps you make friends with Lightroom’s Crop Tool.
Where can you search or find the tool to crop in Lightroom?
The tools to crop can be found on the toolbar right above the Basic Panel which is located in the Develop Module. You can identify it if you see the rectangle tool with a grid inside. The tools to crop can also be activated by using a Keyboard shortcut – “R” key.
You can click and drag as it changes the aspect ratio of your photos in adobe photoshop with the help of crop tool in the Develop module. Using the tools becomes very easy whenever you are trying to crop an image. Let’s get started to find out.
All those who are in the Library Module (present in the menu line) or something else, simply utilize the module menu present at top right. As an alternative, you may even click the D key.
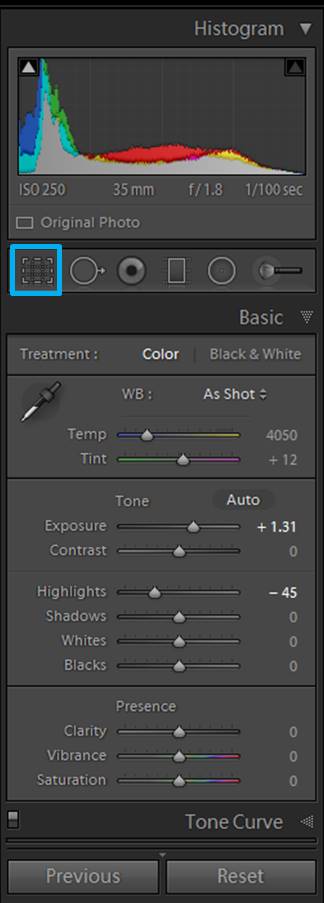
Cropping tool in lightroom classic allows you to select from a variety of cropping ratios like 1:1 (square format), 4×5, 5×7 and more. It may affect the image composition. A crop tool in adobe photoshop helps you in removing the unwanted part of the image in one go. All you have to do is select the image from the Library module (present in the menu line).
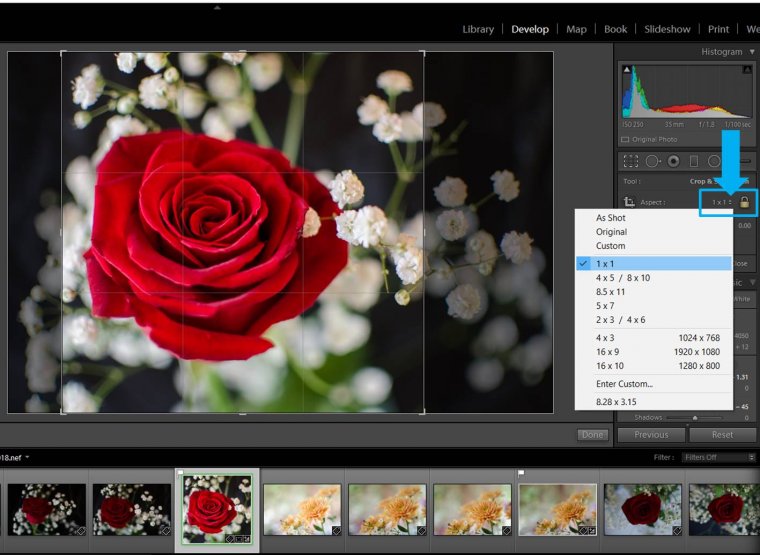
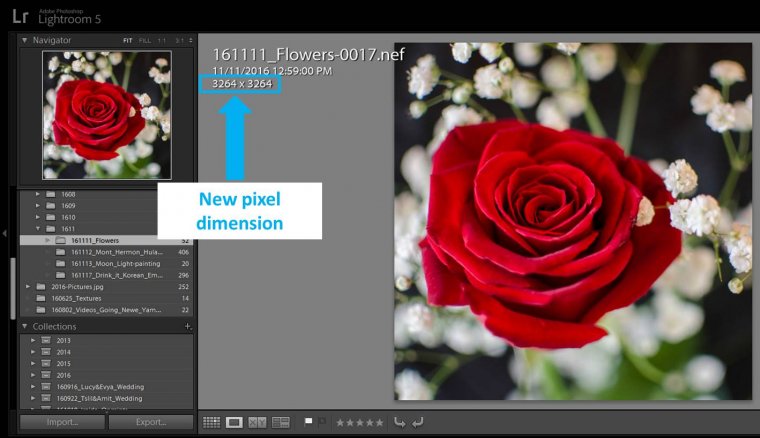
When you crop an image, you reduce its pixel dimension too.
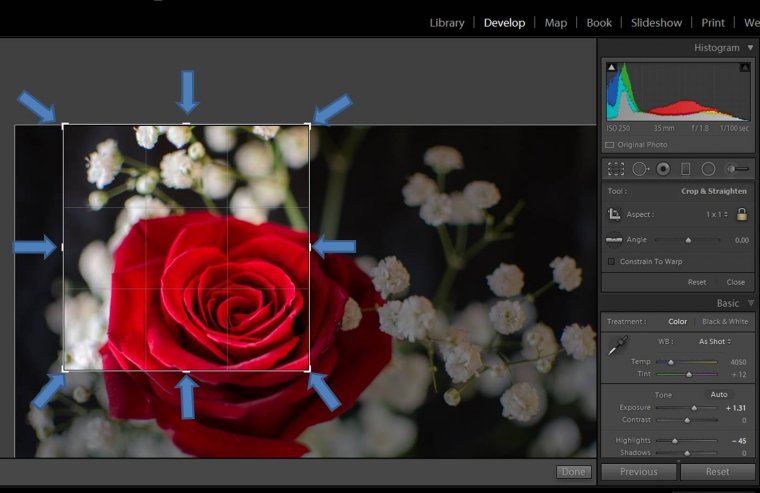
The crop tool in adobe photoshop also allows you to select just one section of your photo by clicking on selected parts of the cropping area (image below) and dragging until you get the element you want to the frame and place it as you want. You can do editing or adjust the position of your photo by clicking inside the cropping area (a little hand will appear in your cursor) and dragging the photo around. If you are familiar with any keyboard shortcut, you may use it to open various tools such as a crop tool easily.
Like the tutorial in this article? Share it on social media now and let your friends know!
Once you are happy with your cropping area, press enter or click the Done button in adobe photoshop and that’s all! Your photo is cropped! Notice again that after cropping an image its pixel dimension changes. What you will create by cropping in Lightroom classic in this way is resizing your image while keeping a particular aspect ratio.
First, go to the library module in order to get started. There, you should select the images that you wish to process or crop. Finally, click on the Develop module in the Module Picker. Also, you may press the D button on the keyboard if you wish to open a specific photo in the Develop module (present in the menu line).
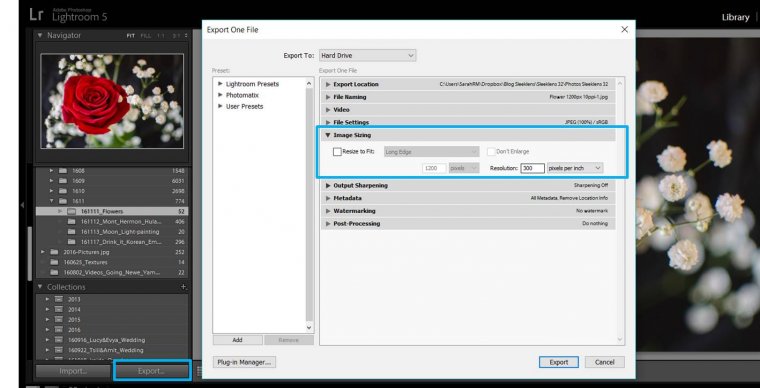
Here is where things get complicated! The image resolution is the number of pixels you have in a certain space. It is usually measured in pixels per inch (PPI). So a 72ppi image will have 72 pixels in an inch, a 100ppi image will have 100 pixels in an inch and so on. In Lightroom Classic, you set the resolution of your photo in the Export dialog. You can get to the Export Dialog by pressing “Export” in the Library module. Alternatively, you can also use a keyboard shortcut in adobe photoshop.
Printed images
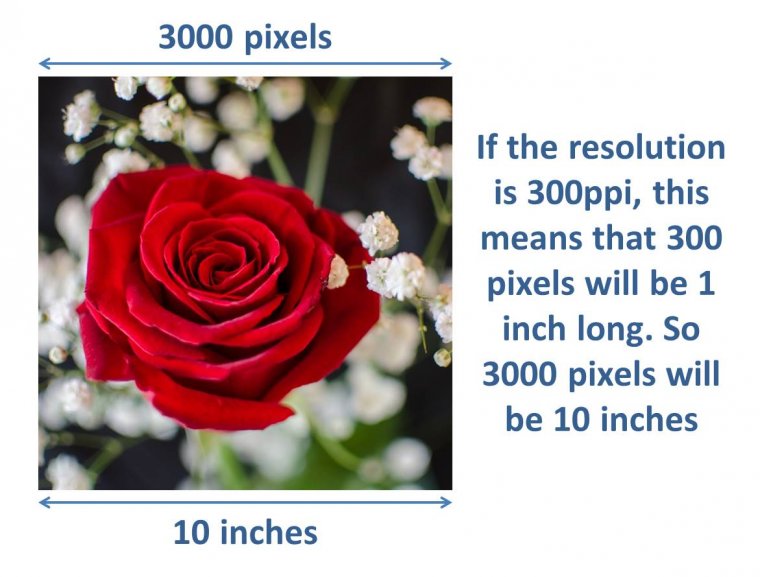
If you are going to print your image, a good resolution is 300ppi. If you are going to create or print canvas, a resolution of 150ppi is good enough. Take into account that the pixel dimension of your photo together with your resolution will determine the size in inches/cm of your final printed photo. I will explain more like this –
I have a photo that has 3000 x 3000pixels. If I print it at 300 pixels by inch, doing the math (3000pixels divided by 300 pixels by inch) I get that my final print will be 10 x 10 inches. What happens if you don’t like this size…then you will need to crop or resize it and get it custom made by using the right tool! I will tell you the same via a quick tutorial in the following section.
Digital image
It is more or less agreed that 72ppi is a good resolution for digital photos because this is the resolution of a screen. You can even get a screen with 100ppi and even 150ppi. But with a digital image, the important thing is how big your file will be (in MBs, that is). A higher resolution image weighs more Mb and this means that uploads and downloads to the web (social media, website or blog) will be slower. For that reason, it is usually accepted that a resolution of 72ppi is good for the web (a perfect balance between a screen with good enough resolution and small enough files to create things fast on the web). If you prefer to use a higher resolution image on the screen it will be at expenses of loading speed on your websites, so it is up to you to decide what is more important: higher resolution or faster loading speeds.

You might need to crop or resize your image to a certain size of inches/cm (if you are printing them) or to certain pixel dimensions (if you are uploading your photos to social media or to your website, your image needs to have certain dimensions). No problem! You can also do it in Lightroom Classic (in the Export dialog).
Lightroom Classic offers you several options for resizing your images. To keep it simple, today I am going to explain to you the one that I use for resizing my image: crop or resize to fit the long edge.
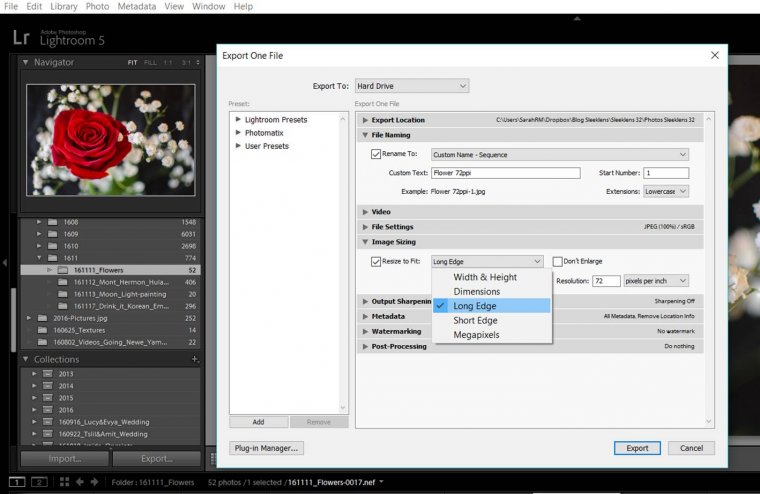 When you mark the “Resize to fit”, you will be able to open specific options to crop or resize your image. The one I use the most is the “Long edge”. Sometimes I will use the “Short Edge” option. Alternatively, you may even use a keyboard shortcut in adobe photoshop.
Do you like the information given here? Tell us in the comment section!
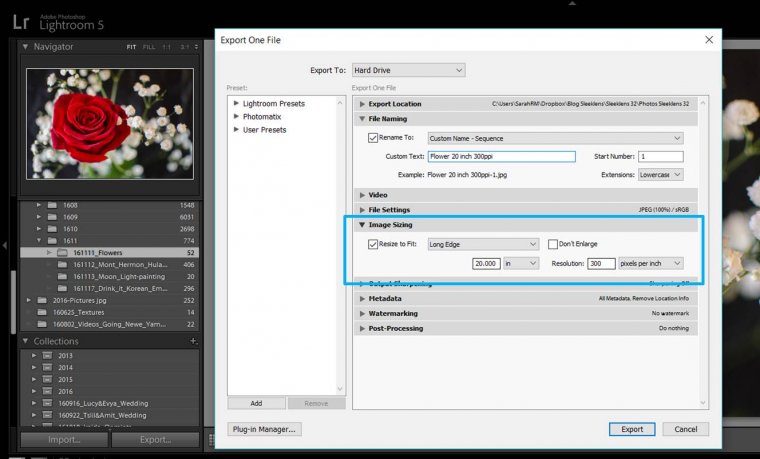
Imagine that you want your final printed image to be 20 inches wide. So how do you do it and save time. In the case of my rose photo, the width corresponds to the long edge of my photo because it is in landscape orientation. I keep the resolution in 300ppi because it is a good one for printing. I write 20 inches for the long edge and I select the units to inches. That’s all!! Now my image will be 20 inches wide and it will keep the 300ppi resolution!
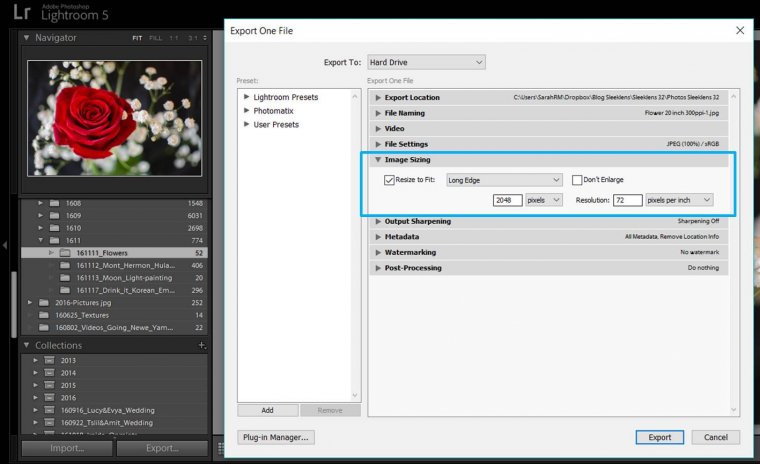
For digital images, its working is the same. Imagine that you want to post your photo in a Facebook album. In 2016, one of the sizes Facebook recommend is 2048pixels. In that case, you keep your resolution to 72ppi, the Long edge will be 2048 and the units should be “pixels”. Your photo is ready for Facebook!!
For resizing portrait images you might find the “Resize to fit the short edge” useful in Lightroom because the short edge will determine the width of your photo. And if you want to learn more, click here.
That’s all for today!! Resizing images can get really complicated, but I wanted to keep it simple. Tell me if you find this article useful! Is your search over now? Also, if you know or learn any keyboard shortcut that might make resizing or cropping easy in Lightroom, do tell us in the comment box or send us a mail on our email address. To all the professional photographers, have a happy resizing in adobe photoshop!!
How about achieving awesome winter scenes, are you interested? If you are, just click this link to know more.
Comments (6)
Very useful thank you 😀
Lovely article! just want i needed. Thank you for sharing!!!
I am glad you find it useful!!
Thank you for this article!! I found it so helpful as I have been struggling with this part of exporting.
Thank you so much for your comment! This article was not easy to write so I really appreciate knowing that it was worth it. If you have any other suggestions or subjects for further articles, just let me know and I will try to write something about it.
BY FAR, one of THE MOST clear explanations I have read thus far. Very informative. THANK YOU.