If you enjoy night photography, you might have already thought about giving a try to some of the easy targets of astrophotography like start trails, the Sun, the Moon or artificial satellites orbiting the Earth. In this post I want to share with you some tips on how to capture artificial satellites and, for that, I will be showing examples on how to get two of the easiest objects to catch, namely the International Space Station (ISS) and the Iridium Satellites, specifically what is commonly known as Iridium flares.
The image below (courtesy of Paul Simpson) shows the trail left by the ISS over Scunthorpe, UK.
But first of all, why do Satellites shine in such a way that we can see them from the Earth? The answer to this question lies in two factors: solar panels and zenith angle.
In order to generate power for all the subsystems contained in a satellite, solar panels are needed and solar panels are reflective from the way they are built. This causes that, when the Sun hits the panels, these reflect the incoming light and this is where the second factor comes into play.
The zenith angle is a measure of how high in the sky the Sun is. If we want to be able to see the reflection of the sunlight into a solar panel, we need two things. The first one is that the angles between the Sun and the satellite and between the satellite and the observer (us) is the appropriate one. The second is that the Sun is low enough so that its light does not simply make it impossible for the satellite to be seen.
These two conditions basically mean that in order to be able to observe a satellite it has to be dark (at least a couple of hours after sunset or before sunrise) and the satellite has to be at a certain location in the sky. And, of course, you need clear skies!
Preparation
Fortunately for use, there are some websites that provide information on when a given satellite will be visible near your location. I usually use one called Heavens Above. This is a very simple website that simply lists all the information you need to know where to look on a given night.
Once you enter the site, the first thing you need to do is give your location. For this, you simply click on the link next to ‘Location’ that can be found on the top right corner of the main page.
Once you’ve done that, you can simply select the satellite you are looking for under ‘Satellites -> 10-day prediction for satellites of special interest’. After you click on the satellite of your choice, a table with dates, times and the necessary information to locate the satellite in the sky will appear.
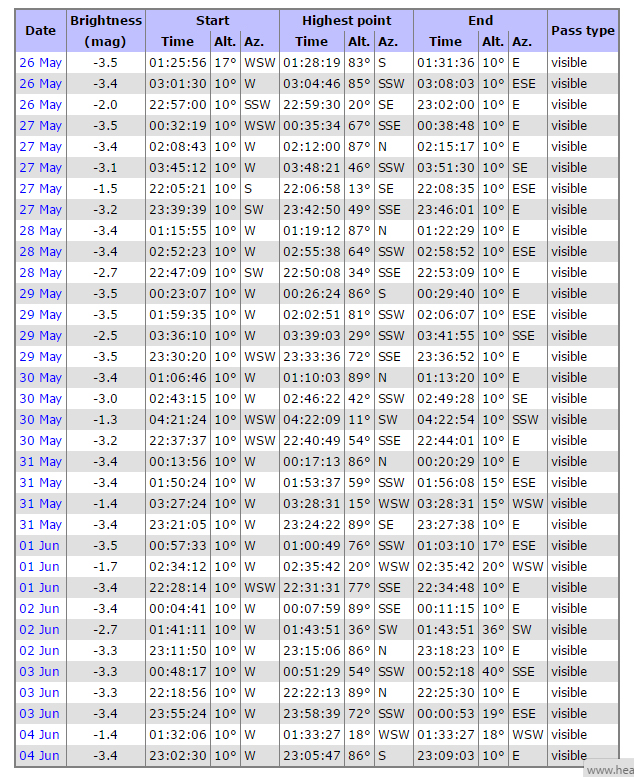
For instance, if I click on the ISS (International Space Station), and given that I am located in Göttingen (Germany), I get the table shown below.
The columns of the table correspond to the following:
Date: exactly that, the date when of that specific pass.
Brightness (mag): the maximum brightness of the object during the pass, given in apparent magnitude. Apparent magnitude (or simply magnitude in this case) is an astronomical unit used to measure the brightness of an object. The more negative the number, the brighter the object. For instance, Sirius, the brightest star in the night sky, has a magnitude of -1.46, while a full moon has a magnitude of -12.6. This means that a magnitude of -3.5 (as some of the ISS passes from the table) is a pretty decent one.
Start, Highest point and End: these three columns are subdivided in Time, Altitude and Azimuth. Time is the local time at which the object will start to be visible, will be highest in the sky and will disappear. Altitude and Azimuth are celestial coordinates and indicate exactly where you have to look. I will show you how to use these two numbers later on.
Pass type: this simply tells you whether a given pass will be visible from your location or not. If you select ‘visible only’ on top of the page (default option) then you will only get ‘visible’ in this column.
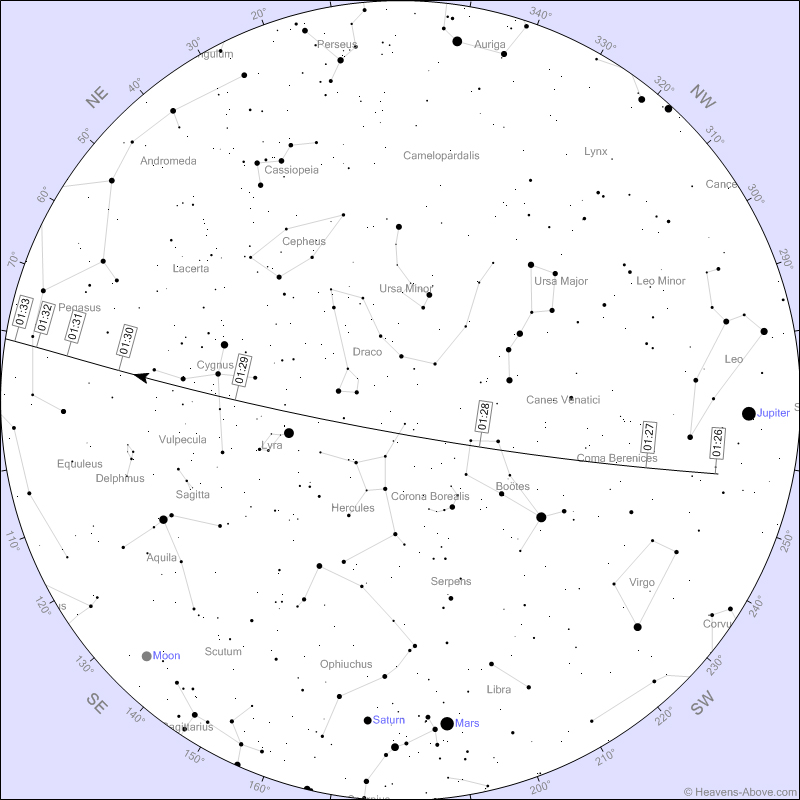
If you go ahead and click on the passage you are interested on, a detailed view of the night sky at the given time, showing different celestial objects together with the trajectory of the ISS will appear.
This is basically all the information you need to set up your camera (to know how to identify the location in the sky where to look, keep reading). Notice that the whole passage lasts for about six minutes, so you just need to point your camera approximately to the desired location, since you will have some time to make adjustments once the ISS appears into view. There are a couple of tools that you can use to better locate the position where to point your camera to, but I will show you this while looking at another bright object, namely Iridium flares.
Iridium satellites are a constellation of communication satellites that have incredibly large solar panels. The passage of the satellites is similar to that of the ISS but, given the size of the panels, there is a precise location where the Sun is directly reflected to the observer, causing a very bright (much brighter than the ISS) flares. These can reach magnitudes of -8.5 (compare this with a magnitude of -6 for the crescent moon!) but the brightness is highly dependent on the position of the observer. For instance, a flare with maximum brightness of -8.5 at the center of the satellite’s trajectory will only have a magnitude of -3.4 if the observer is located 12 km away.
To get the information for Iridium flares near your location, on the main page of Heavens Above, under ‘Satellites’, click on ‘Iridium Flares’. This will take you to a table similar to the one explained before for the ISS but with slightly different columns. In this case, these are:
Time: this column shows the date and also the time of the flare. Notice that the flare occurs around the center of the visible trajectory, so this is not the time for the whole trajectory, only for the flare.
Brightness: same as above.
Altitude: this is the altitude in degrees measured from the horizon. It is usually hard to estimate the elevation angle, so I will show you how to get an idea using a free software called Stellarium.
Azimuth: this is the cardinal direction at which to look in degrees measured from the North in clockwise direction (I will show you how to find this using Google Earth).
Satellite: which satellite from the Iridium constellation is causing the flare.
Distance to flare centre: perpendicular distance from your location to the center of the satellite’s trajectory (or footprint).
Brightness at flare centre: how bright the flare will look at the center of the trajectory.
Sun altitude: how low below the horizon will the Sun be during the flare; the lower the Sun the darker the sky will be, so the better the flare will look.
That’s all the information you need. Once again, if you click on a date, a sky map showing several celestial objects, the trajectory of the satellite and the location of the flare will appear. Also, a map showing the footprint of the satellite is shown, which could be useful if you are planning to drive somewhere closer to the center of the flare.
Keep in mind that the flare itself only lasts for just a few seconds, so properly pointing your camera is a must here.
Azimuth and Elevation
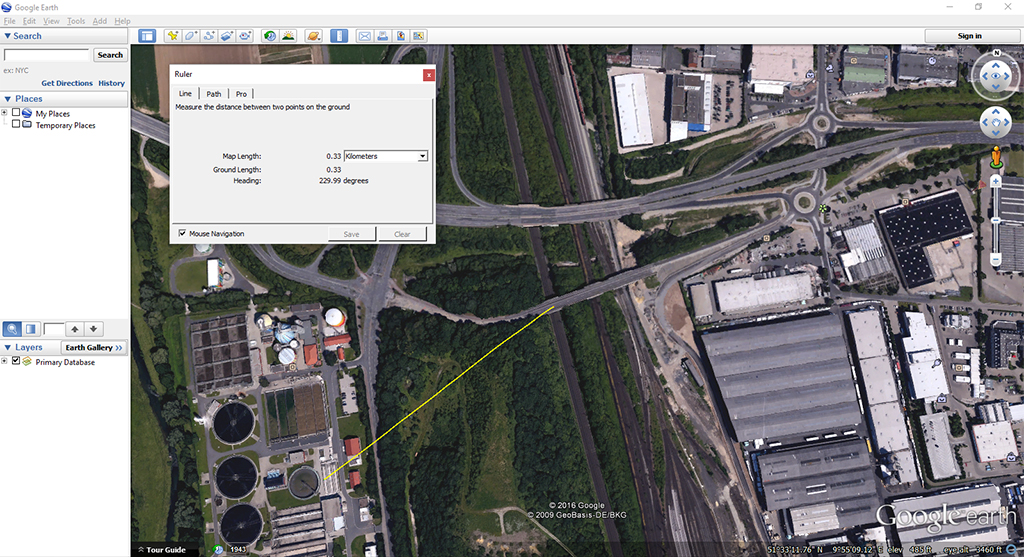
A very easy way to find the azimuth angle from your location is to use Google Earth. For this, simply go to your location and open the ‘Ruler’ function (‘Tools -> Ruler’) and while on the ‘Line’ tab, click on the exact location where you are planning to stand with your camera. This will lock that location and with the mouse you can move around (this function is designed to measure distance along a straight line). Inside the ‘Ruler’ dialogue, you will see three quantities changing: Map Length, Ground Length and Heading. This last one is basically the azimuth angle.
Now, what you need to do is identify some landmark that is close to the direction where you are expecting the satellite to pass and use that as a guidance to know where to point your camera. In the image below, I show an example of the procedure with an azimuth angle of 230 degrees (SW).
In that example, once I stand on the bridge at the center of the image, all I have to do is locate the tank shown on the other end of the line and that will be my visual guide.
Another way to do this is by using the sky as a guide. This method is especially useful if you are on an open field, where finding a specific landmark can be rather difficult. For this, you can use a software called Stellarium. This is a great free software if you enjoy astronomy in general and it works perfectly for the purpose of planning for photographing celestial objects.
Let’s assume, for instance, that I want to capture a satellite that is going to pass over my location (Göttingen) on the 26th of May 2016 at 1:30 am. The elevation is 40 degrees and the azimuth is 230 degrees. After adjusting the location and time in Stellarium, you can tell the program to show the azimuthal grid as well as the constellations and the following image shows what you get.
The vertical lines show the azimuth angle and the horizontal ones show the elevation. So you can see that our point of interest lies pretty close to Arcturus, a star of the Bootes constellation. So pointing your camera to Arcturus will ensure that you will be able to catch the passing satellite when the time arrives (keep in mind that you need to synchronize your watch to the second with a time server on the internet; most probably the clock of your computer will be synchronized already, so you can use it as guidance).
It might take a while to get used to Stellarium, but once you are familiar with it, it’s a great tool for astrophotography in general. Now, since most of us are not experts in astronomy, the final step of finding the object of interest remains (Arcturus in our case). So if you are using the Stellarium option, you might need a smart phone or tablet that you can take to the location where you are planning to take the picture from. Then, you can download an app such as Google Sky Map that will allow you to find the object you are looking for in a very straightforward way.
As you see, getting the right information takes a few steps but, once you are used to them, it’s relatively easy. Also, with a smartphone or a tablet you can get all the tools described here as apps, so you can even do all the planning on the go.
So go out there and give this a try. You can always simply point your camera up and capture the passing satellite, but once you are familiar with the procedure, it is worth it trying to find a nice background as well and, if you combine this with a pass happening at relatively low elevation angles (probably less than 20 degrees), you will end up with a great photo.
If you have any question regarding the whole process or how to use a specific tool described here, just write me an email.
Leonardo Regoli is a self-taught amateur photographer currently based in Ann Harbor, Michigan (USA). His main interests are travel and landscape photography.


 Facebook
 Google +
Comments (0)
There are no comments yet.