Lighting is essential to photography, and this is especially true for taking black and white photographs. Depending on what kind of lighting you’re using, you can capture a flat image or silhouette, a dark image with textured portions of the foreground showing through the shadows, or a crisp image in which you get a clear portrait of the subject with all of the rich texture and dimensionality.
You need to know what style you’re going for before you determine what kind of natural or artificial lighting you’ll need. You should also take the subject of the photograph into consideration as different types of lighting work better on different subjects. Portraits will be our subject today, so let’s take a look at different lighting techniques for this type of black and white photograph.
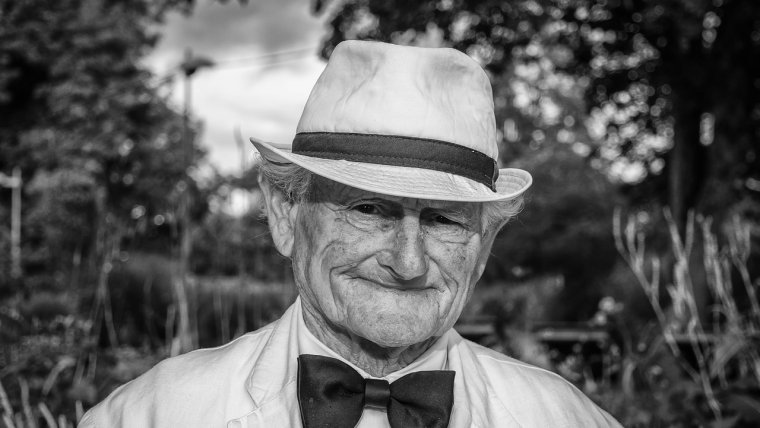
When working with black and white portraiture, if you’re outdoors, overcast lighting actually works really well. While this will produce a pale image in color, in black and white it creates nice contrasts between the lights and shadows. You’ll also pick up the grayscales that add depth and rich texture to the image.
If you’re indoors, you’ll need to play around with main lights and fill lights until you create a rich tonality. Find a balance between the highlights, shadows, and mid-tones by playing around with the positioning and number of lights that you use. It can help to set your camera to preview the shot in black and white even though you will take the shot in color and convert it later using a computer program.
Strong directional lighting will create harsh shadows that may not look good in a black and white portrait, which is why overcast outdoor lighting works better than bright sunlight. Remember this when you’re playing with the lighting in your studio. Try using a strong backlight with soft foreground lighting to create strong contrasts without losing the mid tones that add depth and texture.
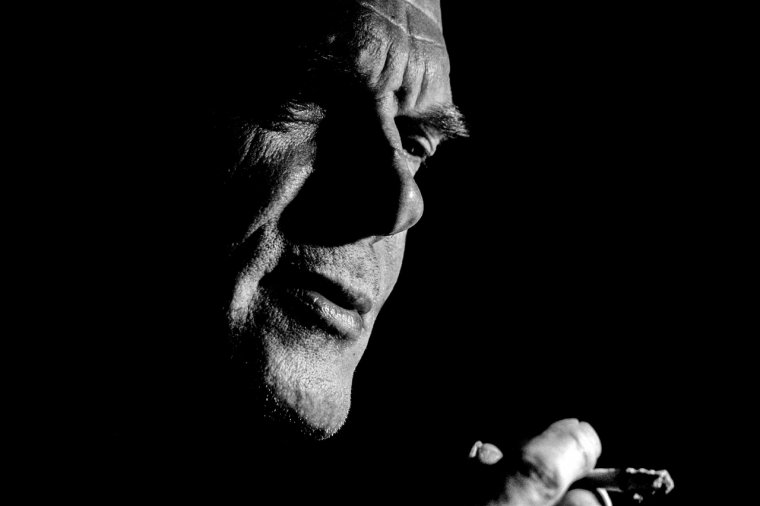
On the other hand, you may enjoy the look of harsh shadows created by hard, directional lighting in a black and white image. As shown in the above photograph, it can create some interesting contrasts. The only real rule is to discover your style, then set up your lights to reflect it.
As with any form of art, it’s better to understand why something works than it is to follow a set of rules with the blind hope that you’ll get the shot you want.
With black and white photography, the name of the game is contrast. You want deep blacks and ultra-whites to stand out against each other within the image. At the same time, however, you don’t want to create such a stark contrast that you end up with a flat image – or maybe you do.
Black and white portraits, specifically, bring in another element to style. A black and white photograph is all about capturing mood and emotion with the image. When you are deciding what style of lighting to use, keep in mind what mood you wish to convey. Also, the eyes of the person are one of the most important parts of the image as the expression of your subject will also affect the mood of the shot.

So, if you’re shooting indoors—whether your subject is a person or a still-life object—think about what you want the final image to look like before you set up the lights. If you are going for something two-dimensional, use hard lights in the background. You can choose to fill in the foreground with some soft lighting if you want to create a little more texture, but you don’t have to if a silhouette or flat image is what you’re going for.
If you want something more three-dimensional and with all the detail, you may not need a hard light in the background. However, you will need to play around with more soft lights off to the sides and in the foreground. This will bring out more of the grayscale, creating a richer texture without losing the contrast. This creates a dark background wherein only the softly lit portions of your subject shine through.
Lastly, if you want a more even image that doesn’t focus as much on contrast, and captures all the detail of the shot, use a combination of hard backlighting and soft foreground lights. You’ll want to create a little deeper shadowing than a color image would require keeping the photo from falling flat but try not to create a harsh shadow unless you are going for a particular style.
Have fun playing around with lighting to see what kind of shots you get, and remember that bending the rules can sometimes result in a truly unique picture.


Please verify your software version before proceeding.
 I’ve verified my software version


 Facebook
 Google +
Comments (0)
There are no comments yet.