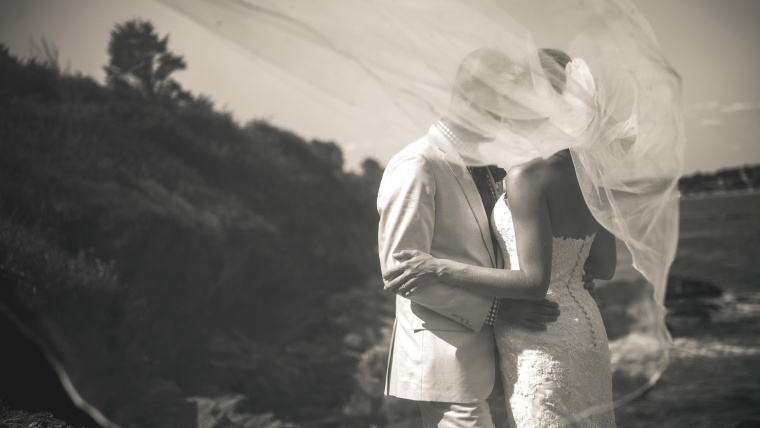
Welcome back! Today we have another tutorial on the “Forever Thine Workflow”, this time we’ll be talking about how to create classic B&W images. You may sometimes find that, although an image is nice, it may look even better in black & white. With this workflow, you’ll be able to make these edits quickly, keeping up with your particular time frame.
With the photograph pulled up, that I will be working with using Forever Thine, let’s go ahead and get right into it.
We will start out by opening up our “Forever Thine” presets and scrolling down to the Wedding Black & White presets. There you will find many choices for black & white such as different tones, contrasts, sepia and many more. For my photograph I’m going to use Wedding Black & White – Old School, which a basic black & white effect.
Then, I want stack Polish preset on top, so we will go with Polish – Sharpen.
After that, I am going to add a vignette. For this photo I am going to use the Black Dreamy vignette.
Then we’ll scroll back up to the Polish presets, but this time we will use High Contrast.
So, this was a really quick edit. All we did was stack four presets on top of each other, but in the before and after you can see that we’ve really changed the picture quite a bit. We have not only changed it to black & white, but we’ve added some contrast and a nice vignette. And, all of it was done super fast.
Now let’s move on to another photograph, which is of a bride standing in a doorway. This photograph is somewhat underexposed in certain areas, so let’s fix that and bit and bring some of those details back to this photo.
Starting out with a “Forever Thine” Wedding Black & White preset, we will scroll down and choose Ivory.
Next, we will apply the Polish – Sharpen preset, similar to the previous photo.
Now, we will scroll up to the “Forever Thine” Base presets and use Base – Fade In, which will brighten up a lot of the shadows and brought out a little more of the detail in the background.
Moving over to our brushes, let’s open up the “Forever Thine” brushes and scroll down to the Wedding – Fix Underexpose brush. We’ll turn up the Exposure and Shadows, then apply this brush right around the brides face, bringing out some of her features.
Like the previous photograph, another quick, but really effective edit. With this photo we have changed it to a nice black & white, while adding contrast. We have also brightened the shadows a bit, bringing more of the detail back, that was previously hiding in the shadows. Just a really easy, but classy effect!
Next we’ll move on to our third photograph, which is a really nice photo, but unfortunately really dark and underexposed.
To start out, before changing the exposure, I am going to apply the black & white preset that I want to use.
Scrolling down through the Wedding Black & White presets, I am going to use the Stardust preset.
Now we will go over and open up the Basic tab to tweak that preset some. First I’ll turn up the exposure a little, then go down to Shadows and move them up as well.
Then, we will go back over to our “Forever Thine” presets and apply Polish – Sharpen.
For the last bit, We will go into the “Forever Thine” brushes and use the Wedding – Fix Underexpose brush, like we did in the previous photos. We’ll apply this brush to our subjects, just to add a little bit more light to them.
With this final photograph, in addition to transforming it to black & white, we also fixed the underexposure and brought out more light and detail, creating a better image all around
I hope you enjoyed this :Thine” tutorial and found it helpful. Hopefully, you’re able to try it out for yourself soon.


Please verify your software version before proceeding.
 I’ve verified my software version


 Facebook
 Google +
Comments (0)
There are no comments yet.