Welcome back! Today we’ll be taking a look at how to work with the “Forever Thine” wedding themed workflow, more specifically, how to apply a vintage looking aesthetic to your photographs.
This is becoming more popular, especially with weddings that are outdoors, in the spring or fall. The effects give the photographs a nice homegrown, vintage wedding look.
Let’s go ahead and get started with my first photograph, which is of a bride and groom walking from their outdoor wedding ceremony.
To start this one off, we will use a “Forever Thine” Base preset. Let’s scroll through those and select Base – Camellia, which will lighten the photo up just a bit.
Next, we’ll move on to a Tone & Tint preset and to help create that vintage, faded matte effect, we will apply the Fading Dream preset.
Another nice aesthetic that is really popular is a matte effect. With several different matte effects included in the “Forever Thine” presets, there many choices. In this photo we are going to go with the Matte – Wanderlust preset. Once applied it has added some contrast, but also added some matte finish to the darker areas.
To adjust this preset a little we will go into the Tone Curve, by dragging the bottom of the lineup some we will add to the matte effect.
Other presets that add a nice vintage look are the Film presets, so let’s scroll down to those and go with Film – Sunset Boulevard, which will change the color and tone a bit.
Next, we’ll move over the “Forever Thine” brushes, starting off with the Light – Darken Shadows brush. Making the brush larger and lowering the exposure, we’ll apply this brush to the background to help darken the shadows some, making sure to get in close to the subjects so they aren’t outlined by a ring of light. The point of using this brush is really to bring the focus to the subjects of this photograph.
In the before and after, starting out with a nice wedding photograph, we added an old school or vintage effect which goes along nicely with the fall theme already in the photograph.
So now we’ll move on to another photograph, this time of a bride and groom on a shoreline with the bride’s veil blowing in front of them. Like the previous photograph, we will give a vintage effect to this one as well.
Getting started, we are going to go back to our “Forever Thine” Film presets and like the previous photo, we’ll apply Sunset Boulevard.
Next, we will scroll down to the Wedding Vintage presets and apply First Class.
The really nice thing about these presets is that they are completely stackable, so while applying one on top of another, you aren’t canceling out the effects of the one previously applied.
Now just to tweak this preset a little, we’ll go over and open the Basic tab, then move the Clarity up just a bit.
Those are the only two presets that I’m going to apply, now we’ll move over to our “Forever Thine” brushes.
Starting out, we will use the Light – Brighten Highlights brush. Let’s turn the Exposure up and apply this brush all around the bride’s veil as well as the groom’s suit.
Now let’s go back into the “Forever Thine” brushes, then scroll down to the Wedding – Clarity & Detail brush and apply this brush to the veil and dress, to help bring some more of the detail out.
Next, I am going to open up the Basic tab and move the Exposure and Contrast up slightly.
Now when we applied one of the presets, we lost a lot of the blue in the sky. To fix that and bring it back we’ll open up the controls for the colors, then slide the Blue up some. I’ll push the Red down a tiny bit as well.
Finishing up with this photograph, we can see that we have given it an older looking sepia effect with a nice brown tone. The picture that we started with was a nice photograph, we just gave it more of a vintage look, which is really trending right now.
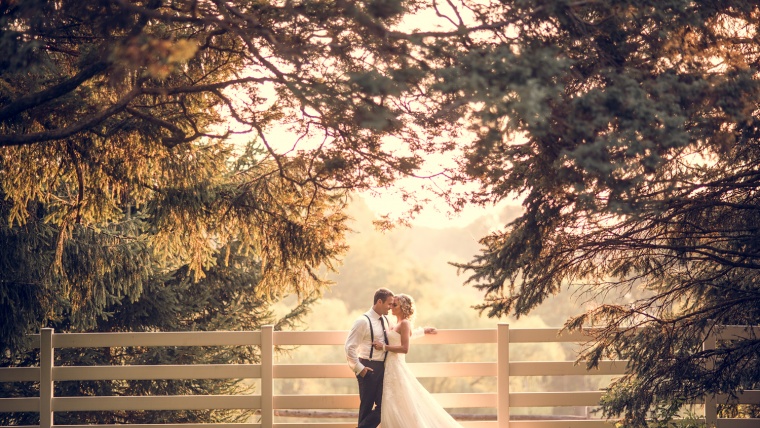
Now, on to our third photograph. In this photo the bride and groom are standing in front of a white fence, a little further back from the camera. This is a nice photograph, however above the subjects it looks like some of the highlights coming through the trees are a bit blown out, so we will have to fix that as we go.
Getting started, we are going to go into our presets and apply Wedding Vintage – Pine, which darkens the photo and gives it a warmer tone. Once applied, let’s open the Basic tab and slide the Highlights down quite a bit, so we can get some of that detail back in the background. It has really darkened the photograph, but we will bring some like back to the subjects as we go along.
This photograph is framed naturally by the trees in it, but we are going to enhance that by adding a vignette. In this photo we will use Vignette – Black Heavy. Since this is really dark, we will go over the Effects tab and Slide the Highlight Priority Amount up a little so it isn’t as dark around the edges.
Let’s now move over to the “Forever Thine” brushes and select Wedding – Fix Underexpose which will help bring some light back. So, we’ll make the brush a little bigger and run this all around the subjects and the center of the photo, turning up the Exposure, Contrast and Clarity while we go.
Now going back into the brushes, let’s use the Wedding – Clarity & Detail brush. Turning the Exposure up, we will run this brush right around the bride and groom to bring a bit more detail and light back to them.
That’s all that we will do with this photograph. By adding this vintage effect, we have focused a lot of light on the subjects while giving it a nice warm tone and color.
I hope that you enjoyed this tutorial and found it helpful. Hopefully you’ll be able to try our “Forever Thine Workflow” for yourself soon.


Please verify your software version before proceeding.
 I’ve verified my software version


 Facebook
 Google +
Comments (0)
There are no comments yet.