We saw the latest upgrade of Adobe Lightroom happening last October, with the CC 2021 version release. Although, as many of you should know by now, those releases come with a series of bugs that will be slowly fixed in upcoming updates by Adobe. In this article, we’re going to describe the Lightroom CC most common issues reported by users this far and how to fix them for proper reliability. Let’s get started.
Table of Contents
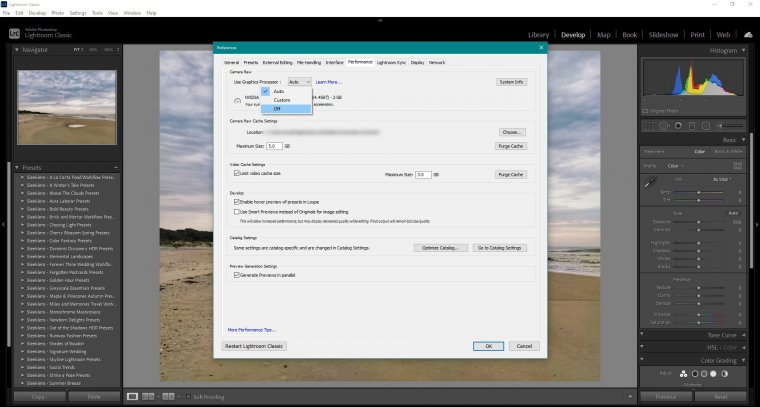
Sudden crash issues in Lightroom are often related to graphic cards drivers not being optimized to run with the latest software upgrade. For that very reason, we recommend you to follow these steps.
Mac Users: Lightroom Classic > Preferences > Performance
Window Users: Edit > Preferences > Performance
Since I’m a Windows user, I’m going to screenshot the exact section you should turn off.
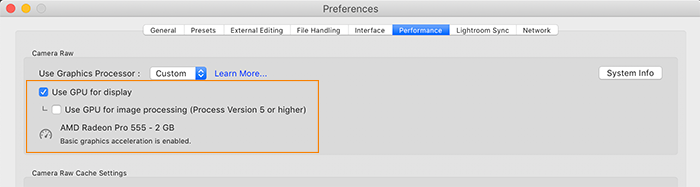
For Mac, it goes like this
One simple explanation of why does this happen is because your graphics card may be too outdated for optimal usage in Lightroom. Another common issue is triggered when PC builds have more than 1 graphics card – usually seen in gamers’ pcs or those who work in the 3D modelling industry. Lightroom doesn’t require a graphics card to enhance its performance, much rather it needs a fast SSD drive and plenty of RAM to perform on peak level.
Disabling the graphics card is one quick fix. Adobe does recommend to switch to the Studio Drivers if you work with Nvidia Cards. Do keep in mind that Studio Drivers are intended for those who work in the graphics industry. Using Studio Drivers in mixed-use computers (graphic design + gaming) will decrease the performance of the card in non-technical working environments and seriously compromise reliability when using them for gaming.
You can check all the recommendations related to GPUs at Adobe’s article here.
Okay, this is one odd issue I found in the most unexpected way you can imagine. Since I work with many files (emphasis in many, 3 external hard drives required), device management tends to get messy. For that very reason, I opted for a USB hub to keep my lack of USB ports at bay. Everything seemed to be great, right?
Well, not that much. First I noticed the issue when working with Photoshop, and I initially blamed the issue on being somewhat short on RAM because of the file size (and the amount of other apps running on background). Then, with some Lightroom edits, I finally noticed it. The cursor kept freezing and freezing randomly, and no extra apps were running at the same time. Opting to switch the USB dongle for my mouse didn’t solve the issue either, so it wasn’t the mouse fault. But guess what happened when I removed the USB hub? Issue solved.
This odd performance liability is related to the amount of energy required for the USB hub to work. If you work with a USB hub with external power supply, then you shouldn’t face the issue at all. My mistake was to get a USB-powered USB Hub, which meant the laptop had to compensate for that extra energy demand, and that implied slowing my pc.
If you can spare using a USB hub when running Lightroom, it may even work better. If not, also consider closing unneeded apps running on the background. You have no idea how much resource-demanding Google Chrome can be if you have multiple tabs opened.
This bug is often seen after a crash, especially a power-related crash when your computer didn’t have time to properly shut down. As Lightroom stores its database on the hard drive, there’s a safety measure to prevent multiple users editing the catalog at the same time: Lightroom creates a lrcat.lock file on the same folder the catalog file is stored.
In case Lightroom crashes or unexpectedly shuts down, one issue that can happen is that the lrcat.lock file remains there – instead of being flushed as it usually happens once you close Lightroom. So, what can you do to access your data? First, don’t panic. Locate your Lightroom’s Catalog folder next.
For Windows users, this is by default on:
C:\Users\(user-account)\Pictures\Lightroom
For Mac users, this is the by default location:
Macintosh HD/Users/(user-name)/Pictures/Lightroom
The (name).lrcat file is the file you DON’T want to delete – as that’s your catalog. I’m using (name) as catalogs can be custom named, by default is Lightroom Catalog.lrcat
Instead, search for a file with your same catalog name with the extension .lrcat.lock. Click on that file and delete it. Then, launch Lightroom again. Your LR Catalog should be intact.
For Windows users: If the filename extension is hidden, the lrcat.lock file still displays its extension, and the Lightroom Catalog.lrcat will show the Lightroom app logo as the icon (whereas the lrcat.lock file will show an empty white icon)
Another annoying issue Lightroom is often prone to show is tools not behaving as they should. Let’s take the Radial Filter as an example. Say I want to apply a Radial filter to a large sky area; after placing the settings for my Radial Filter and dragging the area I want to work on, I find that the filter is acting in the exact opposite area to where I want the effect to be seen. This is due to a checkbox right below the Feather slider named Invert.
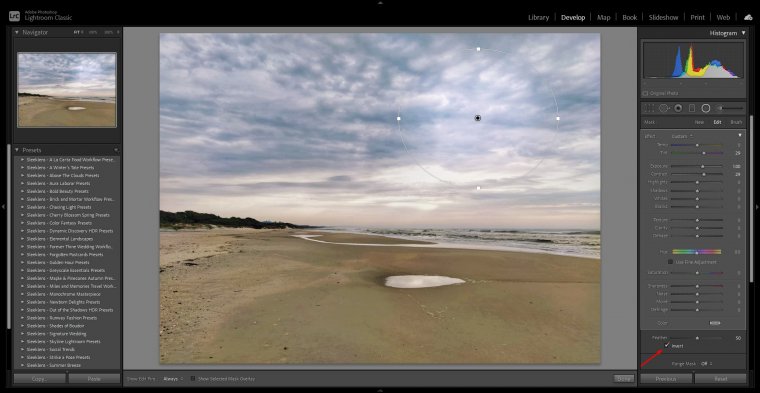
By unclicking the Invert checkbox, the effect of the radial filter gets applied everywhere but inside your radial filter area – which is the default config of Lightroom these days. Knowing your way around with this option is handy to create effects on a layered method, say for adding fake sun effects as an example.
Once the checkbox is checked or unchecked, that will be the default value the next time you open Lightroom or launch the Radial Filter tool.
This error is often seen on batch export. In 80% of the cases, it’s related to the renaming options set in the Export panel, but it can also be triggered by unknown bugs that you should report to Adobe.
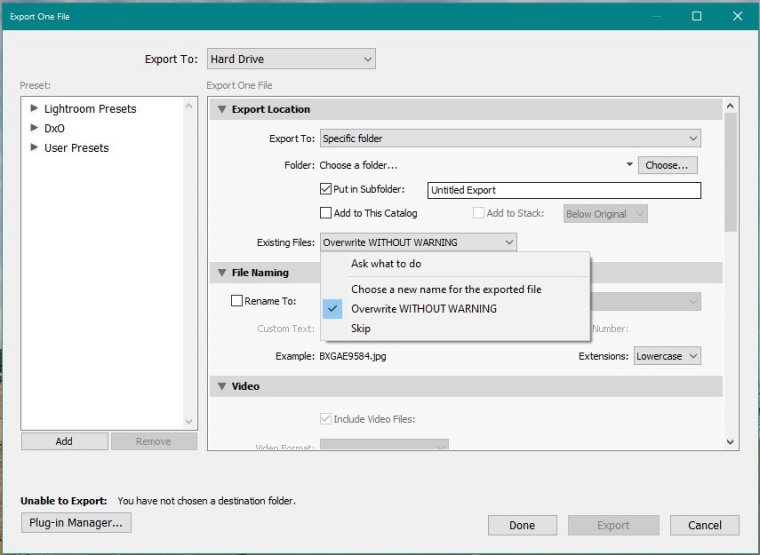
A good practice to avoid these issues is to always create a new folder for exporting your sessions. Check the option “Put in Subfolder”, give a name to your subfolder (good naming practices are usually: CLIENT_DATE or LOCATION_DATE), and then place that subfolder inside your main catalog folder for your edited photos. By doing that, you wouldn’t have to worry about overwriting existing photos or the original files. If you don’t feel confident, you can set the option “Ask what to do”.
Lightroom also allows us to rename the edited photos during export, but you should be very clear in your criteria to avoid having duplicates of the same filename all over your hard drive.
This bug has been reported by many users online. It gets triggered when users that work under the Custom Order for their LR Catalog try to add new photos. As the bug is acknowledged in Adobe Forums, we can expect this will get fixed in the next revision. Meanwhile, you can do this.

Go to View > Sort and select any other option rather than Custom Order. And that’s how easily you can fix this to keep working.
More common issues can be seen, with their respective solution, by this article on Adobe’s official help site. We also recommend this brilliant article by Velox.jp blog that explains how to fix the “File not Found” error in Lightroom, with many different and detailed solutions. (Original article is in Japanese, Google Translate offers a reliable translation of the entire post).
Hope this article can help you fix these common issues and see you next time!
Adobe Creative Cloud is a collection of graphic design and photography software often used by marketing, graphic design, and other creative professionals to create high-quality artistic content. Adobe CC is available for both Mac and Windows, with some limited offerings also available for iOS and Android devices. Applications can be used to create and import everything from edited photos and video to major print design pieces like ads, brochures, billboards, and more.
In addition to its basic design functionality, Adobe Creative Cloud also allows users to collaborate within the same creative space since projects can be saved to the cloud rather than on a local machine. Adobe CC is typically accessed via a subscription model, which may cost users anywhere from $10 to $50 per month, depending on the applications included in the subscription. More than 20 different creative choices are available through Adobe CC, and they all can be purchased as a bundle or as individual subscriptions. Choices include everything from Adobe Acrobat, Dreamweaver, and InCopy to Adobe Illustrator, InDesign, Photoshop, and Spark.
Adobe Lightroom originally was designed as a companion to Photoshop, allowing the user to organize and lightly edit large numbers of digital images. The Lightroom Classic version is designed for desktop use and is considered by many to be the better option because it offers a robust selection of features. In general, it features more advanced tools than the Lightroom CC version – and because it stores your RAW image files on your desktop, you aren’t constrained by the speed of the cloud. The Lightroom Classic version also offers the ability to build everything from slideshows to web galleries and offers more robust export options than those available with Lightroom CC.
If you’re new to editing photos and video, you may find Adobe Lightroom Classic CC a bit more complicated to use than the more straightforward Lightroom CC. But the upside is that if you learn the software by using Lightroom Classic CC, you’ll find Lightroom CC super simple to use. If you try to use Lightroom CC first and then switch to the Classic CC, you may find yourself frustrated – but these Lightroom tutorials may help.
Adobe Lightroom CC is considered more of a mobile version – instead of storing your work products on your local computer, Lightroom CC stores everything in the cloud for access on any of your devices. So if you find yourself needing to edit on the go, Lightroom CC may be your better choice. Its interface and offerings generally are much simpler and more streamlined than Lightroom Classic CC, and it also has built-in learning paths that may make it easier for beginners. For the purists out there, though, please keep in mind that the Lightroom CC version doesn’t feature the full capabilities of the Classic version, so you can’t do everything on Lightroom CC that you can with Lightroom Classic CC.
In most cases, photo files within your digital Lightroom portfolio have a physical connection to your computer. But with Lightroom Smart Preview, you can edit photos without having to import them to your machine. These preview files are basically copies of your original images that you can work with in a smaller, more manageable file format, based on the lossy DNG file format.
These files are tiny compared to your originals. And with these smaller files, you can free up storage space on your machine by keeping the originals on an external hard drive and working with your preview files instead. You can make any edit to a preview file that you would make to the original. As soon as you reconnect the external hard drive, any edits you made to preview files automatically will sync up with the original photo files. The process works in reverse, too. If you make changes to your original photo files, you’ll see them reflected in your preview files as long as your external storage device is connected.
This feature is considered by many to be one of the best advantages of working with Lightroom. It frees you up to edit images wherever you are and sync edits among multiple devices.
All three of these Adobo applications help designers and photographers create and import memorable content, though each is tailored for a specific kind of end product. Adobe Illustrator, for example, is great for designers who want to create logos, icons, or other images that will need to be used in a variety of sizes and contexts. Vector graphics created in Adobe Illustrator retain their sharpness when increased to any size.
Adobe Photoshop is designed specifically for the manipulation of photo files. With the Photoshop suite, you can do everything from correcting exposure and color balance, cropping and straightening images, and changing photographic colors to erasing defects and combining multiple images. For beginner photographers who would prefer a simplified menu of photo editing options, there’s also Photoshop Elements, which you may see referenced or used in basic online photography classes.
Adobe Lightroom offers many of the same photo editing capabilities as Photoshop, but it is defined as “non-destructive software.” This means that every iteration of your photo is saved within Adobe Lightroom, and you don’t have to worry about any adjustments destroying your original image file. In addition, you can purchase Lightroom presets that dramatically reduce the amount of editing time you’ll need to spend.
A RAW image file is an uncompressed image, capturing everything a digital camera or scanner can process. RAW image files are completely unprocessed in any way. When a photographer shoots in RAW mode, the result is an image that offers the highest level of detail. RAW files are huge, but if you have the storage capacity to work with them, they can be edited and then compressed into more manageable image types and sizes.


Please verify your software version before proceeding.
 I’ve verified my software version


 Facebook
 Google +
Comments (0)
There are no comments yet.