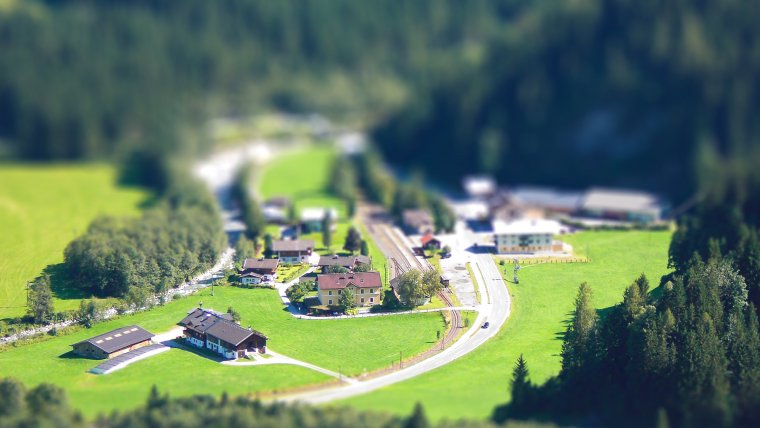
In this video, I will show you how to do a tilt-shift effect in Photoshop. Tilt shift effect is basically simulating a very large depth of field in post processing. This process is traditionally done using lens movements on medium and small-format cameras but many people do it during post processing because it is a way easy effect to do. I will show you how to do this here and just to start this off, it’s good to note that these effects work better on photos are shot at elevation such as the one we have in the video.
The first thing we will do to do this effect is to duplicate our layer by dragging it down to the bottom. With the duplicate layer ready, we will apply a blur to the top layer. A lot of people use the Gaussian blurs or you can use the lens blur, which I will use because I like its effects better. By clicking the Lens Blur, a dialogue box will open and this is a little bit more complicated than that of the Gaussian Blur but the slider we are really interested in is the “Radius”. The more you increase the radius, the more you get in your images. We do not want to be too blurred out but should be able to make out some of the images in the subjects in photos.
I will put the radius to around 19/20 and click ok and wait for it to render. With our blur ready, we will take away a linear portion of the photo that we want back in focus. The way to do that is to make a layer mask by clicking on the layer mask and then get a large black brush that is feathered to zero (0) thus making it very soft. I will then paint a straight line across the image and the way to get a perfectly straight line is by holding the ‘Shift’ button as you paint. This basically gives you what we’ll call a miniature model effect. This looks like a very small miniature model that you took a photo of.
This makes the cars to appear completely sharp while everything is blurred out. This is basically detailed shift effect. If I wanted to blur this a little bit more, I will click on the image, go to blur > lens blur and increase the blur to try and get it to exactly the way I want it to be and then click ok to apply the blur. This is a really cool effect to do especially if you shot your images at an elevation and you want to get an effect of a large depth of field.
Thank you for going through this tutorial and I hope you enjoyed it. You can look out for more tutorials on both Photoshop and Lightroom or check out different Lightroom workflows and Photoshop Actions from the site.


Please verify your software version before proceeding.
 I’ve verified my software version


 Facebook
 Google +
Comments (0)
There are no comments yet.