Tag: splash

How to Capture Water Splash Photography

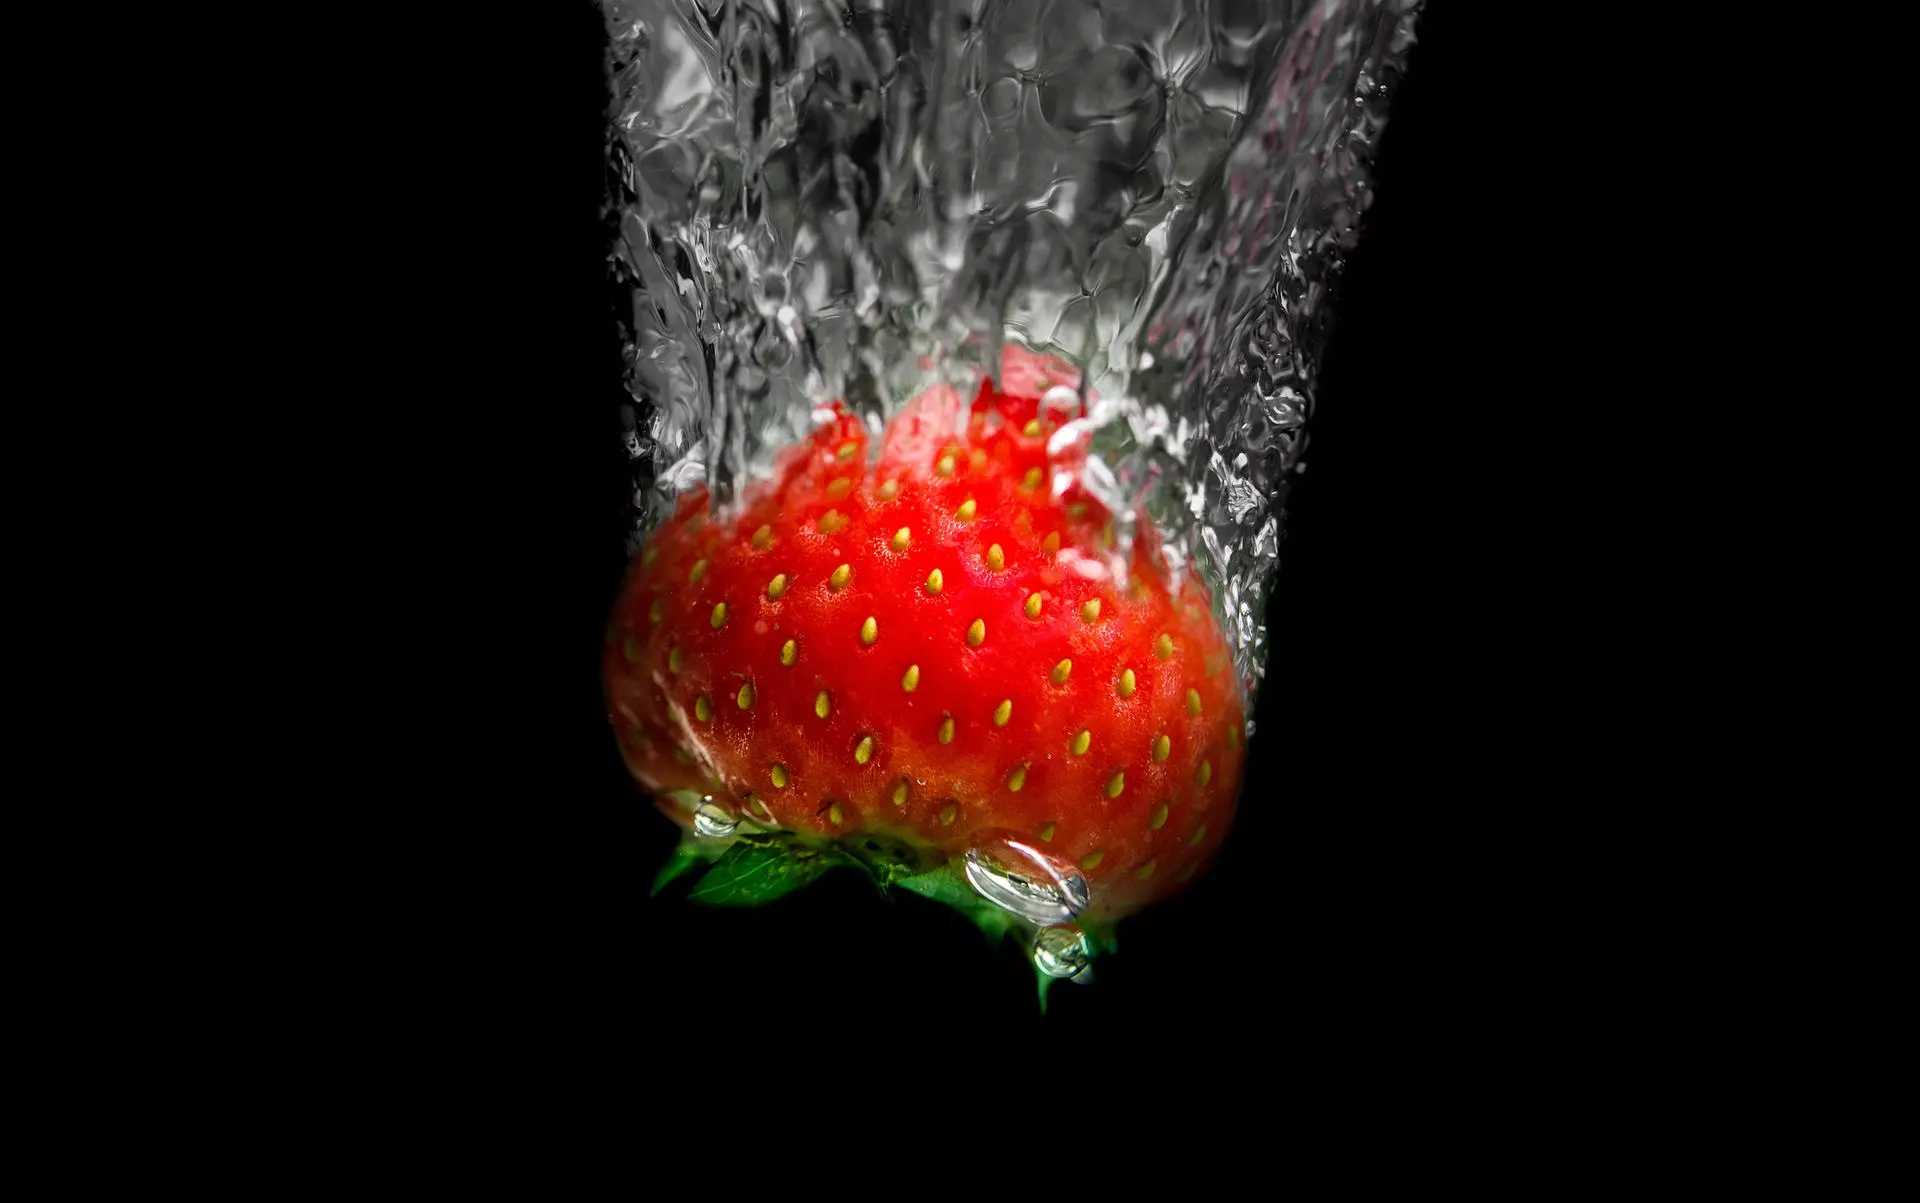
What I’m going to offer to you today would be how to freeze a moment, reproducing the illusion of motion with a bowl of water and a piece or whole fruit. In another word, today subject is Fruity Splash photography.

It is not an ordinary photography; I consider this type of photos as a special effect photos.

So let’s begin. A friend of mine is planning to open a smoothie store and asked me if I could make some fruit pictures for him. I did not want to make simple ordinary dead nature photos, and that’s how I came up with an idea for this kind of photos.

Fruity water splash photography

You don’t, need much of equipment. A tripod and a remote shooter, average macro lens, a Speedlite flash unit or two, a transparent bowl, and cardboard background (I prefer black background) will be enough. Back in the days when my brother had an aquarium, we had different kinds of problems with the tap water, so I used bottled water just to get rid of all the bubbles on the inner side of the bowl.

The setup is the most important. First, the surface will be flooded with water from all the splashes, so be prepared to clean and keep a towel close to you. The camera should be set to cover only the bowl and the background. Then get your flashes ready. If you have only one flash, you should consider having an additional reflector or a bright light. They should be set on the both sides of the bowl, not in the front or the back of the bowl. This creates a great effect and is visible on both the glass and water. Buy many different kinds of fruits just to have many objects for shooting. Also, you can make two photos with one fruit if you shoot the whole fruit and a second photo when sliced.  If you ask me Lemons and other citrus fruits are the best because of the freshness, they bring in to the photography.

Now we are talking about the camera settings. Use aperture form f/4 to f/8. I found that f/5.6 works great. For the shooter speed, you should use anywhere between 1/125s up to 1/250s, but you should experiment on this and find what is best for you. The ISO is also something that is negotiable, I used ISO 400, and it was just fine. The request from my friend demanded that I use RAW format rather than JPEG, and that is what I always prefer to use for something like this.  For this setting, the autofocus works great, so manual or auto-focus does not make any difference. The white balance is set on flash. Finally connect the remote shooter because we don’t need any vibrations on the camera, and make sure that the camera is away from the bowl because nobody wants to splash water on the camera and the lens. It is a must that you use the continuous burst shooting or a timer mode.

Fruity water splash

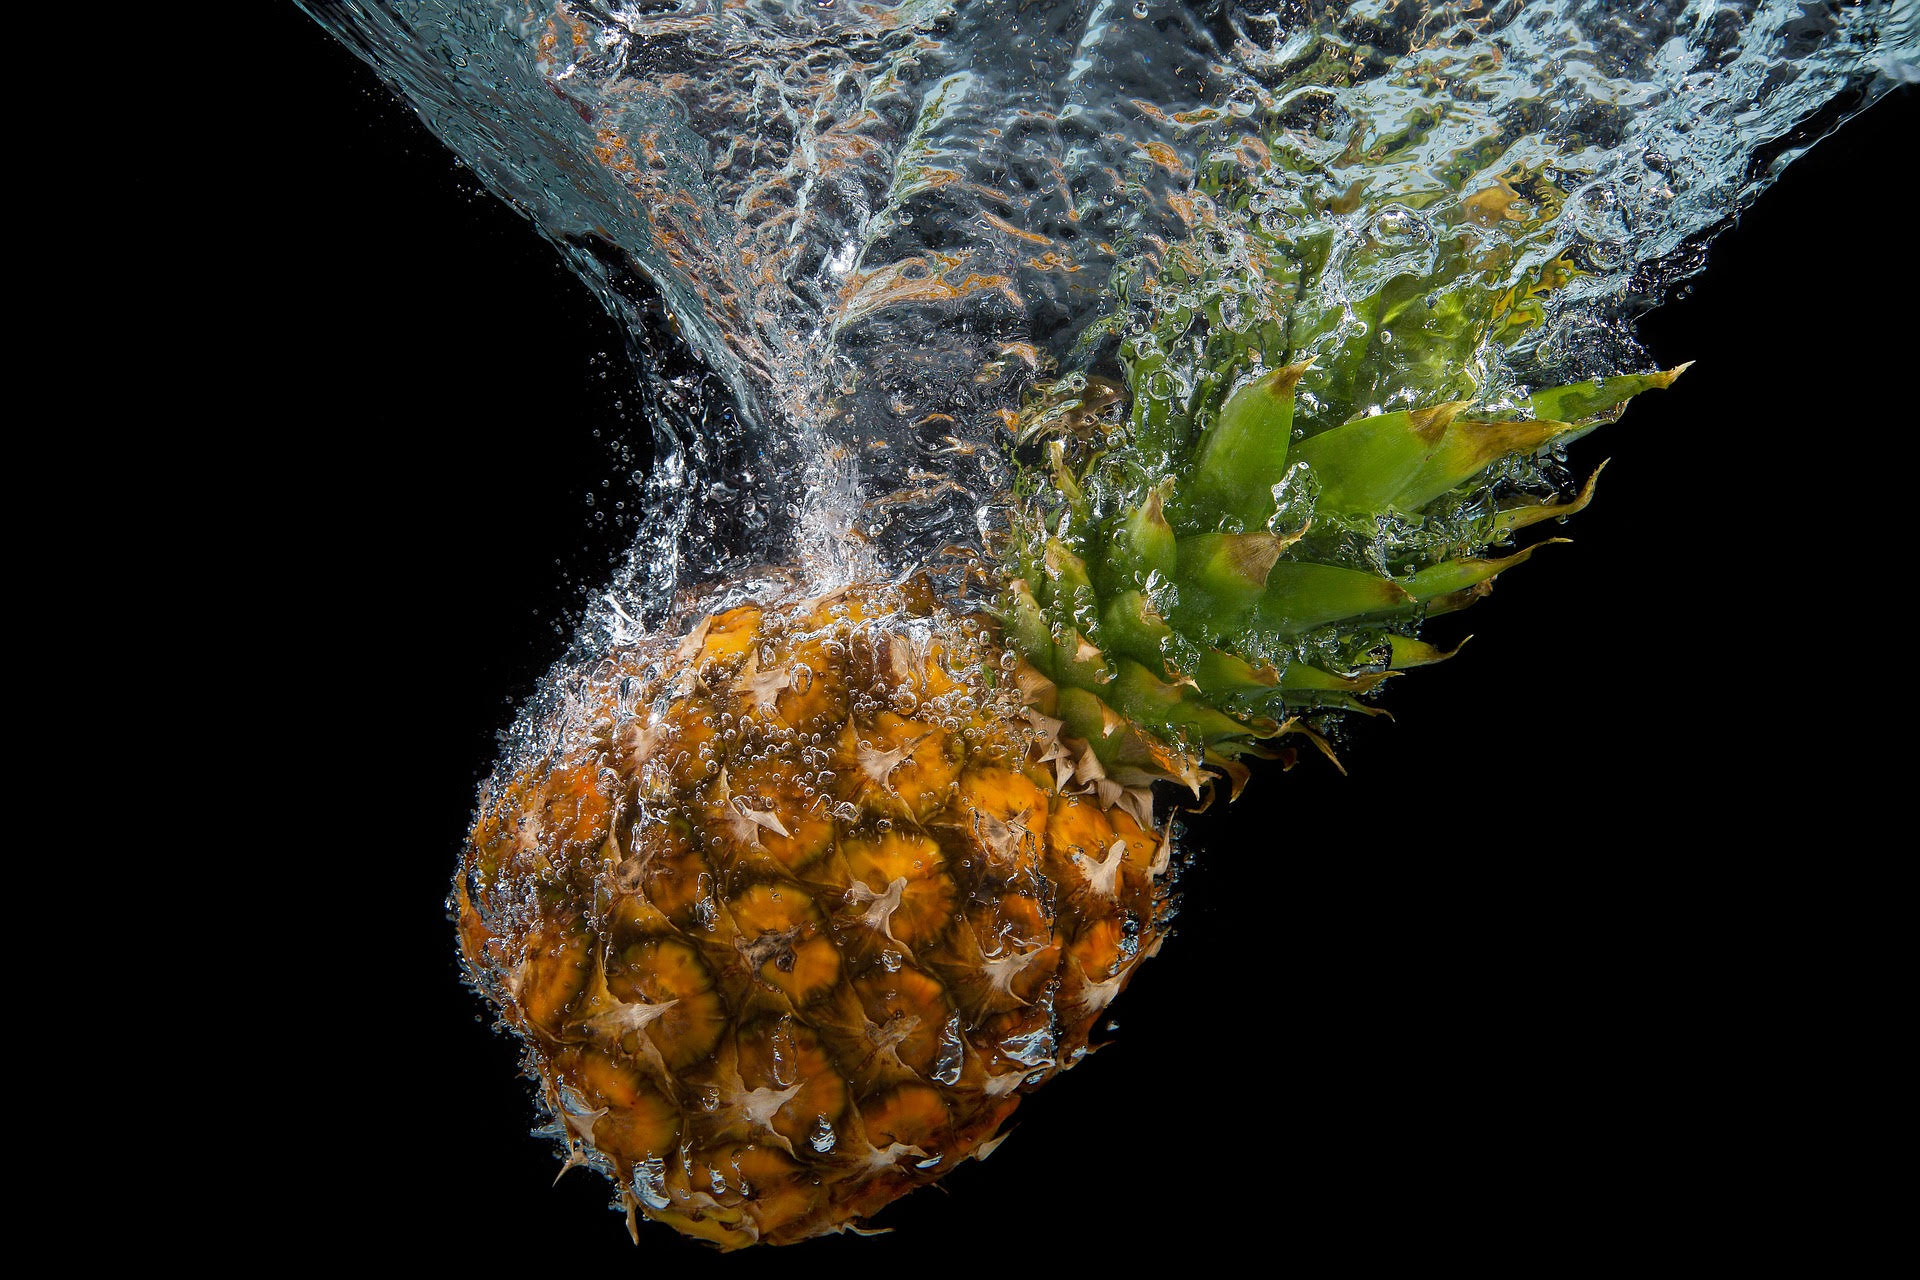
The only thing left is that you drop the fruit in the bowl. But wait, it is not that simple. This is where patience is the key to success, and it is the fun part for this kind of photography. You will need to master the art of pressing the shutter with your left hand, waiting for the timer to end, then dropping the fruit with your right hand and firing the flash with your left hand. The timing is essential, and you will miss a fruit or two just to figure out when to press the button or to drop the fruit. Be sure that you don’t drop the fruit from a location that is too high; it will create a big splash that the camera may not capture, along with that, it can create a mess in your home studio. With practice, you will determine the height for the drop, and you will get the perfect photo. After your first success, things get easy. I find that you get the best splash in the photos if you trigger the flash as the fruit hits bottom, though this will take a lot of trial and error and you will probably end up with a lot of photos of your fruit hovering over the surface of the water. The key is to take a lot of photos. But after you upload them into your computer you will have to choose only 5 to 10 images, because it’s “impossible” to edit all of them.

Post processing the photos is the next step. This is optional but is recommended.

So that is it, go on and try this beautiful and fun technique.

Tips To Photograph A Splashing Wine Glass

There is something beautiful about getting a picture of something frozen in time. Whether it is a glass shattering, or a dog sneezing, it is a glimpse of something that happens too fast for us to really see. It gives us a new perspective on the world.

One of the most common, and most interesting, freeze frames to get is a splashing wine glass. We have all had a wine glass splash its liquid on us, or on our new carpet, but how many of us have actually seen that moment frozen in time? How many of us have wanted to capture that?

It may seem like it is a very complicated thing to do, getting that photo without a blur, but it is actually relatively easy for you to capture that brief moment in time. Here’s how.

splashing-wine-glass-1

What You Need

First, you are going to need some very good equipment to pull this off. A simple point and shoot camera is not going to capture this moment in time clearly, so you are going to need a good DSLR to get the clear photo that you want. In addition, you will need some excellent accessories to get a great photo of that wine splashing out of the glass.

  • The Nikon D800 is an excellent bet, using a 70-200mm lens.
  • A strobe, or any light modifier, is very important. Using a strobe with a seven-inch cone reflector and a soft box attached will ensure that you get enough light when the moment happens.
  • PocketWizard Mini TT1 + AC3 Zone Controller for Nikon (Canon versions are available too) attached to the camera’s hotshoe to trigger the flash.
  • A receiver plugged into the strobe light to receive wireless signal from the Mini TT1.
  • A wirelesss shutter release to allow you to take pictures from any position in the room.

splashing-wine-glass-2

Your Background

For your background, black is usually the best bet because it can create the best contrast for you with the photo. It will also help everything stand out a lot more. You can also place a blue gel over your strobe light, and use another strobe with a blue gel to get a bit of a blue tint on your black background.

All of these things together will create a great balance to your spilling wine glass photo, while at the same time giving you a sharp picture that will capture every drop of water, and every bit of splash across the screen.

splashing-wine-glass-3

Affordable Alternatives

Obviously, we can’t all afford to pay the amount of money needed to get the super sharp picture of the wine glass spilling. There are plenty of great budget lighting alternatives. You can use an LP180 Speedlight instead of a more expensive strobe, and other triggers. You can also just use a cheap light stand with an umbrella on it to get the light you need.

How to Get the Picture

Now that you have the equipment itself, how are you going to get that picture? You can’t just throw a glass and hope you get the picture. Things need to be planned out and be shot perfectly to get that shot that you need. Luckily, there are some very easy steps to remember to get that perfect photo.

  1. You will need to line the glass up to one side to allow the splash and the glass itself to line up within the frame perfectly.
  2. On a table, make sure you mark where the glass should be because you don’t want to lose that spot or have to keep trying over and over to get that spot right.
  3. Toss the glass up and down, side-to-side, and get some pictures with you holding the top of the glass so you can get a clear image of the stem itself. This is important for later.
  4. Make sure you take some photos of the top of the glass as well, with you holding the stem. Again, this will be important for later.

splashing-wine-glass-4

Photoshop it All

Once you have your pictures, you open the RAW files in Photoshop as separate documents.

  1. Choose all the pictures that are the clearest.
  2. Copy each image you choose into the same Photoshop file that you have.
  3. Select an image of the wine glass stem that does not show your hand it in and you will move this to a layer where your hand is on the stem.
  4. Move the stem over to where it needs to be, click the layer mask and erase the part you don’t need.

Getting that perfect wine glass photo, with splashing liquid, is not as difficult as you would imagine. By following these tips, you can get that excellent picture, and you will impress others with your skill in making two photos look seamlessly like one. Just make sure that you get a lot of pictures to work with, so you have plenty of options for your finished picture.